
CRS-WLFD-TA869 - Smoke detector BOSCH - Free user manual and instructions
Find the device manual for free CRS-WLFD-TA869 BOSCH in PDF.


| Product type | Smoke detector |
| Brand | Bosch |
| Model | CRS-WLFD-TA869 |
| Dimensions (diameter x height) | Approx. 100 mm x 40 mm |
| Weight | Approx. 150 g |
| Power supply | 1 9V battery (included) |
| Battery life | Approximately 1 year |
| Sensor type | Photoelectric sensor |
| Alarm sound level | 85 dB at 3 meters |
| Main functions | Smoke detection, test button, low battery indicator, audible alarm |
| Maintenance and cleaning | Dust with a vacuum or soft cloth monthly |
| Safety | Compliant with European standards EN 14604 |
| Spare parts and repairability | Replaceable battery; detector not disassemblable, repair not intended |
| Warranty | 2 years |
| General information | For indoor use only; do not paint |
Frequently Asked Questions - CRS-WLFD-TA869 BOSCH
User questions about CRS-WLFD-TA869 BOSCH
0 question about this device. Answer the ones you know or ask your own.
Ask a new question about this device
Download the instructions for your Smoke detector in PDF format for free! Find your manual CRS-WLFD-TA869 - BOSCH and take your electronic device back in hand. On this page are published all the documents necessary for the use of your device. CRS-WLFD-TA869 by BOSCH.
USER MANUAL CRS-WLFD-TA869 BOSCH
Installation and operating instructions
Please read through these installation and operating instructions completely and carefully before putting the Water Detector into service.
Table of Contents
Product features 18
Operating principle 19
Technical data 20
Choice of location 21
Unsuitable locations 22
Installation and putting into service 23
Operating and warning signals 25
Safety instructions 26
Maintenance and care 27

Product features
- Battery-powered water detector for prompt detection of water leaks.
- T est button for manual functional check plus automatic self-test.
- Visual and acoustic alarms (loud warning beep).
- LED and short beep indicate low battery power.
- Easy placement of instrument with no cabling.
- If no battery is fitted, the water detector will not click into place in its base.

Operating principle
The water detector identifies water leaks promptly and gives an alarm. It detects water by measuring the electrical resistance between two electrodes. If water enters the space between the electrodes, the resistance changes. This variation is evaluated electronically to initiate an alarm.
In the event of an alarm!
- T urn off the water supply at the main stopcock.
- Locate the leak.

Technical data
Operating voltage 9 V rectangular battery
Quiescent current < 0.016 mA
Current in alarm condition < 20 mA
Ambient service temperature +5 °C to +55 °C
Storage temperature +5 °C to +55 °C
Ambient humidity range 0 to 80% relative humidity, non-condensing
Recommended battery type rectangular battery IEC 6F22, 9 V
Battery low power signal acoustic, 1 signal/minute, for about 30 days
Visual alarm LED, red
Acoustic alarm > 85 dB(A) at 1 m
Battery service life (with no alarms) approx. 2 years (for type > 300 mAh)
Ingress protection IP 20
Dimensions height 63 mm, diameter 80 mm
Weight approx. 150 g

Choice of location
- The water detector must be placed on the floor at the lowest point of the room or building level (e.g. bathrooms, kitchens, cellars, etc.).
- It is always recommended to locate water detectors in the near of the washing-machine and the dishwasher. In the cellar near to the house water distribution manifold and where the main water supply enters the building.
- Water detectors can also be located where the house drains are at a lower level than the sewer, or where water can collect if heavy rainfall occurs and water enters the house.

Unsuitable locations
- Walls and ceilings
- Rooms with extremely high humidity and condensation
- Rooms that do not comply with the ambient conditions specified in the technical data.
False alarms

Despite their spurious alarm logic circuitry, water detectors may under certain unfavourable circumstances activate a false alarm. Thick layers of dust (>1 mm) on the floor and high atmospheric humidity (making the dust wet or damp) can be the cause of this.
If the water detector continues to cause false alarms, please locate it somewhere else or clean the floor surface underneath the instrument.
The ageing process means that with time the two detector sensing elements at the bottom of the device can become contaminated, depending on local conditions, which can result in false alarms. If this happens, the detecting elements should be cleaned.
Installation and putting into service
Install the water detector according to the following procedure:
- Remove the water detector (Fig. 1, B) from its base (A) by turning it anticlockwise.
- Attach the 9 V rectangular battery to the connector (4) and insert it into the battery holder (1).
- Insert the water detector into the base, without using force, and turn it gently clockwise until it clicks into place. When doing this, ensure that the two sensor cables do not become trapped.
Note!
If no battery is fitted, the water detector will not click into place.
- Finally verify the good working order of the water detector by pressing its test button (3). If the water detector emits a warning beep, it is functioning correctly. If no beep is given, check that the battery is correctly connected, or replace it with a new battery if necessary.
- Now place the water detector in a suitable location (metal contacts downwards).


Fig. 1 Putting into service
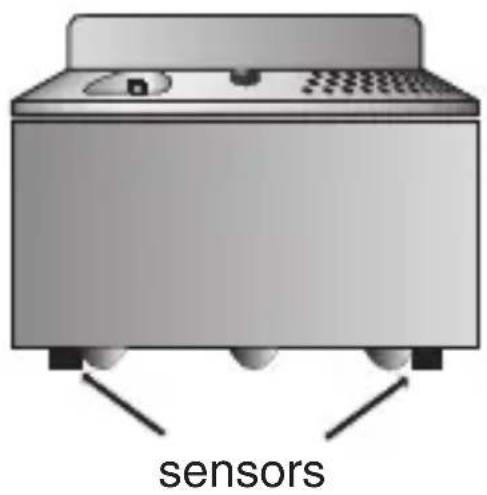
Fig. 2 Detector in place
Operating and warning signals
The water detector's electronic circuitry makes regular measurements every 8 seconds.
Following a water alarm, the instrument resets itself automatically once there is no more water present between the contacts.
| Signal Significance | |
| Loud alarm tone at intervals, Local water alarm red LED flashes | |
| Brief beep tone at one-minute intervals, Battery low-power warning, the red LED simultaneously flashing briefly the battery must be replaced (for up to about 30 days) | |
| Red LED flashes briefly at intervals Automatic self-test, of about 40 seconds normal operating condition |

Safety instructions
- The metal contacts underneath the water detector must not be painted.
- The loud alarm signal can damage hearing. We recommend that when you carry out the manual test, a minimum distance of 40 cm must be maintained between the water detector and your ear. Do not prolong the test for longer than 10 seconds.
- A warning light or a vibrating pillow must be installed for people with impaired hearing. These can be activated by a water detector with a relay module or a radio transmitter module.
- Water detectors do not prevent pipes bursting and do not turn off the water supply. If an alarm occurs, the leak must be located and appropriate measures taken (see “In the event of an alarm”).
- The water detector only works when the battery is in good working order and correctly installed. Rechargeable batteries or AC adapters must not be used, as they can disturb the functioning of the detector or cause its premature failure.
- The water detector only monitors a defined area in its vicinity and will not necessarily monitor another room or another floor (see also “Choice of location”). Therefore install a sufficient number of water detectors to ensure optimum protection.
- The water detector should be audible in the entire living area. If necessary, install additional sounders, e.g. a klaxon. It is possible that people under the influence of alcohol or drugs may not be alerted by the acoustic alarm.
Maintenance and care
To ensure proper functioning of the water detector, please pay attention to the following points:
Monthly
- Press the test button:
- If it emits the warning tone, the water detector is in good working order.
- If the warning tone is not emitted, please check the battery. If this does not help, the water detector must be replaced by a new one.
Every 6 months
- Wipe the instrument with a damp cloth, especially the sensing elements at the bottom.
- Clean the floor surface underneath the water detector.


Wasserwächter
Water Detector
Détecteur d'eau
Installation and operating instructions


- Table of Contents
- Product features
- Operating principle
- In the event of an alarm!
- Technical data
- Choice of location
- Unsuitable locations
- False alarms
- Installation and putting into service
- Operating and warning signals
- Safety instructions
- Maintenance and care
- Monthly
- Every 6 months
- Wasserwächter
- Water Detector
- Détecteur d'eau
Brand : BOSCH
Model : CRS-WLFD-TA869
Category : Smoke detector