
TK-C215VP4E - Surveillance Camera JVC - Free user manual and instructions
Find the device manual for free TK-C215VP4E JVC in PDF.


| Product Type | Surveillance Camera |
| Brand | JVC |
| Model | TK-C215VP4E |
| Dimensions (W x H x D) | Approx. 120 x 80 x 70 mm |
| Weight | Approx. 500 g |
| Power Supply | 12 V DC |
| Image Sensor | 1/3-inch CCD |
| Resolution | 540 TV Lines |
| Minimum Illumination | 0.3 lux |
| Lens | 3.6 mm fixed lens |
| Night Vision | IR LEDs up to 20 m |
| Video Output | BNC (CVBS) |
| Operating Temperature | -10°C to 50°C |
| Mounting | Wall or ceiling mount |
| Protection Rating | IP66 |
| Maintenance | Clean lens with dry cloth; check connections periodically |
| Safety | Use only specified power supply; avoid water ingress unless IP rated |
| Spare Parts | Replacement IR board, power adapter available |
| General Info | Designed for indoor/outdoor use with weatherproof housing |
Frequently Asked Questions - TK-C215VP4E JVC
User questions about TK-C215VP4E JVC
0 question about this device. Answer the ones you know or ask your own.
Ask a new question about this device
Download the instructions for your Surveillance Camera in PDF format for free! Find your manual TK-C215VP4E - JVC and take your electronic device back in hand. On this page are published all the documents necessary for the use of your device. TK-C215VP4E by JVC.
USER MANUAL TK-C215VP4E JVC
For Customer Use:
Enter below the Serial No. which is located on the body. Retain this information for future reference.
Model No. TK-C215VP4U/E, TK-C215VP12U/E
Serial No.
These are general IMPORTANT SAFEGUARDS and certain items may not apply to all appliances.
IMPORTANT SAFEGUARDS
- Read all of these instructions.
- Save these instructions for later use.
- All warnings on the product and in the operating instructions should be adhered to.
- Unplug this appliance system from the wall outlet before cleaning. Do not use liquid cleaners or aerosol cleaners. Use a damp cloth for cleaning.
- Do not use attachments not recommended by the appliance manufacturer as they may cause hazards.
- Do not use this appliance near water - for example, near a bathtub, washbowl, kitchen sink, or laundry tub, in a wet basement, or near a swimming pool, etc.
- Do not place this appliance on an unstable cart, stand, or table. The appliance may fall, causing serious injury to a child or adult, and serious damage to the appliance. Use only with a cart or stand recommended by the manufacturer, or sold with the appliance. Wall or shelf mounting should follow the manufacturer's instructions, and should use a mounting kit approved by the manufacturer. An appliance and cart combination should be moved with care.
Quick stops, excessive force, and uneven surfaces may cause the appliance and cart combination to overturn.
- Slots and openings in the cabinet and the back or bottom are provided for ventilation, and to ensure reliable operation of the appliance and to protect it from overheating, these openings must not be blocked or covered. The openings should never be blocked by placing the appliance on a bed, sofa, rug, or other similar surface.
This appliance should never be placed near or over a radiator or heat register. This appliance should not be placed in a built-in installation such as a bookcase unless proper ventilation is provided.
- This appliance should be operated only from the type of power source indicated on the marking label. If you are not sure of the type of power supplied to your home, consult your dealer or local power company. For appliances designed to operate from battery power, refer to the operating instructions.
- For added protection for this product during a lightning storm, or when it is left unattended and unused for long periods of time, unplug it from the wall outlet and disconnect the antenna or cable system. This will prevent damage to the product due to lightning and power-line surges.
11. Do not allow anything to rest on the power cord. Do not locate this appliance where the cord will be abused by persons walking on it.
- Follow all warnings and instructions marked on the appliance.
- Do not overload wall outlets and extension cords as this can result in fire or electric shock.
- Never push objects of any kind into this appliance through cabinet slots as they may touch dangerous voltage points or short out parts that could result in a fire or electric shock. Never spill liquid of any kind on the appliance.
- Do not attempt to service this appliance yourself as opening or removing covers may expose you to dangerous voltage or other hazards. Refer all servicing to qualified service personnel.
- Unplug this appliance from the wall outlet and refer servicing to qualified service personnel under the following conditions:
a. When the power cord or plug is damaged or frayed. b. If liquid has been spilled into the appliance. c. If the appliance has been exposed to rain or water. d. If the appliance does not operate normally by following the operating instructions. Adjust only those controls that are covered by the operating instructions as improper adjustment of other controls may result in damage and will often require extensive work by a qualified technician to restore the appliance to normal operation. e. If the appliance has been dropped or the cabinet has been damaged. f. When the appliance exhibits a distinct change in performance - this indicates a need for service.
- When replacement parts are required, be sure the service technician has used replacement parts specified by the manufacturer that have the same characteristics as the original part. Unauthorized substitutions may result in fire, electric shock, or other hazards.
- Upon completion of any service or repairs to this appliance, ask the service technician to perform routine safety checks to determine that the appliance is in safe operating condition.
PORTABLE CART WARNING (symbol provided by RETAC)
S3125A
Safety Precautions
FOR USA AND CANADA
CAUTION
RISK OF ELECTRIC SHOCK DO NOT OPEN

CAUTION
TO REDUCE THE RISK OF ELECTRIC SHOCK. DO NOT REMOVE COVER (OR BACK). NO USER-SERVICEABLE PARTS INSIDE. REFER SERVICING TO QUALIFIED SERVICE PERSONNEL.

The lightning flash with arrowhead symbol, within an equilateral triangle, is intended to alert the user to the presence of uninsulated "dangerous voltage" within the product's enclosure that may be of sufficient magnitude to constitute a risk of electric shock to persons.

The exclamation point within an equilateral triangle is intended to alert the user to the presence of important operating and maintenance (servicing) instructions in the literature accompanying the appliance.
INFORMATION (FOR CANADA) RENSEIGNEMENT (POUR CANADA)
This Class B digital apparatus complies with Canadian ICES-003.
TO REDUCE THE RISK OF FIRE OR ELECTRIC SHOCK, DO NOT EXPOSE THIS APPLIANCE TO RAIN OR MOISTURE.
AVERTISSEMENT:
POUR EVITER LES RISQUES D'INCENDIE OU D'ELECTROCUTION, NE PAS EXPOSER L'APPAREIL A L'HUMIDITE OU A LA PLUIE.
INFORMATION FOR USA
INFORMATION
This equipment has been tested and found to comply with the limits for a Class B digital device, pursuant to Part 15 of the FCC Rules. These limits are designed to provide reasonable protection against harmful interference in a residential installation. This equipment generates, uses, and can radiate radio frequency energy and, if not installed and used in accordance with the instructions, may cause harmful interference to radio communications. However, there is no guarantee that interference will not occur in a particular installation. If this equipment does cause harmful interference to radio or television reception, which can be determined by turning the equipment off and on, the user is encouraged to try to correct the interference by one or more of the following measures:
- Reorient or relocate the receiving antenna.
- Increase the separation between the equipment and receiver.
- Connect the equipment into an outlet on a circuit different from that to which the receiver is connected.
- Consult the dealer or an experienced radio/TV technician for help.
CAUTION
CHANGES OR MODIFICATIONS NOT APPROVED BY JVC COULD VOID USER'S AUTHORITY TO OPERATE THE EQUIPMENT.
THIS DEVICE COMPLIES WITH PART 15 OF THE FCC RULES.
OPERATION IS SUBJECT TO THE FOLLOWING TWO CONDITIONS: (1) THIS DEVICE MAY NOT CAUSE HARMFUL INTERFERENCE, AND (2) THIS DEVICE MUST ACCEPT ANY INTERFERENCE RECEIVED, INCLUDING INTERFERENCE THAT MAY CAUSE UNDESIRED OPERATION.
Due to design modifications, data given in this instruction book are subject to possible change without prior notice.
Safety Precautions (continued)
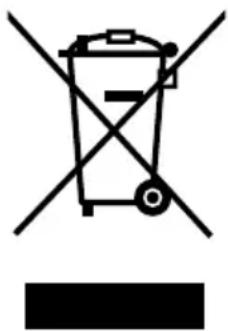
Attention:
This symbol is only valid in the European Union.
Information for Users on Disposal of Old Equipment
[European Union]
This symbol indicates that the electrical and electronic equipment should not be disposed as general household waste at its end-of-life. Instead, the product should be handed over to the applicable collection point for the recycling of electrical and electronic equipment for property treatment, recovery and recycling in accordance with your national legislation.
By disposing of this product correctly, you will help to conserve natural resources and will help prevent potential negative effects on the environment and human health which could otherwise be caused by inappropriate waste handling of this product. For more information about collection point and recycling of this product, please contact your local municipal office, your household waste disposal service or the shop where you purchased the product.
Penalties may be applicable for incorrect disposal of this waste, in accordance with national legislation.
(Business users)
If you wish to dispose of this product, please visit our webpage www.jvc-europe.com to obtain information about the take-back of the product.
[Other Countries outside the European Union]
If you wish to dispose of this product, please do so in accordance with applicable national legislation or other rules in your country for the treatment of electrical and electronic equipment.
Dear Customer,
This apparatus is in conformance with the valid European directives and standards regarding electromagnetic compatibility and electrical safety.
European representative of Victor Company of Japan Limited is:
JVC Technology Centre Europe GmbH
P.O. Box 100552
61145 Friedberg
Germany
● The unit is to be powered by a DC 12 V or an AC 24 V power supply. ● The unit is to be powered by a UL Listed DC 12 V or an AC 24 V power supply. (For U type) ● The AC 24 V and 12 V DC power supply shall conform to the following: Class 2 only (For USA), Isolated power supply only (For Europe). ● This installation should be made by a qualified service person and should conform to all local codes. ● This installation shall be in accordance with the National Electrical Code, ANSI/NFPA 70.
● Any mention in this manual of alarm inputs has not been evaluated by UL to be used for burglar alarm functionality. - When mounting this unit to the ceiling or wall, mount it to a secure location where it can support the mass of this unit. When mounting to an insecure location, make sure to carry out reinforcement of the ceiling or wall before installation. ● The rating label is placed on the bottom surface of the camera unit. ● The camera unit may fall if the mounting screw or piping is not properly tightened. Ensure that the screws and nuts are properly tightened. - We do not accept liability for any damage to the camera in cases when it is dropped because of incomplete installation due to not observing the installation instructions correctly. Please be careful when installing the camera. - Do not install the camera near lighting equipment with a high temperature, such as spotlights. Doing so may cause malfunction or fire.
Thank you for purchasing this product. (These instructions are for: TK-C215VP4U/TK-C215VP4E/TK-C215VP12U/TK-C215VP12E.) Before beginning to operate this unit, please read the instruction manual carefully in order to make sure that the best possible performance is obtained.
Characteristics
■ Excellent dust-proof and water-proof performance
With the dust-proof and water-proof structure, it can be installed outdoor directly as it will not be affected by the rain. (IP66 specification)
Realizing a High Picture Quality
This camera provides 540 TV lines with a S/N ratio of 50 dB. This performance is achieved by using a highly sensitive CCD with 380,000 pixels (U type) or 440,000 pixels (E type) and a high-resolution video processing circuit.
■Enlarged Shooting Range
The adjustment range of the shooting direction is wide, and mounting of the camera to the wall is possible with the employment of a 3-axis rotation mechanism.
■Non Camera-Like Design
Dome-type design allows application in various locations.
■High Magnification Varifocal/Zoom Lens
The built-in x3.6 varifocal lens (TK-C215VP4U/E) and x12 zoom lens (TK-C215VP12U/E) enables detailed supervision.
■Alarm Zoom Feature
(TK-C215VP12U/E only)
2 preset positions are available, which allow setting of the monitoring screen size under normal circumstances and during alarm input.
■Easy DAY & NIGHT Feature
This camera has an Easy Day & Night function. This function, if activated, will automatically switch to B&W image when the scene is getting dark. This is very useful for monitoring a dark environment.
This instruction manual covers total 4 different models in common as follows:
TK-C215VP4U
TK-C215VP4E
TK-C215VP12U
TK-C215VP12E
In this manual, each model number is described without the last letter (U/E) which indicates the shipping destination. (U: NTSC, E: PAL)
Only "U" models (TK-C215VP4U/TK-C215VP12U) have been evaluated by UL.
How to Use This Manual
■Characters and symbols used in this manual
Note: Points to pay attention to during operation.
Memo: Details for reference, such as functions or constraints during use.
Pages or items to refer to.
- All product names that appear in this document are the trademarks or registered trademarks of their respective companies. Marks and symbols such as TM, and do not appear in this document.
Table of Contents
Introduction
Safety Precautions 3
Characteristics 5
Table of Contents 6
Precautions for proper use of this product ... 7
Name of Parts 9
Setting the Switches and the Lens (TK-C215VP4U/E) 12
Setting the Switches and the Lens (TK-C215VP12U/E) 14
Installation and Connection
System Example 16
About Connection Cables 17
Video signal cables 17
DC 12 V or AC 24 V power supply cable .... 17
Electrical Specifications of Alarm Input Terminals 18
The right sequence to connect and set the camera 19
Setting the switches 20
Mounting the base 21
Cable Connection 22
Mounting the camera unit 23
Adjusting the video image 25
Mounting the inner dome 30
Mounting the dome cover 30
Mounting the camera using the electrical box 31
Mounting the camera using the pipe ..... 32
White-spot correction 34
Others
Specifications 36
●Before starting an important recording, be sure to perform a test recording in order to confirm that a normal recording is possible.
- We will not provide any compensation whatsoever for the contents to be recorded or loss of opportunities when recording is not properly performed due to malfunction of the video camera, VTR, hard disk recorder or video tape.
●Before touching the camera unit, make sure to touch the metal surface of the [MONITOR] terminal to discharge any static electricity from your body. Static electricity may cause the camera to malfunction.
Precautions for proper use of this product
Storage and Location of Use
●Do not install this unit at the following locations. - Places that are exposed to vapor or oil, such as kitchens. - Places that exceed the ambient temperature range (-10°C to 50°C). - Places at which corrosive gases are emitted. - Places where radiation or X-rays and strong radio waves or magnetism are present. - Places that are subject to vibration. ● Using this unit or cables connected to this unit in places where strong radio waves and magnetic fields are present (e.g. near a radio, TV, transformer or motor) may increase the noises in the image and color changes. ●Do not install this unit at a place that is directly exposed to cold air or near the outlet of an air-conditioner. The dome cover may become foggy when there is a drastic change in temperature. - Although this unit is IP66-compliant, waterproof under all kinds of environment is not guaranteed.
Others
This unit comes with a built-in AGC circuit. When the AGC function is turned on, the sensitivity increases automatically in a dark place and the screen may appear grainy. This is not a malfunction. When using the Automatic Tracking White balance (ATW) mode, the color tone may differ slightly from the actual color. This slight color variation is caused by the principle of Auto Tracking White balance circuit and is not a camera malfunction. When shooting an object with high brightness (lamps, etc.), vertical lines may appear in the image on the screen (smear phenomenon) and bleeding may be found around the high brightness object (blooming phenomenon). These are due to the characteristics of the CCD and not malfunctions.
- Turning “ON” DAY & NIGHT function switches the image to black-and-white in a dark place. When switching between colored and black-and-white images, the bright portions of the screen are enhanced and the clarity of the screen may deteriorate. Overall the sensitivity increases in the case of black-and-white images, therefore the scene may appear grainy and white spots may become visible. This is not a malfunction.
- When the power source voltage drops (such as during lightning or upon turning on the air-conditioner) distortion or noise may occur in the image.
- When this unit is moved from a cold to a warm place, dew condensation may occur, which may result in camera malfunctioning. In this case, leave this unit at room temperature for about 1 hour before turning on the power. The rotation angle of this unit has been enlarged to enable installation at a wide variety of locations. When the zoom function of the lens is set to Wide and the tilt angle set close to ±70°, a portion of this unit may be visible on the shooting screen depending on the rotation angle. When this occurs, adjust the angle of view accordingly. (Pg. 25) To prevent fogging due to changes in temperature, make sure to insert the supplied silica gel into the designated location. (Pg. 24)
- When the supply voltage of the camera is low, the input protection circuit within the camera may be triggered and the power of the camera may turn off automatically. Make sure to use a power supply and voltage for the camera that is within -10% of the rated voltage. All Interconnecting Equipment must be UL Listed. Upon switching between the HOME and ALARM positions, the camera focus may change slightly after the zoom operation comes to a stop. This is due to the built-in lens performance and is not a malfunction. (TK-C215VP12U/E only)
Precautions for proper use of this product (continued)
Maintenance
Turn off the power before performing maintenance. Clean the dome cover using a lens cleaning cloth (or soft cloth). Wiping it with thinner or benzene may melt the surface or cause it to fog. For tough stains, wipe using a cloth that is dipped into a neutral detergent diluted with water, followed by wiping with a dry cloth.
Energy Conservation
- When not in use, turn off the power of the system to save energy.
■Note on consumable parts (TK-C215VP12U/E only)
The following parts are consumable and should be replaced after a certain number of hours or a count of operations. The service lives given below are only typical values. They may vary depending on the operating environment and conditions. Note that the replacement of consumable parts is chargeable even when they are replaced before the termination of the warranty period.
- Zoom lens assembly
Zooming operation: 2 million times
Name of Parts
Camera

① Mounting hole × 2
Use these when mounting the camera to the ceiling, wall or electrical box. (Pg. 21)(Pg. 31)
Note:
- To mount the camera using the electrical box, consult the dealer from which this product is purchased or any nearby JVC dealer.
②Hole for Connecting Cable and Piping
This is a hole for drawing out the connecting cable.
This hole can also be used to mount directly to pipes. (Piping hole: G3/4-14UNC) (Pg. 32)
③Mounting Screw for Fall Prevention Wire
Use this screw when mounting the fall prevention wire to this unit. (Fall prevention wire is not supplied with this product.)
Note:
- Connect the fall prevention wire to prevent this unit from falling accidentally. The camera unit may fall if this wire is not connected.
④ Dome Cover
⑤ Inner Dome
Set the switches as well as angle of view before mounting the camera. (Pg. 20)
⑥ Plug for Piping Hole and Piping Hole (Side)
Use this plug when mounting directly to pipes from the side. The plug for piping hole is mounted to this hole by default. (C) Pg. 33)
Name of Parts (continued)
Camera (continued)

⑦ Base
Mount the base to the ceiling, wall or electrical box before mounting the camera.
(Pg. 21)(Pg. 31)
⑧ Fastening Screw for Dome Cover
This is a fastening screw for the dome cover. Use a supplied wrench to fasten/unfasten the screw.
⑨AC 24 V/DC 12 V Power Supply Wire
DC 12 V Input: Red (+12 V), Black (GND)
AC 24 V Input: Nonpolar
Note:
- In order to use the optional heater unit sold separately (part number KA-ZH215) with this camera, an AC 24 V power supply MUST be used. ●The AC 24 V power supply should conform to the following: U-type: Class 2 only; E-type: Isolated power supply only. ●For inquiries on the heater, consult your nearby JVC dealer.
10 Alarm signal cable
(TK-C215VP12U/E only)
Yellow (ALARM IN), Gray (ALARM GND). (Pg. 18)
⑪Protection Cover
Upon connecting the video cable, please protect the BNC connection using this rubber cover.
⑫Video signal output connector (BNC)
(Pg. 17)
Camera (Interior)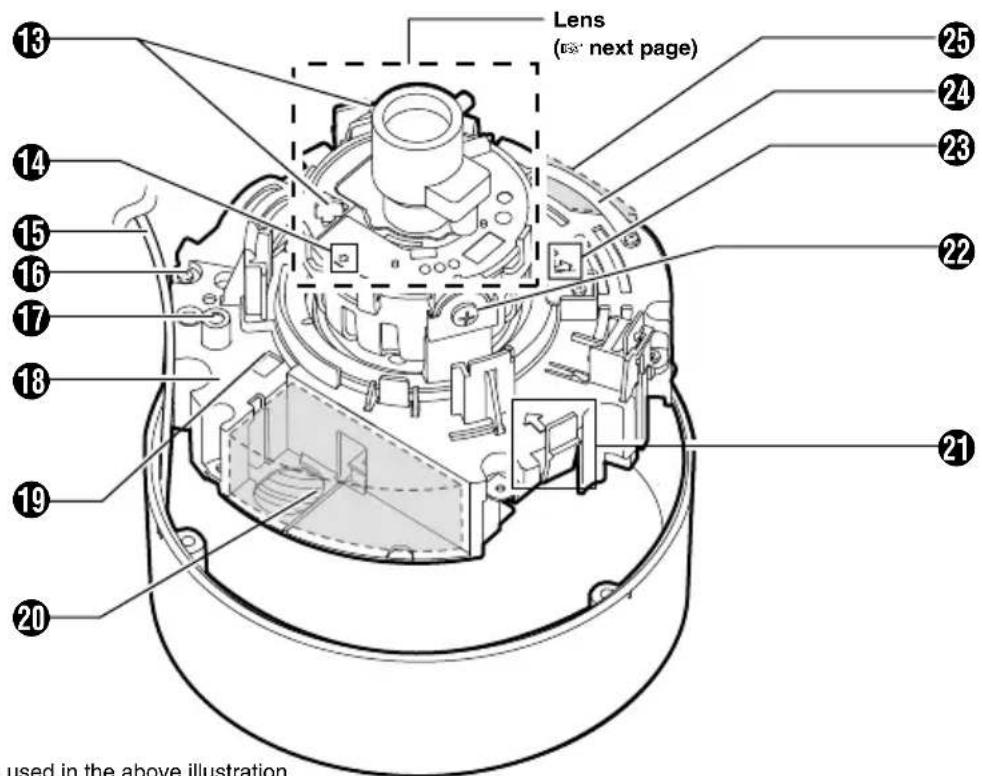
*TK-C215VP4U/E is used in the above illustration
13 Rotation Knob (TK-C215VP4U/E only)
Rotate the lens unit to adjust the inclination of the image. (Pg. 25)
14 Rotation Center Mark (Pg. 25)
⑮Fall Prevention Wire
Use this to connect the base ⑦ to the dome cover ④.
⑯ Camera Unit Fastening Screw × 2
Use this to fasten the camera body 18 to the base 7. To remove (Pg. 21)
17[MONITOR]Monitor Terminal (RCA Jack) (13-Pg. 25)
⑱Camera Unit
19 Connector for Power Supply of Heater
This is a power connector for use when the heater (sold separately: KA-ZH215) is mounted.
20Space for Heater
Memo:
- When mounting the heater (sold separately: KA-ZH215), read the instruction manual of the heater carefully before mounting.
②1 Camera Unit Fastening Clip × 2
This clip is used for fastening the camera unit to the base. When removing the base, press toward the direction indicated by the arrow to release. (Pg. 21)
22 Tilt Fastening Screw
After adjusting the angle of view, tighten the screw to ensure that the camera's angle of view does not go out of alignment when used in a location with strong vibration. (Pg. 25)
⑳Shooting Direction Mark
Install the camera by aligning the shooting direction with the arrow mark.
24Lug Plate
This plate is used for fastening the silica gel. (Pg. 24)
25Space for Silica Gel (Pg. 24)
Setting the Switches and the Lens (TK-C215VP4U/E)
Set the video setting switches on the camera unit before mounting it. To set the switches, use a fine-tipped screwdriver.

Function Selection Switch Settings Chart (Characters in bold indicate factory settings)
| OFF■ | ■ ON | ||
| 1 | AGC OFF | ON | |
| 2 | SELECT | PHASE | WHT.BAL. |
| 3 | LLSYNC | INT | |
| 4 | WHT.BAL. | ATW | MANU |
| 5 | OFFBLC | ON | |
| 6 | DAY/NIGHT | OFF | ON |
| 7 | RESERVED | ■ SET TO OFF | |
| 8 | RESET/SPOT | RESET | SPOT |
①[RESET/SPOT] RESET/SPOT button
When switch #8 is set to [RESET] position and this button is pressed, the value of the white balance or phase adjusted manually is reset to the default value.
- When switch 2 [SELECT] is set to WHT.BAL., the white balance is reset to the default value. When the switch is set to PHASE, the phase is reset to the default value.
- When switch #8 is set to SPOT: When this button is pressed, white spots are corrected. For instructions on correcting white spots, see "White-spot correction" (Pg. 34).
②[R/B,+/-] R/B,+/- adjustment button
This button is pressed when manually adjusting the white balance or when adjusting the vertical phase of the line lock.
The function of this button is selected using the 2 [SELECT] switch.
- When manually adjusting the white balance: Press the R button to increase the red tint and decrease the blue tint. Press the B button to increase the blue tint and decrease the red tint.
- When adjusting the phase: Press the + or - button to adjust the phase.
③Function selection switches
1. [AGC] Auto-gain control switch.
Setting this switch to "ON" automatically increases the sensitivity even when the brightness of the subject is insufficient. (Default setting: ON)
2. [SELECT] WHT.BAL./PHASE setting switch.
WHT.BAL.:
The ② [R/B,+/-] buttons are used as [R/B] adjustment buttons.
PHASE :
The ② [R/B, +/-] buttons are used as [+/-] adjustment buttons. (Default setting: WHT.BAL.)
3. [SYNC] Synchronization system selection switch.
This switch sets the synchronizing system for the camera.
INT:
This is set for internal synchronization
LL (Line Lock):
The camera's vertical synchronization is locked to the AC 24 V 60 Hz or 50 Hz power line frequency. When switching between multiple cameras using a switcher, selecting this mode and adjusting the vertical phase can reduce the monitor sync disturbances that occur when the camera image is switched.
U type: 60 Hz only
E type: 50 Hz only
(Default setting: INT)
4. [WHT.BAL.] ATW/MANUAL selection switch.
For selecting whether to adjust the white balance automatically or manually.
When the setting is changed from manual to ATW, the setting values in the manual mode will be reset. The camera switches to the same mode as with pressing the [RESET] button. (Default setting: ATW)
Memo:
●The white balance of this camera is preset to use under sunlight or halogen lamps, and may not be properly adjusted when used under artificial lights such as fluorescent lights.
5. [BLC] Backlight compensation switch.
When the object is placed against the light, setting this to "ON" increases the iris aperture by 1 stop and the object will appear brighter. (Default setting: OFF)
6. [DAY/NIGHT] Easy Day & Night switch.
To capture a subject with continually changing brightness (day/night), set this switch to “ON”. The camera automatically captures the image in color when the subject is bright, and in black and white mode when it is dark. (Default setting: OFF)
Memo:
- When this item is set to "ON", the AGC feature will automatically be set to "ON" regardless of the [AGC] Switch 1 setting. ●The Easy DAY & NIGHT feature on this camera uses a sensitized black and white mode unlike other black and white surveillance cameras that use infra-red lighting. ●Sensitivity increases in the case of black-and-white images. The screen may therefore
appear rougher and white spots may increase.
7. [RESERVED]
Not used. Ensure to set this to "OFF" before using the camera. (Default setting: OFF)
8. [RESET/SPOT] RESET/SPOT CORRECTION selection switch.
RESET:
The [RESET/SPOT] button is used as a [RESET] button.
SPOT:
The [RESET/SPOT] button is used as a [SPOT] button. (Pg. 34) (Default setting: RESET)
④[IRIS LEVEL] Iris level adjustment
For adjusting the level of the automatic aperture control lens. This adjustment only needs to be made when required. Use this to accommodate particular shooting conditions.
To darken image: Counterclockwise (L side) To brighten image: Clockwise (H side)
Memo:
- Prior to adjusting the aperture level, ensure to set the [AGC] Switch 1 of the function selection switch ③ to "OFF". Otherwise, when the level is turned too far toward L, the AGC function activates increasing sensitivity and the picture may look uneven.
⑤ [FOCUS ADJUST] focus adjustment button
Use this to adjust the lens focus.
Upon pressing, the lens aperture will open up for about 30 seconds such that the depth of field becomes shallower, thus enabling focus to be easily adjusted. (Pg. 26)
Memo:
● The electronic shutter functions automatically upon pressing the focus adjustment button and the screen may flicker. However, this is not a malfunction.
⑥ Focus adjustment ring
Move this to the left/right to adjust the focus.
⑦ Zoom adjustment ring
Move this to the left/right to adjust the field angle.
Setting the Switches and the Lens (TK-C215VP12U/E)
Set the video setting switches on the camera unit before mounting it.
To set the switches, use a fine-tipped screwdriver.
![1 2 3 4 POSTOW SEE LOT ZOOM/FOCUS VAR WID IF S TELE YEAR ALARM POSITION LEVEL [MEMORY] WEHT.BAL R B 1 + 2 20000000000000000000000000000000000000000000000000000000000000000000000000000000000000000000000000000 5 6 7 LIP/FASS RESET$SPOT](/content/2026/06/1279659/images/8a8e5e2f010d9681073ffd410d1108e0e84b337b3f4a4407fe9d02513058bba1.jpg)
Function selection switch setting table (Items in bold are factory position)
| OFF ☐ | ☐ ON | ||
| 1 | AGCOFF | ON | |
| 2 | SELECT | PHASE | WHT.BAL. |
| 3 | LLSYNC | INT | |
| 4 | WHT.BAL. | ATW | MANUAL |
| 5 | OFFBLC | ON | |
| 6 | DAY/NIGHT | OFF | ON |
| 7 | ALARM | TRIGGER | STATE |
| 8 | RESET/SPOT | RESET | SPOT |
① [IRIS LEVEL] Iris level adjustment
For adjusting the level of the automatic aperture control lens. This adjustment only needs to be made when required. Use this to accommodate particular shooting conditions.
To darken image: Counterclockwise (L side)
To brighten image: Clockwise (H side)
Note:
- Prior to adjusting the aperture level, ensure to set the 1 [AGC] Switch of the function selection switch ⑦ to "OFF". Otherwise, when the level is turned too far toward L, the AGC function activates increasing sensitivity and the picture may look uneven.
②[ZOOM / FOCUS, MEMORY] zoom, focus adjustment switches/position memory button
Use the [▲TELE] and [▼WIDE] switches to zoom, and the [◀FAR] and [▶NEAR] switches to adjust focus. (Pg. 28)
Press the [MEMORY] button to register the position. (Pg. 28)
③[ALARM POSITION] status indication LED
Light off : Registration of home position is enabled
Light on (red) : Lens initializing.
Light on (green) : Registration of alarm position is enabled
Blinking (green) : Position memory registration mode → memory registration completed (Pg. 28)
④[POSITION SELECT] POSITION SELECT button
Press this button to switch between the home and alarm positions. Display on the status indication LED ③ will change accordingly. (Pg. 28)
⑤[RESET/SPOT] RESET/SPOT button
When switch #8 is set to [RESET] position and this button is pressed, the value of the white balance or phase adjusted manually is reset to the default value.
- When switch 2 [SELECT] is set to [WHT.BAL.], the white balance is reset to the default value. When the switch is set to PHASE, the phase is reset to the default value.
- When switch #8 is set to SPOT: When this button is pressed, white-spots are corrected. For instructions on correcting white-spots, see "White-spot correction" (Pg. 34).
⑥[R/B,+/-] R/B, +/- adjustment button
This button is pressed when manually adjusting the white balance or when adjusting the vertical phase of the line lock. The function of this button is selected using the 2 [SELECT] switch.
- When manually adjusting the white balance: Press the R button to increase the red tint and decrease the blue tint. Press the B button to increase the blue tint and decrease the red tint.
- When adjusting the phase: Press the + or - button to adjust the phase.
⑦Function selection switches
1. [AGC] Auto-gain control switch.
Setting this switch to “ON” automatically increases the sensitivity even when the brightness of the subject is insufficient. (Default setting: ON)
2. [SELECT] WHT.BAL./PHASE setting switch.
WHT.BAL.:
The ⑥ [R/B,+/-] buttons are used as [R/B] adjustment buttons.
PHASE:
The ⑥ [R/B, +/-] buttons are used as [+/-] adjustment buttons. (Default setting: WHT.BAL.)
3. [SYNC] Synchronization system selection switch.
This switch sets the synchronizing system for the camera.
INT:
This is set for internal synchronization.
LL (Line Lock):
The camera's vertical synchronization is locked to the AC 24 V power line frequency. When switching between multiple cameras using a switcher, selecting this mode and adjusting the vertical phase can reduce the monitor sync disturbances that occur when the camera image is switched. U type: 60 Hz only E type: 50 Hz only (Default setting: INT)
4. [WHT.BAL.] ATW/MANUAL selection switch.
For selecting whether to adjust the white balance automatically or manually. When the setting is changed from manual to ATW, the setting values in the manual mode will be reset. The camera switches to the same mode as with pressing the [RESET] button. (Default setting: ATW)
Note:
●The white balance of this camera is preset to use under sunlight or halogen lamps, and may not be properly adjusted when used under artificial lights such as fluorescent lights.
5. [BLC] Backlight compensation switch.
When the object is placed against the light, setting this to "ON" increases the iris aperture by 1 stop and the object will appear brighter. (Default setting: OFF)
6. [DAY/NIGHT] Easy DAY & NIGHT switch.
To capture a subject with continually changing brightness (day/night), set this switch to "ON". The camera automatically captures the image in color when the subject is bright, and in black and white mode when it is dark.
(Default setting: OFF)
Note:
- When this item is set to "ON", the AGC feature will automatically be set to "ON" regardless of the [AGC] Switch 1 setting. ●The Easy DAY & NIGHT feature on this camera uses a sensitized black and white mode unlike other black and white surveillance cameras that use infra-red lighting.
- Sensitivity increases in the case of black-and-white images. The screen may therefore appear rougher and white spots may increase.
7. [ALARM] alarm input mode selection switch.
For setting the lens movement when there is an alarm input. Set according to the alarm device that you are using.
(pg. 18 "Electrical Specifications of Alarm Input Terminals")
(pg. 25 "Adjusting the video image")
TRIGGER:
Upon input of an alarm, the lens moves to the preset zoom/focus position (alarm position). The lens remains in the alarm position for 15 seconds before it returns automatically to the home position.
When there is a new alarm input while the lens is at the alarm position, the lens continues to remain in the alarm position for 15 seconds upon the last alarm input.
STATE:
Upon input of an alarm, the lens moves to the preset zoom/focus position (alarm position). The lens remains in the alarm position for 15 seconds. The lens will, after a lapse of 15 seconds, continue shooting at the alarm position as long as there is alarm input. The lens returns automatically to the home position immediately after alarm input stops. (Default setting: TRIGGER)
8. [RESET/SPOT] RESET/SPOT correction selection switch.
RESET:
The [RESET/SPOT] button ⑤ is used as a [RESET] button.
SPOT:
The [RESET/SPOT] button ⑤ is used as a [SPOT] button. (Pg. 34) (Default setting: RESET)
System Example
●Turn off the power of devices to be used before connecting the cables. - Read through the "Instruction Manual" of the devices to be used carefully before connecting.
![graph TD A["Monitor"] --> B["Hard Disk Recorder, etc."] B --> C["Power Unit DC12 V or AC24 V (Class 2)"] C --> D["Coaxial Cable"] D --> E["TK-C215VP4U/E"] D --> F["TK-C215VP4U/E"] D --> G["TK-C215VP4U/E"] D --> H["TK-C215VP4U/E"] D --> I["TK-C215VP12U/E"] I --> J["Alarm Signal (METAL CONTACT)"] D --…](/content/2026/06/1279659/images/e7c599c3c9090e115b8031f6d1fafc5d20572a7f5dc60b242bc997246f7b30a9.jpg)
Memo:
- When mounting the heater (sold separately part number KA-ZH215), make sure to connect the power wire to an AC 24 V power supply only. ●The AC 24 V power supply should conform to the following:
U-type: Class 2 only
E-type: Isolated power supply only
Note:
●Power consumption of TK-C215VP4 / TK-C215VP12 are different from one another. When installing a mixture of these models, select a cable length according to the power consumption of each model. Alternatively, install based on the model with the highest power consumption.
About Connection Cables
The maximum connection distance varies with the type of cable used. Please refer carefully to the table for each cable during connection.
* Be sure to turn off the power of devices before connecting cables.

Note:
- When mounting the heater (sold separately part number KA-ZH215), make sure to connect the power wire to an AC 24 V power supply only.
Video signal cables
Connect the coaxial cables (BNC) to the video signal output connector (BNC).
| Cable Maximum extension (No cable compensator) |
| RG-59 200 m |
| RG-6 350 m |
| RG-11 450 m |
DC 12 V or AC 24 V power supply cable
Connect the DC 12 V or the AC 24 V power supply to the DC 12 V/AC 24 V terminals on the terminal board. To prevent connection errors or a cable disconnection, we recommend the use of lug plates for the connections. The following table shows the connection distances and connection cables provided that 2-conductor VVF cables (vinyl-insulated vinyl sheath cables) are used.
| Conductor diameter (mm) ø | 1.0 mm (AWG18) | ø 1.6 mm (AWG14) | ø 2.0 mm (AWG12) | |
| TK-C215VP4U/E Maximum extension (Without heater) | DC12V | 50 m (160ft) | 140 m (450ft) | 220 m (720ft) |
| AC24V | 130 m (420ft) | 350 m (1100ft) | 550 m (1800ft) | |
| TK-C215VP4U/E Maximum extension (With heater) | AC24V | 40 m (130 ft) | 120 m (390 ft) | 180 m (590 ft) |
| TK-C215VP12U/E Maximum extension (Without heater) | DC12V | 30 m (100ft) | 80 m (260ft) | 130 m (430ft) |
| AC24V | 80 m (260ft) | 210 m (690ft) | 340 m (1120ft) | |
| TK-C215VP12U/E Maximum extension (With heater) | AC24V | 30 m (100 ft) | 90 m (300 ft) | 140 m (460 ft) |
Note:
- If thin cables are used (i.e. with a high resistance), a significant voltage drop will occur when the unit is at its maximum power consumption. Either use a thick cable to restrict the voltage drop at the camera side to below 10 %, or place the power supply near to the camera. When the voltage is low, the protection circuit within the camera may be triggered and the power of the camera may turn off automatically.
- Do not allow input from both a DC 12 V and AC 24 V power supply at the same time.
- When using a DC 12 V power supply, ensure that the polarities of the cable are correct. ●The product shall be powered by Class 2 only. ●The AC 24 V power supply should conform to the following:
U-type: Class 2 only
E-type: Isolated power supply only
About Connection Cables (continued)
Electrical Specifications of Alarm Input Terminals
(TK-C215VP12U/E only)
- To prevent penetration of noise in the internal circuitry, apply a non-voltage contact signal to the ALARM input terminal. Never apply a voltage.
- Apply an alarm signal for at least 200 ms. If it is shorter, it is not guaranteed that the signal will be recognized as an alarm signal. ●Under the alarm status (status when the metal contact is "make"), select the contact or connecting wire such that the maximum wire resistance between the ALARM IN and ALARM GND is within 150 Ω.

◆ Polarity of alarm signals
ALARM INPUT
| SHORT (CONTACT) ALARM | |
| OPEN NORMAL (HOME POSITION) |
The correct sequence to connect and set the camera
Follow the procedures below to connect/set this unit.
Turn off the power of devices to be used before connecting the cables.
●Before touching the camera unit, make sure to touch the metal surface of the [MONITOR] terminal to discharge any static electricity from your body. Static electricity may cause the camera to malfunction. - When mounting the base to the ceiling, or when connecting the cable of the camera unit, pay enough attention to the fall of each part. - When mounting the heater (sold separately: KA-ZH215), read the instruction manual of the heater carefully before mounting.
| step 1 | Set the switches(ⓍPg. 20)Remove the dome cover, followed by setting the video image switches. |
| step 2 | Mounting the base(ⓍPg. 21)Mount the base to the wall or ceiling. |
| step 3 | Connect the cable(ⓍPg. 22)Connect the coaxial cable and power supply for the heater. |
| step 4 | Mounting the camera unit(ⓍPg. 23)Fill the piping hole and screw hole with a sealing material, followed by mounting the camera unit to the base. |
| step 5 | Adjusting the video image(ⓍPg. 25)Adjust the camera's angle, focus and brightness. |
| step 6 | Mounting the inner dome(ⓍPg. 30)After setting is complete, mount the inner dome to the camera. |
| step 7 | Mounting the dome cover(ⓍPg. 30)Insert the silica gel into the designated space to prevent fogging of the dome cover, followed by mounting the dome cover. |
Setting the switches
Remove the dome cover, followed by setting the video image switches.
1. Removing the dome cover
Remove the dome cover by unfastening the 3 fastening screws using the wrench supplied.
Memo:
●The dome cover and base are connected with fall prevention wire.
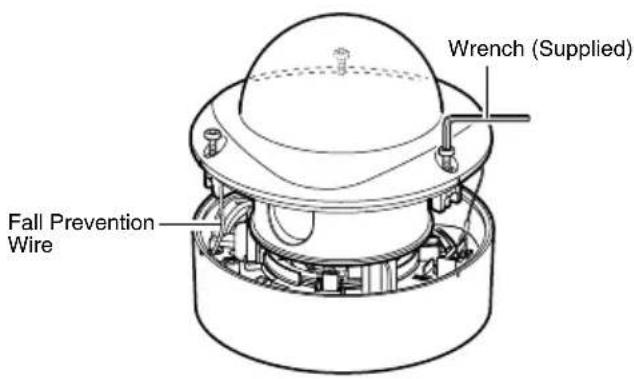
*TK-C215VP4U/E is used in the above illustration
2. Removing the inner dome
The inner dome is fastened using clips at 3 different positions. Grasp the inner dome and remove it from the clips.
Note:
●Before touching the camera unit, make sure to touch the metal surface of the [MONITOR] terminal to discharge any static electricity from your body. Static electricity may cause the camera to malfunction.
3. Setting the switches
Set the switches for video images.
(Pg. 12『Setting the Switches and the Lens (TK-C215VP4U/E)』)
(Pg. 14『Setting the Switches and the Lens (TK-C215VP12U/E)』)

*TK-C215VP4U/E is used in the above illustration
Mounting the base
Remove the camera unit from the base and mount the base to the ceiling or wall. When mounting to a wall, follow the procedures by replacing areas indicated as [ceiling] by [wall] accordingly.
Setup
Drill mounting holes ( 30 mm, 1 1/8 inch) using the template supplied when necessary.

1. Removing the camera unit from the base
①Unfasten the 2 fastening screws from the camera unit using a screwdriver. ②Press the 2 clips inwards to remove the camera unit from the base.

TK-C215VP4U/E is used in the above illustration
2. Mounting the fall prevention wire to the base (fall prevention wire is not supplied)
Remove the fastening screw for the fall prevention wire and mount the fall prevention wire.
Note:
●Pay attention to the length, strength, routing and material (insulation properties) of the fall prevention wire used. ●The internal diameter of the rounded portion on the camera unit to which the fall prevention wire is to be mounted shall be at least ø 4.1 mm and not larger than ø 6.5 mm, and its external diameter shall not be larger than ø 12 mm.
3. Mounting the fall prevention wire to a firm place
To prevent the camera from falling, mount the base to a firm place using the fall prevention wire.
4. Mounting the base
Mount the base by aligning the shooting direction mark on the inner side of the base ( ↑ ) to the shooting direction.
When mounting to the wall, mount it with the shooting direction mark ( ↑ ) facing upward. Do so by using 2 ø 4 mm mounting screws.
Note:
- When mounting to the wall, make sure to mount it with the shooting direction mark ( ↑ ) facing upward. Failure to do so may cause the fall prevention wire of the dome cover to come off easily.
- ø 4 mm screws are not supplied with this product. Use appropriate type of screw according to the material of the mounting place.

Cable Connection
1. Connecting the coaxial cable (Pg. 17)
Lower the protection cover and connect the connectors. Upon connecting, cover the connectors using the protection cover.
2. Connecting the AC 24 V/DC 12 V power supply wires
Note:
- To mount a heater (sold separately) to this unit, make sure to connect it to an AC 24 V supply during use.
3. Connect the alarm cable.
(TK-C215VP12U/E only)(Pg. 18)
4. Binding the AC 24 V/DC 12 V power supply wires and alarm signal wires (TK-C215VP12U/E only) with insulating tape
Make sure to bind the connecting portions of AC 24 V/DC 12 V power supply wires and alarm signal wires (TK-C215VP12U/E only) with insulating tape.
5. Wrap insulation tape around cables.
6. Storing cables
Upon connecting, push the connector into the cable storage space of the camera unit.
Note:
- When mounting the camera to the electrical box, push the connector into the electrical box. ●While the camera unit is disconnected from the base, be extremely careful not to drop the camera unit.
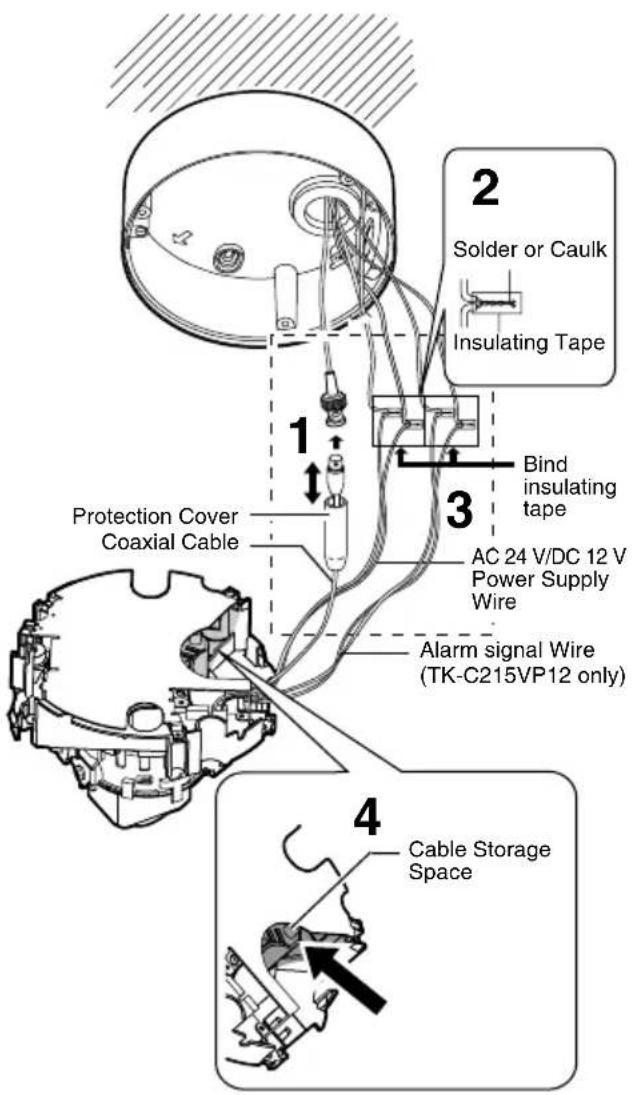
*TK-C215VP12U/E is used in the above illustration
Mounting the camera unit
Fill the piping hole and mounting hole with a sealing material, mount the camera unit to the base, and insert the silica gel.
1. Fill the hole with sealing material
Fill the piping hole as well as the 2 mounting holes mounted with screws using a sealing material.

Memo:
- Use GE silicon or its equivalents as the sealing material.
Note:
- If the piping hole and the 2 mounting holes mounted with screws are not filled with sealing material completely, water or vapor may enter the holes causing the lens and dome cover to fog. Make sure that these holes are completely filled.
2. Mounting the camera unit to the base
Press the 2 clips until a "click" sound is heard.
Note:
- Mount such that the cables and fall prevention wire of the dome cover are not clamped.
3. Fastening the 2 fastening screws of the camera unit
Tighten the 2 fastening screws of the camera unit using a screwdriver to fasten the camera.

*TK-C215VP4U/E is used in the above illustration
Mounting the camera unit (continued)
4. Inserting the silica gel supplied
Take out the silica gel from the aluminum package, insert it into the silica gel insertion space of the camera unit and fasten using the lug plate.

*TK-C215VP4 is used in the above illustration
Memo:
●During reconnection or re-installation after repair or maintenance, make sure to replace the silica gel with a new one. - Consult your nearby JVC's dealer on the replacement procedures.
Serial number of part to be replaced: Use a LW40500-001A silica gel.
Note:
- When mounting is performed on a rainy day, make sure that rain water does not enter this unit. ●Make sure to use the silica gel supplied. Failure to do so may cause the camera lens and dome cover to fog.
- If the angle of view is not adjusted immediately after mounting the camera, insert the silica gel after adjustment is completed. The silica gel loses its effect if it is exposed to the air for a prolonged period of time.
Adjusting the video image
Upon mounting the camera, adjust the images while checking the actual image.
Mounting the test monitor
Connect the [MONITOR] terminal of this unit to the test monitor to adjust the camera's shooting direction, angle of view and focus.
Memo:
●Before setting, ensure to turn on the power of the system.
![[MONITOR] Terminal 75 Ω terminal Test Monitor](/content/2026/06/1279659/images/74a854a3b074b39194d5ef3deaeeadf0a5589170d88585b559c5aea117a95b87.jpg)
*TK-C215VP4U/E is used in the above illustration
Adjusting the shooting direction of the camera
The camera unit can be panned, tilted or rotated. Adjust the camera in the direction of the object.
Note:
●Before touching the camera unit, make sure to touch the metal surface of the [MONITOR] terminal to discharge any static electricity from your body. Static electricity may cause the camera to malfunction. ●Before adjusting the shooting direction of the camera, ensure that the pan fastening screw is loosened. Moving the lens unit without loosening the pan fastening screw may damage the lens unit.

*TK-C215VP4U/E is used in the above illustration
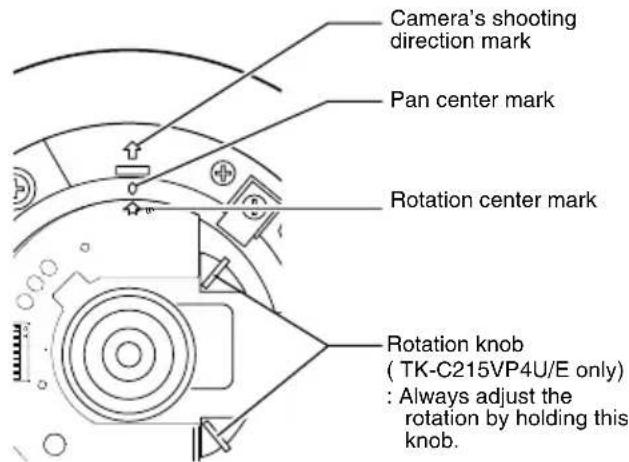
Memo:
- Panning/rotation of ±175° is possible from each of the camera unit's shooting direction mark, pan center mark and rotation center mark. When adjusting the rotation, do not hold the lens unit. Always adjust by holding the rotation knob.
- When using the camera at locations with strong vibration after the angle of view is adjusted, stabilize by tightening the tilt fastening screw to prevent the camera's angle of view from going out of alignment. (Pg. 11)
Note:
- Moving the camera beyond its adjustable range may cause failure in maintaining the performance of this camera.
- As this camera has a wide tilt/rotation range, a part of this camera may appear on the screen depending on the angle of view and orientation.
- Do not hold the lens unit when adjusting the direction of the camera. Applying force on the lens unit may damage it.
Adjusting the video image (continued)
Adjusting the angle of view, focus and brightness
Upon determining the imaging direction, adjust the angle of view, focus and brightness accordingly.
Note:
- When adjusting the focus, make sure to cover the dome cover over the lens. The dome cover of this unit is thick. Therefore, if the focus is not adjusted with the dome cover covered, this may cause the lens to go out of focus when the dome cover is mounted.
- When adjusting the focus, cover the dome cover such that its center is perpendicular to the light axis of the lens, and make sure that the image is not distorted. (See illustration below)

*TK-C215VP4U/E is used in the above illustration
Adjusting the angle of view
Loosen the fastening screw for the zoom adjustment ring and move the ring to the left/right to adjust the image.
Adjusting the focus
Press the focus adjustment button. The iris will be released for about 30 seconds. Loosen the fastening screw for the focus adjustment ring and move the ring to the left/right to align the focus.
Memo:
- Set by repeating [Adjusting the angle of view] and [Adjusting the focus] for 2 to 3 times. After adjustment is completed, fasten by tightening each of the fastening screws. ●The electronic shutter functions automatically upon pressing the focus adjustment button and the screen may flicker. However, this is not a malfunction.
Adjusting the brightness
Usually, adjustment of the brightness is not required. When this is necessary, adjust the iris level accordingly.
To darken : Anti-clockwise direction (L side)
To brighten : Clockwise direction (H side)
Memo:
- Do not perform iris level adjustment within 30 seconds after pressing the focus adjustment button. (It cannot be adjusted correctly as the electronic shutter mode is activated.)
- Before adjusting the iris level, set the [AGC] switch of selection switch ③ to “OFF”. If turning too much to L side when not set to “OFF”, AGC feature will activate causing the sensitivity increases and the picture quality may appear grainy.
Adjusting the video image (continued)
TK-C215VP12U/E
- 2 types of angle of view may be selected for TK-C215VP12U/E. In general, set in a way such that the home position shoots a wide range and the alarm position a narrow range.
- Use the alarm input mode selection switch to set the actions when there is an alarm input. (Pg. 15)
●Registering home position
For registering the angle of view during monitoring under normal conditions.
![4. 2.,3. 1. 1. POSITION SELECT WID ZOOM/FOCUS FAR TELE L H LEVEL [MEMORY] NBAR ALARM POSITION R B + - LIPASE RESET[SPOT]](/content/2026/06/1279659/images/461760c373cfaf4455ead663034d24dca1b1df69e7917018cfb86eb67a283964.jpg)
1. Check that the [ALARM POSITION] indicator light is turned off.
Registration of home position is enabled. Press the [POSITION SELECT] button if the [ALARM POSITION] indicator light is on.
2. Adjust the angle of view.
①Adjust the field angle
Move the zoom adjustment switch in the [TELE] or [WIDE] direction to adjust the field angle.
②Adjust the focus
Move the focus adjustment switch in the [NEAR] or [FAR] direction to adjust the focus.
Note:
When the [ZOOM / FOCUS] switch is set to either [TELE / WIDE] or [NEAR / FAR], the iris will automatically open up for about 30 seconds and focus can be easily adjusted. During this interval, the electronic shutter mode is activated and the image may flicker. However, this is not a malfunction.
3. Press the [MEMORY] button for 2 seconds or longer.
The [ALARM POSITION] indicator light blinks 3 times (green).
4. Adjust the brightness.
This adjustment only needs to be made when required. Use this to accommodate particular shooting conditions.
To darken image: Counterclockwise (L side).
To brighten image: Clockwise (H side).
Note:
- For adjusting the brightness, do not conduct it within 30 seconds after pressing the [ZOOM / FOCUS] button.
- When adjusting the iris level, set the AGC switch to "OFF". Otherwise, when the level is turned too far toward L, the AGC function activates increasing sensitivity and the picture may look uneven.

Home position registration is completed.
● Registering alarm position
For registering the angle of view during monitoring when there is an alarm input.

1. Check that the [ALARM POSITION] indicator light is turned on.
Registration of alarm position is enabled.
- Press the [POSITION SELECT] button if the [ALARM POSITION] indicator light is off.
2. Adjust the image size. (Pg. 28)
3. Press the [MEMORY] button for 2 seconds or longer.
The [ALARM POSITION] indicator light blinks 3 times (green).
![JVC TK-C215VP4E - Press the [MEMORY] button for 2 seconds or longer. - 1](/content/2026/06/1279659/images/61f1752fdeb460c746317b1bfa441d745e7e03b2e015472053175c7c0f65d11c.jpg)
ALARM position registration is completed.
4. Adjust the brightness. (Pg. 28)
5. Press the [POSITION SELECT] button.
The camera returns to the home position.
Note:
- Be sure to return the camera to the home position after registration of the alarm position is completed. In addition to pressing the [POSITION SELECT] button, you can also use the power ON/OFF button to return the camera to the home position.
- To check images at the registered home position or alarm position, press the [POSITION SELECT] button. Press this button to switch between the image at the home and alarm positions.
Mounting the inner dome
After setting is complete, mount the inner dome to the camera.
1. Mounting the inner dome
Mount the inner dome to the 3 clips.

*TK-C215VP4 is used in the above illustration
Note:
- Mount the inner dome such that it does not cover the lens.
- When mounting the inner dome, make sure not to move the position of the lens. Doing so may cause the preset angle of view to go out of alignment.
Mounting the dome cover
1. Cleaning the dome cover
Before mounting, remove any dust or dirt from the dome cover.
Memo:
- Dirt that is not removed from the cover before mounting may appear on the camera's image.
Memo:
- Do not apply excessive force to the dome cover such as stretching it.
2. Mounting the dome cover to the base
Mount the dome cover by aligning the 3 position marks on the base with the dome cover.
3. Fastening the dome cover
Fasten by tightening the 3 fastening screws of the dome cover using the wrench supplied.

*TK-C215VP4 is used in the above illustration
Note:
●Make sure that the dome cover is firmly fastened.
Otherwise, the humidity level may rise, which may result in fogging and even falling of the cover.
- Ensure that the fall prevention wire of the dome cover is not caught in the space between the dome cover and base. Failing to do so may cause the dust-proof and water-proof features to malfunction.

Mounting the camera using the electrical box
Mounting the base to the electrical box.
- Setting the switches (Pg. 20)
- Removing the camera unit from the base (Pg. 21)
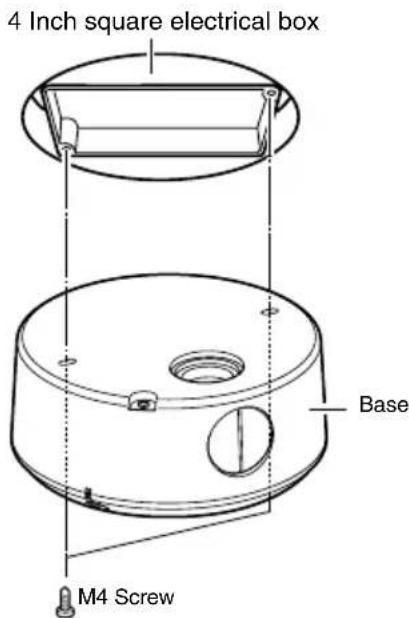
- Mounting the base to the electrical box Mount the base to the electrical box by using the 2 mounting holes and 2 M4 screws.
Memo:
●M4 screws are not supplied with this product.
- The following procedures are the same as normal mounting.
● Cable Connection (Pg. 22) ● Mounting the camera unit to the base (Pg. 23) - Adjusting Images (Pg. 25) ● Mounting the inner dome (Pg. 30) - Mounting the dome cover (Pg. 30)
Mounting the camera using the pipe
Use the piping hole to mount the camera.
Mounting the camera using the piping hole at the bottom surface of the base
- Setting the switches (Pg. 20)
- Removing the camera unit from the base. (Pg. 21, step 1)
- Mount the fall prevention wire to the base (Pg. 21)
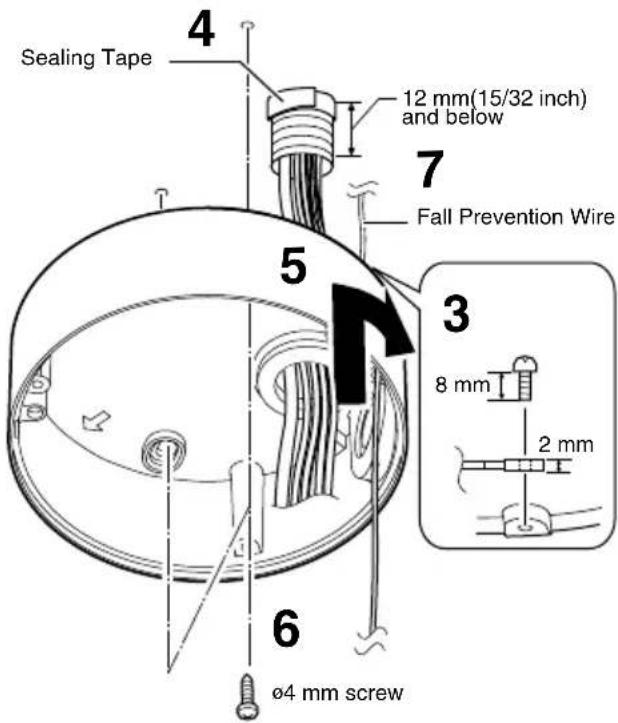
- Binding the sealing tape
Bind at least 2 layers of the sealing tape to the joint of the pipe (point where the thread of the piping hole coincides with the screw hole of the pipe).
- Mounting the base to the pipe
Screw the base into the pipe by turning the base in the clockwise direction. (Piping hole: G3/4-14 UNC)
Note:
- When screwing in the pipe, make sure that not more than 12 mm (15/32 inch) of the pipe is being screwed in. Failure to do so may damage the internal components of this unit.
6. Fastening the base to the ceiling
Fasten the base to the ceiling firmly using 2øM4 mm screws.
Note:
- 04 mm screws are not supplied with this product. Use appropriate type of screw according to the material of the mounting place.
- Check to ensure that there is no space between the ceiling and base.
- Mounting the fall prevention wire to a firm place (Pg. 21)
8. The following procedures are same as normal mounting
• Cable Connection (Pg. 22) ●Mounting the camera unit to the base (Pg. 23) - Adjusting Images (Pg. 25) - Mounting the inner dome (Pg. 30) - Mounting the dome cover (Pg. 30)
Mounting the camera using the piping hole at the side surface of the base
If the camera cannot be mounted directly to the ceiling, mount it to the pipe using the piping hole at the side surface of the base.
- Setting the switches (Pg. 20)
- Dismantle the camera unit from the base and mount the fall prevention wire (Pg. 21)(Pg. 9)
- Binding the sealing tape
Bind at least 2 layers of the sealing tape to the joint of the pipe (point where the thread of the piping hole coincides with the screw hole of the pipe).

- Removing the plug for the piping hole of the base
Loosen the mounting screw (M3 x 6 mm) using a slotted screwdriver and pull out the plug at the side of the base.
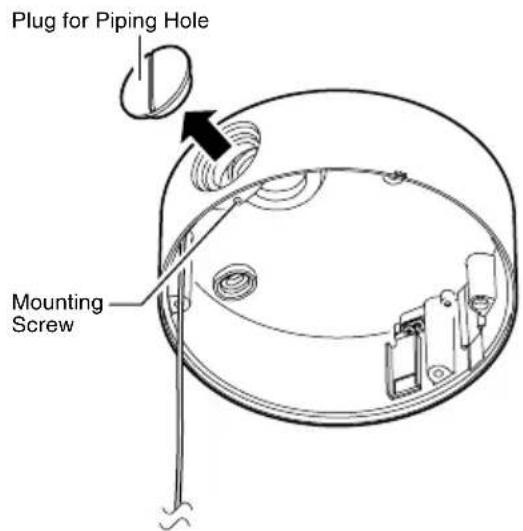
- Mounting the removed plug for the piping hole to the piping hole at the bottom surface of the base
- Mounting the base to the pipe
Screw the pipe into the piping hole at the side of the base.
(Piping hole: G3/4-14 UNC)
Note:
- When screwing in the pipe, make sure that not more than 12 mm (15/32 inch) of the pipe is being screwed in. Failure to do so may damage the internal components of this unit.

- The following procedures are the same as normal mounting.
- Cable Connection (Pg. 22)
- Mounting the camera unit to the base (Pg. 23)
- Adjusting Images (Pg. 25)
- Mounting the inner dome (Pg. 30)
- Mounting the dome cover (Pg. 30)
White-spot correction
As a general characteristic unique to CCDs, white-spots may appear on the screen with age. In order to reduce this phenomenon, this unit is equipped with a white-spot correction feature. Switch on the camera power supply and wait for at least 30 minutes.
TK-C215VP4U/E![RESET [SPOT] [C] [SPOT] button. LL PHASE 1 O 2 N 3 4 5 WHT. 6 BAL 7 8. Function selection switch 8.](/content/2026/06/1279659/images/963229984ab99c99fe1de01abf53447a8f522ea090a5afc17fe7b7e3371cb474.jpg)
TK-C215VP12U/E![ZOOM/FOCUS FAR WIDE POSITION SELECT IRIS LEVEL H L TELE NEAR [MEMORY] ALARM POSITION 4 3 R B I + RESET/[SPOT] LIP [SPOT] button. Function selection switch 8.](/content/2026/06/1279659/images/5cae6e33b8a31badd18bfda1ccd8f8d3231e44b4cb91108e32902e63df0f4bf0.jpg)
- Remove the dome cover.
- Cover the lens surface using a black sheet of paper, etc. so that light does not enter the lens.
- Set the function selection switch 8 to [SPOT]. (Pg. 13)
- Press and hold the SPOT CORRECTION button for more than 2 seconds.
●White-spot correction will start. Correction may take several seconds for completion.
Memo:
●Maximum correction: 32 ●The white-spot correction feature of this unit does not guarantee the correction of all white spots. - Depending on the characteristic of white spots, correction may not be possible. - When performing white-spot correction, accurate data may not be achieved in case of highly detailed pixels since correction is made using the information of surrounding pixels. ●The result of white-spot correction is maintained until the next correction is performed.
Specifications
Camera
Signal system:
U type: Based on NTSC standard
E type: Based on PAL standard
Scanning frequencies
U type: 15.734 kHz (Horizontal), 59.94 Hz (Vertical)
E type: 15.625 kHz (Horizontal), 50 Hz (Vertical)
Image device: 1/4" IT CCD
Effective picture elements:
U type: 380,000 pixels, 768 (H) x 494 (V)
E type: 440,000 pixels, 752 (H) x 582 (V)
Sync system
: Line lock/Internal
Video S/N:
: 50 dB (AGC OFF, white 50 % output)
Horizontal resolution:
: 540 TV lines (Center, Typ.)
Minimum illumination: (Typical)
TK-C215VP4U
Color mode: 2.5 lx (Standard, AGC ON, 50 IRE, WIDE end) 0.8 lx (Standard, AGC ON, 25 IRE, WIDE end)
Black and White mode
1.4 lx (Standard, AGC ON, 50 IRE, WIDE end) 0.4 lx (Standard, AGC ON, 25 IRE, WIDE end)
TK-C215VP12U
Color mode: 3.5 lx (Standard, AGC ON, 50 IRE, WIDE end) 1.1 lx (Standard, AGC ON, 25 IRE, WIDE end)
Black and White mode
2.0 lx (Standard, AGC ON, 50 IRE, WIDE end) 0.6 lx (Standard, AGC ON, 25 IRE, WIDE end)
TK-C215VP4E
Color mode: 2.9 lx (Standard, AGC ON, 50 IRE, WIDE end) 0.9 lx (Standard, AGC ON, 25 IRE, WIDE end)
Black and White mode
1.7 lx (Standard, AGC ON, 50 IRE, WIDE end) 0.6 lx (Standard, AGC ON, 25 IRE, WIDE end)
TK-C215VP12E
Color mode: 4.2 lx (Standard, AGC ON, 50 IRE, WIDE end) 1.3 lx (Standard, AGC ON, 25 IRE, WIDE end)
Black and White mode
: 2.4 lx (Standard, AGC ON, 50 IRE, WIDE end) 0.8 lx (Standard, AGC ON, 25 IRE, WIDE end)
White balance
: ATW/Manual (Switchable) Color temperature range 2,300 K to 10,000 K
Backlight compensation
: ON/OFF (Switchable)
Easy DAY & NIGHT
: ON/OFF (Switchable)
Lens
Focal length
TK-C215VP4U/E : 2.8 mm to 10 mm (variable)
TK-C215VP12U/E : 3.8 mm to 45.6 mm (variable)
Zoom ratio
TK-C215VP4U/E : Approx. 3.6
TK-C215VP12U/E : Approx. 12
Maximum aperture
TK-C215VP4U/E : F1.3 (f = 2.8 mm) to F3.0 (f = 10 mm)
TK-C215VP12U/E : F1.6 (f = 3.8 mm) to F2.7 (f = 45.6 mm)
Angle adjustment range
Pan: ±175°
Rotation: ±175°
Tilt: ±70°
Angle of vision
TK-C215VP4U/E: f = 2.8 mm
73° (H) × 54° (V)
f = 10 mm
20° (H) × 15° (V)
TK-C215VP12U/E: f = 3.8 mm
52° (H) × 39° (V)
f = 10 mm
4.5°(H)× 3.4°(V)
General
Power supply
U type: AC 24 V 60 Hz
DC 12 V
E type: AC 24 V ~ 50 Hz/60 Hz
DC 12 V =
Power consumption
TK-C215VP4
U type: 4.2 W
: 23 W (When using KA-ZH215)
E type: 340 mA
: 1 A (When using KA-ZH215)
TK-C215VP12
U type: 6.6 W
: 24 W (When using KA-ZH215)
E type : 550 mA
: 1 A (When using KA-ZH215)
Ambient temperature
:-10 °C to 50 °C
(14 °F to 122 °F) (Operation)
: 0 °C to 40 °C
(32 °F to 104 °F) (Recommended)
When using KA-ZH215
:-30 °C to 50 °C
(-22 °F to 122 °F) (Operation)
:-20 °C to 40 °C
(-4 °F to 104 °F) (Recommended)
Dustproof/Waterproof
: IP66
Mass
TK-C215VP4: Approx. 1250 g
TK-C215VP12: Approx. 1310 g
Accessories
U type:
Instructions 1
Installation Precautions 1
Warranty Card 1
Service Information Card.... 1
Silica gel 1
Wrench 1
Template 1
E type:
Instructions 1
Installation Precautions 1
Silica Gel 1
Wrench 1
Template 1
Specifications (continued)
■ Dimensional Outline Drawing
[Unit: mm (inch)]
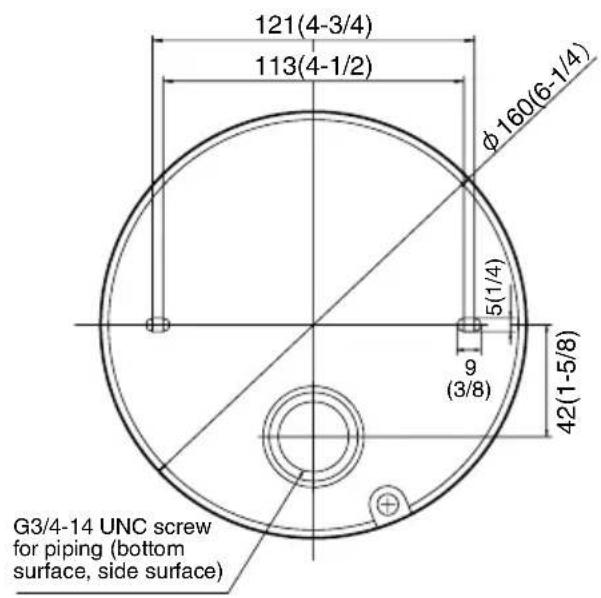

* Specifications and appearance of this unit and related products are subject to change for product improvement without prior notice.

Focus chart
JVC


- FOR CUSTOMER USE
- THESE ARE GENERAL IMPORTANT SAFEGUARDS AND CERTAIN ITEMS MAY NOT APPLY TO ALL APPLIANCES
- IMPORTANT SAFEGUARDS
- SAFETY PRECAUTIONS
- FOR USA AND CANADA
- CAUTION
- INFORMATION (FOR CANADA) RENSEIGNEMENT (POUR CANADA)
- AVERTISSEMENT
- INFORMATION FOR USA
- INFORMATION
- SAFETY PRECAUTIONS (CONTINUED)
- ATTENTION
- INFORMATION FOR USERS ON DISPOSAL OF OLD EQUIPMENT
- [EUROPEAN UNION]
- (BUSINESS USERS)
- [OTHER COUNTRIES OUTSIDE THE EUROPEAN UNION]
- DEAR CUSTOMER
- CHARACTERISTICS
- EXCELLENT DUST-PROOF AND WATER-PROOF PERFORMANCE
- REALIZING A HIGH PICTURE QUALITY
- ENLARGED SHOOTING RANGE
- NON CAMERA-LIKE DESIGN
- HIGH MAGNIFICATION VARIFOCAL/ZOOM LENS
- ALARM ZOOM FEATURE
- (TK-C215VP12U/E ONLY)
- EASY DAY & NIGHT FEATURE
- HOW TO USE THIS MANUAL
- CHARACTERS AND SYMBOLS USED IN THIS MANUAL
- TABLE OF CONTENTS
- INTRODUCTION
- INSTALLATION AND CONNECTION
- OTHERS
- PRECAUTIONS FOR PROPER USE OF THIS PRODUCT
- STORAGE AND LOCATION OF USE
- PRECAUTIONS FOR PROPER USE OF THIS PRODUCT (CONTINUED)
- MAINTENANCE
- ENERGY CONSERVATION
- NOTE ON CONSUMABLE PARTS (TK-C215VP12U/E ONLY)
- NAME OF PARTS
- CAMERA
- ① MOUNTING HOLE ×
- NOTE
- ②HOLE FOR CONNECTING CABLE AND PIPING
- ③MOUNTING SCREW FOR FALL PREVENTION WIRE
- ④ DOME COVER
- ⑤ INNER DOME
- ⑥ PLUG FOR PIPING HOLE AND PIPING HOLE (SIDE)
- NAME OF PARTS (CONTINUED)
- CAMERA (CONTINUED)
- ⑦ BASE
- ⑧ FASTENING SCREW FOR DOME COVER
- ⑨AC 24 V/DC 12 V POWER SUPPLY WIRE
- ALARM SIGNAL CABLE
- ⑪PROTECTION COVER
- ⑫VIDEO SIGNAL OUTPUT CONNECTOR (BNC)
- MEMO
- SETTING THE SWITCHES AND THE LENS (TK-C215VP4U/E)
- ①[RESET/SPOT] RESET/SPOT BUTTON
- ②[R/B,+/-] R/B,+/- ADJUSTMENT BUTTON
- ③FUNCTION SELECTION SWITCHES
- [AGC] AUTO-GAIN CONTROL SWITCH
- [SELECT] WHT.BAL./PHASE SETTING SWITCH
- WHT.BAL
- PHASE
- [SYNC] SYNCHRONIZATION SYSTEM SELECTION SWITCH
- INT
- LL (LINE LOCK)
- [WHT.BAL.] ATW/MANUAL SELECTION SWITCH
- [BLC] BACKLIGHT COMPENSATION SWITCH
- [DAY/NIGHT] EASY DAY & NIGHT SWITCH
- [RESERVED]
- [RESET/SPOT] RESET/SPOT CORRECTION SELECTION SWITCH
- RESET
- SPOT
- ④[IRIS LEVEL] IRIS LEVEL ADJUSTMENT
- ⑤ [FOCUS ADJUST] FOCUS ADJUSTMENT BUTTON
- ⑥ FOCUS ADJUSTMENT RING
- ⑦ ZOOM ADJUSTMENT RING
- SETTING THE SWITCHES AND THE LENS (TK-C215VP12U/E)
- ① [IRIS LEVEL] IRIS LEVEL ADJUSTMENT
- ⑦FUNCTION SELECTION SWITCHES
- [ALARM] ALARM INPUT MODE SELECTION SWITCH
- TRIGGER
- STATE
- SYSTEM EXAMPLE
- ABOUT CONNECTION CABLES
- VIDEO SIGNAL CABLES
- DC 12 V OR AC 24 V POWER SUPPLY CABLE
- ABOUT CONNECTION CABLES (CONTINUED)
- ELECTRICAL SPECIFICATIONS OF ALARM INPUT TERMINALS
- ◆ POLARITY OF ALARM SIGNALS
- THE CORRECT SEQUENCE TO CONNECT AND SET THE CAMERA
- SETTING THE SWITCHES
- REMOVING THE DOME COVER
- REMOVING THE INNER DOME
- MOUNTING THE BASE
- SETUP
- REMOVING THE CAMERA UNIT FROM THE BASE
- MOUNTING THE FALL PREVENTION WIRE TO THE BASE (FALL PREVENTION WIRE IS NOT SUPPLIED)
- MOUNTING THE FALL PREVENTION WIRE TO A FIRM PLACE
- CABLE CONNECTION
- CONNECTING THE COAXIAL CABLE (PG. 17)
- CONNECTING THE AC 24 V/DC 12 V POWER SUPPLY WIRES
- CONNECT THE ALARM CABLE
- BINDING THE AC 24 V/DC 12 V POWER SUPPLY WIRES AND ALARM SIGNAL WIRES (TK-C215VP12U/E ONLY) WITH INSULATING TAPE
- WRAP INSULATION TAPE AROUND CABLES
- STORING CABLES
- MOUNTING THE CAMERA UNIT
- FILL THE HOLE WITH SEALING MATERIAL
- MOUNTING THE CAMERA UNIT TO THE BASE
- FASTENING THE 2 FASTENING SCREWS OF THE CAMERA UNIT
- MOUNTING THE CAMERA UNIT (CONTINUED)
- INSERTING THE SILICA GEL SUPPLIED
- ADJUSTING THE VIDEO IMAGE
- MOUNTING THE TEST MONITOR
- ADJUSTING THE SHOOTING DIRECTION OF THE CAMERA
- ADJUSTING THE VIDEO IMAGE (CONTINUED)
- ADJUSTING THE ANGLE OF VIEW, FOCUS AND BRIGHTNESS
- ADJUSTING THE ANGLE OF VIEW
- ADJUSTING THE FOCUS
- ADJUSTING THE BRIGHTNESS
- TK-C215VP12U/E
- ●REGISTERING HOME POSITION
- CHECK THAT THE [ALARM POSITION] INDICATOR LIGHT IS TURNED OFF
- ADJUST THE ANGLE OF VIEW
- ①ADJUST THE FIELD ANGLE
- ②ADJUST THE FOCUS
- PRESS THE [MEMORY] BUTTON FOR 2 SECONDS OR LONGER
- ADJUST THE BRIGHTNESS
- ● REGISTERING ALARM POSITION
- CHECK THAT THE [ALARM POSITION] INDICATOR LIGHT IS TURNED ON
- ADJUST THE IMAGE SIZE. (PG. 28)
- ALARM POSITION REGISTRATION IS COMPLETED
- ADJUST THE BRIGHTNESS. (PG. 28)
- PRESS THE [POSITION SELECT] BUTTON
- MOUNTING THE INNER DOME
- MOUNTING THE DOME COVER
- CLEANING THE DOME COVER
- MOUNTING THE DOME COVER TO THE BASE
- FASTENING THE DOME COVER
- MOUNTING THE CAMERA USING THE ELECTRICAL BOX
- MOUNTING THE CAMERA USING THE PIPE
- MOUNTING THE CAMERA USING THE PIPING HOLE AT THE BOTTOM SURFACE OF THE BASE
- THE FOLLOWING PROCEDURES ARE SAME AS NORMAL MOUNTING
- MOUNTING THE CAMERA USING THE PIPING HOLE AT THE SIDE SURFACE OF THE BASE
- WHITE-SPOT CORRECTION
- SPECIFICATIONS
- SIGNAL SYSTEM
- SCANNING FREQUENCIES
- IMAGE DEVICE: 1/4" IT CCD
- EFFECTIVE PICTURE ELEMENTS
- SYNC SYSTEM
- VIDEO S/N
- HORIZONTAL RESOLUTION
- MINIMUM ILLUMINATION: (TYPICAL)
- TK-C215VP4U
- TK-C215VP12U
- TK-C215VP4E
- TK-C215VP12E
- WHITE BALANCE
- BACKLIGHT COMPENSATION
- EASY DAY & NIGHT
- LENS
- FOCAL LENGTH
- ZOOM RATIO
- MAXIMUM APERTURE
- ANGLE ADJUSTMENT RANGE
- ANGLE OF VISION
- GENERAL
- POWER SUPPLY
- POWER CONSUMPTION
- AMBIENT TEMPERATURE
- DUSTPROOF/WATERPROOF
- MASS
- ACCESSORIES
- SPECIFICATIONS (CONTINUED)
- DIMENSIONAL OUTLINE DRAWING
- JVC
Brand : JVC
Model : TK-C215VP4E
Category : Surveillance Camera