
EasyClean FC8733 - Vacuum Cleaner PHILIPS - Free user manual and instructions
Find the device manual for free EasyClean FC8733 PHILIPS in PDF.


| Product Type | Bagless Cylinder Vacuum Cleaner |
| Model | Philips EasyClean FC8733 |
| Dimensions (L x W x H) | 400 x 250 x 200 mm |
| Weight | 4.5 kg |
| Power Supply | Mains powered, 220-240V, 50-60Hz |
| Power Consumption | 1800 W |
| Cord Length | 6 m |
| Dust Capacity | 1.5 L |
| Filtration System | HEPA 13 washable filter |
| Suction Control | Electronic suction control on handle |
| Floor Nozzle | TriActive+ all-floor nozzle |
| Accessories Included | Crevice tool, small brush, upholstery nozzle |
| Noise Level | 78 dB(A) |
| Operating Radius | 9 m (cord + hose) |
| Dust Container Emptying | One-touch hygienic emptying |
| Filter Maintenance | Washable HEPA filter, clean every 3 months |
| Exhaust Filter | Washable exhaust filter |
| Tube Material | Metal telescopic tube |
| Parking Mode | Horizontal and vertical parking |
| Safety Features | Thermal overload protection, automatic cord rewind |
| Repairability | Spare parts available: filters, nozzle, hose, tube |
| Warranty | 2 years manufacturer warranty |
| Energy Class | A (per EU regulation) |
Frequently Asked Questions - EasyClean FC8733 PHILIPS
User questions about EasyClean FC8733 PHILIPS
0 question about this device. Answer the ones you know or ask your own.
Ask a new question about this device
Download the instructions for your Vacuum Cleaner in PDF format for free! Find your manual EasyClean FC8733 - PHILIPS and take your electronic device back in hand. On this page are published all the documents necessary for the use of your device. EasyClean FC8733 by PHILIPS.
USER MANUAL EasyClean FC8733 PHILIPS

ENGLISH 6
BULGARIAN 21
CZECH 36
ESTONIAN 51
CROATIAN 67
HUNGARIAN 83
KAZAKH 98
LITHUANIAN 113
LATVIAN 129
POLISH 145
ROMANIAN 160
RUSSIAN 175
SLOVAK 191
SLOVENIAN 206
SERBIAN 222
UKRAINIAN 237
Arabic 264
2774
Introduction
Congratulations on your purchase and welcome to Philips! To fully benefit from the support that Philips offers, register your product at www.philips.com/welcome.
Philips incorporates the latest technologies to create products that are good for the environment in terms of energy consumption as well as material usage. Specific types in this range are partly made of bioplastics and recycled plastics. Parts made of bioplastics are environmentally friendly because they have been derived from renewable biomass sources. Some parts still need to be made of conventional plastics, but for these parts Philips tries to use recycled plastics as much as possible. This production method results in considerably less waste than the traditional method. Moreover, this vacuum cleaner's extremely efficient motor yields high performance at low power consumption.
For more information on this and other environmental efforts of Philips, please visit www.asimpleswitch.com.
General description (Fig. 1)
1 Filter cylinder 2 Filter cylinder case 3 Hose connection opening 4 Dust bucket handle 5 Dust bucket 6 Filter cylinder lock 7 Motor protection filter 8 Suction power knob 9 Top handle 10 On/off button 11 Rear wheel 12 Cleaning brush 13 Hinged dust bucket retainer 14 Cord rewind button 15 Hose connector 16 Hose connector release buttons 17 Hose fastening hook 18 Small brush (specific types only) 19 Small nozzle (specific types only) 20 Crevice tool (specific types only). 21 Standard handgrip (specific types only) 22 Accessory holder (specific types only) 23 Tube release button (specific types only) 24 Accessory holder release levers (specific types only) 25 Crevice tool (specific types only) 26 Accessory holder (specific types only) 27 Small nozzle (specific types only). 28 Brush attachment (specific types only) 29 Ergonomic ComfortControl handgrip (specific types only) 30 Flexible hose connection (specific types only) 31 Hose 32 Combination nozzle (specific types only) 33 Parking ridge 34 Rocker switch
35 Tri-Active nozzle (specific types only) 36 Side brush 37 Accessory clip (specific types only) 38 Telescopic tube (specific types only) 39 Telescopic tube (specific types only) 40 Filter grille 41 Super Clean Air filter (specific types only) 42 Mains plug 43 Parking slot 44 Super Clean Air HEPA filter (specific types only) 45 Swivel wheel 46 Type plate
Important
Read this user manual carefully before you use the appliance and save it for future reference.
Danger
- Never suck up water or any other liquid. Never suck up flammable substances and do not suck up ashes until they are cold.
Warning
- Check if the voltage indicated on the appliance corresponds to the local mains voltage before you connect the appliance.
- Do not use the appliance if the mains cord, the plug or the appliance itself is damaged.
- If the mains cord is damaged, you must have it replaced by Philips, a service centre authorised by Philips or similarly qualified persons in order to avoid a hazard.
- This appliance is not intended for use by persons (including children) with reduced physical, sensory or mental capabilities, or lack of experience and knowledge, unless they have been given supervision or instruction concerning use of the appliance by a person responsible for their safety.
- Children should be supervised to ensure that they do not play with the appliance.
- Do not point the hose, the tube or any other accessory at the eyes or ears nor put it in your mouth when it is connected to the vacuum cleaner and the vacuum cleaner is switched on.
Caution
- Do not suck up large objects as this may cause the air passage in the tube or hose to become obstructed.
- When you use the vacuum cleaner to vacuum ashes, fine sand, lime, cement dust and similar substances, the pores of the filter cylinder become clogged. If you notice a strong decrease in suction power, clean the filter cylinder.
- Never use the appliance if the filter cylinder, filter cylinder case and the dust bucket are not properly installed or if the cover is not closed properly.
- Always unplug the appliance before you empty the dust bucket or clean the filter cylinder.
- Never use the appliance without the motor protection filter. This could damage the motor and shorten the life of the appliance.


- Only use the Philips filter cylinder supplied with the appliance.
- Noise level: Lc= 80 dB(A).
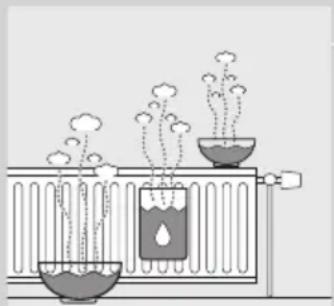
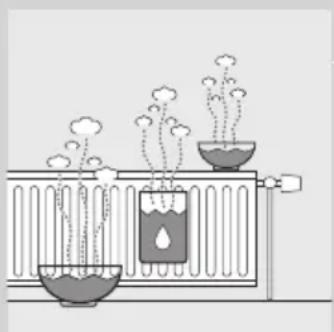
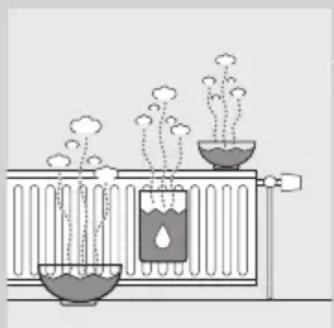
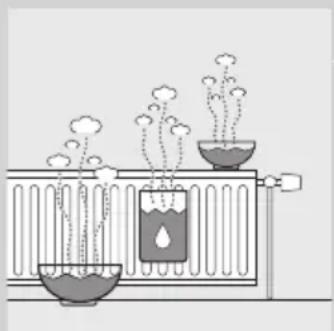
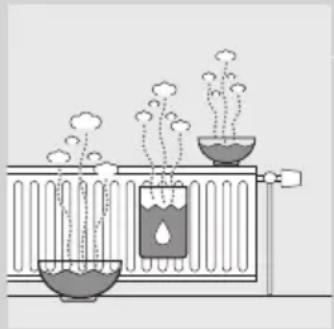
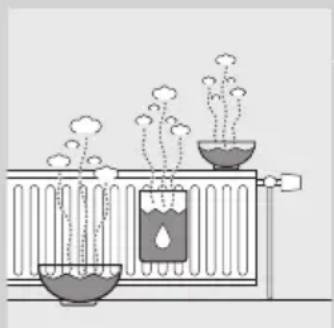
- During vacuum cleaning, especially in rooms with low air humidity, your vacuum cleaner builds up static electricity. As a result, you can experience electric shocks when you touch the tube or other steel parts of your vacuum cleaner. These shocks are not harmful to you and do not damage the appliance. To reduce this inconvenience, we advise you: 1) to discharge the appliance by frequently holding the tube against other metal objects in the room (for example, legs of a table or chair, radiator, etc.); 2) to raise the air humidity level in the room by placing water in the room. For example, you can hang containers filled with water from your radiators or place bowls filled with water on or near your radiators.
Electromagnetic fields (EMF)
This Philips appliance complies with all standards regarding electromagnetic fields (EMF). If handled properly and according to the instructions in this user manual, the appliance is safe to use based on scientific evidence available today.
Preparing for use
Ergonomic advice
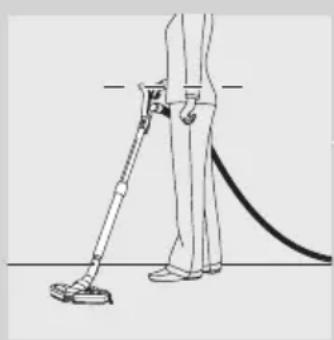
ComfortControl handgrip (specific types only)
- The unique ComfortControl handgrip is ergonomically designed to give you sufficient comfort during vacuum cleaning.
- To gain optimal benefit from this handgrip, it is important that you do not position your second hand on the tube. When you do so, you twist and bend your back, which could result in back problems.
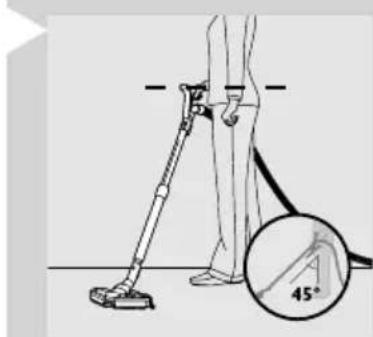
- Our ergonomist advises you to adjust the length of the tube so that the hand holding the standard handgrip is at hip level.
Attaching the ComfortControl handgrip (specific types only)
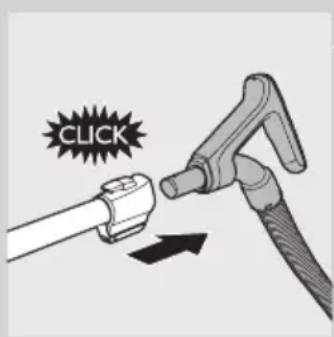
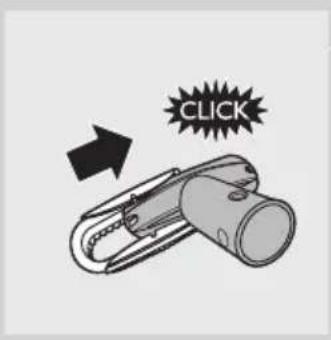
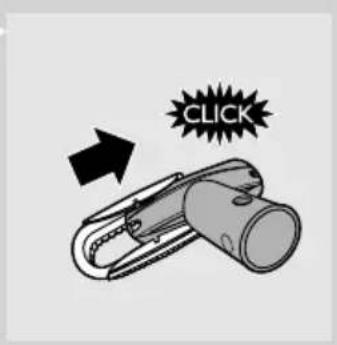
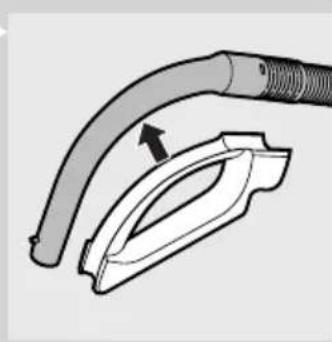
1. Attach the handgrip to the telescopic tube ('click').
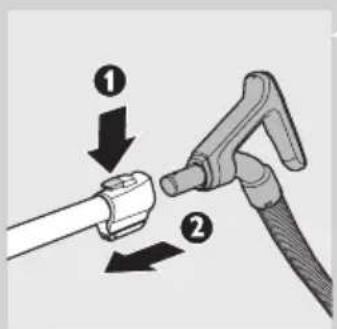
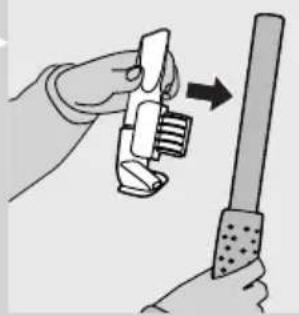
2. To disconnect the handgrip from the tube, hold the handgrip with one hand. With the other hand, hold the telescopic tube and press the tube release button (1) and pull the tube off the handgrip (2).
Attaching the standard handgrip (specific types only)
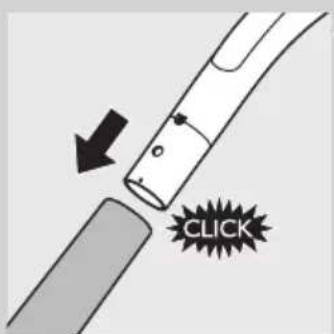
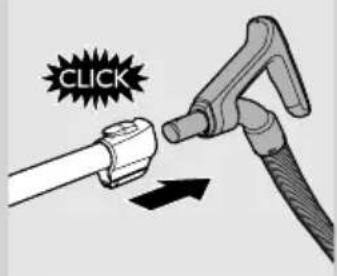
1. To connect the telescopic tube to the handgrip, press the spring-loaded lock button on the handgrip (1) and insert the handgrip into the tube (2). Fit the spring-loaded lock button into the opening in the tube ('click'). 2. To disconnect the tube from the handgrip, press the spring-loaded lock button and pull the handgrip out of the tube.
Note: This vacuum cleaner has been fitted with holes (specific types only) at the end of the handgrip. These holes may prevent objects from getting stuck or damaged when you use your vacuum cleaner without the tube or accessories supplied.
Hose
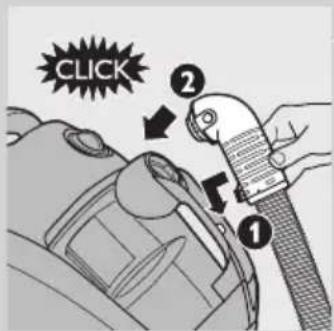
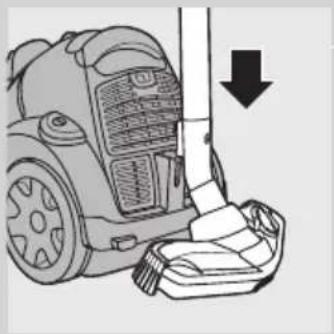
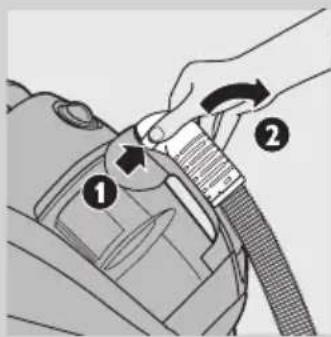
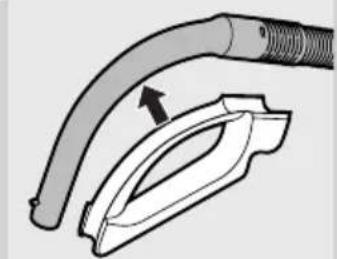
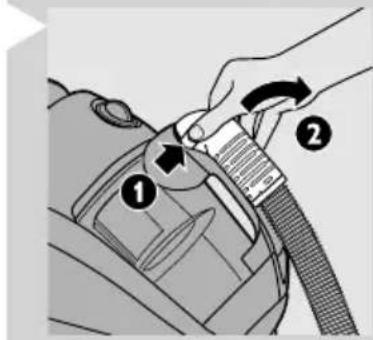
1 To connect the hose, insert the hose fastening hook into the opening (1) and then push the hose connector downwards ('click') (2).
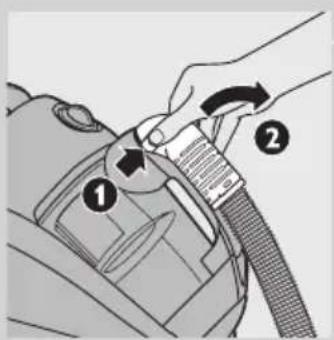
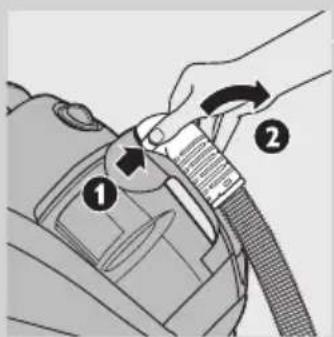
2 To disconnect the hose, press the release buttons (1) and pull the hose connector out of the hose connection opening (2).
Telescopic tube
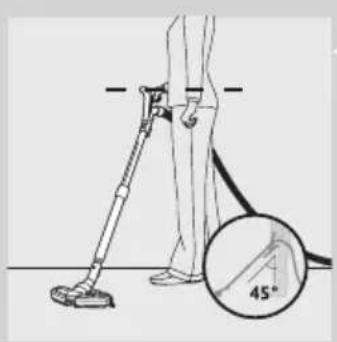
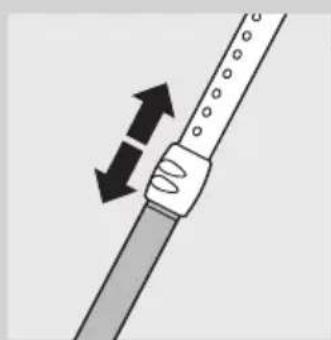
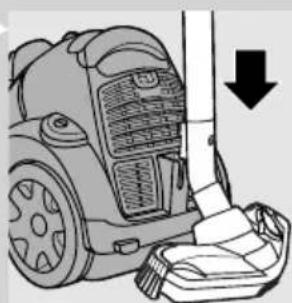
1 Position the nozzle on the floor and hold the tube at an angle of 45° to the floor.

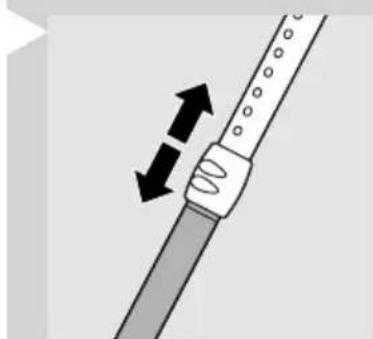
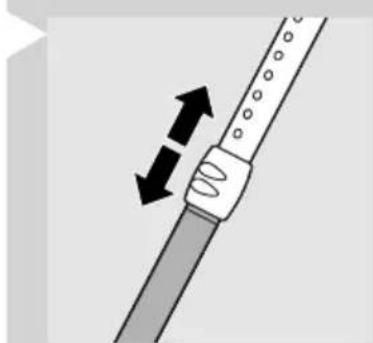
2 Move the tube lock up or down until the handgrip is at hip level.

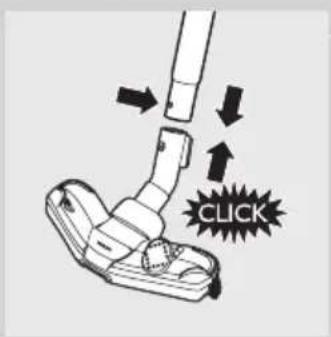
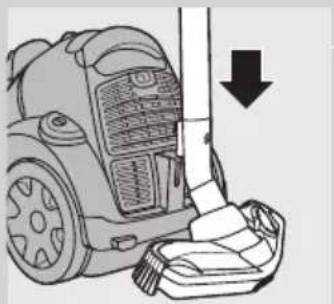
3 To connect the tube to a nozzle, press the spring-loaded lock button on the tube and insert the tube into the nozzle. Fit the spring-loaded lock button into the opening in the nozzle ('click').
- To disconnect the tube from the handgrip, press the spring-loaded lock button and pull the handgrip out of the tube.
Accessory holder (specific types only)

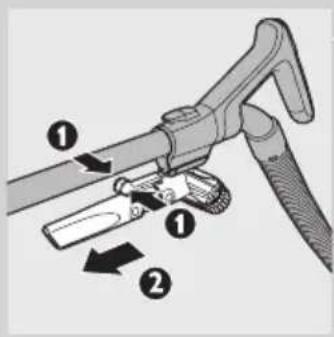
1 Slide the accessory holder with accessories onto the handgrip ('click').
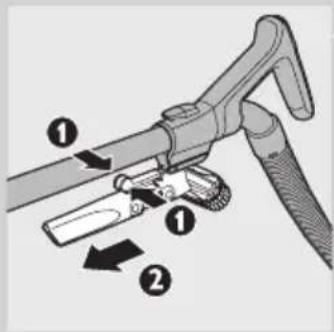
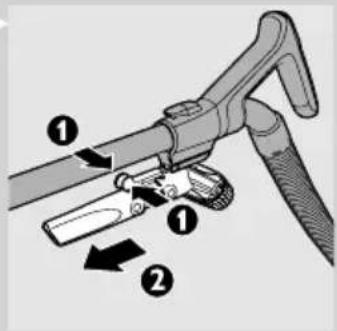
2 To detach the accessory holder, squeeze the release levers together (1) and slide the accessory holder off the handgrip (2).
Accessory clip (specific types only)
The accessory clip can simply be snapped onto the tube.
- You can snap the crevice tool and the small nozzle (specific types only) onto the clip.
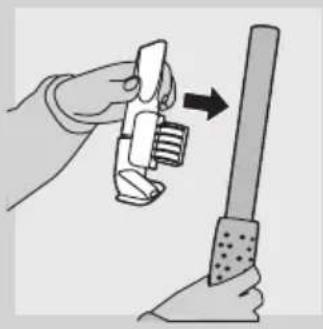
Accessory holder (specific types only)

- The accessory holder can simply be snapped onto the handgrip. You can store accessories in the accessory holder by pushing them into the holder. To detach the accessories, pull them out of the holder. You can store two accessories at a time in the accessory holder:

- Crevice tool and small nozzle. Please note the way in which the small nozzle must be placed in the accessory holder.
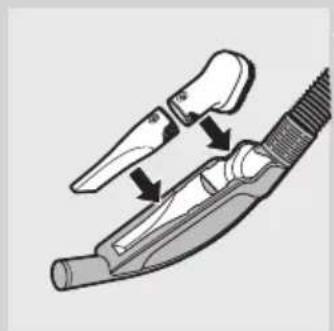
- Crevice tool and small brush.
Crevice tool and small nozzle (specific types only)

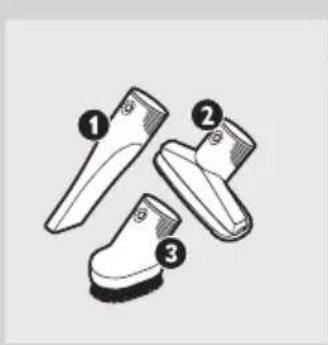
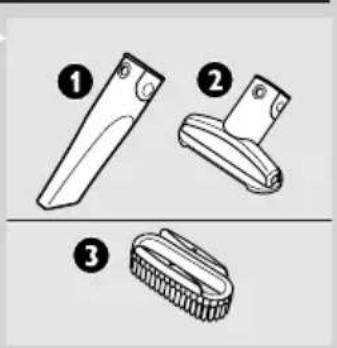
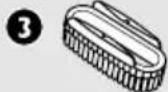
1 Connect the crevice tool (1) or small nozzle (2) with or without brush attachment (3) to the tube or directly to the handgrip.

Brush attachment (specific types only)
1 To assemble the brush attachment, slide it onto the bottom of the small nozzle ('click').
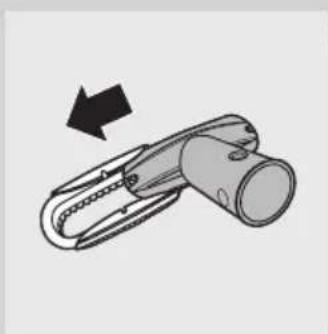
2 To disassemble the brush attachment, slide it off the bottom of the small nozzle.
Crevice tool, small nozzle and small brush (specific types only)
- You can connect the crevice tool (1), the small nozzle (2) or the small brush (3) directly to the handgrip or to the tube.
Tri-Active nozzle (specific types only)
The Tri-Active nozzle is a multi-purpose nozzle for carpets and hard floors.
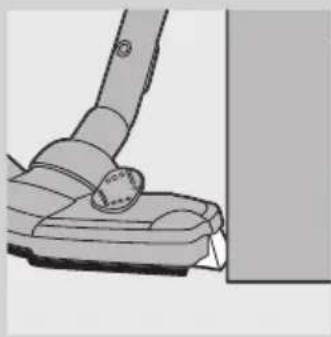
- The side brushes catch more dust and dirt at the sides of the nozzle and allow you to clean better along furniture and other obstacles.
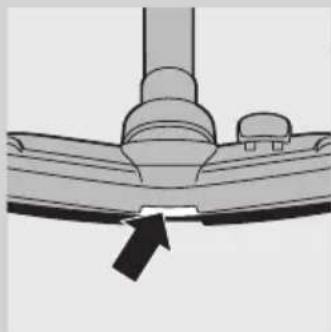
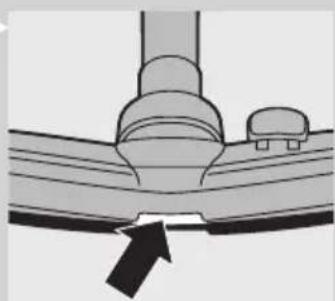
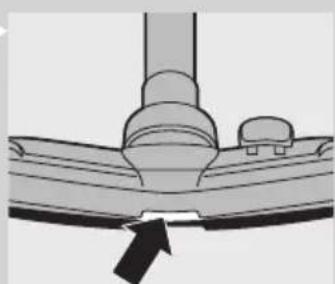
- The opening at the front of the nozzle allows you to suck up larger particles.

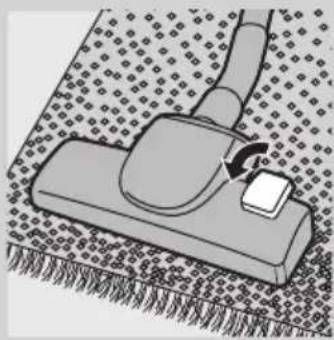
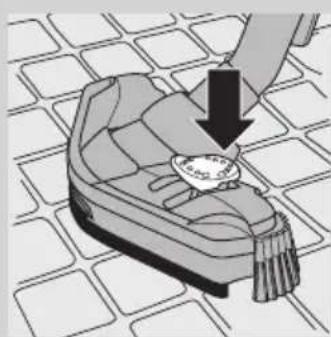
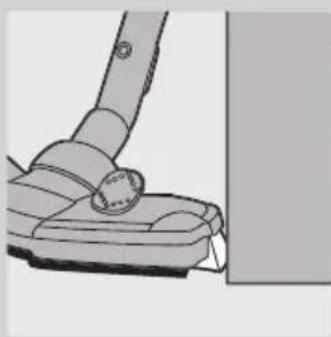
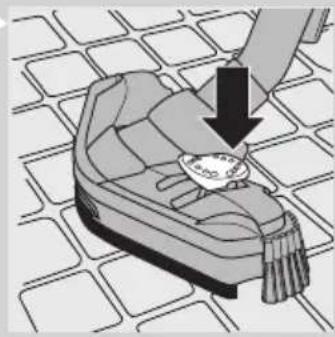
1 Use the hard floor setting to clean hard floors (for instance for tiled, parqueted, laminated and linoleumed flooring): push the rocker switch on top of the nozzle with your foot to make the brush strip come out of the housing. At the same time, the wheel is lifted to prevent scratching and to increase manoeuvrability.
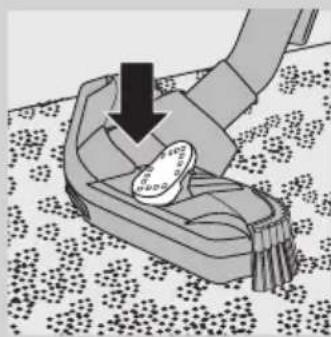
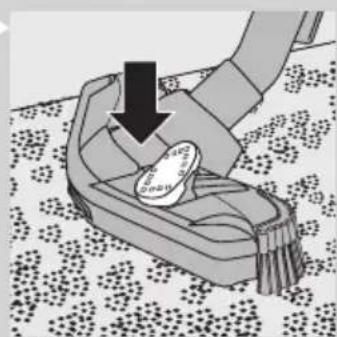
2 Use the carpet setting to clean carpets: push the rocker switch again to make the brush strip disappear into the nozzle housing. The wheel is lowered automatically.
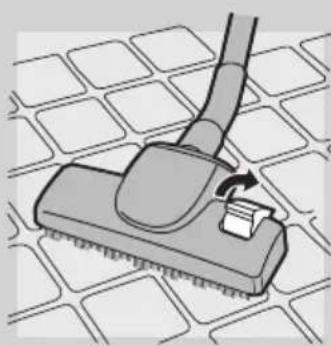
Combination nozzle (specific types only)
You can use the combination nozzle on carpets (with the brush strips folded in) or on hard floors (with the brush strips folded out).
1 To clean hard floors, push the rocker switch on top of the combination nozzle with your foot. The brush strips come out of the nozzle housing.
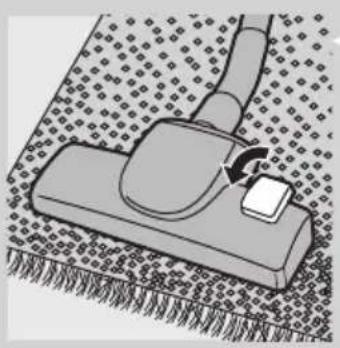
2 To clean carpets, push the rocker switch again to make the brush strips disappear into the nozzle housing again.
Using the appliance
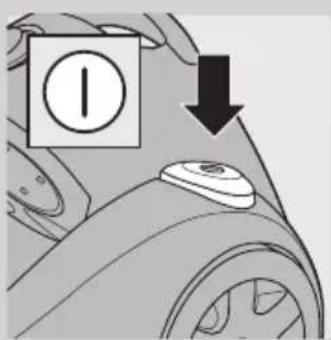
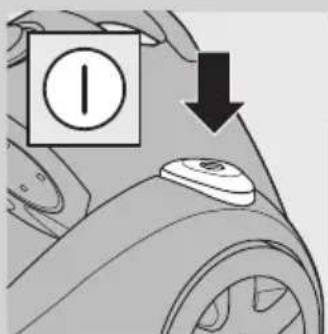
1 Pull the cord out of the appliance and put the mains plug in the wall socket. 2 Press the on/off button to switch on the appliance.

- During vacuuming, you can adjust the suction power with the suction power knob.
- Use maximum suction power to vacuum very dirty carpets and hard floors.
- Use minimum suction power to vacuum curtains, table carpets, etc.

- If you want to pause for a moment, insert the ridge on the nozzle into the parking slot to park the tube in a convenient position.
Cleaning and maintenance
Do not clean any parts of the appliance in the dishwasher.
Always switch off the appliance and unplug it before you remove and clean any parts.
Emptying the dust bucket
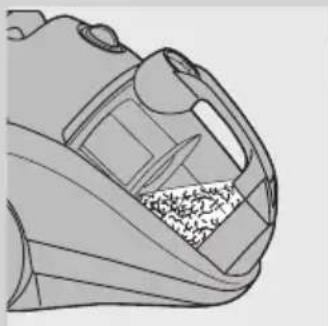
- Empty the dust bucket as soon as the dust level has reached the round disc of the filter cylinder case.
1 Disconnect the hose from the appliance.
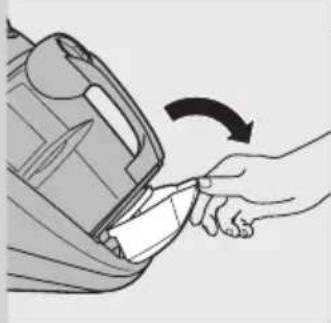
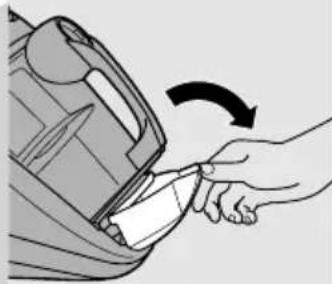
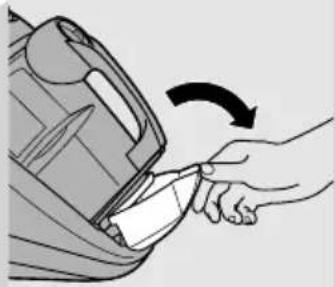
2 Pull the dust bucket retainer downwards to release the dust bucket.

3 Grab the dust bucket handle and lift the dust bucket out of the appliance.
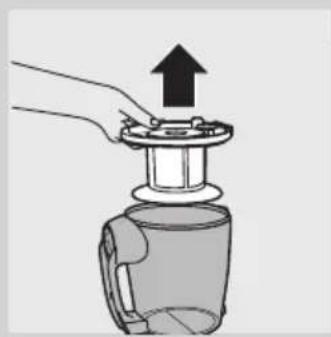
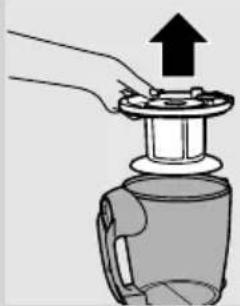
4 Hold the dust bucket over a dustbin and lift the filter cylinder case out of it.

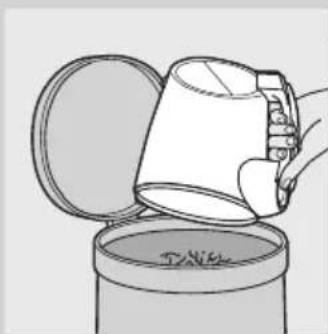
5 Empty the dust bucket into the dustbin.
You can clean the dust bucket with cold tap water and some washing-up liquid.
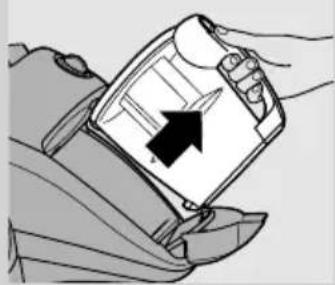
6 Put the filter cylinder case back into the dust bucket and put the bucket back into the appliance.
Make sure you have inserted the filter cylinder into the filter cylinder case, otherwise it is not possible to close the dust bucket retainer.
Cleaning and maintenance of filters
Filter cylinder
Clean the filter cylinder every week.
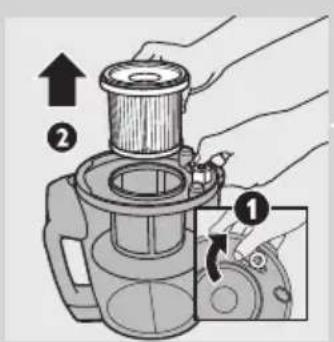
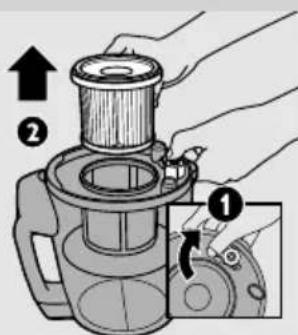
1 Remove the dust bucket from the appliance, unlock the filter cylinder lock (1) and lift the filter cylinder out of the filter cylinder case (2).

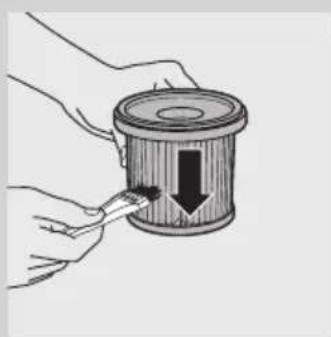
2 Clean the filter cylinder with the brush supplied. Brush from the top of the filter cylinder downwards along the ribs.
Only use the brush supplied! Other brushes may damage the filter cylinder.
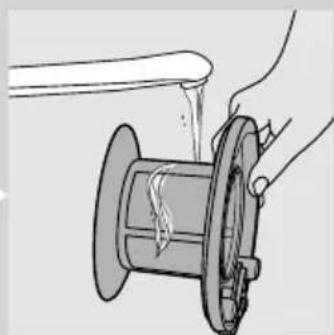
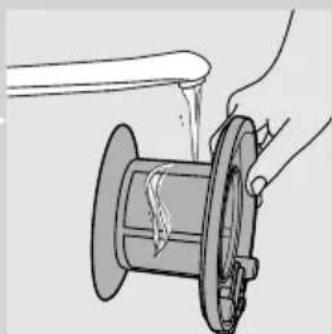
3 If you want to wash the filter cylinder, wash it thoroughly with only water.
Do not use any soap, washing-up liquid or other detergent to clean the filter cylinder. Let the filter cylinder dry completely before you reinsert it into the case.
Filter case
1 Remove the filter cylinder case from the dust bucket. 2 If there is any dirt on the inside of the filter cylinder case, empty the case over a dustbin. 3 If necessary, clean the filter cylinder case with cold tap water and some washing-up liquid. 4 Unlock the filter cylinder lock and put the filter cylinder back into the filter cylinder case. 5 Put the filter cylinder case back into the dust bucket and put the bucket back into the appliance.
Motor protection filter
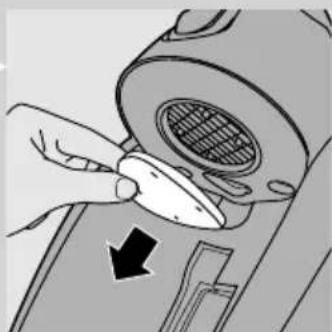
Clean the motor protection filter once a year.
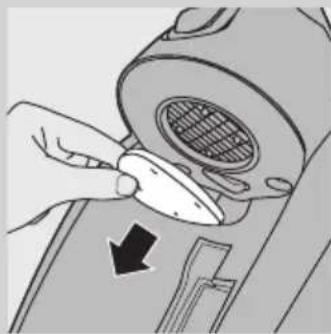
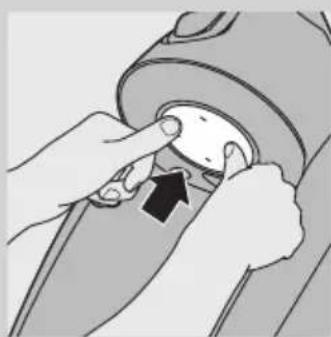
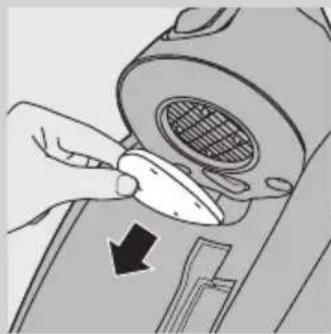
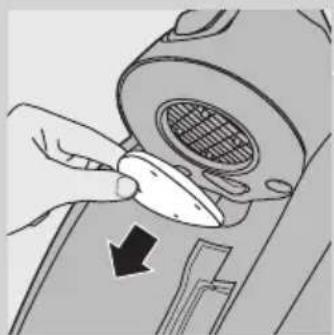
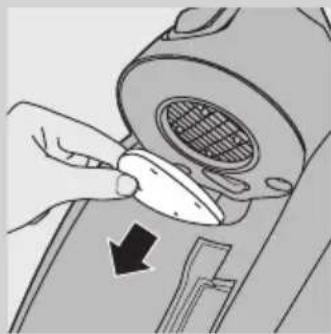
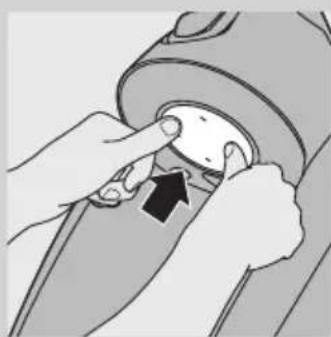
1 Take the motor protection filter out of the appliance. 2 Tap the dust out of the filter over a dustbin.
If the motor protection filter is very dirty, you can also rinse it with cold tap water.
Do not use washing-up liquid or any other cleaning agent to clean the motor protection filter!
Let the filter cylinder dry completely before you reinsert it into the appliance.
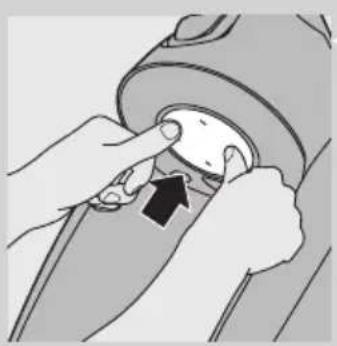
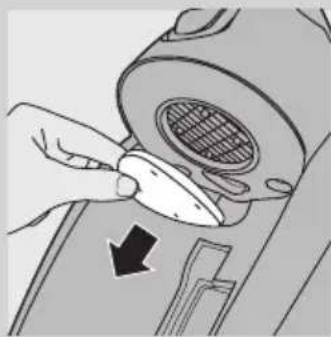
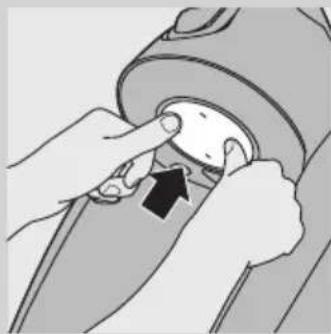
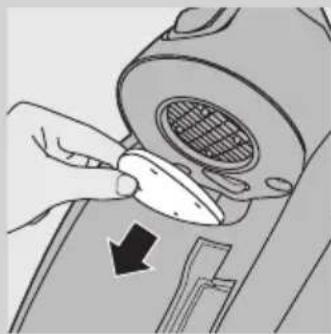
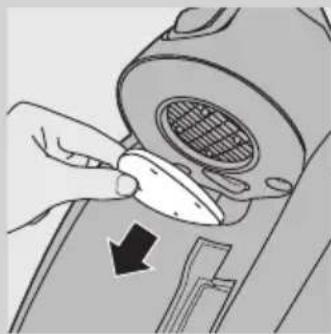
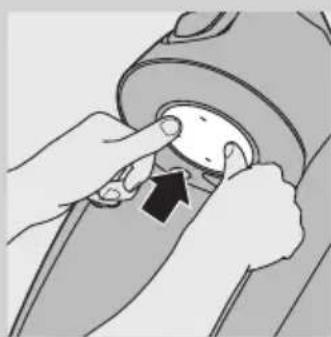
3 Press the clean motor protection filter firmly back into the filter compartment to ensure that it is properly placed.
Super Clean Air filter (specific types only)
The Super Clean Air filter located in the back of the appliance has electrostatically charged fibres. These fibres filter a large part of the smaller particles from the exhaust air.
Replace the Super Clean Air filter every six months.

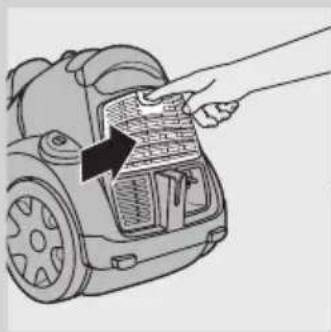
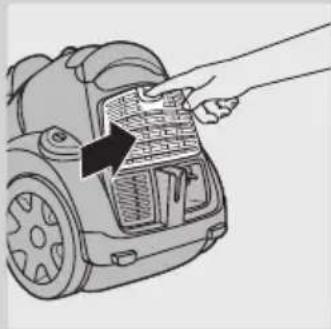
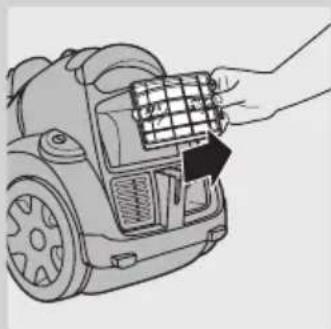
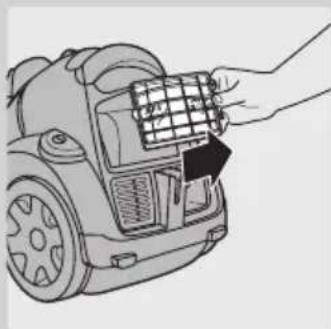
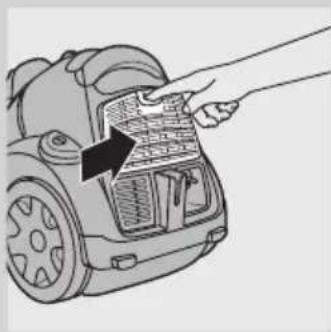
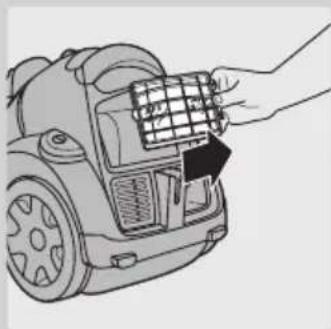
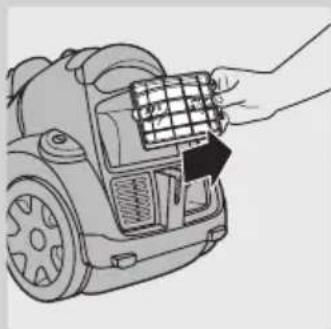
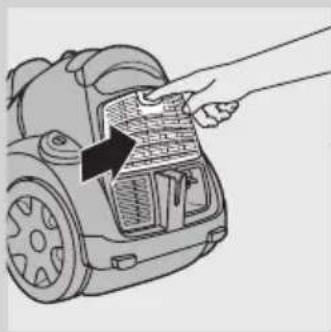
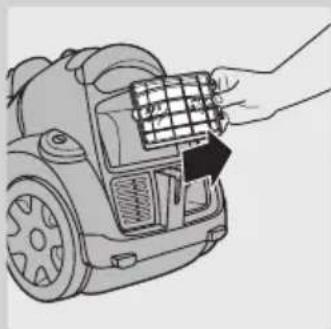
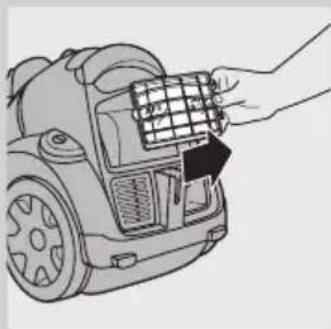
1 Open the filter grille.

2 Remove the filter holder.

3 Open the filter holder and remove the old filter.
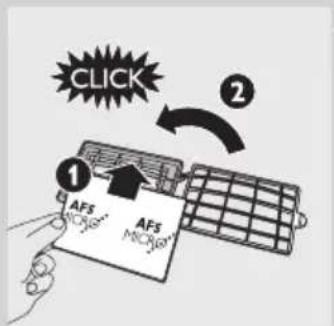
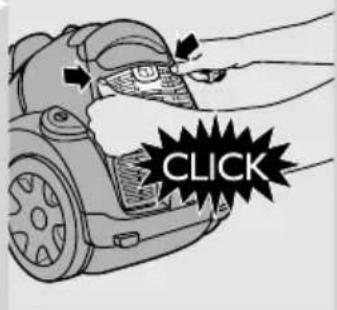
4 Place the new filter in the filter holder and close the holder ('click').
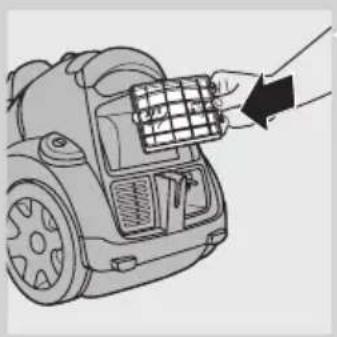
5 Put the filter holder back into the appliance.
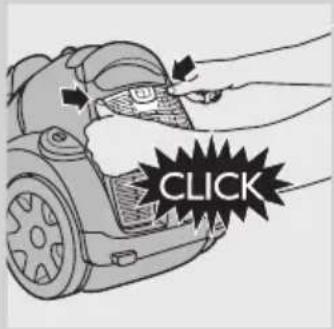
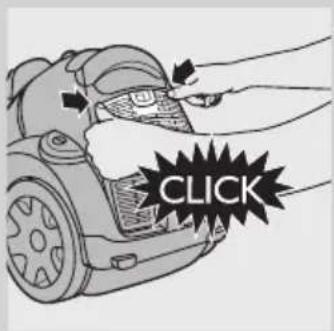
6 Close the filter grille ('click').
Super Clean Air HEPA filter (specific types only)
Instead of with the Super Clean Air filter, some types are equipped with the special Super Clean Air HEPA filter. This filter is able to remove 99.5% of all particles down to 0.0003mm in size from the outlet air. This not only includes normal house dust, but also harmful microscopic vermin such as house dust mites and their excrements, which are well-known causes of respiratory allergies.
- Replace the Super Clean Air HEPA filter every six months.
- You can replace this filter in the same way as the Super Clean Air filter.
Storage
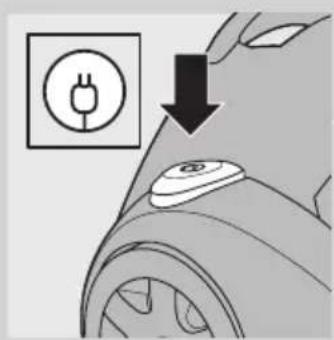
1 Switch off the appliance and remove the mains plug from the wall socket.
2 Press the cord rewind button to rewind the mains cord.
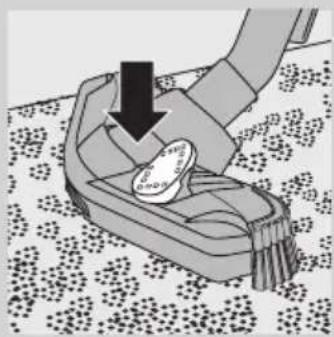
3 Always put the Tri-Active nozzle in the carpet setting when you store it and prevent the side brushes from becoming bent.
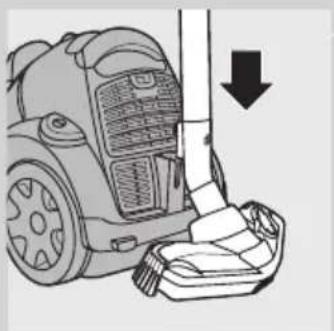
4 Insert the ridge on the nozzle into the parking slot to attach the nozzle to the appliance. Store the appliance in horizontal position, with all wheels touching the floor.
Ordering accessories and filters
If you have any difficulties obtaining filters or other accessories for this appliance, contact the Philips Consumer Care Centre in your country or consult the worldwide guarantee leaflet.
- Philips filter cylinders are available under service number 4322 004 93320.
- Super Clean Air filters are available under type number FC8032.
- Super Clean Air HEPA filters are available under type number FC8044.
Environment
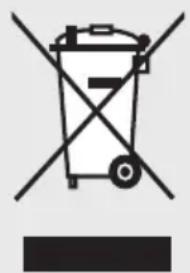
Do not throw away the appliance with the normal household waste at the end of its life, but hand it in at an official collection point for recycling. By doing this, you help to preserve the environment.
Guarantee & service
If you need service or information or if you have a problem, please visit the Philips website at www.philips.com or contact the Philips Consumer Care Centre in your country (you find its phone number in the worldwide guarantee leaflet). If there is no Consumer Care Centre in your country, go to your local Philips dealer.
Troubleshooting
This chapter summarises the most common problems you could encounter with the appliance. If you are unable to solve the problem with the information below, contact the Consumer Care Centre in your country.
Problem Possible cause Solution
| The suction power is insufficient. | You have selected a low suction power setting. | Select a higher suction power setting. |
| The filter cylinder is clogged with dirt. | Clean the filter cylinder (see chapter 'Cleaning and maintenance'). | |
| The motor protection filter and/or the HEPA filter are dirty. | Clean or replace the filters (see chapter 'Cleaning and maintenance'). | |
| The nozzle, hose or tube is blocked up. | To remove the obstruction, disconnect the blocked-up item and connect it (as far as possible) the other way around. Switch on the vacuum cleaner to force the air through the blocked-up item in opposite direction. | |
| I cannot close the dust bucket retainer. | You have not inserted the filter cylinder properly into the filter cylinder case. | Insert the filter cylinder properly in the filter cylinder case. |
| When I use my vacuum cleaner I sometimes feel electric shocks. | Your vacuum cleaner has built up static electricity. The lower the air humidity in the rooms, the more static electricity the appliance builds up. | To reduce this inconvenience, we advise you to discharge the appliance by frequently holding the tube against other metal objects in the room (for example legs of a table or chair, radiator etc.). |
| To reduce this inconvenience, we advise you to raise the air humidity level in the room by placing water in the room. For example, you can hang containers filled with water from your radiators or place bowls filled with water on or near your radiators. |

Filter cylinder



Filter housing

Filter cylinder


Cylindrical filter
Clean the cylindrical filter every month.
2 Clean the cylindrical filter with the supplied brush. Brush the cylindrical filter along the ribs from top to bottom.

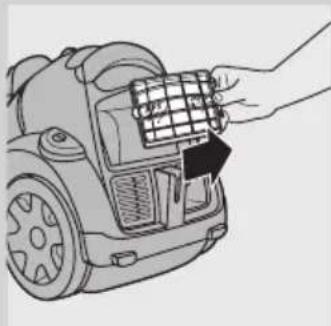

5 Put the filter holder back into the appliance.
2 Increase the humidity level in the room by placing a container of water in the room. For example, you can hang or place containers of water on or near radiators.
Electromagnetic fields (EMF)
This Philips product complies with all standards regarding electromagnetic fields (EMF). If handled properly and in accordance with the instructions in this user manual, the product is safe for use based on available scientific evidence.
ComfortControl handle (specific models only)
- The unique ComfortControl handle is ergonomically designed to provide comfort during vacuuming.
- To get the most benefit from this handle, it is important not to place your other hand on the tube. Doing so twists and bends your back, which can lead to spinal problems.
- Our experts advise you to adjust the length of the tube so that the hand holding the standard handle is at hip level.
Attaching the ComfortControl handle (specific models only)
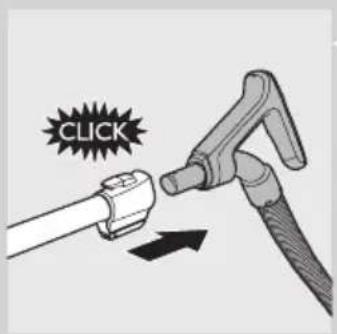
2 To detach the handle from the tube, hold the handle with one hand. With the other hand, hold the telescopic tube and press the tube release button (1), then pull the tube off the handle (2).
Attaching the standard handle (specific models only)

1 To connect the telescopic tube to the handle, press the spring-loaded safety button on the handle (1) and insert the handle into the tube (2). Align the spring-loaded safety button with the hole on the tube ("click"). 2 To detach the tube from the handle, press the spring-loaded button and pull the handle out of the tube.
Note: This vacuum cleaner has openings (only some models) at the end of the handle. These openings prevent objects from getting stuck or damage when the vacuum cleaner is used without the hose or accessories.
Hose

1 To connect the hose, insert the hose attachment hook into the opening (1), then push the hose connector down until it clicks (2).

2 To disconnect the hose, press the release buttons (1) and pull the hose connector out of the hose connection opening (2).
Telescopic tube
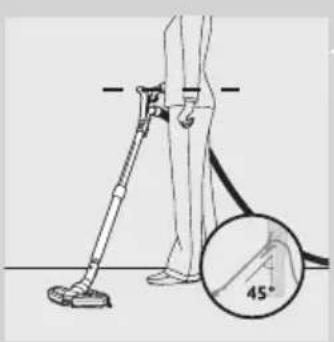
1 Place the floor nozzle on the floor and hold the tube at a 45° angle to the floor.
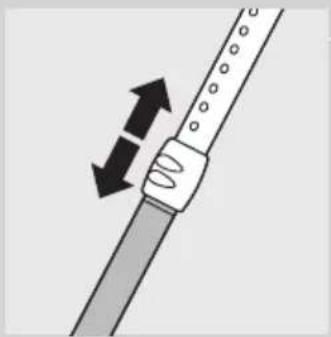
2 Move the tube locking mechanism up or down until the handle is at hip level.
2 To detach the accessory holder, squeeze the release levers (1) and pull the accessory holder off the handle (2).
Accessory clip (only some models)
The accessory clip simply attaches to the tube.
- The accessory holder can be simply attached to the handle. You can store the nozzles in the accessory holder by pushing them into it. To remove them, pull them out of the holder. Two nozzles can be stored in the accessory holder at the same time:

- Crevice nozzle and small upholstery nozzle. Pay attention to how the small upholstery nozzle is placed in the accessory holder.
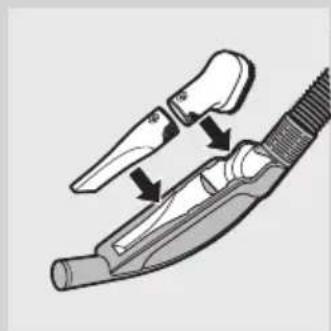
- Crevice nozzle and small round brush.
Crevice nozzle and small upholstery nozzle (only some models)
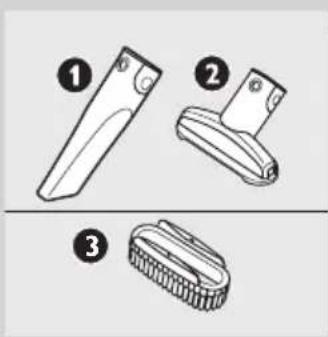
2 To detach the brush nozzle, pull it out of the bottom of the small upholstery nozzle ("click").

Crevice tool, small suction brush and small brush (specific models only)
- You can connect the crevice tool (1), small suction brush (2) or small brush (3) directly to the handle or tube.
Tri-Active suction brush (specific models only)
- The side brushes pick up more dust and dirt from the side of the suction brush, allowing you to vacuum better around furniture and other objects.
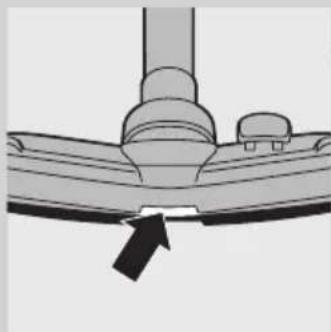
Combination suction brush (specific models only)
You can use the combination suction brush on carpets (with brushes retracted) or hard floors (with brushes extended).
- Empty the dust container when the dust level reaches the round disc of the cylindrical filter housing.
1 Disconnect the hose from the appliance.
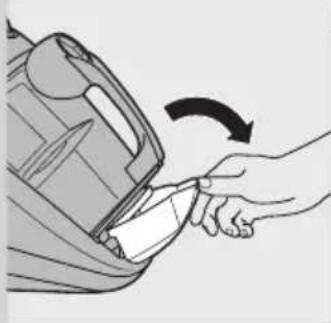
2 To release the dust container, pull the dust container holder downwards.

3 Grasp the handle of the dust container and remove the container from the appliance.
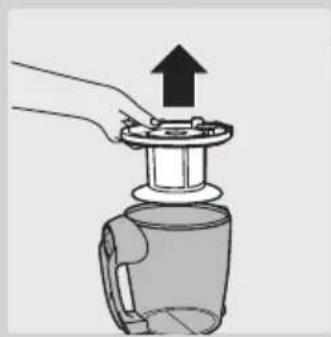
4 Hold the dust container above a waste bin and remove the cylindrical filter housing.

1 Remove the dust container from the appliance, move the locking catch of the cylindrical filter (1) and take it out of the housing (2).

2 Clean the cylindrical filter with the brush supplied. Brush from the top of the filter downwards along the ribs.
Use only the supplied brush! Other brushes may damage the cylindrical filter.
3 If you wish to wash the cylindrical filter, wash it thoroughly with water only.
Do not use soaps, cleaning agents, or other detergents to clean the filter. Before returning it to the housing, allow the cylindrical filter to dry completely.
Filter housing
1 Remove the cylindrical filter housing from the dust container. 2 If there is dirt inside the cylindrical filter housing, empty it into a waste bin. 3 If necessary, wash the cylindrical filter housing with cold water and a little dishwashing liquid. 4 Move the locking tab of the cylindrical filter and return the filter to the housing. 5 Return the cylindrical filter housing to the dust container, and the container to the appliance.
Motor protection filter
Clean the motor protection filter once a year.
1 Remove the motor protection filter from the appliance. 2 Shake the dust out of the filter by tapping it over a waste bin.
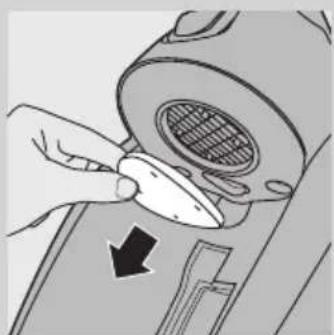
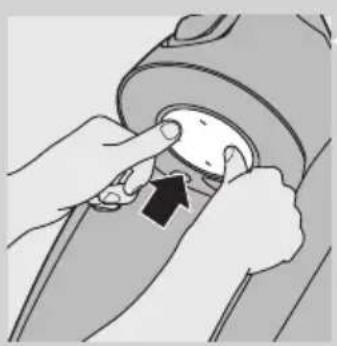
1 Open the filter grille.

2 Remove the filter holder.

3 Open the filter holder and remove the old filter.
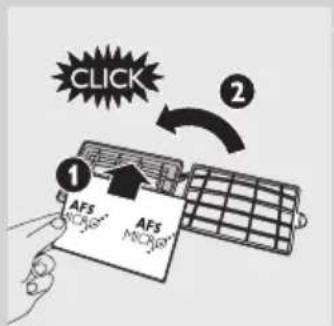
4 Place a new filter in the filter holder and close the holder (it should click).
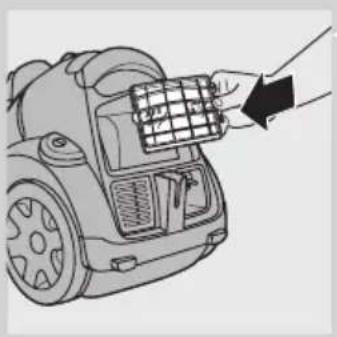
5 Return the filter holder to the appliance.
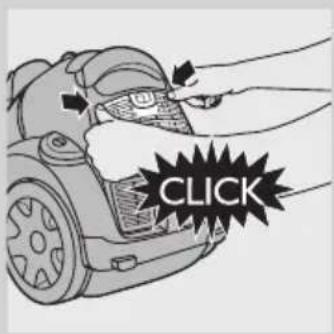
6 Close the filter grille ("click").
Super Clean Air HEPA filter (only some models)
Instead of the Super Clean Air filter, some models have a special Super Clean Air HEPA filter. This filter can remove 99.5% of all particles from the exhaust air, even down to a size of 0.0003 mm. This includes not only common household dust but also harmful microscopic organisms, such as dust mites and their feces, well-known causes of respiratory allergies.
- Replace the Super Clean Air HEPA filter every 6 months.
1 Unplug the vacuum cleaner and remove the plug from the socket.
2 Press the cord rewind button.

4 Insert the guide on the suction brush into the stop slot to connect it to the appliance. Store the appliance in a horizontal position, with all wheels on the floor.
Ordering accessories and filters
If you have any problems obtaining filters or other accessories for the appliance, contact the Philips Consumer Care Center in your country or read the international warranty leaflet.
- Philips cylinder filters are available under service number 4322 004 93320.
- Super Clean Air filters are available under number FC8032.
- Super Clean Air HEPA filters are available under number FC8044.
Environment protection
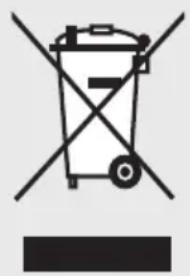
- Do not dispose of the appliance with normal household waste when it can no longer be used, but take it to a designated recycling point. This will help protect the environment.
Warranty and service
If you need service or information or have a problem, visit the Philips website, www.philips.com, or contact the Philips Consumer Care Center in your country (the phone number is in the enclosed warranty). If there is no Consumer Care Center in your country, contact your local Philips dealer.
Troubleshooting
This chapter describes the most common problems you might encounter when using the appliance. If you cannot solve the problem with the information below, contact the customer support center in your country.


Filter cylinder


Filter housing
2 To store the power cord, press the cord rewind button.

- The nozzle, located at the front, sucks up larger particles.
Filter cylinder

Filter housing
ComfortControl handle (only for certain models)
2 To detach the handle from the tube, hold the handle with one hand. With the other hand, hold the telescopic tube, press the tube release button (1) and pull the tube out of the handle (2).
1 Place the nozzle on the floor and hold the tube at a 45° angle to the floor.

- The narrow nozzle and the small brush.
- Attach the narrow nozzle (1), the small nozzle (2), or the small brush (3) directly to the handle or tube.
Tri-Active nozzle (only for certain models)

4 Hold the dust container above a trash bin, and lift the filter cylinder frame out of the container.

Filter cylinder
Clean the filter cylinder every week.


Cylindrical filter


Filter housing
ComfortControl handle (certain models only)
1 Attach the handle to the telescopic tube (click).

Brush accessory (certain models only)
1 To mount the brush accessory, slide it onto the bottom of the small suction head ('click').
Cylindrical filter



Cleaning and care


Filter housing

2 To disconnect the handle from the tube, hold it with one hand. With the other hand, hold the telescopic tube and press the tube release button (1) and pull the tube out of the handle (2).
1 To connect the hose, insert the hose mounting hook into the opening (1) and then press the hose connection piece downward (you will hear a 'click') (2).
2 To disconnect the hose, press the release buttons (1) and pull the hose connector out of the hose connection opening (2).
Simply attach the accessory holder clip to the tube.
- Crevice nozzle and small brush.
Combination nozzle (certain models only)
2 When vacuuming a carpet, press the position switch so that the brush bristles retract into the storage compartment of the combination nozzle.
Using the appliance
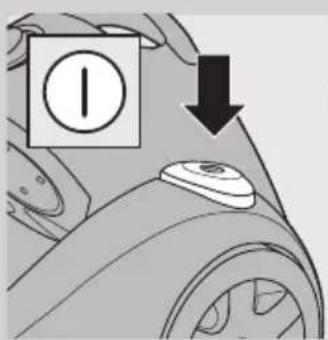
Cleaning and maintenance
3 Grasp the handle of the dust container and remove it from the appliance.

1 Remove the dust container from the appliance, unlock the lock of the cylindrical filter (1), and remove the filter from its housing (2).

1 Open the filter grille.
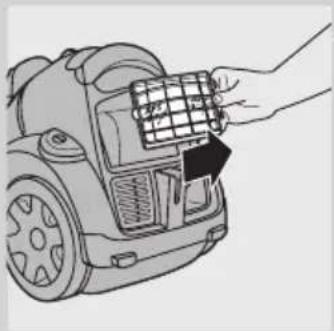
2 Remove the filter holder.

3 Open the filter holder and remove the old filter.
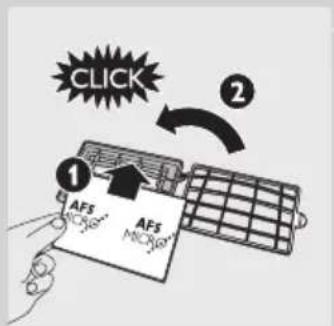
4 Insert a new filter into the filter holder and close it (you will hear a "click").
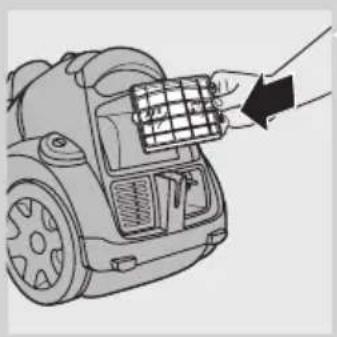
5 Place the filter holder back into the appliance.
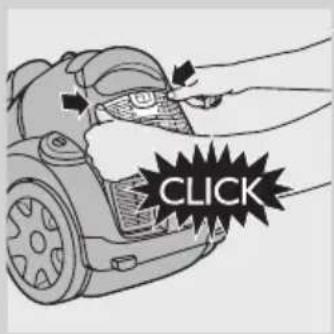
1 Turn off the appliance and unplug it from the mains.
1 Insert the plug of the flexible hose into the opening (1) and push the flexible hose connector downwards ("click") (2).
1 Place the nozzle on the floor and hold the hose at a 45° angle.
1 Attach the accessory holder with the accessories onto the handle ("click").
- Narrow nozzle and small nozzle. Remember how to attach the small nozzle to the holder.
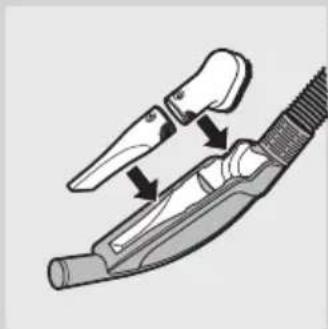
- Narrow nozzle and small brush.
Narrow nozzle and small nozzle (only on certain models)

2 When vacuuming carpets, press the switch on top of the combination nozzle again with your foot so that the brush jumps back into the nozzle.
Using the appliance
3 Hold the handle of the dust chamber and pull the dust chamber out of the appliance.
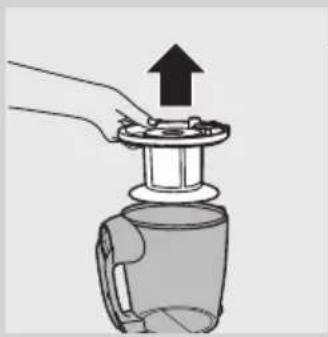
4 Hold the dust chamber over a trash bin and pull the filter housing out of it.
Cylindrical filter
Clean the cylindrical filter once a week.
1 Remove the dust chamber from the appliance, push aside the lock of the cylindrical filter (1) and lift the cylindrical filter out of the housing (2).


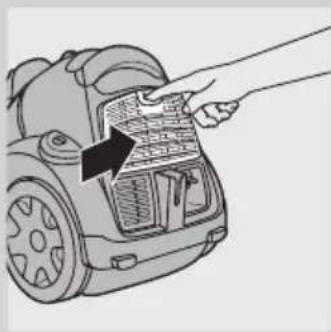
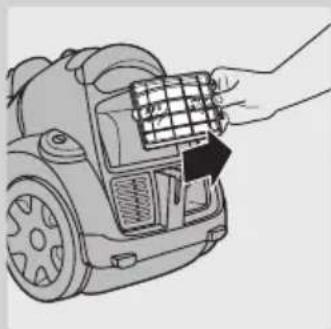
3 Open the filter grille and remove the old filter.
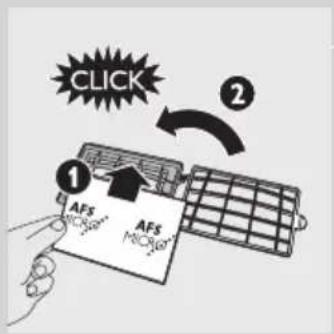
4 Insert the new filter into the holder and close the holder so that it clicks into place.
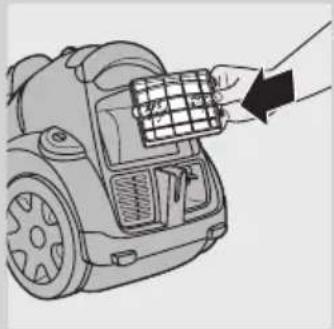
5 Reinstall the filter holder into the appliance.

6 Close the filter grille so that it clicks into place.
Super Clean Air HEPA filter (only on certain models)
2 Press the cord rewind button to rewind the power cord.
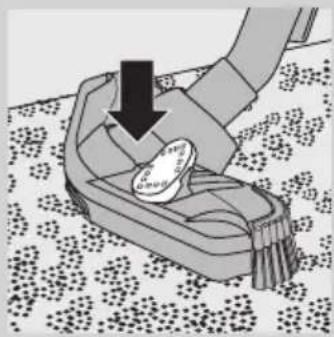
3 Store the accessory with triple action in the carpet cleaning position to prevent the side brushes from bending.
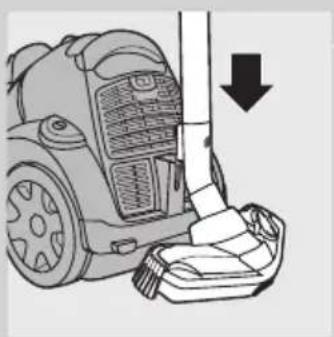
4 Insert the accessory into the storage slot to connect it to the appliance. Store the appliance in a horizontal position with the wheels on the floor.
- Noise level: Lc = 80 dB(A)
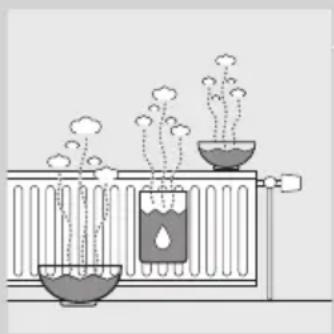
- During vacuuming, especially in rooms with low air humidity, the vacuum cleaner generates static electricity. This may cause you to experience an electric shock if you touch the hose or another metal part of the vacuum cleaner. These shocks are not dangerous and will not damage the appliance. However, to avoid such inconvenience, we recommend:
1 Empty the appliance by frequently pointing the hose at metal objects in the room (e.g., table or chair legs, radiators, etc.);
2 Increase the humidity level in the room by placing water somewhere in the room. For example, you can hang containers of water on the radiator, place them on it, or put them near it.
Electromagnetic fields (EMF)
This Philips appliance complies with all standards regarding electromagnetic fields (EMF). If handled properly and in accordance with the instructions in this user manual, the appliance is safe to use based on scientific evidence available today.
Before use
Ergonomic tips

ComfortControl handle (specific models only)
- The unique ComfortControl handle is ergonomically designed to provide the right level of comfort during vacuuming.
- To use this handle optimally, it is important not to place your other hand on the hose. Doing so causes you to bend your back, which can lead to back problems.
- Our ergonomics experts recommend adjusting the tube length so that the hand holding the standard handle is at hip level.
Attaching the ComfortControl handle (specific models only)

2 To remove the handle from the tube, hold it with one hand. With the other hand, hold the telescopic tube and press the tube release button (1), then pull the tube out of the handle (2).
Attaching the standard handle (certain models only)
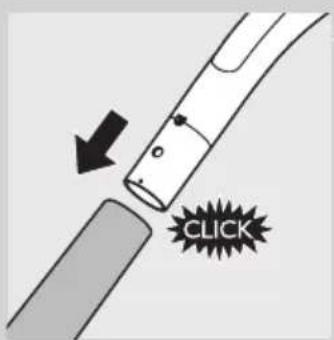
1 To connect the telescopic tube to the handle, press the spring-loaded button on the handle (1) and insert the handle into the tube (2). Align the spring-loaded button with the hole on the tube ("click"). 2 To detach the tube from the handle, press the spring-loaded button and pull the handle out of the tube.
Note: This vacuum cleaner is equipped with openings (certain models only) at the end of the handle. These openings prevent objects from getting stuck or damage when using the vacuum cleaner without the tube or attached accessories.
Hose

1 Place the nozzle on the floor and hold the tube at a 45° angle to the floor.

1 Attach the accessory holder with accessories to the handle ("click").
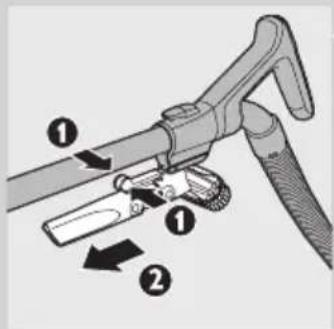
2 To detach the accessory holder, press the release handles simultaneously (1), then remove the accessory holder from the handle (2).
Additional handle (certain models only)
The additional handle simply attaches to the tube.
- Crevice tool and small nozzle. Be careful how you place the small nozzle in the accessory holder.

- Crevice tool and small brush.
Crevice tool and small nozzle (certain models only)

1 Connect the crevice tool (1) or small nozzle (2), with or without the brush attachment (3), to the tube or directly to the handle.
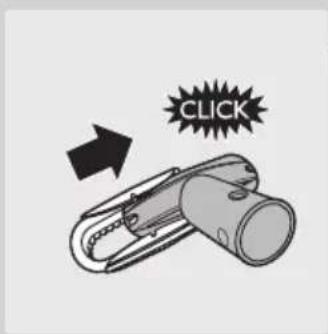
Corner tool, small nozzle, and small brush (certain types only)
- Attach the crevice tool (1), small nozzle (2), or small brush (3) directly to the handle or hose.
Tri-Active nozzle (certain models only)
The Tri-Active nozzle is a multi-purpose nozzle for carpets and hard floors.
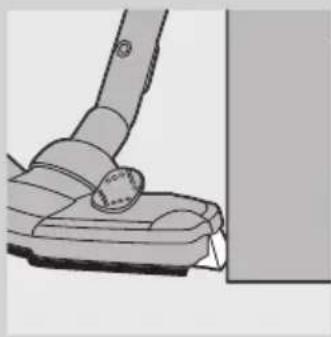
- The side brushes pick up more dust and dirt on the sides of the nozzle and allow for better cleaning along furniture and other obstacles.
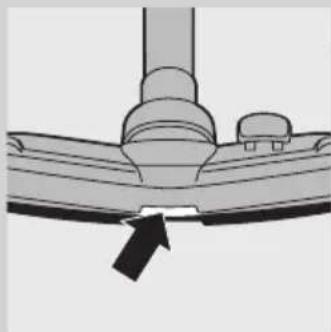
1 For cleaning hard floors, use the hard floor setting (e.g., tiles, parquet, laminate, linoleum): press the switch on top of the nozzle with your foot to extend the brushes out of the housing. At the same time, the wheel lifts to prevent scratching and increase maneuverability.
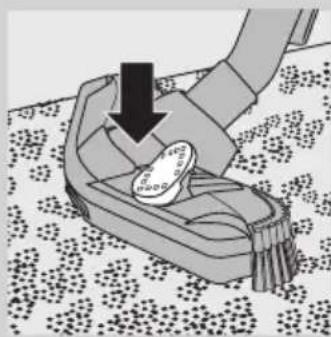
2 For cleaning carpets, use the carpet setting: press the rocker switch again to retract the brushes into the nozzle housing. The wheel will automatically lower.

Combination nozzle (certain models only)
You can use the combination nozzle on carpets (with brushes retracted) or on hard floors (with brushes extended).
1 For cleaning hard floors, press the switch on top of the combination nozzle with your foot. The brushes will extend out of the nozzle housing.
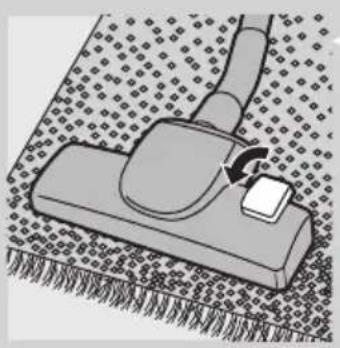
1 Pull the cord out of the vacuum cleaner and push the plug into the wall socket. 2 Press the on/off button to turn on the appliance.
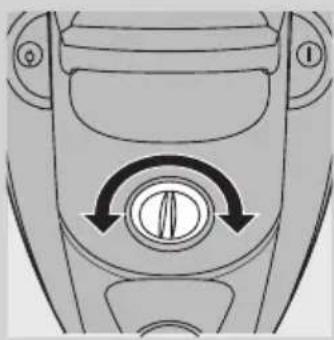
- During vacuuming, you can adjust the suction power using the suction power button.
- Use maximum suction power for vacuuming very dirty carpets and hard floors.
- Use minimum suction power for cleaning curtains, drapes, etc.

- If you want to take a short break, insert the tab on the nozzle into the parking slot and place the hose in the appropriate position.
2 Pull the dust container release latch downward to release the container.
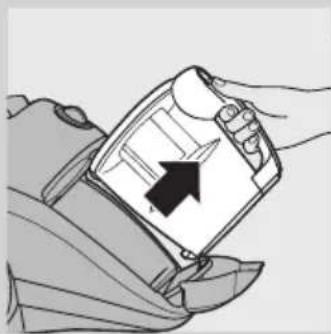
4 Hold the dust container above a waste bin and pull the cylinder housing out of the container.
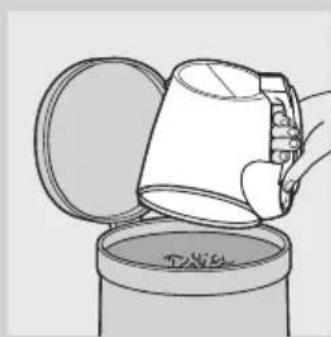
5 Empty the dust container into the bin. Clean the dust container under cold running water using a little detergent.
6 Return the filter cylinder housing to the dust container, and then return the dust container to the appliance.
Make sure you have placed the filter cylinder in the filter cylinder housing; otherwise, it will not be possible to close the dust container holder.
1 Remove the dust container from the appliance, unlock the filter cylinder lock (1), and remove the filter cylinder from the housing (2).
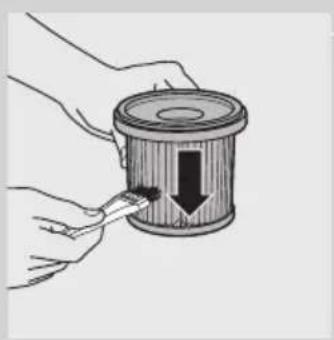
2 Clean the filter cylinder with the brush provided. Brush from the top of the filter cylinder downwards along the filter ribs.
Use only the supplied brush! Other brushes may damage the filter cylinder.
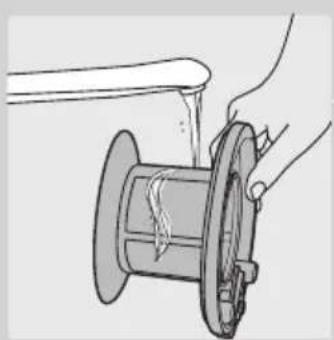
3 If you only want to clean the filter cylinder, wash it thoroughly with water only.
Do not use soap, liquid detergent, or any other detergent to clean the filter cylinder. Allow the filter cylinder to dry completely before returning it to the housing.
Filter housing
1 Remove the filter cylinder housing from the dust container. 2 If there is dirt inside the housing, empty it into a waste bin. 3 If necessary, clean the filter cylinder housing under cold running water using a little detergent. 4 Unlock the filter cylinder lock and return it to the housing. 5 Return the filter cylinder housing to the dust container, and then return the dust container to the appliance.
Motor protection filter
Clean the motor protection filter once a year.
1 Remove the motor protection filter from the appliance. 2 Gently shake the dust out of the filter into a waste bin.
If the motor protection filter is very dirty, you can also rinse it under cold tap water.
Do not use detergent or other cleaning agents when cleaning the motor protection filter!
Let the filter cylinder dry completely before putting it back into the appliance.

1 Open the filter cover.

2 Remove the filter holder.

3 Open the filter holder and remove the old filter.
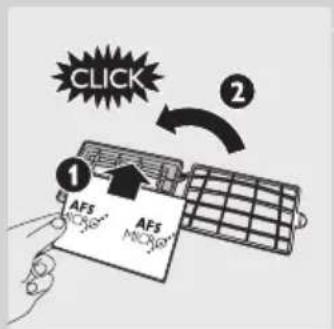
4 Place a new filter in the filter holder and close it ('click').

4 Place the protrusion on the nozzle into the slot for storing the tube and attach the nozzle to the appliance. Store the appliance in a horizontal position with the wheels on the floor.
Ordering accessories and filters
If you have problems obtaining filters or other accessories for your vacuum cleaner, contact Philips Consumer Care in your country or refer to the international warranty leaflet.
- Philips cylinder filters are available under service number 4322 004 93320.
- Super Clean Air filters are available under type number FC8032.
- Super Clean Air HEPA filters are available under type number FC8044.
Environment protection





Cleaning and maintenance


Using the device






(EMF) HEALTHCUL (EMF)
Crispy



Cleaning and maintenance

Using the device






(Equt) ComfortControl (Defect melaia chao)
Crispy

- INTRODUCTION
- GENERAL DESCRIPTION (FIG. 1)
- IMPORTANT
- DANGER
- WARNING
- CAUTION
- ELECTROMAGNETIC FIELDS (EMF)
- PREPARING FOR USE
- ERGONOMIC ADVICE
- COMFORTCONTROL HANDGRIP (SPECIFIC TYPES ONLY)
- ATTACHING THE COMFORTCONTROL HANDGRIP (SPECIFIC TYPES ONLY)
- ATTACHING THE STANDARD HANDGRIP (SPECIFIC TYPES ONLY)
- HOSE
- TELESCOPIC TUBE
- ACCESSORY HOLDER (SPECIFIC TYPES ONLY)
- ACCESSORY CLIP (SPECIFIC TYPES ONLY)
- CREVICE TOOL AND SMALL NOZZLE (SPECIFIC TYPES ONLY)
- BRUSH ATTACHMENT (SPECIFIC TYPES ONLY)
- CREVICE TOOL, SMALL NOZZLE AND SMALL BRUSH (SPECIFIC TYPES ONLY)
- TRI-ACTIVE NOZZLE (SPECIFIC TYPES ONLY)
- COMBINATION NOZZLE (SPECIFIC TYPES ONLY)
- USING THE APPLIANCE
- CLEANING AND MAINTENANCE
- EMPTYING THE DUST BUCKET
- CLEANING AND MAINTENANCE OF FILTERS
- FILTER CYLINDER
- FILTER CASE
- MOTOR PROTECTION FILTER
- SUPER CLEAN AIR FILTER (SPECIFIC TYPES ONLY)
- SUPER CLEAN AIR HEPA FILTER (SPECIFIC TYPES ONLY)
- STORAGE
- ORDERING ACCESSORIES AND FILTERS
- ENVIRONMENT
- GUARANTEE & SERVICE
- TROUBLESHOOTING
- FILTER HOUSING
- CYLINDRICAL FILTER
- COMFORTCONTROL HANDLE (SPECIFIC MODELS ONLY)
- ATTACHING THE COMFORTCONTROL HANDLE (SPECIFIC MODELS ONLY)
- ATTACHING THE STANDARD HANDLE (SPECIFIC MODELS ONLY)
- ACCESSORY CLIP (ONLY SOME MODELS)
- CREVICE NOZZLE AND SMALL UPHOLSTERY NOZZLE (ONLY SOME MODELS)
- CREVICE TOOL, SMALL SUCTION BRUSH AND SMALL BRUSH (SPECIFIC MODELS ONLY)
- TRI-ACTIVE SUCTION BRUSH (SPECIFIC MODELS ONLY)
- COMBINATION SUCTION BRUSH (SPECIFIC MODELS ONLY)
- SUPER CLEAN AIR HEPA FILTER (ONLY SOME MODELS)
- ENVIRONMENT PROTECTION
- WARRANTY AND SERVICE
- COMFORTCONTROL HANDLE (ONLY FOR CERTAIN MODELS)
- TRI-ACTIVE NOZZLE (ONLY FOR CERTAIN MODELS)
- COMFORTCONTROL HANDLE (CERTAIN MODELS ONLY)
- BRUSH ACCESSORY (CERTAIN MODELS ONLY)
- CLEANING AND CARE
- COMBINATION NOZZLE (CERTAIN MODELS ONLY)
- NARROW NOZZLE AND SMALL NOZZLE (ONLY ON CERTAIN MODELS)
- SUPER CLEAN AIR HEPA FILTER (ONLY ON CERTAIN MODELS)
- BEFORE USE
- ERGONOMIC TIPS
- ATTACHING THE STANDARD HANDLE (CERTAIN MODELS ONLY)
- ADDITIONAL HANDLE (CERTAIN MODELS ONLY)
- CREVICE TOOL AND SMALL NOZZLE (CERTAIN MODELS ONLY)
- CORNER TOOL, SMALL NOZZLE, AND SMALL BRUSH (CERTAIN TYPES ONLY)
- TRI-ACTIVE NOZZLE (CERTAIN MODELS ONLY)
- DO NOT USE DETERGENT OR OTHER CLEANING AGENTS WHEN CLEANING THE MOTOR PROTECTION FILTER
- USING THE DEVICE
- CRISPY
Brand : PHILIPS
Model : EasyClean FC8733
Category : Vacuum Cleaner