
497AJM - Vacuum Cleaner 3M - Free user manual and instructions
Find the device manual for free 497AJM 3M in PDF.


| Product type | Vacuum cleaner |
| Brand | 3M |
| Model | 497AJM |
| Dimensions (L x w x h) | 30 x 30 x 50 cm |
| Weight | 5 kg |
| Power supply | 1000 W, 220-240 V, 50 Hz |
| Dust collection type | Bagless (cyclonic) |
| Tank capacity | 2 L |
| Filtration | HEPA 13 |
| Noise level | 75 dB |
| Operating radius | 8 m |
| Main functions | Floor and carpet vacuuming, crevice tool for furniture |
| Maintenance and cleaning | Clean the HEPA filter monthly, empty the tank after each use |
| Safety | Do not vacuum liquids, unplug before maintenance |
| Spare parts | HEPA filter, crevice tool, brush |
| Repairability | Repairability index 7.5/10 |
Frequently Asked Questions - 497AJM 3M
User questions about 497AJM 3M
0 question about this device. Answer the ones you know or ask your own.
Ask a new question about this device
Download the instructions for your Vacuum Cleaner in PDF format for free! Find your manual 497AJM - 3M and take your electronic device back in hand. On this page are published all the documents necessary for the use of your device. 497AJM by 3M.
USER MANUAL 497AJM 3M
3M™ Vacuum Operating Instructions
International Service 497 (AB) & Electronic Service 497 (ABF)
English
Deutsch
Español
Français
Italiano
한국어
Norsk
Русский
中文版


This 3M ™ Vacuum is Intended for Commercial Use Only
Important Safety Instructions — Save These Instructions
Read all instructions before using the vacuum. When using an electrical appliance, always use basic precautions, including the following:
WARNING
TO REDUCE THE RISK OF FIRE, ELECTRIC SHOCK OR INJURY, FOLLOW THESE SAFETY RULES:
- Use only as described in this manual. Use only manufacturer's recommended attachments.
- Do not use this machine to vacuum hazardous dust.
- Connect to a properly grounded outlet only. See Grounding Instructions.
- Do not use without filter in place.
- Do not leave appliance plugged in when not in use. Unplug from outlet when not in use and before servicing.
- Turn off all controls before unplugging.
- Do not unplug by pulling on cord. To unplug, grasp the plug, not the cord.
- Do not handle plug or appliance with wet hands.
- Do not use appliance outdoors or on wet surfaces. Electric shock could occur.
- Do not use with damaged cord or plug. If appliance is not working as it should, has been dropped or damaged, left outdoors, or dropped in water, discontinue use.
- Do not pull or carry by cord, use cord as a handle, close a door on cord or pull cord around sharp edges and corners. Do not run appliance over cord. Keep cord away from heated surfaces.
- Do not put any object into openings. Do not use with any opening blocked. Keep openings free of dust, lint, hair, and anything that may reduce air flow.
- Keep hair, loose clothing, fingers, and all body parts away from openings and moving parts.
- Do not pick up anything that is burning or smoking, such as cigarettes, matches or hot ashes.
- Do not use to pick up flammable or combustible liquids, such as gasoline, and do not use in areas where these may be present.
- Do not allow to be used as a toy. Close attention is necessary when used near children.
Grounding/Earthing Instructions
⚠️ DANGER
This appliance must be grounded/earthed.
The wires in this main lead are colored in accordance with the following code:
Green/Yellow: Earth
Blue: Neutral
Brown: Live
As the colors may not correspond with the colored markings identifying the terminals in your plug, proceed as follows:
The wire which is colored Green/Yellow must be connected to the terminal in the plug which is marked with the letter "E" or by the ground/earth symbol " 1/2 " or colored Green or Green/Yellow.
The wire which is colored Blue must be connected to the terminal in the plug which is marked with the letter "N" or colored Black or Blue.
The wire which is colored Brown must be connected to the terminal in the plug which is marked with the letter "L" or colored Brown or Red.
Specifications
Electrical
220-240 V
50/60 Hz
3.7 amps
Dimensions
Length 17-13/16 in.
Width 7-3/4 in.
Height 9-1/4 in.
Certification
Meets VDE RFI 0875 Conducted Limits.
Motor
1 H.P.
Continuous duty rated with one sealed ball bearing and one sleeve bearing lubricated for life. Internal thermal breaker opens at 221° F [ 105° C] and automatically closes when motor cools (after about 30 minutes).
BSI: Internal thermal breaker opens at 274° F [ 120° C] and automatically closes when motor cools (after about 30 minutes).
Conforms to EMC Requirements Defined in:
EUROPEAN STANDARD EN 55014 (1993) - Conducted Emissions
CISPR 14 Third Edition (1993-01) - Conducted Emissions
EN60555-3 - Harmonic Current Emissions (Class A)
IEC 1000-3-2 - Harmonic Current Emissions (Class A)
EUROPEAN STANDARD EN 50082-1 (1992), Immunity
TEC Publication 801-2 (1991) - ESD, Contact Discharge, Severity Level 4 - ESD, Air Discharge, Severity Level 4
TEC Publication 801-3 (1991) - Radiated Immunity, Severity Level 2
IEC Publication 801-4 (1998) - EFT, Severity Level 3
prIEC Draft 801-5 - Surge, Severity Level 3
To Operate
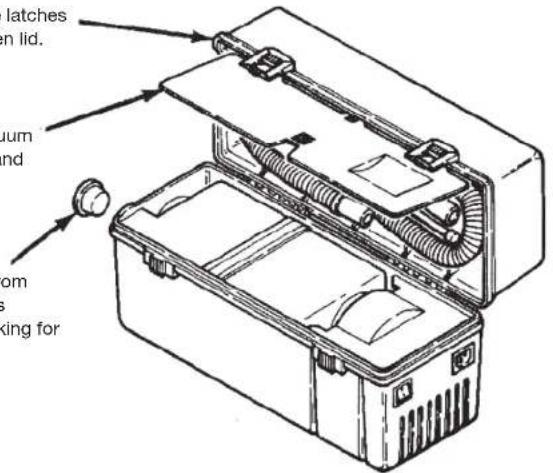
Step 1
Release latches and open lid.
Step 2
Unfasten accessory door and remove vacuum hose, electrical cord and hose attachments.
Step 3
Remove filter plug from vacuum inlet (always replace when repacking for transport).
Step 4
Attach selected accessory to hose (insert crevice brush as shown). Insert other end of hose into inlet.
Step 5
Place remaining accessory and filter plug in lid. Close lid.
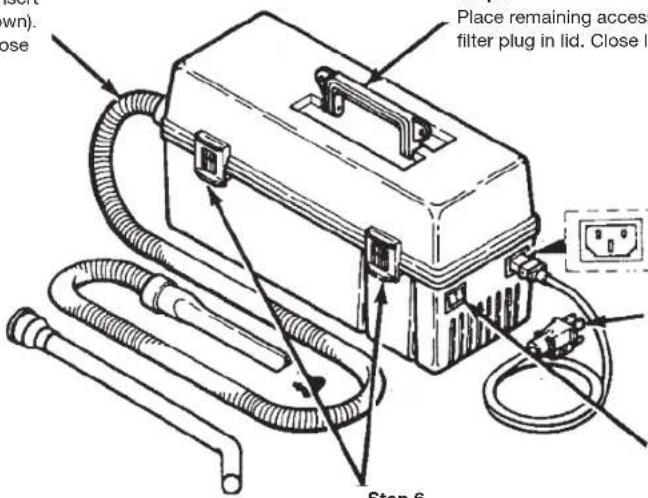
Step 8
Plug cord into power receptacle.
Turn on power switch.
Step 9
Follow the steps in the illustration. DO NOT OPERATE WHEN FILTER IS FULL. A lack of exhaust air, or diminished suction, indicates a full filter.

WARNING
ELECTRIC SHOCK COULD OCCUR IF USED OUTDOORS OR ON WET SURFACES.
- Release the latches and open the lid.
- Unfasten the accessory door and remove the vacuum hose, electrical cord and hose attachments.
- Remove the L-15X filter plug from the vacuum inlet (always replace when the vacuum is not in use or repacking for transport).
- Attach the selected accessory to the hose (insert the crevice brush as shown). Insert the hose into the inlet.
-
Place the other accessories and plug in the lid. Close the lid.
-
Latch the lid securely.
- Plug the cord into the vacuum.
- Plug the cord into the power receptacle.
- Turn on the power switch.
Note
The motor has a thermal breaker that opens and stops the motor if it overheats. This usually occurs if the filter is full and needs to be replaced. The motor will restart automatically when it cools (after about 30 minutes).
To Store Attachments for Transport
- Unplug the power cord from the outlet and the vacuum.
- Open the lid and retrieve the L-15X filter plug.
-
Remove the hose from the inlet and insert the L-15X filter plug.
-
Detach the hose nozzle from the base.
- Place the hose, power cord and attachments into the lid and close the accessory door.
- Close the lid and securely fasten the latches.
To Replace Filter
The 3M ™ Vacuum is designed for use with disposable 3M ™ Filters. The 3M Filters must be replaced on a regular basis. Frequency of filter replacement depends on the type and frequency of use of the Service Vacuum.
- Release the latches and open the lid.
- Remove either the L-15X filter plug or hose. Save the plug for use later (see note below).
- Grasp the filter and pull it straight up.
- Insert the L-14X filter plug in the filter.
-
Dispose of the filter in a suitable manner.
-
Remove the L-14X plug from the new filter and position filter in the vacuum with the filter hole to your left. Save the L-14X plug for use in disposing the filter (see note below).
-
Verify that the gasket between the filter and the motor fits tightly.
-
Insert the L-15X filter plug or hose.
-
Close and latch the lid.
Note: The L-15X plug (longer plug) is used to cover the filter inlet for storage when the vacuum cleaner is not in use. This plug comes with the filter in a new vacuum cleaner. The L-14X plug (shorter plug) is used to cover the filter inlet for disposal. This plug comes with each new replacement filter.
WARNING
ELECTRIC SHOCK COULD OCCUR IF USED OUTDOORS OR ON WET SURFACES!
CAUTION
Do not operate when filter is full. A lack of suction or exhaust is an indication of a full filter.
CAUTION
To avoid risk of fire, filter must be installed properly and replaced regularly. Do not open filter, reuse filter or attempt to replace components within filter.
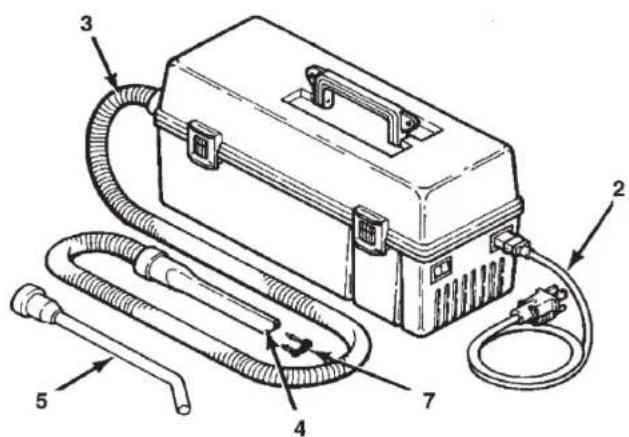
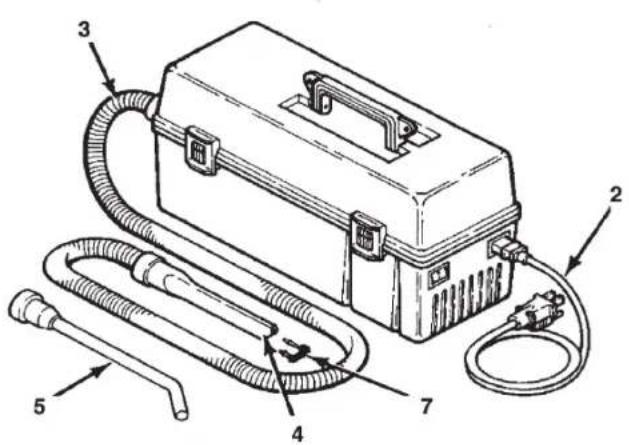
Parts List


Item Part Number Description Type of Vacuum
| 1 | 78-8063-1943-6 | Receptacle, 220V (SV-PCR6) | Service/Electronics | |
| 2 | 26-1011-8421-1 | Power Cord, 250V, 10 amp | Service/Electronics | |
| 3 | 78-8063-2418-8 | Vacuum Hose Assembly (SV-SH32) | Service/Electronics | |
| 4 | 80-6104-7958-8 | Crevice Nozzle (SV-CN1) | Service/Electronics | |
| 5 | 78-8063-1540-0 | Curved Wand Nozzle (SV-WA2) | Service/Electronics | |
| 6 | 78-8005-5350-1 | Type 2 Filter, Toner/Dust (SV-MPF2) | Service/Electronics | |
| 7 | 80-6104-7957-0 | Crevice Brush (SV-CB1) | Service/Electronics | |
| 8 | 78-8079-9435-1 | Needle Nose Nozzle (SV-NN) | Electronics | |
| 9 | 80-6104-7960-4 | Dusting Brush (SV-DBSD1) | Electronics | |
| 10 | 80-6104-7640-2 | Short Red Filter Plug L-14X (SV-SRP) | Service/Electronics | |
| 11 | 80-6104-7639-4 | Long Red Filter Plug L-15X (SV-LRP) | Service/Electronics |
Important
Power cord must be VDE SEMKO approved 250 V, 10 amp
Professional's Guide to Filter Selection
Now you have a choice of two distinctly different filters designed to do distinctly different jobs with your 3M Service Vacuum Cleaner. Make a professional decision on which filter meets your in-house or client clean-up requirements.
- Type I Filter for extremely fine particles
- Type 2 Filter for toners and dust
The two filters described in this “Professional’s Guide to Filter Selection” are completely disposable. Replacements are easy and clean.
Type 1 Filter, Fine Particle
A thinner, more concentrated weave (HEPA media) for trapping extremely fine particles to 0.3 microns. Typical applications are color laser printers, color copiers and highly sensitive equipment.
Type 2 Filter, Toner/Dust
Specifically designed for trapping unwanted toner from copiers and laser printers. Also ideal for cleaning data processing equipment.
3M Service Vacuum Cleaner Limited Warranty and Limitation of Liability
Limited Warranty: To the first user purchasing this 3M Service Vacuum Cleaner. 3M warrants that the 3M Service Vacuum will be free of defects in material and manufacture for a period of three (3) years from the time of purchase. Should any failure to conform to this warranty appear within this period upon notice to 3M within said three (3) years from the time of purchase and upon proof of purchase. 3M shall, at its option, either repair or replace the defective product. It will be the purchaser's responsibility to return the product, freight prepaid, to the service location specified by 3M. These remedies are the purchaser's exclusive remedies for breach of this warranty.
Exclusions to Warranty Coverage: The above warranty shall not apply to any 3M Service Vacuum Cleaner that has been modified without the approval of 3M, or has been damaged by negligence, misuse, accident, failure to follow 3M's written operating instructions or use of any filter which does not meet 3M specifications. Consumable supplies, such as filters, are not covered by the above warranty.
Disclaimer of Warranty: 3M MAKES NO OTHER WARRANTIES WITH RESPECT TO THE 3M SERVICE VACUUM CLEANER. EXPRESS OR IMPLIED, INCLUDING BUT NOT LIMITED TO ANY IMPLIED WARRANTY OF MERCHANTABILITY OR FITNESS FOR A PARTICULAR PURPOSE.
Limitation or Liability: 3M SHALL NOT BE LIABLE UNDER ANY CIRCUMSTANCES FOR ANY INCIDENTAL, SPECIAL, OR CONSEQUENTIAL DAMAGES, OR ECONOMIC LOSS, BASED UPON BREACH OF WARRANTY, BREACH OF CONTRACT, NEGLIGENCE, STRICT LIABILITY IN TORT OR ANY OTHER LEGAL THEORY, EVEN IF 3M HAS BEEN ADVISED OF THE POSSIBILITY OF SUCH DAMAGES INCLUDING, BUT NOT LIMITED TO LOSS OF PROFITS, REVENUE, EQUIPMENT USE, DATA OR INFORMATION OF ANY KIND. THE LIABILITY OF 3M SHALL NOT UNDER ANY CIRCUMSTANCES, EXCEPT AS EXPRESSLY PROVIDED HEREIN, EXCEED THE PRICE OF THE 3M SERVICE VACUUM CLEANER. These limitations do not apply to damages caused by breach of the implied warranties of title and against infringement, nor to claims for personal injury. Some states have laws which require liability rights different from those stated above. In such states, the minimum required liability terms shall apply.



EUROPEAN STANDARD EN 55014 (1993) - Conducted Emission
CISPR 14 Third Edition (1993-01) - Conducted Emission
EN 60553-3 - Harmonic Current Emmission (Class A)
IEC 1000-3-2 - Harmonic Current Emmision (Class A)
EUROPEAN STANDARD EN 50082-1 (1992), Immunity
IEC Publication 801-2 (1991) - ESD, Contact Discharge, Severity Level 4
- ESD, Air Discharge, Severity Level 4
IEC Publication 801-3 (1991) - Radiated Immunity, Severity Level 2
IEC Publication 801-4 (1998) - EFT, Severity Level 3
prIEC Draft 801-5 - Surge, Severity Level 3
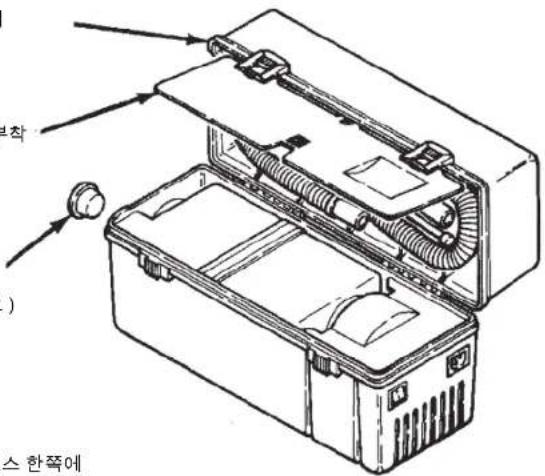
작동 순서
Step 1
걸쇠를 풀어서 집진기
박스를 여십시오.
Step 2
부속품 덮개를 열고
집진호스,전기코드와 호스 부착
부품들을 꺼내십시오
Step 3
집진구에 끼워진 필터마개를
제거하십시오.(이동 전
패키징시에 항상 막아놓으십시오)
번호 럜품 코드 부품명드
부품명

Del Delenummer Beskrivelse
1 78-8063-1943-6 Støpsel, 220 V (SV-PCR6)
2 26-1011-8421-1 Strømkabel, 250 V, 10 amp
3 78-8063-2418-8 Støvsugeslange enhet (SV-SH32)
4 80-6104-7958-8 Spaltemunnstykke (SV-CN1)
5 78-8063-1540-0 Bøyd stavformet munnstykke (SV-WA2)
6 78-6969-6211-3 Type I filter, for finpartikler (SV-SPF1)
78-8005-5350-1 Type 2 filter, toner/støv (SV-MPF2)
7 80-6104-7957-0 Spaltebørste (SV-CB1)
8 80-6104-7640-2 Kort rød filterplugg L-14X (SV-SRP)
9 80-6104-7639-4 Lang rød filterplugg L-15X (SV-LRP)
Viktig
Type 2, filter for tonerpigment/støv, (SV-MPF2)


项目 不见编号 说明 真空清洁器类型
1 78-8063-1943-6 Receptacle, 220伏(SV-PCR6) 维修/电子产品
3M
3M Electronic Solutions Division Static Control Products
6801 River Place Blvd.
Austin, Texas 78726-9000
www.3Mstatic.com
Printed in U.S.A.
© 3M 2009 All rights reserved. 78-6970-3445-8 Rev. G JHA
- 3M™ VACUUM OPERATING INSTRUCTIONS
- IMPORTANT SAFETY INSTRUCTIONS — SAVE THESE INSTRUCTIONS
- WARNING
- TO REDUCE THE RISK OF FIRE, ELECTRIC SHOCK OR INJURY, FOLLOW THESE SAFETY RULES
- GROUNDING/EARTHING INSTRUCTIONS
- ⚠️ DANGER
- SPECIFICATIONS
- ELECTRICAL
- DIMENSIONS
- CERTIFICATION
- MOTOR
- CONFORMS TO EMC REQUIREMENTS DEFINED IN
- TO OPERATE
- STEP 2
- STEP 3
- STEP 4
- NOTE
- TO STORE ATTACHMENTS FOR TRANSPORT
- TO REPLACE FILTER
- CAUTION
- IMPORTANT
- PROFESSIONAL'S GUIDE TO FILTER SELECTION
- TYPE 1 FILTER, FINE PARTICLE
- TYPE 2 FILTER, TONER/DUST
- 3M SERVICE VACUUM CLEANER LIMITED WARRANTY AND LIMITATION OF LIABILITY
- 작동 순서
- 번호 럜품 코드 부품명드
- DEL DELENUMMER BESKRIVELSE
- VIKTIG
- 项目 不见编号 说明 真空清洁器类型
Brand : 3M
Model : 497AJM
Category : Vacuum Cleaner