
LE50H6500 - Television HAIER - Free user manual and instructions
Find the device manual for free LE50H6500 HAIER in PDF.


| Product Type | LED TV |
| Brand | Haier |
| Model | LE50H6500 |
| Screen Size | 50 inches (127 cm) |
| Display Resolution | 1920 x 1080 (Full HD) |
| Refresh Rate | 60 Hz |
| Smart TV | Yes (Android TV) |
| Operating System | Android TV |
| Processor | Quad-core |
| RAM | 1.5 GB |
| Storage | 8 GB |
| Wi-Fi | Yes (802.11 b/g/n) |
| Bluetooth | Yes (4.2) |
| HDMI Ports | 3 |
| USB Ports | 2 |
| Audio Output | 2 x 8W |
| Power Consumption (Typical) | 100 W |
| Standby Power | < 0.5 W |
| Weight (without stand) | 11.2 kg |
| Dimensions (without stand) | 112.7 x 65.2 x 8.4 cm |
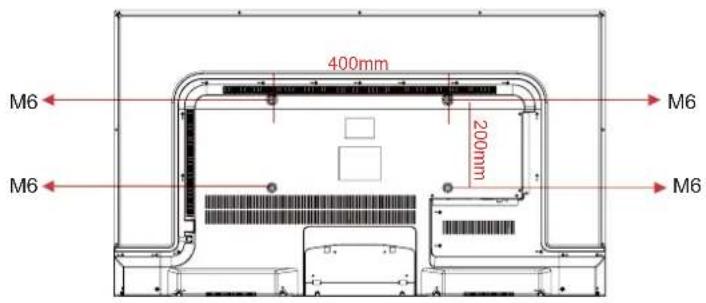
| VESA Mount | 200 x 200 mm |
Frequently Asked Questions - LE50H6500 HAIER
User questions about LE50H6500 HAIER
0 question about this device. Answer the ones you know or ask your own.
Ask a new question about this device
Download the instructions for your Television in PDF format for free! Find your manual LE50H6500 - HAIER and take your electronic device back in hand. On this page are published all the documents necessary for the use of your device. LE50H6500 by HAIER.
USER MANUAL LE50H6500 HAIER
Please read this manual carefully before operating the unit, and keep it for future reference.
Contents
01 Safety Warnings
Welcome....2
Important Information....2
Safety notice....3
Warning and cautions....4
02 Introduction
Main Parameter....5
Base Stand Assembly Instruction....7
Wall Mounting Installation Guidelines....8
Front Control Panel....9
Rear/Side Sockets....9
Connecting to your Haier TV 10
Common Interface 12
03 Remote Control
Remote Control....13
Teletext 14
04 Operation
Installation Guide....15
Select channel search 16
Tuning setup menu 16
Picture menu 18
Screen 18
Sound menu 18
Option menu 18
Lock menu 19
USB play 20
Photo 20
Music 21
Movie 21
Text 21
EPG Menu 22
Record/Time shift 22
05 Trouble shooting
Trouble shooting 23
06 Specification
Specification 26
01 Safety warnings
WELCOME
Thanks for buying this 50" LED LCD TV. This guide will help you set up and begin using your TV.
First, check the contents of your box with the parts check list below:
50" Ultra HD Digital LED LCD TV
Remote control
AAA ba x2ttery
Instruction Manual
Quick start guide
Stand
AV adaptor cable
YPbPr adaptor cable
Now you can get started!

IMPORTANT INFORMATION
READ ALL INSTRUCTIONS BEFORE USE AND KEEP FOR FUTURE REFERENCE.


CAUTION
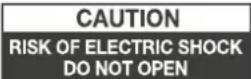
TO REDUCE THE RISK OF ELECTRIC SHOCK, DO NOT REMOVE COVER (OR BACK). NO USER SERVICEABLE PARTS INSIDE. FOR ANY PROBLEMS, REFER SERVICING TO THE CUSTOMER HELP LINE. THERE IS A LIGHTNING ARROW SYMBOL IN THE TRIANGLE: THIS SYMBOL INDICATES HIGH VOLTAGE IS PRESENT INSIDE. IT IS DANGEROUS TO MAKE ANY KIND OF CONTACT WITH ANYINSIDE PART OF THIS PRODUCT.
THERE IS A EXCLAMATION MARK IN THE TRIANGLE: THIS SYMBOL ALERTS YOU THAT IMPORTANT LITERATURE CONCERNING OPERATION AND MAINTENANCE HAS BEEN INCLUDED WITH THIS PRODUCT.

CAUTION: TO REDUCE THE RISK OF ELECTRIC SHOCK AND FIRE, DO NOT PUT THE TV SET NEAR SOURCES OF HUMIDITY. DO NOT USE ANY ABRASIVE CLEANERS WHICH MAY SCRATCH OR DAMAGE THE LCD SCREEN. AVOID CONTACT WITH OBJECTS THAT MAY SCRATCH THE LCD SCREEN.

NOTE: SERVICING THE UNIT YOURSELF IS UNAUTHORISED AND COULD LEAD TO INJURY OR PRODUCT DAMAGE. REFER ALL SERVICING TO THE CUSTOMER HELPLINE.
Safety notice
- Warning: To reduce the risk of electric shock, do not remove the cover or back. There are no user-serviceable parts inside. Refer servicing to qualified personnel.
- Warning: To prevent fire or electric shock hazard, do not expose the unit to rain or moisture.
- Do not expose the product to water (dripping or splashing) and no objects filled with liquids, such as vases, should be placed on the unit.
- Keep the product away from direct sunlight and heat source such as radiators or stoves.
- Do not block the ventilation openings. Slots and openings on the unit are provided for ventilation. The openings should never be blocked by placing your product on a cushion, sofa or other similar surface.
- Do not place the product on unstable cart, stand, tripod, bracket or table. The unit may fall, resulting in possible damage or injury.
- Never place heavy or sharp objects on the panel or frame.
- Unplug the Power from the outlet when the unit is not in use.
- Attention should be drawn to the environmental aspects of battery disposal.
- WARNING: The battery shall not be exposed to excessive heat such as sunshine, fire or the like.
- WARNING: Excessive sound pressure from earphones or headphones can cause hearing loss.
- Warning: To avoid any injury caused by lean of the product, please always ensure the whole product was placed within the table surface in horizontal.
• CAUTION: When the apparatus was in electrostatic circumstance, it maybe malfunction and need to reset by user.


This marking indicates that this product should not be disposed with other household wastes throughout the EU. To prevent possible harm to the environment or human health from uncontrolled waste disposal, recycle it responsibly to promote the sustainable reuse of material resources. To return your used device, please use the return and collection systems or contact the retailer where the product was purchased. They can take this product for environmental safe recycling.
CE RoHS√
WARNING AND CAUTIONS
Warning

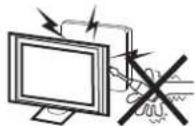
High voltages are used in the operation of this television receiver. Do not remove the cabinet back from your set. Refer servicing to qualified service personnel.

Warning

To prevent fire or electrical shock hazard, do not expose the television receiver to rain or moisture.

Warning

Do not drop or push objects into the television cabinet slots or openings. Never spill any kind of liquid on the television receiver.

Caution

Do not block the ventilation holes in the back cover. Adequate ventilation is essential to prevent failure of electrical components.

Caution

Do not trap the power supply cord under the television receiver.

Caution

Never stand on, lean on, or suddenly push the television or its stand. You should pay special attention to children. Serious injury may result if it should fall.
Caution

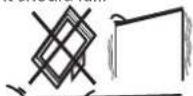
Do not place your television on an unstable cart, stand, shelf or table. Serious injury to an individual, and damage to the television, may result if it should fall.

Caution

When the television receiver is not used for an extended period of time, it is advisable to disconnect the AC power cord from the AC outlet.

Caution

If the television is to be built into a compartment or similar enclosure, the minimum distances must be maintained. Heat build-up can reduce the service life of your television, and can also be dangerous.

02 Introduction
Never tamper with any components inside the TV, or any other adjustment controls not described in this manual. All LED-TV's are high voltage electrical equipment.
When you clean dust or any water drops off the SCREEN or CABINET or around any of the buttons or connectors, the power cabled should be removed from the power socket. Wipe the TV with a soft, dry, dust free cloth.
During thunderstorms, unplug the power cable and aerial / antenna cable to prevent damage to your TV and any other devices connected to it. All repairs to this TV should only be performed by qualified TV service personnel.
Main features
① Used as Television, display terminal, PC display;
② High luminance, wide viewing angle;
③ HDMI interface support 4K*2K (3840*2160) signal input:
Main parameter
| Panel | 50" |
| TV System | PAL-B/G,I,D/KSECAM-B/G,D/K,L,DVB-T,DVB-C |
| Video Signal System | PAL/SECAM/MPEG2/MPEG4/H.264 |
| ≥400CH(DTV);100CH(ATV)Storage channel number | |
| Input Power Voltage | AC 100 -240V 50/60Hz |
| Power consumption | 150W |
| Standby Power consumption | ≤0.30W |
| Audio Output Power (THD≤7%) | 2x10W |
| Signal Input | Analog RGB(PC) x1; PC audio x1High-Definition Multimedia Interface (HDMI) x 3Composite Input x 1YPbPr x 1SCART Inputx 1CI x 1USB x 1RF x 1 |
| Signal output | Headphone x 1COAXIAL Output x 1 |
| Horizontal definition (TV line) | Composite video input >=350YPbPr >=400 |
INSTALLATIONCAUTION
*Locate the TV in the room where light does not strike the screen directly.
*Total darkness or a reflection on the picture screen can cause eyestrain. Soft and indirect lighting is recommended for comfortable viewing.
*Allow enough space between the TV and the wall to permit ventilation.
*Avoid excessively warm locations to prevent possible damage to the cabinet or premature component failure.
*Do not cover the ventilation openings when using theTV.
④ SCART Interface :
⑤NICAM ;
⑥Time shift/Record :
PC
SUPPORTED MODE
| RESOLUTION | V.Freq.(Hz) H.Freq.(Hz) | ||
| 1 | 640x480 | 60 31.47 | |
| 2 | 800x600 | 60 37.88 | |
| 3 | 1024x768 | 60 | 48.36 |
| 4 | 1360x768 | 60 47.7 | |
| 5 | 1920x1080 | 60 67.5 | |

Base Stand Assembly Instruction
-
Place the TV with the display side down on a flat surface. Use a cloth to protect the display. Position the stand base pillar onto the bottom of the TV.
-
Attach the stand base plate to the stand pole by firmly tightening the supplied screws.

natural_image
Technical line drawing of a computer chassis showing internal components and exterior panel (no text or symbols)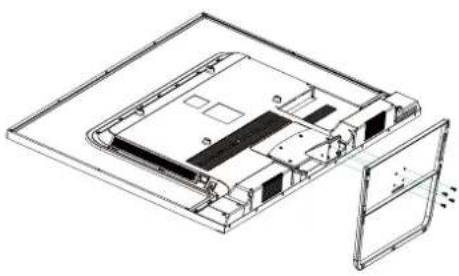
natural_image
Technical line drawing of a device chassis with internal components and an open panel (no text or symbols)INSTALLATION NOTES
Locate the TV in a room where light does not strike the screen directly. Total darkness or a reflection on the screen can cause eyestrain. Soft and indirect lighting is recommended for comfortable viewing.
Allow enough space between the TV and the wall to permit ventilation. Please do not attempt to rotate the TV on the stand.
Avoid excessively warm locations to prevent possible damage to the cabinet or premature component failure.
WALL MOUNTING INSTALLATION GUIDELINES
This television can be wall mounted as follows:
-
Place the LED LCDTelevision onto a solid surface. Please place some soft material over the front of the screen to protect it from any damage.
-
Remove the screws from the lower part of the television, where the base joins to the TV, and take away the stand (put the stand somewhere safe for future use).


natural_image
Technical line drawing of a mechanical or electronic component with no visible text, numbers, or symbols.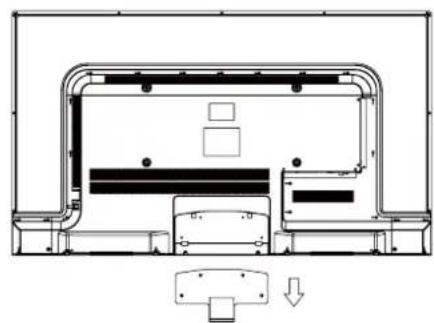
natural_image
Technical line drawing of a mechanical assembly with no visible text or symbols- Use the four screws to fix the TV onto a wall mounting bracket (not included) via the four VESA standard holes on the back of the television.
Front control panel

1 Remote control sensor.
2 Indicator LED:
RED: STANDBY.
3 Key board.

flowchart
graph TD
    A["Power CH-CH+ VOL-VOL+ MENU SOURCE"] --> B["⑤"]
    A --> C["④"]
    A --> D["③"]
    A --> E["②"]
    A --> F["①"]
| 1 | SOURCE | Display the input source menu. |
| 2 | MENU | Display main MENU. |
| 3 | VOL+/VOL- | Adjust sound level.In MENU,adjust the item that you selected. |
| 4 | CH+/CH- | In TV mode,press CH+ or CH- to change the channel up and down.In MENU, press CH+ or CH- to select items. |
| 5 | POWER | Turn the TV On/Off. |
Rear/Side Sockets

| 1 | AV | input |
| 2 | COMMON INTERFACE(CI) | input |
| 3 | HDMI1 | input |
| 4 | HDMI2 | input |
| 5 | HDMI3 | input |
| 6 | USB | input |
| 7 | HEADPHONE analogue audio output | |
| 8 | SCART | input/output |
| 9 | PC AUDIO | input |
| 10 | VGA | input |
| 11 | RF | input |
| 12 | DIGITAL AUDIO OUTPUT(COAXIAL) | digital audio output |
| 13 | YPbPr | input |
Connecting to your HaierTV

Connecting to your HaierTV
Connecting a DVD player / Satellite / cable set top box receiver / games console / PC or Laptop
There are several options to connecting a DVD player / Satellite or Cable set top box receiver / games console / PC or Laptop to your TV.
Option 1 SCART
Connect a SCART cable (not supplied) from the SCART socket on the TV to the DVD player cable set top box receiver or games consol.
To select the device connected with the SCART cable press the SOURCE button on the remote and use the ▼▲keys to select SCART and press the OK button.
Note:-The TV will default to the SCART connection when the TV is switched on.
Option 2 HDMI1/HDMI2/HDMI3
If the device you want to connect to the TV is switched on, switchoff the device first
2 Connect a HDMI cable (not supplied) from the HDMI socket on the TV to the DVD player cable receiver or games consol.
3 Switch on the device you have just connected to the TV
To select the device connected with the HDMI cable press the SOURCE button on the remote and use the ▼▲keys to select HDMI and press the OK button.
Note: Only HDMI1 supports ARC function, HDMI2 and HDMI3 don't support.
Option 3 AV AudioVisual (Yellow/White/Red)
1 Make sure that both TV and the device are switched off before connecting.
2 Connect the AV cables (not supplied) from the Video (yellow) and Audio (white, red) sockets on the TV to the DVD player or games console etc.
To select the device connected with the AV cable press the SOURCE button on the remote and use the ▼▲ keys to select AV and press the OK button.
Option 4 YPBPR
(Green/Blue/Red)+(White/Red)
1 Make sure that both TV and the device are switched off before connecting.
2 Connect the cables (not supplied) from the COMPONENT IN sockets Y, Pb, Pr (green, blue, red) and L-Audio-R (white, red) on the TV to the DVD player or games console etc.
To select the device connected with the COMPONENT cable press the SOURCE button on the remote and use the key to select and YPbPr press the OK button.
Option 5 PC (15pin Sub-D)
Connect a VGA cable (not supplied) from the VGA socket on the TV to the PC / Laptop.
To select the PC / Laptop connected with the VGA cable press the SOURCE button on the remote and use the key to select PC and press the OK button.
Note VGA is video only. For audio from your PC/Laptop you need to connect a separate cable from the PC Audio (3.5mm jack) to the headphone socket on you PC/Laptop (3.5mm jack)
Option 6 USB
1 Most USB sticks can be connected to your TV and some digital cameras may also work.
2 Connect USB stick (not supplied) or a USB cable (not supplied) to theTV.
To select the USB device connected to the TV, press the SOURCE button on the remote and use the keys to select USB and press the
Note1:Only *.jpg and *.mp3files will work, other file types are not guaranteed and may not. Note 2. Apple iPhones and iPods are not compatible with yourTV.
Note 3. When connecting any device to the USB connection, keep the USB cable length as short as possible.
Note2: Only *.jpg, *.mp3, *.txt, *.avi, *.mp4, files will work, other file types are not guaranteed and may not.
OK button.
Option 7 HEADPHONE OUTPUT
Insert the plug of the earphone into the headphone socket on the TV. The TV speakers are now muted. Alternatively you can also plug in external speakers if required.
Option 8 DIGITAL AUDIO OUTPUT(COAXIAL)
COAXIAL is a digital audio connection used to connect audio equipment, for example home theatres and other digital HiFi systems over short distances. The signal is transmitted over either a coaxial cable with RCA connectors.
1 Make sure that both TV and the device are switched off before connecting.
2 Connect the AV cables (not supplied) from the socket on the TV to the Home Theater sound system or digital HiFi system etc.
COMMON INTERFACE
The common interface (CI) slot is designed to accept the conditional Access (CA) Module and Smart card in order to view the payTV programmes and additional services. Contact your Common Interface service provider to get more information about the modules and subscription. Please noted that CA modules and smart cards are neither supplied nor optional accessories from us.
Warning
- Switch off your TV before any module is inserted in the Common Interface slot.
1 Insert the CAM correctly, then Smart Card to the CI slot that is located at the side of the TV.
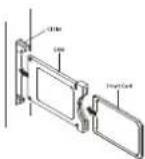
2 Turn on the TV and it will display the below message if the CI module is detected. Wait for few moments until the card is activated.
CI Module Inserted
3 Detailed information on the CI card in use is displayed.
4 Press OK button to access the card menu. Refer to the module instruction manual for setting details.
5 When module is removed, the following message will appear on the screen.
CI Module Removed

03 Remote Control

| # | Button | Descriptions |
| 1 | (Power) | Press to turn theTV on or off |
| 2 | S.MODE | Press to select the sound mode. |
| 3 | P.MODE | Press to select the picture mode. |
| 4 | 0-9 | Press to enter a channel number or password. |
| Q.VIEW | Press to switch to the last viewed channel. | |
| SLEEP | Press to set the sleep timer. | |
| 5 | VOL +/- | Press to adjust the volume level. |
| 6 | (Mute) | Press to turn the sound on or off. |
| AUDIO(I/II) | Press to select Mono,Nicam stereo for ATV channel.Select Audio language for DTV channel. | |
| 7 | SUBTITLE | Press to turn the subtitle on or of. |
| 8 | FAV/88 | Press to open a favorite channel list.In teletext mode,press to hold a page. |
| 9 | SCREEN | Press to change picture aspect ratio. |
| 10 | MENU/ | Press to open the on-screen menu.In teletext mode,press to open the INDEX page. |
| 11 | ▲▼◀ | Press to navigate the on-screen menu. |
| Press to confirm a selection.OK | ||
| 12 | BACK/ | Press to return to the previous screen.In teletext mode,press to enter mix mode. |
| 13 | ◀(reverse)▶(forward) | Press to fast forward or reverse playback in multimedia mode. |
| 14 | ≡/≡ | In teletext mode,press to open or close teletext page. Press to display main menu in the MHLmode,for example the APP menu. |
| 15 | ▶II(play/pause) | Press to play/pause in multimedia mode, Time Shift in DTV mode. |
| 16 | SOURCE Press to open the input source list. | |
| 17 | ♡ | No function. |
| 18 | P Press to change the channel. | |
| 19 | INFO/ | Press to display the channel information. In teletext mode,press to reveal the hidden information. |
| 20 | 3D WORLD These models do not support 3D feature. | |
| 21 | CH.LIST/ | Press to open the channel list.In teletext mode, press to switch the image to top,bottom or full. |
| 22 | GUIDE / | Press to display electronic programme guide inTV mode. Press to enter the teletext subpage. |
| 23 | EXIT/ | Press to close the on-screen menu.In teletext mode,press to hide the text. |
| 24 | ◀(previous)▶(next) | Press to select previous or next file. |
| 25 | ●(REC) | Press to record the TV program you are watching in DTV mode. |
| 26 | ■(stop) | Press to stop multimedia playback. |
Insert Batteries into the Remote Contol

natural_image
Diagram showing two identical mechanical components with a central component and an arrow indicating rotation (no text or symbols)- Remove the battery cover.
- Inserting the 2 AAA 1.5V batteries making sure the polarity
(+ or -) of the batteries matches the polarity marks inside the unit. - Mount the battery cover. Replace with new batteries when the TV set begins to show the following symptoms: Operation is unsteady or erratic. Sometimes the TV set does not function with Remote Control Unit.
Remark:
1) Alkaline Battery Recommended.
2) Remove batteries when they are exhausted or if the remote control is not to be used for long time.
TELETEXT
Teletext is an information system broadcast by certain channels which can be consulted like a newspaper. It also offers access to subtitles for viewers with hearing problems or who are not familiar with the transmission language(cable networks, satellite channels, etc.)
| Press: | You will obtain : |
| This is used to call or exit teletext modes. The summary appears with a list of items that can be accessed. Each item has a corresponding 3 digit page number. | |
| SELECTING A PAGE | Enter the number of the page required using the 0 to 9 up/down. Example: page 120, enter 120. The number is displayed top left, the counter turns and then the page is displayed. Repeat this operation to view another page. If the counter continues to search, this means that the page is not transmitted. Select another number. |
| DIRECT ACCESS TO THE ITEMS | Coloured are as are displayed at the bottom of the screen. The 4 coloured keys are used to access the items or corresponding pages. The coloured areas flash when the item or the page is not yet available. |
| MENU/INDEX | This returns to the contents page (usually page 100). |
| Does the button and enter the 4-digit number to enter a secondary page. | |
| To freeze the page. | |
| To display or hide the concealed information (games solutions). | |
| This will superimpose the teletext data on top of the TV picture. Press button again to return to full text. | |
| Hide the teletext. | |
| Switch the image to top,bottom. |
04 OPERATION
Installation Guide
The First Time Setup screen will appear when the TV is first switched on or reset to the factory setting.

Please press(OK) to start the wizard.
- Press the▼▲ buttons to navigate the menu and buttons to change the settings. Select your desired language

Press the buttons to navigate the menu select Home/Shop mode to be displayed on the menu.

If "Shop mode" is choose, the following menu will displayed

Choose "select" to enter the next prompt menu

Choose "Cancel" to go back to the Initialization set up menu, and the cursor will stay at the "home mode" choice. choose it to go the next menu to choose the country.
- Press the buttons to navigate the menu to change the settings. Select your desired Country.
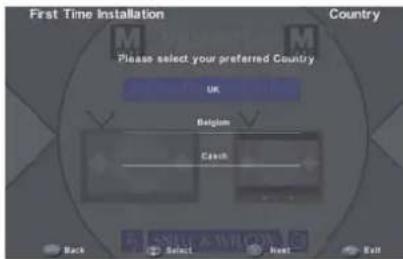
Press the ▼▲ buttons to navigate the menuto change the settings. Select your desired Time Zone.

flowchart
graph TD
    A["First Time Installation"] --> B["Time Zone"]
    B --> C["Clock"]
    B --> D["Durich GMT"]
    B --> E["Amsterdam GMT+1"]
    B --> F["Bergold GMT-1"]
    B --> G["Berby GMT+"]
    B --> H["Brussels GMT-1"]
    C --> I["Cenry GMT"]
    D --> J["Lisbon GMT"]
    E --> K["Lundon GMT"]
    F --> L["Robot GMT"]
    G --> M["Back"]
    H --> N["Select"]
    I --> O["Next"]
    J --> P["Exit"]
Select Channel Search

1. Tuning setup menu
1.1. Press the MENU button and then press the ▼▲ buttons to select the CHANNEL menu and then pressthe OK button or Right button.
1.2 Press the ▼▲ buttons to select Auto Scan and then press the OK button.

1.2.1 If you select DVB-T, the next step is to select the Tune y pe and country then press the OK button to start tuning.
1.2 2 If you select DVB-C, the next step is to config the DVB-C system like (scan type / Frequency/ NetworkID/Symbol(KS/S) then press OK button to into the tune type and country select menu, this step is the same as DVB-T, select the tune type (DTV/ATV). Choose the right country, press OK button to start.
1.2.3 Channel tuning will commence. This operation may take up to . The display will show the progress of the tuning and the number of channels found.


1.2.4 If you want to skip the ATV tuning, press the MENU button to interrupt the tuning half way. A pop-up screen will be displayed, press the button to select YES to confirm. You will then go straight to DTV tuning. You may repeat the above step if you also want to skip the DTV tuning. An installation reminder will appear the next time you turn on the TV.

Note: All the channels including ATV, DTV and Radiocan be tuning by one time, if the Tune Type is DTV+ATV. All the stored channels will be disappear after auto tuning After auto tuning, the channel will skip to the first DTV channel.
1.3 ATV Manual tuning
1.3.1 Press the MENU button and then press the ▼▲ buttons to select the CHANNEL menu and then press the OK button.
1.3.2 Press the ▼▲ buttons to select ATV Manual Tuning and then press the OK button.
1.3.3 Press the EXIT button to exit the menu
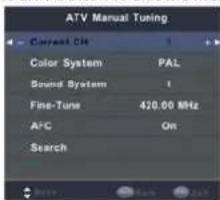
1.4DTV Manual Tuning (DVB-T)
1.4.1 Press the MENU button and then press the buttons to select the CHANNEL menu and then press the OK button.
1.4.2 Press the ▼▲ buttons to select DTV Manual Tuning and then press the OK button.
1.4.3 Press the EXIT button to exit the menu.

1.5 DTV Manual Tuning (DVB-C)
1.5.1 Press the MENU button and then press the ▼▲ buttons to select the CHANNEL menu and then press the OK button.
1.5.2 Press the ▼▲ buttons to select DTV Manual Tuning and then press the OK button.
1.5.3 Press the EXIT button to exit the menu.
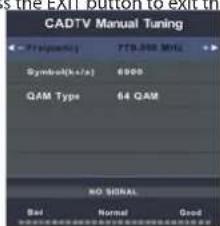
1.6 Channel labeling
1.6.1 Press the MENU button and then press the ▼▲ buttons to select the CHANNEL menu and then press the OK button.
1.6.2 Press the ▼▲ buttons to select Channel labeling and then press the OK button.
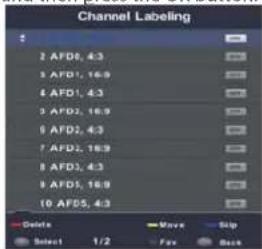
You can Delete, ,Move, Skip, FAV.
Delete:
Press teletext red button, the program in cursor will delete.
Move:
Use the Arrow Buttons to select the channel you wish to move. Then press the Yellow Button to select Move function. Once active use the Arrow Buttons to move and then press OK to confirm
Skip:
Press to choose the program, press teletext blue button to skip this program, The will show on the right side of the program. Choose the skipped program, press blue button again, you can cancel the skip, The will disappear
— Fav:
Press to choose the program, press FAV button, it will show on the right side of the program. Choose the FAV program, press FAV button again, you can cancel the FAV, the will disappear.
Once your favorite group is created, you can press the FAV key to quickly access your favorite channel.
1.7 Schedule list:
1.7.1 Press the MENU button and then press the ▼▲ buttons to select the CHANNEL menu and then press the OK button.
1.7.2 Press the ▼▲ buttons to select Schedule list and then press the OK button.

1.7.3 Press the teletext yellow key, It can list all the records schedule, press to choose the list, press red key to delete the schedule list.
Scheduled Record:
You may set the scheduled record List here. And you may also delete the scheduled records you have set.
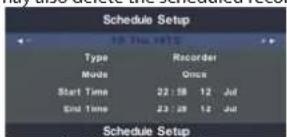
Press the OK button and you may set the recording frequency as Once, Daily, Weekly, Weekday, Start time, End Timeor off. Press the OK button timer was saved successfully.

1.8.CI information: (optional)
This menu can display the CI card's information.

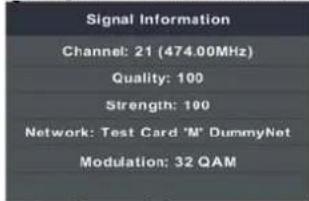
1.9. Signal Information (Only for DTV)
2.PICTURE MENU
Press the MENU button on the remote control to display the Main menu, and use the buttons to select the PICTURE.

Picture Mode: Cycles among display types: Vivid/Standard/Mild/User/Eco
Note
User: Allows to store your preferred settings. If you select the User mode, you can individually set the items shown; Contrast: Controls the difference between the brightest and darkest regions of the picture. Brightness Controls the overall brightness of the picture. Colour: Controls the colour intensity.
Tint :Controls the difference between the green and red regions of the picture(Tint is available in NTSC system only). Sharpness:Increase this setting to see crisp edges in the picture; decrease it for soft edges.
Colour Temp: Adjusts colour components independently to achieve a warm or cool effect: Cool/Normal/Warm Cool: Increases blue tint
Normal: Increases nature tint
Warm: Increases red tint
Noise Reduction: Select to reduce the noise level of connected equipment: Off / Low / Middle / High / Default. MEMC Mode: Select to reduce the dynamic image distortion: Off / Low / Middle / High
3.SCREEN
In PC mode only which can adjust Horizontal position, vertical position, size and phase.

4.SOUND MENU
4.1 The third item of the MENU is the AUDIO MENU. You can adjust the sound effect here such as treble, bass, balance etc. Press ▼▲ to move, press ▶adjust
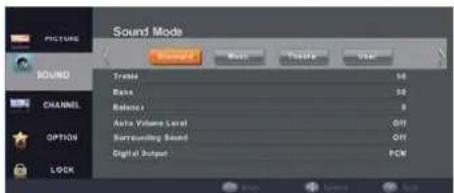
Sound Mode: Allows selection of an audio-enhancement technique from among the following options: /Standard/Music/Theater/User
User: Allows to store your preferred settings. If you select the User mode, you can individually set the items shown. Treble :Controls the relative intensity of higher pitched sounds.
Bass: Controls the relative intensity of lower-pitched sounds. Balance : Adjusts the relative volume of the speakers in a multiple speaker system.
Auto Volume Level: Allows to selection of an Auto Volume format: On / Off.
Surrounding Sound: Allows to selection of an Surround Sound: add minish.
Digital Output: Allows to selection of the SPDIF Mode format: PCM / Auto / Off.
Note: Auto Volume Level only available when the input signal volume is too large or distortion.
5.OPTION MENU
5.1 Press the MENU button on the remote control to display the Main menu, and use the ▼▲buttons to select the OPTION
Use the ◀▶ buttons to highlight an individual option.
use the ▼▲ buttons to change the setting, and press the MENU to exit the menu.

Language: Selects to display all on-screen menus in your language of choice.
Hearing Impaired: While viewing a digital channel, this function can be selected. Select on, the TV will be activated the subtitle for a hearing-impaired person.
PVR File System: Use buttons to select PVR File System, then press OK button to enter sub-menu.


Operation
5.2 Prepare to record the program
PVR function only works in DTV
From OPTION MENU enter into PVR File System In "OPTION MENU", please choose "check
PVR File System". Click "OK", until
"checking"change into "Success"
Note: please check the term "speed". If it is "HD support", that means the speed of USB device is available for time shift and record. If not, please format the device, to make sure the device available. The default "Free Record Limit" is 6 hour, if the space on the disk is big enough. If the space is not
big enough, the record time should be shorter, depends on the room on the device. During the "check PVR File System" checking, please do not take any other operation until it finished. The recordings must be done with the TV PVR system. It can only be played in the same TV, not in any other kind of device (computer, DVD, etc.) which is not compatible with.
- file format.
Please note that in order to carry out any kind of recording, the TV will require you to format th connected USB device to store the recording. WARNING. WHEN YOU FORMAT, THE EXTERNAL USB DEVICE YOU WILL LOSE ALL THE FILES AND INFORMATION YOU HAVE STORAGE ON THE DEVICE.
The USB file system will limit the size of the storage size.
File system: NTFS up to 2TB
FAT32 with up to 192GB
FAT16 with up to 2GB
From OPTION MENU enter into PVR File
5.3 Aspect Selects through Wide mode settings :
Auto/4:3/16:9/ZOOM1/ZOOM2.
5.4 Blue Screen: Enables or disables the blue screen.
5.5 Time:
5.5.1 lock
Selects to set the current clock in TV mode. Press OK button to display the lock menu: Press ▼buttons to move to Date, Month, Year, Hour and Minute.
Press ◀▶ buttons to set.
Note: In DTV mode, the current time depends on the broadcast station. The clock function can not be set.
5.5.2 Time Zone: Use buttons to cycle through the available time zones in the country.
5.5.3 Sleep Timer: Use ◀▶ buttons to select a period of time after which the TV automatically switches to standby mode:Off,10,20,30,60,90,120,180,240(minutes)
5.5.4 Auto Sleep: Select on, the TV will be automatically turned off, in case of no signal in TV& input source or no remote control input.( Available options are: Off/3H/4H/5H )
5.5.5 OSD Timer: Use ▼▲ buttons to select OSD Timer, then press OK button to enter submenu. Use ▼▲ buttons to select.( Available options are: 5s / 10s /15s / 20s / 25s / 30s )
5.5.6 First Time Installation: Press buttons to select FirstTime Installation, then press OK button to set relevant options including OSD language, country and tuning.
5.5.7 Reset: Press OK button to restore factory settings.
Note: Restore factory default will clear all the programs and password.
5.5.8 Software Update (USB): Selects for software upgrades by channel. Upgrades the software using the broadcasting signal. If the function is selected during the software transmission period, this function searches for available software and downloads the software and the "Software Update" option is changed to highlight.
Press OK Button to display the Software Update progress bar. This function will start software upgrading. The time required to download the software is determined by the signal status.Do not turn the TV on before software update has finished. The TV will turn on again automatically. has finished. The TV will turn off again automatically after completing the software.
5.5.9 Shop Mode: Use ◀▶ and OK buttons to select off/on.
5.5.00 HDMI CEC: To set CEC function to on or off.
6. LOCK MENU
6.1.1 Press the MENU button on the remote control to display the Main menu, and use the ▼▲
buttons to select the LOCK.
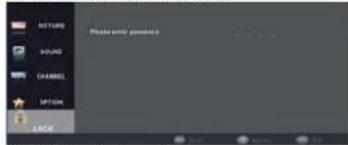
6.1.2 Use the function, must enter a four-digit password. The factory password is 0000.
Note: If you forget the password, you can use the super
password:9443.
6.1.3 You can lock system, set password, block program and set parental guidance Once you set the lock system
on you must input the password before searching the
channels or change any programs.
6.2 Hotel Mode:
Please press MENU key first, and then press number key "1001" to enter into Hotel Mode.

Hotel Mode :
Hotel mode is set "ON", these below functions will be unavailable
- Auto Tuning
• Color temperature
• Balance
- Sound mode
• Auto Volume
- Manual Tuning
- Clock
Source lock: you can't change the source, when set to "Yes".
Default Source: Choose source, the options as follow:OFF/ATV/AV/PC/SCART/YPbPr/HDMI1/HDMI2/HDMI3/USB,press the ◀button to select the desired source
Default Prog: In TV mode, you can select a channel number to be set as the TV present channel. Press the button to select the desired channel number
Default Volume: Set default volume.
Max Volume: Set max volume limited. This option allows you to set the Max Volume Level.
Import Database: You can use the U disk to import the Source lock / Default Source / Default Prog / Default Volume/ Max Volume database.
Export Database: You can use the U disk to export the Source lock / Default Source / Default Prog / Default Volume/ Max Volume database,
Clear lock: Clear Source lock / Default Source / Default Prog / Default Volume/ Max Volume set
7.USB PLAY
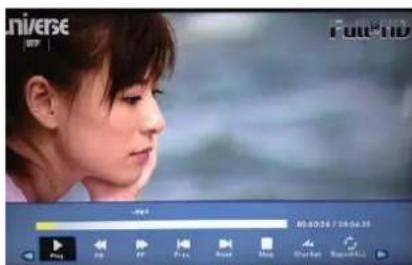
Press source key, and select USB in source list, press OK button to enter the USB menu. Please make sure that the USB device have plugged in the slot. There are four type media item can be selected, such as photo, music, Movie, and text. Select the type media item by pressing ▶press OK button to enter the disk selection menu.

Press the to select the right disk and folder press
OK to . Press EXIT button to back to the media type selection menu.
Select the media file by pressing and OK button, then the preview frame will pop up. Press the ▶ button to play the media
PHOTO

natural_image
Coastal landscape with a clear blue sea and grassy shoreline under a clear sky (no text or symbols visible)
Select one and press OK to view, and it will display all the picture in the folder automatically. Press ENTER to display the following menu, then you can press to select them.

Press to play or stop.

Press to view the previous picture.

Press to view the next picture.

Press to stop and back to the previous folder.

Press to play all the pictures repeatedly in the current folder. Press ENTER to select the repeat mode: Repeat 1/ALL/None

Press to play or stop the background music. Note: Image le during playback, background music if you want to join, please sendmusic les and picture lesin the same folder.

Press to view the list of pictures.

Press to display the information of the current picture(Rresolution/Size/Date/Time)

Rotate clockwise.

Rotate counterclockwise.

Zoom the picture out.

Zoom the picture in.

Zoom out the picture first. Highlight the icon and press ENTER, then press to
▼▲◀▶ move the picture.
Music
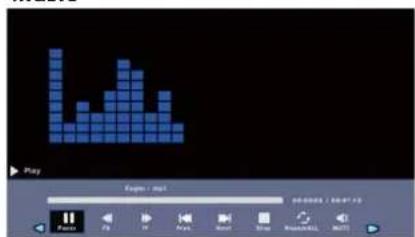
Press ENTER to display the menu.

Press to play or stop.
Press to play slower.

Press to play faster

Press to view the previous music

Press to view the next music

Press to stop and back to the previous folder.

Press to play all the pictures repeatedly in the current folder.
Press ENTER to select the repeat mode: Repeat 1/ALL/None.

Press to Mute or cancel.

Press to view the list of music.

Press to display the information of the current picture(Rresolution/Size/Date/Time).

Press to go the point you want to play.
Movie
Press to play or stop.
Press to play slower.
Press to play faster.
Press to view the previous movie.
Press to view the next movie
Press to stop and back to the previous folder.
Press to play all the pictures repeatedly in the current folder.
Press ENTER to select the repeat mode: Repeat 1/ALL/None
Set A - B to play repeatedly.
Press once to set A, and press again to set B, then press the third time to cancel.
Press to view the list of movie.
Press to display the information of the current picture(Rresolution/Size/Date/Time).


TEXT
Press to ▶ and select previous / next page, Input the number key and OK to jump to the page you want.
USB multimedia playback format
- Photo: jpg
- Audio : .mp3
• Video : .avi /.mp4 - Text: .txt
Note:
-
USB HDD compatibility is not assured
-
Some format video is not played for some _le reason
- Haier will not bear any responsibility for saving facility quality problem or date missing.
8.EPG Menu(Electronic Program Guide).
The EPG (Electronic Program Guide) Menu provides you with detailed broadcast program information. Press the GUIDE Button and a pop-up Menu will be displayed with program information about the channel you are currently watching. You will be able to see up to seven days of program information. To view the next day or more use the ▼▲ Buttons to highlight the date and then press the ◀► Buttons to scroll through the available dates.
The EPG menu is used to look at what is being broadcasted on DTV or Radio channel in a day. To access the EPG menu, press the GUIDE button following menu will be displayed:

9. Record the program:
9.1 Press the remote control red key, you can set the program to be recorded.
9.2 To record the program you are currently watching press the REC Button and a red REC icon will appear on the screen.
The record time/ length and remaining record time will be displayed in the menu below.
![the hike 16 The HITS Masker Hits [00:00:01] 22:04](/content/2026/06/1278283/images/d4c184077986f328bba7af4677f389d477f9e47f769734111f7b5a7a72e6a3fe.jpg)
9.3 To reveal the menu press the REC Button again. To stop recording, press the Stop Button. You may also enter the Media Player Menu to view your recorded programs via Movie mode.
9.4 Play the recording:
The program recorded on the "USB" will be saved in the folder "usb record" on the device. You can play it in PVR File System and in File manager submenu.
9.4.1 The USB storage size can be between 128MB and 500GB in size, but for practical use 2GB to 500GB is recommended.
9.4.2 Video may become pixelated when Video bit rate is too low. This can be caused by connecting a USB extension cable instead of plugging the USB directly into the TV.
Note: Ensure the storage device used to record is inserted into the USB Input on the back of the unit and is compatible for recording. If your storage device is not compatible, you will be asked to format it. Enter the PVR File System menu and select Device List to format your device. During recording, only the Stop functions is available. There will be no record function, when the channel is CI+ channel.

10. Time Shift
This TV allows you to pause and record the currently watched digital program to a USB storage device, and to resume to the point where it was paused.
10.1 While in the DTV input source, insertUSB storage device to the USB port on the side of your TV.
10.2 Press the ▶ button to pause the program you are watching to activate Time Shift function. The below menu will be displayed. This Menu will auto disappear after several seconds.

10.3 Choose the option and press OK to resume playing, and a white play icon will appear at the right of the screen, which shows that time shift is being performed.
10.4 When the ▶ menu disappeared, press the button, the menu will appear again. To stoptime shifting, press the Stop Button or move the cursor to select the Stop option when the menu is on, and then follow the pop-up guide.
Note:
Ensure the storage device used for recording is inserted into the USB Input on the back of the unit and is compatible for recording. If your storage device is not compatible, you will be asked to format it. In Setup menu, enter the PVR File System submenu and select Device List to format your device. All the functions (Play, FB, FF, Pause and Stop) in the menu can only be performed when the menu is on. Ensure the storage device used to record is inserted into the USB Input on the back of the unit and is compatible for recording. If your storage device is not compatible, you will be asked to format it. Enter the PVR File System menu and select Device List to format your device. During recording, only the Stop functions is available.
There will be no record function, when the channel is Cl+ channel.
05 Trouble shooting
| Trouble phenomenon Symptom | Inspection Check | |||
| Picture | Audio | |||
 | Snow |  | Noise | antenna position, direction or connection |
 | Ghost |  | Normal audio | antenna position, direction or connection |
 | Interference |  | Noise | electronic equipment, car/ motorcycle, fluorescent light |
 | Normal Picture |  | Mute | Volume(check if mute is activated or if the audio system connections are not correct) |
 | No picture |  | Mute | Power cord is not inserted Power switch is not opened Contrast and brightness/volume setup Press standby key on the remote control for inspecting |
 | No colour |  | Normal audio | Colour control |
 | Picture breaking up |  | Normal audio or weak | retune channel |
 | No colour |  | Noise | TVsystem |
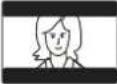 | There is black bar on top and bottom |  | Normal audio | Change aspect to zoom |
Trouble Shooting
| My TV does not display the picture on my laptop / PC when connected. | Most PC's and laptops when connected with a VGA Plug (the blue 15 pin plug on your PC or laptop) require you to press some buttons on your key board to get a picture on a TV or other external display. This is usually the F7 (Dell) or F4 (HP / Samsung) or F5 (Toshiba). On laptops, you have to press the "Fn" key at the same time as the "F" key. |
| I have connected my PC/Laptop to the TV and get a picture but no sound. Why ? | The VGA cable only carries the video or picture information. You need to connect a separate cable connected to the earphone socket (3.5mm jack) on you PC/Laptop to the 3.5m (PC Audio IN) socket on your TV. You will need to select "PC" using the Source button on your remote. Alternatively connect your PC/Laptop using a HDMI cable if you PC/Laptop has a HDMI connector. HDMI is both audio and video. |
| The picture is not auto resizing when changing channels. | Check that the TV picture Aspect Ratio is set to 'Auto' on all inputs ATV, DTV, SCART, HDMI 1, 2 etc.To set the aspect ratio, (Auto, 4:3 or 16:9). Press Source button start at ATV and repeat the sequence below for all input sources ATV, DTV, SCART, HDMI 1 and 2 as each input source is controlled separately.Press TV Menu buttonPress Right Arrow to access Picture sub menuPress Down Arrow to select Aspect RatioSelect AutoPress ExitRepeat for all input sources. |
| I have just plugged in a DVD player or another item into my TV and it doesn't work. | This is applicable to any item of equipment plugged to the TV1. Turn both TV & DVD player off (plugs out of the wall socket, not standby).Turn off any equipment connected to the SCART socket.Disconnect the SCART plug from the TV.Plug in and turn TV onPlug in and turn DVD player onSelect HDMI from Source MenuPress play on DVD player and check movie plays okNOTE: The SCART socket has priority over HDMI and it is important that the equipment connected to the SCART socket on the TV is switched OFF (not in standby).Please follow this information. If the advice works and the DVD player works, the TV is OK it is just a bit confused.Probably HDMI plugs have been removed and plugged back in when the TV is switched on.Never remove or plug in HDMI cables or any digital equipment with the equipment switched on.Always switch off all equipment when unplugging or connecting any digital equipment. |

Trouble Shooting Digital TV Problems and possible Solutions.
Picture Breaks into Pixels
A typical example of a reception problem includes the break up of pictures (pixilation) or the picture freezing, sometimes there are clicking or squeaking sounds or the sound drops out or there is NO reception at all. Your picture may break into pixels due to the digital video signal dropping. The signal dropping may occur because of either problems with weak signals (see TV Aerials) or if you are connected by cable a weak cable signal. If the problem is weak signals, use an amplifier to strengthen the signal. A cable technician can help you install an inline amplifier or a pre-amplifier. This will boost your signal strength and fix the pixel problem.
If you are receiving your TV signal by satellite, check your dish has not moved following high winds, or that the signal is blocked by trees. Trees can be a problem as the TV signal can change depending if a tree between the satellite dish and satellite is in bare or in full leaf.
Missing channels
It may be that you find that there are channels missing, or you're receiving channels from the wrong region. Sometimes the interactive services (red button) doesn't work. This is usually caused by weak signal, see TV Aerials
TV Aerials
Digital terrestrial television (Freeview) comes to your TV via an aerial, The old aerial that was good for analogue TV may not work well for digital so may need upgrading. If you are getting some but not all of the digital channels on DTV (Freeview) for example you get BBC1, BBC2, Channel 4, but not ITV or Channel 5, this is usually because your aerial is a narrow band type, and needs to be changed to a wide band type.
Faulty Leads and Cables
Check your TV. Are the leads at the back - to the mains, the aerial, the set-top box, the video or DVD player or recorder properly connected? SCART leads are known to work loose over time and can result in both audio and video (picture) problems. Either left or right or both audio is missing and the colours are poor or muddy looking. Push the SCART plugs firmly in, this should fix the problem.
HDMI plugs need to be pushed in firmly; it's only the last millimetre that the contacts make. Typically the black plastic part of the HDMI plug should be very close or touching the body of the TV or component. When plugging in any HDMI cables you may experience problems if the HDMI cables are plugged in when the TV or the other component is switched on. Always switch off both the TV and the component you are plugging in. If you have checked the plugs and sockets, switch off the TV and whatever you have plugged in to the TV and then switch them on again.
I have connected my PC to the TV. There is no sound.
If you connect your PC or Laptop to the TV using a VGA (15 pin Sub D) cable there is no audio, you need to connect a separate audio cable to the TV from the PC or laptop.
Unnatural Colours and Flesh Tones
Unnatural flesh tones and other colours could present another problem even in a new HDTV. This is due to the TV picture settings, which are optimized for a showroom environment. Fix this by changing the picture mode to natural in the picture menu. For more precision, try manually setting the colour, contrast and brightness options in the picture menu.
White Outlines
White outlines around objects and people generally appear either if the TV sharpness is set to very high, or if your television set uses some edge-enhancement processing technology. Go to the picture menu and adjust the sharpness till the white outline disappears. If edge-enhancement is enabled, try to disable it using the service menu.
Choppy Video
At times the video might become choppy. When this happens, check whether the signal is strong enough. If the signal is strong the problem is with the cable operator. If the signal strength is weak, try boosting the signal strength with the help of an amplifier.
The picture does not fill the screen
When connecting PC's or laptops to the TV, the picture may not fill the screen. Check the display settings on your PC or laptop (Windows > Start > Control Panel > Appearance and Personalization > Display settings) and select the best resolution. On your TV select: - TV Menu > Picture > Settings and then try AUTO, ZOOM1 or ZOOM2 for the best display.
USB Connection
The USB connection will work with *.jpg (photo) and *.mp3 (music) files. Please note the TV does not recognize Apple iPhone, or iPod's connected to the USB connector on the TV. The TV may play other files, but due to the multiple different file formats, there is no guarantee that these other file formats will work.
06 Specification
50" Ultra HD Digital LED LCD TV
| Television picture quality: | Ultra HDIntegrated digital.Screen Size: 127cmResolution 3840 x2160 pixels 50Hz. |
| DTV Tuner Decorder | DVB-T, DVB-C16/32/64/128/256 QAM modulationMPEG2,MPEG4,H.264 |
| Connectivity: | 3 HDMI sockets.1 SCART socket.PC input socket.Component video socket.Composite.1 USB port.1 Headphone port.Supported Systems:PAL+SECAMStorage channel number: ≥400CH(DTV),100(ATV)TV (RF):75Ω ImbalanceYPbPr/HDMI Video Input:480i, 480p, 576i, 576p, 720p, 1080i, 1080p |
| Sound quality: | NICAM stereo sound system.2 x 10 watts RMS power output. |
| Standby Power consumption | ≤0.30W |
| Digital features: | Digitally interactive.Digital text.Digital video broadcasting (DVB) subtitles available.Auto setup.Auto scan for new channels.Now and next programme guide.7 day electronic programme guide (EPG).Top upTV compatible.CI slot.Audio description compatible. |
| Additional features: | UHF/VHF tuner;Sleep timer;Child lock;Picture and textRemote control batteries required 2 x AAA (included).VESA Mount Size: 400 x 200 mmPackage Size (WxHxD): 1216x185x772 mmSet Size (WxHxD) with Stand: 1117x692x242 mmSet Size (WxHxD) without Stand: 1117x650x59 mmPackage weight : 21.7 kgSet weight with stand: 18.4 kgSet weight without stand: 15.7 kg |
* The part specifications of this TV set provided here are for reference only.
Differences may occur as product technology is updated.
Design and specifications are subject to change without notice.
Scart Output description :
- When current source is ATV/AV/SCART, scart output signal is ATV.
- When current source is DTV, there will be no SCART output signal.
Haier
Haier
RISQUES D'ELECTROCUTION NE PAS OUVRIR

natural_image
Technical line drawing of a flatbed electronic device with internal components and an open panel (no text or symbols)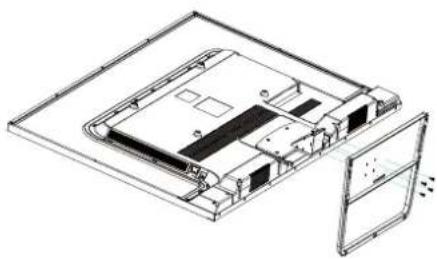
natural_image
Technical line drawing of a device chassis with internal components and an open lid (no text or symbols)REMARQUES SUR L'INSTALLATION
natural_image
Technical line drawing of a mechanical or architectural component with no visible text, numbers, or symbols.
natural_image
Technical line drawing of a mechanical assembly with no visible text or symbolsOption 5 VGA (Sub-D 15 broches)
natural_image
Technical line drawing of two mechanical components with a small inset showing a pin or bracket (no text or symbols)FR
UTILISATION

1.8. CI information (Informations relatives à la CI) (en option):
- MENU PICTURE (IMAGE)
natural_image
Coastal landscape with blue sea and green hillside under clear sky (no text or symbols)


- Contents
- Safety Warnings
- Introduction
- Remote Control
- Operation
- Trouble shooting
- Specification
- WELCOME
- IMPORTANT INFORMATION
- Safety notice
- WARNING AND CAUTIONS
- Main features
- INSTALLATIONCAUTION
- PC
- Base Stand Assembly Instruction
- INSTALLATION NOTES
- WALL MOUNTING INSTALLATION GUIDELINES
- Connecting to your HaierTV
- Connecting a DVD player / Satellite / cable set top box receiver / games console / PC or Laptop
- Option 1 SCART
- Option 2 HDMI1/HDMI2/HDMI3
- Option 3 AV AudioVisual (Yellow/White/Red)
- Option 4 YPBPR
- Option 5 PC (15pin Sub-D)
- Option 6 USB
- OK button.
- Option 7 HEADPHONE OUTPUT
- Option 8 DIGITAL AUDIO OUTPUT(COAXIAL)
- COMMON INTERFACE
- Warning
- TELETEXT
- Installation Guide
- Tuning setup menu
- ATV Manual tuning
- 1.4DTV Manual Tuning (DVB-T)
- DTV Manual Tuning (DVB-C)
- Channel labeling
- Delete:
- Move:
- Skip:
- — Fav:
- Schedule list:
- Scheduled Record:
- 1.8.CI information: (optional)
- Signal Information (Only for DTV)
- 2.PICTURE MENU
- Note
- 3.SCREEN
- 4.SOUND MENU
- 5.OPTION MENU
- Operation
- LOCK MENU
- 7.USB PLAY
- TEXT
- USB multimedia playback format
- Note:
- 8.EPG Menu(Electronic Program Guide).
- Record the program:
- Play the recording:
- Time Shift
- Trouble Shooting Digital TV Problems and possible Solutions.
- Picture Breaks into Pixels
- Missing channels
- TV Aerials
- Faulty Leads and Cables
- I have connected my PC to the TV. There is no sound.
- Unnatural Colours and Flesh Tones
- White Outlines
- Choppy Video
- The picture does not fill the screen
- USB Connection
- Scart Output description :
- Haier
- RISQUES D'ELECTROCUTION NE PAS OUVRIR
- REMARQUES SUR L'INSTALLATION
- Option 5 VGA (Sub-D 15 broches)
- UTILISATION
Brand : HAIER
Model : LE50H6500
Category : Television