
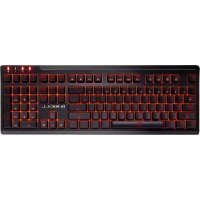
RIPJAWS KM780 RGB - Keyboard G.Skill - Free user manual and instructions
Find the device manual for free RIPJAWS KM780 RGB G.Skill in PDF.


| Product Type | Mechanical Gaming Keyboard |
| Model | RIPJAWS KM780 RGB |
| Brand | G.Skill |
| Dimensions (W x D x H) | 475 x 190 x 35 mm |
| Weight | 1.2 kg (with wrist rest) |
| Cable Length | 2.0 m braided USB cable |
| Connection Type | USB 2.0 (with pass-through) |
| Switch Type | Cherry MX (Blue, Red, or Brown options) |
| Backlighting | Per-key RGB, 16.8 million colors |
| Polling Rate | 1000 Hz |
| Key Rollover | Full N-key rollover |
| Programmable Keys | Yes, via G.Skill software |
| Onboard Memory | Yes, 5 profiles |
| Media Controls | Dedicated media keys and volume wheel |
| Wrist Rest | Detachable magnetic wrist rest |
| Compatibility | Windows 7, 8, 10; macOS limited |
| Power Supply | USB powered; 5V DC, 500 mA |
| Cleaning Instructions | Disconnect from computer; use compressed air or soft damp cloth; avoid liquids |
| Safety | Keep away from moisture; do not disassemble; for indoor use only |
| Spare Parts / Repairability | Keycaps and switches are replaceable; other components require professional service |
| Warranty | 2 years limited warranty |
Frequently Asked Questions - RIPJAWS KM780 RGB G.Skill
User questions about RIPJAWS KM780 RGB G.Skill
0 question about this device. Answer the ones you know or ask your own.
Ask a new question about this device
Download the instructions for your Keyboard in PDF format for free! Find your manual RIPJAWS KM780 RGB - G.Skill and take your electronic device back in hand. On this page are published all the documents necessary for the use of your device. RIPJAWS KM780 RGB by G.Skill.
USER MANUAL RIPJAWS KM780 RGB G.Skill
Link Program to a Profile
Save Profile to Device Memory
8 Profiles
Create a Profile
Select a Profile
Delete a Profile
Copy a Profile
Export/Import a Profile
Save a Profile
9 Modes
Create a Mode
Select a Mode
Activate a Mode
Delete a Mode
Copy a Mode
Export/Import a Mode
Mode Management
11 Keys
Introducing Programmable Keys
Customize a Programmable Key
Key Assignment
15 Macros
Introducing Macros
16 Macros (Keystroke)
Create a Macro
Delete a Macro
Copy a Macro
Export/Import a Macro
Record a Macro
Edit a Recorded Macro
Insert Commands in a Macro
Update Edited Macros
21 Macros (Text)
Create a Text Macro
Edit a Text Macro
Delete a Text Macro
Copy a Text Macro
Export/Import a Text Macro

natural_image
Abstract geometric pattern of intersecting diagonal lines (no text or symbols)Table of Contents
23 Lighting Profiles
Introducing Lighting Profiles
Lighting Effects
Create a Lighting Profile
Customizing Your Lighting Profile
Add/Remove a Color
Change a Color
28 Setting
Introducing Keyboard Settings
Polling Rate
N-Key Rollover
Timer Setting (Timer Key)
Repeat Rate Acceleration
Repeat Delay
LED Sleep Setting
32 Lighting
Introducing Lighting
Per-Key Lighting
Adjust Brightness
Disable Volume Display
Disable All Lighting
Enable Lighting Effect
Editing Options in Lighting Effect
Enable Static Base Color
38 Color Palette
Introducing the Color Palette
Accessing the Color Palette
Customizing the Color Palette
40 Additional Settings
Driver Software Settings
UI Language
Keyboard Layout
Update Firmware
Export All Profiles and Settings
Import All Configuration and
Settings
Reset All Current Settings
43 Hardware
Introducing the Keyboard Hardware
45 On-the-fly Macro
Introducing On-the-fly Macro
Recording an On-the-fly Macro
47 Support
Website FAQ
Online Forum
Technical Support

natural_image
Abstract geometric pattern of intersecting diagonal lines (no text or symbols)Introduction
The G.SKILL Driver System is the software system that allows you to fully control and manage macros, lighting effects, and various customizations for your RIPJAWS KM780 RGB mechanical gaming keyboard.
To help you through this manual, here are some useful key terms to keep in mind:
- Profile:
A full collection of settings and modes. Each profile has its own unique list of modes.
- Mode:
A single complete set of key assignments, keyboard settings, and lighting effects. A single profile supports up to three modes, which can be stored in the on-board memory of your keyboard.
- Key:
Refers to the keyboard input. Each key may have its own default function, or it can be programmed to have a customized function through the software.
- Macro:
A powerful function that allows you to execute a series of key presses with the press of a designated key.
To open the G.SKILL Driver System, go to the system tray and double click on the G.SKILL icon.
You are now ready to begin.

natural_image
Abstract geometric pattern of intersecting diagonal lines (no text or symbols)Introduction
Layout Overview
The G.SKILL Driver System has four main sections:
1. Profiles & Modes:
Create and manage profiles and modes. Activate and store a profile to the keyboard.
2. Mode Settings:
Customizable settings for each mode.
3. Macros & Lighting Profiles:
Create and manage your library of macros and lighting profiles, which can be applied to mode settings.
4. Additional Settings:
Access to UI language settings, keyboard layout settings, firmware and software version information, profile reset, and more.

Profiles & Modes
Introducing Profiles & Modes
A profile is a collection of modes and settings that can be saved to the on-board memory of your keyboard, allowing the customization to follow the device, no matter which computer it's connected to. Each profile can contain multiple modes, but only three modes are active at any given time.
A mode is a single complete layout of key assignments, keyboard settings, and lighting effects.
This section will help you manage your profiles and modes.

natural_image
Abstract geometric pattern of intersecting diagonal lines (no text or symbols)Profiles & Modes
Link Program to a Profile
You have the option to automatically load a profile when launching a certain program.
Check the box next to "Link Program" and select a *.exe file to link the selected profile to a program.
Save Profile to Device Memory
Your RIPJAWS KM780 keyboard can store a single profile (of three modes) within the keyboard on-board memory. This is equivalent to 3 unique sets of keyboard settings, including key assignments, macros, lighting effects, and more.
After creating a new Profile, remember to click "Save to Device Memory" to save that profile into the keyboard onboard memory.
After saving the profile to device memory, further setting changes to the "Customize", "Setting", and "Lighting" tab will be automatically updated and saved to the keyboard onboard memory.
When switching to another mode within the saved profile, the selected mode will also be automatically saved to the keyboard onboard memory.
Once the profile and modes are saved to the keyboard, a small keyboard icon will appear to the left of the profile or mode name.

Profiles
Create a Profile
To create a new profile, click on the "+" button located under the profile name. A new profile will be generated using default settings.
Select a Profile
Click the upside-down triangle to the right of the profile name for a drop-down list of available profiles. If only one profile is available, the drop-down list will be unavailable.
Delete a Profile
Click the trash bin icon located below the profile name to delete a profile. A confirmation dialogue window will pop up to confirm the deletion. A profile cannot be deleted if there are no other selectable profiles or if the profile is currently in use by the device.
Copy a Profile
Click the gear icon below the profile name, then choose "Copy" from the list to make an exact copy of the profile, including the modes created under the profile.
Export/Import a Profile
Click the gear icon below the profile name, then choose "Export" (or "Import") from the list. A window will prompt you to choose a location and a file name to save (or load) the profile to (or from) a *.profile file.
Save a Profile
When a new profile is created, any further setting changes will not be automatically saved to the onboard memory until "Save to Device Memory" is clicked.
To make sure the current profile settings are applied, click "Save to Device Memory".

Modes
Create a Mode
To create a new mode, click on the "+" button located under the mode name. A new mode will be generated using default settings. The newly created mode will be automatically saved to the keyboard onboard memory.
Select a Mode
Click the upside-down triangle to the right of the mode name for a drop-down list of available modes. The drop-down list will be unavailable if there are less than three modes in the current profile. Selecting a mode will automatically save the mode to the keyboard onboard memory.
Activate a Mode
The red icon designated "M1", "M2", and "M3" indicates the current active mode. This matches the mode keys with the same names on the keyboard.
Delete a Mode
Click the trash bin icon located below the mode name to delete the currently selected mode. A mode cannot be deleted if there are no other selectable modes or if the mode is currently in use by the device.
Copy a Mode
Click the gear icon below the mode name and select "Copy" from the list to make an exact copy of the mode.
Export/Import a Mode
Click the gear icon below the mode name and select "Export" (or "Import") from the list. A window will prompt you to choose a location and a file name to save (or load) the mode to (or from) a *.mode file.

Modes
Mode Management
Click "M1", "M2", or "M3" to select the corresponding mode to edit. A selected mode will be highlighted in red. The mode keys on your keyboard will also change accordingly to the currently selected mode.
Each mode has its own "Customize", "Setting", and "Lighting" settings. As long as the profile is currently saved to the keyboard onboard memory, any setting changes under the mode will be automatically saved.

Keys
Introducing Programmable Keys
Under the "Customize" menu, you can customize the function of each key on the keyboard. When the mouse cursor hovers over a programmable key, the display will show the key (on the right) and its current function (on the left).
Example: The image on the right shows the "G" key, and the circular icon with a slash shows its current function is set at default.

Keys
Customize a Programmable Key
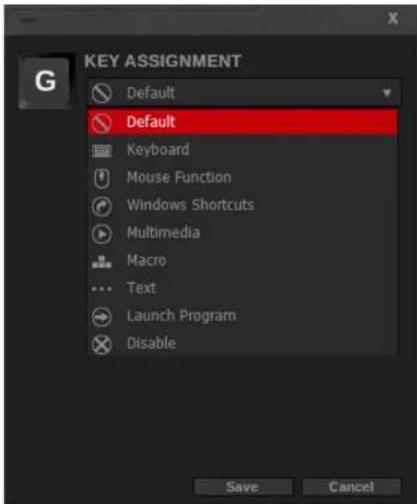
Click on the key you wish to customize, and a "Key Assignment" window will pop up. Choose from the drop-down list for the desired function. Macros can be selected here to customize a particular key to a macro. Once the desired function is selected, clicking "Save" will save the setting to the keyboard onboard memory and return to the "Customize" menu.
Tip: Make sure you are customizing to the correct mode by selecting the desired mode (M1, M2, or M3) before customizing the key assignment.

Keys
Key Assignment
A variety of functions can be assigned and customized to a key. See below for a list of functions.
- Default
Sets the key to its default function.
- Keyboard
Press a keyboard key to assign its function to the selected key.
- Mouse Function
Sets a mouse function, such as left click, right click, scroll click, double click, scroll up/down, or forward/backward to the selected key.
- Windows Shortcuts
Sets Windows functions, such as open task manager, open start menu, show desktop, close window, cut, copy, and paste.
- Multimedia
Sets multimedia playback functions, such as volume up/down, mute, play/pause, and previous/next track.
Keys
- Macro
Sets a macro to the selected key.
Select a macro from the "Assign Macro" drop-down menu to set a programmed macro to the selected key.
Additional options can be set for the macro to run once, multiple times, toggle function (press selected key once to start, then press a second time to stop), and continuous activation while the key is held down.
To add or edit a macro, click on the "+" button or the pencil button below the "Playback Option". This will jump to the Macro menu for you to make further edits. To delete the currently selected macro, click on the trash bin icon.
- Text
Sets a text-only macro to the selected key. Use the drop-down list to select a text macro.
To add or edit a text macro, click on the "+" button or the pencil button below the drop-down list. This will jump to the Text Macro menu for you to make further edits. To delete the currently selected text macro, click on the trash bin icon.
- Launch Program
Opens a designated program (*.exe), or opens a website in your default browser.
- Disable
Disables the selected key.

Macros
Introducing Macros
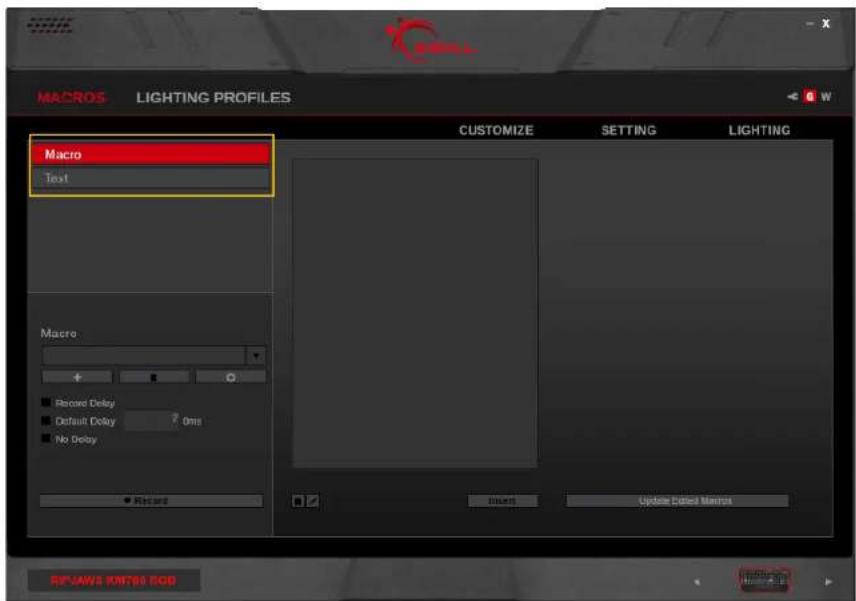
There are two kinds macros you can set: keystroke macro and text macro.
Macros are a series of keypresses, commands, and/or delays that can be set to activate when a certain key is pressed. This may be useful for repeatable actions by creating a string of keyboard shortcuts, or to automatically insert a string of text with a single keypress.
Use the keystroke macro if your macro requires keystroke combinations or custom delays.
Use the text macro if you are looking to insert a string of text.
Macros (Keystroke)
Create a Macro
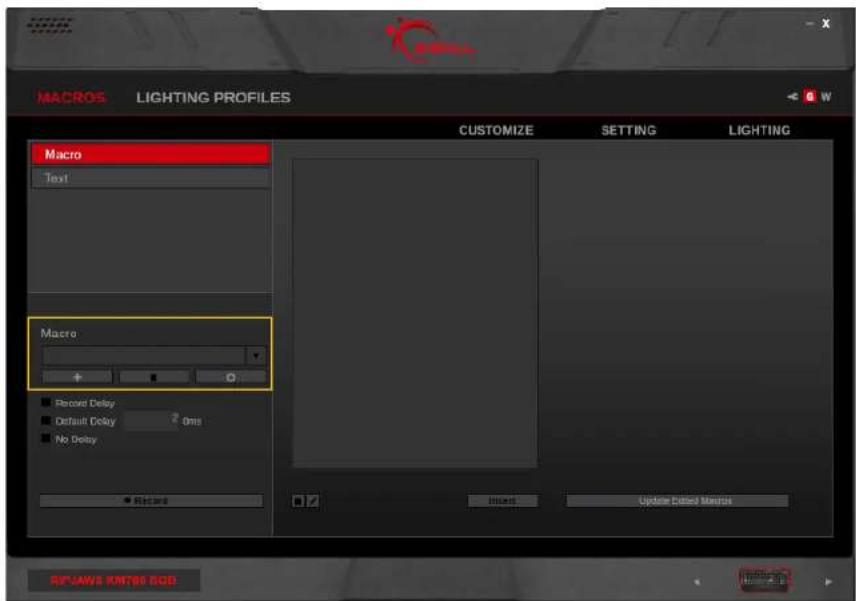
In the left column, click on the "+" button to create a new macro. Options for recording a macro will be available when a macro is created.
Delete a Macro
Click the trash bin icon below the macro name to delete the current macro.
Copy a Macro
Click the gear icon below the macro name and select "Copy" to make a duplicate of the current macro.
Export/Import a Macro
Click the gear icon below the macro name, and select "Export" (or "Import") to save (or load) the macro to (or from) a *.macro file.
Macros (Keystroke)
Record a Macro
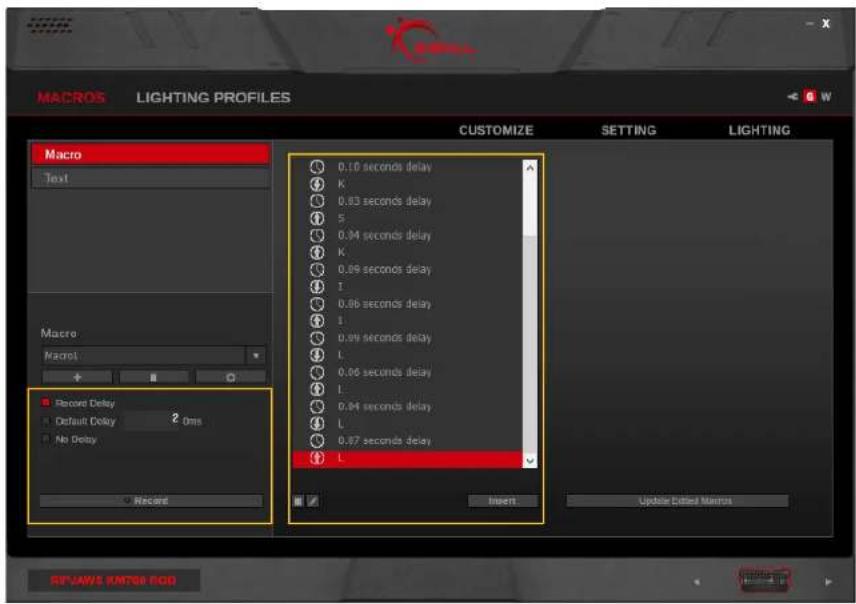
Click the "Record" button on the bottom of the left column to begin recording a macro. The keystrokes and delays of the recorded macro will appear in the middle column.
Note: Before recording the macro, you may choose to record the delay, use a default delay, or no delays. Default delays can be changed in 10ms increments. Type "2" in the textbox for 20ms, and "20" for 200ms.
To end recording, click "Stop" on the bottom of the left column.
Tip: On some systems, a delay of 30ms would work better than 20ms for actions such as accessing menus or switching applications.
Macros (Keystroke)
Edit a Recorded Macro
You can delete or edit a specific macro command, after recording the macro.
To delete a specific macro command, click on the macro command you wish to delete, then click the trash bin icon on the bottom left of the middle column.
Note: If the keystroke has a related action, the related action and delays will be deleted at the same time. For example, a recorded mouse click has a down-stroke, delay, and up-stroke. Deleting either the down-stroke or up-stroke will delete both actions and the delay in between.
To edit a specific macro command, click on the macro command you wish to edit, then click on the pencil icon. A field will appear to allow you to change the command.

Macros (Keystroke)
Insert Commands in a Macro
Click the keystroke location you wish to insert an additional command. Then click "Insert" on the bottom of the middle column. Options will appear in the right column to allow inserting before or after the selected keystroke command.
You can choose to customize a delay, then click on "Record" in the right column to insert additional keystroke commands.
Click "Save" to save the changes.
Tip: If you want the macro to repeat, you can set "Toggle Macro On/Off" or "Continuous Repeat While Pressed" when assigning a macro to a key in the "Customize" menu. (Go to Customize > [click a key] > Key Assignment > Macro > Playback Option)

Macros (Keystroke)
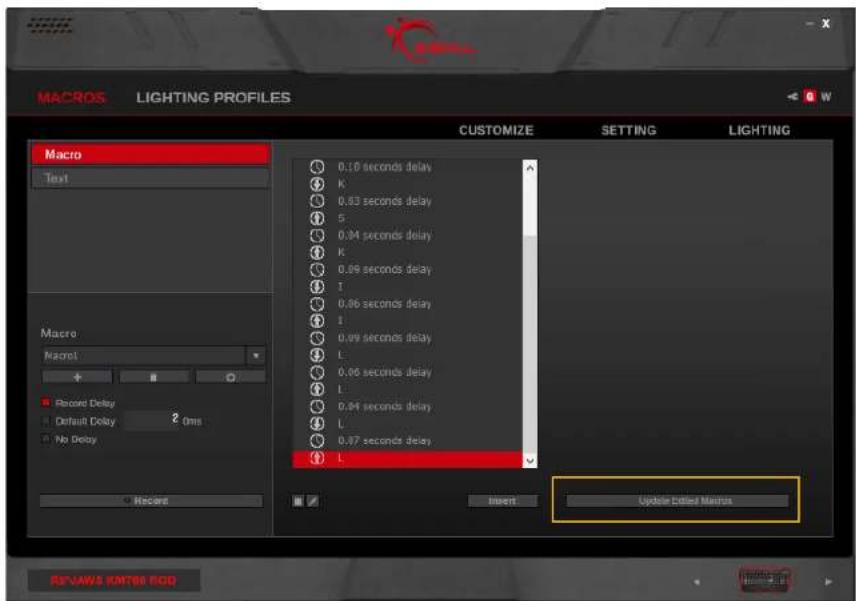
Update Edited Macros
After a macro has been edited, click on "Update Edited Macros" to make sure that the macros saved in the keyboard onboard memory are updated with any changes that have been made.
The "Update Edited Macros" button is also accessible from the "Customize" tab.
Macros (Text)
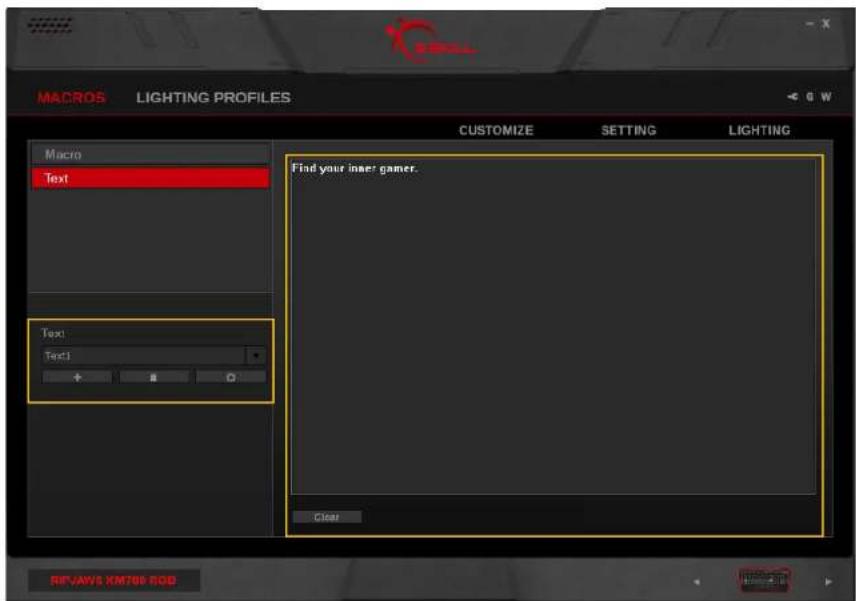
Create a Text Macro
Click the "+" to create a new text macro. Then type the desired text in the textbox on the right. The changes will be automatically saved.
Edit a Text Macro
The text in the textbox can be edited at any time, and the changes will be automatically saved. To clear the text in the textbox, click on "Clear" below the textbox.
Delete a Text Macro
To delete the currently selected text macro, click on the trash bin icon below the text macro name.
Macros (Text)
Copy a Text Macro
Click the gear icon below the text macro name, and select "Copy" to duplicate the currently selected text macro.
Export/Import a Text Macro
Click the gear icon below the text macro name, and select "Export" (or "Import") to save (or load) the text macro to (or from) a *.text file.

Lighting Profiles
Introducing Lighting Profiles
Lighting profiles are customizable lighting patterns that can be set under a mode and applied to your device.

Lighting Profiles
Lighting Effects
Available lighting effects and its description are listed below.
- Wave
A continuous wave of colors, moving across the keyboard.
- Breathing
All keys will brighten and dim simultaneously, from one color to the next.
- Cycle
All keys will change colors simultaneously, from one color to the next.
- Ripple\*
When a key is pressed, a circular colored lighting pattern ripples outward from that pressed key.
- Sonic\*
When a key is pressed, that key will brighten and spread in a single row toward both sides of the keyboard in the color of your choice.
- Changeling\*
When a key is pressed, that key will brighten and cycle through the set colors. If the same key is pressed while lit, then the cycle of colors will restart from the beginning.
- Checkpoint
When the number of keystrokes reach the designated amount, the entire keyboard will change to the next color point. The faster you type, the faster the keyboard will change color.
- Rain\*
Streaks of light will randomly fall across the keyboard in the colors you set.
* An additional per-key static base color can be set. This option is accessible in the "Lighting" menu.

natural_image
Abstract geometric pattern of intersecting diagonal lines (no text or symbols)Lighting Profiles
Create a Lighting Profile
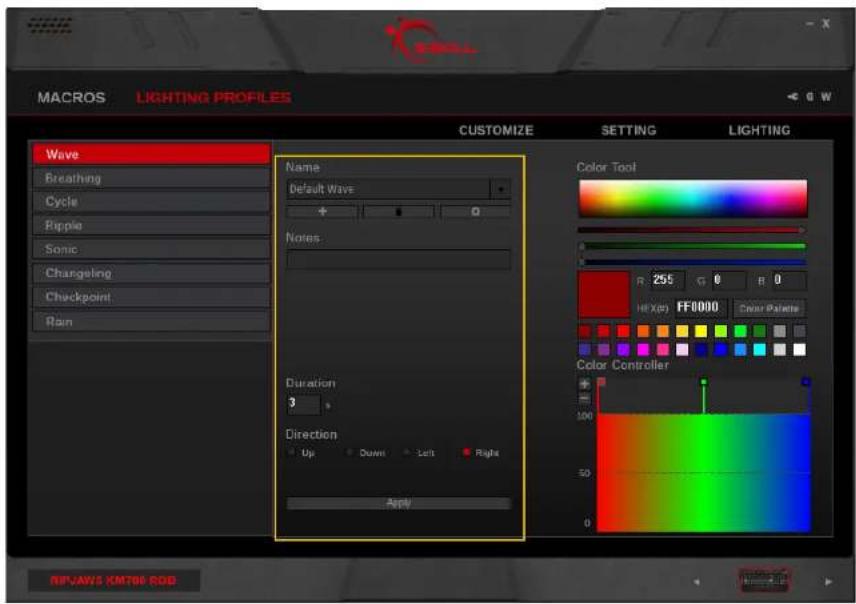
First, select a lighting effect type in the left column, then click on the "+" button under "Name" to create a new lighting profile.
Once a lighting profile is created, associated options will be available for customization.
Each lighting profile will be automatically saved within the software. To apply the lighting pattern to the device, please go to the "Lighting" menu and choose a lighting profile to apply.
If you want to apply the current lighting effect to your current mode, click on the "Apply" button at the bottom of the middle column.
Lighting Profiles
Customizing Your Lighting Profile
There are four main sections to this interface.
1. Notes:
Type here to add notes for each lighting profile. This may be useful for remembering color codes.
2. Duration/Keystroke/Direction:
Change the speed of how fast your lighting effect or colors change. If the lighting effect is directional, you can set "Up", "Down", "Left", or "Right".
3. Color Tool:
Use this section to pick and fine-tune your color. The color palette can also be customized with the colors you use the most often.
4. Color Controller:
Add or delete color points to edit the number of colors for the lighting profile. Drag a color point up or down to adjust brightness.

Lighting Profiles
Add/Remove a Color
To add (or delete) a color point, click on the "+" or "-" under "Color Controller" in the right column. A new color point will be added.
Change a Color
Click the square of a color point under "Color Controller", and then change the color by doing one of the following:
- Click in the color selection rectangle
- Click and drag the RGB color slider
- Enter the RGB value
- Enter the HEX color code
- Click a color in the color palette
Note: When adding a color point, the color point will be inserted at the mid-way point between the currently selected color point and the next one (to the right).
Note: The left-most and right-most color points cannot be deleted.

Setting
Introducing Keyboard Settings
The "Setting" menu allows you to set general settings for your device.
If the profile is already saved to the device memory, keyboard settings will be automatically saved to the device after it is changed.

Setting
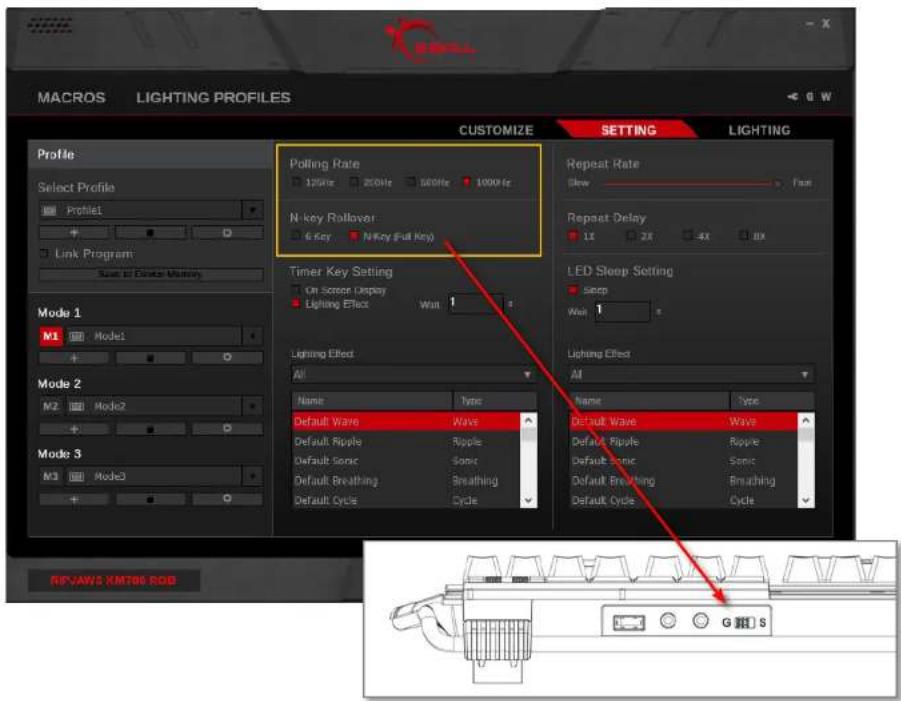
Polling Rate
Click to select the desired polling rate of your device. A higher number indicates a faster polling rate and faster response time. For gaming, 500Hz or 1000Hz is recommended.
N-Key Rollover
Check your keyboard to change this setting. A switch next to the USB pass-through port can be flipped to "G" for n-key rollover or to "S" for standard 6-key rollover.
Note: Some BIOS interface, non-Windows operating system, or legacy software may only have support for standard 6-key rollover.
Setting
Timer Setting (Timer Key)
Selecting "On Screen Display" (OSD) and/or "Lighting Effect" will enable the timer key, which is located above the "F4" key.
Enabling "On Screen Display" will open a pop up window, allowing you to set a text string to show on the top right corner of the screen when the time is up. Text color, size, and flash on/off can be customized.
Enabling "Lighting Effect" will allow you to choose from a list of lighting profiles to display on the device when the time is up.
When "On Screen Display" and/or "Lighting Effect" is enabled, the timer duration can be set in units of seconds.
After the timer function is enabled, press the timer key on the keyboard and the key will flash, indicating the countdown. To cancel the countdown or to snooze the timer, press the timer key again.

Setting
Repeat Rate Acceleration
Drag the slider to adjust how fast a key will repeat itself when the key is held down.
Repeat Delay
Allows you to choose the delay time before a key begins repeating itself when held down. 1X is a short delay; 8X is a long delay.
LED Sleep Setting
Allows you to enable and set a time delay for entering sleep mode. When the keyboard is idle for the set number of seconds, the LED lighting on the device will enter sleep mode. A custom lighting effect can be selected to be displayed when entering sleep mode. To wake from LED sleep mode, press any key.
Tip: If you want to turn off the LED lights for sleep mode, simply create a lighting profile with black color points. Black in RGB value is "000000".

Lighting
Introducing Lighting
Lighting may be customized and applied to your keyboard. There are options to easily set per-key lighting or a lighting effect.
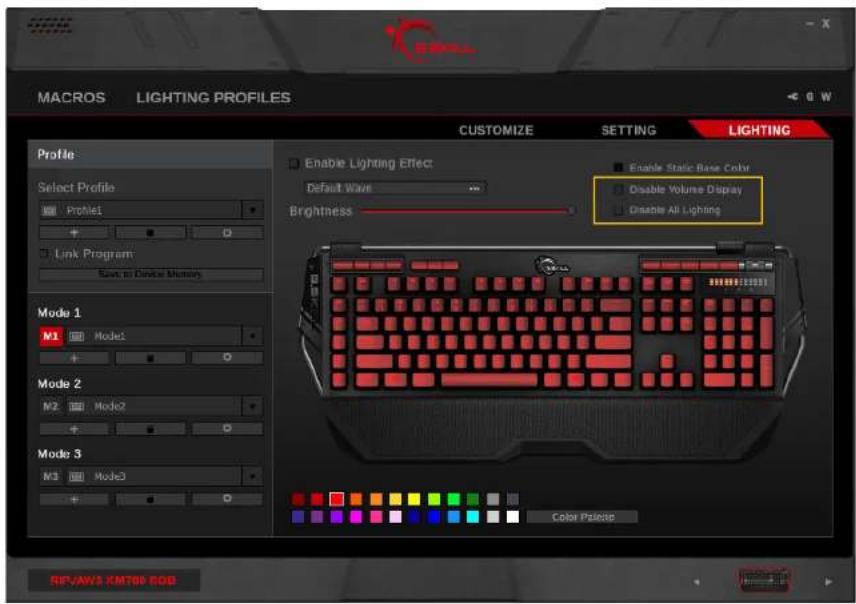
Checking or unchecking "Enable Lighting Effect" will allow you to set a lighting effect or static per-key lighting.
Additional settings on the right side allows you to disable LED lighting, disable the volume display lighting, or enable a per-key background base color with some lighting effects.
Note: Changes to lighting will affect the currently selected mode, so please make sure to select the correct mode before making changes to lighting.
Note: The lighting effect will only take effect if the current profile is saved to the device memory.

Lighting
Per-Key Lighting
Uncheck the box next to "Enable Lighting Effect" to set static lighting for each key. When unchecked, the color palette will appear at the bottom.
To change the color of a single key, click and choose a color from the color palette, then click on the key you wish to change.
To change the color of multiple keys, click and choose a color from the color palette, then click and drag the region of keys you wish to change.
Adjust Brightness
Drag the slider to adjust the brightness of the lighting. Sliding all the way to the left will turn off the lighting.

Lighting
Disable Volume Display
Check the box next to "Disable Volume Display" to disable the digital volume display on the keyboard.
Disable All Lighting
Check the box next to "Disable All Lighting" to disable all lighting on the keyboard.
Note: Any changes to a saved profile will be automatically updated and saved to the device. The software may be unresponsive for a few seconds while settings are being saved.
Lighting
Enable Lighting Effect
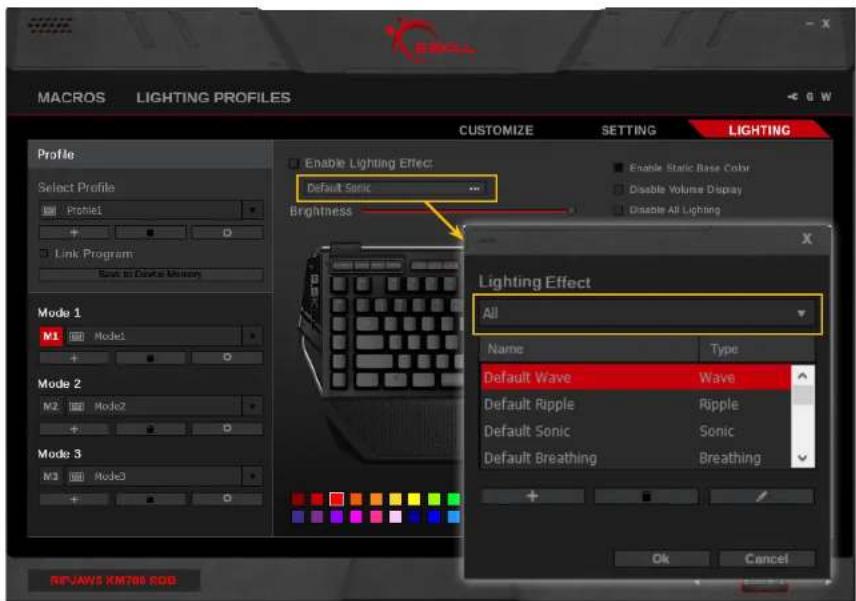
Check the box next to "Enable Lighting Effect" will enable active lighting effects.
Click on the box below "Enable Lighting Effect" will open a pop-up window that allows you to select and change a lighting profile. From this pop-up window, you can filter the lighting effects according to lighting effect type (or select "All"), and select the desired lighting profile from the list. Then click "OK" to confirm your selection.
Lighting
Editing Options in Lighting Effect
From the list of lighting profiles in the pop-up window, you can click the three icons below to add ("+"), delete (trash bin icon), or edit (pencil icon) the currently selected lighting profile.
Clicking on "+" or the pencil icon will jump to the "Lighting Profiles" menu.
Clicking on the trash bin icon will delete the currently selected lighting profile. The trash bin icon will not be available if the selected lighting profile is the only one of that type.

Lighting
Enable Static Base Color
Ripple, Sonic, Changeling, and Rain lighting profiles support a customizable static base color.
To set and enable the static base color:
- Select a lighting profile that supports static base color.
- Check "Enable Static Base Color", and the color palette should appear at the bottom.
- Configure a custom background pattern using the color palette to select the desired color, and then either click single keys on the keyboard or click-and-drag a region on the keyboard.
Note: Background base color is available for Ripple, Sonic, Changeling, and Rain lighting effects only. The checkbox for static base color will dim when other lighting effects are selected.

Color Palette
Introducing the Color Palette
The KM780 RGB keyboard software allows customization of the 24 color palette with a full range of RGB colors. Now you can edit and save your own custom colors to use in lighting effects and key lighting!
Accessing the Color Palette
The color palette can be accessed by clicking on the "Color Palette" button in the "Lighting Profiles" menu or the "Lighting" menu.
Note: The colors in both locations will sync, so your custom color palette will be accessible in both locations after the color palette has been saved.

Color Palette
Customizing the Color Palette
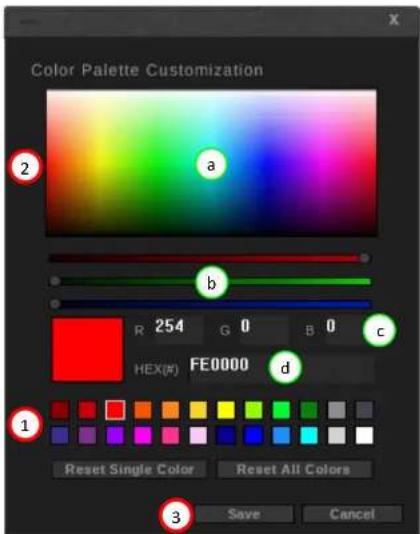
After clicking on the "Color Palette" button, a "Color Palette Customization" window will pop up.
To change a color:
- Click the color you want to change.
- Edit a color by (a) clicking on the color box, (b) dragging the RGB color bars, (c) editing the RGB values, or (d) editing the RGB Hex values.
- Click "Save" to save your customized color palette.
Reset the Color Palette
In the "Color Palette Customization" popup window, click on "Reset All Colors" button to reset the whole color palette to its default color values, or click on a single color you want to reset and click on the "Reset Single Color" button.
Additional Settings
Driver Software Settings
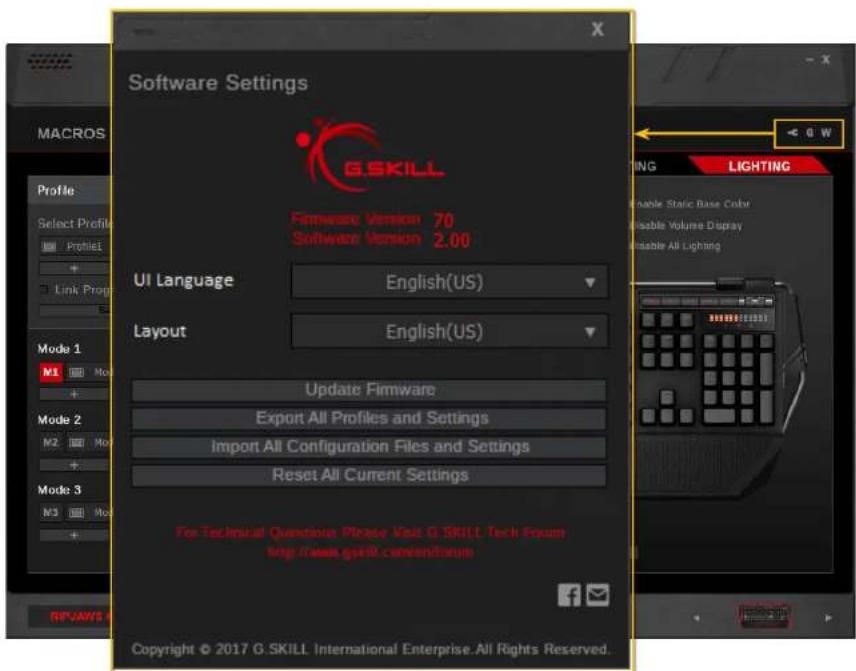
Click the wrench icon on the top right corner to access the driver software settings. From here, you can change UI display language, select keyboard layout, reset the current profile to default, export all current profiles and settings, import settings, and more.
Click the "G" button to visit the G.SKILL webpage.
Click the "W" button to view the warranty document. For a more complete warranty policy, please visit http://www.gskill.com/en/warranty/

Additional Settings
UI Language
Click to open a drop-down list for all supported display language. Software restart is required.
Keyboard Layout
Click to open a drop-down list for all supported keyboard layouts. Software restart is required.

Additional Settings
Update Firmware
Click to update firmware. No actions will be taken if the firmware is already updated.
Export All Profiles and Settings
This will export all profiles, macros, and settings to a specified folder location. A save dialogue will pop-up for you to select a folder location.
Import All Configuration and Settings
This will import the set of profiles and settings that was exported using the above option. Look for the "Setting.Set" file when prompted for the file to load.
Reset All Current Settings
Activating this option will reset the current profile to default values. All modes under this profile will be reset.
Hardware
Introducing the Keyboard Hardware
- On-the-fly Macro Record (MR) Key Press "MR" key once, [LED stays on], press a key to designate as macro key, [LED blinks], begin recording your key combination (delays included), and press "MR" key again to finish recording [LED off]. Now the designated macro key will activate the recorded macro when pressed.
- Dedicated Macro Keys These keys don't have a default function, so you can set macros to these keys.
- Mode Keys (M1-M3) Instantly switch between 3 different keyboard modes.
- Windows Lock Enables or disables the Windows key.

Hardware
5. Backlight Brightness Key
Cycle through keyboard backlight brightness.
6. Timer Key
Activate or deactivate timer function. For more information, see "Setting > Timer Setting".
7. Media Control
Control your media player. You can play, pause, stop, mute, or move to the next or previous track.
8. Volume Roller
Controls the system volume.
9. LED Volume Display
Displays the system volume.
10. Rollover Switch
Flip to "G" (gaming mode) to enable n-key rollover. Flip to "S" (standard mode) for standard USB 6-key rollover.
11. Audio Passthrough Jacks
Connect for line-out and mic-in audio extensions.
12. USB Passthrough Port
Easy access USB 2.0 port for low powered USB devices (e.g. flash drives, etc.); high powered devices (e.g. external hard drives, etc.) are not recommended.
13. Foldable Cable Holder
Flip the cable holder from below the keyboard to use.
14. Detachable Wrist Rest

natural_image
Abstract geometric pattern of intersecting diagonal lines (no text or symbols)On-the-fly Macro
Introducing On-the-fly Macro
The RIPJAWS KM780 series keyboard features on-the-fly macro recording, which means you can program keystroke patterns whenever you need, directly from the keyboard.
Being able to record macros on-the-fly is helpful when doing repetitive tasks that have a specific keystroke combination (such as casting spells or utilizing skills in a game) or combining two or more keyboard shortcuts while working on a document (such as Ctrl+B and Ctrl+U to bold and underline at the same time).

natural_image
Abstract geometric pattern of intersecting diagonal lines (no text or symbols)On-the-fly Macro
Recording an On-the-fly Macro
To record an on-the-fly macro on your KM780 keyboard:
- Press the "MR" (Macro Record) key. The "MR" key will light up.
- Press a key to assign it as a "Macro Key", so the macro will activate whenever that key is pressed. The "MR" key will blink while recording.
- Type the key combination you wish to program as your macro.
- Press the "MR" key to stop recording. The "MR" key will stop blinking.
- A macro is successfully recorded to the assigned key!
Note: Time delays will also be recorded, which can be edited in the software.
Note: "MR", "M1-3", special hotkeys, and media control keys cannot be set as a Macro Key.

⑤ Example: Pressing "G1" will now type out "GSKILL".

Support
Website FAQ
Our website has a FAQ section that may answer your questions. http://www.gskill.com/en/faq/
Online Forum
We have an online forum where you can discuss, ask questions, or get tips on G.SKILL products. http://www.gskill.us/forum/
Technical Support
Our technical support team can be contacted via email.
Global: techsupport@gskill.com
Europe: eurotech@gskill.com
North America: ustech@gskillusa.com
When submitting a technical support email, please include your system information (e.g. Windows version, motherboard model, G.SKILL Driver System software & firmware version, and device model) with a description of the issue.


- Profiles
- Modes
- Keys
- Macros
- Macros (Keystroke)
- Macros (Text)
- Table of Contents
- Lighting Profiles
- Setting
- Lighting
- Color Palette
- Additional Settings
- Hardware
- On-the-fly Macro
- Support
- Introduction
- - Profile:
- - Mode:
- - Key:
- - Macro:
- Layout Overview
- Profiles & Modes:
- Mode Settings:
- Macros & Lighting Profiles:
- Additional Settings:
- Profiles & Modes
- Introducing Profiles & Modes
- Link Program to a Profile
- Save Profile to Device Memory
- Profiles
- Create a Profile
- Select a Profile
- Delete a Profile
- Copy a Profile
- Export/Import a Profile
- Save a Profile
- Modes
- Create a Mode
- Select a Mode
- Activate a Mode
- Delete a Mode
- Copy a Mode
- Export/Import a Mode
- Mode Management
- Keys
- Introducing Programmable Keys
- Customize a Programmable Key
- Key Assignment
- - Default
- - Keyboard
- - Mouse Function
- - Windows Shortcuts
- - Multimedia
- - Macro
- - Text
- - Launch Program
- - Disable
- Macros
- Introducing Macros
- Macros (Keystroke)
- Create a Macro
- Delete a Macro
- Copy a Macro
- Export/Import a Macro
- Record a Macro
- Edit a Recorded Macro
- Insert Commands in a Macro
- Update Edited Macros
- Macros (Text)
- Create a Text Macro
- Edit a Text Macro
- Delete a Text Macro
- Copy a Text Macro
- Export/Import a Text Macro
- Lighting Profiles
- Introducing Lighting Profiles
- Lighting Effects
- - Wave
- - Breathing
- - Cycle
- - Ripple\*
- - Sonic\*
- - Changeling\*
- - Checkpoint
- - Rain\*
- Create a Lighting Profile
- Customizing Your Lighting Profile
- Notes:
- Duration/Keystroke/Direction:
- Color Tool:
- Color Controller:
- Add/Remove a Color
- Change a Color
- Setting
- Introducing Keyboard Settings
- Polling Rate
- N-Key Rollover
- Timer Setting (Timer Key)
- Repeat Rate Acceleration
- Repeat Delay
- LED Sleep Setting
- Lighting
- Introducing Lighting
- Per-Key Lighting
- Adjust Brightness
- Disable Volume Display
- Disable All Lighting
- Enable Lighting Effect
- Editing Options in Lighting Effect
- Enable Static Base Color
- Color Palette
- Introducing the Color Palette
- Accessing the Color Palette
- Customizing the Color Palette
- Reset the Color Palette
- Additional Settings
- Driver Software Settings
- UI Language
- Keyboard Layout
- Update Firmware
- Export All Profiles and Settings
- Import All Configuration and Settings
- Reset All Current Settings
- Hardware
- Introducing the Keyboard Hardware
- Backlight Brightness Key
- Timer Key
- Media Control
- Volume Roller
- LED Volume Display
- Rollover Switch
- Audio Passthrough Jacks
- USB Passthrough Port
- Foldable Cable Holder
- Detachable Wrist Rest
- On-the-fly Macro
- Introducing On-the-fly Macro
- Recording an On-the-fly Macro
- Support
- Website FAQ
- Online Forum
- Technical Support
Brand : G.Skill
Model : RIPJAWS KM780 RGB
Category : Keyboard