
CD-NT670 - Cd player/recorder YAMAHA - Free user manual and instructions
Find the device manual for free CD-NT670 YAMAHA in PDF.


| Product Type | Network CD Player/Recorder |
| Brand | Yamaha |
| Model | CD-NT670 |
| Dimensions (W x H x D) | 435 x 111 x 390 mm |
| Weight | 8.2 kg |
| Power Supply | 220-240 V, 50/60 Hz |
| Power Consumption | 35 W (operation), 0.3 W (standby) |
| Supported Audio Formats | CD, CD-R/RW, MP3, WMA, AAC, WAV, FLAC, ALAC, AIFF |
| Main Functions | CD playback, CD-R/RW recording, FM/AM tuner, network streaming (Wi-Fi, Ethernet), Bluetooth, AirPlay, compatibility with Spotify Connect, Tidal, etc. |
| Connectivity | Wi-Fi, Ethernet, Bluetooth, USB (front), Optical/Coaxial digital audio, RCA analog output, subwoofer output |
| Maintenance and Cleaning | Use a soft, dry cloth. Do not use solvents or abrasive products. Unplug before cleaning. |
| Safety | Do not expose to humidity, rain, or splashes. Do not obstruct ventilation openings. Unplug during thunderstorms. |
| Spare Parts and Repairability | Remote control, power cable, FM/AM antenna, remote control battery. Repairs by authorized technician. |
| General Information | Warranty: 2 years. Made in Japan. Consult the full manual for details. |
Frequently Asked Questions - CD-NT670 YAMAHA
User questions about CD-NT670 YAMAHA
0 question about this device. Answer the ones you know or ask your own.
Ask a new question about this device
Download the instructions for your Cd player/recorder in PDF format for free! Find your manual CD-NT670 - YAMAHA and take your electronic device back in hand. On this page are published all the documents necessary for the use of your device. CD-NT670 by YAMAHA.
USER MANUAL CD-NT670 YAMAHA
Digital Audio Broadcasting

Digital Audio Broadcasting
MusicCast
CAUTION: READ THIS BEFORE OPERATING YOUR UNIT.
1 To assure the finest performTo assure the finest performance, please read this manual carefully. Keep it in a safe place for future reference.
2 Install this sound system in a well ventilated, cool, dry, clean place - away from direct sunlight, heat sources, vibration, dust, moisture, and/or cold. For proper ventilation, allow the following minimum clearances.
Top: 10 cm (4 in), Rear: 6 cm (2.5 in), Sides: 6 cm (2.5 in)
3 Locate this unit away from other electrical appliances, motors, or transformers to avoid humming sounds.
4 Do not expose this unit to sudden temperature changes from cold to hot, and do not locate this unit in an environment with high humidity (i.e. a room with a humidifier) to prevent condensation inside this unit, which may cause an electrical shock, fire, damage to this unit, and/or personal injury.
5 Avoid installing this unit where foreign object may fall onto this unit and/or this unit may be exposed to liquid dripping or splashing. On the top of this unit, do not place:
- Other components, as they may cause damage and/or discoloration on the surface of this unit.
- Burning objects (i.e. candles), as they may cause fire, damage to this unit, and/or personal injury.
- Containers with liquid in them, as they may fall and liquid may cause electrical shock to the user and/or damage to this unit.
6 Do not cover this unit with a newspaper, tablecloth, curtain, etc. in order not to obstruct heat radiation. If the temperature inside this unit rises, it may cause fire, damage to this unit, and/or personal injury.
7 Do not plug in this unit to a wall outlet until all connections are complete.
8 Do not operate this unit upside-down. It may overheat, possibly causing damage.
9 Do not use force on switches, knobs and/or cords.
10 When disconnecting the power cable from the wall outlet, grasp the plug; do not pull the cable.
11 Do not clean this unit with chemical solvents; this might damage the finish. Use a clean, dry cloth.
12 Only voltage specified on this unit must be used. Using this unit with a higher voltage than specified is dangerous and may cause fire, damage to this unit, and/or personal injury. Yamaha will not be held responsible for any damage resulting from use of this unit with a voltage other than specified.
13 To prevent damage by lightning, keep the power cable and outdoor antennas disconnected from a wall outlet or this unit during a lightning storm.
14 Do not attempt to modify or fix this unit. Contact qualified Yamaha service personnel when any service is needed. The cabinet should never be opened for any reasons.
15 When not planning to use this unit for long periods of time (i.e. vacation), disconnect the AC power plug from the wall outlet.
16 Be sure to refer to the "Troubleshooting" section for common operating errors before concluding that this unit is faulty.
17 Before moving this unit, press ⭕ to set it to standby mode and disconnect the AC power plug from the wall outlet.
18 Condensation will form when the surrounding temperature changes suddenly. Disconnect the power cable from the outlet, then leave this unit alone.
19 When using this unit for a long time, this unit may become warm. Turn the power off, then leave this unit alone for cooling.
20 Install this unit near the AC outlet and where the AC power plug can be reached easily.
21 The batteries shall not be exposed to excessive heat such as sunshine, fire or the like. When you dispose of batteries, follow your regional regulations.
WARNING TO REDUCE THE RISK OF FIRE OR ELECTRIC SHOCK, DO NOT EXPOSE THIS UNIT TO RAIN OR MOISTURE.
This unit is not disconnected from the AC power source as long as it is connected to the wall outlet, even if this unit itself is turned off by . This state is called the standby mode. In this state, this unit is designed to consume a very small quantity of power.
Radio waves may affect electro-medical devices. Do not use this unit near medical devices or inside medical facilities.
Do not use this unit within 22 cm (9 inches) of persons with a heart pacemaker implant or defibrillator implant.
■ Notes on remote controls and batteries
- Do not spill water or other liquids on the remote control.
- Do not drop the remote control.
- Do not leave or store the remote control in the following conditions:
places of high humidity, such as near a bath - places of high temperatures, such as near a heater or stove
- places of extremely low temperatures
- dusty places
- Insert the battery according to the polarity markings (+ and -).
- Change all batteries if you notice the following conditions:
– the operation range of the remote control narrows
- the transmit indicator does not flash or is dim
- If the batteries run out, immediately remove them from the remote control to prevent an explosion or acid leak.
- If you find leaking batteries, discard the batteries immediately, taking care not to touch the leaked material. If the leaked material comes into contact with your skin or gets into your eyes or mouth, rinse it away immediately and consult a doctor. Clean the battery compartment thoroughly before installing new batteries.
- Do not use old batteries together with new ones. This may shorten the life of the new batteries or cause old batteries to leak.
- Do not use different types of batteries (such as alkaline and manganese batteries) together. Specification of batteries may be different even though they look the same. Danger of explosion may happen if batteries are incorrectly replaced.
• Before inserting new batteries, wipe the compartment clean.
- Dispose of batteries according to your regional regulations.
- Keep batteries away from children. If a battery is accidentally swallowed, contact your doctor immediately.
- When not planning to use the remote control for long periods of time, remove the batteries from the remote control.
- Do not charge or disassemble the supplied batteries.
The user shall not reverse engineer, decompile, alter, translate or disassemble the software used in this unit, whether in part or in whole. For corporate users, employees of the corporation itself as well as its business partners shall observe the contractual bans stipulated within this clause. If the stipulations of this clause and this contract cannot be observed, the user shall immediately discontinue using the software.
LASER SAFETY
This unit employs a laser. Due to possible eye injury, only a qualified service person should remove the cover or attempt to service this device.
DANGER
This unit emits visible laser radiation when open. Avoid direct eye exposure to beam. When this unit is plugged into the wall outlet, do not place your eyes close to the opening of the disc tray and other openings to look into inside.
CAUTION
Use of controls or adjustments or performance of procedures other than those specified herein may result in hazardous radiation exposure.
The laser component in this product is capable of emitting radiation exceeding the limit for Class 1.
■ For U.K. customers
If the socket outlets in the home are not suitable for the plug supplied with this appliance, it should be cut off and an appropriate 3 pin plug fitted. For details, refer to the instructions described below.
Note
The plug severed from the mains lead must be destroyed, as a plug with bared flexible cord is hazardous if engaged in a live socket outlet.
■ Special Instructions for U.K. Model
IMPORTANT
THE WIRES IN MAINS LEAD ARE COLOURED IN ACCORDANCE WITH THE FOLLOWING CODE:
Blue: NEUTRAL
Brown: LIVE
As the colours of the wires in the mains lead of this apparatus may not correspond with the coloured markings identifying the terminals in your plug, proceed as follows: The wire which is coloured BLUE must be connected to the terminal which is marked with the letter N or coloured BLACK. The wire which is coloured BROWN must be connected to the terminal which is marked with the letter L or coloured RED.
Making sure that neither core is connected to the earth terminal of the three pin plug.
Information for Users on Collection and Disposal of Old Equipment and Used Batteries

These symbols on the products, packaging, and/or accompanying documents mean that used electrical and electronic products and batteries should not be mixed with general household waste.
For proper treatment, recovery and recycling of old products and used batteries, please take them to applicable collection points, in accordance with your national legislation and the Directives 2002/96/EC and 2006/66/EC.

By disposing of these products and batteries correctly, you will help to save valuable resources and prevent any potential negative effects on human health and the environment which could otherwise arise from inappropriate waste handling.

For more information about collection and recycling of old products and batteries, please contact your local municipality, your waste disposal service or the point of sale where you purchased the items.
[Information on Disposal In other Countries outside the European Union]
These symbols are only valid in the European Union. If you wish to discard these items, please contact your local authorities or dealer and ask for the correct method of disposal.
Note for the battery symbol (bottom two symbol examples):
This symbol might be used in combination with a chemical symbol. In this case it complies with the requirement set by the Directive for the chemical involved.
We, Yamaha Music Europe GmbH hereby declare that this unit is in compliance with the essential requirements and other relevant provisions of Directive 1999/5/EC.
Yamaha Music Europe GmbH
Siemensstr. 22-34 25462 Rellingen, Germany
Tel: +49-4101-303-0

Bluetooth
- Bluetooth is a technology for wireless communication between devices within an area of about 10 meters (33 ft) employing the 2.4 GHz frequency band, a band which can be used without a license.
Handling Bluetooth communications
- The 2.4 GHz band used by Bluetooth compatible devices is a radio band shared by many types of equipment. While Bluetooth compatible devices use a technology minimizing the influence of other components using the same radio band, such influence may reduce the speed or distance of communications and in some cases interrupt communications.
- The speed of signal transfer and the distance at which communication is possible differs according to the distance between the communicating devices, the presence of obstacles, radio wave conditions and the type of equipment.
- Yamaha does not guarantee all wireless connections between this unit and devices compatible with Bluetooth function.
Table of Contents
What you can do with this unit....2
Introduction....3
Supplied accessories....3
About this manual----3
Part name.....4
Front panel.....4
Rear panel……5
Front panel display……6
Remote control.....7
Preparations.....8
Connecting amplifier----8
Connecting antenna----9
Turning on the power----10
Configuring network connection----11
Selecting connection method----11
Preparing for network connection.....12
Connecting to the wired network.....14
Connecting to the wireless network……16
Establishing wireless direct connection with mobile
device....19
Playing back music on your CD ^21
Playing back music on USB
devices....22
Playing back songs in the
computer----23
Setting the media sharing of music files----23
Playing back songs in the PC----24
Playing back music via Bluetooth
connection.....25
Pairing a Bluetooth device with the unit----25
Performing pairing and playing back music....26
Connecting a paired Bluetooth device
and playing back music……27
Playing back music from external devices....28
Listening to DAB stations (CD-NT670D only)....29
Initial scan----29
Tuning in DAB stations----29
Presetting DAB stations----30
Selecting preset DAB stations----30
Confirming the reception----31
Listening to the FM radio
stations....32
Tuning in FM stations----32
Presetting FM stations.....32
Selecting preset FM stations.....33
Radio Data System……34
Listening to the Internet radio....35
Playing back music with AirPlay----36
Playing back songs with iPod----36
Playing back songs with iTunes....36
More on playback....37
Shuffle playback....37
Repeat playback....37
Playback information.....38
Presetting network contents.....39
Selecting preset network content....39
Presetting music contents to FAVORITES....40
Selecting network content registered to FAVORITES....40
FAVORITES registration list....41
Using the sleep timer----42
Option settings.....43
Option menu list……44
Updating the firmware....45
Troubleshooting....46
General.....46
Network……47
Bluetooth……48
Disc……49
USB devices....50
DAB reception (CD-NT670D only)....50
FM reception……51
Messages on the front panel display----52
Supported devices/media and file formats----53
Specifications....55
Trademarks....56
What you can do with this unit
- This unit is a network CD player, on which you can enjoy playing back music files stored on your media server (PC or NAS) and USB devices, audio content on the Internet radio, FM radio, CD, AirPlay devices (iPod/iTunes), and external devices including DVD disc players, by connecting the unit to your home network and audio system on the same network.
- This unit supports various streaming services (supported streaming services depend on your region).
- You can select songs and operate the unit easily by using the free dedicated "MusicCast CONTROLLER" app supporting iOS/Android. See "MusicCast Setup Guide" for details.

flowchart
graph TD
    A["Internet"] --> B["Modem"]
    B --> C["PC"]
    C --> D["NAS"]
    D --> E["Mobile device (AirPlay iPod), MusicCast CONTROLLER"]
    E --> F["Router*"]
    F --> G["Bluetooth device CD"]
    G --> H["Amplifier"]
    H --> I["FM radio DAB"]
    I --> J["This unit"]
    J --> K["USB"]
    J --> L["DVD disc player, etc. (External devices)"]
* You need a commercially available wireless router (access point) when you use a mobile device.
① Play back the Internet radio (P.35)
② Play back music files stored on your PC (P.23)
③ Play back music files stored on your NAS (P.23)
④ Play back music in a Bluetooth device (P.25)
⑤ Play back your iPod with AirPlay (P.36)
Use of MusicCast CONTROLLER (P.11)
⑥ Play back a CD (P.21)
⑦ Play back music in an USB device (P.22)
⑧ Listening to the FM radio stations (P.32)
Listening to DAB stations (CD-NT670D only)
(P.29)
⑨ Play back music in an external device (P.28)
Introduction
Confirm the package contents and useful points of this manual.
Supplied accessories About this manual
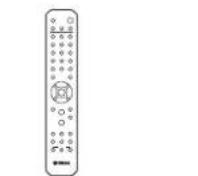
Remote control FM antenna

(for CD-NT670)
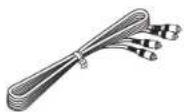
RCA stereo cable

Batteries (× 2)
(AA, R6, UM-3)

DAB/FM antenna (for CD-NT670D)

MusicCast Setup Guide
- Instructions and illustrations used in this manual refer to the CD-NT670, unless otherwise specified.
- How to operate this unit is described mainly using the remote control.
- iOS and Android mobile devices are collectively referred to as "mobile devices." The specific type of mobile device is noted in explanations as needed.
- "iPod" described in this manual may also refer to "iPhone" or "iPad."
• Illustrations may differ from actual item depicted.
Symbols:

Indicates precautions for use of the unit and its feature limitations.

Indicates supplementary explanations for better use.

Indicates the corresponding reference page(s).
Part name
Familiarize yourself with all parts and these functions.
Front panel

① ⊕ (Power) (P.10)
② USB jack (P.22)
③ Disc tray (P.21)
④ Bluetooth indicator (P.26)
⑤ Wi-Fi indicator (P.16)
⑥ Front panel display (P.6)
⑦ △(Open/close the disc tray) (P.21)
⑧ Remote control sensor
⑨(◀◀◀ P:21, 22,24)▶
PRESET </> (◀ P.33)
⑩(Play/pause)
( P.21, 22, 24)
⑪ □(Stop) (P.21, 22, 24, 35)
CONNECT
Use to control the unit using the dedicated "MusicCast CONTROLLER" app for mobile device. See "MusicCast Setup Guide" for details.
⑫ INPUT (P.21, 22)
Turn left or right to change the audio source. (The source is shown on the front panel display.)
Rear panel

① ANTENNA jack (P.9)
② AUX IN jacks (RCA input) (P.28)
③ ANALOG OUT jacks (P.28)
④ SYSTEM jack (mini jack input)
Connect to the pre-main amplifier (A 670/A U670). For details, see the owner's manual that comes with your pre-main amplifier.
⑤ Wireless antenna (P.16)
⑥ NETWORK jack (P.12)
Connects to a network using a commercially available network cable.
⑦ DIGITAL IN jack (optical input) (P.28)
⑧ Power cable (P.10)
Front panel display

①Multi information display
Shows various information, such as the music information and radio frequency.
Characters shown on the front panel display are alphanumeric only.
②STEREO indicator
Lights up when the unit is receiving a strong signal from an FM stereo broadcast.
③TUNED indicator
Lights up when the unit is tuned into FM station.
④MUTE indicator
Lights up when the sound is muted (P.7).
⑤SLEEP indicator
Lights up when the sleep timer is set (P.42).
⑥Shuffle/repeat indicator
Lights up when you shuffle or repeat music of your CD, USB device or computer (P.37).

- MUTE indicator can function only when the pre-main amplifier (A-670/A-U670) is connected with the system.

Adjusting display brightness
You can adjust the brightness of the front panel display by pressing the DIMMER button on the remote control (° P.7).
•Each press of the button changes the brightness: bright (default), mid dim, or dim.
Remote control

①Infrared signal transmitter
② △ (Open/close the disc tray) (P.21)
③Source buttons
Switch the audio source to be played.
④ Numeric buttons (P.21, 39)
⑤ MEMORY (P.32, 39)
⑥ Audio control, cursor control buttons (P.21, 22, 24, 35)
⑦ REPEAT (∼ P.37)
⑧ SHUFFLE (P.37)
⑨ DIMMER (P.6)
⑩ FAVORITES (P.40)
⑪ ⏻ (Power) (√ P.10)
⑫ OPTION (P.43)
⑬VOLUME +/- Controls the volume.
⑭MUTE
lums mute on or off.
⑮ DISPLAY (P.38)
⑯ HOME (P.24, 35)
⑰ SLEEP (P.42)
Installing batteries

Check the “+” and “-” of the batteries and inset them the correct way around.
- Change both batteries when the operation range of the remote control decreases.
•VOLUME and MUTE can be used only when the pre-main amplifier (A 670/A U670) is connected with the system. For details, see the owner's manual that comes with your pre-main amplifier.
Preparations
Connect an amplifier or antenna and turn the unit on.
Do not connect the power cable of the unit until you have finished connecting all cables.
Connecting amplifier
Connect the amplifier to the unit, as the illustration shows.
- Use the supplied stereo pin cable to connect the unit to the audio input jacks of the amplifier.


- To play content with the unit, make sure to connect the unit to an amplifier and speaker.
- Depending on the device to be connected or connection environment, you may not be able to correctly play content. Check also the specifications and settings of the source device.

- You can also connect powered speakers to the unit.
Connecting antenna
1 Connect the supplied antenna to the unit.
2 Install it with pins where the unit can obtain good reception.


- Be sure to stretch out the antenna as the illustration shows.
- If radio reception with the supplied antenna is not satisfactory, a commercially available outdoor antenna may improve reception.
Turning on the power
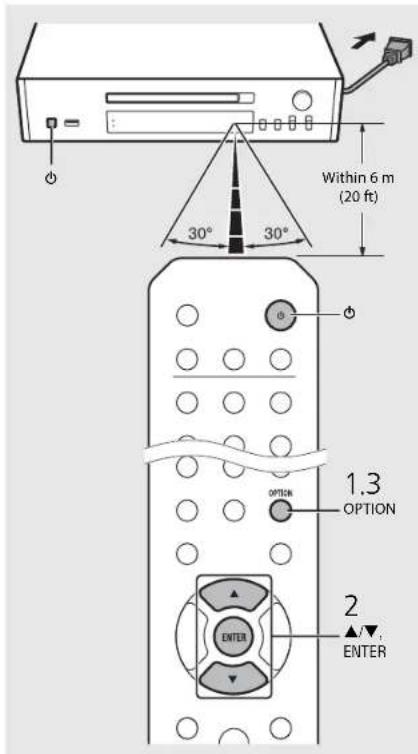
Plug the power cable into the wall outlet and press ⏻
•The unit turns on.
- Press again to turn off (standby mode).
- You can set the mode to "eco standby", which consumes less power. If set to "eco standby", some operations are restricted (See the table on the right).
Setting to the eco standby
You can set the mode to the eco standby by turning off the network standby.
1 Press OPTION O.
- The option menu is shown on the front panel display.
2 Setting to the eco standby.
- Set the item in the order of [System Config] - [Net Standby].
- Select [Off] with ▲/▼ and press ENTER to set.
3 Press OPTION to finish the option setting.
Status in standby/eco standby
| Standby | Eco standby | |
| Charging of USB devices √ | — | |
| Operation of the source buttons ^ | √ | √ |
| CD load/eject √ | √ | |
| AirPlay √ | ||
| Control from the app √ — | ||
| Bluetooth √ — |
* Operation with the remote control only
Option menu regarding power (System Config)
(Bold: default)
AutoPowerStdby
Configure the setting so that the unit automatically enters the standby status.
(On, Off)
When set to On, the unit automatically enters the standby status under the following conditions according to the music source.
• Network / Bluetooth/CD/USB: When no operation or playback is performed for 20 minutes
• Other sources: When no operation is performed for 8 hours

- If the network connection is not set, turn the power on to display "Share WiFi Set" on the front panel display and trigger an automatic iOS device search. See "Sharing the setting of iOS device" (P.18) for details on the iOS device and network connection.
Configuring network connection
Select a method of connecting to the network. You can play back music files stored on your PC, mobile devices, DLNA -compatible NAS, or audio contents on the Internet, by connecting this unit to the network. You can also operate the unit with your mobile device.
^x Digital Living Network Alliance
Selecting connection method
Using "MusicCast CONTROLLER" to make connection
You can set the network connection by using the free dedicated "MusicCast CONTROLLR" app installed to your mobile device.
See "MusicCast Setup Guide" for details.
With MusicCast CONTROLLER, you can use the following functions in addition to the network setting.
- Play songs stored on computers (servers)
- Select an Internet radio station
•Distribute and receive audio between the unit and other Yamaha MusicCast devices
Establishing connection by the unit operation
You can also connect to the network by using the following methods beside using "MusicCast CONTROLLER".
Connecting to wired network
Setting wired network connection (P.14).
Connecting to wireless network
Setting wireless network connection (P.16).
Connecting by Wireless Direct
Setting the wireless direct connection with mobile device (P.19).

- It is recommended to use wired connection to keep a stable connection.
- For details on Internet connection, refer to the owner's manuals of your network devices.
- If you are using a router that supports DHCP, you do not need to configure any network settings for the unit. If you are using a router that does not support DHCP, configure the network setting from [Network Config] in the option setting (P43).
- Some security software installed on your PC or the firewall settings of network devices (such as a router) may block the access of the unit to the network devices or the Internet. In this case, change the setting of the security software or network devices.
- When setting the subnet manually, each server must be connected to the same subnet as the unit (P.44).
Preparing for network connection
Preparing for wired connection
Connect the unit to the router as shown on the right.
- Connect with a commercially available STP (shielded twisted pair) network cable (CAT-5 or higher, straight-through cable).

Preparing for wireless connection
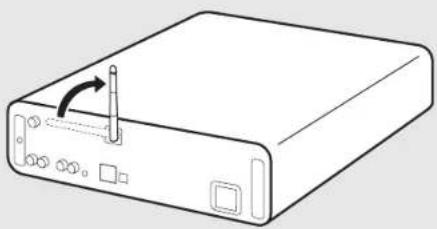
Put up the wireless antenna.
- Put up the wireless antenna on the rear panel of the unit.
natural_image
Line drawing of a portable electronic device with a scroll wheel and indicator lights (no text or symbols)•Do not apply excessive force to the antenna. Doing so may damage the antenna.
- Check the orientation of the movable part and bend it in the correct direction.
- Do not remove the antenna.
Connecting to the wired network
Connect the unit to the network using a cable. You need to connect in advance the NETWORK jack of the unit to the router using a network cable (P.12).

flowchart
graph TD
    A["Internet"] --> B["Modem"]
    B --> C["Router"]
    C --> D["Network cable"]
    D --> E["PC"]
    E --> F["Network attached storage (NAS)"]
    G["Mobile device"] --> H["This unit"]
    I["Internet"] --> J["Modem"]
    J --> K["Router"]
1 Press
- The option menu is shown on the front panel display.
2 Select [Network Config] with ▲/▼, and press ENTER
3 Select [Select Network] with ▲/▼, and press ENTER
4 Select [Wired] with ▲/▼, and press ENTER.
- By default, [Wired] is set for the unit.


Connecting to the wireless network
Connect the unit to network wirelessly. Put up the wireless antenna of the unit in advance (P.13).

flowchart
graph LR
    A["Internet"] --> B["Modem"]
    B --> C["Wireless router (access point)"]
    C --> D["PC"]
    D --> E["Mobile device"]
    C --> F["This unit"]
- You cannot simultaneously use this setting with the wired network connection or the Wireless Direct.
- If the unit is placed away from the wireless router (access point), connection may not be able to be established. In that case, place them closer together.
- If the unit cannot be connected to the wireless router (access point), you can use the Wireless Direct to play back music files in mobile devices (P.19).
- Once the connection is complete, the Wi-Fi indicator lights up.
Setting with WPS button
You can easily establish a connection only by pressing the WPS button on the wireless router (access point).
- A wireless router (access point) with the WPS button is required.

1 Press
- The option menu is shown on the front panel display.
2 Select [Network Config] with ▲/▼, and press ENTER
3 Select [Select Network] with ▲/▼, and press ENTER
4 Select [Wireless] with ▲/▼, and press ENTER
5 Select [WPS] with ▲/▼, and press ⒽTER.
6 Press the WPS button on the wireless router (access point).
About WPS
WPS (Wi-Fi Protected Setup) is a standard established by the Wi-Fi Alliance, which allows easy establishment of a wireless home network.


- Once the connection is complete, the Wi-Fi indicator lights up.
Sharing the setting of iOS device
You can apply the network setting of your iOS device (iPhone or other iOS devices) to the unit to connect the device to the unit easily.
Before starting setting, check that your iOS device is connected to the wireless router (access point).
1 Press

- The option menu is shown on the front panel display.
2 Select [Network Config] with ▲/▼, and press ENTER
3 Select [Select Network] with ▲/▼, and press ENTER
4 Select [Wireless] with ▲/▼, and press ENTER.
5 Select [Share WiFi Set] with ▲/▼, and press ENTER.
- A message for the initialization of the network will be shown on the front panel display. Press ENTER.
6 Display the Wi-Fi setup screen on the iOS device and select the unit from "SETUP A NEW AIRPLAY SPEAKER...".
- Follow the on-screen instructions displayed on the iOS device.


- You need iOS device with iOS7.1 or later.
- If the network setting of the iOS device is set to be shared, all the network and the Bluetooth connection settings will be initialized. Also the account information of streaming services will be initialized.

- Once the connection is complete, the Wi-Fi indicator lights up.
Establishing wireless direct connection with mobile device
Connect the unit directly with the mobile device wirelessly. Put up the wireless antenna of the unit in advance (P.13).


- You cannot simultaneously use this setting with the wired network connection or the wireless network connection.
- When using the Wireless Direct, you cannot connect the unit to the Internet. Therefore, the Internet services, such as the Internet radio, are unavailable.
- For details about how to set Wi-Fi connection of the mobile device, see the user's guide of your mobile device.
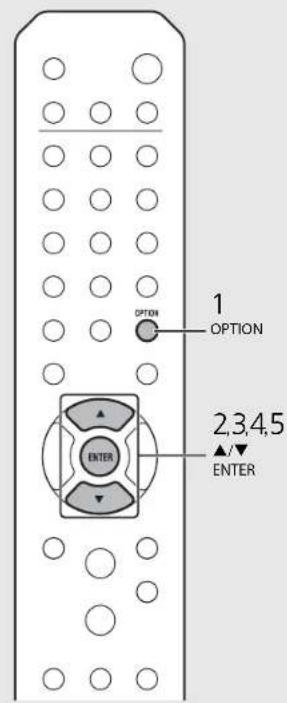
1 Press

- The option menu is shown on the front panel display.
2 Select [Network Config] with ▲/▼, and press ENTER
3 Select [Select Network] with ▲/▼, and press ENTER
4 Select [Direct] with ▲/▼, and press ENTER.
5 Select desired security method with ▲/▼, and press Ⓞ • Available choices are: [OPEN], [WPA2 PSK(AES)]
6 Check the SSID and the security key. - These values are required for Wi-Fi setting of the mobile device. - You can check the value from the option menu [Network Info] - [Direct Info].
7 Configure the Wi-Fi setting of the mobile device.
- Enable the Wi-Fi function of the mobile device.
- When the access points are listed, select the SSID you have checked in step 6.
- When the terminal prompts you to enter a password, enter the security key you have checked in step 6.

- If you select [OPTN] in step 5, the connection may be insecure since the communication is not encrypted.
Playing back music on your CD
This unit allows playback of audio CDs and data CDs in which the MP3/WMA files are recorded. For details on playable CDs, see "Supported devices/medias" (P.53).
1 Turn INPUT to select [CD] or press on the remote control.
2 Set a CD in a disc tray.
- Press to open/close the disc tray.
3 Playback starts.
The remote control functions are shown below.
| ▶/■ | Play/pause |
| ■ | Stop |
| |◀◀/◀◀ | Skip to the beginning of the song being played back or the previous song/press and hold to fast rewind. |
| ▶▶/▶▶ | Skip to the next song/press and hold to fast forward. |
| SHUFFLE Starts shuffle playback (→ P.37). | |
| REPEAT Starts repeat playback (→ P.37). | |
| 1 - 9,0 Specify the song number. | |
| FNTFR | Confirmation of the song number selected with the numeric buttons. |


- When CD playback is stopped, playback will resume from the beginning of the song last played. Pressing ■ while playback is stopped will clear resume playback.
- You can cancel the song number selected with the numeric buttons by pressing ◀.
- If you turn off the unit with CD selected as music source and a CD set in it, the unit automatically plays back the set CD next time you turn on the unit.
Playing back music on USB devices
This unit allows playback USB devices which music files are recorded.
For details on playable USB devices, see "Supported devices/medias" (P.53).
1 Turn INPUT to select [USB] or press on the remote control.
2 Connect a USB device to the USB port.
3 Browse and select a song.
Shows other item.
ENTER/▶ Confirms the selected item and proceeds to the next level or start playback.
HOME Shows the top-level item.
Returns to the previous item.
DISPLAY Finishes browsing and displays the playback content information.
4Playback starts.
▶/■ Play/pause ▶▶/▶▶/ Moves to the next or previous song in the folder. ◀◀/◀◀ folder. ■ Stop
SHUFFLE Starts shuffle playback (P.37).
RFPEAT Starts repeat playback (P.37).

• Some USB devices may not work properly even if they meet the requirements. Playability of and power supply to all USB devices are not guaranteed.
• Yamaha and suppliers do not accept any liability for the loss of data saved on a USB device connected to the unit. As a precaution, it is recommended to make backup copies of important files.
- Stop playback before disconnecting the USB device.
- A USB device is automatically charged when it is connected to the unit, except in the eco standby mode. However, depending on the device design, the current supplied from the port may be limited to 500 mA, or the device may not be charged.
Playing back songs in the computer
This unit allows you to play back music files such as MP3, WMA, or FLAC (lossless audio data compression format) files stored in the computer (server) connected to the network or NAS. Brows the front panel display and select your favorite music file.
Setting the media sharing of music files
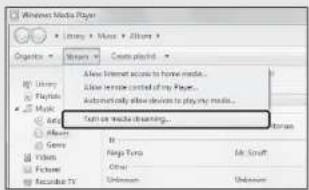
To play back music files in your computer with this unit, you need to make the media sharing setting between the unit and computer (Windows Media Player 11 or later). In here, setting with Windows Media Player 12 in Windows 7 is taken as an example.
1 Start Windows Media Player 12 on your PC.
2 Select "Stream," then "Turn on media streaming."
•The control panel window of your PC is shown.
3 Click "Turn on media streaming."
4 Select "Allowed" from the drop-down list next to the unit's model name.
5 Click "OK" to exit.
2
3

4


- or details on media sharing settings, refer to the Help of Windows Media Player.
For a PC or a NAS with other DLNA server software installed
Refer to the owner's manual of your device or software and configure the media sharing settings.
Playing back songs in the PC
1 Press NET Repeatedly and select [Server].
2 Browse and select a song.
▲/▼ Shows other item.
ENTER▶ Confirm the selected item and proceed to the next level or start playback.
HOME Show the top-level item.
Back to the previous item.
DISPLAY Finish browsing and display the playback content information.
3 Playback starts.
Play/pause
▶▶/▶▶/ Move to the next or previous song in the folder.
Stop
SHUFFLE Starts shuffle playback (P.37).
REPEAT Starts repeat playback (P.37).


- If playback is not possible, check the network connections and your router settings, and then connect the unit and the PC to the same network.
• The music files in your PC can be preset (P.39).
Playing back music via Bluetooth connection
You can listen to sound wirelessly from a Bluetooth compatible device.
Pairing a Bluetooth device with the unit
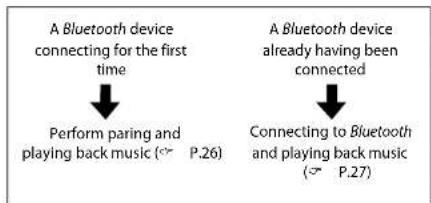
When connecting a Bluetooth device to the unit for the first time, the device is required to be registered to the unit. This process is called "pairing."
Once pairing is completed, subsequent connection can be made with a couple of easy steps.
flowchart
graph TD
    A["A Bluetooth device connecting for the first time"] --> B["Perform paring and playing back music (P.26)"]
    C["A Bluetooth device already having been connected"] --> D["Connecting to Bluetooth and playing back music (P.27)"]

- If pairing information for a device is deleted, you will need to perform pairing of that device again in order to connect it again.
Performing pairing and playing back music
1 Press BLUETOOTH to set the source to Bluetooth.
2 Turn on the Bluetooth function on your device.
3 In the Bluetooth setting of the device, select the unit (network name of the unit).
• After pairing is complete, the Bluetooth indicator lights up when a Bluetooth connection is established.
- If the device does not connect to the unit automatically after the pairing is completed, select the unit (network name of the unit) again in the Bluetooth setting on your device.
- For details, see the owner's manual of your device.
4 Play back music on your device.

- If another device is already connected to the unit, press and hold BLUETOOTH to terminate the Bluetooth connection, then perform pairing with the new device.
- You can find the network name in the option menu.
- If a passkey is required during the pairing operation, enter the number "0000."
Connecting a paired Bluetooth device and playing back music
If the unit is connected to another device via Bluetooth connection, terminate that connection (see "Terminating the Bluetooth connection" on the right) before connecting to the target device.
1 Perform Bluetooth connection.
- Connecting from the unit: Press BLUETOOTH.
- Connecting from the Bluetooth device: Turn on the Bluetooth function of the connected device, and select the unit (network name of the unit) from the available device list. - The Bluetooth indicator lights up when a connection is established.
2 Play back music on the connected device.

• Decrease the volume of the amplifier connected to the unit before playback.
Otherwise, playback volume may be too loud.
- If connecting from the unit, the unit searches for the Bluetooth device connected the last time. In this case, make sure that device's Bluetooth function is turned on.
Terminating the Bluetooth connection
- Bluetooth connection can be terminated by either one of the following.
- Terminate the Bluetooth connection from the connected device. - Change to another input source.
-Press and hold BLUETOOTH.
- Set the unit to standby mode.
Playing back music from external devices
This unit allows playback of external devices, such as a DVD player. Use the jacks (DIGITAL IN or AUX IN) according to the device to be connected (P.S). For the connection of each external device, refer to its supplied owner's manual.
1 Unplug the power cable of the unit and connect the external device to the unit.
•Prepare commercially available cables for connection.
2 Plug the power cable of the unit back into the wall outlet and press 10 turn the unit on.
3 Change the music source.
- Each time you press AUX/DIGITAL, AUX IN (analog input) and DIGITAL IN (digital input) are alternately switched.
4 Play back the connected external device.
- For details on playback, refer to the owner's manual supplied with the external device.

- Decrease the volume of the amplifier connected to the unit before connection. Otherwise, playback volume may be too loud.
Listening to DAB stations (CD-NT670D only)
You can listen to radio of higher quality sound with Digital Audio Broadcasting (DAB) and DAB+ (upgraded version of DAB). Connect the supplied antenna (P.9) and perform an initial scan before you tune into DAB for the first time.
Initial scan
Press TUNER repeatedly to select [DAB].
- Initial scan starts automatically when you select [DAB] for the first time.
- When scanning is complete, the number of receivable DAB stations is shown on the front panel display momentarily, and the first station stored in station order is played.
Tuning in DAB stations
1 Press TUNER repeatedly to select [DAB].
- When the unit cannot receive the DAB signal, "Off Air" is shown on the front panel display.
2 Press ◀/▶ to select a DAB station.
DAB Station1


- You can also perform initial scan from the option setting.
1 Press OPTION when the source is DAB.
-Option menu is shown on the front panel display.
2 Press ▲/▼ to select [Initial Scan] and press
-Initial scan starts and finishes automatically. - If the initial scan is performed, stored DAB station information and preset DAB stations are cleared.
• This unit can receive only Band III DAB frequencies. Frequency in MHz/Channel Labels
| 174.928/5A | 176.640/5B | 178.352/5C | 180.064/5D |
| 181.936/6A | 183.648/6B | 185.360/6C | 187.072/6D |
| 188.928/7A | 190.640/7B | 192.352/7C | 194.064/7D |
| 195.936/8A | 197.648/8B | 199.360/8C | 201.072/8D |
| 202.928/9A | 204.640/9B | 206.352/9C | 208.064/9D |
| 209.936/10A | 211.648/10B | 213.360/10C | 215.072/10D |
| 216.928/11A | 218.640/11B | 220.352/11C | 222.064/11D |
| 223.936/12A | 225.648/12B | 227.360/12C | 229.072/12D |
| 230.784/13A | 232.496/13B | 234.208/13C | 235.776/13D |
| 237.488/13E | 239.200/13F |
Presetting DAB stations
Use the preset function to store your favorite 30 DAB stations.
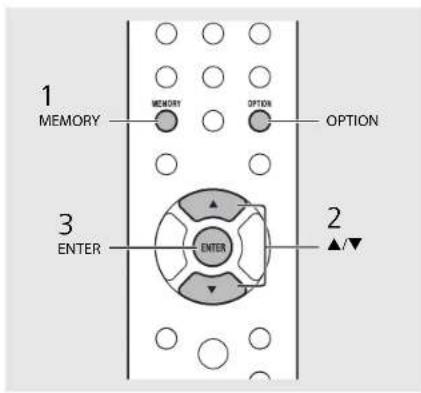
1 Tune in a DAB station you want to preset (P.29) and press MEMORY • Preset number flashes on the front panel display.

2 Press ▲/▼ to select the desired preset number.
3 Press to completes presetting.
Selecting preset DAB stations
1 Press TUNER repeatedly to select [DAB]. 2 Press ▲/▼ to select a preset station.

- No cancel the DAB preset setting, press - You can change the information of the DAB station shown on the front panel display by pressing the DISPLAY button. Display switches in the order as shown below each time you press the DISPLAY button. STATION (default) DLS (Dynamic Label Segment) ENSEMBLE CHANNEL/FREQ (Channel label and frequency) SIGQ (signal quality) AUDIO FORMAT
Deleting a preset station
Use the option setting to delete a preset station.
1 Press OPTION when the source is DAB. -Option menu is shown on the front panel display.
2 Press ▲/▼ to select [Preset Delete] and press
3 Press ▲/▼ to select the preset number to be deleted.
4 Press -A preset station is deleted.
5 Press to finish the option setting.
Confirming the reception
You can confirm the DAB signal level. This is useful when you set the antenna.
1 Press OPTION when the source is [DAB]. Option menu is shown on the front panel display,
2 Press ▲/▼ to select [Tune Aid] and press ENTER.
3 Press ▲/▼ to change the channel label.
•The measured DAB signal reception level is displayed.

•The level is from 0 (none) to 100 (best).
4 Press OPTION to finish the option setting.
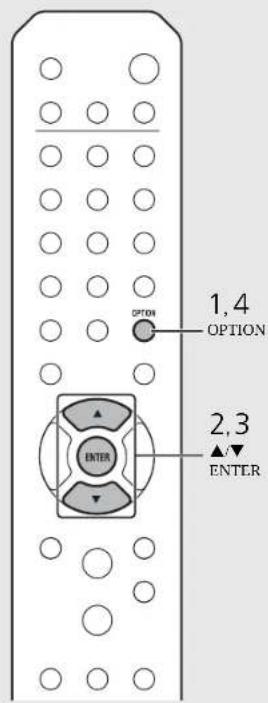

- When performing June Aid and the DAB signal is weak, try adjusting the position of the antenna to obtain good reception.
Listening to the FM radio stations
To play the FM radio, connect the supplied antenna.
See "Connecting antenna" (P.9) for connecting the antenna to the unit.
Tuning in FM stations
1 Press TUNER
2 Press and hold ◀/▶.
•Automatic tuning starts, then stops automatically when a station is tuned in.
FM
STEREO TUNED
86,50MHz
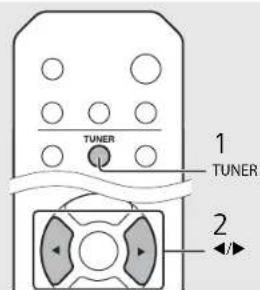

- If station reception is weak,
you can tune into a station manually by pressing the ◀/▶ button repeatedly.
Presetting FM stations
Auto preset
Tunes in stations with good reception and presets them automatically.
1 Press TUNER
2 Press and hold for 2 seconds or more.
3 Press MEMORY
- Auto preset starts and when it finishes, "Completed" is shown on the front panel display.


•Auto preset replaces all currently-stored stations with newly stored stations.

•You can preset up to 30 FM stations.
• To cancel the auto preset, press ■
- You can also preset station automatically from the option menu (P.13).
Manual preset
1 Tune into a station you want to preset (P.32).
2 Press MEMORY.
- Preset number flashes on the front panel display.
Memory
FM01 88.50MHz
3 Press ▲/▼ to select the desired preset number.
4 Press to preset the station.
Selecting preset FM stations
1 Press TUNER
2 Press ▲/▼ to select a station.


- lo cancel manual preset setting, press.
Deleting a preset station
Use the option setting to delete a preset station.
1 Press OPTION when the source is FM.
- The option menu is shown on the front panel display.
-To cancel deleting preset stations, press OPTION
2 Press▲/▼ to select [Preset Delete] and press ENTER.
3 Press ▲/▼ to select the preset number to be deleted.
4 Press ENTER.
- The preset station is deleted and [Deleted] is shown on the front panel display.
5 Press OPTION to finish the option setting.
Radio Data System
The unit can receive Radio Data System information.
Press DISPLAY when the source is FM.
• Each press of the button changes the information displays shown below.
PService (Program Service)
PTY (Program Type)
R1 (Radio Text)
CT (Clock Time)
Frequency
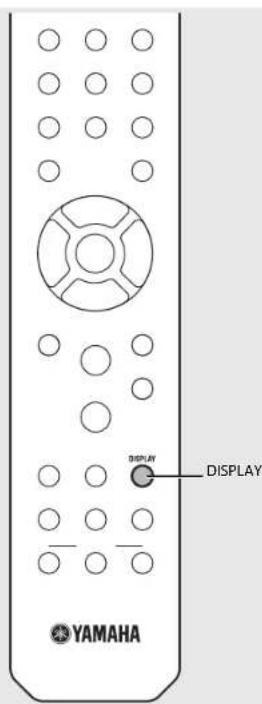

- If the signal transmission of the Radio Data System station is too weak, this unit may not be able to receive Radio Data System information completely. In particular, RT (Radio Text) information uses a lot of bandwidth, so it may be less available compared to other types of information.
Listening to the Internet radio
You can play back world-wide radio stations via the Internet.
Make sure that the unit is connected to the Internet properly (P.11).
1 Press repeatedly and select [NetRadio].
2 Browse the Internet and select a radio station.

•The remote control functions are shown below.
▲/▼ Shows other item.
ENTFR/▶ Confirm the selected item and proceed to the next level or start playback.
HOME Show the top-level item.
Back to the previous item.
DISPLAY Finish browsing and display the playback content information.
3 Playback starts.
•To stop playback, press .
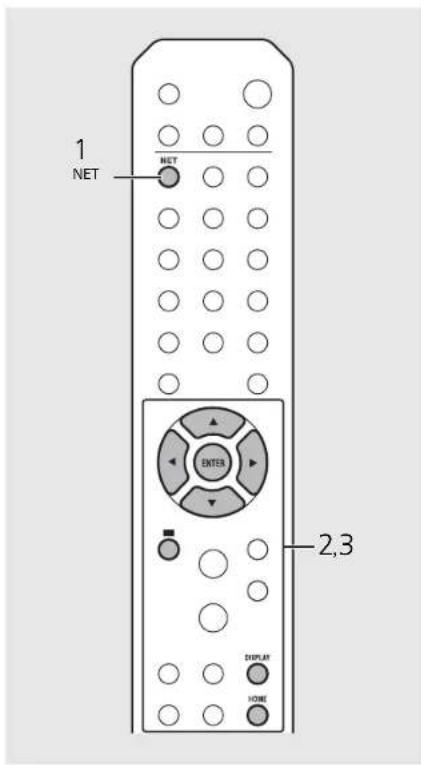

-Playback information can be shown by pressing the DISPLAY button while Internet radio is played back. Information changes as shown below each time you press it.
Radio station name (default)
Playing Time
Song title
- You can register your favorite Internet radio stations to the "Bookmarks" folder by accessing the following website with the web browser on your PC.
http://yradio.vtuner.com
- Before registering Internet radio stations, play back any of the Internet radio stations with the unit.
-To use this feature, you need the vTuner ID of the unit and your e-mail address to create your personal account. You can check the vTuner ID in [Network Info] (P44) in the option setting
• The stations of the Internet radio can be preset (P.39).
Playing back music with AirPlay
The AirPlay function allows you to play back iTunes/iPod music on the unit wirelessly via a network. Make sure that the unit and your PC or iPod are connected to the same router (P.11).
Playing back songs with iPod
1 Turn on the unit and display the playback screen on the iPod.
- If the iPod recognizes the unit, it is shown on the screen of the iPod.
2 Tap and select the unit (network name of the unit).
•The source automatically switches to [AirPlay] and playback starts (except in the eco standby mode).
Example
1

2


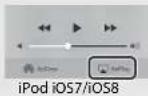
- I or an iPod with IOS7/IOS8 installed, the indication is displayed within the control center. To display the control center, swipe the iPod screen in an upward direction.

- You can also use the unit and remote control to play back, pause, stop, and skip songs.
Clearing AirPlay
- Tap/click on the iPod/Tunes screen and select a device other than the unit from the speaker list. Or, change the source to other than AirPlay.
Playing back songs with iTunes
1 Turn on the unit and start iTunes.
- If the iTunes recognizes the unit, is shown on the screen of iTunes.
2 Click ▲ and thelet (network name of the unit).
- The source automatically switches to [AirPlay] (except in the eco standby mode).
3 Play back songs with iTunes.
Example
1

2

More on playback
You can enjoy music in varied song order and view music information during playback.
Operations described in this section apply to all devices, such as PC (server), USB device, or CD. The operation for preset registration is available only for network
contents.
Shuffle playback
Press SHUFFLE during playback.
- The shuffle indicator in the front panel display switches as shown below each time you press the button.
| × | Perform shuffle playback.* |
| Not displayed Does not perform shuffle playback. | |
* The range of shuffle depends on the media being played back.
Repeat playback
Press REPEAT during playback.
• The repeat indicator in the front panel display switches as shown below each time you press the button.
| ○1 | Repeat the song being played back. |
| ○ | Perform repeat playback* |
| Not displayed D | Does not perform repeat playback. |
* The range of repeat depends on the playback media.

Playback information
Song title, elapsed time, etc., can be shown on the front panel display.
Press DISPLAY during playback.
ALBUM ▶Meteor
- Display switches in the order as shown below each time you press the button.
| USB/AirPlay/Server | CD |
| Song title*1 | Playing time |
| Album tile | Remaining time of the song*2 |
| Artist name | Remaining time of the disc*7 |
| Playing time Song title* | 1,×3 |
| Artist name*3 | |
| Album tile*3 |
*1 If the song title cannot be obtained, the file title may be displayed.
*2 Only when playing an audio CD.
*3 Only when playing an audio CD and when there is information to display.


- Characters shown on the front panel display are alphanumeric only.
Presetting network contents
You can preset the network content being played back.
1 Press during the playback of the network content.
- Start presetting.
2 Enter the desired preset number using the numeric buttons.
3 Press MEMORY to preset the station.
Selecting preset network content
1 Press NET
2 Enter the preset number using the numeric buttons.
- When the network is connected, the content preset for the input preset number is played back.
- If the source being used is not the selected content, the current source is replaced with the selected content.


- If the input preset number already has content registered, the content is overwritten.
- If is pressed during presetting, the preset is canceled.
- The preset is available for the following sources:
- Internet radio
-Server
-Streaming service (may be unavailable for some areas) - You can set the preset number from 1 to 37.
Presetting music contents to FAVORITES
You can register your favorite content to the FAVORITES buttons (A to C) to easily play back the content.
Press and hold any of the FAVORITES buttons (A to C) during the playback of the content.
• The content being played back is registered to the FAVORITES button.
Selecting network content registered to FAVORITES
Press the FAVORITES button (A to C) with the content registered.
•The content is being played is switched to that registered to the pressed FAVORITES button.


• The operation when the registered FAVORITES buttons are pressed depends on the input sources of the registered contents (P.41).
FAVORITES registration list
| Input sources | Content that can be registered | What happens when the FAVORITES buttons are pressed |
| Server Songs | The input source is switched and the registered songs are played back from the first track. | |
| NetRadio Radio station | The input source is switched and the registered radio station is played back. | |
| AirPlay ^1 | Input source only The input source is switched. | |
| Bluetooth ^1 | Input source only The input source is switched. | |
| USB Songs | The input source is switched and the registered songs is played back. | |
| USB DAC ^1*2 | Input source only The input source is switched. | |
| CD Songs | The input source is switched and the registered songs are played back from the first track. | |
| FM Radio station | The input source is switched and the registered radio station is played back. | |
| DAB(CD-N1670D only) | Station | The input source is switched and the registered radio station is played back. |
| AUX ^1 | Input source only The input source is switched. | |
| Digital ^1 | Input source only The input source is switched. | |
*1 To play back the content, you must configure the device for the input source.
*2 Available only when the pre main amplifier (A U570) is connected with the system.
Using the sleep timer
You can set the time to elapse which the unit automatically enters to standby mode.
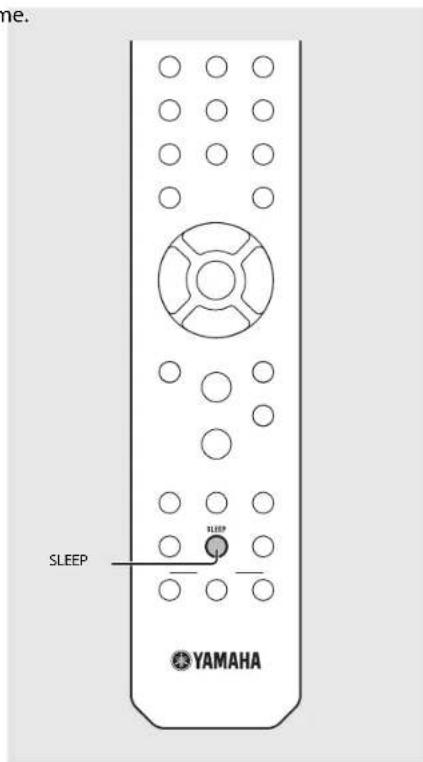
Press SLEEP several times to select the time.
•Time can be selected from 120/90/60/30 min., or OFF.
•The SLEEP indicator lights up when the sleep timer is set.
• To cancel the sleep timer, press SLEEP again.
Option settings
Option settings allow you to configure the unit to suit how you will use it.
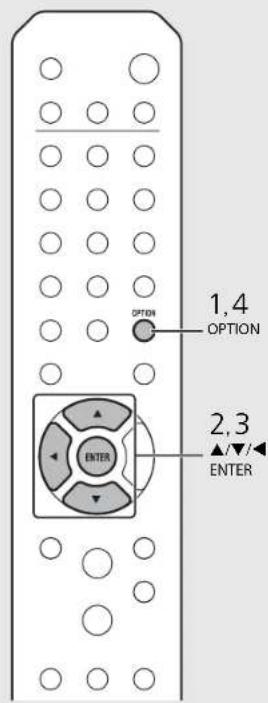
1 Press

-Option menu is shown on the front panel display (P.44).
2 Select a desired option menu with ▲/▼, and press ENTER
OPTION Network Config
3 Change the setting with ▲/▼, and press ENTER.
- Repeat step 3 if the sub menu is required to be set.
- Press ◀ to cancel the setting and return to the previous level.
- Repeat steps 2 and 3 if you set another menu item.
4 Press OPTION to finish the option setting.
Option menu list
| Menu Sub menu Default Function | |||
| Preset Delete^*1 (P.33) Deletes preset stations. | |||
| Auto Preset^*1 | Sets the Auto Preset. | ||
| Initial Scan^*1 ×^2 (P.29) | Scans all receivable frequencies and registers them in the unit. | ||
| Tune Aid^*1 ×^2 (P.31) Shows the level of received DAB signal. | |||
| Network Info | Status | Shows the connection status of the NETWORK jack. | |
| LAN MAC Address Shows MAC address. | |||
| WiFi MAC Address Shows MAC address. | |||
| Bluetooth Addr Confirms the Bluetooth address. | |||
| MusicCast Info Shows the information on MusicCast. | |||
| SSID Confirms the SSID. | |||
| Direct Info Shows the information for Wireless Direct. | |||
| Network Name | Shows the name of the unit that appears on the network. | ||
| vTuner ID | Confirms the vTuner ID. | ||
| IP Address | 0.0.0.0 | Confirms the IP address. | |
| Subnet Mask | 0.0.0.0 | Confirms the subnet mask. | |
| Default Gateway | 0.0.0.0 | Confirms the default gateway. | |
| DNS Server(P) | 0.0.0.0 | Confirms the primary DNS server. | |
| DNS Server(S) | 0.0.0.0 | Confirms the secondary DNS server. | |
| Menu | Sub menu | Default Function | |
| Network Config | Select Network | Wired | Selects a network connection method. |
| DHCP | On | Enables/disables DHCP. | |
| System Config | AutoPowerStdby | On | Sets the unit into standby mode automatically (P.10). |
| Net Standby | On | Sets the eco standby (P.10). | |
| Bluetooth | On | Sets Bluetooth. | |
| Initialize Set | Resets to the factory default settings. | ||
| Firmware Update | Version | Shows the firmware version of the unit. | |
| Update | Network | Updates the firmware of the unit (P45). | |
*1 Only when the radio is played back
*2 CD-NT670D only
Updating the firmware
When a new firmware for the unit is released, a message to update your current firmware will be shown on the front panel display (when the unit is connected to the Internet only). In this page, an updating method via a network using the option setting is shown.
1 Press

- The option menu is shown on the front panel display.
2 Select [Firmware Update] with ▲/▼, and press ENTER
3 Select [Update] with ▲/▼ and press ENTER.
4 Select [Network] with ▲/▼, and press ENTER.
- Press ENTER again, then update starts.

- When update finishes, messages are shown in the following order: "UPDATE SUCCESS", "PLEASE ..., and "POWER OFF!"
5 Press ⏻ on the front panel.
- Update is applied.


- Do not operate the unit or disconnect the power cable and network cables while updating.

- When Internet speed is not fast enough or the unit is connected to the wireless network via a wireless network adapter, network update may not be possible depending on the condition of the wireless connection. In this case, try again or update the firmware using a USB memory device. The firmware can be downloaded from the Yamaha Website.
To update the firmware using a USB memory device
You can download the firmware to the USB memory device, and connect that USB memory device to the USB jack on the unit.
- Select [USB] in step 4 to start the update.
Troubleshooting
Refer to the table below when the unit does not function properly. If your problem is not listed below or if the instruction below does not help, turn off the unit, disconnect the power cable, and contact the nearest authorized Yamaha dealer or service center.
First, check that the connectors of each cable are securely inserted in to jacks on each device. Check also that the power cable is plugged into an outlet.
General
| Problem Cause Solution | ||
| The unit enters the standby mode soon after the power is turned on. The unit does not operate properly. | The power cable is not properly connected. Connect the power cable firmly. | |
| The unit got a strong electric shock from an outside source, such as lighting or excessive static electricity. | Hold down on the front panel for more than 10 seconds to initialize and reboot the unit. (If the problem persists, unplug the power cable from the wall outlet and plug it again after 30 seconds or more.) | |
| No sound. | The audio cable connection between this unit and amplifier is improper. | Connect the audio cable firmly. If the problem persists, use another audio cable ( P.8). |
| The input setting on the amplifier is incorrect. Select the correct input (from this unit) on the amplifier. | ||
| Noise is heard. | This unit is too close to the digital or radio-frequency equipment. | Move this unit away from such equipment. |
| The audio cable between this unit and the media sever is defective. | Connect the audio cable firmly. If the problem persists, use another audio cable. | |
| The power is suddenly turned off. | The sleep timer may be set ( P.42). | Turn on the unit and play the source again. |
| Auto Power Standby function is activated ( P.10). | ||
| There is noise interference from digital or high-frequency equipment. | This unit is too close to the digital or high-frequency equipment. Place this unit farther away from such equipment. | |
| The remote control does not work or does not function properly. | The remote control may be operated outside its operation range. | Operate the remote control within its operation range ( P.10). |
| The remote control sensor on this unit may be exposed to direct sunlight or strong lighting such as an inverter type fluorescent lamp. | Change the orientation of lighting or the unit, or location of the unit. | |
| The battery may be worn out. | Replace the batteries with new ones ( P.7). | |
| There are obstacles between the sensor of this unit and the remote control. | Remove the obstacles. |
Network
| Problem Cause Solution | ||
| The network feature does not function. The | network parameters (IP address) have not been obtained properly. | Enable the DI ICP server function of the router. In addition, in the [Network Config] of the option setting of the unit, set [DI ICP] to [On]. If you want to configure the network parameters manually, check that you are using an IP address which is not used by other network devices in your network (P.44). For details on how to set the router, contact the manufacturer of the router. |
| Playback stops (songs cannot be played back continuously). | There are unsupported files in the server. | Remove the files (including image files or hidden files) which the unit does not support, from the folder being played back. |
| The unit does not detect the PC. | The media sharing setting is not correct. | Configure the sharing setting and select the unit as a device to which music contents are shared (P.23). |
| Some security software installed on your PC is blocking the access of the unit to your PC. | Check the setting of the security software installed in your PC. | |
| The unit and PC are not in the same network. | Check the network connections and your router settings, and then connect the unit and the PC to the same network. | |
| The files in the PC cannot be viewed or played back. | The files are not supported by the unit or the media server. | Use the file format supported by both the unit and the media server (P.54). |
| The Internet radio cannot be played. | The selected Internet radio station is currently not available. | There may be a network problem at the radio station, or the service may have been stopped. Try the station later or select another station. |
| The selected Internet radio station is currently broadcasting silence. | Some Internet radio stations broadcast silence at certain of times of the day. In this case, no sound is output even if the radio waves are received. Try the station later or select another station. | |
| Access to the network is restricted by the firewall settings of your network devices (such as the router). | Check the firewall settings of your network devices. The Internet radio can be played only when it passes through the port designated by each radio station. The port number varies depending on the radio station. | |
| The dedicated application for mobile devices does not detect the unit. | The unit and mobile devices are not in the same network. | Check the network connections and your router settings, and then connect the unit and the PC to the same network. |
| Update of the firmware via network failed. | The network connection is unstable. | Try updating again after a while. Or update the firmware via USB memory (P.45). |
Troubleshooting
| Problem Cause Solution | ||
| The iPod does not recognize the unit when using AirPlay. | A multi-SSID supported router is used. | The network separation function of the router may prevent the iPod from accessing the unit. When connecting an iPod, use SSID that can access the unit. |
| The unit cannot connect to the Internet via a wireless router (access point). | The wireless router (access point) is turned off. Turn on the wireless router (access point). | |
| The unit is placed too far from the wireless router (access point). | Place the unit and the wireless router (access point) closer to each other. | |
| There is an obstacle between the unit and the wireless router (access point). | Place the unit and the wireless router (access point) without any obstacle between them. | |
| Wireless network is not found. | Wireless communication is interrupted by the electromagnetic waves emitted from a microwave oven or other wireless devices. | When using the unit via wireless connection, place it away from devices emitting electromagnetic waves. |
| Access to the network is restricted by the firewall settings of your wireless router (access point). | Check the firewall setting of the wireless router (access point). | |
Bluetooth
| Problem Cause Solution | ||
| Cannot make the unit pair with a Bluetooth device. | The unit is turned off. | Turn the unit on and perform the pairing (P.P.25). |
| The [Bluetooth] of the option setting is set to [Off]. Set it to [On]. | ||
| Another Bluetooth device is connected. | Terminate current Bluetooth connection, and perform pairing with the new device. | |
| This unit and the device are too far apart. Pair the unit and device within a distance of 10 m (33 ft). | ||
| There is a device (microwave oven, wireless LAN, etc.) that outputs signals in the 2.4 GHz frequency band nearby. | Move this unit away from the device that is emitting radio-frequency signals. | |
| A Bluetooth adapter, etc., that you want to pair with this unit has a passkey other than "0000." | Use a device whose passkey is "0000." | |
| The Bluetooth device does not support A2DP. | Perform pairing with a device which supports A2DP. | |
| Cannot make a Bluetooth connection. | The unit is turned off. Turn the unit on. | |
| The [Bluetooth] of the option setting is set to [Off]. Set it to [On]. | ||
| Another Bluetooth device is connected. | Terminate current Bluetooth connection, then establish a connection with that device again. | |
| The Bluetooth function of the device is turned off. | Turn on the Bluetooth function of the device. | |
| The pairing information has been deleted. | Perform pairing again (P.25).This unit can be paired with 20 devices. If pairing with a 21st device is performed, the pairing information with the earliest connection date will be deleted. | |
| This unit is not registered on the device's Bluetooth connection list. | Perform pairing again (P.25). | |
| No sound is produced, or the sound is interrupted during playback. | The volume of the connecting device is set too low. Turn up the volume of the connecting device. | |
| The connecting device is not set to send Bluetooth audio signals to the unit. | Switch the output of Bluetooth audio signals of the connecting device to the unit. | |
| The Bluetooth connection of the unit with the device has terminated. | Perform Bluetooth connection operations again (P.25). | |
| There is a device (microwave oven, wireless LAN, etc.) that outputs signals in the 2.4 GHz frequency band nearby. | Move this unit away from the device that is emitting radio-frequency signals. | |
| This unit and the connecting device are too far apart. Move the connecting device to within 10 m (33 ft) of the unit. | ||
| The Bluetooth function of the device is turned off. | Turn on the Bluetooth function of the device. | |
| The connecting device is not set to send Bluetooth audio signals to this unit. | Check that the Bluetooth function of the connecting device is set properly. | |
Disc
| Problem Cause Solution | ||
| Playback does not start after a disc is set. Some button operations do not work. | The disc set in the unit may not be supported. | Use the disc supported by the unit (P.P.53). |
| Playback does not start immediately after pressing ▶/□unit or ▶/□Remote control (stops immediately). | The disc may be dirty. | Wipe the disc clean (P.P.53). |
| The disc set in the unit may not be supported. | Use the disc supported by the unit (P.P.53). | |
| If the unit was moved from a cold to warm place, condensation may have formed on the disc reading lens. | Wait for an hour or two until the unit adjusts to the room temperature, and try again. |
USB devices
| Problem Cause Solution | ||
| The unit does not detect the USB device. | The USB device is not connected to the USB jack securely. | Turn off the unit, reconnect your USB device, and turn the unit on again (P.22) |
| A USB device in a format other than FAT16/32 format is used. Use a USB device with FAT16 or FAT32 format. | ||
| Folders and files in the USB device cannot be viewed. | The data in the USB device is protected by the encryption. Use a USB device without an encryption function. | |
DAB reception (CD-NT670D only)
| Problem Cause Solution | ||
| Cannot tune into any DAB stations. | The initial scan operations were not performed. | Perform the initial scan operations (P.P.26). |
| The initial scan operations are not successful and [Not Found] is shown on the front panel display. | The DAB signals are too weak. | Use the DAB Tune Aid feature to conform the best position of the antenna (P.P.22). |
| The positioning of the antenna is not optimal for DAB reception. | ||
| There is no DAB coverage in your area. | Check with your dealer or WorldDMB online at http://www.worlddab.org for a listing of the DAB coverage in your area. | |
| There is noise interference (e.g. hiss, crackle or jitter) | The antenna needs to be repositioned. | Readjust the position of the antenna (P.P.9). |
| The DAB signals are too weak. | Use the DAB Tune Aid feature to conform the best position of the antenna (P.P.29). | |
| The DAB station information is not shown or is inaccurate. | The DAB station may be temporarily out of service, or the DAB station information is not provided by the DAB broadcaster. | Contact the DAB broadcaster. |
FM reception
| Problem Cause Solution | ||
| FM stereo reception is noisy. | The antenna is not connected properly. | Make sure the antenna is connected properly and change the position of the antenna (P.P). |
| The radio station you selected may be far from your area, or the antenna input is poor. | Use a commercially available outdoor antenna. For details, consult a specialist store. | |
| Automatic tuning does not work. | The radio station you selected may be far from your area, or the antenna input is poor. | Use a commercially available outdoor antenna. For details, consult a specialist store. |
| Use the manual tuning method (P.P.33). | ||
| Cannot select a preset radio station. | The preset (memory) may have been erased. | Preset radio stations again (P.P.32,33). |
| There is distortion, and clear reception cannot be obtained even with a good FM antenna or an outdoor antenna. | Multipath reflection or other radio interference may have occurred. | Change the height, direction, or placement of the antenna. |
Messages on the front panel display
| Message Cause Solution | ||
| Access Denied Access to the PC is denied. | Configure the sharing settings and select the unit as a device to which music contents are shared (P.P.23). | |
| Access Error | The unit cannot access the USB device. | Turn off the unit and reconnect your USB device. If the problem persists, try another USB device. |
| There is a problem with the signal path from the network to the unit. | Make sure your router and modem are turned on. Check the connection between the unit and your router (or hub) (P.P.12). | |
| Initializing The unit is starting up. | Wait until the message disappears. If the message stays more than 3 minutes, turn off the unit and turn it on again. | |
| Loading... The unit is loading the specified file/contents. Wait until the unit finishes loading. | ||
| No Content | Selected folder does not contain playable files. | Select a folder with playable files (P.P.54). |
| No Disc | The disc set in the unit may not be supported. | Use a disc supported by the unit (P.P.53). |
| The disc may be dirty, or foreign objects may be attached to it. | Wipe the disc clean. Alternatively, remove foreign matters adhered to the disc. | |
| Disc is set upside-down. Set the disc with the labeled side facing up. | ||
| No Songs | The disc does not contain playable files. | Set a disc with playable files (P.P.53). |
| Not Connected The unit is not connected to the network. Check the network connection. | ||
| Over current | The connected USB device is not supported by the unit. | Disconnect the USB device, turn off the unit, and turn it on again. If this does not solve the problem for the USB device, it is not playable on the unit. |
| USB device is not connected properly. | ||
| Unable to play | The unit cannot play back the songs stored on the USB devices or the computer for some reason. | Check if the format of files you are trying to play is supported by the unit (P.P.54). |
| Version Error | Firmware update is failed. | Update the firmware again. |
Supported devices/media and file formats
Supported devices/ medias
PCs
PC with Windows Media Player 11 or Windows Media Player 12 installed.
NAS
NAS compatible with DLNA version 1.5.
USB devices
- The unit is compatible with USB mass storage class devices (e.g., flash memories or portable audio players) using FAT16/FAT32 format.
- Do not connect devices other than the USB mass storage class devices (USB charger, USB hub, etc.), PCs, card readers, and external hard discs.
- USB devices with encryption cannot be used.
- Depending on the manufacturer or type of the USB device, the unit may not recognize the USB device or some functions may be unavailable.
Discs
- This unit is designed for use with audio CD, CD-R/RW (ISO 9660 format) with any of the following logos printed on the disc or the disc jacket.
Audio CD


CD-R/RW\*


* Discs which bear one of the following. FOR CONSUMER
FOR CONSUMER USE
FOR MUSIC USE ONLY
- 8-cm discs are playable with this unit. Set a disc in the inner recessed area of the disc tray.
Notes on discs
- Do not set any other type of disc other than stated above in this unit. Doing so may damage the unit.
- CD-R/RW cannot be played back unless finalized. Finalization means the process for making a disc to be ready for playback on a compatible device.
• Some discs cannot be played back depending on the disc characteristics or recording conditions. - Do not use any non-standard shaped discs such as a heart-shaped disc.
- Do not use discs with many scratches or a crack on their surface, or warped/glued discs.
Handling discs
- Do not touch the surface of the disc. I hold a disc by its edge or center hole.
- Use a soft-tipped pen when writing on the label side of a disc.
- Do not put tape, seal, glue, etc., on a disc.
- Do not use a protective cover to prevent scratches.
- Do not set foreign object on the disc tray.
- Do not set more than one disc in this unit at one time. This could cause damage to both this unit and the discs.
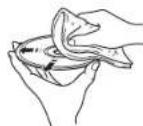
- If a disc becomes dirty, wipe it with a clean, dry soft cloth from the center out to the edge. Do not use record cleaner or paint thinner.
- Do not use any lens cleaners as they may cause malfunction.
- Do not expose discs to direct sunlight, high temperature, high humidity, or dust.
- When a disc is not being used, remove it from this unit and store in an appropriate case.
File format
File format the unit supporting is as follows.
DLNA/USB
| Format | Sampling frequency (kHz) | Quantization bitrate (bit) | Bitrate (kbps) | Number of channels | Gapless playback supported |
| WAV^* | 32/44.1/48/88.2/96/176.4/192 | 16/24 - 2 √ | |||
| MP3 32/44.1/48 - 8-320 2 - | |||||
| WMA 32/44.1/48 - 8-320 2 - | |||||
| MPEG-4 AAC 32/44.1/48 - 8-320 2 - | |||||
| FLAC | 32/44.1/48/88.2/96/176.4/192 | 16/24 - 2 √ | |||
| ALAC | 32/44.1/48/88.2/96 | 16/24 - 2 √ | |||
| AIFF | 32/44.1/48/88.2/96/176.4/192 | 16/24 - 2 √ | |||
* Linear PCM format only
- To play back FLAC files, you need to install server software that supports sharing of FLAC files via DLNA on your PC or use a NAS that supports FLAC files.
• Digital Rights Management (DRM) files cannot be played back.
Disc
Format Sampling frequency (kHz) Quantization bitrate
MP3 8-48 16
WMA 16-48 16
Specifications
Input
| AUX IN RCA x 1 | |
| DIGITAL IN OPTICAL x 1 |
Output
| ANALOG OUT RCA x 1 |
CD
| Laser | Wave length 790 nm | |
| Output power 10 mW | ||
| Media CD, CD-R/RW | ||
| Audio format Audio CD, MP3, WMA | ||
USB
| Supported file format MP3, WMA, MPEG1 AAC, WAV, FLAC, ALAC, AFF |
Network
| Interface 100Base 1X/10Base T | |
| Internet radio vTuner supported | |
| PC client function DLNA Ver. 1.5 supported (DMP/DMR function) | |
| Supported file format Same as USB supported file format | |
| AirPlay AirPlay supported | |
Wi-Fi
| Wireless network standards III 802.11 b/g/n | |
| Radio frequency band 2.4 GHz | |
| Available security method | WIP, WPA7-PSX (ALS), Mixed Mode |
Tuner
| Tuning range | FM | 87.5 MHz to 108.0 MHz |
| DA3 (CD-NT6/OD only) | 1/4 MHz to 240 MHz (Band III) |
Bluetooth
| Bluetooth version | Ver. 2.1+EDR |
| Supported profile | A2DP (Advanced Audio Distribution Profile)AVRCP (Audio/Video Remote Control Profile) |
| Compatible codecs | SBC, AAC |
| Wireless output | Bluetooth Class 2 |
| Maximum communication range | 10 m (33 ft) (without interference) |
Audio
| Output level | ANALOG OUT 2.0=0.3 V | |
| Frequency response | CD | 2 Hz to 20 kHz (3 dB) |
| Network | Fs 48 kHz: 2 Hz to 24 kHz (3 dB)Fs 96 kHz: 2 Hz to 48 kHz (3 dB)Fs 192 kHz: 2 Hz to 96 kHz (3 dB) | |
General
| Power supply AC 220 to 240 V, 50/60 Hz | ||
| Power consumption | 16 W | |
| Standby power consumption | Network standby off | 0.1 W |
| Network standby on | Wired (Ethernet): 1.7 W | |
| Wireless (Wi-Fi/Wireless Direct/Bluetooth): 1.8 W/1.9 W/1.6 W | ||
| Auto power standby function | No signal input: 20 minutes | |
| No operation: 8 hours | ||
| Dimensions (W x H x D) | 314 x 70 x 338 mm (12 3/8 x 2 3/4 x 13 1/4 in.) (With the antenna stood upright)314 x 142 x 338 mm (12 3/8 x 5 5/8 x 13 1/4 in.) | |
| Weight | 2.9 kg (6.5 lbs.) | |
Specifications are subject to change without notice.
Trademarks
AirPlay, iPad, iPhone, iPod, iPod touch and iTunes are trademarks of Apple Inc., registered in the U.S. and other countries.
AirPlay works with iPhone, iPad, and iPod touch with iOS 4.3.3 or later, Mac with OS X Mountain Lion or later, and Mac and PC with iTunes 10.2.2 or later. (as of July 2015)

dlna CERTIFIED
DLNA™ and DLNA CERTIFIED™ are trademarks or registered trademarks of Digital Living Network Alliance. All rights reserved. Unauthorized use is strictly prohibited.


CERTIFIED
The Wi-Fi CERTIFIED Logo is a certification mark of the Wi-Fi Alliance.
The Wi-Fi Protected Setup Identifier Mark is a mark of the Wi-Fi Alliance.
Wi-Fi, Wi-Fi Alliance, Wi-Fi CERTIFIED, Wi-Fi Protected Setup, WPA and WPA2 are trademark or registered trademark of Wi-Fi Alliance.

Bluetooth®
The Bluetooth ^® word mark and logos are registered trademarks owned by Bluetooth SIG, Inc. and any use of such marks by Yamaha Corporation is under license.
Bluetooth protocol stack (Blue SDK)
Copyright 1999-2014 OpenSynergy GmbH
All rights reserved. All unpublished rights reserved.

Digital Audio Broadcasting

Digital Audio Broadcasting
(For CD NT670D)
The unit supports DAB/DAB+ tuning
Explanations regarding GPL
This product utilizes GPL/LGPL open source software in some sections. You have the right to obtain, duplicate, modify, and redistribute this open source code only. For information on GPL/LGPL open source software, how to obtain it, and the GPL/LGPL license, refer to the Yamaha Corporation website (http://download.yamaha.com/sourcecodes/musiccast/).
Windows™
Windows is a registered trademark of Microsoft Corporation in the United States and other countries. Internet Explorer, Windows Media Audio and Windows Media Player are either registered trademarks or trademarks of Microsoft Corporation in the United States and/or other countries.
Android™
Android and Google Play are trademarks of Google Inc.
MusicCast
MusicCast is a trademark or registered trademark of Yamaha Corporation.
ATTENTION : VEUILLEZ LIRE CE QUI SUIT AVANT D'UTILISER L'APPAREIL.
Balayage initial....29
Syntonisation de stations DAB.....29
Préréglage de stations DAB....30

Piles (× 2)
(AA, R6, UM-3)
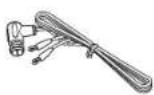
Antenne DAB/FM (pour CD-NT670D)
⑮ DISPLAY (P.38)
⑯ HOME (P.24, 35)
⑰ SLEEP (P.42)
Installation des piles


natural_image
Line drawing of a portable electronic device with a scroll wheel and indicator lights (no text or symbols)

3

4


| 174.928/5A | 176.640/5B | 178.352/5C | 180.064/5D |
| 181.936/6A | 183.648/6B | 185.360/6C | 187.072/6D |
| 188.928/7A | 190.640/7B | 192.352/7C | 194.064/7D |
| 195.936/8A | 197.648/8B | 199.360/8C | 201.072/8D |
| 202.928/9A | 204.640/9B | 206.352/9C | 208.064/9D |
| 209.936/10A | 211.648/10B | 213.360/10C | 215.072/10D |
| 216.928/11A | 218.640/11B | 220.352/11C | 222.064/11D |
| 223.936/12A | 225.648/12B | 227.360/12C | 229.072/12D |
| 230.784/13A | 232.496/13B | 234.208/13C | 235.776/13D |
| 237.488/13E | 239.200/13F |
Préréglage de stations DAB
DLS (Dynamic Label Segment)
ENSEMBLI
PService (Program Service)
Digital Audio Broadcasting

Digital Audio Broadcasting
(Pour CD NT670D)

natural_image
Line drawing of a portable electronic device with ports and a scroll wheel (no text or symbols)

3

4
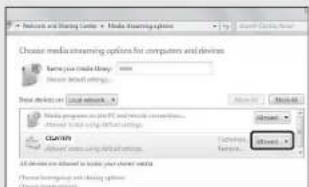

| 174.928/5A | 176.640/5B | 178.352/5C | 180.064/5D |
| 181.936/6A | 183.648/6B | 185.360/6C | 187.072/6D |
| 188.928/7A | 190.640/7B | 192.352/7C | 194.064/7D |
| 195.936/8A | 197.648/8B | 199.360/8C | 201.072/8D |
| 202.928/9A | 204.640/9B | 206.352/9C | 208.064/9D |
| 209.936/10A | 211.648/10B | 213.360/10C | 215.072/10D |
| 216.928/11A | 218.640/11B | 220.352/11C | 222.064/11D |
| 223.936/12A | 225.648/12B | 227.360/12C | 229.072/12D |
| 230.784/13A | 232.496/13B | 234.208/13C | 235.776/13D |
| 237.488/13E | 239.200/13F |
DLS (Dynamic Label Segment)
ENSEMBLE
Memory ◆FM01 88.50MHz
PService (Program Service)
PTY (Programmtyp)
RT (Radiotext)
CT (Uhrzeit)
Frequenz


| AUX IN RCA x 1 | |
| DIGITAL IN OPISCH x 1 |
Ausgang
| ANALOG OUT RCA x 1 |
CD
Digital Audio Broadcasting

Digital Audio Breaadrarting
(für CD-NT670D)

natural_image
Line drawing of a portable electronic device with a scroll wheel and indicator lights (no text or symbols)
3

4


| 174.928/5A | 176.640/5B | 178.352/5C | 180.064/5D |
| 181.936/6A | 183.648/6B | 185.360/6C | 187.072/6D |
| 188.928/7A | 190.640/7B | 192.352/7C | 194.064/7D |
| 195.936/8A | 197.648/8B | 199.360/8C | 201.072/8D |
| 202.928/9A | 204.640/9B | 206.352/9C | 208.064/9D |
| 209.936/10A | 211.648/10B | 213.360/10C | 215.072/10D |
| 216.928/11A | 218.640/11B | 220.352/11C | 222.064/11D |
| 223.936/12A | 225.648/12B | 227.360/12C | 229.072/12D |
| 230.784/13A | 232.496/13B | 234.208/13C | 235.776/13D |
| 237.488/13E | 239.200/13F |
DLS (Dynamic Label Segment)
ENSEMBLI
Memory ◆FM01 88.50MHz
PService (Program Service)
PTY (programtyp)
RT (radiotext)
CT (aktuell tid)
Frekvens
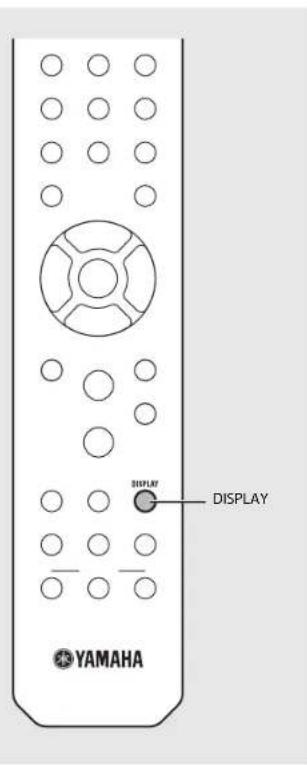

Digital Audio Broadcasting

Digital Audio Broadcasting
(För CD NT670D)

Batterie (× 2)
(AA, R6, UM-3)

Antenna DAB/FM (per CD-NT670D)
① Presa ANTENNA (P.9)
② Prese AUX IN (ingresso RCA) (P.28)
③ Prese ANALOG OUT (P.28)
④Presa SYSTEM (ingresso presa mini)
⑮ DISPLAY (P.38)
⑯ HOME (P.24, 35)
⑰ SLEEP (P.42)


natural_image
Line drawing of a portable electronic device with a scroll wheel and indicator lights (no text or symbols)

3
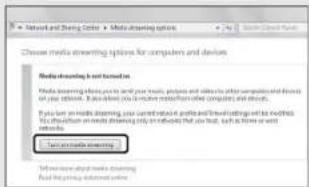
4
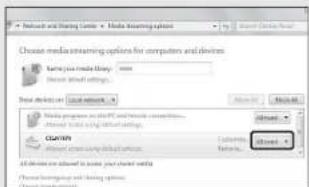

| 174.928/5A | 176.640/5B | 178.352/5C | 180.064/5D |
| 181.936/6A | 183.648/6B | 185.360/6C | 187.072/6D |
| 188.928/7A | 190.640/7B | 192.352/7C | 194.064/7D |
| 195.936/8A | 197.648/8B | 199.360/8C | 201.072/8D |
| 202.928/9A | 204.640/9B | 206.352/9C | 208.064/9D |
| 209.936/10A | 211.648/10B | 213.360/10C | 215.072/10D |
| 216.928/11A | 218.640/11B | 220.352/11C | 222.064/11D |
| 223.936/12A | 225.648/12B | 227.360/12C | 229.072/12D |
| 230.784/13A | 232.496/13B | 234.208/13C | 235.776/13D |
| 237.488/13E | 239.200/13F |
DLS (Dynamic Label Segment)
ENSEMBL
PService (Program Service)
Digital Audio Broadcasting

Digital Audio Broadcasting
(Per CD NT670D)
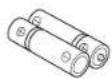
Pilas (× 2)
(AA, R6, UM-3)

Antena DAB/FM (para CD-NT670D)
⑪ □(Parada) (P.21, 22, 24, 35)
CONNECT

natural_image
Line drawing of a portable electronic device with a scroll wheel and indicator lights (no text or symbols)

3

4


| 174.928/5A | 176.640/5B | 178.352/5C | 180.064/5D |
| 181.936/6A | 183.648/6B | 185.360/6C | 187.072/6D |
| 188.928/7A | 190.640/7B | 192.352/7C | 194.064/7D |
| 195.936/8A | 197.648/8B | 199.360/8C | 201.072/8D |
| 202.928/9A | 204.640/9B | 206.352/9C | 208.064/9D |
| 209.936/10A | 211.648/10B | 213.360/10C | 215.072/10D |
| 216.928/11A | 218.640/11B | 220.352/11C | 222.064/11D |
| 223.936/12A | 225.648/12B | 227.360/12C | 229.072/12D |
| 230.784/13A | 232.496/13B | 234.208/13C | 235.776/13D |
| 237.488/13E | 239.200/13F |
PService (Program Service)
Digital Audio Broadcasting

Digital Audio Broadcasting
(Para CD NT670D)
⑪ □(Stop) (P.21, 22, 24, 35) CONNECT
⑮ DISPLAY (P.38)
⑯ HOME (P.24, 35)
⑰ SLEEP (P.42)

Status in stand-by/ecostand-by
natural_image
Line drawing of a portable electronic device with a scroll wheel and indicator lights (no text or symbols)

3
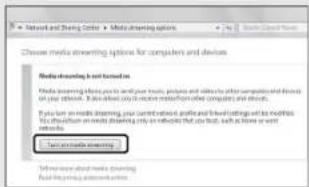
4


| 174.928/5A | 176.640/5B | 178.352/5C | 180.064/5D |
| 181.936/6A | 183.648/6B | 185.360/6C | 187.072/6D |
| 188.928/7A | 190.640/7B | 192.352/7C | 194.064/7D |
| 195.936/8A | 197.648/8B | 199.360/8C | 201.072/8D |
| 202.928/9A | 204.640/9B | 206.352/9C | 208.064/9D |
| 209.936/10A | 211.648/10B | 213.360/10C | 215.072/10D |
| 216.928/11A | 218.640/11B | 220.352/11C | 222.064/11D |
| 223.936/12A | 225.648/12B | 227.360/12C | 229.072/12D |
| 230.784/13A | 232.496/13B | 234.208/13C | 235.776/13D |
| 237.488/13E | 239.200/13F |
PService (Program Service)
PTY (Programmatype)
R1 (Radiotekst)
CT (Kloktijd)
Frequentie
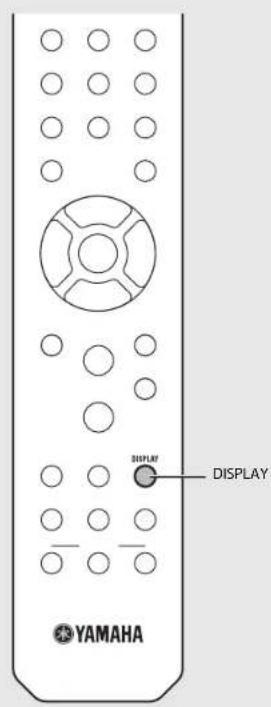

Opmerking over discs
Digital Audio Broadcasting

Digital Audio Broadcasting
(voor CD NT670D)

natural_image
Line drawing of a portable electronic device with a scroll wheel and indicator lights (no text or symbols)

3

4


| 174.928/5A | 176.640/5B | 178.352/5C | 180.064/5D |
| 181.936/6A | 183.648/6B | 185.360/6C | 187.072/6D |
| 188.928/7A | 190.640/7B | 192.352/7C | 194.064/7D |
| 195.936/8A | 197.648/8B | 199.360/8C | 201.072/8D |
| 202.928/9A | 204.640/9B | 206.352/9C | 208.064/9D |
| 209.936/10A | 211.648/10B | 213.360/10C | 215.072/10D |
| 216.928/11A | 218.640/11B | 220.352/11C | 222.064/11D |
| 223.936/12A | 225.648/12B | 227.360/12C | 229.072/12D |
| 230.784/13A | 232.496/13B | 234.208/13C | 235.776/13D |
| 237.488/13E | 239.200/13F |
PService (Program Service)
РГУ (тип программы)
RT (радиотекст)
СТ (текущее время)
Частота


OPTION #Network Config
Digital Audio Broadcasting

Digital Audio Broadcasting
(Для CO-NT670D)
CAUTION: INVISIBLE LASER RADIATION WHEN OPEN.
DO NOT STARE INTO BEAM.
DANGER: INVISIBLE LASER RADIATION WHEN OPEN.
AVOID DIRECT EXPOSURE TO THE BEAML
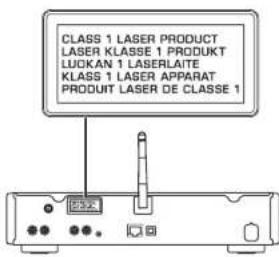
Important Notice: Guarantee Information for customers in EEA\* and Switzerland
English
For detailed guarantee information about this Yamaha product, and Pan-EEA* and Switzerland warranty service, please either visit the website address below (Printable file is available at our website) or contact the Yamaha representative office for your country * EEA: European Economic Area



- CAUTION: READ THIS BEFORE OPERATING YOUR UNIT.
- WARNING TO REDUCE THE RISK OF FIRE OR ELECTRIC SHOCK, DO NOT EXPOSE THIS UNIT TO RAIN OR MOISTURE.
- ■ Notes on remote controls and batteries
- LASER SAFETY
- DANGER
- CAUTION
- ■ For U.K. customers
- Note
- ■ Special Instructions for U.K. Model
- IMPORTANT
- Information for Users on Collection and Disposal of Old Equipment and Used Batteries
- [Information on Disposal In other Countries outside the European Union]
- Note for the battery symbol (bottom two symbol examples):
- Yamaha Music Europe GmbH
- Bluetooth
- Handling Bluetooth communications
- Table of Contents
- What you can do with this unit
- Introduction
- Supplied accessories About this manual
- Part name
- Rear panel
- Front panel display
- ①Multi information display
- ②STEREO indicator
- ③TUNED indicator
- ④MUTE indicator
- ⑤SLEEP indicator
- ⑥Shuffle/repeat indicator
- Adjusting display brightness
- Remote control
- Preparations
- Connecting amplifier
- Connecting antenna
- Turning on the power
- Setting to the eco standby
- Option menu regarding power (System Config)
- AutoPowerStdby
- Configuring network connection
- Selecting connection method
- Using "MusicCast CONTROLLER" to make connection
- Establishing connection by the unit operation
- Connecting to wired network
- Connecting to wireless network
- Connecting by Wireless Direct
- Preparing for network connection
- Preparing for wired connection
- Preparing for wireless connection
- Put up the wireless antenna.
- Connecting to the wired network
- Connecting to the wireless network
- Setting with WPS button
- About WPS
- Sharing the setting of iOS device
- Establishing wireless direct connection with mobile device
- Press
- Playing back music on your CD
- Playing back music on USB devices
- Playing back songs in the computer
- Setting the media sharing of music files
- For a PC or a NAS with other DLNA server software installed
- Playing back songs in the PC
- Playing back music via Bluetooth connection
- Pairing a Bluetooth device with the unit
- Performing pairing and playing back music
- Connecting a paired Bluetooth device and playing back music
- Perform Bluetooth connection.
- Play back music on the connected device.
- • Decrease the volume of the amplifier connected to the unit before playback.
- - If connecting from the unit, the unit searches for the Bluetooth device connected the last time. In this case, make sure that device's Bluetooth function is turned on.
- Terminating the Bluetooth connection
- Playing back music from external devices
- Listening to DAB stations (CD-NT670D only)
- Initial scan
- Tuning in DAB stations
- Presetting DAB stations
- Selecting preset DAB stations
- Deleting a preset station
- Confirming the reception
- Listening to the FM radio stations
- Tuning in FM stations
- Presetting FM stations
- Auto preset
- Manual preset
- FM01 88.50MHz
- Selecting preset FM stations
- Press ENTER.
- Radio Data System
- Press DISPLAY when the source is FM.
- Listening to the Internet radio
- Playing back music with AirPlay
- Playing back songs with iPod
- Clearing AirPlay
- Playing back songs with iTunes
- More on playback
- Shuffle playback
- Repeat playback
- Playback information
- ALBUM ▶Meteor
- Presetting network contents
- Selecting preset network content
- Presetting music contents to FAVORITES
- Selecting network content registered to FAVORITES
- Using the sleep timer
- Option settings
- Select a desired option menu with ▲/▼, and press ENTER
- OPTION Network Config
- Change the setting with ▲/▼, and press ENTER.
- Press OPTION to finish the option setting.
- Updating the firmware
- To update the firmware using a USB memory device
- Troubleshooting
- General
- Network
- Disc
- USB devices
- DAB reception (CD-NT670D only)
- FM reception
- Supported devices/media and file formats
- Supported devices/ medias
- PCs
- NAS
- Discs
- Audio CD
- CD-R/RW\*
- Notes on discs
- Handling discs
- File format
- Specifications
- Trademarks
- CERTIFIED
- Bluetooth protocol stack (Blue SDK)
- Explanations regarding GPL
- Windows™
- Android™
- ATTENTION : VEUILLEZ LIRE CE QUI SUIT AVANT D'UTILISER L'APPAREIL.
- Préréglage de stations DAB
- 3
- 4
- CONNECT
- Opmerking over discs
- OPTION #Network Config
- Important Notice: Guarantee Information for customers in EEA\* and Switzerland
- English
Brand : YAMAHA
Model : CD-NT670
Category : Cd player/recorder