
PMC 8 - Saw BOSCH - Free user manual and instructions
Find the device manual for free PMC 8 BOSCH in PDF.


| Product type | Circular saw |
| Brand | Bosch |
| Model | PMC 8 |
| Dimensions (L x W x H) | 300 x 250 x 250 mm |
| Weight | 3.5 kg |
| Power supply | 230 V, 50 Hz |
| Power consumption | 1200 W |
| Blade diameter | 160 mm |
| Max cutting depth | 50 mm |
| No-load speed | 5000 rpm |
| Depth stop | Yes, graduated |
| Parallel guide | Integrated |
| Brake system | Electronic blade brake |
| Anti-restart protection | Yes |
| Safety switch | Double press |
| Dust extraction connection | Yes, diameter 35 mm |
| Sound level | 95 dB(A) |
| Vibration | 2.5 m/s² |
| Maintenance | Cleaning ventilation slots, replacing carbon brushes |
| Spare parts | Blade, carbon brushes, brushes, switch |
| Repairability | Repairability score: 8.2 / 10 |
Frequently Asked Questions - PMC 8 BOSCH
User questions about PMC 8 BOSCH
0 question about this device. Answer the ones you know or ask your own.
Ask a new question about this device
Download the instructions for your Saw in PDF format for free! Find your manual PMC 8 - BOSCH and take your electronic device back in hand. On this page are published all the documents necessary for the use of your device. PMC 8 by BOSCH.
USER MANUAL PMC 8 BOSCH

Robert Bosch GmbH
Power Tools Division
70764 Leinfelden-Echterdingen
GERMANY
www.bosch-pt.com
1 609 92A 1GM (2015.06) PS / 260 EURO

PCM 8

BOSCH
Bosch Power Tools 1 609 92A 1GM | (23.6.15)
6






8


Deutsch | 9
Deutsch
Safety instructions
Executive Vice President
Head of Product Certification
Engineering
PT/ETM9

Robert Bosch GmbH, Power Tools Division 70764 Leinfelden-Echterdingen, GERMANY Leinfelden, 23.06.2015
Assembly
General Power Tool Safety Warnings
WARNING
Read all safety warnings, instructions, illustrations and specifications provided with this power tool. Failure to follow all instructions listed below may result in electric shock, fire and/or serious injury.
ed with this power tool. Failure to follow all instructions listed below may result in electric shock, fire and/or serious injury.
Save all warnings and instructions for future reference.
The term "power tool" in the warnings refers to your mains-operated (corded) power tool or battery-operated (cordless) power tool.
When using electric tools, basic safety precautions should always be followed to reduce the risk of fire, electric shock and personal injury, including the following.
When using electric tools, basic safety precautions should always be followed.
To reduce the risk of fire, electric shock, and personal injury, including the following:
Read all these instructions before attempting to operate this product and save these instructions.
Work area safety
- Keep work area clean and well lit. Cluttered or dark areas invite accidents. ▶ Do not operate power tools in explosive atmospheres, such as in the presence of flammable liquids, gases or dust. Power tools create sparks which may ignite the dust or fumes. ▶ Keep children and bystanders away while operating a power tool. Distractions can cause you to lose control.
Electrical safety
▶ Power tool plugs must match the outlet. Never modify the plug in any way. Do not use any adapter plugs with earthed (grounded) power tools. Unmodified plugs and matching outlets will reduce risk of electric shock. - Avoid body contact with earthed or grounded surfaces, such as pipes, radiators, ranges and refrigerators.
There is an increased risk of electric shock if your body is earthed or grounded.
▶ Do not expose power tools to rain or wet conditions. Water entering a power tool will increase the risk of electric shock. Do not abuse the cord. Never use the cord for carrying, pulling or unplugging the power tool. Keep cord away from heat, oil, sharp edges and moving parts. Damaged or entangled cords increase the risk of electric shock. When operating a power tool outdoors, use an extension cord suitable for outdoor use. Use of a cord suitable for outdoor use reduces the risk of electric shock. ▶ If operating a power tool in a damp location is unavoidable, use a residual current device (RCD) protected supply. Use of an RCD reduces the risk of electric shock.
Personal safety
Stay alert, watch what you are doing and use common sense when operating a power tool. Do not use a power tool while you are tired or under the influence of drugs, alcohol or medication. A moment of inattention while operating power tools may result in serious personal injury. Use personal protective equipment. Always wear eye protection. Protective equipment such as dust mask, non-skid safety shoes, hard hat, or hearing protection used for appropriate conditions will reduce personal injuries. Prevent unintentional starting. Ensure the switch is in the off-position before connecting to power source and/or battery pack, picking up or carrying the tool. Carrying power tools with your finger on the switch or energising power tools that have the switch on invites accidents. Remove any adjusting key or wrench before turning the power tool on. A wrench or a key left attached to a rotating part of the power tool may result in personal injury. Do not overreach. Keep proper footing and balance at all times. This enables better control of the power tool in unexpected situations. Dress properly. Do not wear loose clothing or jewellery. Keep your hair and clothing away from moving parts. Loose clothes, jewellery or long hair can be caught in moving parts. If devices are provided for the connection of dust extraction and collection facilities, ensure these are connected and properly used. Use of dust collection can reduce dust-related hazards. Do not let familiarity gained from frequent use of tools allow you to become complacent and ignore tool safety principles. A careless action can cause severe injury within a fraction of a second.
Power tool use and care
Do not force the power tool. Use the correct power tool for your application. The correct power tool will do the job better and safer at the rate for which it was designed. Do not use the power tool if the switch does not turn it on and off. Any power tool that cannot be controlled with the switch is dangerous and must be repaired.
Disconnect the plug from the power source and/or remove the battery pack, if detachable, from the power tool before making any adjustments, changing accessories, or storing power tools. Such preventive safety measures reduce the risk of starting the power tool accidentally. Store idle power tools out of the reach of children and do not allow persons unfamiliar with the power tool or these instructions to operate the power tool. Power tools are dangerous in the hands of untrained users. Maintain power tools and accessories. Check for misalignment or binding of moving parts, breakage of parts and any other condition that may affect the power tool's operation. If damaged, have the power tool repaired before use. Many accidents are caused by poorly maintained power tools. Keep cutting tools sharp and clean. Properly maintained cutting tools with sharp cutting edges are less likely to bind and are easier to control. Use the power tool, accessories and tool bits etc. in accordance with these instructions, taking into account the working conditions and the work to be performed. Use of the power tool for operations different from those intended could result in a hazardous situation. Keep handles and grasping surfaces dry, clean and free from oil and grease. Slippery handles and grasping surfaces do not allow for safe handling and control of the tool in unexpected situations.
Service
Have your power tool serviced by a qualified repair person using only identical replacement parts. This will ensure that the safety of the power tool is maintained.
Safety Warnings for Mitre Saws
- Mitre saws are intended to cut wood or wood-like products, they cannot be used with abrasive cut-off wheels for cutting ferrous material such as bars, rods, studs, etc. Abrasive dust causes moving parts such as the lower guard to jam. Sparks from abrasive cutting will burn the lower guard, the kerf insert and other plastic parts. Use clamps to support the workpiece whenever possible. If supporting the workpiece by hand, you must always keep your hand at least 100 mm from either side of the saw blade. Do not use this saw to cut pieces that are too small to be securely clamped or held by hand. If your hand is placed too close to the saw blade, there is an increased risk of injury from blade contact. The workpiece must be stationary and clamped or held against both the fence and the table. Do not feed the workpiece into the blade or cut "freehand" in any way. Unrestrained or moving workpieces could be thrown at high speeds, causing injury. Never cross your hand over the intended line of cutting either in front or behind the saw blade. Supporting the workpiece "cross handed" i.e. holding the workpiece to the right of the saw blade with your left hand or vice versa is very dangerous.
Do not reach behind the fence with either hand closer than 100 mm from either side of the saw blade, to remove wood scraps, or for any other reason while the blade is spinning. The proximity of the spinning saw blade to your hand may not be obvious and you may be seriously injured. Inspect your workpiece before cutting. If the workpiece is bowed or warped, clamp it with the outside bowed face toward the fence. Always make certain that there is no gap between the workpiece, fence and table along the line of the cut. Bent or warped workpieces can twist or shift and may cause binding on the spinning saw blade while cutting. There should be no nails or foreign objects in the workpiece. Do not use the saw until the table is clear of all tools, wood scraps, etc., except for the workpiece. Small debris or loose pieces of wood or other objects that contact the revolving blade can be thrown with high speed. ▶ Cut only one workpiece at a time. Stacked multiple workpieces cannot be adequately clamped or braced and may bind on the blade or shift during cutting. ▶ Ensure the mitre saw is mounted or placed on a level, firm work surface before use. A level and firm work surface reduces the risk of the mitre saw becoming unstable. ▶ Plan your work. Every time you change the bevel or mitre angle setting, make sure the adjustable fence is set correctly to support the workpiece and will not interfere with the blade or the guarding system. Without turning the tool "ON" and with no workpiece on the table, move the saw blade through a complete simulated cut to assure there will be no interference or danger of cutting the fence. ▶ Provide adequate support such as table extensions, saw horses, etc. for a workpiece that is wider or longer than the table top. Workpieces longer or wider than the mitre saw table can tip if not securely supported. If the cut-off piece or workpiece tips, it can lift the lower guard or be thrown by the spinning blade. Do not use another person as a substitute for a table extension or as additional support. Unstable support for the workpiece can cause the blade to bind or the workpiece to shift during the cutting operation pulling you and the helper into the spinning blade. The cut-off piece must not be jammed or pressed by any means against the spinning saw blade. If confined, i.e. using length stops, the cut-off piece could get wedged against the blade and thrown violently. ▶ Always use a clamp or a fixture designed to properly support round material such as rods or tubing. Rods have a tendency to roll while being cut, causing the blade to "bite" and pull the work with your hand into the blade. ▶ Let the blade reach full speed before contacting the workpiece. This will reduce the risk of the workpiece being thrown. ▶ If the workpiece or blade becomes jammed, turn the mitre saw off. Wait for all moving parts to stop and disconnect the plug from the power source and/or remove
the battery pack. Then work to free the jammed material. Continued sawing with a jammed workpiece could cause loss of control or damage to the mitre saw.
After finishing the cut, release the switch, hold the saw head down and wait for the blade to stop before removing the cut-off piece. Reaching with your hand near the coasting blade is dangerous. The power tool is provided with a laser warning label (marked with number 2 in the representation of the power tool on the graphics page).

If the text of the warning label is not in your national language, stick the provided warning label in your national language over it before operating for the first time.

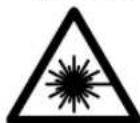
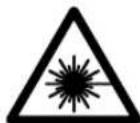
Do not direct the laser beam at persons or animals and do not stare into the direct or reflected laser beam yourself, not even from a distance. You could blind somebody, cause accidents or damage your eyes.
If laser radiation strikes your eye, you must deliberately close your eyes and immediately turn your head away from the beam. Do not make any modifications to the laser equipment. Never make warning signs on the machine unrecognisable. Store the machine in a safe manner when not being used. The storage location must be dry and lockable. This prevents the machine from storage damage, and from being operated by untrained persons. Never use the machine with a damaged cable. Do not touch the damaged cable and pull the mains plug when the cable is damaged while working. Damaged cables increase the risk of an electric shock. Check the cable regularly and have a damaged cable repaired only through an authorised customer service agent for Bosch power tools. Replace damaged extension cables. This will ensure that the safety of the power tool is maintained. Do not use dull, cracked, bent or damaged saw blades. Unsharpened or improperly set saw blades produce narrow kerf causing excessive friction, blade binding and kick-back. Never operate the machine without the insert plate. Replace a defective insert plate. Without flawless insert plates, injuries are possible from the saw blade. Do not use high speed steel (HSS) saw blades. Such saw blades can easily break. Always use blades with correct size and shape (diamond versus round) of arbour holes. Blades that do not match the mounting hardware of the saw will run eccentrically, causing loss of control.
Make sure that the guard operates properly and that it can move freely. Never lock the guard in place when opened. Keep the floor free of wood chips and material remainders. You could slip or trip. Do not touch the saw blade after working before it has cooled. The saw blade becomes very hot while working. Never leave the machine before it has come to a complete stop. Cutting tools that are still running can cause injuries. Guide the saw blade against the workpiece only when the machine is switched on. Otherwise there is danger of kickback when the saw blade becomes wedged in the workpiece. Never stand on the power tool. Serious injuries can occur when the power tool tips over or when inadvertently coming into contact with the saw blade. Products sold in GB only: Your product is fitted with a BS 1363/A approved electric plug with internal fuse (ASTA approved to BS 1362). If the plug is not suitable for your socket outlets, it should be cut off and an appropriate plug fitted in its place by an authorised customer service agent. The replacement plug should have the same fuse rating as the original plug. The severed plug must be disposed of to avoid a possible shock hazard and should never be inserted into a mains socket elsewhere.
Products sold in AUS and NZ only: Use a residual current device (RCD) with a rated residual current of 30 mA or less.
Symbols
The following symbols can be important for the operation of your power tool. Please memorise the symbols and their meanings. The correct interpretation of the symbols helps you operate the power tool better and more secure.
Symbols and their meaning

Keep hands away from the cutting area while the machine is running. Danger of injury when coming in contact with the saw blade.

Wear a dust respirator.

Wear safety goggles.

Wear ear protectors. Exposure to noise can cause hearing loss.
Symbols and their meaning

Laser Radiation. Do not stare into beam. Class 2 laser product.

Danger area! Keep hands, fingers or arms away from this area.

The adjustable fence must be pulled outward when sawing bevel angles.
ø 216 mm, ø 30 mm
Observe the dimensions of the saw blade. The hole diameter must match the tool spindle without play. Do not use reducers or adapters.
Product Description and Specifications

Read all safety warnings and all instructions. Failure to follow the warnings and instructions may result in electric shock, fire and/or serious injury.
Intended Use
The power tool is intended as a stationary machine for making straight lengthways and crossways cuts in wood. In this, mitre angles from -48° to +48° as well as bevel angles from 0° to 45° are possible.
The capacity of the power tool is designed for sawing hardwood and softwood.
The power tool is not suitable for cutting aluminium or other non-ferrous metals or alloys.
Product Features
The numbering of the components shown refers to the representation of the power tool on the graphic pages.
1 Handle 2 Laser warning label 3 Lever for releasing the tool arm 4 Blade guard 5 Retracting blade guard 6 Fence 7 Insert plate 8 Mounting holes 9 Locking knob for various mitre angles
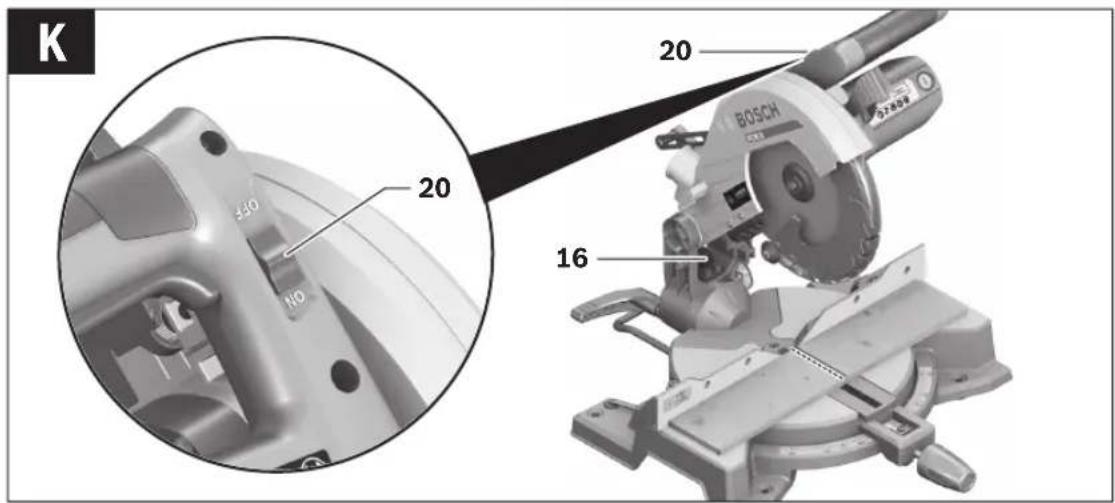
20 Laser on/off switch (for marking of cutting line)
21 On/Off switch
22 Chip ejector
23 Mounting holes for material clamp
24 Hex key
25 Tilt-protector bar
26 Transport safety-lock
27 Material clamp
28 Spindle lock
29 Indicator for bevel angle
30 Scale for bevel angle
31 Fastening screw for insert plate
32 Fastening screw for tilt-protector bar
33 Hex socket screw for mounting of saw blade
34 Clamping flange
35 Interior clamping flange
36 Wing bolt
37 Threaded rod
38 Clamping lever of the adjustable fence
Accessories shown or described are not part of the standard delivery scope of the product. A complete overview of accessories can be found in our accessories program.
Technical Data
| Mitre Saw PCM 8 | ||
| Article number | 3603M100. | |
| Rated power input | W1200 | |
| No-load speed | min 1 | 4800 |
| Laser type | nm | 650 |
| mW | < 1 | |
| Laser class | 2 | |
Weight according to
EPTA-Procedure 01:2014 kg 7.9
Protection class ☐/II
Permissible workpiece dimensions (maximum/minimum) see page 24.
The values given are valid for a nominal voltage [U] of 230 V. For different voltages and models for specific countries, these values can vary.
Dimension of suitable saw blades
| Saw blade diameter | mm 216 | |
| Blade body thickness | mm 1.4-1.8 | |
| Max. cutting width | mm | 2 |
| Mounting hole diameter | mm | 30 |
Noise Information
Sound emission values determined according to EN 61029-2-9.
Typically the A-weighted noise levels of the product are:
Sound pressure level 96 dB(A); Sound power level 103 dB(A). Uncertainty K = 3 dB.
Wear hearing protection!
Declaration of Conformity

We declare under our sole responsibility that the product described under "Technical Data" is in conformity with all relevant provisions of the directives 2011/65/EU, until
19 April 2016: 2004/108/EC, from 20 April 2016 on:
2014/30/EU, 2006/42/EC including their amendments and complies with the following standards:
EN 61029-1, EN 61029-2-9, EN 60825-1.
Technical file (2006/42/EC) at:
Robert Bosch GmbH, PT/ETM9,
70764 Leinfelden-Echterdingen, GERMANY
Henk Becker
Helmut Heinzelmann
Executive Vice President
Head of Product Certification
Engineering
PT/ETM9


Robert Bosch GmbH, Power Tools Division
70764 Leinfelden-Echterdingen, GERMANY
- Avoid unintentional starting of the machine. During assembly and for all work on the machine, the power plug must not be connected to the mains supply.
Delivery Scope

Please also observe the representation of the delivery scope at the beginning of the operating instructions.
Before starting the operation of the machine for the first time, check if all parts listed below have been supplied:
below have been supplied:
- Mitre saw with mounted saw blade
- Dust bag 19
- Material clamp 27
- Hex key 24
- Tilt-protector bar 25 with fastening screws 32
Note: Check the power tool for possible damage.
Before further use of the machine, check that all protective devices are fully functional. Any lightly damaged parts must be carefully checked to ensure flawless operation of the tool. All parts must be properly mounted and all conditions fulfilled that ensure faultless operation.
Damaged protective devices and parts must be immediately replaced by an authorised service centre.
Mounting Individual Components
- Carefully remove all parts included in the delivery from their packaging.
- Remove all packaging material from the machine and the accessories provided.
- For easier working when mounting the supplied product features, please observe that the machine is in the transport position.
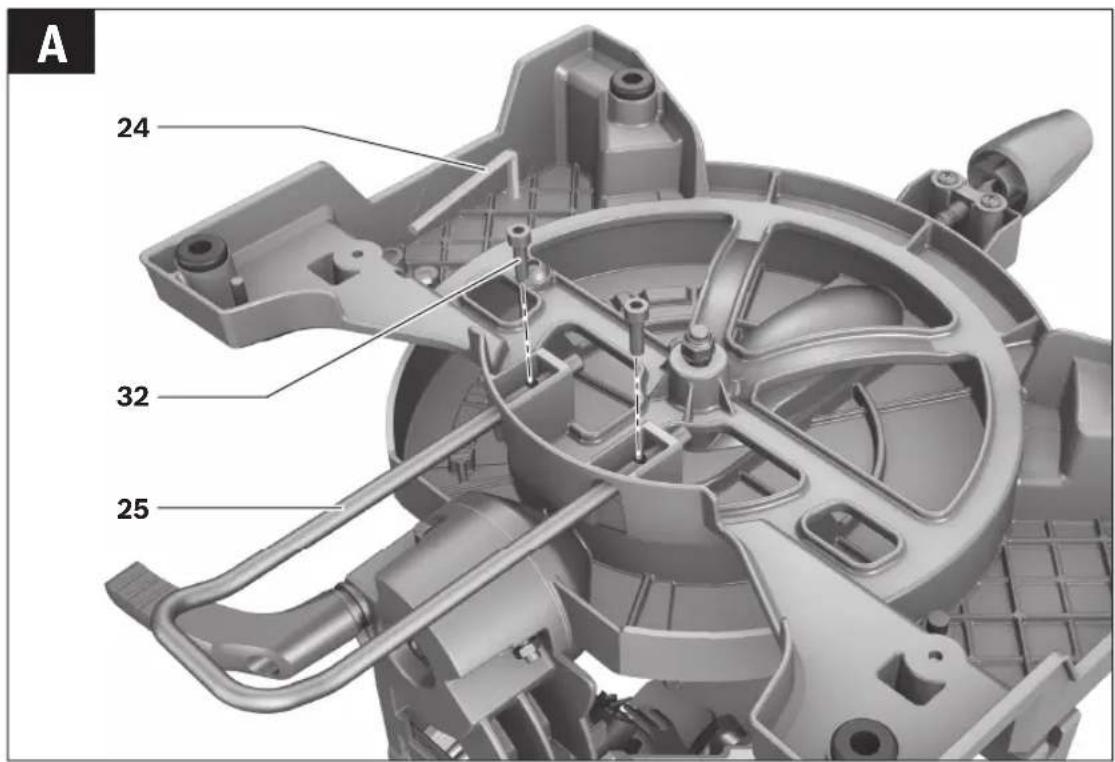
Mounting the Tilt-Protector Bar (see figure A)
Before using the power tool for the first time, the tilt-protector bar 25 must be mounted.
- Turn the power tool over and place it carefully on the blade guard 4 and the saw table 12.
- Insert the tilt-protector bar 25 into the mounting holes provided in the base plate until the threaded holes of tilt-protector bar and base plate are flush.
- Insert the fastening screws 32 into the threaded holes and tighten them using the hex key 24 provided.
- Turn the power tool over so that it is back in the correct position for working.
Never remove the tilt-protector bar. Without the use of the tilt-protector bar, the machine does not stand safely and can tip over, especially when sawing at maximum mitre/bevel angles.
Mounting to a Working Surface (see figure B)
Fasten the power tool with suitable screw fasteners to the working surface. The mounting holes 8 serve for this purpose.
Dust/Chip Extraction
Dusts from materials such as lead-containing coatings, some wood types, minerals and metal can be harmful to one's health. Touching or breathing-in the dusts can cause allergic reactions and/or lead to respiratory infections of the user or bystanders.
Certain dusts, such as oak or beech dust, are considered as carcinogenic, especially in connection with wood-treatment additives (chromate, wood preservative). Materials containing asbestos may only be worked by specialists.
- Always use dust extraction.
- Provide for good ventilation of the working place.
- It is recommended to wear a P2 filter-class respirator.
Observe the relevant regulations in your country for the materials to be worked.
The dust/chip extraction can be blocked by dust, chips or workpiece fragments.
- Switch the machine off and pull the mains plug from the socket outlet.
- Wait until the saw blade has come to a complete stop.
- Determine the cause of the blockage and correct it.
Integrated Dust Extraction (see figure C)
Mount the dust bag 19 onto the chip ejector 22. During sawing, the dust bag must never come into contact with the movable machine parts.
Always empty the dust bag in good time.
External Dust Extraction
For dust extraction, a vacuum hose (size ∅ 35 mm) can also be connected to the chip ejector 22.
The vacuum cleaner must be suitable for the material being worked.
When vacuuming dry dust that is especially detrimental to health or carcinogenic, use a special vacuum cleaner.
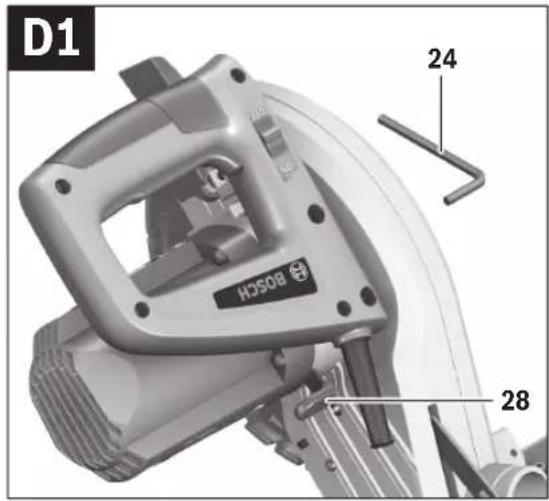
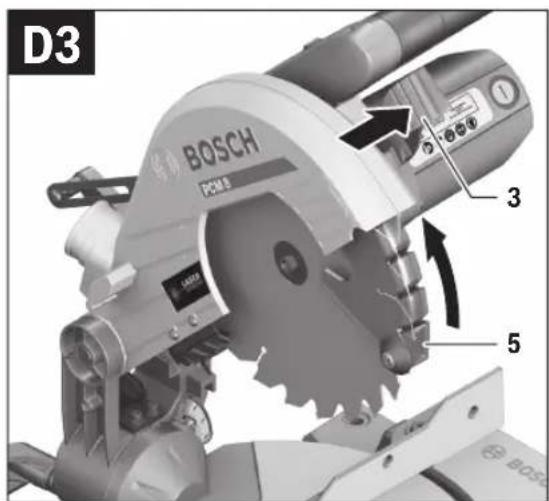
Changing the Tool (see figures D1-D4)
Before any work on the machine itself, pull the mains plug.
When mounting the saw blade, wear protective gloves. Danger of injury when touching the saw blade.
Use only saw blades whose maximum permitted speed is higher than the no-load speed of the power tool.
Use only saw blades that correspond with the characteristic data given in these operation instructions and that are tested and marked in accordance with EN 847-1.
Use only saw blades recommended by the tool manufacturer, and suitable for sawing the materials to be cut. This prevents overheating of the saw teeth during sawing.
Removing the Saw Blade
- Bring the power tool into the working position.
- Turn the hex socket screw 33 with the hex key 24 provided and at the same time press the spindle lock 28 until it engages.
- Hold the spindle lock 28 pressed and unscrew the hex socket screw 33 in clockwise direction (left-hand thread!).
- Remove the clamping flange 34.
- Press lever 3 and swing back the retracting blade guard 5 to the stop.
- Hold the retracting blade guard in this position and remove the saw blade 18.
- Slowly guide the retracting blade guard downward again.
Mounting the Saw Blade
If required, clean all parts to be mounted prior to assembly.
- Press lever 3, swing back the retracting blade guard 5 to the stop and hold it in this position.
- Place the new saw blade onto the interior clamping flange 35.
When mounting the saw blade, pay attention that the cutting direction of the teeth (arrow direction on the saw blade) corresponds with the direction of the arrow on the blade guard!
- Slowly guide the retracting blade guard downward again.
- Place on the clamping flange 34 and the screw 33. Press the spindle lock 28 until it engages and tighten the screw turning in anticlockwise direction.
Operation
▶ Before any work on the machine itself, pull the mains plug.
Transport Safety (see figure E)
The transport safety-lock 26 enables easier handling of the machine when transporting to various working locations.






Releasing the Machine (Working Position)
- Push the tool arm by the handle 1 down a little in order to relieve the transport safety-lock 26. – Pull the transport safety-lock 26 completely outward.
- Guide the tool arm slowly upward.
Securing the Machine (Transport Position)
- To lock the saw table 12, tighten the locking knob 9.
- Press lever 3 and at the same time, push the tool arm by handle 1 downward until the transport safety-lock 26 can be pushed completely inward.
The tool arm is now securely locked for transport.
Clamping the Workpiece (see figure F)
To ensure optimum working safety, the workpiece must always be firmly clamped.
Do not saw workpieces that are too small to clamp.
- Press the workpiece firmly against the fences 14 and 6.
- Insert the material clamp 27 provided into one of the holes 23 intended for it.
- Loosen the wing bolt 36 and adapt the material clamp to the workpiece. Tighten the wing bolt again.
- Firmly clamp the workpiece by turning the threaded rod 37 in clockwise direction.
Loosening the Workpiece
- To release the material clamp, turn the threaded rod 37 in anticlockwise direction.
Adjusting the Cutting Angle
When adjusting the cutting angle, never actuate the On/Off switch 21. Danger of injury if the machine should accidentally start.
Adjusting Mitre Angles (see figure G)
The mitre angle can be set in the range from 48° (left side) to 48° (right side).
- Loosen the locking knob 9 in case it is tightened. This allows the saw table to move freely.
- Turn the saw table 12 left or right by the locking knob until the angle indicator 10 indicates the requested mitre angle.
- Tighten the locking knob 9 again.
For quick and precise setting of often used mitre angles, the saw table 12 engages at the detents of the following standard angles:
Left Right
0°
45° 30° 22.5° 15° 15° 22.5° 30° 45°
- Loosen the locking knob 9 in case it is tightened.
- Turn the saw table 12 left or right by the locking knob until the requested standard mitre angle engages.
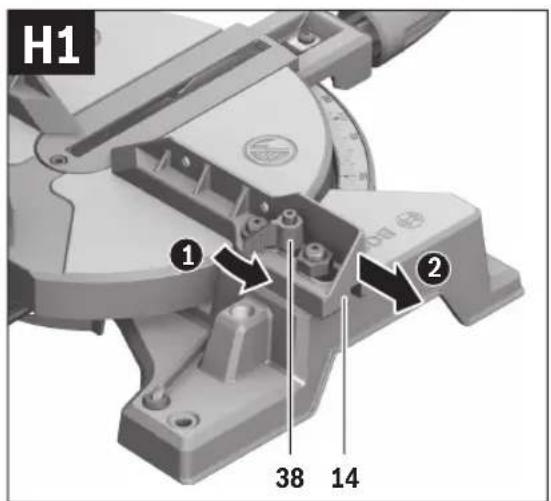
Adjusting Bevel Angles (see figures H1–H2)
The bevel angle can be set in the range from 0° to 45°.
- Loosen the clamping lever 38.
- Pull the adjustable fence 14 completely outward.
- To lock the adjustable fence, re-tighten the clamping lever 38.
- Loosen the lock lever 15.
- Tilt the tool arm by the handle 1 until the angle indicator 29 indicates the desired bevel angle.
- Hold the tool arm in this position and retighten the clamping lever 15.
For quick and precise setting of the standard 0° and 45° angles, factory-set stops have been provided.
- Loosen the lock lever 15.
- For this, tilt the tool arm by the handle 1 to the stop toward the right (0°) or to the stop toward the left (45°).
- Retighten the lock lever 15 again.
Starting Operation
▶ Observe correct mains voltage! The voltage of the power source must agree with the voltage specified on the nameplate of the machine. Power tools marked with 230 V can also be operated with 220 V.
Switching On (see figure I)
To save energy, only switch the power tool on when using it.
- To start the machine, press the On/Off switch 21 and keep it pressed.
Note: For safety reasons, the On/Off switch 21 cannot be locked; it must remain pressed during the entire operation. The tool arm can only be guided downward when pressing lever 3.
- For sawing, you must additionally press lever 3 in addition to actuating the On/Off switch 21.
Switching Off
- To switch off the machine, release the On/Off switch 21.
Working Advice
General Sawing Instructions
Always tighten the locking knob 9 firmly before sawing. Otherwise the saw blade can become wedged in the workpiece.
Make sure that the retracting blade guard operates properly and that it can move freely. The retracting blade guard must open when the tool arm is guided downward. When the tool arm is guided upward, the retracting blade guard must close again over the saw blade and lock in the uppermost position of the tool arm.
Protect the saw blade against impact and shock. Do not subject the saw blade to lateral pressure.
Position of the Operator (see figure J)
Do not stand in a line with the saw blade in front of the machine. Always stand aside of the saw blade. This protects your body against possible kickback.
Marking the Cutting Line (see figure K)
A laser beam indicates the cutting line of the saw blade. This allows for exact positioning of the workpiece for sawing, without having to open the retracting blade guard.
- For this, switch the laser beam on with the switch 20.
- Align the cutting mark on your workpiece with reference to the right-hand edge of the laser line.


Permissible Workpiece Dimensions
Maximum workpiece sizes:
Mitre/Bevel Angle Height x Width
| Horizontal Vertical | |
| 0° 0° | 60 x 120 mm |
| 45° 0° | 60 x 85 mm |
| 0° 45° | 37 x 120 mm |
| 45° 45° | 37 x 85 mm |
Minimum workpiece sizes (= all workpieces that can be clamped left or right from the saw blade with the supplied material clamp 27): 100 x 40 mm (length x width)
Cutting depth, max. (0°/0°): 60 mm
Cutting Off
- Firmly clamp the workpiece as appropriate for its dimensions.
- Adjust the requested mitre and/or bevel angle.
- Switch on the machine.
- Press lever 3 and slowly guide the tool arm downward by handle 1.
- Saw through the workpiece applying uniform feed.
- Switch off the machine and wait until the saw blade has come to a complete stop.
- Guide the tool arm slowly upward.
Replacing the Insert Plate
The black insert plate 7 can become worn after prolonged use of the power tool.
Replace a defective insert plate.
- Bring the power tool into the working position.
- Unscrew the fastening screw 31 using the hex key 24 and remove the old insert plate.
- Insert the new insert plate and screw the fastening screw 31 in tight again.
Sawing Profile Strips
Profile strips/mouldings can be sawn in two different ways:
- Placed against the fence

- Lying flat on the saw table
Always make trial cuts with the mitre angle setting first on scrap wood.
Transport
Before transporting the power tool, the following steps must be carried out:
- Bring the machine into the transport position.
- Remove all accessories that cannot be mounted firmly to the power tool.
If possible, place unused saw blades in an enclosed container for transport.
- For lifting or transporting, hold the power tool by the recessed grips 13 on the side of the saw table 12. ▶ When transporting the power tool, use only the transport devices and never use the protective devices.
Maintenance and Service
Maintenance and Cleaning
▶ Before any work on the machine itself, pull the mains plug.
Cleaning
For safe and proper working, always keep the power tool and its ventilation slots clean.
The retracting blade guard must always be able to move freely and retract automatically. Therefore, always keep the area around the retracting blade guard clean.
Remove dust and chips after each working procedure by blowing out with compressed air or with a brush.
Clean the roller 17 regularly.
Accessories
| Article number | |
| Saw blades for wood | |
| Saw blade 216 x 30 mm, 24 teeth | 2 608 640 431 |
| Saw blade 216 x 30 mm, 48 teeth | 2 608 640 432 |
| Saw blades for hardwood and composite materials | |
| Saw blade 216 x 30 mm, 60 teeth | 2 608 640 433 |
After-sales Service and Application Service
Our after-sales service responds to your questions concerning maintenance and repair of your product as well as spare parts. Exploded views and information on spare parts can also be found under:
www.bosch-pt.com
Bosch's application service team will gladly answer questions concerning our products and their accessories.
In all correspondence and spare parts orders, please always include the 10-digit article number given on the nameplate of the product.
Great Britain
Robert Bosch Ltd. (B.S.C.)
P.O. Box 98
Broadwater Park
North Orbital Road
Denham
Uxbridge
UB9 5HJ
At www.bosch-pt.co.uk you can order spare parts or arrange the collection of a product in need of servicing or repair.
Tel. Service: (0344) 7360109
E-Mail: boschservicecentre@bosch.com
Ireland
Origo Ltd.
Unit 23 Magna Drive
Magna Business Park
City West
Dublin 24
Tel. Service: (01) 4666700
Fax: (01) 4666888
Australia, New Zealand and Pacific Islands
Robert Bosch Australia Pty. Ltd.
Power Tools
Locked Bag 66
Clayton South VIC 3169
Customer Contact Center
Inside Australia:
Phone: (01300) 307044
Fax: (01300) 307045
Inside New Zealand:
Phone: (0800) 543353
Fax: (0800) 428570
Outside AU and NZ:
Phone: +61 3 95415555
Republic of South Africa
Customer service
Hotline: (011) 6519600
Gauteng - BSC Service Centre
35 Roper Street, New Centre
Johannesburg
Tel.: (011) 4939375
Fax: (011) 4930126
E-Mail: bsctools@icon.co.za
KZN - BSC Service Centre
Unit E, Almar Centre
143 Crompton Street
Pinetown
Tel.: (031) 7012120
Fax: (031) 7012446
E-Mail: bsc.dur@za.bosch.com
Western Cape - BSC Service Centre
Democracy Way, Prosperity Park
Milnerton
Tel.: (021) 5512577
Fax: (021) 5513223
E-Mail: bsc@zsd.co.za
Bosch Headquarters
Midrand, Gauteng
Tel.: (011) 6519600
Fax: (011) 6519880
E-Mail: rbsa-hq.pts@za.bosch.com
Disposal
The machine, accessories and packaging should be sorted for environmental-friendly recycling.
Do not dispose of power tools into household waste!
Only for EC countries:

According to the European Directive 2012/19/EU for Waste Electrical and Electronic Equipment and its implementation into national right, power tools that are no longer usable must be collected separately and disposed of in an environmentally correct manner.
Subject to change without notice.
Français
IEC 60825-1:2014 <1mW, 650 nm Laser Radiation
Do not stare into beam
Class 2 laser product
Executive Vice President Engineering
Head of Product Certification
PT/ETM9

Robert Bosch GmbH, Power Tools Division
70764 Leinfelden-Echterdingen, GERMANY
Robert Bosch (France) S.A.S.

Español | 37
Executive Vice President
Head of Product Certification
Engineering
PT/ETM9

Robert Bosch GmbH, Power Tools Division
70764 Leinfelden-Echterdingen, GERMANY
Laser Radiation Do not stare into beam Class 2 laser product
Executive Vice President
Head of Product Certification
Engineering
PT/ETM9

Robert Bosch GmbH, Power Tools Division
70764 Leinfelden-Echterdingen, GERMANY
Laser Radiation Do not stare into beam Class 2 laser product
Henk Becker Executive Vice President Engineering Helmut Heinzelmann Head of Product Certification PT/ETM9

Robert Bosch GmbH, Power Tools Division 70764 Leinfelden-Echterdingen, GERMANY Leinfelden, 23.06.2015
Assembly
Executive Vice President Engineering
Head of Product Certification PT/ETM9

Robert Bosch GmbH, Power Tools Division 70764 Leinfelden-Echterdingen, GERMANY Leinfelden, 23.06.2015
Assembly
Executive Vice President
Head of Product Certification
Engineering
PT/ETM9

Robert Bosch GmbH, Power Tools Division
70764 Leinfelden-Echterdingen, GERMANY
45°30°22,5°15°15° 22,5°30°45°
Bosch Service Center
Telegrafvej 3
2750 Ballerup
At www.bosch-pt.dk you can order spare parts online or create a repair order.
Tlf. Service Center: 44898855
Fax: 44898755
E-Mail: vaerktoej@dk.bosch.com
Disposal
Henk Becker Executive Vice President Engineering Helmut Heinzelmann Head of Product Certification PT/ETM9

Robert Bosch GmbH, Power Tools Division 70764 Leinfelden-Echterdingen, GERMANY Leinfelden, 23.06.2015
Assembly
Bosch Service Center
Telegrafvej 3
2750 Ballerup
Denmark
Tel.: (08) 7501820 (within Sweden)
Fax: (011) 187691
Waste management
If the text on the warning sign is not in your language, you must stick a label in your language over this sign before using the product.
86 | Norwegian

23 Holes for clamping screw
24 Hex key
Executive Vice President
Head of Product Certification
Engineering
PT/ETM9

Robert Bosch GmbH, Power Tools Division
70764 Leinfelden-Echterdingen, GERMANY
Always test the set miter angle on a piece of wood first.
Transport
IEC 60825-1:2014
<1mW, 650 nm Laser Radiation
Do not stare into beam
Class 2 laser product
Executive Vice President
Head of Product Certification
Engineering
PT/ETM9

Robert Bosch GmbH, Power Tools Division
70764 Leinfelden-Echterdingen, GERMANY
Laser Radiation Do not stare into beam Class 2 laser product
Executive Vice President
Head of Product Certification
Engineering
PT/ETM9

Robert Bosch GmbH, Power Tools Division
70764 Leinfelden-Echterdingen, GERMANY
Laser Radiation Do not stare into beam Class 2 laser product
Executive Vice President
Head of Product Certification
Engineering
PT/ETM9

Robert Bosch GmbH, Power Tools Division 70764 Leinfelden-Echterdingen, GERMANY Leinfelden, 23.06.2015
Assembly
Henk Becker Executive Vice President Engineering Helmut Heinzelmann Head of Product Certification PT/ETM9

Robert Bosch GmbH, Power Tools Division 70764 Leinfelden-Echterdingen, GERMANY Leinfelden, 23.06.2015
Assembly
Robert Bosch Sp. z o.o.
Executive Vice President
Head of Product Certification
Engineering
PT/ETM9

Robert Bosch GmbH, Power Tools Division
70764 Leinfelden-Echterdingen, GERMANY
Bosch Service Center PT
K Vápence 1621/16
692 01 Mikulov
Executive Vice President
Head of Product Certification
Engineering
PT/ETM9

Robert Bosch GmbH, Power Tools Division
70764 Leinfelden-Echterdingen, GERMANY
IEC 60825-1:2014 <1mW, 650 nm Laser Radiation
Do not stare into beam
Class 2 laser product
Executive Vice President Engineering
Helmut Heinzelmann Head of Product Certification PT/ETM9

Robert Bosch GmbH, Power Tools Division 70764 Leinfelden-Echterdingen, GERMANY Leinfelden, 23.06.2015
Assembly
No. TC RU C-DE.AЯ46.B.68731
Executive Vice President Engineering
Head of Product Certification PT/ETM9

Robert Bosch GmbH, Power Tools Division 70764 Leinfelden-Echterdingen, GERMANY Leinfelden, 23.06.2015
Assembly
Laser Radiation Do not stare into beam Class 2 laser product
Henk Becker Executive Vice President Engineering Helmut Heinzelmann Head of Product Certification PT/ETM9
Laser Radiation Do not stare into beam Class 2 laser product
Executive Vice President
Head of Product Certification
Engineering
PT/ETM9

LW Jede
i.v. h=mc
Robert Bosch GmbH, Power Tools Division
70764 Leinfelden-Echterdingen, GERMANY
Executive Vice President
Head of Product Certification
Engineering
PT/ETM9

Robert Bosch GmbH, Power Tools Division
70764 Leinfelden-Echterdingen, GERMANY
Tel. service scule electrice: (021) 4057540
Fax: (021) 4057566
E-Mail: infoBSC@ro.bosch.com
Henk Becker Executive Vice President Engineering
Helmut Heinzelmann Head of Product Certification PT/ETM9

Robert Bosch GmbH, Power Tools Division 70764 Leinfelden-Echterdingen, GERMANY Leinfelden, 23.06.2015
Mounting
Executive Vice President Engineering
Helmut Heinzelmann
Head of Product Certification PT/ETM9

Robert Bosch GmbH, Power Tools Division 70764 Leinfelden-Echterdingen, GERMANY Leinfelden, 23.06.2015
Mounting
Laser Radiation Do not stare into beam Class 2 laser product
If the warning label text is not in your language, stick the supplied label in your country's language over it before first use.
Executive Vice President
Head of Product Certification
Engineering
PT/ETM9

Robert Bosch GmbH, Power Tools Division 70764 Leinfelden-Echterdingen, GERMANY Leinfelden, 23.06.2015
Mounting
Avoid unintentional starting of the power tool. During mounting and all work on the power tool, the mains plug must not be connected to the power supply.
Scope of delivery

Pay attention to the scope of delivery shown at the beginning of the operating instructions. Before first use of the power tool, check that all parts listed below have been delivered.
208 | Serbian
- Mitre saw with mounted saw blade.
- Dust bag 19
- Hex key 27
- Hex key 24 – Rollover protection hoop 25 with fastening screws 32
Instructions: Check the power tool for any damage.
Before further use of the power tool, the protective devices or lightly damaged parts must be carefully examined to ensure that they function flawlessly and as intended. Check whether the moving parts function properly and do not jam, or whether parts are damaged. All parts must be correctly mounted and meet all requirements to ensure proper operation. Damaged protective devices and parts must be professionally repaired or replaced at a recognized professional workshop.
If the warning label is not in your language, cover it with the appropriate label in your national language before first use.
Executive Vice President
Head of Product Certification
Engineering
PT/ETM9

Robert Bosch GmbH, Power Tools Division
70764 Leinfelden-Echterdingen, GERMANY
Executive Vice President Engineering
Helmut Heinzelmann
Head of Product Certification PT/ETM9

Robert Bosch GmbH, Power Tools Division 70764 Leinfelden-Echterdingen, GERMANY Leinfelden, 23.06.2015
Assembly
Laser Radiation Do not stare into beam Class 2 laser product
Executive Vice President
Head of Product Certification
Engineering
PT/ETM9

Robert Bosch GmbH, Power Tools Division
70764 Leinfelden-Echterdingen, GERMANY
attached to the saw blade
IEC 60825-1:2014 <1mW, 650 nm Laser Radiation
Do not stare into beam
Class 2 laser product
Executive Vice President
Head of Product Certification
Engineering
PT/ETM9


i.v. h=m
Robert Bosch GmbH, Power Tools Division
70764 Leinfelden-Echterdingen, GERMANY
IEC 60825-1:2014 <1mW, 650 nm Laser Radiation
Do not stare into beam
Class 2 laser product
Executive Vice President Engineering
Head of Product Certification PT/ETM9
PPa
jaw Bao i.v. h.w.
Robert Bosch GmbH, Power Tools Division 70764 Leinfelden-Echterdingen, GERMANY Leinfelden, 23.06.2015
Montavimas
- سكة المصدمة
ي منصدة النشر -
Henk Becker Executive Vice President Engineering
Helmut Heinzelmann Head of Product Certification PT/ETM9

Robert Bosch GmbH, Power Tools Division
70764 Leinfelden-Echterdingen, GERMANY
Laser Radiation Do not stare into beam Class 2 laser product
Symbols

- PCM
- BOSCH
- DEUTSCH
- SAFETY INSTRUCTIONS
- ASSEMBLY
- GENERAL POWER TOOL SAFETY WARNINGS
- WARNING
- WHEN USING ELECTRIC TOOLS, BASIC SAFETY PRECAUTIONS SHOULD ALWAYS BE FOLLOWED TO REDUCE THE RISK OF FIRE, ELECTRIC SHOCK AND PERSONAL INJURY, INCLUDING THE FOLLOWING
- WORK AREA SAFETY
- ELECTRICAL SAFETY
- PERSONAL SAFETY
- POWER TOOL USE AND CARE
- SERVICE
- SAFETY WARNINGS FOR MITRE SAWS
- SYMBOLS
- SYMBOLS AND THEIR MEANING
- PRODUCT DESCRIPTION AND SPECIFICATIONS
- INTENDED USE
- PRODUCT FEATURES
- NOISE INFORMATION
- DECLARATION OF CONFORMITY
- DELIVERY SCOPE
- MOUNTING INDIVIDUAL COMPONENTS
- MOUNTING THE TILT-PROTECTOR BAR (SEE FIGURE A)
- MOUNTING TO A WORKING SURFACE (SEE FIGURE B)
- DUST/CHIP EXTRACTION
- INTEGRATED DUST EXTRACTION (SEE FIGURE C)
- EXTERNAL DUST EXTRACTION
- CHANGING THE TOOL (SEE FIGURES D1-D4)
- REMOVING THE SAW BLADE
- MOUNTING THE SAW BLADE
- OPERATION
- TRANSPORT SAFETY (SEE FIGURE E)
- RELEASING THE MACHINE (WORKING POSITION)
- SECURING THE MACHINE (TRANSPORT POSITION)
- CLAMPING THE WORKPIECE (SEE FIGURE F)
- LOOSENING THE WORKPIECE
- ADJUSTING THE CUTTING ANGLE
- ADJUSTING MITRE ANGLES (SEE FIGURE G)
- LEFT RIGHT
- ADJUSTING BEVEL ANGLES (SEE FIGURES H1–H2)
- STARTING OPERATION
- SWITCHING ON (SEE FIGURE I)
- SWITCHING OFF
- WORKING ADVICE
- GENERAL SAWING INSTRUCTIONS
- POSITION OF THE OPERATOR (SEE FIGURE J)
- MARKING THE CUTTING LINE (SEE FIGURE K)
- PERMISSIBLE WORKPIECE DIMENSIONS
- CUTTING OFF
- REPLACING THE INSERT PLATE
- SAWING PROFILE STRIPS
- TRANSPORT
- MAINTENANCE AND SERVICE
- MAINTENANCE AND CLEANING
- CLEANING
- AFTER-SALES SERVICE AND APPLICATION SERVICE
- WWW.BOSCH-PT.COM
- GREAT BRITAIN
- IRELAND
- AUSTRALIA, NEW ZEALAND AND PACIFIC ISLANDS
- REPUBLIC OF SOUTH AFRICA
- CUSTOMER SERVICE
- GAUTENG - BSC SERVICE CENTRE
- KZN - BSC SERVICE CENTRE
- WESTERN CAPE - BSC SERVICE CENTRE
- BOSCH HEADQUARTERS
- DISPOSAL
- ONLY FOR EC COUNTRIES
- FRANÇAIS
- WASTE MANAGEMENT
- NORWEGIAN
- MOUNTING
- SCOPE OF DELIVERY
- SERBIAN
- MONTAVIMAS
Brand : BOSCH
Model : PMC 8
Category : Saw