
SWS74500G0 - Wine cellar AEG - Free user manual and instructions
Find the device manual for free SWS74500G0 AEG in PDF.


| Product type | Wine cellar |
| Brand | AEG |
| Model | SWS74500G0 |
| Bottle capacity | 45 standard bottles |
| Temperature range | 5°C to 20°C |
| Number of temperature zones | 1 zone |
| Cooling type | Compressor |
| Dimensions (H x W x D) | 82 cm x 59.5 cm x 57.5 cm |
| Net weight | 35 kg |
| Power supply | 220-240 V, 50 Hz |
| Energy efficiency class | G (according to new regulations) |
| Annual energy consumption | 120 kWh |
| Noise level | 42 dB(A) |
| Interior lighting type | LED |
| Shelves | 5 sliding wooden shelves |
| Door | Solid door with integrated handle |
| Ventilation | Natural ventilation |
| Main features | Electronic temperature control, open door alarm, child lock |
| Maintenance and cleaning | Clean interior with a soft cloth and soapy water. Defrost manually if necessary. |
| Safety | Child safety lock, automatic shutdown in case of overheating |
| Spare parts and repairability | Repairability index 7.4/10. Available parts: thermostat, compressor, shelves. |
Frequently Asked Questions - SWS74500G0 AEG
User questions about SWS74500G0 AEG
0 question about this device. Answer the ones you know or ask your own.
Ask a new question about this device
Download the instructions for your Wine cellar in PDF format for free! Find your manual SWS74500G0 - AEG and take your electronic device back in hand. On this page are published all the documents necessary for the use of your device. SWS74500G0 by AEG.
USER MANUAL SWS74500G0 AEG
natural_image
Modern kitchen interior with white cabinetry, stainless steel appliances, and glossy flooring (no visible text or symbols)CONTENTS
- SAFETY INFORMATION......3
- SAFETY INSTRUCTIONS......4
- ENVIRONMENTAL CONCERNS 5
- PRODUCT DESCRIPTION 5
- CONTROL PANEL....5
- DAILY USE....6
- INSTALLATION....9
- CARE AND MAINTENANCE 12
- TROUBLE SHOOTING GUIDE....13
FOR PERFECT RESULTS
Thank you for choosing this AEG product. We have created it to give you impeccable performance for many years, with innovative technologies that help make life simpler – features you might not find on ordinary appliances. Please spend a few minutes reading to get the very best from it.
Visit our website for:

Get usage advice, brochures, trouble shooter, service information:
www.aeg.com

Register your product for better service:
www.registeraeg.com

Buy Accessories, Consumables and Original spare parts for your appliance:
www.aeg.com/shop
CUSTOMER CARE AND SERVICE
We recommend the use of original spare parts.
When contacting Service, ensure that you have the following data available.
The information can be found on the rating plate. Model, PNC, Serial Number

Warning / Caution-Safety information.

General information and tips

Environmental information.
Subject to change without notice.
1. ⚠ SAFETY INFORMATION
Before the installation and use of the appliance, carefully read the supplied instructions. The manufacturer is not responsible if an incorrect installation and use causes injuries and damages. Always keep the instructions with the appliance for future reference.
1.1 Children and vulnerable people safety
- This appliance can be used by children aged from 8 years and above and persons with reduced physical, sensory or mental capabilities or lack of experience and knowledge if they have been given supervision or instruction concerning use of the appliance in a safe way and understand the hazards involved.
- Do not let children play with the appliance.
- Keep all packaging away from children.
- Cleaning and user maintenance shall not be made by children without supervision.
1.2 General Safety
- This appliance is intended to be used in household and similar applications such as:
- Farm houses; staff kitchen areas in shops, offices and other working environments
- By clients in hotels, motels, bed and breakfast and other residential type environments
• Use this appliance for storage of wine only. - Keep ventilation openings, in the appliance enclosure or in the built-in structure, clear of obstruction.
- Do not use mechanical devices or other means to accelerate the defrosting process, other than those recommended by the manufacturer.
- Do not damage the refrigerant circuit.
- Do not use electrical appliances inside the food storage compartments of the appliance, unless they are of the type recommended by the manufacturer.
- Do not use water spray and steam to clean the appliance.
- Clean the appliance with a moist soft cloth. Only use neutral detergents. Do not use abrasive products, abrasive cleaning pads, solvents or metal objects.
- Do not store explosive substances such as aerosol cans with a flammable propellant in this appliance.
- If the supply cord is damaged, it must be replaced by the manufacturer, its service agent or similarly qualified persons in order to avoid a hazard.
2. SAFETY INSTRUCTIONS
2.1 Installation

Warning! Only a qualified person must install this appliance.
- Remove all the packaging.
- Do not install or use a damaged appliance.
- Obey the installation instruction supplied with the appliance.
- Always be careful when you move the appliance because it is heavy. Always wear safety gloves.
• Make sure the air can circulate around the appliance. - Wait at least 4 hours before connec ting the appliance to the power supply. This is to allow the oil to flow back in the compressor.
- Do not install the appliance close to radiators or cookers, oven or hobs. The rear of the appliance must stand against the wall.
- Do not install the appliance where there is direct sunlight.
- Do not install this appliance in areas that are too humid or too colds, such as the construction appendices, garages or wine cellars.
- When you move the appliance, lift it by the front edge to avoid scratching the floor.
2.2 Electrical connection

Warning! Risk of fire and electrical shock.
• The appliance must be earthed.
- All electrical connections should be made by a qualified electrician.
- Make sure that the electrical information on the rating plate agrees with the power supply. If not contact an electrician.
- Always use a correctly installed shockproof socket.
- Do not use multi-plug adapters and extension cables.
- Make sure not to cause damage to the electrical components (e.g. mains plug, mains cable, compressor). Contact the Service or an electrician to change the electrical components.
- The mains cable must stay below the level of the mains plug.
- Connect the mains plug to the mains socket only at the end of the installation. Make sure that there is access to the mains plug after the installation.
- Do not pull the mains cable to disconnect the appliance. Always pull the mains plug.
2.3 Use

Warning! Risk of fire and electrical shock or fire.
- Do not change the specification of this appliance.
- Do not put electrical appliances (e.g. ice cream makers) in the appliance unless they are stated applicable by the manufacturer.
- Be careful not to cause damage to the refrigerant circuit. It contains isobutane (R600a), a natural gas with a high level of environmental compatibility. This gas is flammable.
- If damage occurs to the refrigerant circuit, make sure that there are no flames and sources of ignition in the room. Ventilate the room.
- Do not let hot items to touch the plastic parts of the appliance.
- Do not store flammable gas and liquid in the appliance.
- Do not put flammable products or items that are wet with flammable products in, near or on the appliance.
- Do not touch the compressor or the condenser. They are hot.
2.4 Care and cleaning

Warning! RRisk of injury or damage to the appliance.
- Before maintenance, deactivate the appliance and disconnect the mains plug from the mains socket.
- This appliance contains hydrocarbons in the cooling unit. Only a qualified person must do the maintenance and the recharging of the unit.
- Regularly examine the drain of the appliance and if necessary, clean it. If the drain is blocked, defrosted water collects in the bottom of the appliance.
2.5 Disposal

Warning! Risk of injury or suffocation.
- Disconnect the appliance from the mains supply.
• Cut off the mains cable and discard it. -
Remove the door to prevent children and pets to be closed inside of the appliance.
-
The refrigerant circuit and the insulation materials of this appliance are ozone-friendly.
- The insulation foam contains flammable gas. Contact your municipal authority for information on how to discard the appliance correctly.
- Do not cause damage to the part of the cooling unit that is near the heat exchanger.
3. ENVIRONMENTAL CONCERNS
Recycle the materials with the symbol Put the packaging in applicable containe to recycle it. Help protect the environment and human health and to recycle waste of electrical and electronic
appliances. Do not dispose appliances marked with the symbol ✉ with the household waste. Return the product to your local recycling facility or contact your municipal office.
4. PRODUCT DESCRIPTION

1 Handle
2 Gasket
3 Door
4 Fastening bar
5 Shelves
6 Telescopic runners
7 Control panel
8 Rating plate
5. CONTROL PANEL
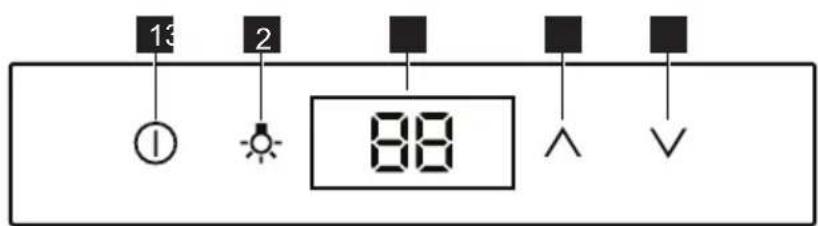
1 ON/OFF button
2 Light button
3 Display
4 Temperature warmer button
5 Temperature colder buton
5.1 Switching on
To switch on the appliance follow these steps:
- Connect the mains plug to the power socket.
- Press the ON/OFF button if the display is off.
- The display shows the set default temperature (5°C).
To select a different set temperature refer to "Temperature regulation".
5.2 Switching off
To switch off the appliance follow these steps:
- Press the ON/OFF button for 3 seconds.
- The display switches off.
- To disconnect the appliance from the power disconnect the mains plug from the power socket.
5.3 Temperature regulation
The set temperature of the wine cellar may be adjusted by pressing the temperature regulators.
Each press once the ∧ or ∨ button, the temperature setting will increase or lower 1°C. When the temperature setting reaches the upper limit 20°C and lower limit 5°C, the temperature setting will not increase or lower.
5.4 Light Button
When the door is opened, the LED light is on, when closed is off. If you want to keep the light on with the door closed, open the door, press the light button to turn off the light, then press the light button again to turn on the light.
6. DAILY USE
6.1 Cleaning
Before using the appliance for the firsttime, wash the interior and all internal accessories with lukewarm water and some neutral soap in order to remove the typical smell of a brand-new product, then dry thoroughly.
If you want to restore the standard conditions, press the light button to turn off the light.
LED Light is equipped with a smooth shut off system lasting 3 seconds.
5.5 Door open alarm
An acoustic alarm will sound if the door is not completely close d after 5 minutes. When the door is closed the alarm will stop.
5.6 Temperature Alarm
- If the inner temperature is higher than 23irc C, "HI" is shown in display panel, and the buzzer rings for one hour continuously.
- If the inner temperature is lower than 0irc C, “LO” is shown in display panel and blinks. The buzzer rings at the same time.
5.7 TemperatureRecollection Function
In the event of a power interruption, the wine cellar can remember the previous temperature settings, and when power is recovered, the temperature will go back to the original.
Do not use detergents or abrasive powders, as these will damage the finish.
6.2 Wine Storage

natural_image
Line drawing of a double-door refrigerator with shelves stocked with bottles (no text or symbols)(for 750 ml Bordeaux bottles)
Total: 24 bottles
The temperature can be adjusted between +5 and +20°C. That is ideal for wines.
The storage time for wine depends onageing, the type of grapes, alcoholic content and level of fructose and tannin contained in it. At the time of purchase, check if the wine is already aged or if it will improve over time.
Preservation temperature suggested:
- Champagne/Prosecco and Sparkling wines +6 to +8°C
- White Wines +10 to +12°C
- Rosé wines +12 to +16°C
- Red Wines +14 to +18°C
6.3 Wine Shelves

natural_image
Diagram of an open refrigerator with shelves and a door, showing internal structure and airflow direction (no text or symbols)
natural_image
Diagram of a refrigerator with internal shelves and an inset showing a close-up of the interior structure (no text or symbols)- For easy access to the contents, pull the shelves approximately 1/2 out of the rail compartment. This unit is designed with the telescopic runners for easy sliding the shelves.

To prevent damaging the door gasket, make sure that the door is fully opened when pulling shelves out.
- To remove or fit the wooden shelves lift the shelf upward as per the diagram and simply pull out or push in the shelf till it sits on the telescopic runner securely.
6.4 Possible configurations
- Standard
natural_image
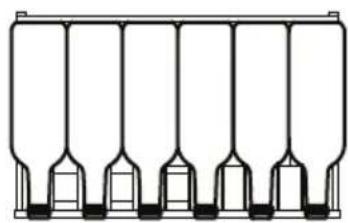
Pure diagram of six identical vertical containers with no text or symbols, arranged in parallel rows (no labels or symbols)To store up to 24 bordeaux bottles (0.75cl) placing 6 bottles each level.

The first level has been designed to accommodate larger and longer bottles. By removing shelves 2/3/4 is possible to increase the capacity as shown in the pictures below.

natural_image
Pure diagram of a rectangular box with circular patterns inside, no text or symbols present.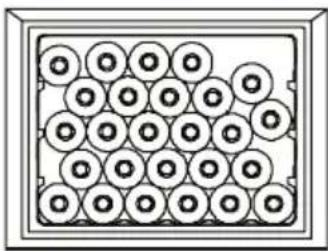
natural_image
Grid of circular objects arranged in rows within a rectangular frame (no text or symbols)
Warning! Please ensure in this case that the bottles do not come in contact with the backwall of the cavity.
- Horizontal

natural_image
Pure diagram of parallel pipe channels without any text, numbers, or symbols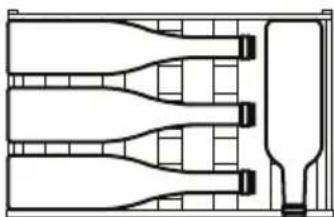
natural_image
Pure diagram of a symmetrical mechanical or fluidic component with no text, numbers, or symbolsSuitable for large bottles like Prosecco and Champagne taller than 310mm.

To store tall/large bottles, remove shelves 3 or 4 and place bottles on lower level.
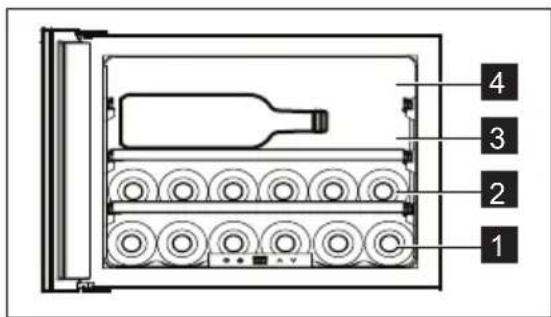

The space behind control panel can store 2 bottles of wine, but please pay attention that put bottles in/out have to move around the control panel.
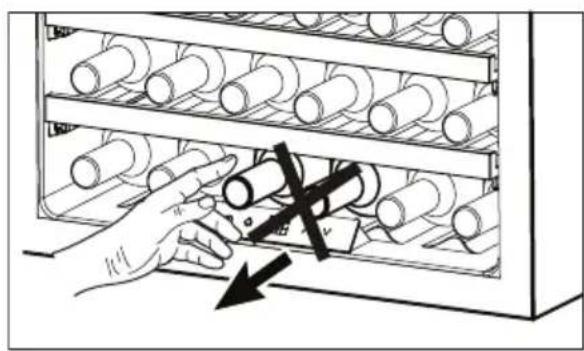
natural_image
Illustration of a hand inserting a spring into a rack with multiple cylinders (no text or symbols)Do not pull out the bottles directly behind the control panel as it may damage it.

natural_image
Diagram of a multi-tiered storage unit with cylindrical tanks and a bottle inside, showing no text or symbols.Do not store bottles crossways on level 1! As bottles may fall out when the appliance door is opened.
7. INSTALLATION
7.1 Positioning
Adequate air circulation should be around the appliance, to prevent overheating. To achieve sufficient ventilation follow the instructions relevant to installation.
Install this appliance at a location where the ambient temperature corresponds to the climate class indicated on the rating plate of the appliance:
| Climate class Ambient temperature |
| SN +10 °C to +32 °C |
| N +16 °C to +32 °C |
| ST +16 °C to +38 °C |
| T +16 °C to +43 °C |
7.2 Electrical Connection

Caution! Any electrical work required to install this appliance should be carried out by a qualified electrician or competent person.

Warning! This appliance must be earthed. The manufacturer declines any liability should these safety measures not be observed.
Consult a qualified electrician or service technician if the grounding instructions are not completely understood, or if doubt exists as to whether the appliance is properly grounded.

Warning! We recommend that you wait 4 hours before connecting and installing the appliance to allow the refrigerant to flow back into the compressor.
Before plugging in, ensure that the voltage and frequency shown on the rating plate correspond to your domestic power supply.
The appliance must be grounded. The power supply cable plug is provided with a contact for this purpose. If the domestic power supply socket is not grounded, connect the appliance to a separate ground in compliance with current regulation.
Consult a qualified electrician.
7.3 Installation dimensions (mm) and ventilation requirements
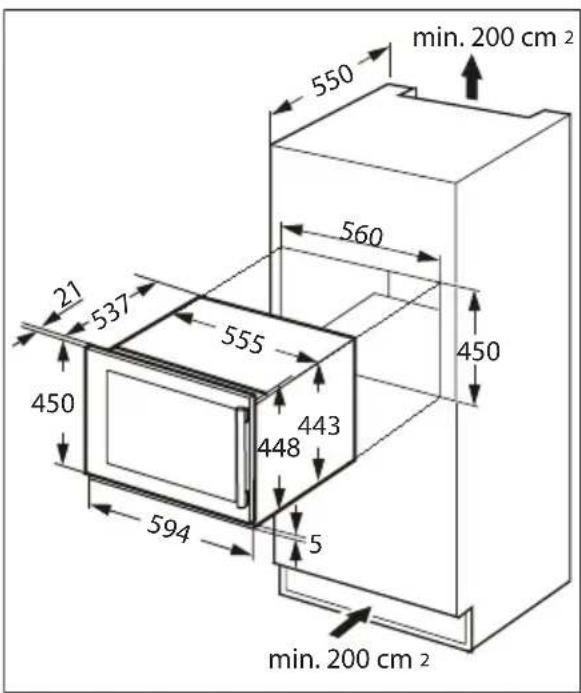
The airflow behind the appliance must be sufficient.

Make sure that the mains cable can move freely.
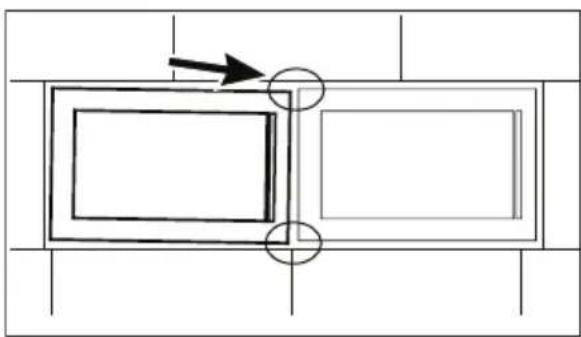
7.4 Adjust door for alignment
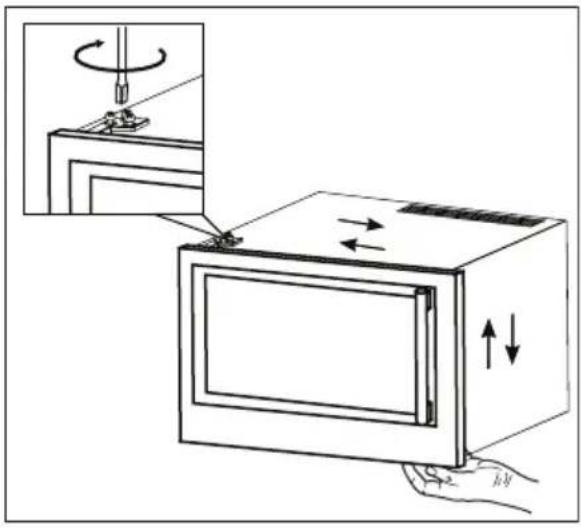
Please follow the below procedure for door adjustment.
- Hold the door whilst loosening the top and bottom screws
- Align the door
- Tighten the screws.
natural_image
Top-down architectural diagram showing a room layout with two rectangular windows and directional arrows indicating movement (no text or symbols)7.5 Installing in a kitchen unit
natural_image
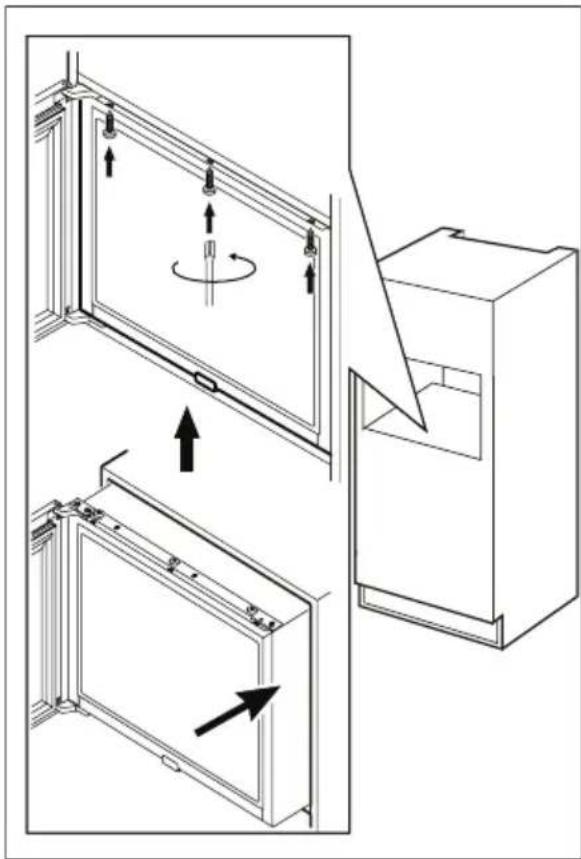
Technical line drawing of a door frame assembly with directional arrows indicating motion (no text or symbols)Follow the below procedure:
- Place the appliance in the niche with door closed and align depth to the front of the kitchen cabinet.
- Open the door and fix the fastening bar with the 3 screws provided.
8. CARE AND MAINTENANCE

Caution! Unplug the appliance before carrying out any maintenance operation.

This appliance contains hydrocarbons in its cooling unit; maintenance and recharging must therefore only be carried out by authorized technicians.
8.1 Periodic cleaning
The equipment has to be cleaned regularly:

Do not pull, move or damageany pipes and/or cables insidethe cabinet.
Never use detergents, abrasive-powders, highly perfumed cleaning products or wax polishes to clean the interior as this will damage the surface and leave astrong odour.
- Wash the inside surfaces with a warm water and baking soda solution. The solution should be about 2 tablespoons of baking soda to a quart of water.
- Wash the shelves with a mild detergent solution.
- Wring excess water out of the sponge or cloth when cleaning area of the controls, or any electrical parts.
- Wash the outside cooler with warm water and mild liquid detergent.
- Clean the condenser (black grill) and the compressor at the back of the appliance with a brush. This operation will improve the performance of the appliance and save electricity consumption.
- Clean the inside and accessories with lukewarm water and some neutral-soap.
- Regularly check the door seals and wipe clean to ensure they are clean and free from debris.
• Rinse and dry thoroughly.

Take care of not to damage the cooling system.
After cleaning, reconnect the equipment to the mains supply.
8.2 Periods of non-operation
When the appliance is not in use for long periods, take the following precautions:
- disconnect the appliance from electricity supply
- remove all items.
- clean the appliance and all accessories.
- leave the door open to prevent unpleasant smells.
8.3 Power Failure
Most power failures are corrected within a few hours and should not affect the temperature of your appliance if you minimize the number of times the door is opened. If the power is going to be off for a longer period of time, you need to take the proper steps to protect your contents.

The Wine cellar should be located in the coolest area of the room, away from heat producing appliances, and out of the direct sunlight.
9. TROUBLE SHOOTING GUIDE
You can solve many common Wine cellar problems easily, saving you the cost of a possible service call. Try the suggestions
below to see if you can solve the problem before calling the servicer.
| Problem Possible cause Solution | ||
| Wine cellar does not operate. | Not plugged in. Please connect the appliance. | |
| The appliance is turned off. Please turn ON the appliance. | ||
| The circuit breaker tripped or a blown fuse. | Turn on the circuit breaker or change the fuse. | |
| Interior lighting does not work. | Check the temperature control setting. | Verify the set temperature. |
| The door is not completely closed. | Review the door adjustment procedure. (par. 7.4) | |
| The door gasket does not seal properly. | Clean the door gasket with a humid sponge using neutral detergent and water. | |
| The room temperature is hotter than normal. | Verify the room temperature. | |
| The compressor operates continually. | The door is opened too often. | Do not keep the door open longer than necessary. |
| The door is not completely closed. | Verify that the door is completely closed. | |
| The door gasket does not seal properly. | Verify the gasket condition and in case clean it with a humid sponge using neutral detergent and water. | |
| Not plugged in. Please connect the appliance. | ||
| The light does not work. | The circuit breaker tripped or a blown fuse. | Turn on the circuit breaker or change the fuse |
| The LED has burned out. Contact the service. | ||
| The light button is not operating. | Contact the service. | |
| Too much vibration. | Check that the wine cellar is level. | Level the appliance. |
| Too much noise. | The rattling noise may come from the flow of the refrigerant, which is normal. | |
| Contraction and expansion of the inside walls may cause popping and crackling noises. | If the noises become louder contact the service. | |
| The wine cellar is not level. Level the appliance. | ||
| The door does not close properly. | The wine cellar is not level. Level the appliance. | |
| The door was fixed not properly. | Review the door adjustment procedure (par. 7.4) | |
| The gasket is dirty. | Clean the door gasket with a humid sponge using neutral detergent and water. | |
SOMMAIRE
- CONSIGNES DE SÉCURITÉ....15
- INSTRUCTIONS DE SÉCURITÉ....16
- PROTECTION DE L'ENVIRONNEMENT 18
- DESCRIPTION DE L'APPAREIL 18
- BANDEAU DE COMMANDE....18
- UTILISATION QUOTIDIENNE....19
- INSTALLATION....22
- ENTRETIEN ET MAINTENANCE....25
- GUIDE DE DÉPANNAGE....26
POUR DES RÉSULTATS PARFAITS
natural_image
Line drawing of a stainless steel oven with open door and multi-tiered shelves (no text or symbols)natural_image
Line drawing of an open refrigerator with shelves and a door open, showing internal components (no text or symbols)
natural_image
Diagram of a refrigerator with internal shelves and an inset showing a close-up of the interior structure (no text or symbols present)natural_image
Pure diagram of six identical vertical containers with no text or symbols, arranged in parallel rows (no labels or symbols)natural_image
Pure diagram of a rectangular box with circular patterns inside, no text or symbols present.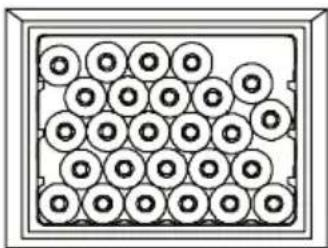
natural_image
Grid of circular objects arranged in rows within a rectangular frame (no text or symbols)
natural_image
Pure schematic diagram of parallel pipe channels without any text, numbers, or symbols
natural_image
Pure diagram of fluid flow through a channel with no text, numbers, or symbols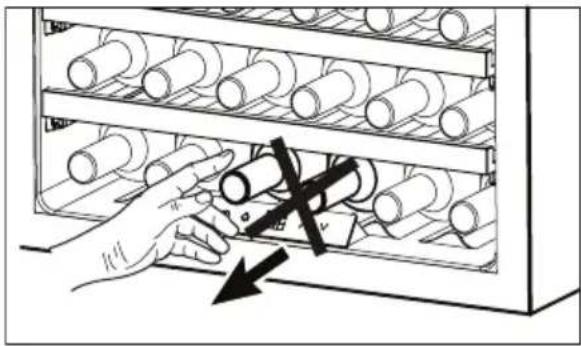
natural_image
Illustration of a hand inserting a spring into a rack of cylindrical objects (no text or symbols)
natural_image
Diagram of a multi-tiered storage unit with cylindrical tanks and a bottle inside, showing no text or symbols.natural_image
Top-down architectural diagram showing a room layout with two rectangular windows and directional arrows indicating movement (no text or symbols)7.5 Installation en cuisine

natural_image
Technical line drawing of a door frame assembly with directional arrows indicating motion (no text or symbols)natural_image
Line drawing of a stainless steel oven with open door and multi-tiered shelves (no text or symbols)natural_image
Line drawing of an open refrigerator with shelves and a door open, showing internal components (no text or symbols)natural_image
Technical diagram of a refrigerator with internal shelves and an inset showing a close-up of the interior (no text or symbols)natural_image
Pure diagram of a multi-stage cylindrical tank or storage unit with no text, numbers, or symbolsnatural_image
Diagram of a rectangular frame containing a grid of circular elements, no text or symbols present.
natural_image
Diagram of a grid of circular elements inside a square frame (no text or symbols)
natural_image
Pure schematic diagram of parallel channels with no text, numbers, or symbols
natural_image
Pure diagram of a multi-layered funnel or channel structure without any text, numbers, or symbolsnatural_image
Illustration of a hand inserting a cylindrical object into a rack of cylindrical objects (no text or symbols)
natural_image
Diagram of a multi-tiered storage unit with cylindrical tanks and a bottle inside, showing no text or symbols.
natural_image
Top-down architectural diagram showing a room layout with two rectangular windows and directional arrows indicating movement (no text or symbols)natural_image
Technical line drawing of a door frame assembly with directional arrows indicating motion (no text or symbols)natural_image
Line drawing of a stainless steel oven with multiple shelves and an open door (no text or symbols)natural_image
Line drawing of an open refrigerator with shelves and a door open, showing internal compartments (no text or symbols)natural_image
Diagram of a kitchen oven with internal shelves and an inset showing a structural detail (no text or symbols)natural_image
Pure diagram of a multi-stage cylindrical tank or storage unit with no text, numbers, or symbolsnatural_image
Pure diagram of a rectangular frame with circular holes, no text or symbols present
natural_image
Diagram of a grid of circular elements inside a square frame (no text or symbols)
natural_image
Pure schematic diagram of parallel channels with no text, numbers, or symbols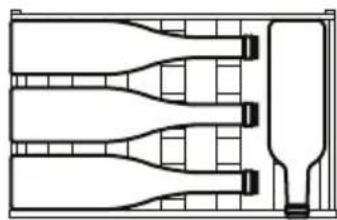
natural_image
Pure diagram of a multi-layered funnel or channel structure without any text, numbers, or symbolsnatural_image
Illustration of a hand inserting a cylindrical object into a rack of cylindrical objects (no text or symbols)natural_image
Diagram of a multi-tiered storage unit with cylindrical tanks and a bottle inside, showing no text or symbols.natural_image
Top-down architectural diagram showing a room layout with two rectangular windows and directional arrows indicating movement (no text or symbols)natural_image
Technical line drawing of a door frame assembly with directional arrows indicating motion (no text or symbols)



- CONTENTS
- FOR PERFECT RESULTS
- Visit our website for:
- CUSTOMER CARE AND SERVICE
- ⚠ SAFETY INFORMATION
- Children and vulnerable people safety
- General Safety
- SAFETY INSTRUCTIONS
- Installation
- Electrical connection
- Use
- Care and cleaning
- Disposal
- ENVIRONMENTAL CONCERNS
- PRODUCT DESCRIPTION
- CONTROL PANEL
- Switching on
- Switching off
- Temperature regulation
- Light Button
- DAILY USE
- Cleaning
- Door open alarm
- Temperature Alarm
- TemperatureRecollection Function
- Wine Storage
- Wine Shelves
- Possible configurations
- INSTALLATION
- Positioning
- Electrical Connection
- Installation dimensions (mm) and ventilation requirements
- Adjust door for alignment
- Installing in a kitchen unit
- CARE AND MAINTENANCE
- Periodic cleaning
- Periods of non-operation
- Power Failure
- TROUBLE SHOOTING GUIDE
- SOMMAIRE
- POUR DES RÉSULTATS PARFAITS
- Installation en cuisine
Brand : AEG
Model : SWS74500G0
Category : Wine cellar