
Duetto Plus - Chopper RGV - Free user manual and instructions
Find the device manual for free Duetto Plus RGV in PDF.


| Product type | Electric chopper |
| Brand | RGV |
| Model | Duetto Plus |
| Dimensions (L x D x H) | 20 x 20 x 15 cm |
| Weight | 1.5 kg |
| Power supply | 220-240 V, 50-60 Hz |
| Rated power | 500 W |
| Bowl capacity | 1.2 litre |
| Bowl material | Tempered glass |
| Blade | 4-prong stainless steel |
| Speed | 2 speeds + pulse |
| Main functions | Chop, mix, grind, emulsify |
| Maintenance and cleaning | Removable bowl and blade, hand washing recommended |
| Safety | Safety lock, automatic shut-off in case of overload |
| Spare parts | Available on request from customer service |
| Repairability | Repairability index: 7.8/10 |
| Color | White and black |
| Cable length | 1.2 m |
| Warranty | 2 years |
Frequently Asked Questions - Duetto Plus RGV
User questions about Duetto Plus RGV
0 question about this device. Answer the ones you know or ask your own.
Ask a new question about this device
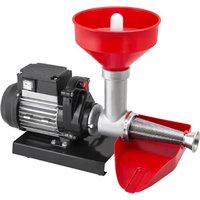
Download the instructions for your Chopper in PDF format for free! Find your manual Duetto Plus - RGV and take your electronic device back in hand. On this page are published all the documents necessary for the use of your device. Duetto Plus by RGV.
USER MANUAL Duetto Plus RGV
Instruction booklet for use and maintenance
natural_image
Product collage featuring a white electrician with kitchen utensils, fresh tomatoes, and a close-up of a person eating vegetables (no visible text or labels)Tritacarne/Spremipomodoro/Grattugia
Meat Grinder/Tomato Press/Grater
For the purposes of improving the product and/or construction requirements, the manufacturer reserves the right to make technical, esthetic, and dimensional changes without notice.
natural_image
Line drawing of two hands shaking, no text or symbols presentIndice
natural_image
Illustration of a red portable device with a child reacting to its shock, accompanied by a prohibition symbol (no text or labels)
natural_image
Hand inserting a plug into an electrical outlet (no text or symbols visible)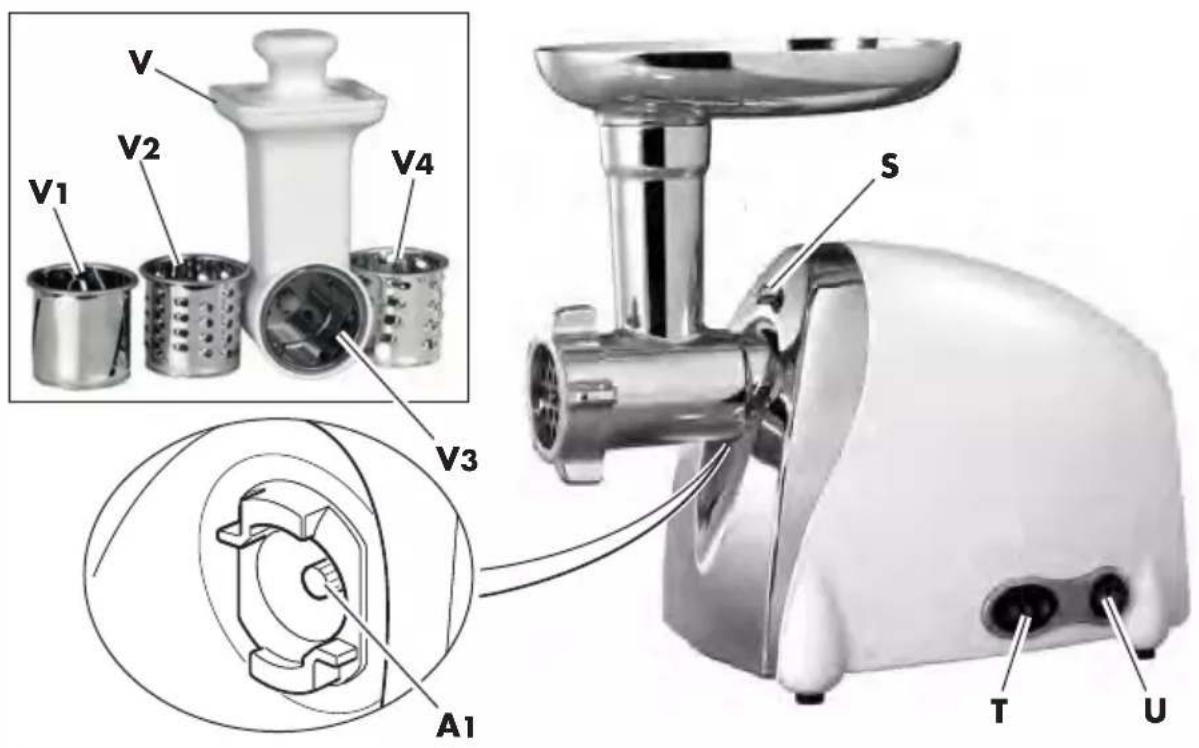
natural_image
Black-and-white close-up of fresh persimmons on a vine (no text or symbols visible)
natural_image
Hand inserting a plug into an electrical outlet (no text or symbols visible)natural_image
Line drawing of a food processing machine with bowl, spoon, and side dish (no text or symbols)natural_image
Two semi-circular dark objects with textured surfaces, possibly food items or baked goods (no visible text or symbols)
natural_image
Hand inserting a black plastic plug into an electrical outlet (no text or symbols visible)natural_image
Illustration of a hand inserting a plug into a motor (no text or symbols)natural_image
Line drawing of a food grater with noodles being inserted (no text or symbols)natural_image
Black and white photo of two dark, oval-shaped objects resembling carrots or similar vegetables (no text or symbols visible)natural_image
Diagram of a hand turning a mechanical component with a threaded shaft (no text or symbols)natural_image
Line drawing of a hand operating a mechanical component with a shaft and valve (no text or symbols)natural_image
Abstract line drawing of a curved mechanical or architectural component within a circular boundary (no text or symbols)


natural_image
Line drawing of a hand washing a bowl over a washing machine, with no text or symbols present.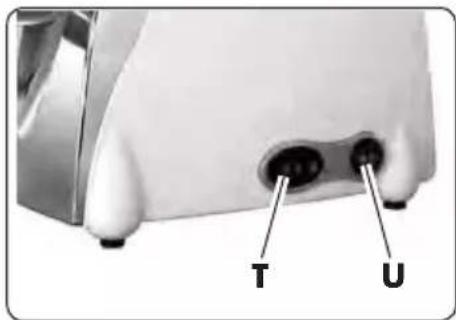

natural_image
Technical line drawing of a mechanical component with circular features and a labeled section 'U' (no text or symbols beyond label)natural_image
Line drawing of a device casing with three circular ports and a pointer pointing to one (no text or symbols)"ON"

N INSERIRE LE DITA, UTENSILI O OGGETTI METALLICI NEL CONDOTTO DI ALIMENTAZIONE (B) PER PRESSARE GLI ALIMENTI. LIZZARE ESCLUSIVAMENTE IL PRESSINO (F).
natural_image
Simple line drawing of three overlapping leaf-like shapes (no text or symbols)natural_image
Line drawing of a hand inserting a component into a car wheel (no text or symbols)
natural_image
Mechanical assembly diagram showing a hand adjusting a component with a curved arrow indicating rotation (no text or symbols present)
natural_image
Diagram of a hand turning a mechanical component with a threaded shaft and circular base (no text or symbols)natural_image
Line drawing of a mechanical component with a cylindrical shaft and flange (no text or symbols)natural_image
Hand inserting a plug into a wall socket, showing electrical wiring (no text or symbols)
natural_image
Technical line drawing of a washing machine (A) and its exterior view with no text or symbols
natural_image
Technical line drawing of a mechanical component with cross-sectional lines (no text or symbols)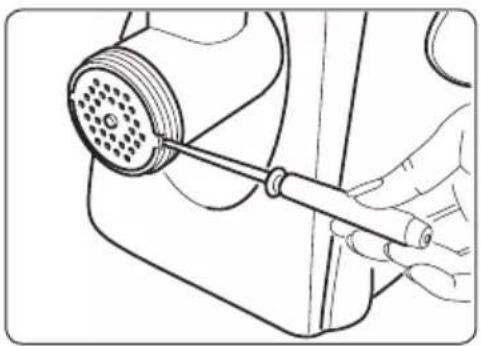
natural_image
Line drawing of a hand holding a tool interacting with a mechanical device (no text or symbols)
We thank you for choosing our product and are confident that this choice will fully meet your expectations.
Before using this appliance, please carefully read this "instructions for use booklet" in order to optimize its functional features and eliminate any inconveniences that may arise from improper use or use that is not in accordance with it.

natural_image
Line drawing of two hands shaking, no text or symbols presentIndex
- Introduction......Page 28
- Technical Features...." 28
- Instructions for use...." 29
- Package contents....” 30
- Appliance Controls...." 30
-
Preparation of the Appliance...." 32
-
For use as a "TOMATO PRESS" 32
- For use as a "MEAT GRINDER" 35
- For use of the accessory for "FILLING" 37
- For use of the "KIBBE" accessory ...." 38
- To use the "GRATER" 39
- Appliance Use...." 40
"Reverse" Function ...." 40
- Useful tips...." 41
- Useful tips for pureeing tomatoes (or fruit and vegetables) ......” 41
- Useful tips for meat grinding ...." 42
- How to prepare "FILLINGS" (sausages, etc.) 42
- Useful tips for "filling sausages" 43
-
How to prepare the "KIBBE" 43
-
Cleaning and maintenance ...." 45
- Important information ...." 47
- Appliance disposal....” 48
- Possible disadvantages ...." 48
- Additional instructions ...." 49
- Standard Warranty conditions ...." 50
- How to contact technical support ...." 99
- Rating label ......” 99
TECHNICAL FEATURES
• Appliance Dimensions (lxpxh)
- Dimensions of motor unit :......cm 27x18x23
- Dimensions of appliance as "tomato press":......cm 49x18x32
- Dimensions of appliance as "meat grinder" :......cm 32,5x18x32
- Dimensions of appliance with "accessory for sausages": cm 43x18x32
- Dimensions of appliance with "grater":......cm 32,5x18x32
• Weight of appliance (approximate)
- Weight of motor unit :......g 2000
- Weight of appliance as "tomato press": 3600
- Weight of appliance as "meat grinder" : 3500
• Electrical data of "Motor unit"
- Voltage : V\~ 220-240
- Frequency :......Hz 50
- Power :....Watt 500
- Maximum power of blocked motor : ...... approx Watt 1000
Instructions for use

Carefully read the instructions contained in this booklet as they provide important information about safe installation, use and maintenance.
Keep this booklet in a safe place for future reference

To ensure safe operation of the appliance
As special precautions:
- Before each use, check the mechanical integrity of the appliance in all of its components.
The motor unit, the infeed duct, the conical sieve and all other components should not show any cracks or tears.
The sheath and plug of the power cord of the motor unit should not show any cracks or breakage.
Once the above has been verified, immediately disconnect the power plug from the electrical outlet and bring the motor unit to an authorized retailer to make the necessary checks.
Do not insert your finger into the infeed duct.
Use the press (F) to "push" the tomato or the meat.
- Do not insert utensils or metal objects into the infeed duct.
Before electrically connecting the motor unit, make sure that the mains voltage corresponds to what is indicated in the nameplate data of the appliance.
- Do not leave the motor unit's power cord within reach of children.
- Before plugging the motor unit into the electrical outlet, make sure that the appliance is turned off (power switch is in the "0" position)
- Electrical safety of the motor unit is only assured when it is connected to an efficient grounding connector according to current safety standards.
Have this important requirement checked by a qualified professional.
The manufacturer cannot be held responsible for damages caused by lack of grounding.
• Always unplug the motor unit from the electrical outlet
- Do not operate the motor continuously for more than ten minutes. Alternate periods of operation with breaks of at least ten minutes.
- Do not cover the ventilation holes of the motor unit during operation.
- Do not immerse the motor unit, the power cord or the plug in water or any other liquid.
- Avoid disconnecting the motor unit by pulling on the power cord.
- Do not use or store the motor unit outside or near water.
- After each use of the motor unit, always disconnect the plug from the electrical outlet.
- This appliance should not be used by children, the disabled etc. without close supervision, or by people that in any case have not been adequately trained to use the appliance and to understand the dangers that come from misuse.
- Do not leave the appliance unattended (above all, in the presence of children).
before cleaning the appliance and before carrying out any kind of operation.

natural_image
Illustration of a red toaster with a warning symbol and a cartoon character pointing at it (no text or symbols present)
natural_image
Hand inserting a plug into an electrical outlet (no text or symbols visible)
The appliance MUST be checked and/or repaired only with an authorized retailer.

DO NOT PROCESS HARD FOOD ITEMS LIKE BONES, DRIED FRUITS, ETC
DO NOT GRIND GINGER OR OTHER FOODS WITH TOUGH FIBER.
- Do not press too firmly on the food in the infeed duct (B). Excessive effort of the motor can cause the temporary stop of same. In this case, turn off the appliance and wait for a few minutes before thermal protection is restored before resuming work.
Package Contents
A - Motor Unit
A1 - Conduit insert
B - Infeed duct
C - Conical sieve
C1 - Plastic adjusting screws
D - Tray
E - Sauce protection
F - Press
G - Extended conical auger (for tomatoes)
H - Auger (for meat)
I - Star knife
L - Grinder disk, large (7mm holes)
M - Grinder disk, size (5mm holes)
N - Grinder disk, fine (3mm holes)
- Ring nut
P - Sausage cone
Q - Kibbe accessory
V - Grater
V 1-2-3-4 - Accessories for grating
Appliance controls
S - Supply conduit quick-release button
T - On/Off switch
0 - Appliance off
ON - Appliance in operation
R - Reverse (reverse rotation direction of the auger)
U - Forward/reverse switch

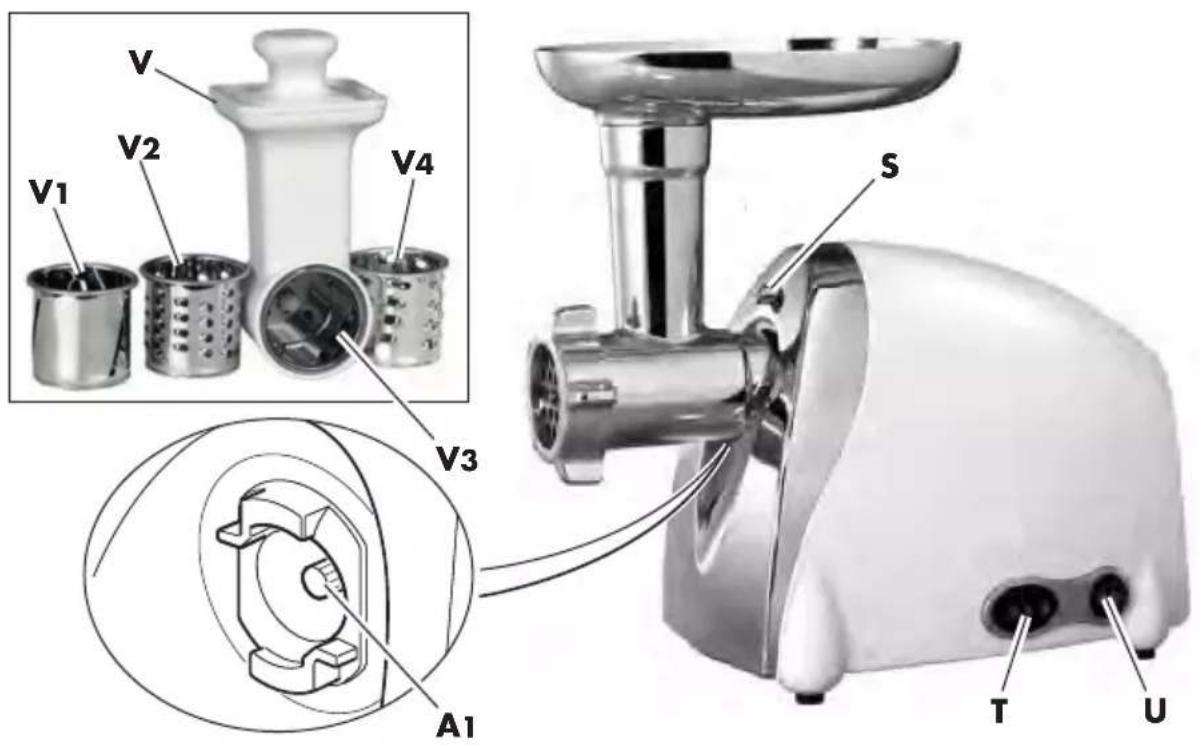
Preparation of the Appliance
When using the appliance for the first time or after a long period of disuse, clean the motor unit (A) with a damp cloth.
Wash all components that you intend to use (except for the motor unit) with water and dishwashing detergent. Rinse and dry thoroughly before using them.
For use as a "TOMATO PRESS"
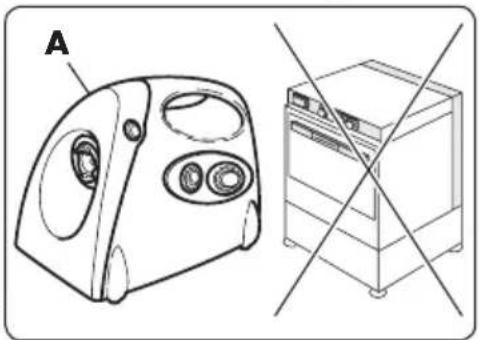
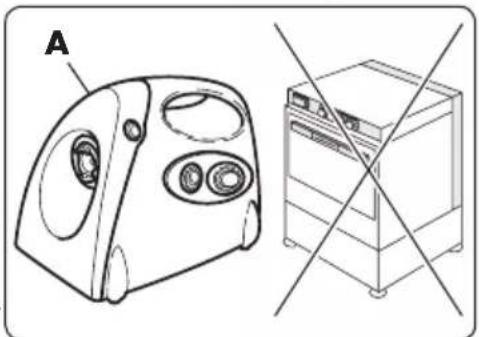
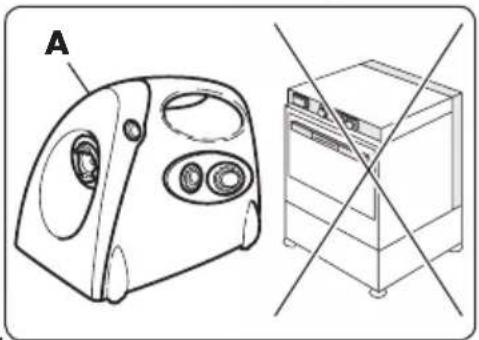
a1 - Position the motor unit (A) on a horizontal and stable plane (table, etc.).

natural_image
Black-and-white close-up of fresh tomatoes on a vine (no text or symbols visible)
ke sure the power cord is not plugged into the power outlet.

natural_image
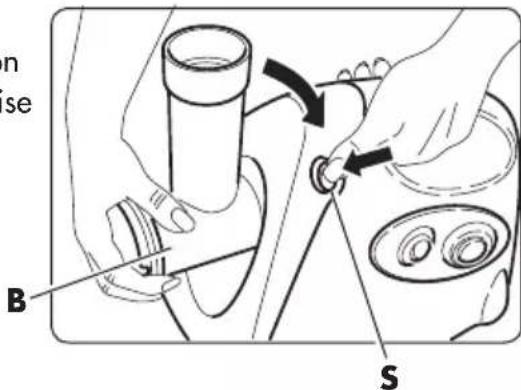
Hand inserting a black cable into a white electrical socket (no text or symbols visible)a2 - Position the supply conduit (B) on the insert (A1) of the motor unit (A).

a3 - While holding down the quick-release button (S) rotate the infeed duct in a counter-clockwise direction (B) to lock it into position.

Relaase the quick-release button (S).
Make sure that the auger (H) is fitted on the teflon coating and the metal washer (X) and that these are intact. Otherwise, replace them by going to a point of sales.

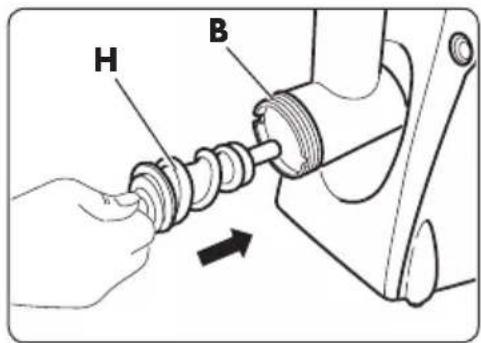
a4 - Insert the auger (H) in the infeed duct (B) attaching it to the motor pin.

a5 - Insert the extended conical auger (G) on the auger (H).

a6 - Insert the conical sieve (C) in the infeed duct (B) positioning it as illustrated.
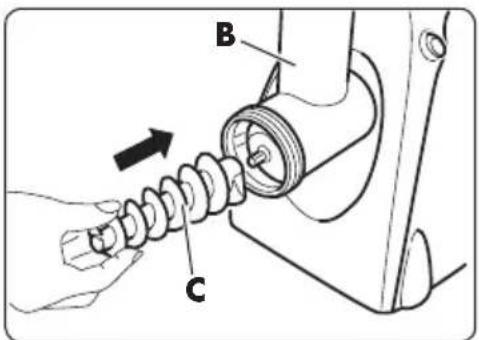
a7 - Tighten the ring nut (O) using your hands.

While tightening the nut (O) with the other hand hold the infeed duct (B).
a8 - Tighten the plastic pressure adjusting screw (C1) in the appropriate spot on the conical sieve (C).

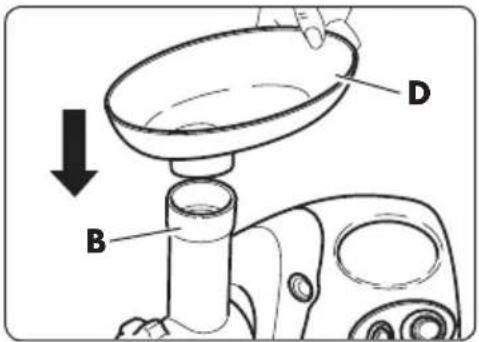
a9 - Place the tray (D) on the infeed duct (B).

a10 - Attach the sauce protection (E) to the conical sieve (C).

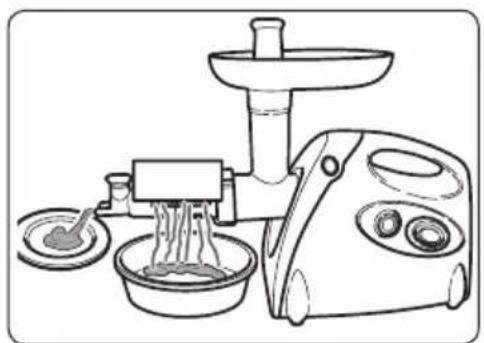
a11 - Place a waste-collecting container below the terminal portion of the conical sieve (C) and another container below the grill to collect puree.
natural_image
Line drawing of a food processing machine with bowl, side dish, and plate (no text or symbols)a12 - With this configuration, the appliance can be used for:
- Tomato preserves
- Fruit preserves and gelatin
• Vegetable preserves and gelatin - Fruit puree for jam
For use as a "MEAT GRINDER"
natural_image
Two semi-circular dark objects with textured surfaces, possibly food items or baked goods (no visible text or symbols)b1 - Position the motor unit (A) on a horizontal and stable plane (table, etc.).

ke sure the power cord is not plugged into the power outlet.

natural_image
Hand inserting a plug into an electrical outlet (no text or symbols visible)b2 - Position the infeed duct (B) on the insert (A1) of the motor unit (A).

b3 - While holding down the quick-release button (S) rotate the infeed duct in a counter-clockwise direction (B) to lock it into position.
Relaase the quick-release button (S).

take sure that the auger(H) is fitted on the teflon coating and the metal washer (X) and that these are intact. Otherwise, replace them by going to a point of sales.

b4 - Insert the auger (H) in the infeed duct (B) attaching it to the motor pin.

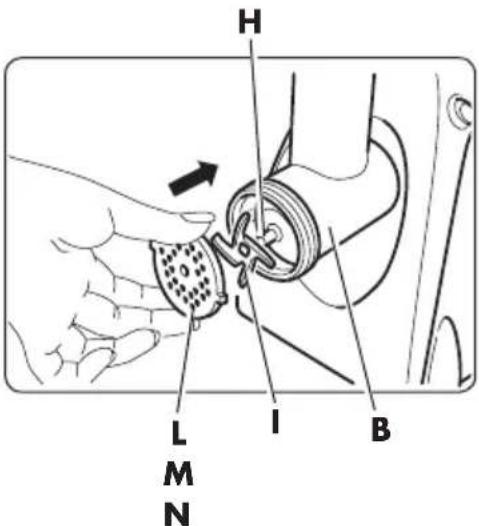
b5 - Position the star blade (I) on the auger (H) with its edge side facing outwards.
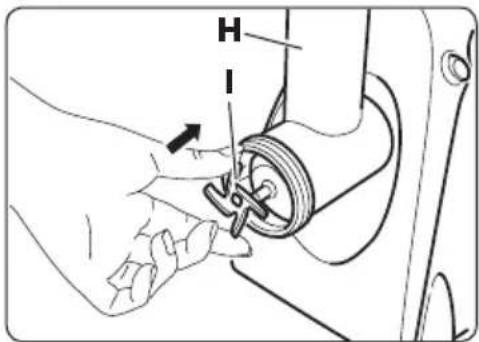
Positioning the star blade (I) with its sharp edge towards the auger (H) will cause the appliance to not function correctly.
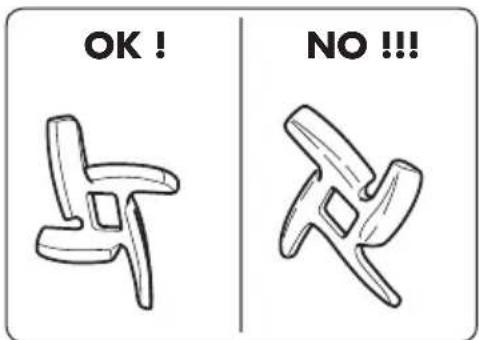
The star blade (I) is very sharp. An cause injury!
natural_image
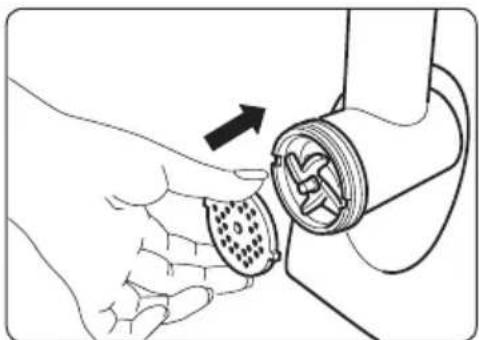
Illustration of a hand inserting a plug into a motor (no text or symbols)b6 - Position the chosen grinding disk (L, M or N) in the infeed duct (B) aligning the two protruding disk ridges with their respective slots.

b7 - Tighten the ring nut (O) using your hands.

While tightening the nut (O) with the other hand hold the infeed duct (B).
b8 - Position the tray (D) on the infeed duct (B).
b9 - Place a container for collecting ground meat below the end of the infeed duct (B).

natural_image
Line drawing of a food grater with noodles being inserted (no text or symbols)For use of the accessory for "FILLING"
- Using this accessory will allow you to prepare delicious sausages right in your own home and to allow you to choose your preferred meat.
natural_image
Black and white photo of two dark, oval-shaped objects resembling carrots or similar vegetables (no text or symbols visible)c1 - Prepare the appliance as described in the section "For use as a MEAT GRINDER" from point "b1" to point "b6".
c2 - Position the sausage cone (P) on the infeed duct (B).

natural_image
Diagram of a hand turning a mechanical component with a threaded shaft (no text or symbols)c3 - Tighten the ring nut (O) using your hands.
While tightening the nut (O) with the other hand hold the infeed duct (B).

natural_image
Line drawing of a hand operating a mechanical component with a shaft and valve (no text or symbols)For use of the "KIBBE" accessory
- Using this accessory will allow you to prepare delicious saccottini.
d1 - Prepare the appliance as described in the section "For use as a MEAT GRINDER" from point "b1" to point "b4".
d2 - Position the kibbe accessory (Q) in the infeed duct (B) aligning the two protruding disk ridges with their respective slots.

natural_image
Abstract line drawing of a curved mechanical or architectural component within a circular boundary (no text or symbols)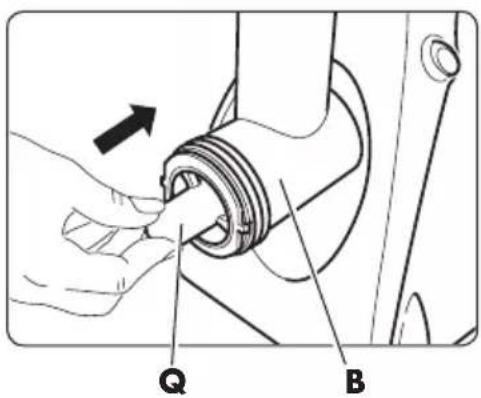
d3 - Position the conical part of the kibbe accessory (Q1) on the infeed duct (B).

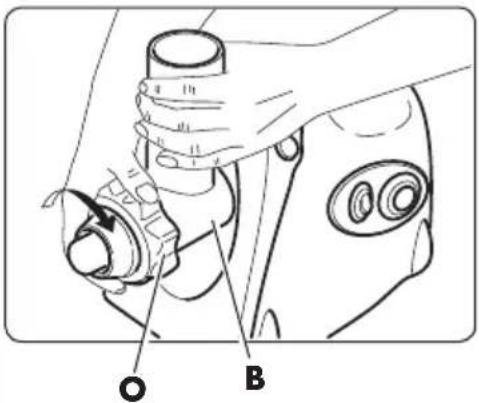
d4 - Tighten the ring nut (O) using your hands.

While tightening the nut (O) with the other hand hold the infeed duct (B).

not use the star blade (I) or the disks for grinding for kibbe preparation.
To use the "GRATER"
e1 - Press the lock button and insert the cutting mechanism made of white plastic in the entrance of the tube.
During insertion, make sure that the plastic cutting mechanism is inclined as indicated by the arrow).
Turn the plastic cutting mechanism clockwise until it is fully tightened, and then release the lock button.
e2 - Put the barrel of the grater into the cutting unit, and then rotate the cylinder clockwise so that it is properly closed.
e3 - Put the tool to push the ingredients in the upper part of the cutting mechanism and push slowly the foods inside.
Now the 'device' is ready to use.

Appliance use
Operate as follows
- After assembling the appliance for the intended use, as described in the preceding pages, plug it into an electrical outlet.

fore plugging the appliance into an electrical outlet, make sure that the power switch (T) is set to "0" (OFF).

fore plugging in the motor unit, make sure that the mains voltage corresponds to what is indicated on the nameplate.
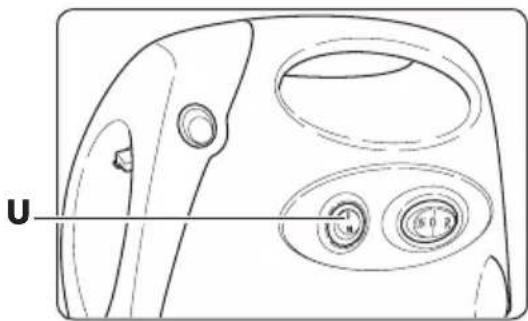
f1 - Push the " " switch (U).
f2 - Start the appliance by pushing the "ON" power switch (T).
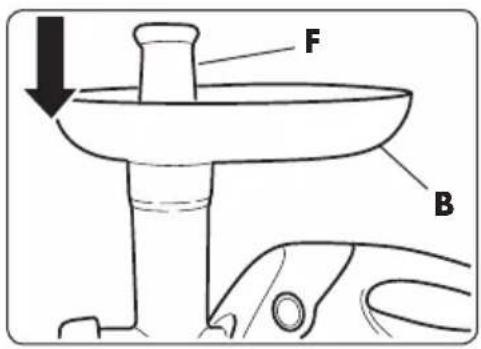
f3 - Put the food to be processed in the tray (D) and push it into the infeed duct (B) using the appropriate press (F).

NOT INSERT FINGERS, UTENSILS OR METAL OBJECTS IN THE INFEED DUCT (B) IN ORDER TO PRESS FOOD IN. ONLY USE THE PRESS (F).

Do not operate the appliance continuously for more than 10 minutes. Alternate periods of operation with breaks of at least 10 minutes.

220-240V\~ 50Hz


natural_image
Line drawing of a hand stirring a bowl in a kitchen, with no text or symbols presentREVERSE function
f4 - If the auger gets blocked, reverse its direction of advancement by pushing on the switch "◀" (U) and then holding down the power switch "R" (T) for the amount of time needed to unblock the auger.

Do not insert anything into the tray (D) or press anything during this operation.
If the appliance does not work even in REVERSE function, unplug it from the electrical outlet, disassemble and clean.
Useful tips
Useful tips for pureeing tomatoes (or fruits and vegetables)
- Wash and chop the tomatoes (or the fruit/vegetables) to such dimensions that they can be introduced into the infeed duct (B).
- The conical sieve (C) separates the skin from the seeds, making them leave out of the front and letting the pulp and juice fall into the sauce conveyor (E).
Make sure, during use, that the containers for collecting skin and seeds and the one for collecting sauce do not get too full.

DO NOT PLACE HOT TOMATOES (OR FRUITS/VEGETABLES) IN THE TRAY (D). WAIT UNTIL THEY HAVE COOLED BEFORE PROCESSING THEM.
- The sauce can be eaten as is or cooked to make it into tomato sauce for pizza or for other dishes
- Adjust the degree of "squeezing" with the plastic adjusting screw (C1).
By tightening the screw completely (CI) you obtain maximum squeezing of the tomatoes (or other fruit) (the outputted pulp is "drier" and the puree more "concentrated.").
- Gradually put the meat into the tray (B) and push it down using the press (F).


Useful tips for meat grinding
- Prepare the meat that is to be ground by removing bone and cartilage.
- Cut the meat into strips of about 2 x 2 x 6cm.
- Gradually put the meat into the tray (B) and push it down using the press (F).
- Once the meat has been ground, put a few pieces of bread into the food processor to remove small particles of meat that remain in the appliance.
How to prepare "SAUSAGES"
- Prepare the meat that is to be ground and made into sausages, along with any spices to be added, and remove bones and cartilage.
- Cut the meat into strips of about 2 x 2 x 6cm.
- Moisten the skin with lukewarm water to give it more elasticity.
- Slide the skin (Z) onto the sausage cone (P), letting it take up about 5 cm.
$$
$$

- Push the switch " (U).
natural_image
Line drawing of a device casing with three circular components and a labeled arrow 'U' (no text or symbols on the diagram itself)- Start the appliance by pushing the "ON" power switch (T).
- Gradually put the meat into the tray (B) and push it down using the press (F).

natural_image
Line drawing of a device casing with three circular ports and a pointer pointing to one (no text or symbols)"ON"

DO NOT INSERT FINGERS, UTENSILS OR METAL OBJECTS IN THE INFEED DUCT (B) IN ORDER TO PRESS FOOD IN. ONLY USE THE PRESS (F).
- Turn off the appliance by pushing "0" (OFF) on the on/off switch (T).
- Tie a knot that leaves 5cm of extra skin and push it down so that there is no remaining air.
- Restart the appliance and continue adding meat until you get the desired "sausage."

not operate the appliance continuously for more than 10-12 minutes Alternate periods of operation with breaks of at least 10 minutes.
Useful tips for preparing "sausages".
- To prevent the skin from "bursting," try not to make the sausages too big.
- The work will be easier if done in two (one person introduces the meat into the appliance while the other holds the skin).
- When all of the meat has been used, turn off the food processor, unplug it from its power outlet and remove any parts remaining inside.
- To make sausages of the desired length, tighten and twist the skin in the appropriate places.
How to prepare "KIBBE"
- FILLING
Ingredients: - 100g of mutton
- 1 tablespoon of olive oil
- 1 tablespoon of finely chopped (or ground) onion
- 1 tablespoon of flour
- add spices to taste
- salt to taste
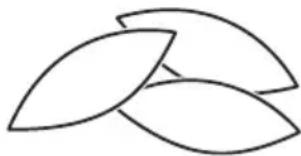
natural_image
Simple line drawing of three overlapping leaf-like shapes (no text or symbols)Preparation of the filling
- Prepare the appliance as "MEAT GRINDER"
- Grind the meat once or twice depending on the degree of grinding desired.
- Sauté the onion until it turns brown, then add the ground meat, spices, salt and flour and stir to mix everything together.
- Remove from heat and let cool.
- EXTERNAL CASING
Ingredients: - 450g of lean meat
- 150/200g of flour
- 1 nutmeg, finely chopped or ground
- add spices to taste
- chili powder to taste
- pepper to taste
KIBBE preparation
- Grind the meat three times
- To the ground meat, add the flour, nutmeg, spices, pepper and chili powder in the desired amounts and mix together in a bowl until everything is well incorporated.
Mixing more meat and less flour will result in a more consistent and tasty casing.
- Grind the obtained mixture two or three times.
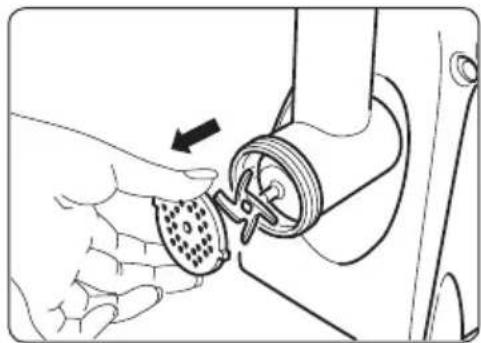
- Turn off the appliance ("T" switch on "0") and unplug it from the electrical outlet.
- Unscrew the ring nut (O).
- Remove the grinding disk and the star blade.
natural_image
Line drawing of a hand inserting a component into a car wheel (no text or symbols)- Prepare the appliance as described in the section "For use of the Kibbe accessory" from point "d2" to point "d4".

natural_image
Line drawing of a hand turning a mechanical component with a knob (no text or symbols)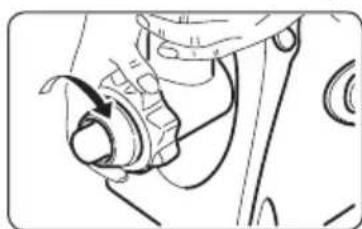
natural_image
Mechanical assembly diagram showing a hand adjusting a component with a curved arrow indicating rotation (no text or symbols present)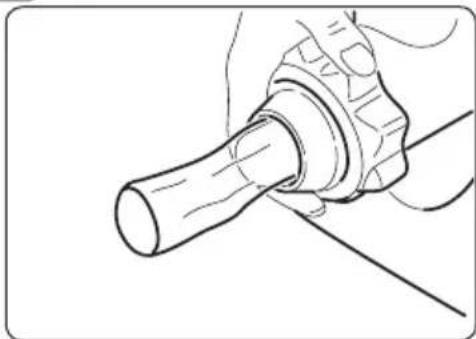
natural_image
Line drawing of a mechanical component with a cylindrical shaft and flange (no text or symbols)- Start the appliance and put the dough obtained into the tray (D) and form it into a cylindrical casing.
- Fill the casing with the filling made earlier, cut and close the casings at the desired length in order to make "saccotini ripieni."
- Fry in hot oil.

Cleaning and maintenance
Proceed as follows:

plug from the electrical outlet BEFORE proceeding with disassembly and cleaning.
- To remove the infeed duct (B) from the motor unit (A), hold down the quick-release button (S) and rotate the conduit (B) clockwise

not try to remove the infeed duct without first having pushed the quick-release button (S).
- Clean the motor unit (A) with a damp cloth WITHOUT EVER using abrasive products.

er wash the motor unit (A) with water or in the dishwasher.
- Wash all components (except the motor unit "A") with water and dishwashing detergent without using abrasive sponges or mesh.
- Rinse and dry thoroughly before storing.
- For a thorough cleaning of the conical sieve (C), remove the plastic adjustment screw (C1) before washing.

natural_image
Hand inserting a plug into a wall socket, showing electrical wiring (no text or symbols)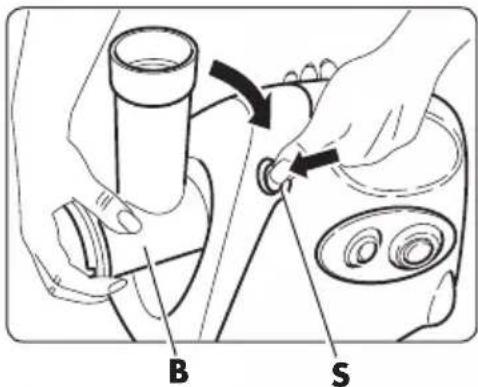
natural_image
Line drawing of a microwave oven and a washing machine (no text or symbols)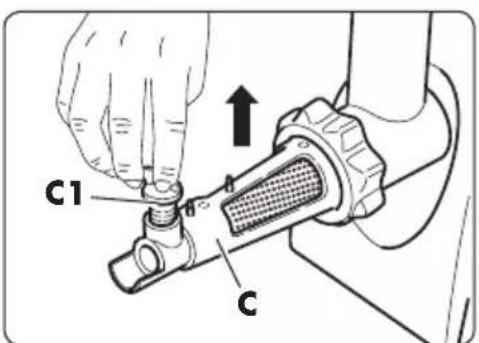
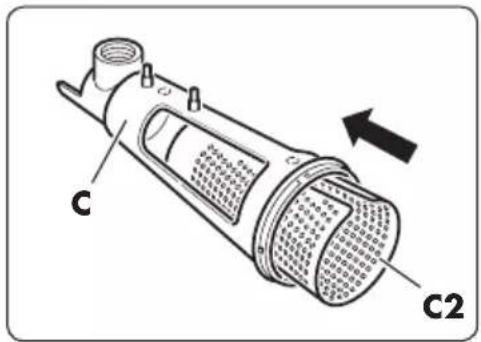
- Remove the perforated grille (C2) from the body (C) by pressing on it and pulling it outwards at the same time.

- In order to properly reposition the perforated grill (C2) on the sieve body (C), push it down to make sure that that open part of the grille is positioned on the upper part of the body.


natural_image
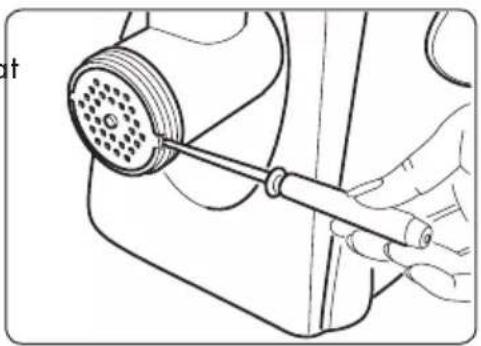
Technical line drawing of a mechanical component with cross-sectional lines (no text or symbols)- To remove the disk easily, insert a flat screwdriver between it and the infeed duct (B) for leverage.
natural_image
Line drawing of a hand holding a tool interacting with a mechanical component (no text or symbols)- Make sure that the set screw (K) on the conical sieve (C) is screwed in a way that will prevent losing it.


ndle the star blade with particular attention. It is very sharp. It can cause injury!
- It is recommended that steel components (star blade, grinding disks and augers) be greased with a few drops of cooking oil before storing.
- It is not recommended that plastic components be washed in a dishwasher, given that the high water temperature may cause them to become deformed.
- DO NOT wash the components in dishwasher.
- The coloration that the plastic parts of the appliance may assume when they come into contact with food may be eliminated by using a cloth soaked in cooking oil
- Replace the star blade (I) if it no longer cuts.

not sharpen the star blade (I). place it if it does not cut correctly or if it is damaged.
Important information
- Do not tamper with the appliance for any reason. In case of malfunction, contact a point of sale.
- To avoid unnecessary and dangerous overheating of the appliance, DO NOT leave it plugged in when not in use. Unplug the appliance when it does not need to be used.
- Use the appliance with its power cord.
- Regularly check the wear and tear of the power cord. Its replacement should be carried out by a qualified professional.
- If you decide to scrap the appliance, make it unusable by cutting the power cord after disconnecting it from its power outlet.
- Make harmless any parts that could be potential sources of danger to children, the disabled, etc.
This appliance has been designed and build to process foods and in particular to make tomato puree, sauces, fruit and vegetable preserves and gelatin, to grind meat, for grating and to make sausages; and should only be used for these purposes. The manufacturer does not accept any responsibility for improper use or use that does not conform with the instructions provided, for tampering with the appliance or for improper maintenance of the appliance.
The crossed-out wheeled bin symbol placed on the product and on the accompanying documentation indicates that the product itself is subject to Directive 2012/19/EU which regulates the collection, the management, the processing and the disposal of electrical and electronic equipment waste (WEEE).
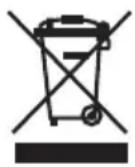
When the product reaches the end of its lifetime must therefore not be disposed of as a common mixed urban waste but it must be subject to sorted collection at authorized collection centers.
Responsible disposal of electrical and electronic equipment waste helps to ease the material resources sustainable recycling and reuse, as well as to avoid possible damages to the environment and to human health caused by uncontrolled waste disposal.
The municipalities organize sorted collection centers specialized for WEEE. For more detailed information regarding the WEEE collection and pick-up systems, it is possible to refer to your own municipality or to the local household waste disposal service.
Moreover, at the time of purchase of a new equivalent equipment intended to be used in a household environment, the customer has the right to freely lend, at the rate of one on one, the used equipment to the distributor which will provide for its disposal as required by law.
Professional purchasers are exhorted to contact their own supplier to check the terms and conditions of the purchase contract.
Possible disadvantages
- In case there is a malfunction, contact the authorized retailer or contact customer support (technical support) (see page 99).
Additional Warnings
- Packaging materials (plastic bags, polystyrene foam, nails, etc.) should not be left within reach of children, as they are potential sources of danger.
- Before connecting the appliance, make sure that the nameplate data corresponds with what the power distribution network. The nameplate is located on the back of the appliance.
- In case of incompatibility between the electrical outlet and the appliance's plug, have the outlet replaced with another type by a qualified professional that should also make sure that the section of cable for the outlet is suitable for power absorbed by the appliance.
It is not recommended that adapters, multiple plugs and extension cords be used.
If their use is absolutely necessary, you should use only simple or multiple adapters and extension cords that comply with current safety standards, taking care not to exceed the range limit. - The use of an electrical appliance implies the observance of a few fundamental rules.
In particular: - neither touch nor use with wet or damp hands or in bare feet;
- do not pull the power cord or the appliance itself to remove the plug from its socket;
- do not allow the appliance to be used by children or by unfil persons, without supervision.
- In the event of failure and/or malfunction to the unit, turn it off and do not tamper with it.
For necessary repairs, only refer to an authorized retailer.
Failure to comply with the above can compromise the safety of the appliance. - If you decide to no longer use this appliance, it should be rendered inoperable by cutting the power cord after unplugging it.
It is also recommended that those parts of the appliance that may constitute a danger, especially for children who could use our appliance outside of its use in their games. - Installation should be carried out according to the manufacturer's instructions. Improper installation can cause injury to people and animals, or damage to things, in which regard the manufacture cannot be held responsible.
- To prevent dangerous overheating, it is recommended to operate the appliance with its power cord and to use the appliance as recommended in the paragraph "Instructions for use."
- If the power cord of this appliance is damaged, it should be replaced only by an authorized retailer.
- The manufacturer cannot be held responsible for any injury to people and animals or damage to things resulting from improper and unreasonable use of the appliance, or for repairs performed by unqualified persons.
Standard Warranty conditions
This warranty does not affect your statutory rights under the Legislative Decrees 02/022002, n. 24.
With this warranty, the manufacturer offers to the Buyer who directly contacts a Sales Point the restoration of technical compliance of the appliance quickly, sfafely, and at a high level of quality.
This warranty is effective regardless of the evidence of manufacturer defects at the time of purchase for this appliance.
a) Duration of the warranty: 24 months from the date of purchase.
After the first twelve months of the Warranty, service under warranty for the appliance will be managed by the Point of Sales in the following 12 months under legal warranty in strict application of the provisions of the Legislative Decrees. 02/022002, n. 24.
b) Validity of the warranty: In case assistance is requested, the warranty is valid only if the warranty certificate is exhibited in conjunction with a document, which is valid for tax purposes, which includes the identification of the retailer of the product and its purchase date.
c) Extension of the warranty: Repair DOES NOT interrupt or modify the duration of the warranty that will end at its legal expiry.
d) Limits of the warranty:
The warranty does not cover any damage resulting from:
- negligence, incompetence, recklessness and carelessness in usage (non-compliance with what is provided in the booklet: "Instructions for use");
- maintenance not coverend inthe booklet "Instructions for use" or performed by unauthorized personnel;
- tampering or interventions to increase the power or efficacy fo the product;
- incorrect installation (power with voltage other than what is provided on the data nameplate and also in this booklet);
- improper use of the appliance;
- damage due to nominal wear and tear of the components, shocks, falls, damage in transit.
- the warranty does not include repair/replacement of parts that are subject to wear during normal product use (hooks, kneaders, blades, belts, connectors....).
e) Costs: IN cases not covered by the warranty, the manufacturer reerves the right to charge the customer for the costs for repair or replacement of the appliance.
f) Responsibility of the manufacturer: The manufacturer declines all responsibility fro any damage that may, directly or indirectly, result from persons, things, or pets as a result of failure to comply with all the requirements set out in the booklet "Instructions for use" and especially concerning the instructions regarding installation, use and maintenance of the appliance.
Cher client,
natural_image
Line drawing of two hands shaking, no text or symbols presentTable des matières
natural_image
Illustration of a red toaster with a smoke and a child standing beside it, no text or symbols present.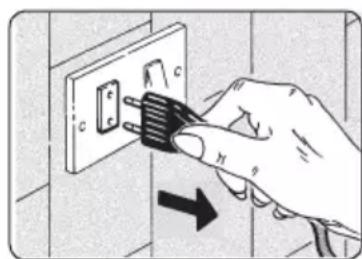
natural_image
Hand inserting a plug into an electrical outlet wall, showing a black arrow indicating direction (no text or symbols)
natural_image
Black-and-white close-up of fresh tomatoes on a vine (no text or symbols visible)
natural_image
Hand inserting a black plug into a white electrical outlet (no text or symbols visible)natural_image
Line drawing of a food processing machine with bowl, fork, and side dish (no text or symbols)natural_image
Two dark, semi-circular objects with textured surfaces, possibly food items or baked goods (no visible text or symbols)natural_image
Hand inserting a plug into a wall socket, showing electrical wiring (no text or symbols)natural_image
Illustration of a hand inserting a plug into a motor (no text or symbols)natural_image
Line drawing of a food grater with noodles being inserted (no text or symbols)natural_image
Black and white photo of two elongated, dark-colored root vegetables (no text or symbols visible)natural_image
Diagram of a hand turning a mechanical component with a threaded shaft (no text or symbols)natural_image
Line drawing of a hand operating a mechanical component with a shaft and valve (no text or symbols)natural_image
Abstract line drawing of a curved mechanical or architectural component within a circular boundary (no text or symbols)
Pour utiliser la «RÂPE»


natural_image
Line drawing of a hand using a spoon to clean or wash a bowl, with no text or symbols present.

natural_image
Technical line drawing of a device casing with internal components and a labeled section U (no text or symbols beyond label)natural_image
Line drawing of a device casing with three circular ports and a pointer pointing to one (no text or symbols)«ON»

NE PAS INSÉRER LES DOIGTS, LES USTENSILES OU DES OBJETS MÉTALLIQUES DANS LE CONDUIT D'ALIMENTATION (B) POUR PRESSER LES ALIMENTS. LISER EXCLUSIVEMENT LE POUSSOIR (F).
natural_image
Simple line drawing of three overlapping leaf-like shapes (no text or symbols)natural_image
Line drawing of a hand inserting a component into a car wheel (no text or symbols)
natural_image
Mechanical assembly diagram showing a hand adjusting a component with a curved arrow indicating rotation (no text or symbols present)
natural_image
Line drawing of a hand turning a mechanical component with a bolt, showing no text or symbolsnatural_image
Line drawing of a mechanical component with a cylindrical shaft and flange (no text or symbols)natural_image
Hand inserting a plug into a wall socket, showing electrical wiring (no text or symbols)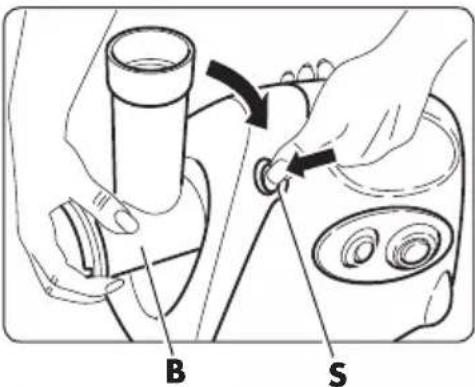

natural_image
Line drawing of a microwave oven and a front-loading washing machine (no text or symbols)
natural_image
Technical line drawing of a mechanical component with cross-sectional view (no text or symbols)natural_image
Line drawing of a hand holding a tool interacting with a mechanical component (no text or symbols)natural_image
Line drawing of two hands shaking, no text or symbols presentVerzeichnis
natural_image
Illustration of a red toaster with a warning symbol and a cartoon character standing beside it (no text or symbols present)
natural_image
Hand inserting a plug into an electrical outlet (no text or symbols visible)

natural_image
Black-and-white close-up of fresh tomatoes on a vine (no text or symbols visible)natural_image
Hand inserting a plug into a wall socket, showing electrical wiring (no text or symbols)natural_image
Line drawing of a food robotic arm with chopsticks, bowl, and side dish (no text or symbols)natural_image
Two dark, semi-circular objects resembling food items or baked goods, with no visible text or symbols.
natural_image
Hand inserting a plug into an electrical outlet (no text or symbols visible)natural_image
Illustration of a hand inserting a plug into a motor (no text or symbols)natural_image
Line drawing of a food grater with a side bowl and funnel (no text or symbols)natural_image
Black and white photo of two dark, oval-shaped objects resembling carrots or similar vegetables (no text or symbols visible)natural_image
Mechanical assembly diagram showing a hand pin fastening a bolt onto a mechanical component (no text or symbols)natural_image
Line drawing of a hand operating a mechanical component with a shaft and valve (no text or symbols)natural_image
Abstract line drawing of a curved mechanical or architectural component within a circular boundary (no text or symbols)
natural_image
Line drawing of a hand using a spoon to clean or wash a bowl, with no text or symbols present.Funktion REVERSE
natural_image
Line drawing of a mechanical component with circular features and a central oval (no text or symbols)natural_image
Line drawing of a device casing with three circular components and a pointer pointing to one (no text or symbols)"ON"

natural_image
Simple line drawing of three overlapping leaf-like shapes (no text or symbols)natural_image
Line drawing of a hand inserting a component into a car wheel (no text or symbols)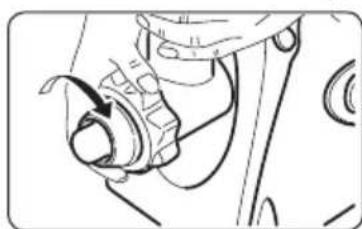
natural_image
Mechanical assembly diagram showing a hand adjusting a component with a curved arrow indicating rotation (no text or symbols present)
natural_image
Diagram of a hand turning a mechanical component with a threaded shaft and circular base (no text or symbols)natural_image
Line drawing of a mechanical component with a cylindrical shaft and flange (no text or symbols)natural_image
Hand inserting a black cable into a wall socket, with a black arrow indicating direction (no text or symbols)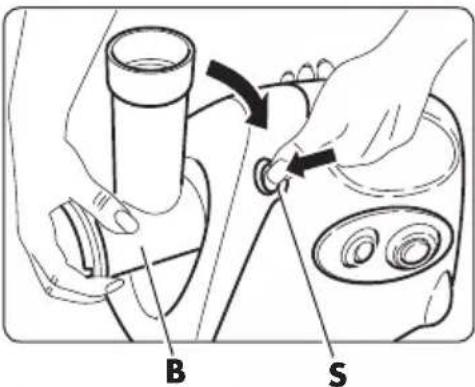
natural_image
Line drawing of a microwave oven and a refrigerator with no text or symbols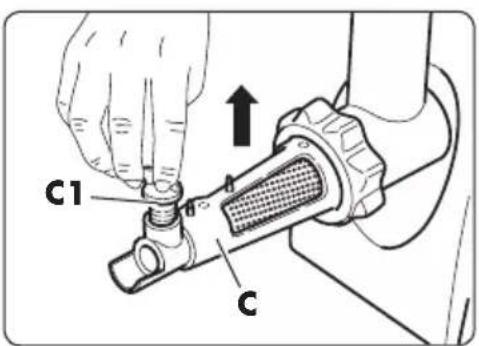
natural_image
Technical line drawing of a mechanical component with cross-sectional view (no text or symbols)
natural_image
Line drawing of a hand holding a tool interacting with a mechanical component (no text or symbols)
How to contact technical support
natural_image
Close-up of a white electrician's meat processing tool (no visible text or labels)
Fill in the fields below for the validity of the Warranty

- Indice
- N INSERIRE LE DITA, UTENSILI O OGGETTI METALLICI NEL CONDOTTO DI ALIMENTAZIONE (B) PER PRESSARE GLI ALIMENTI. LIZZARE ESCLUSIVAMENTE IL PRESSINO (F).
- Index
- TECHNICAL FEATURES
- Instructions for use
- Do not insert your finger into the infeed duct.
- Before electrically connecting the motor unit, make sure that the mains voltage corresponds to what is indicated in the nameplate data of the appliance.
- DO NOT PROCESS HARD FOOD ITEMS LIKE BONES, DRIED FRUITS, ETC
- DO NOT GRIND GINGER OR OTHER FOODS WITH TOUGH FIBER.
- Package Contents
- Appliance controls
- Preparation of the Appliance
- For use as a "TOMATO PRESS"
- For use as a "MEAT GRINDER"
- For use of the accessory for "FILLING"
- For use of the "KIBBE" accessory
- To use the "GRATER"
- During insertion, make sure that the plastic cutting mechanism is inclined as indicated by the arrow).
- Appliance use
- Operate as follows
- REVERSE function
- Useful tips
- Useful tips for pureeing tomatoes (or fruits and vegetables)
- DO NOT PLACE HOT TOMATOES (OR FRUITS/VEGETABLES) IN THE TRAY (D). WAIT UNTIL THEY HAVE COOLED BEFORE PROCESSING THEM.
- Useful tips for meat grinding
- How to prepare "SAUSAGES"
- DO NOT INSERT FINGERS, UTENSILS OR METAL OBJECTS IN THE INFEED DUCT (B) IN ORDER TO PRESS FOOD IN. ONLY USE THE PRESS (F).
- Useful tips for preparing "sausages".
- How to prepare "KIBBE"
- KIBBE preparation
- Cleaning and maintenance
- - DO NOT wash the components in dishwasher.
- Important information
- Possible disadvantages
- Additional Warnings
- Standard Warranty conditions
- Cher client,
- Table des matières
- Pour utiliser la «RÂPE»
- NE PAS INSÉRER LES DOIGTS, LES USTENSILES OU DES OBJETS MÉTALLIQUES DANS LE CONDUIT D'ALIMENTATION (B) POUR PRESSER LES ALIMENTS. LISER EXCLUSIVEMENT LE POUSSOIR (F).
- Verzeichnis
- Funktion REVERSE
- How to contact technical support
Brand : RGV
Model : Duetto Plus
Category : Chopper