
TC8-331 - Safe SentrySafe - Free user manual and instructions
Find the device manual for free TC8-331 SentrySafe in PDF.


| Product Type | Security safe |
| Brand | SentrySafe |
| Model | TC8-331 |
| Lock Type | Electronic numeric keypad (5 digits) |
| Power Supply | 4 AA alkaline batteries (not included, 6 VDC) |
| Fire Resistance | 30 minutes at 760 °C (1,400 °F) - ETL certified |
| Water Resistance | FloodGuard™: tested up to 30.48 cm of water for 72 hours - must be bolted down |
| Anchoring Capability | Boltable to the floor (bolting kit included) |
| Factory Code | 5-digit code provided (printed on the manual) |
| Programmable User Code | Yes, 1 user code (5 digits) |
| Temporary Password | Yes, programmable and erasable |
| Priority Key | Yes (master key, provided) |
| Opening Delay after Valid Code | 4 seconds |
| Auto-locking | Yes, after 4 seconds if handle not turned |
| Lockout Mode after Errors | 2 minutes after 3 consecutive incorrect codes |
| Audible Signal | Beep enable/disable (CLEAR + 0 or 1 keys) |
| Low Battery Indicator | Yellow LED steady or flashing |
| Maintenance | Clean the housing with a dry, lint-free cloth |
| Fire Warranty | Lifetime replacement warranty after fire |
| Limited Warranty | 1 year against defects in materials and workmanship |
| Satisfaction Guarantee | 90 days, full refund |
| Customer Service | 1-800-828-1438 (North America) or www.sentrysafe.com |
| Spare Parts | Replacement keys available ($12), codes not recoverable by phone |
Frequently Asked Questions - TC8-331 SentrySafe
User questions about TC8-331 SentrySafe
0 question about this device. Answer the ones you know or ask your own.
Ask a new question about this device
Download the instructions for your Safe in PDF format for free! Find your manual TC8-331 - SentrySafe and take your electronic device back in hand. On this page are published all the documents necessary for the use of your device. TC8-331 by SentrySafe.
USER MANUAL TC8-331 SentrySafe
Fire-Safe® BRAND Security Safe Owner's Manual
| English | 2-5 |
| French | 6-10 |
| Spanish | 11-15 |
TABLE DES MATIÈRES
Thank you for purchasing this Sentry Fire-Safe® product.
For safes with electronic lock:
Model TC8-331
Battery Installation
To power the lock, four alkaline AA batteries (not included) are required.
NOTE: Non-alkaline and rechargeable batteries ARE NOT RECOMMENDED.
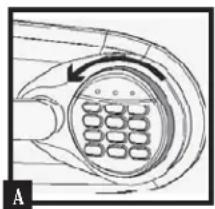
To install batteries, turn the electronic lock case to the left and remove. (Fig. A) Unlock door with the override key provided in the plastic bag attached to the owner's manual, and open the door using the lever handle. Remove key hook plate located on the inside back of the door by sliding the plate upward, then pulling toward you. (Fig. B) Insert the four batteries as indicated. Replace the key hook plate and keypad.
natural_image
Diagram of a mechanical component with internal grid pattern and directional arrow (no text or symbols)
Model TW8-331
Battery Installation
To power the lock, four alkaline AA batteries equaling voltage: 6Vdc, (not included) are required.
NOTE: Non-alkaline and rechargeable batteries ARE NOT RECOMMENDED.
To install batteries, turn the electronic lock case to the left and remove. (Fig. A) Insert four new batteries as indicated, replace the electronic lock case and turn to the right to reassemble.
For all models, test first with door open!
(See back cover of this manual for your factory code.)
Test your combination several times with the door open.
NOTE: All electronic lock units have been provided with an override key (skeleton key). Some electronic units are equipped with a handle OR electronic lock and key.
- Insert the four-bitted key into the lock to the left of the key pad. (Be sure key lock is turned as far left as possible.)
- Press the five-digit factory code. The green light will come on.
- For units with key, turn the key to the right.
- Open the door.
Using the keypad
Only a light touch is needed. A green PROCEED light and a single beep indicate that the keypad "felt" your touch. The lock allows 5 seconds for each key press. If you pause longer, an error signal will occur (blinking red light and three beeps), indicating you should start over.
Models TC8-331 and TW8-331
Access Codes
There are three possible ways to unlock and access the safe—by entering its preset Factory Code, your own User Code or a Passcode.
You can always open the safe by entering the 5-digit Factory Code. But if you prefer to use your own code, you can program the safe to open to the 5-digit User Code of your choice. If you wish to give someone else temporary access to the safe, you can program a passcode that can later be erased.
Programming a user code
There are two ways to program a user code.
A 1. Press the Program key.
- Enter the Factory Code. The green LED remains ON while you enter the 5-digit user code of your choice. After 5 digits are entered the green LED turns OFF.
(To enter a new User Code, repeat these steps.)
B 1. Press the red button inside the safe. The lock will "beep" and the green LED will come on.
- Enter a 5-digit user code.
(To enter a new User Code, repeat these steps.)
Programming a passcode
- Press the Program key twice.
- Enter your 5-digit User Code. The green LED remains ON.
- Enter the 5-digit passcode of your choice (any combination except 00000.) After 5 digits are entered, the green LED turns OFF.
(To enter a new passcode, repeat these steps. To erase the passcode, press Program twice, enter your User Code and then enter 00000.)
Unlocking
To unlock the safe, you must enter a valid Factory Code, User Code or Passcode. Once you have done this, you have 4 seconds to open the safe by turning the handle or 4-bitted key to the unlock position. If you fail to do so in time, the lock will reactivate.
(If you realize you have made an error while entering your code, press the CLEAR button and start over.)
FloodGuard™
Water-resistance protection
For those models with water resistance (TW models), which have been tested by the independent testing firm ETL SEMKO and certified to be in compliance with the manufacturer's specifications for water-resistant protection. Products were immersed in up to 1' of water for up to 72 hours and withstood water leakage.

Water-resistant models must be bolted down.
The supplied hardware MUST BE USED to bolt the safe to the floor to assure the watertight seal, or the water-resistant claim is invalid.
NOTE: It is normal to feel a slight amount of resistance when closing the door and locking water-resistant models.
NOTE: Sentry Group is not responsible for any costs incurred if unit is to be replaced.
Instructions for floor mounting
This kit contains:
• (2) lag screws
• (2) rubberized washers
• (2) masonry anchors
Required tools:
- Drill
• Wrench - For wood anchoring: 7/16" (11.0 mm) drill bit
- For masonry anchoring: 7/16" (11.0 mm) masonry drill bit
Instructions
- Unlock the safe and open the door.
- Use a screw or drill bit to mark the floor through both holes.
- Move the safe aside to clear both marked spots for drilling.
-
Drill into the floor:
-
Forwood: Using the 7/16" (11.0 mm) drill bit drill a hole 2 1/2"(64.0 mm) deep in each marked spot.
- For masonry: Using the 7/16" (11.0 mm) masonry drill bit drill a hole 2 1/2"(64.0 mm) deep in each marked spot. Install a masonry anchor in each hole.
- Replace the safe in the desired position, with the holes in the safe aligned with those in the floor.
-
Securing the safe:
-
For wood: Pass each lag screw through a washer (rubber side toward floor), then through the safe and into a hole. Tighten with the wrench. (Fig. C)
- For masonry: Pass each lag screw though a washer (rubber side toward floor), then through the safe and into a masonry anchor. Tighten with the wrench. (Fig. D)

natural_image
Simple line drawing of a doorway with a ladder and rope, no text or symbols present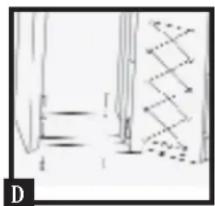
natural_image
Pure mechanical diagram showing a bracket and zigzag component without any text or symbolsFor safes with a fingerprint swipe lock

IMPORTANT
For some fingerprint locks
NOTE: If you are experiencing difficulty with the operation of the locking mechanism, DO NOT RETURN THIS PRODUCT TO THE STORE. PLEASE CONTACT SENTRY GROUP CUSTOMER SERVICE at 1-800-828-1438 for assistance. Most problems can be quickly resolved over the telephone.
It is important that you keep this Owner's Manual in a secure place other than IN your safe; it is your reference for the safe's Serial Number and Factory Code.
To open your safe for the first time
Battery installation:
To power the lock, four alkaline AA batteries, equalling voltage: 6Vdc (not included), are required.
NOTE: Non-alkaline and rechargeable batteries ARE NOT RECOMMENDED.
To install batteries:
-
Remove and discard the screw at the base of the lock case.
-
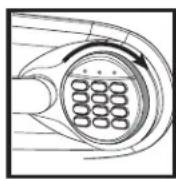
Turn the electric lock case to the right (clockwise) from 12 o'clock to 2 o'clock and remove. Insert four new batteries as indicated, replace the electric lock case and turn to the left to reassemble.
Low battery notice
When the battery power gets low, the battery icon will blink with each activation of the lock until batteries are replaced.
NOTE: No codes are erased when old batteries are removed for replacement.
First time use
Open unit first, then test with door open!
To unlock safe with numeric codes:
NOTE: Press CLEAR to remove numeric inputs.
Enter the 5-digit factory code provided on the front of the Owner's Manual, a pre-programmed manager code, or a pre-programmed user code and press the PROG/ENTER key. (See the following instructions for inputting manager and user codes.) An asterisk will light each time a digit is entered. When the unlocked padlock icon appears you have 4 seconds to turn the handle downward and open the safe.
To unlock safe with a fingerprint:
Press any key except the PROG/ENTER key to wake the electronic lock. Swipe your pre-programmed finger over the sensor. When the unlocked padlock icon appears you have 4 seconds to turn the handle downward and open the safe.
To lock safe:
Close the door and return the handle to the horizontal position.
Tips for fingerprint programming and usage
Best finger for programming
- Do not choose a finger with a cut or scar.
- Choose a finger with the tightest swirl pattern.
Swiping fingerprints
- When swiping, keep your finger flat against the fingerprint sensor.
- Swipe in a downward motion using a consistent medium speed.
- Use a medium pressure on the sensor. Too firm or too light will not read correctly.
- Also note where you are standing in relation to the safe. Programming or usage at a different angle will not work well.
Skin condition
- If you have dirt on your hands, please wash them before using the safe.
- Very dry skin will not program well. Use a skin moisturizer, being sure to rub the moisturizer in well and remove any excess before using the safe.
Environmental conditions
- The electronics may not work or may have a slow reaction time in cold temperatures (50°F or less). Make sure that the safe is at room temperature before programming and usage.
Cleaning the sensor
- For optimal accuracy and fingerprint-reading success, clean the electronic case and fingerprint sensor periodically with a dry, lint-free cloth.
Programming the manager code
NOTE: See page 2 for icon identification.
NOTE: All zeros is an invalid code. The pre-programmed factory code is also an invalid manager code. One (1) manager code is allowed.
To add:
- Press PROG/ENTER.
- Enter the 5-digit factory code.
- Press PROG/ENTER.
- Enter your new manager code consisting of 4-8 digits, and then press PROG/ENTER.
To delete:
WAR NING: A manager code must be programmed to add or delete users
- Press PROG/ENTER.
- Enter the 5-digit factory code.
- Press PROG/ENTER.
- Enter 0, 0, 0, 0, then the PROG/ENTER key.
Enrolling manager fingerprints

NOTE: The fingerprint lock stores one (1) manager and up to six (6) users. The manager and each user are encouraged to program two fingers, preferably one finger from each hand.
To add:
- Press PROG/ENTER twice.
- Enter the 5-digit factory code.
- Press PROG/ENTER.
- Swipe your first finger in a downward direction over the fingerprint sensor. Three accurate reads of the fingerprint are necessary for successful enrollment. After each successful swipe a beep up will sound and an asterisk will light. An unsuccessful swipe will result in an ERR signal and a low pitch will sound.
- The blinking finger icon indicates that the sensor is ready to read a fingerprint swipe. After the sensor reads a finger swipe, the finger icon stays lit while saving the fingerprint into memory. Wait for the finger icon to blink before proceeding with additional finger swipes.
To delete:
- Press PROG/ENTER twice.
- Enter the 5-digit factory code.
- Press PROG/ENTER.
- Press 0, 0, 0, 0, then the PROG/ENTER key.
Errors while enrolling fingerprints:
- A single BEEP/ERROR signal means that the sensor did not read the fingerprint.
- A three BEEP/ERROR signal means that the sensor read the fingerprint but data did not meet minimum requirements.
- The electronic lock will automatically turn off after ten consecutive errors.
Programming users
NOTE: You must program a manager code before programming a user. Six (6) users are allowed. All zeros is an invalid code. A personal 4-8 digit user code will be programmed and then the fingerprints will be enrolled.
To add:
- Press PROG/ENTER.
- Enter the 4-8 digit manager code.
- Press PROG/ENTER.
- Use the << and >> keys to scroll between the lighted boxes. An empty box means it is available for a code entry. A boxed lighted * means it is being used.
-
Enter your new user code consisting of 4-8 digits, and then press PROG/ENTER.
-
When the finger icon blinks, swipe your first finger in a downward direction over the fingerprint sensor. Three accurate reads of the fingerprint are necessary for successful enrollment. After each successful swipe a beep up will sound and an asterisk will light. An unsuccessful swipe will result in an ERR signal and a low pitch will sound.
-
With successful enrollment of the first finger the asterisk will clear. Swipe your second finger over the sensor. Three accurate reads are required.
To delete:
This operation will delete both the personal code and fingerprints of users.
- Press PROG/ENTER.
- Enter the 4-8 digit manager code.
- Press PROG/ENTER
- Use the << and >> keys to scroll to the programmed location that you want to delete.
- Enter 0, 0, 0, 0, then the PROG/ENTER to delete the selected user.
To delete all programmed memory
WARNING: All manager codes, user codes and fingerprints will be deleted.
- Press PROG/ENTER three times.
- Enter the 5-digit factory code.
- Press PROG/ENTER.
- Enter 0, 0, 0, 0, then the PROG/ENTER key to delete all codes and fingerprints.
Beeper on/off
To turn the Beeper OFF, press the CLEAR and 0 keys at the same time for 1 second. Beeper will beep once when it turns off. To turn the Beeper ON, press the CLEAR and 1 keys at the same time for 1 second.
Time out
During usage and programming the fingerprint lock will automatically time out and turn off if there is no input for 30 seconds.
Delay Mode
The lock automatically enters a two-minute delay mode after an invalid code or fingerprint has been entered three consecutive times. In this mode, the lock cannot be activated.

WARNING
Do not remove batteries or press any button. Doing so restarts the 2 minute delay.
Icon identification
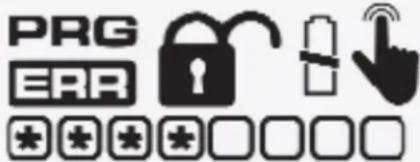
ERR (Error) indicates one of the following:
- You have pressed PROG/ENTER key out of sequence.
- You have entered an invalid code.
- Sensor did not read finger swipe.
PRG (Program)
Lights after pressing the PROG/ENTER key and stays lit while programming a manager or user code.
\* (Asterisk) indicates one of the following:
- A number key has been pressed.
- In Program mode, it signals a programmed code location or a successful fingerprint swipe.
Box
Lights during programming and indicates code locations. A box with an asterisk inside indicates a location with a programmed code.
Padlock
Lights after three consecutive invalid codes or fingerprint scans are input and stays lit during the 2-minute delay mode.
Unlocked Lock
Lights when a valid code is entered or a programmed finger is swiped. Indicates that the safe is unlocked and the door can be opened.
Battery
Blinks when batteries are low, indicating that the batteries need to be replaced soon.
Finger
Blinks during fingerprint enrollment and when a finger can be swiped to unlock the safe.
For all models
Key override
If your electronic lock fails or you do not have any codes available, you may use a key override to access this unit. Remove the keypad by rotating the cover counterclockwise, then pull toward you. Unlock the door by inserting the key provided into the hole and turning clockwise. Open the door. Do not lock override key inside of unit.
Signals
Your electronic-lock safe communicates by means of several audio/visual signals.
Red (Error) LED + three beeps indicates one of the following:
- You have pressed Program key out of sequence
- You have entered an invalid code or passcode.
- You have let 5 seconds or more elapse between key entries.
Green (Proceed) LED + single beep occurs
- After entering each digit of Factory or User Code, or Passcode
- After pressing Clear key
- After pressing Program key
Green LED only
- Comes ON after you enter a valid code/passcode and remains lit during the 4-second period in which the safe can be opened.
- Comes ON in the Program User Code mode after you enter the Factory Code and remains lit until you have finished entering a 5-digit User Code.
- Comes ON in the Program Passcode mode after you have entered your User Code and remains ON until you have entered a 5-digit passcode.
Yellow LED - Low Battery Indicator
Indicates "low battery" and will typically not turn OFF until new alkaline batteries are installed.
Your electronic lock automatically performs a low battery test during each lock use.
If a “low battery” condition is detected, the Yellow LED will come ON and remain ON during each subsequent lock operation. (The lock will continue to function in a Low Battery state, until battery failure.) The Yellow LED will turn OFF only after three consecutive “Good Battery” readings or after the low batteries are replaced. (Note: When the new batteries are installed, the Yellow LED may come ON and stay ON during the first lock operation before it returns to OFF.)
NOTE: When changing the batteries, you must use the factory code to open. (See back cover.) Passcode will have to be re-programmed.
Delay mode
The lock automatically enters a two-minute Delay Mode after an invalid code has been entered three consecutive times. In this mode, the lock cannot be activated and any key entry will generate an ERROR signal.
Lost combination or keys
IMPORTANT: Please read the following instructions carefully. For your protection, combinations CANNOT be issued by telephone request. To order replacement keys and/or combinations, it is essential that you MAIL the items listed in each category below to Sentry Group with your order. If you need assistance in preparing your order, or wish to purchase via credit card (Visa/Mastercard only), please call Sentry Customer Service toll-free Monday–Friday at 1-800-828-1438, 8:00am - 6:00pm E.S.T.
To purchase on-line, please visit www.sentrysafe.com/CustomerService
Lost combination: First, find your safe's Model and Serial Number. The Serial Number is in this packet, and is also printed on the small label beside the door hinge (outside). Send a copy of this, a notarized letter (last name must be different than that of owner) stating you are the safe's owner, and a check or money order for \$12.00* (U.S. funds) to: Sentry Group, Dept. 200, 882 Linden Avenue, Rochester, NY 14625-2784 USA.
If using a credit card (Visa/Mastercard only), call 1-800-828-1438 and fax your Model and Serial number with the notarized letter to 585-381-2940. Credit card information is not accepted by fax, mail or e-mail.
Lost keys: To obtain replacement keys, find your safe's Model and Serial Number. The Serial Number is in this packet, and is also printed on the small label beside the door hinge (outside).
Order by Mail: Send the Model and Serial number along with check or money order (U.S. funds) for \$12.00* to: Sentry Group, Dept. 200, 882 Linden Avenue, Rochester, NY 14625-2784 USA.
* NOTE: Prices subject to change without prior notification.
IMPORTANT: For assistance in the event of lost keys or combination, or for information on ordering extra organizational features, please call us toll-free Monday-Friday (8:00am- 6:00pm E.S.T.) at 1-800-828-1438, or visit us on-line at www.sentrysafe.com.
Order by Internet: Visit our website at www.sentrysafe.com. Go to our Customer Service Section.
* NOTE: Prices subject to change without prior notification.
Express Delivery is available for keys and/or combinations for an additional charge. Visit our website for details at www.sentrysafe.com/customer service.
ETL verified fire claim
This Sentry Fire-Safe® branded product has been verified by ETL SEMKO to meet manufacturer's specification for fire resistance 1400°F for 30 minutes endurance 1400°F.
Lifetime after-fire replacement guarantee
If a Sentry Fire-Safe® product is damaged by fire at any time while still owned by you (the original owner), Sentry Group will ship a replacement free of charge, if you send the following to Sentry Group, 882 Linden Avenue, Rochester, NY 14625-2784 USA:
- Your name and address;
- A description of the fire, with the model number and a photo of the burned unit, and a copy of the report from the fire department, insurance or police.
100% Customer Satisfaction Guarantee
If at any time during the first ninety (90) days after the date of purchase, you are not entirely satisfied with this Sentry Group product, please call us toll-free at 1-800-828-1438. Dated receipt required as proof of purchase. We'll solve the problem or ensure that you receive a replacement or full refund.
--The employees of Sentry Group
1 Year Limited Warranty
This product is warranted to the original purchaser for one year (1) from the date of purchase to be free of structural and mechanical defects due to faulty materials or workmanship. If a structural or mechanical defect occurs during the warranty period, Sentry Group (also referred to as "Sentry") will repair or replace the defective part(s) or product, at its option, at no charge upon proof of purchase validation.
For Warranty Service (North America only)
Please notify the Sentry Group Customer Service Department of the problem by phone (at 1-800-828-1438 or 585-381-4900, 9 a.m. through 6 p.m. EST, M-F) or in writing to Sentry Group, 882 Linden Avenue, Rochester, New York 14625-2784, U.S.A. Do not ship your product back to Sentry Group. The Sentry Group Customer Service Department will decide either to have the product returned, repaired, replaced, or refund your money.
Proof of Purchase Date
For all Sentry Group products, a dated store receipt is required as proof of purchase.
Limitations Of Warranty
- Sentry's responsibility and the buyer's exclusive remedy under this warranty are limited to the repair or replacement of the defective part(s) or product, at Sentry's option. In no event shall Sentry be liable for any incidental or consequential damages (including but not limited to loss or damage due to fire, water, theft or vandalism) to persons or property resulting from the breach of this or any other express or implied warranty applicable to the product. Some states, provinces and countries do not allow the exclusion or limitation of incidental or consequential damages, so the above limitation or exclusion may not apply to you.
- Except as may be otherwise provided by applicable law, Sentry disclaims any and all other covenants and warranties, whether written or oral, express or implied, including, but not limited to, the implied warranties of merchantability and fitness for a particular purpose. The implied warranty applicable to this product shall not exceed the standard one year limited
warranty. Some states, provinces and countries do not allow disclaimers of implied warranties or limitations on their duration, so the above disclaimer and/or limitation may not apply to you.
-
Sentry is not responsible for damage, defects, or malfunction to the product incurred during shipment. The product was packed in accordance with Interstate Commerce Commission specifications, and with reasonable handling, should be in good condition on arrival. Any claims for shipping damage should be made directly to the carrier.
-
These warranties do not cover defects, damage, or malfunction caused by modification, alteration, repair or service of the product by anyone other than Sentry or its authorized representative, or caused by physical abuse to or misuse of the product. Sentry specifically disclaims coverage for damage that may result from the product being bolted-down and/or damage that may result from the improper handling of the product during moving and/or installation.
-
No Sentry agent, employee, representative, dealer or retailer has the authority to make or imply any representation, promise or agreement which in any way varies the terms of this Limited Warranty.
-
This Limited Warranty shall apply to new, first quality Sentry products and shall not apply to factory seconds or previously-owned products, or products previously damaged by such events including but not limited to, fire, flood, earthquake, burglary, handling by movers or installers.
All of the provisions of this Limited Warranty are separate and severable. If any provision is held invalid and unenforceable, such determination shall not affect the validity or enforceability of the other provisions. This Limited Warranty gives you specific legal rights, and you may also have other rights which vary from state to state, province to province, or country to country.
Water-resistant
ETL Verified for up to 12 inches of water for up to 72 hours. Must be bolted to ensure water-tight seal, bolt-down hardware included.
natural_image
Diagram of a mechanical component with circular housing and internal grid pattern (no text or symbols)
TW8-331 Modèle
natural_image
Simple line drawing of two vertical panels with horizontal lines and a zigzag pattern, no text or symbols present.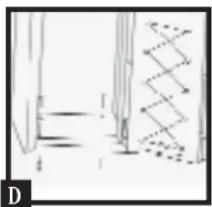
natural_image
Pure mechanical diagram showing a bracket and spring mechanism without any text or symbolsnatural_image
Diagram of a mechanical component with circular housing and internal grid pattern (no text or symbols)
TW8-331 Modelo
natural_image
Simple line drawing of a doorway with vertical bars and a zigzag pattern on the right side (no text or symbols)
natural_image
Pure technical line drawing of a mechanical assembly without any text, numbers, or symbols(Electronic Lock Models)
Code de fabricant
- Fire-Safe® BRAND Security Safe Owner's Manual
- Thank you for purchasing this Sentry Fire-Safe® product.
- For safes with electronic lock:
- Model TC8-331
- Battery Installation
- NOTE: Non-alkaline and rechargeable batteries ARE NOT RECOMMENDED.
- Model TW8-331
- For all models, test first with door open!
- NOTE: All electronic lock units have been provided with an override key (skeleton key). Some electronic units are equipped with a handle OR electronic lock and key.
- Using the keypad
- Models TC8-331 and TW8-331
- Access Codes
- Programming a user code
- Programming a passcode
- Unlocking
- FloodGuard™
- Water-resistance protection
- Instructions for floor mounting
- This kit contains:
- Required tools:
- Instructions
- For safes with a fingerprint swipe lock
- IMPORTANT
- To open your safe for the first time
- Battery installation:
- To install batteries:
- Low battery notice
- First time use
- Open unit first, then test with door open!
- To unlock safe with a fingerprint:
- To lock safe:
- Tips for fingerprint programming and usage
- Best finger for programming
- Swiping fingerprints
- Skin condition
- Environmental conditions
- Cleaning the sensor
- Programming the manager code
- To add:
- To delete:
- Enrolling manager fingerprints
- Errors while enrolling fingerprints:
- Programming users
- To delete all programmed memory
- Beeper on/off
- Time out
- Delay Mode
- WARNING
- Icon identification
- ERR (Error) indicates one of the following:
- PRG (Program)
- \* (Asterisk) indicates one of the following:
- Box
- Padlock
- Unlocked Lock
- Battery
- Finger
- For all models
- Key override
- Signals
- Red (Error) LED + three beeps indicates one of the following:
- Green (Proceed) LED + single beep occurs
- Green LED only
- Yellow LED - Low Battery Indicator
- Lost combination or keys
- ETL verified fire claim
- Lifetime after-fire replacement guarantee
- 100% Customer Satisfaction Guarantee
- Year Limited Warranty
- Water-resistant
- TW8-331 Modèle
- TW8-331 Modelo
Brand : SentrySafe
Model : TC8-331
Category : Safe