
V10 - Computer cooling COOLER MASTER - Free user manual and instructions
Find the device manual for free V10 COOLER MASTER in PDF.


| Product Type | CPU Cooler |
| Brand | Cooler Master |
| Model | V10 |
| Compatible Sockets | Intel LGA 1700, 1200, 115x; AMD AM5, AM4 |
| Cooling Type | Air Cooling (Tower) |
| Fan Size | 120 mm |
| Fan Speed | 600 - 2000 RPM |
| Noise Level | 8 - 30 dBA |
| Airflow | 60 CFM max |
| Dimensions (W x H x D) | 150 x 160 x 120 mm |
| Weight | 850 g |
| Power Supply | 12V DC, 0.25A (fan) |
| Main Features | Direct contact heatpipes, aluminum fins, PWM fan control |
| Maintenance & Cleaning | Clean with compressed air or soft brush; avoid water |
| Safety Precautions | Ensure proper mounting; avoid contact with fan blades while running |
| Spare Parts & Repairability | Replacement fan available; thermal paste included |
| Warranty | 2 years |
Frequently Asked Questions - V10 COOLER MASTER
User questions about V10 COOLER MASTER
0 question about this device. Answer the ones you know or ask your own.
Ask a new question about this device
Download the instructions for your Computer cooling in PDF format for free! Find your manual V10 - COOLER MASTER and take your electronic device back in hand. On this page are published all the documents necessary for the use of your device. V10 by COOLER MASTER.
USER MANUAL V10 COOLER MASTER
De LG Bridge software downloaden ....50
SmartShare 50
natural_image
Illustration of a hand pressing on a tablet with two arrows indicating left and right movement (no text or symbols)
natural_image
Blank white rectangular image with selection handles and a small 'X' icon in the top-left corner (no text or symbols on main content)Second screen
natural_image
Smartphone home screen with navigation buttons and a red arrow pointing to a yellow square button (no readable text or symbols)

OPMERKING
natural_image
Diagram of a device with a button and arrow indicating a process or operation (no text or symbols present)natural_image
Diagram of a smartphone rear panel with an inset showing a close-up of the internal components (no text or symbols)natural_image
3D diagram of a smartphone showing front and back panels with no text or symbolsDe batterij opladen
natural_image
Diagram of a smartphone with cable and connector, showing a close-up of its cable being inserted (no text or symbols present)
OPMERKING
natural_image
Diagram of a smartphone showing internal components and a close-up view of the device's internal structure (no text or symbols present)natural_image
Hand pointing at a red circular button on a gray square background (no text or symbols)natural_image
Hand pointing at a circular button with red dots, no text or symbols presentSlepen
natural_image
Illustration of two hands interacting with a touchscreen icon, one pointing at a red arrow (no text or symbols)Vegen of schuiven
natural_image
Illustration of two hands pointing at a tablet screen with bidirectional arrows indicating left and right movement (no text or symbols)Dubbeltikken
natural_image
Hand pointing at a red circular button on a gray square background (no text or symbols)natural_image
Hand pointing at a double-headed arrow symbol (no text or labels)
natural_image
Hand holding a red directional arrow icon (no text or symbols)Google-account instellen
natural_image
Hand pointing at a red downward arrow on a gray background (no text or symbols)
De LG Bridge software download
Applications Applications
Opties in cameramodus


VERKLARING VAN OVEREENSTEMMING
The Ground Truth image displays a single, solid horizontal line. According to Rule 2 (UNDERSCORE & LINE RULES), this is a stylistic or background line, not a placeholder underscore. Therefore, the OCR result must ignore it and output nothing or only meaningful text. The provided OCR content is "____", which consists of four underscores. This is an incorrect interpretation of the line as a placeholder, violating the rule that stylistic lines must be ignored. The OCR has hallucinated placeholder underscores where none should exist in the GT. Hence, the OCR result is inconsistent with the Ground Truth.
[Non-Text]
......
The Ground Truth image displays a single, solid horizontal line, which is a stylistic or background element (like a rule line on paper). According to Rule 2, such lines must be ignored by the OCR result. The OCR content provided is "", which consists of no characters. Since the OCR output correctly ignores the stylistic line, it complies with Rule 2. Therefore, the OCR result is consistent with the Ground Truth.
The following table provides the information in a tabular format:
Theorem 1.2. (A) Let (f,f) be a finite field and let (x,y) be the set of all elements of (f,f) . Then
[Non-Text]
(1) = = = = = = = = = = = = = = = =
(一)本次股东大会的召集和召开程序
[Non-Text]
Theorem 1.2. (A) Let be a finite field and let (x) be the set of all elements of such that x (x) . Then
[Non-Text]
(1) AD = AC = B^ (2) BD = BF = C^ (3) AD = AC = B^ (4) BC = BF = C^
The Ground Truth image displays a single, solid horizontal line. According to Rule 2 (UNDERSCORE & LINE RULES), this is a stylistic or background line, not a placeholder underscore. Therefore, the OCR result must ignore it and output nothing or only meaningful text. The provided OCR content is "____", which consists of four underscores. This is an incorrect interpretation of the line as a placeholder, violating the rule that stylistic lines must be ignored. The OCR has hallucinated placeholder underscores where none exist in the GT. Hence, the OCR result is inconsistent with the Ground Truth.
The Ground Truth image displays a single, solid horizontal line. According to Rule 2 (UNDERSCORE & LINE RULES), this is a stylistic or background line, not a placeholder underscore. Therefore, the OCR result must ignore it. The provided OCR content is "____", which consists of four underscores. This is an incorrect interpretation of the line as a placeholder, violating the rule that stylistic lines must be ignored. The OCR has hallucinated text (underscores) where none should exist. Hence, the result is inconsistent with the Ground Truth.
(1) AD = BD = 1
[Non-Text]
The Ground Truth image displays a single, solid horizontal line, which is a stylistic or background element (like a rule line on paper). According to Rule 2, such lines must be ignored by the OCR result. The OCR content provided is "", which consists of no characters. Since the OCR output correctly ignores the stylistic line, it complies with Rule 2. Therefore, the OCR result is consistent with the Ground Truth.
The Ground Truth image displays a single, solid horizontal line. According to Rule 2 (UNDERSCORE & LINE RULES), this is a stylistic or background line, not a placeholder underscore. Therefore, the OCR result must ignore it and output nothing or only meaningful text. The provided OCR content is "____", which consists of four underscores. This is an incorrect interpretation of the line as a placeholder, violating the rule that stylistic lines must be ignored. The OCR has hallucinated placeholder underscores where none should exist in the GT. Hence, the OCR result is inconsistent with the Ground Truth.
[Non-Text]
The Ground Truth image displays a single, solid horizontal line. According to Rule 2 (UNDERSCORE & LINE RULES), this is a stylistic or background line, not a placeholder underscore. Therefore, the OCR result must ignore it and output nothing or only meaningful text. The provided OCR content is "____", which consists of four underscores. This is an incorrect interpretation of the line as a placeholder, violating the rule that stylistic lines must be ignored. The OCR has hallucinated placeholder underscores where none should exist in the GT. Hence, the OCR result is inconsistent with the Ground Truth.
(1) AD = BD = 1 ,故 AC = DE = 1
The Ground Truth image displays a single, solid horizontal line. According to Rule 2 (UNDERSCORE & LINE RULES), this is a stylistic or background line, not a placeholder underscore. Therefore, the OCR result must ignore it and output nothing or only meaningful text. The provided OCR content is "____", which consists of four underscores. This is an incorrect interpretation of the line as a placeholder, violating the rule that stylistic lines must be ignored. The OCR has hallucinated placeholder underscores where none should exist in the GT. This adheres to the strict requirement to ignore such lines.
......
Smart cleaning....103
Applications 104
DÉCLARATION DE CONFORMITÉ .....116
natural_image
Illustration of a hand holding a smartphone with a magnified inset showing the close-up of the screen (no text or symbols present)Second screen
natural_image
Smartphone home screen with navigation buttons and a red arrow pointing to a yellow square button (no readable text or symbols)

REMARQUE
natural_image
Diagram of a device with a button and arrow indicating a process or operation, showing no text or symbols.natural_image
Diagram of a smartphone showing internal components and a close-up view of the device's internal structure (no text or symbols present)natural_image
3D diagram of a smartphone showing front panel and back cover with dashed red boundary lines (no text or symbols)natural_image
Diagram of a smartphone cable connector with a magnified inset showing the cable being inserted (no text or symbols present)
REMARQUE
natural_image
Diagram of a smartphone showing internal components and a close-up view of the screen (no text or symbols present)Appuyer ou effleurer
natural_image
Hand pointing at a red circular button on a gray square background (no text or symbols)natural_image
Hand pointing at a circular button with red dots, no text or symbols presentGlissez
natural_image
Illustration of two hands pointing at a circular button with a red arrow, no text or symbols presentnatural_image
Illustration of two hands pointing at a screen with bidirectional arrows indicating movement (no text or symbols)Appuyez deux fois
natural_image
Hand pointing at a red circular button on a gray square background (no text or symbols)natural_image
Hand pointing at a double-headed arrow symbol (no text or labels)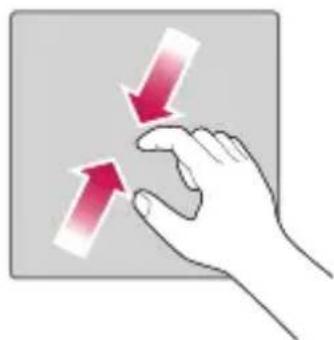
natural_image
Hand holding a finger with two red arrows pointing downward (no text or symbols)natural_image
Hand pointing at a red downward arrow on a gray background (no text or symbols)
1 Zone de paramètres rapides
2 Notifications
3 EFFACER
Applications Applications


Autofocus multipoint
DÉCLARATION DE CONFORMITÉ
The Ground Truth image displays a single, solid horizontal line. According to Rule 2 (UNDERSCORE & LINE RULES), this is a stylistic or background line, not a placeholder underscore. Therefore, the OCR result must ignore it and output nothing or only meaningful text. The provided OCR content is "____", which consists of four underscores. This is an incorrect interpretation of the line as a placeholder, violating the rule that stylistic lines must be ignored. The OCR has hallucinated placeholder underscores where none should exist in the GT. Hence, the OCR result is inconsistent with the Ground Truth.
[Non-Text]
......
The Ground Truth image displays a single, solid horizontal line, which is a stylistic or background element (like a rule line on paper). According to Rule 2, such lines must be ignored by the OCR result. The OCR content provided is "", which consists of no characters. Since the OCR output correctly ignores the stylistic line, it complies with Rule 2. Therefore, the OCR result is consistent with the Ground Truth.
The following table provides the information in a tabular format:
Theorem 1.2. (A) Let (f,f) be a finite field and let (x,y) be the set of all elements of (f,f) . Then
[Non-Text]
(1) = = = = = = = = = = = = = = = =
Theorem 1.2. (A) Let be a finite field and let (x) be the set of all elements of such that x (x) . Then
[Non-Text]
(1) AD = AC = B^ (2) BD = BD = C^ (3) AD = AD = BC = C^
The Ground Truth image displays a single, solid horizontal line. According to Rule 2 (UNDERSCORE & LINE RULES), this is a stylistic or background line, not a placeholder underscore. Therefore, the OCR result must ignore it and output nothing or only meaningful text. The provided OCR content is "____", which consists of four underscores. This is an incorrect interpretation of the line as a placeholder, violating the rule that stylistic lines must be ignored. The OCR has hallucinated placeholder underscores where none should exist in the GT. Hence, the OCR result is inconsistent with the Ground Truth.
The Ground Truth image displays a single, solid horizontal line. According to Rule 2 (UNDERSCORE & LINE RULES), this is a stylistic or background line, not a placeholder underscore. Therefore, the OCR result must ignore it. The provided OCR content is "____", which consists of four underscores. This is an incorrect interpretation of the line as a placeholder, violating the rule that stylistic lines must be ignored. The OCR has hallucinated text (underscores) where none should exist. Hence, the result is inconsistent with the Ground Truth.
(1) AD = BD = 1
[Non-Text]
The Ground Truth image displays a single, solid horizontal line, which is a stylistic or background element (like a rule line on paper). According to Rule 2, such lines must be ignored by the OCR result. The OCR content provided is "", which consists of no characters. Since the OCR output correctly ignores the stylistic line, it complies with Rule 2. Therefore, the OCR result is consistent with the Ground Truth.
The Ground Truth image displays a single, solid horizontal line. According to Rule 2 (UNDERSCORE & LINE RULES), this is a stylistic or background line, not a placeholder underscore. Therefore, the OCR result must ignore it and output nothing or only meaningful text. The provided OCR content is "____", which consists of four underscores. This is an incorrect interpretation of the line as a placeholder, violating the rule that stylistic lines must be ignored. The OCR has hallucinated placeholder underscores where none should exist in the GT. Hence, the OCR result is inconsistent with the Ground Truth.
[Non-Text]
The Ground Truth image displays a single, solid horizontal line. According to Rule 2 (UNDERSCORE & LINE RULES), this is a stylistic or background line, not a placeholder underscore. Therefore, the OCR result must ignore it and output nothing or only meaningful text. The provided OCR content is "____", which consists of four underscores. This is an incorrect interpretation of the line as a placeholder, violating the rule that stylistic lines must be ignored. The OCR has hallucinated placeholder underscores where none should exist in the GT. This adheres to the strict requirement to ignore such lines.
[Non-Text]
About this user guide
Thank you for choosing LG. Please carefully read this user guide before using the device for the first time to ensure safe and proper use.
• Always use genuine LG accessories. The supplied items are designed only for this device and may not be compatible with other devices.
- This device is not suitable for people who have a visual impairment due to the touchscreen keyboard.
- Descriptions are based on the device default settings.
- Default apps on the device are subject to updates and support for these apps may be withdrawn without prior notice. If you have any questions about an app provided with the device, please contact a LG Service Centre. For user-installed apps, please contact the relevant service provider.
- Modifying the device's operating system or installing software from unofficial sources may damage the device and lead to data corruption or data loss. Such actions will violate your LG licence agreement and void your warranty.
- Some contents and illustrations may differ from your device depending on the region, service provider, software version, or OS version, and are subject to change without prior notice.
- Software, audio, wallpaper, images, and other media supplied with your device are licensed for limited use. If you extract and use these materials for commercial or other purposes, you may be infringing copyright laws. As a user, you are fully are entirely responsible for the illegal use of media.
• Additional charges may apply for data services, such as messaging, uploading, downloading, auto-syncing and location services. To avoid additional charges, select a data plan suitable to your needs. Contact your service provider to obtain additional details.
Instructional notices
 WARNING WARNING | Situations that could cause injury to yourself and others, or damage to phone or other property. |
 NOTE NOTE | Notices or additional information. |
Table of contents
Guidelines for safe and efficient use .....5
Features you will love .... 12
Dual window 13
Activating the Dual window 13
Using the Dual window 13
Fingerprint ....14
Registering your fingerprint .....14
LG Health 15
Mini view ......15
Second screen 16
Feature of Second screen 16
Turning on and off Second screen feature ..17
Smart Notice ....17
Snap movie ....18
QSlide 19
Using QSlide 19
QuickMemo+ 20
Using Capture+ 20
Viewing the saved memo 20
QuickRemote 21
Set up QuickRemote 21
Universal remote 21
Using QuickRemote 21
Quick Share 22
Basics 23
Accessories 24
Phone layout 25
Turning Your Phone On and Off ......27
Installing the Nano SIM card and battery 27
Charging the battery 29
Optimizing battery life 29
Inserting the memory card ....30
Removing the memory card ....31
Touch screen tips ......31
Tap or touch 31
Touch and hold....32
Drag....32
Swipe or slide 32
Double-tap 33
Pinch-to-Zoom 33
Google account setup ....34
Creating your Google account ....34
Signing into your Google account....34
Locking and unlocking the device .....35
Fingerprint....35
KnockON 35
Knock Code 35
Changing the screen lock method....36
Smart Lock....36
Home screen 37
Getting to Know the Home Screen ....37
Returning to recently-used applications .....38
Customizing the Home screen 39
Notifications panel 40
Capturing a screenshot 42
On-screen keyboard 43
Using the keypad and entering text .....43
Entering special characters......43
To split or merge the keyboard 44
Transferring data between a PC and the device 44
Transferring data using USB connection .....44
Transferring data using wireless connection4.5
LG Bridge 45
Features of LG Bridge 45
To download the LG Bridge software .....46
SmartShare 46
Using SmartShare 46
Enjoying content from nearby devices on your
phone 46
Apps 47
Installing or uninstalling apps ....48
To open the Play Store app ....48
To open a screen with details about an app48
To uninstall applications ....48
Calls 49
Making a call 49
Calling your contacts 49
Answering and rejecting a call ....49
Making a second call 50
Viewing your call logs 50
Change your call settings ....50
Contacts 51
Searching for a contact 51
Adding a new contact 51
Favourites contacts 52
Creating a group 52
Messaging ....53
Sending a message 53
Conversation view 53
Changing your messaging settings....53
Camera 54
Taking a photo 54
Auto Mode on the viewfinder ....55
Manual Camera Mode on the viewfinder .....57
Manual Video Mode on the viewfinder .....58
Snap Video Mode on the viewfinder .....58
Interval shot 59
Burst shot 59
Gesture shot 59
Gesture View 60
Multi-point Auto Focus 60
8X Zooming....60
Once you have taken a photo 60
Recording a video....61
After recording a video 61
Gallery 62
Viewing pictures 62
Editing photos 62
Setting wallpaper 62
Zooming in and out 63
Playing a video 63
Editing videos 64
Deleting photos/videos 64
E-mail......65
Adding an account 65
Working with account folders......65
Composing and sending email 65
Changing an email general settings ......66
Deleting an email account ....66
Music 67
Playing a song 67
Music player options 67
Clock 69
Alarms 69
Timer....69
World clock 69
Stopwatch 70
Calculator 70
Calendar 70
Voice Recorder 71
Recording a sound or voice 71
Downloads 71
FM Radio 71
LG Backup....72
About backing up and restoring device data 72
To backup your device data 72
Google apps....73
Settings 75
Access the Settings menu 76
Networks Settings 76
Wi-Fi 76
Wi-Fi Direct 77
Bluetooth 77
Mobile data 78
Call 79
NFC 80
Android Beam 81
SmartShare Beam 81
Media server 82
Miracast 82
LG AirDrive 82
Printing 83
USB tethering 83
Wi-Fi hotspot 83
Bluetooth tethering....84
Airplane mode 84
Mobile networks 84
VPN 84
Sound & notification settings .....85
Display settings 86
Second screen 86
Home screen 86
Lock screen 87
Home touch buttons 87
More display settings 88
General settings 88
Language & keyboard 88
Location 89
Accounts & sync 89
Cloud 90
Users 90
Accessibility 90
Mini view 91
Shortcut key 92
Fingerprints & security 92
Smart settings 93
Quick Cover case 93
Dual window 93
Date & time 93
Storage....93
Battery & power saving 94
Smart cleaning 94
Apps 95
Default message app 95
Backup & reset 95
About phone 95
Appendix 96
Phone software update 97
FAQ 98
Anti-Theft Guide ....101
More information 102
Open source software notice information1.02
Trademarks 102
DivX HD 103
Dolby Digital Plus 103
Laser safety statement 104
Declaration of conformity 105
Contact office for compliance of this product 105
Wi-Fi (WLAN) 105
Guidelines for safe and efficient use
Please read these simple guidelines. Not following these guidelines may be dangerous or illegal.
Should a fault occur, a software tool is built into your device that will gather a fault log. This tool gathers only data specific to the fault, such as signal strength, cell ID position in sudden call drop and applications loaded. The log is used only to help determine the cause of the fault. These logs are encrypted and can only be accessed by an authorised LG Repair centre should you need to return your device for repair.
Exposure to radio frequency energy
Radio wave exposure and Specific Absorption Rate (SAR) information. This mobile phone model LG-H960A has been designed to comply with applicable safety requirements for exposure to radio waves. These requirements are based on scientific guidelines that include safety margins designed to assure the safety of all persons, regardless of age and health.
- The radio wave exposure guidelines employ a unit of measurement known as the Specific Absorption Rate, or SAR. Tests for SAR are conducted using standardised methods with the phone transmitting at its highest certified power level in all used frequency bands.
- While there may be differences between the SAR levels of various LG phone models, they are all designed to meet the relevant guidelines for exposure to radio waves.
- The SAR limit recommended by the International Commission on Non-Ionizing Radiation Protection (ICNIRP) is 2 W/kg averaged over 10 g of tissue.
- The highest SAR value for this model phone tested for use at the ear is 0.590 W/kg (10 g) and when worn on the body is 0.297 W/Kg (10 g).
- This device meets RF exposure guidelines when used either in the normal use position against the ear or when positioned at least 1.5 cm away from the body. When a carry case, belt clip or holder is used for body-worn operation, it should not contain metal and should position the product at least 1.5 cm away from your body. In order to transmit data files or messages, this device requires a quality connection to the network. In some cases, transmission of data files or messages may be delayed until such a connection is available.
Ensure the above separation distance instructions are followed until the transmission is completed.
Product care and maintenance
- Always use genuine LG batteries, chargers and accessories approved for use with this particular phone model. The use of any other types may invalidate any approval or warranty applying to the phone and may be dangerous.
- Some contents and illustrations may differ from your device without prior notice.
- Do not disassemble this unit. Take it to a qualified service technician when repair work is required.
- Repairs under warranty, at LG's discretion, may include replacement parts or boards that are either new or reconditioned, provided that they have functionality equal to that of the parts being replaced.
- Keep away from electrical appliances such as TVs, radios and personal computers.
- The unit should be kept away from heat sources such as radiators or cookers.
- Do not drop.
- Do not subject this unit to mechanical vibration or shock.
- Switch off the phone in any area where you are required to by special regulations. For example, do not use your phone in hospitals as it may affect sensitive medical equipment.
- Do not handle the phone with wet hands while it is being charged. It may cause an electric shock and can seriously damage your phone.
- Do not charge a handset near flammable material as the handset can become hot and create a fire hazard.
- Use a dry cloth to clean the exterior of the unit (do not use solvents such as benzene, thinner or alcohol).
- Do not charge the phone when it is on soft furnishings.
- The phone should be charged in a well ventilated area.
- Do not subject this unit to excessive smoke or dust.
- Do not keep the phone next to credit cards or transport tickets; it can affect the information on the magnetic strips.
- Do not tap the screen with a sharp object as it may damage the phone.
- Do not expose the phone to liquid or moisture.
- Use accessories like earphones cautiously. Do not touch the antenna unnecessarily.
- Do not use, touch or attempt to remove or fix broken, chipped or cracked glass. Damage to the glass display due to abuse or misuse is not covered under the warranty.
- Your phone is an electronic device that generates heat during normal operation. Extremely prolonged, direct skin contact in the absence of adequate ventilation may result in discomfort or minor burns.
Therefore, use care when handling your phone during or immediately after operation.
- If your phone gets wet, immediately unplug it to dry off completely. Do not attempt to accelerate the drying process with an external heating source, such as an oven, microwave or hair dryer.
- The liquid in your wet phone, changes the colour of the product label inside your phone. Damage to your device as a result of exposure to liquid is not covered under your warranty.
Efficient phone operation
Electronics devices
All mobile phones may receive interference, which could affect performance.
- Do not use your mobile phone near medical equipment without requesting permission. Avoid placing the phone over pacemakers, for example, in your breast pocket.
• Some hearing aids might be disturbed by mobile phones. - Minor interference may affect TVs, radios, PCs etc.
- Use your phone in temperatures between 0 °C and 40 °C, if possible. Exposing your phone to extremely low or high temperatures may result in damage, malfunction, or even explosion.
Road safety
Check the laws and regulations on the use of mobile phones in the area when you drive.
- Do not use a hand-held phone while driving.
- Give full attention to driving.
- Pull off the road and park before making or answering a call if driving conditions so require.
- RF energy may affect some electronic systems in your vehicle such as car stereos and safety equipment.
- When your vehicle is equipped with an air bag, do not obstruct with installed or portable wireless equipment. It can cause the air bag to fail or cause serious injury due to improper performance.
- If you are listening to music whilst out and about, please ensure that the volume is at a reasonable level so that you are aware of your surroundings. This is of particular importance when near roads.
Avoid damage to your hearing

To prevent possible hearing damage, do not listen at high volume levels for long periods.
Damage to your hearing can occur if you are exposed to loud sound for long periods of time. We therefore recommend that you do not turn on or off the handset close to your ear. We also recommend that music and call volumes are set to a reasonable level.
- When using headphones, turn the volume down if you cannot hear the people speaking near you, or if the person sitting next to you can hear what you are listening to.

NOTE
- Excessive sound pressure from earphones and headphones can cause hearing loss.
Glass Parts
Some parts of your mobile device are made of glass. This glass could break if your mobile device is dropped on a hard surface or receives a substantial impact. If the glass breaks, do not touch or attempt to remove it. Stop using your mobile device until the glass is replaced by an authorised service provider.
Blasting area
Do not use the phone where blasting is in progress. Observe restrictions and follow any regulations or rules.
Potentially explosive atmospheres
- Do not use your phone at a refueling point.
- Do not use near fuel or chemicals.
- Do not transport or store flammable gas, liquid or explosives in the same compartment of your vehicle as your mobile phone or accessories.
In aircraft
Wireless devices can cause interference in aircraft.
- Turn your mobile phone off before boarding any aircraft.
- Do not use it on the ground without permission from the crew.
Children
Keep the phone in a safe place out of the reach of small children. It includes small parts which may cause a choking hazard if detached.
Emergency calls
Emergency calls may not be available on all mobile networks. Therefore you should never depend solely on your phone for emergency calls. Check with your local service provider.
Battery information and care
- You do not need to completely discharge the battery before recharging. Unlike other battery systems, there is no memory effect that could compromise the battery's performance.
- Use only LG batteries and chargers. LG chargers are designed to maximise the battery life.
- Do not disassemble or short-circuit the battery.
- Keep the metal contacts of the battery clean.
- Replace the battery when it no longer provides acceptable performance. The battery pack may be recharged hundreds of times before it needs replacing.
- Recharge the battery if it has not been used for a long time to maximise usability.
- Do not expose the battery charger to direct sunlight or use it in high humidity, such as in the bathroom.
- Do not leave the battery in hot or cold places, as this may deteriorate battery performance.
- Risk of explosion if battery is replaced by an incorrect type. Dispose of used batteries according to the instructions.
- If you need to replace the battery, take it to the nearest authorised LG Electronics service point or dealer for assistance.
- Always unplug the charger from the wall socket after the phone is fully charged to save unnecessary power consumption of the charger.
- Actual battery life will depend on network configuration, product settings, usage patterns, battery and environmental conditions.
- Make sure that no sharp-edged items such as animal's teeth or nails, come into contact with the battery. This could cause a fire.
- Power Consumption (Networked Standby Mode) : 0.35 W
Features you will lover eat
Dual window
The Dual window function splits the screen to enable multi-tasking, drag and drop interaction, auto-linking, and recently used apps.
Activating the Dual window
1 Tap ○ > ⏻ > ⚙ > General tab > Dual window.
2 Tap ON to toggle it On.
- Checkmark the Auto-open checkbox to automatically open the Dual window function when you tap a link on the full screen or tap an email image attachment.
Using the Dual window
1 Tap > Dual window.
NOTE
- While viewing an app, you can tap the □ > Dual window to automatically set that app in the top window, then select the second app.
2 Tap the app icon you want to use. The first app you tap opens in a window at the top of the screen. The second app opens in the bottom window.
3 Tap a window to select and use it.
- A blue box appears around the selected window with a blue semicircle handle between the windows.
- Drag the blue handle to change the window sizes (one larger and one smaller).
4 Tap 📋 to access the Dual window options.
Fingerprint
The Fingerprint feature allows you to place a finger on the Power/Lock Key to unlock screen or see locked content.
Registering your fingerprint
1 Tap ○ > ⚙ > 📋 > General tab > Fingerprints & security > Fingerprints.
2 You need to set the secure screen lock before registering fingerprint. The lock will be used as an alternative method for fingerprints.
3 Place your finger on the Power/Lock Key.

4 Lift your finger when the device vibrates and then place it on the Power/Lock Key again. Repeat this action using the same finger until the fingerprint is registered.

NOTE
• Make sure that your fingers and the Power/Lock Key are clean and dry.
- Moisture, lotions, sweat, oils, cut or dry skin might affect fingerprint recognition. Certain activities can also temporarily affect fingerprint recognition, including exercising, showering, swimming, cooking or other conditions or changes that affect your fingerprint.
- Cover the Power/lock Key completely. don't press too quickly, hardly move your finger while finger is scanning.
- As you use the fingerprint, it will continue to learn and improve recognition of your fingerprint.
LG Health
The LG Health helps you manage your health and maintain good exercise habits by tracking logs and competing with people.
1 Tap ○ > ➕ .
2 Read and agree to the terms and conditions.
3 On the Profile and goal page, enter your profile information and tap SAVE.
4 Use the options below to begin tracking activity.

NOTE
- This feature is provided for user convenience. Please use for reference only.
Mini view
To shrink the screen for use with one hand, swipe left or right across the Home touch buttons.
To close the Mini view, tap ✗.

natural_image
Illustration of a tablet with two finger buttons and directional arrows, no text or symbols present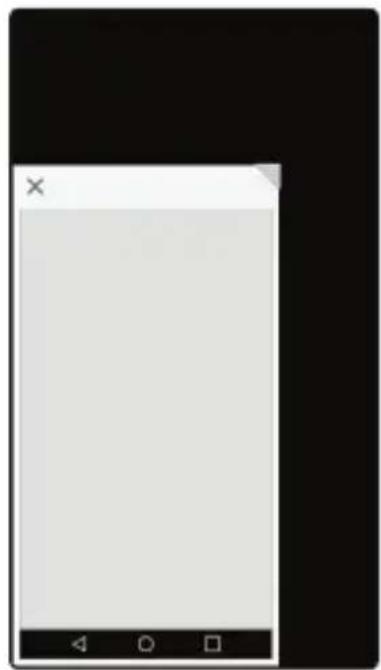
natural_image
Blank white rectangular image with selection handles and a small 'X' icon in the top-left corner (no text or symbols on main content)Second screen
When the home main is turned off, you can see the useful information such as weather, date, time, battery status and notifications.
Feature of Second screen
- You can set the function on the second screen when main screen is turned on. (Recent apps, App shortcuts, Music Player, Quick contacts, Upcoming plans and Signature)
- You can see notifications and use the function via second screen while you are use the entire screen apps.
- You can use the control panel during take a picture or recording.
• To turn on/off the second screen, filp over the device.

Turning on and off Second screen feature
You can turn on and off the Second screen feature and select what to display.
- Tap ○ > ⏻ > 📋 > Display tab > Second screen.
| Main screen is ON Provide the useful function for multi tasking. |
| Main screen is OFF Always show the useful information and provide quick launch of frequently used functions. |
Smart Notice
Improve your lifestyle with Smart Notice cards.
These cards provide customized suggestions based on the time of day, your location, and how you use your phone.
- Touch and hold the empty part of the Home screen > Widgets > Smart Notice.
Snap movie
You can make a story movie using short videos.
1 Tap ○ > ➕ >
2 Tap to record for three seconds scene.
OR
Touch and hold 📄 to record for desired time.
3 Repeat this action.

NOTE
• Movies can be stored for up to one minute.
4 After you are done scene, tap SAVE.

NOTE
- You can edit for various video effects and background music in Gallery.
QSlide
From any screen, use the Notification panel to easily access and use the Notepad, Calendar, Calculator, and more with QSlide.
Using QSlide
1 Touch and slide the status bar downward > tap QSlide.

NOTE
- While using applications that support QSlide, tap : > QSlide. The function is displayed as a small window on your screen.
2 Using the following options.
| 1 | Tap to expand the window to full window size. | |
| 2 | Tap to adjust the window's transparency. | |
| 3 | Tap to close the QSlide window. | |
| 4 | Drag to adjust the size of the QSlide window. |
3 You can use and tap the screen under the QSlide windows when the transparency bar is not full.

NOTE
- QSlide can support up to two windows at the same time.
QuickMemo+
The QuickMemo+ feature allows you to create memos.
Using Capture+
You can use Capture+ function to easily and efficiently create memos during a call, with a saved picture or on the current phone screen.
1 Touch and slide the status bar downward and tap.
2 Create a memo using the following options:

Tap to save the memo you've created.

Tap to undo the most recent action.

Tap to redo the most recently deleted action.

Tap to insert text into your memo.

Tap to select the pen type and colour.

Tap to use the eraser to erase the pen marks on the memo.

Tap to crop the image of memo.

Tap to select the share or paper style.
Tap to hide or display the toolbar.

NOTE
- Please use a fingertip while using the QuickMemo+ feature. Do not use your fingernail.
3 Tap to save the current memo to or.

Viewing the saved memo
Tap > > and select the Capture+ album.
QuickRemote
QuickRemote turns your phone into a Universal Remote for your home TV, set-top box and audio system, and more.
Set up QuickRemote
1 Touch and slide the status bar downward and tap >> ADD REMOTE. If you can not see @, tap @checkmark QuickRemote to enable.
OR
Tap ○ > ➕ > tap . +
2 Select the type and brand of the device, then follow the on-screen instructions to configure the device.
Universal remote
You can create your own personalized universal remote and choose where to place all of the buttons.
1 Tap ○ > ➕ ➕ ➕ Universal remote.
2 Enter the remote name.
3 Place the buttons you want on the remote at the desired location.
4 Follow the next step and learn the instructions.
Using QuickRemote
Once you have completed the initial set up, you can easily access the QuickRemote from the Notification panel. Open the Notification panel and use the QuickRemote functions.

NOTE
- The QuickRemote operates the same way as an ordinary remote control infrared (IR) signals. Be careful not to cover the infrared sensor at the top of the phone when you use the QuickRemote function. This function may not be supported depending on the model, the manufacturer or service company.
Quick Share
After take a photo or recroding a video, you can share photos and videos. Tap the appears icon or touch and slide to left the app. Then select the desired apps.
- Tap >> > AUTO mode

natural_image
Smartphone home screen with navigation buttons and a red arrow pointing to a yellow button (no readable text or symbols)

NOTE
- The app appears to the user, arranged as a quick share, depending on the type and frequency.
BasicsBasics
Accessories
These accessories are available for use with the your phone.
- Travel Adaptor
- Quick Start Guide
- Stereo Headset
- USB Cable
- Battery

NOTE
- Items described above may be optional.
- Always use genuine LG accessories. The supplied items are designed only for this device and may not be compatible with other devices.
- The items supplied with the device and any available accessories may vary depending on the region or service provider.
Phone layout


| Power/Lock Key | ·Turn your phone on/off by pressing and holding this key.·Short press to turn on/off the screen. |
| Volume Keys While screen is off:Press Volume Up Key twice to launch Capture+.Press Volume Down Key twice to launch Camera and take a picture.On the Home screen:Control ringer volume.During a call:Control your earpiece volume when playing audio/video.Control volume continuously. | |

NOTE : Proximity Sensor
- When receiving and making calls, the proximity sensor automatically turns the backlight off and locks the touch screen by sensing when the phone is near your ear. This extends battery life and prevents you from unintentionally activating the touch screen during calls.

WARNING
- The NFC antenna for this model is on the back cover. Be careful not to damage the NFC touch point on the phone, which is part of the NFC antenna.

WARNING
- Placing a heavy object on the phone or sitting on it can damage the display and touch screen functions. Do not cover the proximity sensor with screen protectors or any other type of protective film. This could cause the sensor to malfunction.
Turning Your Phone On and Off
Turning your phone on
Press and hold the Power/Lock Key on the back of the phone for a couple of seconds until the screen turns on.
Turning your phone off
1 Press and hold the Power/Lock Key on the back of the phone until the Phone options menu appears.
2 Tap Power off in the Phone options menu.
3 Tap OK to confirm that you want to turn off the phone.
Installing the Nano SIM card and battery
Insert the Nano SIM card provided by the mobile telephone service provider, and the included battery.

WARNING
- Do not insert a memory card into the Nano SIM card slot. If a memory card happens to be lodged in the Nano SIM card slot, take the device to a LG Service Centre to remove the memory card.
1 To remove the back cover, hold the phone firmly in one hand. With your other hand, lift off the back cover with your thumbnail as shown in the figure below.

natural_image
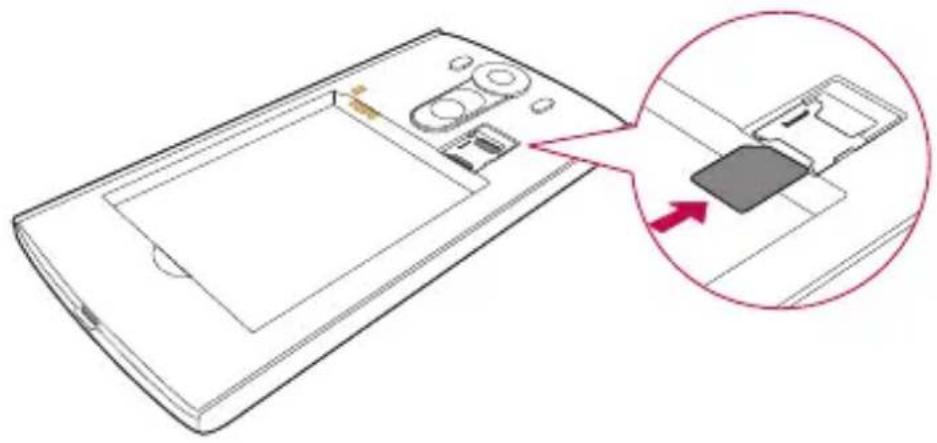
Diagram of a device with a lock and a button, showing a red circular arrow indicating rotation or movement (no text or symbols present)2 Slide the Nano SIM card into the Nano SIM card slot as shown in the figure. Make sure the gold contact area on the card is facing downward.
natural_image
Diagram of a mobile phone casing with internal components and an inset showing a close-up of the internal portion (no text or symbols present)3 Insert the battery.

4 To replace the cover onto the device, align the back cover over the battery compartment and press it down until it clicks into place.
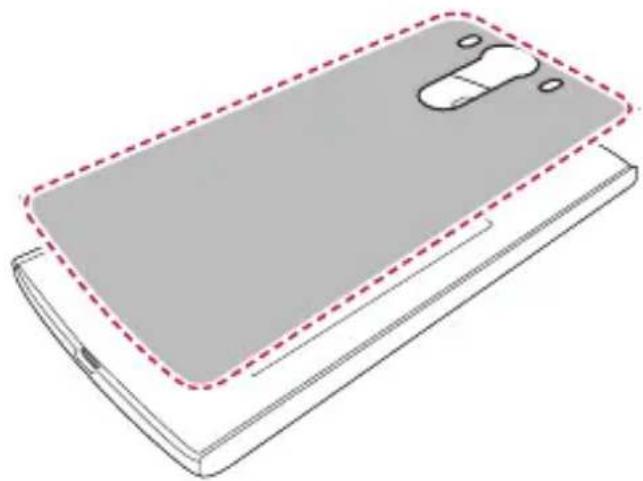
natural_image
Illustration of a smartphone with a gray body and red dashed outline, showing front panel and side cover (no text or symbols)Charging the battery
Charge the battery before using it for first time. Use the charger to charge the battery. A computer can also be used to charge the battery by connecting the phone to it using the USB cable.

WARNING
- Use only LG-approved chargers, batteries and cables. If you use unapproved chargers, batteries or cables, it may cause battery charging delay. Or this can cause the battery to explode or damage the device, which are not covered by the warranty.
The charger connector is located at the bottom of the phone. Insert the charger and plug it into a power outlet.

natural_image
Diagram of a smartphone with cable and connector, showing a close-up of its cable (no text or symbols present)
NOTE
- Do not open the back cover while your phone is charging.
Optimizing battery life
Extend your battery's power by turning off features that you do not need to run constantly in the background. You can monitor how applications and system resources consume battery power.
Extending your phone's battery life:
- Turn off radio communications when you are not using. If you are not using Wi-Fi, Bluetooth® or GPS, turn them off.
- Reduce screen brightness and set a shorter screen timeout.
- Turn off automatic syncing for Gmail, Calendar, Contacts and other applications.
- Some applications you download may consume battery power.
- While using downloaded applications, check the battery charge level.
Inserting the memory card
Your device supports up to a 2TB microSD card. Depending on the memory card manufacturer and type, some memory cards may not be compatible with your device.

WARNING
- Some memory cards may not be fully compatible with the device. Using an incompatible card may damage the device or the memory card, or corrupt the data stored in it.

NOTE
- Frequent writing and erasing of data shortens the lifespan of memory cards.
1 Remove the back cover.
2 Insert a memory card with the gold-coloured contacts facing downwards.

natural_image
Diagram of a smartphone showing internal components and a close-up view of the screen (no text or symbols present)3 Replace the back cover.
Removing the memory card
Before removing the memory card, first unmount it for safe removal.
1 Tap ○ > ⏻ > ⚙ > General tab > Storage > Unmount SD card.
2 Remove the back cover and pull out the memory card.

WARNING
- Do not remove the memory card while the device is transferring or accessing information. Doing so can cause data to be lost or corrupted or damage to the memory card or device. It is not responsible for losses that result from the misuse of damaged memory cards, including the loss of data.
Touch screen tips
Here are some tips on how to navigate on your phone.

NOTE
- Do not press too hard; the tap screen is sensitive enough to pick up a light, yet firm tap.
- Use the tip of your finger to tap the option you want. Be careful not to tap any other buttons.
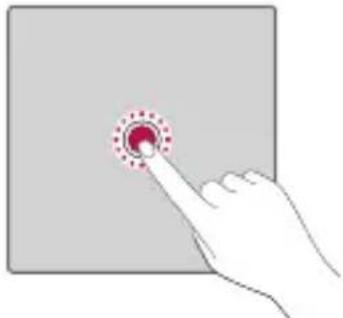
Tap or touch
A single finger tap selects items, links, shortcuts and letters on the on-screen keyboard.

natural_image
Hand pointing at a red circular button on a gray square background (no text or symbols)Touch and hold
Touch and hold an item on the screen by tapping it and not lifting your finger until an action occurs.
natural_image
Hand pointing at a circular button with red dots, no text or symbols presentDrag
Touch and hold an item for a moment and then, without lifting your finger, move your finger on the screen until you reach the target position. You can drag items on the Home screen to reposition them.

natural_image
Illustration of two hands interacting with a touchscreen device, one pointing at a red circular icon (no text or symbols)Swipe or slide
To swipe or slide, quickly move your finger across the surface of the screen, without pausing when you first tap it (so you don't drag an item instead).
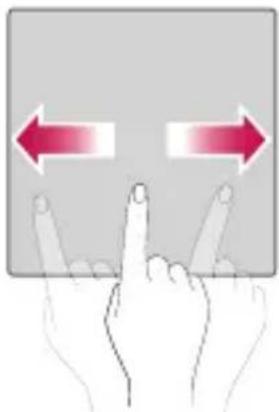
natural_image
Illustration of two hands pointing at a screen with bidirectional arrows indicating movement (no text or symbols)Double-tap
Double-tap to zoom on a webpage or a map.
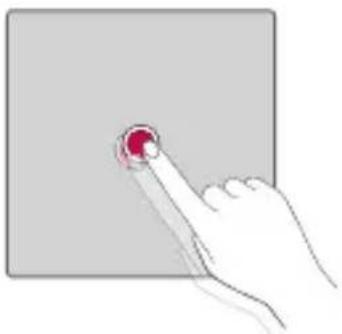
natural_image
Hand pointing at a red button on a gray square background (no text or symbols)Pinch-to-Zoom
Use your index finger and thumb in a pinching or spreading motion to zoom in or out when using the browser, Maps, or when viewing pictures.
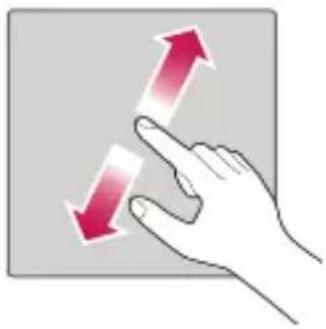
natural_image
Hand pointing at a double-headed arrow symbol (no text or labels)
natural_image
Hand holding a finger with two red arrows pointing downward (no text or symbols)Google account setup
The first time you open a Google application on your phone, you will be required to sign in with your existing Google account. If you do not have a Google account, you will be prompted to create one.
Creating your Google account
1 Tap ○ > ⏻ > ⚙ > General tab > Accounts & sync.
2 Tap ADD ACCOUNT > Google > Or create a new account.
3 Enter your first and last name, then tap NEXT.
4 Enter your phone number for security tap NEXT.
5 Follow the instructions and enter the required and optional information about the account. Wait while the server creates your account.
Signing into your Google account
1 Tap ○ > ⏻ > ⚙ > General tab > Accounts & sync.
2 Tap ADD ACCOUNT > Google.
3 Enter your email address and tap NEXT.
4 Enter your password and tap NEXT.
5 After signing in, you can use Gmail and take advantage of Google services on your phone.
6 Once you have set up your Google account, your phone will automatically synchronise with your Google account on the web (if a data connection is available).
After signing in, your phone will sync with your Google services, such as Gmail, Contacts, and Google Calendar. You can also use Maps, download applications from Play Store, back up your settings to Google servers, and take advantage of other Google services on your phone.
Locking and unlocking the device
Pressing the Power/Lock Key turns off the screen and puts the device into lock mode. The device automatically gets locked if it is not used for a specified period. This helps to prevent accidental taps and saves battery power.
To unlock the device, press the Power/Lock Key and swipe the screen in any direction.
Fingerprint
The Fingerprint feature allows you to place a finger on the Power/Lock Key to unlock screen. Refer to Fingerprint in Features you will love.
KnockON
The KnockON feature allows you to double-tap the screen to easily turn it on or off.
Turning the screen on
1 Double-tap the centre of the Lock screen to turn the screen on.
2 Unlock the screen or access any of the available shortcuts or widgets.
Turning the screen off
1 Double-tap an empty area of the Home screen or the status bar.
2 The screen will turn off.

NOTE
- Tap on the centre area of the screen. If you tap on the bottom or the top area, the recognition rate may decrease.
Knock Code
The Knock Code feature allows you to create your own unlock code using a combination of knocks on the screen. You can access the Home screen directly when the screen is off by tapping the same sequence on the screen.

NOTE
- If you enter the wrong Knock Code 5 times, it will compulsorily take you to your Google account log in/backup PIN.
- Use the fingertip instead of finger nail to tap the screen for turning it on or off.
Setting up the Knock Code feature
1 Tap ○ > ⚙ > Display tab > Lock screen > Select screen lock > Knock Code.
2 Tap the squares in a pattern to set your Knock Code. Your Knock Code pattern can be 3 to 8 taps.
Unlocking the screen using the Knock Code
You can unlock the screen by tapping the Knock Code pattern you already set, when the screen turns off.
Changing the screen lock method
You can change the way that you lock the screen to prevent others accessing your personal information.
1 Tap ○ > ⏻ > Display tab > Lock screen > Select screen lock.
2 Select a desired screen lock from None, Swipe, Knock Code, Pattern, PIN and Password.

NOTE
- Create a Google account before setting an unlock pattern and remember the Backup PIN you created when creating your pattern lock.
Smart Lock
You can use Smart Lock to make unlocking your phone easier. You can set it to keep your phone unlocked when you have a trusted Bluetooth device connected to it, when it's in a familiar location like your home or work, or when it recognises your face.
Setting up Smart Lock feature
1 Tap ○ > ⏻ > Display tab > Lock screen > Smart Lock.
2 Before you add any trusted devices, trusted places, or trusted face, you need to set up a screen lock (Knock Code, Pattern, PIN or Password).
Home screen
The Home screen is the starting point for many applications and functions. It allows you to add items like app shortcuts and Google widgets to give you instant access to information and applications. This is the default canvas and accessible from any menu by tapping○.
Getting to Know the Home Screen

1 Second Screen - Second screen at the top of the screen the user can configure the desired app. Try to quickly and easily run your favorite app by setting the second screen.
2 Status Bar - Shows the phone's status information, including the time, signal strength, battery status and notification icons.
3 Widget - Widgets are self-contained applications that can be accessed through the Apps drawer or on the Home screen. Unlike a shortcut, a Widget can function as an on-screen application.
4 Application Icons - Tap an icon (application, folder, etc.) to open and use it.
5 Location Indicator - Indicates which Home screen canvas you are currently viewing.
6 Quick Button Area - Provides one-touch access to the function in any Home screen canvas.
7 Home Touch Buttons
| Back Button | Returns to the previous screen. Also closes pop-up items, such as menus, dialog boxes and the on-screen keyboard. |
| Home Button | Return to the Home screen from any screen. |
| Overview Button | Displays recently used applications. If you touch and hold this button, it opens a menu of available options. |
To view other Home screen panels
The operating system provides multiple Home screen canvases to provide more space for adding icons, widgets and more.
- Slide your finger left or right across the Home screen to access additional canvases.
Returning to recently-used applications
Multitasking is easy with Android; you can keep more than one application running at the same time. There is no need to quit an application before opening another. Use and switch between several open applications.
Android manages each application, stopping and starting them as needed to make sure that idle applications don't consume resources unnecessarily.
1 Tap □. A list of recently used applications will be displayed.
2 Tap the application you want to access. This does not stop the previous app from running in the background. Make sure to tap to back out of an app after using it.
- To close an app from the recent apps list, swipe the app preview to the left or right. To clear all apps, tap Clear all.
Customizing the Home screen
You can customise your Home screen by adding apps and widgets and changing wallpapers.
Adding items on your Home screen
1 Touch and hold the empty part of the Home screen.
2 In the Add Mode menu, select the item you want to add. You then see this added item on the Home screen.
3 Drag it to the desired location and lift your finger.

NOTE
- To add an application icon to the Home screen from the Apps screen, touch and hold the application you want to add.
Removing an item from the Home screen
While on the Home screen, touch and hold the icon you want to remove > drag it to 📁.
Adding an app to the Quick Button Area
From the Apps screen or on the Home screen, touch and hold an application icon and drag it to the Quick Button Area. Then release it in the desired location.
Removing an app from the Quick Button Area
Touch and hold the desired Quick Button, drag it to.

NOTE
- The Apps Button ⏻ cannot be removed.
Customizing app icons on the Home screen
1 Touch and hold an application icon until it unlocks from its current position, then release it. The editing icon appears in the upper-right corner of the application.
2 Tap the application icon again and select the desired icon design and size.
3 Tap OK to save the change.
Notifications panel
Notifications alert you to the arrival of new messages, calendar events and alarms, as well as ongoing events, such as when you are on a call.
Opening the notifications panel
Swipe down from the status bar to open the notifications panel. To close the notifications panel, swipe the screen upwards or tap◀
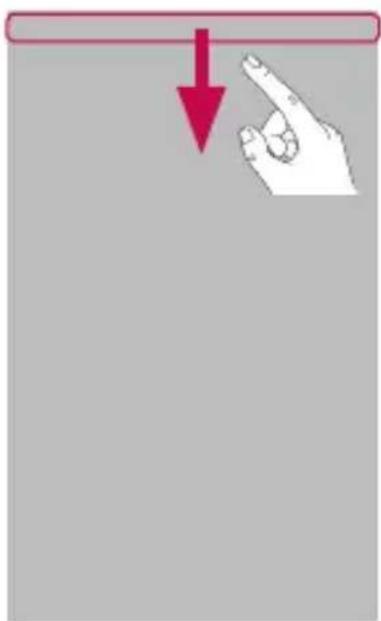
natural_image
Hand pointing at a red downward arrow on a gray background (no text or symbols)
1 Quick Settings Area
2 Notifications
3 CLEAR
1 Tap each quick setting button to toggle it on/off. Touch and hold the desired button to directly access the settings menu for the function. To see more toggle buttons, swipe left or right. Tap to remove, add or rearrange quick setting buttons.
2 Current notifications are listed, each with a brief description. Tap a notification to view it.
3 Tap to clear all the notifications.
When a notification arrives, its icon appears at the top of the screen. Icons for pending notifications appear on the left, and system icons, such as Wi-Fi and battery strength are shown on the right.
Indicator icons on the Status Bar
Indicator icons appear on the status bar at the top of the screen to report missed calls, new messages, calendar events, device status and more.

The icons displayed at the top of the screen provide information about the status of the device. The icons listed in the table below are some of the most common ones.
| Icon | Description Icon Description | ||
 | No SIM card inserted |  | A song is currently playing |
 | No network signal available | [GGDS] | No interruptions, not even alarms |
 | Airplane mode is on Vibrate model is on | ||
 | Connected to a Wi-Fi network | Battery fully charged | |
 | Wired headset connected | Battery is charging | |
 | Call in progress | The phone is connected to a PC via a USB cable | |
 | Missed call Downloading data ↓ | ||
 | Bluetooth is on Uploading data ↑ | ||
| [23YC] | System warning GPS is on | ||
 | An alarm is set Data is synchronizing | ||
 | New voicemail available Choose input method | |
 | New text or multimedia message | |
 | Wi-Fi hotspot is active | |
 | NFC is on LG AirDrive connected | |
 | Miracast connected | |

NOTE
- The icon's location in the status bar may differ according to the function or service.
- The available options may vary depending on the region or service provider.
Capturing a screenshot
Press and hold the Volume Down Key and the Power/Lock Key at the same time for 2 seconds to capture a screenshot of the current screen. To view the captured image, tap the > > the Screenshots folder.
On-screen keyboard
You can enter text using the on-screen keyboard. The on-screen keyboard appears on the screen when you tap an available text entry field.
Using the keypad and entering text
| Icon Description | |
 | Tap once to capitalise the next letter you type. Double-tap for all caps. |
 | Tap to go to the keyboard settings. Touch and hold to change entering text method. |
 | Tap to enter a space. |
 | Tap to create a new line. |
 | Tap to delete the previous character. |
Entering special characters
The on-screen keyboard allows you to enter special characters.
For example, to input "á", touch and hold the "a" button until the pop-up appears and displays related special characters. Without lifting the finger, drag your finger to the desired special character. Once it's highlighted, lift your finger.

NOTE
- A symbol at the top right corner of a key indicates that additional characters are available for that key.
To split or merge the keyboard
You can split the keyboard in half by spreading two fingers horizontally on the landscape keyboard. This makes it easier to type using your thumbs. Make sure the Split keyboard setting is enabled to use this feature.
- Tap ○ > ⚙ > 📋 > General tab > Language & keyboard > LG Keyboard > Keyboard height and layout > Split keyboard.

flowchart
graph LR
    A["Input Block 1"] --> B["Process Node 1"]
    C["Input Block 2"] --> D["Process Node 2"]
    B --> E["Output Block 1"]
    D --> F["Output Block 2"]
Transferring data between a PC and the device
You can copy or move data between a PC and the device.
Transferring data using USB connection
1 Connect your device to a PC using the USB cable that came with your phone.
2 Open the Notifications panel, tap the current connection type, and select Media device (MTP).
3 A window will pop-up on your PC, allowing you to transfer the desired data.

NOTE
- The LG Android Platform Driver is required to be installed on your PC to be able to detect the phone.
- Check the requirements for using Media device (MTP).
| Items Requirement | |
| OS Microsoft Windows XP SP3, Vista or higher | |
| Window Media Player version | Windows Media Player 10 or higher |
Transferring data using wireless connection
You can share or manage content from your phone on PC via Wi-Fi or mobile data using LG AirDrive function.

NOTE
- If you want to use the LG AirDrive, please refer to LG AirDrive section in Settings.
LG Bridge
LG Bridge is an application that helps you conveniently manage images, music, videos, documents, etc. saved on a LG mobile device on your PC. Also, you can back up your files such as contacts and images to your PC or update software of a mobile device.

NOTE
- You can see detailed instructions on how to use LG Bridge in Help menu after installing and opening the program.
- Supported features may vary depending on the device.
- The LG unified USB driver is a program required to connect an LG mobile phone to a PC. It is automatically installed when installing LG Bridge.
Features of LG Bridge
- Manage contents from your phone on PC via Wi-Fi or mobile data.
- Back up and restore the data of your mobile device via USB.
- Update software of a mobile device on your PC via USB.
To download the LG Bridge software
1 Go to www.lg.com.
2 Tap the Search button and enter the model name to search for the model.
3 Select the model information and click GO.
4 Scroll down, select the PC SYNC tab > Windows or Mac OS > DOWNLOAD to download LG Bridge.
SmartShare
SmartShare allows you to share multimedia content using Gallery and Music Apps.
Using SmartShare
1 While viewing the content you want to share, tap : > SmartShare or →.
2 Tap the device you want to share from the list.
- If the device is not displayed on the list, make sure that Wi-Fi, Wi-Fi Direct, or Bluetooth is turned on. Then tap RESCAN.
Enjoying content from nearby devices on your phone
1 To connect nearby devices to your device, tap the Nearby devices option on the Gallery and Music apps.
- Make sure that your device and nearby devices are connected to the same Wi-Fi network and that the DLNA service on the nearby device is turned on.
2 Tap the device you wish to connect to.
If the device is not listed, tap Search nearby devices.
3 After a connection is established, you can enjoy the content on your device.
AppsApps
Installing or uninstalling apps
Play Store allows you to browse and search for free and paid applications.
To open the Play Store app
Tap


To open a screen with details about an app
At any time while browsing in Play Store, tap an app to open its details screen.
The App details screen includes a description, ratings, comments, and related information about the app. From this screen, you can download, install, uninstall, rate the app, and more.
To uninstall applications
1 Tap ○ > ⏻ > 📋 > General tab > Apps.
2 Once all applications appear, scroll to and select the application you want to uninstall.
3 Tap Uninstall.
Calls
You can enjoy clear calling across the region.
Making a call
1 Tap > .
2 Enter the number using the dialer. To delete a digit, tap ✗
3 After entering the desired number, tap to place the call.
4 To end the call, tap.
NOTE
- To enter "+" to make international calls, touch and hold 0+
Calling your contacts
1 Tap 🔍 .
2 Scroll through the contact list. You can also enter the contact's name in the Search field or scroll along the alphabet letters on the right edge of the screen.
3 In the list that is displayed, tap the contact you want to call.
Answering and rejecting a call
- Swipe in any direction to answer an incoming call.
- Swipe in any direction to decline an incoming call.
NOTE
- Swipe if you want to decline a call and send a message to the caller.
Making a second call
1 During your first call, tap : > Add call and enter the number.
2 Tap
3 Both calls are displayed on the call screen. Your initial call is locked and put on hold.
4 Tap the displayed number to toggle between calls. Or tap to start a conference call.
5 To end all calls, tap

NOTE
- You are charged for each call you make.
Viewing your call logs
1 Tap > > Call logs tab.
2 View a list of all dialed, received and missed calls.

NOTE
- Tap any call log entry to view the date, time and duration of the call.
- Tap :> Delete all to delete all of the recorded items.
Change your call settings
You can configure phone call settings, such as call forwarding, as well as other special features offered by your carrier.
1 Tap ○ > .
2 Tap : > Call settings and configure the desired options.
Contacts
You can add contacts on your phone and synchronise them with the contacts in your Google Account or other accounts that support syncing contacts.
Searching for a contact
1 Tap ↗ .
2 Tap Search contacts and enter the contact name using the keyboard. Matches are displayed as you begin to type.
Adding a new contact
1 Tap 🔗 .
2 Enter the new contact's number.
3 Tap : > Add to Contacts > New contact.
4 If you want to add a picture to the new contact, tap the image icon. Choose Take photo or Select from Gallery.
5 Enter the desired information for the contact.
6 Tap SAVE.
Favourites contacts
You can classify frequently called contacts as favourites.
Adding a contact to your favourites
1 Tap 🔍 .
2 Tap a contact to view its details.
3 Tap the star at the top right of the screen. The star turns yellow.
Removing a contact from your favourites list
1 Tap > Favourites tab.
2 Choose a contact to view its details.
3 Tap the yellow star at the top right of the screen. The star turns a dark colour and the contact is removed from your favourites.
Creating a group
1 Tap > >Groups tab.
2 Tap : > New group.
3 Enter a name for the new group. You can also set a distinct ringtone for the newly created group.
4 Tap Add members to add contacts to the group and tap ADD.
5 Tap SAVE to save the group.
NOTE
- If you delete a group, the contacts assigned to that group will not be lost. They will remain in your contact list.
Messaging
Your phone combines text and multimedia messaging into one intuitive, easy to use menu.

NOTE
- You may be charged for each message you send. Please consult with your service provider.
Sending a message
1 Tap


2 Tap OR

then select one or more entries from your Contacts list.
Enter a contact name or contact number into the To field. As you enter the contact name, matching contacts appear. You can tap a suggested recipient and add more than one contact.
3 Tap the text field and start entering your message.
4 Tap : to open the options menu. Choose from any of the available options.
5 Tap 🔒 to attach the file that you want to share with message.
6 Tap Send to send your message.
Conversation view
Messages exchanged with another party are displayed in chronological order so that you can conveniently see and find your conversations.
Changing your messaging settings
Your phone's messaging settings are predefined to allow you to send messages immediately. You can change the settings based on your preferences.
• Tap


Settings.
Camera
You can use the camera or camcorder to take and share pictures and videos.
• Tap


Taking a photo
1 Frame your subject on the screen.
2 A square around the subject indicates that the camera has focused.
3 Tap to take a photo. Your picture will be automatically saved to the Gallery.
Camera mode options

| 1 | Snap Video mode – Allows you to make a story video. |
| 2 | Manual Video Mode – Allows you to record video as well. You can control every detail option manually. |
| 3 | Manual Camera Mode – Allows you to use professional-type settings to capture exactly the shot. You can control every detail option manually. |
| 4 | Auto Mode – Allows you to apply commonly-used settings for your photos and videos. |
| 5 | Simple Mode – Allows you to take simple, quick photos. There are no additional settings and video capture is not available in this mode. |
Auto Mode on the viewfinder

| 1 | Allows you to manage the camera's flash. | |
| 2 | Tap to swap between the rear camera lens and the front camera lens. | |
| 3 | Allows you to select the shot mode for the picture. | |
| 4 | Tap this icon to open the camera settings menu. | |
| 5 | Tap to view the last photo or video you recorded. | |
| 6 | Tap to start recording. | |
| 7 | Tap to take a photo. | |
| 8 | Tap to exit the camera. |

NOTE
- Be sure to clean the protective lens cover with a microfiber cloth before taking pictures. A lens cover with smudges from fingers can cause blurry pictures with a "halo" effect.
Using the mode settings
In the camera viewfinder, tap Mode show the mode options. Tap each icon to use the following mode settings.
 | Taking photos or videos in different views with the front and rear cameras. |
 | Allows you to take a panoramic picture. |
 | Recording a video for viewing it in slow motion. |
 | Recording a video for viewing it in fast motion. |
Using the advanced settings
In the camera viewfinder, tap to show the advanced options. Tap each icon to adjust the following camera settings.
 | Combines photos taken at multiple exposures into one optimal photo to get a better photo in difficult lighting situations. |
 | Set the ratio of your picture and the quality of video. |
 | Allows you to take pictures with voice commands. When on, you just say "Cheese", "Smile", "LG", etc. to take a picture. |
 | Set your camera's timer. This is ideal if you want to be a part of the picture or video. |
 | Allows you to take better pictures and record better videos by displaying a grid line for help with alignment. |
 | Tap to remove motion blur especially when you are walking or moving a lot. |
 | Set the storage location for your pictures and videos. Choose from IN (internal memory) and SD (memory card). This menu appears only when the SD card is inserted. |

Allows you to learn how a function works. This icon will provide you with a help guide.
Manual Camera Mode on the viewfinder
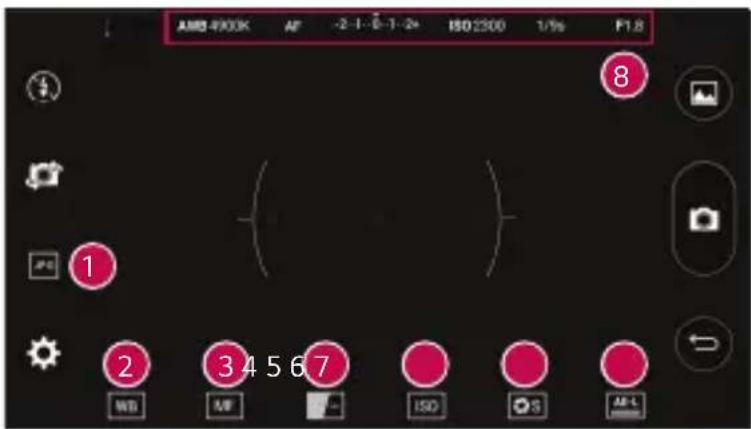
| 1 |  | Tap to select a file format between the JPEG and the DNG. |
| 2 |  | Tap to improve colour quality in various lighting conditions. |
| 3 |  | Tap to use the manual focus mode. |
| 4 |  | Tap to adjust the brightness. |
| 5 |  | Tap to adjust the ISO. |
| 6 |  | Tap to adjust the shutter speed. |
| 7 |  | Tap to use the auto expose lock. |
| 8 | Displays the current Advanced settings values. | |
Manual Video Mode on the viewfinder
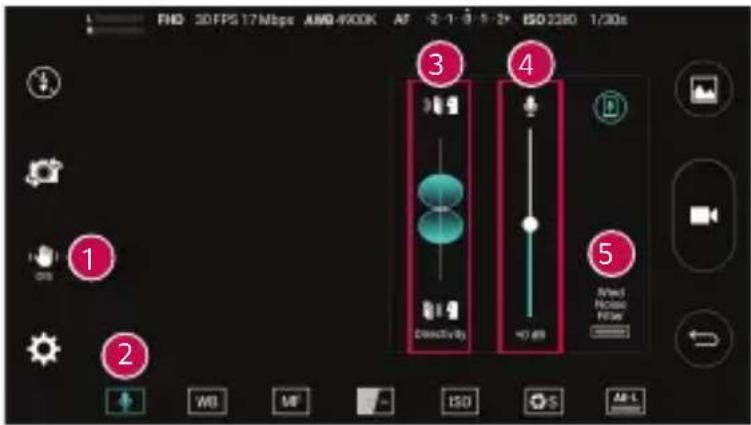
| 1 |  | Tap to remove motion blur especially when you are walking or moving a lot. |
| 2 |  | Tap to set the recording settings.3 Tap to adjust the sound direction.4 Tap to adjust the decibel.5 Tap to adjust the wind sound.: You can use this function after connected the earphone.TapYou can hear the recording sound during a record. |
Snap Video Mode on the viewfinder
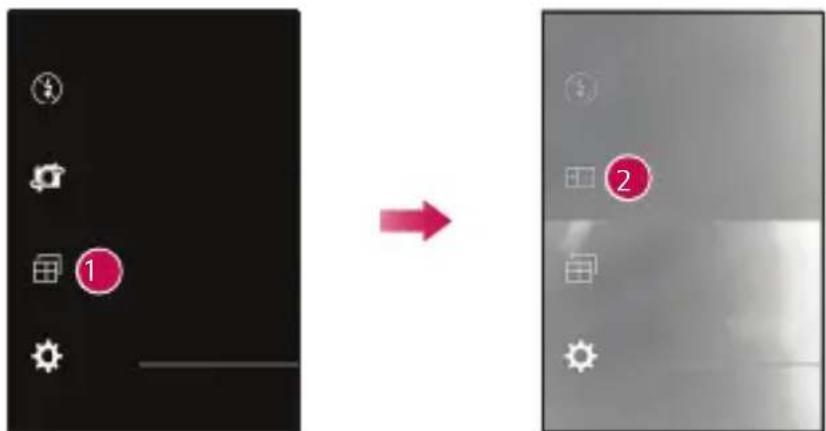
| 1 |  | Tap to change the Multi-View mode. |
| 2 |  | Photos and videos are assembled into the layout you choose.To switch the each camera view, swipe the view. |
Interval shot
You can take Interval shots from the Auto mode using the front camera lens. Touch and hold to automatically take 4 selfies in a row.
Burst shot
You can take Burst shots from the Auto camera mode using the rear camera lens. Touch and hold to take a barrage of photos in a row until the Capture button is released. The viewfinder displays the number of shots taken. When viewing Burst shots in the Gallery, tap to display each shot in sequence (similar to a viewing flipbook).
Gesture shot
The Gesture shot feature allows you to take a picture with a hand gesture using the front camera.
Taking the photos with a gesture
There are two methods for using the Gesture shot feature.
- Raise your hand, with an open palm, until the front camera detects it and a box appears on the screen. Then close your hand into a fist to start the timer, allowing you time to get ready.
OR
- Raise your hand, in a clenched fist, until the front camera detects it and a box appears on the screen. Then unclench your fist to start the timer, allowing you time to get ready.
![[f] OR](/content/2026/06/1264322/images/56955cf1d6c5d058fdcef334fc0c2c981f1b5fb10d9eb3ce0f326cb73a44dea6.jpg)


NOTE
• This function may not be supported in Multi-View Recording.
Gesture View
After taking a photo with the front camera lens, you can automatically check the captured photo with this gesture.
1 Tap ○ > :> .
2 Take a picture with the front camera.
3 After taking the picture, bring the phone close to your face. The captured photo will be displayed.

NOTE
- Depends on the speed and angle of the gesture, this feature may not work properly.
- When the angle is changed after Quick preview, it will go back to the camera mode. You should go to Gallery to view the picture again.
Multi-point Auto Focus
When you take a picture, the Multi-point Auto Focus (AF) function operates automatically and will allow you to see a clear image.
8X Zooming
When using the rear camera lens, you can zoom in or out to 8x.

NOTE
- Use a steady hand. This feature does not work with some functions. Objects may be overlapped when taking a picture of fast-moving subjects.
Once you have taken a photo
Tap the image thumbnail on the screen to view the last photo you took.
 | Tap to edit the photo. |
 | Tap to take another photo immediately. |
 | Tap to open the available sharing options. |
 | Tap to delete the photo. |
| ⋮ | Tap to access additional options. |
| ★ | Tap to add the photo to your favourites. |
Recording a video
1 Tap


2 Frame your subject on the screen.
3 Tap ☐ to start recording the video.
4 The length of the recording is displayed on the top of the screen.

NOTE
- Tap 📄 take pictures while recording video.
5 Tap to pause recording video. You can resume recording again by tapping
OR
Tap ☐ to stop recording. Your video will be automatically saved to the Gallery.
After recording a video
Tap the video thumbnail on the screen to view the last video you recorded.
 | Tap to edit the video. |
 | Tap to record another video immediately. |
 | Tap to open the available sharing options (such as Messaging or Bluetooth) to share. |
 | Tap to delete the video. |
| [###] | Tap to access additional options. |
| [###] | Tap to add the video to your favourites |
Gallery
The Gallery application presents the pictures and videos in your storage, including those you've taken with the Camera application and those you downloaded from the web or other locations.
1 Tap ○ > ➤ .
2 Tap an album to open it and view its contents. (The pictures and videos in the album are displayed in chronological order.)
3 Tap a picture in an album to view it.
NOTE
- Depending on the software installed, some file formats may not be supported.
- Some files may not play properly due to their encoding.
Viewing pictures
The Gallery displays your pictures in folders. When an application, such as E-mail, saves a picture, the download folder is automatically created to contain the picture. Likewise, capturing a screenshot automatically creates the Screenshots folder.
Pictures are displayed by the date they were created. Select a picture to view it full screen. Scroll left or right to view the next or previous image.
Editing photos
While viewing a photo, tap
Setting wallpaper
While viewing a photo, tap :> Set image as to set the image as wallpaper or assign it to a contact.
NOTE
- Depending on the software installed, some file formats may not be supported.
- If the file size exceeds the available memory, an error can occur when you open files.
Zooming in and out
Use one of the following methods to zoom in on an image:
• Double-tap anywhere to zoom in.
- Spread two fingers apart on any place in the picture zoom in. Pinch in or double-tap the image to zoom out.
Playing a video
1 Tap


2 Select the video you want to watch.
Video options

| 1 | // | Tap to pause/resume video playback. |
| 2 | Touch and hold to fast-forward incrementally.Tap to fast-forward 10 seconds. | |
| 3 | Touch and hold to rewind incrementally.Tap to rewind 10 seconds. | |
| 4 | Tap to adjust the video volume. | |
| 5 | Tap to lock/unlock the screen. | |
| 6 | Tap to set the various effects. | |
| 7 | Tap to use QSlide for the Video app. | |
| 8 | Tap to share your video using the SmartShare function. | |
| 9 | Tap to access additional options. |

NOTE
- While playing a video, slide the right side of the screen up or down to adjust the sound.
- While playing a video, slide the left side of the screen up or down to adjust the brightness.
- While playing a video, slide your finger from left to right (or vice versa) to fast-forward and rewind.
Editing videos
Tap 📋 to edit the various effects.
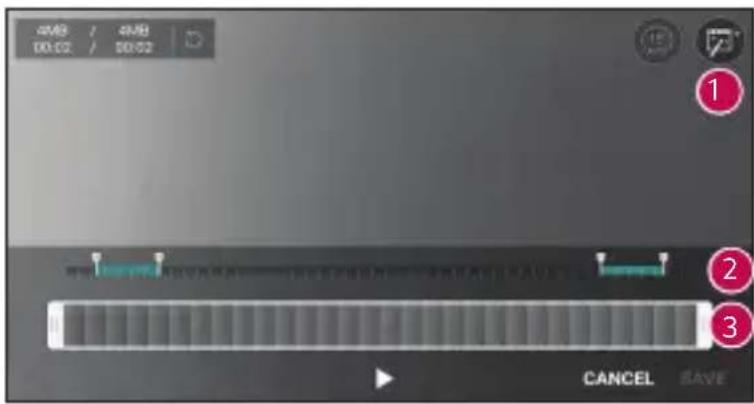
1 Tap to set the background music, title or author.
2 Tap to adjust the video speed.
3 Tap to edit the frame.
Deleting photos/videos
Use one of the following methods:
- While in a folder, tap 📄 select the photos/videos and then tap DELETE.
· While viewing a photo, tap
You can use the Email application to read email from providers other than Gmail. The Email application supports the following account types: POP3, IMAP, Microsoft Exchange (for Enterprise users) and other accounts.
- Tap >> >>
Adding an account
The first time you open the Email application, a setup wizard opens to help you add an email account. You can also add your email account using the Settings app.
- Tap : > Settings > ⊕.
Working with account folders
- Tap ≧ Show all folders.
Each account has Inbox, VIP, Sent, Drafts and Show all folders. Depending on the features supported by your account's service provider, you may have additional folders.
Composing and sending email
1 Tap
2 Enter an address for the message's intended recipient. As you enter text, matching addresses will be offered from your contacts. Separate multiple addresses with semicolons.
3 Tap the Cc/Bcc field to copy or blind copy to other contacts/email addresses.
4 Tap the text field and enter your message.
5 Longpress the text field to edit selected words (Bold/Italic/Underline/Color).
6 Tap 🔍 to attach the file you want to send with your message.
7 Tap ➞ to send the message.
Changing an email general settings
- Tap : > Settings > General settings.
Deleting an email account
- Tap : > Settings > : > Remove account > Select the account to delete > REMOVE > YES.
Music
Your phone has a music player that lets you play all your favourite tracks.

NOTE
- Depending on the software installed, some file formats may not be supported.
- If the file size exceeds the available memory, an error can occur when you open files.
- Music file copyrights may be protected by international treaties and national copyright laws. Therefore, it may be necessary to obtain permission or a licence to reproduce or copy music. In some countries, national laws prohibit private copying of copyrighted material. Before downloading or copying the file, please check the national laws of the relevant country concerning the use of such material.
Playing a song
1 Tap


2 Tap the Songs tab.
3 Select the song you want to play.
4 The following options are available.
Music player options

| 1 |  | Tap to pause playback. |
 | Tap to resume playback. | |
| 2 |  | Tap to skip to the next track in the album, playlist or shuffle list. Touch and hold to fast-forward. |
| 3 |  | Tap to restart the current track or skip to the previous track in the album, playlist or shuffle list. Touch and hold to rewind. |
| 4 |  | Tap to adjust the volume. |
| 5 |  | Tap to set audio effects. |
| 6 |  | Tap to play the current playlist in shuffle mode (tracks are played in random order). |
| 7 |  | Tap to toggle through repeat all songs, repeat current song and repeat off. |
| 8 |  | Tap to share your music using the SmartShare function. |
| 9 | [BKTK] | Tap to add the song to your favourites. |
| 10 |  | Tap to open the current playlist. |
| 11 | [DHTS] | Tap to access additional options. |
Clock
The Clock app gives you access to the Alarms, Timer, World clock and Stopwatch functions. Access these functions by tapping the tabs across the top of the screen or swiping horizontally across the screen.
- Tap >> >
Alarms
The Alarms tab allows you to set alarms.
1 Tap Alarms tab.
2 Tap + to add a new alarm.
3 Adjust the settings as necessary and tap SAVE.

NOTE
- You can also tap an existing alarm to edit it.
Timer
The Timer tab can alert you with an audible signal when a set amount of time has passed.
1 Tap Timer tab.
2 Set the desired time on the timer.
3 Tap Start to start the timer.
4 Tap Stop to stop the timer.
World clock
The World clock tab allows you to easily check the current time in other cities around the world.
1 Tap World clock tab.
2 Tap + and select the desired city.
Stopwatch
The Stopwatch tab allows you to use your phone as a stopwatch.
1 Tap Stopwatch tab.
2 Tap Start to initiate the stopwatch.
- Tap Lap to record lap times.
3 Tap Stop to stop stopwatch.
Calculator
The Calculator app allows you to perform mathematical calculations using a standard or scientific calculator.
1 Tap > .
2 Tap the number buttons to enter numbers.
3 For simple calculations, tap the function you want to perform (+, -, x or ÷) followed by =.

NOTE
- For more complex calculations, tap :.
Calendar
The Calendar app allows you to track your schedule of events.
1 Tap ○ > ➡ .
2 Tap the date you want to add an event to. Then tap
Voice Recorder
The Voice Recorder app records audible files for you to use in a variety of ways.
Recording a sound or voice
1 Tap >> >>
2 Tap to begin recording.
3 Tap ☐ to end the recording.
4 Tap ▶ to listen to the recording.
NOTE
- Tap to access your recordings. You can listen to your saved recordings.
Downloads
Use this application to see what files have been downloaded through the applications.
- Tap >> >
FM Radio
Your phone has a built-in FM Radio so you can tune in to your favourite stations and listen on the go.
- Tap >> >
NOTE
- You must plug in your earphones in order to use them as an antenna.
LG Backup
About backing up and restoring device data
It is recommended that you regularly create and save a backup file on the internal storage, especially before updating any software. Maintaining a current backup file in storage memory may allow you to recover device data if your device is lost, stolen, or corrupted by an unforeseen issue.
This LG Backup application is supported between LG smartphones and tablets, other software or operating system versions. As a result, when you buy the new LG smartphones and tablets, you can backup the current device data to your new device.
If you have the LG Backup application preloaded on your smartphones and tablets, you can backup and restore most of your data, including downloaded and pre-installed applications, bookmarks, calendar entries, contacts, home screen settings, and system settings.

WARNING
- To protect against an unexpected power off during backup or restore operations, due to insufficient battery power, you should always keep your battery fully charged.

NOTE
- All files that are stored on your device are deleted before the backup file is restored. Make sure to copy the backup file to another location.
- Please note that your device data will be overwritten with the content of your backup.
To backup your device data
1 Tap


2 Select the desired options.
- Copy data between devices – Copy data from old device to new device.
- Back up & restore – Back up data or restore from backup.
Google apps
Google provides entertainment, social network, and business apps. You may require a Google account to access some apps.
To view more app information, access each app's help menu.

NOTE
- Some apps may not be available depending on the region or service provider.
Search quickly for items on the Internet or your device.
Chrome
Search for information and browse webpages.
Gmail
Send or receive emails via the Google Mail service.
Maps
Find your location on the map, search for locations, and view location information for various places.
YouTube
Watch or create videos and share them with others.
Drive
Store your content on the cloud, access it from anywhere, and share it with others.
Play Music
Discover, listen to, and share music on your device.
Play Movies & TV
Watch videos stored on your device and download various content to watch from the Play Store.
Hangouts
Chat with your friends individually or in groups and use images, emoticons, and video calls while you are chatting.
Photos
Manage photos, albums, and videos that you have saved on the device and uploaded to Google+.
Google Settings
Configure settings for some features provided by Google.
Voice Search
Search quickly for items by saying a keyword or phrase.
Settings Settings
Access the Settings menu
The Settings app allows you to customize and personalize your phone.
Opening the settings app
- Tap ⬤ touch and hold >System settings.
OR
- Tap >> >
Viewing settings
Tap : to switch the view mode.
- List view – Scroll up and down through the list.
- Tab view – Swipe left and right or tap the tab you want.

NOTE
- The instructions to perform tasks in this guide are based on the default view setting.
Networks Settings
Wi-Fi
You can use high-speed Internet access while within the coverage of the wireless access point (AP).
On the Settings screen, tap Networks tab > Wi-Fi.
1 Tap ☑ to turn Wi-Fi on and start scanning for available Wi-Fi networks.
2 Tap a network to connect to it.
- If the network is secured with a lock icon, you will need to enter a security key or password.
3 The status bar displays icons that indicate Wi-Fi status.

NOTE
- If you are out of the Wi-Fi zone or have set Wi-Fi to Off, the device may automatically connect to the Web using mobile data, which may incur data charges.
Wi-Fi Direct
Wi-Fi Direct provides a direct connection between Wi-Fi enabled devices without requiring an access point.
- Tap : > Advanced Wi-Fi > Wi-Fi Direct.

NOTE
- When in this menu, your device is visible to other visible Wi-Fi Direct devices nearby.
Bluetooth
Bluetooth is a short-range communications technology that allows you to connect wirelessly to a number of Bluetooth devices, such as headsets and hands-free car kits, and Bluetooth-enabled handhelds, computers, printers, and wireless devices.

NOTE
- LG is not responsible for the loss, interception or misuse of data sent or received via the Bluetooth feature.
- Always make sure that you share and receive data with devices that are trusted and properly secured.
- If there are obstacles between the devices, the operating distance may be reduced.
- Some devices, especially those that are not tested or approved by Bluetooth SIG, may be incompatible with your device.
Pairing your phone with another Bluetooth device
1 On the Settings screen, tap Networks tab > Bluetooth.
2 Tap ☐ to turn Bluetooth on and start scanning for available Bluetooth devices.
- If you want to detect the visible devices in range additionally, tap SEARCH.
3 Choose the device you want to pair with from the list. Once the paring is successful, your phone connects to the other device.

NOTE
- Pairing between two Bluetooth devices is a one-time process. Once a pairing has been created, the devices will continue to recognise their partnership and exchange information.
- Please consult documentation included with Bluetooth device for information on pairing mode and passcode (typically 0 0 0 0 – four zeroes).
Sending data via Bluetooth
1 Select a file or item such as a contact or media file.
2 Select the option for sending data via Bluetooth.
3 Search for and pair with a Bluetooth-enabled device.

NOTE
- Due to different specifications and features of other Bluetooth-compatible devices, display and operations may be different, and functions such as transfer or exchange may not be possible with all Bluetooth compatible devices.
Receiving data via Bluetooth
1 On the Settings screen, tap Networks tab > Bluetooth.
2 Tap OFF to turn Bluetooth on.
3 You will receive a request to accept a pairing attempt from the sending device. Be sure to select ACCEPT.
Mobile data
Displays the data usage and mobile data usage limit.
- Tap to toggle your mobile data connection On or Off. This allows you to manage your mobile data usage. You can use a Wi-Fi network connection for data instead.
Call
Allows you to configure various call settings.
On the Settings screen, tap Networks tab > Call.
- Voicemail – Allows you to select your carrier's voicemail service.
- Show voice calls while in an app – Display incoming voice call pop-up when an app is in use.
- Fixed dialing numbers – Allows you to manage and compile a list of numbers that can be called from your phone. You need your PIN2, which is available from your operator. If activated, only numbers in the fixed dial list can be called from your phone.
- Call reject – Allows you to set the call decline function.
- Decline with message – When you want to decline a call, you can send a quick message using this function. This is useful if you need to decline a call during a meeting.
- Call forwarding – Allows you to choose when to forward calls.
- Auto answer – Set the time before a connected hands-free device automatically answers an incoming call.
- Connection vibration – Vibrates your phone when the other party answers the call.
- Noise suppression – Suppress background noise on my end during a call.
- Voice clarity – Enhance voice clarity to hear more cleary.
- Save unknown numbers – Allows you to add unknown numbers to contacts after a call.
- Power key ends call – Allows you to use the Power key to end calls.
- Answer an incoming call – During an incoming call, baring the phone to your ear to answer the call.
- Silence incoming calls – Enable to allow you to flip the device to silence incoming calls.
- Call barring – Locks incoming, outgoing or international calls.
- Call duration – Allows you to view the call duration for various types of calls.
- Additional settings – Allows you to change the following settings such as Caller ID or Call waiting, etc.
NFC
Your phone is an NFC-enabled cell mobile phone. NFC (Near Field Communication) is a wireless connectivity technology that enables two-way communication between electronic devices. It operates over a distance of a few centimetres. You can share your content with an NFC tag or another NFC support device by simply tapping it with your device. If you tap an NFC tag with your device, it displays the tag content on your device.
On the Settings screen, tap Networks tab > Share & connect > NFC
1 Tap OFF to turn NFC on.
2 Allows you to send or receive files simply by bringing your phone and another data compatible device together (typically within 20mm of each other) at the NFC touchpoint.
- Tap & pay – When NFC is turned on, you can use the Tap & pay feature to pay for items just by touching your phone to a reader at a register. If your phone doesn't have a default app, you can browse Google Play Store for other payment apps.

NOTE
- Due to different specifications and features of other Bluetooth-compatible devices, display and operations may be different, and functions such as transfer or exchange may not be possible with all Bluetooth compatible devices.
- When in this menu, your device is visible to other visible Wi-Fi Direct devices nearby.
Android Beam
When this feature is turned on, you can transfer app content to another NFC-capable device by holding the devices close together. Just bring the device together (typically back to back) and then tap your screen. The app determines what gets beamed.
On the Settings screen, tap Networks tab > Share & connect > Android Beam
1 Tap to turn Android Beam on (Turn on Android Beam on each device).
2 Select the screen or files to share (e.g. images from Gallery).
3 Hold devices together.
4 Tap the screen that you want to send after shrinking the screen (Each app determines what is sent or received).
SmartShare Beam
SmartShare Beam lets you send and receive files between LG phones or tablets quickly.
Receiving data via SmartShare Beam
1 On the Settings screen, tap Networks tab > Share & connect > SmartShare Beam.
2 Tap to turn SmartShare Beam on. Wi-Fi will be turned on automatically on your phone and it's ready to receive files.
Sending data via SmartShare Beam
1 Select a file or item such as a media file.
2 Select the option for sending data via SmartShare Beam.
3 Choose the device you want to pair with from the list.
Media server
Allows you to share the phone's multimedia content with nearby DLNA-compatible devices.
On the Settings screen, tap Networks tab > Share & connect > Media server
- Enable Content sharing option to allow nearby devices to access your content.
Miracast
Allows you to wirelessly mirror the phone screen and sound onto a Miracast dongle or TV.
On the Settings screen, tap Networks tab > Share & connect >
Miracast
- Tap to turn Miracast on and start scanning for available Miracast devices. Your phone displays all of the devices that can project your content via Miracast.
LG AirDrive
Allows you to connect to PC to manage your phone. Set up LG Bridge from LG Electronics website on a PC before use. When you sign in to the same LG Account on your phone and PC, you can use the LG AirDrive function.
1 Log in to the same LG account on a mobile devices and a PC.
2 On the Settings screen, tap Networks tab > Share & connect > LG AirDrive.
3 Run the LG Bridge application on your PC and select LG AirDrive.

NOTE
- If you need to set up LG Bridge, please refer to LG Bridge section in Basics.
Printing
Allows you to print the content of certain screens (such as web pages displayed in Chrome) to a printer connected to the same Wi-Fi network as your Android device.
On the Settings screen, tap Networks tab > Share & connect >
Printing.
Printing via wireless printer
1 Select a file or item such as a contact or media file.
2 Select the option for sending data via Bluetooth.
3 Search for and pair with a Bluetooth-enabled device.

NOTE
- Due to different specifications and features of other Bluetooth-compatible devices, display and operations may be different, and functions such as transfer or exchange may not be possible with all Bluetooth compatible devices.
USB tethering
Allows you to share the internet connection with your computer via a USB cable.
1 Connect your phone to your PC with a USB cable.
2 On the Settings screen, tap Networks tab > Tethering.
3 Tap OFF ON to turn USB tethering on.
Wi-Fi hotspot
You can also use your phone to provide a mobile broadband connection.
Create a hotspot and share your connection.
On the Settings screen, tap Networks tab > Tethering
1 Tap OFF ON to turn Wi-Fi hotspot on.
2 Tap Set up Wi-Fi hotspot to change the SSID, security type, password, and other hotspot options.
Bluetooth tethering
Allows you to connect to other devices via Bluetooth.
- On the Settings screen, tap Networks tab > Tethering.
- Tap to turn Bluetooth tethering on to share your connection via Bluetooth tethering.
Airplane mode
Allows you to use many of your phone's features, such as games, and music, when you are in an area where making or receiving calls or data use is prohibited. When you set your phone to Airplane Mode, it cannot send or receive any calls or access online data.
On the Settings screen, tap Networks tab > More > Airplane mode.
Mobile networks
This menu allows you to configure various mobile network settings such as Mobile data, Data roaming, etc.
On the Settings screen, tap Networks tab > More > Mobile networks.
VPN
From your phone, you can add, set up, and manage virtual private networks (VPNs) that allow you to connect and access resources inside a secured local network, such as your corporate network.
On the Settings screen, tap Networks tab > More > VPN.
Sound & notification settings
Allows you to change settings for various sounds on the device.
On the Settings screen, tap Sound & notification tab.
- Sound profile – Allows you to set your phone's sound profile.
- Volume – Adjust the phone's volume settings to suit your needs and environment.
- Ringtone – Allows you to set the ringtones for calls. You can also add and delete ringtones.
- Ringtone ID – Allows you to compose ringtones based on phone number of incoming call.
- Vibration strength – Allows you to set the vibration strength for calls, notifications and touch feedback.
- Sound with vibration –Enable to set the phone to vibrate in addition to the ringtone when you receive calls.
- Vibration type – Allows you to choose the type of vibration.
- Interruptions – Allows you to set a schedule when to prevent interruptions from notifications. You can set to allow certain features to interrupt when Priority only is set.
- Lock screen – Allows you to choose if you want to show or hide notifications on the lock screen.
- Apps – Allows you to set notifications for individual apps including preventing them from displaying notifications and setting priority.
- 32 bit Hi-Fi DAC – Enable this feature increase audio quality with supported headphone.
- Notification sound – Allows you to set the notification sound. You can also add and delete notification sounds.
- Vibrate on tap – Enable to vibrate when tapping the Home touch buttons and during other UI interactions.
- Sound effects – This menu lets you select whether you hear tones when tapping numbers on the dial pad, selecting on-screen options, and more.
- Message/call voice notifications – Allows your device to read out incoming calls and message events automatically.
Display settings
Second screen
On the Settings screen, tap Display tab > Second screen.
If you need more information, please refer to Second screen in Features you will love.
Home screen
Allows you to set your home screen settings.
On the Settings screen, tap Display tab > Home screen.
- Select Home – Select the desired Home theme.
- Smart Bulletin – Enable to use an additional Home screen showing customised information.
- Theme – Sets the screen theme for your device. You can download new themes from LG SmartWorld.
- Wallpaper – Sets the wallpaper to use on your Home screen.
- Screen swipe effect – Choose the desired type of effect to display when you swipe from one Home screen canvas to the next.
- Allow Home screen looping – Enable to allow continuous Home screen scrolling (loop back to first screen after last screen).
- Help – Displays help information for the Home screen.
Lock screen
Allows you to set your lock screen settings.
On the Settings screen, tap Display tab > Lock screen.
- Select screen lock – Allows you to set a screen lock type to secure your phone.
- Smart Lock – Sets to keep your phone unlocked with trusted device or a place. If you need more information, please refer to Smart Lock section in Basics.
- Screen swipe effect – Sets the effect used when swiping the lock screen.
- Wallpaper – Select the wallpaper to display for your lock screen.
- Shortcuts – Allows you to choose the shortcuts available on the lock screen.
- Weather animation – Enable to show weather animation on the lock screen for the current location.
- Contact info for lost phone – Allows you to display the owner information on the lock screen in case the phone is lost.
- Lock timer – Allows you to set the amount of time before the screen automatically locks after the screen has timed-out.
- Power button instantly locks – Checkmark to instantly lock the screen when the Power/Lock Key is pressed. This setting overrides the lock timer setting.
Home touch buttons
Set the Home touch buttons displayed at the bottom of all screens. Set which buttons are displayed, their position on the bar and what they look like.
On the Settings screen, tap Display tab > Home touch buttons.
More display settings
Allows you to set other display settings.
On the Settings screen, tap Display tab.
- Font type – Select the desired font type.
- Font size – Select the desired font size.
- Brightness – Adjust the screen brightness by using the slider.
- Auto-rotate screen – Set to switch orientation automatically when you rotate the phone.
- Screen timeout – Set the time delay before the screen automatically turns off.
- Daydream – Select the screen saver to be displayed when the phone is sleeping while docked and/or charging.
- Motion sensor calibration – Allows you to improve the accuracy of the tilt and speed of the sensor.
General settings
Language & keyboard
Allows you to change the text input settings.
Select the language for the text on your phone and for configuring the on-screen keyboard, including words that you've added to its dictionary.
On the Settings screen, tap General tab > Language & keyboard.
- Language – Choose a language to use on your phone.
- Current keyboard – Allows you to select the other keyboard type.
- LG Keyboard – Change the LG Keyboard settings.
- Google voice typing – Enable to select Google voice typing to enter data. Tap the Settings icon to change the Google voice settings.
- Voice Search – Tap to configure the Voice Search settings.
- Text-to-speech output – Tap to set the preferred engine or general settings for text-to-speech output.
- Pointer speed – Adjust the pointer speed.
- Reverse buttons – Reverse the mouse buttons to use primary button on right.
Location
Turn on location service, your phone determines your approximate location using Wi-Fi and mobile networks. When you select this option, you're asked whether you consent to allowing Google to use your location when providing these services.
On the Settings screen, tap General tab > Location.
- Mode – Sets the how your current location information is determined.
- My place – Enable to locate your home for smart settings.
- Low power location estimation – Enable to use hardware acceleration.
- Camera – Enable to tag photos or videos with their locations.
- Google Location History – Allows you to choose your location information settings as accessed by Google and its products.
Accounts & sync
Use this menu to add, remove, and manage your Google and other supported accounts. You also use these settings to control how and whether all applications send, receive, and sync data on their own schedules and whether all applications can synchronize user data automatically.
Gmail™, Calendar, and other applications may also have their own settings to control how they synchronize data; see the sections on those applications for details.
On the Settings screen, tap General tab > Accounts & sync.
- Auto-sync data – Enable this option to automatically sync all accounts you’ve added on your phone.
- ACCOUNTS – Displays all of your added accounts. Tap one to view and/ or manage it.
- ADD ACCOUNT – Tap to add new account.
Cloud
Allows you to add a cloud account to quickly and easily use a cloud service.
On the Settings screen, tap General tab > Cloud.
Users
Add user to share the phone with other people. Each user can have their own apps and content in their own space. Initial setup is required for new users to use phone.
On the Settings screen, tap General tab > Users.
- ADD USER – Allows you to add and configure a new user for the device.
Accessibility
Use the Accessibility settings to configure accessibility plug-ins you have installed on your phone.
On the Settings screen, tap General tab > Accessibility.
- Vision – Sets options for people with impaired sight.
- TalkBack – Allows you to set up the TalkBack function which assists people with impaired vision by providing verbal feedback.
- Message/call voice notifications – Enable to allows you to hear automatic spoken alerts for incoming calls and messages.
- Screen shade – Enable to set the screen to a darker contrast.
- Font size – Sets the font size.
- Touch zoom – Allows you to zoom in and out by triple-tapping the screen.
- Screen colour inversion – Enable to invert the colours of the screen and content.
- Screen colour adjustment – Allows you to adjust the colours of screen and content.
- Power key ends call – Enable so that you can end voice calls by pressing the Power/Lock Key.
- Hearing – Sets options for people with impaired hearing.
- Captions – Allows you to customise caption settings for those with hearing impairments.
- Flash alerts – Enable to set the flash to blink for incoming calls and notifications.
- Turn off all sounds – Enable to turn off all device sounds.
- Audio type – Sets the audio type.
- Sound balance – Sets the audio route. Move the slider on the slide bar to set it.
- Motor & cognition – Sets options for people with impaired motor skills.
- Touch feedback time – Sets the touch feedback time.
- Touch assistant – Show a touch board with easy access to common actions.
- Screen timeout – Sets the amount of time before the backlight turns off automatically.
- Touch control areas – Allows you to select an area of the screen to limit touch activation to just that area of the screen.
- Accessibility features shortcut – Allow you to access selected features quickly when triple-tapping the Home button.
- Auto-rotate screen – Enable to allow the phone to rotate the screen depending on the physical phone orientation (portrait or landscape).
- Switch Access – Allows you to interact with your device using one or more switches that work like keyboard keys. This menu can be helpful for users with mobility limitations that prevent them from interacting directly with the your device.
Mini view
Turn on this menu to shrink the screen for use with one hand by swiping left or right across the Home touch buttons. If you need more information, please refer to Mini view section in Features you will love. On the Settings screen, tap General tab > Mini view.
Shortcut key
Get quick access to apps by pressing the Volume Keys twice when the screen is off or locked.
On the Settings screen, tap General tab > Shortcut key.
- Press the Volume Up Key twice to open the Capture+ app.
- Press the Volume Down Key twice to launch the Camera app.
- Quick shot – Enable this option to immediately take a photo when the Volume Down Key is pressed twice.
Fingerprints & security
Use this menu to configure how to help secure your phone and its data. On the Settings screen, tap General tab > Fingerprints & security.
- Fingerprints – Unlock screen or see locked content with your fingerprint. If you need more information, please refer to Fingerprints section in Features you will love.
- Content lock – Select lock types to lock memos for QuickMemo+.
- Encrypt phone – Allows you to encrypt data on the phone for security. You will be required to enter a PIN or password to decrypt your phone each time you power it on.
- Encrypt SD card storage – Encrypt SD card storage and keep data unavailable for other devices.
- Set up SIM card lock – Sets the PIN to lock your SIM card and allows you to change the PIN.
- Password typing visible – Enable to briefly show each character of passwords as you enter them so that you can see what you enter.
- Phone administrators – View or deactivate phone administrators.
- Unknown sources – Allow installation of non-Play Store applications.
- Verify apps – Disallow or warn before installation of apps that may cause harm.
- Storage type – Displays the current storage type.
- Certificate management – Allows you to manage your security certificates.
- Trust agents – Select apps to use without unlocking screen.
- Screen pin – You can enable your device to only show a certain app's screen using screen pin.
- App usage access – Allows you to view usage information of apps on your phone.
Smart settings
Allows you to turn on/off, open or change something such as Wi-Fi, Music, Sound profile according to where you are or what you do.
On the Settings screen, tap General tab > Smart settings.
Quick Cover case
With Quick Cover case, you can check incoming calls and stop alarm/timer when the cover is closed. To unlock with the cover, screen lock must be set to Swipe.
On the Settings screen, tap General tab > Quick Cover case.
Dual window
Allows you to configure the Dual Window feature.
On the Settings screen, tap General tab > Dual window.
- Auto-open – Checkmark to allow you to tap a link on the full screen or attachments from emails to open Dual window.
- Help – Display tips for using Dual window.
If you need more information, please refer to Dual window section in Features you will love.
Date & time
Set your preferences for how the date and time is displayed.
On the Settings screen, tap General tab > Date & time.
Storage
You can monitor the used and available internal memory in the device.
On the Settings screen, tap General tab > Storage.
INTERNEAL STORAGE
- Total space – Displays the total amount of space and the available space in your phone’s internal memory in text and with a color-coded bar graph (unused space is gray). Corresponding apps and the amount of space they use is listed under each device user.
SD CARD
- Total space – Displays the total amount of space and the remaining available space in your memory card.
- Mount/Unmount SD card – Allows you to mount or unmount your SD card.
- Erase SD card – Allows you to erase all of the data on your SD card.
Battery & power saving
Displays the current battery status including the percentage of remaining charge and charging state.
On the Settings screen, tap General tab > Battery & power saving.
- Battery usage – Displays the battery usage level and battery use details. Tap one of the items to see more detailed information.
- Battery percentage on status bar – Checkmark to display the battery level percentage on the status bar next to the Battery icon.
- Battery saver – Tap the Battery Saver switch to toggle it on or off. Sets the battery charge percent level that automatically turns on Battery Saver.
- Game optimizer – Adjusts the video quality in games to save battery.
Smart cleaning
Displays the space in use and free space in your phone and allows you to selectively clean up your files.
On the Settings screen, tap General tab > Smart cleaning.
1 Tap a folder location, then set the appropriate boxes.
2 Tap CLEAN > YES.
Apps
Allows you to view details about the apps installed on your phone, manage their data, and force them to stop.
On the Settings screen, tap General tab > Apps.
Default message app
This menu allows you to choose what messaging app to use as your default messaging app.
On the Settings screen, tap General tab > Default message app.
Backup & reset
Change the settings for managing your settings and data.
On the Settings screen, tap General tab > Backup & reset.
- LG Backup – Backs up all information on the device and restores it in the event of data loss or replacement. If you need more information, please refer to LG Backup section in Apps.
- Back up my data – Back up app data, Wi-Fi passwords, and other settings to Google servers.
- Backup account – Displays the account that is currently being used to back up information.
- Automatic restore – When reinstalling an app, restore backed up settings and data.
- Factory data reset – Reset your settings to the factory default values and delete all your data. If you reset the phone this way, you are prompted to re-enter the same information as when you first started Android.
About phone
View legal information, check phone status and software versions, and perform a software update.
On the Settings screen, tap General tab > About phone.
Appendix Appendix
Phone software update
LG Mobile phone software update from the Internet
For more information about using this function, please visit http://www.lg.com/common/index.jsp→select your country and language. This feature allows you to conveniently update the firmware on your phone to a newer version from the Internet without needing to visit a service centre. This feature will only be available if and when LG makes a newer firmware version available for your device.
Because the mobile phone firmware update requires the user's full attention for the duration of the update process, please make sure you check all instructions and notes that appear at each step before proceeding. Please note that removing the USB data cable during the upgrade may seriously damage your mobile phone.

NOTE
- LG reserves the right to make firmware updates available only for selected models at its own discretion and does not guarantee the availability of the newer version of the firmware for all handset models.
LG Mobile Phone software update via Over-the-Air (OTA)
This feature allows you to conveniently update your phone's software to a newer version via OTA, without connecting using a USB data cable. This feature will only be available if and when LG makes a newer firmware version available for your device.
You should first check the software version on your mobile phone:
Settings > General tab > About phone > Update Center > Software Update > Check now for update.

NOTE
- Your personal data from internal phone storage—including information about your Google account and any other accounts, your system/application data and settings, any downloaded applications and your DRM licence—might be lost in the process of updating your phone's software. Therefore, LG recommends that you backup your personal data before updating your phone's software. LG does not take responsibility for any loss of personal data.
- This feature depends on your network service provider, region and country.
FAQ
This chapter lists some problems you might encounter when using your phone. Some problems require you to call your service provider, but most are easy to fix yourself.
| Message Possible causes Possible corrective measures | ||
| SIM card error | There is no SIM card in the phone or it is inserted incorrectly. | Make sure that the SIM card is correctly inserted. |
| No network connection/ Dropped network | Signal is weak or you are outside the carrier network. | Move toward a window or into an open area. Check the network operator coverage map. |
| Operator applied new services. | Check whether the SIM card is more than 6~12 months old. If so, change your SIM or USIM card at your network provider's nearest branch. Contact your service provider. | |
| Codes do not match | To change a security code, must need to confirm the new code by re-entering it. | If you forget the code, contact your service provider. |
| The two codes you entered do not match. | ||
| No applications can be set | Not supported by service provider or registration required. | Contact your service provider. |
| Downloaded application causes a lot of errors. | Remove the application. | 1 Tap > ➤.2 Tap General tab > Apps.3 Tap the app > Uninstall. |
| Calls not available | Dialing error New network not authorised. | |
| New SIM card inserted. | Check for new restrictions. | |
| Pre-paid charge limit reached. | Contact service provider or reset limit with PIN2. | |
| Phone cannot be turned on | On/Off key pressed too briefly. | Press the On/Off key for at least two seconds. |
| Battery is not charged. | Charge battery. Check the charging indicator on the display. | |
| Charging error | Battery is not charged. | Charge battery. |
| Outside temperature is too hot or cold. | Make sure phone is charging at a normal temperature. | |
| Contact problem | Check the charger and its connection to the phone. | |
| No voltage | Plug the charger into a different outlet. | |
| Charger defective Replace the charger. | ||
| Wrong charger Use only original LG accessories. | ||
| Number not allowed. | The Fixed dialling number function is on. | Check the Settings menu and turn the function off. |
| Impossible to receive/ send SMS & photos | Memory full | Delete some data, such as applications or messages from your phone to make more memory available. |
| Files do not open | Unsupported file format | Check the supported file formats. |
| The screen does not turn on when I receive a call. | Proximity sensor problem | If you use a protection tape or case, make sure it has not covered the area around the proximity sensor. Make sure that the area around the proximity sensor is clean. |
| No sound Vibration mode | Check the settings status in the sound menu to make sure you are not in vibration or no interruptions mode. | |
| Hangs up or freezes | Intermittent software problem | If the screen freezes or the phone does not respond when you try to operate it, remove the battery and reinsert it. Then power the phone back on.ORTry to perform a software update through the website. |
Anti-Theft Guide
You can set up your device to prevent other people from using it if it's been reset to factory settings without your permission. For example, if your device is lost, stolen, or wiped, only someone with your Google account or screen lock information can use the device.
All you need to make sure your device is protected is:
- Set a screen lock: If your device is lost or stolen but you have a screen lock set, the device can't be erased using the Settings menu unless your screen is unlocked.
- Add your Google account on your device: If your device is wiped but you have your Google account on it, the device can't finish the setup process until your Google account information is entered again.
After your device is protected, you'll need to either unlock your screen or enter your Google account password if you need to do a factory reset.
This ensures that you or someone you trust is doing the reset.

NOTE
- Do not forget your Google account and password you had added to your device prior to performing a factory reset. If you can't provide the account information during the setup process, you won't be able to use the device at all after performing the factory reset.
More information
Open source software notice information
To obtain the source code under GPL, LGPL, MPL, and other open source licenses, that is contained in this product, please visit http://opensource.lge.com.
In addition to the source code, all referred license terms, warranty disclaimers and copyright notices are available for download.
LG Electronics will also provide open source code to you on CD-ROM for a charge covering the cost of performing such distribution (such as the cost of media, shipping, and handling) upon email request to opensource@lge.com. This offer is valid for three (3) years from the date on which you purchased the product.
Trademarks
- Copyright ©2015 LG Electronics, Inc. All rights reserved. LG and the LG logo are registered trademarks of LG Group and its related entities. All other trademarks are the property of their respective owners.
- Google™, Google Maps™, Gmail™, YouTube™, Hangouts™ and Play Store™ are trademarks of Google, Inc.
- Bluetooth® is a registered trademark of Bluetooth SIG, Inc. worldwide.
- Wi-Fi® and the Wi-Fi logo are registered trademarks of the Wi-Fi Alliance.
- All other trademarks and copyrights are the property of their respective owners.
DivX HD

This DivX Certified® device has passed rigorous testing to ensure it plays DivX® video.
To play purchased DivX movies, first register your device at vod.divx.com. Find your registration code in the DivX VOD section of your device setup menu.
DivX Certified ^® to play DivX ^® video up to HD 720p, including premium content.
DivX®, DivX Certified® and associated logos are trademarks of DivX, LLC and are used under license.
Dolby Digital Plus

DOLBY. DIGITAL PLUS
Manufactured under license from Dolby Laboratories. Dolby, Dolby Digital Plus, and the double-D symbol are trademarks of Dolby Laboratories.
Laser safety statement
Caution!
This product employs a laser system. To ensure proper use of this product, please read this owner's manual carefully and retain for future reference. Should the unit require maintenance, contact an authorised service centre. Use of controls, adjustments, or the performance of procedures other than those specified herein may result in hazardous radiation exposure. To prevent direct exposure to laser beam, do not try to open the enclosure or make direct contact with the laser.

Declaration of conformity
Hereby, LG Electronics declares that this LG-H960A product is in compliance with the essential requirements and other relevant provisions of Directive 1999/5/EC. A copy of the Declaration of Conformity can be found at http://www.lg.com/global/declaration
Contact office for compliance of this product
LG Electronics Inc.
EU Representative, Krijgsman 1,
1186 DM Amstelveen, The Netherlands
Wi-Fi (WLAN)
This equipment may be operated in all European countries.
The 5150 - 5350 MHz band is restricted to indoor use only.
| AT | BE | BG | CH | HR | CY | CZ | DK | EE | FI | FR | DE | GR | HU | IE | IT | LI | LV | |||
| LT | LU | MT | NO | NL | PL | PT | RO | SK | SI | ES | SE | GB | IS | ME | RS | TR | MK |

Disposal of your old appliance
1 All electrical and electronic products should be disposed of separately from the municipal waste stream via designated collection facilities appointed by the government or the local authorities.
2 The correct disposal of your old appliance will help prevent potential negative consequences for the environment and human health.
3 For more detailed information about disposal of your old appliance, please contact your city office, waste disposal service or the shop where you purchased the product.

Disposal of waste batteries/accumulators
1 This symbol may be combined with chemical symbols for mercury (Hg), cadmium (Cd) or lead (Pb) if the battery contains more than 0.0005% of mercury, 0.002% of cadmium or 0.004% of lead.
2 All batteries/accumulators should be disposed separately from the municipal waste stream via designated collection facilities appointed by the government or the local authorities.
3 The correct disposal of your old batteries/accumulators will help to prevent potential negative consequences for the environment, animal and human health.
4 For more detailed information about disposal of your old batteries/ accumulators, please contact your city office, waste disposal service or the shop where you purchased the product.

LG
Life's Good
A QUESTION ABOUT YOUR MOBILE PHONE?
Our Customer Service is there to support you:
0900 - 543 5454 (NL)
015 - 200 255 (BE)
- Second screen
- OPMERKING
- De batterij opladen
- Slepen
- Vegen of schuiven
- Dubbeltikken
- Google-account instellen
- De LG Bridge software download
- Applications Applications
- Opties in cameramodus
- VERKLARING VAN OVEREENSTEMMING
- REMARQUE
- Appuyer ou effleurer
- Glissez
- Appuyez deux fois
- Autofocus multipoint
- DÉCLARATION DE CONFORMITÉ
- About this user guide
- Instructional notices
- Table of contents
- Features you will love .... 12
- Basics 23
- Transferring data between a PC and the device 44
- LG Bridge 45
- SmartShare 46
- Apps 47
- Installing or uninstalling apps ....48
- Calls 49
- Contacts 51
- Messaging ....53
- Camera 54
- Gallery 62
- E-mail......65
- Music 67
- Clock 69
- Calculator 70
- Calendar 70
- Guidelines for safe and efficient use
- Exposure to radio frequency energy
- Product care and maintenance
- Efficient phone operation
- Electronics devices
- Road safety
- Avoid damage to your hearing
- NOTE
- Glass Parts
- Blasting area
- Potentially explosive atmospheres
- In aircraft
- Children
- Emergency calls
- Battery information and care
- Features you will lover eat
- Dual window
- Activating the Dual window
- Using the Dual window
- Fingerprint
- Registering your fingerprint
- LG Health
- Mini view
- Feature of Second screen
- Turning on and off Second screen feature
- Smart Notice
- Snap movie
- QSlide
- Using QSlide
- QuickMemo+
- Using Capture+
- Viewing the saved memo
- QuickRemote
- Set up QuickRemote
- Universal remote
- Using QuickRemote
- Quick Share
- BasicsBasics
- Accessories
- Phone layout
- NOTE : Proximity Sensor
- WARNING
- Turning Your Phone On and Off
- Turning your phone on
- Turning your phone off
- Installing the Nano SIM card and battery
- Charging the battery
- Optimizing battery life
- Extending your phone's battery life:
- Inserting the memory card
- Removing the memory card
- Touch screen tips
- Tap or touch
- Touch and hold
- Drag
- Swipe or slide
- Double-tap
- Pinch-to-Zoom
- Google account setup
- Creating your Google account
- Signing into your Google account
- Locking and unlocking the device
- KnockON
- Turning the screen on
- Turning the screen off
- Knock Code
- Setting up the Knock Code feature
- Unlocking the screen using the Knock Code
- Changing the screen lock method
- Smart Lock
- Setting up Smart Lock feature
- Home screen
- Getting to Know the Home Screen
- To view other Home screen panels
- Returning to recently-used applications
- Customizing the Home screen
- Adding items on your Home screen
- Removing an item from the Home screen
- Adding an app to the Quick Button Area
- Removing an app from the Quick Button Area
- Customizing app icons on the Home screen
- Notifications panel
- Opening the notifications panel
- Indicator icons on the Status Bar
- Capturing a screenshot
- On-screen keyboard
- Using the keypad and entering text
- Entering special characters
- To split or merge the keyboard
- Transferring data between a PC and the device
- Transferring data using USB connection
- Transferring data using wireless connection
- LG Bridge
- Features of LG Bridge
- To download the LG Bridge software
- SmartShare
- Using SmartShare
- Enjoying content from nearby devices on your phone
- AppsApps
- Installing or uninstalling apps
- To open the Play Store app
- To open a screen with details about an app
- To uninstall applications
- Calls
- Making a call
- Calling your contacts
- Answering and rejecting a call
- Making a second call
- Viewing your call logs
- Change your call settings
- Contacts
- Searching for a contact
- Adding a new contact
- Favourites contacts
- Adding a contact to your favourites
- Removing a contact from your favourites list
- Creating a group
- Messaging
- Sending a message
- Conversation view
- Changing your messaging settings
- Camera
- Taking a photo
- Camera mode options
- Auto Mode on the viewfinder
- Using the mode settings
- Using the advanced settings
- Manual Camera Mode on the viewfinder
- Manual Video Mode on the viewfinder
- Snap Video Mode on the viewfinder
- Interval shot
- Burst shot
- Gesture shot
- Taking the photos with a gesture
- OR
- Gesture View
- Multi-point Auto Focus
- 8X Zooming
- Once you have taken a photo
- Recording a video
- After recording a video
- Gallery
- Viewing pictures
- Editing photos
- Setting wallpaper
- Zooming in and out
- Playing a video
- Video options
- Editing videos
- Deleting photos/videos
- Adding an account
- Working with account folders
- Composing and sending email
- Changing an email general settings
- Deleting an email account
- Music
- Playing a song
- Music player options
- Clock
- Alarms
- Timer
- World clock
- Stopwatch
- Calculator
- Calendar
- Voice Recorder
- Recording a sound or voice
- Downloads
- FM Radio
- LG Backup
- About backing up and restoring device data
- To backup your device data
- Google apps
- Chrome
- Gmail
- Maps
- YouTube
- Drive
- Play Music
- Play Movies & TV
- Hangouts
- Photos
- Google Settings
- Voice Search
- Settings Settings
- Access the Settings menu
- Opening the settings app
- Viewing settings
- Networks Settings
- Wi-Fi
- Wi-Fi Direct
- Bluetooth
- Pairing your phone with another Bluetooth device
- Sending data via Bluetooth
- Receiving data via Bluetooth
- Mobile data
- Call
- NFC
- Android Beam
- SmartShare Beam
- Receiving data via SmartShare Beam
- Sending data via SmartShare Beam
- Media server
- Miracast
- LG AirDrive
- Printing
- Printing via wireless printer
- USB tethering
- Wi-Fi hotspot
- Bluetooth tethering
- Airplane mode
- Mobile networks
- VPN
- Sound & notification settings
- Display settings
- Lock screen
- Home touch buttons
- More display settings
- General settings
- Language & keyboard
- Location
- Accounts & sync
- Cloud
- Users
- Accessibility
- Shortcut key
- Fingerprints & security
- Smart settings
- Quick Cover case
- Date & time
- Storage
- INTERNEAL STORAGE
- SD CARD
- Battery & power saving
- Smart cleaning
- Apps
- Default message app
- Backup & reset
- About phone
- Appendix Appendix
- Phone software update
- LG Mobile phone software update from the Internet
- LG Mobile Phone software update via Over-the-Air (OTA)
- FAQ
- Anti-Theft Guide
- More information
- Open source software notice information
- Trademarks
- DivX HD
- Dolby Digital Plus
- Laser safety statement
- Caution!
- Declaration of conformity
- Contact office for compliance of this product
- Wi-Fi (WLAN)
- Disposal of your old appliance
- Disposal of waste batteries/accumulators
- LG
- A QUESTION ABOUT YOUR MOBILE PHONE?
Brand : COOLER MASTER
Model : V10
Category : Computer cooling