
KF 1901 SF - Combined refrigerator MIELE - Free user manual and instructions
Find the device manual for free KF 1901 SF MIELE in PDF.


| Brand | MIELE |
| Model | KF 1901 SF |
| Product type | Combined refrigerator (fridge and freezer) |
| Dimensions (H x W x D) | Approximately 177 x 76 x 66 cm |
| Net weight | Approximately 80 kg |
| Power supply | 220-240 V, 50 Hz |
| Energy class | E (according to EU standards) |
| Fridge volume | Approximately 280 L |
| Freezer volume | Approximately 100 L |
| Defrost type | Automatic (No Frost) |
| Main functions | Refrigeration, freezing, food preservation |
| Maintenance and cleaning | Regular cleaning with a soft cloth and soapy water; automatic defrost |
| Safety | Automatic door closing, open door alarm, child lock |
| Spare parts and repairability | Parts available via Miele; repair by authorized technician recommended |
| General information | Side-by-side installation possible with kit; user manual included |
Frequently Asked Questions - KF 1901 SF MIELE
User questions about KF 1901 SF MIELE
0 question about this device. Answer the ones you know or ask your own.
Ask a new question about this device
Download the instructions for your Combined refrigerator in PDF format for free! Find your manual KF 1901 SF - MIELE and take your electronic device back in hand. On this page are published all the documents necessary for the use of your device. KF 1901 SF by MIELE.
USER MANUAL KF 1901 SF MIELE
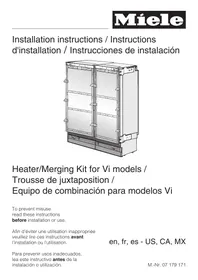
To prevent misuse, read these instructions before installation or use.
... without partition. 3
... with partition.... 4
Required accessories and tools 4
Tools 4
Other....4
Prepare the appliances 5
Installing the heating mat....6
Connect the appliances. 7
fr 9
Before starting installation....9
Side by side 9
... without partition 9
This merging kit should be used for side-by-side installation of the following models:
- K 18x1 SF, K 19x1 SF
- F 14x1 SF, F 18x1 SF, F 19x1 SF
- KF 18x1 SF, KF 19x1 SF
- KWT 16x1 SF
For side-by-side installation of appliances with a stainless-steel front, you also need a top-frame.
Contact Miele to obtain a top-frame in the required width. The width of the top-frame corresponds to the total width of your side-by-side combination.
Before you begin
Please read all instructions in this manual, as well as the manual which accompanied your machine, before installation and use.
This appliance is top-heavy and must be secured to prevent the possibility of tipping forward.
Keep the doors closed until the appliance is completely installed and secured per the installation instructions.
To reduce the risk of injury or damage to the product, two people should be used for installation.
Side-by-side
... without partition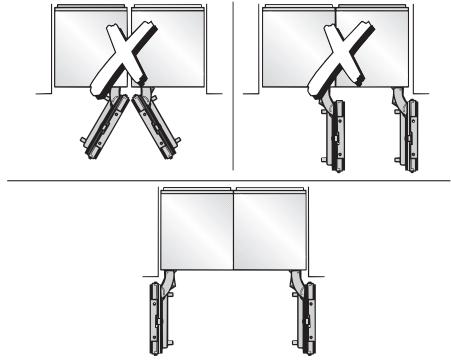
If the appliances are installed directly next to each other (without a partition), they need to be attached together. A heating mat must also be installed. This will help avoid condensation and prevent damages.
Installing the heating mat will increase energy consumption.
... with partition
The minimum thickness of the partition is 5/8" (16 mm).
If there is a partition with a thickness from 5/8" (16 mm) to 6 5/16" (160 mm) between the adjacent appliances, then each appliance should be individually installed within its own niche using the mounting accessories included.
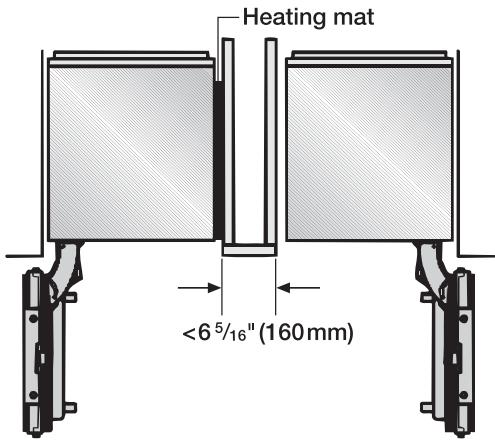
In this case, you will only need the heating mat from the "Merging Kit" to avoid condensation and prevent damages.
Installing the heating mat will increase energy consumption.
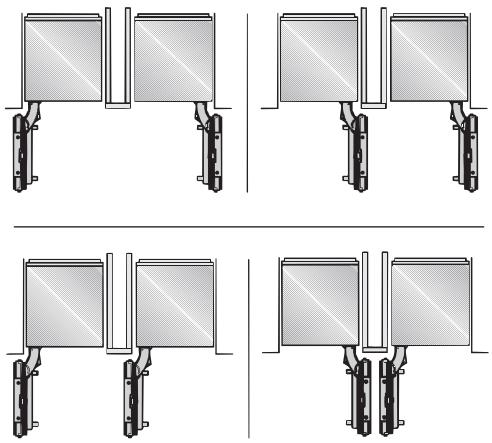
When finding the dimensions for the partition in model 4, note the thickness of the custom door panels and the door handles. This will prevent damage to the doors if they are opened at the same time.
Required accessories and tools
To connect a side-by-side combination, you will need a Top-frame, which can be obtained from Miele.
Tools
- T 20 Torx screwdriver
- T 20 Torx bit + magnetic holder
- Adjustable wrench
Other
- Various bit sizes, suitable for material
- Piece of thin material (for example, linoleum) to protect the floor from damage
- Adhesive tape
Prepare the appliances
Place the appliances next to each other in the intended configuration.
Remove the mounting frames located on the top and inside (handle side) of each appliance.
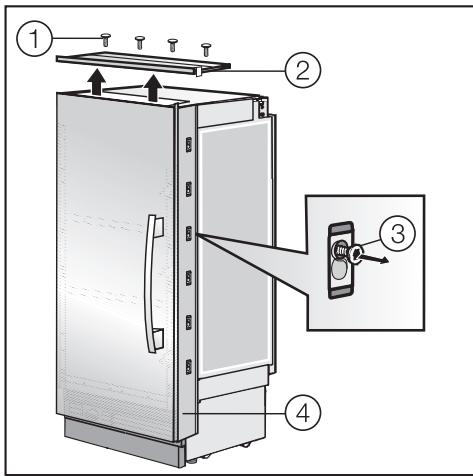
On each appliance, remove the screws ① from the upper mounting frame ② and pull the frame up and off. Loosen the screws ③ a few turns on the side mounting frame ④ of each appliance. Slide each side mounting frame ④ slightly upward and then outward to unhinge. Screw the screws ③ all the way in again or remove them completely.
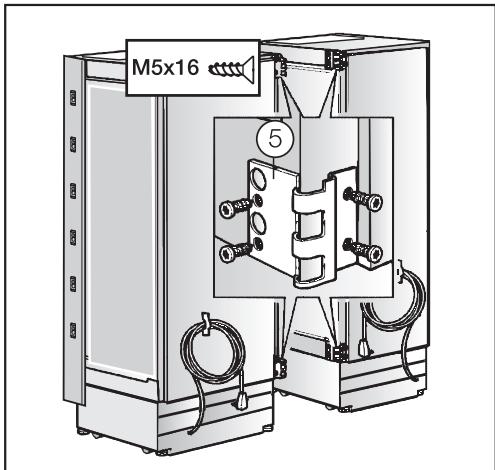
Take the hinge halves ⑤ from the side-by-side kit and screw them to both appliances.
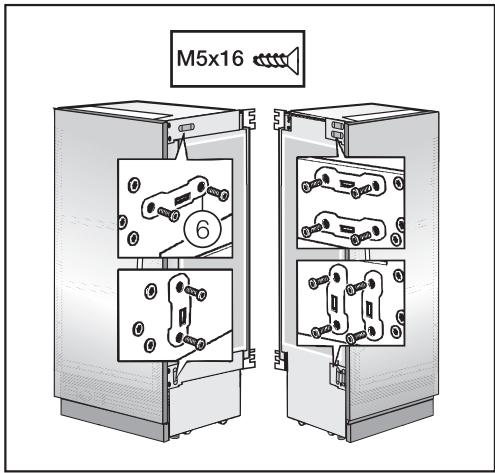
Screw the side plates ⑥ to both appliances. Check the position of both appliances!
Installing the heating mat
The heating mat has to be secured on the right side of the left-standing appliance.
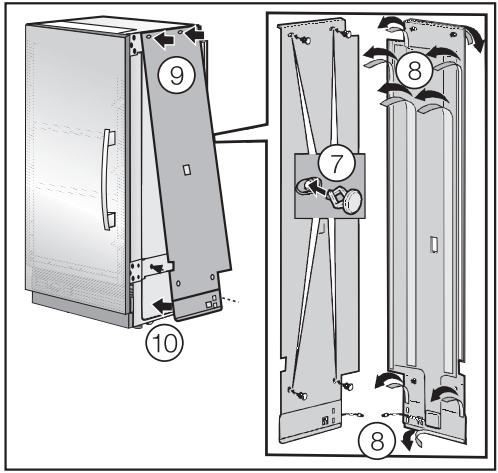
Insert pins through the prepared holes ⑦. Pull the protective strip off of the adhesive tape ⑧. Insert the pins into the upper holes, while keeping the heating mat away from the bottom of the appliance ⑨. Adhere the heating mat from top to bottom, and insert the lower pins into the holes ⑩.
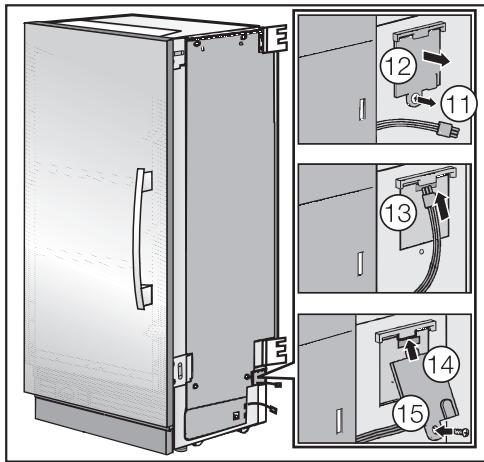
Loosen the screws from the connection box ⑪. Open the connection box ⑫. Attach the cable ⑬. Close the connection box lid ⑭. Secure the connection box screws ⑮.
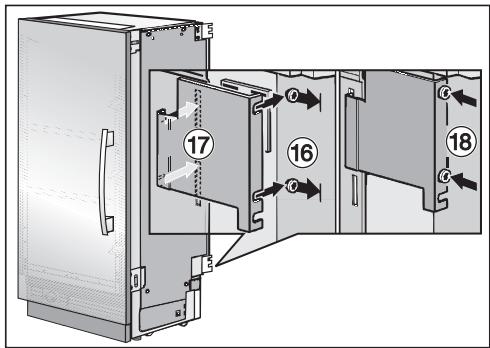
Loosen the screws on the rear side of the appliance ⑯. Do not unscrew completely. Hang the cable cover by its hinge on the heating mat and, from below, push into the screws ⑰. Tighten the screws ⑱.
Connect the appliances
Push the appliances together until the hinge halves interlock.
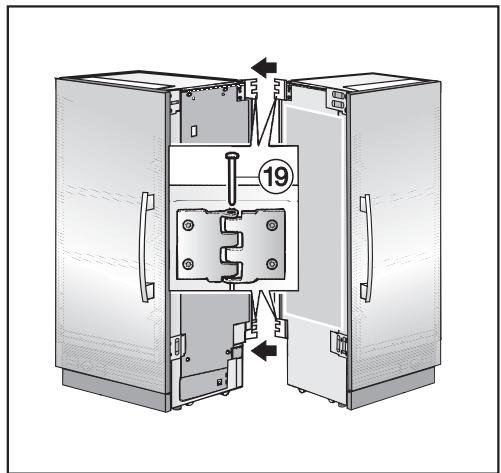
Insert the pins ⑲ into the hinges.
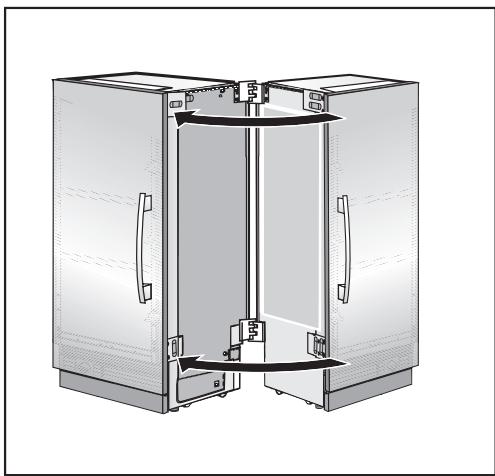
Push the appliances together as far as possible.
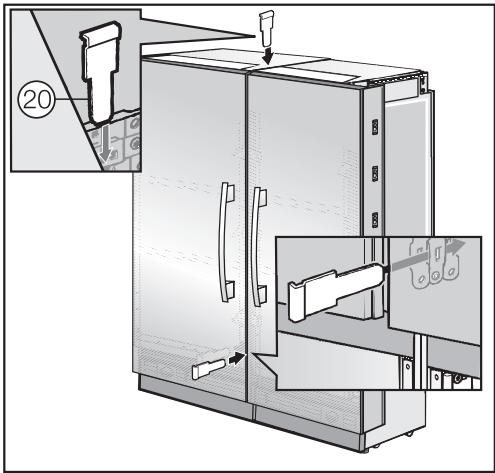
■ Once the appliances have been pushed together, insert the metal bracket ⑳ into the upper and lower plates. Use a tool to push the bracket in all the way.
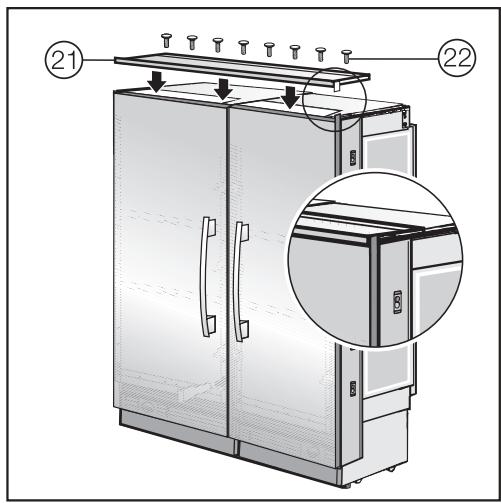
■ Place the Top-frame ② on the side-by-side combination, hook it into the keyholes, and fasten it to the appliances with the screws ② .
Now attach the appliance combination to the installation niche. For instructions, refer to the installation instructions for each appliance.
The remaining frames and screws are no longer needed for the side-by-side combination.
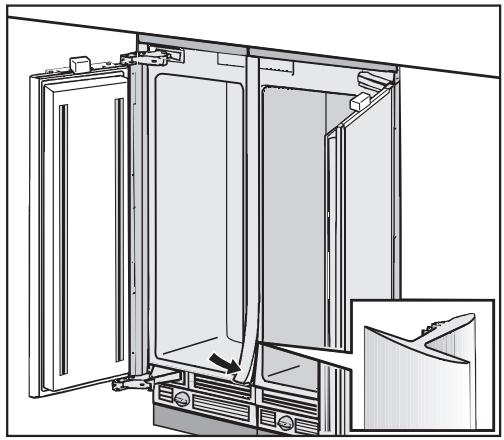
■ Insert the cover strip into the seam between the appliances.
- K 18x1 SF, K 19x1 SF
- F 14x1 SF, F 18x1 SF, F 19x1 SF
- KF 18x1 SF, KF 19x1 SF
- KWT 16x1 SF
- K 18x1 SF, K 19x1 SF
- F 14x1 SF, F 18x1 SF, F 19x1 SF
- KF 18x1 SF, KF 19x1 SF
- KWT 16x1 SF


Brand : MIELE
Model : KF 1901 SF
Category : Combined refrigerator