
KFN 14943 - Combined refrigerator MIELE - Free user manual and instructions
Find the device manual for free KFN 14943 MIELE in PDF.

| Product type | Combined refrigerator (fridge-freezer) |
| Brand | Miele |
| Model | KFN 14943 SD ed |
| Dimensions (H × W × D) | 2020 × 750 × 630 mm |
| Power supply | 120 V, 60 Hz, 15 A |
| Plug type | NEMA 5-15 P (3-pin, grounded) |
| Climate class | SN (10–32 °C), N (16–32 °C), ST (16–38 °C), T (16–43 °C) |
| Main functions | Cooling and freezing, reversible, soft-close |
| Door opening direction | Right (reversible to left) |
| Door material | Stainless steel (probable) |
| Installation type | Build-in or freestanding, with possible adaptation cabinet |
| Required ventilation | Unobstructed ventilation slots, at least 50 mm gap between cabinet and wall |
| Capacity (estimate) | Approximately 300 L (total, approximate) |
| Energy consumption | Not specified (estimated energy class A+ or better) |
| Noise level | Not specified (estimated 35–40 dB) |
| Weight (estimate) | Approximately 80–90 kg |
| Compressor | Not specified (probably AC) |
| Refrigerant | Not specified (probably R600a or R134a) |
| Maintenance and cleaning | Regular cleaning of ventilation slots, no abrasive cleaners |
| Safety | Grounded outlet mandatory, no extension cord, no unqualified repair |
| Spare parts | Available from Miele service (contact after-sales service) |
| Repairability | Repair by qualified electrician recommended; hinge cover and mechanisms replaceable |
| Warranty | Not specified (standard Miele: 2 years, depending on country) |
| Country of manufacture | Not specified (probably Germany) |
Frequently Asked Questions - KFN 14943 MIELE
User questions about KFN 14943 MIELE
0 question about this device. Answer the ones you know or ask your own.
Ask a new question about this device
Download the instructions for your Combined refrigerator in PDF format for free! Find your manual KFN 14943 - MIELE and take your electronic device back in hand. On this page are published all the documents necessary for the use of your device. KFN 14943 by MIELE.
USER MANUAL KFN 14943 MIELE
Operating and Installation Instructions
Fridge-Freezer Combination KFN 14943 SD ed
To prevent accidentsand machine damageread these instructions
before
installation or use.
en - CA
M.-Nr. 07 589 450
Avoid the risk of electrical shock
- Plug into a grounded 3-prong outlet.
- Do not move the ground plug.
- Do not use an adapter.
- Do not use an extension cord.
Failure to follow these instructions can result in death, fire, or electrical shock.
Improper connection of the equipment grounding conductor may result in electric shock. If you are in any doubt as to whether the appliance has been properly grounded, have the appliance checked by a qualified electrician or service technician.
Installation, repairs and other work by unqualified persons could be dangerous. The manufacturer will not be held responsible for damage or injury arising from unauthorized work.
Before installing the appliance, verify that the voltage, load and circuit rating information found on the data plate match the household electrical supply.
If there are any questions regarding the electrical connection of this appliance to the power supply, please consult a licensed electrician or call the Miele Technical Service.
CDN 1-800-565-6435
The appliance is supplied with a UL-listed, 3-wire power cord and NEMA 5-15 P plug ready for connection to a 120V , 60Hz supply.
The fuse rating is 15 amps.
The appliance requires a 3-wire receptacle.
The receptacle must be installed by a licenced electrician only.
In the case of side-by-side installations, a separate outlet must be used for each appliance.
Ideally, the power outlet should be next to the appliance and easily accessible. Do not connect the appliance to the power supply by an extension cord. Extension cords do not guarantee the required safety of the appliance (danger of overheating).
If any changes are needed to the household wiring or power supply, this work must be performed by a qualified electrician.
Do not place any devices that produce heat (such as a toaster or microwave) on top of the appliance. This would increase the energy consumption of the appliance!
This fridge/freezer should not be placed side-by-side with a second model.
Because the appliance does not have heated side walls, a side-by-side arrangement can lead to the build-up of condensation water.
Contact your dealer for advice.
Location
The appliance should not be installed directly next to a heat source (such as a kitchen range or a heater) or in direct sunlight. The higher the ambient temperature, the longer the appliance will run and the higher the energy consumption.
Choose a dry, well-ventilated room for installation.
Climate range
The appliance is designed for use within a certain climate range (room temperature range) and should not be used outside this range. The climate range is stated on the data plate inside the appliance.
| Climate range | Room temperature |
| SN | +10 °C to +32 °C |
| N | +16 °C to +32 °C |
| ST | +16 °C to +38 °C |
| T | +16 °C to +43 °C |
If the room is too cold, it will cause the cooling system in the appliance to switch off for too long. This may lead to higher temperatures in the appliance and the frozen food may even start thawing!
Proper ventilation
The air behind the appliance gets warm. In order to ensure adequate ventilation, you must make sure that the ventilation slits are not covered or blocked in any way.
Also, the ventilation slits must be dusted/cleaned on a regular basis.
Installation
■ First remove any cable clips from the rear of the appliance.
- Check that all the parts on the rear of the appliance are free to move. Remove any obstructions.
Gently slide the appliance into the desired location.
The rear of the appliance can be directly against the wall.
Adjustments

Use the wrench provided to adjust the feet as needed, so that the appliance is level.
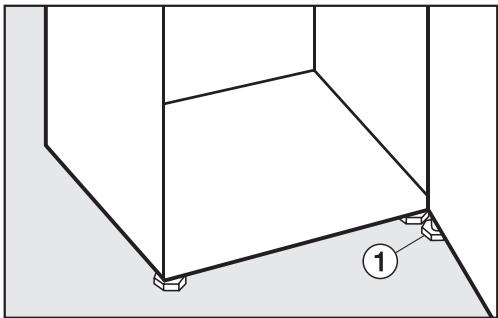
If necessary, unscrew the foot ① from the hinge bracket in order to support the appliance door.
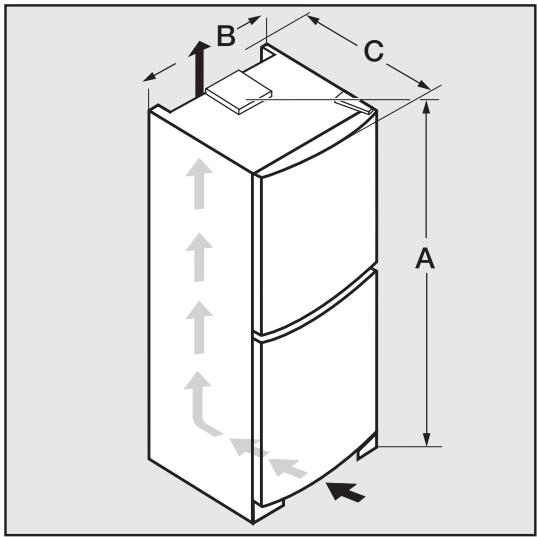
Appliance dimensions
| A | B | C | |
| KFN 14943 SD ed | 2020 | 750 | 630 |
The appliance comes with right-hand hinging. If left-hand door hinging is preferred, then follow these instructions to change the door hinge:
You will need the following tools:
- a crosstip screwdriver,
- a flathead screwdriver,
- various sizes of Torx screwdrivers,
- a fork wrench.
Always change the door hinging with the assistance of another person.
Removing the door handles:
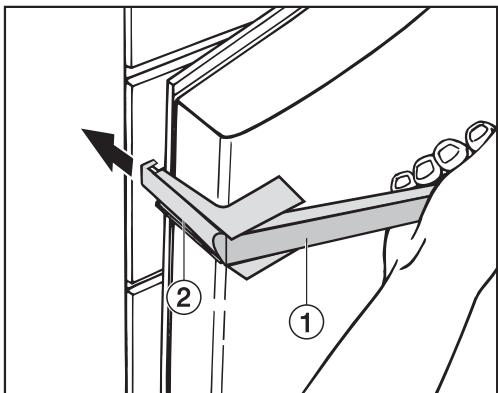
When you pull on the door handle ①, the sidebar ② moves backwards.
Pull the sidebar ② backwards out of the track.
Now loosen the 4 screws (Torx 15) in the mounting plate and remove the handle.
- Remove the covers from the opposite side and place them on the holes that are now vacant.
Before changing the hinging, remove any items of food from the shelves in the appliance door.
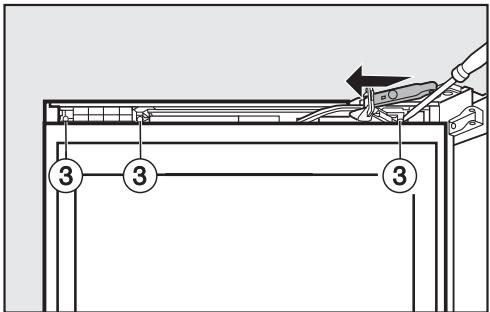
Removing the top soft-close mechanism:
- Open the top door of the appliance.
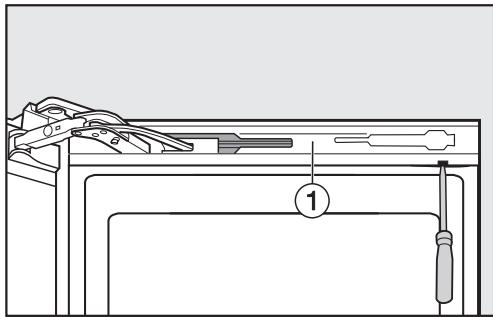
- Loosen the panel ① from the soft-close mechanism: From below, slide a flathead screwdriver into the recesses, then slowly and carefully lift off the panel.
Be careful not to damage the door seal.
If the door seal is damaged, the appliance door may not close properly and there will not be enough refrigeration!
- Slide the panel ① in the direction of the appliance and leave it hanging between the door and the appliance.
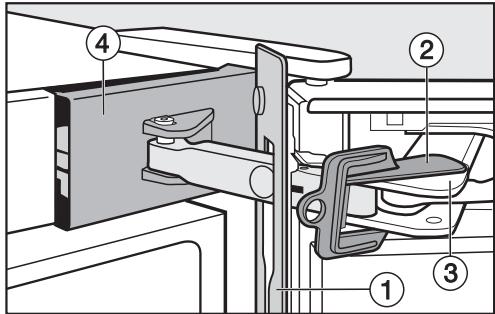
- Place the securing device (2) (supplied with the appliance) on the soft-close mechanism (3) so that it engages.
With the securing device in place, the joint cannot snap shut. Do not remove the securing device until instructed to!
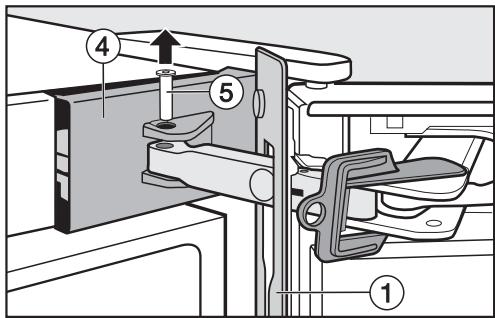
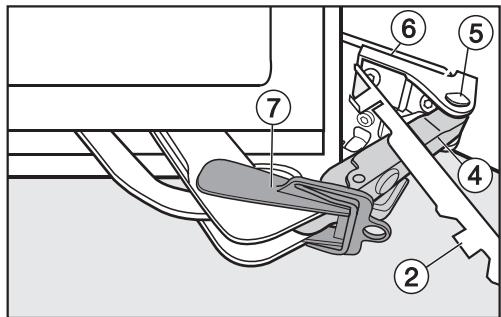
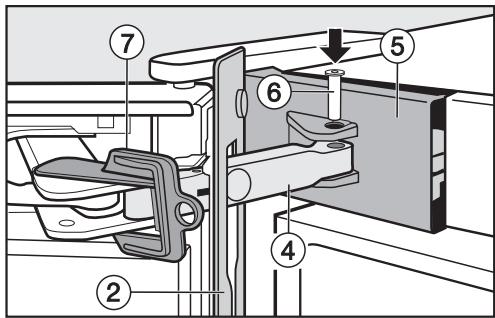
Using a flathead screwdriver, carefully lift the top and the bottom of the cover ④ from the retainer.
Push the pin ⑤ up and out using a flathead screwdriver.
Remove the cover ④.
Now the soft-close mechanism and the appliance are no longer connected.
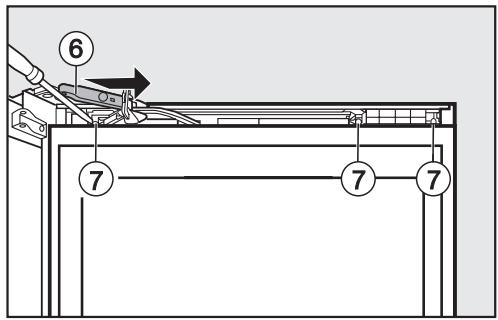
Remove the panel ①.
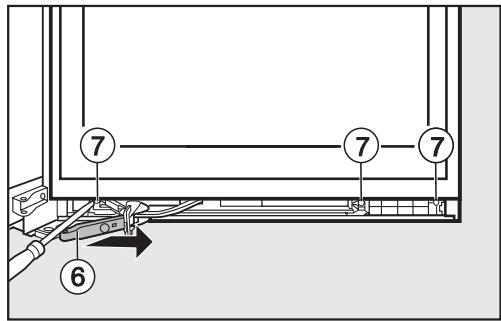
Push the shock absorber arm 6 as far as possible towards the handle side.
- Loosen the three screws ⑦ on the soft-close mechanism and the spacer.
In the middle, pry out the housing with the soft-close mechanism using a flathead screwdriver.
- Then, pry the housing with the soft-close mechanism out of the retainer from the appliance side.
Lay the soft-close mechanism aside.
Push out the spacer towards the hinge side.
Lay the spacer aside.
Removing the top door of the appliance:
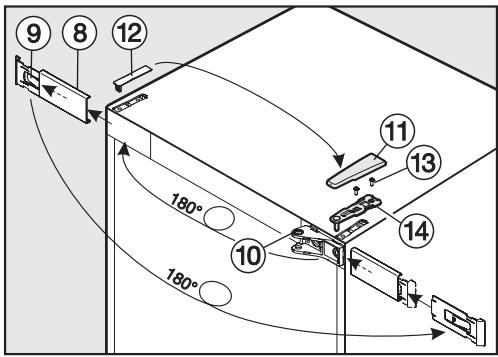
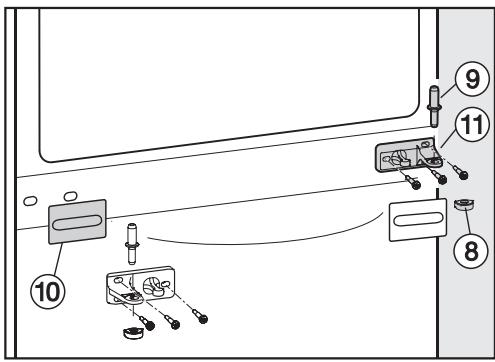
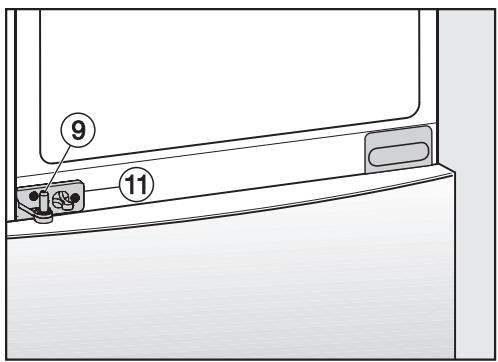
- Loosen the cover ⑧ by carefully sliding a flathead screwdriver from below into the recess.
Remove the cover ⑧ together with the mounting bracket ⑨ - Loosen the mounting bracket ⑨ from the cover ⑧ by pushing it slightly to the left and then removing the cover plate towards the front.
Turn the mounting bracket ⑨ 180^ - Place the cover ⑧ onto the front of the mounting bracket ⑨ and push it to the right. The writing must be visible.
- Unscrew the bearing ⑩ mechanism, turn it 180^ and replace it on the opposite side. If necessary, pre-punch the screw holes.
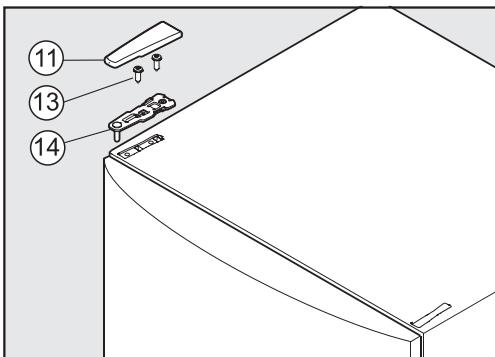
Remove the top cover ① by pushing it from back to front and lifting it up.
Remove the cover 12 upwards.
Caution! The top door of the appliance is no longer secured as soon as the hinge bracket is removed when following the instructions below!
- Close the top door of the appliance.
Loosen the screws ⑬ on the top hinge bracket ⑭ and remove the hinge bracket by pulling up.
Carefully lift and remove the top door of the appliance and set aside.
Make sure that the bearing pin in the middle of the appliance stays in place, otherwise the bottom door of the appliance has no hold!
■ Engage the cover ⑧ together with the mounting bracket ⑨ on the opposite side.
Now place the cover 12 on the other side.
Removing the bottom soft-close mechanism:
-
Open the bottom door of the appliance.
-
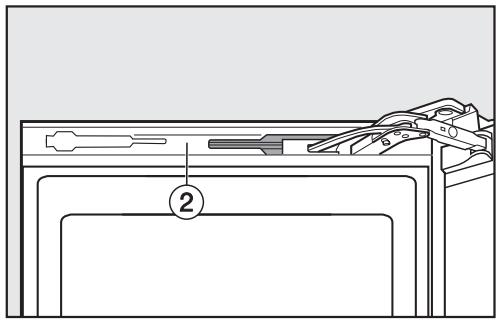
Loosen the panel ① of the soft-close mechanism: Slowly pry the panel off from the top.
Be careful not to damage the door seal. If the door seal is damaged, the appliance door may not close properly and there will not be enough refrigeration!
- Slide the panel ① in the direction of the appliance and leave it hanging between the door and the appliance.
- Place the securing device (supplied with the appliance) on the soft-close mechanism (3).
With the securing device in place, the joint cannot snap shut. Do not remove the securing device until instructed to!
From the side, carefully lift off the cover ④ using a flathead screwdriver.
If necessary, lift the appliance backwards slightly with the assistance of another person.
Push the pin ⑤ up and out.
Now the soft-close mechanism and the appliance are no longer connected.
Remove the panel ①.
Push the shock absorber arm 6 as far as possible towards the handle side.
- Loosen the three screws ⑦ on the soft-close mechanism and the spacer.
In the middle, pry out the housing with the soft-close mechanism using a flathead screwdriver.
- Then, pry the housing with the soft-close mechanism out of the retainer from the appliance side.
Lay the soft-close mechanism aside.
Push out the spacer towards the hinge side.
Lay the spacer aside.
Removing the bottom door of the appliance:
- Close the bottom door of the appliance.
Pull the bearing pin ⑨ in the middle of the appliance up and out.
Carefully lift and remove the bottom door of the appliance and set aside.
Pull the cover 4 off.
■ Unscrew the hinge bracket ⑤ , rotate it 180^ , then screw it onto the opposite side.
Turn the plastic cap ⑧ 180^ and replace it on the hinge bracket ⑪ in the middle.
Now place the cover 12 on the other side.
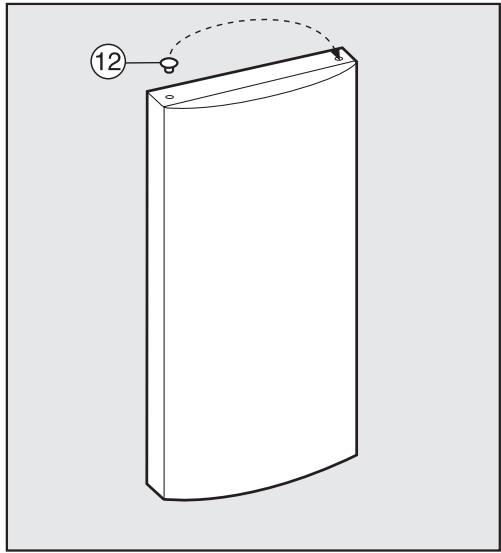
- Lift the plugs ⑫ out of the door bearing bushing in the appliance door and place it on the other side.
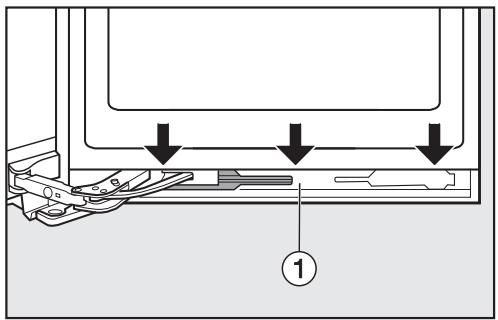
Mounting the bottom door of the appliance:
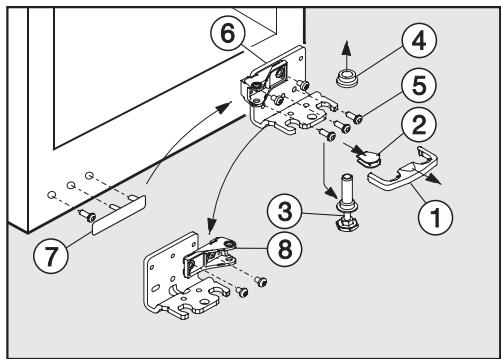
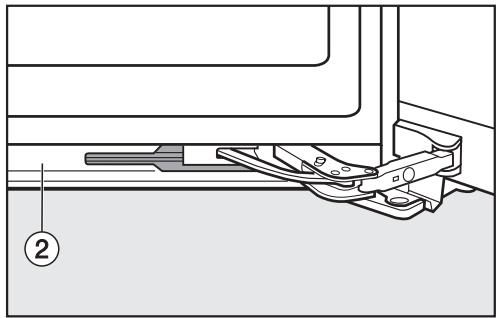
Remove the cover ① towards the front.
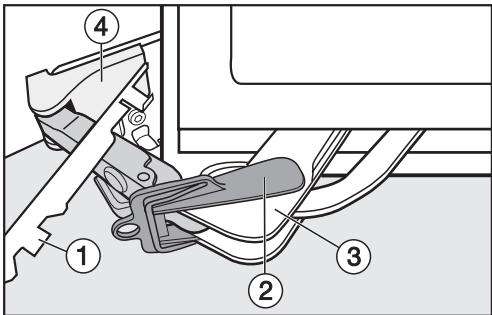
Pull the cover ② off.
Screw the adjustment foot at the bearing pin ③ completely in.
■ With the assistance of another person, carefully tilt the appliance backwards and pull the bearing pin ③ down and out.
Pay attention to the hinge bushing ④.
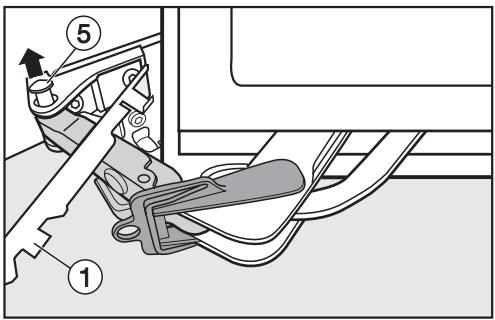
Loosen the screws ⑤ and remove the hinge bracket ⑥
Remove the cover ⑦ and loosen the screw. Attach both to the other side.
- Screw the hinge bracket ⑥ onto the other side with the two outer screws. Do not use the middle screw; this allows later alignment of the appliance door using the outer, elongated holes!
- Unscrew the bearing part ⑧ from the hinge bracket ⑥ , turn it 180^ and screw it into the opposite hole of the hinge bracket.
Now place the cover ② on the other side.
- With the assistance of another person, carefully tilt the appliance backwards and insert the bearing pin ③ into the hinge bracket ⑥ from below. The groove in the bottom of the hinge bracket faces forwards.
Place the hinge bushing ④ onto the bearing pin ③ .
Put the cover ① on.
- Place the lower door of the appliance onto the bearing pin ③ from above.
- Close the bottom door of the appliance.
Put the bearing pin ⑨ in the middle of the appliance through the hinge bracket ① into the bottom door of the appliance.
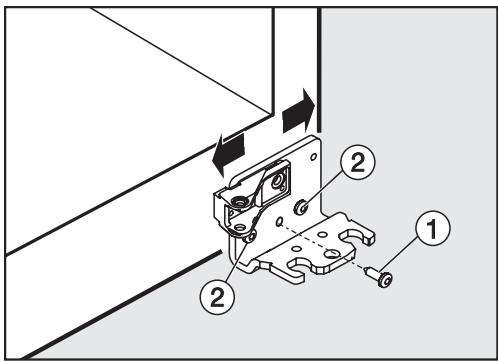
Mounting the bottom soft-close mechanism:
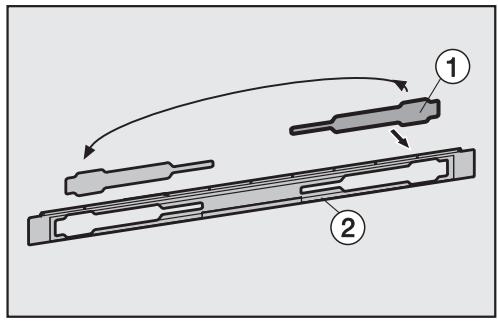
Remove the cover ① from the panel ②, turn it 180^ and replace it on the other side.
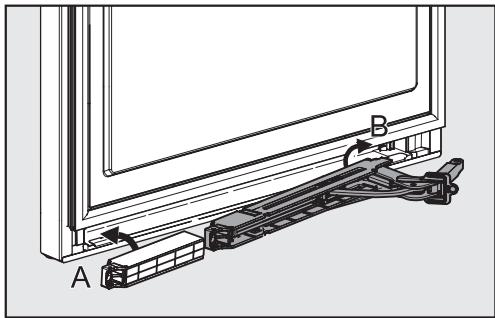
- Hook the spacer on the handle side into the retainer (A).
- Hook the soft-close mechanism into the retainer (B) on the appliance side.
Push both parts outwards until they engage.
- With the three screws ③ , first screw on the spacer on the handle side and then the soft-close mechanism on the appliance side.
- Hang the panel ② on the shock absorber arm ④ .
Pull the shock absorber arm ④ towards the hinge bracket and insert the pin ⑤ from the top so that the square rests in the recess.
Put on the cover ⑥ in such a way that it engages.
Take care that the cover ⑥ sits correctly to ensure that the door closes properly and the pin is secured.
Remove the securing device ⑦.
- Place the panel ② onto the soft-close mechanism from above, engaging it at the bottom first and then at the top.
- Close the bottom door of the appliance.
Mounting the top door of the appliance:
- Place the top door of the appliance onto the bearing pin ⑨ in in the middle of the appliance.
Close the top door of the appliance.
Put the hinge bracket ⑭ on the opposite side and and fasten it with the screws ⑬ . The screw holes may have to be pre- punched or use a power screwdriver.
Now place the cover ① on the other side.
Align the appliance door with the appliance housing via the elongated holes in the bottom hinge bracket. Tighten the screws.
Mounting the top soft-close mechanism:
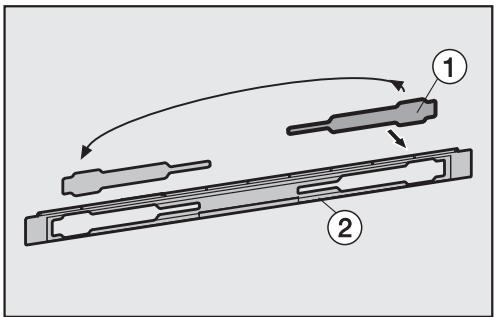
Remove the cover ① from the panel ②, turn it 180^ and replace it on the other side.

- Hook the spacer on the handle side into the retainer (A).
- Hook the soft-close mechanism into the retainer (B) on the appliance side.
Push both parts outwards until they engage.
- With the three screws ③ , first screw on the spacer on the handle side and then the soft-close mechanism on the appliance side.
Hang the panel ② on the shock absorber arm ④
Push the cover ⑤ on from the side so that the openings for the pin ⑥ are on top of each other.
Pull the shock absorber arm ④ towards the hinge bracket and insert the pin ⑥ from the top so that the square rests in the recess.
Then engage the cover ⑤ completely.
Take care that the cover ⑤ sits correctly to ensure that the door closes properly and the pin is secured.
Remove the securing device ⑦.
- Place the panel ② onto the soft-close mechanism from above, engaging it at the bottom first and then at the top.
- Close the top door of the appliance.
Remounting the door handles:
The following instructions must be followed when attaching the door handle, otherwise the door seal could be damaged.
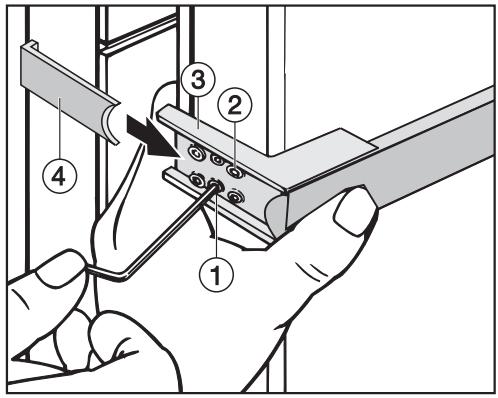
■ First, loosely screw the door handle onto the opposite side with the two front screws ②.
The mounting plate ③ must be positioned on the door housing in such a way that when the door is closed the mounting plate is aligned with the outside wall of the appliance.
If this alignment is off, you can correct it by
turning both of the pre-mounted set screws ① with a wrench until the mounting plate ③ is at the correct angle.
Tighten all 4 screws ②
From the appliance side, slide the sidebar onto the guide for the mounting plate, until it audibly engages.
Make sure that the sidebar ④ does not come in contact with the door seal when the door is opened. This would damage the door seal over time.
If you see that the sidebar is coming into contact with the door seal,
- adjust the mounting plate ③ again using the set screws ① until the mounting plate and the sidebar ④ are at the correct angle and the sidebar no longer touches the seal when the door is opened.
The appliance doors can be aligned with the appliance housing afterwards.
In the following figure, the appliance door is not closed so that the individual steps can be seen more clearly.
Align the bottom door in the bottom hinge bracket via the outer, elongated holes:
Remove the middle screw ① from the hinge bracket.
Loosen the two outer screws ② slightly.
Align the appliance door by moving the hinge bracket to the right or left.
- Tighten the screws ② ; the screw ① does not need to be screwed on again.
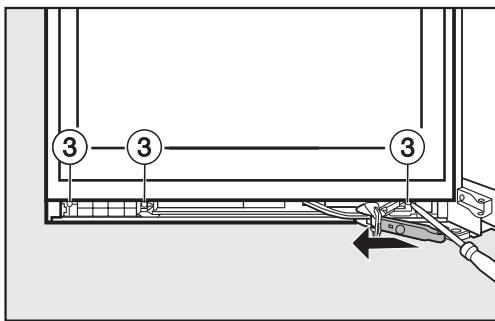
Align the top door via the elongated holes in the middle hinge bracket:
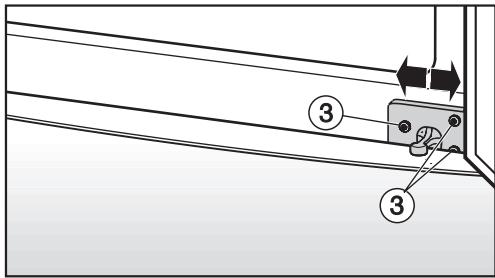
Loosen the three screws ③ slightly.
Align the appliance door by moving the hinge bracket to the right or left.
Tighten the screws ③.
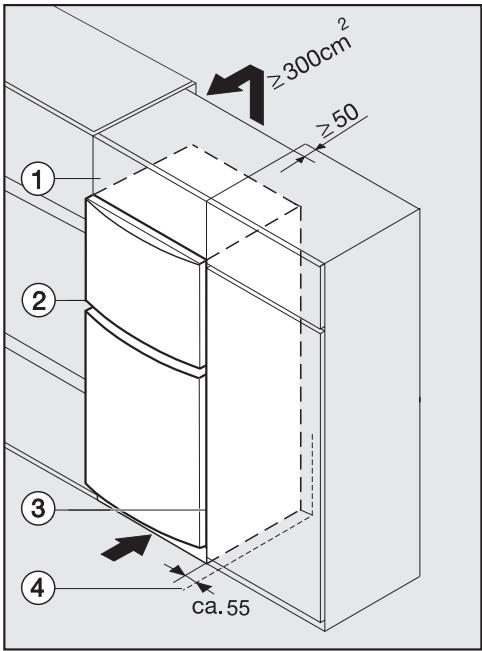
①adapter cabinet
② appliance
③ kitchen cabinet
④ wall
The appliance can be installed in any fitted kitchen. To match the appliance to the height of the fitted kitchen, a suitable adapter cabinet ① can be installed over the appliance.
A ventilation gap of at least 2 inches (50 mm) must be provided between the adapter cabinet and the kitchen wall. The ventilation cross-section below the room ceiling must be at least 46 in² (300 cm²) so that warm air can escape without obstruction. Otherwise the appliance has to work harder, which results in increased energy consumption.
The ventilation cross-sections must not be blocked or covered in any way.
They also need to be dusted/cleaned on a regular basis.
If installing with standard kitchen cabinets (max. depth 580 mm), the appliance can be set up directly next to the kitchen cabinet. In that case the side of the appliance door would project 34 mm and the middle of the appliance 55 mm beyond the front of the kitchen cabinet. This allows the appliance door to open and close properly.
If the appliance is installed next to a wall ④ , a gap of at least 55 mm is needed on the hinge side between the wall ④ and the appliance ② . This allows space for the handle when the door is open.
Miele Limited
Headquarters and Showroom
161 Four Valley Drive
Vaughan, ON L4K 4V8
Phone: 800-643-5381
905-660-9936
Fax: 905-532-2290
www.miele.ca
professional@miele.ca (commercial enquiries)
MieleCare National Service
Phone: 800-565-6435
905-532-2272
Fax: 905-532-2292
customercare@miele.ca (general and technical enquiries)
Subject to change without notice / 4709