
ACAM-002 - Camcorder Gembird - Free user manual and instructions
Find the device manual for free ACAM-002 Gembird in PDF.


| Product type | Digital camcorder |
| Brand | Gembird |
| Model | ACAM-002 |
| Dimensions (L x H x D) | 11 x 6 x 6 cm |
| Weight | 150 g |
| Power supply | Rechargeable lithium-ion battery 3.7 V, 900 mAh |
| Battery type | Built-in Li-ion |
| Battery life | Approx. 60 minutes |
| Recording resolution | Full HD 1080p (1920 x 1080) |
| Photo resolution | 12 megapixels (interpolated) |
| Storage | microSD card up to 32 GB (not included) |
| Screen | 2-inch rotatable LCD |
| Optical zoom | None (digital zoom x8) |
| Connectivity | USB 2.0, Mini HDMI (output) |
| Main functions | Video recording, photo, motion detection, Webcam function |
| Care and cleaning | Clean with a soft dry cloth. Do not use solvents. |
| Safety | Do not expose to water, shocks, or extreme temperatures. |
| Spare parts and repairability | Replaceable battery (soldered), no other spare parts available. |
| Included accessories | USB cable, mounting bracket, protective case |
| Warranty | 2 years (parts and labor) |
Frequently Asked Questions - ACAM-002 Gembird
User questions about ACAM-002 Gembird
0 question about this device. Answer the ones you know or ask your own.
Ask a new question about this device
Download the instructions for your Camcorder in PDF format for free! Find your manual ACAM-002 - Gembird and take your electronic device back in hand. On this page are published all the documents necessary for the use of your device. ACAM-002 by Gembird.
USER MANUAL ACAM-002 Gembird
Thank you for choosing this camera. Please carefully read the manual before first use, and keep it at a safe place for future reference.
All texts, images and screenshots, are according to the latest standards, however, the actual product might differ slightly sometimes due to changes in production techniques, materials or product functionality.
Prec autions
For the best result please only use high-speed microSD card at Class10 or above for use in this camera.
Instructions for using the memory card
- When you place a microSD card in the camera, please format the memory card first via the on screen menu;
- Before plugging in or removing the memory card, please disconnect the power supply of the camera;
- Performance of the memory card will decline over time. In case of lowered performance, a new memory card is needed;
- Don't keep the memory card near strong electromagnetic or magnetic field, like speakers or receivers;
- Don't use or keep the memory card in fast changing, very high or low temperatures;
- Keep the memory card clean and away from liquids. In case of contacting liquid, please dry it quickly with soft cloth;
- Please note that the memory card can get a little warm after long-term usage, this is normal;
Camera Maintenance
- When you don't use the camera, store it in a clean and dry place, away from direct sunlight;
- If you need to clean the camera lens, first blow off any dust or dirt particles and than use a soft cloth that is suitable for cleaning optical equipment to wipe the lens gently. Use only professional camera cleanser to clean the lens. Do not use any organic solvent;
- Do not touch the lens surface with your fingers.
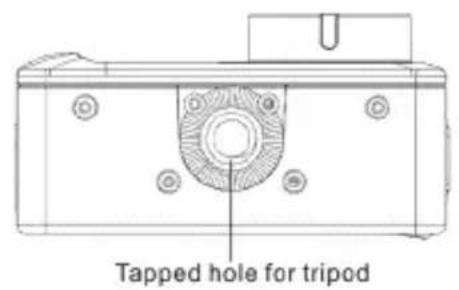
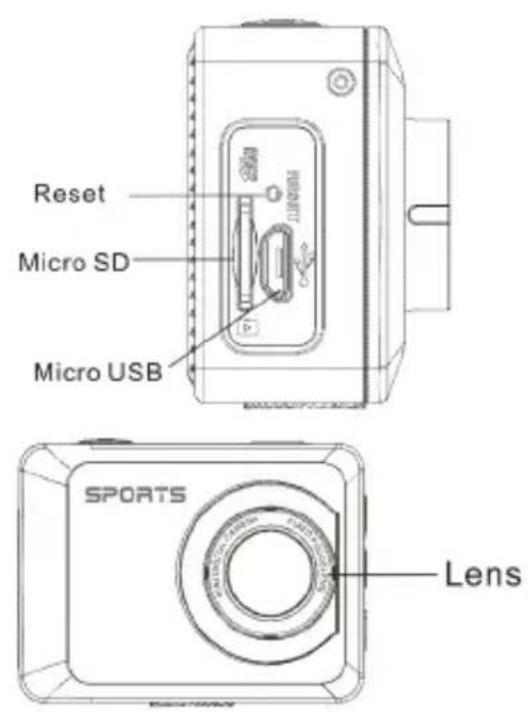
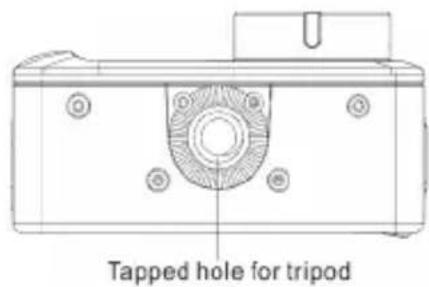
Appearance
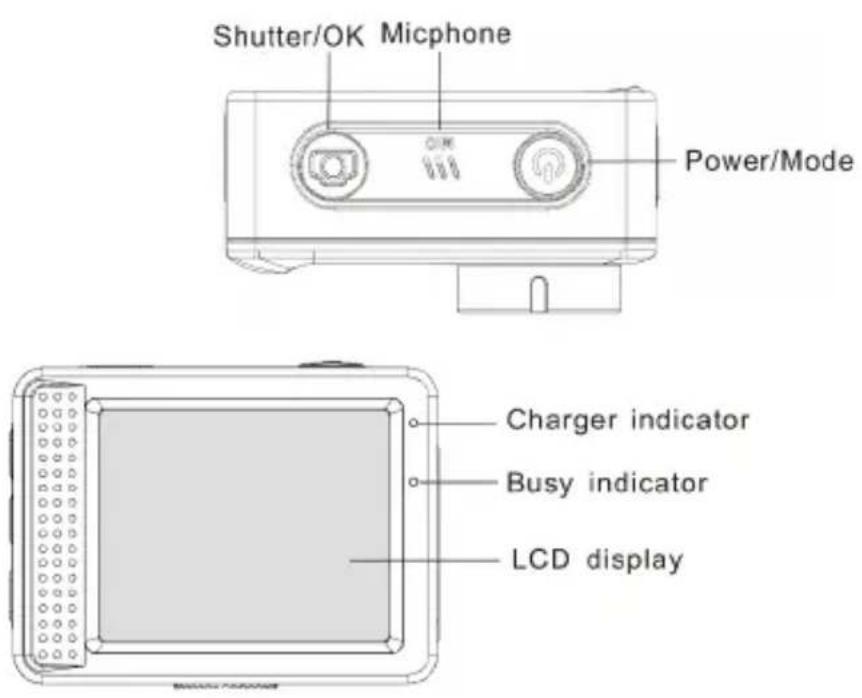
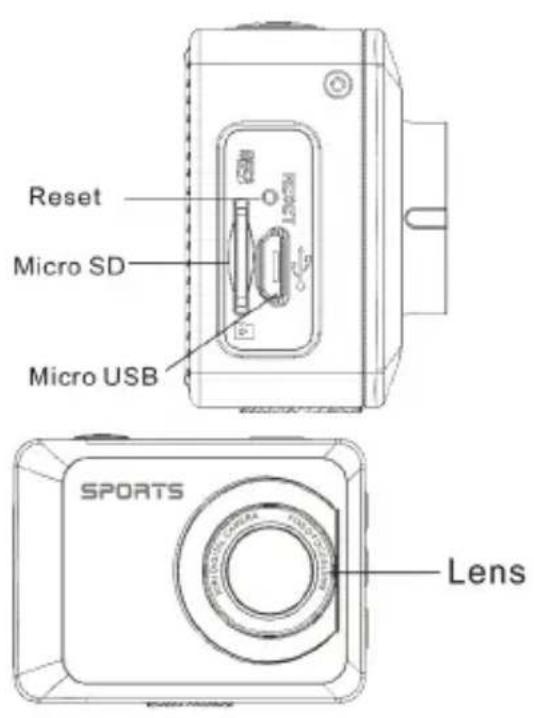

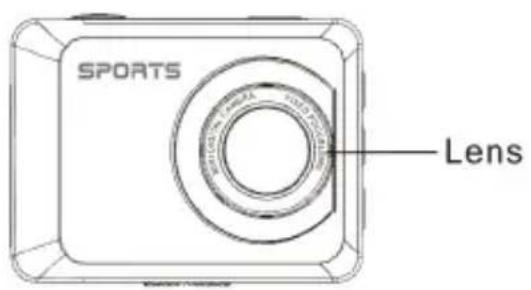
Key Functions and Indicators
| Key/Indicator | Function |
| Power key | Power On/Off; switch camera mode between video, photo and playback |
| Shutter key | Start/stop Video recording, take photo; play/stop playing video file (Playback mode); menu confirmation |
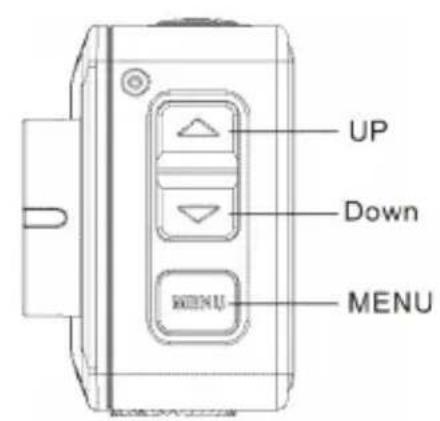
| MENU key | Open and exit from menu ; Stop play video files ( playback mode) |
| Up key | Digital zoom-in: select menu (after opening the menu); file page-up; pause playing video ( playback mode); Reverse quickly video ( playback mode) |
| Down key | Digital zoom-out: select menu (after opening the menu); file page-down ; Fast forward video ( playback mode) |
| Charger indicator | Indicator lights up in red during charging, and turns off after charging is completed. |
| Busy indicator | When the camera is busy (for example: during film recording, capturing, automatic screen-off), the busy indicator will light. |
Before the first use
1. Charge the built-in lithium battery
The camera is equipped with built-in 3.7V lithium battery. Please the battery completely before the first use and charge it whenever the camera has a low battery.

natural_image
Diagram showing a device connected to a laptop via cable, with no visible text or symbols.Connect the camera to computer for charging under shutdown status. The charging indicator will be on when charging, and will be off when the battery is fully charged. Usually, the battery will be fully charged after 2-4 hours.
- How to use the memory card
2.1. Properly insert the microSD card into the card holder as indicated on the camera body.
2.2. To remove the memory card, gently press the end of the card, the card will be ejected.

natural_image
Line drawing of a portable printer with a front panel and cable connector (no text or symbols)Note: The camera is not equipped with built-in memory. Please insert memory card before using. Before using the camera, it is needed to format the memory card on the camera.
- Startup and shutdown:
3.1 Startup: press the POWER key for 3 seconds, the camera will show startup screen and enters into POWER ON state;
3.2 Shutdown: press the POWER key when the camera is under idle mode to shut down;
3.3 Auto shutdown: the camera will be shut down automatically when the camera is under idle mode for a certain time to save power. The default time for auto shutdown is 3 minutes.
3.4 Shutdown under low power: when the battery power is low, the LCD will indicate “☑”. Please charge the battery in this case. When the icon turns red and flashes, the camera will be shut down automatically.
4. Function modes switching
The camera has 3 modes: photo mode, video mode, and playback mode. Use the power key to switch between the modes after starting up.
Video mode: for recording videos;
Photo mode: for taking photos;
Playback mode: for playing back the current video.
5. Indicators
5.1 BUSY indicator: When the camera is working (e.g. recording, photographing, auto screen off etc.), the indicator will light;
5.2 Charging indicator: In shutdown state, the burning indicator means the camera battery is being charged.
6. Photo/recording mode
By default, the camera will startup in recording mode. Use the power key to switch to photo mode.
In video mode, press Shutter to start recording, and press Shutter again to stop recording.
In photo mode, press Shutter to directly take photo.
In both video- and photo mode, press Up/Down for digital zoom in/out.
6.1 Screen display in photo mode

- Photo mode;
- Three photos continuous shooting mode;
- Self-timer mode;
- Photo resolution;
- Photo quality;
- Available shooting count;
- Icon of digital zoom ;
- Battery state ;
- Face detect ;
6.2 Screen display in recording mode
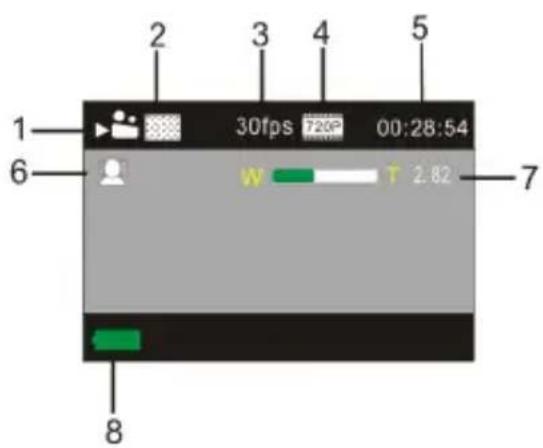
- Video mode;
- Video quality;
- Video frame rate
- Video resolution ;
- Available time to record ;
- Face detect;
- Icon of digital zoom;
- Battery state;
Note:
- When recording HD or FHD video, use high-speed memory card, class 10 or above.
- During recording the screen will automatically turn off for saving power. You can shortly press the Power key or shutter key to turn the screen back on.
7. Video and photo mode Settings Menu
7.1 Menu display
In photo, video and playback mode, press the Menu key to open the menu, and then press Up/Down key to select menu items and press the Shutter key to confirm selection or enter submenu. When selecting menu items, the selected menu item will be marked blue.
In video mode you can use the "Seamless" menu setting to enable/disable loop recording. Video segments can be set to lengths of 1/3/5 minutes. All video segments will connect seamlessly to each other. When the card is full, the oldest video segment is automatically deleted and overwritten. This way the camera can continuously keep recording video.
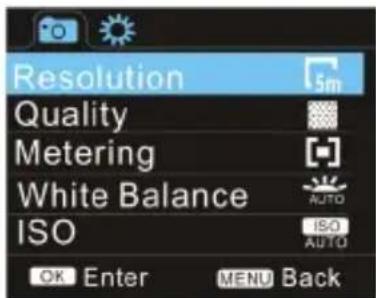
Photo mode menu

Video mode menu
7.2 System Settings menu
Open the menu by pressing the Menu key and shortly press the power key to switch over to the system setting menu. Press the Up/Down key to select menu items and press the Shutter key to confirm selection or enter submenu. In the submenu, press Up or Down key to select menu item, and press Shutter to confirm. After returning to the main menu, press Menu key to exit from the menu.

System menu
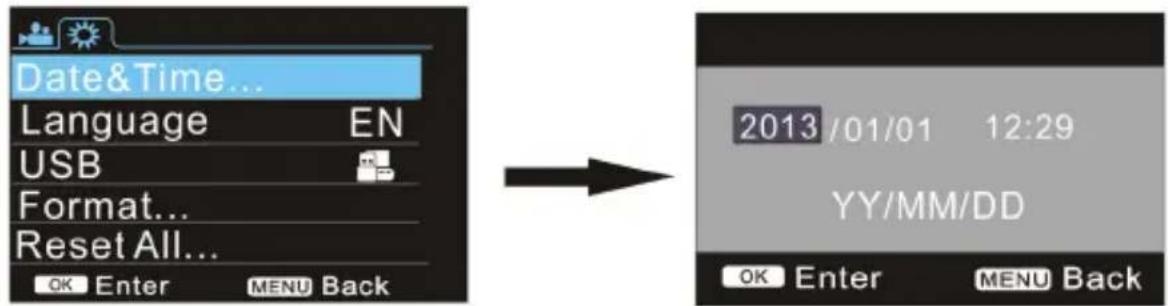
7.3 Setting date and time
Press the Menu key to open the menu, then press the Power key to switch to system settings menu and press Shutter key to confirm. Press the Down key to the select "Date and time" menu item, and then press Shutter key to enter the date/time settings window.
In the date/time settings window, press Power key to select items (date, time) to be adjusted, and then press Up key or Down key to make adjustment, press Shutter key for confirmation when adjustment is completed. Press Menu key to cancel setting and exit. Finally, press Menu key to exit from settings menu.
7.4 Playback mode settings menu
Put the camera into playback mode. Press the Menu key to open playback main menu, press Up or Down key to select menu items and press Shutter key to enter submenu. In the submenu, again press Up or Down key for selection, and press Shutter key to confirm. After returning to the main menu, press Menu key to exit from the menu.

▲ Playback menu
8. Playback mode
Press Power key to enter playback mode to browse photo/video files and play the videos recorded.
Press Up/Down key to select previous or next photo/video.
Play movie: Press the shutter button to start/pause play video, press the up/down key to reverse quickly /fast forward playback, press the MENU button to stop play videos.

Video file playback

Video pause mode
9. Connect to computer to download photo/video
When the camera is connected with the computer, select the ‘removable disk’ (MSDS) mode. There will be a removable disk added in the Windows file explorer. The photo or video files will be stored in a folder named “DCIM\100MEDIA” on this removable disk. Browse this file folder to select and copy files onto the hard disk of your computer.

Note: During file transfer, it is not allowed to disconnect the USB cable or to remove the memory card to avoid loss of data.
The ACAM-002can also be used as webcam (video only) on your PC. In order to use the webcam function, please follow the next steps:
- Connect the camera to your PC with the supplied USB cable
- Turn the camera on with the power button
- the camera display will show PC functions (MSDS by default), select "P C Camera"
- Windows will now install all needed camera drivers automatically
- You can now use the AC AM-002 as webca min all common software that supports webcam use, e.g. Style,
Technical parameters
| Image sensor | 5.0 MP CMOS |
| Function mode | Video, photo, playback |
| Lens | F2.5 f=3.53mm |
| Digital zoom | 8x |
| LCD screen | 2.0” color LCD screen |
| Picture resolution | 12M (4000 x 3000), 8M (3264 x 2448), 5M (2592 x 1944) |
| Video resolution | FHD (1920x1080@30fps), HD (1280X720@30fps), HD (1280X720@60fps) |
| Storage medium | MicroSD (TF) card, speed class 10 (Max. 32GB) |
| File format | JPEG (photo), H.264 (video) |
| USB port | USB 2.0 |
| Power supply | 5V, 800 mA |
| Battery | Built-in 3.7V rechargeable lithium battery (700 mAh) |
| Operating system requirements | Windows XP/Vista/7/8, Mac 10.2 |
| Dimensions | 58 x 44 x 23 mm |
| Weight | 70 g |
Note: The product design specifications are based on the latest information available while compiling this product manual. All camera specifications and features are subject to change without further notice.
ACAM-002
natural_image
Diagram showing a device connected to a laptop via cable, with no visible text or symbols.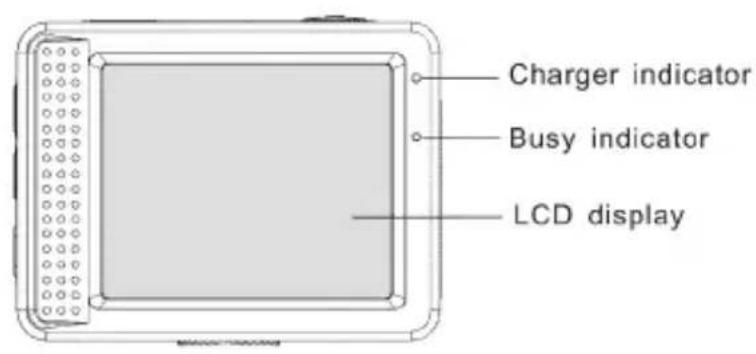

Knoppen en indicators
natural_image
Diagram showing a device connected to a laptop via cable, with no visible text or symbols.natural_image
Line drawing of a portable electronic device with ports and a cable inserted (no text or symbols)▲ Playback menu
8. Playbackmodus
Video op pauze

natural_image
Diagram showing a device connected to a laptop via cable, with no visible text or symbols.natural_image
Line drawing of a camera with a labeled sensor and connector (no text or symbols)- Photo mode;
- Three photos continuous shooting mode;
- Self-timer mode;
- Photo resolution;
- Photo quality;
- Available shooting count;
- Icon of digital zoom ;
- Battery state ;
- Face detect ;
▲ Menu "Lecture"
8. Mode Lecture
Shutter/OK - 3atBop/OK
Micphone – Микрофон
Power/Mode -
Питание/Режим
natural_image
Diagram showing a device connected to a laptop via cable, with no visible text or symbols.natural_image
Line drawing of a portable electronic device with ports and a connector (no text or symbols)natural_image
Diagram showing a device connected to two laptops, one with a screen displaying a photo and the other with a keyboard (no text or symbols visible)6.1 Screen display in photo mode

▲ Menu Reproducción
(ENG) Declaration of conformity
This product is tested and complies with the essential requirements of the laws of member states concerning EMC (2004/108/EG). The CE declaration can be found under www.gembird.eu


- Prec autions
- Instructions for using the memory card
- Camera Maintenance
- Appearance
- Key Functions and Indicators
- Before the first use
- Charge the built-in lithium battery
- Function modes switching
- Indicators
- Photo/recording mode
- Screen display in photo mode
- Screen display in recording mode
- Note:
- Video and photo mode Settings Menu
- Menu display
- System Settings menu
- Setting date and time
- Playback mode settings menu
- Playback mode
- Connect to computer to download photo/video
- Technical parameters
- ACAM-002
- Knoppen en indicators
- Playbackmodus
- Mode Lecture
- (ENG) Declaration of conformity
Brand : Gembird
Model : ACAM-002
Category : Camcorder