
ACAM-W-01 - Camcorder Gembird - Free user manual and instructions
Find the device manual for free ACAM-W-01 Gembird in PDF.


| Product Type | Digital Camcorder |
| Brand | Gembird |
| Model | ACAM-W-01 |
| Dimensions (W x H x D) | Approx. 100 x 60 x 30 mm |
| Weight | Approx. 200 g (with battery) |
| Power Supply Type | Built-in rechargeable lithium-ion battery |
| Battery Life | Approx. 2 hours continuous recording |
| Maximum Video Resolution | Full HD 1080p |
| Maximum Photo Resolution | 16 megapixels (interpolated) |
| Screen | 2.7-inch rotatable TFT LCD screen |
| Zoom | 8x digital zoom |
| Storage | SD/SDHC memory card (up to 32 GB, not included) |
| Connections | USB 2.0, HDMI, microphone input, headphone output |
| Sensor | 5 megapixel CMOS sensor |
| Image Stabilization | Electronic digital stabilization |
| Care and Cleaning | Clean the exterior with a soft, dry cloth. Avoid chemicals. |
| Safety | Do not expose to moisture, shocks, or extreme temperatures. |
| Spare Parts and Repairability | Battery, USB cable, AC charger (available separately) |
| Package Contents | Camcorder, USB cable, AV cable, battery, charger, wrist strap, manual |
Frequently Asked Questions - ACAM-W-01 Gembird
User questions about ACAM-W-01 Gembird
0 question about this device. Answer the ones you know or ask your own.
Ask a new question about this device
Download the instructions for your Camcorder in PDF format for free! Find your manual ACAM-W-01 - Gembird and take your electronic device back in hand. On this page are published all the documents necessary for the use of your device. ACAM-W-01 by Gembird.
USER MANUAL ACAM-W-01 Gembird
natural_image
Exterior view of a Sound Cam camera module (no visible text or symbols on body)"ACAM-W-01"
User Manual - Benutzerhandbuch Gebruiksaanwijzing – mode d'employ
Welcome
Thank you for choosing our ACAM-W-01, a Full HD action camera with WiFi feature.
This user manual provides detailed instructions regarding how to use this device and other detailed information, including installation, technical specifications, etc.. Before use, please read this manual carefully and be sure to understand it completely. Please keep this manual for future reference.
Product Structure

- "OK" key 7. Speaker
- "POWER" key 8. Microphone
- "MENU" (M) key 9. HDMI port
- “<-” key 10. SD card slot
- “+>” key 11. USB port
- Wide-angle lens 12. Battery compartment
Key/button functions
- "OK" key: confirmation
- "POWER" key: On/Off.
- "M" key: shortly pressed, menu function key; held, playback/return
- "<-” key: Down key/shooting.
- “+>” key: UP key/ marking/WIFI
Installing the battery and memory card
-
Open the waterproof lid that covers the connectors, battery compartment and memory card slot.
-
Insert the battery until the safety catch snaps into place.
-
Insert the memory card into the card slot until it is fixed firmly in the slot. Be sure to insert it only in the correct direction, as indicated on the camera.
-
For removing the memory card, slightly press the card to release it. Only after it is released, you may take it out.
-
If no card is inserted, the screen will display the information "No card!" as shown in the below picture:
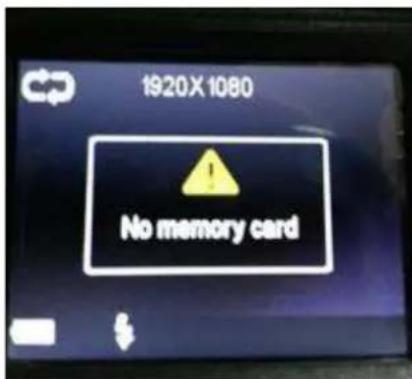
Note:
-
Please make sure the direction in which you insert the card is right. Otherwise, the device and/or the memory card may be damaged.
-
It is advised to format the card via the camera settings menu before the first use.
Video recording capacity (only for reference)
| SD Card size | (1080P) 30F | (720P) 60F |
| 16GB | 120 min | 160 min |
| 8GB | 60 min | 80 min |
| 4GB | 30 min | 40 min |
| 2GB | 15 min | 20 min |
Note: The number of shots that can be taken will vary depending on device settings, the subject and the memory card used.
Product features
■ Full HD 1080p action camera with built-in microphone and speaker
■ IP68 full waterproof camera body, so no extra case needed
■ 140 degrees ultra wide angle lens
■ WiFi function - for easy wireless control with smartphone or tablet
■ Free remote control app available in iOS and android app stores
■ Stores hours of video material on removable SD card (not included)
■ Built-in 1.5" color LCD screen
■ Supports single-, triple- and interval photo shooting
■ Practical instant snapshot button
Directions for Use
Charging:
This device is equipped with a rechargeable lithium battery. For the first three times, please completely discharge the battery during use and charge the battery for 12 hours, so that the battery can have its maximal efficiency.
For the first use, please charge the battery for 12 hours in one of the following ways:
1) Connect it to PC with USB data cable for charging.
2) Connect the USB cable with the USB charger and plug the charger into the power supply socket. When charging, the blue indicator light will be on. When the battery is fully charged, the blue indicator will turn off again.
Note:
- When the battery is low, the camera will directly enter the power protected mode and cannot be switched on. In such case, please charge it.
- If an empty battery causes unforeseen white screen or halts, etc. Please reset the device and recharge it.
General functions:
- Press the POWER key shortly to switch the camera on. Hold the POWER key to switch off the camera.
- The camera will start up in video mode by default. Press the OK key to start recording. Press OK again to stop recording and automatically save the video file.
- In video mode (when not recording), press the "MENU" key shortly to enter the main settings menu. Press the OK key to switch between 'video', 'photo' and 'system' settings. Press the "<-” key or the "+" key to select menu items.
- Hold the "MENU" key for 3 seconds to enter playback mode. Press the "<-” key or the “+>” key to select the file type to be opened (video/photo/event) and press the OK key to enter the file browser page. Use the "<-” or “+>” key to choose the file to browse through the files. In case of a video file, press the OK key to start playing the file. Hold the "MENU" key to exit.
- Press the “+>” key to enter the WIFI mode.
- Hold the “+>” key to exit from the WIFI mode.
Settings menu
Switching between Video-, Photo- and System setup
Press the POWER key to switch the camera on, it is now in standby mode. To open the settings menu, just press the "M" key. Press the "OK" key to switch between different menus (video/photo/system). Within a selected menu you can use the "<-/+>" keys to select menu items and press "OK" to confirm. Press the MENU (M) key to back to the previous menu.
1. Video setup menu
Press the “M” key to open the settings menu. Video settings will be selected by default. Press the “<-/+>” key to choose the option to be set up as follows and then press the OK key to confirm.
■ Resolution: select 1920*1080 (30 fps) or 1280*720 (60 fps).
- Loop record: When this option is switched off, each video segment will be 30 minutes long and the camera will keep recording until the SD card is full without deleting the previous files recorded. When this option is switched on, each video segment will be 15 minutes long and the camera will keep recording until you press the record button, or when the camera is turned off. If the SD card is full, the camera will overwrite the previous files recorded, starting with the oldest recording.
■ Date stamp: Turn on/off the use of a date stamp in you videos
■ Exposure value: Depending on the recording environment, select EV-2.1...EV-+0.0...EV-+2.1, etc..
2. Photo setup menu
Press the “M” key to open the settings menu and press OK once to switch to the photo menu. Press the “<-/+>” key to choose the option to be set up as follows and then press the OK key to confirm.
■ Resolution: 2M by default.
- Single shot: When this option is switched on, the camera will take one picture at a time. When enabled, all possible other settings (e.g. triple mode, continuous mode and self-timer) will automatically be switched OFF. When either triple mode, continuous mode or self-timer mode is turned on, the single shot photo mode will be automatically switched off.
- Triple shot: When this option is switched on, the camera will take three (3) pictures at a time. When enabled, all possible other settings (e.g. single mode, continuous mode and self-timer) will automatically be switched OFF. When either single mode, continuous mode or self-timer mode is turned on, the triple shot photo mode will be automatically switched off.
- Self-timer: When this option is set as 5s or 10s, you may enter the self-timer mode; in such case, single mode, continuous mode and triple mode are inactive and automatically trip to OFF. In self-timer mode, press the shooting key, the camera will delay 5s or 10s to take one picture. When any of single mode, continuous mode and triple mode is on, the self-timer mode will be automatically off.
- Continuous: This option allows the camera to take one picture every 2s, 3s, 5s, 10s, 20s, 30s or 60s until the card is full or when you stop the process by pressing the “<-”key. When enabled, all possible other settings (e.g. single mode, triple mode and self-timer)
will automatically be switched OFF. When either single mode, triple mode or self-timer mode is turned on, the continuous shot photo mode will be automatically switched off.
3. System setup menu
Press the “M” key to open the settings menu and press OK twice to switch to the system settings menu. Press the “<-/+>” key to choose the option to be set up as follows and then press the OK key to confirm.
■ Sounds: Shutter sound /Power-on tone selection/ Beep tone /Volume settings.
■ Power frequency: Automatic, 50Hz or 60Hz.
■ Screen saver: Turns the LCD display off after 1min /3min/5min/never.
■ Auto power-off: Turns the camera off after 1 min /3 min/5 min of non-usage (or never).
- Date & Time: Set the correct date and time. Press the “<-/+>”key to increase/decrease; press the OK key to automatically switch among “Month/Date/Year” and “Hour/Minute”.
- Language: Press the “<-/+>” key to choose the desired language; press the OK key to confirm and go back to the previous menu.
- Format: Use this function to format the SD card. Press the “<-/+>”key to choose “Yes” and press the OK key to start formatting the memory card; choose “No” and press the OK key to exit from the current menu setup.
■ Screen rotation: Rotate the image by 180°.
■ Reset all: Restores camera to factory defaults
■ Version info: Display current software version.
Daily use: make videos, take pictures, charging and playback
Video: Press the POWER key to switch the camera on. The camera always starts up in video mode and is now standby for recording a video. Press the REC/OK key to start recording. The right upper corner of the screen will now display a flickering red “REC” icon. To lock the current video segment, just press the “+” key during the recording. The left upper corner of the screen will now display a lock icon. The file is now locked and saved into the EVENT folder.
Photo: In video mode, press the “<-” key to switch to the photo mode. The camera will then take one or more photos depending on you photo settings (single/triple shot, continues shot, etc). Press “<-” again to stop taking photos and return to video mode.
Charging: When you connect the camera to the charger, it will automatically turn on. The blue LED charging indicator will turn on. If you press the REC/OK button now, the camera stops charging and starts to record your video. When you stop recording, the charging will resume. It's possible to turn the camera off while charging, just press the "POWER" key to turn it off. The blue charging indicator will stay on until the charging is complete.
Playback: Hold the “MENU” key for 3 seconds to pop up the playback mode menu, press the “<-/+>” keys to choose between Event/Video/Photo and the “OK” key to confirm your selection.
- Press the OK key to start playing a selected video file. Hold the “MENU” key to exit when done playing videos.
In playback mode, press the “<-/+>” key to choose to delete or lock the selected file, press the
“MENU” key shortly again to pop up DELETE/LOCK and press the OK key to confirm.
- Press the “MENU” key to exit from the playback menu and then to exit from the playback mode.
- Connecting the camera to your PC
Use the included USB cable to connect the ACAM-W-01 action camera to your PC. The camera display will then show 2 options: MSDC and PC-CAM. Press the “<-/+>” keys to select PC-CAM and confirm with the OK key use the ACAM-W-01 as a PC webcam. Windows will recognize the ACAM-W-01 as webcam and install needed drivers automatically. If you select the MSDC option, the camera will be recognized as removable storage device, which allows you to view, copy or delete all files on the internal SD card.
Note:
a) You can easily switch between the PC-CAM and MSDC mode by pressing the “M” key on the camera at any time.
b) When you connect the ACAM-W-01 USB cable to a PC, but you do not want to make a real data connection, just press the "M" key on the camera when the PC-CAM-MSDC option screen is visible on the display. This will switch the camera into standard video recording mode.
- Setup WIFI: use your phone or tablet as remote control
To use your phone or tablet as remote control for your ACAM-W-01 camera, you will first need to install the ISMART camera app from your app store. Just type ISMART in the search field of the app store, or use below QR codes.

Android

Apple
Turn the camera on and press the “+>” key to enter the WIFI mode. The camera display will show “waiting for WiFi connection”. Now get your mobile phone or tablet, let it search the WIFI signal from the camera and connect to it. When connecting to WiFi network of the camera, the mobile phone will ask you to enter a password. The default WiFi password of the camera is 1234567890. When the password is entered, the camera display will show “Connected”.
Now open the ISMART camera app on your mobile phone or tablet. You will see the camera image right away. You can move the camera lens to ensure the image on your mobile phone or tablet will also show this movement. If so, you are bow ready to record videos and take pictures with your ACAM-W-01 camera via your mobile phone or tablet. You can also use your phone/tablet to watch all recorded videos and pictures that are stored on the camera.
NOTES:
a) For Android devices it is needed to also install MX Player (or other video player) for video playback.
b) Different mobile phones may have different sounds, image smoothness and different WiFi range, etc.
- Connect to a TV with HDMI
Insert the mini connector of the HDMI cable into the HDMI OUT port of the camera and the standard size connector into the HDMI port of the TV. Set the TV to the corresponding HDMI mode to see the images from the camera. On the camera, select the desired video file and press the OK key to start the video output to your TV.
Product Specs
| Sensor | Full HD CMOS |
| Lens | 140° |
| Focus range | 12cm~infinite |
| Screen | 1.5” LTPS TFT LCD |
| TV out | NTSC/PAL |
| Video format | .MOV (H.264) |
| Video | 1920*1080(30 fps), 1280*720(60 fps) |
| Memory | MicroSD (TF) card (max. 32G ) |
| Interface | USB 2.0, HDMI |
| Battery | Removable Lithium-ion battery, 1000 mAh |
| USB | USB 2.0 |
| Dimensions/Weight | 86 x 40 x 57 mm |
| Working temperature/humidity | 0~40°C / 10%~80% |
- Troubleshooting
Q: Unable to switch on?
A: Maybe the battery is empty. Please charge the battery and try again.
Q: Unable to take videos?
A: Please check the memory card capacity. Is there enough free space? Also check whether or not it is inserted properly. Check the memory card in another device or PC to check for card damage.
Q: No video on the TV screen?
A: Please check if the TV OUT cable HDMI connector is connected correctly. Also check your TV HDMI settings, is it set to the correct HDMI IN?
Q: Unclear images/videos?
A: Clean the lens carefully with soft cloth before use
Q: The camera is not responding anymore, what to do?
A: If the camera does not respond, please press the RESET button to restart the device.
Welkom
- "OK" knop 7. Luispreker
- "POWER" knop 8. Microfoon
- "MENU" (M) knop 9. HDMI aansluiting
- "<-” knop 10. SD kaartsleuf
- “+>” knop 11. USB poort
- Wide-angle lens 12. Batterij compartiment
Note:
Android
Apple
-
Touche "OK" 7. Haut parleur
-
Touche "ON/OFF" 8. Microphone
-
Touche "MENU" (M) 9. Port HDMI
-
Touche "<-” 10. Logement de carte SD
-
Touche “+>” 11. Port USB
-
Super grand angle 12. Logement batterie
Nota :
Press the “M” key to open the settings menu and press OK once to switch to the photo menu. Press the “<-/+>” key to choose the option to be set up as follows and then press the OK key to confirm.
Android

Apple
natural_image
Exterior view of a Sports Cam device with visible lens and control buttons (no text or symbols on body)Benutzerhandbuch
Ver. 20140929
Inhaltsverzeichnis
- Installing the battery and memory card Seite 4
Hinweis:
Android

Apple
This product is tested and complies with the essential requirements of the laws of member states concerning EMC(2004/108/EC), R&TTE(1999/5/EC). The CE declaration can be found under www.gembird.eu
natural_image
Simple line drawing of a hand washing a cup with water droplets falling (no text or symbols)
natural_image
Illustration of a hand using a tool to adjust or install a screwdriver, with no text or symbols present.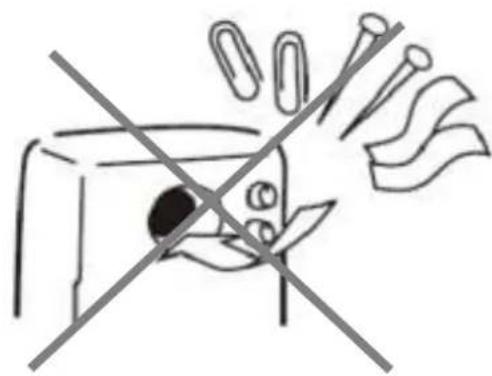
natural_image
Simple line drawing of a hand holding a device with a crossed-out arrow, no text or symbols presentWaste disposal: Do not deposit this equipment with the household waste. Improper disposal can harm both the environment and human health. For Information about waste collection facilities for used electrical and electronic devices, please contact your city council or an authorized company for the disposal of electrical and electronic equipment. Do not deposit this equipment with the household waste. Improper disposal can harm both the environment and human health. For Information about waste collection facilities for used electrical and electronic devices, please contact your city council or an authorized company for the disposal of electrical and electronic equipment. | Entsorgungshinweise:   Werfen Sie dieses Gerät nicht in den Hausmüll. Unsachgemäße Entsorgung kann sowohl der Umwelt als auch der menschlichen Gesundheit schaden.Informationen zu Sammelstellen für Altgeräte erhalten Sie bei Ihrer Stadtverwaltung oder einer autorisierten Stelle für die Entsorgung von Elektro-und Elektronikgeräten. Werfen Sie dieses Gerät nicht in den Hausmüll. Unsachgemäße Entsorgung kann sowohl der Umwelt als auch der menschlichen Gesundheit schaden.Informationen zu Sammelstellen für Altgeräte erhalten Sie bei Ihrer Stadtverwaltung oder einer autorisierten Stelle für die Entsorgung von Elektro-und Elektronikgeräten. |
| Richtlijnen m.b.t. afvalverwerkingBatterijen en accu’s dienen als klein-chemisch afval afgeleverd te worden bij toegewezen afvalverzamelpunten (zie www.afvalgids.nl). U dient ervoor te zorgen dat de batterijen/accu’s leeg zijn en dus geen stroom meer kunnen leveren. Let op, de batterijen/accu’s dienen onbeschadigd ingeleverd te worden.Gooi dit product niet weg in uw vuilnisbak. Dit kan zowel het milieu als de menselijke gezondheid schade toebrengen. Informatie over het inleveren van dit product kunt u inwinnen bij uw gemeentelijke vuilnisdienst of andere geautoriseerde instelling in uw buurt. | Traitement des déchets:Ne jetez pas cet appareil dans les déchets domestiques. Un traitement inapproprié peut être dommageable à l'environnement et à la santé humain.Vous trouvez des informations sur les centres de rassemblement des appareils vieux chez l'administration municipale ouchez un centre autorisé pour le traitement des appareils électriques ou électroniques. |


- Welcome
- Product Structure
- Key/button functions
- Installing the battery and memory card
- Note:
- Product features
- Directions for Use
- Charging:
- General functions:
- Settings menu
- Switching between Video-, Photo- and System setup
- Video setup menu
- Photo setup menu
- System setup menu
- Daily use: make videos, take pictures, charging and playback
- - Connecting the camera to your PC
- - Setup WIFI: use your phone or tablet as remote control
- NOTES:
- - Connect to a TV with HDMI
- - Troubleshooting
- Welkom
- Nota :
- Benutzerhandbuch
- Inhaltsverzeichnis
- Hinweis:
Brand : Gembird
Model : ACAM-W-01
Category : Camcorder