
47701 - Coffee machine HAMILTON BEACH - Free user manual and instructions
Find the device manual for free 47701 HAMILTON BEACH in PDF.


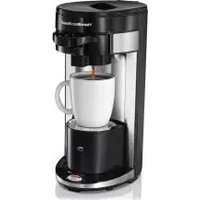
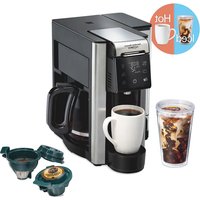
| Product Type | Programmable Drip Coffee Maker |
| Brand | Hamilton Beach |
| Model | 47701 |
| Capacity | 12 cups (1.8 L) |
| Color | Black with silver accents |
| Dimensions (L x W x H) | 30 x 20 x 35 cm |
| Weight | 2.5 kg |
| Power supply | 230 V, 50 Hz, 900 W |
| Coffee type | Ground coffee (permanent filter included) |
| Programmable timer | Yes, with digital clock |
| Auto shut-off | Yes, adjustable (2 hours) |
| Carafe | Graduated glass, handle and pouring spout |
| Warming plate | Yes, keeps warm |
| Permanent filter | Yes, fine mesh (washable) |
| Drip-stop | Yes (pause & serve) |
| Water level indicator | Yes, transparent window |
| Care and cleaning | Regular descaling (white vinegar); clean carafe and filter with soapy water |
| Safety | Auto shut-off, overheat protection |
| Spare parts available | Carafe, filter basket, permanent filter |
| Repairability | Repairability index not communicated; standard parts available |
Frequently Asked Questions - 47701 HAMILTON BEACH
User questions about 47701 HAMILTON BEACH
0 question about this device. Answer the ones you know or ask your own.
Ask a new question about this device
Download the instructions for your Coffee machine in PDF format for free! Find your manual 47701 - HAMILTON BEACH and take your electronic device back in hand. On this page are published all the documents necessary for the use of your device. 47701 by HAMILTON BEACH.
USER MANUAL 47701 HAMILTON BEACH
Visit www.hamiltonbeach.com for our complete line of products and Use and Care Guides – as well as delicious recipes, tips, and to register your product online!
Please call us – our friendly associates are ready to help. USA: 1.800.851.8900
Questions?
natural_image
Black and white photo of a Bosch coffee maker with digital display and control buttons (no visible text or symbols on device body)Hamilton Beach®
BrewStation®
English 2
Français 13
Español 25
IMPORTANT SAFEGUARDS
When using electrical appliances, basic safety precautions should always be followed to reduce the risk of fire, electric shock, and/or injury to persons, including the following:
- Read all instructions.
- Do not touch hot surfaces. Use handles or knobs. Care must be taken, as burns can occur from touching hot parts or from spilled, hot liquid.
- To protect against electric shock, do not place cord, plug, or BrewStation® in water or other liquid.
- Close supervision is necessary when any appliance is used by or near children.
- Unplug from outlet when either the BrewStation ^® or clock is not in use and before cleaning. Allow to cool before putting on or taking off parts and before cleaning the appliance.
- Scalding may occur if the lid is lifted during the brewing cycle. Do not open lid until coffeemaker has cooled completely.
- BrewStation ^® must be operated on a flat surface away from the edge of counter to prevent accidental tipping.
-
Do not operate any appliance with a damaged cord or plug, or after the appliance malfunctions or is dropped or damaged in any manner. Call our toll-free customer service number for information on examination, repair, or adjustment.
-
The use of accessory attachments not recommended by the appliance manufacturer may cause injuries.
- Do not use outdoors.
- Do not let cord hang over edge of table or counter or touch hot surfaces, including stove.
- The coffee tank is designed for use with this BrewStation ^® . It must never be used on a range top or in a microwave oven.
- Do not place BrewStation® on or near a hot gas or electric burner or in a heated oven.
- To disconnect BrewStation, turn controls to OFF (O) and then remove plug from wall outlet.
- WARNING! To reduce the risk of fire or electric shock, do not remove the bottom cover. No user-serviceable parts are inside. Repair should be done by authorized service personnel only.
- Do not use appliance for other than intended use.
SAVE THESE INSTRUCTIONS!
IMPORTANT
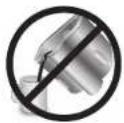
Never use coffee tank to pour hot coffee or carry hot coffee. Handle coffee tank when it holds only cold water or cold coffee.

Additional Information
- If overflow occurs: Let unit, coffee, and grounds cool completely before attempting any cleanup.
- Use only brand-name, high-quality filters.
- Use only 1 tablespoon of ground coffee for each cup of water.
- Use coffeemaker cleaner to prevent hard water deposits that affect coffeemaker performance. Clean monthly.
- Read instructions before using.
Other Consumer Safety Information
This appliance is intended for household use only.
WARNING! Shock Hazard: This appliance has a polarized plug (one wide blade) that reduces the risk of electric shock. The plug fits only one way into a polarized outlet. Do not defeat the safety purpose of the plug by modifying the plug in any way or by using an adapter. If the plug does not fit fully into the outlet, reverse the plug. If it still does not fit, have an electrician replace the outlet.
The length of the cord used on this appliance was selected to reduce the hazards of becoming tangled in or tripping over a longer cord. If a longer cord is necessary, an approved extension cord may be used. The electrical rating of the extension cord must be equal to or greater than the rating of the appliance. Care must be taken to arrange the extension cord so that it will not drape over the countertop or tabletop where it can be pulled on by children or accidentally tripped over.
To avoid an electrical circuit overload, do not use another high-wattage appliance on the same circuit with your BrewStation ^® .
Parts and Features
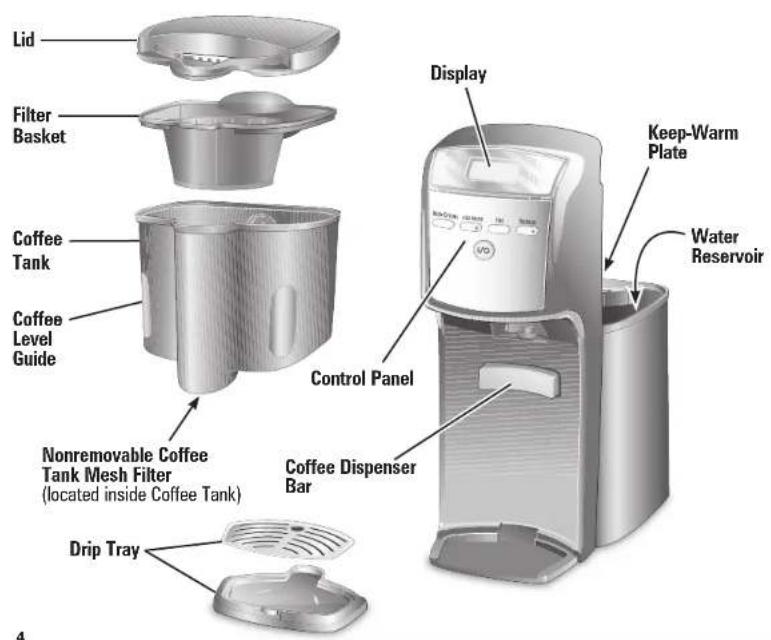
Optional Accessories

To Order Accessories:
1.800.851.8900 (U.S.)
1.800.267.2826 (Canada)
01.800.71.16.100 (Mexico)
or visit hamiltonbeach.com
hamiltonbeach.ca
How to Make Coffee
*Coffee scoop is optional feature on select models.
BEFORE FIRST USE: Wash coffee tank, filter basket, and drip tray in hot, soapy water.
This BrewStation® automatically defaults to KEEP WARM for 2 hours after the brew cycle ends. KEEP WARM will be shown in the display during this portion of the cycle.

natural_image
Interior view of a kitchen sink with a metal bowl and water pipe (no text or symbols visible)
natural_image
Illustration of a kitchen blender with liquid being poured into a cup (no text or symbols visible)| Normal Amount of Coffee Per Cup1 scoop* or 1 level tablespoon per cup | ||
| Maximum Amount of AutomaticDrip Coffee to Use in BrewStation* | ||
| Coffee | Scoop | Tablespoons |
| Regular | 12 | 12 |
| Decaf | 12 | 12 |

natural_image
Close-up of a hand using a spatula to spread dark granular material in a square cupbell (no text or symbols visible)Put grounds in the filter with the filter basket out of the brew tank.

natural_image
3D illustration of a mechanical component with a downward arrow indicating process (no text or symbols)
natural_image
3D rendering of a mechanical component with a downward arrow indicating compression or disassembly (no text or symbols)
natural_image
Illustration of a kitchen appliance with two cups and a digital display, showing a drop in the cup (no text or symbols)How to Make Coffee (cont.)


natural_image
Illustration of a hand pouring tea from a cup into a milk dispenser (no text or symbols visible)WARNING
Burn Hazard.
- Never use coffee tank to pour or carry hot coffee,
- Handle coffee tank only when holding cold water for filling water reservoir and to clean tank after BrewStation* has been shut off and the coffee is cool.
- If BrewStation® overflows, unplug unit. Allow unit, coffee, and grounds to cool before cleaning unit, coffee, or grounds.
NOTE: BOLD and 1-4 CUPS modes will require additional time to complete a brewing cycle. A Brew Option must be selected prior to pressing the I/O button. The setting cannot be changed during/ in brew mode.
TO REHEAT COFFEE: Make sure unit is turned off. Press and hold I/O button for 3 seconds. This will reset the timer and keep coffee warm up to 2 hours. KEEP WARM will flash in the display and then stay constant to show this coffee reheat option is selected.
Reheating will not work if the Iced Coffee function is selected.
Brew Options
BOLD
Enhanced full/strong-flavored coffee:
Press Brew Options Button until BOLD
is displayed.
1-4 CUPS
When brewing 1–4 cups of coffee:
Press Brew Options Button until
1-4 CUPS is displayed.
If a Brew Option is not selected, the coffeemaker will automatically brew on the regular/default setting.
To Make Iced Coffee
*Coffee scoop is optional feature on select models.

natural_image
Interior view of a kitchen sink with water being poured into it (no text or symbols visible)Fill coffee tank with water. Do not fill beyond the 6-cup line when making iced coffee.

natural_image
Illustration of a kitchen blender with a digital display and handle (no text or symbols visible)natural_image
Two-step assembly diagram showing a mechanical component being inserted into a container, with no visible text or symbols.
natural_image
Close-up of a kitchen appliance with a hand inserting into a container (no visible text or symbols)WARNING Burn Hazard.
If BrewStation® overflows, unplug unit. Allow unit, coffee, and grounds to cool before cleaning unit, coffee, or grounds.

natural_image
Illustration of a hand pouring liquid into a container with granular material (no text or symbols)Fill coffee tank with ice to the 10 CUP marking line.

natural_image
Close-up of a hand using a spatula to spread dark chocolate pieces into a paper liner in a square bowl (no text or symbols visible)Brew double-strength coffee for iced coffee. Add 2 scoops* or 2 level tablespoons of ground coffee per cup (up to 12 scoops).
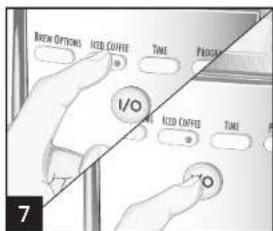
Press the ICED COFFEE button. Press I/O button to brew. Green light will be displayed on the Iced Coffee button. Unit will automatically shut off when iced coffee is ready. NOTE: Keep Warm setting is not available with the Iced Coffee function.

natural_image
Illustration of a hand mixer with ice cubes inside, no text or symbols present7
Programming

To set clock: Press TIME. NOTE: Clock time must be set for programming function to work.

To program auto brew: Press and hold PROGRAM until clock flashes.

Continue holding PROGRAM; then press TIME until the desired brewing start time is reached.

Press and release PROGRAM to activate automatic brewing. A green light will signal that the unit is in program mode.
Water Filter

natural_image
Illustration of hands pouring liquid into a bowl with a downward arrow, labeled '15 min.' (no text or symbols on the diagram itself)8

natural_image
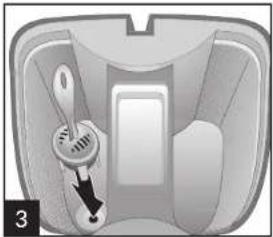
Top-down view of a kitchen utensil with a handle and side bowl (no text or symbols visible)For better tasting coffee, use a water filter.
Filter replacement is recommended every 60 cycles.
natural_image
Interior view of a car seatbelt with a hand holding a tool, showing no text or symbols.广力云智慧零售收银系统
Water Filter (Optional Accessory)
If using a water filter, it should be replaced every 60 cycles for best-tasting coffee.
To Order a Water Filter, Call:
1.800.851.8900 (U.S.)
1.800.267.2826 (Canada)
01.800.71.16.100 (Mexico) or visit
hamiltonbeach.com
hamiltonbeach.ca
Cleaning With Vinegar

natural_image
Interior view of a car gear shift lever (no text or symbols visible)Remove optional water filter.

natural_image
Illustration of a white wine dispenser and a white wine jar (no text or symbols on the devices themselves)Pour 1 pint (2 cups/500 ml) vinegar into water reservoir.
All coffeemakers should be cleaned at least once a month (once a week for areas with hard water).


natural_image
Hand pouring liquid into a milk dispenser (no text or symbols visible)Press I/O button. Press I/O button again after 30 seconds and wait 30 minutes. Press I/O button. Press I/O button again when finished. When cool, dispense several cups before emptying and rinsing reservoir. NOTE: Coffeemaker will remind you it is time for cleaning:
- Built-in residue sensor—CLEAN will appear in display when unit senses residue buildup and remain illuminated until the end of the cycle.

natural_image
Close-up of a modern office kitchen appliance with a digital display and handle (no visible text or symbols)Run 2–3 more brew cycles with CLEAN WATER only. Allow to cool between cycles.

natural_image
Product image of a dishwasher-safe water heater with visible internal components (no text or symbols on the product itself)DO NOT use the "SANI" setting when washing in the dishwasher. "SANI" cycle temperatures could damage your product.
General Cleaning Instructions
WARNING
Shock Hazard. Do not immerse cord, plug, or coffeemaker in any liquid.
Follow steps 1–5 in "Cleaning With Vinegar."
FILTER BASKET:
Remove the filter basket and wash by hand with warm, soapy water. Clean filter basket often.
COFFEE TANK:
To clean using denture-cleaning tablets: Fill water tank to max line. Add 3 denture-cleaning tablets to the water and allow the mixture to sit overnight. In the morning, empty the mixture and clean the tank well, using a sponge and warm, soapy water. Coffee tank may also be cleaned in top rack of dishwasher.
OUTSIDE OF COFFEEMAKER:
Wipe outside with a soft cloth and warm, soapy water. Do not use abrasive cleaners, since they will scratch the finish of the product.
Troubleshooting
PROBLEM
CLEAN appears in display.
Coffee tastes bad.
PROBABLE CAUSE
| • This is a reminder to clean coffeemaker. See "Cleaning With Vinegar." |
| • Coffeemaker needs cleaning. |
| • Coffee ground too coarsely or too finely. Set coffee grinder to automatic drip grind. |
| • Coffee-to-water ratio unbalanced. Adjust for personal preference. |
| • Poor water quality. Use water filter or bottled water to make coffee. |
Troubleshooting (cont.)
| PROBLEM | PROBABLE CAUSE |
| Coffee not brewing or stops brewing/unit will not turn on. | Mineral deposits have built up. Clean the coffeemaker following “Cleaning With Vinegar.”Water reservoir is empty.Unit is unplugged.Power outage or power surge. If surge, unplug; then plug back in. |
| Coffee brews slowly. | Coffeemaker needs cleaning. Clean at least every 30 days to maintain proper performance.Coffeemaker is in the 1-4 CUPS or BOLD modes. Press Brew Options Button until no lights appear. |
| Coffee overflows basket. | Excessive amounts of coffee grounds. See table on page 5.Coffee ground too finely. Set coffee grinder to automatic drip grind.More than one paper filter in filter basket. Poor quality paper filter or wrong size paper filter. |
| Unit will not brew and/orPOUR WATERappears in display. | No water in reservoir. Transfer water from coffee tank to reservoir. |
| Coffee is cold when dispensed. | Keep-Warm Hours have elapsed and coffeemaker has automatically shut off.See “To Reheat Coffee” instructions on page 6, or brew new cycle. |
Limited Warranty
This warranty applies to products purchased and used in the U.S. and Canada. This is the only express warranty for this product and is in lieu of any other warranty or condition.
This product is warranted to be free from defects in material and workmanship for a period of one (1) year from the date of original purchase. During this period, your exclusive remedy is repair or replacement of this product or any component found to be defective, at our option; however, you are responsible for all costs associated with returning the product to us and our returning a product or component under this warranty to you. If the product or component is no longer available, we will replace with a similar one of equal or greater value.
This warranty does not cover glass, filters, wear from normal use, use not in conformity with the printed directions, or damage to the product resulting from accident, alteration, abuse, or misuse. This warranty extends only to the original consumer purchaser or gift recipient. Keep the original sales receipt, as proof of purchase is required to make a warranty claim. This warranty is void if the product is used for other than single-family household use or subjected to any voltage and waveform other than as specified on the rating label (e.g., 120V \~ 60 Hz).
We exclude all claims for special, incidental, and consequential damages caused by breach of express or implied warranty. All liability is limited to the amount of the purchase price. Every implied warranty, including any statutory warranty or condition of merchantability or fitness for a particular purpose, is disclaimed except to the extent prohibited by law, in which case such warranty or condition is limited to the duration of this written warranty. This warranty gives you specific legal rights. You may have other legal rights that vary depending on where you live. Some states or provinces do not allow limitations on implied warranties or special, incidental, or consequential damages, so the foregoing limitations may not apply to you.
To make a warranty claim, do not return this appliance to the store. Please call 1.800.851.8900 in the U.S. or 1.800.267.2826 in Canada or visit hamiltonbeach.com in the U.S. or hamiltonbeach.ca in Canada. For faster service, locate the model, type, and series numbers on your appliance.
PRÉCAUTIONS IMPORTANTES
natural_image
Interior view of a kitchen sink with a metal bowl and piping (no text or symbols visible)AVERTISSEMENT
Risque de brûlure.
natural_image
Exterior view of a modern office building (no signage)natural_image
Close-up of a hand using a spatula to spread dark granular material into a paper liner in a container (no text or symbols visible)natural_image
3D illustration of a mechanical press or stamping device with a downward arrow indicating compression or disassembly (no text or symbols present)
natural_image
3D rendered mechanical component with a downward arrow indicating compression or disassembly (no text or symbols)
natural_image
Close-up of a kitchen appliance with a digital display and a cylindrical container being inserted (no visible text or symbols)

natural_image
Hand pouring liquid into a milk dispenser (no text or symbols visible)natural_image
Interior view of a kitchen sink with water being poured into it (no text or symbols visible)natural_image
Close-up of a modern kitchen appliance with a digital display and handle (no visible text or symbols)[Non-Text]

natural_image
Diagram showing two mechanical components with arrows indicating assembly or transformation (no text or symbols)18

natural_image
Close-up of a hand holding a device with a label '678' and an arrow pointing to it (no readable text or symbols on the device itself)AVERTISSEMENT
Risque de brûlure.
natural_image
Illustration of a hand pouring liquid into a container with granular material (no text or symbols)natural_image
Illustration of a hand using a spatula to spread dark granular material into a paper liner in a container (no text or symbols)natural_image
Illustration of a water dispenser pouring milk into a glass with ice cubes (no text or symbols)Programmation

natural_image
Illustration of hands pouring liquid into a bowl with a downward arrow indicating a drop (no text or symbols)0194402 FRv01.indd 19
(accessoire offert en option)

natural_image
Top-down view of a cleaning tool with a handle and base (no text or symbols visible)natural_image
Interior view of a car seatbelt with a hand valve inserted (no text or symbols visible)natural_image
Interior view of a car seatbelt with a hand holding a tool, no visible text or symbolsnatural_image
Illustration of a white coffee maker and a white wine jar (no text or symbols on the devices themselves)natural_image
Hand pouring tea from a milk dispenser into a water dispenser (no text or symbols visible)natural_image
Illustration of a kitchen blender with a digital display and handle, no visible text or symbolsnatural_image
Interior view of a kitchen sink with hand cleaning the cup (no text or symbols visible)natural_image
Illustration of a kitchen blender with liquid being poured into a container (no text or symbols visible)natural_image
Illustration of a hand using a spoon to spread dark granular material into a cup-like container (no text or symbols visible)natural_image
3D rendering of a mechanical component with a downward arrow indicating process (no text or symbols)
natural_image
3D rendering of a mechanical component with a downward arrow indicating compression or disassembly (no text or symbols)
natural_image
Illustration of a digital kitchen appliance with a hand inserting into a container (no text or symbols visible)

natural_image
Illustration of a hand pouring milk from a water dispenser into a cup (no text or symbols visible)natural_image
Interior view of a kitchen sink with water being poured into it (no text or symbols visible)natural_image
Illustration of a kitchen blender with a water dispenser pouring liquid into a container (no text or symbols visible)The Ground Truth image displays a single, solid horizontal line. According to Rule 2 (UNDERSCORE & LINE RULES), this is a stylistic or background line, not a placeholder underscore. Therefore, the OCR result must ignore it and output nothing or only meaningful text. The provided OCR content is "____", which consists of four underscores. This is an incorrect interpretation of the line as a placeholder, violating the rule that stylistic lines must be ignored. The OCR has hallucinated placeholder underscores where none exist in the GT. Hence, the OCR result is inconsistent with the Ground Truth.

natural_image
Diagram showing two mechanical components with arrows indicating assembly or transformation (no text or symbols)30

natural_image
Close-up of a kitchen appliance with a double door and a side panel, showing no visible text or symbols.ADVERTENCIA
natural_image
Illustration of a hand pouring milk into a container (no text or symbols visible)natural_image
Illustration of a hand using a spatula to spread food into a cupcake (no text or symbols visible)natural_image
Illustration of a milk dispenser pouring ice into a glass (no text or symbols visible)Programación

natural_image
Illustration of hands pouring liquid into a bowl with a downward arrow indicating a drop, labeled '15 min.' (no text or symbols on the diagram itself)natural_image
Illustration of a kitchen utensil with a handle and base (no text or symbols)natural_image
Interior view of a car seatbelt with a hand holding a tool, no visible text or symbolsFiltro de Agua
natural_image
Interior view of a car seatbelt with a hand valve and numbered indicator (no text or symbols)natural_image
Illustration of a white water dispenser and a white wine bottle (no text or symbols on the devices themselves)natural_image
Illustration of a hand pouring liquid into a white cup inside a milk dispenser (no text or symbols visible)natural_image
Close-up of a modern kitchen brush with a digital display and handle (no visible text or symbols)Mixcoac MEXICO 03910 D.F.
Tel: 01 55 5563 8723 • Fax: 01 55 5615 1856
Nuevo Leon
- Questions?
- Hamilton Beach®
- BrewStation®
- IMPORTANT SAFEGUARDS
- SAVE THESE INSTRUCTIONS!
- IMPORTANT
- Additional Information
- Other Consumer Safety Information
- This appliance is intended for household use only.
- How to Make Coffee
- How to Make Coffee (cont.)
- WARNING
- Burn Hazard.
- Brew Options
- BOLD
- 1-4 CUPS
- To Make Iced Coffee
- WARNING Burn Hazard.
- Programming
- Water Filter
- Cleaning With Vinegar
- General Cleaning Instructions
- FILTER BASKET:
- COFFEE TANK:
- OUTSIDE OF COFFEEMAKER:
- Troubleshooting
- Limited Warranty
- PRÉCAUTIONS IMPORTANTES
- AVERTISSEMENT
- Risque de brûlure.
- Programmation
- ADVERTENCIA
- Programación
- Filtro de Agua
- Nuevo Leon
Brand : HAMILTON BEACH
Model : 47701
Category : Coffee machine