
Avance Collection HR2357 - Pasta machine PHILIPS - Free user manual and instructions
Find the device manual for free Avance Collection HR2357 PHILIPS in PDF.


| Product type | Electric pasta machine |
| Brand | Philips |
| Model | Avance Collection HR2357 |
| Category | Pasta machine |
| Housing material | ABS plastic |
| Power | 150 W |
| Voltage | 220-240 V ~ 50/60 Hz |
| Dimensions (L x W x H) | 25 x 20 x 30 cm |
| Weight | 4 kg |
| Kneading capacity | Up to 250 g of flour |
| Functions | Automatic kneading and extrusion |
| Included discs | 8 pasta discs (spaghetti, fettuccine, tagliatelle, etc.) |
| Extrusion speeds | 3 speeds |
| Ease of cleaning | Removable parts dishwasher safe |
| Safety | Safety locking system, overheat protection |
| Power cord | 1 m |
| Accessories | Cleaning tool, measuring spoon |
| Warranty | 2 years |
| Repairability score | 8.0 / 10 |
| Spare parts | Available on the Philips website |
Frequently Asked Questions - Avance Collection HR2357 PHILIPS
User questions about Avance Collection HR2357 PHILIPS
0 question about this device. Answer the ones you know or ask your own.
Ask a new question about this device
Download the instructions for your Pasta machine in PDF format for free! Find your manual Avance Collection HR2357 - PHILIPS and take your electronic device back in hand. On this page are published all the documents necessary for the use of your device. Avance Collection HR2357 by PHILIPS.
USER MANUAL Avance Collection HR2357 PHILIPS
HR2357/05
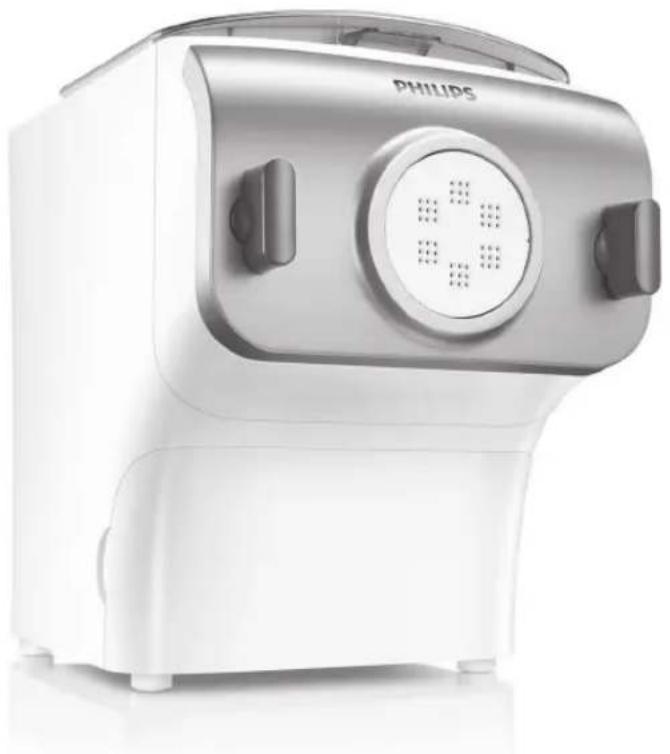
natural_image
White Philips kitchen appliance with a circular control panel and side buttons (no visible text or symbols on the device body)User manual / Manual del usuario / Guide d'utilisation
PHILIPS
Congratulations on your purchase, and welcome to Philips!
To fully benefit from the support that Philips offers, register your product at www.Philips.com/welcome.
Read this user manual carefully before you install and use the unit. Save it for future reference.
What's in the box
Main unit

natural_image
Line drawing of a kitchen appliance with control panel and power outlet (no text or symbols)Lasagna/Dumpling
Shaping discs
Cleaning tools

Use the flat cleaning tool
User manual Recipe book
Penne

Use the flat cleaning tool

Flour cup

Water cup


Spaghetti Assembled on the appliance upon purchase

Fettuccine


Flat cleaning tool
2 ENGLISH
Contents
What's in the box 2
Contents 3
IMPORTANT SAFEGUARDS .... 4
POLARIZED PLUG....5
Overview....6
Disassembling and cleaning before first use 8
Assembling 10
Using the pasta maker....12
Cleaning 18
Troubleshooting 21
Product information 23
Recycling 23
Warranty and service 24
IMPORTANT SAFEGUARDS
When using electrical appliances, basic safety precautions should always be followed including the following:
Read this user manual carefully before you use the appliance and save it for future reference.

Warning
1 Read all instructions.
2 Before you connect the appliance to the power, make sure that the voltage indicated on the bottom of the appliance corresponds to the local power voltage.
3 To protect against risk of electrical shock, do not immerse main unit, cord or plug in water or other liquid. Remove shaping discs from Pasta Maker before washing.
4 Close supervision is necessary when any appliance is used by or near children. Keep the appliance and its power cord out of the reach of children.
5 Do not leave the Pasta Maker unattended when in use.
6 Do not move the Pasta Maker while in operation.
7 Make sure the plug is firmly inserted into the power outlet.
8 Make sure your hands are dry before you insert the plug into the power outlet.
9 Do not operate any appliance with a damaged cord or plug or after the appliance malfunctions, or is dropped or damaged in any manner. For assistance in the U.S. or Canada only, call 1-866-309-8817.
10 Do not place any part of this appliance on, in or near a hot gas, electric, convection or microwave oven or on a hot gas or electric burner.
11 The use of accessory attachments not recommended or sold by the appliance manufacturer may cause fire, electric shock or injury.
12 Do not use outdoors.
13 Do not let cord hang over edge of table or counter, or touch hot surfaces.
14 Do not use this appliance on an unstable or uneven surface, near the edge of a bench top, counter or table during operation. Ensure the surface is level, clean and free of water, flour and other substances.
4 ENGLISH
Warning
15 Never connect this appliance to a timer switch or separate remote control system, to avoid a hazardous situation.
16 Ensure the ON/OFF switch has been pressed to OFF and the appliance is unplugged when not in use, if left unattended, before assembling or disassembling, cleaning or storing. Always ensure the Pasta Maker is completely assembled before inserting plug into power outlet and operating. The Pasta Maker will not operate unless properly assembled.
17 Keep hands, hair, clothing, as well as spatulas and other utensils away from appliance during operation to reduce the risk of injury to persons, and/or damage to the Pasta Maker.
18 Do not place hands, fingers or utensils in the mixing bin of the appliance unless the ON/OFF switch is off, the appliance is unplugged and the motor and mixing paddle have come to a complete stop. Ensure the motor and the mixing paddle have completely stopped before disassembling, cleaning or storing.
19 Do not put your fingers or other objects into the Pasta Maker opening while it is in operation. Avoid contacting moving parts.
20 Do not attempt to defeat the cover interlock mechanism.
21 To prevent a short circuit or an electric shock, do not pour water or any liquid into the safety switch.
22 The shaping discs and all detachable parts of the appliance are dishwasher proof. When you clean them in a dishwasher, make sure to set the temperature below 60^ C ( 140^ F).
SAVE THESE INSTRUCTIONS
POLARIZED PLUG
This appliance has a polarized plug (one blade is wider than the other). To reduce the risk of electric shock, this plug will fit in a polarized outlet only one way. If the plug does not fit fully in the outlet, reverse the plug. If it still does not fit, contact a qualified electrician. Do not modify the plug in any way.
Overview

natural_image
Line drawing of a kitchen appliance with a power outlet and control panel (no text or symbols)
natural_image
Technical line drawing of a mechanical device with internal components (no text or symbols)Mixing chamber lid
Mixing chamber
Mixing paddle
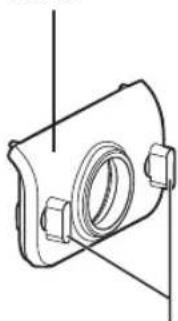
Disc holder Front panel

natural_image
Technical line drawing of a fan or impeller assembly (no text or symbols)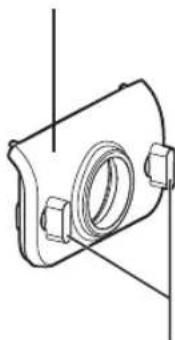
natural_image
Technical line drawing of a mechanical component with mounting holes and a central cylindrical feature (no text or symbols)Shaping discsDisc front panel knobs
6 ENGLISH
| Abbreviations |
| g = grams |
| oz = ounce |
| ~ = approximately |
| ml = milliliters |
| mm = millimeters |
| lb = pound |
| kg = kilogram |
| in = inch |
Program button - select the extrusion-only program (+) or automatic program ()
Servings button - select 1 to make \~ 300g (10.5 oz), 1-2 servings or 2 to make \~ 600g (21 oz), 3-4 servings of fresh pasta.

Disassembling and cleaning before first use
Important
- Before using the appliance for the first time, remove and safely discard any packaging material and /or promotional labels.
• Take out all the parts and accessories, wash and thoroughly dry all parts and accessories (see "Cleaning" section). - Do not use water to rinse or soak the main unit.
- Do not use a scourer or similar cleaners as these will scratch the plastic surface and affect the lifetime of the pasta maker.
- The shaping discs and all detachable parts of the appliance are dishwasher proof. When you clean them in a dishwasher, make sure to set the temperature below 60°C (140°F).
• This appliance is intended for household use only.
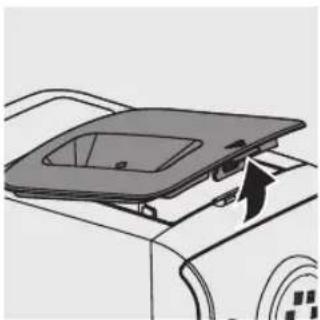
1 Remove the mixing chamber lid from the appliance.

natural_image
Diagram of a car interior showing a lid and fan assembly with an arrow indicating direction (no text or symbols)2 Loosen the front panel control knobs.
Note:
- The front panel is heavy. Take extra caution when removing it.

natural_image
Diagram of a device casing with circular vent and directional arrows indicating movement (no text or symbols)8 ENGLISH
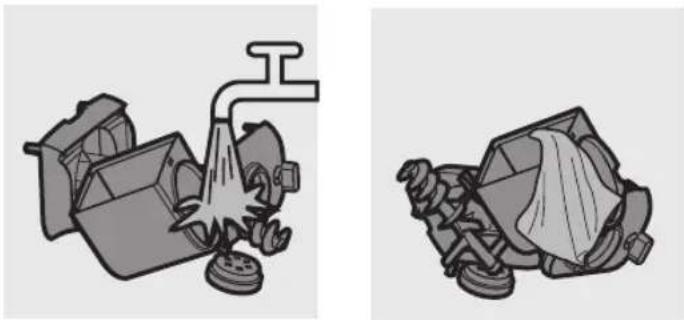
3 Disassemble the front panel, the shaping disc, the shaping disc holder, the mixing paddle, and the mixing chamber in order.
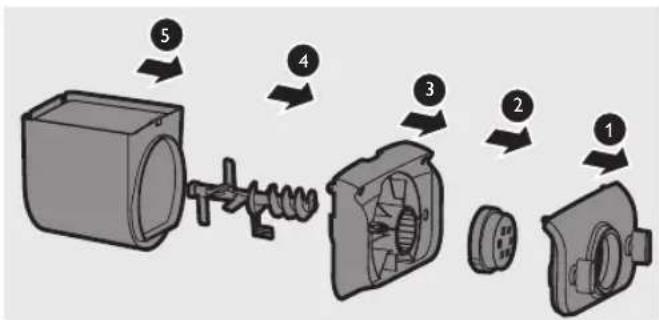
4 Clean all detachable parts, and wipe them dry.
natural_image
Two grayscale illustrations of industrial waste disposal methods: one with a pipe pouring into a binhole, the other with a meshed container (no text or symbols)Assembling
Follow below assembling steps to install the pasta maker.
Important
• Make sure to tighten the front panel knobs during assembly.
• Make sure the appliance is not plugged in when assembling the appliance.
1 Push the mixing chamber into the appliance.

natural_image
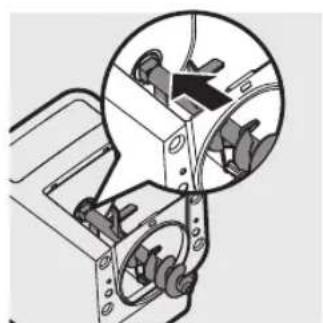
Diagram of a device interior showing a rectangular housing with a circular component and an arrow indicating direction (no text or symbols present)2 Point the mixing paddle to the hole in the main unit. Insert the mixing paddle all the way into the main unit.
natural_image
Mechanical assembly diagram showing a gear mechanism with a magnified inset of a component (no text or labels)3 Attach the disc holder onto the appliance.
① Disc holder safety switch
② Disc holder safety switch lever
Note:
- Check that the safety switch ① and safety switch lever ② are set as shown in the illustration to the right.

10 ENGLISH
4 Put the shaping disc onto the disc holder ①, and make sure it is firmly fixed on the disc holder ②.
Note:
• Make sure the inner cavity of the shaping disc and disc holder is properly fitted.

natural_image
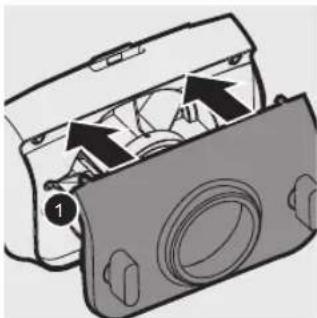
Two technical illustrations of a fan assembly showing internal components and a close-up view of the fan's internal structure (no text or symbols present)5 Attach the front panel to the main unit.
① Disc holder safety switch lever
Note:
- Make sure the front panel is completely fastened before using the appliance.
- The front panel is heavy. Take extra caution when assembling it.
natural_image
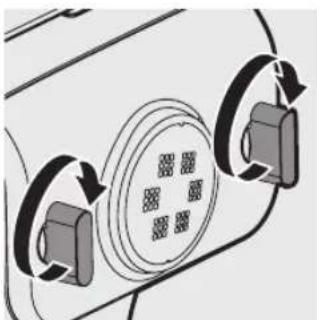
Diagram of a camera module with arrows indicating internal components (no text or symbols)6 Fasten the front panel control knobs.
Note:
- If the front panel or the shaping disc is not properly assembled, the safety switch will prevent the appliance from working.
natural_image
Diagram of a vehicle's rearview mirror with four circular components and directional arrows indicating rotation (no text or symbols)7 Close the mixing chamber lid properly.
Note:
- If the mixing chamber lid is not properly installed, the safety switch will prevent the appliance from working.

Using the pasta maker
Important
- Make sure to follow the right order to add flour and water into the mixing chamber. Put the flour into the mixing chamber first, then place the chamber lid onto the chamber. Start the pasta maker, and then slowly pour water along the entire length of the opening in the lid.
- Never put excessive ingredients into the pasta maker. Otherwise, it will damage the appliance. The maximum amount of flour used for each batch is 500g.
- Do not put any ingredients that are 60^ / 140^ or above into the pasta maker, nor place the pasta maker in surroundings with high temperature (60^ / 140^) , for instance in a high temperature sterilization. This will deform the appliance.
- Never pour water into the mixing chamber before you place the chamber lid onto the chamber. Do not pour any liquids into the safety switch hole.
- Do not pour water into the mixing chamber before turning on the pasta maker. Follow the instruction carefully to enjoy homemade pasta.
Preparing the ingredients
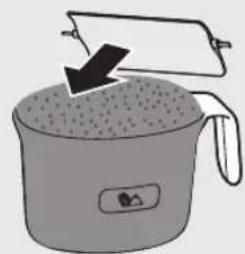
1 Measure one full cup of flour. Scrape off any excessive flour from the cup edge with the supplied flat cleaning tool. One full cup is equivalent to 1-2 servings.
Note:
- Do not shake or hit the flour cup to remove excessive flour. This will affect the flour weight.
You can also use a kitchen scale to measure the flour. For instance, 250g flour makes approximately 1-2 servings; 500g flour makes approximately 3-4 servings of fresh pasta.
natural_image
Illustration of a cooking pot with a lid and lid removed, showing grain being inserted (no text or symbols)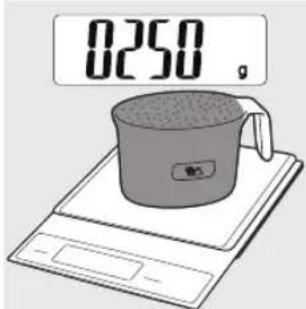
12 ENGLISH
2 Remove the chamber lid.

natural_image
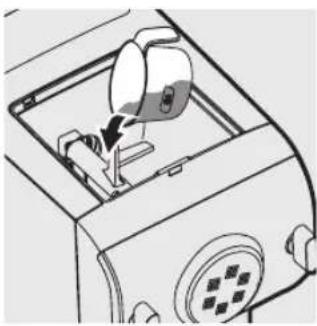
Diagram of a car interior showing a lid and vent, with an arrow indicating direction (no text or symbols)3 Pour the flour into the chamber. If you want to make 3-4 servings, add a second cup of flour as you will need 2 cups (\~500g) of flour in total.
natural_image
Diagram of a device interior showing a dial indicator and control panel (no text or symbols)4 Close the chamber lid properly.
Note:
- Insert the two hooks into the appliance first ①, and then push the lid against the main unit ②.
- The appliance will not start working if the chamber lid is not properly closed. During the pasta making process, if the chamber lid becomes loose, the appliance will automatically stop working.

5 Use the "Pasta-making recipe table" and measure the required amount of water.
Note:
- Do not pour water into the mixing chamber before turning on the pasta maker.
- There are 2 sets of water markings on the supplied water cup. One set is for normal pasta making, and the other set is for egg pasta and other flavor pasta making.

Pasta making recipe table
For more information, you can visit www.philips.com/kitchen
| Flour/water ratio table | ||||
| Flour | Normal pasta Egg pasta | Processing time | Output | |
| Water (marking) | Water + egg mixture (marking) | |||
 1 flour cup (~250g) 1 flour cup (~250g) |  Amount of water needed for a cup of flour (~90ml) Amount of water needed for a cup of flour (~90ml) |  Amount of water + egg mixture needed for a cup of flour (~95ml) Amount of water + egg mixture needed for a cup of flour (~95ml) | 10 minutes | ~300g (10.5 oz) fresh pasta.This is sufficient as a main meal for 1-2 persons, or as a side dish for 4-6 persons. |
 2 flour cups (~500g) 2 flour cups (~500g) |  Amount of water needed for 2 cups of flour (~180ml) Amount of water needed for 2 cups of flour (~180ml) | 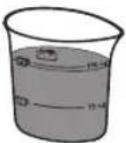 Amount of water + egg mixture needed for 2 cups of flour (~190ml) Amount of water + egg mixture needed for 2 cups of flour (~190ml) | 15 minutes | ~600g (21 oz) fresh pasta.This is sufficient as a main meal for 3-4 people, or as a side dish for 8-10 people. |
Important
- The flour cup included with the pasta maker is not a standard 8 oz measuring cup and should not be used as such. The flour cup holds \~250g (\~ 1 2/3 standard cup measure) of flour.
- The pasta recipes provided in the user manual and recipe book have been tested for success. If you experiment with or use other pasta recipes, the flour and water/egg ratios will need to be adjusted to the flour and water cup ratios included with the pasta maker. The pasta maker will not operate successfully without adjusting the new recipe accordingly.
Note:
- To ensure the quality of the pasta, use gluten flour to make pasta. Follow the recommended proportion to add the ingredients.
- Seasonal changes and using ingredients from different regions may affect the flour/water ratio. You may adjust based on the recommended proportion.
- When making the egg pasta or vegetable pasta, make sure you whisk the egg mixture or vegetable juice evenly with the water before pouring into the chamber. When adding ingredients, make sure the ingredient is in a liquid form.
- See the recipe book provided for additional pasta and noodle recipe variations and many delicious new recipes to try.
Selecting the pasta making program
Important
- Do not select the extrusion-only program before the dough mixing is complete. Otherwise, this will damage the noodle maker and its lifetime.
- Do not disconnect the power cord before processing is complete. If you have to stop processing, press the on/off button ① to turn off the pasta maker and then disconnect the power cord from outlet before performing other operations.
- To better protect the lifetime of the appliance, it is recommended the continuous working time be less than 45 minutes. You can restart using the appliance after a 15 minute rest.
- If you intend to use the appliance continuously, clean the shaping disc with the supplied cleaning tool each time after each pasta making session. For cleaning ease, do not soak the shaping disc directly in water.
1 Connect the power plug to any 120V AC outlet. The pasta maker will sound once, and all indicators will flash once. Press the power on/off button Ⓤ to switch on the pasta maker.
2 Based on the amount of flour, press the servings button ☑ to select □ to make \~ 300g (10.5 oz) or ▼ to make \~ 600g (21 oz) of fresh pasta.


3 Press the start/pause button ☐to start processing, and the processing time starts to count down.
Note:
- By default, the program is set as automatic. If this is not the case, press the program button ☑ to re-select.

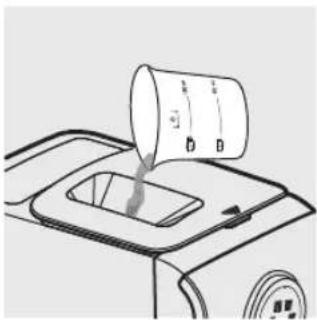
4 After the kneading starts, slowly pour in the water or water + egg mixture along the entire length of the slot in the lid.
Note:
- During dough mixing, do not add other ingredients after you have poured in the water. Otherwise, it will affect the results of the noodle texture.
natural_image
Line drawing of a car interior with a container and pouring liquid from a bucket (no text or symbols)5 The pasta will start extruding out after a few minutes. Place a container right under the outlet. Cut the pasta into the desired length with the supplied cleaning tool.
Note:
- If you notice the program is not set as automatic while pasta is extruding, press the start/pause button to stop the program. Then, press the power on/off button and disconnect the plug from the power socket. After cleaning the shaping discs, you can restart the process.

natural_image
Line drawing of a kitchen mixer blending liquid into a bowl (no text or symbols)- If the ratio of liquid and flour is not correct, the extrusion will not succeed. In this case, prepare the ingredients again.
- Move the cleaning tool downwards to cut the pasta.
6 After the pasta making is complete, if you notice there is some leftover dough inside the chamber, you can press the extrusion-only button and press the start/pause button for extra extrusion.
Note:
• The countdown timer of the extrusion-only program is 3 minutes.
- You may find some fine pasta threads on the pasta surface. This is normal.
- The cooking time of the pasta varies depending on personal preferences, pasta shapes, and number of servings.
Cleaning
Important
- Disconnect the power and remove the power cord before cleaning or disassembling this appliance.
- Do not immerse the main unit in water.
- Do not use a scourer, caustic cleaners, or abrasive cleaners (for examples, gasoline, alcohol, and propanol) to clean the appliance.
- Clean the appliance each time after use, or the appliance might not operate properly.
• Take extra caution when cleaning the appliance to avoid getting cut by any sharp edges. - The shaping discs and all detachable parts of the appliance are dishwasher proof. When you clean them in a dishwasher, make sure to set the temperature below 60°C (140°F).
1 Press the power on/off button to turn off the pasta maker, and then disconnect the plug from the power outlet.

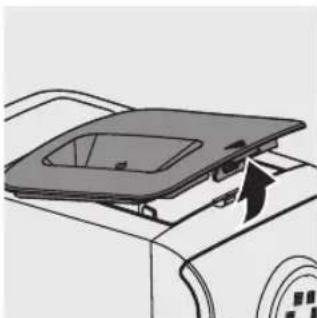
2 Remove the chamber lid from the appliance.
natural_image
Diagram of a car interior showing a lid and vent, with no visible text or symbols18 ENGLISH
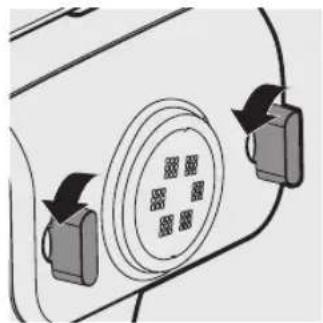
3 Loosen the front panel control knobs.
Note:
- The front panel is heavy. Take extra caution when removing it.
natural_image
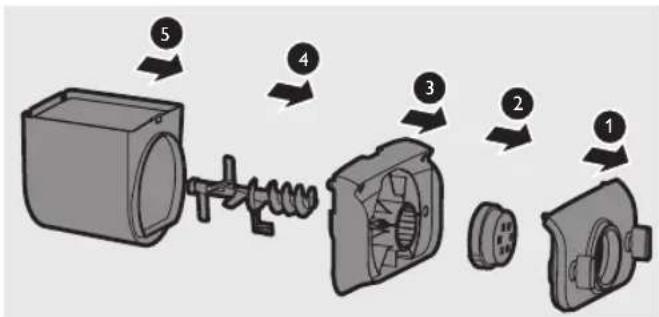
Diagram of a vehicle interior with circular vent and directional arrows indicating movement (no text or symbols)4 Disassemble the front panel, the shaping disc, the shaping disc holder, the mixing paddle, and the mixing chamber in order.
5 Use a dry cloth to clean flour residue in the hole
① where the mixing paddle is placed.
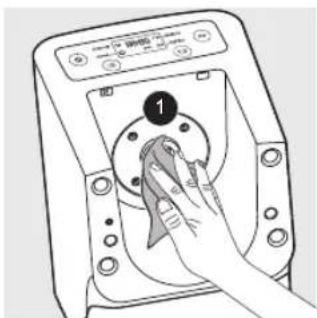
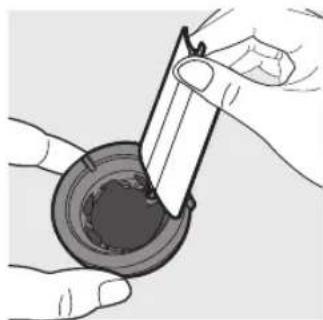
6 Clean the shaping disc with the supplied cleaning tool to remove the dough residues. After that, you can clean it with water.
Tip:
- For the spaghetti and fettuccine shaping discs, put the shaping disc into the freezer for 2 hours. Then use the corresponding cleaning tool to poke out the dough in the holes.

flowchart
graph TD
    A["Refrigerator"] --> B["Shuttered Plate"]
    B --> C["Cleaner with Cover"]
    C --> D["Cleaner with Cover"]

natural_image
Illustration of hands using a tool to apply liquid into a container (no text or symbols visible)7 Clean all detachable parts.
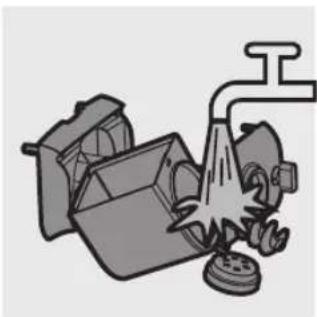
natural_image
Illustration of a mechanical device with a pipe and gear, no text or symbols present8 Use a dry cloth to clean the main unit, control panel, and the exterior of the pasta maker.

natural_image
Line drawing of a portable electronic device with a cable and ventilation cover (no text or symbols)9 Store the pasta maker in a dry, well ventilated place after use.
Note:
- After cleaning, make sure all parts and the shaping disc air dry thoroughly before storing. Assemble the pasta maker back for next use.
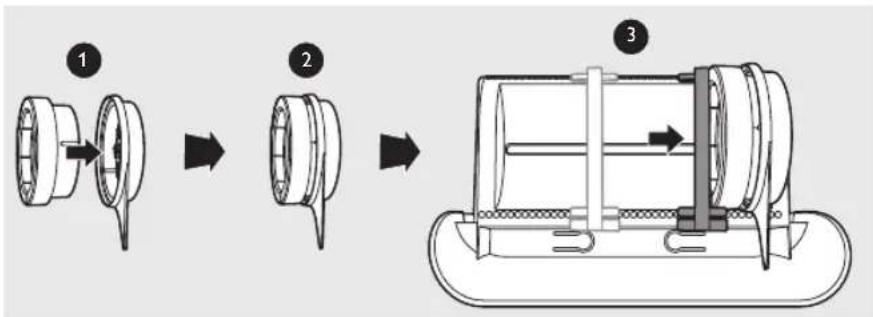
Storing the shaping discs and cleaning tools
1 Insert the shaping disc ① and cleaning tool ② together. Put ① and ② into the storage drawer. Move the sliding bar ③ to secure the shaping discs and cleaning tools.
Make sure the cleaning tools and shaping discs are dry before putting them into the storage drawer.
flowchart
graph LR
    A["Step 1: Component 1"] --> B["Step 2: Component 2"]
    B --> C["Step 3: Final Assembly with Internal Component"]
20 ENGLISH
Troubleshooting
This chapter summarizes the most common problems you could encounter with the appliance. If you are unable to solve the problem with the information below, visit www.philips.com/support or in the U.S. or Canada only, call 1-866-309-8817 for assistance.
The indicators do not light up.
• The power plug is not connected correctly.
Check whether the power plug is plugged correctly and the outlet is working properly.
• The on/off button is not pressed.
Press the power on/off button Ⓤ.
After pressing the start/pause button • the appliance sounds but it does not work.
• The chamber is assembled incorrectly.
The shaping disc, or the front panel is assembled incorrectly.
Make sure you follow the user manual to assemble all parts correctly.
• The preferred servings is not selected.
Make sure you have selected the servings before pressing the start/pause button.
The safety switch is triggered and the appliance suddenly stopped or suddenly restarts during the processing.
• The front panel knob is loose.
Make sure the front panel is securely assembled.
• Excessive ingredients in the pasta maker.
The maximum amount of flour used for each batch is 500g. If more than 500g is added, reduce the amount of flour before next batch.
During processing, the appliance stops. There is no alarm sound or flashes.
• The pasta maker has overheated due to long continuous working time.
Disconnect from the power, and allow the pasta maker to cool down. To better protect the lifetime of the appliance, the continuous working time should be less than 45 minutes. You can restart using the appliance after 15 minutes of rest.
The appliance stops during processing, then the indicators are flashing quickly, and the alarm sounds.
- The mixing paddle may be blocked by some foreign objects.
The dough may be too dry.
The wrong program is selected.
Disconnect from the power, clean the pasta maker, and follow the user manual again to restart the pasta making.
Too much leftover dough inside the chamber.
- The flour is either exposed to moisture before use, or the dough is too wet.
Keep your flour dry during storage. Follow the user manual instructions to restart the pasta making.
- The chamber, the mixing paddle, the shaping disc are not cleaned properly before use.
Make sure all parts are clean before use.
• The mixing paddle or the chamber is still wet.
Make sure all parts are completely dry before use.
• Water is not added in the right order.
The flour type is not suitable.
Incorrect servings was selected.
Follow the user manual instructions to make pasta.
Small amount of water is leaking out from the appliance.
• Water is added before the program starts.
Follow the user manual instructions to add water right after the program starts.
The mixing paddle is running idle, and there is no pasta coming out.
• The ratio of the flour and water is incorrect.
Disconnect the plug from the power socket and discard dough. Clean the pasta maker, re-measure ingredients correctly and follow the user manual instructions again to restart the pasta making.
22 ENGLISH
Product information
| Model HR2357 | |
| Motor power 200W | |
| Rated voltage AC120V (60Hz) | |
| Dimensions (L x W x H) 215mm | x 343mm x 300mm /8.5 in x 13.5 in x 11.8 in |
| Weight 7.8kg / 17.2 lb |
- For rated voltage and frequency information, refer to the typeplate on the product. Product information is subject to change without prior notice.
Recycling
Do not throw away the appliance with normal household waste at the end of its life, but hand it in at an official collection point for recycling. By doing this, you help to preserve the environment.
Warranty and service
One Year Limited Warranty
Philips warrants that this product shall be free from defects in material, workmanship and assembly, under normal use, in accordance with the specifications and warnings, for a period of one year from the date of purchase. This warranty extends only to the original purchaser of the product, and is not transferable. To exercise your rights under this warranty, you must provide proof of purchase in the form of an original sales receipt that shows the product name and the date of purchase. For customer support or to obtain warranty service, please visit our website www.philips.com/support. THERE ARE NO OTHER EXPRESS OR IMPLIED WARRANTIES. Philips' liability is limited to repair or, at its sole option, replacement of the product. Incidental, special and consequential damages are disclaimed where permitted by law. This warranty gives you specific legal rights. You may also have other rights that vary from state to state, province to province or country to country.
In U.S. only
Manufactured for:
Philips Consumer Lifestyle
A Division of Philips Electronics North America Corporation
P.O. Box 10313, Stamford, CT 06904
Canada only
Manufactured for:
Philips Electronics Ltd.
281 Hillmount Road
Markham, ON L6C 2S3
Manufactured for:
- Colombia: 01-800-700-7445
- Costa Rica: 0800-507-7445
© 2014 Philips Electronics North America Corporation. All Rights Reserved.
24 ENGLISH
natural_image
Line drawing of a kitchen appliance with control panel and power outlet (no text or symbols)ENCHUFE POLARIZADO....29
natural_image
Line drawing of a kitchen appliance with a power outlet and control panel (no text or symbols)
natural_image
Technical line drawing of a mechanical device with internal components (no text or symbols)natural_image
Technical line drawing of a fan or vent assembly (no text or symbols)natural_image
Technical line drawing of a mechanical component with bolts and a central threaded feature (no text or symbols)natural_image
Diagram of a car interior showing a solar panel mounted on the roof, with an arrow indicating airflow direction (no text or symbols present)natural_image
Diagram of a vehicle interior with circular vent and directional arrows indicating movement (no text or symbols)32 ESPAÑOL
natural_image
Two grayscale illustrations of industrial waste disposal methods: one with a pipe and waste pile, the other with a meshed container (no text or symbols)Montaje
natural_image
Diagram of a device interior showing a rectangular housing with internal components and a black arrow indicating a directional component (no text or symbols present)natural_image
Mechanical assembly diagram showing a gear mechanism with a magnified inset (no text or symbols)34 ESPAÑOL
natural_image
Two technical illustrations of a mechanical device with internal components, labeled 1 and 2 (no text or symbols present)natural_image
Diagram of a camera module with labeled parts and directional arrows indicating internal components (no text or symbols present)natural_image
Diagram of a vehicle's wheel assembly with rotating components (no text or symbols)natural_image
Diagram of a car interior showing a lid and vent, with an arrow indicating direction (no text or symbols)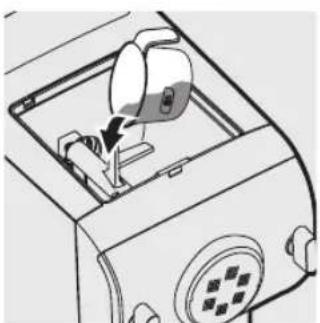
natural_image
Diagram of a device interior showing a device with a magnified view and a switch, no text or symbols present.
natural_image
Line drawing of a container with liquid being poured into it, no text or symbols presentnatural_image
Line drawing of a kitchen mixer blending liquid into a bowl (no text or symbols)natural_image
Diagram of a car interior showing a lid and vent, with an arrow indicating direction (no text or symbols)42 ESPAÑOL
natural_image
Diagram of a vehicle interior with circular vent and directional arrows indicating movement (no text or symbols)flowchart
graph TD
    A["Refrigerator with lid"] --> B["Close-up of lid"]
    B --> C["Close-up of lid with disc"]
    C --> D["Close-up of disc with disc"]
    D --> E["Final packaging with lid"]

natural_image
Illustration of hands using a tool to apply liquid into a container (no text or symbols visible)natural_image
Illustration of a mechanical device with a pipe and flange, no text or symbols presentnatural_image
Line drawing of a portable radio or megaphone device with no visible text or symbolsnatural_image
Line drawing of a kitchen appliance with control panel and power outlet (no text or symbols)natural_image
Line drawing of a kitchen appliance with a power outlet and control panel (no text or symbols)
natural_image
Technical line drawing of a mechanical device with internal components and housing (no text or symbols)natural_image
Technical line drawing of a fan or vent assembly with internal components (no text or symbols)Panneau avant
natural_image
Technical line drawing of a mechanical component with no visible text or symbolsnatural_image
Diagram of a car interior showing a lid and vent, with an arrow indicating direction (no text or symbols)natural_image
Diagram of a vehicle rearview system with circular vent and directional arrows indicating components (no text or labels)natural_image
Two grayscale illustrations of industrial waste or pollution handling devices, one with a pipe pouring water into a container and the other with a meshed container (no text or symbols)Montage
natural_image
Diagram of a mechanical component with an arrow indicating direction, no visible text or symbolsnatural_image
Mechanical assembly diagram showing a rotating component with a magnified inset view (no text or symbols)natural_image
Two technical diagrams showing a fan assembly process, with no visible text or symbols.natural_image
Diagram of a camera module with labeled parts and directional arrows indicating internal components (no text or symbols present)natural_image
Diagram of a car interior showing circular components with directional arrows indicating rotation or movement (no text or symbols)natural_image
Illustration of a cooking pot with a lid and lid removed, showing grain being inserted (no text or symbols)
natural_image
Diagram of a car interior showing a lid and vent, with an arrow indicating direction (no text or symbols)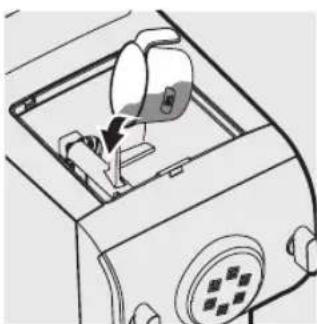
natural_image
Diagram of a device interior showing a device with a handle and control panel (no text or symbols)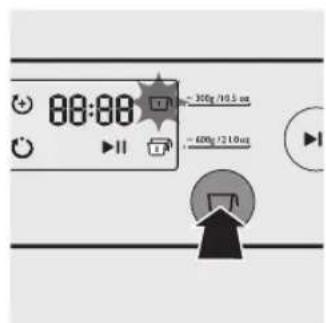
natural_image
Line drawing of a car interior with a container and pouring liquid from a cylindrical container (no text or symbols)natural_image
Illustration of a kitchen mixer blending liquid into a bowl (no text or symbols)natural_image
Diagram of a car interior showing a lid and vent, with an arrow indicating direction (no text or symbols)natural_image
Diagram of a vehicle interior with circular vent and directional arrows indicating movement (no text or symbols)flowchart
graph TD
    A["Refrigerator"] --> B["Shuttered Plate"]
    B --> C["Box with Cover"]
    C --> D["Shuttered Plate with Cover"]
    D --> E["Box with Cover"]
natural_image
Illustration of hands using a tool to apply liquid into a container (no text or symbols visible)natural_image
Illustration of a mechanical device with a pipe and valve, no text or symbols presentnatural_image
Line drawing of a portable electronic device with a cable and ventilation cover (no text or symbols)Dépannage


- What's in the box
- ENGLISH
- Contents
- IMPORTANT SAFEGUARDS
- Warning
- ENGLISH
- SAVE THESE INSTRUCTIONS
- POLARIZED PLUG
- Overview
- ENGLISH
- Disassembling and cleaning before first use
- Important
- Note:
- Assembling
- ENGLISH
- Using the pasta maker
- Preparing the ingredients
- ENGLISH
- Pasta making recipe table
- Selecting the pasta making program
- Cleaning
- Tip:
- Storing the shaping discs and cleaning tools
- ENGLISH
- Troubleshooting
- The indicators do not light up.
- After pressing the start/pause button • the appliance sounds but it does not work.
- The safety switch is triggered and the appliance suddenly stopped or suddenly restarts during the processing.
- During processing, the appliance stops. There is no alarm sound or flashes.
- Too much leftover dough inside the chamber.
- Small amount of water is leaking out from the appliance.
- The mixing paddle is running idle, and there is no pasta coming out.
- ENGLISH
- Product information
- Recycling
- Warranty and service
- One Year Limited Warranty
- ENGLISH
- Montaje
- ESPAÑOL
- Montage
- Dépannage
Brand : PHILIPS
Model : Avance Collection HR2357
Category : Pasta machine