
Satinelle Ice HP6495 - Epilator PHILIPS - Free user manual and instructions
Find the device manual for free Satinelle Ice HP6495 PHILIPS in PDF.


| Product Type | Epilator |
| Brand | Philips |
| Model | Satinelle Ice HP6495 |
| Cooling Technology | Ice-cooling attachment for reduced discomfort |
| Cordless Operation | Yes, rechargeable battery |
| Charging Time | Approx. 1.5 hours |
| Operating Time | Up to 40 minutes |
| Speed Settings | 2 speeds (gentle and normal) |
| Attachment Heads | Epilation head with ice-cooling cap, shaving head, trimmer cap |
| Epilation Tweezers | 21 tweezers |
| Washable | Yes, epilation head washable under running water |
| Light | Built-in LED light for precise epilation |
| Skin Types | Suitable for legs, arms, underarms, and bikini line |
| Dimensions (L x W x H) | Approx. 15 cm x 5 cm x 5 cm |
| Weight | Approx. 200 g |
| Power Supply | Rechargeable Li-ion battery, 100-240V adapter |
| Battery Type | Lithium-ion |
| Cleaning | Rinse epilation head under water; use cleaning brush |
| Storage | Store with protective cap, keep dry |
| Safety Features | Automatic shut-off after 15 minutes of inactivity |
| Spare Parts | Replacement epilation heads (HP6495/00), ice-cooling cap, adapter |
| Warranty | 2 years (subject to conditions) |
| Package Contents | Epilator, ice-cooling cap, shaving head, trimmer head, cleaning brush, pouch, charger |
Frequently Asked Questions - Satinelle Ice HP6495 PHILIPS
User questions about Satinelle Ice HP6495 PHILIPS
0 question about this device. Answer the ones you know or ask your own.
Ask a new question about this device
Download the instructions for your Epilator in PDF format for free! Find your manual Satinelle Ice HP6495 - PHILIPS and take your electronic device back in hand. On this page are published all the documents necessary for the use of your device. Satinelle Ice HP6495 by PHILIPS.
USER MANUAL Satinelle Ice HP6495 PHILIPS
natural_image
Diagram of a folded solar panel with grid patterns and directional arrows indicating rotation (no text or symbols)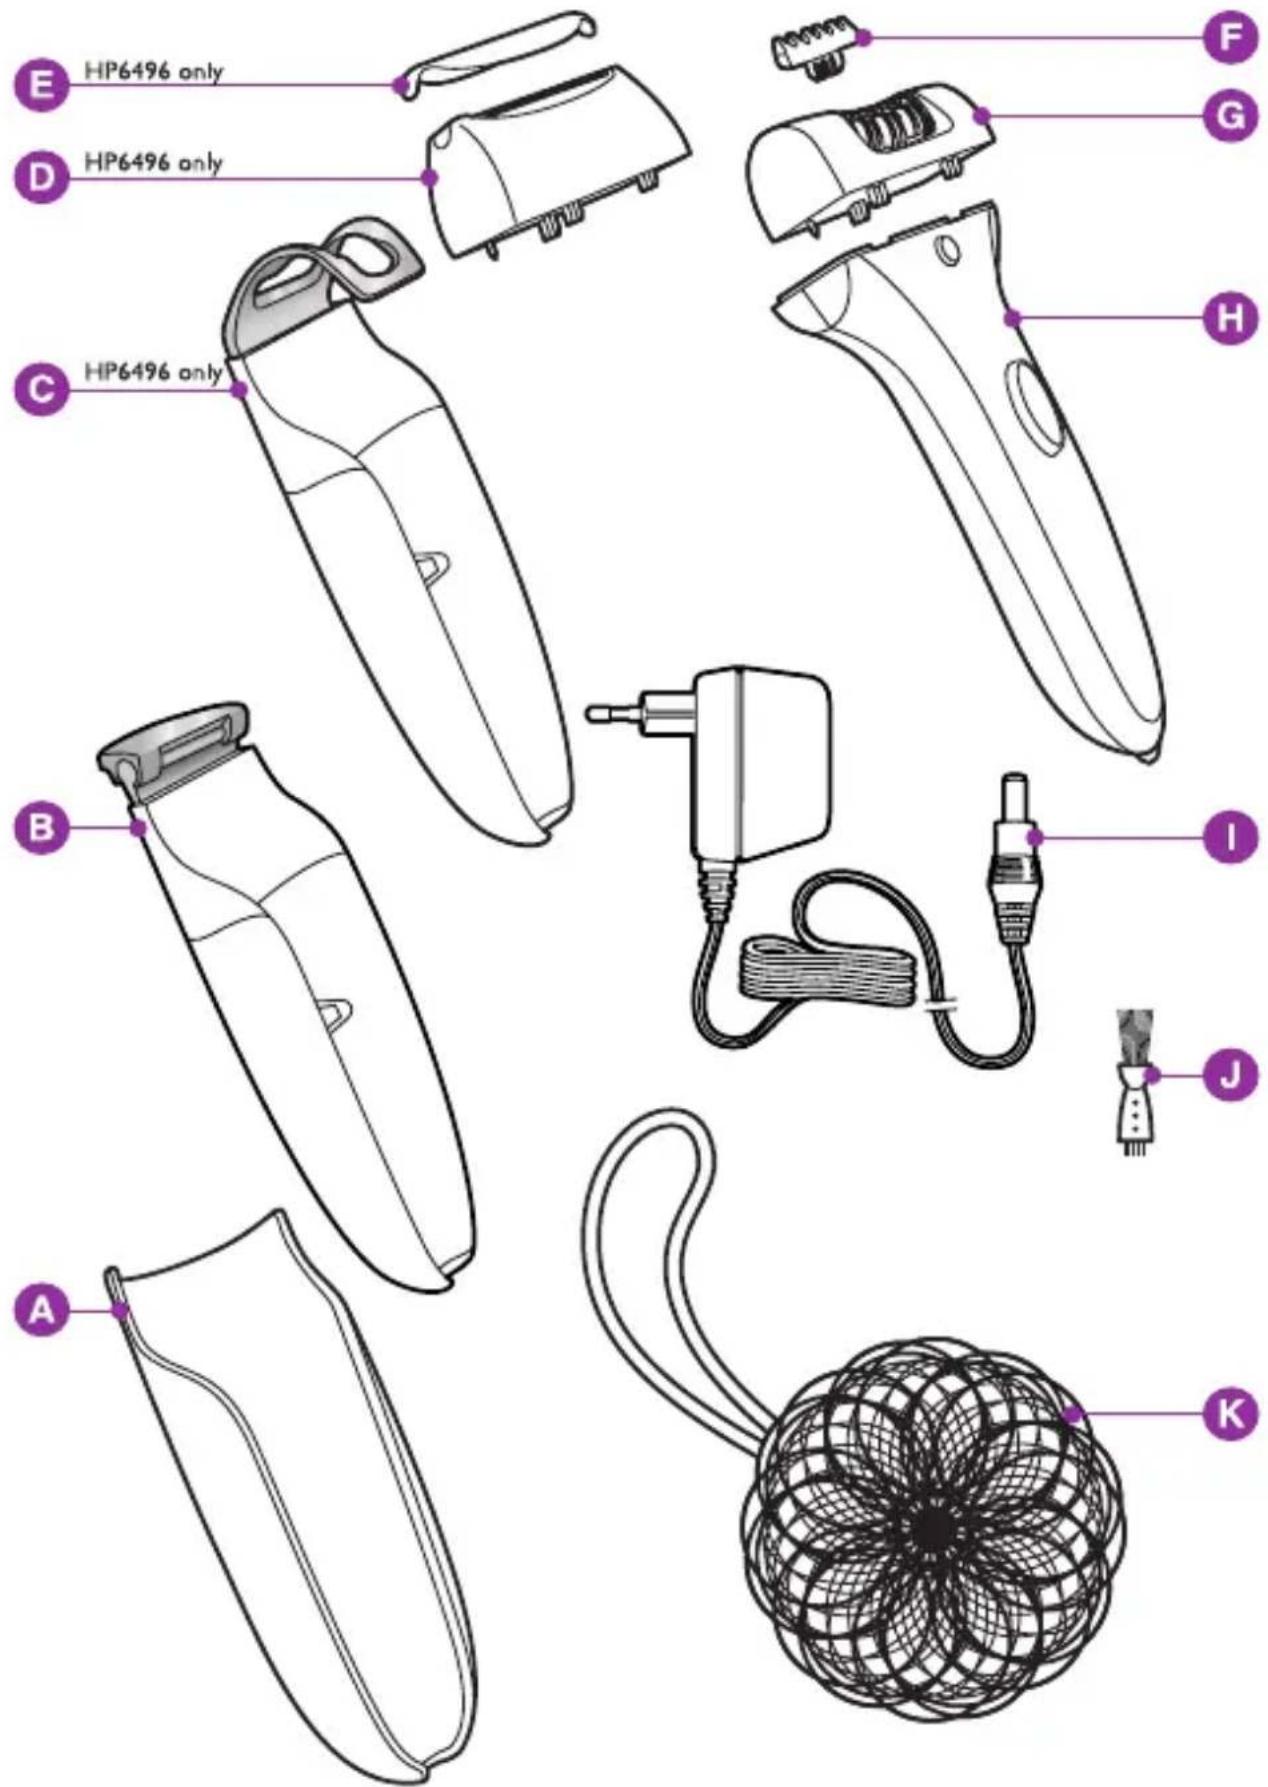
1
ENGLISH 6
БЪЛГАРСКИ 17
ČEŠTINA 30
EESTI 41
HRVATSKI 52
MAGYAR 63
ҚАЗАҚША 74
LIETUVIŠKAI 87
Introduction
With your new Satinelle ICE you can remove unwanted hairs quickly, easily and effectively. The combination of the new ceramic epilating system with the contour-following skin cooler and the massaging system constitutes a revolution in epilation. Thanks to the natural numbing effect of ice and massaging, the new Satinelle ICE makes epilation more comfortable and less painful than ever. The result is a silky-smooth skin and a hair growth reduction of up to 50%, assuming you use the appliance regularly (every 4 weeks).
The Satinelle ICE is suitable for all body parts. Type HP6496 also comes with a skin cooler specially developed for epilating sensitive areas (underarms, bikini line). These areas can be particularly sensitive to pain, which this special skin cooler helps to diminish.
The rapidly rotating epilating discs catch even the shortest hairs (down to 0.5 millimetre!) and pull them out by the roots. As a result, your skin stays smooth for up to four weeks and regrowth is soft and downy.
General description (Fig. 1)
A Insulating sleeve for skin cooler
B Leg skin cooler with pivoting cooling head
Skin cooler for underarms and bikini line (HP6496 only)
D Shaving head (HP6496 only)
E Protective cap of shaving head (HP6496 only)
F Massaging element
G Epilating head
H Appliance
I Adapter
J Cleaning brush
K Exfoliating body puff
Important
Read these instructions for use carefully before you use the appliance and save them for future reference.
Check if the voltage indicated on the adapter corresponds to the local mains voltage before you connect the appliance.
Only use the appliance in combination with the adapter supplied.
Do not use the appliance if the adapter or the appliance itself is damaged.
If the adapter is damaged, always have it replaced by one of the original type in order to avoid a hazard.
The adapter contains a transformer. Do not cut off the adapter to replace it with another plug, as this causes a hazardous situation.
Keep the appliance and the adapter dry.
Keep the appliance out of the reach of children.
Do not expose the appliance to temperatures lower than 5^ C or higher than 35^ C.
To prevent damage and injuries, keep the running appliance away from your scalp hair, eyebrows, eyelashes, clothes, threads, cords, brushes etc.
Do not use the epilating head on irritated skin or skin with varicose veins, rashes, spots, moles (with hairs) or wounds without consulting your doctor first. People with a reduced immune response or people who suffer from diabetes mellitus, Raynaud's disease or immunodeficiency should contact their doctor first.
Noise level: Lc = 75.8dB [A]
Electromagnetic fields
This Philips appliance complies with all standards regarding electromagnetic fields (EMF). If handled properly and in accordance with the instructions in this instruction manual, the appliance is safe to use according to scientific evidence available today.
Preparing for use
Freezing the skin cooler
1 Put the skin cooler WITHOUT the insulating sleeve in the freezer or freezing compartment ( ^*** ) at least 4 hours before you start epilating. When the fluid has turned completely blue, the skin cooler is ready for use.
Make sure the outside of the skin cooler is completely dry before you freeze it.
Tip: You can store the skin cooler in the freezer permanently.
Using the appliance
General information about epilation
Epilation is easier just after a bath or shower. Make sure your skin is completely dry when you start to epilate.
When you use the appliance for the first time, we advise you to try it out on an area with only light hair growth. This helps you get accustomed to the epilation process.
Before you epilate longer hairs on sensitive skin areas, shorten them with a trimmer or a pair of scissors.
Your skin may become a little red and irritated the first few times you use the epilator. This phenomenon is absolutely normal and quickly disappears. As you use the appliance more often, your skin gets used to epilation, skin irritation decreases and regrowth becomes thinner and softer. If the irritation has not disappeared within three days, we advise you to consult a doctor.
We advise you to epilate before you go to bed at night, as this allows any skin irritation that may develop to diminish overnight.
Epilating with the leg skin cooler
Make sure your skin is clean, entirely dry and free from grease. Do not use any cream before you start to epilate.
1 Slide the insulating sleeve onto the skin cooler. (Fig. 2)
The insulating sleeve prevents an unpleasant sensation of coldness in your hand while you use the appliance. It also keeps the skin cooler cold as long as possible.
Sometimes the pivoting cooling head freezes onto the skin cooler and does not move when you take the skin cooler from the freezer. The pivoting cooling head starts to pivot again after you have passed it over your leg a few times.
2 Snap the appliance onto the skin cooler. (Fig. 3)
3 Insert the appliance plug into the bottom of the appliance and put the adapter in the wall socket.
4 Select the desired speed to switch on the appliance. (Fig. 4)
Select speed I for areas with little hair growth and for areas where bones are located directly beneath the skin, such as knees and ankles.
Select speed II for larger areas with stronger hair growth.
5 Stretch your skin with your free hand to make the hairs stand upright.
6 Place the appliance perpendicularly onto the skin with the epilating head pointing forward. Move the appliance against the direction of hair growth at a moderate speed. (Fig. 5)
Make sure both the epilating discs and the skin cooler are in proper contact with the skin.
Press the appliance lightly onto the skin.
If you are not completely satisfied with the epilation result, try moving the epilator more slowly over your skin.
7 Use the tab on the bottom end of the appliance to remove the appliance from the skin cooler. (Fig. 6)
Epilating with the skin cooler for underarms and bikini line (HP6496 only).
The special skin cooler for the underarms and the bikini line reduces the number of active epilating discs. Combined with the large cooling surface, this skin cooler makes epilating sensitive areas less painful. You get the best results when the hairs are not too long (max. 1cm).
1 Slide the insulating sleeve onto the skin cooler. (Fig. 7)
2 Snap the appliance onto the skin cooler. (Fig. 8)
3 Switch on the appliance by selecting the desired speed. (Fig. 4)
We advise you to use speed I.
4 To epilate the underarm area, place one arm behind your head to stretch the skin. Then place the appliance perpendicularly onto the skin with the hand of the other arm. (Fig. 9)
ENGLISH10
5 To epilate the bikini line, stretch the skin with your free hand and place the appliance perpendicularly onto your skin. Do not exert any pressure. (Fig. 10)
6 Move the appliance slowly across the skin against the direction of hair growth.
7 Use the tab on the bottom end of the appliance to remove the appliance from the skin cooler for underarms and bikini line (HP6496 only). (Fig. 6)
Epilating without skin cooler
If you do not want to use the skin cooler, for instance because you have grown accustomed to the sensation of epilation, you can also use the appliance without the skin cooler.
Make sure that you place the epilator perpendicularly onto your skin and that you move it against the direction of hair growth.
Using the exfoliating body puff
Use the exfoliating body puff in the shower.
Regular massages with the puff may help to prevent ingrown hairs. Do not use the puff immediately before or after epilation.
Shaving (HP6496 only)
You can use the shaving head to shave sensitive body parts, such as your underarms and bikini line. With the shaving head, you obtain a smooth result in a comfortable and gentle way.
1 Make sure the appliance is switched off.
2 Remove the skin cooler
3 Remove the epilating head. (Fig. 11)
Press the release button (1) and move the epilating head in the direction of the arrow (2).
4 Place the shaving head on the appliance and press it onto the appliance until it snaps home ('click'). (Fig. 12)
5 Switch on the appliance by selecting speed II.
6 Place the shaving head onto your skin and move the appliance slowly and smoothly against the direction of hair growth. Press the appliance lightly. (Fig. 13)
Cleaning and maintenance
Never rinse the adapter or the appliance itself with water.
Do not use any corrosive detergents, scouring pads or cloths, petrol, acetone etc. to clean the appliance.
1 Make sure the appliance is switched off and unplugged.
2 Remove the skin cooler from the appliance and slide the insulating sleeve off the skin cooler.
3 Clean the pivoting cooling head of the leg skin cooler with the brush supplied or with a moist cloth after each use.
Make sure the outside of the skin cooler is completely dry before you freeze it again.
Cleaning the epilating head
1 Remove the epilating head. (Fig. 11)
Press the release button (1) and move the epilating head in the direction of the arrow (2).
2 Clean all accessible parts and the epilating discs with the brush. (Fig. 14)
3 For thorough cleaning, remove the massaging element. (Fig. 15)
4 To clean the epilating head (not the appliance!) more thoroughly, rinse it under the tap. (Fig. 16)
Never try to detach the epilating discs from the epilating head.
5 Place the epilating head on the appliance and press it onto the appliance until it snaps home ('click'). (Fig. 17)
The epilating head only fits onto the appliance in one way.
Cleaning the shaving head (HP6496 only)
Clean the shaving head after every use.
1 Make sure the appliance is switched off and unplugged.
2 Pull the shaving unit out of the shaving head. (Fig. 18)
3 Brush the hairs off the shaving unit and the shaving head. Make sure that you also brush away any hairs that have collected under the trimmers. (Fig. 19)
4 You can also rinse the shaving unit (not the appliance!) under the tap. (Fig. 20)
5 Put the shaving unit back into the shaving head and snap the shaving head back onto the appliance ('click'). (Fig. 21)
Do not exert pressure on the shaving foil to avoid damage.
6 Rub a drop of sewing machine oil onto the trimmers and shaving foil of the shaving unit twice a year.
Storage
1 Put the protective cap on the shaving head ('click'). (Fig. 22)
2 Store the appliance and the accessories in the pouch.
Replacement (HP6496 only)
If you use the shaving head several times a week, replace the shaving unit (type HP6193) after one or two years of use or if these parts are damaged.
Environment
Do not throw away the appliance with the normal household waste at the end of its life, but hand it in at an official collection point for recycling. By doing this, you help to preserve the environment. (Fig. 23)
Guarantee & service
If you need information or if you have a problem, please visit the Philips website at www.philips.com or contact the Philips Customer Care Centre in your country (you find its phone number in the worldwide guarantee leaflet). If there is no Customer Care Centre in your country, turn to your local Philips dealer or contact the Service Department of Philips Domestic Appliances and Personal Care BV.
Troubleshooting
Problem Possible cause Solution
| Reduced epilating performance. | You moved the epilator in the wrong direction. | Move the appliance against the direction of hair growth. |
| You placed the epilating head on the skin at the wrong angle. | Make sure you place the appliance perpendicularly onto the skin. | |
| The epilating head did not touch the skin. | Make sure both the epilating head and the skin cooler are in proper contact with your skin during epilation. | |
| You moistened your skin with water or a cream or other skincare product prior to epilation. | Make sure your skin is entirely dry and free from grease. Do not put any cream, body milk or other skincare product on your skin before you start to epilate. |
Problem Possible cause Solution
| The skin cooler for underarms and bikini line was on the appliance when you epilated your legs. | Only use the leg skin cooler to epilate your legs. | |
| The appliance does not work. | The socket to which the appliance is connected is not live. | Make sure the socket you use is live. If you use a socket in a bathroom cabinet, you may need to switch on the light to activate the socket. |
| The appliance is not switched on. | Make sure that the appliance is plugged in and switched on. | |
| You did not attach the epilating head correctly. | Place the epilating head on the appliance and press it onto the appliance until it snaps home ('click'). | |
| Skin irritation occurs. | You used the epilator for the first time or after a long period of disuse. | Some skin irritation may occur the first few times you use the appliance. This is absolutely normal and usually disappears quickly. For tips to reduce skin irritation, see the first section of chapter 'Using the appliance'. Also make sure you keep the epilating head clean. |
| Problem Possible cause Solution | ||
| The skin cooler is not cold enough. | You did not freeze the skin cooler long enough. | Put the skin cooler without the insulating sleeve in the freezer or freezing compartment (***) for at least 4 hours. When the colour of the fluid has changed from white to completely blue, the skin cooler is ready for use. |
| You dit not put the skin cooler in the freezer or freezing compartment. | Put the skin cooler without the insulating sleeve in the freezer or freezing compartment (***) for at least 4 hours. Do not store the skin cooler in the refrigerator. | |
| The skin cooler did not touch the skin. | Make sure the skin cooler is always in proper contact with your skin during epilation. | |
| The pivoting cooling head of the leg skin cooler does not move. | The pivoting cooling head is frozen. | Pass the skin cooler over your leg a few times to make it pivot again. Always make sure the outside of the skin cooler is completely dry before you freeze it. |
| It is not possible to remove the epilating head. | You did not move the epilating head in the right direction. | Press the release button and move the epilating head in the direction of the arrow (fig. 11) to remove it. |
| It is not possible to remove the shaving head (HP6496 only). | You did move the shaving head in the right direction. | Press the release button and move the shaving head in the direction of the arrow (fig. 11) to remove it. |
| Reduced shaving performance (HP6496 only). | The shaving head is dirty. | Switch off the appliance, unplug it and remove the shaving unit. Then clean the shaving unit with the cleaning brush supplied. Remove any hairs that are stuck under the trimmers. |
| Stronger skin irritation than usual after shaving (HP6496 only). | The shaving foil is damaged or worn. | Replace the shaving unit. |
YBOA
natural_image
Symbol of a trash bin crossed with a diagonal line and a horizontal bar, representing waste or discharge (no text or numbers present)


- Introduction
- General description (Fig. 1)
- Important
- Electromagnetic fields
- Preparing for use
- Freezing the skin cooler
- Using the appliance
- General information about epilation
- Epilating with the leg skin cooler
- Slide the insulating sleeve onto the skin cooler. (Fig. 2)
- Snap the appliance onto the skin cooler. (Fig. 3)
- ENGLISH10
- Epilating without skin cooler
- Using the exfoliating body puff
- Shaving (HP6496 only)
- Cleaning and maintenance
- Cleaning the epilating head
- Cleaning the shaving head (HP6496 only)
- Storage
- Replacement (HP6496 only)
- Environment
- Guarantee & service
- Troubleshooting
- YBOA
Brand : PHILIPS
Model : Satinelle Ice HP6495
Category : Epilator