16590008 - Dishwasher Melissa - Free user manual and instructions
Find the device manual for free 16590008 Melissa in PDF.


| Product Type | Dishwasher |
| Brand | Melissa |
| Model | 16590008 |
| Width | 60 cm |
| Height | 85 cm |
| Depth | 60 cm |
| Weight | 50 kg |
| Power Supply | 220-240 V ~ 50 Hz |
| Energy Consumption | 0.92 kWh per cycle |
| Water Consumption | 12 L per cycle |
| Noise Level | 49 dB(A) |
| Number of Place Settings | 12 |
| Programs | Eco, Intensive, Normal, Quick, Glass, Pre-wash |
| Additional Functions | Half load, Delay start, Child lock |
| Drying System | Condensation drying |
| Filter Type | Self-cleaning filter |
| Salt and Rinse Aid Indicator | Yes |
| Adjustable Rack System | Height-adjustable upper basket |
| Safety Features | Child lock, Anti-flood system |
| Maintenance | Clean filters regularly, descale as needed |
| Spare Parts Availability | Spare parts available for 10 years |
| Repairability Index | 8.4 / 10 |
Frequently Asked Questions - 16590008 Melissa
User questions about 16590008 Melissa
0 question about this device. Answer the ones you know or ask your own.
Ask a new question about this device
Download the instructions for your Dishwasher in PDF format for free! Find your manual 16590008 - Melissa and take your electronic device back in hand. On this page are published all the documents necessary for the use of your device. 16590008 by Melissa.
USER MANUAL 16590008 Melissa
natural_image
Exterior view of a white stainless steel kitchen appliance with control buttons (no visible text or symbols)DK Opvaskemaskine 2
SE Diskmaskin 8
NO Benkoppvaskmaskin 14
FI Astianpesukone 20
UK Dishwasher 26
OVERSIGT OVER APPARATETS DELE


natural_image
Three mechanical components labeled 10, 11, and 12, shown in grayscale without any text or symbols on the parts themselves.
KLARG∅RING AF APPARATET

natural_image
Interior view of a stainless steel kitchen appliance with numbered components (no visible text or symbols)
10.
11.

12


natural_image
Interior view of a kitchen appliance with numbered components (no visible text or symbols)
natural_image
Three mechanical components labeled 10, 11, and 12, shown in grayscale without any text or symbols on the parts themselves.
KLARGJ∅RING AV APPARATET


10

11.
12.
To get the best out of your new appliance, please read this user guide carefully before using the appliance for the first time. Take particular note of the safety precautions. We also recommend that you keep the instructions for future reference, so that you can remind yourself of the functions of your appliance.
IMPORTANT SAFETY PRECAUTIONS
General
- Incorrect use of this appliance may cause personal injury and damage.
- Use for its intended purpose only. The manufacturer is not responsible for any injury or damage resulting from incorrect use or handling (see also Guarantee Terms).
- For domestic use only. Not for outdoor or commercial use.
- Do not immerse the appliance, cord or plug in water and make sure no water enters the appliance.
- Never touch the appliance, cord or plug with wet or damp hands.
- Do not expose to direct sunlight, high temperatures, humidity, dust or corrosive substances.
- Keep the appliance under constant supervision while in use. Keep an eye on children in the vicinity of the appliance when it is being used. The appliance is not a toy.
- The appliance is not to be used by persons with reduced sensitivity, physical or mental disabilities or persons who are unable to use the appliance, unless supervised or instructed by a person responsible for their safety.
- Dishwasher detergent must always be stored out of reach of children, as it is highly toxic.
- Make sure that dishwasher detergent does not come into contact with the eyes or skin.
- Never use solvents or thinners in the appliance, as these can cause explosions or fire.
- Do not allow persons or heavy objects to rest on the door when it is open. This can cause the door and hinges to become deformed and cease functioning correctly.
Positioning the appliance
- Always place the appliance on a dry, level, firm and heat-resistant surface well away from the edges.
- Do not place the appliance or the cord near hot areas, for example gas rings and electric hotplates.
- The back of the appliance must be supported by a rear wall.
Connection
- For connection to 230 V, 50 Hz only. The guarantee is not valid if the appliance is connected to incorrect voltage.
- The appliance should only be connected to sockets with a functioning earth circuit that is suitable for the mains plug.
o Position the appliance so that the cord can easily reach the socket without being in the way or posing a safety hazard.
- In normal circumstances the appliance can be connected to both hot and cold water supply. If the hot water supply temperature cannot be kept below 60 °C, the appliance must be connected to the cold water supply instead.
Use
- Do not place objects on top of the appliance while in use.
- Do not use the appliance if the cable or plug are damaged, if it is not functioning properly, or if it has been damaged by a heavy impact or similar.
- Avoid using the dishwasher to wash kitchen equipment that is not heat-resistant. Also avoid washing delicate objects, such as crystal glasses, and objects made from copper, tin and aluminium in the dishwasher, as these can become damaged.
- Never insert anything into any of the holes in the appliance.
- If the door is left open, you may be exposed to hot steam. Water damage may also occur. Keep children away from the appliance when the door is opened.
Cord and plug
- Do not let the cord hang out over the edge of the work surface.
- Check that it is not possible to pull or trip over the cord of the appliance.
- Keep the cord and appliance away from heat sources, hot objects and naked flames, including gas rings and electric hobs.
- Ensure that the cord is fully extended.
• The cord must never have sharp kinks. - Turn off and unplug the appliance and shut off the water supply as soon as you have finished using it, before cleaning it, or when it is not in use. Avoid pulling the cord when removing the plug from the socket. Instead, hold the plug.
- Check regularly that neither cord nor plug is damaged. Do not use if they are damaged or if the appliance has been dropped or damaged in any other way.
- If the appliance, cord or plug has been damaged, have the appliance inspected and if necessary repaired by an authorised repairer. Never try to repair the appliance yourself. Please contact the store where you bought the appliance for repairs under the guarantee. Unauthorised repairs or modifications to the appliance will invalidate the guarantee.
KEY TO THE MAIN COMPONENTS OF THE
APPLIANCE


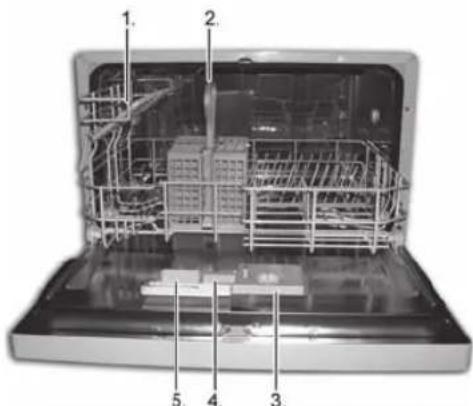
- Rack
- Cutlery basket
- Dishwasher rinse agent container
- Main dishwasher detergent compartment
- Secondary dishwasher detergent compartment
- Salt compartment
- Dishwasher arm
- Fine and coarse filters
- Main filter
-
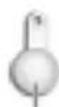
Funnel for filling salt
-
Measuring spoon
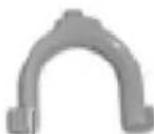
- U-shaped hose
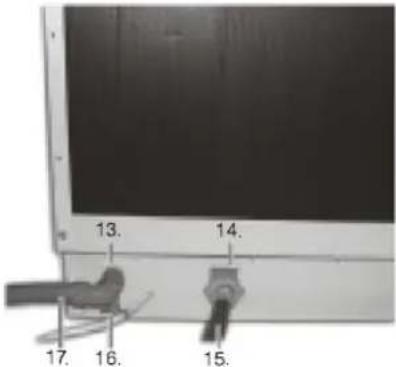
- Drainage nozzle
- Water intake
- Water intake hose
- Hose clip
- Drainage hose

PREPARING THE APPLIANCE
Each individual appliance is checked at the factory but, for safety's sake, after unpacking, check carefully that your appliance has not been damaged during transport.
- Check whether there is any visible damage (e.g. in the form of dents or similar), if the door closes properly, and if the hinges are in order.
- If the appliance appears to have been damaged, contact the shop where you bought it, and do not use it until it has been checked by an authorised specialist.
- Before use, check that you have removed all transport packaging inside and out.
Positioning the appliance
• Always place the appliance on a dry, level, firm and heat-resistant surface well away from any edges.
- The back of the appliance must be supported by a rear wall.
Connection
-
The appliance must be connected to a 230-volt AC current, 50 Hz.
-
Always use new hoses when installing the appliance. Old hoses should not be reused for new installations.
-
Screw the hose to the water supply (15) at the water intake (14).
- The water intake on the appliance ends in a 3/4" female plug – check that the correct hose is used.
- Do not overtighten the connection, as this can damage the thread.
- There should be a stopcock connected to the hose, so it is easy to disconnect the water supply to the appliance.
o Regulations stipulate that the water tap connection should be with a non-return valve. However, we recommend that the appliance has a permanent connection to the water supply. You must ensure that the correct spacers or adapters are used to connect the appliance in a safe and responsible way.
- The appliance can be connected to both hot and cold water supply.
- If the hot water supply temperature cannot be maintained under 60 °C, the appliance must be connected to the cold water supply, as it may be damaged by water that is too hot.
- When connected to hot water, wash times are reduced by approximately 15 minutes. There will also be a slight reduction in wash efficiency.
o The appliance is equipped with a water level gauge, which ensures that the appliance stops automatically if there is a drop in water pressure
- Attach the drainage hose (1) to the drainage nozzle (1) using the hose clip (16). Tighten the hose clip until the hose is secure.
The drainage hose is fed upwards like an upturned U over the accompanying plastic U-bend (12) before being fed downwards into the drain. This prevents drainage water flowing back into the appliance. For increased protection, a reflux valve (not included) can be used.
The drainage hose should be fed down into a drainage pipe, which must be no higher than max. 75 cm above the base of the appliance. The drainage pipe diameter should be at least 4 cm in order to ensure that air can escape around the drainage hose. Extra drainage hose (if any): max. length 4 m.
- Turn water on.
NOTE! AS SOON AS THE WATER SUPPLY IS TURNED ON, THERE IS PRESSURISED WATER IN THE HOSE AND APPLIANCE, EVEN IF THE WATER SUPPLY IS SUBSEQUENTLY TURNED OFF AGAIN!
Fitting the filter, rack and cutlery basket
• Fit the filters in the base of the appliance.
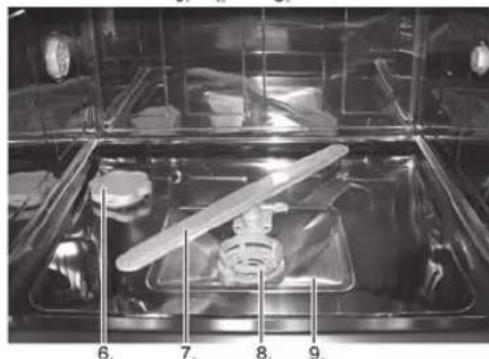
o Fit the main filter (9) first. Then insert the fine and coarse filter element (8). Then turn the filter clockwise.
- Check that the filters are correctly fitted and that the dishwasher arm (7) rotates freely and can turn a complete circle.
- The rack (1) is equipped with wheels, so that it slides easily in and out.
- Position the cutlery basket (2) on the rack. The cutlery basket can be removed from the rack if it is not required, e.g. when washing serving dishes, bowls and other large objects.
Filling salt
Water hardness varies from place to place and from waterworks to waterworks. Hard water can leave white deposits on dishes and requires more detergent. This appliance is therefore equipped with a softener, which softens the water in the appliance with the aid of salt, which helps to ensure good washing results. Soft water requires less detergent, so the salt helps to reduce detergent consumption and also protect the environment.
To fill with salt:
- Remove the cutlery basket and screw off the salt compartment cap (6).
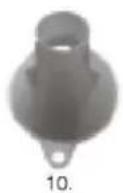
- Fit the funnel (10) into the port. Fill with about 1 kg salt.
- Close cap.
- IMPORTANT! Immediately after filling with salt, run a quick wash program to avoid salt water corrosion of the parts.
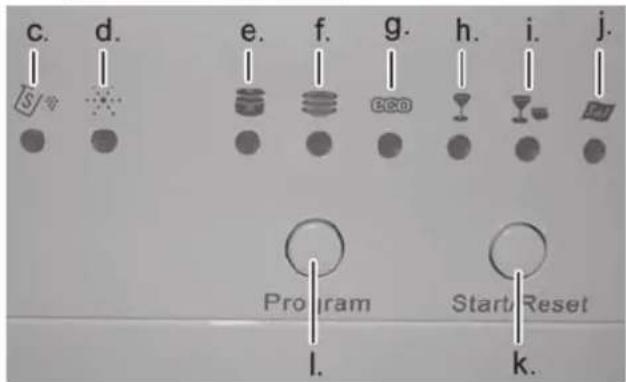
- Refill with salt when the salt indicator (c) lights up. NOTE! IT IS IMPORTANT TO ADD SALT BEFORE THE FIRST WASH CYCLE! ONLY USE SALT INTENDED FOR DISHWASHERS.
Filling dishwasher rinse agent
The surface-active substances in dishwasher rinse agent reduce surface tension in the water for quicker, better drying. Using a dishwasher rinse agent also means dishes are cleaner and glass remains clear and shiny.
To fill with dishwasher rinse agent:
- Screw the cap off the dishwasher rinse agent compartment (3), turning it to the left (in the direction of the arrow). Lift cap off.
- Fill dishwasher rinse agent but be careful not to overfill the compartment.
- Screw the cap back on, turning it to the right (in the direction of the arrow) to close.
- Refill when the dishwasher rinse indicator (d) lights up.
OPERATING THE APPLIANCE
Basic operation
• To open the appliance, grasp the handle.
- Check that the filters in the base of the appliance are fitted correctly and are not blocked.
- Put the items to be washed in the rack and cutlery basket.
o Glasses must always be turned upside down so water runs off easily.
- Glasses should not be put over the pins, which are intended for plates. The pins do not provide sufficient support, which means glasses may fall over and be damaged.
- Always place sharp knives with the blade downwards in the cutlery basket to avoid cutting yourself.
- Very dirty dishes should be rinsed off before putting them in the machine. Ensure that large food residues are removed to prevent them blocking the filter in the base of the appliance.
- Check that the dishwasher arm moves freely and can turn a complete circle.
- Fill dishwasher detergent in the main dishwasher detergent compartment (4), using the measuring spoon (11). Alternatively, place one dishwasher tab in the main detergent compartment.
As a guideline, use one measure of detergent per wash cycle, but check local guidelines for your area. Check also with your local waterworks and read the manufacturer's instructions on the detergent pack.
- If there is heavy food residue on the dishes, add extra detergent in the secondary dishwasher detergent compartment (5).
° Never use dishwasher tabs with short programs. The tabs may not dissolve completely and are therefore not effective for use with short programs.
- Close the door. Check that the door is closed properly before continuing.
- Check that the water supply is connected and on.
- Select wash program: Turn the Program button (1) until the indicator for the correct program lights up. See program overview below.
- Press the Power button (b) to start the appliance. - The indicator light (a) lights up when the appliance is switched on.
- Once the program is finished, the appliance stops automatically. An acoustic signal sounds for 8 seconds when the wash cycle is complete.
- Switch off the appliance by pressing the Power button (off).
Wash program overview
Select one of the appliance's 6 wash programs: Press the Program button until the indicator lights up for the program you require.
| Intensive (e).Very heavy food residues.Incl. pre-wash cycle. | Water temperature: 70 °CWash time: 145 minutesWater consumption: 11.0 litres |
| Normal (f).Normal food residues.Incl. pre-wash cycle. | Water temperature: 60 °CWash time: 125 minutesWater consumption: 8.4 litres |
| Eco wash (g)Light food residues.Incl. pre-wash cycle. | Water temperature: 50 °CWash time: 170 minutesWater consumption: 7 litres |
| Glass wash (h).Light food residues, e.g. glasses. No pre-wash cycle. | Water temperature: 45 °CWash time: 75 minutesWater consumption: 6.8 litres |
| Quick wash (i).Light food residues on dishes that do not have to be dried. No pre-wash cycle. | Water temperature: 40 °CWash time: 30 minutesWater consumption: 6.0 litres |
| 3-in-1wash (j).Normal food residues.Incl. pre-wash cycle. | Water temperature: 60 °CWash time: 140 minutesWater consumption: 8.4 litres |
Temporary interruption of wash program
- Any wash program can be temporarily interrupted at any time by pressing the Start/Reset button (k).
- When the wash program is interrupted, an acoustic signal sounds once a minute until the appliance is restarted. To restart, close the door (if it has been opened) and press the start/reset button. The appliance restarts after 10 seconds.
- When the wash program is interrupted, you can switch to another wash program by pressing the program selector button.
After each wash program
- The power to the appliance remains on until it is interrupted by pressing the Power button.
- Then allow the dishes to cool for approximately 15 minutes before emptying the appliance.
- Once the appliance is empty, check the filter in the base of the appliance for impurities. Clean if necessary.
Some useful advice
- Dishes will dry quicker if the door is opened slightly after the wash program has finished.
- Be sure to rinse dishes after use. Dishes with dried-on food are more difficult to clean using a normal program.
- Detergent loses its detergency over time. If your detergent is very old or lumpy, it should be replaced.
STORAGE
If the appliance is not used daily, you are advised to do the following every time you have used it:
- Disconnect power supply to the appliance.
- Turn off the water supply and disconnect the hose from the water intake.
- Drain any remaining water in the water intake hose (into a basin).
• Fix the hose back onto the water intake. - Remove the filters and use a sponge to draw water up from the base.
CLEANING
When cleaning the appliance, you should pay attention to the following:
- Remove plug from the mains socket, and allow the appliance to cool down before cleaning it.
- Never submerge the appliance in water and make sure no water enters the appliance.
- Clean the appliance by wiping it with a damp cloth. A little detergent can be added if the appliance is heavily soiled.
- Do not use scouring pads, steel wool or any form of strong solvents or abrasive cleaning agents to clean the appliance, as they may damage the external surfaces of the appliance.
- The filters and the inside base of the appliance must be cleaned regularly so that water can circulate freely.
This appliance is intended to be used in household and similar applications such as:
- staff kitchen areas in shops, offices and other working environments;
- farm houses;
- by clients in hotels, motels and other residential type environments;
- bed and breakfast type environments.
BEFORE GOING TO A REPAIR CENTRE
| Problem | Possible causes Solution | |
| The appliance does not start. | The fuse has blown/relay has been switched off. | Replace fuse/switch on relay. |
| The door is not closed completely. | Close door completely. | |
| Water remains in the appliance. | There is a kink in the drainage hose. | Check the drainage hose. It must not be crushed or kinked. |
| The filters are blocked. | Remove any impurities from the coarse filter . | |
| The drain is blocked. | Check the drain.Make sure that it is functioning correctly. | |
| The dishes are not clean. | The dishwasher arm is blocked. | Check that the dishwasher arm rotates freely and turns a complete circle. |
| The dishes are incorrectly positioned in the dishwasher. | Check that the dishes are arranged in the rack in such a way that water from the dishwasher arm reaches all the dishes. | |
| There is too little dishwasher detergent. | Use more detergent or try a different type. | |
| The dishes are not dry. | Dishes are incorrectly positioned in the dishwasher. | Check that the dishes are positioned correctly. |
| There is too little dishwasher rinse agent. | Fill more dishwasher rinse agent. | |
| The appliance has been emptied too soon. | Open door. Allow the dishes to cool before emptying the appliance. | |
| The problem may be that there are a relatively large number of plastic containers that do not absorb as much heat and moisture as, e.g. porcelain. | Allow more time for the dishes to cool. | |
If the appliance still does not work, contact a repair engineer.
ERROR WARNING CODES
When an error occurs, the appliance will use the following error warning codes:
| Error warning code | Description of problem: | Possible solution |
| The 3-in-1 indicator is flashing | The water is entering more slowly than usual. | Water intake is blocked or water pressure is too low. |
| The glass indicator is flashing | Abnormal water level. | The appliance is leaking. |
FOR UNITED KINGDOM ONLY
Plug wiring:
This product is fitted with a BS 1363 13-amp plug. If you have to replace the fuse, only those that are ASTA or BSI approved to BS1362 and with a rated current of 13 amps should be used. If there is a fuse cover fitted, this cover must be refitted after changing the fuse. If the fuse cover is lost or damaged, the plug must not be used. You must also check if the socket outlets in your home fit with the plug of the appliance. If the socket outlet in your home does not fit with the plug, the plug must be removed and disposed of safely as insertion of the plug into the socket is likely to cause electric hazard. A replacement plug should be wired according to following description.
Important
This appliance must be earthed. The wires in the cord set are coloured thus:
BLUE- Neutral, Brown-Live, Green& Yellow-earth (For detachable plug only)
As the colours of the wires in the mains lead of this appliance may not correspond with the coloured markings identifying the terminals in your plug, proceed as follows:
The wire that is coloured Green& Yellow must be connected to the terminal in the plug that is marked with the letter E or by the earth symbol, or coloured green& yellow.
The wire that is coloured blue must be connected to the terminal that is marked with the letter N or coloured black.
The wire that is couloured brown must be connected to the terminal that is marked with the letter L or coloured red.
INFORMATION ON DISPOSAL AND RECYCLING OF THIS PRODUCT
Please note that this Adexis product is marked with this

This means that this product must not be disposed of along with ordinary household waste, as electrical and electronic waste must be disposed of separately.
In accordance with the WEEE directive, every member state must ensure correct collection, recovery, handling and recycling of electrical and electronic waste. Private households in the EU can take used equipment to special recycling stations free of charge. In some member states you can, in certain cases, return the used equipment to the retailer from whom you purchased it, if you are purchasing new equipment. Contact your retailer, distributor or the municipal authorities for further information on what to do with electrical and electronic waste.
GUARANTEE TERMS
The guarantee does not apply:
• if the above instructions have not been followed
• if the appliance has been tampered with
- if the appliance has been mishandled, subjected to rough treatment, or has suffered any other form of damage
- if the appliance is faulty due to faults in the electricity supply.
Due to the constant development of our products in terms of function and design, we reserve the right to make changes to the product without prior warning.
FREQUENTLY ASKED QUESTIONS
If you have any questions regarding the use of the appliance and cannot find the answer in this user guide, please try our website at www.adexi.eu.
Go to the “Consumer Services” menu and click on “Frequently Asked Questions” to view the most frequently asked questions.
You can also see contact details on our website if you need to contact us for technical questions, repairs, accessories or spare parts.
IMPORTER
Adexi Group
www.adexi.eu
We cannot be held responsible for any printing errors.
DE
EINLEITUNG






- KLARG∅RING AF APPARATET
- KLARGJ∅RING AV APPARATET
- IMPORTANT SAFETY PRECAUTIONS
- General
- Positioning the appliance
- Connection
- Use
- Cord and plug
- PREPARING THE APPLIANCE
- Fitting the filter, rack and cutlery basket
- Filling salt
- To fill with salt:
- Filling dishwasher rinse agent
- To fill with dishwasher rinse agent:
- OPERATING THE APPLIANCE
- Basic operation
- Wash program overview
- Temporary interruption of wash program
- After each wash program
- Some useful advice
- STORAGE
- CLEANING
- This appliance is intended to be used in household and similar applications such as:
- ERROR WARNING CODES
- FOR UNITED KINGDOM ONLY
- Plug wiring:
- Important
- BLUE- Neutral, Brown-Live, Green& Yellow-earth (For detachable plug only)
- INFORMATION ON DISPOSAL AND RECYCLING OF THIS PRODUCT
- GUARANTEE TERMS
- FREQUENTLY ASKED QUESTIONS
- IMPORTER
- DE
- EINLEITUNG
Brand : Melissa
Model : 16590008
Category : Dishwasher