
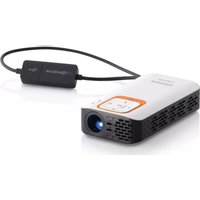
PicoPix PPX3407 - Projector PHILIPS - Free user manual and instructions
Find the device manual for free PicoPix PPX3407 PHILIPS in PDF.


| Product Type | Portable Pico Projector |
| Model | PicoPix PPX3407 |
| Brand | Philips |
| Dimensions (approx.) | 100 x 100 x 30 mm |
| Weight (approx.) | 0.3 kg |
| Power Supply | Built-in battery (USB charging) |
| Display Technology | DLP |
| Brightness (approx.) | 100 lumens |
| Native Resolution | 854 x 480 pixels (WVGA) |
| Contrast Ratio (approx.) | 1000:1 |
| Projection Size | Up to 80 inches |
| Projection Distance | 0.5 - 3 m |
| Lamp Life (approx.) | 20,000 hours (LED) |
| Connectivity | HDMI, USB, microSD |
| Audio Output | Built-in speaker (1W) |
| Battery Life (approx.) | 2 hours |
| Main Features | Portable, compact design, media playback from USB/microSD |
| Cleaning Instructions | Wipe the lens gently with a soft, dry cloth. |
| Safety Warning | Avoid looking directly into the lens. |
| Spare Parts / Repairability | Contact Philips support for service. |
| User Manual | Available in PDF for download. |
Frequently Asked Questions - PicoPix PPX3407 PHILIPS
User questions about PicoPix PPX3407 PHILIPS
0 question about this device. Answer the ones you know or ask your own.
Ask a new question about this device
Download the instructions for your Projector in PDF format for free! Find your manual PicoPix PPX3407 - PHILIPS and take your electronic device back in hand. On this page are published all the documents necessary for the use of your device. PicoPix PPX3407 by PHILIPS.
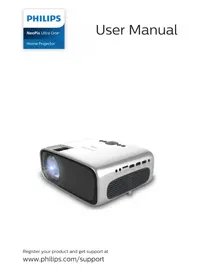
USER MANUAL PicoPix PPX3407 PHILIPS
Register your product and get support at
www.philips.com/welcome
PicoPix
PPX3407
PPX3410

US User Manual
Table of Contents
Overview 3
Dear Customer 3
About this User Manual 3
1 General Safety Information...... 4
Setting Up the Device 4
Repairs 4
Power Supply 4
2 Overview...... 6
Top of the Device 6
Side view 6
Bottom of the Device 6
Remote Control 7
Overview of the Menu Functions 8
3 Initial Operation 9
Setting up the Device 9
Connecting power supply / Charging battery 9
Initial Installation 9
Installing or Changing the Batteries of the Remote
Control 10
Using the Remote Control 11
4 Connect to the playback device...... 12
Connecting to Devices with HDMI output 12
Connecting to a Computer (VGA) 12
Connecting using Audio/Video (CVBS) Adaptor Cable 13
Connecting using Component-Video (YPbPr/YUV)
Cable 13
Connecting the headphones 14
5 Memory card / USB storage medium 15
Inserting a Memory Card 15
Connecting USB Storage Medium 15
6 Media Playback.... 16
Video Playback 16
Photo Playback 17
Music Playback 18
Managing files 18
7 Settings 21
8 Service.... 23
Care Instructions for the Battery 23
Battery deep discharge 23
Cleaning 24
Device overheated 24
Troubleshooting 25
9 Appendix.... 26
Technical Data 26
Accessories 26
Overview
Dear Customer
Thank you for purchasing our Pocket Projector.
We hope you enjoy your device and its many functions!
About this User Manual
With the installation guide on the following pages, you can start using your device quickly and easily. Detailed descriptions can be found in the following sections of this user manual.
Read the entire user manual carefully. Follow all safety instructions in order to ensure proper operation of your device. The manufacturer accepts no liability if these instructions are not followed.
Symbols Used
Note

Troubleshooting
This symbol designates tips that will help you to use your device more effectively and easily.
CAUTION!

Damage to the Device or Loss of Data!
This symbol gives warning of damage to the device and possible loss of data. These damages can result from improper handling.
DANGER!

Danger to Persons!
This symbol gives warning of danger to persons. Physical injury or damage can result from improper handling.
1 General Safety Information
Do not make any changes or settings that are not described in this user manual. Physical injury or damage to the device or loss of data can result from improper handling. Take note of all warning and safety notes indicated.
Setting Up the Device
The device is exclusively for indoor use. The device should be placed securely on a stable, flat surface. Position all cables in such a way that no one will stumble on them, thus avoiding possible injuries to persons or damage to the device itself.
Do not plug in the device in moist rooms. Never touch the electrical cable or the electrical connection with wet hands.
The device must have sufficient ventilation and may not be covered. Do not put your device in closed cabinets or boxes.
Do not place the machine on soft surfaces such as tablecloths or carpets and do not cover the ventilation slits. Otherwise the device could overheat or catch fire.
Protect the device against direct sunlight, heat, large temperature fluctuations and moisture. Do not place the device in the vicinity of heaters or air conditioners. Observe the information on temperature and humidity in the technical data.
When the device is running for a long period of time, the surface becomes hot and a warning symbol appears on the projection. The device switches automatically to stand-by mode when it gets too hot. After the device has cooled down, you can continue playback by pressing any key.
Do not allow liquids to enter into the device. Switch off the device and disconnect it from the power supply if liquids or foreign substances end up inside the device. Have the product inspected by a technical service department.
Always handle the product with care. Avoid touching the lens. Never place heavy or sharp objects on the projector or the power cable.
If the projector gets too hot or emits smoke, shut it down immediately and unplug the power cable. Have your device examined by trained professionals at a technical service location. To prevent the spread of fire, open flames should be kept away from the device.
Under the following conditions, a layer of moisture can appear inside the device which can lead to malfunctions:
- if the device is moved from a cold to a warm area; · after a cold room is heated;
- when this device is placed in a damp room.
Proceed as follows to avoid any moisture build-up:
1 Seal this device in a plastic bag before moving it to another room, in order for it to adapt to room conditions. 2 Wait one to two hours before you take the device out of the plastic bag.
The device should not be used in a very dusty environment. Dust particles and other foreign objects may damage the product.
Do not expose the device to extreme vibrations. It may damage the internal components.
Do not allow children to handle the device without supervision. The packing materials should be kept out of the hands of children.
Repairs
Do not make any repairs to the device yourself. Improper maintenance can result in injuries or damage to the device. Have your device repaired only by an authorized service center.
Do not remove the type label from your device; this would void the warranty.
Power Supply
Use only the enclosed power adapter (see chapter Appendix / Technical Data). Check whether the electrical voltage of the power supply matches the electrical voltage available at the setup location. This equipment complies with the voltage type specified on the product.
The AC main plug of the adapter is used as the power disconnect device. The socket-outlet shall be installed near the equipment and shall be easily accessible.
The product should be supplied by a power system compliant with LPS requirements of 2.5 of UL60950-1.
The capacity of the battery diminishes with time. If the device functions only with the power supply, the battery is defective. Contact an authorized service center to replace the battery.
Do not try to replace the battery yourself. Incorrect handling of the battery or using the wrong type of battery can cause damage to the device or cause injury.
Batteries (battery pack or batteries installed) must not be exposed to flame or excessive heat including from direct sunshine or the like.
Attention should be drawn to the environmental aspects of battery disposal.
DANGER!

Risk of explosion with incorrect type of batteries
Only replace the batteries with the same or comparable batteries.
There is a risk of explosion if the incorrect battery type is used.
Switch the device on or off using the power switch before removing the power supply from the socket.
Turn off the device and remove it from the power supply before cleaning the surface. Use a soft, lint-free cloth. Never use liquid, gaseous or easily flammable cleansers (sprays, abrasives, polishes, alcohol). Do not allow any moisture to reach the interior of the device.
DANGER!

Danger of Damage to the Eye by High Power LED
This device is equipped with a high power LED (Light Emitting Diode), which emits very bright light. Do not stare directly into the projector lens to avoid eye injury or irritation.
DANGER!

Danger of Hearing Damage
Do not use the device over a longer time at high volume—especially when using headphones. This could lead to the risk of hearing damage.
2 Overview
Top of the Device
(1)—Focus wheel for image sharpness.
Note

Note that the distance to the projection surface must be a minimum of 0.5 meters and a maximum of 5 meters. If the Pocket Projector is located outside of this range, it will not be possible to focus the image. Turn the focus wheel carefully so as to avoid damaging the lens.
(2) ☑—One menu step back, one directory level back / cancelling a function (3)—Navigation key / OK key OK—Confirm entry / start, stop video/music playback or slideshow. ▲/▼—Navigating / during music playback select previous, next title when image display is switched off ☑/▶—Navigating / during music playback: adjust volume level / during video playback review, cue

Side view
(1)ON/OFF—On/Off switch (2)—Battery status monitor
Red: battery is charging.
Green: battery charging complete.
Red/Green flashing: battery low, or charging stopped due to temperature protection.
(3) Remote control signal receiver (4) ☐ Audio output – headphone jack or connection for external speakers (5) HDMI/YPbPr/VGA – connection for a playback device with HDMI/YPbPr/VGA output via an adapter cable (6) SD/MMC – memory card slot (SD/SDHC/SDXC/MMC) (7) Mini USB – connection for a computer (data exchange) (8) DC IN – power supply port (9) A/V – connection for a playback device with A/V (CVBS) output via an adapter cable (10) USB – connection for a USB storage device

Bottom of the Device
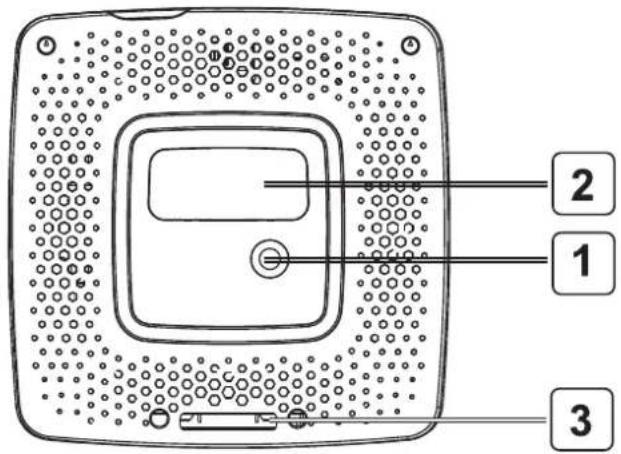
(1) Tripod socket (2) Pico Station connector (3) Pico Station connection socket
Remote Control
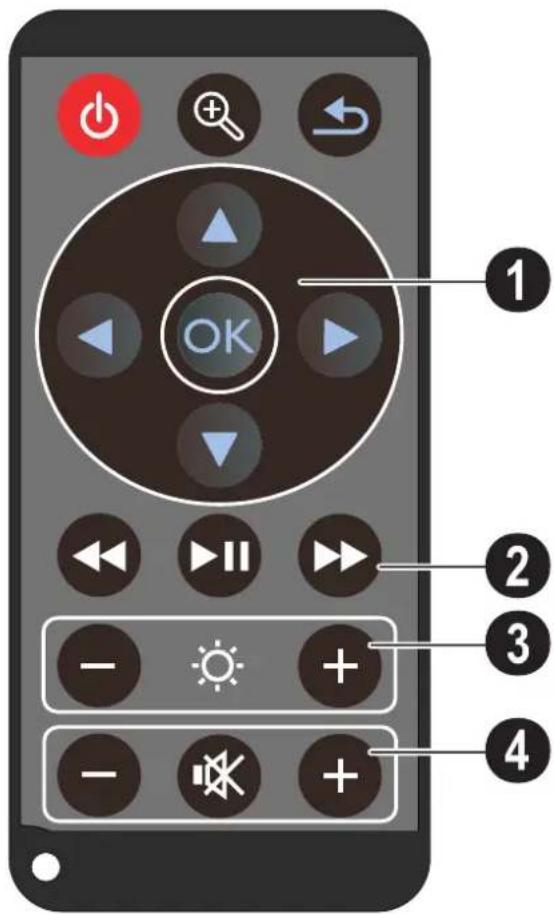
Standby / Activate the device. Magnify still. Pan using the navigation keys (▲/▼, ◀/▶). One menu step back, one directory level back / cancelling a function.
(1) Direction Buttons
OK – confirms selection. ▲/▼, ◀/▶ – navigation keys / navigate the menu / modify settings. ▲/▼ – modify settings / during music playback select previous or next title. ☑/▶ – during music playback adjust volume level / during video playback review or cue.
(2) Playback keys
During video playback: review. Start / stop playback. During video playback: cue.
(3) Brightness keys
⊖ ⚙ ⊕ – decrease / increase brightness. (4) Volume keys
– decrease volume. Deactivate sound. ⊕ – increase volume.
Overview of the Menu Functions
1 After switching on the device, the main menu appears. 2 Select the desired menu using the navigation keys ▲/▼, ◀/▶. 3 Confirm with OK. 4 By pressing the ⏻ key several times, you will return to the main menu.

Videos—Selecting files for video playback
Source—Switch to the external video input HDMI, AV, COMPONENT
Pictures—Selecting files for the slideshow
Folder View—Selecting files for playback. Copy or delete files (mark the files with ▶ and confirm using Ⓞ).
Music—Selecting music files for playback
Settings—Configure settings for playback and for the device
Symbols in the Main Menu
The chosen storage appears highlighted in white.
①—USB storage medium ②—Memory card ③—Internal memory 4—Charge level of the internal battery. The icon will flash red when the battery needs to be recharged. If the power supply is connected, no symbol is displayed.
3 Initial Operation
Setting up the Device
You can position the device so that it lies flat on a table in front of the projection surface; it is not necessary to tilt it towards the projection surface. The device compensates for the distortion from the slanted projection (pincushion distortion).
A tripod accessory is available if you want to elevate the device (Pico Tripod / 253521272).
Connecting power supply / Charging battery
CAUTION!

Electrical Voltage at the Site of Installation!
Check whether the electrical voltage of the power supply matches the electrical voltage available at the setup location.
1 Insert the small plug of the power supply into the socket on the rear side of your device. 2 Plug the power supply into the power outlet. 3 During the charging process, the indicator light on the side of the device will be red. When the battery is fully charged, it will turn green. 4 Charge the built-in battery before using for the first time for at least 3 hours. This will prolong the life of the battery.

Initial Installation
1 Switch the device on using the on/off switch on the side. 2 Turn the device towards a suitable projection surface or wall. Note that the distance to the projection surface must be a minimum of 0.5 meters and a maximum of 5 meters. Make sure the projector is in a secure position. 3 Use the focus wheel on the top to adjust the image sharpness. 4 Select the desired menu language using ▲/▼. 5 Confirm with OK.
Note

The main menu appears instead of the language selection
The device has already been installed. In order to change the menu language, proceed as follows:
1 Use the navigation keys to select Settings. 2 Confirm with OK. 3 Select with Language. 4 Confirm with OK. 5 Select the desired language with ▲/▼. 6 Confirm with OK. 7 Exit with ↻.
Installing or Changing the Batteries of the Remote Control
DANGER!

Risk of explosion with incorrect type of batteries
Only use the CR 2025 type battery.
There is a risk of explosion if the incorrect battery type is used.
1. To access the battery, disengage the locking mechanism (①) and slide out the battery compartment (②).

2. Insert the new batteries into the battery compartment with the positive and negative poles as shown on the back of the remote control. Make sure the polarities (+ and -) are aligned correctly.

3. Push the battery compartment back into the remote control until the locking mechanism engages.

Note:

Normally the batteries will last for around one year. If the remote control stops working, please replace the batteries. If the device is not used for a long time, take out the batteries. This will prevent leakage and possible damage to the remote control.
The used batteries should be disposed of according to the recycling regulations of your country.
Using the Remote Control
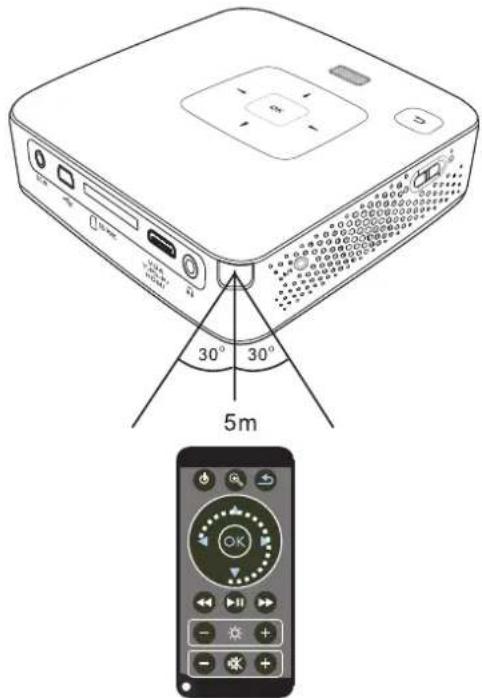
Point the remote control at the remote sensor on the back of the device. The remote can be used within an angle of 60 degrees and up to 5 meters from the device. When using the remote control, no obstacle should be placed between the remote control and remote sensor.
CAUTION!

Risk of overheating, explosion, fire and injury. Leaking batteries can possibly damage the remote control.
Do not expose the remote control to direct sunlight.
Do not expose the remote control to water or moisture.
Remove the batteries from the remote control if not in use for a long period of time.
4. Connect to the playback device
Only use the supplied cable or cables that are available as accessories to connect the projector.
Supplied Cables
Mini-USB to USB Cable
HDMI to mini-HDMI Cable (PPX3410 included)
Cables available as Accessories
Component Video Cable .....(PPA 1210 / 253447083)
VGA-Audio Cable .....(PPA 1250 / 253447070)
iPhone Cable ..... (PPA 1280 / 253447091)
MHL to mini-HDMI cable .....(PPA 1240 / 253520048)
Pico Station.....(PPA 7300 / 253529749)
Connecting to Devices with HDMI output
Use the HDMI to mini HDMI cable to connect the projector to a computer or laptop.

1 Switch to HDMI in Menu > Source 2 Connect the HDMI cable to the projector's mini-HDMI socket. 3 Connect the cable to the HDMI socket of the play-back device.
Connecting to a Computer (VGA)
Note

Many laptops do not activate the external video output automatically when you connect a second display such as a projector. Check your laptop's manual to find out how to activate the external video output.
Use the VGA-Audio cable (available as an accessory) to connect the projector to a computer, laptop, or some PDAs. The projector supports the following resolutions: VGA/SVGA/XGA. For best results, set the computer's resolution to SVGA (800x600).

1. Connect the VGA-Audio cable to the projector's mini-HDMI socket. 2. Connect the VGA plug to the computer's VGA socket and the audio plug to the computer's audio output. 3. Adjust the computer's resolution to the correct setting and switch the VGA signal to an external monitor. The following resolutions are supported:
| Resolution | Image refresh rate | |
| VGA | 640 x 480 | 60 Hz |
| SVGA | 800 x 600 | 60 Hz |
| XGA | 1024 x 768 | 60 Hz |
Note

Screen Resolution
You can obtain the best results with the 800 x 600 (60Hz) resolution.
4. Select Menu > Source and switch to VGA.
Connecting using Audio/Video (CVBS) Adaptor Cable
Use the projector's audio/video adaptor cable (A/V cable) to connect camcorders, DVD players or digital cameras. The jacks for these devices are yellow (video), red (audio right) and white (audio left).
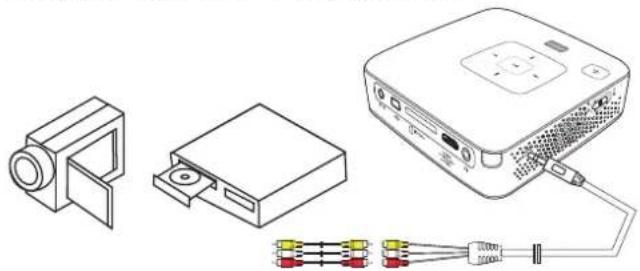
1. Connect the supplied A/V cable to the projector's A/V socket. 2. Connect the video device's audio/video jacks to the A/V cable using a conventional composite video (RCA) cable. 3. Select Menu > Source and switch to AV.
Connecting to mobile multimedia devices
Some video devices (e.g., pocket multimedia players, ...) require specific connection cables. These are either supplied with the device or acquired from the manufacturer of the multimedia device. Please note that only the original cables from the device manufacturer may function.

Note

Switching to the multimedia device signal output
See the multimedia device instruction manual to find out how to switch the signal output to this jack.
Connecting using Component-Video (YPbPr/YUV) Cable
Please use this type of connection to obtain the highest possible image quality. This cable is available as an accessory. The device jacks have the colours green (Y), blue (U/Pb), red (V/Pr) for the video signal and red (audio right) and white (audio left) for the audio signal.
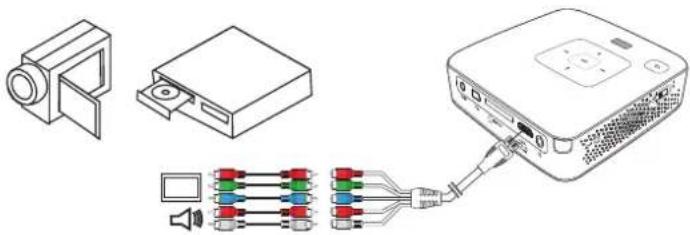
1. Connect the video component cable (accessory) to the projector's mini-HDMI socket. 2. Connect the video device's appropriate colored sockets to the component video cable of the projector using a conventional component video (RCA) cable.
Note

YCbCr
Note that the YPbPr outlets are labelled YCbCr on some devices.
Note

Two red phono (RCA) connectors
When connecting, note that there are two red phono (RCA) connectors on the cable. One is for the right audio signal and the other for the V/Pr element of the component video signal. If these two connectors are inserted incorrectly, the projected image appears green and the audio signal for the right speaker will not work.
3. Select Menu > Source and switch to Component.
Connecting to mobile multimedia devices
Some video devices (e.g.: pocket multimedia players, ...) require specific connection cables. These are either supplied with the device or acquired from the manufacturer of the multimedia device. Please note that only the original cables from the device manufacturer may function.

Note

Switching to the multimedia device signal output
See the multimedia device instruction manual to find out how to switch the signal output to this jack.
Connecting the headphones
1 Before connecting the headphones, turn down the volume on the device. 2 Connect the headphones to the projector's headphone slot. The device speakers deactivate automatically when the headphones are connected.

3 After connecting the headphones, increase the volume to a comfortable level.
DANGER!

Danger of Hearing Damage
Do not use the device over a longer time at high volume—especially when using headphones. This could lead to the risks of hearing damage. Before connecting the headphones, turn down the volume on the device. After connecting the headphones, increase the volume to a comfortable level.
5 Memory card / USB storage medium
Inserting a Memory Card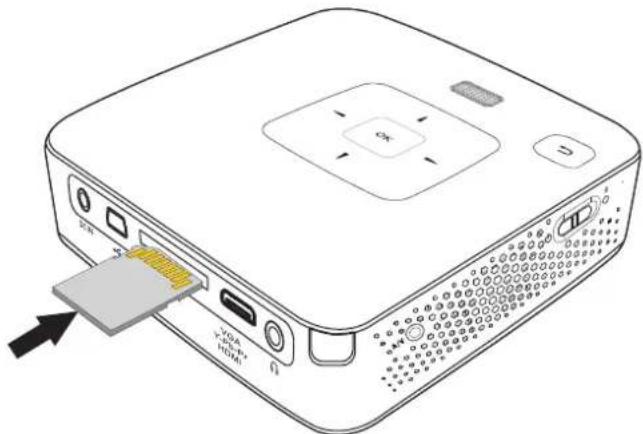
1 Insert a memory card with the contacts facing upwards into the SD/MMC slot at the back of the device. Your device supports the following memory cards: SD/SDHC/SDXC/MMC.
2 Insert the memory card into the slot until it snaps into position.
DANGER!

Prematurely remove a Memory Card!
Never pull out the memory card while the device is accessing it. This could cause data to be damaged or lost.
In order to make sure that the device does not access the memory card, press the ⏻ key in the main menu until the symbol for the internal memory has been selected.
3 Press lightly on the memory card to remove it.
4 The memory card is ejected.
Connecting USB Storage Medium
1 Connect the USB storage medium directly to the USB socket on the left side of the device.
6 Media Playback
Note

Navigation keys
All the keys shown are buttons on the remote control.
Video Playback
Video Playback (USB/SD card/internal memory)
1 Switch the device on using the on/off switch on the side. 2 After the initial screen the main menu appears.

3 Use the navigation keys to select Videos. 4 Confirm with OK. 5 With an inserted memory card or USB storage device: Select the internal memory, the USB storage medium or the memory card using the keys ▲/▼. 6 Confirm with OK. 7 Use ▲/▼ to select the video file that you wish to play.

Note

Displaying video files
Only those videos that are compatible with the Pocket Projector will be displayed.
8 Press OK to start playback.
9 Press ⬆ to end playback and return to the overview. 10 When you press 📊 again, you will return to the main menu.
Note

Navigation during playback
Review / cue: Press ◀/▶ on the remote control or ◀/▶ on the device.
Press ▶ to stop or continue playback.
During playback you can adjust the volume using ⏻/⊕ on the remote control. Press ⏻ or ⏻repeatedly to shut off the volume completely.
File Format
There are various video file formats as *.mov, *.avi, *.m4v. Many of these formats function as a container that contains the various encoded audio and video files. MPEG-4, H.264, MP3, and AAC are all examples of encoded audio/video files. In order to play these files, the projector must read them and decode the audio/video signals.
Please note that some files cannot be played as a result of different video and audio encoders.
Supported File Formats
| Container | Video Format |
| *.avi, *.mkv | MJPEG, MPEG-4, H.264 |
| *.mov, *.mp4 | MPEG-4, H.264 |
| *.ts | MPEG-2, H.264 |
| *.m2ts | H.264 |
| *.3gp | H.263 |
| *.rm, *.rmvb | Real video |
| *.dat, *.vob | MPEG-1, MPEG-2 |
| *.mpg, *.mpeg | MPEG-1, MPEG-2 |
Video Playback (Mini-HDMI socket)
1 Connect the audio/video output of the external device to the Pocket Projector's mini-HDMI socket. Use the corresponding cable and cable adapter for this purpose (see also chapter Connect to the play-back device, page 12). 2 To find out how to deactivate the video output for the external device, please see the relevant instruction manual. Most often, this option is labeled "TV out" or "TV Output" in the corresponding menu. 3 Start the video playback on the external device. 4 Modify the volume with ⊖/⊕.
Modify settings during playback
1 Press the ▲ or ▶key.
2 Use the ▲/▼ keys to choose from the following settings:
Brightness: Adjust brightness
Contrast: Adjust contrast
Saturation: Adjust colour saturation
Smart Settings: Select predefined settings for brightness / contrast / colour saturation
Volume: Adjust volume level
3 Modify the setting using ◀/▶.
The device saves the modified settings automatically.
Modify other settings
1 Press the OK button.
2 Use the ▲/▼ keys to choose from the following settings:
Image Settings: Adjust brightness, contrast, colour saturation
Sound Settings: Adjust treble, bass and volume
Power Save: This function reduces the light output in order to increase the operating time for the built-in battery.
3 Confirm with OK. 4 Modify the setting using Ⓞ and ▲/▼. 5 Confirm with OK.
Photo Playback
1 Switch the device on using the on/off switch on the side. 2 After the initial screen the main menu appears.

3 Use the navigation keys to select Pictures. 4 Confirm with OK. 5 With an inserted memory card or USB storage device: Select the internal memory, the USB storage medium or the memory card using the keys ▲/▼. 6 Confirm with OK. 7 Miniature photos are displayed on the screen as an overview.

Note

Miniature view or list
In the settings, you are able to select whether the overview will be displayed as miniatures or in a list.
Note

Many photos on the memory card or the USB medium
If there are a lot of photos on the memory card or the USB storage medium it can take a moment before the overview appears.
8 Use ◀/▶ or ▲/▼ to select the image that you want to start the slide show with. 9 Press OK to start the slide show.
Note

Zoom in / Zoom out
You can enlarge the displayed image during the slide show using the ☐ key. Use the ☑/☐/☐/☑ keys to move around the magnified image.
10 Press ▶ to pause the slide show. 11 Press ↩ to end the slide show and return to the overview. 12 When you press 📊 again, you will return to the main menu.
Music Playback
Note

Switch off the image playback
You can turn off image playback while playing music in order to save power (see also chapter Music Settings, page 21). As soon as you press the key, the image reappears and the fan starts again.
1 Switch the device on using the on/off switch on the side.
2 After the initial screen the main menu appears.

3 Use the navigation keys to select Music.
4 Confirm with OK.
5 With an inserted memory card or USB storage device: Select the internal memory, the USB storage medium or the memory card using the keys ▲/▼.
6 Confirm with OK.
7 Use ▲/▼ to select the file that you wish to play.

8 Press OK to start playback.
9 Press ▶ to stop or continue playback.
Note

Navigating when image playback is switched off
Press ▲/▼ to skip to the previous or next song.
Press ▶ to stop or continue playback.
Press ⬆ to return to the selection.
During playback you can adjust the volume using ⏻/⊕ on the remote control. Press ⚙ or ⏱ repeatedly to shut off the volume completely.
Managing files
Copy Files
You can copy files back and forth from the internal memory to the connected USB storage medium or memory card.
1 Switch the device on using the on/off switch on the side.
2 After the initial screen the main menu appears.

3 Use the navigation keys to select Folder View.
4 Confirm with OK.
5 With an inserted memory card or USB storage device: Select the internal memory, the USB storage medium or the memory card using the keys ▲/▼.
6 Confirm with OK.
7 Use ▲/▼ to select the file that you want to copy.
Note

No Files Found (0 files)
Only those files that are compatible with the Projector will be displayed.
8 Mark the file using ▶. Pressing the key again deselects the chosen file(s).
Note

Mark the entire folder
You can also mark an entire folder to copy all files from the folder. Note that the copy process of large folders can take some time.
9 Use ▲/▼ to select other files.
10 Press OK.
11 Select with ©opy.

12 Confirm with OK.
13 Use ▲/▼ to select the destination memory: SD card, internal memory or USB storage medium.
14 Confirm with OK.
Note

Files already exist
If the files you are copying already exist in the target folder, you must choose whether or not you want to overwrite them using ▲/▼ and Ⓞ. If you choose not to overwrite these files, copies will be created. The copies can be recognised by a number added to the file names.
15 The files are copied.
Note

If errors occur during the copying process, make sure that enough free space is available on the medium.
Note

Removing storage medium
Only remove the storage medium after the copy process is complete.
Delete Files
You can delete files from the internal memory, the connected USB storage medium or the memory card.
1 Switch the device on using the on/off switch on the side.
2 After the initial screen the main menu appears.

3 Use the navigation keys to select Folder View.
4 Confirm with OK.
5 With an inserted memory card or USB storage device: Select the internal memory, the USB storage medium or the memory card using the keys ▲/▼.
6 Confirm with OK.
7 Use ▲/▼ to select the file that you want to delete.
Note

No Files Found (0 files)
Only those files that are compatible with the Projector will be displayed.
8 Mark the file using ▶. Pressing the key again deselects the chosen file(s).
9 Use ▲/▼ to select other files.
10 Press OK.
11 Select with ▲/▼ Delete.
12 Confirm with OK.
13 Use ▲/▼ if you want to delete the files or cancel the deletion process.
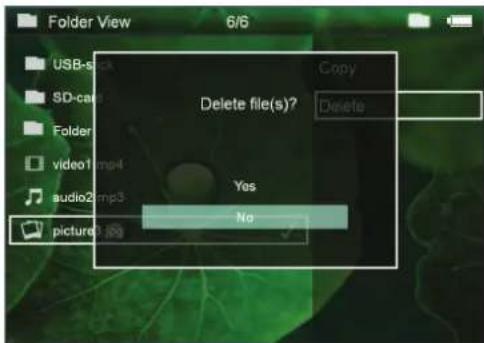
14 Confirm with OK.
Note

Error
If errors occur during the deletion process, make sure that the storage medium is not write-protected.
Note

Deleting photos on the memory card
When deleting photos via the computer, note that the photos may not be correctly displayed when the memory card is inserted into the digital camera again. Digital cameras sometimes store additional information in specific folders, including previews and orientation information.
For this reason, only delete the photos using the digital camera.
Microsoft® Office & Adobe® PDF Files Playback
1 Switch the device on using the on/off switch on the side.
2 After the initial screen the main menu appears.

3 Use the navigation keys to select Folder View.
4 Confirm with OK.
5 With an inserted memory card or USB storage device: Select the internal memory, the USB storage medium or the memory card using the keys ▲/▼.
6 Confirm with OK.
7 Use to select the Microsoft® Office file or Adobe® PDF file that you wish to view.
8 Press OK to start view.
9 Press ⬆ to end view and return to the overview.
10 When you press 📋 again, you will return to the main menu.
Note

Zoom in / Zoom out
You can enlarge the displayed image during the slide show using the 🔒 key. Use the ⏻/▶ keys to move around the magnified image.
Connect to a Computer (USB)
You can use the USB cable to connect the Pocket Projector to a computer. In this way, you are able to copy files back and forth between the internal memory, an inserted memory card and the computer. You can also delete the files. You can playback the files saved on the Pocket Projector on your computer.

1 Connect the mini-USB socket to the Pocket Projector and the USB socket to the computer.
2 Switch the device on using the on/off switch on the side.
3 A confirmation appears when the devices are connected successfully.
Note

Successful connection
You cannot use the projection function of the Pocket Projector when it is connected to a computer via USB.
4 If a memory card has been inserted, it will be displayed as another disk drive.
5 You can move, copy or delete data from the computer, the memory card (if inserted) and the internal memory.
7 Settings
1 Switch the device on using the on/off switch on the side. 2 After the initial screen the main menu appears.

3 Use the navigation keys to select Settings. 4 Confirm with OK. 5 Use ▲/▼ to select from the following settings.

6 Confirm with OK. 7 Modify the settings using Ⓞ, ⬆/▼, 8 Confirm with OK.
The ⏻ key takes you one step back in the menu.
Image settings
Wall paper—Select background images
Fit Screen—Convert videos and images to 16:9 resolution
Projection mode
Front—Normal projection; the device is located in front of the projection surface/screen.
Rear—Rear projection; the device is located behind the projection surface; the image is horizontal mirrored.
Ceiling—The device is hanging from the ceiling in an upside-down position; the image is rotated by 180 degrees.
Rear ceiling—The device is hanging from the ceiling in an upside-down position behind the projection surface; the image is rotated by 180 degrees and horizontal mirrored.
Wall color correction—Colour correction of the projected image to adjust to coloured projection surfaces
Smart Settings—Select predefined settings for brightness / contrast / colour saturation. If you modify these settings, the setting is switched to Manual.
Brightness—Adjust brightness
Contrast—Adjust contrast
Saturation—Adjust colour saturation
Sound Settings:
Volume—Adjust the volume
Bass—Set the playback of the low frequencies
Treble—Set the playback of the high frequencies
Key tones—Turn key tones on and off
Video Settings
View—Display all videos in a list or a corresponding folder structure on the drive.
Repeat—Set the repeat type for video files: Repeat deactivated (Off), repeat all videos in a directory (Directory), repeat only the current video (Movie), repeat all videos (All).
Resume play—If this function is activated, playback will continue at the position it was last stopped. If deactivated, playback will always start at the beginning of the video.
Music Settings
View—Show all songs in a list or a corresponding folder structure on the drive.
Screen—Activate or deactivate the projection during playback.
Repeat—Set the repeat type for music files: Repeat deactivated (Off), repeat all songs in a directory (Directory), repeat only the current song (Song), repeat all songs (All).
Shuffle—Activate this function for random playback. Otherwise, playback will take place in sequence.
Picture Settings
View—Display the images as a thumbnail or as a list during selection in the main menu.
Time per slide—Image viewing time during slide show
Repeat—Set the type of repeat for slide show photos: Repeat off (Off), repeat all photos in the directory (Directory), repeat all stored photos (All).
Slide transition—Set image transitions
Slideshow order—Play slide show in order or randomly
Power Save
Brightness mode—Adjust the brightness level in order to save the power consumption and increase battery play time.
Sleep mode—With this function, the projector automatically shuts down after a specified period of time or at the end of a movie.
Language
Select the desired language for the menu.
Auto demo mode
Play automatically demonstration videos when product is powered on.
Maintenance
Reset settings—Reset settings to factory defaults.
Firmware Update—Update Firmware
Note

Keep the device connected to a power outlet for the duration of the firmware update.
Information—Display free space in the internal memory and information on the device (Capacity: / Free space: / Firmware Version / Device name: / Model / Mcu Version)
8 Service
Care Instructions for the Battery
The capacity of the battery diminishes with time. You can prolong the life of the battery if you observe the following points:
the built-in battery. When the battery does not have sufficient capacity, the device switches to stand-by mode. Connect the device to the power supply.
ity, the battery symbol in the display and the battery status light on the side of the device turns red.
time, the surface becomes hot and a warning symbol appears on the projection. The device switches automatically to stand-by mode when it gets too hot. After the device has cooled down, you can continue playback by pressing any key.
device with a completely discharged battery.
charge the battery a little by using the device before storing it.
or with the power supply, the battery is defective.
sources of heat.
DANGER!

Do not replace the battery yourself
Do not try to replace the battery yourself. Incorrect handling of the battery or using the wrong type of battery can cause damage to the device or cause injury.
Battery deep discharge
When the battery is in deep discharge or the device is not used for a longer period, proceed as follows:
1. Connect the device to the power supply (see also chapter Connecting power supply / Charging battery, page 9). The device behaves as follows:
| Device off | Device on | |
| Connect to a computer (USB 5V DC min. 0.7A) | Slow charging | Device turns on and off again. |
| Connect to the power adapter | Fast charging | Device remains turned on.Slow charging |
2. The device can be turned on and is ready to use after approximately five minutes of charging time.
Battery recharge time with device off
| Turning on possible | Completely charged | |
| Slow charging | 5 minutes | 10 hours |
| Fast charging | 5 minutes | 3 hours |
Cleaning
DANGER!

Switching off the device!
Switch the device on or off using the power switch before removing the power supply from the socket.
DANGER!

Instructions for Cleaning!
Use a soft, lint-free cloth. Never use liquid or easily flammable cleansers (sprays, abrasives, polishes, alcohol, etc.). Do not allow any moisture to reach the interior of the device. Do not spray the device with any cleaning fluids.
Wipe over the surfaces gently. Be careful that you do not scratch the surfaces.
Cleaning the Lens
Use a brush or lens cleaning paper for cleaning the lens of the projector.
DANGER!

Do not use any liquid cleaning agents
Do not use any liquid cleaning agents for cleaning the lens, to avoid damaging the coating film on the lens.
Device overheated
An overheat symbol appears if the device is overheated.
It appears in the status bar and the device automatically turns to minimum level of brightness.
for three seconds in the middle of the screen. Then the device turns off automatically.
Troubleshooting
Power Cycling
If a problem occurs that cannot be corrected with the instructions in this user manual (see also the help below), follow the steps given here.
1 Switch the device off using the on/off switch on the side. 2 Wait at least ten seconds. 3 Switch the device on using the on/off switch on the side. 4 If the problem repeats, please contact our technical customer service or your retailer.
| Problems Solutions | |
| internal battery. | |
| remote control. | |
| turer may function | |
| ers headphone socket or the line-out socket. too high. | |
| Only the initial screen appears and not the image from the external device | ets. switched on. |
| Only the initial screen appears and not the image from the connected computer | is switched on. 800x600. |
| the surface becomes hot and a warning symbol appears on the projection. The device switches automatically to stand-by mode when it gets too hot. After the device has cooled down, you can continue playback by pressing any key. have sufficient capacity, the device switches to stand-by mode. Connect the device to the power supply. | |
| Devices changes from maximum level of brightness to minimum level of brightness when the device is connected over USB to play videos. | devices turns automatically from maximum level of brightness to minimum level of brightness in order to protect the high power LED. tures. |
| Device can not connect with an Android device (for example mobilephone/smartphone with Android operating system) when connected via USB. | tings menu of your Android device before connecting the Pocket Projector via USB; your Android device should be recognized as USB storage medium. |
9 Appendix
Technical Data
Dimensions (L × H × W)....105 × 31 × 105 mm
Weight 0.27 kg
Recommended Ambient....5–35°C
Relative Humidity....20–80% (non-condensing)
File format....*.mp4, *.avi, *.mov, *.mkv, ....*.dat, *.mpg, *.mpeg, *.vob, *.ts ....*.m2ts, *.rm, *.rmvb, *.3gp
Photo formats ......JPEG, BMP
Music formats..... MP3, WAV, WMA, OGG, AAC
Video Standard (CVBS)......PAL, SECAM, NTSC, HD
Video Standard (YPbPr)....480i/p, 576i/p, 720p, 1080i/p
Video connection ...... Mini-HDMI & A/V-in socket
Headphone connection......Stereo - jack plug: 3,5 mm
Audio Output....1W
Internal memory....4 GB
Compatible Memory Cards .....SD/SDHC/SDXC/MMC
Technology / Optical
Display technology......WVGA 0,3" DLP
Light source.... RGB LED
Resolution 854 x 480 Pixel (16:9) 800 x 600 Pixel (4:3)
Supported Resolutions..... VGA/SVGA/WVGA ..... XGA/WXGA
Brightness (Bright Mode)...up to 100 lumen (PPX3410) up to 65 lumen (PPX3407)
Contrast ratio 1000:1
Projected image size....12–120 inch
Screen distance....0.5 m up to 5 m
Horizontal Scan Rate....31–69 kHz
Vertical Scan Rate 56–85 Hz
Power supply
Model No.... MPA-630
Manufacturer...... Wanlida Group Co., Ltd.
Built-in rechargeable battery
Battery type...... LiPol
Capacity....1800mAh 7.4V
Charging time.... 3 h
Operating time.... 1 h
Operating time (ECO mode switched on)....2 h
Manufacturer ...... Great Power
Accessories
The following accessories are available for your device:
YUV /YPbPr Adapter Cable.....PPA 1210 / 253447083
VGA-Audio Cable....PPA 1250 / 253447070
iPod / iPhone /iPad cable ......PPA 1280 / 253447091
MHL to mini-HDMI cable.....PPA 1240 / 253520048
Pico Station....PPA 7300 / 253529749
All data are provided for reference purposes only.
Sagemcom Documents SAS reserves the right to make any changes without prior notice.

The CE marking certifies that the product meets the main requirements of the European Parliament and Council directives 1999/5/CE, 2006/95/CE, 2004/108/CE and 2009/125/CE on information technology equipment, regarding safety and health of users and regarding electromagnetic interference.
The declaration of compliance can be consulted on the site www.picopix.philips.com.
Preservation of the environment as part of a sustainable development plan is an essential concern of Sagemcom Documents SAS. The desire of Sagemcom Documents SAS is to operate systems observing the environment. The desire of Sagemcom Documents SAS is to operate systems observing the environment and consequently it has decided to integrate environmental performances in the life cycle of this product, from manufacturing to commissioning use and elimination.

FCC notice: This device has been tested and found to comply with the limits for a Class B digital device pursuant to Part 15 of the FCC rules. These limits are designed to provide reasonable protection against harmful interference in a residential installation. This device generates, uses, and can radiate radio frequency energy and, if not installed and used in accordance with the instructions, may cause harmful interference to radio communications.
However, there is no guarantee that interference will not occur in a particular installation. If this device does cause harmful interference to radio or television reception, which can be determined by turning the device off and on, the user is encouraged to try to correct the interference by one or more of the following measures:
receiver.
from that to which the receiver is connected.
levision
technician for help.
Canada Regulatory Compliance
This device complies with Industry Canada CAN ICES-3 (B)/NMB-3(B)

Packaging: The presence of the logo (green dot) means that a contribution is paid to an approved national organisation to improve package recovery and recycling infrastructures. Please respect the sorting rules set up locally for this kind of waste.
Batteries: If your product contains batteries, they should be disposed of at an appropriate collection point.
Trademarks: The mentioned references in this manual are trademarks of the respective companies. The lack of the trademarks ® and ™™ does not justify the assumption that these dedicated terminologies are free trademarks. Other product names used herein are for identification purposes only and may be trademarks of their respective owners. Sagemcom Documents SAS disclaims any and all rights in those marks.
Neither Sagemcom Documents SAS nor its affiliates shall be liable to the purchaser of this product or third parties for damages, losses, costs, or expenses incurred by the purchaser or third parties as a result of accident, misuse, or abuse of this product or unauthorized modifications, repairs, or alterations to this product, or failure to strictly comply with Sagemcom Documents SAS operating and maintenance instructions.
Sagemcom Documents SAS shall not be liable for any damages or problems arising from the use of any options or any consumable materials other than those designated as original Sagemcom Documents SAS / PHILIPS products or Sagemcom Documents SAS / PHILIPS approved products.
Sagemcom Documents SAS shall not be held liable for any damage resulting from electromagnetic interference that occurs from the use of any interface cables other than those designated as Sagemcom Documents SAS / PHILIPS products.
All rights reserved. No part of this publication may be reproduced, stored in a retrieval system or transmitted in any form or by any means, electronic, mechanical, photocopying, recording, or otherwise, without the prior written permission of Sagemcom Documents SAS. The information contained herein is designed only for use with this product. Sagemcom Documents SAS is not responsible for any use of this information as applied to other devices.
This user manual is a document that does not represent a contract.
Errors, printing errors and changes are reserved.
Copyright © 2013 Sagemcom Documents SAS

PHILIPS and the PHILIPS' Shield Emblem are registered trademarks of Koninklijke Philips Electronics N.V. and are used by Sagemcom Documents SAS under license from Koninklijke Philips Electronics N.V.
© 2013 Sagemcom Documents SAS
All rights reserved
Documents Business Unit
Headquarters: CS 50001
92848 Rueil Cedex - FRANCE
Tel: +33 (0)1 57 61 10 00 · Fax: +33 (0)1 57 61 10 01
www.sagemcom.com
Simplified Joint Stock Company · Capital 8.479.978 € · 509 448 841 RCS Nanterre
PPX3407 · 3410
US
253528536-B
- PICOPIX
- TABLE OF CONTENTS
- OVERVIEW
- GENERAL SAFETY INFORMATION
- INITIAL OPERATION
- CONNECT TO THE PLAYBACK DEVICE
- MEMORY CARD / USB STORAGE MEDIUM
- MEDIA PLAYBACK
- SETTINGS
- SERVICE
- APPENDIX
- DEAR CUSTOMER
- ABOUT THIS USER MANUAL
- SYMBOLS USED
- NOTE
- TROUBLESHOOTING
- CAUTION
- DAMAGE TO THE DEVICE OR LOSS OF DATA
- DANGER
- DANGER TO PERSONS
- SETTING UP THE DEVICE
- REPAIRS
- POWER SUPPLY
- RISK OF EXPLOSION WITH INCORRECT TYPE OF BATTERIES
- DANGER OF DAMAGE TO THE EYE BY HIGH POWER LED
- DANGER OF HEARING DAMAGE
- TOP OF THE DEVICE
- SIDE VIEW
- BOTTOM OF THE DEVICE
- REMOTE CONTROL
- OVERVIEW OF THE MENU FUNCTIONS
- SYMBOLS IN THE MAIN MENU
- CONNECTING POWER SUPPLY / CHARGING BATTERY
- ELECTRICAL VOLTAGE AT THE SITE OF INSTALLATION
- INITIAL INSTALLATION
- THE MAIN MENU APPEARS INSTEAD OF THE LANGUAGE SELECTION
- INSTALLING OR CHANGING THE BATTERIES OF THE REMOTE CONTROL
- USING THE REMOTE CONTROL
- SUPPLIED CABLES
- CABLES AVAILABLE AS ACCESSORIES
- CONNECTING TO DEVICES WITH HDMI OUTPUT
- CONNECTING TO A COMPUTER (VGA)
- SCREEN RESOLUTION
- CONNECTING USING AUDIO/VIDEO (CVBS) ADAPTOR CABLE
- CONNECTING TO MOBILE MULTIMEDIA DEVICES
- SWITCHING TO THE MULTIMEDIA DEVICE SIGNAL OUTPUT
- CONNECTING USING COMPONENT-VIDEO (YPBPR/YUV) CABLE
- YCBCR
- TWO RED PHONO (RCA) CONNECTORS
- CONNECTING THE HEADPHONES
- PREMATURELY REMOVE A MEMORY CARD
- VIDEO PLAYBACK
- VIDEO PLAYBACK (USB/SD CARD/INTERNAL MEMORY)
- FILE FORMAT
- VIDEO PLAYBACK (MINI-HDMI SOCKET)
- MODIFY SETTINGS DURING PLAYBACK
- MODIFY OTHER SETTINGS
- PHOTO PLAYBACK
- MINIATURE VIEW OR LIST
- MANY PHOTOS ON THE MEMORY CARD OR THE USB MEDIUM
- ZOOM IN / ZOOM OUT
- MUSIC PLAYBACK
- SWITCH OFF THE IMAGE PLAYBACK
- NAVIGATING WHEN IMAGE PLAYBACK IS SWITCHED OFF
- MANAGING FILES
- COPY FILES
- NO FILES FOUND (0 FILES)
- MARK THE ENTIRE FOLDER
- FILES ALREADY EXIST
- REMOVING STORAGE MEDIUM
- DELETE FILES
- ERROR
- DELETING PHOTOS ON THE MEMORY CARD
- MICROSOFT® OFFICE & ADOBE® PDF FILES PLAYBACK
- CONNECT TO A COMPUTER (USB)
- SUCCESSFUL CONNECTION
- IMAGE SETTINGS
- PROJECTION MODE
- SOUND SETTINGS
- VIDEO SETTINGS
- MUSIC SETTINGS
- PICTURE SETTINGS
- POWER SAVE
- LANGUAGE
- AUTO DEMO MODE
- MAINTENANCE
- CARE INSTRUCTIONS FOR THE BATTERY
- DO NOT REPLACE THE BATTERY YOURSELF
- BATTERY DEEP DISCHARGE
- CLEANING
- SWITCHING OFF THE DEVICE
- INSTRUCTIONS FOR CLEANING
- CLEANING THE LENS
- DO NOT USE ANY LIQUID CLEANING AGENTS
- DEVICE OVERHEATED
- POWER CYCLING
- TECHNICAL DATA
- TECHNOLOGY / OPTICAL
- BUILT-IN RECHARGEABLE BATTERY
- ACCESSORIES
- CANADA REGULATORY COMPLIANCE
Brand : PHILIPS
Model : PicoPix PPX3407
Category : Projector