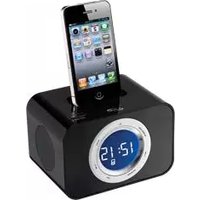
ICP211B - Docking Station GPX - Free user manual and instructions
Find the device manual for free ICP211B GPX in PDF.


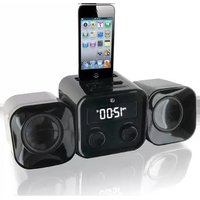
| Product Type | Docking Station with Speakers |
| Brand | GPX |
| Model | ICP211B |
| Color | Black |
| Dimensions (W x H x D) | 6.5 x 4.5 x 3.5 inches |
| Weight | 1.2 lbs |
| Power Supply | AC Adapter (100-240V, 50/60Hz) |
| Charging Output | 5V, 1A via Dock Connector |
| Audio Output | 3.5mm Auxiliary Jack |
| Speaker Output | 5W RMS (2 x 2.5W) |
| Frequency Response | 40Hz - 20kHz |
| Compatibility | iPod (30-pin) and iPhone (30-pin) models up to iPhone 4S |
| Remote Control | Included (Infrared) |
| Additional Functions | FM Radio (with PLL tuning) |
| Package Contents | Docking Station, Remote Control, AC Adapter, User Manual |
| Maintenance & Cleaning | Use a soft, dry cloth. Do not use liquids or aerosols. |
| Safety Warnings | Do not expose to water or moisture. Use only supplied adapter. Keep away from heat sources. |
| Spare Parts & Repairability | No spare parts available. Not user-serviceable. Contact GPX support. |
Frequently Asked Questions - ICP211B GPX
User questions about ICP211B GPX
0 question about this device. Answer the ones you know or ask your own.
Ask a new question about this device
Download the instructions for your Docking Station in PDF format for free! Find your manual ICP211B - GPX and take your electronic device back in hand. On this page are published all the documents necessary for the use of your device. ICP211B by GPX.
USER MANUAL ICP211B GPX
natural_image
Black and white photo of a smartphone with an analog phone connected to a digital clock (no visible text or symbols)ICP211
Clock Radio with Dock for iPod and iPhone
For the most up-to-date version of this User's Guide, go to www.ilive.net
Warnings and Precautions
- CAUTION: TO PREVENT ELECTRIC SHOCK, MATCH WIDE BLADE OF PLUG TO WIDE SLOT, FULLY INSERT.
- WARNING: To reduce the risk of fire or electric shock, do not expose this apparatus to rain or moisture.
- AVERTISSEMENT: Pour réduire le risque d'incendie ou de choc électrique, ne pas exposer cet appareil sous la pluie et l'humidité.
- CAUTION: Use of any controls or adjustments or performance of procedures other than those herein specified may result in hazardous radiation exposure
- WARNING: Changes or modifications to this unit not expressly approved by the party responsible for compliance could void the user's authority to operate the equipment.
- WARNING: Do not place the unit on top of any soft, porous, or sensitive surfaces to avoid damaging the surface. Use a protective barrier between the unit and surface to protect the surface.
- WARNING: Use of this unit near fluorescent lighting may cause interference regarding use of the remote. If the unit is displaying erratic behavior move away from any fluorescent lighting, as it may be the cause.
- CAUTION: Danger of explosion if battery is incorrectly replaced. Replace only with the same or equivalent type.
- PRÉCAUTION: Danger d'explosion si les piles sont remplacées de façon incorrect. Remplacer les piles seulement par le même type de pile ou l'équivalent.
- WARNING: There is a danger of explosion if you attempt to charge standard Alkaline batteries in the unit. Only use rechargeable NiMH batteries.
- WARNING: The remote control's button cell battery contains mercury. Do not put in the trash, instead recycle or dispose of as hazardous waste.
- WARNING: Lithium batteries, like all rechargeable batteries are recyclable and should be recycled or disposed of in normal household waste. Contact your local government for disposal or recycling practices in your area. They should never be incinerated since they might explode.
• WARNING: Shock hazard - Do Not Open.
• AVIS: RISQUE DE CHOC ÉLECTRIQUE - NE PAS OLIVIR
Mains plug is used as disconnect device and it should remain readily operable during intended use. In order to disconnect the apparatus from the mains completely, the mains plug should be disconnected from the mains socket outlet completely.
Do not mix old and new batteries.
Do not mix alkaline, standard (carbon-zinc), or rechargeable (ni-cad, ni-mh, etc) batteries.
The lightning flash with screwhead symbol, within an equilateral triangle, is intended to detect the user in the presence of uncontrolled "angrenous voltage" within the product's enclosure that may be if sufficient magnitude to constitute a risk of electric shock to persons.

The endoflation point within an equilateral triangle is intended to select the user to the presence of important operating and maintenance (servicing) instructions in the literature accompanying the appliance.
Important Safety Instructions
- Read these Instructions.
- Keep these Instructions.
- Need all Warnings.
- Follow all instructions.
- Do not use this apparatus near water.
- Clean only with a dry cloth.
- Do not block any ventilation openings. Install in accordance with the manufacturer's instructions.
- Do not install near any heat sources such as radiators, heat registers, stoves, or other apparatus (including amplifiers) that produce heat.
- Do not defeat the safety purpose of the polarized or grounding -type plug. A polarized plug has two blades with one wider than the other. A grounding type plug has two blades and a third grounding prong. The wide blade or the third prong are provided for your safety. When the provided plug does not fit into your outlet, consult an electrician for replacement of the obsolete outlet.
- Protect the power cord from being walked on or pinched particularly at plugs, convenience receptacles, and the point where they exit from the apparatus.
- Only use attachments/accessories specified by the manufacturer.

Use only with a cart, stand, tripod, bracket, or table specified by the manufacturer, or sold with the apparatus. When a cart is used, use caution when moving the cart/apparatus combination to avoid injury from up-over.
- Unplug this apparatus during lightning storms or when unused for long periods of time.
- Refer all servicing to qualified service personnel. Servicing is required when the apparatus has been damaged in any way, such as power-supply cord or plug is damaged, liquid has been spilled or objects have fallen into the apparatus, the apparatus has been exposed to rain or moisture, does not operate normally, or has been dropped.
FCC Warnings
NOTE: This equipment has been tested and found to comply with the limits for a Class B digital device, pursuant to Part I5 of the FCC Rules. These limits are designed to provide reasonable protection against harmful interference in a residential installation. This equipment generates, uses, and can radiate radio frequency energy and, if not installed and used in accordance with the interactions, may cause harmful interference to radio communications. However, there is no guarantee that interference will not occur in particular installations of this equipment does cause harmful interference to radio or television reception, which can be determined by turning the equipment off and on, the user is encouraged to try to correct the interference by one or more of the following measures:
- Recent or relocate the receiving antenna.
- Increase the separation between the equipment and receiver.
- Connect the equipment into an outlet on a circuit different from that to which the receiver is connected.
- Consult the dealer or an experienced radio TV technician for help.
Additional Warnings
This symbol indicates that this product incorporates double insulation between hazardous mains voltage and user accessible parts.
Clock Radio with Dock for iPod and iPhone
Features
• Made for iPod and iPhone
- Plays & charges docked iPhone & iPod
• Digital tune FM radio
• 20 station memory presets
- Single alarm
• Auto time sync with docked iPhone
- Digital clock
- Snooze
- Sleep timer
• Gradual wake to iPod and iPhone, radio, and buzzer
• Line input (3.5mm)
- LCD display
- Last station, volume and function memory
• Digital volume control
• Built-in speakers
• AC power: requires AC/DC power adapter (included)
Included
- AC/DC power adapter
TABLE OF CONTENTS
Warnings and Precautions . . . . . 2
Important Safety Instructions . . . . 3
• FCC Warnings
• Additional Warnings
Clock Radio with Dock for iPod and iPhone. 4
- Features
- Included
Introduction . . . . . . . . . 6
Setup . . . . . . . . . . . 8
- Power
iPod and iPhone . . . . . . . . 9
- Docking an iPod
- Playing a Docked iPod
Clock . . . . . . . . . . . . 10
- Setting the Clock
- Sleep Timer
- Setting the Alarm
• Turning the Alarm off and on
• After the Alarm Sounds
Radio and 3.5mm Audio Input . . . . 11
• Tuning the FM Radio
• Saving a Station as a Preset
- Tuning to a Preset Station
• Using the 3.5mm Audio Input
Company Information . . . . . . 12
- Green Initiative
• International Support - Contact Information
Introduction
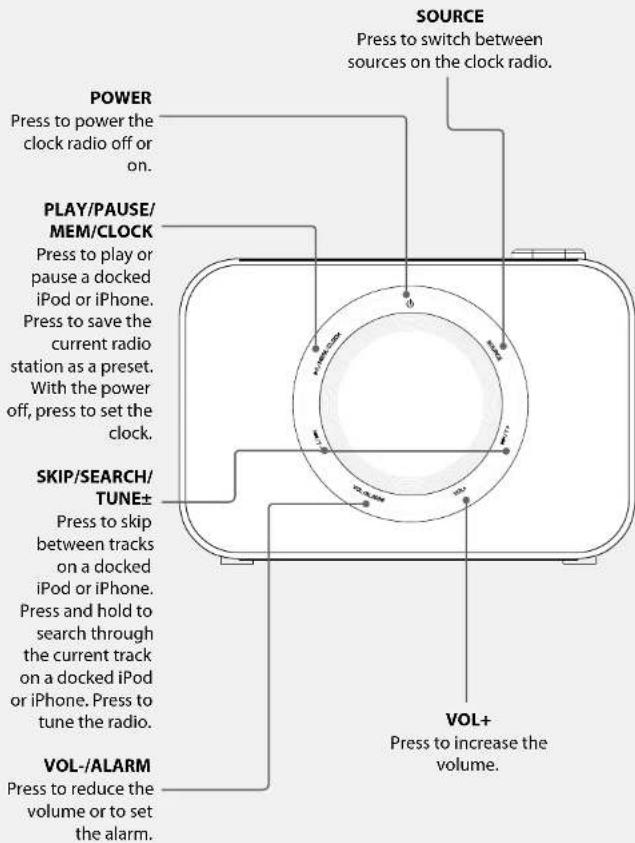
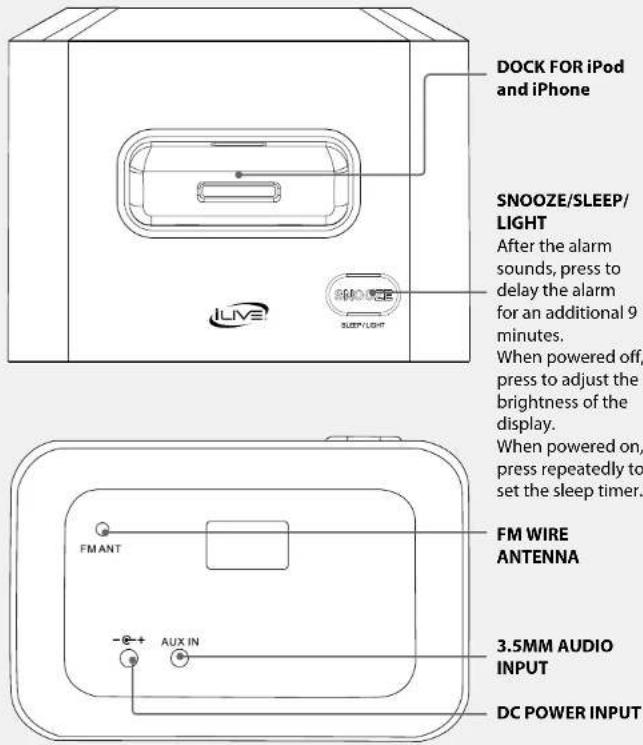
6 Customer Support: 1-888-999-4215 7
Setup iPod and iPhone
Power Docking an iPod or iPhone
Plug the included AC/DC power adapter into the DC POWER INPUT on the clock radio and a standard AC power outlet.


natural_image
Diagram showing a music player icon transforming into a camera (no text or symbols present)- Connect the iPhone or iPod to the connector inside the Dock for iPhone/iPod.
- When the dock is plugged in, using AC power, the docked iPhone or iPod will charge.
Playing a Docked iPod or iPhone
- Follow the instructions for Docking an iPod or iPhone.
- Press the SOURCE button to switch to iPod mode.
- Press the PLAY/PAUSE button to begin playing the docked iPod or iPhone.
Auto Time Sync with iPhone
- Press the POWER button to power the clock radio off.
- Follow the instructions for Docking an iPod or iPhone. Auto time sync will not work with all iPods.
- Press the PLAY/PAUSE/MEM/CLOCK button. The clock will automatically set to the time of the docked iPhone.
Clock Radio and 3.5mm Audio Input
Manually Setting the Clock Setting the Alarm
To set the clock manually you must undock and iPod or iPhone from the clock radio.
- With the clock radio powered off, press and hold the PLAY/PAUSE/MEM/CLOCK button for 2 seconds. The hour will begin to blink on the display.
- Press the SKIP/SEARCH/TUNE± buttons to adjust the hour.
- Press the PLAY/PAUSE/MEM/CLOCK button. The minute will begin to blink on the display.
- Press the SKIP/SEARH/TUNE± buttons to adjust the minute.
- Press the PLAY/PAUSE/MEM/CLOCK button to finish setting the clock.
Sleep Timer
- With the clock radio powered on, press the SNOOZE/SLEEP/LIGHT button repeatedly to set the sleep timer.
A sleep icon will appear on the display when the sleep timer is set.
- After the set sleep time has expired the clock radio will automatically power off.
To turn the sleep timer off, press the SNOOZE/SLEEP/LIGHT button repeatedly until OFF appears on the display.
- Press and hold the VOL-/ALARM button for 2 seconds.
The hour will begin to blink on the display.
-
Press the SKIP/SEARCH/TUNE± buttons to adjust the hour.
-
Press the VOL-/ALARM button.
The minute will begin to blink on the display.
-
Press the SKIP/SEARH/TUNE± buttons to adjust the minute.
-
Press the VOL-/ALARM button.
-
Press the SKIP/SEARH/TUNE± buttons to adjust the alarm source between buzzer, FM radio, and iPod/iPhone.
Turning the Alarm off and on
- With the clock radio powered off, press the VOL-/ALARM button twice to activate or deactivate the alarm.
An alarm indicator will appear on the display when the alarm is activated.
After the Alarm Sounds
-
After the alarm sounds, press the SNOOZE button to delay the alarm for an additional 9 minutes, or press the POWER button to turn the alarm off.
-
Press the SOURCE button to switch to FM radio mode. An FM radio icon will appear on the display.
- Press the SKIP/SEARCH/TUNE± buttons to tune the FM radio.
Saving a Station as a Preset
- Follow the instructions for Tuning the FM Radio.
- Press and hold the PLAY/PAUSE/MEM/CLOCK button for 2 seconds. The preset numbers will begin to blink on the display.
- Press the SKIP/SEARCH/TUNE± buttons to select a preset.
- Press the PLAY/PAUSE/MEM/CLOCK button to save the current station to the selected preset.
Tuning to a Preset Station
- Follow the instructions for Tuning the FM Radio and Saving a Station as a Preset.
- Press the PLAY/PAUSE/MEM/CLOCK button repeatedly to cycle through saved preset radio stations.
Using the 3.5mm Audio InputTuning the FM Ra
Requires a 3.5mm audio cable (not included)
- Connect a 3.5mm audio cable to the 3.5MM AUDIO INPUT on the boombox and an audio output on an MP3 player or other audio source.
- Press the SOURCE button to switch to AUX mode.
- Use the native controls on the connected MP3 player or other audio source to play and control audio played through the boombox.
Company Information
International Support
To download this User's Guide in English, Spanish, or French, visit the support section at www.ilive.net.
Website: www.ilive.net


- ICP211
- Clock Radio with Dock for iPod and iPhone
- Warnings and Precautions
- Important Safety Instructions
- FCC Warnings
- Additional Warnings
- Features
- Included
- TABLE OF CONTENTS
- Introduction
- Setup iPod and iPhone
- Power Docking an iPod or iPhone
- Playing a Docked iPod or iPhone
- Auto Time Sync with iPhone
- Clock Radio and 3.5mm Audio Input
- Manually Setting the Clock Setting the Alarm
- Sleep Timer
- Turning the Alarm off and on
- After the Alarm Sounds
- Saving a Station as a Preset
- Tuning to a Preset Station
- Using the 3.5mm Audio InputTuning the FM Ra
- Company Information
- International Support
Brand : GPX
Model : ICP211B
Category : Docking Station