
XW-NAS3 - Docking Station PIONEER - Free user manual and instructions
Find the device manual for free XW-NAS3 PIONEER in PDF.


| Product Type | Docking Station |
| Brand | Pioneer |
| Model | XW-NAS3 |
| Dimensions (W x D x H) | 180 x 120 x 70 mm |
| Weight | 0.8 kg |
| Power Supply | 12 V DC, 1.5 A power adapter |
| Power Consumption | 18 W (operating) |
| Compatibility | iPod (30-pin connector), iPhone (1st generation) |
| Connectivity | RCA audio output, iPod/iPhone port, auxiliary input |
| Main Functions | Audio playback, charging of connected device, remote control included |
| Care and Cleaning | Clean with a soft, dry cloth. Do not use abrasive products. |
| Safety | Do not expose to moisture or extreme temperatures. |
| Spare Parts and Repairability | Remote control, power adapter, audio cable available |
| General Information | 1-year warranty, made in China |
Frequently Asked Questions - XW-NAS3 PIONEER
User questions about XW-NAS3 PIONEER
0 question about this device. Answer the ones you know or ask your own.
Ask a new question about this device
Download the instructions for your Docking Station in PDF format for free! Find your manual XW-NAS3 - PIONEER and take your electronic device back in hand. On this page are published all the documents necessary for the use of your device. XW-NAS3 by PIONEER.
USER MANUAL XW-NAS3 PIONEER
Discover the benefits of registering your product online at http://www.pioneer.co.uk (or http://www.pioneer.eu).
The lightning flash with arrowhead symbol, within an equilateral triangle, is intended to alert the user to the presence of uninsulated "dangerous voltage" within the product's enclosure that may be of sufficient magnitude to constitute a risk of electric shock to persons.
CAUTION
RISK OF ELECTRIC SHOCK DO NOT OPEN
CAUTION:
TO PREVENT THE RISK OF ELECTRIC SHOCK, DO NOT REMOVE COVER (OR BACK). NO USER-SERVICEABLE PARTS INSIDE. REFER SERVICING TO QUALIFIED SERVICE PERSONNEL.

The exclamation point within an equilateral triangle is intended to alert the user to the presence of important operating and maintenance (servicing) instructions in the literature accompanying the appliance.
D3-4-2-1-1_A1_En
WARNING
This equipment is not waterproof. To prevent a fire or shock hazard, do not place any container filled with liquid near this equipment (such as a vase or flower pot) or expose it to dripping, splashing, rain or moisture.
D3-4-2-1-3 A1 En
WARNING
Before plugging in for the first time, read the following section carefully.
The voltage of the available power supply differs according to country or region. Be sure that the power supply voltage of the area where this unit will be used meets the required voltage (e.g., 230 V or 120 V) written on the bottom panel.
D3-4-2-1-4* A1 En
WARNING
To prevent a fire hazard, do not place any naked flame sources (such as a lighted candle) on the equipment.
D3-4-2-1-7a_A1_En
Operating Environment
Operating environment temperature and humidity: +5 °C to +35 °C (+41 °F to +95 °F); less than 85 %RH (cooling vents not blocked)
Do not install this unit in a poorly ventilated area, or in locations exposed to high humidity or direct sunlight (or strong artificial light)
D3-4-2-1-7c*_A1_En
VENTILATION CAUTION
When installing this unit, make sure to leave space around the unit for ventilation to improve heat radiation (at least 20 cm at top, 10 cm at rear, and 10 cm at each side).
WARNING
Slots and openings in the cabinet are provided for ventilation to ensure reliable operation of the product, and to protect it from overheating. To prevent fire hazard, the openings should never be blocked or covered with items (such as newspapers, table-cloths, curtains) or by operating the equipment on thick carpet or a bed.
D3-4-2-1-7b*_A1_En

natural_image
Illustration of a printer with a prohibition symbol (no text or labels)This product is for general household purposes. Any failure due to use for other than household purposes (such as long-term use for business purposes in a restaurant or use in a car or ship) and which requires repair will be charged for even during the warranty period.
K041_A1_En
When using this product, confirm the safety information shown on the bottom of the unit.
D3-4-2-2-4_B1_En
Information for users on collection and disposal of old equipment and used batteries
(Symbol for equipment)

(Symbol examples) for batteries
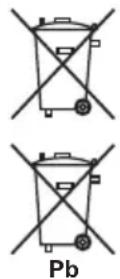
These symbols on the products, packaging, and/or accompanying documents mean that used electrical and electronic products and batteries should not be mixed with general household waste.
For proper treatment, recovery and recycling of old products and used batteries, please take them to applicable collection points in accordance with your national legislation.
By disposing of these products and batteries correctly, you will help to save valuable resources and prevent any potential negative effects on human health and the environment which could otherwise arise from inappropriate waste handling.
For more information about collection and recycling of old products and batteries, please contact your local municipality, your waste disposal service or the point of sale where you purchased the items.
These symbols are only valid in the European Union.
For countries outside the European Union:
If you wish to discard these items, please contact your local authorities or dealer and ask for the correct method of disposal.
K058a_A1_En
If the AC plug of this unit does not match the AC outlet you want to use, the plug must be removed and appropriate one fitted. Replacement and mounting of an AC plug on the power supply cord of this unit should be performed only by qualified service personnel. If connected to an AC outlet, the cut-off plug can cause severe electrical shock. Make sure it is properly disposed of after removal. The equipment should be disconnected by removing the mains plug from the wall socket when left unused for a long period of time (for example, when on vacation).
D3-4-2-2-1a_A1_En
CAUTION
The ⏻ STANDBY/ON switch on this unit will not completely shut off all power from the AC outlet. Since the power cord serves as the main disconnect device for the unit, you will need to unplug it from the AC outlet to shut down all power. Therefore, make sure the unit has been installed so that the power cord can be easily unplugged from the AC outlet in case of an accident. To avoid fire hazard, the power cord should also be unplugged from the AC outlet when left unused for a long period of time (for example, when on vacation).
D3-4-2-2-2a*_A1_En
POWER-CORD CAUTION
Handle the power cord by the plug. Do not pull out the plug by tugging the cord and never touch the power cord when your hands are wet as this could cause a short circuit or electric shock. Do not place the unit, a piece of furniture, etc., on the power cord, or pinch the cord. Never make a knot in the cord or tie it with other cords. The power cords should be routed such that they are not likely to be stepped on. A damaged power cord can cause a fire or give you an electrical shock. Check the power cord once in a while. When you find it damaged, ask your nearest PIONEER authorized service center or your dealer for a replacement.
S002*_A1_En
Thank you for buying this Pioneer product.
Please read through these operating instructions so that you will know how to operate your model properly. After you have finished reading the instructions, put them in a safe place for future reference.
Contents
01 Before you start
What's in the box 5
Before using the remote control ..... 5
Replace the battery 5
Using the remote control 6
Installing the unit 6
Plugging in....6
02 Controls and displays
Remote control 7
Front /top panel 7
03 iPod playback
Confirm what iPod models are supported.....8
Connecting your iPod 8
Connecting your TV 9
Playing your iPod 10
Using the tone controls 10
04 Bluetooth® ADAPTER for Wireless Enjoyment of Music
Wireless music play 12
Remote control operation....12
Connecting Optional Bluetooth ADAPTER ...12
Setting the PIN code....13
Pairing Bluetooth ADAPTER and Bluetooth wireless technology device 13
Listening to Music Contents of Bluetooth wireless technology device with Your System...14
05 Other connections
Connecting auxiliary components....15
06 Additional information
Troubleshooting 16
Resetting the system 17
About iPod 17
Specifications 17
Cleaning the unit 18
Chapter 1:
Before you start
What's in the box
Please confirm that the following accessories are in the box when you open it.
- Remote control
- Remote control holder
• Lithium battery (CR2025) - Power cord
- Cleaning cloth
- Warranty card
- Operating instructions (This document)
Before using the remote control
The remote control is shipped already set in the remote control holder.

The battery supplied with this unit is stored in the battery casing.
- Remove the protective seal from the battery casing.
When you notice a decrease in the operating range, replace the battery (see below).
Replace the battery
When replacing the battery, use a commercially available Lithium CR2025 battery.
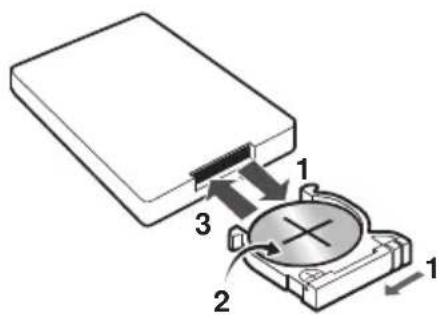
1 Push the release tab to the left to open the battery casing.
2 Pull out the battery casing.
3 Remove the battery from the casing.
4 Place a new battery in the casing.
Make sure the ⊕ side of the battery is facing up when you place it in the space provided.

Caution
When using lithium batteries, please observe the following:
- There is danger of explosion if the battery is incorrectly replaced. Make sure to replace only with the same or equivalent type recommended by the manufacturer.
- Dispose of used battery cells immediately after replacement. Keep away from children.
- If swallowed, please contact a doctor immediately.
- Lithium batteries may present a fire or chemical burn hazard if misused. Do not disassemble, heat above 100 °C, or incinerate.
Before you start
- Remove the battery if the unit isn't going to be used for a month or more.
- When disposing of used batteries, please comply with governmental regulations or environmental public instruction's rules that apply in your country or area.
- WARNING
Do not use or store batteries in direct sunlight or other excessively hot place, such as inside a car or near a heater. This can cause batteries to leak, overheat, explode or catch fire. It can also reduce the life or performance of batteries.
Using the remote control
The remote has a range of about 7 m at an angle of about 30^ from the remote sensor.

Keep in mind the following when using the remote control:
• Make sure that there are no obstacles between the remote and the remote sensor on the unit.
- Remote operation may become unreliable if strong sunlight or fluorescent light is shining on the unit's remote sensor.
- Remote controllers for different devices can interfere with each other. Avoid using remotes for other equipment located close to this unit.
- Replace the batteries when you notice a fall off in the operating range of the remote.
Installing the unit
- When installing this unit, make sure to put it on a level and stable surface.
Don't install it on the following places:
-on a color TV (the screen may distort)
- near a cassette deck (or close to a device that gives off a magnetic field). This may interfere with the sound.
- in direct sunlight
- in damp or wet areas
- in extremely hot or cold areas
– in places where there is vibration or other movement
- in places that are very dusty
– in places that have hot fumes or oils (such as a kitchen)
Plugging in
After you've finished making all connections, plug the unit into an AC outlet.

1 Plug the supplied power cord into the AC IN socket on the back of the unit.
2 Plug the other end into a power outlet.

Important
- Before making or changing any connections, switch off the power and disconnect the power cord from the AC outlet.
Chapter 2:
Controls and displays
Remote control
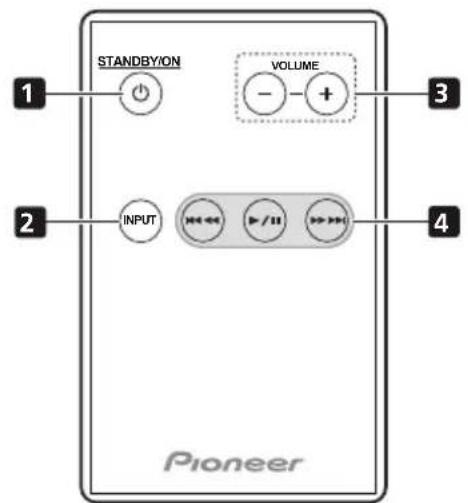
1 ⏻ STANDBY/ON
Switches the unit between standby and on.
2 INPUT
Use to select an input source. Press repeatedly to switch between iPod, Bluetooth ADAPTER ^1 and external input.
3 VOLUME +/-
Use to set the listening volume.
4 Playback control buttons
Use when operating an iPod or Bluetooth wireless technology device with this remote control (page 10, 14).
Front /top panel

1 Speaker units
2 iPod connector port
3 ⏻ STANDBY/ON
Switches the unit between standby and on.
4 Power indicator
5 INPUT SELECTOR
Use to select an input source. Press repeatedly to switch between iPod, Bluetooth ADAPTER ^1 and external input.
6 VOLUME +/-
Use to set the listening volume.
7 Bluetooth ADAPTER indicator
8 Remote sensor
9 i Pod indicator

Note
1 When the Bluetooth ADAPTER is not plugged in the ADAPTER PORT, Bluetooth ADAPTER input mode cannot be selected even if INPUT is pressed.
Chapter 3:
iPod playback
Merely by connecting your iPod to this speaker system, you can enjoy high-quality digital sound direct from your iPod. These speakers can also be connected to a television set, letting you view images from your iPod.
Playback and volume level setting for iPod music and images can be performed from this unit or the iPod itself.
Confirm what iPod models are supported
This system is compatible with the audio and video of the iPod nano third generation and above, iPod classic and iPod touch. It also supports audio playback on the iPod nano second generation. ^1
Always use the most recent version of iPod software available. Operation compatibility may vary depending on the version of the software used. You can confirm your software version by operating your iPod as follows:
1 Select 'Settings' from the top menu.
2 Select 'About'.
The software version will be displayed.
- Consult the Apple website regarding the newest software versions and instructions on how to update your version.

Tip
- When using an iPod not supported by this unit, use a commercially available cable to connect the iPod to the AUDIO IN connector of this unit.
Connecting your iPod

Caution
- To prevent damage when connecting an iPod, always use the Dock adaptor supplied with your iPod, or a commercially purchased Dock adaptor designed for your iPod model.

Note
• Some functions may be restricted depending on the model or software version.
- iPod is licensed for reproduction of non-copyrighted materials or materials the user is legally permitted to reproduce.
- Features such as the equalizer cannot be controlled using this system, and we recommend switching the equalizer off before connecting.
- Pioneer cannot under any circumstances accept responsibility for any direct or indirect loss arising from any inconvenience or loss of recorded material resulting from the iPod failure.
- When connecting an iPod, use the 'Speaker' menu's 'Backlight' item to set the iPod's backlight function. This does not apply to iPod touch.
1 Attach the Dock adaptor to iPod connector port on the top panel of this unit.
- An iPod Dock adaptor is not supplied with this unit.
When attaching the Dock adaptor, be sure to orient the front-back directions of the Dock adaptor correctly. To attach, first place the protruding tabs on the front side of the adaptor into the depressions on the iPod connector port and press into position. When attaching the adaptor, be careful not to strike the connectors.
2 Connect your iPod.
Connecting your TV
To watch iPod images on a television, perform connections using either a composite video cable or component video cable.
- When using a component video cable for connections, it is necessary to adjust the unit's video output. See Setting the video output below.
- When an iPod is connected to this unit, the iPod's TV output setting is automatically set to ON. While connected, the iPod can be used to switch the TV output setting. ^1

Caution
- Before making or changing the connections, switch off the power and disconnect the power cord from the power outlet. Plugging in should be the final step.
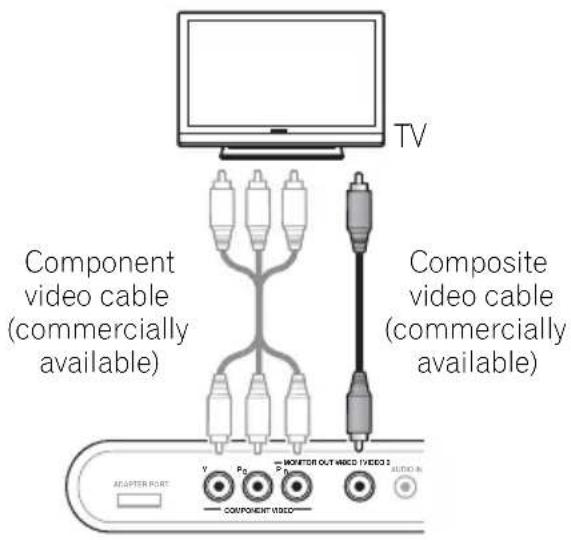
Setting the video output
Adjust the video output on this unit in accordance with the method used to connect the television. ^2
- Default setting: Composite

1 Switch the unit into standby.
2 Press and hold INPUT on the remote control for three seconds.
The iPod indicator will flash two times, and the video output will switch to Component. When step 2 is repeated again, the iPod indicator will flash one time, and the video output will switch to Composite.

Note
1 • This function is limited to iPod models providing TV output settings.
- When the iPod is disconnected from this unit, the iPod's TV output setting returns to its original state.
2 • Stop the iPod's video playback before adjusting the video output setting. The setting mode is disabled during playback and pause.
- During the video output setting process, if no button operation is performed for 3 minutes, the setting will be canceled and power will return to the standby mode.
Playing your iPod

Caution
- When your iPod is connected to this unit and you wish to operate the iPod by touching it directly, be sure to hold the iPod steady with the other hand to prevent malfunctions due to faulty contacts.
When an iPod is connected to this unit, iPod indicator will flash while the unit confirms the iPod connection and retrieves data from the iPod. When INPUT is pressed to change the input to iPod, the connection is completed and iPod indicator will light steadily. ^1
Playback and volume level setting for iPod music and images can be performed from this unit or the iPod itself.
- When using the iPod to adjust sound volume, the adjustment will be applied only to the sound produced from this unit's speakers. ^2 If the iPod is disconnected from this unit, the iPod's sound volume will return to its original setting.
The following operations are possible for iPod, using the remote control.
Button What it does
▶/II Starts normal playback and pauses/unpauses playback.
Press to skip to the start of the current file, then previous files. Press and hold to start fast reverse scanning.
▶▶▶▶▶ Press to skip to the next file. Press and hold to start fast forward scanning.
VOLUME Use to set the listening volume. +/-
Using the tone controls
Adjust the sound tone. Adjustment is performed from the iPod's screen. ^2 The settings performed here are reflected in the BASS/TREBLE settings on this unit.
iPod nano or iPod classic:
1 Select 'Speaker' from the top menu.
2 Select 'Tone control'.
3 Select a setting.
iPod touch ^3 :
1 Select 'Settings' from the home menu.
2 Select 'Speaker'.
3 Select 'Tone control'.
4 Select a setting.
Select one of the following:
- Flat – Revert sound to its natural state.
- Bass ON – Emphasize bass sound.
- Treble ON – Emphasize treble sound.
- Bass/Treble ON –Emphasizes bass and treble sounds.

Note
1 If an iPod is connected when this unit is in standby mode, the power will turn on and iPod input will be selected automatically.
2 These adjustments are applied to all inputs to the unit.
3 This setting may not be supported, depending on the iPod touch software version.

Important
If the power indicator and iPod indicator flash simultaneously, a connection fault is indicated. Perform the following troubleshooting checks:
- Check whether the iPod was supported by this unit.
- Reconnect the iPod to the unit. If this doesn't seem to work, try resetting your iPod.
- Update the iPod software to the latest version.
If the iPod cannot be operated, check the following items:
- Is the iPod connected correctly? Reconnect the iPod to the unit.
- Is the iPod experiencing a hangup? Try resetting the iPod, and reconnect it to the unit.

Tip
- iPod recharging occurs whenever an iPod is connected to this unit. (This function is supported in standby mode as well.)
- Whenever an iPod is connected to this unit, turning the unit's power ON or switching input to iPod will cause iPod playback to begin automatically.
- When input is switched from iPod to another function, the iPod playback stops automatically.
- If the unit is set to standby when an iPod is connected, the iPod's power will be turned OFF automatically.
Chapter 4:
Bluetooth® ADAPTER for Wireless Enjoyment of Music

Wireless music play
When the Bluetooth ADAPTER (Pioneer Model No. AS-BT100) is connected to this unit, a product equipped with Bluetooth wireless technology (portable cell phone, digital music player, etc.) can be used to listen to music wirelessly. ^1 Also, by using a commercially available transmitter supporting Bluetooth wireless technology, you can listen to music on a device not equipped with Bluetooth wireless technology. The AS-BT100 model supports SCMS-T contents protection, so music can also be enjoyed on devices equipped with SCMS-T type Bluetooth wireless technology.
Remote control operation
The remote control supplied with this unit allows you to play and stop media, and perform other operations. ^2
Connecting Optional Bluetooth ADAPTER
- Before making or changing the connections, switch off the power and disconnect the power cord from the AC outlet.


Note
1 • It must be necessary that the Bluetooth wireless technology enabled device supports A2DP profiles.
- Pioneer does not guarantee proper connection and operation of this unit with all Bluetooth wireless technology enabled devices.
2 • It must be necessary that the Bluetooth wireless technology enabled device supports AVRCP profiles.
- Remote control operations cannot be guaranteed for all Bluetooth wireless technology enabled devices.
1 Switch the unit into standby and connect Bluetooth ADAPTER to the ADAPTER PORT located in the rear panel.
2 Press ⏻ STANDBY/ON.
3 Press INPUT to switch to Bluetooth ADAPTER input mode. ^1
The Bluetooth ADAPTER indicator blinks.
Setting the PIN code
Set this unit's PIN code to the same setting as that for the Bluetooth wireless technology device used. Supported PIN code setting values include 0000, 1234 or 8888.
- Default setting: 0000
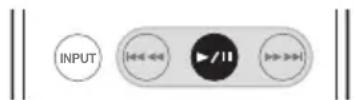
1 Switch the unit into standby.
2 Press and hold ▶/Ⅱ for three seconds.
The Bluetooth ADAPTER indicator will flash, and the PIN code will be changed. The number of flashes corresponds to the newly set PIN code as follows:
- 1 flash: 0000
- 2 flashes: 1234
- 3 flashes: 8888
Repeat step 2 until the PIN code is reset to the value desired.
Pairing Bluetooth ADAPTER and Bluetooth wireless technology device
"Pairing" must be done before you start playback of Bluetooth wireless technology content using Bluetooth ADAPTER. Make sure to perform pairing first time you operate the system or any time pairing data is cleared. "Pairing" is the step necessary to register Bluetooth wireless technology device to enable Bluetooth communications. ^2 For more details, see also the operating instructions of your Bluetooth wireless technology device.
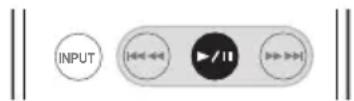
1 When the Bluetooth ADAPTER indicator blinks, press ▶/Ⅱ.
The Bluetooth ADAPTER indicator will blinks fast, and the unit will enter the pairing standby mode.
2 Switch on the Bluetooth wireless technology device that you want to make pairing, place it near the system and set it into the pairing mode.
Pairing begins.
3 Check to see that the Bluetooth ADAPTER is detected by the Bluetooth wireless technology device.
The Bluetooth ADAPTER indicator lights when Bluetooth wireless technology device is connected.
The Bluetooth ADAPTER indicator blinks slowly when Bluetooth wireless technology device is not connected. In this case, perform the connection operation from the side of the Bluetooth wireless technology device.
Note
1 When the Bluetooth ADAPTER is not plugged in the ADAPTER PORT, Bluetooth ADAPTER input mode cannot be selected even if INPUT is pressed.
2 • Pairing is required when you first use Bluetooth wireless technology device and Bluetooth ADAPTER.
- To enable Bluetooth communication, pairing should be done with both of your system and Bluetooth wireless technology device.
Listening to Music Contents of Bluetooth wireless technology device with Your System
1 P r INPUT to switch to Bluetooth ADAPTER input mode.
The Bluetooth ADAPTER indicator blinks.
2 Connect the Bluetooth wireless technology device to the Bluetooth ADAPTER.
3 Start playback of music contents stored in Bluetooth wireless technology device.
The following operations are now possible for Bluetooth wireless technology devices, using the remote control. ^1
Button What it does
| ▶/II | Starts normal playback and pauses/unpauses playback. |
| I◀◀◀◀ | Press to skip to the start of the current file, then previous files. Press and hold to start fast reverse scanning. |
| ▶▶▶▶I | Press to skip to the next file. Press and hold to start fast forward scanning. |
| VOLUME+/- | Use to set the listening volume. |

Note
1 • Bluetooth wireless technology device should be compatible with AVRCP profile.
- Depending on Bluetooth wireless technology device you use, operation may differ from what is shown in this table.
Chapter 5:
Other connections
- Before making or changing the connections, switch off the power and disconnect the power cord from the AC outlet.
Connecting auxiliary components
Connect the rear panel AUDIO IN mini-plug jack to your auxiliary playback component.
- This method can be used to play music on this unit from iPods that do not support use of an iPod Dock.

- Press INPUT to switch to external input mode.
Both the iPod indicator and the Bluetooth ADAPTER indicator will go out.
Chapter 6:
Additional information
Troubleshooting
Incorrect operations are often mistaken for trouble and malfunctions. If you think that there is something wrong with this component, check the points below. Sometimes the trouble may lie in another component. Investigate the other components and electrical appliances being used. If the trouble cannot be rectified even after exercising the checks listed below, ask your nearest Pioneer authorized service center or your dealer to carry out repair work.
- If the unit does not operate normally due to external effects such as static electricity disconnect the power plug from the outlet and insert again to return to normal operating conditions.
Problem Remedy
| The power does not turn on. | · Disconnect the power plug from the outlet, and insert again.· If the power shuts off automatically, take the unit to your nearest Pioneer authorized service center or your dealer for servicing. |
| Power automatically switches to standby without user action. | · When input is set to iPod, if no iPod is connected for one hour or more, the unit's power automatically turns OFF. |
| No sound is output when a function is selected. | · Make sure the component is connected correctly (refer to Connecting auxiliary components on page 15). |
| Can't operate the remote control. | · Replace the battery (refer to page 5).· Operate within 7 m, 30° of the remote sensor on the front panel (refer to page 6).· Remove the obstacle or operate from another position.· Avoid exposing the remote sensor on the front panel to direct light. |
| The Bluetooth wireless technology device cannot be connected or operated. Sound from the Bluetooth wireless technology device is not emitted or the sound is interrupted. | · Check that no object that emits electromagnetic waves in the 2.4 GHz band (microwave oven, wireless LAN device or Bluetooth wireless technology apparatus) is near the unit. If such an object is near the unit, set the unit far from it. Or, stop using the object emitting the electromagnetic waves.· Check that the Bluetooth wireless technology device is not too far from the unit and that obstructions are not set between the Bluetooth wireless technology device and the unit. Set the Bluetooth wireless technology device and the unit so that the distance between them is less than about 10 m and no obstructions exist between them.· Check that the Bluetooth ADAPTER and the ADAPTER PORT of the unit are correctly connected.· The Bluetooth wireless technology device may not be set to the communication mode supporting the Bluetooth wireless technology. Check the setting of the Bluetooth wireless technology device.· Check that pairing is correct. The pairing setting was deleted from this unit or the Bluetooth wireless technology device. Reset the pairing.· Check that the profile is correct. Use a Bluetooth wireless technology device that supports A2DP profile and AVRCP profile. |
Resetting the system
Use this procedure to reset all system settings to the factory default.
- When performing reset, first disconnect all components connected to this unit.
1 Switch the unit on.
2 Press and hold VOLUME – on the top panel, and then press and hold ⏻ STANDBY/ON for three seconds.
Power is set to standby mode.
The next time you switch on, all the system settings should be reset.
About iPod

"Made for iPod" means that an electronic accessory has been designed to connect specifically to iPod and has been certified by the developer to meet Apple performance standards.
Apple is not responsible for the operation of this device or its compliance with safety and regulatory standards.
iPod is a trademark of Apple Inc., registered in the U.S. and other countries.
Specifications
- Amplifier section
RMS Power Output:
Front Left/Right....15 W + 15 W
(1 kHz, 10 %, T.H.D., 8 Ω)
Subwoofer....30 W
(100 Hz, 10 %, T.H.D., 4 Ω)
- Speaker section
Enclosure .. Bass-reflex (magnetically shielded)
System....2-way system
Speakers:
Subwoofer....10 cm cone
Fullrange 5.2 cm cone
Frequency range.....50 Hz to 20 kHz
- Miscellaneous
Power requirements
AC 220 V to 240 V, 50 Hz/60 Hz
Power consumption 30 W
In standby 0.5 W
Dimensions
Weight (without package) 4.9 kg
- Accessories
Remote control .... 1
Remote control holder....1
Lithium battery (CR2025) 1
Power cord 1
Cleaning cloth....1
Warranty card 1
Operating instructions (This document)

Note
- Specifications and the design are subject to possible modifications without notice, due to improvements.
Cleaning the unit
- Use a polishing cloth or dry cloth to wipe off dust and dirt.
- When the surface is dirty, wipe with a soft cloth dipped in some neutral cleanser diluted five or six times with water, and wrung out well, and then wipe again with a dry cloth. Do not use furniture wax or cleansers.
- Never use thinners, benzine, insecticide sprays or other chemicals on or near this unit, since these will corrode the surface.
Published by Pioneer Corporation.
Copyright © 2009 Pioneer Corporation.
All rights reserved.
Additional information
IMPORTANT

natural_image
Illustration of a printer with a prohibition symbol (no text or labels)Consommation....30 W
Publication de Pioneer Corporation.
© 2009 Pioneer Corporation.
natural_image
Illustration of a printer with a prohibition symbol (no text or labels)http://www.pioneer.co.uk
http://www.pioneer.fr
http://www.pioneer.es
http://www.pioneer.eu
Published by Pioneer Corporation.
Copyright © 2009 Pioneer Corporation.
All rights reserved.
Publication de Pioneer Corporation.
© 2009 Pioneer Corporation.
PIONEER ELECTRONICS (USA) INC.
P.O. BOX 1540, Long Beach, California 90801-1540, U.S.A. TEL: (800) 421-1404
PIONEER ELECTRONICS OF CANADA, INC.
300 Allstate Parkway, Markham, Ontario L3R 0P2, Canada TEL: 1-877-283-5901, 905-479-4411
PIONEER EUROPE NV
Haven 1087, Keetberglaan 1, B-9120 Melsele, Belgium TEL: 03/570.05.11
PIONEER ELECTRONICS ASIACENTRE PTE. LTD.
253 Alexandra Road, #04-01, Singapore 159936 TEL: 65-6472-7555
PIONEER ELECTRONICS AUSTRALIA PTY. LTD.
178-184 Boundary Road, Braeside, Victoria 3195, Australia, TEL: (03) 9586-6300
PIONEER ELECTRONICS DE MEXICO S.A. DE C.V.
Blvd.Manuel Avila Camacho 138 10 piso Col.Lomas de Chapultepec, Mexico,D.F. 11000 TEL: 55-9178-4270
K002_B_En


- CAUTION
- RISK OF ELECTRIC SHOCK DO NOT OPEN
- CAUTION:
- WARNING
- Operating Environment
- VENTILATION CAUTION
- Information for users on collection and disposal of old equipment and used batteries
- POWER-CORD CAUTION
- Thank you for buying this Pioneer product.
- Contents
- Before you start
- Controls and displays
- iPod playback
- Bluetooth® ADAPTER for Wireless Enjoyment of Music
- Other connections
- Additional information
- Chapter 1:
- Before you start
- What's in the box
- Before using the remote control
- - Remove the protective seal from the battery casing.
- Replace the battery
- - WARNING
- Using the remote control
- Installing the unit
- Plugging in
- Important
- Chapter 2:
- Controls and displays
- Remote control
- ⏻ STANDBY/ON
- INPUT
- VOLUME +/-
- Playback control buttons
- Front /top panel
- ⏻ STANDBY/ON
- Power indicator
- INPUT SELECTOR
- VOLUME +/-
- Bluetooth ADAPTER indicator
- Remote sensor
- Note
- Chapter 3:
- iPod playback
- Confirm what iPod models are supported
- Select 'Settings' from the top menu.
- Select 'About'.
- Tip
- Connecting your iPod
- Attach the Dock adaptor to iPod connector port on the top panel of this unit.
- Connect your iPod.
- Connecting your TV
- Setting the video output
- Switch the unit into standby.
- Press and hold INPUT on the remote control for three seconds.
- Playing your iPod
- Button What it does
- Using the tone controls
- Chapter 4:
- Bluetooth® ADAPTER for Wireless Enjoyment of Music
- Wireless music play
- Remote control operation
- Connecting Optional Bluetooth ADAPTER
- Setting the PIN code
- Pairing Bluetooth ADAPTER and Bluetooth wireless technology device
- Listening to Music Contents of Bluetooth wireless technology device with Your System
- P r INPUT to switch to Bluetooth ADAPTER input mode.
- Connect the Bluetooth wireless technology device to the Bluetooth ADAPTER.
- Start playback of music contents stored in Bluetooth wireless technology device.
- Chapter 5:
- Other connections
- Connecting auxiliary components
- Chapter 6:
- Additional information
- Troubleshooting
- Resetting the system
- Switch the unit on.
- Press and hold VOLUME – on the top panel, and then press and hold ⏻ STANDBY/ON for three seconds.
- About iPod
- Specifications
- - Amplifier section
- - Speaker section
- - Miscellaneous
- - Accessories
- Cleaning the unit
- PIONEER ELECTRONICS (USA) INC.
- PIONEER ELECTRONICS OF CANADA, INC.
- PIONEER EUROPE NV
- PIONEER ELECTRONICS ASIACENTRE PTE. LTD.
- PIONEER ELECTRONICS AUSTRALIA PTY. LTD.
- PIONEER ELECTRONICS DE MEXICO S.A. DE C.V.
Brand : PIONEER
Model : XW-NAS3
Category : Docking Station