
1764 AK - Drill SKIL - Free user manual and instructions
Find the device manual for free 1764 AK SKIL in PDF.


| Product type | SDS+ rotary hammer |
| Brand | Skil |
| Model | 1764 AK |
| Power supply | 230 V ~ 50 Hz |
| Power consumption | 800 W |
| No-load speed | 0 – 1800 rpm (variable) |
| Impact rate | 0 – 5600 bpm |
| Drilling capacity in concrete | 20 mm |
| Drilling capacity in steel | 13 mm |
| Drilling capacity in wood | 30 mm |
| Tool holder | SDS+ and 13 mm chuck (via adapter) |
| Operating modes | Drilling, hammer drilling, rotary chiseling, fixed chiseling |
| Safety clutch | Yes |
| Variable speed control | Yes, with adjustment wheel |
| Switch lock for continuous operation | Yes |
| Reversing rotation direction | Yes |
| Auxiliary handle | Yes, adjustable |
| Sound pressure level (EN 60745) | 93 dB(A) |
| Sound power level (EN 60745) | 104 dB(A) |
| Vibration (hammering concrete) | 15.1 m/s² |
| Vibration (chiseling) | 11.9 m/s² |
| Weight | 2.6 kg |
| Maintenance and cleaning | Clean ventilation slots regularly; unplug before cleaning |
| Included accessories | Adapter with 13 mm chuck, auxiliary handle |
| Safety | Safety clutch, double insulation, auxiliary handle |
Frequently Asked Questions - 1764 AK SKIL
User questions about 1764 AK SKIL
0 question about this device. Answer the ones you know or ask your own.
Ask a new question about this device
Download the instructions for your Drill in PDF format for free! Find your manual 1764 AK - SKIL and take your electronic device back in hand. On this page are published all the documents necessary for the use of your device. 1764 AK by SKIL.
USER MANUAL 1764 AK SKIL
natural_image
Illustration of a SKIL electric drill with control panel and handle (no text or symbols on the device itself)

GB ORIGINAL INSTRUCTIONS 9
F NOTICE ORIGINALE 12
D ORIGINALBETRIEBSANLEITUNG 15
NL ORIGINELE GEBRUIKSAANWIJZING 19
S BRUKSANVISNING I ORIGINAL 23
DK ORIGINAL BRUGSANVISNING 26
N ORIGINAL BRUKSANVISNING 29
FIN ALKUPERÄISET OHJEET 32
E MANUAL ORIGINAL 36
P MANUAL ORIGINAL 40
I ISTRUZIONI ORIGINALI 43
H EREDETI HASZNÁLATI UTASÍTÁS 47
CZ PÜVODNÍM NÁVODEM K POUŽÍVÁNÍ 51
TR ORIJINAL İŞLETME TALİMATI 54
PL INSTRUKCJA ORYGINALNA 57
RU ПОДЛИННИК РУКОВОДСТВА
ПО ЭКСПЛУАТАЦИИ 61
UA ОРИГІНАЛЬНА ІНСТРУКЦІЯ
З ЕКСПЛУАТАЦІЇ 65
GR ΠΡΩΤΟΥΠΟ ΟΔΗΓΙΩΝ ΧΡΗΣΗΣ 69
RO INSTRUCTIUNI DE FOLOSIRE
ORIGINALE 73
BG ОРИГИНАЛНО РЪКОВОДСТВО
ЗА ЕКСПЛОАТАЦИЯ 77
SK PÔVODNÝ NÁVOD NA POUŽITIE 81
HR ORIGINALNE UPUTE ZA RAD 85
SRB ORIGINALNO UPUTSTVO ZA RAD 88
SLO IZVIRNA NAVODILA 91
EST ALGUPÄRANE KASUTUSJUHEND 95
LV ORIGINĀLĀ LIETOŠANAS PAMĀCĪBA 98
LT ORIGINALI INSTRUKCIJA 102
МК ИЗВОРНО УПАТСТВО ЗА РАБОТА 105
AL UDHËZIMET ORIGJINALE 109
AR دليل الاستعمال 120
④ RAHENMAI AUSLI 118
www.skil.com

① 1764

②

natural_image
Simple black-and-white icon of a person reading a book inside a circle, with number 3 in the top-left corner (no text or symbols on the icon itself)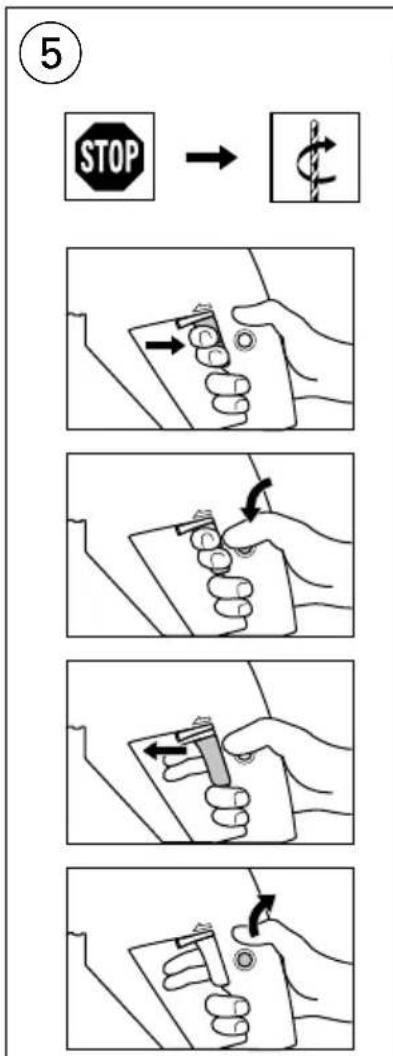

flowchart
graph LR
    A["Raw Material Input"] --> B["Step 3"]
    B --> C["Step 2"]
    C --> D["Plastic Sample"]
    D --> E["Step 4"]
    E --> F["Final Product"]
    subgraph Process Steps
        G["Step 1: Plastic Fabric"]
        H["Step 2: Plastic Fiber"]
        I["Step 3: Raw Material"]
        J["Step 4: Raw Material"]
    end




GB
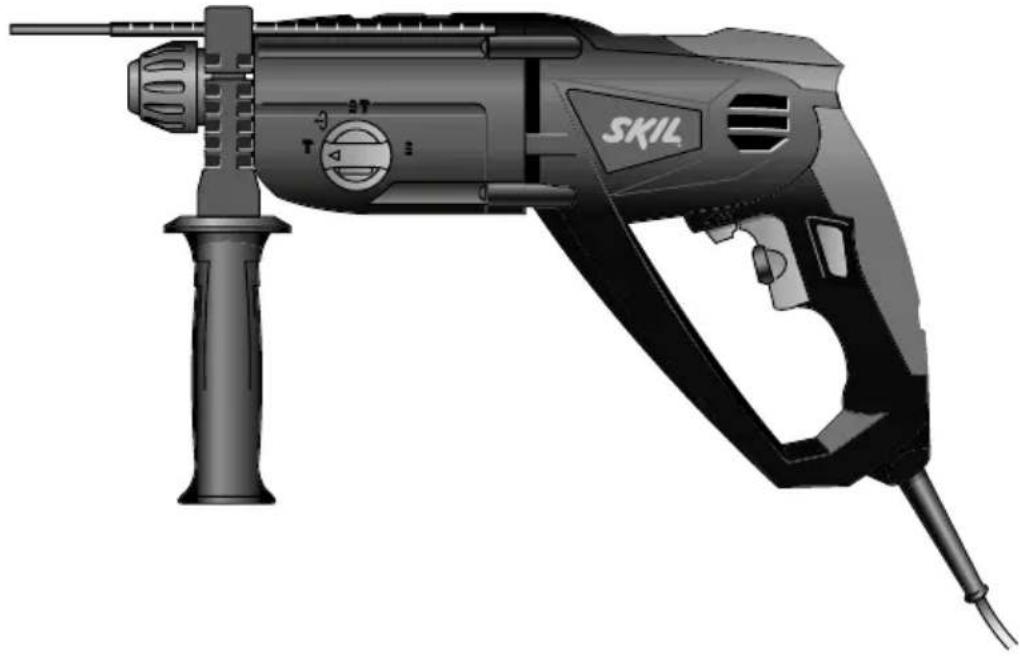
Rotary hammer 1764
INTRODUCTION
- This tool is intended for hammer drilling in concrete, brick and stone as well as for light chiseling work; for drilling in wood, metal and plastic as well as for screwdriving specific accessories should be used
- The hammering system in this tool outperforms any traditional ratcheting drill when drilling in concrete
• This tool is not intended for professional use - This tool is designed for use in combination with all standard SDS+ accessories
- Read and save this instruction manual ③
TECHNICAL DATA ①
*) Impact energy per stroke according to EPTA-Procedure 05/2009
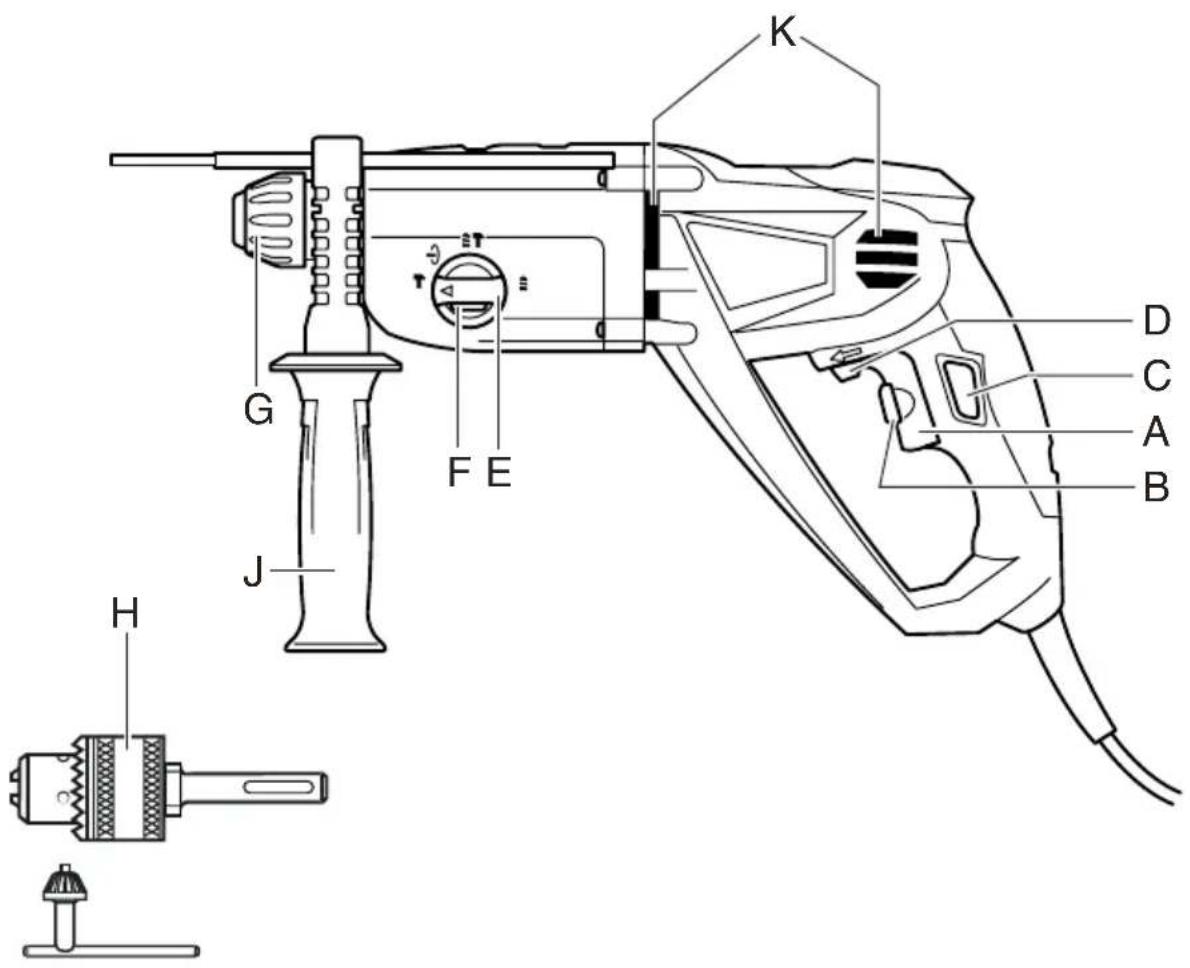
TOOL ELEMENTS ②
A Switch for on/off and speed control
B Wheel for maximum speed control
C Button for switch locking
D Lever for changing direction of rotation
E Switch for selecting operating mode
F Unlocking button
G Locking sleeve
H Adapter + 13 mm chuck
J Auxiliary handle
K Ventilation slots
SAFETY
GENERAL SAFETY INSTRUCTIONS
WARNING! Read all safety warnings and all instructions. Failure to follow the warnings and instructions may result in electric shock, fire and/or serious injury. Save all warnings and instructions for future reference. The term "power tool" in the warnings refers to your mains-operated (corded) power tool or battery-operated (cordless) power tool.
1) WORK AREA SAFETY
a) Keep work area clean and well lit. Cluttered or dark areas invite accidents.
b) Do not operate power tools in explosive atmospheres, such as in the presence of flammable liquids, gases or dust. Power tools create sparks which may ignite the dust or fumes.
c) Keep children and bystanders away while operating a power tool. Distractions can cause you to lose control.
2) ELECTRICAL SAFETY
a) Power tool plugs must match the outlet. Never modify the plug in any way. Do not use any adapter plugs with earthed (grounded) power tools.
Unmodified plugs and matching outlets will reduce risk of electric shock.
b) Avoid body contact with earthed or grounded surfaces such as pipes, radiators, ranges and refrigerators. There is an increased risk of electric shock if your body is earthed or grounded.
c) Do not expose power tools to rain or wet conditions. Water entering a power tool will increase the risk of electric shock.
d) Do not abuse the cord. Never use the cord for carrying, pulling or unplugging the power tool. Keep cord away from heat, oil, sharp edges or moving parts. Damaged or entangled cords increase the risk of electric shock.
e) When operating a power tool outdoors, use an extension cord suitable for outdoor use. Use of a cord suitable for outdoor use reduces the risk of electric shock.
f) If operating a power tool in a damp location is unavoidable, use an earth leakage circuit breaker. Use of an earth leakage circuit breaker reduces the risk of electric shock.
3) PERSONAL SAFETY
a) Stay alert, watch what you are doing and use common sense when operating a power tool. Do not use a power tool while you are tired or under the influence of drugs, alcohol or medication. A moment of inattention while operating power tools may result in serious personal injury.
b) Use personal protective equipment. Always wear eye protection. Protective equipment such as dust mask, non-skid safety shoes, hard hat, or hearing protection used for appropriate conditions will reduce personal injuries.
c) Prevent unintentional starting. Ensure the switch is in the off-position before connecting to power source and/or battery pack, picking up or carrying the tool. Carrying power tools with your finger on the switch or energising power tools that have the switch on invites accidents.
d) Remove any adjusting key or wrench before turning the power tool on. A wrench or a key left attached to a rotating part of the power tool may result in personal injury.
e) Do not overreach. Keep proper footing and balance at all times. This enables better control of the power tool in unexpected situations.
f) Dress properly. Do not wear loose clothing or jewelry. Keep your hair, clothing and gloves away from moving parts. Loose clothes, jewelry or long hair can be caught in moving parts.
g) If devices are provided for the connection of dust extraction and collection facilities, ensure these are connected and properly used. Use of dust collection can reduce dust-related hazards.
4) POWER TOOL USE AND CARE
a) Do not force the power tool. Use the correct power tool for your application. The correct power tool will do the job better and safer at the rate for which it was designed.
b) Do not use the power tool if the switch does not turn it on and off. Any power tool that cannot be controlled with the switch is dangerous and must be repaired.
c) Disconnect the plug from the power source and/or the battery pack from the power tool before making any adjustments, changing accessories, or storing power tools. Such preventive safety measures reduce the risk of starting the power tool accidentally.
d) Store idle power tools out of the reach of children and do not allow persons unfamiliar with the power tool or these instructions to operate the power tool. Power tools are dangerous in the hands of untrained users.
e) Maintain power tools. Check for misalignment or binding of moving parts, breakage of parts and any other condition that may affect the power tool's operation. If damaged, have the power tool repaired before use. Many accidents are caused by poorly maintained power tools.
f) Keep cutting tools sharp and clean. Properly maintained cutting tools with sharp cutting edges are less likely to bind and are easier to control.
g) Use the power tool, accessories and tool bits etc., in accordance with these instructions, taking into account the working conditions and the work to be performed. Use of the power tool for operations different from those intended could result in a hazardous situation.
a) Have your power tool serviced by a qualified repair person using only identical replacement parts. This will ensure that the safety of the power tool is maintained.
5) SERVICE
SAFETY INSTRUCTIONS FOR HAMMERS
GENERAL
- Always check that the supply voltage is the same as the voltage indicated on the nameplate of the tool (tools with a rating of 230V or 240V can also be connected to a 220V supply)
- This tool should not be used by people under the age of 16 years
- Do not work materials containing asbestos (asbestos is considered carcinogenic)
- Never use the tool when cord is damaged; have it replaced by a qualified person
• Always disconnect plug from power source before making any adjustment or changing any accessory ACCESSORIES - SKIL can assure flawless functioning of the tool only when original accessories are used
- Use only accessories with an allowable speed matching at least the highest no-load speed of the tool
BEFORE USE
- Use completely unrolled and safe extension cords with a capacity of 16 Amps (U.K. 13 Amps)
- Avoid damage that can be caused by screws, nails and other elements in your workpiece; remove them before you start working
- Secure the workpiece (a workpiece clamped with clamping devices or in a vice is held more securely than by hand)
- Use suitable detectors to find hidden utility lines or call the local utility company for assistance (contact with electric lines can lead to fire or electrical shock; damaging a gas line can result in an explosion;
penetrating a water pipe will cause property damage or an electrical shock)
- Dust from material such as paint containing lead, some wood species, minerals and metal may be harmful (contact with or inhalation of the dust may cause allergic reactions and/or respiratory diseases to the operator or bystanders); wear a dust mask and work with a dust extraction device when connectable
- Certain kinds of dust are classified as carcinogenic (such as oak and beech dust) especially in conjunction with additives for wood conditioning; wear a dust mask and work with a dust extraction device when connectable
- Follow the dust-related national requirements for the materials you want to work with
DURING USE
- Wear ear protectors (exposure to noise can cause hearing loss)
- Use auxiliary handle(s), if supplied with the tool (loss of control can cause personal injury)
- Hold power tool by insulated gripping surfaces, when performing an operation where the cutting accessory may contact hidden wiring or its own cord (a cutting accessory contacting a "live" wire may make exposed metal parts of the power tool "live" and could give the operator an electric shock)
• Always keep the cord away from moving parts of the tool
- In case of electrical or mechanical malfunction, immediately switch off the tool and disconnect the plug
- If the cord is damaged or cut through while working, do not touch the cord, but immediately disconnect the plug
- If the drill bit becomes unexpectedly jammed (causing a sudden, dangerous reaction), immediately switch off the tool
- Be aware of the forces that occur as a result of jamming (especially when drilling metals); always use auxiliary handle J ② and take a secure stance
AFTER USE
- When you put away the tool, switch off the motor and ensure that all moving parts have come to a complete standstill
WHEN CONNECTING NEW 3-PIN PLUG (U.K. ONLY):
- Do not connect the blue (= neutral) or brown (= live) wire in the cord of this tool to the earth terminal of the plug
- If for any reason the old plug is cut off the cord of this tool, it must be disposed of safely and not left unattended
USE
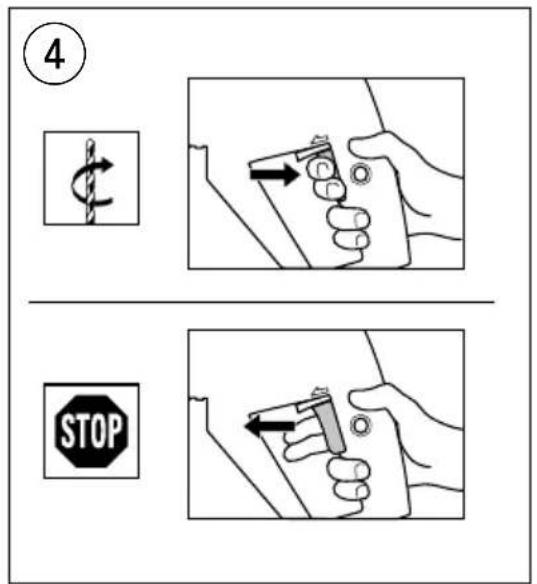
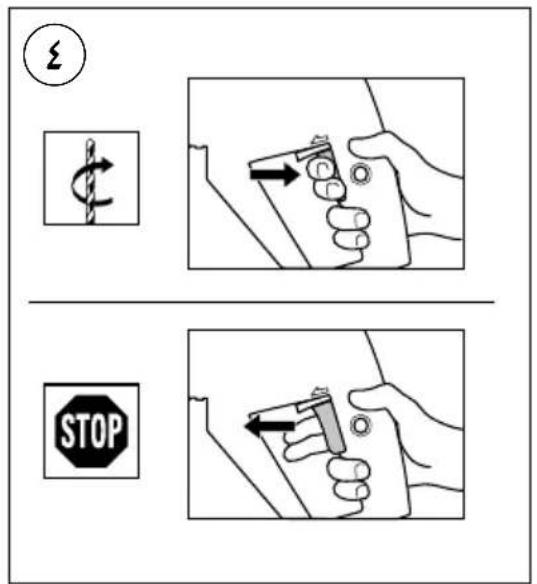
- On/off ④
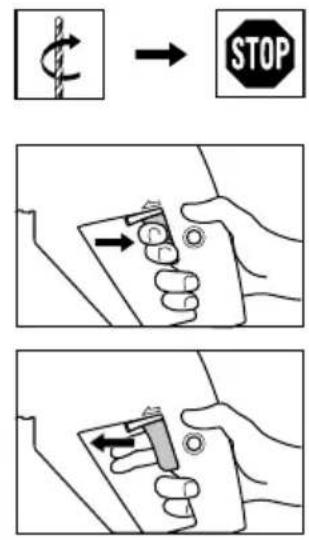
- Switch locking for continuous use ⑤
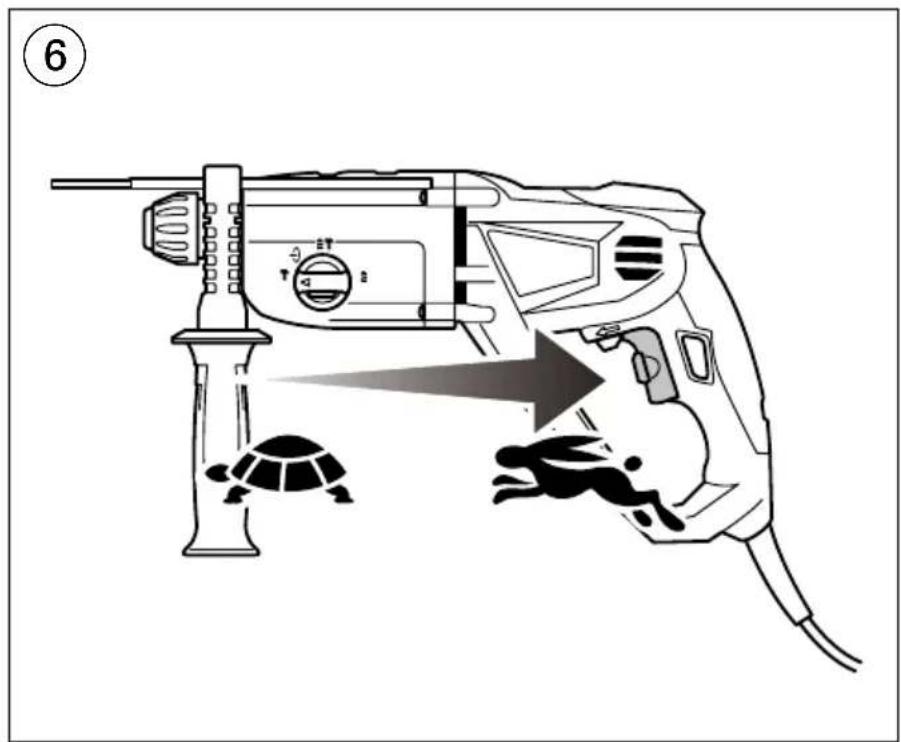
• Speed control for smooth starting ⑥ - Maximum speed control ⑦ With wheel B ② the maximum speed can be adjusted steplessly from minimum to maximum
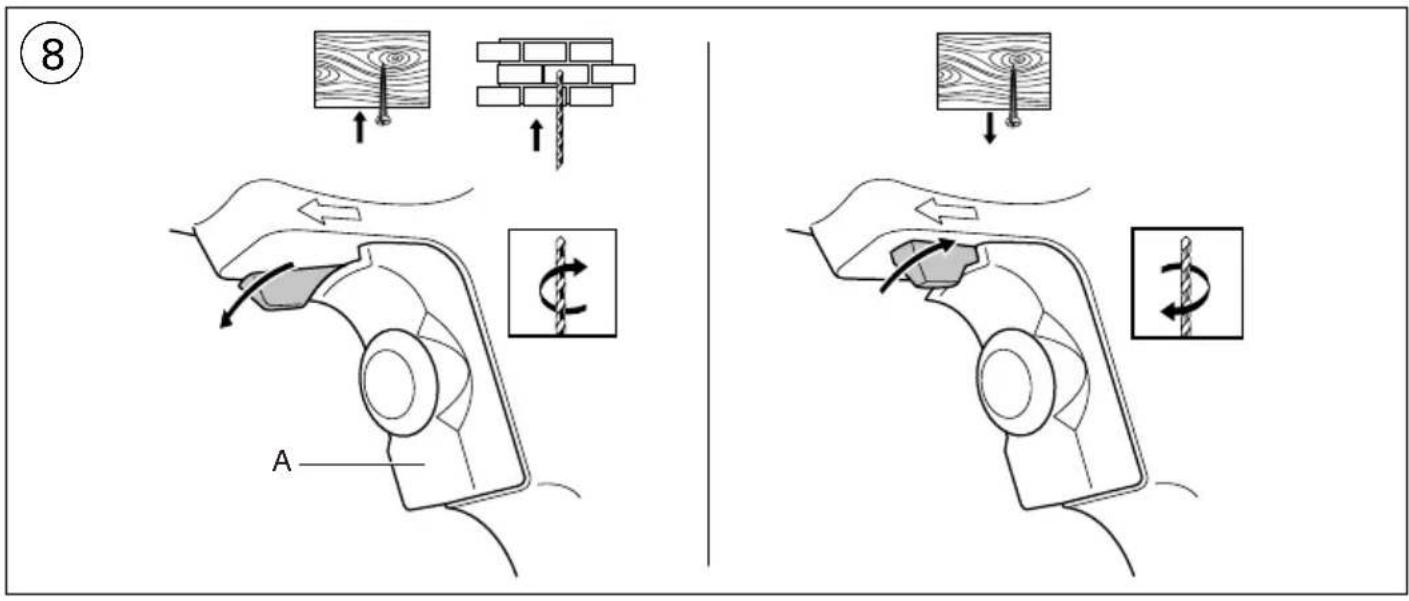
- Changing direction of rotation ⑧
-
when not properly set in left/right position, switch A cannot be activated
! change direction of rotation only when tool is at a complete standstill -
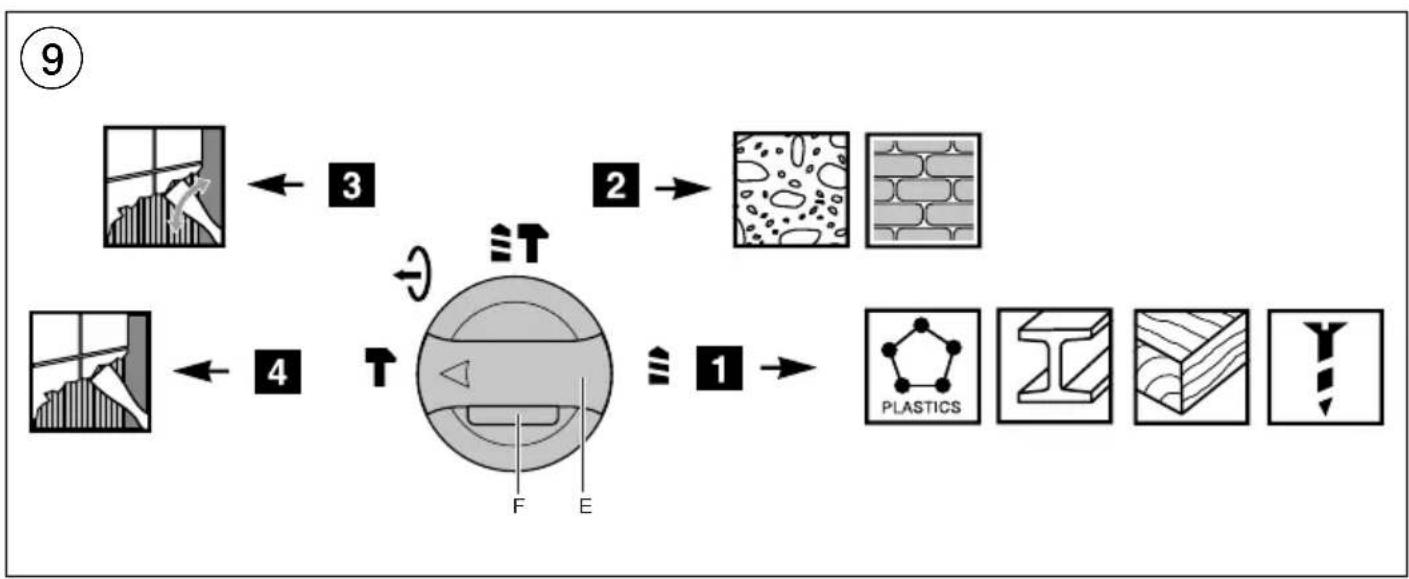
Selecting operating mode ⑨
- press button F to unlock switch E
- turn switch E to the desired operating mode until it snap-locks
! start working only when switch E is locked
1 = normal drilling/screwdriving
2 = impact drilling
3 = chiseling with rotating chisel
4 = chiseling with fixed chisel
! select operating mode only when tool is switched off and plug is disconnected
- the hammer mechanism is activated by applying a slight pressure on the tool when the drill bit is in contact with the workpiece
- best hammer drilling results can be obtained by only a slight pressure on the tool needed to keep the automatic clutch engaged; drilling performance will not improve by applying more pressure on the tool
- Chiseling with rotating chisel ⑩
! switch off the tool and disconnect the plug
- select "rotating" chiseling mode
- Chiseling with fixed chisel ⑪
! switch off the tool and disconnect the plug
- select "rotating" chiseling mode
- place chisel in desired position
- select "fixed" chiseling mode
- Changing bits ⑫
! clean and lightly lubricate the SDS+ accessory before insertion
- pull back locking sleeve G and insert accessory in SDS+ chuck while turning and pushing it until it engages; the accessory locks in position automatically
- pull accessory to check that it is locked correctly
- remove accessory by pulling back locking sleeve G
! the SDS+ accessory requires freedom of movement which causes eccentricity when tool is off-load; however, the accessory automatically centres itself during operation without affecting drilling precision
! do not use bits/chisels with a damaged shank
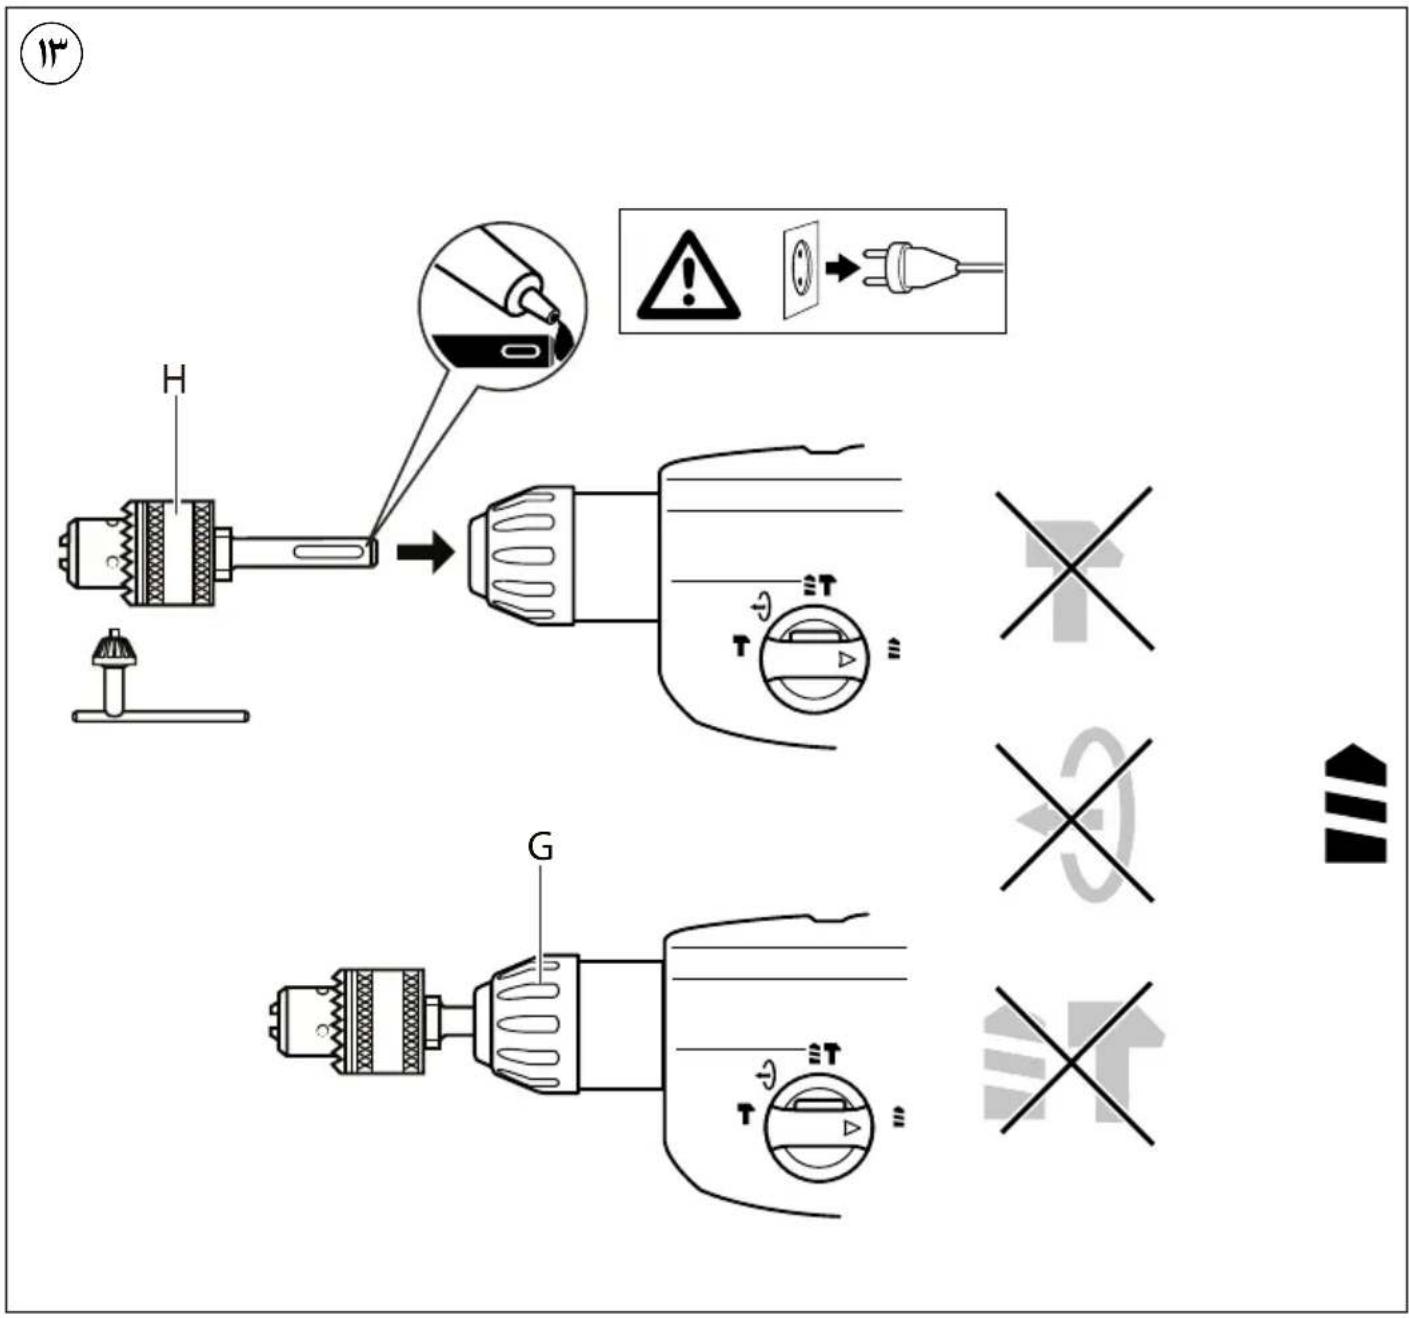
For drilling in wood, metal and plastic as well as for screwdriving use adapter H ^13
- clean and lightly lubricate adapter before insertion
- pull back locking sleeve G and insert adapter in SDS+ chuck while turning and pushing it until it engages; the adapter locks in position automatically
- pull adapter to check whether is it locked correctly
- set switch E ② to normal drilling (only activate when tool is switched off and plug is disconnected)
- Safety clutch
If the accessory gets jammed, the drive to the spindle is interrupted (causing a rattling noise)
- immediately switch off tool
- remove the jammed accessory
- switch on tool again
- Adjusting drilling depth ⑭
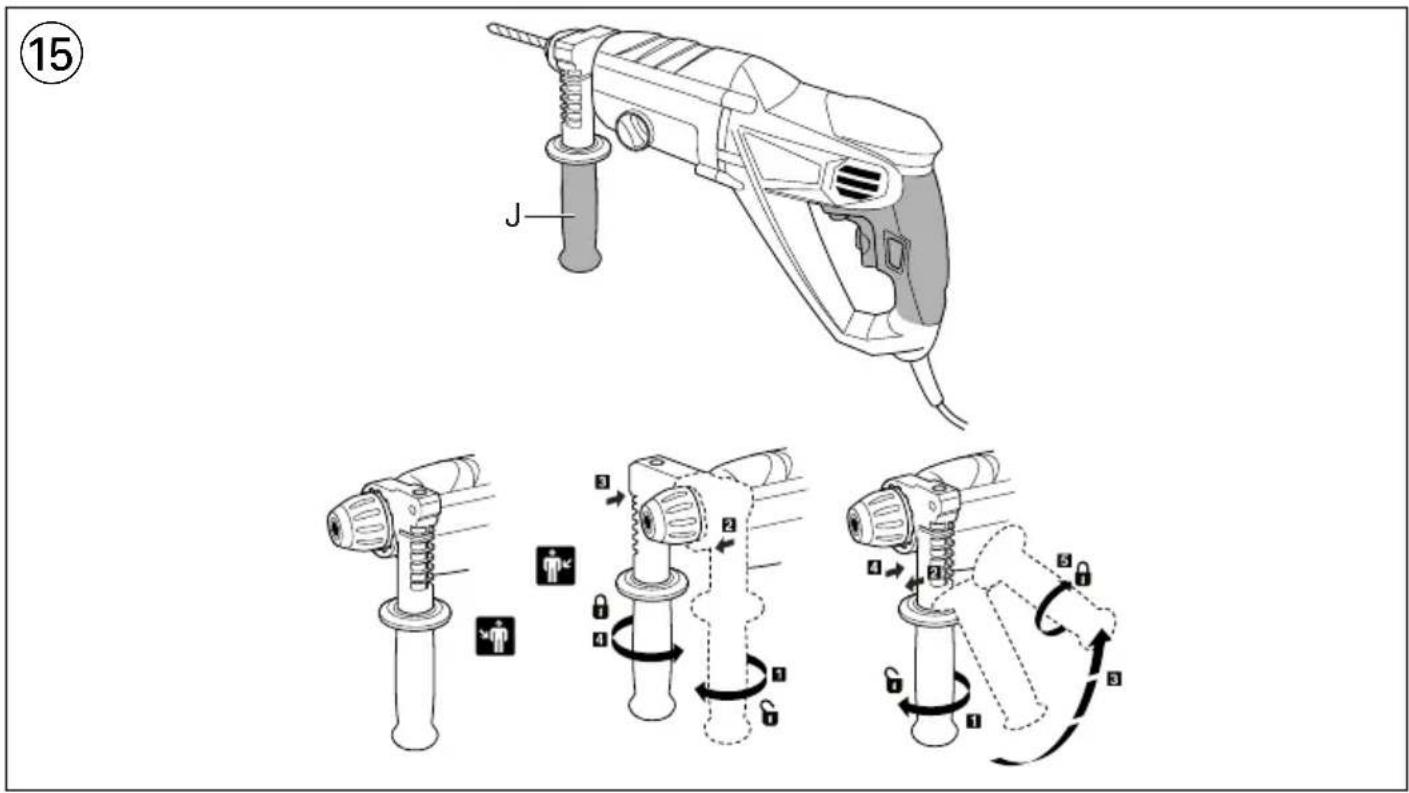
- Holding and guiding the tool ⑮
! while working, always hold the tool at the grey-coloured grip area(s)
- always use auxiliary handle J (can be adjusted as illustrated)
- keep the ventilation slots uncovered
- do not apply too much pressure on the tool; let the tool do the work for you
APPLICATION ADVICE
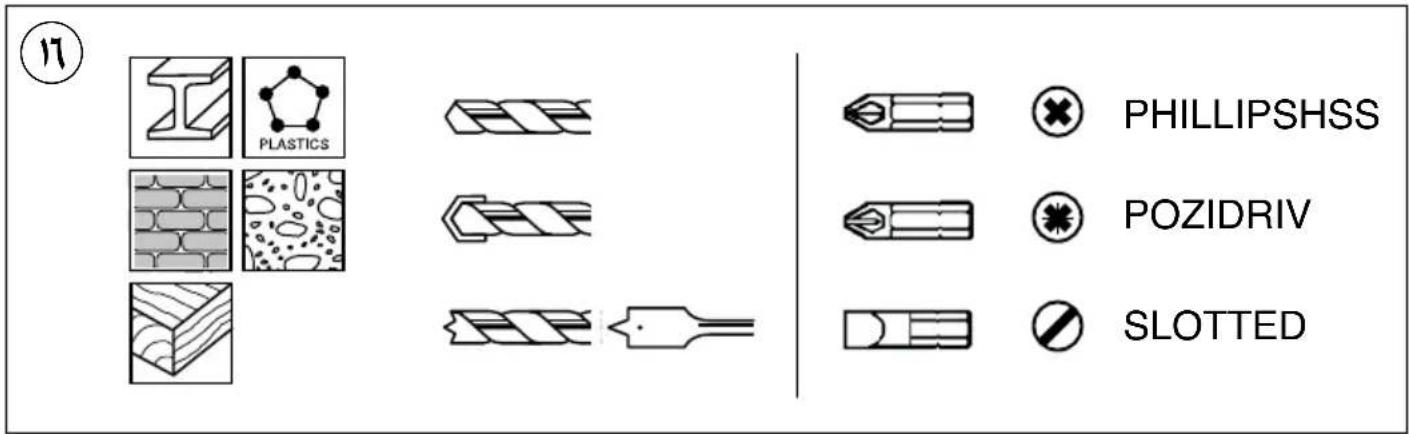
- Use the appropriate bits ⑯
! only use sharp bits/chisels
- When drilling ferrous metals
- pre-drill a smaller hole, when a large hole is required - lubricate drill bit occasionally with oil
- When turning in a screw at/near the cross cut end or an edge of wood, pre-drill a hole in order to avoid cracking of the wood
- Splinterfree drilling in wood ⑰
• Dustfree drilling in walls ⑱
• Dustfree drilling in ceilings ⑲
- Drilling in tiles without skidding 20
- For more tips see www.skil.com
MAINTENANCE / SERVICE
• This tool is not intended for professional use
- Always keep tool and cord clean (especially ventilation slots K ②)
! disconnect the plug before cleaning
- If the tool should fail despite the care taken in manufacturing and testing procedures, repair should be carried out by an after-sales service centre for SKIL power tools
- send the tool undismantled together with proof of purchase to your dealer or the nearest SKIL service station (addresses as well as the service diagram of the tool are listed on www.skil.com)
ENVIRONMENT
- Do not dispose of electric tools, accessories and packaging together with household waste material (only for EU countries)
- in observance of European Directive 2002/96/EC on waste of electric and electronic equipment and its implementation in accordance with national law, electric tools that have reached the end of their life must be collected separately and returned to an environmentally compatible recycling facility
- symbol ② will remind you of this when the need for disposing occurs
DECLARATION OF CONFORMITY C€
- We declare under our sole responsibility that the product described under “Technical data” is in conformity with the following standards or standardization documents: EN 60745, EN 61000, EN 55014, in accordance with the provisions of the directives 2004/108/EC, 2006/42/EC, 2011/65/EU
- Technical file at: SKIL Europe BV (PT-SEU/ENG1), 4825 BD Breda, NL
Operations & Engineering
Olaf Dijkgraaf
Approval Manager

SKIL Europe BV, 4825 BD Breda, NL
12.08.2013
NOISE/VIBRATION
- Measured in accordance with EN 60745 the sound pressure level of this tool is 93 dB(A) and the sound power level 104 dB(A) (standard deviation: 3 dB), and the vibration * (hand-arm method; uncertainty K = 1.5 m/s ^2 )
* when hammer drilling in concrete 15.1 m/s ^2
* when chiseling 11.9 m/s²
- The vibration emission level has been measured in accordance with a standardised test given in EN 60745; it may be used to compare one tool with another and as a preliminary assessment of exposure to vibration when using the tool for the applications mentioned
- using the tool for different applications, or with different or poorly maintained accessories, may significantly increase the exposure level
- the times when the tool is switched off or when it is running but not actually doing the job, may significantly reduce the exposure level
! protect yourself against the effects of vibration by maintaining the tool and its accessories, keeping your hands warm, and organizing your work patterns
F
Operations & Engineering
Olaf Dijkgraaf
Approval Manager


SKIL Europe BV, 4825 BD Breda, NL
12.08.2013
BRUIT/VIBRATION
Operations & Engineering
Olaf Dijkgraaf
Approval Manager
SKIL Europe BV, 4825 BD Breda, NL
12.08.2013
GELUID/VIBRATIE
Operations & Engineering
Olaf Dijkgraaf
Approval Manager


SKIL Europe BV, 4825 BD Breda, NL
12.08.2013
ST∅J/VIBRATION
1) SIKKERHET PÅ ARBEIDSPLASSEN
VEDLIKEHOLD / SERVICE
Operations & Engineering
Olaf Dijkgraaf
Approval Manager


SKIL Europe BV, 4825 BD Breda, NL
12.08.2013
RUIDOS/VIBRACIONES
Operations & Engineering
Olaf Dijkgraaf
Approval Manager

SKIL Europe BV, 4825 BD Breda, NL
12.08.2013
RUÍDO/VIBRAÇÕES
Operations & Engineering
Olaf Dijkgraaf
Approval Manager

SKIL Europe BV, 4825 BD Breda, NL
12.08.2013
ZAJ/REZGÉS
Operations & Engineering
Olaf Dijkgraaf
Approval Manager


SKIL Europe BV, 4825 BD Breda, NL
12.08.2013
HLUČNOSTI/VIBRACÍ
Operations & Engineering
Olaf Dijkgraaf
Approval Manager


SKIL Europe BV, 4825 BD Breda, NL
12.08.2013
ZGOMOT/VIBRATII
Operations & Engineering
Olaf Dijkgraaf
Approval Manager
SKIL Europe BV, 4825 BD Breda, NL
12.08.2013
ШУМ/ВИБРАЦИИ
Operations & Engineering
Olaf Dijkgraaf
Approval Manager


SKIL Europe BV, 4825 BD Breda, NL
12.08.2013
HLUKU/VIBRÁCIÁCH
Operations & Engineering
Olaf Dijkgraaf
Approval Manager

SKIL Europe BV, 4825 BD Breda, NL
12.08.2013
BUCI/VIBRACIJAMA
- Mjereno prema EN 60745 prag zvučnog tlaka ovog električnog alata iznosi 93 dB(A) a jakost zvuka 104 dB(A) (standardna devijacija: 3 dB), a vibracija
* m/s ^2 (postupkom na šaci-ruci; nesigurnost K = 1,5 m/s ^2 )
OPŠTA UPUTSTVA O SIGURNOSTI
PAŽNJA! Čitajte sva upozorenja i uputstva. Propusti kod pridržavanja upozorenja i uputstava mogu imati za posledicu električni udar, požar i/ili teške povrede. Čuvajte sva upozorenja i uputstva za budućnost. Pojam upotrebljen u upozorenjima “električni alat” odnosi se na električne alate sa radom na mreži (sa mrežnim kablom) i na električne alate sa radom na akumulator (bez mrežnog kabla).
1) SIGURNOST NA RADNOM MESTU
a) Držite Vaše područje rada čisto i pospremljeno. Nered ili neosvetljena radna područja mogu voditi nesrećama.
b) Ne radite sa aparatom u okolini ugroženoj od eksplozija u kojoj se nalaze zapaljive tečnosti, gasovi ili prašine. Električni alati proizvode varnice, koje mogu zapaliti prašinu ili isparenja.
c) Za vreme korišćenja električnog alata držite podalje decu i druge osobe. Kod skretanja možete izgubiti kontrolu nad aparatom.
2) ELEKTRIČNA SIGURNOST
a) Utikač za priključak aparata mora odgovarati utičnoj kutijici. Utikač se nesme nikako menjati. Ne upotrebljavajte adaptere utikača zajedno sa aparatima sa uzemljenom zaštitom. Ne promenjeni utikači i odgovarajuće utičnice smanjuju rizik od električnog udara.
b) Izbegavajte telesni kontakt sa uzemljenim gornjim površinama, kao što su cevi, grejanja, šporeti i rashladni ormani. Postoji povećani rizik od električnog udara, ako je Vaše telo uzemljeno.
c) Držite aparat podalje od kiše ili vlage. Prodiranje vode u električni aparat povećava rizik od električnog udara.
d) Ne koristite kabl da bi aparat nosili, obesili ili ga izvlačili iz utičnice. Držite kabl dalje od vreline, ulja, oštrih ivica ili pokretnih delova aparata. Oštećeni ili zamršeni kablovi povećavaju rizik od elektrinog udara.
e) Ako sa nekim električnim alatom radite u prirodi, upotrebljavajte samo produžne kablove koji su dozvoljeni za spoljno područje. Upotreba produžnog kabla pogodnog za spoljno područje smanjuje rizik od električnog udara.
f) Ako rad električnog alata ne može da se izbegne u vlažnoj okolini, koristite prekidač strujne zaštite pri kvaru. Upotreba prekidača strujne zaštite pri kvaru smanjuje rizik od električnog udara.
3) SIGURNOST OSOBA
a) Budite pažljivi, pazite na to, šta radite i idite razumno na posao sa električnim alatom. Ne upotrebljavajte aparat, kada ste umorni ili pod uticajem droga, alkohola ili lekova. Momenat nepažnje kod upotrebe aparata može voditi do ozbiljnih povreda.
b) Nosite ličnu zaštitnu opremu i uvek zaštitne naočare. Nošenje lične zaštitne opreme, kao maske za prašinu, sigurnosne cipele koje ne klizaju, zaštitni šlem ili zaštitu za sluh, zavisno od vrste i upotrebe električnog alata, smanjujete rizik od povreda.
c) Izbegavajte nenamerno puštanje u rad. Uverite se da je električni alat isključen, pre nego što ga priključite na struju i/ili na akumulator, uzmete ga ili nosite. Ako prilikom nošenja električnog alata držite prst na prekidaču ili aparat uključen priključujete na struju, može ovo voditi nesrećama.
d) Uklonite alate za podešavanje ili ključeve za zavrtnje, pre nego što uključite aparat. Alat ili ključ koji se nalazi u delu aparata koji se okreće, može voditi povredama.
e) Ne precenjujte sebe. Pobrinite se da sigurno stojite i održavajte u svako doba ravnotežu. Na taj način možete bolje kontrolisati aparat u neočekivanim situacijama.
f) Nosite pogodno odelo. Ne nosite široko odelo ili nakit. Držite kosu, odelo i rukavice podalje od pokretnih delova. Opušteno odelo, nakit ili duža kosa mogu biti zahvaćeni od rotirajućih delova.
g) Ako se mogu montirati uredjaji za usisavanje prašine i uredjaji za hvatanje prašine, uverite se da li su priključeni i ispravno koriste. Upotreba usisavanja prašine može smanjiti opasnosti od prašine.
4) BRIŽLJIVO OPHODJENJE I KORIŠĆENJE ELEKTRIČNIH ALATA
a) Ne preopterećujte aparat. Upotrebljavajte za Vaš posao električni alat odredjen za to. Sa odgovarajućim električnim alatom radićete bolje i sigurnije u navedenom području rada.
b) Ne upotrebljavajte električni alat, čiji je prekidač u kvaru. Električni alat koji više ne može da se uključi ili isključi je opasan i mora da se popravi.
c) Izvucite utikač iz utičnice i/ili uklonite akumulator pre nego što preduzmete podešavanja na aparatu,
promenu delova pribora ili ostavite aparat. Ova mera opreza sprečava nenameran start aparata.
d) Čuvajte nekorišćene električne alate izvan domašaja dece. Ne dopustite osobama da koriste aparat, koje ga ne poznaju ili nisu pročitali ova uputstva. Električni alati su opasni, ako ih koriste neiskusne osobe.
e) Održavajte aparat brižljivo. Kontrolišite, da li pokretni delovi aparata funkcionišu besprekorno i ne slepljuju, da li su delovi slomljeni ili tako oštećeni, da je funkcija aparata oštećena. Popravite oštećene delove pre upotrebe aparata. Mnoge nesreće imaju svoj uzrok u loše održavanim električnim alatima.
f) Držirte alate za sečenja oštre i čiste. Brižljivo negovani alati za sečenje sa oštrim sečivima manje slepljuju i lakše se vode.
g) Upotrebljavajte električne alate, pribor, alate koji se umeću itd. prema ovim uputstvima. Obratite pažnju pritom na uputstva za rad i posao koji treba izvesti. Upotreba električnih alata za druge od propisanih namena može voditi opasnim situacijama.
5) SERVIS
a) Neka Vam Vaš aparat popravlja samo kvalifikovano stručno osoblje i samo sa originalnim rezervnim delovima. Na taj način se obezbedjuje da ostane sačuvana sigurnost aparata.
SIGURNOSNA UPUTSTVA ZA UDARNE BUŠILICE
OPŠTA
Operations & Engineering
Olaf Dijkgraaf
Approval Manager

SKIL Europe BV, 4825 BD Breda, NL
12.08.2013
BUKA/VIBRACIJE
- Mereno u skladu sa EN 60745 nivo pritiska zvuka ovog alata iznosi 93 dB(A) a jačina zvuka 104 dB(A) (normalno odstupanje: 3 dB), a vibracija * m/s ^2 (mereno metodom na šaci-ruci; nesigurnost K = 1,5 m/s ^2 )
* pri bušenju sa čekićem betona 15,1 m/s²
* pri klesanju 11,9 m/s² - Nivo emisije vibracija izmeren je u skladu sa standardizovanim testom datim u EN 60745; on se može koristiti za upoređenje jedne alatke sa drugom, kao i za preliminarnu procenu izloženosti vibracijama pri korišćenju ove alatke za pomenute namene
- korišćenje alatke u drugačije svrhe ili sa drugačijim ili slabo održavanim nastavcima može značajno povećati nivo izloženosti
- vreme kada je alatka isključena ili kada je uključena, ali se njome ne radi, može značajno smanjiti nivo izloženosti
! zaštitite se od posledica vibracija održavanjem alatke i njenih nastavaka, održavajući Vaše ruke toplim i organizovanjem Vaših radnih obrazaca

Operations & Engineering
Olaf Dijkgraaf
Approval Manager


SKIL Europe BV, 4825 BD Breda, NL
12.08.2013
HRUP/VIBRACIJA
ÜLDISED OHUTUSJUHISED
Operations & Engineering
Olaf Dijkgraaf
Approval Manager


SKIL Europe BV, 4825 BD Breda, NL
12.08.2013
MÜRA/VIBRATSIOON
APKALPOŠANA / APKOPE
Operations & Engineering
Olaf Dijkgraaf
Approval Manager


SKIL Europe BV, 4825 BD Breda, NL
12.08.2013
TROKSNIS/VIBRĀCIJA
TECHNINIAI DUOMENYS ①
*) Smūgio energija pagal EPTA-Procedure 05/2009
PRIETAISO ELEMENTAI ②
Operations & Engineering
Olaf Dijkgraaf
Approval Manager


SKIL Europe BV, 4825 BD Breda, NL
12.08.2013
ZHURMA/VIBRIMI
Operations & Engineering
Olaf Dijkgraaf
Approval Manager


SKIL Europe BV, 4825 BD Breda, NL
12.08.2013
الضوضاء/الاهتاز




flowchart
graph LR
    A["Raw Materials Image"] --> B["Step 3"]
    B --> C["Step 2"]
    C --> D["Plastic Structure"]
    D --> E["PLASTICS"]
    E --> F["Steel Structure"]
    F --> G["Y-shaped Form"]
    G --> H["Final Product Structure"]

natural_image
Simple black-and-white icon showing a person reading a book inside a circle, with a small circular symbol above (no text or symbols)



1
1764

1
المطرقة
1764
SKIL®
natural_image
Illustration of a SKIL electric drill with handle and control panel (no text or symbols on the device itself)دليل الاستعمال
AR
راهنماي اصلی
FA


2610Z05111
08/13
سکیل أروبا ب.ق - کونینانبرج 60



- ① 1764
- ②
- GB
- Rotary hammer 1764
- INTRODUCTION
- TECHNICAL DATA ①
- TOOL ELEMENTS ②
- SAFETY
- GENERAL SAFETY INSTRUCTIONS
- 5) SERVICE
- SAFETY INSTRUCTIONS FOR HAMMERS
- GENERAL
- BEFORE USE
- DURING USE
- AFTER USE
- USE
- APPLICATION ADVICE
- MAINTENANCE / SERVICE
- ENVIRONMENT
- DECLARATION OF CONFORMITY C€
- NOISE/VIBRATION
- F
- BRUIT/VIBRATION
- GELUID/VIBRATIE
- ST∅J/VIBRATION
- 1) SIKKERHET PÅ ARBEIDSPLASSEN
- VEDLIKEHOLD / SERVICE
- RUIDOS/VIBRACIONES
- RUÍDO/VIBRAÇÕES
- ZAJ/REZGÉS
- HLUČNOSTI/VIBRACÍ
- ZGOMOT/VIBRATII
- ШУМ/ВИБРАЦИИ
- HLUKU/VIBRÁCIÁCH
- BUCI/VIBRACIJAMA
- OPŠTA UPUTSTVA O SIGURNOSTI
- SIGURNOSNA UPUTSTVA ZA UDARNE BUŠILICE
- OPŠTA
- BUKA/VIBRACIJE
- HRUP/VIBRACIJA
- ÜLDISED OHUTUSJUHISED
- MÜRA/VIBRATSIOON
- APKALPOŠANA / APKOPE
- TROKSNIS/VIBRĀCIJA
- TECHNINIAI DUOMENYS ①
- PRIETAISO ELEMENTAI ②
- ZHURMA/VIBRIMI
- 1764
Brand : SKIL
Model : 1764 AK
Category : Drill