
2431 AD - Drill SKIL - Free user manual and instructions
Find the device manual for free 2431 AD SKIL in PDF.


| Product Type | Cordless Drill Driver |
| Brand | Skil |
| Model | 2431 AD |
| Rated Voltage | 18 V |
| Battery Type | Lithium-Ion |
| Battery Capacity | 1.5 Ah |
| No-load Speed (1st Gear) | 0 - 450 rpm |
| No-load Speed (2nd Gear) | 0 - 1600 rpm |
| Max Torque | 30 Nm |
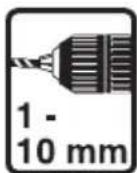
| Chuck | Keyless, 1 - 10 mm |
| Max Drilling Diameter in Wood | 25 mm |
| Max Drilling Diameter in Metal | 10 mm |
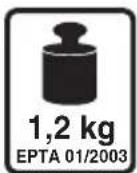
| Weight (without battery) | 1.2 kg |
| Dimensions (L x W x H) | 220 x 180 x 60 mm |
| Power Supply | 18 V Li-Ion Battery |
| Main Functions | Drilling, screwdriving, variable speed, reverse rotation, LED light |
| Maintenance and Cleaning | Clean with a dry, soft cloth. Do not use solvents or abrasive products. |
| Safety | Spindle lock, automatic overload shutdown, child safety (trigger lock) |
| Spare Parts and Repairability | Battery, charger, chuck, motor brushes available. Repairable by a professional. |
| General Information | 2-year warranty, CE certification, compatible with Skil QC18 charger |
Frequently Asked Questions - 2431 AD SKIL
User questions about 2431 AD SKIL
0 question about this device. Answer the ones you know or ask your own.
Ask a new question about this device
Download the instructions for your Drill in PDF format for free! Find your manual 2431 AD - SKIL and take your electronic device back in hand. On this page are published all the documents necessary for the use of your device. 2431 AD by SKIL.
USER MANUAL 2431 AD SKIL
natural_image
Illustration of a SKIL electric drill putter with handle and control buttons (no text or symbols on body)
GB ORIGINAL INSTRUCTIONS 6
F NOTICE ORIGINALE 9
D ORIGINALBETRIEBSANLEITUNG 13
NL ORIGINELE GEBRUIKSAANWIJZING 18
S BRUKSANVISNING I ORIGINAL 22
DK ORIGINAL BRUGSANVISNING 25
N ORIGINAL BRUKSANVISNING 29
FIN ALKUPERÄISET OHJEET 33
E MANUAL ORIGINAL 36
P MANUAL ORIGINAL 41
I ISTRUZIONI ORIGINALI 45
H EREDETI HASZNÁLATI UTASÍTÁS 49
CZ PÚVODNÍM NÁVODEM K POUŽÍVÁNÍ 53
TR ORIJINAL İŞLETME TALİMATI 57
PL INSTRUKCJA ORYGINALNA 60
UA ОРИГІНАЛЬНА ІНСТРУКЦІЯ
З ЕКСПЛУАТАЦІЇ 65
GR ΠΡΩΤΟΥΠΟ ΟΔΗΓΙΩΝ ΧΡΗΣΗΣ
RO INSTRUCTIUNI DE FOLOSIRE 69
ORIGINALE 74
BG ОРИГИНАЛНО РЪКОВОДСТВО
ЗА ЕКСПЛОАТАЦИЯ 78
SK PÔVODNÝ NÁVOD NA POUŽITIE 82
HR ORIGINALNE UPUTE ZA RAD 86
SRB ORIGINALNO UPUTSTVO ZA RAD 90
SLO IZVIRNA NAVODILA 94
EST ALGUPÄRANE KASUTUSJUHEND 97
LV ORIGINALA LIETOŠANAS PAMACIBA 101
LT ORIGINALI INSTRUKCIJA 105
МК ИЗВОРНО УПАТСТВО ЗА РАБОТА 109
AL UDHËZIMET ORIGJINALE 114
AR دليل الاستعمال 123
④ RAHENMAI AUSLI 121
www.skil.com

① 2431



②

natural_image
Icon of a person reading a book inside a circle, with number 3 above (no text or symbols)
natural_image
Simple line drawing of a house with a numbered circle (4) above it, no text or symbols present.
natural_image
Simple geometric diagram with two concentric squares, one circled in blue (no text or symbols)


10

natural_image
Line drawing of a hairdryer with a power outlet and sun symbol (no text or labels)


flowchart
graph TD
    A["Step 1: Turning"] --> B["Step 2: Lock"]
    B --> C["Step 3: Rolling"]
    C --> D["Step 4: Rotation"]
    D --> E["End"]

14


15
16

natural_image
Line drawing of a handheld electric drill press (no text or symbols)GB
Cordless drill/driver 2431
INTRODUCTION
- This tool is intended for drilling in wood, metal, ceramic and plastic; tools with electronic speed control and left/right rotation are also suitable for screwdriving and thread cutting
• This tool is not intended for professional use - The light of this power tool is intended to illuminate the power tool's direct area of working operation and is not suitable for household room illumination
- Read and save this instruction manual ③
TECHNICAL DATA①
Max. torque for hard screwdriving application according to ISO 5393 : 38 Nm
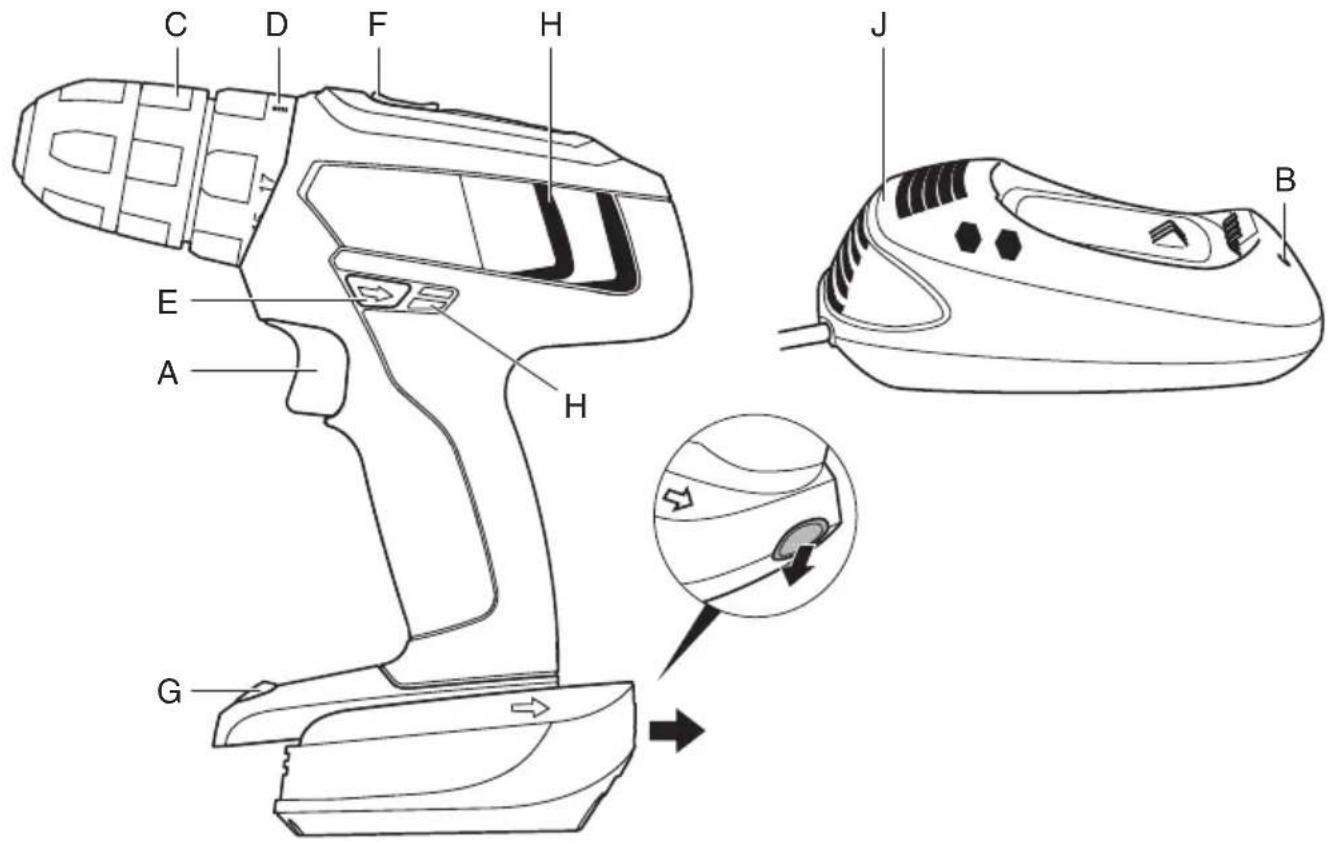
TOOL ELEMENTS ②
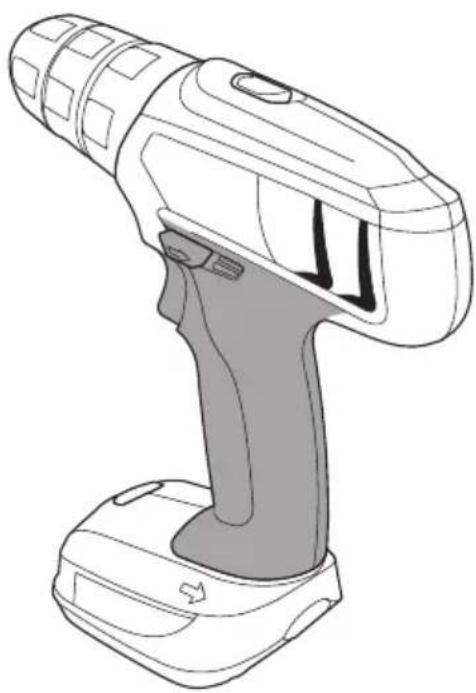
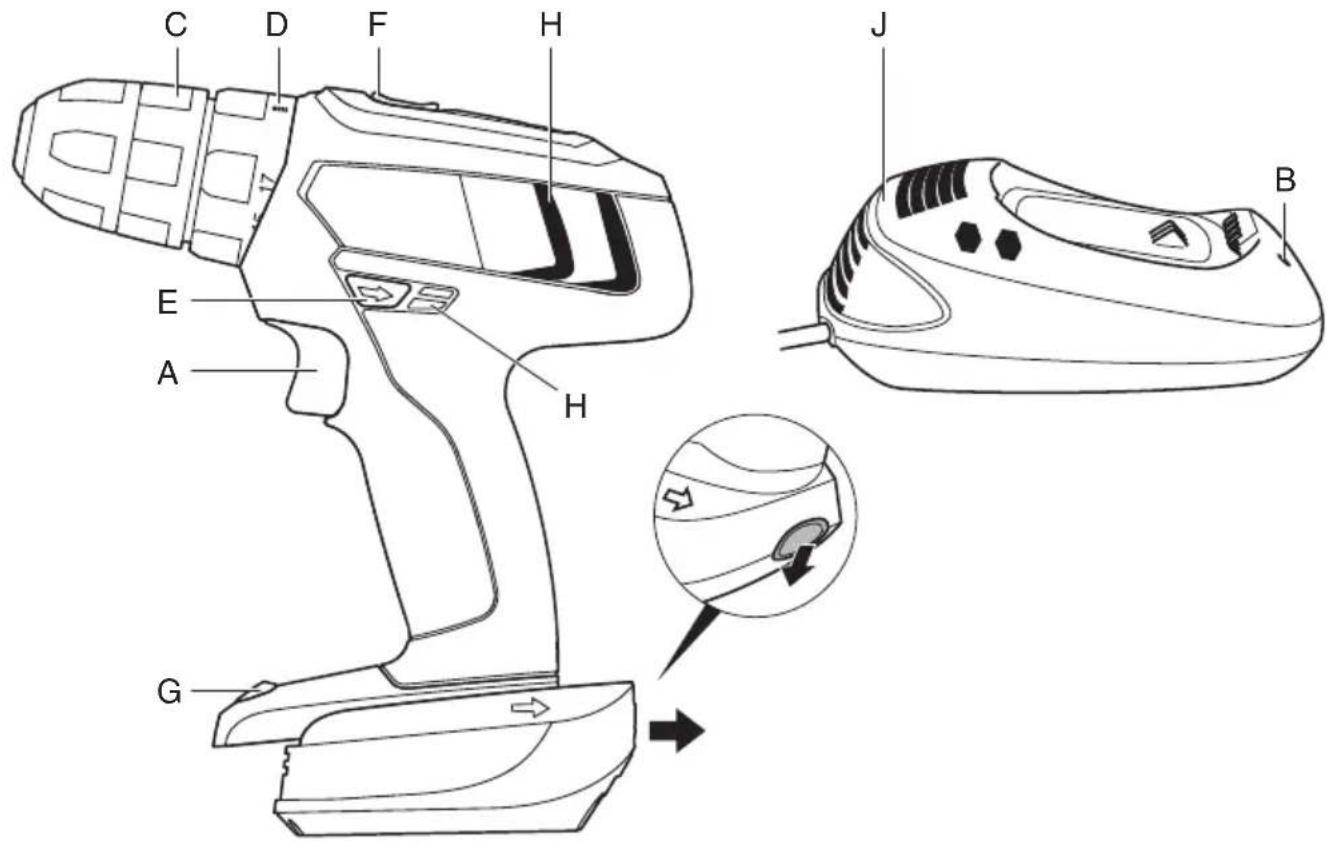
A Switch for on/off and speed control
B Green charging light
C Ring for torque control
D Lock-position (clutch)
E Switch for changing direction of rotation
F Gear selector
G Spot light
H Ventilation slots
J Charger
SAFETY
GENERAL SAFETY INSTRUCTIONS
WARNING! Read all safety warnings and all instructions. Failure to follow the warnings and instructions may result in electric shock, fire and/or serious injury. Save all warnings and instructions for future reference. The term "power tool" in the warnings refers to your mains-operated (corded) power tool or battery-operated (cordless) power tool.
1) WORK AREA SAFETY
a) Keep work area clean and well lit. Cluttered or dark areas invite accidents.
b) Do not operate power tools in explosive atmospheres, such as in the presence of flammable liquids, gases or dust. Power tools create sparks which may ignite the dust or fumes.
c) Keep children and bystanders away while operating a power tool. Distractions can cause you to lose control.
2) ELECTRICAL SAFETY
a) Power tool plugs must match the outlet. Never modify the plug in any way. Do not use any adapter plugs with earthed (grounded) power tools.
Unmodified plugs and matching outlets will reduce risk of electric shock.
b) Avoid body contact with earthed or grounded surfaces such as pipes, radiators, ranges and refrigerators. There is an increased risk of electric shock if your body is earthed or grounded.
c) Do not expose power tools to rain or wet conditions. Water entering a power tool will increase the risk of electric shock.
d) Do not abuse the cord. Never use the cord for carrying, pulling or unplugging the power tool. Keep cord away from heat, oil, sharp edges or moving parts. Damaged or entangled cords increase the risk of electric shock.
e) When operating a power tool outdoors, use an extension cord suitable for outdoor use. Use of a cord suitable for outdoor use reduces the risk of electric shock.
f) If operating a power tool in a damp location is unavoidable, use a residual current device (RCD) protected supply. Use of an RCD reduces the risk of electric shock.
a) Stay alert, watch what you are doing and use common sense when operating a power tool. Do not use a power tool while you are tired or under the influence of drugs, alcohol or medication. A moment of inattention while operating power tools may result in serious personal injury.
b) Use personal protective equipment. Always wear eye protection. Protective equipment such as dust mask, non-skid safety shoes, hard hat, or hearing protection used for appropriate conditions will reduce personal injuries.
c) Prevent unintentional starting. Ensure the switch is in the off-position before connecting to power source and/or battery pack, picking up or carrying the tool. Carrying power tools with your finger on the switch or energising power tools that have the switch on invites accidents.
d) Remove any adjusting key or wrench before turning the power tool on. A wrench or a key left attached to a rotating part of the power tool may result in personal injury.
e) Do not overreach. Keep proper footing and balance at all times. This enables better control of the power tool in unexpected situations.
f) Dress properly. Do not wear loose clothing or jewelry. Keep your hair, clothing and gloves away from moving parts. Loose clothes, jewelry or long hair can be caught in moving parts.
g) If devices are provided for the connection of dust extraction and collection facilities, ensure these are connected and properly used. Use of dust collection can reduce dust-related hazards.
a) Do not force the power tool. Use the correct power tool for your application. The correct power tool will do the job better and safer at the rate for which it was designed.
b) Do not use the power tool if the switch does not turn it on and off. Any power tool that cannot be controlled with the switch is dangerous and must be repaired.
c) Disconnect the plug from the power source and/or the battery pack from the power tool before making any adjustments, changing accessories, or storing power tools. Such preventive safety measures reduce the risk of starting the power tool accidentally.
3) PERSONAL SAFETY
4) POWER TOOL USE AND CARE
d) Store idle power tools out of the reach of children and do not allow persons unfamiliar with the power tool or these instructions to operate the power tool. Power tools are dangerous in the hands of untrained users.
e) Maintain power tools. Check for misalignment or binding of moving parts, breakage of parts and any other condition that may affect the power tool's operation. If damaged, have the power tool repaired before use. Many accidents are caused by poorly maintained power tools.
f) Keep cutting tools sharp and clean. Properly maintained cutting tools with sharp cutting edges are less likely to bind and are easier to control.
g) Use the power tool, accessories and tool bits etc., in accordance with these instructions, taking into account the working conditions and the work to be performed. Use of the power tool for operations different from those intended could result in a hazardous situation.
5) BATTERY TOOL USE AND CARE
a) Recharge only with the charger specified by the manufacturer. A charger that is suitable for one type of battery pack may create a risk of fire when used with another battery pack.
b) Use power tools only with specifically designated battery packs. Use of any other battery packs may create a risk of injury and fire.
c) When battery pack is not in use, keep it away from other metal objects like paper clips, coins, keys, nails, screws, or other small metal objects that can make a connection from one terminal to another. Shorting the battery terminals together may cause burns or a fire.
d) Under abusive conditions, liquid may be ejected from the battery; avoid contact. If contact accidentally occurs, flush with water. If liquid contacts eyes, additionally seek medical help. Liquid ejected from the battery may cause irritation or burns.
6) SERVICE
a) Have your power tool serviced by a qualified repair person using only identical replacement parts. This will ensure that the safety of the power tool is maintained.
SAFETY INSTRUCTIONS FOR CORDLESS DRILL/DRIVERS
PERSONAL SAFETY
- Do not work materials containing asbestos (asbestos is considered carcinogenic)
- Dust from material such as paint containing lead, some wood species, minerals and metal may be harmful (contact with or inhalation of the dust may cause allergic reactions and/or respiratory diseases to the operator or bystanders); wear a dust mask and work with a dust extraction device when connectable
- Certain kinds of dust are classified as carcinogenic (such as oak and beech dust) especially in conjunction with additives for wood conditioning; wear a dust mask and work with a dust extraction device when connectable
- Follow the dust-related national requirements for the materials you want to work with
- The tool/charger is not intended for use by persons (including children) with reduced physical, sensory or mental capabilities, or lack of experience and knowledge, unless they have been given supervision or instruction concerning use of the tool/charger by a person responsible for their safety
- Ensure that children do not play with the tool/charger
- Ensure that switch E ② is in the middle (locking) position before making any adjustments or changing accessories as well as when carrying or storing the tool
ACCESSORIES
- Only use SKIL charger 2607225575 (U.K. 2607225577) and SKIL battery pack(s) 2607337035 with this tool
- SKIL can assure flawless functioning of the tool only when original accessories are used
- Use only accessories with an allowable speed matching at least the highest no-load speed of the tool
BEFORE USE
- Always check that the supply voltage is the same as the voltage indicated on the nameplate of the charger
- Avoid damage that can be caused by screws, nails and other elements in your workpiece; remove them before you start working
- Use suitable detectors to find hidden utility lines or call the local utility company for assistance (contact with electric lines can lead to fire or electrical shock; damaging a gas line can result in an explosion; penetrating a water pipe will cause property damage or an electrical shock)
- Secure the workpiece (a workpiece clamped with clamping devices or in a vice is held more securely than by hand)
DURING USE
- Hold power tool by insulated gripping surfaces, when performing an operation where the cutting accessory or fastener may contact hidden wiring (cutting accessory and fasteners contacting a "live" wire may make exposed metal parts of the power tool "live" and could give the operator an electric shock)
- In case of electrical or mechanical malfunction, immediately switch off the tool or unplug charger from power source
CHARGING/BATTERIES
- Charge battery only with the charger that is supplied with the tool
- Do not touch the contacts in the charger
- Do not expose tool/charger/battery to rain
- Do not charge battery in damp or wet environments
- Do not use charger when damaged; take it to one of the officially registered SKIL Service Stations for a safety check
- Do not use charger when cord or plug is damaged; cord or plug should be replaced immediately at one of the officially registered SKIL Service Stations
- Do not disassemble charger or battery
- Do not use battery when damaged; it should be replaced immediately
- Do not attempt to recharge non-rechargeable batteries with the charger
- Permitted ambient temperature (tool/charger/battery):
-when charging 0...+45°C
-during operation -20...+50^
-during storage -20...+50°C
EXPLANATION OF SYMBOLS ON CHARGER/BATTERY
③ Read the instruction manual before use
④ Only use the charger indoors
⑤ Double insulation (no earth wire required)
⑥ Batteries may explode when disposed of in fire, so do not burn battery for any reason
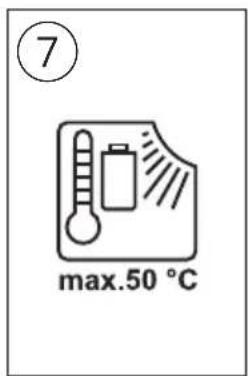
⑦ Store tool/charger/battery in locations where temperature will not exceed 50°C
⑧ Do not dispose of the charger together with household waste material
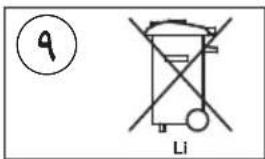
⑨ Do not dispose of the battery together with household waste material
WHEN CONNECTING NEW 3-PIN PLUG (U.K. ONLY):
- Do not connect the blue (= neutral) or brown (= live) wire in the cord of the charger to the earth terminal of the plug
- If for any reason the old plug is cut off the cord of the charger, it must be disposed of safely and not left unattended
USE
- Combined switch for on/off and speed control A ② Control the speed steplessly from zero to maximum by putting less or more pressure on the trigger
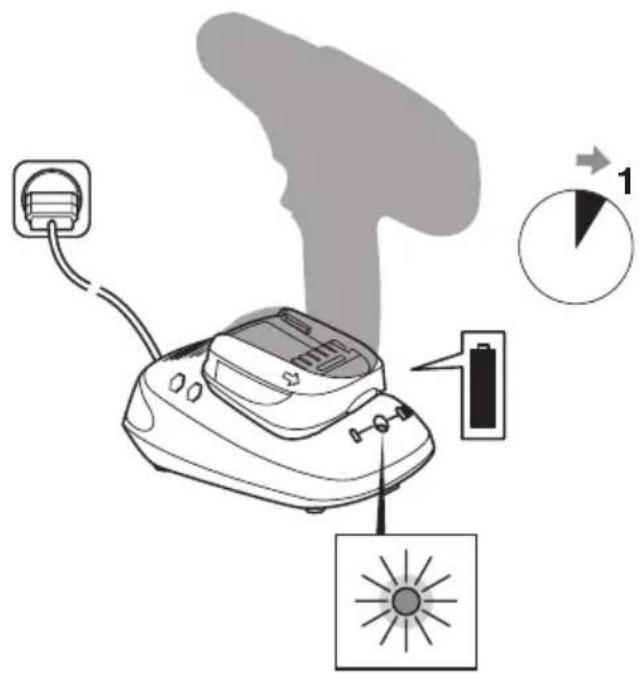
- Charging battery ⑩ -connect charger to power source as illustrated -green light B will turn on indicating that the charger is ready for operation -insert battery into charger as illustrated !the battery can also remain in the tool while charging; in that case the tool cannot be switched on -green light B will blink indicating that the battery is being charged -after approximately 1 hour the battery is fully charged and green light B stays on after blinking !remove battery from charger after charging period has ended thereby lengthening the service life of the battery
IMPORTANT:
-if green light B does not blink after inserting a battery, this may mean:
1) that the battery is too cold or too hot (charger only charges batteries when its temperature is between 0^ C and 45^ C)
2) that the battery should be replaced
-the lithium-ion battery can be charged at any time (interrupting the charging procedure does not damage the battery)
-the lithium-ion battery does not have to be empty before charging (no "memory-effect" as with nickel-cadmium batteries)
-while charging, the charger and the battery may become warm to touch; this is normal and does not indicate a problem
-ensure that the outside surface of the battery is clean and dry before inserting into charger
-do not remove battery from tool while it is running
-if you anticipate long periods of non-use for the tool, it is best to unplug the charger from its power source
-when the lithium-ion battery is empty, the tool is switched off automatically
-a significantly reduced working period after charging indicates that the battery is worn out and should be replaced
- Changing direction of rotation ⑪
-when not properly set in left/right position, switch A② cannot be activated
!change direction of rotation only when tool is at a complete standstill
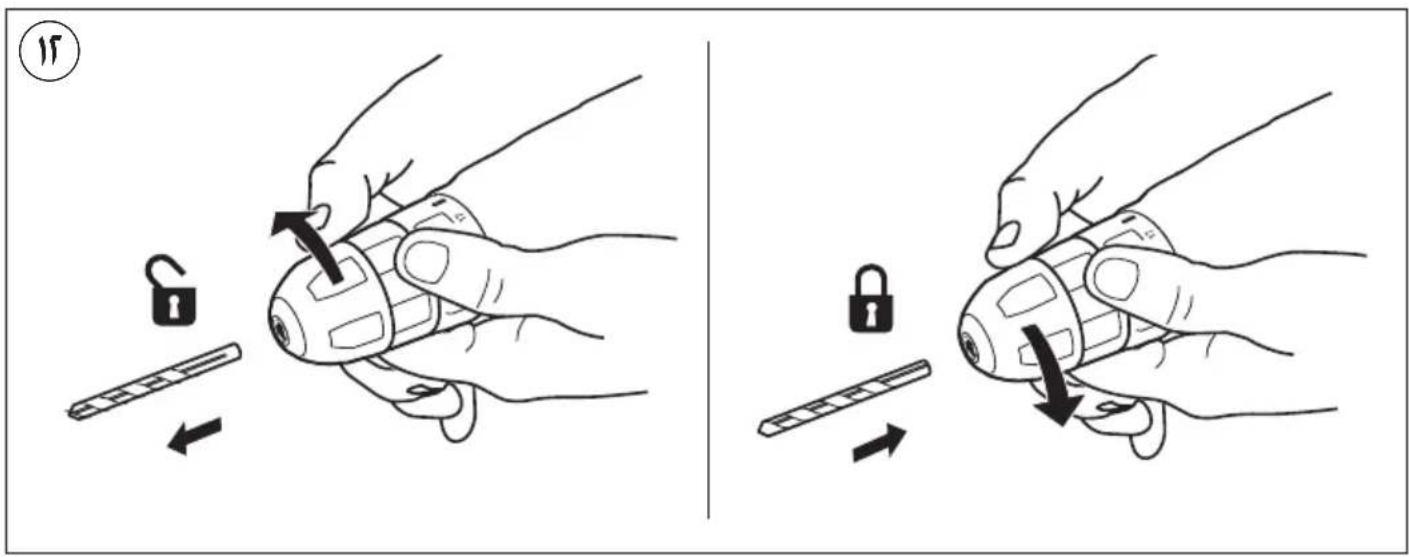
- Changing drill bits ⑫
-insert the bit as deep as possible in the chuck
-use screw bits in combination with a bitholder !do not use bits with a damaged shank !only use sharp bits
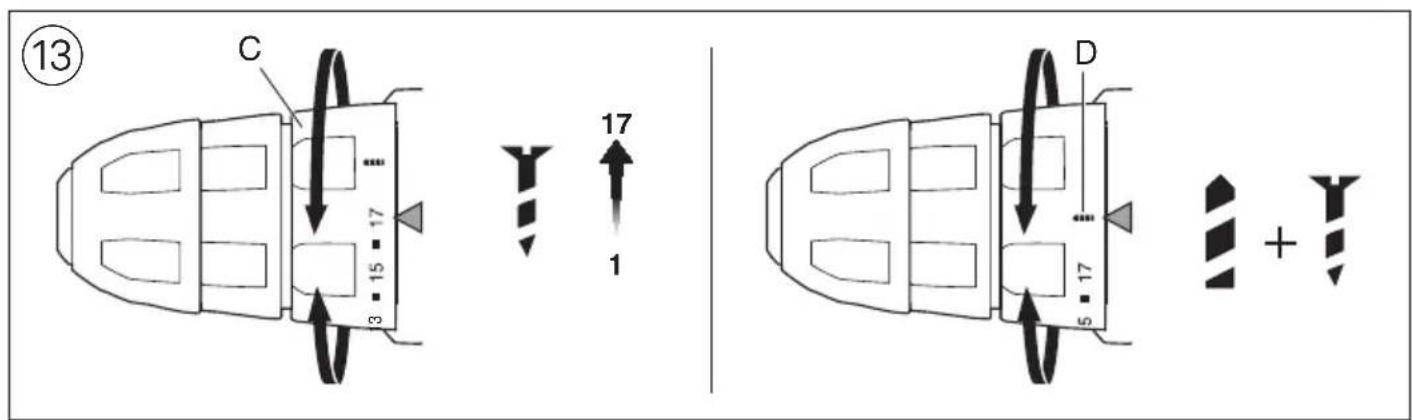
- Torque control (VariTorque) ⑬
-output torque will increase as clutch ring C is rotated from 1 to 17; position D will lock up the clutch to permit drilling or driving heavy duty work
-when turning in a screw, first try VariTorque position 1 and increase until the desired depth has been reached
• Mechanical gear selection ⑭
-set selector F to desired speed !actuate the gear selector while tool is running slowly
LOW
-high torque
-for screwdriving and drilling large diameters
-for tapping thread
HIGH
-lower torque
-for drilling small diameters
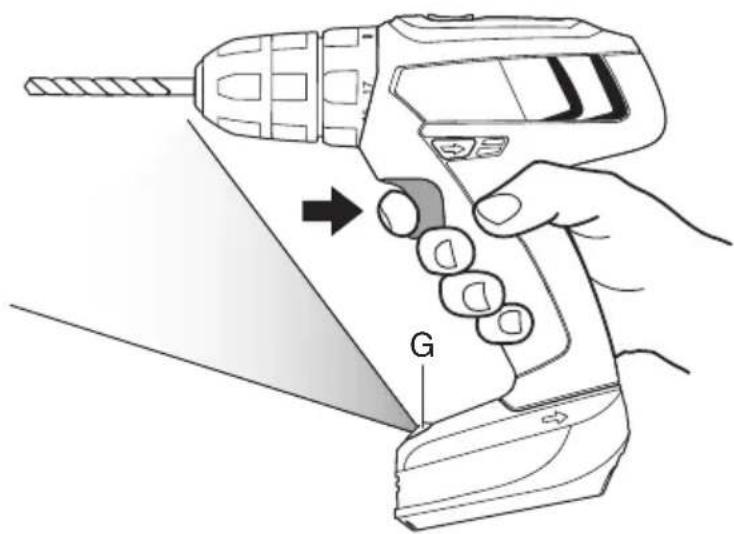
- Spot light G ⑮
Spot light G automatically lights on when activating switch A ②
- Battery protection (spot light G ② will flash rapidly)
Switches off the tool or reduces the speed or prevents the tool from being switched on, when
-the load is too high
-the battery temperature is not within the allowable range
-the battery is empty
!do not continue to press the on/off switch after the tool is switched off automatically; battery may be damaged
- Holding and guiding the tool ⑯
!while working, always hold the tool at the grey-coloured grip area(s)
-keep ventilation slots H② uncovered
-do not apply too much pressure on the tool; let the tool do the work for you
APPLICATION ADVICE
- When drilling ferrous metals
-pre-drill a smaller hole, when a large hole is required -lubricate drill bit occasionally with oil - When turning in a screw at/near the cross cut end or an edge of wood, pre-drill a hole in order to avoid cracking of the wood
- For an optimal use of the tool a steady pressure on the screw is required, especially while removing
- When screwdriving in hard wood one should pre-drill a hole
MAINTENANCE / SERVICE
• This tool is not intended for professional use
- Keep tool and charger clean
-clean charging contacts in charger with alcohol or contact cleaner
!unplug charger from power source before cleaning
- If the tool/charger should fail despite the care taken in manufacturing and testing procedures, repair should be carried out by an after-sales service centre for SKIL power tools
- send the tool or charger undismantled together with proof of purchase to your dealer or the nearest SKIL service station (addresses as well as the service diagram of the tool are listed on www.skil.com)
- in case of a defective charger send both charger and battery to your dealer or the SKIL service station
ENVIRONMENT
- Do not dispose of electric tools, accessories and packaging together with household waste material (only for EU countries)
-in observance of European Directive 2012/19/EC on waste of electric and electronic equipment and its implementation in accordance with national law, electric tools that have reached the end of their life must be collected separately and returned to an environmentally compatible recycling facility symbol⑧ will remind you of this when the need for disposing occurs
- The battery must be kept separate from the natural environment and should not be disposed of as normal domestic waste (symbol ⑨ will remind you of this when the need for disposing occurs)
!prior to disposal protect battery terminals with heavy tape to prevent short-circuit
CE DECLARATION OF CONFORMITY
Cordless drill/driver 2431
Technical data①
- We declare under our sole responsibility that the product described under "Technical data" is in conformity with the following standards or standardization documents: EN 60745 (tool), EN 60335 (charger), EN 61000, EN 55014, in accordance with the provisions of the directives 2006/42/EC, 2014/35/EU, 2014/30/EU, 2011/65/EU, 2009/125/EC (EU regulation 1194/2012)
• Technical file at: SKIL Europe BV (PT-SEU/ENG1), 4825 BD Breda, NL
Operations & Engineering
Olaf Dijkgraaf
Approvals Manager

SKIL Europe BV, 4825 BD Breda, NL
15.12.2014
NOISE/VIBRATION
- Measured in accordance with EN 60745 the sound pressure level of this tool is <70 dB(A) (standard deviation: 3 dB) and the vibration <2.5 m/s ^2 (triax vector sum; uncertainty K = 1.5 m/s ^2 )
- The vibration emission level has been measured in accordance with a standardised test given in EN 60745; it may be used to compare one tool with another and as a preliminary assessment of exposure to vibration when using the tool for the applications mentioned
- using the tool for different applications, or with different or poorly maintained accessories, may significantly increase the exposure level
- the times when the tool is switched off or when it is running but not actually doing the job, may significantly reduce the exposure level
!protect yourself against the effects of vibration by maintaining the tool and its accessories, keeping your hands warm, and organizing your work patterns
F
Perceuse/visseuse sans fil 2431
INTRODUCTION
Operations & Engineering
Olaf Dijkgraaf
Approvals Manager


SKIL Europe BV, 4825 BD Breda, NL
15.12.2014
BRUIT/VIBRATION
Operations & Engineering
Olaf Dijkgraaf
Approvals Manager

SKIL Europe BV, 4825 BD Breda, NL
15.12.2014
GELUID/VIBRATIE
Operations & Engineering
Olaf Dijkgraaf
Approvals Manager

SKIL Europe BV, 4825 BD Breda, NL
15.12.2014
ST∅J/VIBRATION
1) SIKKERHET PÅ ARBEIDSPLASSEN
VEDLIKEHOLD / SERVICE
Operations & Engineering
Olaf Dijkgraaf
Approvals Manager


SKIL Europe BV, 4825 BD Breda, NL
15.12.2014
ST∅Y/VIBRASJON
Operations & Engineering
Olaf Dijkgraaf
Approvals Manager


SKIL Europe BV, 4825 BD Breda, NL 15.12.2014
RUIDOS/VIBRACIONES
Operations & Engineering
Olaf Dijkgraaf
Approvals Manager

SKIL Europe BV, 4825 BD Breda, NL
15.12.2014
RUÍDO/VIBRAÇÕES
Operations & Engineering
Olaf Dijkgraaf
Approvals Manager
SKIL Europe BV, 4825 BD Breda, NL 15.12.2014
Operations & Engineering
Approvals Manager


SKIL Europe BV, 4825 BD Breda, NL
15.12.2014
ZAJ/REZGÉS
Operations & Engineering
Olaf Dijkgraaf
Approvals Manager

SKIL Europe BV, 4825 BD Breda, NL
15.12.2014
HLUČNOSTI/VIBRACÍ
Operations & Engineering
Olaf Dijkgraaf
Approvals Manager


SKIL Europe BV, 4825 BD Breda, NL 15.12.2014
GÜRÜLTÜ/TİTREŞIM
Operations & Engineering
Olaf Dijkgraaf
Approvals Manager

SKIL Europe BV, 4825 BD Breda, NL
15.12.2014
HAŁASU/WIBRACJE
Operations & Engineering
Olaf Dijkgraaf
Approvals Manager

SKIL Europe BV, 4825 BD Breda, NL
15.12.2014
ΘΟΡΥΒΟ/ΚΡΑΔΑΣΜΟΥΣ
Operations & Engineering
Olaf Dijkgraaf
Approvals Manager

SKIL Europe BV, 4825 BD Breda, NL
15.12.2014
ZGOMOT/VIBRATII
Operations & Engineering
Olaf Dijkgraaf
Approvals Manager

SKIL Europe BV, 4825 BD Breda, NL 15.12.2014
HLUKU/VIBRÁCIÁCH
Operations & Engineering
Olaf Dijkgraaf
Approvals Manager

SKIL Europe BV, 4825 BD Breda, NL
15.12.2014
BUKA/VIBRACIJE
- Mereno u skladu sa EN 60745 nivo pritiska zvuka ovog alata iznosi <70 dB(A) (normalno odstupanje: 3 dB) a vibracija <2,5 m/s ^2 (zbir vektora tri pravca; nesigurnost K = 1,5 m/s ^2 )
- Nivo emisije vibracija izmeren je u skladu sa standardizovanim testom datim u EN 60745; on se može koristiti za upoređenje jedne alatke sa drugom, kao i za preliminarnu procenu izloženosti vibracijama pri korišćenju ove alatke za pomenute namene -korišćenje alatke u drugačije svrhe ili sa drugačijim ili slabo održavanim nastavcima može značajno povećati nivo izloženosti
-vreme kada je alatka isključena ili kada je uključena, ali se njome ne radi, može značajno smanjiti nivo izloženosti
!zaštitite se od posledica vibracija održavanjem alatke i njenih nastavaka, održavajući Vaše ruke toplim i organizovanjem Vaših radnih obrazaca

Akumulatorski vrtalnik/vijačnik 2431 UVOD
Operations & Engineering
Olaf Dijkgraaf
Approvals Manager


SKIL Europe BV, 4825 BD Breda, NL 15.12.2014
HRUP/VIBRACIJA
ÜLDISED OHUTUSJUHISED
APKALPOŠANA / APKOPE
TECHNINIAI DUOMENYS ①
Operations & Engineering
Olat Dijkgraaf
Approvals Manager
SKIL Europe BV, 4825 BD Breda, NL
15.12.2014
TRIUKŠMINGUMAS/VIBRACIJA
Operations & Engineering
Olaf Dijkgraaf
Approvals Manager

SKIL Europe BV, 4825 BD Breda, NL 15.12.2014
БУЧАВА/ВИБРАЦИИ
Operations & Engineering
Olaf Dijkgraaf
Approvals Manager

SKIL Europe BV, 4825 BD Breda, NL
15.12.2014
ZHURMA/VIBRIMI
17
natural_image
Line drawing of a handheld electric drill press (no text or symbols)
flowchart
graph TD
    A["Step 1: Turning"] --> B["Step 2: Lock"]
    B --> C["Step 3: Rolling"]
    C --> D["Step 4: Rotation"]
    D --> E["End"]



natural_image
Line drawing of a portable electric fan with a power outlet and a sun icon below (no text or symbols)

1
2431





1


natural_image
Simple geometric diagram with two nested squares inside a rectangle, no text or symbols present.

متقاب لاسلكي امfk
2431
SKIL®

natural_image
Illustration of a SKIL electric drill with handle and control buttons (no text or symbols on the device body)



- ① 2431
- ②
- GB
- Cordless drill/driver 2431
- INTRODUCTION
- TECHNICAL DATA①
- TOOL ELEMENTS ②
- SAFETY
- GENERAL SAFETY INSTRUCTIONS
- 1) WORK AREA SAFETY
- 2) ELECTRICAL SAFETY
- 3) PERSONAL SAFETY
- 4) POWER TOOL USE AND CARE
- 5) BATTERY TOOL USE AND CARE
- 6) SERVICE
- SAFETY INSTRUCTIONS FOR CORDLESS DRILL/DRIVERS
- PERSONAL SAFETY
- ACCESSORIES
- BEFORE USE
- DURING USE
- CHARGING/BATTERIES
- EXPLANATION OF SYMBOLS ON CHARGER/BATTERY
- WHEN CONNECTING NEW 3-PIN PLUG (U.K. ONLY):
- USE
- IMPORTANT:
- APPLICATION ADVICE
- MAINTENANCE / SERVICE
- ENVIRONMENT
- CE DECLARATION OF CONFORMITY
- NOISE/VIBRATION
- F
- Perceuse/visseuse sans fil 2431
- BRUIT/VIBRATION
- GELUID/VIBRATIE
- ST∅J/VIBRATION
- 1) SIKKERHET PÅ ARBEIDSPLASSEN
- VEDLIKEHOLD / SERVICE
- ST∅Y/VIBRASJON
- RUIDOS/VIBRACIONES
- RUÍDO/VIBRAÇÕES
- ZAJ/REZGÉS
- HLUČNOSTI/VIBRACÍ
- GÜRÜLTÜ/TİTREŞIM
- HAŁASU/WIBRACJE
- ΘΟΡΥΒΟ/ΚΡΑΔΑΣΜΟΥΣ
- ZGOMOT/VIBRATII
- HLUKU/VIBRÁCIÁCH
- BUKA/VIBRACIJE
- Akumulatorski vrtalnik/vijačnik 2431 UVOD
- HRUP/VIBRACIJA
- ÜLDISED OHUTUSJUHISED
- APKALPOŠANA / APKOPE
- TECHNINIAI DUOMENYS ①
- TRIUKŠMINGUMAS/VIBRACIJA
- БУЧАВА/ВИБРАЦИИ
- ZHURMA/VIBRIMI
- 2431
Brand : SKIL
Model : 2431 AD
Category : Drill