
DAV-D150E - Home Theater System SONY - Free user manual and instructions
Find the device manual for free DAV-D150E SONY in PDF.


| Product Type | Home Theater System |
| Brand | Sony |
| Model | DAV-D150E |
| Main Functions | DVD player, amplifier, FM/AM tuner, 5.1 channel surround sound |
| Audio Output | 5.1 channels (front, center, surround, subwoofer) |
| Total Power Output | Approx. 500 W (RMS) |
| Playable Discs | DVD, CD, MP3, JPEG, Video CD |
| Radio Tuner | FM/AM with presets |
| Inputs | 1× Audio In, 1× Optical, 1× Coaxial, 1× USB |
| Outputs | Component Video, Composite Video, Audio (Front, Center, Surround), Subwoofer |
| Dimensions (Main Unit) | Approx. 430 × 78 × 310 mm (W×H×D) |
| Weight (Main Unit) | Approx. 3.8 kg |
| Speaker Dimensions (Front) | Approx. 200 × 900 × 200 mm (W×H×D) each |
| Speaker Weight (Front) | Approx. 3.0 kg each |
| Subwoofer Dimensions | Approx. 200 × 400 × 350 mm (W×H×D) |
| Subwoofer Weight | Approx. 5.0 kg |
| Power Consumption | Approx. 100 W (standby: < 0.5 W) |
| Power Supply | AC 220-240 V, 50/60 Hz |
| Remote Control | Included (RM-ED001) |
| Safety Features | Automatic standby after idle, overheat protection |
| Cleaning & Maintenance | Use a soft dry cloth; avoid chemicals; clean disc lens with a CD lens cleaner |
| Spare Parts & Repairability | Contact Sony service center for replacement speakers, remote, or lens |
Frequently Asked Questions - DAV-D150E SONY
User questions about DAV-D150E SONY
0 question about this device. Answer the ones you know or ask your own.
Ask a new question about this device
Download the instructions for your Home Theater System in PDF format for free! Find your manual DAV-D150E - SONY and take your electronic device back in hand. On this page are published all the documents necessary for the use of your device. DAV-D150E by SONY.
USER MANUAL DAV-D150E SONY
DVD/VCR-Receiver Heimkinosystem
Operating Instructions GB


SHOWVIEW®



DAV-D150E
den DVD/VCR-Receiver 11
Instant Timer Recording (ITR) 25
natural_image
Diagram showing two types of electrical connectors: one with a switch and another connected to a power outlet (no text or symbols present)
OPR (Optimum Picture Response):
Instant Timer Recording (ITR)
natural_image
Black-and-white landscape photo of a rugged mountain range under a cloudy sky (no text or symbols visible)Tipps
Check the following guide for the possible cause of a problem before contacting service.
SHOWVIEW is a registered trademarks of Gemstar Development Corporation. The SHOWVIEW System is manufactured under license from Gemstar Development Corporation.
Contenidos
INTRODUCCIÓN
natural_image
Diagram showing two connected electrical connectors with a close-up view of the connector (no text or symbols present)
AV 3 for recording from AV3 sockets (analog audio) on the front of your DVD/VCR receiver.
natural_image
Black-and-white landscape photo of a rugged mountain range under a cloudy sky (no text or symbols visible)Sugerencia
GP Guadalupe (French)
GQ Guinea Ecuatorial
GR Grecia
GS S. Georgia y S.
Sandwich Bermuda
GT Guatemala
GU Guam (EEUU)
GW Guinea Bissau
GY Guyana
HK Hong Kong
MQ Martinique (French)
MR Mauritar
MS Montserrat
MT Malta
MU Mauricio
MV Maldiva
MW Malawi
MX México
MY Malasia
MZ Mozambique
NA Namibia
PF Polinesia (French)
Cable coaxial RF 75-ohmios ....1
DVD/VCR Receiver Home Theatre System
Operating Instructions.
GB




SHOWVIEW®


DAV-D150E
Safety Precautions
WARNING
To prevent fire or shock hazard, do not expose the unit to rain or moisture.
To avoid electrical shock, do not open the cabinet. Refer servicing to qualified personnel only.
The mains lead must only be changed at a qualified service shop.
To prevent fire, do not Cover the ventilation of the apparatus with news papers, table-cloths, curtains, etc. And don't place lighted candles on the apparatus.
AC power cord must be changed only at the qualified service shop.
Don't throw away the battery with general house waste, dispose of it correctly as chemical waste.

This appliance is classified as a CLASS 1 LASER product. The CLASS 1 LASER PRODUCT MARKING is located on the rear exterior.

This product is manufactured to comply with the radio interference requirements of EEC
DIRECTIVE 89/336/EEC, 93/68/EEC and 73/23/EEC.
Precautions
Safety
- This unit operates on 230 V AC, 50/60 Hz. Check that the unit's operating voltage is identical with your local power supply.
- To prevent fire or shock hazard, do not place objects filled with liquids, such as vases, on the apparatus.
- The DVD/VCR Receiver is not disconnected from the AC power source (mains) as log as it is connected to the wall outlet, even if the player itself has been turned off.
Installing
- Do not install the appliance in a confined space, such as a bookcase or built-in cabinet.
- Do not install the unit in an inclined position. It is designed to be operated in a horizontal or vertical position only.
- Keep the unit, cassettes and discs away from equipment with strong magnets, such as microwave ovens, or large loudspeakers.
- Do not place heavy objects on the unit.
- Do not place the unit on surfaces (rug, blanket, etc.) or near materials (curtains, draperies) that may block the ventilation slots.
CAUTION
For use of the VIDEO
Television programmes, films, video tapes and other materials may be copyrighted.
Unauthorized recording of such material may be contrary to the provisions of the copyright laws.
Also, use of this recorder with cable television transmission may require authorization from the cable television transmitter and/or program owner.
For use of the DVD player
This product incorporates copyright protection technology that is protected by method claims of certain U.S. patents, other intellectual property rights owned by Macrovision Corporation, and other rights owners. Use of this copyright protection technology must be authorized by Macrovision Corporation, and is intended for home and other limited viewing uses only unless otherwise otherwise authorized by Macrovision Corporation. Reverse engineering or disassembly is prohibited.
Welcome!
Thank you for purchasing Sony Home Theatre System. Before operating this system, please read this manual thoroughly and retain it for future reference.
SHOWVIEW®
SHOWVIEW is a registered trademarks of Gemstar Development Corporation. The SHOWVIEW System is manufactured under license from Gemstar Development Corporation.
Table of Contents
INTRODUCTION
Safety Precautions 2
Table of Contents 3
Before Use 4-5
Playable Discs 4
Precautions 5
Notes on Discs 5
About Symbols 5
Selecting the Viewing Source. 5
Front Panel 6
Display Window 7
Remote Control 8
Rear Panel 9
PREPARATION
Connections 10-12
TV and Decoder (or Set Top Box) Connections . 10
Radio Aerial Connections 11
Accessory Audio/Video (A/V)
Connections to DVD/VCR Receiver ..... 11
Digital Device Connections....11
Speaker System Connections ..... 12
Speaker Positioning 12
Selecting the Input/Output Source ..... 13
Mini Glossary....14
Mini Glossary for Audio Stream
and Surround mode 14
Sound Mode 14
Volume Control 14
Muting 14
VIDEO Operation Setup 15-19
Video Channel Set 15
How to use the main menu 15
Tuning in TV Stations Automatically ..... 16
Tuning in TV Stations Manually ..... 16-17
Changing the order of TV Stations ..... 17
Deleting TV Stations 18
Setting the Clock Manually....18
Toset the colour system 19
DVD Operation Setup 20-23
General Explanation....20
On-Screen Display....20
Initial Settings 21-23
- General Operation 21
- Language 21
- Picture....21
- Parental Control....22
- Speaker Setup. 23
- Others (DRC/PBC) 23
OPERATION
VIDEO Operation 24-29
Playing a tape 24
• CM (Commercial Message) Skip ..... 24
- OPR (Optimum Picture Response)....24
Instant Timer Recording (ITR) 25
SHOWVIEW® System recording ..... 26
Timer recording using On Screen Display.....27
Hi-Fi Stereo Sound System 28
Widescreen Compatibility 16:9 ..... 28
Toset the decoder 28
Copying from DVD to VIDEO 29
Recording from another video recorder ..... 29
Additional Information 30
On Screen Display 30
DVD and Video CD Operation 31-32
Playing a DVD and Video CD. 31
General Features 31
- Resuming Playback 31
- Selecting Another TITLE .... 31
- Selecting Another CHAPTER/TRACK.....31
- Search....31
- Still Picture 31
- Slow Motion 32
- Shuffle 32
- Repeat. 32
- Repeat A-B 32
• Time Search 32
- 3D Surround .... 32
Special DVD Features 33
- Checking the contents of
DVD Video discs: Menus .... 33
- Title Menu 33
• DVD Menu. 33
- Camera Angle 33
- Changing the Audio Language .... 33
- Changing the Audio Channel .... 33
- Subtitle 33
- Screen Saver....33
Audio CD and MP3 Disc Operation ..... 34-35
Playing an Audio CD and MP3 Disc ..... 34
Notes on MP3 Files 34
- Pause 35
- Selecting Another Track 35
- Search....35
- Shuffle....35
- Repeat 35
- Repeat A-B 35
- 3D Surround .... 35
- Changing the Audio Channel ..... 35
JPEG File Operation 36
Viewing JPEG Files on a Disc 36
- Selecting another Files .... 36
- Still Picture 36
- To flip the picture....36
- To rotate picture....36
- To record the picture slide show....36
Notes on JPEG Files 36
Programmed Playback 37
Programmed Playback with Audio CD
and MP3 Disc 37
Programmed Playback with Video CD ..... 37
- Repeat Programmed Tracks .... 37
- Erasing a Track from Program List ..... 37
- Erasing the whole Program List .... 37
Speaker Setup 38
Radio Operation 39-40
Presetting the Radio Stations 39
Listening to the Radio 39
ToClear the Stored Radio Stations ..... 39
Tuning into a Station Manually 40
RDS Operation 40
REFERENCE
Controlling the TV with the Supplied Remote . . . 41
Language Code List 42
Area Code List. 43
Troubleshooting 44-45
Specifications 46-47
About the symbols for instructions
⚠️ Indicates hazards likely to cause harm to the unit itself or other material damage.
Note Indicates special operating features of this unit.
Tip Indicates tips and hints for making the task easier.
Before Use
playable Discs
 | DVD(8 cm / 12 cm disc) |
 | Video CD (VCD)(8 cm / 12 cm disc) |
 | Audio CD(8 cm / 12 cm disc) |
In addition, this unit can play a DVD-R/±RW, SVCD and CD-R or CD-RW that contains audio titles, MP3 or JPEG files.
Notes
- Depending on the conditions of the recording equipment or the CD-R/RW (or DVD-R, DVD±RW) disc itself, some CD-R/RW (or DVD-R, DVD±RW) discs cannot be played on the unit.
- Do not attach any seal or label to either side (the labeled side or the recorded side) of a disc.
- Do not use irregularly shaped CDs (e.g., heart-shaped or octagonal). It may result in malfunctions.
Notes on DVDs and Video CDs
Some playback operations of DVDs and Video CDs may be intentionally fixed by software manufacturers. As this unit plays DVDs and Video CDs according to disc content designed by the software manufacturer, some playback features of the unit may not be available or other functions may be added.
Make sure to also refer to the instructions supplied with the DVDs and Video CDs. Some DVDs made for business purposes may not be able to be played on the unit.
Regional code of the DVD/VCR Receiver and DVDs
This DVD/VCR Receiver is designed and manufactured for playback of region "2" encoded DVD software. The region code on the labels of some DVDs indicates which type of player can play those discs. This unit can only play DVDs labeled "2" or "ALL". If you try to play any other discs, the message "Check Regional Code" will appear on the TV screen. Some DVDs that have no region code label may still be subject to area restrictions and therefore not playable.

Disc-related terms
Title (DVD only)
The main film content or accompanying feature content or additional feature content, or music album.
Each title is assigned a title reference number enabling you to locate it easily.
Chapter (DVD only)
Sections of a picture or a musical piece that are smaller than titles. A title is composed of one or several chapters. Each chapter is assigned a chapter number, enabling you to locate the chapter you want. Depending on the disc, chapters may not be recorded.
Track (Video CD and Audio CD only)
Sections of a picture or a musical piece on a video CD or an audio CD. Each track is assigned a track number, enabling you to locate the track you want.
Scene
On a video CD with PBC (Playback control) functions, moving pictures and still pictures are divided into sections called "Scenes". Each scene is displayed in the menu screen and assigned a scene number, enabling you to locate the scene you want.
A scene is composed of one or several tracks.
Types of video CDs
There are two types of video CDs:
Video CDs equipped with PBC (Version 2.0)
PBC (Playback control) functions allow you to interact with the system via menus, search functions, or other typical computer-like operations. Moreover, still pictures of high resolution can be played if they are included in the disc.
Video CDs not equipped with PBC (Version 1.1)
Operated in the same way as audio CDs, these discs allow playback of video pictures as well as sound, but they are not equipped with PBC.
Notes
"Music discs encoded with copyright protection technologies"
This product is designed to playback discs that conform to the Compact Disc (CD) standard.
Recently, various music discs encoded with copyright protection technologies are marketed by some record companies. Please be aware that among those discs, there are some that do not conform to the CD standard and may not be playable by this product.
Before Use (Continued)
Precautions
Handling the unit
When shipping the unit
The original shipping carton and packing materials come in handy. For maximum protection, re-pack the unit as it was originally packaged at the factory.
When setting up the unit
The picture and sound of a nearby TV, VCR, or radio may be distorted during playback. In this case, position the unit away from the TV, VCR, or radio, or turn off the unit after removing the disc.
To keep the surface clean
Do not use volatile liquids, such as insecticide spray, near the unit. Do not leave rubber or plastic products in contact with the unit for a long period of time. They will leave marks on the surface.
Cleaning the unit
To clean the cabinet
Use a soft, dry cloth. If the surfaces are extremely dirty, use a soft cloth lightly moistened with a mild detergent solution. Do not use strong solvents such as alcohol, benzine, or thinner, as these might damage the surface of the unit.
To obtain a clear picture
The DVD/VCR Receiver is a high-tech, precision device. If the optical pick-up lens and disc drive parts are dirty or worn, the picture quality will be poor. Regular inspection and maintenance are recommended after every 1,000 hours of use. (This depends on the operating environment.) For details, please contact your nearest dealer.
Notes on Discs
Handling discs
Do not touch the playback side of the disc.
Hold the disc by the edges so that fingerprints will not get on the surface.
Do not stick paper or tape on the disc.


Storing discs
After playing, store the disc in its case.
Do not expose the disc to direct sunlight or sources of heat, or leave it in a parked car exposed to direct sunlight, as there may be a considerable temperature increase inside the car.
Cleaning discs
Fingerprints and dust on the disc can cause poor picture quality and sound distortion. Before playing, clean the disc with a clean cloth. Wipe the disc from the center out.
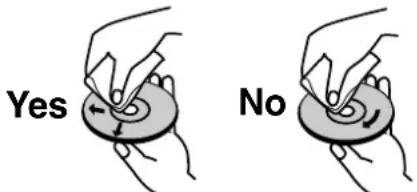
Do not use strong solvents such as alcohol, benzine, thinner, commercially available cleaners, or anti-static spray intended for older vinyl records.
About Symbols
About the symbol display
" may appear on the TV screen during operation. This icon means the function explained in this owner's manual is not available at that moment or with that specific DVD.
About the disc symbols for instructions
A section whose title has one of the following symbols are applicable only to those discs represented by the symbol.
DVD DVD
VCD2.0 Video CDs with the PBC (playback control) function.
VCD1.1 Video CDs without the PBC ( playback control) function.
CD Audio CDs.
MP3 MP3 Discs.
JPEG JPEG Files.
Selecting the Viewing Source
You must select one of your output sources (DVD or VIDEO) to view on the TV screen.
- If you want to view DVD deck output source:
Press DVD on the remote or DVD/VIDEO on the front panel until DVD indicator in the display window lights and output source of DVD deck is viewed on the TV screen.
- If you want to view VIDEO deck output source:
Press VIDEO on the remote or DVD/VIDEO on the front panel until VIDEO indicator in the display window lights and output source of VIDEO deck is viewed on the TV screen.
Note
If you insert a cassette tape without an erasure prevention tab intact while the DVD/VCR Receiver is in the DVD mode, the DVD/VCR Receiver will switch to VIDEO function mode automatically.
Front Panel

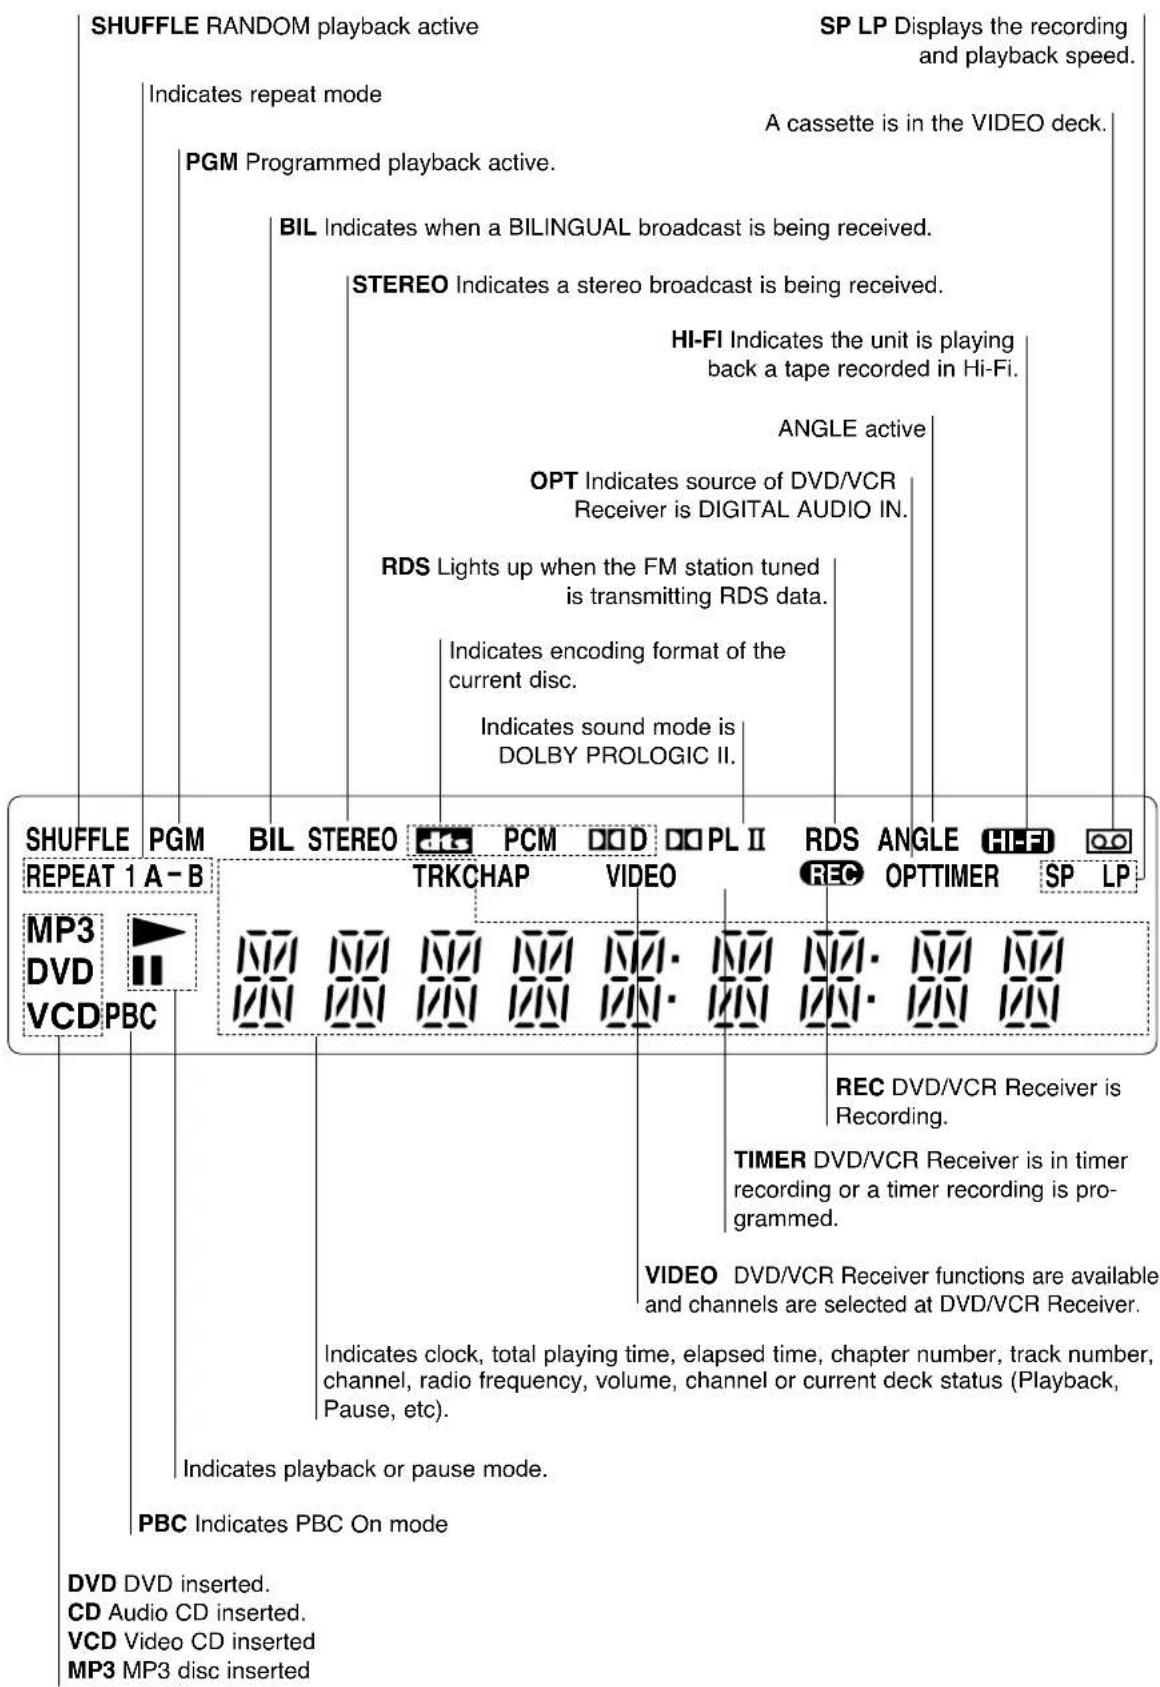
Display Window
Remote Control

Note
This remote control uses the same buttons for VIDEO and DVD functions (ex. PLAY).
To use the VIDEO, first press the VIDEO button.
To use the DVD, first press the DVD button.
Rear Panel
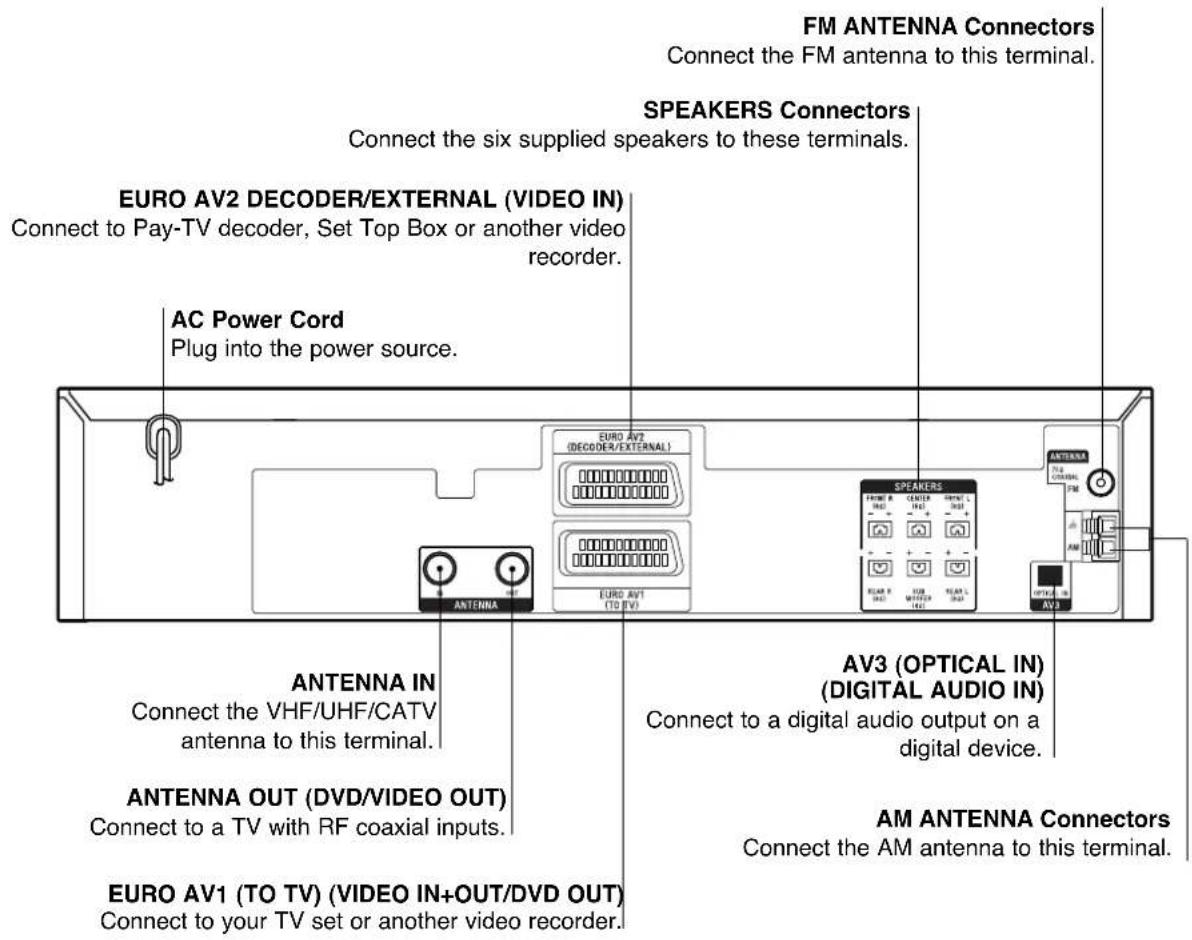
Dust Protection Cap
Remove the dust protection cap from the OPTICAL IN jack and connect the optical digital cable (not supplied) securely so that the configurations of both the cable and the connector match. Keep the dust protection cap and always reattach the cap when not using the connector to protect against dust intrusion.
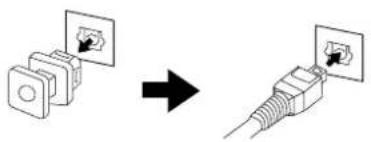

Do not touch the inner pins of the jacks on the rear panel. Electrostatic discharge may cause permanent damage to the unit.
Remote control battery installation
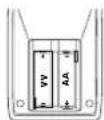
Detach the battery cover on the rear of the remote control, and insert two R6 (size AA) batteries with +nd - aligned correctly.
When using the remote control, point it at the remote sensor ☐ in the unit.

Do not mix old and new batteries. Never mix different types of batteries (standard, alkaline, etc.).
Connections
TV and Decoder (or Set Top Box) Connections
Make one of the following connections, depending on the capabilities of your existing equipment.

Tips
- Depending on your TV and other equipment you wish to connect, there are various ways you could connect the DVD/VCR Receiver. Use one of the connections described below.
- Please refer to the manuals of your TV, VIDEO, Stereo System or other devices as necessary to make the best connections.

Caution
- Make sure the DVD/VCR Receiver is connected directly to the TV. Select the correct AV input on your TV.
- Do not connect your DVD/VCR Receiver to TV via your VIDEO. The DVD image could be distorted by the copy protection system.
Basic connections (AV)
1 Connect the EURO AV1 (TO TV) on the rear panel of the DVD/VCR Receiver to the scart input socket on the TV using a SCART lead (E).
2 Some TV broadcasters transmit encoded television signals which you can only see with a purchased or rented decoder. You can connect such a decoder (descrambler) to the DVD/VCR Receiver (D).
Basic connection (RF)
11 Connect the aerial cable (A) from your indoor/outdoor aerial to ANTENA IN jack on the rear panel of DVD/VCR Receiver.
2 Connect the supplied RF cable (R) from the ANTENA OUT jack on the rear panel of DVD/VCR Receiver to your television's Aerial Input.
Notes
When you connect the DVD/VCR Receiver to your TV, be sure to turn off the power and unplug both units from the wall outlet before making any connections.
Connections (Continued)
Radio Aerial Connections
Connect the supplied FM/AM antennas for radio listening.
1 Connect the AM loop antenna to the AM antenna connectors.
2 Connect the FM wire antenna to the FM antenna connectors.
Notes
- To prevent noise pickup, keep the AM loop antenna away from the DVD/VCR Receiver and other components.
- Be sure to fully extend the FM wire antenna.
- After connecting the FM wire antenna, keep it as horizontal as possible.

Accessory Audio/Video (A/V) Connections to DVD/VCR Receiver
Connect the AV3 IN jacks on the DVD/VCR Receiver to the audio/video out jacks on your accessory component, using optional audio/video cables.
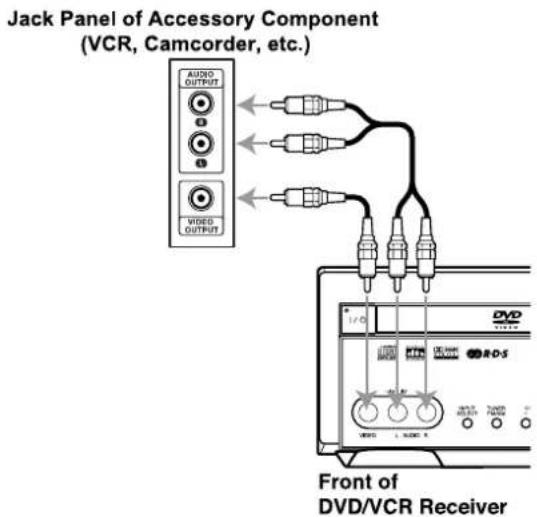
Digital Device Connections
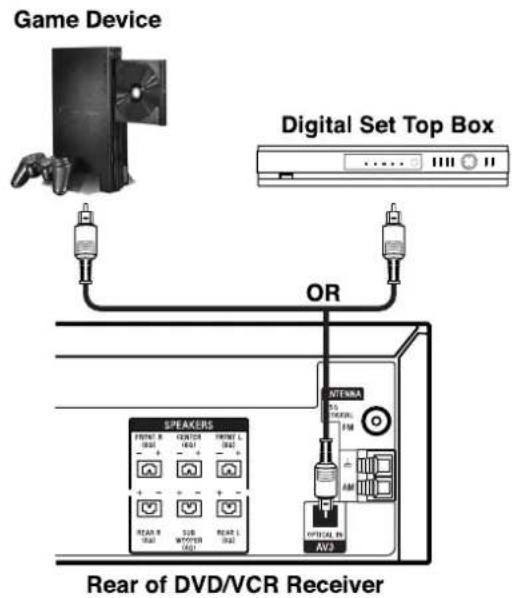
Connect the OPTICAL IN jacks on the DVD/VCR Receiver to the digital audio out (optical) jacks on your digital device (Game device, Digital Set Top Box, etc.), using optional optical audio cable.
To select source of DVD/VCR Receiver to OPTICAL IN, press INPUT SELECT repeatedly on the remote control until "AV3 OPT" appears in the display window.
Notes
- If the audio format of the digital output does not match the capabilities of your DVD/VCR Receiver, the DVD/VCR Receiver will produce a strong, distorted sound or no sound at all.
- The Optical input function is available only when the other unit's Sampling Frequency is 32 - 48kHz.
Connections (Continued)
Speaker System Connections
Connect the speakers using the supplied speaker cords by matching the colors of the terminals and those of the cords. To obtain the best possible surround sound, adjust the speaker parameters (distance, level, etc.).
Notes
- Be sure to match the speaker cord to the appropriate terminal on the components: ⊕ to ⊕ and ⊖ to ⊖. If the cords are reversed, the sound will be distorted and lack bass.
- If you use front speakers with low maximum input rating, adjust the volume carefully to avoid excessive volume output to the speakers.
- Do not disassemble the front covers of supplied speakers.

flowchart
graph TD
    A["Front Speaker (Right)"] --> B["SPEAKERS"]
    C["Center Speaker"] --> B
    D["Front Speaker (Left)"] --> B
    B --> E["ANTENNA"]
    E --> F["FM"]
    F --> G["AM"]
    G --> H["OPTICAL IN AV3"]
    H --> I["Rear speaker (Left surround)"]
    I --> J["Subwoofer"]
    J --> K["Black Red"]
    J --> L["White"]
    J --> M["White"]
    J --> N["White"]
    J --> O["White"]
    J --> P["White"]
    J --> Q["White"]
    J --> R["White"]
    J --> S["White"]
    J --> T["White"]
    J --> U["White"]
    J --> V["White"]
    J --> W["White"]
    J --> X["White"]
    J --> Y["White"]
    J --> Z["White"]
About Ferrite Core
1
2
3

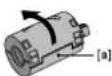
Be sure to attach the ferrite core to the speaker cables (for connecting to this unit).
This ferrite core can reduce noises.
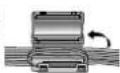
How to attach the ferrite core.
1 Push the stopper [a] of the ferrite core to open.
2 Wind the Center and Subwoofer
Speaker cables once on the ferrite core.
Pass the others straight on the ferrite
core.
3 Close the ferrite core until it clicks.
Speaker Positioning
For a normal setup use 6 speakers (2 front speakers, center speaker, 2 rear speakers and subwoofer).
- Front Speakers
Based on your listening position, set up the speakers at equal distance. And by hearing position, set up an interval between speakers of 45 degree.
• Center Speaker
It is ideal that the center speakers and front speakers are same height. But normally place it above or below the television as shown below.
- Rear Speakers
Place the rear surround speakers to the left and right behind the primary listening area. These speakers recreate sound motion and atmosphere required for surround playback. For best results, do not install the rear speakers too far behind the listening position, install them at or above the level of the listener's ears. It is also effective to direct the rear speakers towards a wall or ceiling to further disperse the sound. In the case of a smaller room size, if the audience is near to the rear wall set the rear speakers opposite each other, and set the rear speakers 60 - 90 cm above the listener's ears.
- Subwoofer
This can be placed in any front position.

Note
Speaker stand is optional.
Attaching the foot pads
To prevent speaker vibration or movement while listening, attach the supplied foot pads to the speaker, as shown.

Attaching the color labels
Attach the color labels onto the rear panel of the speakers before connecting the speakers.

Color labels
Selecting the Input/Output Source

Follow these guidelines to select and switch among the various DVD/VCR Receiver input and output sources:
• DVD
To view output from the DVD deck:
Press DVD on the remote or DVD/VIDEO on the on the front panel until the DVD indicator on the front panel lights and output from the DVD deck is viewed on the TV screen.
• VIDEO
To view output from the VIDEO deck:
Press VIDEO on the remote or DVD/VIDEO on the front panel until the VIDEO indicator on the front panel lights and output from the VIDEO deck is viewed on the TV screen.
• TUNER FM/AM
To listen to AM/FM radio broadcasts:
Press TUNER FM/AM to toggle between AM and FM radio. The selected frequency appears in the display window.
- INPUT SELECT
To listen and view to an audio source connected to the EURO AV1:
Press INPUT SELECT on the remote control once. The "AV1" appears in the display window and TV screen. Audio and Video will come from an external source connected to the EURO AV1 (for rear panel).
To listen and view to an audio source connected to the EURO AV2:
Press INPUT SELECT on the remote control a second time. The "AV2" appears in the display window and TV screen. Audio and Video will come from an external source connected to the EURO AV2 (for rear panel).
To listen to an audio source connected to the OPTICAL IN jack :
Press INPUT SELECT on the remote control a third time. The "AV3 OPT" appears in the display window. Audio will come from an external source connected to the OPTICAL IN jack (for rear panel).
To listen and view to an audio source connected to the AUDIO jack of AV3 IN with video from AV3:
Press INPUT SELECT on the remote control a fourth time. The "AV3" appears in the display window and TV screen. Audio and Video will come from an external source connected to the AUDIO/VIDEO jacks of AV3 IN (for front panel).
Mini Glossary for Audio Stream and Surround mode
dts
Allows you to enjoy 5.1(or 6) discrete channels of high quality digital audio from DTS programme sources such as discs, DVD and compact discs, etc.bearing the trademark. DTS Digital Surround delivers up to 6 channels of transparent audio(which means identical to the original masters) and results in exceptional clarity throughout a true 360 degree sound field. The term DTS is a trademark of DTS Technology, LLC. Manufactured under license from DTS Technology, LLC.
D (Dolby Digital)
The Dolby Digital surround format lets you enjoy up to 5.1 channels of digital surround sound from a Dolby Digital programme source. If you play DVDs with "I" mark, you can enjoy even better sound quality, greater spatial accuracy, and improved dynamic range.
PL (Dolby Pro Logic)
Use this mode when playing movie or Dolby Digital 2 channel which carries the "Dmark. This mode provides the effect of being in a movie theatre or live concert house—an effect with an intensity which can only be obtained through DOLBY PRO LOGIC SURROUND. The effect of the front/back/left/right movement of the sound image, as well as the sense of fixed position in the sound image, is much clearer and more dynamic than before.
□□ PL II (Dolby Pro Logic II)
Dolby Pro Logic II creates five full-bandwidth output channels from two-channel sources. This is done using an advanced, high-purity matrix surround decoder that extracts the spatial properties of the original recording without adding any new sounds or tonal colorations.
MOVIE mode:
The Movie mode is for use with stereo television shows and all programs encoded in Dolby Surround. The result is enhanced soundfield directionality that approaches the quality of discrete 5.1-channel sound.
MUSIC mode:
The Music mode is for use with any stereo music recordings, and provides a wide and deep sound space. The Music mode includes controls that allow the sound to be tailored to individual listening tastes.
MATRIX mode:
The Matrix mode is the same as the Music mode except that the directional enhancement logic is turned off. It may be used to enhance mono signals by making them seem "larger." The Matrix mode may also find use in auto systems, where the fluctuations from poor FM stereo reception can otherwise cause disturbing surround signals from a logic decoder. The ultimate "cure" for poor FM stereo reception may be simply to force the audio to mono.
3D SURROUND
This unit can produce a 3D Surround effect, using 3D Surround Sound technology, which simulates multi-channel audio playback from two conventional stereo speakers instead of the five or more speakers normally required to listen to multi-channel audio from a home theatre. This feature works with DVD discs encoded with Dolby Pro Logic and Dolby Digital audio tracks.
BYPASS
Software with multichannel surround audio signals is played according to the way it was recorded.
Sound Mode
You can enjoy surround sound simply by selecting one of the pre-programmed sound fields according to the programme you want to listen to.
Press SOUND FIELD repeatedly until the sound mode you want appears in the display window as below.
Each time you press SOUND FIELD button, the sound mode is changed in the following order;
PRO LOGIC → PL2 MOVIE → PL2 MUSIC → PL2 MATRIX → 3D SURROUND → BYPASS
When DVD is inserted.
You can change the sound mode of DVD (Dolby Digital, DTS, PRO LOGIC, etc) by pressing the AUDIO button on the remote during playback.
Although the DVD contents differ from disc to disc, the following explains the basic operation when this feature is used.
Each time you press AUDIO button, the sound mode of DVD is changed as the following order;
D D → dts → PCM → D D
For your reference
- The DVD/VCR Receiver memorizes the last mode settings for each source individually.
- You can identify the encoding format of programme software by looking at its packaging.
- Dolby Digital discs are labeled with the logo.
- Dolby Surround encoded programs are labeled with the □□[COLBY] SURROUND logo.
- DTS Digital Surround discs are marked with DTS.
Note
When you play sound tracks with 96kHz sampling frequency, the output signals will be converted to 48kHz (sampling frequency).
Volume Control
You can adjust the volume by rotating VOLUME on the front panel or by pressing VOL (+/-) on the remote control repeatedly.
Muting
Press MUTING to mute your unit.
You can mute your unit in order, for example, to answer the telephone, "MUTING" indicator in the display window. To exit mute mode, press MUTING again.
VIDEO Operation Setup
Video channel set
Video channel (RF output channel) is the channel on which your TV receives picture and sound signals from the DVD/VCR Receiver through the RF cable.
If you have used a SCART lead you will not have to tune your TV, simply select the AV channel. The AV channel is already pre-tuned for optimum video playback on your TV.
Perform the following steps only if interference appears in the TV picture after you have moved to a different area or a new station has started broadcasting in your area, or if you change the connection from RF connection to AV connection, or vise versa.
11 Turn on DVD/VCR Receiver and TV.
22 Set the vacant position 36 on your TV.
3 Press I / ⏻ on the remote control to enter the standby mode.
4 Press and hold CH/PRESET + or - on the DVD/VCR Receiver for more than 4 seconds.
RF 36 will appear in the DVD/VCR Receiver display.

The following picture will be displayed on the TV screen.
If the picture is snowy, move to step 5. If the picture is clean, press I / ⏻ on the DVD/VCR Receiver to store the RF channel. The video channel is now set.
5 Press CH/PRESET + or - on the DVD/VCR Receiver to set the video channel to a vacant position between 22 and 68 which is not occupied by any local station in your area.
You can also set it to "OFF" if there is any interference when your TV is connected to the DVD/VCR Receiver.
Note
The RF channel will not change until step 6 has been executed.
6 Press I / ⏻ to store the new RF channel into the DVD/VCR Receiver.
7 Press I / ⏻ to bring the DVD/VCR Receiver from standby to on and follow your TV manufacturers tuning instruction manual to tune a new channel to the DVD/VCR Receiver.
How to use the main menu
This DVD/VCR Receiver can easily be programmed by using the menus displayed on screen.
The menus are controlled from the Remote Control Handset.
1 Switch on your TV set and DVD/VCR Receiver by pressing I/⏻.
2 Press MENU (i). The main menu will appear on the TV screen.
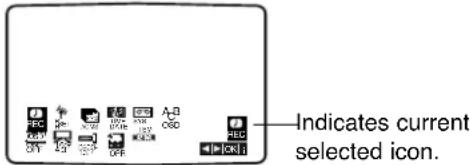
• REC
Timer recording setting (see pages 27).
•CPR SET
Manual tuning setting (see page 16-17).
•ACMS
ACMS (Automatic Channel Memory System) (see page 16).
•TIME DATE
Date and clock setting (see page 18).
- SYSTEM
To set the Colour TV System (see page 19).
- ABC OSD
To change the language setting for OSD. You can select the language from English, German, French, Italian, Spanish, Dutch, and Portuguese.
- fOSD ON/OFF
To display the operational mode of your DVD/VCR Receiver (see page 30).
• 16:9/4:3
To select the aspect ratio of your TV (see page 28).
• DECODER
To use a pay-TV decoder with your DVD/VCR Receiver (see page 28).
• OPR
To improve the playback picture (see page 24).
• NIC
To activate or deactivate the NICAM digital sound (see page 28).
Press ← or → to select the desired menu.
4 Press ENTER/OK and press ↑ or ↓ to select.
5 Press MENU (i) to return to a TV picture.
Note
The VIDEO main menu will appear incorrectly when NTSC video source is inputted to the DVD/VCR Receiver.
VIDEO Operation Setup (Continued)
Tuning in TV Stations Automatically
Should you wish to perform the Automatic Channel Memory System (ACMS) again please follow the guidance given on this page. You may tune up to 88 TV stations into your DVD/VCR Receiver.
11 Press I / ⏻ to turn on your DVD/VCR Receiver.
2 Press MENU (i).
The main menu will appear on the TV screen.
3 Press ← or → to select ACMS and press ENTER/OK

4 Press ← or → to select the desired country.
(A: Austria, B: Belgium, CH: Switzerland,
D: Germany, DK: Denmark, E: Spain, F: France,
I: Italy, N: Norway, NL: Netherlands, P: Portugal,
S: Sweden, SF: Finland, AUTRES: Others.)
5 Press ENTER/OK again to start the automatic tuning process.

6 While automatic tuning is taking place the time and date will set automatically. If - - : - appears in the DVD/VCR Receiver display it means that the broadcast signal is weak and the clock was not set. Please turn to TIME DATE section of this book on page 18.
7 Press MENU (i) to remove the menus from the TV screen.
Tuning in TV Stations Manually
In certain areas of the country broadcast signals may be too weak for your DVD/VCR Receiver's automatic tuning process to find or assign TV stations correctly. You must tune in these weaker broadcast stations manually in order for your DVD/VCR Receiver to store them.
1 Press MENU (i).
The main menu will appear on the TV screen.
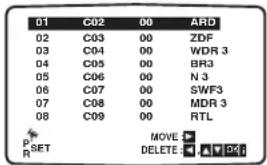
2 Press ← or → to select PR SET and press ENTER/OK.

3 Press MENU (i) and press ♦ or ↓ to select the programme number that you want to tune (for example, PR 07). Press ENTER/OK

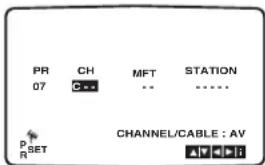
4 Press INPUT SELECT to select C (Standard stations) or S (Cable stations): C02-C70, S01-S41.
Enter the channel number of station that you want to tune with the numerical buttons.

VIDEO Operation Setup (Continued)
5 Searching will stop when it locates a station. If the station transmits VPS/PDC, the station name will be added automatically.
Control the fine tuning of the station by pressing or .
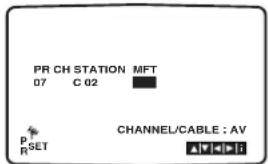
6 Press → to select STATION and press ENTER/OK
The TV station name list will appear.
Press ↑ or ↓ to select a station name from the list and press ENTER/OK to select it.
If your station name isn't on the list do not press ENTER/OK, but go to stage 7.

7 You can change a TV station name manually rather than using the "standard" names.
Press and press or to select letters and numbers for the new station name.
Press ← or → to move back and forth between characters. Press ENTER/OK.

8 Press MENU (i), confirm the station placement.

9 Press MENU (i) to remove the menus from the TV screen.
Your new TV station has now been tuned into your DVD/VCR Receiver.
If you wish to manually tune other stations repeat stages 1 - 9.
Changing the order of TV Stations
After tuning TV stations into your DVD/VCR Receiver you may wish to change the order in which they are stored without having to retune them. The instructions given on this page will show you how you can simply move them into your desired order.
11 Press MENU (i). The main menu will appear on the TV screen.
Press ← or → to select PR SET and press ENTER/OK

2 Press MENU (i). Press ♦ or ♦ to select the programme number you want to move (for example, PR 03). Press ➤.

3 Press ↑ or ↓ to select the programme number you want to move to (for example, PR 05).

4 Press ENTER/OK. The selected programme will be moved to the new programme number.
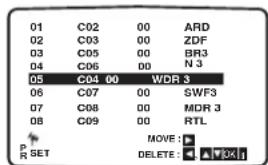
5 Press MENU (i) to remove the menus from the TV screen. If you wish to move other TV stations repeat stages 1 - 4.
VIDEO Operation Setup (Continued)
Deleting TV Stations
After tuning TV stations into your DVD/VCR Receiver you may wish to delete a station.
The instructions given on this page will show you how to easily delete any unwanted TV stations.
1 Press MENU (i).
The main menu will appear on the TV screen.
Press ← or → to select PR SET and press ENTER/OK

2 Press MENU (i).
Press ↑ or ↓ to select the programme number you want to delete (for example, PR 03).

Press ←.
After a short while, the selected station will be deleted.

4 Press MENU (i) to remove the menus from the TV screen.
If you wish to delete other TV stations repeat stages 2 - 3.
How to select Stored TV stations:
Stored TV stations can be selected in either of two ways.
Press CH+ or CH− to select different stations that are tuned into your DVD/VCR Receiver.
You may also directly select stations using the numerical buttons on the remote control.
Setting the Clock Manually
The clock in your DVD/VCR Receiver controls time, day and date settings for your DVD/VCR Receiver.
For SHOWVIEW system to work correctly the correct time and date must be set. The clock is set automatically during ACMS (Automatic Channel Memory System) when your DVD/VCR Receiver detects a channel that broadcasts a Teletext signal.
If the broadcast signal is weak the clock will not be set and will require setting manually.
1 Press MENU (i).
Press ← or → to select TIME DATE and press ENTER/OK.
The auto adjust mode can be set to "OFF" by pressing or if you want to set the time manually.

2 Press ENTER/OK.
Use the numerical buttons or press ↕/↙ or ↕/↙ on the remote control to alter the HOURS, MINUTES, DAY, MONTH and YEAR.
Please note your DVD/VCR Receiver uses a 24-hour clock. e.g. 1pm will be displayed as 13:00.
The day of the week will appear automatically when you enter the year.

3 If you make a mistake, press ← or → and enter the correct details.
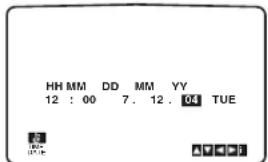
4 Press MENU (i) to remove the menus from the TV screen.
Your new clock settings are stored and will appear on your DVD/VCR Receiver's Display.
VIDEO Operation Setup (Continued)
To set the colour system
Your DVD/VCR Receiver is equipped with dual colour standard, you can play back a tape in PAL and MESE-CAM.
During playback your DVD/VCR receiver detects the colour system automatically.
If there is any colour problem please select the colour system manually.
1 Press MENU (i).
The main menu will appear on the TV screen.
22 Press ← or → to select the SYSTEM.

3 Press ENTER/OK and press or to select according to the COLOUR system used.

AUTO:
Allows PAL or MESECAM signals to be distinguished automatically.
PAL:
Use when receiving PAL signals or use when playing back a tape recorded in PAL system.
MESECAM:
Use when receiving MESECAM signals or use when playing back a tape recorded in MESECAM system
4 Press MENU (i) to remove the menus from the TV screen.
DVD Operation Setup
General Explanation
This manual gives basic instructions for operating the DVD/VCR Receiver. Some DVDs require specific operation or allow only limited operation during playback. When this occurs, the symbol appears on the TV screen, indicating that the operation is not permitted by the DVD/VCR Receiver or is not available on the disc.
On-Screen Display
General playback status can be displayed on the TV screen. Some items can be changed on the menu.
On-screen display operation
1 Press DVD DISPLAY during playback.
2 Press / to select an item. The selected item will be highlighted.
3 Press ◀/→ to change the setting of an item.
The number buttons can be also be used for setting numbers (e.g., title number). For some functions, press ENTER/OK to execute the setting.
DVD
| Items | Function (Press / to select desired item) | Selection Method | ||
| Title Number |  | 1/3 | Shows the current title number and total number of titles, and skips to the desired title number. | / , or Numbers, ENTER/OK |
| Chapter Number |  | 1/12 | Shows the current chapter number and total number of chapters, and skips to the desired chapter number. | / , I /I or Numbers, ENTER/OK |
| Time search |  | 0:20:09 | Shows the elapsed playing time, and searches the point directly from the elapsed time. | Numbers, ENTER/OK |
| Audio language and Digital Audio Output mode |  | 1 ENG 00D5.1 CH | Shows the current audio soundtrack language, encoding method, and channel number, and changes the setting. | / , or AUDIO |
| Subtitle language |  | OFF | Shows the current subtitles language, and changes the setting. | / , or SUBTITLE |
| Angle |  | 1/1 | Shows the current angle number and total number of angles, and changes the angle number. | / , or ANGLE |
| Sound |  | BYPASS | Shows the current sound mode, and changes the setting. | / , or SOUND FIELD |
VCD2.0 VCD1.1
| Items | Function (Press ♦/♦ to select desired item) | Selection Method | ||
| Track Number |  | 1/3 | Shows the current track number, total number of tracks and PBC On mode, and skips to the desired track number. | ♦/♦, or Numbers, ENTER/OK |
| Time |  | 0:20:09 | Shows the elapsed playing time (Display only) | - |
| Audio Channel |  | ST | Shows the audio channel, and changes the audio channel. | ♦/♦, or AUDIO |
| Sound |  | BYPASS | Shows the current sound mode, and changes the setting. | ♦/♦, or SOUND FIELD |
DVD Operation Setup (Continued)
Initial Settings
You can set your personal preferences on the DVD function mode.
General Operation
1 Press SETUP/MENU. The Setup menu appears.
2 Use ♦/♦ to select the desired option.
The screen will show the current setting for the selected option, as well as alternate setting(s).
3 While the desired option is selected, press →, then ↗/↓ to select the desired setting.
4 Press ENTER/OK to confirm your selection. Some options require additional steps.
5 Press SETUP/MENU, RETURN, or ▷ (PLAY) to exit the setup menu.
Language
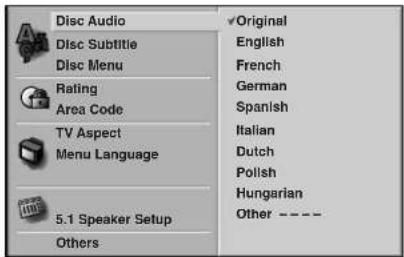
Disc Language DVD
Select a language for the disc's Menu, Audio, and Subtitle features.
Original : The original language set for the disc is selected. Other : To select another language, use number buttons to enter the corresponding 4-digit number according to the language code list on page 42. If you enter the wrong language code, press CLEAR.

Note
Disc Language selection may not work for some DVDs.
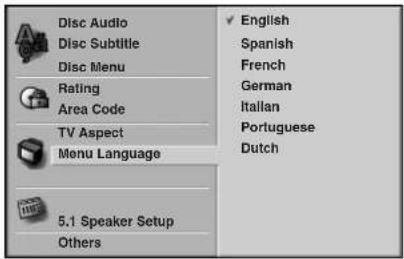
Menu Language
Select a language for the Setup menu. This is the menu you see when you press SETUP/MENU.
Picture
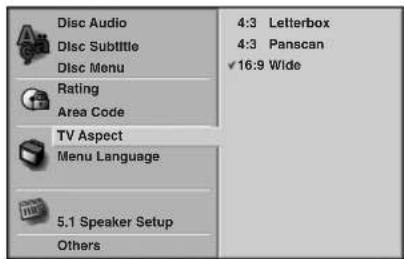
TV Aspect DVD
4:3 Letterbox: Select when a standard 4:3 TV is connected. Displays pictures with masking bars above and below the picture.
4:3 Panscan: Select when a standard 4:3 TV is connected. Displays pictures cropped to fill your TV screen. Both sides of the picture are cut off.
16:9 Wide: Select when a 16:9 wide TV is connected.
DVD Operation Setup (Continued)
Parental Control
Rating DVD
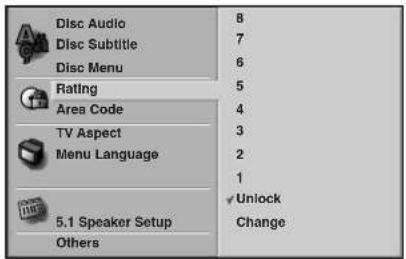
Movies on DVDs may contain scenes not suitable for children. Therefore, discs may contain Parental Control information that applies to the complete disc or to certain scenes on the disc. These scenes are rated from 1 to 8, and alternatively, more suitable scenes are available for selection on some discs. Ratings are country dependent. The Parental Control feature allows you to prevent discs from being played by your children or to have certain discs played with alternative scenes.
1 Select Rating on the Setup menu using ↕/↓ buttons on the setup menu.
2 While Rating is selected, press →.
3 When you have not entered a password yet; Enter a 4-digit password using the number buttons to create a personal 4-digit security password, then press ENTER/OK. Enter the 4-digit password again and press ENTER/OK to verify.
When you have already entered a password; Enter a 4-digit password using the numerical buttons to confirm the personal 4-digit security password, then press ENTER/OK.
If you make a mistake before pressing ENTER/OK, press CLEAR and enter 4-digit security password again.
4 Select a rating from 1 to 8 using ♦/♦ buttons. One (1) has the least playback restrictions. Eight (8) has the most playback restrictions.
Unlock: If you select Unlock, Parental Control is not active. The disc will play in full.
Ratings 1 to 8: Some discs contain scenes not suitable for children. If you set a rating for the DVD, all disc scenes with the same rating or lower will be played. Higher rated scenes will not be played unless an alternative scene is available on the disc. The alternative must have the same rating or a lower one. If no suitable alternative is found, playback will stop. You must enter the 4-digit password or change the rating level in order to play the disc.
5 Press ENTER/OK to confirm your rating selection, then press SETUP/MENU to exit the menu.
Area Code DVD
Enter the code of an area whose standards were used to rate the DVD video disc, referring to the list (See "Area Code List", page 43.).
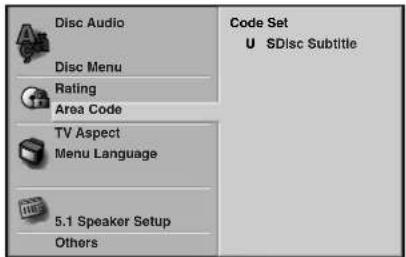
1 Select the Area Code option using the ♠/♦ buttons on the setup menu.
2 While Area Code is selected, press →.
3 Follow step 3 of "Rating" on left.
4 Select the first character using the ♦/♦ buttons.
5 Press → to shift to second character and select the second character using ↑/↓ buttons.
6 Press ENTER/OK to confirm your Area Code selection, then press SETUP/MENU to exit the menu.
Note
Confirmation of the 4-digit password is necessary when the password is changed (see Changing the 4-digit password below).
Changing the 4-digit password
1 Follow Steps 1-2 as shown above to the left (Rating).
2 Enter the old password, then press ENTER/OK.
3 Select Change using ♦/▼ buttons then press ENTER/OK.
4 Enter the new 4-digit password, then press ENTER/OK.
5 Enter exactly the same password a second time and verify by pressing ENTER/OK.
6 Press SETUP/MENU to exit the menu.
If you forget your 4-digit password
If you forget your password, to clear the current password follow the procedure below.
1 Press SETUP/MENU to display the setup menu.
2 Enter the 6-digit number "210499". The 4-digit password is cleared.
3 Enter a new password as shown above to the left (Rating).
Speaker Setup
5.1 Speaker settings DVD
Select speaker settings, including volume balance and distance, or test the speaker settings. Speaker settings are only active on the Analog Multi-Channel Output. (See "Speaker Setup", page 38.)

Others (DRC/PBC)
The DRC and PBC settings can be changed.
- Press / to select the desired item and press ENTER/OK. The setting of the selected item is changed between On and Off.

Dynamic Range Control (DRC)
With the DVD format, you can hear a program's soundtrack in the most accurate and realistic presentation possible, thanks to digital audio technology. However, you may wish to compress the dynamic range of the audio output (the difference between the loudest sounds and the quietest ones). Then, you may listen to a movie at a lower volume without losing clarity of sound. Set DRC to On for this effect.
Playback Control (PBC)
On: Video CDs with PBC are played according to the PBC. Off: Video CDs with PBC are played the same way as Audio CDs.
Playing a tape
You will only be able to load and eject video cassettes when your DVD/VCR Receiver is plugged into the mains.
Your DVD/VCR Receiver may also play back recordings from NTSC tapes (on PAL TV).
Getting a better picture
When a cassette is inserted and playback started, the ATR (automatic tracking) function works to get the best possible picture automatically (ATR appears in the display window). If the quality of the recording is poor, repeatedly press CH/PRESET (+/-) to manually adjust the tracking until any distortions have been removed.
11 Make sure that you have correctly connected your DVD/VCR Receiver as described earlier in this book.
Turn on your TV.
Press I / ⏻ to turn on your DVD/VCR Receiver. Insert the video cassette into your DVD/VCR Receiver.
The video cassette should have the window side facing up and the arrow facing away from you.
2 Press ▷ (PLAY) to start playing your tape.
If you load a video cassette which has had its record protection tab removed, playback of the cassette will start automatically.
AUTO TRACKING
Your DVD/VCR Receiver will automatically adjust the tracking to give the best picture quality.
2 Press II (PAUSE) to still a picture.
Press II (PAUSE) repeatedly to advance the tape frame by frame.
If you press SLOW (▶▶, ▶), the picture will be slowed down at about 1/19 times the normal play-back.
Tapes can be paused for up to 5 minutes. After 5 minutes your DVD/VCR Receiver will stop the tape to prevent from damage to the tape or your DVD/VCR Receiver.
Still picture quality can be improved slightly by pressing CH/PRESET (+/-) on the remote control.
4 Press ▷ (PLAY) to continue playing your tape.
Picture search:
During playback press either SLOW (◄◄/◄l or ►►/I►) buttons. This will enable you to rapidly wind the tape (7 times normal playback) while seeing where you are on the tape.
Logic search:
During fast forward or rewind press and hold SLOW (◄◄/◄l or ►►/l►) button. The picture will be played back at 7 times normal playback speed.
5 During playback or still picture press ← or →. You can reach the following playback speeds.
(-7xplay, -3xplay, -play, still, 1/19 slow, play, 2xplay, 7xplay)
To switch off the slow motion and shuttle, press the desired function.
During slow motion and shuttle, the noise bars may appear on the picture according to the status of tape.
If distortions can be seen in the picture, reduce them with CH/PRESET (+/-) on the remote control.
6 Press ■ (STOP) to end playback. Press ≜ VIDEO.
If the end of the tape is reached, your DVD/VCR Receiver will stop playback automatically, rewind, stop at the top of the tape, eject the tape, and it will turn itself off.
CM (Commercial Message) Skip:
When playing back tapes, this feature lets you skip through commercial breaks by fast-forwarding, and then resume normal playback.
While tape is playing press CM SKIP on the remote control to skip commercial (or other programme material).
Repeatedly press CM SKIP to skip:
The tape will fast forward picture search through 30 seconds of recording for each press of the button.
1 Press 30 seconds
2 Presses 60 seconds
3 Presses 90 seconds
4 Presses 120 seconds
5 Presses 150 seconds
6 Presses 180 seconds
OPR (Optimum Picture Response):
This feature automatically improves playback picture quality by adjusting your DVD/VCR Receiver to the condition of the tape.
11 Press MENU (i).
2 Press ← or → to select OPR and press ENTER/OK.

3 Press ↑ or ↓ repeatedly to select: OFF, SOFT or SHARP.
Please note you may set OPR only when playing back a tape.
4 Press MENU (i) to remove the menus from the TV screen.
VIDEO Operation (Continued)
The DVD/VCR Receiver allows you to make recordings using a variety of simple methods:
Instant Timer Recording (ITR): Starts recording immediately for a set period of time or until the video cassette runs out.
SHOWVIEW System Recording greatly simplifies entering the date, channel, start and end times of a Timer Recording.
Timer Recording: You may record at a later time (up to 1 month from the present). Up to 7 of these automatic recordings may be set.
The DVD/VCR Receiver incorporates Long Play (LP) which enables you to record up to twice the amount of time on a video cassette. For example an E-180 will record up to 180 minutes using Standard Play (SP); using LP you will be able to record up to 360 minutes.
Please note there will be a slight loss in picture and sound quality when using LP.
Instant Timer Recording (ITR)
11 Make sure that you have correctly connected your DVD/VCR Receiver as described earlier in this book.
Press I / ⏻ to turn on your DVD/VCR Receiver.
2 Insert a video cassette with protection tab into your DVD/VCR Receiver.
The video cassette should have the window side facing up and the arrow facing away from you.
3 Press CH (+/-) to select the programme number you wish to record.
You may also directly select programme numbers using the numerical buttons on the remote control.
4 If you wish to record directly from either of the SCART sockets or AV3 sockets, repeatedly press INPUT SELECT until the socket you wish to record from is displayed.
AV 1 for recording from EURO AV1 socket on the rear of your DVD/VCR Receiver.
AV 2 for recording from EURO AV2 socket on the rear of your DVD/VCR Receiver.
AV 3 for recording from AV3 sockets (analog audio) on the front of your DVD/VCR Receiver.
5 Press SP/LP if you wish to record in Long Play or Standard Play.
SP will produce improved picture and sound quality, however LP will provide twice as much recording time as SP.
6 Press REC/ITR (●) to start recording. RECORD will appear on the TV screen.
Press REC/ITR (●) several times. Each successive press will increase the record time by 30 minutes until you reach a maximum of 9 hours.
7 Press II (PAUSE) to avoid recording unwanted scenes.
Press II (PAUSE) to continue recording.
If you press II (PAUSE) during ITR, the DVD/VCR Receiver will enter the record pause mode and ITR is cancelled.
Tapes can be paused for up to 5 minutes; RECP will be displayed when a tape is paused. After 5 minutes your DVD/VCR Receiver will stop recording to prevent damaging the tape or your DVD/VCR Receiver.
8 Press ■ (STOP) to end recording. Press ≜ VIDEO.
EJECT will appear on the TV screen for a few seconds.
Notes
- If you do not wish to record on a tape (this can happen quite easily by accident!) remove the protection tab on the back edge of the video cassette.
- It is possible to record on a video cassette with the record protection tab removed by covering the hole with self adhesive tape.
- Remember you can record one programme while watching another by starting your instant recording, pressing TV/VIDEO to disappear VIDEO indicator in the display window and then selecting a different channel on your TV.
SHOWVIEW® System recording
SHOWVIEW System greatly simplifies entering the date, channel, start and end times of a Timer recording by simply entering a SHOWVIEW programming number. The SHOWVIEW programming numbers are published in most TV guide magazines; they can vary from one to nine numbers in length.
11 Make sure that TV channels have been tuned and stored.
Insert a video cassette with protection tab into your DVD/VCR Receiver.
The video cassette should have the window side facing up and the arrow facing away from you.
22 Press SHOWVIEW.

3 Press ↑ or ↓ to select the recording type. ONCE: To record once. WEEKLY: To record at the same time every week. DAILY: To record every day (except Saturday and Sunday) at the same time.
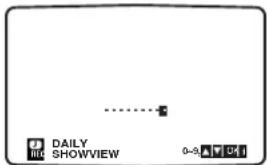
4 Press the numerical buttons to enter the SHOWVIEW programming number of the TV programme that you wish to record.
If you make a mistake press then enter the revised number.

5 Press ENTER/OK The recording details of your programme will be displayed.
If PLEASE CHECK is displayed it means that you have entered the wrong SHOWVIEW programming number, entered the SHOWVIEW programming number incorrectly or the SHOWVIEW programming number has been printed incorrectly in the TV guide. If “- -” is displayed in “PR”, you have to enter the programme number of the station you want to record from.

If you want to record from either of the SCART sockets or AV3 on the front, repeatedly press INPUT SELECT for the correct display (AV1, AV2 or AV3).
6 Press → and press ↑ or ↓ to switch VPS/PDC on or off.
If you are recording from stations that do not broadcast VPS/PDC switch VPS/PDC off! (* symbol will disappear on the TV screen). Remember only certain stations transmit VPS/PDC.

7 Press → to select the recording speed and press ↑ or ↓ if you wish to record in SP, IP or LP.
SP will produce improved picture and sound quality, however LP will provide twice as much recording time as SP.
8 Check that the timer event details are correct. Press MENU (i) to save your settings.
If PLEASE CHECK is displayed, you have entered incorrect information and will need to re-enter the data.

If you want to make other SHOWVIEW system recordings repeat stages 2 - 8.
Press I / ⏻ to switch your unit to Standby. TIMER will appear in the DVD/VCR Receiver's display while your DVD/VCR Receiver waits to make the recording.
If the DVD/VCR Receiver is DVD mode, even with the DVD/VCR Receiver is power on, it will record any timer programme. You can clear the recording by pressing STOP during programmed recording.
Intelligent LP Recording
When you set the tape speed to "IP", the DVD/VCR Receiver automatically switches to LP mode to allow complete recording if there is not enough tape to record the entire programme while timer- recording in SP mode.
It is not possible to set the tape speed to "IP" with "VPS/PDC" set to "ON".
Timer recording using On Screen Display
If you choose not to use SHOWVIEW System Recording, you can set timer recordings manually.
You may set up to seven timer record events within one month of the current date.
PLEASE NOTE! before setting the timer make sure that you have set the DVD/VCR Receiver clock correctly and you know which channels on your DVD/VCR Receiver you have tuned to TV stations.
In a stage 4, if you want to record from either of the SCART sockets or AV3 on the front, press INPUT SELECT.
11 Insert a video cassette with protection tab into your DVD/VCR Receiver.
The video cassette should have the window side facing up and the arrow facing away from you.
2 Press MENU (i). Press ← or → to select REC and press ENTER/OK
If all timer record events are full press or to select the event that you wish to remove and replace.
Press ← to delete the event.

3 Press ENTER/OK to start setting the timer record event.
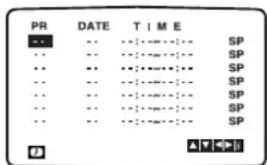
4 Press the numerical buttons to enter the station that you wish to record.
When selecting stations 1 - 9, press 0 first, then the channel number; for example Stations 3 - 03. You may also
select Channels by pressing or .
If you want to record from either of the SCART sockets or AV3 IN on the front, repeatedly press INPUT SELECT for the correct display (AV1, AV2 or AV3).
Once selected press →.
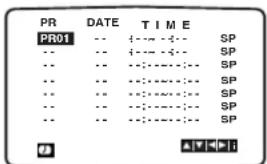
If you press ENTER/OK before entering the date you may select one of the following automated recording features. Press ◆ or ➤ to select, then press ENTER/OK to confirm.
DLY To record every day (except Saturday and Sunday) at the same time.
SU - SÄ Torecord at the same time every week.
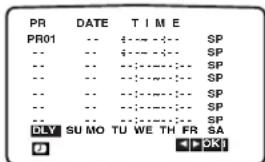
6 Press the numerical buttons to enter the recording start and end times of the programme that you wish to record.
Please note your DVD/VCR Receiver uses a 24-hour clock. e.g. 1pm will be displayed as 13:00. You may also select the start and end times by pressing or .

7 Press → and press ↑ or ↓ to switch VPS/PDC on or off.
If you are recording from stations that do not broadcast VPS/PDC switch VPS/PDC off! (* symbol will disappear on the TV screen). Remember only certain stations transmit VPS/PDC.
8 Press → to select the recording speed and press or ↓ if you wish to record in SP, IP or LP.
• IP (Intelligent LP recording) on page 26.
9 Check that the timer event details are correct. Press MENU (i) to save your settings.
If PLEASE CHECK is displayed, you have entered data incorrectly and will need to re-enter the data.
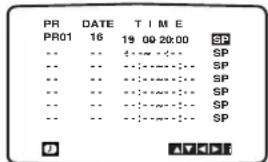
1 Press MENU (i) to remove the menus.
If you want to make other timer recordings repeat stages 2 - 9.
11 Press I / ⏻ to switch your DVD/VCR Receiver to Standby.
TIMER will appear in the DVD/VCR Receiver's display while your DVD/VCR Receiver waits to make the recording.
If the DVD/VCR Receiver is DVD mode, even with the DVD/VCR Receiver is power on, it will record any timer programme. You can clear the recording by pressing STOP during programmed recording.
Hi-Fi Stereo Sound System
Your DVD/VCR Receiver will record and play back Hi-Fi stereo sound. In addition it has a NICAM digital stereo sound decoder. This allows you to record and play back the sound in several different ways. Video cassettes recorded on your DVD/VCR Receiver will have a normal mono audio track and two VHS Hi-Fi stereo audio tracks. These stereo tracks allow you to make audio recordings in Hi-Fi stereo or bilingual mode from a TV broadcast, stereo audio system, video disc or another Hi-Fi VIDEO.
1 Your DVD/VCR Receiver's NICAM digital sound decoder allows you to enjoy broadcasts with NICAM sound, as well as standard stereo NICAM, bilingual and mono sound.
The particular type of sound received or that recorded will be briefly displayed on the TV screen for a couple of seconds:
STEREO
Sound is automatically recorded on the Hi-Fi stereo and mono tracks of the video tape.
BIL NICAM
Both audio channels will be recorded on the Hi-Fi stereo tracks. The primary language channel (left) will be recorded on the mono track of the video tape. MONO
The sound is recorded on the Hi-Fi tracks and the mono track of the video tape without any separation.

2 Press AUDIO repeatedly until the desired audio mode appears.
The choice is STEREO, LEFT (left channel), RIGHT (right channel) and MONO.
In BIL NICAM playback the primary language is output on the left channel and the secondary language is output simultaneously from the right channel when audio output is set to STEREO.
The primary language will be output from both channels when the audio setting is MONO. Please note that when adjusting the tracking control Hi-Fi stereo sound may revert to MONO.
Note
If the quality of stereo sound being received is poor, the broadcast is automatically received in monaural with better quality.
Still, if the quality of the sound is poor, set NIC in the main menu to OFF (see page 15). NICAM broadcasts will be detected.
Widescreen Compatibility 16:9
Your DVD/VCR Receiver can record and play back widescreen aspect ratio programmes (16:9). To record a wide screen format programme successfully the correct type of widescreen signal must be broadcast by the TV station.
1 Press MENU (i) and press ← or → to select 16:9/4:3.
Press ENTER/OK.

2 Press ↑ or ↓ repeatedly to select : AUTO, 4:3 or 16:9.
AUTO:
Automatically plays back Widescreen programmes as Widescreen and Normal programmes as normal.
4:3:
Only for playing back and recording Normal format recordings (4:3).
16:9:
Only for playing back and recording Widescreen format recordings (16:9).
3 Press MENU (i) to remove the menus.
Note
To enjoy Widescreen playback you must connect your DVD/VCR Receiver to the TV using a SCART lead.
To set the decoder
We have already described, how to connect a decoder for pay-TV station as DECODER on page 10. For the recording of an encoded station you do not have to control anything. You just select the station and wait shortly until the decoding will start.
11 Press MENU (i). The main menu will appear on the TV screen.
Press ← or → to select the DECODER. Press ENTER/OK
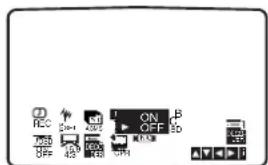
2 Press ↑ or ↓ to select ON when the receiving encoded broadcast.
The connected decoder will be activated.
3 Press MENU (i) to remove the menus from the TV screen.
VIDEO Operation (Continued)
Copying from DVD to VIDEO
This unit allows you to copy the contents of a DVD to a VHS tape.
Note
If the DVD you are attempting to copy is copy protected, you will not be able to copy the disc. It is not permitted to copy Macrovision encoded DVDs. "COPY LOCK" and "COPY PROTECTED DISC" appears in the display window and TV screen.
1 Insert Disc.
/Insert the disc you wish to copy in the DVD deck and close the disc tray.
2 Insert VHS Tape.
Insert a blank VHS video tape into the VIDEO deck.
Press ▷ (PLAY) on the DVD deck.
The DVD will go into play mode
- If the DVD disc menu appears, you may need to press the ▷ (PLAY) manually to begin copying.
Press REC/ITR (●).
The DVD/VCR Receiver will go into Record mode.
5 Stop the Copy Process.
When the DVD is finished playing, press ■ (STOP) to end the copy.
You must stop the Copy process manually when the DVD movie ends, or the unit may replay and record over and over again.
Note
If you try to copy a disc with NTSC disc, the recording will not be recorded correctly because this DVD/VCR Receiver's color system is PAL.
Recording from another video recorder
With the DVD/VCR Receiver you can make recordings from an external source, such as copying from another VIDEO or a camcorder.
Note
In the following description, this DVD/VCR Receiver will be one used for recording and other VIDEO will be used for playback.
11VIDEO should be connected to the one of the SCART sockets on the rear panel of your DVD/VCR Receiver or the AV3 sockets on the front panel of your DVD/VCR Receiver.
2 Press INPUT SELECT until the socket you wish to record from is displayed.
AV1 Sound and Picture recording using the lower EURO AV1 socket on the back of your DVD/VCR Receiver.
AV2 Sound and Picture recording using the upper EURO AV2 socket on the back of your DVD/VCR Receiver.
AV3 Sound and Picture recording from AV3 IN sockets (analog audio) on the front of your DVD/VCR Receiver.
3 Insert the recorded tape into VIDEO and a blank tape into DVD/VCR Receiver.
4 To start recording, press REC/ITR (●) on DVD/VCR Receiver and press ▷ (PLAY) on VIDEO.
5 When you want to finish copying, press the ■ (STOP) on both appliances.
Press ■ (STOP) at DVD/VCR Receiver.
Additional Information
If Timer record events Overlap...
Do not overlap programmes, since overlapping portions of the conflicting programmes will not be recorded. Earlier recording times have priority over later recording times as shown in the diagram.

bar
| Time | Program | Value | | :--- | :--- | :--- | | 16:00 | Case A | | | 17:00 | Case A | | | 18:00 | Case A | | | 16:00 | Case B | | | 17:00 | Case B | | | 18:00 | Case B | | | 16:00 | Case C | | | 17:00 | Case C | | | 18:00 | Case C | |: This potion will not be recorded.
Change (Deleting) the Timer Programme
If at a later date you wish to delete or change any of the settings in timer event memory you may do so without having to enter all the timer event information again. Simply display the timer event screen. Press or to select the event that you wish to delete or change. Press to delete the event...or
Press ENTER/OK to change; then press or to select; Station, Date, Start and End times, VPS/PDC and LP. Press or to enter the correct information.
Video Programme System (VPS)
The Video Programme System (VPS) ensures that the TV programmes that you have programmed for timer recording will be recorded exactly from their beginning to end, even if the actual broadcasting time differs from the scheduled time due to delayed start, or if the programme is extended beyond its scheduled time. Also, if a programme is interrupted, for example, if a news flash is inserted, the recording will also be interrupted automatically and resumed when the programme continues. The VPS signal is broadcast by the TV station and this controls the timer in the video recorder. VPS should be set ON for all timer recordings from TV stations broadcasting these signals. It should be set OFF for all timer recordings from TV stations that are not broadcasting these signals.
*** The similar system PDC, which is used in the time being in the Netherlands, can also be used with your new video recorder.
On Screen Display (OSD)
You may easily display the clock or tape counter and tape remaining, day, month, year, day of week, programme channel, tape speed and VIDEO function on the TV screen. If a recording is taking place these On Screen Displays will not be recorded onto the tape.
11 Press DVD DISPLAY (CLK/CNT) to display.
2 Press DVD DISPLAY (CLK/CNT) repeatedly to display the tape counter.
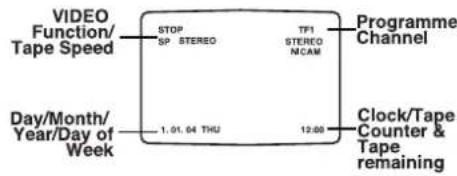
During playback or recording, the tape remaining is displayed with the tape counter.
3 After 3 seconds the display will clear from the TV screen, leaving only the clock or tape counter and tape remaining on the TV screen. Press DVD DISPLAY (CLK/CNT) again to remove all displays from the TV screen.
The tape remaining will only be accurate for E-180 and E-240 tapes.
The tape remaining indicator may not be accurate, since it depends on the type or condition of tape used. Also, the tape remaining indicator is not displayed just after a cassette has been inserted, or after playback or recording has begun.
Playing a DVD and Video CD
Playback Setup
DVD
-
VCD1.1V
- Turn on the TV and select the video input source connected to the DVD/VCR Receiver.
- Audio system: Turn on the audio system and select the input source connected to the DVD/VCR Receiver.
- Set the Output Source to DVD as shown in Selecting the Input/Output Source on page 13.
1 Press ≅ DVD to open the disc tray.
2 Place a disc on the tray, with the label facing up. When a double-sided DVD is inserted, make sure the side you want to play is facing down.
3 Press ≅ DVD to close the tray.
"READING" appears in the display window, and playback starts automatically. If playback does not start, press ▷ (PLAY).
In some cases, the disc menu might appear instead.
If a menu screen is displayed
A menu screen may appear automatically after loading a DVD.
DVD
Use ←/→/↑/↓ buttons to select the title/chapter you want to view, then press ENTER/OK to start playback.
Press DVD TOP MENU or DVD MENU to return to the menu screen.
VCD2.0
- Use the number buttons to select the track you want to view. Press RETURN to return to the menu screen.
- Menu setting and the exact operating procedures for using the menu may differ depending on the disc. Follow the instructions on the each menu screen. You also may set PBC to Off under setup. See page 23.
Notes
- If Parental Control is set and the disc is not within the Rating settings (not authorized), the 4-digit password must be entered and/or the disc must be authorized (see Parental Control, on page 22).
- DVDs may have a Region Code. Your DVD/VCR Receiver will not play discs that have a Region Code different from your DVD/VCR Receiver. The Region Code for this DVD/VCR Receiver is 2 (two).
- Do not keep a fixed image displayed on the screen for a long time.
General Features
Note
Unless stated otherwise, all operations described use the remote control. Some features may also be available on the Setup menu.
Resuming Playback
DVD
VCD1.1VCD2D
When you stop the disc. the player remembers the point where you pressed ■ (STOP) and "RESUME ■" appears on the TV screen. Press ▷ (PLAY) and play will resume from this point.
Tip
To play from the beginning of the disc, press ■ twice, then press ▷.
Notes
- Depending on where you stopped the disc, the recorder may not resume playback from exactly the same point.
- The point where you stopped playing is cleared when:
- Press ■ in the STOP mode.
Selecting Another TITLE
DVD

If a disc has more than one title, you can select another title as follows:
- Press DVD DISPLAY, then press the appropriate number buttons (0-9), to select a title number.
- Press DVD DISPLAY, then use to select a title number, then press ENTER/OK.
Selecting Another CHAPTER/TRACK
DVD
VCD2.0
VCD1.1


If a title on a disc has more than one chapter or a disc has more than one track, you can move to another chapter/track as follows:
- Press ◀◀◀ or ▶▶◀ briefly during playback to return to the beginning of the current chapter/track or to select the next chapter/track.
- Press I twice briefly to step back to the previous chapter/track.
- To go directly to any chapter during playback, press DVD DISPLAY. Use ♦/♦ to select chapter/track icon. Then, enter the chapter/track number with the number buttons (0-9) or use ◀/♦ to select chapter, then press ENTER/OK.
Notes
- For two-digit numbers, press the number buttons (0-9) in rapid succession.
- On a Video CD with PBC, you must set PBC to Off on the setup menu to use this function. See page 23.
Search
DVD

VCD1.1
1 Press ◀◀ or ▶▶ during playback.
The DVD/VCR Receiver will now go into SEARCH mode.
2 Press ◀◀ or ▶▶ repeatedly to select the required speed: X2 ◀, 1 ◀◀, 2 ◀◀, 3 ◀◀ (backward) or X2 ▶, 1 ▶◀, 2 ▶◀, 3 ▶◀ (forward).
With a Video CD, the Search speed changes: 1 ◀◀, 2 ◀◀, 3 ◀◀ (backward) or 1 ▶◀, 2 ▶◀, 3 ▶◀ (forward).
3 To return to playback, press ▷ (PLAY).
Still Picture
DVD

VCD1.1
1 Press III (PAUSE) during playback.
The DVD/VCR Receiver will go into PAUSE mode.
2 To return to playback, press or II (PAUSE) again or ▷ (PLAY).
General Features (Continued)
Slow Motion
DVD

VCD1.1V
1 Press III (PAUSE) during playback.
The DVD/VCR Receiver will now go into PAUSE mode.
2 Press SLOW ◀ or ▶ during pause mode. The DVD/VCR Receiver will enter SLOW mode.
3 Use SLOW ◀ or ▶ to select the required speed:
4 ◀, 3 ◀, 2 ◀ or 1 ◀ (backward), or
4 ▶, 3 ▶, 2 ▶ or 1 ▶ (forward).
4 To return to playback, press ▷ (PLAY).
Note
Slow motion playback in reverse is not applicable for Video CD.
Shuffle
Karaoke DVD

VCD1.1
1 Press SHUFFLE during playback or in Stop mode. The unit automatically begins Shuffle Playback and "SHUFFLE" appears on the TV screen.
2 To return to normal playback, press SHUFFLE until "NORMAL" appears on the TV screen.
Tip
By pressing ▶▶ during Shuffle playback, the unit selects another title (track) and resumes Shuffle play-back.
Notes
- This function only works with DVD Karaoke discs and Video CD without PBC.
- On a Video CD with PBC, you must set PBC to Off on the setup menu to use the Shuffle function. See page 23.
- After finishing the Shuffle playback mode, Shuffle function is canceled.
Repeat
DVD

VCD1.1V
DVD Video Discs - Repeat Chapter/Title/Off
1 Press REPEAT when playing a disc.
The Repeat icon appears on the TV screen.
2 Press REPEAT to select a desired repeat mode.
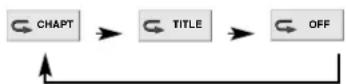
• CHAPT: repeats the current chapter.
• TITLE: repeats the current title on a disc.
• OFF: does not play repeatedly.
Video CDs - Repeat Track/All/Off
1 Press REPEAT when playing a disc.
The Repeat icon appears on the TV screen.
2 Press REPEAT to select a desired repeat mode.

- TRACK: repeats the current track
- ALL: repeats all the tracks on a disc.
- OFF: does not play repeatedly.
Notes
- On a Video CD with PBC, you must set PBC to Off on the setup menu to use the Repeat function. See page 23.
- By pressing ▶▶ during Random playback, the unit selects another title and resumes Random playback.
- When you press ◀◀ twice or ▶▶ during Repeat mode to go to previous track or next track, repeat mode is canceled.
Repeat A-B
DVD

VCD1.1


To repeat a sequence in a title(track):
1 During disc playback, Press A-B at your chosen start point.
“A *” appears briefly on the TV screen.
2 Press A-B again at your chosen end point.
"A B" appears briefly on the TV screen, and the repeat sequence begins.
3 To cancel the sequence and return to normal play, press A-B.
Note
Repeat A-B play may not work with some scene of the DVD.
Time Search
DVD


The Time Search function allows you to start playing at any chosen time on the disc.
1 Press DVD DISPLAY during playback. The on-screen display appears on the screen.
The Time Search box shows the elapsed playing time of the current disc.
2 Within 10 seconds, use ♦/▼ to select the Time Search icon in the on-screen display.
The “-:-:-:-” appears in the Time Search box.
3 Within 10 seconds, use the number buttons to enter the required start time. Enter hours, minutes and seconds from left to right in the box.
If you enter the wrong numbers, press CLEAR to remove the numbers you entered. Then enter the correct numbers.
4 Within 10 seconds, press ENTER/OK.
Playback starts from the selected time on the disc. If you enter an invalid time, playback will continue from the current point.
3D Surround
DVD

VCD1.1


This unit can produce a 3D Surround effect, which simulates multi-channel audio playback from two conventional stereo speakers, instead of the five or more speakers normally required to listen to multi-channel audio from a home theatre system.
1 Press SOUND FIELD to select "3D SUR" during playback.
2 To turn off the 3D Surround effect, press SOUND FIELD again to select "BYPASS".
Note
On DVD, you can select "3D SUR" only during playing
2 channel audio.
DVD and Video CD Operation (Continued)
Special DVD Features
Checking the contents of DVD Video discs: Menus
DVDs may contain menus that allow you to access special features. To use the disc menu, press DVD DISPLAY. Then, press the appropriate number button to select an option. Or, use ◀/◆/♠/↓ buttons to highlight your selection, then press ENTER/OK.
Title Menu DVD
1 Press DVD TOP MENU.
If the current title has a menu, the menu will appear on the screen. Otherwise, the disc menu may appear.
2 The menu can list camera angles, spoken language and subtitle options, and chapters for the title.
3 To remove the title menu, press DVD TOP MENU again.
DVD Menu DVD
1 Press DVD MENU.
The disc menu is displayed.
2 To remove the disc menu, press DVD MENU again.
Camera Angle

If the disc contains sequences recorded from different camera angles, the angle icon appears on the TV screen. You can then change the camera angle if you wish.
- Press ANGLE repeatedly during playback to select a desired angle.
The number of the current angle appears on the display.
Changing the Audio Language

Press AUDIO repeatedly during playback to hear a different audio language or audio track.
Changing the Audio Channel


Press AUDIO repeatedly during playback to hear a different audio channel (ST, LEFT or RIGHT).
Subtitle DVD 1 ENG
Press SUBTITLE repeatedly during playback to see the different subtitle languages.
Note
If appears, the feature at that moment or with that specific DVD.
Screen Saver
The screen saver picture appears when you leave the DVD/VCR Receiver in Stop mode for about 5 minutes.
Audio CD and MP3 Disc Operation
Playing an Audio CD and MP3 Disc MP3C
The DVD/VCR Receiver can play MP3 formatted recordings on CD-ROM, CD-R or CD-RW discs. Before playing MP3 disc, read the notes on MP3 files on right.
1 Insert a disc and close the tray.
Audio CD: Audio CD menu appears on the TV screen go to step 4.
MP3 disc: The MP3/JPEG select menu appears on the TV screen. Go to step 2

2 Use ♦/♦ to select the MP3 then press ENTER/OK.
The MP3 disc Menu appears on the TV screen. Press RETURN to move to the MP3/JPEG select menu.

3 Use / to select a folder, and ENTER/OK. A list of files in the folder appears.
If a list of files contains another folder, repeat step 3 once more.
Tip
If you are in a file list and want to return to the Folder list, use the / to highlight - and press ENTER/OK to return to the previous menu screen.
4 Use ↑/↓ to select a track then press ▷ (PLAY) or ENTER/OK.
Playback starts.
During playback, the current track's elapsed playing time will appear in the display window and menu.
Playback will stop at the end of the disc.
Press DVD TOP MENU to move to the next page.
Press DVD MENU to move to the previous page.

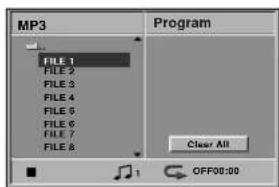
Audio CD Menu MP3 disc Menu
5 press ■ (STOP) to stop playback.
Notes on MP3 Files
About MP3
- An MP3 file is audio data compressed by using the MPEG1 audio layer-3 file-coding scheme. We call files that have the ".mp3" file extension "MP3 files".
- The DVD/VCR Receiver can not read an MP3 file that has a file extension other than ".mp3".
MP3 Disc compatibility with this DVD/VCR Receiver is limited as follows:
- Sampling Frequency : only at 44.1kHz
●○Bit rate : within 32 - 320kbps - CD-R physical format should be "ISO 9660"
- If you record MP3 files using the software which cannot create a FILE SYSTEM, for example "UDF" etc., it is impossible to playback MP3 files. We recommend that you use an ISO9660 file system.
- A single session disc requires MP3 files in the first track. If there is no MP3 file in the 1st track, it cannot playback MP3 files. If you wish to playback MP3 files, format all the data in the disc or use a new one.
- File names should be named using 8 letters or less and must incorporate ".mp3" extension e.g. "*******.mp3".
- Do not use special letters such as "/ : * ? "< >" etc.
- Total number of files on the disc should be less than 650.
This DVD/VCR Receiver requires discs/recordings to meet certain technical standards in order to achieve optimal playback quality. Pre-recorded DVDs are automatically set to these standards. There are many different types of recordable disc formats (including CD-R containing MP3 files). That require certain pre-existing conditions (see above) to insure compatible playback.
Customers should also note that permission is required in order to download MP3 files and music from the Internet. Our company has no right to grant such permission. Permission should always be sought from the copyright owner.
Audio CD and MP3 Disc Operation (Continued)
Pause

MP3C
1 Press III (PAUSE) during playback.
2 To return to playback, press Ⅲ (PAUSE) again or press ▷ (PLAY).
Selecting Another Track

MP3C
If a disc has more than one track, you can move to another track as follows:
- Press I◀◀ or ▶▶I briefly during playback to go to the next track or to return to the beginning of the current track.
- Press ◀◀ twice briefly to step back to the previous track.
- On Audio CDs, to go directly to any track, enter the track number using the number buttons (0-9) during playback.
Note
For two-digit numbers, press the number buttons (0-9) in rapid succession.
Search

MP3C
1 Press ◀◀ or ▶▶ for about two seconds during playback.
The DVD/VCR Receiver will now go into SEARCH mode.
2 Press ◀◀ or ▶▶ repeatedly to select the required speed:
1 ◀◀, 2 ◀◀, 3 ◀◀ (backward) or 1 ▶▶, 2 ▶▶, 3 ▶▶ (forward).
Search speed and direction are indicated on the menu screen.
3 To return to playback, press ▷ (PLAY).
Shuffle

MP3C
1 Press SHUFFLE during playback or in Stop mode. The unit automatically begins Shuffle Playback and "SHUFFLE" and "SHUF" appears in the display window and menu screen.
2 To return to normal playback, press SHUFFLE repeatedly until "SHUFFLE" and "SHUF" disappears from the display window and menu screen.
Tip
By pressing ▶▶ during Shuffle playback, the unit selects another track and resumes Shuffle playback.
Note
After finishing the Shuffle playback mode, Shuffle function is canceled.
Repeat

MP3C
1 Press REPEAT when playing a disc.
The Repeat icon appears on the TV screen.
2 Press REPEAT to select a desired repeat mode.

- TRACK: repeats the current track
- ALL: repeats all the tracks on a disc.
• OFF: does not play repeatedly.
Note
When you press I◀◀ twice or ▶▶I during Repeat mode to go to previous track or next track, repeat mode is canceled.
Repeat A-B
CD
To repeat a sequence in a track.
1 During disc playback, press A-B at your chosen starting point.
The Repeat icon and "A * " appears on the menu screen.
2 Press A-B again at your chosen end point.
"A B" appears on the menu screen, and the repeat sequence begins.
3 To cancel the sequence and return to normal play, press A-B again.
The Repeat icon and "OFF" appears on the menu screen.
3D Surround
CD
This unit can produce a 3D Surround effect, which simulates multi-channel audio playback from two conventional stereo speakers, instead of the five or more speakers normally required to listen to multi-channel audio from a home theatre system.
1 Press SOUND FIELD to select "3D SUR" during play-back.
2 To turn off the 3D Surround effect, press SOUND FIELD again to select "BYPASS".
Changing the Audio Channel
CD
Press AUDIO repeatedly during playback to hear a different audio channel (ST, LEFT, or RIGHT).
JPEG File Operation
Viewing JPEG Files on a Disc JPEG
This DVD/VCR Receiver can play discs with JPEG files. Before playing JPEG files, read the notes on JPEG Files on right.
1 Insert a disc and close the tray.
The MP3/JPEG select menu appears on the TV screen.

2 Use ♦/♦ to select the JPEG then press ENTER/OK.
The JPEG menu appears on the TV screen.

3 Use / to select a folder, and ENTER/OK. A list of files in the folder appears.
Press RETURN to move to the MP3/JPEG select menu.
Tip
If you are in a file list and want to return to the Folder list, use the ♦/♦ buttons on the remote to highlight “ ≡…” and press ENTER/OK to return to the previous menu screen.
4 Use ↗/↓ to select a file then press ENTER/OK or ▷ (PLAY).
Viewing the file function starts.
While viewing a file, press RETURN to move to the previous menu (JPEG menu).
Press DVD TOP MENU to move to the next page. Press DVD MENU to move to the previous page.

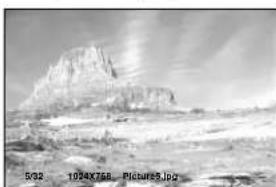
natural_image
Black-and-white landscape photo of a desert with rocky outcrops and sparse vegetation (no text or symbols visible)Tip
There are three viewing Slide Speed options: Fast, Normal, Slow, and Off. Use / to highlight the Slide Speed then use / to select the option you want to use, and press ENTER/OK.
5 Press ■ (STOP) to stop viewing. The JPEG menu appears.
Selecting another Files
Press ◀◀◀ or ▶▶◀ once while viewing a picture to advance to the next file or to the previous file.
Still Picture
1 Press III (PAUSE) during slide show.
The DVD/VCR Receiver will now go into PAUSE mode.
2 To return to the slide show, press ▷ (PLAY) or ▪ (PAUSE) again.
To flip the picture
Press ♠/♦ while showing a picture to flip the picture horizontally or a vertically.
To rotate picture
Press ←/→ while showing a picture to rotate the picture clockwise or counter clockwise.
To record the picture slide show
Press ● REC/ITR to record.
Notes on JPEG Files
- Depending upon the size and number of the JPEG files, it could take a long time for the DVD/VCR Receiver to read the disc's contents. If you don't see an on-screen display after several minutes, some of the files are too big — reduce the resolution of the JPEG files to less than 2 mega pixels and burn another disc.
- Total number of files and folders on the disc should be less than 650.
- Some disc may be incompatible due to different recording format or condition of disc.
- If the files have ".jpe" or ".jpeg" extensions, please rename them as ".jpg" files.
- File names without ".jpg" extension will not be able to be read by this DVD/VCR Receiver, even though the files are shown as JPEG image files in windows explorer.
Programmed Playback with Audio CD and MP3 Disc
The Program function enables you to store your favorite tracks from any disc in the DVD/VCR Receiver memory.
Program can contain 30 tracks.
1 Press PROGRAM during playback or in the stop mode to enter the Program Edit mode.
The mark will appear to the right of the word
Program on the right side of the menu screen.
Note
Press PROGRAM to exit the Program Edit mode; the mark will disappear.
2 Select a track, then press ENTER/OK to place the selected track on the Program list.
3 Repeat step 2 to place additional tracks on the Program list.


Audio CD menu MP3 disc Menu
4 Press →. The progr
4 The programmed track you selected last is highlighted on the program list.
5 Press ↑/↓ to select the track you want to start playing.
Press DVD TOP MENU to move to the next page. Press DVD MENU to move to the previous page.
Press ▷ (PLAY) or ENTER/OK to start.
Playback begins in the order in which you programmed the tracks and "PGM" appears on the menu screen. Playback stops after all of the tracks on the Program list have played once.
7 To return normal playback from programmed playback, press PROGRAM to exit the Program Edit mode. Select a track of CD (or MP3) list and then press ENTER/OK or ▷ (PLAY).
"PGM" indicator disappears in the display window.
Programmed Playback with Video CD
Note
On a Video CD with PBC, you must set PBC to Off on the setup menu to use the Program function. See page 23.
1 Insert Video CD and close the tray.
2 Press PROGRAM while playback is stopped. The VCD Program menu will appear.
Note
Press RETURN, PROGRAM or ▷ (PLAY) to exit the Program menu.
3 Follow steps 2-6 of "Programmed Playback with Audio CD and MP3 disc" on left.
"PGM" and "PROGRAM" appears in the display window and TV screen.
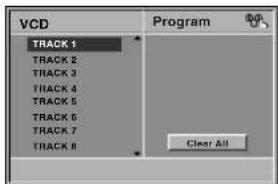
4 To return normal playback from programmed playback, press PROGRAM.
"PGM" indicator disappears in the display window.
Repeat Programmed Tracks
1 Press REPEAT when playing the programmed tracks. The Repeat icon appears on the TV screen.
2 Press REPEAT to select a desired repeat mode.

- TRACK: repeats the current track
- ALL: repeats all tracks on the program list.
• OFF: does not play repeatedly.
Erasing a Track from Program List
1 Press PROGRAM during playback (Audio CD and MP3 disc only) or stop to enter the Program Edit mode.
The mark will appear.
2 Press → to move to the Program list.
3 Use / to select the track that you wish to erase from the Program list.
4 Press CLEAR.
The track will be erased from the Program list.
Erasing the whole Program List
1 Follow steps 1-2 of "Erasing a Track from Program List" as above.
2 Use / to select "Clear All", then press ENTER/OK. The complete Program for the disc will be erased
Notes
- The programs are cleared when the disc is removed.
- The programs are cleared when another function mode (VIDEO, radio etc.) is selected.
Speaker Setup
You can set your personal preferences on the DVD function mode.
Adjust the following settings for the built-in 5.1 channel surround decoder.
1 Press SETUP/MENU. The Setup menu appears.

2 Select "5.1 Speaker Setup" using the ↑/↓ buttons on the setup menu.
3 While "5.1 Speaker Setup" is selected, press → button.
4 Press → buttons to select the desired speaker.
5 Adjust options by using ♦/♦/♦/♦ buttons.
Speaker selection
Select a speaker that you want to adjust. ((Front speaker (Left), Front speaker (Right), Center Speaker, Rear speaker (Left), Rear speaker (Right), or Subwoofer))
Note
Certain speaker settings are prohibited by the Dolby Digital licensing agreement.
Volume
Press / to adjust the output level of the selected speaker. (-6dB \~ 6dB)
Size
Since the speaker settings are fixed, you cannot change the settings.
- Subwoofer's size is fixed "Large" and the other speaker's size are fixed "small".
Distance
If you connected speakers to your DVD/VCR Receiver, setting the Distance lets the speakers (except subwoofer) know how far the sound has to travel to reach your set listening point. This allows the sound from each speaker to reach the listener at the same time (0.3 - 6.0 m, 0.3m=1ft).
Note
You can not set the distance of subwoofer speaker.
Test
Press ENTER/OK to test the signals of each speaker. Adjust the volume to match the volume of test signals memorized in the system.
- Front Left (L) → Center → Front Right (R) → Rear Right (R) → Rear Left (L) → Subwoofer
You can stop the test using ↑/↓.
Return
Press ENTER/OK to return to the previous menu.
Radio Operation
Presetting the Radio Stations
You can preset 30 stations for FM and AM. Before tuning, make sure that you have turned down the volume.
Notes
●The On Screen Display for radio is not appeared when:
- the TIMER appears in the display window.
- the DVD/VCR Receiver in recording mode.
1 Press TUNER FM/AM on the remote control until the frequency band appears on the display and TV screen.

2 Press PRESET (+/-) on the remote control to select your desired radio channel.

3 Press TUNER FM/AM on the remote control to select the desired band.
4 Hold down TUNING (+/-) on the remote control for 1 or 2 seconds, and a station is searched for automatically.
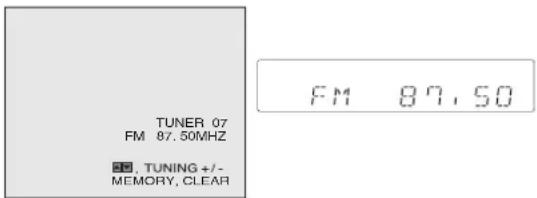
5 Press MEMORY on the remote control.
MEMORY
6 Repeat steps 2 to 5 to store other stations.
Listening to the Radio
Preset radio stations in the DVD/VCR Receiver memory first (see "Presetting radio stations" on the left).
1 Press TUNER FM/AM on the remote control until the frequency band appears on the display and TV screen.
The last received station is tuned in.
- Press PRESET (+/-) on the remote control repeatedly to select the preset station you want. Each time you press the button, the DVD/VCR Receiver tunes in one preset station at a time.
3 Adjust the volume by rotating VOLUME on the front panel or by pressing VOL + or - on the remote control repeatedly.
To Clear the Stored Radio Stations
1 Press TUNER FM/AM on the remote control until the frequency band appears on the display and TV screen.
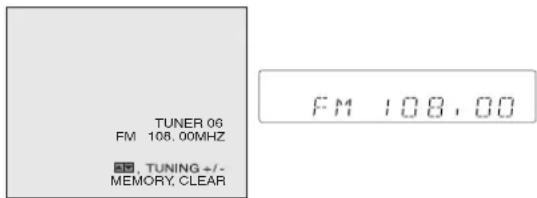
2 Press PRESET (+/-) on the remote control to select your desired station.
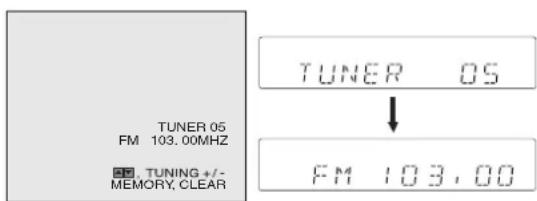
3 Press CLEAR the remote control to clear the stored radio station.

Radio Operation (Continued)
Tuning into a Station Manually
1 Press TUNER FM/AM on the remote control until the frequency band appears on the display and TV screen.
2 Press TUNER FM/AM on the remote control to select the desired band.
3 Press TUNING (+/-) on the remote control to tune in the desired station.
For your reference
Weak FM stations
"STEREO" may flash when the weak FM stereo signal is received, select another station.
To turn off the radio
Press I / ⏻ to turn the DVD/VCR Receiver off or select another function mode (DVD or VIDEO).
Tuning into a Station Automatically
Hold down TUNING (+/-) on the remote control for 1 or 2 seconds, and a station is searched for automatically.
Note
The search may not stop at a station with a very weak signal.
Muting
Press MUTING to mute your unit.
You can mute your unit in order, for example, to answer the telephone, MUTING appear in the display.
RDS Operation
This unit is equipped with RDS (Radio Data System), which brings a wide range of information to FM radio. Now in use in many countries, RDS is a system for transmitting station call signs or network information, a description of station programme type text message about the station or specifics of musical selection and the correct time.
RDS Tuning
When a FM station is tuned in and it contains RDS data, the unit will automatically display the station's call sign and the RDS indicator will light in the Display Window as well as indicators for the RDS services programme (PS) if transmitted by the station.
RDS Display
The RDS system is capable of transmitting a wide variety of information in addition to the initial call sign that appears when a station is first tuned. In normal RDS operation the display will indicate the station name. Pressing RDS on the remote control enables you to show the station name.
Note
If the RDS services programme (PS) is not being transmitted, the Display Window will show a PS NONE message.
Controlling the TV with the Supplied Remote
By adjusting the remote signal, you can control your TV with the supplied remote.
Notes
- If you enter a new code number, the code number previously entered will be erased.
- When you replace the batteries of the remote, the code number may be reset to the default (SONY) setting. Reset the appropriate code number.
Controlling TVs with the remote
Press and hold TV I / ⏻ while entering your TV's manufacturer's code (see the table) using the number buttons and press ENTER/OK. Then release TV I / ⏻.

Code numbers of controllable TVs
If more than one code number is listed, try entering them one at a time until you find the one that works with your TV.
Manufacturer Code Number
| SONY 501 | |
| AIWA 553, 501 | |
| DAEWOO 504, 505, 506, 507, 515, 544 | |
| FISHER 508 | |
| GOLDSTAR/LG 503, 511, 512, 515, 534, 544 | |
| GRUNDIG 517, 534 | |
| HITACHI 513, 514, 515, 544 | |
| JVC 516 | |
| MAGNAVOX 503, 518, 544 | |
| MITSUBISHI/MGA 503, 519, 544 | |
| NEC | 503, 520, 544 |
| PANASONIC | 509, 524 |
| PHILIPS | 515, 518 |
| PIONEER | 509, 525, 526, 540 |
| RCA/PROSCAN | 510, 527, 528, 529, 544 |
| SAMSUNG | 503, 515, 531, 532, 533, 534, 544 |
| SANYO | 508, 545, 546, 547 |
| SHARP | 535 |
| TELEFUNKEN | 523, 536, 537, 538 |
| THOMSON | 537, 539 |
| TOSHIBA | 535, 540, 541 |
| ZENITH | 542, 543 |
Controlling the TV
You can control your TV using the buttons below.
| By pressing | You can |
| TV I / ⏻ | Turn the TV on or off. |
| TV/VIDEO | Switch the TV's input source between the TV and other input sources. |
Note
Depending on the TV, you may not be able to control your TV or to use some of the buttons above.
Language Code List
Enter the appropriate code number for the initial settings "Disc Audio", "Disc Subtitle" and/or "Disc Menu" (See page 21).
| Code Language | Code Language | Code Language | Code Language |
| 6566 Abkhazian | 7074 Fiji | 7678 Lingala | 8373 Singhalese |
| 6565 Afar | 7073 Finnish | 7684 Lithuanian | 8375 Slovak |
| 6570 Afrikaans | 7082 French | 7775 Macedonian | 8376 Slovenian |
| 8381 Albanian | 7089 Frisian | 7771 Malagasy | 8379 Somali |
| 6577 Ameharic | 7176 Galician | 7783 Malay | 6983 Spanish |
| 6582 Arabic | 7565 Georgian | 7776 Malayalam | 8385 Sudanese |
| 7289 Armenian | 6869 German | 7784 Maltese | 8387 Swahili |
| 6583 Assamese | 6976 Greek | 7773 Maori | 8386 Swedish |
| 6588 Aymara | 7576 Greenlandic | 7782 Marathi | 8476 Tagalog |
| 6590 Azerbaijani | 7178 Guarani | 7779 Moldavian | 8471 Tajik |
| 6665 Bashkir | 7185 Gujarati | 7778 Mongolian | 8465 Tamil |
| 6985 Basque | 7265 Hausa | 7865 Nauru | 8484 Tatar |
| 6678 Bengali; Bangla | 7387 Hebrew | 7869 Nepali | 8469 Telugu |
| 6890 Bhutani | 7273 Hindi | 7879 Norwegian | 8472 Thai |
| 6672 Bihari | 7285 Hungarian | 7982 Oriya | 6679 Tibetan |
| 6682 Breton | 7383 Icelandic | 8065 Panjabi | 8473 Tigrinya |
| 6671 Bulgarian | 7378 Indonesian | 8083 Pashto, Pushto | 8479 Tonga |
| 7789 Burmese | 7365 Interlingua | 7065 Persian | 8482 Turkish |
| 6669 Byelorussian | 7165 Irish | 8076 Polish | 8475 Turkmen |
| 7577 Cambodian | 7384 Italian | 8084 Portuguese | 8487 Twi |
| 6765 Catalan | 7465 Japanese | 8185 Quechua | 8575 Ukrainian |
| 9072 Chinese | 7487 Javanese | 8277 Rhaeto-Romance | 8582 Urdu |
| 6779 Corsican | 7578 Kannada | 8279 Rumanian | 8590 Uzbek |
| 7282 Croatian | 7583 Kashmiri | 8285 Russian | 8673 Vietnamese |
| 6783 Czech | 7575 Kazakh | 8377 Samoan | 8679 Volapük |
| 6865 Danish | 7589 Kirghiz | 8365 Sanskrit | 6789 Welsh |
| 7876 Dutch | 7579 Korean | 7168 Scots Gaelic | 8779 Wolof |
| 6978 English | 7585 Kurdish | 8382 Serbian | 8872 Xhosa |
| 6979 Esperanto | 7679 Laothian | 8372 Serbo-Croatian | 7473 Yiddish |
| 6984 Estonian | 7665 Latin | 8378 Shona | 8979 Yoruba |
| 7079 Faroese | 7686 Latvian, Lettish | 8368 Sindhi | 9085 Zulu |
Area Code List
Enter the appropriate code number for the initial setting "Area Code" (See page 22).
Code Country
AD Andorra
AE United Arab Emirates
AF Afghanistan
AG Antigua and Barbuda
Al Anguilla
AL Albania
AM Armenia
AN Netherlands Antilles
AO Angola
AQ Antarctica
AR Argentina
AS American Samoa
AT Austria
AU Australia
AW Aruba
AZ Azerbaijan
BA Bosnia-Herzegovina
BB Barbados
BD Bangladesh
BE Belgium
BF Burkina Faso
BG Bulgaria
BH Bahrain
BI Burundi
BJ Benin
BM Bermuda
BN Brunei Darussalam
BO Bolivia
BR Brazil
BS Bahamas
BT Bhutan
BV Bouvet Island
BW Botswana
BY Belarus
BZ Belize
CA Canada
CC Cocos (Keeling) Islands
CF Central African Republic
CG Congo
CH Switzerland
Cl Ivory Coast
CK Cook Islands
CL Chile
CM Cameroon
CN China
CO Colombia
CR Costa Rica
CS Former Czechoslovakia
CU Cuba
CV Cape Verde
CX Christmas Island
CY Cyprus
CZ Czech Republic
DE Germany
DJ Djibouti
DK Denmark
DM Dominica
DO Dominican Republic
DZ Algeria
EC Ecuador
EE Estonia
EG Egypt
EH Western Sahara
Code Country
ER Eritrea
ES Spain
ET Ethiopia
FI Finland
FJ Fiji
FK Falkland Islands
FM Micronesia
FO Faroe Islands
FR France
FX France (European Territory)
GA Gabon
GB Great Britain
GD Grenada
GE Georgia
GF French Guyana
GH Ghana
GI Gibraltar
GL Greenland
GM Gambia
GN Guinea
GP Guadeloupe (French)
GQ Equatorial Guinea
GR Greece
GS S. Georgia & S. Sandwich Isls.
GT Guatemala
GU Guam (USA)
GW Guinea Bissau
GY Guyana
HK Hong Kong
HM Heard and McDonald Islands
HN Honduras
HR Croatia
HT Haiti
HU Hungary
ID Indonesia
IE Ireland
IL Israel
IN India
IO British Indian Ocean Territory
IQ Iraq
IR Iran
IS Iceland
IT Italy
JM Jamaica
JO Jordan
JP Japan
KE Kenya
KG Kyrgyzstan
KH Cambodia6
KI Kiribati
KM Comoros
KN Saint Kitts & Nevis Anguilla
KP North Korea
KR South Korea
KW Kuwait
KY Cayman Islands
KZ Kazakhstan
LA Laos
LB Lebanon
Code Country
LC Saint Lucia
LI Liechtenstein
LK Sri Lanka
LR Liberia
LS Lesotho
LT Lithuania
LU Luxembourg
LV Latvia
LY Libya
MA Morocco
MC Monaco
MD Moldavia
MG Madagascar
MH Marshall Islands
MK Macedonia
ML Mali
MM Myanmar
MN Mongolia
MO Macau
MP Northern Mariana Islands
MQ Martinique (French)
MR Mauritania
MS Montserrat
MT Malta
MU Mauritius
MV Maldives
MW Malawi
MX Mexico
MY Malaysia
MZ Mozambique
NA Namibia
NC New Caledonia (French)
NE Niger
NF Norfolk Island
NG Nigeria
NI Nicaragua
NL Netherlands
NO Norway
NP Nepal
NR Nauru
NU Niue
NZ New Zealand
OM Oman
PA Panama
PE Peru
PF Polynesia (French)
PG Papua New Guinea
PH Philippines
PK Pakistan
PL Poland
PM Saint Pierre and Miquelon
PN Pitcairn Island
PR Puerto Rico
PT Portugal
PW Palau
PY Paraguay
QA Qatar
RE Reunion (French)
RO Romania
RU Russian Federation
RW Rwanda
SA Saudi Arabia
SB Solomon Islands
Code Country
SC Seychelles
SD Sudan
SE Sweden
SG Singapore
SH Saint Helena
SI Slovenia
SJ Svalbard and Jan Mayen Islands
SK Slovak Republic
SL Sierra Leone
SM San Marino
SN Senegal
SO Somalia
SR Suriname
ST Saint Tome and Principe
SU Former USSR
SV El Salvador
SY Syria
SZ Swaziland
TC Turks and Caicos Islands
TD Chad
TF French Southern Territories
TG Togo
TH Thailand
TJ Tadjikistan
TK Tokelau
TM Turkmenistan
TN Tunisia
TO Tonga
TP East Timor
TR Turkey
TT Trinidad and Tobago
TV Tuvalu
TW Taiwan
TZ Tanzania
UA Ukraine
UG Uganda
UK United Kingdom
UM USA Minor Outlying Islands
US United States
UY Uruguay
UZ Uzbekistan
VA Vatican City State
VC Saint Vincent & Grenadines
VE Venezuela
VG Virgin Islands (British)
VI Virgin Islands (USA)
VN Vietnam
VU Vanuatu
WF Wallis and Futuna Islands
WS Samoa
YE Yemen
YT Mayotte
YU Yugoslavia
ZA South Africa
ZM Zambia
ZR Zaire
ZW Zimbabwe
Troubleshooting
Check the following guide for the possible cause of a problem before contacting service.
| Symptom | Cause | Correction |
| No power. | The power cord is disconnected. | Plug the power cord into the wall outlet securely. |
| The power is on, but the DVD/VCR Receiver does not work. | No disc is inserted.No tape is inserted. | Insert a disc or tape. (Check that the disc or tape indicator in the display window is lit.) |
| No picture. | The TV is not set to receive DVD/VCR Receiver signal output. | Select the appropriate video input mode on the TV so the picture from the DVD/VCR Receiver appears on the TV screen. |
| TV/VIDEO mode for DVD/VCR Receiver is set to TV. | Press the TV/VIDEO button on the remote control repeatedly to choose VIDEO mode. TV indicator disappears in the display window. | |
| The video cable is not connected securely. | Connect the video cable securely. | |
| The connected TV power is turned off. | Turn on the TV. | |
| No sound. | The equipment connected with the audio cable is not set to receive DVD/VCR Receiver signal output. | Select the correct input mode on the audio receiver so you can listen to the sound from the DVD/VCR receiver. |
| The audio cables are not connected securely. | Connect the audio cables securely. | |
| The power of the equipment connected with the audio cables is turned off. | Turn on the equipment connected with the audio cables. | |
| The playback picture is poor. | The disc is dirty. | Clean the disc. |
| Tape heads are dirty. | Clean video heads. | |
| Tape is a rental or was recorded on another VIDEO. | Use CH/PRESET (+/-) for manual tracking adjustment while tape is playing. | |
| The DVD/VCR Receiver does not start playback. | No disc is inserted.No tape is inserted. | Insert a disc or tape. (Check that the disc or tape indicator in the display window is lit.) |
| An unplayable disc is inserted. | Insert a playable disc. (Check the disc type, color system, and Regional code.) | |
| The disc is placed upside down. | Place the disc with the playback side down. | |
| The disc is not placed within the guide. | Place the disc on the disc tray correctly inside the guide. | |
| The disc is dirty. | Clean the disc. | |
| The Rating level is set. | Cancel the Rating function or change the rating level. | |
| Forward Skip is not available during DVD playback. | The current chapter is last of the current title. | Move to next title using DVD on-screen display (See page 20). |
| The remote control does not work properly. | The remote control is not pointed at the remote sensor of the DVD/VCR Receiver. | Point the remote control at the remote sensor of the DVD/VCR Receiver. |
| The remote control is too far from the DVD/VCR Receiver. | Operate the remote control within 7 m (23 ft). | |
| There is an obstacle in the path of the remote control and the DVD/VCR Receiver. | Remove the obstacle. | |
| The batteries in the remote control are exhausted. | Replace the batteries with new ones. | |
| This remote control uses the same buttons for VIDEO and DVD functions (ex. PLAY). | When using a VIDEO, first press the VIDEO button. When using a DVD, first press the DVD button. | |
| The tape does not run during recording. | The DVD/VCR Receiver is in the RECORD PAUSE MODE. | Press II (PAUSE) to resume recording. |
| The tape will not rewind or fast-forward. | The tape is already fully rewound or fast-forwarded. | Check the tape. |
| The playback picture does not appear while the tape is running. | If you're using only the RF cable for connection. | Set the TV to the Video channel (see page 15). |
| Noise appears during visual search. | This is normal. | Turn camcorder on and operate properly. |
| Noise appears during normal playback. | The automatic tracking mode is engaged. | Try manual tracking (see page 24). |
| Breaks are noticeable in Hi-Fi soundtrack. | The automatic tracking mode is engaged. | Try manual tracking (see page 24). |
| Recording cannot be started. | There is no tape loaded, or the tape loaded has had its record safety tab removed.DVD and VIDEO is working simultaneously. | Insert a tape, or using adhesive tape, cover the hole where the tab was removed.Set the function mode to VIDEO mode by pressing DVD/VCR on the front panel or VIDEO on the remote control. Press ■ (STOP) to stop the working then press REC. |
| Tape-to-tape editing is not possible. | The source (another VIDEO, camcorder) has not been properly connected. | Confirm that the camcorder is properly connected. |
| Timer recording won't work. | The clock/or the timer have been set incorrectly.The timer is not engaged.The loaded tape has had its record safety tab removed. | Re-perform the clock and/or timer settings.Press I / ↓ and confirm that the timer indicator is displayed on the DVD/VCR Receiver's Display.Insert a pate with adhesive tape, or insert a tape with the record safety tab intact. |
| PLEASE CHECK appears when entering SHOWVIEW programming number. | Incorrect the SHOWVIEW programming number. | Re-enter the SHOWVIEW programming number. |
| No Hi-Fi sound. | Audio mode is not set properly. | Select "STEREO" by repeatedly pressing AUDIO on the remote control. |
| No NICAM sound recording. | NICAM mode is not set properly. | Make sure NIC in the menu is set to "AUTO" for the station to be recorded. |
Moisture Condensation
| Moisture condensation can occur: | In locations where moisture condensation may occur: |
| When the DVD/VCR Receiver is moved from a cold place to a warm place.Under extremely humid conditions. | Keep the DVD/VCR Receiver plugged into an AC power outlet with POWER On. This will help prevent condensation.When condensation has occurred, wait a few hours for the DVD/VCR Receiver to dry before using it. |
Video Head Cleaning
The dirt accumulating on the head after a long period of time can cause the playback picture to become blurred or broken up. High quality video cassette tapes will not normally deposit dirt onto the video head, but old or damaged tapes might.
Specifications
General
(AVD-K150E)
Power requirements AC 230 V, 50/60 Hz
Power consumption 74W
Dimensions (approx.) 430 x 98 x 386 mm (17 x 3 78 x 15 14 inches) (W x H x D)
Mass (approx.) 6.5 kg (14 lb 6 oz)
Operating temperature 5°C to 35°C (41°F to 95°F)
Operating humidity 5 % to 90 %
DVD Section
Laser Semiconductor laser (Wavelength DVD: 650nm, CD: 780nm)
Signal system PAL
Frequency response DVD (PCM 48 kHz): 10 Hz to 22 kHz
CD: 10 Hz to 20 kHz
Signal-to-noise ratio More than 80 dB (ANALOG OUT connectors only)
Harmonic distortion Less than 0.05%
VIDEO Section
Head system 4 heads helical scan azimuth system
Television system PAL B/G colour system
Recording format PAL
RF OUT G
RF Modulator UHF 22-68 (Adjustable)
Tape speed PAL/MESECAM; 23.39 mm/s (SP), 16.69 mm/s (LP)
Maximum recording time SP: 4 hour (E-240 tape), LP: 8 hour (E-240 tape)
Rewind time About 180 seconds (E-180 tape)
Input level VIDEO: 1.0 V(p-p), 75 ohms, unbalanced
AUDIO: -6.0 dBm, more than 10 kohms (SCART)
-6.0 dBm, more than 47 kohms (RCA)
DIGITAL AUDIO IN: Optical connector x 1
Output level VIDEO: 1.0 V(p-p), 75 ohms, unbalanced
FM Tuner
Tuning Range 87.5 - 108.0 MHz
Intermediate Frequency 10.7 MHz
AM Tuner
Tuning Range 522 - 1,611 kHz
Intermediate Frequency 450 kHz
Specifications (Continued)
Amplifier Section
Stereo mode 70W + 70W (6Ω at 1 kHz, THD 10 %)
Surround mode Front: 70W/ch (6Ω at 1 kHz, THD 10 %)
Center*: 70W (6Ω at 1 kHz, THD 10 %)
Surround*: 70W/ch (6Ω at 1 kHz, THD 10 %)
Subwoofer*: 100W (4Ω at 30 Hz, THD 10 %)
* Depending on the sound mode settings and the source, there may be no sound output.
Inputs AV 2, AV 3, OPTICAL IN (AV3 OPT)
Speaker Section
Front/Center/Surround speakers (SS-MSP661)
Speaker system Full range, Magnetically shielded
Speaker units 80 mm cone type
Enclosure type Bass reflex
Rated Impedance 6 ohms
Dimensions (w/h/d) (Approx.) 120 x 122 x 100 mm (4 68 x 4 78 x 4 inches)
Mass (Approx.) 0.8 kg (1 lb 13 oz)
Subwoofer (SS-WMSP700)
Speaker system Magnetically shielded
Speaker units 200 mm cone type
Enclosure type Acoustically loaded bass reflex
Rated Impedance 4 ohms
Dimensions (w/h/d) (Approx.) 270 x 325 x 333 mm (10 6/8 x 12 7/8 x 13 1/8 inches) including front panel
Mass (Approx.) 6.5 kg (14 lb 6 oz)
Accessories
Scart cable 1
Speakers 6
Speaker color label 1
AM loop antenna 1
Remote control 1
Ferrite Core ....1
RF 75-ohm Coaxial Cable .....1
Speaker cables 6
Speaker foot (for satellite speaker) .....20
FM antenna 1
Batteries 2
- Design and specifications are subject to change without notice.
- Manufactured under license from Dolby Laboratories. "Dolby", "Pro Logic", and the double-D symbol are trademarks of Dolby Laboratories. Confidential unpublished works. Copyright 1992-1997 Dolby Laboratories. All rights reserved.
• DTS and DTS Digital Surround are registered trademarks of Digital Theatre Systems, Inc.


- DVD/VCR-Receiver Heimkinosystem
- OPR (Optimum Picture Response):
- Instant Timer Recording (ITR)
- Tipps
- Contenidos
- INTRODUCCIÓN
- Sugerencia
- DVD/VCR Receiver Home Theatre System
- Safety Precautions
- WARNING
- Precautions
- Safety
- Installing
- CAUTION
- For use of the VIDEO
- For use of the DVD player
- Welcome!
- SHOWVIEW®
- Table of Contents
- INTRODUCTION
- PREPARATION
- OPERATION
- REFERENCE
- About the symbols for instructions
- Before Use
- Notes
- Notes on DVDs and Video CDs
- Regional code of the DVD/VCR Receiver and DVDs
- Disc-related terms
- Title (DVD only)
- Chapter (DVD only)
- Track (Video CD and Audio CD only)
- Scene
- Types of video CDs
- Video CDs equipped with PBC (Version 2.0)
- Video CDs not equipped with PBC (Version 1.1)
- Before Use (Continued)
- Handling the unit
- When shipping the unit
- When setting up the unit
- To keep the surface clean
- Cleaning the unit
- To clean the cabinet
- To obtain a clear picture
- Notes on Discs
- Handling discs
- Storing discs
- Cleaning discs
- About Symbols
- About the symbol display
- About the disc symbols for instructions
- Selecting the Viewing Source
- Note
- Front Panel
- Remote Control
- Rear Panel
- Dust Protection Cap
- Remote control battery installation
- Connections
- TV and Decoder (or Set Top Box) Connections
- Tips
- Basic connections (AV)
- Basic connection (RF)
- Connections (Continued)
- Radio Aerial Connections
- Accessory Audio/Video (A/V) Connections to DVD/VCR Receiver
- Digital Device Connections
- Speaker System Connections
- About Ferrite Core
- How to attach the ferrite core.
- Speaker Positioning
- - Front Speakers
- • Center Speaker
- - Rear Speakers
- - Subwoofer
- Attaching the foot pads
- Attaching the color labels
- Selecting the Input/Output Source
- • DVD
- To view output from the DVD deck:
- • VIDEO
- To view output from the VIDEO deck:
- • TUNER FM/AM
- To listen to AM/FM radio broadcasts:
- - INPUT SELECT
- To listen and view to an audio source connected to the EURO AV1:
- To listen and view to an audio source connected to the EURO AV2:
- To listen to an audio source connected to the OPTICAL IN jack :
- To listen and view to an audio source connected to the AUDIO jack of AV3 IN with video from AV3:
- Mini Glossary for Audio Stream and Surround mode
- dts
- D (Dolby Digital)
- PL (Dolby Pro Logic)
- □□ PL II (Dolby Pro Logic II)
- MOVIE mode:
- MUSIC mode:
- MATRIX mode:
- 3D SURROUND
- BYPASS
- Sound Mode
- When DVD is inserted.
- For your reference
- Volume Control
- Muting
- Press MUTING to mute your unit.
- VIDEO Operation Setup
- Video channel set
- How to use the main menu
- VIDEO Operation Setup (Continued)
- Tuning in TV Stations Automatically
- Tuning in TV Stations Manually
- Changing the order of TV Stations
- Deleting TV Stations
- How to select Stored TV stations:
- Setting the Clock Manually
- To set the colour system
- AUTO:
- PAL:
- MESECAM:
- DVD Operation Setup
- General Explanation
- On-Screen Display
- On-screen display operation
- DVD Operation Setup (Continued)
- Initial Settings
- General Operation
- Language
- Disc Language DVD
- Menu Language
- Picture
- TV Aspect DVD
- Parental Control
- Rating DVD
- Area Code DVD
- Changing the 4-digit password
- If you forget your 4-digit password
- Speaker Setup
- Speaker settings DVD
- Others (DRC/PBC)
- Dynamic Range Control (DRC)
- Playback Control (PBC)
- Playing a tape
- Getting a better picture
- AUTO TRACKING
- Picture search:
- Logic search:
- CM (Commercial Message) Skip:
- VIDEO Operation (Continued)
- SHOWVIEW® System recording
- Intelligent LP Recording
- Timer recording using On Screen Display
- Hi-Fi Stereo Sound System
- Your DVD/VCR Receiver's NICAM digital sound decoder allows you to enjoy broadcasts with NICAM sound, as well as standard stereo NICAM, bilingual and mono sound.
- STEREO
- BIL NICAM
- Press AUDIO repeatedly until the desired audio mode appears.
- Widescreen Compatibility 16:9
- Press MENU (i) and press ← or → to select 16:9/4:3.
- Press ↑ or ↓ repeatedly to select : AUTO, 4:3 or 16:9.
- 4:3:
- 16:9:
- Press MENU (i) to remove the menus.
- To set the decoder
- Press MENU (i). The main menu will appear on the TV screen.
- Press ↑ or ↓ to select ON when the receiving encoded broadcast.
- Press MENU (i) to remove the menus from the TV screen.
- Copying from DVD to VIDEO
- Insert Disc.
- Insert VHS Tape.
- Press ▷ (PLAY) on the DVD deck.
- Press REC/ITR (●).
- Stop the Copy Process.
- Recording from another video recorder
- Press INPUT SELECT until the socket you wish to record from is displayed.
- Insert the recorded tape into VIDEO and a blank tape into DVD/VCR Receiver.
- Additional Information
- If Timer record events Overlap...
- Change (Deleting) the Timer Programme
- Video Programme System (VPS)
- On Screen Display (OSD)
- Playing a DVD and Video CD
- Playback Setup
- If a menu screen is displayed
- DVD
- VCD2.0
- General Features
- Resuming Playback
- Tip
- Selecting Another TITLE
- Selecting Another CHAPTER/TRACK
- Search
- Still Picture
- General Features (Continued)
- Slow Motion
- Shuffle
- Repeat
- DVD Video Discs - Repeat Chapter/Title/Off
- Video CDs - Repeat Track/All/Off
- Repeat A-B
- Time Search
- DVD and Video CD Operation (Continued)
- Special DVD Features
- Checking the contents of DVD Video discs: Menus
- Title Menu DVD
- DVD Menu DVD
- Camera Angle
- Changing the Audio Language
- Changing the Audio Channel
- Subtitle DVD 1 ENG
- Screen Saver
- Audio CD and MP3 Disc Operation
- Playing an Audio CD and MP3 Disc MP3C
- Insert a disc and close the tray.
- Use ♦/♦ to select the MP3 then press ENTER/OK.
- Use / to select a folder, and ENTER/OK. A list of files in the folder appears.
- Use ↑/↓ to select a track then press ▷ (PLAY) or ENTER/OK.
- press ■ (STOP) to stop playback.
- Notes on MP3 Files
- About MP3
- MP3 Disc compatibility with this DVD/VCR Receiver is limited as follows:
- Audio CD and MP3 Disc Operation (Continued)
- Pause
- MP3C
- Selecting Another Track
- CD
- JPEG File Operation
- Viewing JPEG Files on a Disc JPEG
- Use ♦/♦ to select the JPEG then press ENTER/OK.
- Use ↗/↓ to select a file then press ENTER/OK or ▷ (PLAY).
- Press ■ (STOP) to stop viewing. The JPEG menu appears.
- Selecting another Files
- To flip the picture
- To rotate picture
- To record the picture slide show
- Notes on JPEG Files
- Programmed Playback with Audio CD and MP3 Disc
- Press PROGRAM during playback or in the stop mode to enter the Program Edit mode.
- Select a track, then press ENTER/OK to place the selected track on the Program list.
- Repeat step 2 to place additional tracks on the Program list.
- Press →. The progr
- Press ↑/↓ to select the track you want to start playing.
- Press ▷ (PLAY) or ENTER/OK to start.
- To return normal playback from programmed playback, press PROGRAM to exit the Program Edit mode. Select a track of CD (or MP3) list and then press ENTER/OK or ▷ (PLAY).
- Programmed Playback with Video CD
- Insert Video CD and close the tray.
- Press PROGRAM while playback is stopped. The VCD Program menu will appear.
- Follow steps 2-6 of "Programmed Playback with Audio CD and MP3 disc" on left.
- To return normal playback from programmed playback, press PROGRAM.
- Repeat Programmed Tracks
- Erasing a Track from Program List
- Erasing the whole Program List
- Speaker selection
- Volume
- Size
- Distance
- Test
- Return
- Radio Operation
- Presetting the Radio Stations
- Listening to the Radio
- To Clear the Stored Radio Stations
- Radio Operation (Continued)
- Tuning into a Station Manually
- Weak FM stations
- To turn off the radio
- Tuning into a Station Automatically
- RDS Operation
- RDS Tuning
- RDS Display
- Controlling the TV with the Supplied Remote
- Controlling TVs with the remote
- Code numbers of controllable TVs
- Controlling the TV
- Language Code List
- Area Code List
- Code Country
- Troubleshooting
- Video Head Cleaning
- Specifications
- General
- (AVD-K150E)
- DVD Section
- VIDEO Section
- FM Tuner
- AM Tuner
- Specifications (Continued)
- Amplifier Section
- Speaker Section
- Front/Center/Surround speakers (SS-MSP661)
- Subwoofer (SS-WMSP700)
- Accessories
Brand : SONY
Model : DAV-D150E
Category : Home Theater System