
CID3711 - Car Radio PHILIPS - Free user manual and instructions
Find the device manual for free CID3711 PHILIPS in PDF.


| Product Type | Car Radio |
| Brand | Philips |
| Model | CID3711 |
| Dimensions (H x W x D) | 50 x 180 x 160 mm |
| Weight | 1.5 kg |
| Power Supply | 12V DC (negative ground) |
| Maximum Power Output | 4 x 50W (peak) |
| RMS Power Output | 4 x 20W |
| Tuner Bands | AM (FM stereo) |
| Preset Stations | 30 (18 FM / 12 AM) |
| CD Player | Yes |
| Audio Formats Supported | CD, CD-R/RW, MP3 |
| Front Panel | Detachable |
| AUX Input | 3.5 mm jack |
| Display | LCD with backlight |
| Clock | Yes |
| Remote Control | Yes (wired or infrared) |
| Security Code | Yes (4-digit PIN) |
| Fuse Rating | 10 A |
| Maintenance | Clean with soft dry cloth; avoid liquids |
| Repairability | Spare parts available through Philips service centers |
Frequently Asked Questions - CID3711 PHILIPS
User questions about CID3711 PHILIPS
0 question about this device. Answer the ones you know or ask your own.
Ask a new question about this device
Download the instructions for your Car Radio in PDF format for free! Find your manual CID3711 - PHILIPS and take your electronic device back in hand. On this page are published all the documents necessary for the use of your device. CID3711 by PHILIPS.
USER MANUAL CID3711 PHILIPS
Register your product and get support at
www.philips.com/welcome
CID3711
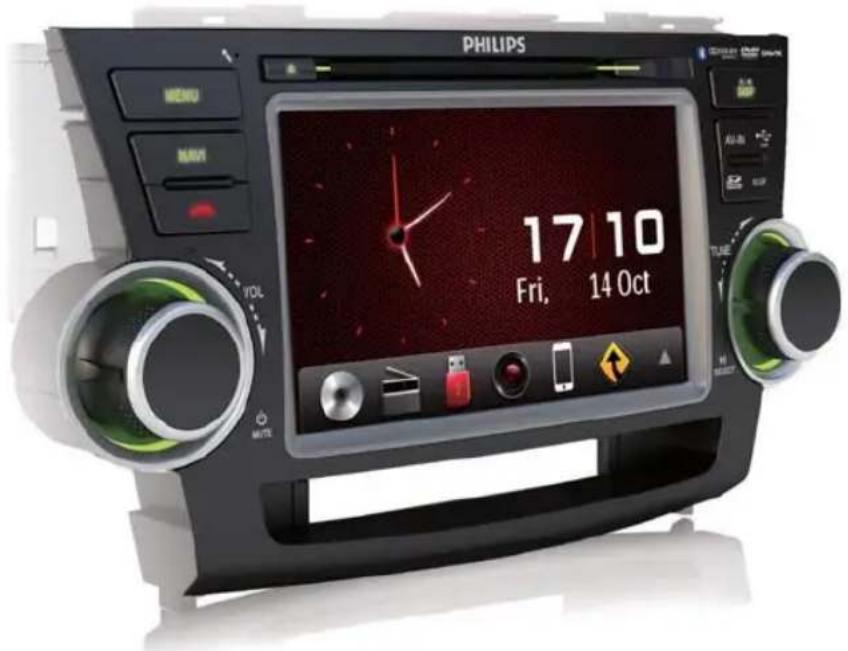
用户手册 37User manual 3
Contents
1 Important 4
Safety 4
Notice 4
2 Your in-car entertainment system 6
Introduction 6
What's in the box 6
Overview of the main unit 7
3 Get started 8
Install the car audio 8
Turn on 11
Set date and time 11
4 Play audio/video/picture 12
Load discs 12
Connect USB device 13
Insert SD/MMC card 13
Play/pause 13
Browse 14
Video options 14
Audio options 15
View photo 16
5 Listen to radio 17
Tune to a radio station 17
Store radio stations in memory 17
Tune to a preset station 18
6 Use navigation system 19
Insert map card 19
Use map 19
Upgrade the map 19
7 Play with Bluetooth device 21
Pair the Bluetooth-enabled devices 21
Make a call 21
Receive call 22
Adjust Bluetooth settings 22
Listen to music from Bluetooth device 23
8 Play iPod/iPhone 2
Compatible iPod/iPhone 24
Listen to the iPod/iPhone 24
Charge the iPod/iPhone 24
9 Adjust sound 25
Adjust volume 25
Mute 25
Select preset equalizer 25
Turn FullSound on/off 25
Turn DBB on/off 25
10 Adjust settings 26
Display system setup menu 26
Adjust general settings 26
Adjust sound settings 27
Adjust video settings 28
Adjust Bluetooth settings 28
Adjust volume settings 29
Adjust language settings 29
Adjust DVD rating 29
11 Others 31
Adjust brightness 31
Set rear view camera 31
Allocate Steering Wheel Control 31
Play from rear displays 31
Listen to other devices 32
Reset 32
Replace fuse 32
12 Product information 33
Supported video formats 34
USB playability information 34
Supported MP3 disc format 34
13 Troubleshooting 35
About the Bluetooth device 36
1 Important
Safety
- Read and understand all instructions before you use the apparatus. If damage is caused by failure to follow instructions, the warranty does not apply.
- Use of controls or adjustments or performance of procedures other than herein may result in hazardous radiation exposure or other unsafe operation.
- The device is designed for negative ground (earth) 12 V DC operation only.
- To reduce the risk of traffic accidents, do not watch video when driving.
- To ensure safe driving, adjust the volume to a safe and comfortable level.
- Improper fuses can cause damage or fire. When you need to change the fuse, consult a professional.
- Use only the supplied mounting hardware for a safe and secure installation.
- To avoid short circuits, do not expose the device to rain or water.
- The apparatus shall not be exposed to dripping or splashing.
- Do not place any sources of danger on the apparatus (e.g. liquid filled objects, lighted candles).
- Never insert objects into the ventilation slots or other openings on the device.
- Never place any objects other than discs into the disc tray/slot.
- To avoid exposure to laser radiation, do not disassemble the device.
- Risk of damage to the screen! Never touch, push, rub or strike the screen with any object.
- Never use solvents such as benzene, thinner, cleaners available commercially, or anti-static sprays intended for discs.
- Clean the apparatus with soft, damp cloth. Never use substances such as alcohol, chemicals or household cleaners on the apparatus.
Notice

Be responsible Respect copyrights
The making of unauthorized copies of copy-protected material, including computer programs, files, broadcasts and sound recordings, may be an infringement of copyrights and constitute a criminal offence. This equipment should not be used for such purposes.
The Bluetooth ^® word mark and logos are registered trademarks owned by Bluetooth SIG, Inc. and any use of such marks by Philips is under license.
Made for

iPhone
“Made for iPod” and “Made for iPhone” mean that an electronic accessory has been designed to connect specifically to iPod or iPhone respectively, and has been certified by the developer to meet Apple performance standards. Apple is not responsible for the operation of this device or its compliance with safety and regulatory standards. Please note that the use of this accessory with iPod or iPhone may affect wireless performance.
iPod and iPhone are trademarks of Apple Inc., registered in the U.S. and other countries.
DIVX™
ABOUT DIVX VIDEO: DivX® is a digital video format created by DivX, LLC, a subsidiary of Rovi Corporation. This is an official DivX Certified® device that plays DivX video. Visit divx.com for more information and software tools to convert your files into DivX videos.
ABOUT DIVXVIDEO-ON-DEMAND: This DivX Certified® device must be registered in order to play purchased DivX Video-on-Demand (VOD) movies. To obtain your registration code, locate the DivX VOD section in your device setup menu. Go to vod.divx.com for more information on how to complete your registration.
DivX ^® , DivX Certified ^® and associated logos are trademarks of Rovi Corporation or its subsidiaries and are used under license.
DOLBY.
DIGITAL
Manufactured under license from Dolby Laboratories.
"Dolby" and the double-D symbol are trademarks of Dolby Laboratories.
Other trademarks and trade names are those of their respective owners.
This apparatus includes this label:

Environmental information
All unnecessary packaging has been omitted.
We have tried to make the packaging easy to separate into three materials: cardboard (box), polystyrene foam (buffer) and polyethylene (bags, protective foam sheet.)
Your system consists of materials which can be recycled and reused if disassembled by a specialized company. Please observe the local regulations regarding the disposal of packaging materials, exhausted batteries and old equipment.
Disposal of your old product and batteries
Your product is designed and manufactured with high quality materials and components, which can be recycled and reused.
Never dispose of your product with other household waste. Please inform yourself about the local rules on the separate collection of electrical and electronic products and batteries.
The correct disposal of these products helps prevent potentially negative consequences on the environment and human health.
Your product contains batteries, which cannot be disposed of with normal household waste.
Please inform yourself about the local rules on separate collection of batteries. The correct disposal of batteries helps prevent potentially negative consequences on the environment and human health.
Please visit www.recycle.philips.com for additional information on a recycling center in your area.
Any changes or modifications made to this device that are not expressly approved by Philips Consumer Lifestyle may void the user's authority to operate the equipment.
2011 © Koninklijke Philips Electronics N.V. All rights reserved.
Specifications are subject to change without notice. Trademarks are the property of Koninklijke Philips Electronics N.V. or their respective owners. Philips reserves the right to change products at any time without being obliged to adjust earlier supplies accordingly.
2 Your in-car entertainment system
Congratulations on your purchase, and welcome to Philips! To fully benefit from the support that Philips offers, register your product at www.philips.com/welcome.
Introduction
With the car entertainment system, you can
- Quickly found routine through the navigation system
And you can also enjoy:
• Audio/video/JPEG pictures from
- DVD, VCD or CD
- USB devices
• SD/SDHC/MMC cards - iPod/iPhone
- External devices
• FM or AM (MW) radio
- Audio from Bluetooth-enabled devices
Besides, you can make/receive phone calls with Bluetooth-enabled devices.
What's in the box
Check and identify the contents of your package:
①

natural_image
Line drawing of a vintage car front panel with two side fans and a monitor (no text or symbols)②

③

④

⑤

⑥

⑦

⑨

10

① Main unit
② Power cable
③ AV OUT cable
④ MZ-TFT/Video out cable
⑤ Control cable
⑥ AV IN cable
⑦ GPS antenna
⑧ Cleaning cloth
⑨ Printing materials (include User manual, Quick start guide)
⑩ QC card / Guarantee card
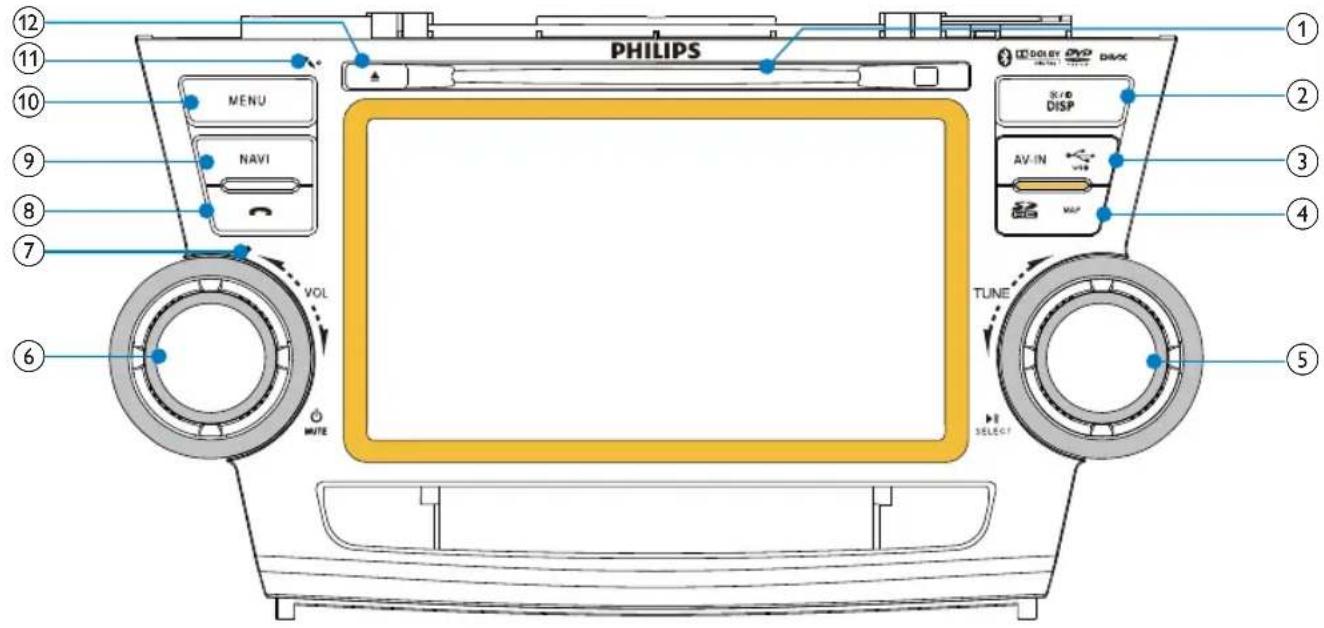
Overview of the main unit
English
① Disc slot
② DISP/☀️ / ⏱
- Adjust screen brightness.
- Turn on/off the screen display.
③ AV IN/
- Open the cover and connect the AV IN/USB device.
④ /MAP
- Open the cover and insert/remove the SDHC/GPS map card.
⑤ TUNE▶II SELECT
- Skip to the previous or next title, chapter, or track.
- Search backward/forward at different speeds.
- Confirm an entry or selection.
- Start, pause or resume play.
⑥ ⏻/MUTE/VOL
- Turn the unit on or off.
- Mute or unmute audio.
- Adjust volume.
⑦ RESET button
- Reset the unit when it hangs up.
⑧
- Terminate call.
⑨ NAVI
- Enter the GPS navigation system or exit.
⑩ MENU
- Return to the home menu.
11
• Built-in microphone for phone calls.
⑫
- Eject disc.
3 Get started

Caution
- Use of controls or adjustments or performance of procedures other than herein may result in hazardous radiation exposure or other unsafe operation.
Always follow the instructions in this chapter in sequence.
Install the car audio
These instructions are for a typical installation. However, if your car has different requirements, make the corresponding adjustment. If you have any questions regarding installation kits, consult your Philips car audio dealer.

Caution
- This unit is designed for negative ground (earth) 12 V DC operation only.
• Always install this unit in the car dashboard. Other locations can be dangerous as the rear of the unit heats up during use.
• To avoid short-circuit: before you connect, ensure that the ignition is off. - Ensure that you connect the yellow and red power supply leads after all other leads are connected.
- Ensure that all loose leads are insulated with electrical tape.
- Ensure that the leads do not get caught under screws or in moving parts (e.g. seat rail).
- Ensure that all ground (earth) leads are connected to a common ground (earth) point.
- Use only the supplied mounting hardware for a safe and secure installation.
- Improper fuses can cause damage or fire. When you need to change the fuse, consult a professional.
Connect wires

Caution
- Ensure that all loose leads are insulated with electrical tape.
1 Check the car's wirings carefully, then connect them to the unit.

flowchart
graph TD
    A["主轴系统"] --> B["传感器1"]
    A --> C["传感器2"]
    A --> D["传感器3"]
    A --> E["传感器4"]
    A --> F["传感器5"]
    A --> G["传感器6"]
    A --> H["传感器7"]
    A --> I["传感器8"]
    A --> J["传感器9"]
    A --> K["传感器10"]
    A --> L["传感器11"]
    A --> M["传感器12"]
    A --> N["传感器13"]
    A --> O["传感器14"]
    A --> P["传感器15"]
    A --> Q["传感器16"]
    A --> R["传感器17"]
    A --> S["传感器18"]
    A --> T["传感器19"]
    A --> U["传感器20"]
    A --> V["传感器21"]
    A --> W["传感器22"]
    A --> X["传感器23"]
    A --> Y["传感器24"]
    A --> Z["传感器25"]
    A --> AA["传感器26"]
    A --> AB["传感器27"]
    A --> AC["传感器28"]
    A --> AD["传感器29"]
    A --> AE["传感器30"]
    A --> AF["传感器31"]
    A --> AG["传感器32"]
    A --> AH["传感器33"]
    A --> AI["传感器34"]
    A --> AJ["传感器35"]
    A --> AK["传感器36"]
    A --> AL["传感器37"]
    A --> AM["传感器38"]
    A --> AN["传感器39"]
    A --> AO["传感器40"]
    A --> AP["传感器41"]
    A --> AQ["传感器42"]
    A --> AR["传感器43"]
    A --> AS["传感器44"]
    A --> AT["传感器45"]
    A --> AU["传感器46"]
    A --> AV["传感器47"]
    A --> AW["传感器48"]
    A --> AX["传感器49"]
    A --> AY["传感器50"]
    A --> AZ["传感器51"]
    A --> BA["传感器52"]
    A --> BB["传感器53"]
    A --> BC["传感器54"]
    A --> BD["传感器55"]
    A --> BE["传感器56"]
    A --> BF["传感器57"]
    A --> BG["传感器58"]
    A --> BH["传感器59"]
    A --> BI["传感器60"]
    A --> BJ["传感器61"]
    A --> BK["传感器62"]
    A --> BL["传感器63"]
    A --> BM["传感器64"]
    A --> BN["传感器65"]
    A --> BO["传感器66"]
    A --> BP["传感器67"]
    A --> BQ["传感器68"]
    A --> BR["传感器69"]
    A --> BS["传感器70"]
    A --> BT["传感器71"]
    A --> BU["传感器72"]
    A --> BV["传感器73"]
    A --> BW["传感器74"]
    A --> BX["传感器75"]
    A --> BY["传感器76"]
    A --> BZ["传感器77"]
    A --> CA["传感器78"]
    A --> CB["传感器79"]
    A --> CC["传感器80"]
Notes on speaker connection
- Never connect speaker wires to the metal body or chassis of the car.
- Never connect speaker wires with stripes to one another.
Note on the power supply lead (yellow)
- When you connect other devices to this system, ensure that the rating of the car circuit is higher than the total fuse value of all the connected devices.
Notes on rear camera connection
- Check your local driving regulations on whether it is legally required to install a rear view camera. These connections require a professional mechanic to install.
- You can connect a rear view camera to this car audio video system, so as to view the things that happens behind your car through the screen on the system. This helps protecting your bumper and anything it might contact, especially you are driving a big vehicle.
Mount in the dashboard

Note
- Check wire connections before you mount the unit into a car.
- If preset radio stations are lost when the ignition key is turned OFF and then back ON, reconnect the red leads crosswise to the yellow ones.
1 If the car does not have an on-board drive or navigation computer, disconnect the negative terminal of the car battery.
- If you disconnect the car battery in a car that has an on-board drive or navigation computer, the computer may lost its memory.
- If the car battery is not disconnected, to avoid short-circuit, ensure that bare wires do not touch each other.
2 Ensure that the horizontal slant of the car dashboard opening is between 0 and 20 degrees. The unit cannot be used if the dashboard opening's slant angle is above 20 degrees.
3 Fix the four plastic buckles (supplied by the car manufacturer for the original audio system) to the unit.

natural_image
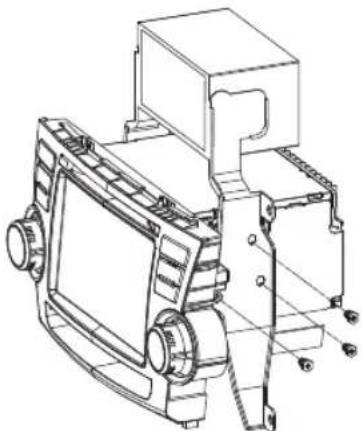
Technical line drawing of a mechanical housing or enclosure with mounting brackets and internal components (no text or symbols)4 Fix the mounting brackets to the unit with screws (supplied by the car manufacturer).
natural_image
Technical line drawing of a mechanical assembly with no visible text or symbols5 Slide the unit into the dashboard and fix it to the car with four screws.
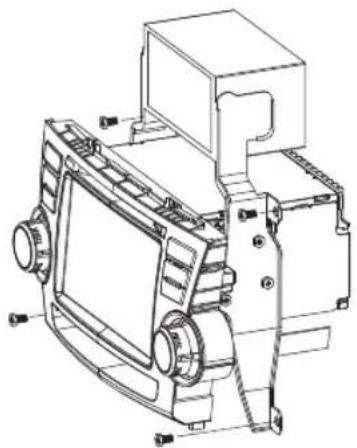
natural_image
Technical line drawing of a mechanical device with no visible text or symbols6 Reconnect the negative terminal of the car battery.
Turn on

Caution
- Risk of road accidents! Never watch video or adjust settings while you drive.
1 Press ⏻ to turn on the unit. → Calibration requests displayed.
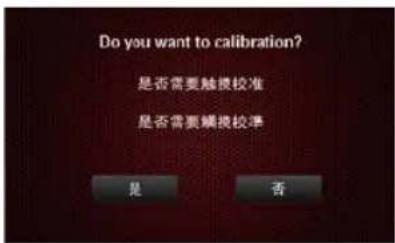
2 Tap YES and follow the on-screen display (OSD) to complete calibration.
3 Tap anywhere on the screen to save. → The available OSD languages are displayed.

4 Tap a language. → The OSD language is changed to the selected language immediately. • To turn off the unit, press 🔊.
Set date and time
1 Tap 🏠️ display main menu.
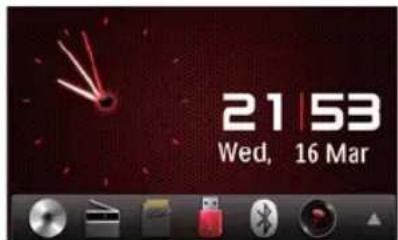
2 Tap ▲ display the full menu.

3


→ The setup menu is displayed.

4


→ The date/time setup menu is displayed.

5
Tap on [Date], [Clock mode] or [Time].
6


ate/time.
7
When date/time is set, tap to main menu.

return
4
Play audio/video/picture
Load discs
You can play video, audio, or images stored on the following discs:
• DVD video, DVD-R, DVD-RW
• VCD
• Audio CD, CD-R, CD-RW
1 Insert the disc into the disc slot with label side facing up.
→ The disc starts playing automatically.

natural_image
Line drawing of a car front panel with visible door, wheels, and a CD inside (no text or symbols)2
To remove the disc, press the ▲button.
When the disc is ejected, the unit switches to the previous source if connected. Otherwise, the unit switches to [Radio] mode automatically.

Note
• Supported region code depends on where you bought the car audio system.
Supported DVD region code
Countries where you bought the unit

China
Connect USB device

Note
- Ensure that the device contains playable content.
- For detail information on supported video format, see "Product Information" chapter.
1 Pull the USB flap up.
2 Insert the USB device into the USB slot.
→ The files play automatically.
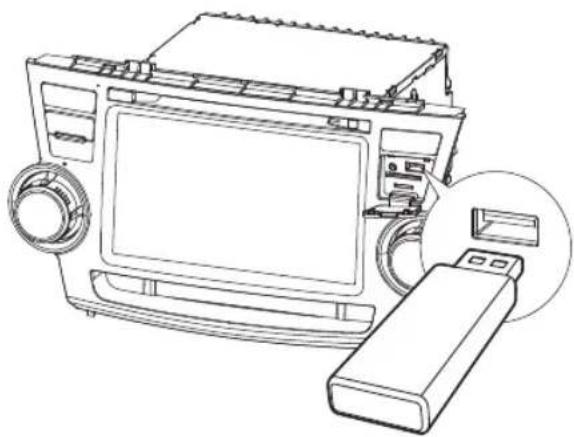
natural_image
Line drawing of a device with a monitor, fan, and USB port (no text or symbols)3 To remove the USB device, switch the car audio system to other source first, and then take off the USB device.
When USB devise is disconnected, it plays the previous source.
Insert SD/MMC card

Note
- This device supports Secure Digital High Capacity (SDHC) card.
1 Open the SD card flap.
2 Insert the SD/MMC card into the SD/MMC card slot.
→ Play starts automatically.

natural_image
Line drawing of a car air conditioner unit with a close-up inset showing the internal components (no text or symbols)Remove the SD/MMC card
1 Switch to another source.
2 Press the card until you hear a click sound.
→ The card is now disengaged.
3 Remove the SD or MMC card.
Play/pause
1 Once a disc, USB or SD/MMC card is inserted, play starts automatically.

- For DVD movie, if a menu appears, press ▶ to start play.
2 To pause, tap || • To resume play, tap || again.
3 To skip forward/backward, tap ▶ or | ◀◀◀ 4 To fast forward/backward, tap and hold ▶▶| or | ◀◀◀
Browse
During play from USB device or SD card, you can browse through the listed audio, video or picture files to select preferred file.
1 Tap to return to playlist menu.
2 Tap one of the icons below to select folder/file:
• 📌: To display all available audio folders/track.
• To display all available video folders/files.
• : To display all available picture folders/files.

3 Swipe your finger upward/downward to browse through the list.
4 Tap on the name to start play.
Video options
Select audio language
For video discs that contain two or more audio languages.
1 During play, tap anywhere except for the upper left corner to display the menu on the screen.
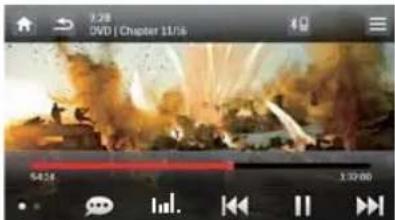
2 Tap 🙏 repeatedly to select audio language.
→ The audio channel information is displayed on the upper line of the screen.
Select subtitle language
For DVD or DivX discs that contain two or more subtitle languages.
1 During play, tap anywhere except for the upper left corner to display the menu on the screen.
2 Tap ●● display the second menu

natural_image
Dramatic battle scene with explosions and smoke, displayed in a mobile app interface (no readable text or symbols)3 Tap repeatedly to select a language. → The selected language is displayed.
Skip to a chapter/title/time
1 During play, tap anywhere except for the upper left corner to display the menu on the screen.
2 Tap ● to display the 2nd menu
3 Tap The search screen is displayed.

4 Tap repeatedly to select:
• [Enter chapter number:]
• [Enter title number:]
• [Enter time:]
5 Tap the numbers, then tap √
• To clear the previous input, tap ←.
• To clear all input, tap ✗.
Repeat a section
You can repeat a specific section of the video file.
1 During play, tap anywhere except for the upper left corner to display menu on the screen.
2 Tap ●● display the 2nd menu.
3 Tap A→B repeatedly to mark:
- [Repeat A-]: the start of the section to repeat.
- [Repeat A-B]: the end of the section to repeat.
→ The selected section plays repeatedly.
4 To exit A-B repeat mode, tap A=B repeatedly until [Repeat A-B off] is displayed.
Repeat one/all chapter
For DVD/VCD movie disc:
1 Tap anywhere except for the upper left corner to display the menu on the screen.
2 Tap ●● display the second menu.
3 Tap to select:
• [Repeat chapter]: play the current chapter repeatedly.
- [Repeat title]: play all chapters in the title repeatedly.
• [Repeat off]: cancel repeat play.
For VCD karaoke:
Tap 📌 to select:
- [Repeat one]: play the current track repeatedly.
• [Repeat off]: cancel repeat play.
Use the disc menu
When you load a DVD/(S)VCD disc, a menu is displayed on the screen.
1 Tap 'play' to start playback.
2 During play, you can tap ●▶ to □ display the disc menu.
Audio options
Select a track
1 Tap
→ The search screen is displayed.

2 Tap the numbers to enter track number, then tap OK.
• To clear the previous input, tap
• To clear all input, tap X
Random play
You can play audio tracks/files in random order.
1 During play, tap repeatedly to turn random play on or off.
• (red): start random play.
• (gray): cancel random play.
Repeat one/all
Tap repeatedly to select:
• (red): play the current track repeatedly.
• (gray): cancel repeat play.
View photo
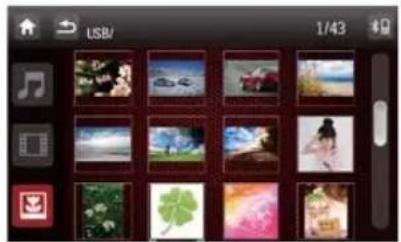
1 Tap
→ Thumbnail view of the pictures is displayed.
natural_image
Grid of 16 small photos displayed in a mobile app interface, no visible text or symbols on the images themselves.2 Drag the bar downward to view all pictures.
3 Tap on a picture to view it in full screen.

natural_image
Close-up of a floral arrangement with green leaves and a pen, displayed within a video player interface (no readable text or symbols)Zoom
You can zoom in pictures for a close view.
1 During view pictures, tap anywhere except for the upper left corner to display menu on the screen.
2 Tap repeatedly to zoom in/out the picture.
Rotate pictures
1 When you view pictures, tap anywhere except for the upper left corner to display menu on the screen.
2 Tap repeatedly to rotate the picture.
5 Listen to radio
Tune to a radio station
1 Tap ↑ to display home menu.
2 Tap → Band and frequency information is displayed.
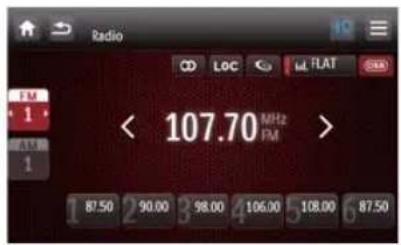
3 Tap FM or AM to select band:
• FM band options: FM1, FM2, FM3
• AM band options: AM1, AM2
4 Briefly tap or to tune to a radio station by step.
- Tap < or > for over 1 second to tune to a radio station automatically.
Tune by frequency
1 Tap FM or AM to select band.
2 Tap ≡
3 Tap [Goto].
4 Tap the numbers to enter frequency.

- Tap to clear the last entered number.
- Tap X clear all the entered numbers.
5 Tap OK to confirm.
→ The radio station is broadcast.
Select radio range
Before you start to search for radio stations, you can select radio range.
1 Tap LOC to toggle tuner sensitivity from normal to high sensitivity.
• LOC (red): Only stations with strong signals can be broadcast.
• LOC (gray): Stations with strong and weak signals can be broadcast.
Turn stereo broadcasting on/off
At FM band, if the radio broadcasting is stereo, you can switch it to mono broadcasting.
1 Tap repeatedly to select.
• (red): for stereo broadcasting.
• (gray): for mono broadcasting.
Store radio stations in memory
You can store up to 6 stations in each band.
Store stations manually
1 Tune to the station by tapping
2 Tap ≡
3 Tap [Save].
4 Tap one of the channels 01 to 06 to save the select band.

Store stations automatically
You can search for a station with intro search, which broadcasts a 10-second preview of each detected radio station.
1 Select band.
2 Tap
3 Tap [Search].
Auto search starts. The six strongest stations of the selected band are saved in preset channels 1-6 automatically.
Tune to a preset station
1 Select band.
2 Tap one of the preset channels (01 to 06) to select a preset station.

6 Use navigation system
Insert map card

Note
- Navigation map card is not included in the packaging of the car entertainment system.
1 Open the card door.
2 Insert the map card into the map card slot.
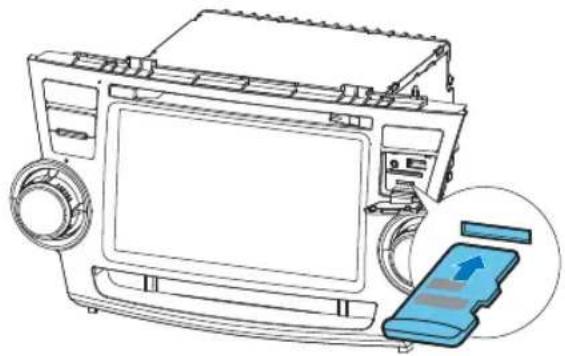
natural_image
Line drawing of a car air conditioner unit with a close-up of its internal components (no text or symbols)3 Close the card door.
Use map

Note
- You might need to upgrade the navigation map (sold separately) before using it. See "Upgrade the map" section
1 Tap the upper left corner to display main menu.
2 Tap
→ The navigation menu is displayed in a few seconds.
3 Refer to the user manual of the navigation map to operate the navigation tool.

Use one-touch navigation service (Optional)
If you use Careland GPS service and your phone is connected to the car audio system via Bluetooth, you can connect to Careland call center for navigation guide at one touch.
1 Call 400-886-9545 to register your phone number.
2 Pair your mobile phone with the car audio system (see the section "Pair the Bluetooth-enabled devices" for details).
3 Tap no display main menu.
4 Tap ▲(Dual-Tone-Multi-Frequency).
→ The call center is connected. If the connection is failed, follow the onscreen display to check connection.

5 Tell the receptionist where you want to go. → Navigation routine data will be transferred to your navigation system and your car audio will switch to navigation mode automatically.
Upgrade the map
1 Exit navigation system.
2 Open the card cover.
3 Press on the map card until you hear a click sound.
4 Pull out the map card and bring it to the authorized service center for upgrade.
5 Insert the upgraded map card back into the card slot.
6 Turn on the car audio.
→ The map upgrades in a few minutes.
7 Play with Bluetooth device
You can make or receive phone calls with Bluetooth-enabled phones through the unit. You can also listen to music from a Bluetooth-enabled device.
Pair the Bluetooth-enabled devices
To connect your Bluetooth device to the unit, you need to pair the device to the unit. Pairing needs only to be done once. You can pair up to eight devices.

Note
• The operational range between this unit and a Bluetooth device is approximately 10 meters (30 feet). Turn on the Bluetooth function on the device.
- Before you connect a Bluetooth device to this unit, familiarize yourself with the Bluetooth capabilities of the device.
- Compatibility with all Bluetooth devices is not guaranteed.
- Any obstacle between this unit and a Bluetooth device can reduce the operational range.
- Keep this unit away from any other electronic device that may cause interference.
1 Turn on the Bluetooth function on the device.
2 Search for Bluetooth device with the device.
3 Select "CID3711" in the pairing list.
4 Enter default password "0000".
→ If the pairing succeeds, the phone call record is displayed.

Disconnect Bluetooth devices
The device will also be disconnected when the device is moved beyond the operational range. If you want to reconnect the device to the unit, place it within the operational range.

Tip
- If you do not want to reconnect the device to the unit automatically, tap >[Auto connect], then select [Off]. For details, see the "Adjust Bluetooth settings" section.
Make a call
1 Pair the phone with the unit.
2 Tap 🏠 to display the home menu.
3 Tap
→ List of available Bluetooth devices is displayed.

4 Tap on the name of your mobile phone. → The Bluetooth menu is displayed.

5 Tap 🔍, or to elect a phone number.
• Ⓤ: List of recent contacts including [Missed calls], [Received calls] and [Dialed calls].
• ♥ : Favorite contacts.
• : Phone book.
6 Tap on a phone number from the list. → Phone calling starts.

- You can also tap dial number directly, then tap to start calling.

• If connection failed, tap to re-dial

7 When conversation ends, tap
Receive call
By default, all incoming calls are received automatically.

Note
- You can select to receive calls manually by set [Auto answer] to [Off] status. For details, refer to "Adjust Bluetooth settings".
1 If there is an incoming call, [Incoming call...] flashes on the screen.

2 Speak into the microphone.
3 When conversation ends, tap to terminate the call.
Adjust Bluetooth settings
1 In the Bluetooth menu, tap ≡ → The option menu is displayed.
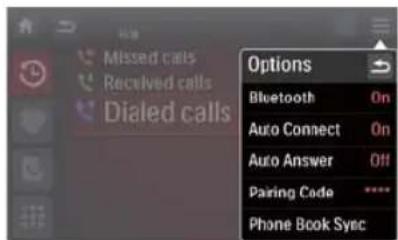
- [Bluetooth]: to turn the "Bluetooth" function on or off.
- [Auto connect]: to turn the "Auto connect" function on or off.
- [Auto answer]: to turn the "Auto answer" function on or off.
• [Pairing code]: to set paring code
• [Phone Book Sync]: to synchronize phone book
2 Tap an option to change the setting.

Tip
- You can also adjust Bluetooth settings in the "Settings" menu.
Listen to music from Bluetooth device
If the connected Bluetooth device supports Advanced Audio Distribution Profile (A2DP), you can listen to the music stored on the device through the unit. If the device also supports Audio Video Remote Control Profile (AVRCP) profile, you can use the control on the unit or its remote control to play music stored on the device.
1 Pair the phone with the unit.
2 Tap to return to home menu.
3 Tap
4 tap
5 Tap ▶ to start play.

8 Play iPod/iPhone
Compatible iPod/iPhone
The car audio system supports below iPod and iPhone models:
Made for.
- iPod touch (1st, 2nd, 3rd, and 4th generation)
- iPod classic
- iPod nano (1st, 2nd, 3rd, 4th, 5th, and 6th generation)
- iPhone 4
- iPhone 3GS
- iPhone 3G
- iPhone
Listen to the iPod/iPhone

natural_image
Illustration of a CD-ROM device connected to an iPod via cable, showing internal components and a blue arrow indicating direction (no text or symbols present)1 Connect your iPod/iPhone to the front USB socket via Apple's own 30pin USB cable.
→ Music playback starts.
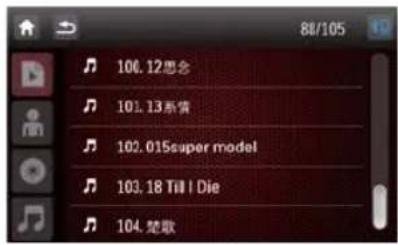
2 To pause, tap 11
3 To skip backward/forward, tap |◀◀. ▶▶▶
4 To search for a track, tap
→ Tracks sorted by genre is displayed.

5 Select a folder and then swipe finger upward/downward to search for preferred tracks.
Charge the iPod/iPhone
When the iPod/iPhone is connected to the car audio system, the iPod/iPhone begins to charge.

Tip
- For certain iPod models, it may take up to a minute before the charging indication is displayed.
9 Adjust sound
Adjust volume
1 Turn VOL button clockwise to increase volume.
2 Turn VOL button anti-clockwise to reduce volume.
Mute
1 During play, press MUTE.
• To restore the sound, press MUTE again.

Tip
- You can also tap on the screen to turn off sound.
Select preset equalizer
1 Tap .mm
→ The current equalizer setting is displayed.

2 Tap or to select an preset EQ:
- [User]
• [Techno]
• [Rock]
• [Classic]
• [Jazz]
• [Optimal]
• [Flat]
• [Pop]
3 Adjust EQ settings by tapping on the screen.
4 If you are not satisfied with the adjusted sound settings, tap ⬆ to restore default settings.
5 Tap to exit.
Turn FullSound on/off
Philips FullSound restores the audio details that is lost in music compression. It enriches the music signal, so what you hear is the full sound with every nuance of emotion and every detail of musical genius. Philips FullSound can:
- Bring CD listening experience to MP3
- Achieve fuller bass with greater depth and impact
- Restore sense of spaciousness that is lacking in compressed audio
• Enhance sound precision and detail
1 During play, tap
→ The FullSound icon changes to red (
→ FullSound is activated.

2 To turn FullSound off, tap the icon until it changes to gray ( ).
Turn DBB on/off
When DBB (Dynamic Bass Boost) is activated, low tones will be enhanced electronically.
Tap DBB to toggle between the settings.
- [DBB] on: the icon turns red ( )
• [DBB] off: the icon turns gray ( DBB ).
10 Adjust settings
Display system setup menu
1


display the full menu.

2


→ The settings menu is displayed.
Adjust general settings
1


2
Swipe finger upward/downward to highlight a setting.
3
Tap on it repeatedly or tap select an option.


→ The setting is changed.
| General set- tings | Options Description | |
| [Radio region] | [USA], [China], [Japan], [Europe], [Europe](LW), [OIRT] | Select one that matches your location. |
| [Radio range] | [Local] | Only stations with strong signals can be broadcast. |
| [Distance] | Stations with strong and weak signals can be broadcast. | |
| [Blackout] [off] | Never turn on the screen saver. | |
| [10s] | Turn on the screen saver automatically 10 seconds after last operation. | |
| [20s] Turn on the screen saver automatically 20 seconds after last operation. | ||
| [Dimmer Mode] | [Night] Select this mode at night. | |
| [Dark] | Select this mode at dusk. | |
| [Normal] | Set screen dimmer to normal mode. | |
| [Bright] | Select this mode in bright environment. | |
| [Key color] | [Green] | Button backlight turns green. |
| [Blue] | Button backlight turns blue. | |
| [Beep] [On] | Turn on the beep sound. Each time you press a button, the unit beeps. |
| [Off] | Turn off the beep sound. |
| [WallPaper] [WallPaper]1/2/3 | Select a wall paper |
| [Calibra-tion] | Calibrate the touch screen. |
Adjust sound settings
1
Tap


2 Swipe finger upward/downward to highlight a setting.
3 Tap on it repeatedly to change setting.
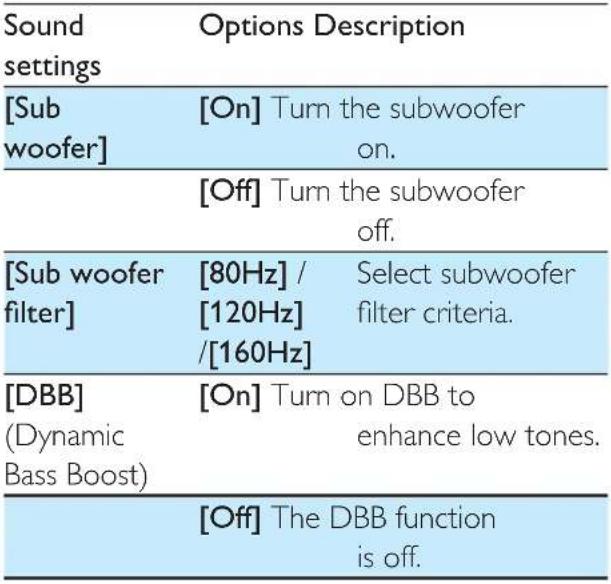 |
| [DRC](Dynamic Range Control) | [On] | Make loud sound level softer and soft sound level louder so that you can watch the DVD movies at a low volume, without disturbing others |
| [Off] | The DRC function is off. | |
| [Auto Calibration] | [On] | This is for auto calibration and auto optimization of the speakers and microphone.Follow on-screen instruction to complete the setting. |
| [Listening Zone] | [On] Select listening areas. | |
Select listening zone
Philips' innovative Zone technology enables driver or passengers to enjoy music with the best speakers balance and experience more vivid spacial effect as the artist is intended to create. You can switch the music listening zone from driver to passengers for the best speaker sound settings in car.
1 Tap (Settings) > (Sound).
2 Swipe finger upward to find [Listening Zone] and tap on it.
→ The listening zone screen is displayed.

3 Tap on the seat to select an area: [All], [Front Left], [Front Right] or [Rear zone].
→ Sound effect changed.
4 Tap to exit.
Adjust video settings
1 Tap

2 Tap on a setting repeatedly or tap ▲ to change setting.
Video settings Options Description
| [Aspect ratio] [Full] For wide screen display. |
[Normal] For normal display.
| [Video input] [Auto] The correct format is set automatically.Select this option if you are not sure which format should be selected. |
| [NTSC] Used in the United States, Canada, Japan, Mexico, the Philippines, South Korea, Taiwan, and some other countries. |
| [PAL] | Used in China, India, Singapore, the western European countries (except France), Australia, and some other countries. | |
| [Parking] | [On] | Disable video view when driving. |
| [Off] | Enable video view during drive. | |
| [DivX registration code] | View code for DivX registration. | |
| [DivX Deactivation] | To deactivate the device for DivX playback. |
Adjust Bluetooth settings
1 Tap
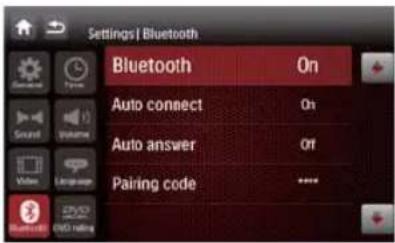
2 Tap on a setting repeatedly to change setting.
| Bluetooth settings | Options | Description |
| [Bluetooth] | [On] | Turn the Bluetooth function on. |
| [Off] | Turn the Bluetooth function off. | |
| [Auto connect] | [On] | If the pre-paired device is within effective range, the system re-connects to pre-paired device automatically. |
| [Off] | Need to re-connect manually. | |
| [Auto answer] | [On] | Answer paired phone call automatically. |
| [Off] | Answer phone call manually. |
| [Pairing code] | Set code for pairing the car entertainment system with other Bluetooth devices. The default code is 0000. |
Adjust volume settings
You can set different volume for different modes.
1


→ The volume setting sub-menu is displayed.
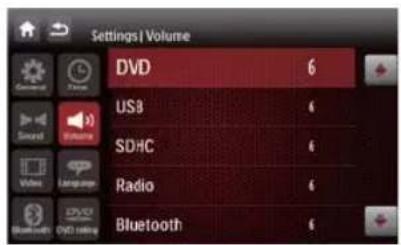
2 Swipe finger upward/downward to highlight a setting.
3 Tap on a source, then tap ▲r to assign value: 0 to 12.
→ When switches to the source, the volume increases automatically.
Adjust language settings
1


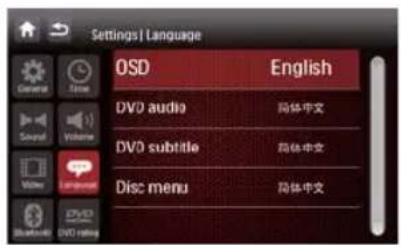
2
Tap on a setting, then tap select an option.


| Language settings | Options Description | |
| [OSD] [English] | Select on-screen-display language. | |
| [简体中文] | ||
| [繁体中文] | ||
| [DVD audio] | [English] | Select DVD audio language. Options available depends on the DVD. |
| [简体中文] | ||
| [繁体中文] | ||
| [DVD subtitle] | [English] | Select DVD subtitle language. Options available depends on the DVD. |
| [简体中文] | ||
| [繁体中文] | ||
| [Off] | Turn off subtitle language display. | |
| [Disc menu] | [English] | Select DVD menu language. Options available depends on the DVD. |
| [简体中文] | ||
| [繁体中文] | ||
Adjust DVD rating
1


2
Tap a setting to make an adjustment.
| DVD rating | Options Description | |
| [Set password] | Set password to restrict access. The default password is 0000. | |
| [Rating level] | [Kid safe] | Acceptable for children. |
| [G] | Acceptable for general viewers. | |
| [PG] | Parental guidance suggested. | |
| [PG-13] | Unsuitable for children under age 13. | |
| [PG-R] | Parental guidance is advised for children under 17. | |
| [R] | Restricted. Shouldn't be viewed by children under 17 without parental consent. | |
| [NC-17] | Unsuitable for children under age 17. | |
| [Adult] | Acceptable for adults only. | |
| [DVD 5.1 Channel] | [On] | Turn on DVD 5.1 channel. |
| [Off] | Disable DVD 5.1 channel. | |
| [Load factory] | Restore to default settings. | |
Restrict access
You can restrict disc access to children or play alternate scenes. Once you selected an access level, discs with higher levels cannot be played.
1 Tap 🎨. DVD
2 Tap [Set password].
→ Password setup menu is displayed.
3 Enter default password (0000) first, then enter new password and tap √.
4 Tap [Rating level] and ▲r . ▼
→ List of different rating level is displayed.
5 Tap on an option.
→ The rating level is changed.

Note
- The ratings are country-dependent. To allow all discs to play, select '8'.
- Some discs have ratings printed on them but are not recorded with ratings. This function has no effect on such discs.
11 Others
Adjust brightness
To adjust screen brightness, press DISP/ ⚙️ / ⏻ button repeatedly.
Press and hold DISP/ 📋 / 🐃 to turn off the display. To resume, press DISP/ 📋 / 🐃 again.
Set rear view camera
If you connected a rear view camera, you can see from the screen of the car audio system what the camera takes when the back lamp lights up.
1 Tap ↑ 2 Tap
→ Picture from rear camera is displayed.
Allocate Steering Wheel Control
To activate the control buttons on the steering wheel, you need to complete the following settings:
1 Tap ↑ 2 Tap 🕒
A new window is displayed.

3 Tap ▲r to allocate key function.
4 Tap
→ You are requested to press the matching button on the steering wheel for one second.
5 Follow the instructions as shown on the screen.
6 Repeat steps above to allocate other buttons.
Play from rear displays
If there is a display installed for passengers on rear seat, you can select a source for rear display. That is, passengers are not necessarily to watch or listen to same source.
1 Make sure that your in-car system is connected to rear display correctly.
2 While playing, tap ↑ to display full menu.
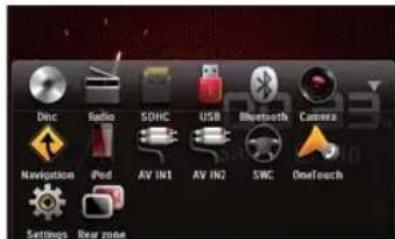
3 Tap [Rear zone].
→ The rear zone options are displayed.

4 Tap on a source.
→ The selected source plays after a few seconds. The passengers can use headphones for listening.
Listen to other devices
You can connect an external audio/video device to the car audio system.
1 Connect the car audio to the device with the supplied AV cable.
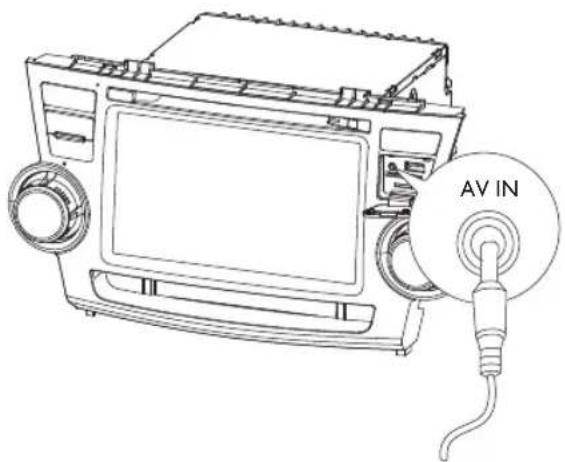
2 Tap ↑ to display the main menu.
3 Tap [AV-IN1].
4 Operate the connected the device (see the device's instructions manual).

Tip
- If you connect the system to other audio devices through the REAR OUT L/R connector (see "Wiring Diagram" section), tap [AV-IN2] to listen to that device.
Reset
When the unit hangs up, you can reset it.
1 Press RESET with a ball-point pen or similar tool.

natural_image
Line drawing of a car front panel with a circular component and directional arrow (no text or symbols)
Tip
- When the unit is reset, all the settings remain unchanged.
Replace fuse
If there is no power, the fuse may be damaged and need to be replaced.
1 Take out the unit from dashboard.
2 Check the electric connection.
3 Buy a fuse that matches the voltage of the damaged fuse (15 A)
4 Replace the fuse.

natural_image
Architectural line drawing of a building interior with structural details and an inset view of internal components (no text or symbols)If the fuse breaks immediately after it has been replaced, there may be an internal malfunction. In this case, consult your Philips dealer.
12 Product information

Note
- Product information is subject to change without prior notice.
General
| Power supply 12 V DC (11 V - 16 V), negative ground | |
| Fuse 15 A | |
| Suitable speaker impedance | 4 - 8 Ω |
| Maximum power output | 50 W × 4 channels |
| Continuous power output | 24 W × 4 channels (4 Ω 10% T.H.D.) |
| Pre-Amp output voltage | 2.0 V (CD play mode; 1 kHz, 0 dB, 10 kΩ load) |
| Subwoofer output voltage | 2.0 V (CD play mode, 61 Hz, 0 dB, 10 kΩ load) |
| Aux-in level | ≥ 500 mV |
| Dimensions(W × H × D) | 178 × 101 × 160 mm |
| Weight (main unit) | 2.5 kg |
| Operating temperature range | -20°C to 70 °C |
Disc player
| System DVD / CD audio / MP3 system | |
| Frequency response 20 Hz - 20k Hz | |
| Signal/noise ratio >75dB | |
| Total harmonic distortion Less than 1% | |
| Channel separation >55dB |
| Video signal format | NTSC only |
| Video output | 1 +/- 0.2V |
Radio
| Frequency range - FM | 87.5 - 108.0 MHz(100kHz per step) |
| Frequency range - AM(MW) | 522 - 1620 KHz(9kHz per step) |
| Usable sensitivity - FM | 5 uV |
| Usable sensitivity - AM (MW) | 25 uV |
LCD
| Screen size 6.2 inches | |
| Display resolution | 800 × 480 dots |
| Contrast ratio | 300 |
| Brightness | 350 cd/m2 |
Bluetooth
| Communication system | Bluetooth Standard version 2.0 |
| Output | Bluetooth Standard Power Class 2 |
| Maximum communication range | Line of sight approx. 8m |
| Frequency band | 2.4 GHz band (2.4000 GHz - 2.4835 GHz) |
| Compatible Bluetooth profiles | Hands-Free Profile (HFP)Handset Profile (HSP)Advanced Audio Distribution Profile (A2DP)Audio Video Remote Control Profile (AVRCP) |
| Supported codecsReceive Transmit | SBC (Sub Band Codec)SBC (Sub Band Codec) |
Supported video formats
File extension: .avi, .mp4
Compatible Video Codec:
• .avi: MPEG-4 SP/ASP; H.263, H.264; XVID, DIVX 4/5/6
• .mp4: MPEG-4 SP/ASP; H.263, H.264;
Compatible Audio Codec:
- .avi: MPEG-1 Layer 1, 2, 3; AC-3 (Downmix), WMA Pro (stereo); WMA 9 Standard
- .mp4: MPEG-4 AAC LC; MPEG-4 AAC HE V1/V2
Recommended Video Specification:
- MPEG-4 SP/ASP: ISO/IEC 14496-2 simple/advanced simple profile 640X480@30fps
• H.263: ISO/IEC 14496-2 simple profile 640×480@30fps
• H.264: ITU-T Rec. H.264 baseline profile, main profile, high profile 640X480@30fps
• XVID, DIVX 4/5/6: ISO/IEC 14496-2 simple/advanced simple profile 640X480@30fps
Maximum Bit rate (Only video play):
• MPEG-4 SP/ASP: 4Mbps
• H.263: 1.5Mbps
• H.264: 4Mbps
• XVID, DIVX 4/5/6: 2Mbps
USB playability information
Compatible USB devices:
• USB flash memory (USB 2.0 or USB1.1)
• USB flash players (USB 2.0 or USB1.1)
• Memory cards (SD / MMC / SDHC)
Supported USB formats:
• USB or memory file format: FAT16, FAT32
- MP3 bit rate (data rate): 32-320 Kbps and variable bit rate
- WMA v9 or earlier
- Directory nesting up to a maximum of 8 levels
• Number of albums/folders: maximum 99
• Number of tracks/titles: maximum 999
• ID3 tag v2.0 or later
- File name in Unicode UTF8 (maximum length: 128 bytes)
Supported MP3 disc format
- ISO9660, Joliet
• Maximum title number: 512 (depending on file name length)
• Maximum album number: 255
• Supported sampling frequencies: 32 kHz, 44.1 kHz, 48 kHz
• Supported Bit-rates: 32-320 Kbps and variable bit rate
13 Troubleshooting

Warning
- Never remove the casing of this device.
To keep the warranty valid, never try to repair the system yourself.
If you encounter problems when using this device, check the following points before requesting service. If the problem remains unsolved, go to the Philips web site (www.philips.com/welcome). When you contact Philips, ensure that the device is nearby and the model number and serial number are available.
No power
- Car engine has not been started. Start the car engine.
- Connections are incorrect.
- Fuse has been damaged. Replace fuse.
No sound
• Volume is too low. Adjust volume.
- Speaker connections are incorrect.
Disc does not play
- Disc is upside down. Ensure that the printed side is upwards.
- Disc is dirty. Clean the disc with a clean, soft, lint-free cloth. Wipe the disc outwards from the center.
• Disc is defective. Try another disc. - incompatible disc is used. Try another disc.
- Disc rating exceeds the restriction setting. Change the rating settings to lower one.
- Disc region code is not compatible with the unit. Use disc with proper region code.
Can't play DivX file from SD or USB
- This device doesn't support DivX playback in SD or USB mode.
No image
- Parking wire connection is incorrect. Check the wiring.
No image on rear display
- Check if you are playing DivX video. If yes, it's normal, for this device does not support video out in DivX playing mode.
Image flashes or distorted
• Video DVD settings do not match with the DVD. Adjust video DVD settings.
• Video connection is improper. Check the connections.
Noise in broadcasts.
• Signals are too weak. Select other stations with stronger signals.
- Check the connection of the car antenna.
- Change broadcast from stereo to mono.
Preset stations lost.
- Battery cable is not correctly connected. Connect the battery cable to the terminal that is always live.
Fuse is broken
- The fuse type is incorrect. Replace it with a 15A fuse.
- Speaker wire or power wire is grounded. Check the connections.
Display show ERR-12
- USB/SD/MMC data error. Check the USB device or SD/MMC card.
About the Bluetooth device
Music playback is unavailable on the system even after successful Bluetooth connection.
- The device cannot be used with the system to play music.
The audio quality is poor after connection with a Bluetooth-enabled device.
- The Bluetooth reception is poor. Move the device closer to the system or remove any obstacle between the device and the system.
Cannot connect with the system.
- The device does not support the profiles required for the system.
- The Bluetooth function of the device is not enabled. Refer to the user manual of the device to find out how to enable the function.
- The system is not in the pairing mode.
- The system is already connected with another Bluetooth-enabled device. Disconnect that device or all other connected devices and then try again.
The paired mobile phone connects and disconnects constantly.
- The Bluetooth reception is poor. Move the mobile phone closer to the system or remove any obstacle between the mobile phone and the system.
- Some mobile phones may connect and disconnect constantly when you make or end calls. This does not indicate any malfunction of the system.
- For some mobile phones, the Bluetooth connection may be deactivated automatically as a power-saving feature. This does not indicate any malfunction of the system.
| 部件名称Name of the Parts | 有毒有害物质或元素Hazardous/toxic Substance | |||||
| 铅(Pb, Lead) | 汞(Hg, Mercury) | 镉(Cd, cadmium) | 六价铬(Chromium 6+) | 多溴联苯(PBB) | 多溴二苯醚(PBDE) | |
| Housing外壳 | ○ | ○ | ○ | |||
| DVD/CD loader DVD/CD 光盒 | × | ○ | ○ | |||
| LCD Panel液晶面板 | × | × | ○ | ○ | ○ | ○ |
| Subwoofer超重低音箱 | × | ○ | ○ | |||
| Loudspeakers喇叭单元 | ○ | ○ | ○ | |||
| PWBs电路板组件 | × | ○ | ○ | |||
| Accessories (Remote control & cables)附件(遥控器,电源线,连接线) | × | ○ | ○ | |||
| Batteries in Remote Control (ZnC)遥控器电池 | × | ○ | ○ | |||
○:表示该有毒有害物质在该部件所有均质材料中的含量均在SJ/T11363-2006标准规定的限量要求以下。
O: Indicates that this toxic or hazardous substance contained in all of the homogeneous materials for this part is below the limit requirement in SJ/T11363 - 2006.
X: Indicates that this toxic or hazardous substance contained in at least one of the homogeneous materials used for this part is above the limit requirement in SJ/T11363 - 2006.

环保使用期限 Environmental Protection Use Period
This logo refers to the period (10 years)
This logo refers to the period (10 years) during which the toxic or hazardous substances or elements contained in electronic information products will not leak or mutate so that the use of these [substances or elements] will not result in any severe environmental pollution, any bodily injury or damage to any assets.

Specifications are subject to change without notice
All rights reserved.
CID3711_00_UM_V3.1

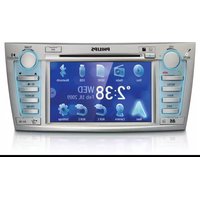

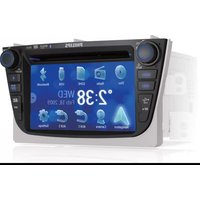
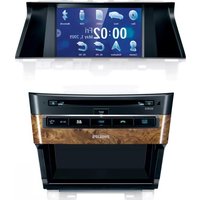

- Contents
- Important 4
- Your in-car entertainment system 6
- Get started 8
- Play audio/video/picture 12
- Listen to radio 17
- Use navigation system 19
- Play with Bluetooth device 21
- Play iPod/iPhone 2
- Adjust sound 25
- Adjust settings 26
- Others 31
- Product information 33
- Troubleshooting 35
- Important
- Safety
- Notice
- Be responsible Respect copyrights
- DIVX™
- DOLBY.
- DIGITAL
- This apparatus includes this label:
- Environmental information
- Disposal of your old product and batteries
- Your in-car entertainment system
- Introduction
- What's in the box
- Overview of the main unit
- Get started
- Caution
- Install the car audio
- Connect wires
- Notes on speaker connection
- Note on the power supply lead (yellow)
- Notes on rear camera connection
- Mount in the dashboard
- Note
- Turn on
- Set date and time
- 3
- 4
- 5
- 6
- 7
- Play audio/video/picture
- Load discs
- 2
- Connect USB device
- Insert SD/MMC card
- Remove the SD/MMC card
- Play/pause
- Browse
- Video options
- Select audio language
- Select subtitle language
- Skip to a chapter/title/time
- Repeat a section
- Repeat one/all chapter
- Use the disc menu
- Audio options
- Select a track
- Random play
- Repeat one/all
- View photo
- Tap
- Zoom
- Rotate pictures
- Listen to radio
- Tune to a radio station
- Tune by frequency
- Select radio range
- Turn stereo broadcasting on/off
- Store radio stations in memory
- Store stations manually
- Store stations automatically
- Tune to a preset station
- Use navigation system
- Insert map card
- Use map
- Use one-touch navigation service (Optional)
- Upgrade the map
- Play with Bluetooth device
- Pair the Bluetooth-enabled devices
- Disconnect Bluetooth devices
- Tip
- Make a call
- Receive call
- Adjust Bluetooth settings
- Listen to music from Bluetooth device
- Play iPod/iPhone
- Compatible iPod/iPhone
- Charge the iPod/iPhone
- Adjust sound
- Adjust volume
- Mute
- Select preset equalizer
- Turn FullSound on/off
- Turn DBB on/off
- Adjust settings
- Display system setup menu
- Adjust general settings
- Adjust sound settings
- Select listening zone
- Adjust video settings
- Adjust volume settings
- Adjust language settings
- Adjust DVD rating
- Restrict access
- Others
- Adjust brightness
- Set rear view camera
- Allocate Steering Wheel Control
- Play from rear displays
- Listen to other devices
- Reset
- Replace fuse
- Product information
- Supported video formats
- USB playability information
- Supported USB formats:
- Supported MP3 disc format
- Troubleshooting
- Warning
- No power
- No sound
- Disc does not play
- Can't play DivX file from SD or USB
- No image
- No image on rear display
- Image flashes or distorted
- Noise in broadcasts.
- Preset stations lost.
- Fuse is broken
- Display show ERR-12
- About the Bluetooth device
- 环保使用期限 Environmental Protection Use Period
Brand : PHILIPS
Model : CID3711
Category : Car Radio