
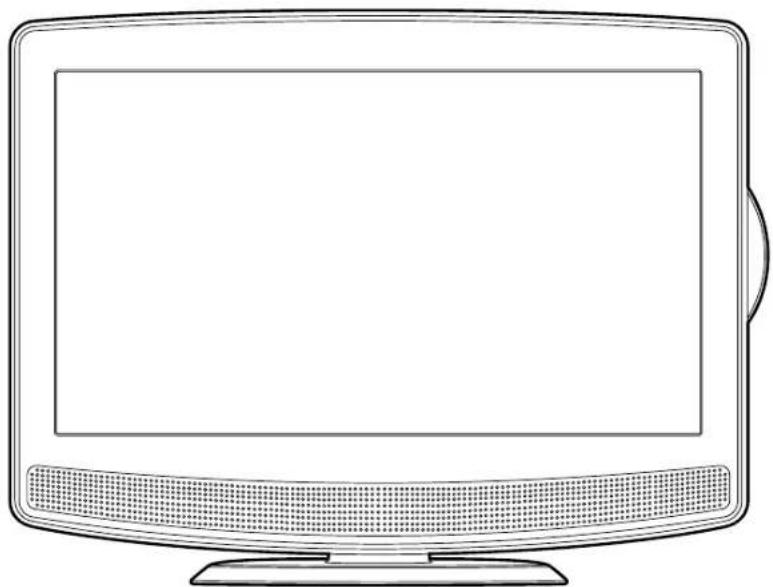
BTVD91216B - Television BUSH - Free user manual and instructions
Find the device manual for free BTVD91216B BUSH in PDF.

| Product Type | 19"/22" HD Ready Digital LCD TV with built-in DVD Player |
| Model | BTVD91216B |
| Brand | Bush |
| Display Size | 22 inches (measured diagonally) |
| Display Resolution | HD Ready (1366 x 768 pixels typical) |
| Built-in DVD Player | Yes, supports DVD, CD, CD-R, CD-RW, JPEG, MPEG |
| Dimensions (with stand) | 150 x 558 x 408 mm (D x W x H) |
| Dimensions (without stand) | 68 x 558 x 387 mm (D x W x H) |
| Weight (with stand) | 4.37 kg |
| Weight (without stand) | 4.25 kg |
| Power Supply | 230V AC, 50 Hz |
| Power Consumption | 52W (typical), <1W in standby |
| Audio Output | 2 x 1.8W stereo speakers, NICAM stereo |
| Connectivity | HDMI x1, SCART x1, Component (YUV via SCART adaptor), Composite AV (RCA) x1, Headphone jack, CI slot, RF antenna input |
| TV Tuner | Digital (DVB-T) and Analog (PAL B/G D/K I) |
| VESA Mount Compatible | Yes, 75 x 75 mm (sold separately) |
| Remote Control | Included (batteries AAA x2) |
| Accessories Included | Remote control, batteries, instruction book, SCART adaptor, screws x2 |
| Special Features | EPG (Electronic Programme Guide), Teletext, Sleep Timer, Child Lock, Parental Control (DVD), Multi-angle, Multi-subtitle, Multi-audio |
| Guarantee | 1 year from date of purchase |
Frequently Asked Questions - BTVD91216B BUSH
User questions about BTVD91216B BUSH
0 question about this device. Answer the ones you know or ask your own.
Ask a new question about this device
Download the instructions for your Television in PDF format for free! Find your manual BTVD91216B - BUSH and take your electronic device back in hand. On this page are published all the documents necessary for the use of your device. BTVD91216B by BUSH.
USER MANUAL BTVD91216B BUSH
19"/22" HD Ready Digital LCD TV with built-in DVD Player
Installation & Operating Instructions
- Please keep for future reference

529/6015 BTVD91186B
529/6022 BTVD91186P
529/6974 BTVD91216B
529/8185 BTVD91216P
529/6981 BTVD91216W
natural_image
Line drawing of a flat-screen computer monitor with blank screen (no text or symbols)


Important - Please read these instructions fully before installing or operating
These instructions contain important information which will help you get the best from your television and ensure safe and correct installation and operation.
For any help concerning set up and use of your TV please call the Customer Helpline: 0845 604 0105
Lines open: 9am - 8pm Monday to Saturday and 10am - 4pm Sunday
Issue 1 - 7/3/11
Contents
Safety Information 3 - 4
Getting Started 5 - 12
Support 5
TV / DVD Features 6
Accessories included 6
Viewing remote control - TV 7
Viewing remote control - DVD 8
TV/DVD - control buttons (top view) 9
TV/DVD - jacks (left view) 9
TV/DVD - (right view) 9
Connecting a TV antenna 10
Connecting a power cord 10
Common interface 10
Remote control 11
Initial set up 12
Connections 13 - 14
Connecting a high definition (HD) source 13
Connecting HDMI 13
Connecting to sources with scart 14
Connecting to devices with a composite 14
Using Headphones 14
Basic Features 15 - 26
Electronic Programme Guide (EPG) for DTV 15
Audio Language for DTV 15
Analogue TV / DVD setup 16 - 20
TV Setting 16 - 17
Picture Menu 17
Sound Menu 18
Time Menu 18
Setup Menu 19
Lock Menu 20
Teletext 21
CD / DVD operation 22 - 25
Playing a disc 22
Playing a picture file disc 22
Pausing playback (still mode) 23
Stopping playback 23
Skipping to a different track 23
Fast forward/fast reverse 23
Slow-motion play (DVD) 23
Audio selection (DVD) 23
Subtitle selection (DVD) 23
Angle selection (DVD) 24
Display function 24
Locating a specific title (DVD) 24
Locating a specific chapter/track 24
Locating a specific time 24
Repeat Playback 25
Repeating a chapter/title (DVD) 25
Repeating a single track/whole disc (CD) 25
Repeating a specific section (DVD/CD) 25
CD/DVD programmable playback 26
Programmable photo file playback 26
Advanced Features 27 - 29
Customising the Function Settings 27 - 29
Language setup 27
Video setup 28
System setup 29
Other Information 30
Installation 30
Specifications 30
Product Support 31 - 35
Support 31
Disc formats 32
Maintenance 33
Sound system 33
Troubleshooting Guide 34
Guarantee 35

Safety Information
Important - Please read these instructions fully before installing or operating

CAUTION
RISK OF ELECTRIC SHOCK
DO NOT OPEN

WARNING: TO REDUCE THE RISK OF ELECTRIC SHOCK, DO NOT REMOVE COVER (OR BACK). NO USER-SERVICEABLE PARTS INSIDE. REFER SERVICING TO QUALIFIED PERSONNEL.
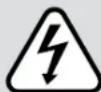
The lightning flash with an arrowhead within a triangle alerts you to uninsulated dangerous voltage within the product's enclosure that could cause an electric shock.

The exclamation point within a triangle alerts you to the presence of important operating, maintenance and servicing instructions in this user's manual.
CAUTION: DANGER OF EXPLOSION IF BATTERY IS INCORRECTLY REPLACED. REPLACE ONLY WITH THE SAME OR EQUIVALENT TYPE. DO NOT MIX OLD AND NEW OR DIFFERENT T' OF BATTERY. IF THE PRODUCT IS NOT TO BE USED FOR A PROLONGED TIME; REMOVE THE BATTERIES AS ELECTROLYTE LEAKAGE WILL DAMAGE THE PRODUCT INVALIDATE THE WARRANTY.
CAUTION
INVISIBLE LASER RADIATION WHEN OPEN AND INTERLOCKS DEFEATED. AVOID EXPOSURE TO BEAM

This product contains a low power laser device.


The symbol for Class II (Double Insulation)

This symbol means that the unit complies with European safely and electrical interference directives.
Safety information
- When connecting or disconnecting the cord, grip the plug and not the AC cord itself. Pulling the cord may damage it and create a hazard.
- When you are not going to use the unit for a long period of time, disconnect the AC cord.
- The mains plug is used as the disconnecting device. It shall remain readily operable and should not be obstructed during intended use. To be completely disconnected from the supply mains, the mains plug of the apparatus should be disconnected from the mains socket outlet completely.
- To be completely disconnect the power input, the mains plug of apparatus shall be disconnected from the mains.
- The mains plug of apparatus should not obstructed OR should be easily accessed during intended use.
- Attention should be drawn to the environ aspects of battery disposal;
• The use of apparatus in moderate climates.
- Under the influence of electrostatic phenomenon, the product may malfunction and require user to power reset.
- Attention should be drawn to environmental aspects of battery disposal;
- The use of apparatus in moderate climate.
- The apparatus should not be exposed to dripping or splashing and that no objects filled with liquids, such as vases, should be placed on apparatus.
- No naked flame sources such as lighted ca should be placed on the apparatus;
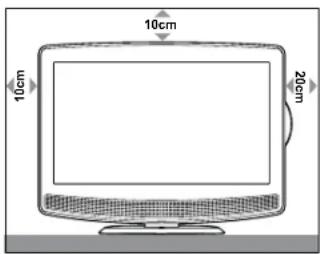
- Leave a minimum of 100mm around the apparatus for ventilation, and 200mm beside the DVD mechanism;
be Condensation information
- When left in a heated room where it is warm and thenal water droplets or condensation may f inside the unit. When there is condensation inside the unit, the unit may not function normally. Let the e unit stand for 1-2 hours before turning the power on, or gradually heat the room and let the unit dry before use.
Rating plate location
• The rating plate is on the rear of product.

WARNING: Should any problems occur, disconnect the AC cord and refer servicing to a qualified technician.

Safety Information
Important - Please read these instructions fully before installing or operating
Mains plug
Units Supplied with Moulded Mains Plug
- If the mains plug fitted to the AC cord supplied is not suitable for your mains outlet it may be necessary to cut it off. Carefully dispose of the severed plug. Under no circumstances must it be inserted into a mains socket, otherwise a dangerous electric shock could result.
- If the fuse in the fitted mains plug should fail, replace it with a BS1362 approved fuse rated at 3A Never use the plug without the fuse cover fitted.
Wiring a mains plug
As the wires in the mains lead may not correspond with the coloured markings identifying the terminals in your plug proceed as follows:
- The wire which is coloured blue must be connected to the terminal which is marked with the letter N or coloured black.
- The wire which is coloured brown must be connected to the terminal which is marked with the letter L or coloured red.
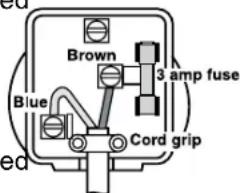
The wires in this mains lead are coloured in accordance with the following code.
BLUE-NEUTRAL
BROWN-LIVE
- No connection is to be made ^BROWN-LIVE to the earth terminal of the plug which is marked with the letter E or coloured green or green and yellow or marked by the safety Earth symbol.
The standard (BS1363) mains plug must be fitted with a 3 Amp fuse approved to BS1362. If any other plug or connection is used a 3 Amp fuse must be fitted in the plug or adaptor or in the distribution board.
Caution: Moisture Condensation
If the equipment is moved from a cold place to a warm one, water in the air will condense on some parts and may cause damage or malfunction if the equipment is operated.
Allow at least two hours for the equipment to acclimatise before switching it on.
This unit is designed to operate from a 230V AC \~ 50Hz mains supply.
Please note that when the STANDBY/ON switch is in the standby position this does not completely disconnect the unit from the mains supply. If the equipment is not to be used for a day disconnect it at the wall outlet.

This symbol means that the unit is double in su la te d. No co n ne c ti on to e a r t h i s necessary.
Safe use of your equipment
This equipment has been designed and manufactured to meet UK safety standards but like any electrical equipment care must be taken to obtain the results from the equipment and assure your safety. Here are a few tips to help you do this:
READ this instruction manual before you attempt to use the equipment.
NEVER fit makeshift stands or legs with woodscrews. Use only approved supports and fasteners specially designed for the equipment.
NEVER let anyone, especially children, push objects into holes, ventilation slots or any other opening; this could result in fatal electric shock!
ALWAYS disconnect the AC power cord when you are not going to use the unit for a long period of time.
ENSURE adequate ventilation of the equipment not obstructed, for example by curtains above or soft furnishings underneath it.
ENSURE that all electrical connections (including the mains plug, extension leads and interconnection between pieces of equipment) are properly made in accordance with the instructions given. Switch off the main supply when making or changing connections.
CONSULT your dealer if you are ever in doubt about the installation, operation or safety of equipment.
DON'T continue to operate the equipment if is damaged in any way or if it does not function normally.
Withdraw the mains plug and consult your dealer.
DON'T leave equipment switched on when it unattended unless it is part of it's normal function to operate in your absence, for example a video cassette recorder with timed recording facility.
LISTEN to headphones at moderate volume levels; high volume levels can permanently damage your hearing.
Getting Started
The Argos Technical Helpline is here to help
Technical experts are available 7 days a week
- Simple help and advice on setting up your digital equipment (image).
• Guidance on connecting other devices to your television such as a DVD player, Sky, home cinema system or a games console. - Order spare parts, including that lost remote control.
- Any other technical issues you may need assistance with.
Call us today: 0845 604 0105
Local call rates applies*
Lines open 9am-8pm Monday to Saturday and 10am-4pm Sunday.
*Calls to Argos enquiry lines may attract a charge and set up fee from residential lines depending on your call plan/tariff. Mobile and other providers costs may vary, see www.bt.com/pricing for details.
For Security and training purposes, telephone calls to and from customer service centres maybe recorded and monitored. Calls from Republic of Ireland will attract international call charges.
Getting Started
TV - Features DVD - Features
- Remote controlled colour LCD TV.
- Fully integrated digital TV (DVB-T).
- HDMI connectors for digital video and This connection is also designed to accept high definition signals.
• 100 programmes from VHF, UHF (analogue). - 500 programmes for digital mode (IDTV).
- OSD menu system.
- Scart socket for external devices (such as video, video games, audio set, etc.).
- Stereo sound system.
- Teletext, fastext, TOP text.
- Headphone connection.
• Automatic programming system. - Forward or backward manual tuning.
- Sleep timer.
-
Child lock.
-
DVD / CD / CD-R / CD-RW / JPEG / MPEG playback.
audio. NTSC / PAL playback (according to disc content). - LPCM audio via coaxial and optical digital audio outputs (optional).
- Multi-Audio (up to 8) support (according to disc content).
- Multi-Subtitle (up to 32) support (according disc content).
- Multi-Angle (up to 9) support (according to disc content).
• 8 level parental control. - Fast forward and rewind - 5 different spe 2x, 4x, 8x, 16x, 32x.
- Slow motion playback - 5 different speeds: 1/2x , 1/4x , 1/8x , 1/16x , 1/32x forward.
- Search Mode
- Repeat
Accessories included
Remote Control
Batteries : AAA x 2
Instruction Book
Scart Adapter
Screws x 2


natural_image
Simple line drawing of an open book with no text or symbols visible
Getting Started
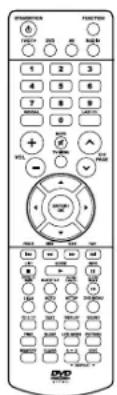
Viewing remote control - TV
- Standby/On button
- TV/DTV button
- Number (0 - 9) buttons
- Reveal button (in Teletext)
- Mute button
- Volume (- / + ) buttons
- Cursor (▼, ▲, ◀▶) buttons
Enter / OK button - Hold button (in Teletext)
Mix button (in Teletext) - List button
Guide button
Information button - Size button (in Teletext)
- OI/II Audio Language button
- Text button (in Teletext)
- Time button
- Sleep button
- Radio button
- AV button
- Last Ch button
- TV Menu button
- Channels/Page ▲ / √ buttons
- FAV (Favourite programme) button Exit button
- Index button (in Teletext)
- Cancel button (in Teletext)
- Sound button
- Picture button
- LCD Mode button
-
Red/Green/Yellow/Blue button
-
Function button (DTV, ATV, AV1, AV2/SCART, YUV/SCART, DVD or HDMI)
Sky remote code :
06
Getting Started
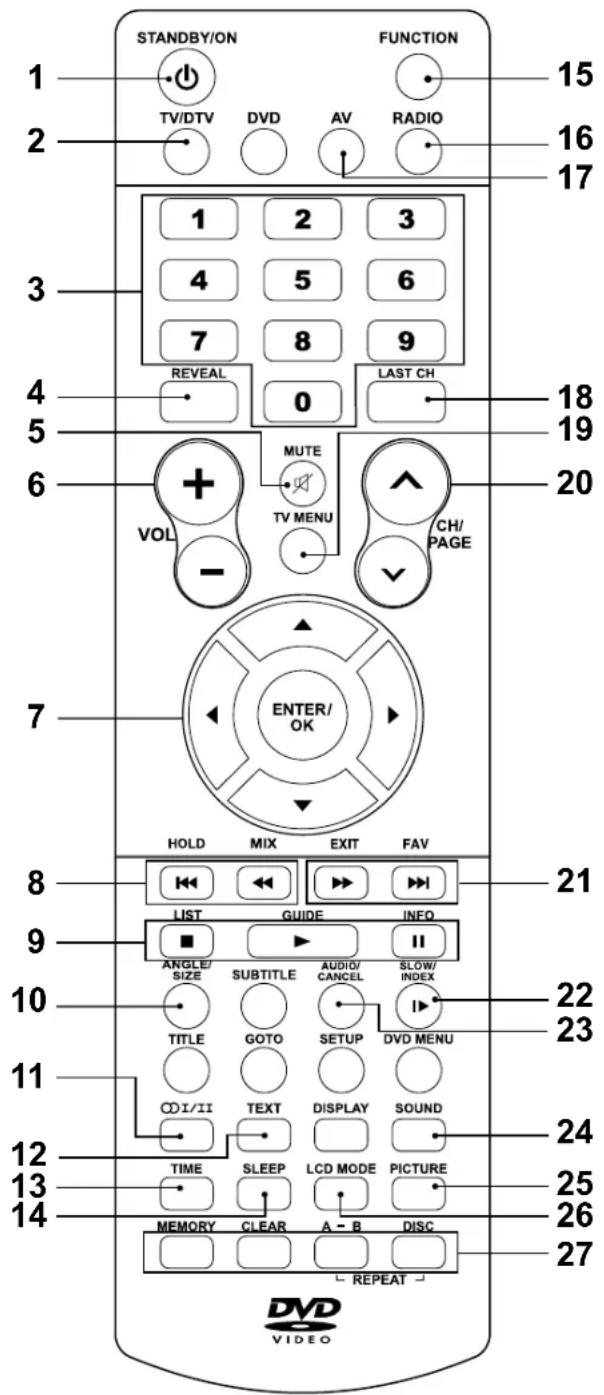
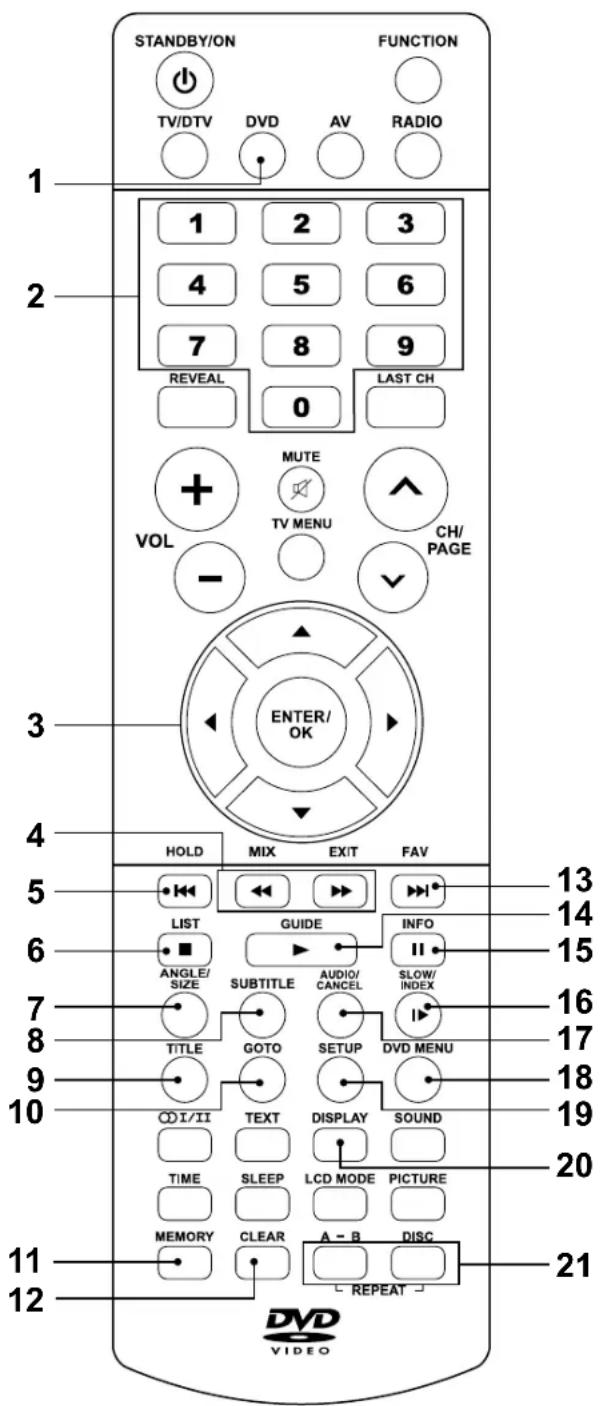
Viewing remote control - DVD
- DVD button
- Number (0 - 9) buttons
- Cursor (▼, ▲, ◀▶) buttons
Enter / OK button
- Fast reverse button
▶ Fast forward button
-
Previou button
-
■ Stop button
-
Angle button
-
Subtitle button
-
Title button
-
Goto button
-
Memory button
-
Clear button
-
▶▶ Next button
-
▶ Play button
-
II Pause button
-
▶ Slow button
-
Audio button
-
DVD Menu button
-
Setup button
-
Display button
-
Repeat button
Getting Started
TV / DVD - control buttons (top view)
1. - Volume + controls
Adjust the volume level.
2. CH buttons
Press to change the TV channels and highlight selections (Up & Down) on the menu screen.
button
Press to select next title, chapter or track on a disc and fast forward playback.
button
Press to select previous titles, chapters tracks on a disc and fast reverse playback.
3. Function button
Select DTV, ATV, AV1, AV2/SCART, SCART, DVD or HDMI.
4. Menu button
Press to display the on-screen TV menu.
5. ▶ Play button
Press to start or resume playback of a disc.
6. ⏻/1 button
Turns the unit on and off.
7. Common Interface slot
(For optional Conditional Access Module)
TV / DVD - jacks (left view)
- Audio in jacks (Left/Right) / Video in jack (AV IN 1)
- TV Aerial - Coaxial TV antenna input
- Headphone jack
- Scart jack (AV IN 2)
- HDMI jack
- Power Cord
TV / DVD - (right view)
14. Disc Door
Push gently to close the disc door.
15. ▼ Push Open knob
Push down to open the disc door.

Getting Started
Connecting a TV antenna
To view television channels correctly, a signal must be received from one of the following sources:
- An indoor or outdoor aerial antenna
- RF output of a cable system
- RF output of a satellite system
Note:
For receiving over-the-air TV broadcasts, we recommend that you use an external roof antenna.
Should you require the use of an indoor antenna, please ensure that you purchase an antenna with sufficient ability to receive in weak signal areas. Only when you are in close proximity to a transmitter will an indoor antenna reproduce a signal as strongly as a roof antenna.
Connecting a power cord
- Connect the AC power cord into a wall outlet.
- Press the / I button on the unit or remote control to turn the TV on.
Note:
- Be sure the AC power cord is disconnected and the TV is switched off before making connections.
- Make sure that all the components are connected correctly.
- When you are not going to use the unit for a long period of time, disconnect the power cord.
- The mains plug is used as the disconnecting device. It should remain readily accessible and should not be obstructed during use. To be completely disconnected from the supply mains, the mains plug of the TV should be disconnected from the mains socket outlet completely.
Common interface
There is a CI slot at top center of the cabinet which allows you to insert a CAM (Conditional Access Module) with an appropriate viewing card for some subscription TV services..
You need to subscribe to a pay channel company who administer the payments and viewing card distribution for these services.
Fully insert the CAM (Conditional Access Module) into the CI (Common Interface) slot on the top of the unit with the service provider's label facing backward.
Important notes:
- Switch off the TV and unplug from the AC power mains before insert or remove the CAM.
- The CAM should be correctly inserted, it is impossible to insert fully if reversed. The CAM or the TV terminal may be damaged if the CAM is forcefully inserted.
- Some CAMs may require setting up. Refer to the module instruction manual for details of the settings.
- If your viewing card subscription is not valid for the received service you will see a message such as 'SCRAMBLED PROGRAM'... 'You are not entitled to watch this program'.
Getting Started
Remote control
Using the Remote Control
- Point the remote control at the REMOTE SENSOR located on the unit.
- When using this unit in a very brightly lit area, the infrared REMOTE CONTROL SENSOR may not work properly.
- The recommended effective distance for using the remote control is about 16 feet (5 metres).
Battery Replacement
When the batteries become weak, the operating distance of the remote control will be greatly reduced and you will need to replace the batteries.
Note:
- If the Remote Control is not to be used for a long time, remove the batteries to avoid damage caused by battery leakage corrosion.
- Do not mix old and new batteries. Do not mix ALKALINE, standard (CARBON-ZINC) or rechargeable (NICKEL-CADMIUM) batteries.
- Corrosion, oxidation, battery-leakage and any other gradually acidic defect of this nature will invalidate the guarantee.
- When discarding batteries, environmental problems must be considered and local rules or laws governing the disposal of these batteries must be strictly followed.

WARNING:
- Do not dispose of batteries in a fire or they may leak and/or explode.
- The battery shall not be exposed to excessive heat such as sunshine, fire or the like.
CAUTION:
Danger of explosion if batteries are incorrectly replaced. Replace only with the same or equivalent type.
To Change the Remote Control Batteries
- Open the battery door. (fig.1a)
- Insert two "AAA" batteries. (fig.1b)
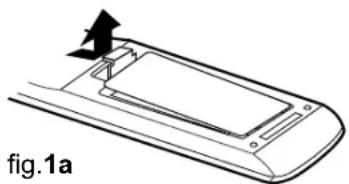
natural_image
Diagram of a device casing with a handle and arrow indicator, labeled 'fig.1a' (no text or symbols on the diagram itself)
Getting Started
Initial set up
The first time you turn the unit on, it will go straight into start-up screen. Simply follow the screen prompts as below to tune in the channels.
- In the initial start-up screen, press ENTER/OK to enter next screen. (fig.2)
- Use the ◀, ▶, ▼ ▲ button to select a desired language, then press the ENTER/OK button to confirm. (fig.3)
- Use the ◀, ▶, ▶, button to select Country, then press the ENTER/OK button to confirm. (fig.4)
- The system will automatically scan and store all available programs which may take five minutes or more. (fig.5)
If the digital TV region choice menu appears, press ENTER/OK to confirm your digital TV regions. (fig.6)
Note:
If tuning fails, a screen will appear as shown. (fig.7)
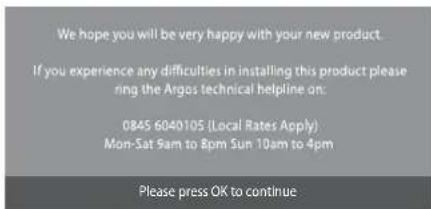
fig.2
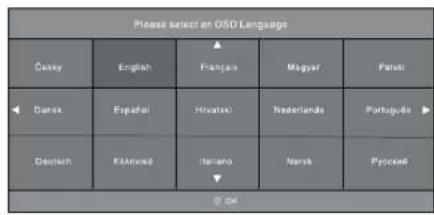
fig.3

fig.4

fig.5

fig.6

fig.7
Connections
Connecting a high-definition (HD) source
High-Definition (HD) Devices with component video output must be connected to the YUV input.
Connect the component video cable and audio cable (not included) as shown.
Make sure you connect the YUV Scart adaptor to this unit, then connect component v cable and audio cable from the other equipment (COMPONENT VIDEO OUT and AUDIO OUT) to this unit (SCART and AUDIO IN).
To operate the connected device and play the source, first press the FUNCTION button to select the YUV/SCART mode.
Note:
When connecting a DVD player to the television, the picture resolution is dependent upon the resolution of both the DVD player and the TV. For best results, select the highest resolution of the DVD up to the TV maximum of 1080i.

flowchart
graph TD
    A["HD SOURCE\nWith component video output\n(Digital Cable Box*, Satellite Receiver*, or external over-the-air HD-Tuner)."] --> B["To AUDIO OUT jacks"]
    B --> C["To COMPONENT VIDEO OUT jacks"]
    C --> D["To SCART jacks"]
    D --> E["YUV SCART adaptor (included)"]
    E --> F["To AUDIO IN jacks"]
    F --> G["AV IN 1"]
    G --> H["SCART"]
    H --> I["AV IN 2"]
    I --> J["Output to monitor"]
* May require a subscription for channels. Check with your cable/satellite service provider for details.
Connecting HDMI
HDMI (High Definition Multimedia Interface) supports both video and audio on a single digital connection for use with DVD players, DTV, set-top boxes and other digital AV devices. HDMI was developed to provide the technologies of High Bandwidth Digital Content Protection (HDCP) as well as Digital Visual Interface (DVI) in one specification. HDCP is used to protect content transmitted and received by DVI-compliant or HDMI-compliant displays.
Make sure you connect the cable from the equipment (HDMI OUT) to this unit (HDMI IN).
To operate the connected device and play the source, first press the FUNCTION button to select the HDMI mode.
Note:
It is not recommended to use HDMI cables digital longer than 2 m as this may affect the HDMI performance.
HDMI has the capability to support standard,
enhanced or high-definition video plus standard to multi-channel surround-sound audio. HDMI feature include uncompressed digital video, a bandwidth of up to 2.2 gigabytes per second (with HDTV signals), one connector (instead of several cables and connectors), and communication between the AV source and AV devices such as DTVs.
HDMI, the HDMI logo HDMI and High-Definition Multimedia Interface are trademarks or registered trademarks of HDMI licensing LLC.
Connect the HDMI cable (not included) as shown.

flowchart
graph LR
    A["HD SOURCE with HDMI output"] --> B["To HDMI IN jack"]
    B --> C["HDMI IN"]
Connections
Connecting to sources with scart
Devices with RGB output must be connected to the SCART input:
Connects the SCART from the source to the corresponding SCART on this unit (SCART cable not included) as shown.
Make sure you connect both to SCART to SCART.
To operate the connected device and play the source, first press the FUNCTION or AV button to select the AV2/SCART mode.

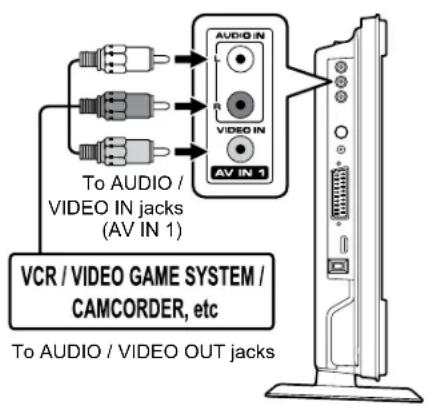
Connecting to devices with a composite
To connect to A/V devices such as a VCR, camcorder or video game system.
Connect the AUDIO / VIDEO cable (not included) as shown.
Make sure you connect the cable from the other equipment (AUDIO and VIDEO OUT) to this unit (AUDIO and VIDEO IN). Press the FUNCTION or AV button to select AV1 mode.
Note:
Please refer to the user manual for the other equipment for more information.
Using headphones
- Turn down the volume before connecting headphones to the unit, then adjust the volume to your desired level.
- When headphones are connected, no sound will come from the front speakers.
Maximum output voltage ≤150mV
CAUTION:
Excessive sound pressure from earphones and headphones can cause hearing loss.
![Earphones / Headphones (1/8" [3.5mm] diameter plug)](/content/2026/06/1244844/images/a8d21a7c8dd35629a7af93b91e382e6363c74f3b08c34540cdf0e7a857646e3a.jpg)
Basic Features
Electronic programme guide (EPG) for DTV
While watching a DTV programme, you can press the GUIDE button to display the PROGRAMME GUIDE menu. (fig.1)
- Press the ▲ or▼ to scroll through the programmes of different channels. Press the ◀or ▶to skip to the programmes of different periods.
(Note: Programme names in GREEN indicates that these programmes are now broadcasting on different channels.) - Use the ▲, ▼, ◀ or ▶ or button to select a programme, press the INFO button to display detailed information if available. Press the INFO button again to return.
- Press the YELLOW button to view the programme list of the next date; press the GREEN button to view the programme list of the previous date.
- Press the ENTER/OK button to watch the selected channel.
- Press the EXIT button to exit the PROGRAMME GUIDE menu.
Note:
Guide information display may be different according to the DTV programmes.

fig.1
Audio language for DTV
While watching a DTV programme, you can press the button to display the Audio Language menu (fig.2), and select audio language, format and sound track.
- Use the or▼ button to select an audio language or audio format if available, praser
▶ button to select sound track between L/R (Stereo), L/L (Mono Left) and R/R (Mono Right). Press the ENTER/OK button to confirm. - Press the _1/11 or EXIT button to exit the Audio Language menu.
Note:
For analogue TV, press the 01/11 button repeatedly to select STEREO/MONO/Dual I/Dual II/Dual I+II directly.
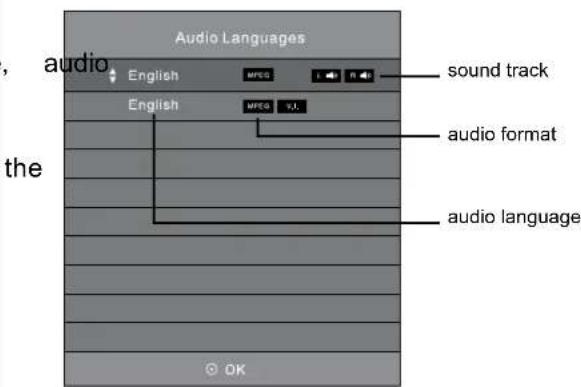
fig.2
Basic Features
Analogue TV / DTV setup

TV Setting (only in ATV or DTV mode)
- Press the TV MENU button.
- Use the ◀ or ▶ button to select ■ . (fig.3)
- Use the ▲ or ▼ button to select the options (Auto Tuning, DTV Manual Tuning, ATV Manual Tuning, Programme Edit), adjust them using the ◀ or ▶ button. Common Interface and Signal information are only available in DTV mode.
- Press the TV MENU button to return to previous menu, repeat step 2 to adjust other settings.
- To exit the setup menu and return to the normal screen, press the EXIT button.
- Auto Tuning: Automatically scan, sort and store all available programmes. Press▶ to choose DTV+ATV, DTV or ATV only.
- DTV Manual Tuning : Perform manual search for DTV (Digital TV) programmes.
• ATV Manual Tuning : Perform manual search and fine tune for ATV (Analog TV) programmes.
- Programme Edit : All channels stored are listed in the Programme Edit menu (fig.4), you can edit the channels by the following steps:
- Use the ▲ or ▼ button to select a channel. (Press the CH/PAGE ∧/ √ button to skip to previous/ next page.)
- Press the RED / GREEN / YELLOW / BLUE button or the FAV button to edit the channel.
- DELETE
Press the RED button to delete the selected channel. Press the TV MENU button to stop delete.
- RENAME (for ATV mode only)
Press the GREEN button to rename the selected channel. Use the ▲ or ▼button to select the characters to represent the station name, use the ◀ or ▶button to move to the next character, press the TV MENU button to confirm.
- MOVE (for ATV mode only)
Press the YELLOW button and use the ▲ or ▼ button to move the selected channel, then press the TV MENU button to confirm.
- SKIP
Press the BLUE button to skip or not skip the selected channel.

DTV setup menu
fig.3

fig.4
Basic Features
Analogue TV / DTV setup
- FAV (Favourite)
Press the FAV button to set or cancel the selected channel as one of the favourite programmes. A "heart"♥ will appear alongside the program set as a favourite.
• Signal Information
Display the signal information, such as channel name, network, modulation, quality and strength.
- CI Information
Display CAM and Smart card information; select the language if available.

Picture menu
-
Press the TV MENU button.
-
Use the ▲ or ▼ button to select the options (fig.5) (Picture Mode, Contrast, Brightness, Colour, Sharpness, Tint, Colour Temperature), adjust them using the ◄ or ◆ button. The adjustments only work in 'personal' mode. Tint only works for NTSC video.
-
Press the TV MENU button to return to previous menu.
-
To exit the setup menu and return to the normal screen, press the EXIT button.
- Picture Mode :
Select from four preset screen display settings (Standard, Soft, Dynamic and Movie), or select Personal in which your own settings of Contrast, Brightness, Colour and Sharpness are stored.
- Contrast :
Adjust the contrast of the picture. The black portions of the picture become richer in darkness and the white become brighter.
- Brightness :
Adjust the brightness of the picture.
- Colour :
Adjust the colour of the picture.
- Sharpness
Adjust the sharpness level to improve detail in the picture.
- Tint (only for AV mode with NTSC signal) :
Adjust the tint of the picture.
• Colour Temperature :
Select the colour temperature of the picture. Select Normal (balanced)/ Warm (red white)/ Cool (blue white) mode.

fig.5
Note:
You can also select Picture Mode simply by pressing the PICTURE button on the remote control.
Basic Features
Analogue TV / DTV setup

Sound memu
- Press the TV MENU button.
- Use the◀ or ▶ button to select the ⚫ (fig.6)
- Use the ▲ or ▼button to select the options (Sound Mode, Treble, Bass, Balance), adjust them using the ◀or ▶button.
- Press the TV MENU button to return to previous menu.
- To exit the setup menu and return to the normal screen, press the EXIT button.
Experiment with different sound settings until you find the settings you prefer.
- Sound Mode :
Select from four preset sound settings (Standard, Music, Theatre and Voice), or select Personal in which your own settings of Treble, Bass and Balance are stored.
- Treble :
Adjust the treble range.
- Bass :
Adjust the bass range.
• Balance :
Adjust the balance level toward the left or right speakers.
Note:
You can also select Sound Mode simply by pressing the SOUND button on the remote control.

Time menu
- Press the TV MENU button.
- Use the◀ or ▶button to select the ⚫(fig.7)
- Use the ▲ or ▼button to select the options (Clock, Sleep Timer, Time Zone), adjust them using the ◀or ▶button.
- Press the TV MENU button to return to previous menu.
- To exit the setup menu and return to the normal screen, press the EXIT button.
- Clock: The clock is set automatically when receiving a digital signal.
- Sleep Timer :
Select the time to turn the unit to Standby mode automatically: Off -> 5min -- -> 90min -> 120min.
• Time Zone : Select your time zone.
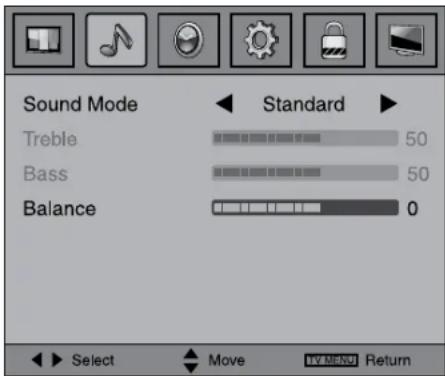
fig.6

fig.7
Basic Features
Analogue TV / DTV setup

Setup menu
- Press the TV MENU button.
- Use the ◀ or ▶ button to select the . (fig.8)
- Use the ▲ or ▼ button to select the options (OSD Language, Audio Language, Subtitle Language, Restore Setting, OAD), adjust them using the ◀ or ▼ button.
- Press the TV MENU button to return to previous menu.
- To exit the setup menu and return to the normal screen, press the EXIT button.
- OSD Language : Select your preferred On Screen Display language.
- Audio Language : Select your preferred audio language. (Available for digital channels if multiple audio languages are broadcasted.)
- Subtitle Language : Select your preferred subtitle language or turn off subtitle. (Available for digital channels if multiple subtitle languages are broadcasted.)
- Restore Setting: Press the ENTER/OK button to restore the system settings to the factory default.
- OAD (Over Air Download) : Select to enable/disable OAD (Over Air Download) feature. This should normally be Set to ON to allow the TV to be automatically upgraded if this is needed from time to time.
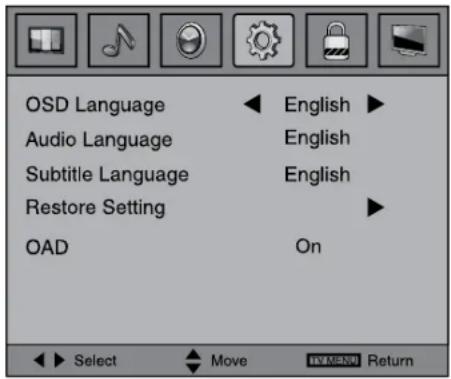
fig.8
Basic Features
Analogue TV / DTV setup

Lock menu
- Press the TV MENU button.
-
Use the ◀ or ▶ button to select the 📄(fig.9)
-
Press the ▼ button to highlight Lock System then press ENTER/OK or ◀ or ▶ to enter, enter password to proceed. (The default password is 0000.)
-
Use the ▲ or ▼button to select the options (Lock System, Change Password, Block Programme, Parental Guidance), press the ENTER/OK or ◀/ ▶button to adjust.
-
Press the TV MENU button to return to previous menu.
-
To exit the setup menu and return to the normal screen, press the EXIT button.
- Lock System: Select to lock or unlock the programmes.
- Change Password: If you change the password, remember your password.
If you forget the password, enter "8888" to unlock parental control.
- Block Programme : Enter the Block Programme menu, press the ▲ or ▼ button to select a channel, press the GREEN button to Lock or Unlock the channel.
- Parental Guidance : Select a censorship level to censor and block the programmes.
Note: This system will only work if the correct information is transmitted by the TV channel.

fig.9
Basic Features
Teletext
Teletext is an information system that displays text on your TV screen. Using the Teletext control buttons you can view pages of information that are listed in the teletext index.
Analog and Digital text look very different and operate differently.
Please Note
Teletext is only transmitted on some channels. You will only be able to enter Teletext on these.
To enter Text mode
For Analogue text, press the TEXT button in ATV mode. For digital text, press the TEXT button in DTV mode. The text page will appear, the index page.
To exit Text mode
Press the TEXT button. The TV will return to the channel you were watching.
To select a page of text
Find the number of the page in the index and enter it using the Numeric buttons. The number of the page will appear on the top corner of the screen.
The page counter will search for your page. When it finds it, the page will be displayed.
To move to the next page of text, press the CH/PAGE √ button.
To move to the previous page, press PAGE ^ button.
To return to the index page, enter the using the Numeric buttons.
For Digital Text you can also use the cursor ▲, ▼ and TV MENU buttons to select pages.
Fastext
At the bottom of the teletext screen is a row of subject headings in red, green, yellow and blue.
The remote control has a row of colour buttons corresponding to the row of coloured subjects on the screen.
Pressing one of the colour buttons will take you directly to the page corresponding to the subject heading.
ANALOGUE TEXT ONLY:
Mix
To view a page of the text whilst watching a TV programme, press the MIX button. The text will be superimposed over the TV programme.
Press the MIX button again to return to the text page.
Page search whilst watching TV
In Text mode press the CANCEL button.
Enter the page number you want using the Numeric buttons.
The top line of the text page will appear whilst the text searches for your page. When the page is found the number will remain in the top left hand corner of the screen.
Double height text
If you have difficulty reading the text on the TV you can double the height of the text.
Press the SIZE button. The top half of the page will be displayed in double height text.
Press the SIZE button again. The bottom half of the page will be displayed in double height text.
Press the SIZE button again to return to the full page.
Page Stop
If the page of text you have selected contains sub pages, these will gradually fill up the memory. You can press cursor or to select "100" by individual sub-pages or highlight the rolling page symbol √ to read them one after another.
To stop the move to the next sub page, the HOLD button. “⊕” will appear on the top left corner of the screen.
To continue moving through the sub pages, press the HOLD button again.
To reveal information
Press the REVEAL button to reveal concealed information (quiz answers etc.).
Press the REVEAL button again to conceal the information again.
Basic Features
CD / DVD Operation
This instruction manual explains the basic instructions of this unit. Some DVDs are produced with limited operation during playback. For example, many DVDs do not allow users to skip government warnings, or in some previews or other features. This is not a defect in the unit. Refer to the instruction notes of discs. "☐" may appear on the screen during operation. A "☐" means that the desired operation is not permitted by the unit or disc.
cases
Playing a disc
- Press the ⏻/I button to turn the unit on.
- Press the FUNCTION button repeatedly to select DVD mode or directly to press DVD button on the remote.
See CUSTOMISING THE FUNCTION SETTINGS before proceeding to step 3.
-
Push down the ▼ knob to open the disc door.
-
Hold the disc by its edge and gently push it onto the spindle, with the label side facing the front, until you hear a "click". (fig.10)
-
Push disc door gently to close it. It takes a short while for your unit to load the disc. After loading, the unit will automatically either bring you to the main menu of DVD, or start playing the DVD. If the unit does not automatically start playing the DVD, press the ▶ PLAY button.

natural_image
Line drawing of a hand holding a CD to an open screen, with no text or symbols present.fig.10
Playing a picture file disc
This unit can play picture files recorded on CD-R and CD-RW discs.
- Push down the ▼ knob to open the disc door.
- Hold the disc by its edge and gently push it onto the spindle, with the label side facing the front, until you hear a "click".
- Push the door gently to close it. The picture files on the disc will be displayed one by one automatically.
- Press the ■ STOP button to go to the folder list.
- Press the ▲ or ▼ button to highlight a file to play. Press the ▶ PLAY button to start playback.
Note:
- You can press the II PAUSE button to interrupt playback, and press the PLAY button to resume playback.
- You can press ◀◀ or ▶▶ list the previous or next block of files.
- You can use the numbered buttons to enter the image number to quickly select any image.
- Press the ANGLE button on the remote control to rotate the picture by 90°.
Basic Features
CD / DVD Operation
Pausing playback (still mode)
Press the II PAUSE button. To resume normal playback, press the ▶ PLAY button. Each time you press the IIPAUSE button, the picture advances one frame on DVD.
Stopping playback
Press the ■ STOP button at the location where you want to interrupt playback. To resume playback at the position where the disc was stopped, press the ▶ PLAY button.
If you press the STOP button twice, the unit's memory will be cleared and pressing the PLAY button will reset the disc to the beginning.
Skipping to a different track
- Press the PREV button to go back to previous titles/chapters/tracks.
- Press the NEXT button to advance titles/chapters/tracks.
- For an audio CD, use the number buttons on the remote control to go directly to the desired track number and press ▶PLAY.
Fast forward / fast reverse
- Press the SEARCH◀ or SEARCH▶ button when a disc is playing.
- The disc begins a fast scan at two times normal (x2) speed.
-
Each time the SEARCH / button is pressed, the speed of the fast scan changes.
-
Press the ▶ PLAY button when you have reached the desired point to resume playback at normal speed.
Slow-motion play (DVD)
- In Play mode, press the ▶ SLOW button on remote control. Each time the ▶ SLOW button is pressed, the speed of slow-motion playback changes in the following sequence:

- Press the ▶ PLAY button to return to the normal playback speed.
Audio selection (DVD)
On some discs, the sound is recorded in two or more formats. Follow the directions below to select the type of playback.
- While a disc is playing, press the AUDIO button to show the current audio format number.
- Press the AUDIO button repeatedly to select the desired audio format.
OD: D D 6CH English 1/3
Note:
- If only one audio format is recorded, the number does not change.
- About two seconds later, playback continues in the new audio format.
Subtitle selection (DVD)
- While a DVD is playing, press the SUBTITLE button to display the current language setting.
- Press the SUBTITLE button repeatedly to select the desired subtitle language.
Subtitle : English 1/5
Note:
- If only one language is recorded, the language does not change.
- About two seconds later, playback continues with the new subtitle you selected.
- The number of languages recorded differs depending on the disc.
- If no button is pressed within a few seconds, playback continues without changing the current subtitle.
- This function can only be used for discs on which subtitles have been recorded in multiple languages.
- On some DVDs, subtitles are activated from the main menu of the DVD. Press the DVD MENU button to activate the main menu.
Basic Features
CD / DVD Operation
Angle selection (DVD)
Some DVDs contain scenes which have been shot from a number of different angles. For these discs, the same scene can be viewed from each of these different angles.
- While you are playing a DVD with different angles recorded, press the ANGLE button to view the number of the current angle available.
-
Press the ANGLE button repeatedly to change the scene to the next angle in those recorded.
-
About two seconds later, playback continues from the new angle you selected.
- If no button is pressed within 10 playback continues without changing the current angle.
:1/3
Sequence of angle shots (Example)
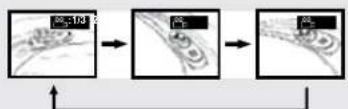
Note:
- This function can only be used for discs on which scenes shot from multiple angles have been recorded.
- If only one angle is recorded, "☐" is displayed.
Display
While the disc is playing, press the button repeatedly to display information on operation status.
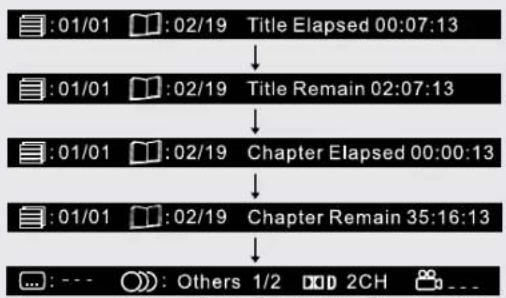
flowchart
graph TD
    A[":01/01"] --> B[":02/19"] --> C["Title Elapsed 00:07:13"]
    B --> D[":01/01"] --> E[":02/19"] --> F["Title Remain 02:07:13"]
    F --> G[":01/01"] --> H[":02/19"] --> I["Chapter Elapsed 00:00:13"]
    I --> J[":01/01"] --> K[":02/19"] --> L["Chapter Remain 35:16:13"]
    L --> M[":---"] --> N[":Others 1/2"] --> O["DOD 2CH"] --> P["..."]
Locating a specific title (DVD)
If a DVD disc contains title numbers, you locate a specific title by directly selecting its title number.

- Press the GOTO button.
- Press the ◀ or ▶ button to highlight a specific field and press the corresponding number button(s) for the title you want.
- Press the ENTER/OK button to confirm. The unit will start playback about 3 second later.
Locating a specific chapter / track
If you know the chapter / track number you want to play, you can locate a specific chapter / track by directly selecting a chapter / track number.

- Press the GOTO button to search for your desired chapter.
- Press the ◀ or ▶ button to highlight a chapter / track and press the corresponding number button(s) for the chapter you want.
- Press the ENTER/OK button to confirm. The unit will start playback about 3 second later.
DISRcAing a specific time
You can move to a specific location by entering its corresponding time (hours, minutes, seconds)

- Press the GOTO button twice.
- Press the ◀or ▶button to highlight a time and press the corresponding number button(s) for the setting point you want.
- Press the ENTER/OK button to confirm. The unit will start playback about 3 second later.
Note:
- Some discs may not respond to this process.
- This method of locating a title/chapter is available only on a DVD disc that contains title/chapter numbers.
- Some scenes may not be located as precisely as you specified.
- This method for accessing specific locations is available only within the current title of the DVD disc.
Basic Features
CD / DVD Operation
Repeat playback
You can play a specific title or chapter repeatedly.
(Title repeat, chapter repeat, Repeat all, A-B repeat)
Repeating a chapter (DVD)
You can play the same chapter repeatedly.
- While the disc is playing, press the DISC button until the Chapter " indicator displays on the screen. The current chapter is played repeatedly.
Repeating a title
You can play the same title repeatedly.
- While the disc is playing, press the DISC button until the 📄 Title indicator displays on the screen. The current title is played repeatedly.
To resume normal playback
- While the disc is playing, press the DISC button until the "on" indicator displays on the screen.
You can play a single track or an entire disc repeatedly.
Repeating a single track (CD)
You can play the same track repeatedly.
- While the disc is playing, press the DISC button until the Track "indicator displays on the screen. The current track is played repeatedly.
Repeating an entire disc
- While the disc is playing, press the DISC button until the 📄 All indicator displays on the screen. The entire disc is played repeatedly.
To resume normal playback
- Press the REPEAT DISC button until the "OFF" indicator displays on the screen.
Repeating a specific section (DVD / CD)
You can play a specific section repeatedly.
-
While the disc is playing, press the REPEAT A-B button at the beginning of the section (" RepeatA " is displayed) you want to play repeatedly.
-
Press the REPEAT A-B button again at the end of the section ("Repeat A-B played) you want to play repeatedly.
-
The unit will immediately begin replaying your selection.
To resume normal playback
- While the disc is playing, press the REPEAT A-B button until the "Repeat Off" indicator displays on the screen.
Note:
- A-B repeat can only be used within the same title. If the start and end of the section to be repeated are in different titles, A-B repeat is cancelled.
- The A-B repeat function does not operate in scenes where different camera angles are recorded.
REPEAT
REPEAT
Basic Features
CD / DVD programmable playback
Programmable memory
The two types of programmed playback provided by this unit are title/chapter for DVD and track for CD.
Track/Title/Chapter programmed playback
- Press the MEMORY button. A screen will be shown as right. (fig.11)
- Press the ▶ button to highlight the Title. Press the ▲ or ▼button to choose the desired title. Press the ▶ button again to highlight the Chapter. Press the ▲ or ▼button to choose the desired Chapter. Press the ENTER/OK button to confirm. The highlight bar will move to next item automatically.
- Repeat step 2 to add up to twenty titles and chapters.
- Press the ▶ PLAY button to start the programmed playback.
- Track programmed playback for CD is like title/chapter programming but just enter track numbers. (fig.12)
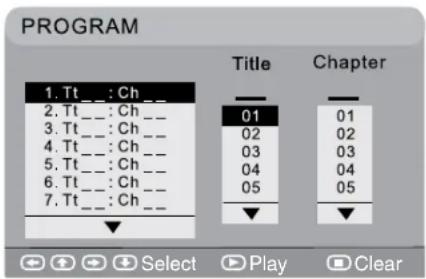
fig.11 DVD
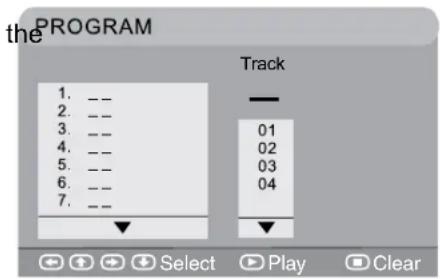
fig.12
Programmable photo file playback
Programmed memory
- Press the MEMORY button to enter program mode. (fig.13)
- Press the ▲ or button to choose the desired files into the program list. Press the OK button to confirm. Repeat these enter more files in the list.
- Press the ▶ button to select "PLAY" option. Press the ENTER/OK button to start playing the programmed list. Or press the button to select "LIST" option. Press the ENTER/OK button to show the programmed list.
If you want to edit the program list, press the
▲ or ▼button to highlight a file to "Delete it" or select the "Delete All" and press the ENTER/OK button to delete the list. Press the◀ or ▶buttons to highlight "Return", press ENTER/OK button to return to Program Mode.
- Press the YELLOW button to enter SORT FILE menu (fig.14). Press the ,▲,▼◄or ► buttons to select the options and press the ENTER/OK button to confirm. Press the YELLOW button again to return to Program Mode.
ENTER
steps to

fig.13
the

fig.14
Note:
- You can press the II PAUSE button to interrupt playback, and press the ▶ PLAY button to resume playback. Press the STOP button to stop the playback. Press MEMORY button to exit the program mode.
Advanced Features
Customising the function settings
Language setup
- In Stop mode, press the SETUP button.
- Use the ▲ or ▼ button to select the option Language Setup (fig.1), then press the ▶ button to move the highlight bar on OSD Language.
- Use the ▶ button to move the highlight then use the ▲ or ▼ button to select your preferred language, and press the ENTER/OK button to confirm.
- Press the button to go back to the previous menu. Repeat steps 2 and 3 to adjust other options.
- To exit the SETUP MENU and return to the normal screen, highlight the Exit Setup Mode (☐) and press the ENTER/OK button.
Note :
- Some DVDs may not play in the audio language you selected. A prior language may be programmed on the disc.
- Some DVDs may be set to display subtitles in a language other than the one you selected. A prior subtitle language may be programmed on the disc.
- Some DVDs allow to change subtitle selections only via the disc menu. If this is the case, press the DVD MENU button and choose the appropriate subtitle from the selection on the disc menu.
- Some DVDs may not included your pre-selected language. In this case, the DVD player automatically displays disc menus consistent with the disc's initial language setting.
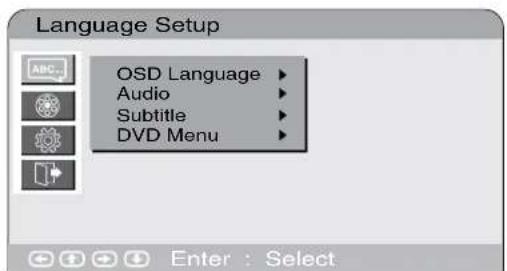
fig.1
Advanced Features
Customising the function settings
Video setup
- In Stop mode, press the SETUP button.
- Use the ▲ or ▼button to select the Video Setup. (fig.2)
- Press the ▶ button to highlight the TV TYPE and then press the ▶ button to enter the desired TV type.
- Use the ▲ or ▼ button to select the desired TV type and press the ENTER/OK button to confirm.
- To exit the SETUP MENU and return to the normal screen, highlight the Exit Setup Mode (☐) and press the ENTER/OK button.
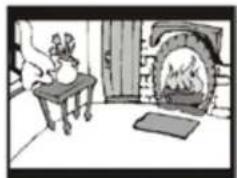
TV Display
Pan Scan
- When wide-screen video is played, this clips the right and left sides of the image so that it can be viewed on a conventional screen.
- Some wide-screen DVDs that do not permit Pan Scan playback are automatically played in Letter Box mode (black bands at top and bottom of screen).
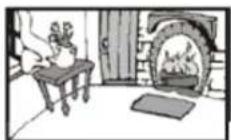
Letter Box
- When wide-screen video is played in this mode on a conventional screen, black bands appear at the top and bottom of the screen.
Wide-screen
- This is the correct mode for playing wide-screen videos on a wide-screen.
Note :
- The displayable picture size is preset on the DVD discs. Therefore the playback picture of some DVDs may not conform to the picture size you select.
- When you play DVDs recorded in the 4:3 aspect ratio, the playback picture will always appear in the 4:3 aspect ratio regardless of the TV shape setting.

fig.2
mode
Cut off when a wide-screen video image is played.

natural_image
Interior view of a room with a person sitting at a bench, a stove, and a fire pit (no text or symbols visible)Pan Scan
natural_image
Illustration of a person sitting at a bench near a fireplace (no text or symbols visible)Letter Box
Wide-screen
Advanced Features
Customising the function settings
System setup
- In Stop mode, press the SETUP button.
- Use the ▲ or ▼button to select the System Setup option. (fig.3)
- Press the ▶ button to highlight the Default.
- Use the ▲ or ▼ button to select the desired setup option.
- To exit the SETUP MENU and return to the normal screen, highlight the Exit Setup Mode (☐) and press the ENTER/OK button.
Parental Control
DVDs are rated according to their content and some are equipped with a password function. The contents allowed by parental lock level and the way a DVD is controlled may vary from disc to disc.
For example, if the disc allows, you could lockout violent scenes unsuitable for children or you could lock out playback of the disc altogether.
You cannot play password function equipped DVDs rated higher than the level you selected unless you cancel the parental lock function.
The parental lock levels are equivalent to the following ratings. Level 1 : Kid Safe Level 2 : G Level 3 : PG Level 4 : PG-13 Level 5 : PG-R Level 6 : R Level 7 : NC-17 Level 8 : Adult
Password
Use ▲ or ▼ button to shift and select PASSWORD, use ▶ button to "Change". Enter your 4-digit security code until the cursor to OK. Press the ENTER/OK button.
If you forget the password, you can erase your current password by pressing number button 8 on the remote four times, then press the ENTER OK button to confirm the setting (PASSWORD: 8 8 8 8).
Default
It takes 3-5 seconds to reset the unit to the factory default.

fig.3
to the
Other Information
Installation
Install / removing the stand
WARNING: The LCD Display is very fragile, and must be protected at all times when installing / removing the stand. Be sure that no hard or sharp object, or anything that could scratch or damage the LCD display, comes into contact with it. Do NOT put pressure on the front of the unit at any time because the screen could crack.
- Disconnect any cables or cords connected to the unit.
- Lay the unit down on a flat surface, so the back is facing up, making sure to place a soft cushioned material (such as a pillow or thick piece of foam) beneath the screen.
- Install / remove the two screws and then install / remove the STAND to / from the TV.
Mounting on the wall
This unit is VESA-compliant, and is designed to be wall-mounted with a VESA-compliant 75mm x 75mm mounting kit designed for flat-panel TVs (sold separately). Mount this unit according to the directions included with the mounting kit.
Note:
Remove the stand before mounting the unit on the wall.

natural_image
Technical line drawing of a flatbed electronic device with screwdriver and grid-patterned component (no text or symbols)
| Specifications | BTVD91186 BTVD91216 | |
| TV Broadcasting | PAL (B/G D/K I) | PAL (B/G D/K I) |
| Receiving Channels | VHF/Low VHF/High UHF | VHF/Low VHF/High UHF |
| Channel Indicator | On screen display | On screen display |
| RF Aerial Input | 75 Ohm (unbalanced) | 75 Ohm (unbalanced) |
| Operating Voltage | 230V AC, 50 Hz. | 230V AC, 50 Hz. |
| Audio | Nicam Stereo | Nicam Stereo |
| Audio Output Power | 2 x 1.8 | 2 x 1.8 |
| Power Consumption | 45W, <1W (Standby) | 52W, <1W (Standby) |
| Panel Dimensions DxLxH (with foot) | 150 x 483 x 368 mm | 150 x 558 x 408 mm |
| Weight (with foot) | 3.76 kg | 4.37 kg |
| Panel Dimensions DxLxH (without foot) | 68 x 483 x 347 mm | 68 x 558 x 387 mm |
| Weight (without foot) | 3.63 kg | 4.25 kg |
Product Support
The Argos Technical Helpline is here to help
Technical experts are available 7 days a week
- Simple help and advice on setting up your digital equipment (image).
• Guidance on connecting other devices to your television such as a DVD player, Sky, home cinema system or a games console. - Order spare parts, including that lost remote control.
- Any other technical issues you may need assistance with.
Call us today: 0845 604 0105
Local call rates applies*
Lines open 9am-8pm Monday to Saturday and 10am-4pm Sunday.
*Calls to Argos enquiry lines may attract a charge and set up fee from residential lines depending on your call plan/tariff. Mobile and other providers costs may vary, see www.bt.com/pricing for details.
For Security and training purposes, telephone calls to and from customer service centres maybe recorded and monitored. Calls from Republic of Ireland will attract international call charges.
Product Support
Disc formats
This unit can playback: Titles, Chapters and Tracks

DVDS
[8cm/12cm disc]

Audio CDS
[8cm/12cm disc]
CD-R/CD-RW
Compatible
Region Management Information
Region Management Information: This unit is designed and manufactured to respond to the Region Management Information that is encoded on DVD discs. If the Region number printed on the DVD disc does not correspond to the Region number of this unit, this unit cannot play that disc.
The region number of this unit is
Disc Function or Operation that is Not Available
When the symbol appears on the indicates that the function or operation attempted is not available at that time. This occurs because the DVD disc manufacturer determines the specific functions. Certain functions may not be available on some discs. Be sure to read the documentation provided with the DVD.
Icons Used on DVDs
Sample Icons
Note:
- When playing back a CD-G (Graphics) or CD EXTRA disc, the audio portion will be played, but the graphic images will not be shown.
- DVDs are divided into "titles" and "chapters". If the disc has more than one movie on it, each movie would be a separate "title". "Chapters" are sections of titles.
- Audio CDs are divided into "tracks". A "track" is usually one song on an Audio CD.

flowchart
graph TD
    A["DVD VIDEO"] --> B["Title 1"]
    A --> C["Title 2"]
    B --> D["Chapter 1"]
    B --> E["Chapter 2"]
    B --> F["Chapter 3"]
    C --> G["Chapter 1"]
    C --> H["Chapter 2"]
    I["DISC CAPITAL AUDIO"] --> J["Track 1"]
    I --> K["Track 2"]
    I --> L["Track 3"]
    I --> M["Track 4"]
    I --> N["Track 5"]
Note:
- Numbers identify each title, chapter, and track on screen a disc. Most discs have these numbers recorded on them, but some do not.
Notes on Unauthorized Discs
You may not be able to play back some DVD discs on this unit if they were purchased from outside your geographic area or made for business purposes.
Notes on Copyright
It is forbidden by law to copy, broadcast, show, broadcast on cable, play in public, or rent copyrighted material without permission.
Apparatus Claims of U.S. Patent Nos. 6,836,549; 6,381,747; 7,050,698; 6,516,132; and 5,583,936 licensed for limited viewing uses only.
This product incorporates copyright protection technology that is protected by U.S. patents and other intellectual property rights. Use of this copyright protection technology must be authorized by Macrovision, and is intended for home and other limited viewing uses only unless otherwise authorized by Macrovision. Reverse engineering or disassembly is prohibited.
Product Support
Maintenance
Cleaning the disc
A defective or dirty disc inserted into the unit can cause sound to drop out during playback.
Handle the disc by holding its inner and outer edges.
- Do NOT touch the surface of the unlabeled side of the disc.
- Do NOT stick paper or tape on the surface of the disc.
- Do NOT expose the disc to direct sunlight or excessive heat.
- Clean the disc before playback. Wipe the disc from the center outward with a cleaning cloth.
- NEVER use solvents such as benzene or alcohol to clean the disc.
- Do NOT use irregular shape discs (example: heart shaped, octagonal, etc.). They may cause malfunctions.
Cleaning the unit
- Be sure to turn the unit off and disconnect the AC power cord before cleaning the unit.
- Wipe the unit with a dry soft cloth. If the surfaces are extremely dirty, wipe clean with a cloth which has been dipped in a weak soap-and-water solution and wrung out thoroughly. Then wipe it with a dry cloth.
- Never use alcohol, benzine, paint-thinner, cleaning fluid or other chemicals. Do NOT use compressed air to remove dust.
Important note
Before shipping the unit, remove any disc from the disc compartment.
Sound system
DOLBY DIGITAL (For DVD)
Dolby Digital is a sound system developed by Dolby Laboratories Inc. This unit automatically recognizes DVDs that have been recorded with Dolby Digital.
Not all Dolby Digital sources are recorded with 6 channels.
Some sources marked Dolby Digital may be recorded in Dolby Surround, a 2 channel system. Look for this logo on your unit.
Manufactured under license from Dolby Laboratories.
"Dolby" and the double-D symbol are trademarks of Dolby Laboratories.

Product Support
Trouble shooting
No power
- Check that the AC power cord is connected.
• The unit is not turned on.
The remote does not function
- Remove any obstacles between the remote and the unit.
- Use the remote near the unit.
- Point the remote at the remote sensor on the unit.
- Replace the batteries in the remote with new ones.
DVD
No sound or very low-level sound
- Make sure that you select DVD mode.
- The system is in pause mode. Press the PLAY button to return to normal PLAY mode.
- Fast-forward or fast-reverse is performed. Press the ▶ PLAY button to return to normal play mode.
• Make sure the AV IN input connections is correct. - The unit is too hot, shut off the unit for 30 minutes to cool it down.
No picture
• The region number of the disc doesn't
region number of this unit.

The picture is breaking up
- Clean the disc.
• The disc is scratched.
Severe hum or noise is heard
- The plugs and jacks are dirty. Wipe them with a cloth slightly moistened with alcohol.
- Clean the disc.
The disc does not play
- There is no disc inside ("No Disc" app screen) or clean the disc.
- Insert the disc correctly with the playback side facing frontwards.
- A non-valid disc has been inserted. The unit and disc region number are incompatible.
- Condensation may have formed inside the unit due to a sudden change in temperature. Wait about an hour for it to clear and try again.
TV
Why have I lost some/all of my channels?
- It happens sometimes, if you have a weak Usually it just means you'll need to rescan your digital box or TV. Don't worry, it easy to do. And once you've done it, you should get all the Freeview channels available to you. If problems persist you may need to get your aerial checked. Talk to your retailer or contact your local aerial installer.
Why do I get 'blocking' on my digital picture?
- In most cases, blocking is caused by a rece problem - either the signal is too weak or there is some kind of interference. Talk to your retailer or contact your local aerial installer
What type of aerial do I need?
- If you are installing a new aerial, we recommend a wideband rooftop aerial rather than a loft aerial. Loft aerials generally receive a weaker digital signal and are more likely to get interference from other electrical equipment in the home. We suggest you have an aerial survey done before getting an aerial upgrade. Talk to your retailer or contact your local aerial installer.
Bad Picture (snow, multiple images, distortion, blurry)
- Check the location of the antenna and adjust necessary.
• Make sure the antenna cable is firmly connected.
• Make sure all input cables are firmly connected. - Check the PICTURE MENU within the ANALOGUE TV/DTV SETUP.
match Check to make sure the program you are watching is broadcast in Colour and not Black & White.
No picture or sound
• Make sure the unit is plugged in and turned on.
• Make sure TV mode is selected.
- Try a new channel to check for possible s trouble.
• Make sure the antenna is connected properly.
- Increase the volume.
- Make sure the antenna or audio video source device is working properly.
• Make sure all cables are firmly connected.
- Check for local interference.
s on the
Function key does not respond correctly
- Under the influence of electrostatic phenomenon, the product may malfunction and require user to power reset.
- Unplug and re-plug the AC power cord.
No picture or sound from the HDMI source
- Check the connection between this unit and the HDMI out jack of other equipment.
- Try setting the other HDMI equipment to a different video output resolution such as 480p, 576p, 720p, 1080i or 1080p and to audio output type 'PCM'. To do this you may need to watch the picture from the source equipment with the scart or AV input of the TV, or on another TV.
- Replace the HDMI cable with a better one. Bad HDMI cable or very long cable (>2m) can cause data lost.
Argos
Product Guarantee
This product is guaranteed against manufacturing defects for a period of

Year
This product is guaranteed for twelve months from the date of original purchase. Any defect that arises due to faulty materials or workmanship will either be replaced, refunded or repaired free of charge where possible during this period by the dealer from whom you purchased the unit.
The guarantee is subject to the following provisions:
- The guarantee does not cover accidental damage, misuse, cabinet parts, knobs or consumable items.
- The product must be correctly installed and operated in accordance with the instructions contained in this manual.
- It must be used solely for domestic purpose.
- The guarantee will be rendered invalid if the product is re-sold or has been damaged by inexpert repair.
- Specifications are subject to change without notice.
- The manufacturer disclaims any liability for the incidental or consequential damages.
- The guarantee is in addition to, and does not diminish your statutory or legal rights.
• In the event of a problem with the product with in the guarantee period call the Customer Helpline: 0845 604 0105.
Guarantor: Argos Ltd 489 - 499 Avebury Boulevard Central Milton Keynes MK9 2NW
811-918691W041
- 19"/22" HD Ready Digital LCD TV with built-in DVD Player
- Important - Please read these instructions fully before installing or operating
- Contents
- Safety Information 3 - 4
- Getting Started 5 - 12
- Connections 13 - 14
- Basic Features 15 - 26
- CD / DVD operation 22 - 25
- Advanced Features 27 - 29
- Other Information 30
- Product Support 31 - 35
- Safety Information
- CAUTION
- be Condensation information
- Rating plate location
- Mains plug
- Units Supplied with Moulded Mains Plug
- Wiring a mains plug
- Caution: Moisture Condensation
- This unit is designed to operate from a 230V AC \~ 50Hz mains supply.
- Safe use of your equipment
- Getting Started
- Technical experts are available 7 days a week
- Call us today: 0845 604 0105
- Lines open 9am-8pm Monday to Saturday and 10am-4pm Sunday.
- TV - Features DVD - Features
- Accessories included
- Viewing remote control - TV
- Viewing remote control - DVD
- TV / DVD - control buttons (top view)
- - Volume + controls
- CH buttons
- button
- Function button
- Menu button
- ▶ Play button
- ⏻/1 button
- Common Interface slot
- TV / DVD - jacks (left view)
- TV / DVD - (right view)
- Disc Door
- ▼ Push Open knob
- Connecting a TV antenna
- Note:
- Connecting a power cord
- Common interface
- Important notes:
- Remote control
- Using the Remote Control
- Battery Replacement
- WARNING:
- CAUTION:
- To Change the Remote Control Batteries
- Initial set up
- Connections
- Connecting a high-definition (HD) source
- Connecting HDMI
- Connecting to sources with scart
- Connecting to devices with a composite
- Using headphones
- Basic Features
- Electronic programme guide (EPG) for DTV
- Audio language for DTV
- Analogue TV / DTV setup
- TV Setting (only in ATV or DTV mode)
- - DELETE
- - RENAME (for ATV mode only)
- - MOVE (for ATV mode only)
- - SKIP
- - FAV (Favourite)
- • Signal Information
- - CI Information
- Picture menu
- - Picture Mode :
- - Contrast :
- - Brightness :
- - Colour :
- - Sharpness
- - Tint (only for AV mode with NTSC signal) :
- • Colour Temperature :
- Sound memu
- Experiment with different sound settings until you find the settings you prefer.
- - Sound Mode :
- - Treble :
- - Bass :
- • Balance :
- Time menu
- - Sleep Timer :
- Setup menu
- Lock menu
- Teletext
- Please Note
- To enter Text mode
- To exit Text mode
- To select a page of text
- Fastext
- ANALOGUE TEXT ONLY:
- Mix
- Page search whilst watching TV
- Double height text
- Page Stop
- To reveal information
- CD / DVD Operation
- Playing a disc
- Playing a picture file disc
- Pausing playback (still mode)
- Stopping playback
- Skipping to a different track
- Fast forward / fast reverse
- Slow-motion play (DVD)
- Audio selection (DVD)
- OD: D D 6CH English 1/3
- Subtitle selection (DVD)
- Subtitle : English 1/5
- Angle selection (DVD)
- Display
- Locating a specific title (DVD)
- Locating a specific chapter / track
- DISRcAing a specific time
- Repeat playback
- Repeating a chapter (DVD)
- Repeating a title
- To resume normal playback
- Repeating a single track (CD)
- Repeating an entire disc
- Repeating a specific section (DVD / CD)
- REPEAT
- CD / DVD programmable playback
- Programmable memory
- Track/Title/Chapter programmed playback
- Programmable photo file playback
- Programmed memory
- Advanced Features
- Customising the function settings
- Language setup
- Note :
- Video setup
- TV Display
- Pan Scan
- Letter Box
- Wide-screen
- System setup
- Parental Control
- You cannot play password function equipped DVDs rated higher than the level you selected unless you cancel the parental lock function.
- Password
- Default
- Other Information
- Installation
- Install / removing the stand
- Mounting on the wall
- Product Support
- Disc formats
- CD-R/CD-RW
- Region Management Information
- Disc Function or Operation that is Not Available
- Icons Used on DVDs
- Notes on Unauthorized Discs
- Notes on Copyright
- Maintenance
- Cleaning the disc
- Cleaning the unit
- Important note
- Sound system
- DOLBY DIGITAL (For DVD)
- Trouble shooting
- No power
- The remote does not function
- DVD
- No sound or very low-level sound
- No picture
- The picture is breaking up
- Severe hum or noise is heard
- The disc does not play
- TV
- Why have I lost some/all of my channels?
- Why do I get 'blocking' on my digital picture?
- What type of aerial do I need?
- Bad Picture (snow, multiple images, distortion, blurry)
- No picture or sound
- Function key does not respond correctly
- No picture or sound from the HDMI source
- Argos
- Product Guarantee
Brand : BUSH
Model : BTVD91216B
Category : Television