PSR-36 - Keyboard YAMAHA - Free user manual and instructions
Find the device manual for free PSR-36 YAMAHA in PDF.

User questions about PSR-36 YAMAHA
0 question about this device. Answer the ones you know or ask your own.
Ask a new question about this device
Download the instructions for your Keyboard in PDF format for free! Find your manual PSR-36 - YAMAHA and take your electronic device back in hand. On this page are published all the documents necessary for the use of your device. PSR-36 by YAMAHA.
USER MANUAL PSR-36 YAMAHA
Thank you for purchasing a Yamaha PortaTone PSR-36. This PortaTone is an ultra-modern keyboard with a design based on the latest digital electronics technology. To be sure you get maximum satisfaction, we suggest you follow the steps in this manual carefully while actually playing the instrument.
Before playing 1
1. Nomenclature 2
2. Playing back the Demonstration Music 3
3. Starting to Play (Orchestra Section) 4
4. Voice Editing 6
5. Using the Built-in Drummer (BCM/Storage Rhythm Section) 7
6. Creating Original Rhythm Patterns (Custom Drummer) ..... 10
7. Adding Accompaniment
(Auto Bass Chord Section) ..... 12
8. Chord Sequence Programming . 15
9. External Jacks 17
8. Optional Accessories 19
10. Optional Accessories 19
11. About MIDI
12. Taking Care of Your PortaTone 22
12. Taking Care of Your Potatoone 23
13. Specifications 23
Inhalt
Remove the battery compartment cover on the bottom of the instrument and insert six 1.5V SUM-1 "D" size, R-20, or equivalent alkaline batteries (sold separately), making sure that the polarities are placed as directed inside the compartment. Replace the cover, ensuring that it locks securely in place.
Optional power adaptors
Household current: Power Adaptor PA-4/PA-40 is available for household current. No other adaptor is usable, so when you purchase a power adaptor please ensure that it is model PA-4/PA-40. Car Battery: Car Battery Adaptor CA-1 plugs into a car cigarette lighter socket.
Vor dem Spielen
① Power Switch
② Master Volume Control
③ Auto Bass Chord Volume Control
④ Bass & Chord Variation Selectors
⑤ Bass & Chord Voice Selectors
⑥ Auto Bass Chord Mode Selector
⑦ Auto Bass Chord Key Section
⑧ Rhythm Volume Control
⑧ Rhythm Volume Control
⑨ Rhythm Variation Sales
⑨ Rhythm Variation Selector
⑩ Custom Drummer Function
⑩ Custom Drummer Function Selectors
⑪ Custom Drummer Key Section
⑪ Custom Drummer Key Section
⑫ Tempo Controls
⑫ Tempo Controls
⑬ Rhythm Selector
⑬ Rhythm Selectors
⑭ Fill-in Button
⑮ Synchro Start and Start Buttons
⑮ Sphon Button
⑫ Stop Button
⑫ Intro :Ending Button
⑱ Keyboard Percussion
⑩ Keyboard Perdusion Button
⑪ Duet On/Off Switch
⑲ Buct On/Off Switch
⑳ Sustain Selector
② Orchestra Bank Selector
(2) Orchestra Bank Selector
(22) Orchestra Voice Selectors
23 Digital Synthesizer Selector
② Voice Data Controllers
25 Chord Sequencer Record Button
②6 Chord Sequencer Play Button
⑳ MIDI Button
28 Demonstration Button
29 Pitch Controls
First, try the sounds in the Orchestra section, which is a fundamental part of this keyboard.
Spielbeginn
Orchesterteil
1. Choose an instrument voice
First set the Orchestra Bank selector ② for the desired bank of voices (Orchestra Bank selector in upper position to select upper row of voices labeled in silver above the voice selectors, lower position to select lower row of voices labeled in yellow.) Then press the Orchestra Voice selector ② for the desired voice in the selected bank.
- When you turn the keyboard ON, the BRASS 1 voice will automatically be selected if the Orchestra Bank selector (2) is set to the upper position, and the BRASS 2 voice will be selected if the Orchestra Bank selector is set to the lower position.
- Vibrato is automatically applied to voices which benefit from application of this effect.
- Be sure to set the Auto Bass Chord MODE selector ⑥ to the OFF position. When the selector is set to the SINGLE FINGER or FINGERED position, the keys in the Auto Bass Chord key section ⑦ cannot be used for melody playing.
2. Try other voices
Make your selection from among the voices in the ORCHESTRA section ^22 .
Hinweise:
The maximum number of notes that can be played simultaneously (normally twelve) will be reduced when the Auto Bass Chord, Duel and Digital Synthesizer are used. The minimum number of simultaneous notes is two.
3. Adding sustain
Slide the SUSTAIN selector 20 to its "1" or "2" setting, and notes will be sustained after you lift your fingers from the keys. SUSTAIN 1 produces a short sustain, SUSTAIN 2 produces a longer sustain.
Hinweis:
The PITCH control function 29 enables you to fine-tune the keyboard for when you want to play in an ensemble. Each time ▲ is pressed, the pitch increases very slightly, up to a maximum of 50 cents above the preset level. Whenever ▼ is pressed, the pitch drops slightly, also to a maximum of 50 cents.
Notes:
- If you hold down one of the PITCH controls, the pitch will change continuously.
- If you press both of the PITCH controls together, the pitch will return to the preset level ( A_s=440Hz ).
- Feinstimmung
As one of the PSR-36's special features, the Digital Synthesizer function allows you to expand the 32 orchestra voices to total of 100,000 different voices.
Let's create various voices using DIGITAL SYNTHESIZER.
- Select the desired voice by pressing one of the 32 Orchestra Voice selectors ②.
- Set the Digital Synthesizer selector ② to ON.
- Adjust the volume using the Master Volume control②.
- Set each Voice Data controller (SPECTRUM, BRILLIANCE, ENVELOPE, 'VIBRATO and DETUNE) ⑳ to the position which results in the desired sound.
SPECTRUM
This controls the timbre or tone color of the voice.
BRILLIANCE
This determines how brilliant or mellow the voice is.
ENVELOPE
Controls the attack of the notes (whether the notes begin sharply or smoothly).
VIBRATO
This controls the vibrato effect.
Increasing the DETUNE setting produces a "thicker" multi-instrument type sound.
- Now, let's play some notes. By comparing the same voice in both the ON and OFF settings of the Digital Synthesizer Selector ②3, you can distinguish the difference in timbre.
- The degree to which a voice changes varies with the selected voice.
DETUNE
Using the built-in drummer
PCM/Stereo rhythm section
Now it's time to add a dynamic rhythm accompaniment to your melody.
1. Choose a rhythm
Pick the rhythm that best suits the music you're going to play and press the corresponding Rhythm selector (13).
- When you turn the keyboard ON, the DISCO rhythm is automatically selected.
After selecting a rhythm, press the START selector 15.
• Synchro Start
Use the SYNCHRO START button ⑮ If you want the rhythm to begin from the moment you first press a key. Any of the 19 keys (up to F_2 ) beginning at the left of the keyboard (Auto Bass Chord key section ⑦) will activate the rhythm.
- Intro./Ending
Instead of using START, you can have the rhythm begin by using the INTRO./ENDING button ⑰. When this selector is pressed, the rhythm will start after a two-bar intro-phrase.
The Rhythm VOLUME control ⑧ lets you adjust the rhythm volume in relation to the melody volume.
- Tempo
Use the TEMPO controls ⑫ to adjust the speed of the rhythm.
- Variation
The Rhythm VARIATION selector⑨ gives a choice of five patterns for each rhythm.
3. Einstellungen
• Lautstärke
4. Making use of the Tempo Light
The Tempo Light functions as a visual metronome, making it simple for you to confirm the rhythm tempo. It flashes indicating tempo when the rhythm is running and also when the SYNCHRO START button ^15 has been pressed but you have not yet started the rhythm by pressing a key.
If you tap the FILL-IN button ⑩, the rhythm being played will be replaced with a 1-bar drum solo.
- If you press the FILL-IN button ⑭ before starting to play, the rhythm will start after a 1-bar drum solo.
If you press the INTRO./ENDING button ⑰ when the rhythm is on, the rhythm will stop automatically after playing a two-bar ending phrase. If you wish to stop the rhythm immediately, press the STOP button ⑱.
Keyboard Percussion
Press the KEYBOARD PERCUSSION button ^18 , and you can enjoy playing like a drummer by tapping the Custom Drummer keys ^19 with your fingers. Twenty-five PCM digital percussion sounds are assigned to the keys. The different kinds of percussion instrument sounds are indicated by symbols next to the relevant keys. (When the Keyboard Percussion feature is engaged, the Tempo Light will come on). If you turn KEYBOARD PERCUSSION ON while a rhythm pattern is playing, the rhythm pattern will stop (leaving bass and/or chord backing when using the Auto Bass Chord function described in item 7) so you can play your own rhythm on the Custom Drummer keys. Press the KEYBOARD PERCUSSION button ^18 a second time to exit the Keyboard percussion mode.
Creating original rhythm patterns
Custom Drummer
The PSR-36 has 80 preset rhythm patterns (including variations). Apart from the preset patterns, you can also create original ones of your own using Custom Drummer 10.
Programming a rhythm pattern
Create your own version of the 8 Beat rhythm.
-
First of all, choose a basic rhythm pattern from among the preset rhythms. As an example, select POPS.
-
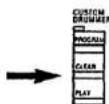
Press the PROGRAM selector. You are now ready to input.
Try writing the following rhythm patterns:
text_image
BASS DRUM SNARE DRUM CLOSED HI-HAT OPEN HI-HAT ACCENT >-
Press the CLEAR selector and the preset POPS is cancelled, leaving only the sound of the beat count.
-
Drücken Sie nun den CLEAR-Schalter. Der POPS-Rhythmus wird dann abgeschaltet, und nur die Schläge sind weiterhin zu hören.
-
Appuyer sur le sélecteur CLEAR et le POPS préréglé sera annulé, ne laissant que le son du battement.
-
Presione el selector CLEAR y se cancelará el ritmo POPS preseleccionado, dejando solamente el sonido del marcacompases.
- Input the bass drum pattern by tapping the key indicated by the figure.
- The same procedure is required for inputting snare drum, closed hi-hat, and open hi-hat. You can add an accent (slightly higher volume level) to the timing you want by tapping the > key (B _k ).
-
If you make an error, cancel it by pressing the relevant percussion key together with the CANCEL key ( C_6 ). The input that percussion instrument again.
-
Programmieren Sie die Baßtrommel durch Antippen der mit ① bezeichneten Taste.
- Auf gleiche Weise wird nun noch die kleine Trommel sowie das geschlossene und das offene Hi-Hat programmiert. Durch gleichzeitiges Anschlagen der Akzenttaste (B₁, mit dem Symbol > markiert) kann das betreffende Perkussionsinstrument akzentuiert (geringfügig höhere Lautstärke) werden.
-
Fehler können durch gleichzeitiges Drücken der betreffenden Perkussionstaste und der CANCEL-Taste (C₆) gelöscht und dann durch eine neue Eingabe korrigiert werden.
-
Entrer le type BASS DRUM en appuyant sur la touche, repérée par le symbole ①.
- La même procédure sera nécessaire pour l'entrée du SNARE DRUM, du CLOSE HI-HAT et du OPEN HI-HAT. On pourra ajouter une accentuation (niveau de volume légèrement plus haut) ou rythme que vous désirez en tapotant sur la touche > (B _3 ).
-
En cas d'erreur, celle-ci sera annulée par pression simultanée sur la touche de percussion adéquate et sur la touche CANCEL (C _s ). Il suffit alors d'entrer à nouveau l'instrument à percussion.
-
Introduzca el patrón de tambor bajo golpeando la tecla indicada por la figura 00.
- Se requiere el mismo procedimiento para introducir el tambor de cuerda, hi-hat cerrado, y hi-hat abierto. Puede añadir un acento (un nivel de volumen ligeramente más alto) a cualquiera de los sonidos de percusión, golpeando la tecla de percusión apropiada mientras presionando la tecla > (B _3 ).
- Si comete un error, cancélelo presionando la tecla de percusión correspondiente junto con la tecla CANCEL (C₆). Luego, introduzca de nuevo el instrumento de percusión.
CANCEL Key CANCEL-Taste Touch CANCEL Tecia CANCEL

text_image
B₅ C₆- When your original pattern is completed, press the STOP button ^16 or PROGRAM button again.
- In procedure 3, if you do not want to erase all of the percussion sounds, you can use the CANCEL key (C _6 ) and individual percussion keys to selectively erase.
- Now, playback what you have programmed by pressing the PLAY selector.
Try other rhythm patterns as shown below:
MARCHING DRUM (set to MARCH/POLKA)
- When you play back a customized rhythm, the Auto Bass Chord feature can be used in the same way as with a preset rhythm.
- The total number of percussion voices that can be used for one pattern amounts to 8.
- When the power is OFF, the data that you input will be erased automatically.
Hinweise:
Adding accompaniment Auto Bass Chord section
text_image
AUTO BASS CHORD BATTEN VAR AT OV VULVE BASS CHORD VAS BASS CHORD BASS BASS BASS BASS BASS BASS BASS BASS BASS BASS BASS BASS BASS BASS BASS BASS BASS BASS BASS BASS BASS BASS BASS BASS BASS BASS BASS BASS BASS BASS BASS BASS BASS BASSThe Auto Bass Chord section is an automatic accompaniment feature. if the MODE selector ⑥ is set to OFF, the Auto Bass Chord system does not function. With the SINGLE FINGER position selected, you can play chords plus bass notes with just one finger when you press any of the keys in the Auto Bass Chord key section ⑦. The FINGERED position is suitable for you if you already know how to play chords since it lets you play your own chords and still get the bass accompaniment.
For one-fingered accompaniment 1. Slide the selector to the SINGLE FINGER position.
-
Select a rhythm Choose the rhythm you want then press the SYNCHRO START or START button ⑮. (Don't forget to do this whenever you use the Auto Bass Chord feature).
-
Press a key Press one of the 19 keys in the Auto Bass Chord key section ⑦ on the left side of the keyboard.
text_image
C D E F G A B C D E F C' F'You will hear the corresponding chord with bass and rhythm accompaniment. For instance, when you press "C," you'll obtain a C major chord that plays along with the bass and rhythm.
Obtaining minor, seventh, and minor seventh chords in Single Finger mode.
• To get a C minor chord depress the C key together with the next black key to the left.
- To get a C seventh chord depress the C key together with the next white key to the left.
- To get a C minor seventh chord, simply press the C key together with the black key and white key to the left.
For automatic accompaniment based on three-note or four-note chords
- Slide the selector to the FINGERED position.
- When a combination of keys located in the Auto Bass Chord key section ⑦ is pressed, the resulting chord will be played together with the automatic accompaniment consisting of the bass line and the selected rhythm.
text_image
AUTO BASS CHORD C chord AUTO BASS CHORD G chord AUTO BASS CHORD F chordNote:
The chord accompaniment selected by chord variation selectors 6 and 7 include arpeggio patterns. The arpeggio patterns are only produced, however, when major, minor, dominant seventh or minor seventh chords are played.
- Adding harmony to the melody (DUET) This function works together with the SINGLE FINGER or FINGERED feature in the Auto Bass Chord section. Slide the DUET on/off switch 10 to ON, and a harmonizing note (taken from your left hand chord) will be added to each melody note you play.
Hinweis:
Manual Bass accompaniment
- Slide the MODE selector ⑧ to the MANUAL BASS position.
- Play your own bass line using the keys in the Auto Bass Chord key section⑦.
Note:
You can play only one note at a time in the Auto Bass Chord key section when using this function.
Advanced course 2:
Keyboard split
If you set the Auto Bass Chord MODE selector (6) to the KEYBOARD SPLIT position, the auto accompaniment will be cancelled, enabling you to play the 19 keys in the Auto Bass Chord key section using any of the CHORD voices. This means that you can play with different voices for your left and right hands.
Choose the left-hand voice by means of the CHORD VOICE selector ⑤.
Note:
You can play up to four notes at the same time in the Auto Bass Chord key section when using this function.
Chord Sequence Programming
With this feature you can have the keyboard store the chords you play in its memory, then have them played back in any tempo you like. A selected rhythm pattern can also be memorized. The main advantage is that after storing the chord progression and rhythm pattern in the memory, you can have them replayed automatically to accompany you while you concentrate on practicing your melody performances or improvisations.
- Press the PLAY button 28 of the CHORD SEQUENCER.
- Start playback by pressing the START button ⑮ or any key on the keyboard.
- Try playing the melody of "Green-sleeves" to the accompaniment playback (see below).
- Playback can be stopped at an time by pressing the STOP button ⑯.
Melody
text_image
Am D G Em Am E7 AmCapacity of Chord Sequencer
- About 100 chord changes are possible. This means that it is possible to record the chords for a piece consisting of 100 measures if one measure contains one chord on average.
- If complicated chords are recorded by using Fingered Chord, the chord recording capacity will be reduced.
- If the number of chords exceeds the memory capacity, recording will stop automatically.
Several jacks are provided at the back of the keyboard for connecting a variety of optional accessories. There is also a headphone jack at the front.
A. External power source jack (DC 9-12V IN)
- AC power Connect the optional AC Power Adaptor PA-4/PA-40 to the DC 9-12V IN jack.
- Car battery The Car Battery Adaptor CA-1 plugs into the DC 9-12V IN jack and a cigarette lighter socket.
B. Aux Out jacks (L & R) You can channel sound through your stereo system using these jacks. Use the optional connecting cord PSC-3. • Impedance: 600Ω • Output level: -7± 2dBm (7 notes sounding simultaneously at maxi- mum volume with Jazz Organ voice)
Note: These jacks were designed to accommodate the most commonly used Impedances. Significant deviation from these specifications will result in inadequate drive, distortion, noise, and poor performance in general.
C. Expression pedal jack The EXP. PEDAL jack is for connecting the Expression Pedal EP-1, which lets you control the overall volume level using your foot.
D. Headphone Jack (Below left end of keyboard.) Connect a set of headphones to this jack and you can practice without disturbing others.
E. MIDI Jacks (IN & OUT) Refer to page 19 for details concerning MIDI.
Optional accessories
- AC Power Adaptor (PA-4/PA-40) Transforms AC voltage to DC voltage.
- Car Battery Adaptor (CA-1) Enables you to provide power to the instrument from a car battery using the cigarette lighter socket.
- Soft Carrying Case (SCC-12) For convenient transportation.
● Headphones (HPE-3/5) Specially designed lightweight dynamic headphones with extra-soft ear pads. - Connecting Cable (PSC-3) For connecting the keyboard to a stereo hi-fi system or cassette tape deck.
- Keyboard Stand (L-2/4)
- Expression Pedal (EP-1) Lets you add more feeling to music by enabling subtle control of the overall volume level.
- Bench (BC-6)
Some optional accessories may not be available in every region.
Sonderzubehör
MIDI is an acronym standing for Musical Instrument Digital Interface, which is a standard interface for communication between keyboards and other music devices. The Porta Tone PSR-36 is equipped with MIDI jacks (IN and OUT), enabling connection of the Porta Tone to another keyboard equipped with MIDI jacks or an expander module, for synchronized performances.
MIDI
1&2. Selecting MIDI Channels
While holding the MIDI button press BRASS 1/BRASS 2 (send channel) or SAX/HORN (receive channel) and then press one of the black or white keys on the left of the keyboard to designate the channel (CH1 through CH16 from left).
1&2. MIDI-Kanalwahl
17th key from the left
17 Taste von links
The OMNI ON Mode is selected by pressing the 17th key from the left while pressing the MIDI button.
3. Split Send Mode
When this mode is selected, only the Key On data for keys to the left of the split point (▼) is sent on the designated channel (fixed at CH2) when SINGLE FINGER, FINGERED, MANUAL BASS, or KEYBOARD SPLIT mode is selected.
4. Program Change Off
This is used to cancel the sending and reception of voice select and rhythm select information (program changes) from an external device.
5. MIDI Clock Select
This is used for synchronization with the timing clock of an external device.
6. Local Off
This is used to cancel the melody sounds of the PSR-36. (Rhythm and Auto Bass Chord cannot be turned off. The Rhythm and Auto Bass Chord sounds can be eliminated by setting their volumes to MIN.)
Hinvels:
Taking care of your PortaTone
Your PortaTone will remain in excellent playing condition if care is taken concerning the following.
-
When you use AC power, be sure to use the optional AC Power PA-4/PA-40 adaptor. Before use, read the adaptor instructions carefully. In particular, please note that in some cases the PA-4/PA-40 is provided with a voltage selector, so confirm that this selector is correctly set.
-
The optional car battery adaptor CA-1 is only for use with a negative around 12V battery. Ensure that this is the case before connecting the adaptor.
-
Connections made between the PortaTone and any other device should be made with both units turned off.
-
Do not set the MASTER VOLUME at MAX when you connect the PortaTone to a stereo system. Use the stereo system's volume control to adjust the sound level.
-
Avoid placing the instrument in excessively humid areas.
-
Do not subject the unit to physical shock, and avoid placing anything heavy on it.
-
The PortaTone should not be placed in direct sunlight for a long time.
-
Do not place the instrument near any heating appliance, or leave it inside a car in direct sunlight for any length of time. Direct sunshine can raise the interior temperature of a car with closed doors and windows to as high as 80°C. Temperatures in excess of 60°C can cause physical and/or electrical damage not covered by warranty.
-
Use a dry or damp cloth for cleaning.
- When you aren't using the Porta-Tone, we recommend keeping it in the case to protect it.
Nützliche Hinweise
Orchestra Voices (Upper Bank/Lower Bank) Brass 1/Brass 2, Sax/Horn, Wah Brass/ Flute, Oboe/Clarinet, Cello/Strings, Synth Organ/Jazz Organ, Pipe Organ 1/Pipe Organ 2, Fantasy/Cosmic, Bluesynthn/ Popsynth, Slapsynth/Funksynth, Percus 1/ Percus 2, Elec. Piano/Piano, Banjo/ Harpsichord, Elec. Guitar/Jazz Guitar, Music Box/Vibes, Koto/Bells
Effects
Duet Sustain (1 2)
Digital Synthesizer Section
Spectrum (1—5), Brilliance (1—5), Envelope (1—5), Vibrato (1—5), Detune (1—5), On/Off
Rhythm Section
Disco, Pops, 16 beat, Rock'n'Roll Reggae. Country, Big Band, Swing, Slow Rock, Heavy Metal, Salsa, Rhumba, Samba, Bossanova, March'Polka, Waltz
Controls: Tempo, Volume, Variation (1-8). Synchro Start, Start, Stop, Intro./Ending, Fill-In. Tempo Light
Custom Drummer: Program, Clear, Play Keyboard Percussion: 11 Latin Percussions, 13 Drum Percussions, Hand Clap, Accent, Capsal
Auto Bass Cord Section
Mode Selector: Single Finger, Fingered, Manual Bass, Keyboard Split, Off
Chord Voices: Piano, E. Piano, Organ, Guitar, Brass, Strings, Synth 1, Synth 2
Bass Voices: Bass 1, Bass 2, E. Bass 1, E. Bass 2, Tuba, Music Box, Synth 1, Synth 2
Chord Variation: 1, 2, 3, 4, 5, 6, 7, 8
Bass Variation: 1, 2, 3, 4, 5, 6, 7, 8
Chord Sequencer Section
Record, Play, Chord Sequencer Light
Pitch Control
+50 cents
Other Controls and indicators
Power Switch, Power-on Light, Master Volume, MIDI, Demonstration
Auxiliary Jacks
Headphones, Expression Pedal, MIDI IN, MIDI OUT, Aux Out (L/R), DC9-12V IN
Main Ampilifier
2.5W x 2 (RMS)
Speaker
12cm (4-3/4") x 2
Repeated Voltage
DC9V (Six SUM-1, "D" size, R-20 or equivalent batteries), AC Power Adaptor (PA-4/PA-40) or Car Batter Adaptor (CA-1)
Dimensions (W X D X H)
913mm x 331mm x 96mm (36" x 13" x 3-3/4")
weight
6.6kg (14.6 lbs.)
Technische Daten
Keyboard
61 Tasten (C 1 —C 6 )
Duett, Sustain (1, 2)
Digital Synthesizer-Tell
Spectrum (1—5), Brilliance (1—5), Envelope (1—5), Vibrato (1—5), Detune (1—5), On/Off Rhythmus-Tell
Disco, Pops, 16 Beat, Rock 'n' Roll, Reggae, Country, Big Band, Swing, Langsamer Rock, Heavy Metal, Salsa, Rhumba, Samba, Bossanova, Marsch/Polka, Walzer
Record, Play, Chord Sequencer Light
Tonhöhenregelung
±50 Cents
Saction Ryminia Disco, Pops, 16 Beat, Rock'n' Roll, Reggae, Country, Big Band, Swing, Slow Rock, Heavy Metal, Salsa, Rhumba, Samba, Bossanova, March/Polka, Waltz
Batterie programmable: Programmation, effacement, lecture
Section de Rhinos Disco, Pops, 16 Beat, Rock'n' Roll, Reggae, Country, Big Band, Swing, Slow Rock, Heavy Metal, Salsa, Rhumba, Samba, Bossanova, March/Polka, Walts.
Controles: Tempo, Volume, Variation (1—8), Synchro Start, Start, Stop, Intro./Ending, Fill-In, Tempo Light
Specifications are subject to change without notice.
Attention users in the U.S.A. PortaTone PSR-36 prepared in accordance with FCC rules.
The PortaTone PSR-36 uses frequencies that appear in the radio frequency range, and it installed in the immediate proximity (within three meters) of some types of audio or video devices interference may occur.
The PortAg Tone PSR-36 has been type lesied and tested to comply with the specifications set for a Class B computing device, in accordance with those specifications listed in Sudan and Part 10 of the POC rules. These rules are not applied to provide any information against such interference; however this does not guarantee that interference will not occur. If your PortAg Tone PSR-36 should be suspected or causing interference with other electronic devices, verification can be made by tuning your portAg Tone PSR-36 if they continue when your PortAg Tone PSR-36 is off. PortAg Tone PSR-36 is not the source of the interference. If your PortAg Tone PSR-36 does appear to be the source of the interference, you should be correct to be situation by using one or more of the following measures:
Relocate either the PortaTone PSR-36 or the electronic device that is being affected by the interference. Utilize power ohols for the PortaTone PSR-36 and the device being affected that are on different branch (circuit breaker of fuse) circuits, or install A/C line filters. In the case of radio TV interference, relocate the antenna or, if the antenna lead-in is a 300 ohm ribbon lead, change the lead-in to an axial type cable.
If these corrective measures do not produce satisfactory results, please contact your Authorized Yamaha dealer for suggestions, and/or corrective measures. If you cannot locate an Authorized Yamaha dealer in your general area, contact the Service Division; Yamaha Music Corporation U.S.A. 6600 Orangetrope Ave Buena Park, CA 30520. If for any reason you should need additional information relating to radio or TV interference, you may find a booklet prepared by the Federal Communications Commission. You should have to identify and Honduras Radio TV interference Problems? This booklet is available from the U.S. Government Printing Office, Washington D.C. 20492—Stock # 004-000-345-4.
| Function | Transmitted | Recongnized | Remarks | |
| Basic Channel | Default Changed | 1 1-16 | 1 1-16 | |
| Mode | Default Messages | 3 X | 1 OMNI on, OMNI off POLY, MONO (M=1) | |
| Note Number: True voice | 30-102********** | 36-96 36-96 | ||
| Velocity Note on Note off | X 9nH, v = 64 X 9nH, v = 0 | X X | ||
| After Touch | Key's Ch's | X X | X X | |
| Pitch | Bender | X | X | |
| Control Change | 64 | O | O | Sustain |
| Program Change : True # | O 0-31********** | O 0-127 0-31 | ||
| System Exclusive | X | X | ||
| System : Song Pos : Song Sel : Common : Tune | X X X | X X | ||
| System : Clock : Real Time : Commands | O O | O O | ||
| Aux : Local ON/OFF : All Notes OFF : Mes- : Active Sense : sases : Reset | X X O X | O O (122-127) | ||
| Notes | ||||
Mode 1 : OMNI ON, POLY Mode 2 : OMNI ON, MONO 0 : Yes Mode 3 : OMNI OFF, POLY Mode 4 : OMNI OFF, MONO X : No
YAMAHA YAMAHA CORPORATION
The serial number of this product may be found on the bottom of the unit. You should note this serial number in the space provided below and retain this manual as a permanent record of your purchase to aid identification in the event of theft.
Model No. PSR-36
Serial No.
Concerning Warranty
This product was made for international distribution, and since the warranty for this type of product varies from marketing area to marketing area, please contact the selling agency for information concerning the applicable warranty and/or service policies.