DEH-P6950IB - Receiver PIONEER - Free user manual and instructions
Find the device manual for free DEH-P6950IB PIONEER in PDF.

User questions about DEH-P6950IB PIONEER
0 question about this device. Answer the ones you know or ask your own.
Ask a new question about this device
Download the instructions for your Receiver in PDF format for free! Find your manual DEH-P6950IB - PIONEER and take your electronic device back in hand. On this page are published all the documents necessary for the use of your device. DEH-P6950IB by PIONEER.
USER MANUAL DEH-P6950IB PIONEER
Pleasereadthroughtheseoperatinginstructionsssoyouwillknowhowtooperate yourmodelproperly.Afteryouhavefinishedreadingtheinstructions,keepthismanualinasafeplaceforfuturereference.
01 BeforeYouStart
Aboutthisunit5
Visitourwebsite5
Protectingyourunitfromtheft6
-Removingthefrontpanel6
-Attachingthefrontpanel6
Aboutthedemomode6
Useandcareoftheremotecontrol7
-Installingthebattery7
-Usingtheremotecontrol7
02 Operatingthisunit
What'sWhat8
-Headunit8
-Remotecontrol8
BasicOperations9
-PowerON/OFF9
-Selectingasource9
-Adjustingthevolume10
Tuner10
-BasicOperations10
-Storingandrecallingbroadcast frequencies11
-Introductionofadvanced operations11
-Storingthestrongestbroadcast frequencies11
-Tuninginstrongsignals12
Built-inCDPlayer12
-BasicOperations12
-Selectingatrackdirectly13
-Introductionofadvanced operations14
-Selectingarepeatplayrange14
-Playingtracksinrandomorder14
-Scanningfoldersandtracks14
-Pausingdiscplayback15
-UsingcompressionandBMX15
-Searchingevery10tracksinthecurrent discorfolder15
-Usingdisctitlefunctions15
-Displayingtextinformationondisc16
-Selectingtracksfromthetracktitle list16
-Selectingtracksfromthefilename list16
PlayingsongsoniPod17
-BasicOperations17
-Browsingforasong18
-Displayingtextinformationon iPod18
-Introductionofadvanced operations18
-Repeatingplay19
-Playingsongsinarandomorder (shuffle)19
-Playingallsongsinarandomorder (shuffleall)19
-Pausingasong19
AudioAdjustments20
-Introductionofaudioadjustments20
-Usingbalanceadjustment20
-Usingtheequalizer20
-Adjustingloudness22
-Usingsubwooferoutput22
-Boostingthebass22
-Usingthehighpassfilter23
-Adjustingsourcelevels23
InitialSettings24
-Adjustinginitialsettings24
-Selectingthedisplaylanguage24
-Settingtheclock24
-SettingtheFMtuningstep25
-SettingtheAMtuningstep25
-Switchingthewarningtone25
-Switchingtheauxiliarysetting25
-Switchingthedimmersetting25
-Adjustingthebrightness25
-Settingtherearoutputandsubwoofer controller26
-Switchingthesoundmuting/attenuation26
-Switchingthefeatureddemo26
-Switchingthereversemode26
-SwitchingtheEverScroll27
-ActivatingtheBTAudiosource27
-EnteringPINcodeforBluetooth wirelessconnection27
OtherFunctions28
-UsingtheAUXsource28
-Turningtheclockdisplayonoroff28
-Usingdifferententertainment displays28
-UsingthePGMbutton29
03 Availableaccessories
PlayingsongsonUSBportableaudioplayer/USBmemory30
-BasicOperations30
-Selectinganaudiofiledirectlyinthe currentfolder30
-Introductionofadvanced operations30
-Displayingtextinformationofanaudio file31
-Selectingfilesfromthefilename list31
BluetoothAudio32
-BasicOperations32
-Introductionofadvanced operations33
-ConnectingaBluetoothaudio player33
-PlayingsongsonBluetoothaudio player33
-Pausingasong33
-Stopping playback33
-DisconnectingaBluetoothaudio player34
-DisplayingBD(BluetoothDevice) address34
-Displayingsystemversionfor repair34
BluetoothTelephone34
-BasicOperations34
-Settingupforhands-freephoning35
-Makingaphonecall35
-Takingaphonecall36
-Introductionofadvanced operations36
-Connectingacellularphone37
-Disconnectingacellularphone37
-Registeringconnectedcellular phone38
-Deletingaregisteredphone38
-Connectingtoaregisteredcellular phone38
-UsingthePhoneBook38
-UsingtheCallHistory41
-Usingpresetnumbers41
-Makingacallbyenteringphone number41
-Clearingmemory42
-Settingtheautomaticrejecting42
-Settingtheautomaticanswering42
-Switchingtheringtone42
-Echocancelingandnoise reduction43
-DisplayingBD(BluetoothDevice) address43
-Displayingsystemversionfor repair43
Multi-CDPlayer43
-BasicOperations43
-Selectingatrackdirectly44
Contents
-Introductionofadvanced operations44
-UsingITSplaylists45
-Usingdisctitlefunctions46
-UsingCDTEXTfunctions46
DVDPlayer47
-BasicOperations47
-Selectingadisc48
-Selectingafolder48
-Introductionofadvanced operations48
TVtuner49
-BasicOperations49
-Storingandrecallingbroadcast stations50
-Storingthestrongestbroadcast stationssequentially50
AdditionalInformation
Troubleshooting51
Understandingerrormessages51
Handlingguidelineofdiscsandplayer51
DualDiscs52
Compressedaudiofiles52
-Exampleofahierarchy53
-Compressedaudiocompatibility53
AbouthandlingtheiPod53
-AboutiPodsettings53
Specifications54
Aboutthisunit

CAUTION
- Donotallowthisunittocomeintocontact with liquids. Electricalshockcouldresult. Also, thisunitdamage, smoke, and overheat could result from contact with liquids.
- Keep this manual handy as a reference for operating procedures and precautions.
• Always keep the volumelowenough so that you can hear sounds from outside the vehicle. - Protect this unit from moisture.
- If the battery is disconnected, discharged, the preset memory will be erased and must be reprogrammed.
- If this unit does not operate properly, contact your dealer or nearest authorized Pioneer Service Station.
AboutWMA

TheWindowsMedia™logoprintedonthebox indicatesthatthisunitcanplaybackWMA data.
WMAisshortforWindowsMediaAudioand referstoanaudiocompressiontechnology thatisdevelopedbyMicrosoftCorporation. WMAdatacanbeencodedbyusingWindows MediaPlayversion7orlater. WindowsMediaandtheWindowslogoaretrademarksorregisteredtrademarksofMicrosoft CorporationintheUnitedStatesand/orother countries.
- ThisunitmaynotoperatecorrectlydependingontheapplicationusedtoencodeWMAfiles.
AboutMP3
Supplyofthisproductonlyconveysalicense forprivate,non-commercialuseanddoesnot conveyalicensenorimplyanyrighttouse thisproductinanycommercial(i.e.revenue-generating)realtimebroadcasting(terrestrial, satellite,cableand/oranyothermedia),broadcasting/streamingviinternet,intranetsand/ orothernetworksorinotherelectroniccontentdistributionsystems,suchaspay-audioor audio-on-demandapplications.Anindependentlicenseforsuchuseisrequired.Fordetails,pleasevisit http://www.mp3licensing.com.
AboutAAC
AACisshortforAdvancedAudioCodingand referstoanaudiocompressiontechnology standardusedwithMPEG2andMPEG4. Several applicationscanbeusedtoencode AACfiles,butfileformatsandextensionsdifferdependingontheapplicationwhichis usedtoencode. ThisunitplaysbackAACfilesencodedby iTunes® version6.0.5andearlier. iTunesisattrademarkofAppleComputer,Inc., registeredintheU.S.andothercountries.
iPod® compatibility
This unit can control and list to song son an iPod.
- iPodisatrademarkofAppleComputer, Inc., registeredintheU.S.andothercountries.
- ThisunitsupportsonlyaniPodwithDock Connector.
- ThisunitdoesnotsupportsoftwareversionspriortoiPodupdate2004-10-20. For supportedversions, consultyournearest Pioneerdealer.
- OperationsmayvarydependingonthesoftwareversionofiPod.
Visitourwebsite
Visitusatthefollowingsite:

text_image
pioneer.jp/group/index-e.html- Weofferthelatestinformationabout PioneerCorporationonourwebsite.

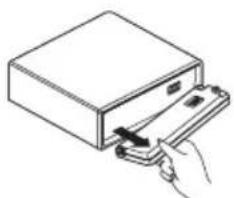
Protectingyourunitfrom theft
Thefrontpanelcanbedetachedtodetertheft.
- If the front panel is not detached from the head unit within five seconds, fast turning off the ignition, awarning on new will sound.
- Youcanturnoffthewarningtone.See Switchingthewarningtoneonpage25.

Important
- Handlegentlywhenremovingorattaching thefrontpanel.
- Avoid subjecting the front panel to excessive shocks.
- Keepthefrontpaneloutofdirectsunlightand hightemperatures.
Removingthefrontpanel
1PressOPENtoopenthefrontpanel.
2Griptheleftsideofthefrontpaneland pullitgentlyoutward.
Takecarenottogripittootightlyortodrop thefrontpanelandprotectitfromcontact withwaterorotherfluidstopreventpermanentdamage.
natural_image
Simple line drawing of a hand inserting a card into a rectangular box (no text or symbols)3Putthefrontpanelintoprovidedprotectivecaseforsafekeeping.
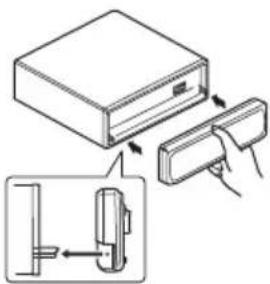
Attachingthefrontpanel
●Replacethefrontpanelbyholdingit uprighttotheunitandclippingitsecurely intothemountinghooks.
text_image
Diagram showing a device with a box and a clip, illustrating the process of inserting or removing a component.
Aboutthedemomode
Thisunitfeaturestwodemonstrationmodes. Oneisthereversemode, theotheristhefeatureddemomode.

Important
Theredlead(ACC)ofthisunitshouldbeconnectedtoaterminalcoupledwithignitionswitch on/offoperations.Ifthisisnotdone,thevehicle batterymaybedrained.
Reversemode
If you donot perform an operation within about 30 seconds, screen indications start to reverse, and then continue reversing every 10 seconds. Pressing BAND when powerto this unit is turned off while the ignition switch is set to ACC or ON cancel there reverse mode. Press BAND again to start there reverse mode.
Featuredemomode
Thefeatureddemoautomaticallystartswhen powertothisunitisturnedoffwhiletheignitionswitchissettoACCorON.Pressing DISPLAYduringfeaturedemooperationcancelsthefeatureddemomode.PressDISPLAYagaintostartthefeaturedemomode.Rememberthatifthefeaturedemocontinuesoperatingwhenthecarengineisturnedoff,itmay drainbatterypower.
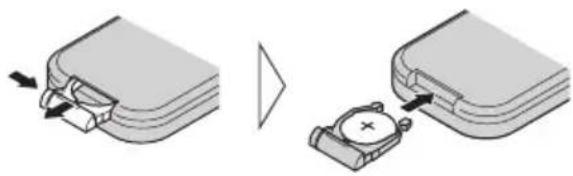
Useandcareoftheremote control
Installingthebattery
Slidethetrayoutonthebackoftheremote controlandinsertthebatterywiththeplus(+) andminus(-)polespointingintheproperdi-rection.
- When using for the first time, pull out the film protruding from the tray.
natural_image
Diagram showing two mechanical components with arrows indicating movement, one being inserted and the other holding a device (no text or symbols present)
WARNING
Keepthebatteryoutofthereachofchildren. Shouldthebatterybeswallowed,immediately consultadoctor.

CAUTION
• UseonlyoneCR2025(3V) lithium battery.
- Removethebatteryiftheremotecontrolisnot usedforamonthorlonger.
- Dangerofexplosionifbatteryisincorrectlyreplaced.Replaceonlywiththesameorequivalenttype.
- Donothandlethebatterywithmetallictools.
- Donotstorethebatterywithmetallicmaterials.
- Intheeventofbatteryleakage, wipetheremotecontrolcompletelycleanandinstalla newbattery.
- Whendisposingofusedbatteries,please complywithgovernmentalregulationsorenvironmentalpublicinstitutions’rulesthat applyinyourcountry/area.
Usingtheremotecontrol
Pointtheremotecontrolinthedirectionofthe frontpaneltooperate.
• Theremotecontrol may not function properly indirect sunlight.

Important
- Donotstoretheremotecontrolinhighttemperaturesordirectsunlight.
- Donotlettheremotecontrolfallontothe floor,whereitmaybecomejammedunderthe brakeoracceleratorpedal.
text_image
① ② ③ SVD +INT BAND +INT INT INT INT INT ⑨ ⑧ ⑦ ⑥ ⑤ ④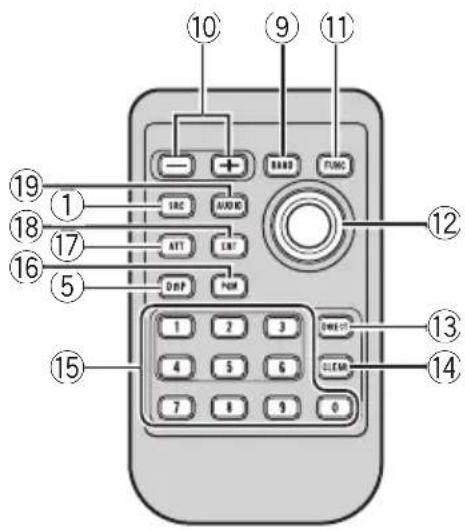
text_image
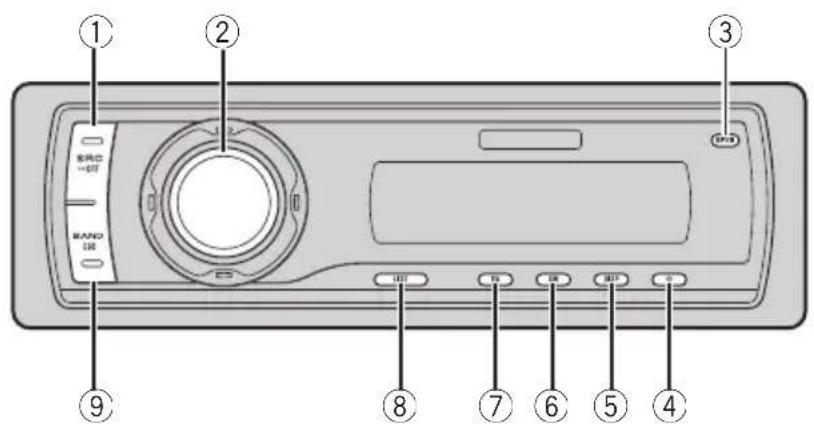
Diagram of a remote control with numbered labels pointing to key function keys like SRC, Audio, ATT, and DNP.What's What
Headunit
①SOURCEbutton
Thisunitisturnedonbyselectingasource. Presstocyclethroughalltheavailable sources.
② MULTI-CONTROL
Movetoperformmanualseektuning, fast forward, reverse and track search controls. Alsoused for controlling functions. Turn to increase or decrease the volume.
③OPENbutton
Presstoopenthefrontpanel.
④CLOCKbutton
Presstochangetotheclockdisplay.
⑤DISPLAYbutton
Presstoselectdifferentdisplays.
⑥SWbutton
Presstoselectthesubwoofersettingmenu. Pressandholdtoselectthebassboostsettingmenu.
⑦EQbutton
Presstoselectvariousequalizercurves.
⑧LISTbutton
Presstodisplaythedisctitlelist,tracktitle list,folderlist,filelistorpresetchannellist dependingonthesource.
⑨BANDbutton
PresstoselectamongthreeFMbandsand oneAMbandandtocancelthecontrol modeoffunctions.
Remotecontrol
Operationisthesameaswhenusingthebuttonsontheheadunit.
⑩VOLUMEbuttons
Presstoincreaseordecreasethevolume.
⑪FUNCTIONbutton
Presstoselectfunctions.
⑫Joystick
Movetoperformmanualseektuning, fast forward, reverse and track search controls. Alsoused for controlling functions. Functions are the same as MULTI-CONTROL except for volume control.
⑬DIRECTbutton
Presstodirectlyselectthedesiredtrack.
Operatingthisunit
⑭CLEARbutton
Presstocanceltheinputnumberwhen0to9areused.
⑮0to9buttons
Presstodirectlyselectthedesiredtrack, presettuningordisc. Buttons1to6canoperatethepresettingforthetunerordisc numbersearchforthemulti-CDplayer.
⑯PGMbutton
Presstoooperatethepreprogrammedfunctionsforeachsource.(RefertoUsingthePGMbuttononpage29.)
⑰ATTbutton
Presstoquicklylowerthevolumelevel,by about 90% .Pressoncemoretoreturntothe originalvolumelevel.
⑱ENTERTAINMENTbutton
Presstochangetotheentertainmentdisplay.
⑲AUDIObutton
Presstoselectvarioussoundqualitycontrols.
BasicOperations
PowerON/OFF
Turningtheuniton
●PressSOURCEtoturntheuniton.
Turningtheunitoff
- PressSOURCEandholduntiltheunit turnsoff.
Selectingasource
Youcanselectasourceyouwanttolistento. Toswitchtothebuilt-inCDplayer,loadadisc intheunit(refertopage12).
●PressSOURCEtoselectasource.
PressSOURCErepeatedlytoswitchbetween thefollowingsources:
Tuner—Television—DVDplayer/Multi-DVDplayer—Built-inCDplayer—Multi-CD player—iPod—USB—External unit 1—Externalunit2—AUX1—AUX2—BTAudio—BTTelephone

Notes
- In the following cases, the soundsource will not change:
—When there is noun it corresponding to the selected source connected to this unit.
—Whenthereisnodiscormagazineinthe player.
—WhentheAUX(auxiliaryinput)issettooff (refertopage25).
—WhentheBTAudiosourceissettooff (refertoActivatingtheBTAudiosourceon page27).
- AUX1issettoonbydefault.TurnofftheAUX1 whennotinuse(refertoSwitchingtheauxiliarysettingonpage25).
Operatingthisunit
- ExternalunitreferstoaPioneerproduct(such asoneavailableinthefuture)that,although incompatibleasasource,enablescontrolof basicfunctionsbythisunit.Twoexternalunits canbecontrolledbythisunit.Whentwoexternalunitsareconnected,theallocationof themtoexternalunit1orexternalunit2is automaticallysetbythisunit.
- Whenthisunit'sblue/whiteleadisconnected tothevehicle'sauto-antennarelaycontrol terminal,thevehicle'santennaextendshwhen thisunit'ssourceisturnedon.Toretractthe antenna,turnthesourceoff.
Adjustingthevolume
●UseMULTI-CONTROLtoadjustthe soundlevel.
Tuner
BasicOperations

Important
If you are using this unit in North, Central or South America, reset the AM tuning step (see Setting the AM tuning step on page 25).
text_image
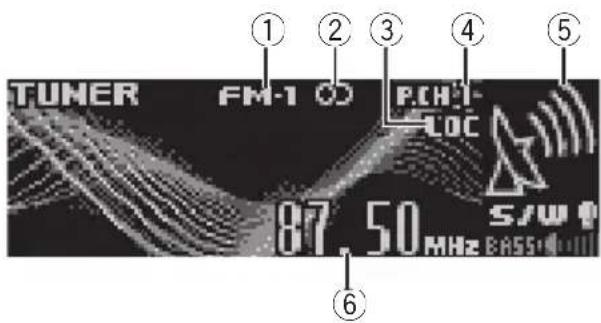
TUNER FM-1 C P.CH-LOC 87.50 MHz S/W①Bandindicator
②Stereo(OD)indicator
Showswhentheselectedfrequencyisbeing broadcastinstereo.
③LOCindicator
Showswhenlocalseektuningison.
④Presetnumberindicator
⑤Signallevelindicator
Showstheradiowavestrength.
⑥Frequencyindicator
1PressSOURCEtoselectthetuner.
2PressBANDtoselectaband.
PressBANDuntilthedesiredbandisdis- played, FM-1, FM-2, FM-3 for FM or AM.
3Toperformmanualtuning, push MULTI-CONTROLleftorright.
4Toperformseektuning, pushandhold MULTI-CONTROLleftor right for about one second and release.
Thetunerwillscanthefrequenciesuntila broadcaststrongenoughforgoodreceptionis found.
■Youcancancelseektuningbypushing MULTI-CONTROLleftorright.
Operatingthisunit
■ If you push and hold MULTI-CONTROL left for right you can skip stations. Seek tuning starts as soon as you release MULTI-CONTROL.

Note
ListeningAMradiowhileconnectingiPodtothisunitmaygeneratenoise.Inthiscase,disconnectiPodfromthisunitandnoiseisdisappeared.
Storingandrecallingbroadcast frequencies
Youcaneasilystoreuptosixbroadcastfrequenciesforlaterrecall.
- Upto18FMstations, sixforeachofthe threeFMbands, andsixAMstationscan bestoredinmemory.
1Whenyoufindafrequencythatyou wanttostoreinmemorypressLIST.
2UseMULTI-CONTROLtostorethese- lectedfrequencyinmemory.
Turntochangethepresetnumber;pressand holdtostore.
Thepresetnumberyouhaveselectedwill flashandthenremainlit.Theselectedradio stationfrequencyhasbeenstoredinmemory.
3UseMULTI-CONTROLtoselectthedesiredstation.
Turntochangethestation;presstoselect.
■Youcanalsochangethestationbypushing MULTI-CONTROLupordown.
■If you donot operatethelist within about 30 seconds, the display is automatically returned to the ordinary display.
Usingtheremotecontrol
- Whenyoufindafrequencythatyou wanttostoreinmemory,pressoneofpre-settuningbuttons1to6andholduntilthe presetnumberstopsflashing.
Thenumberyouhavepressedwillflashinthe presetnumberindicatorandthenremainlit.
Theselectedradiostationfrequencyhasbeen storedinmemory.
Thenexttimeyoupressthesamepresettuningbuttontheradiostationfrequencyisrecalledfrommemory.
■Youcanalsorecallradiostationfrequencies assignedtopresettuningnumbersbypushing MULTI-CONTROLupordownduringthefrequencydisplay.
Introduction of advanced operations
1PressMULTI-CONTROLtodisplaythe mainmenu. FUNCTION, AUDIOandENTERTAINMENT appearonthedisplay.
2UseMULTI-CONTROLtoselect FUNCTION.
Turntochangethemenuoption;presstoselect. Thefunctionnameappearsonthedisplay.
3TurnMULTI-CONTROLtoselectthe function.
Turn MULTI-CONTROL to switch between the functions in the following order:
BSM(beststationsmemory)—Local(local seektuning)
■Youcanalsoselectthefunctionbypassing
FUNCTIONontheremotecontrol.
■Toreturntothefrequencydisplay,press BAND.
■ If you donot operate functions within about 30 seconds, the display is automatically returned to the ordinary display.
Storingthestrongestbroadcast frequencies
BSM(beststationsmemory)letsyouautomaticallystorethesixstrongestbroadcastfrequenciesunder1to6ontheremotecontrol andoncestoredthereyoucantuneintothose frequencieswiththetouchofabutton.
Operatingthisunit
- StoringbroadcastfrequencieswithBSM mayreplacebroadcastfrequenciesyou havesavedusing1to6ontheremotecontrol.
1UseMULTI-CONTROLtoselectBSMin thefunctionmenu.
2PressMULTI-CONTROLtoturnBSMon.
Sixstrongestbroadcastfrequencieswillbe storedintheorderoftheirsignalstrength.
■Tocancelthestorageprocess,press MULTI-CONTROLagain.
3UseMULTI-CONTROLtoselectthedesiredstation.
Turntochangethestation;presstoselect.
■Youcanalsochangetestationbypushing MULTI-CONTROLupordown.
Tuninginstrongsignals
Localseektuningletsyoutuneinonlythose radiostationswithsufficientlystrongsignals forgoodreception.
1UseMULTI-CONTROLtoselectLocalin thefunctionmenu.
2PressMULTI-CONTROLtoturnlocal seektuningon.
■Toturnlocalseektuningoff, press MULTI-CONTROLagain.
3PushMULTI-CONTROLleftorrightto setthesensitivity.
TherearefourlevelsofsensitivityforFMand twolevelsforAM:
FM: Level 1—Level 2—Level 3—Level 4
AM:Level1—Level2
TheLevel4settingallowsreceptionofonly thestrongeststations,whilelowersettingslet youreceiveprogressivelyweakerstations.
Built-inCDPlayer
BasicOperations
Thebuilt-inCDplayercanplaybackaudioCD (CD-DA)andcompressedaudio(WMA/MP3/AAC/WAV)recordedonCD-ROM.(Referto page52forfilesthatcanbeplayedback.) Readtheprecautionswithdiscsandplayeron page51.

text_image
CD WMAFLD01 TRE01 128kbps 01' 17" S/W E:ASS:4-1111①WMA/MP3/AAC/WAVindicator
Showsthetypeofaudiofilecurrentlyplaying
whenthecompressedaudioisplaying.
②Foldernumberindicator
Showsthefoldernumbercurrentlyplaying
whenthecompressedaudioisplaying.
③Tracknumberindicator
④Playtimeindicator
⑤Bitrate/samplingfrequencyindicator
Showsthebitrateorsamplingfrequencyof thecurrenttrack(file)whenthecompressed audioisplaying.
- WhenplayingbackVBR(variablebit rate)-recordedWMAfiles,theaverage bitratevalueisdisplayed.
- WhenplayingbackVBR(variablebit rate)-recordedMP3files, VBRisdisplayinsteadofbitratevalue.
1PressOPENtoopenthefrontpanel.
Discloadingslotappears.

text_image
Discloadingslot EJECTbutton■Toavoidamalfunction,makesurethatno metalobjectcomesintocontactwiththeterm- inalswhenthefrontpanelisopen.
2InsertaCD(CD-ROM)intothedisloadingslot.
Playbackwillautomaticallystart.
■Besuretoturnupthelabelsideofadisc.
■AfteraCD(CD-ROM)hasbeeninserted,press
SOURCEtoselectthebuilt-inCDplayer.
■YoucanejectaCD(CD-ROM)bypassing
EJECT.
3Closethefrontpanel.
4PushMULTI-CONTROLupordownto selectafolderwhenplayingacompressed audio.
■Youcannotselectafolderthatdoesnothave acompressedaudiofilerecordedinit.
■Toreturntofolder01(ROOT),pressandhold BAND.However,iffolder01(ROOT)containsno files.playbackcommenceswithfolder02.
5Toperformfastforwardorreverse, pushandholdMULTI-CONTROLleftor right.
- If you select Rough search, pushing and holding MULTI-CONTROL leftor rightenables youto search every 10 tracks in the current disc (folder). (Referto Searching every 10 tracks in the current disc or folder on page 15.)
6 Toskipbackorforwardtoanother track, push MULTI-CONTROLleftorright.

Notes
- Thereissometimesadelaybetweenstarting updiscplaybackandthesoundbeingissued. Whenbeingread,Formatreadisdisplayed.
- IfanerrormessagesuchasERROR-11isdisplayed,refertoUnderstandingerrormessages onpage51.
- WhenplayingCD-EXTRAorMIXED-MODE CDs, compressedaudioandCD-DAcanbe switchedbypassingBAND.
- If you have switched between uncompressed audio and CD-DA, playback starts at the first track on the disc.
- WhenplayingbackVBR(variablebitrate)recordedfiles, elapsedplaytimemaynotbedisplayedcorrectly.
- When playing compressed audio, there is no soundonfastforwardorreverse.
- Playbackiscarriedoutinorderoffilenumber. Foldersareskippediftheycontainnofiles.(If folder01(ROOT)containsnofiles, playback commenceswithfolder02.)
Selectingatrackdirectly
When using theremote control, you can select a track directly by entering the desired track number.
- Whenaudiofilesarebeingplayedback, youcanselecttrackinthecurrentfolder.
1PressDIRECT.
Tracknumberinputdisplayappears.
2Press0to9buttonstoenterthedesired tracknumber.
■Youcancanceltheinputnumberbypassing CLEAR.
3PressDIRECT.
Thetrackofenterednumberwillplay.
■Afterenteringthenumberinputmode, if you donotperformanoperationwithinabouteight seconds, themodeisautomatically canceled.
Introductionofadvanced operations
1PressMULTI-CONTROLtodisplaythe mainmenu.
FUNCTION, AUDIO and ENTERTAINMENT
appearonthedisplay.
2UseMULTI-CONTROLtoselect FUNCTION.
Turntochangethemenuoption;presstose-lect.
Thefunctionnameappearsonthedisplay.
3TurnMULTI-CONTROLtoselectthe function.
TurnMULTI-CONTROLtoswitchbetweenthe functionsinthefollowingorder:
Playmode(repeatplay)—Randommode(randomplay)—Scanmode(scanplay)—
Pause(pause)—Compression(compression and BMX)—Searchmode(searchmethod)—
TitleInput"A"(disctitleinput)
■Youcanalsoselectthefunctionbypassing FUNCTIONnontheremotecontrol.
■WhenplayingaCDTEXTdisc,youcannot switchtodisctitleinputdisplay.Thedisctitlewill havealreadybeenrecordedonaCDTEXTdisc.
■Whenplayingcompressedaudiodisc,you cannotswitchtodisctitleinputdisplay.
■Toreturntotheordinarydisplay,pressBAND.
■Ifyoudonotoperatefunctionsexceptfor
TitleInput"A" withinabout30seconds, the displayisautomaticallyreturnedtotheordinarydisplay.
Selectingarepeatplayrange
Repeatplayplaysthesametrack/folderwithin theselectedrepeatplayrange.
Also, therepeatrangedeterminestherangeof randomplayandscanplay.
1UseMULTI-CONTROLtoselect Playmodeinthefunctionmenu.
2PressMULTI-CONTROLtoselecttherepeatrange.
- Discrepeat-Repeatalltracks
- Trackrepeat–Repeatjustthecurrent track
- Folderrepeat—Repeat the current folder
■ If you select another folder during repeat play, therepeat play range changestodiscrepeat.
■WhenplayingCD,performingtracksearchor fastforward/reversecancelstherepeatplayautomatically.
■Whenplayingcompressedaudio,performing tracksearchorfastforward/reverseduring
Trackrepeat(trackrepeat)changestherepeat playrangetofolderrepeat.
■WhenFolderrepeat(folderrepeat)isselected,itisnotpossibletoplaybackasubfolder ofthatfolder.
Playingtracksinrandomorder
Randomplayplaystracksinarandomorder withintheselectedrepeatrange.
RefertoSelectingarepeatplayrangeonthis page.
1UseMULTI-CONTROLtoselect Randommodeinthefunctionmenu.
2PressMULTI-CONTROLtoturnrandom playon.
Trackswillplayinarandomorder.
■Toturnrandomplayoff, press
MULTI-CONTROLagain.
Scanningfoldersandtracks
Scanplaysearchesthesongwithinthese-lectedrepeatrange.
RefertoSelectingarepeatplayrangeonthis page.
1UseMULTI-CONTROLtoselect Scanmodeinthefunctionmenu.
2PressMULTI-CONTROLtoturnscanplay on.
The first 10 second so each track is played.
Operatingthisunit
3Whenyoufindthedesiredtrackpress MULTI-CONTROLtoturnscanplayoff.
■ Ifthedisplayhasautomaticallyreturned to the playbackdisplay, select Scanmodeagain by using MULTI-CONTROL.
■Afterscanningofadisc(folder)isfinished, normalplaybackofthetrackswillbeginagain.
Pausingdiscplayback
1UseMULTI-CONTROLtoselectPausein thefunctionmenu.
2PressMULTI-CONTROLtoturnpause on.
Playbackofthecurrenttrackpauses.
■Toturnpauseoff, press MULTI-CONTROL again.
UsingcompressionandBMX
UsingtheCOMP(compression)andBMX functionsletyouadjustthesoundplayback qualityofthisunit.
1UseMULTI-CONTROLtoselect Compressioninthefunctionmenu.
2PressMULTI-CONTROLtoselectyourfavoritesetting.
COMP/BMXOFF—COMP1—COMP2— COMP/BMXOFF—BMX1—BMX2
Searching every 10 tracks in the current discor folder
Youcanswitchthesearchmethodbetween fastforward/reverseandsearchingevery10 tracks.SelectingRoughsearchenablesyou tosearchevery10tracks.
1UseMULTI-CONTROLtoselect Searchmodeinthefunctionmenu.
2PressMULTI-CONTROLtoselect Roughsearch.
- FF/REV—Fastforwardandreverse
- Roughsearch—Searchingevery10tracks
■ToselectFF/REV, pressMULTI-CONTROL again.
3PressBANDtoreturntothe playback display.
4PushandholdMULTI-CONTROLleftor righttosearchevery10tracksonadisc (folder).
■ Iftherestoftracknumberislessthan10, pushingandholdingMULTI-CONTROL recalls thefirst(last)one.
Usingdistitlefunctions
YoucaninputCDtitlesanddisplaythetitle. ThenexttimeyouinsertaCDforwhichyou haveenteredatitle, thetitleofthatCDwillbe displayed.
Enteringdisctitles
Usethedisctitleinputfeaturetostoreupto 48CDtitlesintheunit.Eachtitlecanbeupto 10characterslong.
1PlaytheCDthatyouwanttoentera titlefor.
2UseMULTI-CONTROLtoselect TitleInput"A"inthefunctionmenu.
3PressDISPLAYtoselectthedesired charactertype.
PressDISPLAYrepeatedlytoswitchbetween the followingcharacter types: Alphabet(uppercase),numbersandsymbols—Alphabet(lowercase)—Europeanletters, such as those with accents (e.g. á, à, ä, ç)—Numbersandsymbols
4PushMULTI-CONTROLupordownto selectaletterofthealphabet.
5PushMULTI-CONTROLleftorrightto movethecursorortothepreviousornext characterposition.
6Movethecursortothelastpositionby pushingMULTI-CONTROLrightafterenteringthetitle.
When you push MULTI-CONTROL rightone more time, the entered title is stored in memory.
7PressBANDtoreturntothe playback display.

Notes
- Titlesremaininmemory,evenafterthedisc hasbeenremovedfromtheunit,andarere-calledwhenthediscisreinserted.
• Afterdatafor48discshasbeenstoredin memory, dataforanewdiscwilloverwritethe oldestone. - If you connect amulti-CD player, you can input disctitles for up to 100 discs.
- Whenamulti-CDplayerthatdoesnotsupport disctitlefunctionsisconnected,youcannot enterdisctitlesinthisunit.
Displayingtextinformationon disc
- PressDISPLAYtoselectthedesiredtext information.
FortitleenteredCD
Playtime— Ⓧ:disctitleandplaytime
ForCDTEXTdiscs
Playtime—:discartistnameand:track title—:discartistnameand:disctitle—:disctitleand:tracktitle—:track artistnameand :tracktitle—:tracktitle and playtime
ForWMA/MP3/AACdiscs
Playtime—☐:foldernameand:filename—;artistnameand:tracktitle—:a r - tistnameand ;albumtitle—:albumtitle and ;tracktitle—:tracktitleandplay time—;commentandplaytime
ForWAVdiscs
Playtime—☐:foldernameand:filename

Notes
- Youcanscrolltotheleftofthetitlebypassing andholdingDISPLAY.
• AudioCDthatcontainscertaininformation suchastextand/ornumberisCDTEXT. - If specific information has not been recorded on adisc, title or name is not displayed.
- DependingontheversionofiTunes ^ usedto writeMP3filesontoadisc,commentinformationmaynotbecorrectlydisplayed.
- DependingontheversionofWindowsMedia PlayerusedtoencodeWMAfiles,album namesandothertextinformationmaynotbe correctlydisplayed.
- Thesamplingfrequencyshowninthedisplay maybeabbreviated.
- When EverScrollissettoONattheinitialsetting,textinformationscrollscontinuouslyin thedisplay.RefertoSwitchingtheEverScroll onpage27.
Selectingtracksfromthetrack titlelist
Tracktitlelistletsyouseethelistoftracktitles onaCDTEXTdiscandselectoneofthemto playback.
1PressLISTtoswitchtothetracktitlelist mode.
2UseMULTI-CONTROLtoselectthedesiredtracktitle.
Turntochangethetracktitle;presstoplay.
■Youcanalsochangethetracktitlebypushing MULTI-CONTROLupordown.
■Ifyoudonotoperatethelistwithinabout30 seconds,thedisplayisautomaticallyreturnedto theordinarydisplay.
Selectingtracksfromthefile namelist
Filenamelistletsyouseethelistoffilenames (orfoldernames)andselectoneofthemto playback.
Operatingthisunit
1PressLISTtoswitchtothefilenamelist mode.
Namesoffilesandfoldersappearinthedisplay.
2UseMULTI-CONTROLtoselectthedesiredfilename(orfoldername).
Turntochangethenameoffileorfolder; presstoplay; pushrighttoseealistofthe files(orfolders) intheselectedfolder.
■Youcanalsochangethenameoffileorfolder bypushingMULTI-CONTROLupordown.
■Toreturntothepreviouslist(thefolderone levelhigher),pushMULTI-CONTROLleft.
■ Ifthefolder/filenumberismorethan100, last 2-digitofthefolder/filenumberisdisplayed.
■Numberofthefolders/filesinthecurrentlyselectedfolderwillbeindicatedontherightsideofthedisplay.
■Ifyoudonotoperatethelistwithinabout30 seconds,thedisplayisautomaticallyreturnedto theordinarydisplay.
PlayingsongsoniPod BasicOperations
YoucanusethisunittocontrolaniPodby usingacable(e.g.,CD-I200),whichissoldseparately.
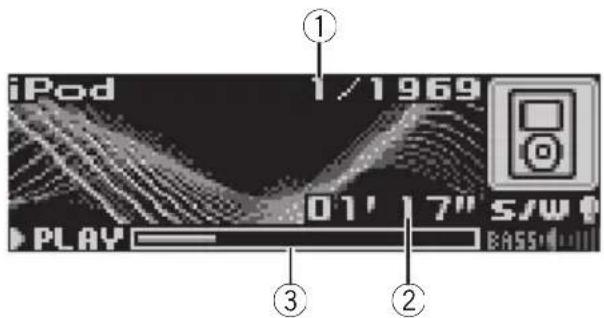
text_image
iPod 1/1969 01' 17" S/W PLAY BASS①Songnumberindicator
②Playtimeindicator
③Songtime(progressbar)
1ConnecttheiPodtothisunit.
Playbackwillautomaticallystart. While theiPodisconnectedtothisunit, PIONEER(or √ (checkmark))isdisplayedon theiPod.
■Beforeconnectingthedockconnectorofthis unittotheiPod, disconnecttheheadphonesfrom theiPod.
■AftertheiPodhasbeenconnectedtothis unit,pressSOURCEtoselecttheiPod.
■WhenremovingtheiPodfromthisunit,this unitisturnedoff.
2Toperformfastforwardorreverse, pushandholdMULTI-CONTROLleftor right.
3 Toskipbackorforwardtoanother song, push MULTI-CONTROLleftorright.

Notes
- ReadtheprecautionswithiPodonpage53.
- IfanerrormessagesuchasERROR-11isdisplayed,refertoUnderstandingerrormessages onpage51.
- Connectdirectlythedockconnectorofthis unittotheiPodsothatthisunitworksproperly.
Operatingthisunit
- WhentheignitionswitchissettoACCorON, theiPod'sbatteryischargedwhiletheiPodis connectedtothisunit.
- While theiPodisconnectedtothisunit, the iPoditselfcannotbeturnedonoroff.
•TheiPodconnectedtothisunitisturnedoff abouttwominutesaftertheignitionswitchis settoOFF.
Browsingforasong
TheoperationofthisunittocontrolaniPodis designedtobeasclosetotheoperationofthe iPodaspossibleforeasyoperationandsong search.
- Ifplaylisthasbeenselected,first,thisunit showsplaylistofyouriPod'sname.This playlistplaysallsongsinyouriPod.
- If the characters recorded on the Pod are not compatible with this unit, those characters will not be displayed.
1PressLISTtoswitchtothetopmenuof thelistsearch.
2UseMULTI-CONTROLtoselectacategory.
Turntochangethecategory:presstoselect.
Playlists (playlists)—Artists (artists)—Albums (albums)—Songs (songs)—Genres (genres)
Listfromtheselectedcategoryisdisplayed.
■Youcanstartplaybackthroughoutthese- lectedcategorybypassingandholding
MULTI-CONTROL.
■Youcanalsochangethecategorybypushing MULTI-CONTROLupordown.
■Youcanalsoselectthecategorybypushing MULTI-CONTROLright.
■Toreturntothepreviouslist,push MULTI-CONTROLleft.
■Togotothetopmenuofthelistsearch, push andhold MULTI-CONTROLleft.
■Ifyoudonotoperatethelistwithinabout30 seconds,thelistsearchiscancelledautomatically.
3Repeatstep2tofindasongyouwant tolistento.
Displayingtextinformationon iPod
- PressDISPLAYtoselectthedesiredtext information.
Playtime—:artistnameand:songtitle—:artistnameand:albumname—:albumnameand :songtitle—:songtitle and playtime
■ If the characters recorded on the Podarenot compatible with this unit, those characters will not be displayed.

Notes
- Youcanscrolltotheleftthetextinformation bypassingandholdingDISPLAY.
- When EverScrollissettoONattheinitialsetting.textinformationscrollscontinuouslyin thedisplay.RefertoSwitchingtheEverScroll onpage27.
Introductionofadvanced operations
1PressMULTI-CONTROLtodisplaythe mainmenu. FUNCTION, AUDIOandENTERTAINMENT appearonthedisplay.
2UseMULTI-CONTROLtoselect FUNCTION.
Turntochangethemenuoption;presstose-lect.
Thefunctionnameappearsonthedisplay.
3TurnMULTI-CONTROLtoselectthe function.
TurnMULTI-CONTROLtoswitchbetweenthe functionsinthefollowingorder:
Playmode(repeatplay)—Shufflemode (shuffle)—Shuffle all (shuffle all)—Pause (pause)
■Youcanalsoselectthefunctionbypassing FUNCTIONNontheremotecontrol.
■Toreturntotheplaybackdisplay,pressBAND.
■ If you donot operate functions within about 30 seconds, the display is automatically returned to the ordinary display.
Operatingthisunit
Repeatingplay
For playbackofthesongsontheiPod, there aretworepeatplayranges:RepeatOne(repeatonesong)andRepeatAll(repeatall songsinthelist).
- WhilePlaymodeissettoRepeatOne, you cannot select the othersongs.
1UseMULTI-CONTROLtoselect Playmodeinthefunctionmenu.
2PressMULTI-CONTROLtoselecttherepeatrange.
- RepeatOne—Repeatjustthecurrentsong
- RepeatAll-Repeatallsongsinthese- lectedlist
Playingsongsinarandom order(shuffle)
For playbackofthesongsontheiPod, there are tworandomplaymethods: ShuffleSongs (playbacksongsinarandomorder) and ShuffleAlbums (playbackalbumsinaran-domorder).
1UseMULTI-CONTROLtoselect Shufflemodeinthefunctionmenu.
2PressMULTI-CONTROLtoselectyourfavoritesetting.
- ShuffleSongs—Playbacksongsinarandomorderwithintheselectedlist
- ShuffleAlbums—Selectanalbumrandomly, and then playback all the songs init inorder
- ShuffleOFF-Canceltherandomplay
Playingallsongsinarandom order(shuffleall)
ThismethodplaysallsongsontheiPodrandomly.
●PressandholdMULTI-CONTROLtoturn shuffleallonduringtheplaybackdisplay.
ShuffleAllisdisplayedbrieflyandallsongs ontheiPodwillplayrandomly.

Note
Youcanalsoturnshufflealloninthemenuthat appearsbyusingMULTI-CONTROL.
Pausingasong
1UseMULTI-CONTROLtoselectPausein thefunctionmenu.
2PressMULTI-CONTROLtoturnpause on.
Playbackofthecurrentsongpauses.
■Toturnpauseoff,pressMULTI-CONTROL again.
AudioAdjustments Introductionofaudioadjustments

text_image
Fader F/R 0 ①①Audiodisplay
Showstheaudioadjustmentstatus.
1PressMULTI-CONTROLtodisplaythe mainmenu.
FUNCTION, AUDIO and ENTERTAINMENT appearonthedisplay.
2UseMULTI-CONTROLtoselectAUDIO.
Turntochangethemenuoption;presstose-lect.
Theaudiofunctionnameappearsonthedisplay.
3TurnMULTI-CONTROLtoselectthe audiofunction.
TurnMULTI-CONTROLtoswitchbetweenthe audiofunctionsinthefollowingorder:
Fader(balanceadjustment)—Powerful(graphicequalizeradjustment)—50Hz(7-band graphicequalizeradjustment)—LOUD(loudness)—Sub W.1 (subwoofer on/off setting)—
SubW.2(subwoofersetting)—Bass(bass boost)—HPF (high pass filter)—SLA (source leveladjustment)
■Youcanalsoselecttheaudiofunctionby pressingAUDIOontheremotecontrol.
■YoucanselecttheSubW.2onlywhensubwooferoutputisturnedoninSubW.1.
■ WhenselectingtheFMtunerasthesource, youcannotswitchtoSLA.
■Toreturntothedisplayofeachsource,press BAND.
■ If you donot operate function except for 50Hz within about 30 seconds, the display is automatically returned to the ordinary display.
Usingbalanceadjustment
Youcanchangethefader/balancesettingso thatitcanprovideyouanideallisteningenvironmentinallooccupiedseats.
1UseMULTI-CONTROLtoselectFader.
■ If the balancesetting has been previously adjusted, Balance will be displayed.
2PushMULTI-CONTROLupordownto adjustfront/rearspeakerbalance.
Eachtime MULTI-CONTROL is pushed up or down, the front/rearspeaker balance moves toward the front or rear.
F 15 to R 15 is displayed as the front/rear speakerbalancemovesfromfronttorear.
■F/R0isthepropersettingwhenonlytwo speakersareused.
- When the rear output setting is Rear SP :S/W, you cannot adjust front/rearspeaker balance. RefertoSettingtherearoutput and subwoofer controller on page 26.
3PushMULTI-CONTROLleftorrightto adjustleft/rightspeakerbalance.
EachtimeMULTI-CONTROL is pushed left for right, the left/right speaker balance is moved forward to the left or right.
L 15 to R 15 is displayed as the left/right speakerbalancemovesfromlefttoright.
Usingtheequalizer
Theequalizerletyouadjusttheequalization to matchcarinterioracoustic characteristics as desired.
Recallingequalizercurves
Therearesevenstoredequalizercurveswhich youcaneasilyrecallatanytime.Hereisalist oftheequalizercurves:
DisplayEqualizercurve
| PowerfulPowerful | |
| NaturalNatural | |
| Vocal | Vocal |
Operatingthisunit
Custom1Custom1
Custom2Custom2
FlatFlat
SuperBass(S.Bass)Superbass
- Custom1andCustom2areadjusted equalizercurvesthatyoucreate.Adjustmentscanbemadewitha7-bandgraphic equalizer.
- When Flatisselectednosupplementor correctionismadetothesound. This is useful to check the effect of the equalizer curves by switching alternatively between Flat and a set equalizer curve.
- PressEQtoselecttheequalizer.
PressEQ repeatedlyytoswitchbetweenthefollowingequalizers:
Powerful—Natural—Vocal—Custom 1—Custom2—Flat—SuperBass(S.Bass)
Adjustingequalizercurves
Thefactorysuppliedequalizercurves, with the exception of Flat, can be adjusted to a finedegree (nuance control).
1UseMULTI-CONTROLtoselectthegraphicequalizeradjustment.
Powerfulappearsinthedisplay.
If the equalizer curve has been previously selected, the curve of that previously selected will be displayed instead of Powerful.
2PushMULTI-CONTROLleftorrightto selectanequalizercurve.
EachtimeMULTI-CONTROL is pushed left for right, equalizer curves are selected in the following order:
Powerful—Natural—Vocal—Custom 1—Custom2—Flat—SuperBass(S.Bass)
3PushMULTI-CONTROLupordownto adjusttheequalizercurve.
EachtimeMULTI-CONTROL is pushed up down, the equalizer curve increases or decreases respectively.
+6 to -4 (or -6) is displayed as the equalizer curveisincreasedordecreased.
■The actual range of the headjustments are different depending on which equalizer curve is selected.
■Theequalizercurvewithallfrequenciessetto 0 cannotbeadjusted.
Adjusting7-bandgraphicequalizer
For Custom 1 and Custom 2 equalizer curves, you can adjust the level of each band.
- AseparateCustom1curvecanbecreated foreachsource.(Thebuilt-inCDplayerand themulti-CDplayeraresettothesame equalizeradjustmentsettingautomatically.)Ifyoumakeadjustmentswhena curveotherthanCustom2isselected,the equalizercurvesettingswillbememorized inCustom1.
- ACustom2curvecanbecreatedcommon toallsources.Ifyoumakeadjustments whentheCustom2curveisselected,the Custom2curvewillbeupdated.
1Recalltheequalizercurveyouwantto adjust.
SeeRecallingequalizercurvesontheprevious page.
2UseMULTI-CONTROLtoselect7-band graphicequalizeradjustment.
Frequencyandthelevel(e.g.,50Hz+4)appearsinthedisplay.
3PushMULTI-CONTROLleftorrightto selecttheequalizerbandtoadjust.
EachtimeMULTI-CONTROL is pushed left for right, equalizer bands are selected in the following order:
50Hz—125Hz—315Hz—800Hz—2kHz—5kHz—12.5kHz
4PushMULTI-CONTROLupordownto adjusttheleveloftheequalizerband.
EachtimeMULTI-CONTROL is pushed up down, the level of the equalization band-increases or decreases.
Operatingthisunit
+6 to -6 is displayed as the level is increased or decreased.
■Youcanthenselectanotherbandandadjust thelevel.
5PressBANDtocancelthe7-bandgraphicequalizeradjustment.
Adjustingloudness
Loudnesscompensatesfordeficienciesinthe low-andhigh-soundrangesatlowvolume.
1UseMULTI-CONTROLtoselectLOUD.
2PressMULTI-CONTROLtoturnloudness on.
Loudnesslevel(e.g.,Mid)appearsinthedisplay.
■Toturnloudnessoff, press MULTI-CONTROL again.
3PushMULTI-CONTROLleftorrightto selectadesiredlevel.
EachtimeMULTI-CONTROL is pushed left for right, level is selected in the following order:
Low (low)—Mid (mid)—High (high)
Usingsubwooferoutput
Thisunitisequippedwithasubwooferoutput whichcanbeturnedonoroff.
1UseMULTI-CONTROLtoselectSubW.1.
■Youcanalsoselectthesubwoofersetting menubypressingSWontheunit.
2PressMULTI-CONTROLtoturnsubwooferoutputon.
Normalappearsinthedisplay.Subwooferoutputisnowon.
■Toturnsubwooferoutputoff, press
MULTI-CONTROLagain.
3PushMULTI-CONTROLleftorrightto select the phase of subwoofer output.
PushMULTI-CONTROL left to select reverse phase and Reverse appears in the display.
PushMULTI-CONTROLrighttoselectnormal phaseandNormalappearsinthedisplay.
Adjustingsubwoofersettings
Whenthesubwooferoutputison,youcanadjustthecut-offfrequencyandtheoutputlevelofthesubwoofer.
1UseMULTI-CONTROLtoselectSubW.2.
■Youcanalsoselectthesubwoofersetting menubypressingSWontheunit.
■Whenthesubwooferoutputison,youcanselectSubW.2.
2PushMULTI-CONTROLleftorrightto selectcut-offfrequency.
EachtimeMULTI-CONTROL is pushed left for right, cut-off frequencies are selected in the following order:
50Hz—63Hz—80Hz—100Hz—125Hz
Only frequencies lower than those in these selected range are outputted from the subwoofer.
3PushMULTI-CONTROLupordownto adjusttheoutputlevelofthesubwoofer.
EachtimeMULTI-CONTROLispushedupor down,subwooferlevelincreasesordecreases.
+6 to -24 is displayed as the level is increased or decreased.
Boostingthebass
Bassboostfunctionbooststhebasslevelof soundlowerthan100Hz. Themorethebass levelisincreased, themorethebasssoundis emphasized and the entire soundbecomes powerful. When using this function with the subwoofer, the soundunderthecut-off frequency is boosted.
1UseMULTI-CONTROLtoselectBass.
■Youcanalsoselectthebassboostsettingby pressingandholdingSW.
Operatingthisunit
2PushMULTI-CONTROLupordownto selectadesiredlevel.
0to+6isdisplayedasthelevelisincreasedor decreased.
Usingthehighpassfilter
When you donotwantlowsounds from the subwoofer output frequency rangetoplay from the frontorrearspeakers, turn on the HPF (high pass filter). Only frequencies higher than those in these selected range are outputted from the frontorrearspeakers.
1UseMULTI-CONTROLtoselectHPF.
2PressMULTI-CONTROLtoturnhigh passfilteron.
80Hzappearsinthedisplay.Highpassfilteris nowon.
■ If the high pass filter has been previously adjusted, the frequency of that previously selected will be displayed instead of 80Hz.
■Toturnhighpassfilteroff,press
MULTI-CONTROLagain.
3PushMULTI-CONTROLleftorrightto selectcut-offfrequency.
EachtimeMULTI-CONTROL is pushed left for right, cut-off frequencies are selected in the following order:
50Hz—63Hz—80Hz—100Hz—125Hz
Only frequencies higher than those in these selected range are outputted from the frontor rearspeakers.
Adjustingsourcelevels
SLA(sourceleveladjustment)letsyouadjust thevolumelevelofeachsourcetopreventradicalchangesinvolumewhenswitchingbetweensources.
- SettingsarebasedontheFMtunervolume level, which remains unchanged.
1 Compare the FM tunervolume level with the level of the source you wish to adjust.
2UseMULTI-CONTROLtoselectSLA.
3PushMULTI-CONTROLupordownto adjustthesourcevolume.
EachtimeMULTI-CONTROL is pushed up down, source volume increases or decreases.
SLA+4toSLA-4isdisplayedasthesource volumeisincreasedordecreased.

Notes
• The AMtunervolume level can also be adjusted with source level adjustments.
- Thebuilt-inCDplayerandthemulti-CDplayer aresettothesamesourceleveladjustment volumeautomatically.
- Externalunit1andexternalunit2aresetto thesamesourceleveladjustmentvolume automatically.
InitialSettings
Adjustinginitialsettings
Using the initial settings, you can customize various system settings to achieve optimal performance from this unit.

text_image
Language select English①Functiondisplay
Showsthefunctionstatus.
1PressSOURCEandholduntiltheunit turnsoff.
2PressMULTI-CONTROLandholduntil Languageselectappearsinthedisplay.
■YoucanalsoperformthisoperationbypassingandholdingFUNCTIONontheremotecontrol.
3TurnMULTI-CONTROLtoselectoneof theinitialsettings.
Turn MULTI-CONTROL to switch between the functions in the following order:
Languageselect(languageselection)—Clock (clock)—FM step (FM tuning step)—AM step (AMtuningstep)—Warningtone(warning tone)—AUX1 (auxiliary input 1)—AUX2 (auxiliaryinput2)—Dimmer(dimmer)—
Brightness(brightness)—S/Wcontrol(rear outputandsubwoofercontroller)—Mute (soundmuting/attenuation)—Demonstration (featuredemo)—Reversemode(reverse mode)—Ever-scroll (ever scroll)—BT AUDIO (Bluetoothaudio)—Pincodeinput(pincode input)
Use the following instruction to operate each particular setting.
■Youcanalsoselectthefunctionbypassing FUNCTIONontheremotecontrol.
■ BTAUDIO and Pincode input can be selected only when Bluetooth adapter (e.g., CD-BTB100) is connected to this unit.
■Tocancelinitialsettings, pressBAND.
Selectingthedisplaylanguage
Foryourconvenience, this unitequips multiple languagedisplay. You can select the language best suited to your first language.
1UseMULTI-CONTROLtoselect Languageselect.
2PressMULTI-CONTROLtoselectthelanguage.
Each press of MULTI-CONTROL selects languages in the following order:
Pushing MULTI-CONTROL left or right will select one segment of the clock display:
Hour—Minute
Asyouselectsegmentsoftheclockdisplay thesegmentselectedwillblink.
3PushMULTI-CONTROLupordownto putaclockright.

Note
You can match the clock to times signal by pressing MULTI-CONTROL.
- Iftheminuteis00to29, theminutesare roundeddown.(e.g., 10:18becomes10:00.)
- Iftheminuteis30to59, theminutesare roundedup.(e.g., 10:36 becomes 11:00.)
Operatingthisunit
SettingtheFMtuningstep
TheFMtuningstepemployedbyseektuning canbeswitchedbetween100kHz,thepreset step,and50kHz.
- Ifseektuningisperformedin50kHzsteps, stationsmaybetunedinimprecisely.Tune inthestationswithmanualtuningoruse seektuningagain.
1UseMULTI-CONTROLtoselectFMstep.
2PressMULTI-CONTROLtoselecttheFM tuningstep.
PressingMULTI-CONTROLrepeatedlywill switchtheFMtuningstepbetween50kHz and100kHz.TheselectedFMtuningstepwill appearinthedisplay.
SettingtheAMtuningstep
TheAMtuningstepcanbeswitchedbetween 9kHz, thepresetstep, and 10kHz. When usingthetunerinNorth, CentralorSouth America, resetthetuningstepfrom9kHz(531 kHz to 1602kHz allowable) to 10kHz (530kHz to 1640kHz allowable).
1UseMULTI-CONTROLtoselectAMstep.
2PressMULTI-CONTROLtoselecttheAM tuningstep.
PressingMULTI-CONTROL repeatedly will switch the AMtuning step between 9kHz and 10kHz. These selected AMtuning step will appear in the display.
Switchingthewarningtone
If the front panel is not detached from the head unit within four second soft turning off the ignition, awarning onewill sound. You can turn off the warning tone.
1UseMULTI-CONTROLtoselect Warningtone.
2PressMULTI-CONTROLtoturnwarning toneon.
■Toturnwarningtoneoff, press MULTI-CONTROLagain.
Switchingtheauxiliarysetting
Auxiliary equipments connected to this unit can be activated individually. Set each AUX source to ON when using. About connecting or using auxiliary equipments, referto Using the AUX source on page 28.
1UseMULTI-CONTROLtoselectAUX1/AUX2.
2PressMULTI-CONTROLtoturnAUX1/AUX2on.
■ToturnAUXoff, press MULTI-CONTROL again.
Switchingthedimmersetting
Topreventthedisplayfrombeingtoobrightat night,thedisplayisautomaticallydimmed whenthecar'sheadlightsareturnedon.You canturnthedimmeronoroff.
1UseMULTI-CONTROLtoselectDimmer.
2PressMULTI-CONTROLtoturndimmer on.
■Toturndimmeroff, press MULTI-CONTROL again.
Adjustingthebrightness
Youcanadjustthedisplaybrightness.Initially thismodeissetto12.
1UseMULTI-CONTROLtoselect Brightness.
2PushMULTI-CONTROLleftorrightto adjustthebrightnesslevel.
0to15isdisplayedasthelevelisincreasedor decreased.
■Whendimmerisfunctioning,thebrightness levelcanbeadjusted0to10.
Settingtherearoutputand subwoofercontroller
Thisunit'srearoutput(rearspeakerleadsoutputandRCArearoutput)canbeusedforfull-rangespeaker(RearSP:F.Range)orsubwoofer(RearSP:S/W)connection.Ifyouswitch therearoutputsettingtoRearSP:S/W,you canconnectarearspeakerleaddirectlytoa subwooferwithoutusinganauxiliaryamp. Initially,theunitissetforrearfull-rangespeakerconnection(RearSP:F.Range).
1UseMULTI-CONTROLtoselect S/Wcontrol.
2PressMULTI-CONTROLtoswitchthe rearoutputsetting.
PressingMULTI-CONTROLwillswitchbetweenRearSP:F.Range(full-rangespeaker) andRearSP:S/W(subwoofer)andthatstatus willbedisplayed.
■Whennosubwooferisconnectedtotherear output,selectRearSP:F.Range.
■Whenasubwooferisconnectedtotherear output,setforsubwooferRearSP:S/W.

Notes
- Evenifyouchangethissetting,thereisno outputunlessyouturnthesubwooferoutput on(refertoUsingsubwooferoutputonpage 22).
- If you chan get his setting, subwoofer output in the audiomenure turn to the factory settings.
- BothrearspeakerleadsoutputsandRCArear outputareswitchedsimultaneouslyinthis setting.
Switchingthesoundmuting/attenuation
Soundfromthissystemismutedorattenuatedautomaticallywhenthesignalfromthe equipmentwithmutefunctionisreceived.
- Thesoundismutedorattenuated, MUTE or ATTaredisplayedandnoaudioadjustmentispossible.
- Soundfromthissystemreturnstonormal whenthemutingorattenuationiscan- celed.
1UseMULTI-CONTROLtoselectMute.
2PressMULTI-CONTROLtoswitchthetelephonemuting/attenuation.
PressingMULTI-CONTROLwillswitchbetweenTELATT(attenuation)andTELmute(muting)andthatstatuswillbedisplayed.
Switchingthefeaturedemo
Thefeatureddemoautomaticallystartswhen powertothisunitisturnedoffwhiletheignitionswitchissettoACCorON.
1UseMULTI-CONTROLtoselect Demonstration.
2PressMULTI-CONTROLtoturnthefea- turedemoon.
■Toturnthefeaturedemooff,press MULTI-CONTROLagain.

Notes
- Remember that if the featured demo continues operating when the care engine is turned off, it may drain battery power.
- Youcanalsoturnonorofffeatureddemoby pressingDISPLAYwhilethisunitisturnedoff. Formoredetails,seeFeaturedemomodeon page6.
Switchingthereversemode
If you donot perform an operation within about 30 seconds, screen indications start to reverse, and then continue reversing every 10 seconds.
1UseMULTI-CONTROLtoselect Reversemode.
Operatingthisunit
2PressMULTI-CONTROLtoturnthere- versemodeon.
■Toturnthereversemodeoff, press MULTI-CONTROLagain.

Note
YoucanalsoturnonoroffreversemodebypassingBANDwhilethisunitisturnedoff.Formore details,seeReversemodeonpage6.
SwitchingtheEverScroll
When Ever ScrollissettoON, textinformation recorded on CDoriPodscrolls continuously in the display. SettoOFFify you prefer the information to scroll just once.
1UseMULTI-CONTROLtoselect Ever-scroll.
2PressMULTI-CONTROLtoturntheEver Scrollon.
■ToturntheEverScrolloff, press MULTI-CONTROLagain.
ActivatingtheBTAudiosource
YouneedtoactivatetheBTAudiosourcein ordertouseaBluetoothaudioplayer.
- OnlywhenBluetoothadapter(e.g.CD-BTB100)isconnectedtothisunit,youcan operatethisfunction.
1UseMULTI-CONTROLtoselect BTAUDIO.
2PressMULTI-CONTROLtoturnthe BTAudiosourceon.
■ToturntheBTAudiosourceoff,press MULTI-CONTROLagain.
EnteringPINcodeforBluetooth wirelessconnection
Toconnectyourcellularphonetothisunitvia Bluetoothwirelesstechnology,youneedto enterPINcodeonyourphonetoverifythe
connection. Thedefaultcodeis0000, butyou canchangethisinthisfunction.
- WithsomeBluetoothaudioplayers, you may berequired to enter to this unit in advance PINcode of your Bluetooth audio player, in order to set this unit ready for a connection from your Bluetooth audio player.
- OnlywhenBluetoothadapter(e.g.CD-BTB100)isconnectedtothisunit,youcan operatethisfunction.
1UseMULTI-CONTROLtoselect Pincodeinput.
2PushMULTI-CONTROLupordownto selectanumber.
3PushMULTI-CONTROLleftorrightto movethecursortothepreviousornextposition.
4AfterinputtingPINcode(upto16digits),pressMULTI-CONTROL.
PINcodeyouenteredisnowstandbytobe storedinmemory.
WhenyoupressMULTI-CONTROLagainon thesamedisplay,thePINcodeyouenteredis storedinthisunit.
- PushingMULTI-CONTROLrightintheconfirmationdisplayreturnsyoutothePINcodeinput display, andyoucanchangethePINcode.
OtherFunctions
UsingtheAUXsource
This unit can control two auxiliary equipment such as VCR or portable devices (sold separately). When connected, auxiliary equipments are automatically readinas AUX sources and assigned to AUX1 or AUX2. The relationship between AUX1 and AUX2 sources is explained below.
AboutAUX1andAUX2
Youhavetwomethodstoconnectauxiliary equipmentstothisunit.
AUX1source:
When connecting auxiliary equipment using a stereominiplugcable
- Insertthestereominiplugintothe inputjackonthisunit.
Formoredetails, refertotheinstallationmanual.
The allocation of this auxiliary equipment is automatically set to AUX1.
AUX2source:
When connecting auxiliary equipment using an IP-BUS-RCA Interconnector(soldseparately)
●UseanIP-BUS-RCAInterconnectorsuch astheCD-RB20/CD-RB10(soldseparetely) toconnectthisunittoauxiliaryequipment featuringRCAoutput.
Formoredetails, refertothelP-BUS-RCAInterconnectorowner'smanual.
The allocation of this auxiliary equipment is automatically set to AUX2.
■Youcanonlymakethistypeofconnectionif theauxiliaryequipmenthasRCAoutputs.
SelectingAUXasthesource
- PressSOURCEtoselectAUXasthe source.
■ If the auxiliary setting is not turned on, AUX cannotbeselected.Formoredetails,seeSwitchingtheauxiliarysettingonpage25.
SettingtheAUXtitle
ThetitledisplayedforeachAUX1orAUX2 sourcecanbechanged.
1AfteryouhaveselectedAUXasthe source,useMULTI-CONTROLandselect FUNCTIONtodisplayTitleInput"A".
2Enteratitleinthesamewayasthe built-inCDplayer.
Fordetailsconcerningoperation,refertoEnteringdisctitlesonpage15.
Turningtheclockdisplayonoroff
Youcanturntheclockdisplayonoroff.
• Evenwhenthesourcesandthefeature demoareoff, theclockdisplayappearson thedisplay.
- PressCLOCKtoturntheclockdisplay onoroff.
Each press of CLOCK turnsthe clock display onoroff.
■Theclockdisplaydisappearstemporarily whenyouperformmotheroperations,buttheclock displayappearsagainafter4seconds.
Usingdifferententertainment displays
Youcanenjoyentertainmentdisplayswhilelisteningtoeachsoundsource.
1PressMULTI-CONTROLtodisplaythe mainmenu.
FUNCTION, AUDIO and ENTERTAINMENT
appearonthedisplay.
Operatingthisunit
2UseMULTI-CONTROLtoselect ENTERTAINMENT.
Turntochangethemenuoption; presstose-lect.
3UseMULTI-CONTROLtochangethedis- play.
Turntochangethemenuoption; presstose-lect.
BGV-1(backgroundvisual1)—BGV-2(backgroundvisual2)—BGP-1(backgroundpicture 1)—BGP-2 (background picture 2)—BGP-3 (backgroundpicture3)—BGP-4(background picture4)—SIMPLE-1(simpledisplay1)—SIMPLE-2(simpledisplay2)—LEVELMETER (levelmeter)—VISUALIZER1(visualizer1)—VISUALIZER2(visualizer2)—VISUALIZER3(visualizer3)—SPECTRUMANALYZER1(spectrumanalyzer1)—SPECTRUMANALYZER2 (spectrumanalyzer2)—MOVIE(movie)—ENTCLOCK(entertainmentclock)
■Youcanalsoswitchbetweenhedisplayby pressingENTERTAINMENTontheremotecontrol.
■Toreturntothe playbackdisplay, pressBAND.
UsingthePGMbutton
Youcanoperatethepreprogrammedfunctions foreachsourcebyusingPGMontheremote control.
- PressPGMtoturnpauseonwhenselectingthefollowingsources:
- CD-Built-inCDplayer
- iPod-iPod
- MultiCD-Multi-CDplayer
- USB–USBportableaudioplayer/USB memory
• BTAudio—Bluetoothaudioplayer
•DVD-DVDplayer/multi-DVDplayer
■Toturnpauseoff, pressPGMagain.
- PressPGMandholdtoturnBSMon whenselectingtunerasthesource.
PressPGMandholduntiltheBSMturnson.
■Tocancelthestorageprocess,pressPGM again.
PressPGMandholduntiltheBSSMturnson.
■Tocancelthestorageprocess,pressPGM again.
●PressPGMandholdtoturnBSSMon whenselectingtelevisionasthesource.
PlayingsongsonUSBportable audioplayer/USBmemory
BasicOperations
YoucanusethisunittocontrolaUSBadapter, whichissoldseparately.
Fordetailsconcerningoperation, refertothe USBadapter'soperationmanual. Thissection providesinformationonUSBportableaudio player/USBmemoryoperationswiththisunit whichdiffersfromthatdescribedintheUSB adapter'soperationmanual.
- Optimumperformanceofthisunitmaynot beobtaineddependingontheconnected USBportableaudioplayer/USBmemory.

text_image
USB WMAFLD01 TRK01 128kbps 01' 17" S/W EASS①WMA/MP3/AACindicator
Showsthetypeoffilecurrentlyplaying.
②Foldernumberindicator
③Tracknumberindicator
④Playtimeindicator
⑤Bitrateindicator
1PressSOURCEtoselectUSB.
2PushMULTI-CONTROLupordownto selectafolder.
■Youcannotselectafolderthatdoesnothave acompressedaudiofilerecordedinit.
■Toreturntofolder01(ROOT),pressandhold BAND. However,iffolder01(ROOT)containsno files, playbackcommenceswithfolder02.
3Toperformfastforwardorreverse, pushandholdMULTI-CONTROLleftor right.
4 Toskipbackorforwardtoanother compressedaudiofile, push MULTI-CONTROLleftorright.
Selectinganaudiofiledirectly inthecurrentfolder
Theoperationisbasicallythesameasthatof thebuilt-inCDplayer.
Fordetailsconcerningoperation,refertoSelectingatrackdirectlyonpage13.
Introductionofadvanced operations
1PressMULTI-CONTROLtodisplaythe mainmenu.
FUNCTION, AUDIO and ENTERTAINMENT appearonthedisplay.
2UseMULTI-CONTROLtoselect FUNCTION.
Turntochangethemenuoption;presstose-lect.
Thefunctionnameappearsonthedisplay.
3TurnMULTI-CONTROLtoselectthe function.
TurnMULTI-CONTROLtoswitchbetween the functionsinthefollowingorder:
Playmode(repeatplay)—Randommode(randomplay)—Scanmode(scanplay)—Pause(pause)
■Youcanalsoselectthefunctionbypassing FUNCTIONnontheremotecontrol.
■ To return to the playback display, press BAND.
■ If you donot operate functions within about 30 seconds, the display is automatically returned to the ordinary display.
Functionandoperation
Playmode, Randommode, Scanmode and Pause operations are basically the same as that of the built-in CD player.
| FunctionnameOperation | |
| Playmode | RefertoSelectingarepeatplay rangeonpage14.Buttherepeatplayrangesyoucan selectaredifferentfromthatofthe built-inCDplayer.Therepeatplay rangesoftheUSBportableaudio player/USBmemoryareasbelow:Trackrepeat-Repeatjustthe currentfileFolderrepeat-Repeatthe currentfolderAllrepeat-Repeatallfiles |
| Randommode | RefertoPlayingtracksinrandom orderonpage14. |
| Scanmode | RefertoScanningfoldersand tracksonpage14. |
| Pause | RefertoPausingdiscplaybackon page15. |

Notes
- If you select another folder during repeat play, therepeat play range changesto All repeat.
- If you perform track search or fast forward/ reversed during Track repeat, therepeat play range changesto Folder repeat.
- WhenFolderrepeatisselected, it is not possible to playback as subfolder of that folder.
- Afterfileorfolderscanningisfinished,normalplaybackofthefileswillbeginagain.
Displayingtextinformationof anaudiofile
Theoperationisthesameasthatofthebuilt-inCDplayer. RefertoDisplayingtextinformationondiscon page16.
- If the characters recorded on the audio file are not compatible with this unit, those characters will not be displayed.
Selectingfilesfromthefile namelist
Theoperationisthesameasthatofthebuilt-inCDplayer. RefertoSelectingtracksfromthefilenamelist onpage16.
BluetoothAudio
BasicOperations
If you connect Bluetooth adapter (e.g. CD-BTB100) to this unit, you can control Bluetooth audioplayervia Bluetooth wireless technology.

Important
- Depending on the Bluetooth audioplayer connected to this unit, the available operations with this unit are limited to the following two levels:
—Lowerlevel: Onlyplayingbacksongson youraudioplayerispossible.
—Higherlevel:Playingback,pausing,selectingsongs,etc.,arepossible(alltheoperationsillustratedinthismanual).
- SincethereareanumberofBluetoothaudio playersavailableonthemarket,operations withyourBluetoothaudioplayerusingthis unitvaryingreatrange.PleaserefertotheinstructionmanualthatcamewithyourBluetoothaudioplayeraswellasthismanual whileoperatingyourplayeronthisunit.
• Informationaboutsongs(e.g.theelapsed playingtime,songtitle,songindex,etc.)cannotbedisplayedonthisunit.
- WhileyouarelisteningtosongsonyourBluetoothaudioplayer, pleaserefrainfromoperatingonyourcellularphoneasmuchas possible.Ifyoutryoperatingonyourcellular phone,thesignalfromyourcellularphone maycauseanoiseonthesong playback.
- Whenyouaretalkingonthecellularphone connectedtothisunitviaBluetoothwireless technology,thesongplaybackfromyourBluetoothaudioplayerconnectedtothisunitis muted.
- Evenifwhileyouarelisteningtosongonyour Bluetoothaudioplayeryouswitchtoanother source,the playbackofsongcontinuesto elapse.
Fordetailsconcerningoperation, refertothe Bluetoothadapter'soperationmanual. This sectionprovidesbriefinformationonBlue-
toothaudioplayeroperationswiththisunit whichslightlydifferesoriscutshortfromthat describedintheBluetoothadapter'soperation manual.
- Eventhoughyouraudioplayerdoesnot containaBluetoothmodule,youcanstill controlitfromthisunitviaBluetoothwirelesstechnology.Tocontrolyouraudio playerbyusingthisunit,connectaproduct featuringBluetoothwirelesstechnology (availableonthemarket)toyouraudio playerandconnectBluetoothadapter(e.g. CD-BTB100)tothisunit.

text_image
BTAudio Pioneer ①①Devicename
Showsthedevicenameoftheconnected Bluetoothaudioplayer(orBluetoothadapter).
1PressSOURCEtoselectBluetoothaudio player.
■ If you cannot display BT Audio, first activate theBTaudiosourceintheinitialsetting.Fordetailes,refertoActivatingtheBTAudiosourceon page27.
■ ForthisunittocontrolyourBluetoothaudio playeritneedstoestablishaBluetoothwireless connection.(RefertoConnectingaBluetooth audioplayeronthenextpage.)
2Toperformfastforwardorreverse, pushandholdMULTI-CONTROLleftor right.
3Toskipbackorforwardtoanother track, pushMULTI-CONTROLleftorright.
Introduction of advanced operations
1PressMULTI-CONTROLtodisplaythe mainmenu. FUNCTION, AUDIOandENTERTAINMENT appearonthedisplay.
2UseMULTI-CONTROLtoselect FUNCTION.
Turntochangethemenuoption;presstose-lect. Thefunctionnameappearsinthedisplay.
3TurnMULTI-CONTROLtoselectthe function.
Turn MULTI-CONTROL to switch between the functions in the following order:
Connectionopen(connectionopen)— Disconnectaudio(disconnectaudio)—Play (Play)—Stop (Stop)—Pause (pause)—
Deviceinfo.(deviceinformation)
■IfaBluetoothaudioplayerisconnectedvia lowerlevel,onlyDisconnectaudioand Deviceinfo.appearinthefunctionmenu.
■IfaBluetoothaudioplayerhasnotbeenconnectedtothisunityet.ConnectionopenandDeviceinfo.appearinthefunctionmenuandotherfunctionsarenotavailable.
■Youcanalsoselectthefunctionbypassing FUNCTIONnontheremotecontrol.
■Toreturntothe playbackdisplay, pressBAND.
■If you donot operate function except for Connection open and Disconnect audio within about 30 seconds, the display is automatically returned to the ordinary display.
ConnectingaBluetoothaudio player
1UseMULTI-CONTROLtoselect Connectionopeninthefunctionmenu.
2PressMULTI-CONTROLtoopentheconnection.
AlwaysWaiting is displayed. This unit is now on stand by for connection from Bluetooth audioplayer.
If your Bluetooth audioplayerisset ready for Bluetooth wireless connection, the connection to this unit will be automatically established.

Note
Beforeyoucanuseaudioplayersyoumayneed toenterthePINcodeintothisunit.Ifyourplayer requiresaPINcodetoestablishaconconnection, lookforthecodeontheplayerorinitsaccompanyingdocumentation.EnterthePINcodereferringtoEnteringPINcodeforBluetoothwireless connectiononpage27.
PlayingsongsonBluetooth audioplayer
1UseMULTI-CONTROLtoselectPlayin thefunctionmenu.
2PressMULTI-CONTROLtostartplay-back.
Pausingasong
1UseMULTI-CONTROLtoselectPausein thefunctionmenu.
2PressMULTI-CONTROLtoturnpause on.
Playbackofthecurrentsongpauses.
■Toturnpauseoff, press MULTI-CONTROL again.
Stopping playback
1UseMULTI-CONTROLtoselectStopin thefunctionmenu.
2PressMULTI-CONTROLtostoptheplayback.
Playbackofthecurrentsongstops.
DisconnectingaBluetooth audioplayer
1UseMULTI-CONTROLtoselect Disconnectaudiointhefunctionmenu.
2PressMULTI-CONTROLtodisconnect theBluetoothaudioplayer.
Disconnectedisdisplayed.TheBluetooth audioplayerisnowdiconnectedfromthis unit.
DisplayingBD(Bluetooth Device)address
1UseMULTI-CONTROLtoselect Deviceinfo.inthefunctionmenu.
Thedevicename(PioneerBTUnit)ofthis unitappearsinthedisplay.
2PushMULTI-CONTROLlefttoswitchto theBDaddress.
12-digithexadecimalstringisdisplayed.
■PushingMULTI-CONTROLrightreturnstothe devicename.
Displayingsystemversionfor repair
1UseMULTI-CONTROLtoselect Deviceinfo.inthefunctionmenu.
Thedevicename(PioneerBTUnit)ofthis unitappearsinthedisplay.
2PushMULTI-CONTROLdowntoswitch tothesystemversionofthisunit.
Thesystem(microprocessor)versionofthis unitisdisplayed.
- PushingMULTI-CONTROLleftdisplaythe versionoftheBluetoothmoduleofthisunit. PushingMULTI-CONTROLrightreturnstothe systemversionofthisunit.
BluetoothTelephone BasicOperations
If you use Bluetooth adapter (e.g. CD-BTB100), you can connect cellular phone featuring Bluetooth wireless technology to this unit for hands-free, wireless calls, even while driving.

Important
- Sincethisunitisonstandbytoconnectwith yourcellularphonesviaBluetoothwireless technology,usingthisunitwithoutrunning theenginecanresultinbatterydrainage.
- Advancedoperationsthatrequireyourattentionsuchasdialingnumbersonthemonitor, usingphonebook,etc.,areprohibitedwhile youaredriving.Whenyouneedtousethese advancedoperations,stopyourvehicleina safeplaceandoperate.
Fordetailsconcerningoperation, refertothe Bluetoothadapter'soperationmanual. This section provides brief information on the hands-freephoning operations with this unit which slightly differs or is cut short from that described in the Bluetooth adapter's operation manual.
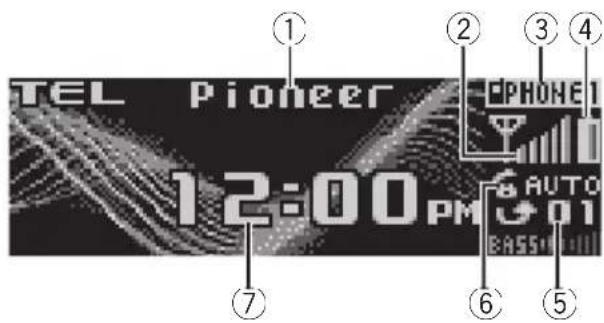
text_image
TEL Pioneer 12:00PM AUTO EASS①Devicename
Showsthedevicenameofthecellularphone.
②Signallevelindicator
Showsthesignalstrengthofcellularphone.
• Signallevelindicatormaydifferfrom theactualsignallevel.
③Usernumberindicator
Showstheregistrationnumberofthecellular phone.
④Batterystrengthindicator
Availableaccessories
Showsthebatterystrengthofcellularphone.
- Batterystrengthindicatormaydiffer fromtheactualbatterystrength.
- If the battery strength is not available, nothing is displayed in the battery strength indicator area.
⑤Incomingcallnoticeindication Showswhenanincomingcallhasbeenreceivedandnotcheckedyet.
- Incomingcallnoticeisnotdisplayedfor callsmadewhenyourcellularphoneis disconnectedfromthisunit.
⑥Automaticanswering/Automaticrejectingindicator
ShowsAUTOwhentheautomaticanswering functionison(formoredetails, refertoSetting theautomaticansweringonpage42).
ShowsREFUSEwhentheautomaticrejecting functionison(formoredetails, refertoSetting theautomaticrejectingonpage42).
⑦Clockdisplay Showsthetime(ifconnectedwithaphone).
●PressSOURCEtoselectthetelephone.

Note
Equalizercurveforthephonesourceisfixed. Whenselectingthephonesource,youcannotoperatetheequalizerfunction.RefertoRecalling equalizercurvesonpage20.
Settingupforhands-freephoning
Beforeyoucanusethehands-freephoning functionyouwillneedtosetuptheunitfor usewithyourcellularphone.ThisentailsestablishingaBluetoothwirelessconnectionbetweenthisunitandyourphone,registering yourphonewiththisunit,andadjustingthe volumelevel.
1Connection
Fordetailedinstructionsonconnectingyour phonetothisunitviaBluetoothwirelestechnology,refertoConnectingacellularphoneon page37.
- Yourphones should now be temporarily connected; however, to make best use of the technology, were recommend you register the phoneto this unit.
2Registration
RefertoRegisteringconnectedcellularphone onpage38forinstructionsonhowtoregister yourtemporarilyconnectedphone.
3Volumeadjustment
Adjusttheearpiecevolumeonyourcellular phoneforcomfort.Whenadjusted,thevolume levelismemorizedinthisunitasthedefault setting.
- Caller'svoicevolumeandringvolumemay varydependingonthetypeofcellularphones.
■ If the difference between the ranging volume and caller's voice volume is big, overall volume level may become unstable.
■ Before disconnecting cellular phone from this unit, makes sure to adjust the volumet proper level. If the volume has been muted (zerolevel) on your cellular phone, the volume level of your cellular phoneremains muted even after the cellular phone is disconnected from this unit.
Makingaphonecall
Voicerecognition
1PressBANDandholduntilVoicedial appearsinthedisplay.
Voicedialappearsinthedisplay.When VoicedialONisdisplayed,voicerecognition functionisnowready.
■Ifyourcellularphonedoesnotfeaturevoice recognitionfunction, Novoicedialappearsin thedisplayandopeparationisnotavailable.
2 Pronouncethenameofyourcontact.
Takingaphonecall
Answeringanincomingcall
1Whenacallcomesin,push MULTI-CONTROLup.
■ If the private mode is selected on the cellular phone, hands-free phoning may not be performed.
2Toendthecall, pushMULTI-CONTROL down.
Theestimatedcalltimeappearsinthedisplay (thismaydifferslightlyfromtheactualcall time).
Rejectinganincomingcall
- Whenacallcomesin, push MULTI-CONTROLdown.
Thecallisrejected.
Answeringacallwaiting
1PushMULTI-CONTROLuptoanswera callwaiting.
■PushingMULTI-CONTROLupswitchesbetweencallersonhold.
2PushMULTI-CONTROLdowntoendall calls.
Pushing MULTI-CONTROL downendsall calls including acallwaitingonline.
■Thecalleryouhavebeentalkingtoisnowon hold.Toendthecall,bothyouandyourcaller needtohangupthephone.
■Whileyourcallersholdtheline,pushing MULTI-CONTROLupswitchesbetweencallers.
Rejectingacallwaiting
●PushMULTI-CONTROLdowntorejecta callwaiting.
Introductionofadvanced operations
1PressMULTI-CONTROLtodisplaythe mainmenu. FUNCTION, AUDIOandENTERTAINMENT appearonthedisplay.
2UseMULTI-CONTROLtoselect FUNCTION.
Turntochangethemenuoption;presstose-lect.
Functionnamesforhands-freephoningappearonthedisplay.
3TurnMULTI-CONTROLtochangefunc- tions.
TurnMULTI-CONTROLtoswitchbetweenthe functions.
Functionnamesthatappearinthedisplayare differentdependingonyourcellularphone's connectionandregistrationstatus.
Ifnotconnectedyet
Search&Connect(searchandconnect)—
Connectionopen(connectionopen)—
Connectphone(connectphone)—
Deletephone(deletephone)—PH.B.Transfer
(phonebooktransfer)—Refusecalls(automaticrejectsetting)—Autoanswer(automaticanswersetting)—Ringtone(rington select)—Autoconnect(automaticconnected setting)—Echocancel(echocancel)—
Deviceinfo.(deviceinformation)
Ifconnectedbutnotregisteredyet
Disconnectphone(disconnectphone)— Setphone(registeringphone)—
Deletephone(deletephone)—PH.B.Transfer(phonebooktransfer)—Numberdial(callby enteringnumber)—Refusecalls(automatic rejectsetting)—Autoanswer(automaticanswersetting)—Ringtone(ringtoneselect)—
Autoconnect(automaticconnectionsetting)—Echocancel(echocancel)—Deviceinfo. (deviceinformation)
Ifalreadyconnectedandregistered
Disconnectphone(disconnectphone)—Deletephone(deletephone)—PH.B.Transfer(phonebooktransfer)—PH.B.Nameview(phonebooknameview)—Clearmemory(clear memory)—Number dial (call by enteringnumber)—Refusecalls(automaticreject setting)—Autoanswer(automaticanswer setting)—Ringtone(ringtoneselect)—Autoconnect(automaticconnectionsetting)—Echocancel(echocancel)—Deviceinfo.(deviceinformation)
■Youcanalsoselectthefunctionbypassing FUNCTIONNontheremotecontrol.
■PH.B.Nameview(phonebooknameview) cannotbeselectedforcellularphoneregistered guestphone.
■Ifcellularphoneisconnectedtothisunitvia BluetoothwirelesstechnologywithHSP(Head SetProfile),PH.B.Nameview,Clearmemory, NumberdialandRefusecallscannotbeselected.
■Toreturntothe playbackdisplay, pressBAND.
■ If you donot operate function except for
Search&Connect, Connectionopen, Connectphone, PH.B.Transfer,
Disconnectphone, Numberdial and Clearmemory within about 30 seconds, the display is automatically returned to the ordinary display.
Connectingacellularphone Searchingforavailablecellularphones
1UseMULTI-CONTROLtoselect Search&Connectinthefunctionmenu.
2PressMULTI-CONTROLtosearchfor availablecellularphones.
Whilesearching, Searchingflashes.When availablecellularphonesfeaturingBluetooth wirelesstechnologyarefound,devicenames or Namenotfound(ifnames cannotbeobtained)aredisplayed.
■ If this unit fail to find any available cellular phones, Not found is displayed.
3PushMULTI-CONTROLupordownto selectadevicenameyouwanttoconnect.
4PressMULTI-CONTROLtoconnectthe selectedcellularphone.
Whileconnecting, Connecting flashes. To completetheconnection, please check the device name (PioneerBTUnit) and enter the linkcode on your cellular phone. If the connection is established, Connected is displayed.
■ Thelinkcodeissetto0000asdefault.You canchangethiscodeintheinitialsetting.Refer toEnteringPINcodeforBluetoothwirelessconnectiononpage27.
Usingacellularphonetoinitiatea connection
1UseMULTI-CONTROLtoselect Connectionopeninthefunctionmenu.
2PressMULTI-CONTROLtoopentheconnection.
Alwayswaiting is displayed and the unit is now on stand by for connection from cellular phone.
3Usecellularphonetoconnecttothis unit.
■ Thelinkcodeissetto0000asdefault.You canchangethiscodeintheinitialsetting.Refer toEnteringPINcodeforBluetoothwirelessconnectiononpage27.
Disconnectingacellularphone
1UseMULTI-CONTROLtoselect Disconnectphoneinthefunctionmenu.
Devicenameoftheconnectedphoneappears inthedisplay.
2PressMULTI-CONTROLtodisconnecta cellularphonefromthisunit.
Afterthedisconnectioniscompleted, Disconnectedisdisplayed.
Registeringconnectedcellular phone
1UseMULTI-CONTROLtoselect Setphoneinthefunctionmenu.
2PushMULTI-CONTROLupordownto selectaregistrationassignment.
P1 (user phone 1)—P2 (user phone 2)—P3 (user phone 3)—G1 (guest phone 1)—G2 (guestphone2)
■ Asyouselecteachassignment,youcansee whetherornotaphoneisalreadyregistered there.Iftheassignmentisempty,Nodataisdisplayed.Iftheassignmentisalreadytaken,thede-vicenameappears.Toreplaceanassignment withanewphone,firstdeletethecurrentassignment.Formoredetailedinstructions,seeDeleting aregisteredphoneonthispage.
3PressMULTI-CONTROLtoregisterthe currentlyconnectedphone.
Whenteregistrationiscompleted,
Reg.Completedisdisplayed.
■Iftheregistrationfailed,Reg.ERRORisdisplayed.Inthiscase,returntostep1andtry again.
Deletingaregisteredphone
1UseMULTI-CONTROLtoselect Deletephoneinthefunctionmenu.
2PushMULTI-CONTROLupordownto selectaregistrationassignment.
P1 (user phone 1)—P2 (user phone 2)—P3 (user phone 3)—G1 (guest phone 1)—G2 (guestphone2)
■Iftheassignmentisempty, Nodata is displayed and the operation is not possible. ■If you need to know the BD (Bluetooth Device) address of the phone, push MULTI-CONTROL left here.
3PushMULTI-CONTROLrighttoselect DeleteYES.
DeleteYESisdisplayed.Deletingphoneis nowonstandby.
4PressMULTI-CONTROLtodeletethe phone.
After the phone is deleted, Deleted is displayed.
Connectingtoaregistered cellularphone
Connectingtoaregisteredphone manually
1UseMULTI-CONTROLtoselect Connectphoneinthefunctionmenu.
2PushMULTI-CONTROLupordownto selectaregistrationassignment.
P1 (user phone 1)—P2 (user phone 2)—P3 (user phone 3)—G1 (guest phone 1)—G2 (guestphone2)
■ If the assignment is empty, Nodata is displayed and the operation is not possible.
3PressMULTI-CONTROLtoconnectthe selectedcellularphone.
Whileconnecting, Connecting is displayed. After the connection is completed, Connected is displayed.
Connectingtoaregisteredphone automatically
1UseMULTI-CONTROLtoselect Autoconnectinthefunctionmenu.
2PressMULTI-CONTROLtoturnautomaticconnection.
If your cellular phone is set ready for Bluetooth wireless connection, the connection to this unit will be automatically established.
■Toturnautomaticconnectionoff,press MULTI-CONTROLagain.
UsingthePhoneBook
TransferringentriestothePhoneBook
ThePhoneBookcanholdatotalof500entries;300fromUser1,150fromUser2,and50fromUser3.
1UseMULTI-CONTROLtoselect PH.B.Transferinthefunctionmenu.
2PressMULTI-CONTROLtoenterinthe phonebooktransferstandbymode. Transferappearsinthedisplay.
3Usecellularphonetoperformphone booktransfer.
Performphonebooktransferusingthecellularphone. Fordetailedinstructiononthis, refertotheinstructionmanualthatcamewith yourcellularphone.
■ Thedisplayindicateshowmanyentrieshave beentransferredandthetotalnumbertobe transferred.
4Datatransferredisdisplayed and phonebooktransferiscompleted.
ChangingthePhoneBookdisplayorder
1UseMULTI-CONTROLtoselect PH.B.Nameviewinthefunctionmenu. InvertnamesYESappearsinthedisplay.
2PressMULTI-CONTROLtochangethe namevieworder.
Inverted is displayed and then a name view order is changed.
PressingMULTI-CONTROL repeatedly changesthenamevieworderbetweenfirst nameandlastname.
CallinganumberinthePhoneBook

Important
Youarerequiredtoparkyourvehicleandsetthe parkingbrakeinordertoperformthisoperation.
AfterfindingthenumberinthePhoneBook youwanttocall,youcanselecttheentryand makethecall.
1PressLISTtodisplaythePhoneBook.
2PushMULTI-CONTROLleftorrightto selectthefirstletterofthenameyouare lookingfor.
3PressMULTI-CONTROLtodisplayentries.
ThedisplayshowsthefirstthreePhoneBook entriesstartingwiththatletter(e.g. "Ben", "Brian" and "Burt" when "B" is selected).
4PushMULTI-CONTROLupordownto selectaPhoneBookentryyouwanttocall.
5PushMULTI-CONTROLrighttodisplay thedetailedlistoftheselectedentry.
Thephonenumber,nameandgenre(ifassigned)ofentriesaredisplayedinthedetailed list.
■Youcanscrollthenameandphonenumber byholdingDISPLAY.
■Ifseveralphonenumbersareenteredtoan entry,selectonebyturningMULTI-CONTROL.
■ If you want togoback and select another entry, push MULTI-CONTROL left.
6PressMULTI-CONTROLtomakeacall.
7Toendthecall, pushMULTI-CONTROL down.
EditingthenameofaPhoneBookentry

Important
Youarerequiredtoparkyourvehicleandsetthe parkingbrakeinordertoperformthisoperation.
YoucaneditthenamesofPhoneBookentries. Eachnamecanbeupto16characterslong.
1Displaythedetailedlistofyourdesired PhoneBookentry.
Seestep1to5onCallinganumberinthe PhoneBookonthispageforhowtodothis.
2PressandholdMULTI-CONTROLtodisplaythenameinputscreen.
Editnameisdisplayed.
3PressDISPLAYtoselectthedesired charactertype.
EachpressofDISPLAYswitchesthecharacter typesinthefollowingorder:
Availableaccessories
Alphabet(uppercase),numbersandsymbols—alphabet(lowercase)—numbersandsymbols—Europeancharacters,suchasthose with accents (e.g., á, à, ä, ç) or Russian characters
- PressingandholdingDISPLAYenablesyouto switchcharactersetbetweenISO8859-1(Europeancharacters)andISO8859-5(Russiancharacters)alternately.
■EuropeancharactersandRussiancharacters can'tbemixed.
4PushMULTI-CONTROLupordownto selectaletter.
■Todeleteacharacterandleaveaspace,select " "(underbar).
5PushMULTI-CONTROLleftorrightto movethecursorortothepreviousornext characterposition.
6PressMULTI-CONTROLtostorethenew name.
Editingphonenumbers

Important
Youarerequiredtoparkyourvehicleandsetthe parkingbrakeinordertoperformthisoperation.
YoucaneditthenumbersofPhoneBookentries.Eachphonenumbercanbeupto24digitslong.
1Displaythedetailedlistofyourdesired PhoneBookentry.
Seestep1to5onCallinganumberinthe PhoneBookonthepreviouspageforhowto dothis.
2PressandholdMULTI-CONTROLtodisplaythenameinputscreen.
Editnameisdisplayed.
3TurnMULTI-CONTROLtoswitchtothe numberinputscreen.
Editname(nameinputscreen)— Editnumber(numberinputscreen)— Clearmemory(clearmemomyscreen)
4PushMULTI-CONTROLleftorrightto movethecursorortothenumberyouwant tochange.
5PushMULTI-CONTROLupordownto changenumbers.
Repeat the seven steps until you have finished changing.
6PressMULTI-CONTROLtostorethenew number.
ClearingaPhoneBookentry

Important
Youarerequiredtoparkyourvehicleandsetthe parkingbrakeinordertoperformthisoperation.
1Displaythedetailedlistofyourdesired PhoneBookentry.
Seestep1to5onCallinganumberinthe PhoneBookonthepreviouspageforhowto dothis.
2PressandholdMULTI-CONTROLtodisplaythenameinputscreen.
Editnameisdisplayed.
3TurnMULTI-CONTROLtoswitchtothe clearmemoryscreen.
Editname(nameinputscreen)— Editnumber(numberinputscreen)— Clearmemory(clearmemomyscreen)
4PushMULTI-CONTROLrighttoshowa confirmationdisplay.
ClearmemoryYESisdisplayed.
■ If you donot want to clear memory that you have selected, push MULTI-CONTROL left. The display reverts.
5PressMULTI-CONTROLtodeletethe PhoneBookentry.
Clearedisdisplayed.
ThePhoneBookentryisdeleted. Thedisplay returnstoPhoneBookentrylist.
UsingtheCallHistory

Important
Youarerequiredtoparkyourvehicleandsetthe parkingbrakeinordertoperformthisoperation.
The12mostrecentcallsmade(dialled),receivedandmissed,arestoredintheCallHistory.YoucanbrowsetheCallHistoryandcallnumbersfromit.
1PressLISTtodisplaythelist.
PressLIST repeatedlyytoswitchbetweenthe followinglists:
Phone book—Missed call—Dialled call—Receivedcall
■AboutthePhoneBooklist,refertoUsingthePhoneBookonpage38.
■ Ifnophonenumbershavebeenstoredinthe selectedlist, Nodata is displayed.
2TurnMULTI-CONTROLtoselectaphone number.
Turning MULTI-CONTROL to changethe phonenumbers stored in the list.
■ IfthenumberisalreadyinthePhoneBook thenameisdisplayed.
■Youcanalsochangethephonenumberby pushingMULTI-CONTROLupordown.
3PushMULTI-CONTROLrighttodisplay thedetailedlist.
Nameandphonenumberaredisplayedinthe detailedlist.
■IfthenumberisalreadyinthePhoneBook thenthenameisalsodisplayed.
■TurningMULTI-CONTROLswitchestothepreviousornextphonenumberdiplayedinthedetailedlist.
■ If you donot operate anything within about 30 seconds, the list display is canceled automatically.
4PressMULTI-CONTROLtomakeacall.
■Foraninternationalcall,pressandhold MULTI-CONTROLtoadd+tothephonenumber.
5Toendthecall, pushMULTI-CONTROL down.
Usingpresetnumbers

Important
Youarerequiredtoparkyourvehicleandsetthe parkingbrakeinordertoperformthisoperation.
Numbersthatyoudialfrequentlycanbeassignedtopresetsforquickrecall.
1Selectadesiredphonenumberfrom thePhoneBookortheCallHistory.Ordirectlyenteradesiredphonenumber.
Toselectadesiredphonenumberfromthe PhoneBookortheCallHistory,seetheinstructionsexplainedinpreviouspages.Todirectlyenteradesiredphonenumber,see Makingacallbyenteringphonenumberon thispage.
2Pressandholdoneof1to6ontheremotecontroltostorethephonenumber.
Theselectedphonenumberhasbeenstored inmemory. Thenexttimeyoupressthesame presetbutton, thephonumberisrecalled frommemory.
Makingacallbyentering phonenumber

Important
Youarerequiredtoparkyourvehicleandsetthe parkingbrakeinordertoperformthisoperation.
Availableaccessories
1UseMULTI-CONTROLtoselect Numberdialinthefunctionmenu.
■Youcanalsoenterinthismenufromthe standbydisplaybypassingDIRECTontheremotecontrol.
2PushMULTI-CONTROLupordownto selectanumber.
- You can also input numbers by pressing 0 to 9 ontheremotecontrol.
3PushMULTI-CONTROLleftorrightto movethecursorortothepreviousornextposition.
■Upto24digitscanbeentered.
4Whenyoucompletedenteringthe number,pressMULTI-CONTROL.
Callconfirmationappears.
5PressMULTI-CONTROLagaintomakea call.
6Toendthecall, pushMULTI-CONTROL down.
Clearingmemory
1UseMULTI-CONTROLtoselect Clearmemoryinthefunctionmenu.
2PushMULTI-CONTROLupordownto selectanitem.
EachtimeMULTI-CONTROL is pushed up or down, the items areswitched in the following order:
Phonebook(phonebook)—Missedcalls (missedcallhistory)—Dialledcalls(dialled callhistory)—Receivedcalls(receivedcallhistory)—Dialpreset(presetphonenumbers)—Allclear(deleteallmemory)
■IfyouwanttoclearallthePhoneBook, dialled/received/missedcallhistorylistandpresetphonenumber,selectAllclear.
■Ifguestphoneisconnectedtothisunitvia Bluetoothwirelesstechnology,Phonebookcannotbeselected.
3PushMULTI-CONTROLrighttodeterminetheitemthatyouwanttodelete fromthisunit.
ClearmemoryYES is displayed. Clearing memory is now on standby.
■ If you donot want to clear memory that you have selected, push MULTI-CONTROL left. The display reverts.
4PressMULTI-CONTROLtoclearthe memory.
Clearedisdisplayandddataontheselected itemisclearedfromthisunit'smemory.
Settingtheautomaticrejecting
1UseMULTI-CONTROLtoselect Refusecallsinthefunctionmenu.
2PressMULTI-CONTROLtoturnautomaticcallrejectionon.
■Toturnautomaticcallrejectionoff,press MULTI-CONTROLagain.
Settingtheautomaticanswering
1UseMULTI-CONTROLtoselect Autoanswerinthefunctionmenu.
2PressMULTI-CONTROLtoturnautomaticansweringon.
■Toturnautomaticansweringfunctionoff, pressMULTI-CONTROLagain.
Switchingtheringtone
1UseMULTI-CONTROLtoselect Ringtoneinthefunctionmenu.
2PressMULTI-CONTROLtoturnthering toneon.
■Toturntheringtoneoff, press MULTI-CONTROLagain.
Echocancelingandnoisereduction
1UseMULTI-CONTROLtoselect Echocancelinthefunctionmenu.
2PressMULTI-CONTROLtoturnechocancelingon.
■Toturnechocancelingoff, press MULTI-CONTROLagain.
DisplayingBD(Bluetooth Device)address
1UseMULTI-CONTROLtoselect Deviceinfo.inthefunctionmenu.
Thedevicename(PioneerBTUnit)ofthis unitappearsinthedisplay.
2PushMULTI-CONTROLlefttoswitchto theBDaddress.
12-digithexadecimalstringisdisplayed.
- PushingMULTI-CONTROLrightreturnstothe devicename.
Displayingsystemversionfor repair
1UseMULTI-CONTROLtoselect Deviceinfo.inthefunctionmenu.
Thedevicename(PioneerBTUnit)ofthis unitappearsinthedisplay.
2PushMULTI-CONTROLdowntoswitch tothesystemversionofthisunit.
Thesystem(microprocessor)versionofthis unitisdisplayed.
- PushingMULTI-CONTROLleftdisplaythe versionoftheBluetoothmoduleofthisunit. PushingMULTI-CONTROLrightreturnstothe systemversionofthisunit.
Multi-CDPlayer
BasicOperations
Youcanusethisunittocontrolamulti-CD player, which is sold separately.
- Onlythosefunctionsdescribedinthismanualaresupportedby50-discmulti-CD players.
- Thisunitisnotdesignedtooperatedisctitle listfunctionswitha50-discmulti-CDplayer. Aboutthedisctitlelistfunctions, please refertoSelectingdiscsfromthedisctitlelist onpage46.
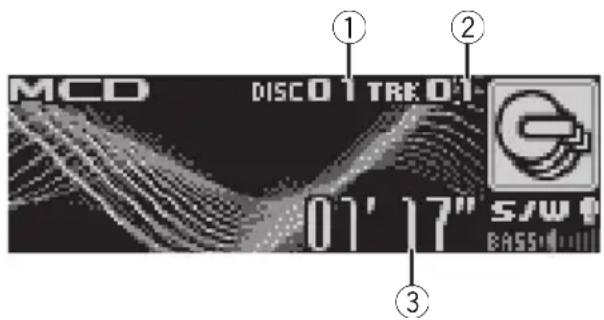
text_image
MCD DISCO1 TRK 01 01' 17" S/W BASS①Discnumberindicator
②Tracknumberindicator
③Playtimeindicator
1PressSOURCEtoselectthemulti-CD player.
2PushMULTI-CONTROLupordownto selectadiscyouwanttolistento.
- You can also select a disc by using 1 to 6 buttonsontheremotecontrol.
- Fordiscs1to6, pressthecorresponding buttonnumber.
- Fordiscs7to12, pressandholdthecorrespondingnumbers, suchas1fordisc7, untilthediscnumberappearsinthedisplay.
3Toperformfastforwardorreverse, pushandholdMULTI-CONTROLleftor right.
4 Toskipbackorforwardtoanother track, push MULTI-CONTROLleftorright.

Notes
- Whenthemulti-CDplayerperformsthepreparatoryoperations, Ready is displayed.
- IfanerrormessagesuchasERROR-11isdisplayed, refertothemulti-CDplayerowner's manual.
- If there are an odiscsin themulti-CD player magazine, NoDisc is displayed.
Selectingatrackdirectly
Theoperationisbasicallythesameasthatof thebuilt-inCDplayer.
Fordetailsconcerningoperation,refertoSelectingatrackdirectlyonpage13.
Introductionofadvanced operations
YoucanuseCompression(compressionand DBE)onlywithamulti-CDplayerthatsupports them.
1PressMULTI-CONTROLtodisplaythe mainmenu.
FUNCTION, AUDIO and ENTERTAINMENT appearonthedisplay.
2UseMULTI-CONTROLtoselect FUNCTION.
Turntochangethemenuoption;presstose-lect.
Thefunctionnameappearsonthedisplay.
3TurnMULTI-CONTROLtoselectthe function.
TurnMULTI-CONTROLToswitchbetweenthe functionsinthefollowingorder:
Playmode(repeatplay)—Randommode
(randomplay)—Scanmode(scanplay)—
Pause(pause)—Compression(compression andDBE)—ITSplaymode(ITSplay)—
ITSmemo(ITSprogramming)—
TitleInput"A"(disctitleinput)
■Youcanalsoselectthefunctionbypassing
FUNCTIONontheremotecontrol.
■Toreturntothe playbackdisplay, pressBAND.
■ If you donot operate function except for ITS memo and Title Input "A" within about 30 seconds, the display is automatically returned to the ordinary display.
Functionandoperation
Playmode, Randommode, Scanmode,
Pause, Compression and TitleInput "A" operations are basically the same as that of the built-in CD player.
FunctionnameOperation
| Playmode | RefertoSelectingarepeatplay rangeonpage14.Buttherepeatplayrangesyoucan selectaredifferentfromthatofthe built-inCDplayer.Therepeatplay rangesofthemulti-CDplayerare asbelow:•M-CDrepeat-Repeatall discsinthemulti-CDplayer•Trackrepeat-Repeatjustthe currenttrack•Discrepeat-Repeatthecurrentdisc |
| Randommode | RefertoPlayingtracksinrandom orderonpage14. |
| Scanmode | RefertoScanningfoldersand tracksonpage14. |
| Pause | RefertoPausingdiscplaybackon page15. |
| Compression | RefertoUsingcompressionand BMXonpage15.Multi-CDplayerhasDBE(dynamic bassemphasis)functioninstead ofBMX.Thesettingscanbeswitchedas below:COMPOFF-COMP1-COMP2-COMPOFF-DBE1-DBE2 |
| ITSplaymode | RefertoUsingITSplaylistsonthe nextpage. |
| ITSmemo | RefertoUsingITSplaylistsonthe nextpage. |
| TitleInput"A" | RefertoEnteringdisctitleson page15. |

Notes
- If you select other discsduring repeat play, therepeat play range changesto M-CDrepeat.
- If you perform track search or fast forward/ reversed during Track repeat, therepeat play range changesto Discrepeat.
- Aftertrackordiscscanningisfinished,normalplaybackofthetrackswillbeginagain.
- WhenplayingaCDTEXTdisconaCDTEXT compatiblemulti-CDplayer,youcannot switchtoTitleInput"A".Thedisctitlehasal-readybeenrecordedonaCDTEXTdisc.
UsingITSplaylists
ITS(instanttrackselection)letsyoumakea playlistoffavoritetracksfromthoseinthe multi-CDplayermagazine.Afteryouhave addedyourfavoritetrackstotheplaylistyou canturnonITSplayandplayjustthoseselections.
CreatingaplaylistwithITSprogramming
YoucanuselTStoenterandplaybackupto 99tracksperdiscfromupto100discs(with thedisctitles).(Withmulti-CDplayerssoldbeforetheCDX-P1250andCDX-P650,upto24 trackscanbestoredintheplaylist.)
1PlayaCDthatyouwanttoprogram.
Push MULTI-CONTROLupordowntoselect theCD.
2UseMULTI-CONTROLtoselect ITSmemointhefunctionmenu.
3Selectthedesiredtrackbypushing MULTI-CONTROLleftorright.
4PushMULTI-CONTROLuptostorethe currentlyplayingtrackintheplaylist.
Memorycomplete is displayed and the currently playing selection is added to your playlist.
5PressBANDtoreturntothe playback display.

Note
Afterdatafor100discshasbeenstoredinmemory, dataforanewdiscwilloverwritetheoldest one.
PlaybackfromyourITSplaylist
ITSplayletsyoulistentothetracksthatyou haveenteredintoyourITSplaylist.Whenyou turnonITSplay,tracksfromyourITSplaylist inthemulti-CDplayerwillbegintoplay.
1Selecttherepeatrange.
RefertoPlayingtracksinrandomorderon page14.
2UseMULTI-CONTROLtoselect ITSplaymodeinthefunctionmenu.
3PressMULTI-CONTROLtoturnITSplay on.
ITSplaymodeappearsinthedisplay.Play-backbeginsofthosetracksfromyourplaylist withinthepreviouslyselectedM-CDrepeater Discrepeatranges.
■IfnotracksinthecurrentrangeareprogrammedforITSplay,thenITSemptyisdisplayed.
■ToturnITSplayoff,pressMULTI-CONTROL again.
ErasingatrackfromyourITSplaylist
YoucandeleteatrackfromyourITSplaylistif ITSplayison.
IfITSplayisalreadyon, skiptostep2. If ITS playisnotalreadyon, use MULTI-CONTROL.
1PlaytheCDwiththetrackyouwantto deletefromyourITSplaylist,andturnITS playon.
RefertoPlaybackfromyourITSplaylistonthis page.
Availableaccessories
2UseMULTI-CONTROLtoselect ITSmemointhefunctionmenu.
3Selectthedesiredtrackbypushing MULTI-CONTROLleftorright.
4PushMULTI-CONTROLdowntoerase thetrackfromyourITSplaylist.
The currently playing selection is erased from yourITSplaylist playback of then next track from yourITSplaylist begins.
■Iftherearenotracksfromyourplaylistinthe currentrange,ITSemptyisdisplayedandnormalplayresumes.
5PressBANDtoreturntothe playback display.
ErasingaCDfromyourITSplaylist
YoucandeletealltracksofaCDfromyourITS playlistifITSplayisoff.
1PlaytheCDthatyouwanttodelete.
PushMULTI-CONTROLupordowntoselect theCD.
2UseMULTI-CONTROLtoselect ITSmemointhefunctionmenu.
3PushMULTI-CONTROLdowntoerase alltracksonthecurrentlyplayingCDfrom yourITSplaylist.
AlltracksonthecurrentlyplayingCDare erasedfromyourplaylist Memorydeletedisdisplayed.
4PressBANDtoreturntothe playback display.
Usingdistitlefunctions
YoucaninputCDtitlesanddisplaythetitles. Thenyoucaneasilysearchforandplayade-sireddisc.
Enteringdisctitles
Usethedisctitleinputfeaturetostoreupto 100CDtitles(withITSplaylist)intothemulti-
CDplayer.Eachtitlecanbeupto10characterslong.
Fordetailsconcerningoperation,refertoEnteringdisctitlesonpage15.
- Titlesremaininmemory,evenafterthe dischasbeenremovedfromthemagazine, andarerecalledwhenthediscisreinserted.
• Afterdatafor100discshasbeenstoredin memory, dataforanewdiscwilloverwrite theoldestone.
Displayingdisctitles
Youcandisplaythetextinformationofany discthathashadadisctitleentered. Theoperationisthesameasthatofthebuilt- inCDplayer. RefertoDisplayingtextinformationondiscon page16.
Selectingdiscsfromthedisctitlelist
Disctitlelistletsyouseethelistofdisctitles that have been entered into them multi-CD player and select one of them to playback.
1PressLISTtoswitchtothedisctitlelist modeduringthe playbackdisplay.
2UseMULTI-CONTROLtoselectthedesireddisctitle.
Turntochangethedisctitle;presstoplay.
■Youcanalsochangethedisctitlebypushing MULTI-CONTROLupordown.
■WhenplayingCDTEXTdisc,push MULTI-CONTROL righttoseealistofthetracks intheselecteddisc.PushMULTI-CONTROL left toreturntothedisclist.
■ If not title has been entered for adisc,
NoD. Title will be displayed.
■NoDiscisdisplayednexttothediscnumber whenthereisnodiscinthemagazine.
UsingCDTEXTfunctions
YoucanusethesefunctionsonlywithaCD TEXTcompatiblemulti-CDplayer.
Availableaccessories
Theoperationisthesameasthatofthebuilt-inCDplayer.
RefertoDisplayingtextinformationondiscon page16.
DVDPlayer
BasicOperations
YoucanusethisunittocontrolaDVDplayeror multi-DVDplayer,whichissoldseparately. Fordetailsconcerningoperation,refertothe DVDplayer'sormulti-DVDplayer'soperation manual.Thissectionprovidesinformationon DVDoperationswiththisunitwhichdiffers fromthatdescribedintheDVDplayer'sor multi-DVDplayer'soperationmanual.
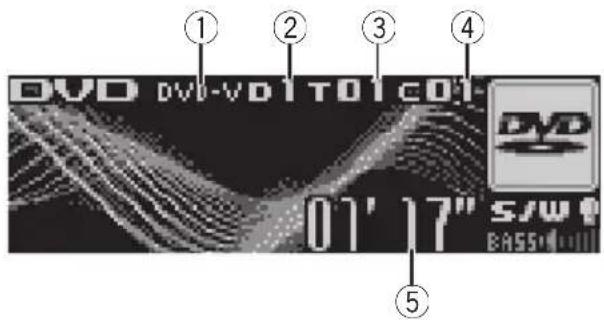
text_image
① ② ③ ④ DVD DVD-VD1 T01 COI- 01' 17" S/W BASS① DVD-V/VCD/CD/MP3/WMA indicator Showsthetypeofdisccurrentlyplaying.
②Discnumberindicator
Showsthediscnumbercurrentlyplaying whenusingamulti-DVDplayer.
③Title/Foldernumberindicator
Showsthetitle(whenplayingDVDvideo)or
folder(whenplayingcompressedaudio)of
theselectioncurrentlyplaying.
④Chapter/tracknumberindicator
Showsthechapter(whenplayingDVDvideo)
ortrack(whenplayingvideoCD,CDorcompressedaudio)currentlyplaying.
⑤Playtimeindicator
1PressSOURCEtoselecttheDVDplayer/multi-DVDplayer.
2Toperformfastforwardorreverse, pushandholdMULTI-CONTROLleftor right.
3Toskipbackorforwardtoanother chapter/track, pushMULTI-CONTROLleftor right.
Selectingadisc
- Youcanoperatethisfunctiononlywhena multi-DVDplayerisconnectedtothisunit.
- Pressanyof1to6ontheremotecontroltoselectthedesireddisc.
Selectingafolder
- Youcanoperatethisfunctiononlywhena DVDplayerwhichiscorrespondingtocompressedaudioplaybackisconnectedto thisunit.
●PushMULTI-CONTROLupordownto selectafolder.
Introductionofadvanced operations
1PressMULTI-CONTROLtodisplaythe mainmenu. FUNCTION, AUDIOandENTERTAINMENT appearonthedisplay.
2UseMULTI-CONTROLtoselect FUNCTION.
Turntochangethemenuoption;presstose-lect. Thefunctionnameappearsonthedisplay.
3TurnMULTI-CONTROLtoselectthe function.
TurnMULTI-CONTROLtoswitchbetweenthe functionsinthefollowingorder:
DuringDVDvideoorVideoCD playback
Playmode(repeatplay)—Pause(pause) DuringCD playback
Playmode(repeatplay)—Randommode (randomplay)—Scanmode(scanplay)—Pause (pause)—ITS play mode (ITS play)—ITS memo (ITS input)—TitleInput "A" (disc titleinput)
Duringcompressedaudioplayback Playmode(repeatplay)—Randommode (randomplay)—Scanmode(scanplay)—Pause(pause)
■Youcanalsoselectthefunctionbypassing
FUNCTIONontheremotecontrol.
■Toreturntothe playbackdisplay, pressBAND.
Functionandoperation
Playmode, Randommode, Scanmode, Pause and TitleInput "A" operations are basically the same as that of the built-in CD player. Also, ITS playmode and ITS memo operations are basically the same as that them multi-CD player.
FunctionnameOperation
| Playmode | RefertoSelectingarepeatplay rangeonpage14.Buttherepeatplayrangethatyou canselectisvarydependingon thetypeofdiscorsystem.There-peatplayrangesoftheDVD player/multi-DVDplayerareas below:DuringPBCplaybackofVideo CDs,thisfunctioncannotbeoper-ated.•Discrepeat-Repeatthecur-rentdisc•Folderrepeat-Repeatthe currentfolder•Titlerepeat-Repeatjustthe currenttitle•Chapterrepeat-Repeatjust thecurrentchapter•Trackrepeat-Repeatjustthe currenttrack |
| Randommode | RefertoPlayingtracksinrandom orderonpage14. |
| Scanmode | RefertoScanningfoldersand tracksonpage14. |
| Pause | RefertoPausingdiscplaybackon page15. |
| ITSplaymode | RefertoUsingITSplaylistson page45. |
| ITSmemo | RefertoUsingITSplaylistson page45. |
| TitleInput"A" | RefertoEnteringdisctitleson page15. |

Notes
- If you select other discsduring repeat play, therepeat play range changesto Discrepeat.
- DuringvideoCDorCD playback, if you perform track search forward/ reversed during Track repeat, therepeat play range changesto Discrepeat.
- During compressed audioplayback, if you select another folder during repeat play, therepeat play range changesto Discrepeat.
- Duringcompressedaudioplayback, if you perform tracksearchor fast forward/reversed during Trackrepeat, therepeat play range changesto Folder repeat.
- When using this unit with multi-DVD player, you can switch to ITS playmode, ITS memo and disc title input.
- TheITSfunctionofaDVDplayerdiffers slightlyfromITSplaybackwithamulti-CD player.Withmulti-DVDplayer,ITSplaybackappliesonlytotheCDplaying.Fordetails,refer toUsingITSplaylistsonpage45.
TVtuner
BasicOperations
YoucanusethisunittocontrolaTVtuner, whichissoldseparately.
Fordetailsconcerningoperation, refertothe TVtuner'soperationmanual. ThissectionprovidesinformationonTVoperationswiththis unitwhichdiffersfromthatdescribedinthe TVtuner'soperationmanual.

text_image
① TV TV-1 P.CH Channel 2 S/W BASS①Bandindicator
②Presetnumberindicator
③Channelindicator
1PressSOURCEtoselecttheTV.
2PressBANDtoselectaband.
PressBANDuntilthedesiredbandisdisplayed, TV-1orTV-2.
3Toperformmanualtuning, push MULTI-CONTROLleftorright.
4Toperformseektuning, pushandhold MULTI-CONTROLleftorrightforaboutone secondandrelease.
Thetunerwillscanthechannelsuntilabroadcaststrongenoughforgoodreceptionis found.
■Youcancancelseektuningbypushing
MULTI-CONTROLleftorright.
■If you push and hold MULTI-CONTROL leftor right, you can skip broadcasting channels. Seek tuning starts a ssoon as you release
MULTI-CONTROL.
Storingandrecallingbroadcast stations
Youcaneasilystoreupto12broadcaststationsforlaterrecall.
• Upto24stations, 12foreachoftwoTV bands, canbestoredinmemory.
1Whenyoufindastationthatyouwant tostoreinmemorypressLIST.
2UseMULTI-CONTROLtostorethese- lectedstationinmemory.
Turntochangethepresetnumber;pressand holdtostore.
Thepresetnumberyouhaveselectedwill flashandthenremainlit.Theselectedstation hasbeenstoredinmemory.
3UseMULTI-CONTROLtoselectthedesiredstation.
Turntochangethestation;presstoselect.
■Youcanalsochangethestationbypushing MULTI-CONTROLupordown.
■ If you donotoperatethelist within about 30 seconds, the display is automatically returned to the ordinary display.
Usingtheremotecontrol
Youcanalsostoreandrecallstationsassigned topresettuningnumbersP.CH1toP.CH6by usingtheremotecontrol.
- When you find a station that you want to store in memory, press one of preset tuning buttons 1 to 6 and hold until the preset number stops flashing.
Thenumberyouhavepressedwillflashinthe presetnumberindicatorandthenremainlit. Theselectedstationhasbeenstoredinmemory.
Thenexttimeyoupressthesamepresettuningbuttonthestationisrecalledfrommemory.
■Youcanalsorecallstationsassignedtopreset tuningnumbersbypushingMULTI-CONTROLup ordownduringthechanneldisplay.
Storingthestrongestbroadcast stationssequentially
1PressMULTI-CONTROLtodisplaythe mainmenu. FUNCTION, AUDIOandENTERTAINMENT appearonthedisplay.
2UseMULTI-CONTROLandselect FUNCTIONtodisplayBSSM.
Turntochangethemenuoption;presstose-lect.
■Youcanalsoselectthefunctionbypassing FUNCTIONNontheremotecontrol.
3PressMULTI-CONTROLtoturnBSSM on.
Searchingisdisplayed.WhileSearchingis displayed,the12strongestbroadcaststations willbestoredinorderfromthelowestchannel up.Whenfinished,thepresetchannellistappears.
■Tocancelthestorageprocess,press MULTI-CONTROLagain.
4UseMULTI-CONTROLtoselectthedesiredstation.
Turntochangethestation;presstoselect.
■Youcanalsochangetestationbypushing MULTI-CONTROLupordown.
■Toreturntothechanneldisplay,pressBAND.
■Ifyoudonotoperatethelistwithinabout30 seconds,thedisplayisautomaticallyreturnedto theordinarydisplay.

Note
StoringbroadcaststationswithBSSMmayreplacebroadcaststationsyouhavesavedusing P.CH1toP.CH12.
Additional Information
Troubleshooting
SymptomCauseAction
| iPoddoesn't operatecor-rectly. | Cablesareincorrectlyconnected. | Disconnectthe cablefromiPod.OnceiPodmain menuisdisplayed, connectthecable again.ResettheiPod. |

Understandingerror messages
Whenyoucontactyourdealeroryournearest PioneerServiceCenter,besuretorecordthe errormessage.
Built-inCDPlayer
| MessageCauseAction | ||
| ERROR-11,12, 17,30 | DirtydiscCleandisc. | |
| ERROR-11,12, 17,30 | ScratcheddiscReplacedisc. | |
| ERROR-10,11, 12,15,17,30, A0 | Electricalorme-chanical | Switchtheignition key,orswitchtoa differentsource, thenbacktothe CDplayer. |
| ERROR-15Theinserteddisc doesnotcontain anydata | Replacedisc. | |
| ERROR-22,23TheCDformat cannotbeplayed back | Replacedisc. | |
| NoaudioTheinserteddisc doesnotcontain anyfilesthatcan beplayedback | Replacedisc. | |
| PROTECTAllthefileson theinserteddisc aresecuredby DRM | Replacedisc. | |
| TRKSKIPPED | Theinserteddisc containsWMA filesthatareprotectedbyDRM | Replacedisc. |
iPod
| MessageCauseAction | ||
| ERROR-11Communication failure | Disconnectthe cablefromiPod.OnceiPodmain menuisdisplayed, connectthecable again. ResettheiPod. | |
| ERROR-21Oldversionof iPod | UpdatetheiPod version. | |
| ERROR-30iPodfailure | ResettheiPod. | |
| ERROR-A0 | iPodisnot chargedbutoperatescorrectly | Checkiftheconnectioncablefor iPodshortedout (e.g.,notcaughtin metalobjects). Afterchecking, switchtheignition keyordisconnect theiPodandconnectagain. |
| NoSongs | NosongsTransferthesongs toiPod. | |
| STOP | Nosongsinthe currentlist | Selectalistthat containsthe songs. |

Handlingguidelineof discs and player
- Useonlydiscsfeaturingeitheroffollowing twologos.


- Useonlyconventional,fullycirculardiscs. Donotuseshapeddiscs.
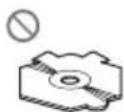

- Use12-cmor8-cmCD.Donotusean adapterwhenplaying8-cmCDs.
AdditionalInformation
- DonotinsertanythingotherthanaCDinto theCDloadingslot.
- Donotusecracked, chipped, warped, or otherwise damaged discsastheymaydamagetheplayer.
- UnfinalizedCD-R/CD-RWdiscplaybackis notpossible.
- Donottouchtherecordedsurfaceofthe discs.
- Storediscsintheircaseswhennotinuse.
- Avoidleavingdiscsinexcessivelyhotenvir- onmentsincludingunderdirectsunlight.
- Donotattachlabels, writeonorapplychemicalstothesurfaceofthediscs.
• TocleanaCD, wipethediscwithasoft clothoutwardfromthecenter. - Condensationmaytemporarilyimpairthe player'sperformance.Leaveittoadjustto thewarmertemperatureforaboutone hour.Also,wipeanydumpdiscswithasoft cloth.
- Playbackofdiscsmaynotbepossiblebe- causeofdisc characteristics, discformat, recorded application, playbackenvironment, storage conditions and soon.
- Textinformationmaynotbecorrectlydis-playeddependingontherecordedenvironment.
• Roadshocksmayinterruptdiscplayback. - Read the precautions with discs before using them.
DualDiscs
- DualDiscsaretwo-sideddiscsthathavea recordableCDforaudioononesideanda recordableDVDforvideoontheother.
- SincetheCDsideofDualDiscsisnotphysicallycompatiblewiththegeneralCD standard, itmaynotbepossibletoplaythe CDsidewiththisunit.
- FrequentloadingandejectingofaDual Discmayresultinscratchesonthedisc. Serioussscratchescanleadtoplaybackproblemsonthisunit.Insomecases,aDual Discmaybecomestuckinthediscloding
slotandwillnoteject.Topreventthis,we recommendyourefrainfromusingDual Discwiththisunit.
- Pleaserefertotheinformationfromthe discmanufacturerformoredetailedinformationaboutDualDiscs.
Compressedaudiofiles
- DependingontheversionofWindows MediaPlayerusedtoencodeWMAfiles, albumnamesandothertextinformation maynotbecorrectlydisplayed.
- Dependingonthesoftware(ortheverversion ofthesoftware)usedtoencodetheaudio files,thisunitmaynotoperateproperly.
- Theremaybeaslightdelaywhenstarting playbackofWMA/AACfilesencodedwith imagedata.
• ISO9660Level1and2compliant.Romeo andJolietfilesystemsarebothcompatible withthisplayer. - Multi-session playback is possible.
- Compressedaudiofilesarenotcompatible withpacketwritedatatransfer.
- Only64charactersfromthebeginningcan bedisplayedasafilename(includingthe extensionsuchas.wma,.mp3,.m4aor.wav)orafoldername.
- Folderselectionsequenceorotheroperationmaybealtereddependingontheencodingorwritingsoftware.
- Regardless of the length of blank section between the song so for original recording, compressed audiodiscswill play with a short pause between songs.
- Fileextensionssuchas.wma,.mp3,.m4a or.wavmustbeusedproperly.
Exampleofahierarchy

Folder

Compressedaudiofile
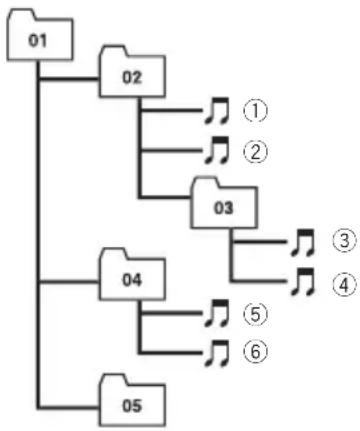
flowchart
graph TD
    01 --> 02
    02 --> 1
    02 --> 2
    02 --> 3
    03 --> 4
    04 --> 5
    04 --> 6
    05 --> 6
    1 --> 3
    2 --> 3
    3 --> 4
    4 --> 5
    5 --> 6
Level 1 L level 2 L level 3 L level 4
- Thisunitassignsfoldernumbers.Theuser cannotassignfoldernumbers.
- Folderhierarchyisalloweduptoeighttiers. However, practical hierarchyoffolderis lessthantwotiers.
- Upto99foldersonadisccanbeplayed back.
Compressedaudiocompatibility
WMA
- Compatible format: WMAencoded by WindowsMediaPlayerVer.7,7.1,8,9or10
- Bitrate:48kbpsto320kbps(CBR),48kbps to384kbps(VBR)
•Samplingfrequency:32kHzto48kHz - WindowsMediaAudio9Professional,Lossless,Voice:No
MP3
- Bitrate:8kbpsto320kbps
- Samplingfrequency:16kHzto48kHz(32, 44.1,48kHzforeemphasis)
- CompatibleID3tagversion:1.0,1.1,2.2, 2.3,2.4(ID3tagVersion2.xisgivenpriority thanVersion1.x.)
- M3uplaylist:No
• MP3i(MP3interactive), mp3PRO: No
AAC
- Compatible format: AACencoded by iTunes® version 6.0.5 and earlier
•Samplingfrequency:11.025kHzto48kHz
•Transmissionrate:16kbpsto320kbps - AppleLossless:No
WAV
- Compatible format: Linear PCM(LPCM), MSADPCM
- Quantizationbits:8and16(LPCM),4(MS ADPCM)
- Samplingfrequency:16kHzto48kHz (LPCM),22.05kHzto44.1kHz(MSAD-PCM)
AbouthandlingtheiPod

CAUTION
- Pioneeracceptsnoresponsibilityfordatalost ontheiPodevenifthatdataislostwhile usingthisunit.
- DonotleavetheiPodindirectsunlightforex-tendedamountsoftime.Extendedexposure todirectsunlightcanresultiniPodmalfunc-tionduetotheresultinghightemperature.
- Donotleavethei Podinanylocationwitha hightemperature.
- FirmlysecuretheiPodwhendriving.Donot lettheiPodfallontothefloor,whereitmaybe-comejammedunderthebrakeoraccelerator pedal.
Fordetails, refertothei Pod's manuals.
AboutiPodsettings
- You cannot operate theiPodEqualizer on the Pioneer products. Were recommend that you set theiPod Equalizerto off, before connecting thei Podto this unit.
- YoucannotsetRepeattooffontheiPod whenusingthisunit.EvenifyousetRepeat tooffontheiPod,RepeatischangedtoAll automaticallywhenconnectingtheiPodto thisunit.
AdditionalInformation
Specifications
General
Ratedpowersource.....14.4VDC
Groundingsystem......Negativetype
Max.currentconsumption
10.0A
Dimensions(W×H×D):
DIN
Chassis....178×50×162mm
Nose....188×58×15mm
D
Chassis....178×50×162mm
Nose....170×46×15mm
Weight....1.5kg
Audio
Maximumpoweroutput.....50W×4
50W×2/4Ω+70W×1/2
Ω(forsubwoofer)
Continuouspoweroutput...22W×4(50Hzto15000
Hz,5%THD,4Ωload,both
channelsdriven)
Load impedance ....4 Ω to 8 Ω × 4
4 to 8 × 2 + 2 × 1
Preoutmaxoutputlevel/outputimpedance
4V/100Ω
Equalizer(7-BandGraphicEqualizer):
Frequency.....50/125/315/800/2k/5k/12.5k
Hz
Gain....±12dB
Loudnesscontour:
Low....+3.5dB(100Hz),+3dB(10
kHz)
Mid....+10dB(100Hz),+6.5dB
(10kHz)
High....+11dB(100Hz),+11dB
(10kHz)
(volume:-30dB)
HPF:
Frequency.....50/63/80/100/125Hz
Slope....-12dB/oct
Subwoofer(mono):
Frequency.....50/63/80/100/125Hz
Slope....-18dB/oct
Gain....+6dBto-24dB
Phase......Normal/Reverse
Bassboost:
Gain....+12dBto0dB
CDplayer
System....Compactdiscaudiosystem
Usablediscs....Compactdisc
Signalformat:
Samplingfrequency.....44.1kHz
Numberofquantizationbits
16;linear
Frequency characteristics...5Hz to 20000 Hz (±1dB)
Signal-to-noiseratio....94dB(1kHz)(IEC-Anet-
work)
Dynamicrange....92dB(1kHz)
Numberofchannels......2(stereo)
MP3decodingformat......MPEG-1&2AudioLayer3
WMAdecodingformat......Ver.7,7.1,8,9,10(2ch
audio)
(WindowsMediaPlayer)
AACdecodingformat......MPEG-4AAC(iTunes ^® en-
codedonly)
WAVsignalformat....LinearPCM&MSADPCM
FMtuner
Frequencyrange.....87.5MHzto108.0MHz
Usable sensitivity .... 8 dBf (0.7 μV/75 Ω, mono,
S/N:30dB)
Signal-to-noiseratio....75dB(IEC-Anetwork)
Distortion....0.3%(at65dBf,1kHz,
stereo)
0.1%(at65dBf,1kHz,
mono)
Frequencyresponse....30Hzto15000Hz(±3dB)
Stereoseparation....45dB(at65dBf,1kHz)
AMtuner
Frequencyrange.....531kHzto1602kHz(9kHz)
530kHzto1640kHz(10
kHz)
Usablesensitivity.....18μV(S/N:20dB)
Signal-to-noiseratio....65dB(IEC-Anetwork)
Infraredremotecontrol
Wavelength....940nm±50nm
Output......typ:12mw/srperInfrared
LED

Note
Specificationsandthedesignaresubjecttopossiblemodificationswithoutnoticeduetoim-
provements.
natural_image
Line drawing of a hand inserting a device into a rectangular box (no text or symbols)text_image
Diagram showing a device with a box and a connector, with an inset close-up illustrating the internal structure.
Acercadelmododemo
natural_image
Diagram showing two steps of a device locking mechanism: one with a lock and arrow, the other with a watch and magnifying glass (no text or symbols)
ADVERTENCIA
■Paradesactivarlapausa,vuelvaapresionar MULTI-CONTROL.
text_image
Language select Englishtext_image
BTAudio Pioneer ① S/W BASStext_image
TEL Pioneer 12:00 PM 4 AM PHONE AUTO BASSSearch&Connect, Connectionopen,
Connectphone.PH.B.Transfer.
Disconnectphone, Numberdialy
Clearmemoryenunos30segundos,eldisplay volveráautomáticamentealavisualizaciónnormal.
CDplayerincorporado126
natural_image
Line drawing of a hand inserting a device into a rectangular box (no text or symbols)text_image
Diagram showing a device being inserted into a folder, with an inset close-up highlighting the internal structure.
natural_image
Diagram showing two steps of a device being inserted into a case, with no visible text or symbols.ADVERTÊNCIA
text_image
Language select English①Displaydefunção
BGV-1(Visualdoplanodefundo1)—BGV-2(Visualdoplanodefundo2)—BGP-1(Imagem doplanodefundo1)—BGP-2(Imagemdo planodefundo2)—BGP-3(Imagemdoplano defundo3)—BGP-4(Imagemdoplanode fundo4)—SIMPLE-1(Displaysimples1)—
•MultiCD-Multi-CDplayer
- USB-AudioplayerportátilUSB/memória USB
• BTAudio–ÁudioplayerBluetooth
•DVD-DVDplayer/Multi-DVDplayer
■Paradesativarapausa, pressionePGM novamente.
- PressioneesegurePGMparaativar BSMaoselecionarSintonizadorcomoa fonte.
PressioneesegurePGMatéativaraBSM.
text_image
BTAudio Pioneer ① S/W BASS①Nomedodispositivo
Mostraonomedodispositivodoáudioplayer Bluetoothconectado(ouadaptadorBluetooth).
Chassi....178×50×162mm
Face.....170×46×15mm
Peso....1,5kg
Áudio
Potenciadesaídamáxima 50W×4 50W×2/4Ω+70W×1/2 Ω(paraalto-falantedegra- vessecundário)
Visit us on the World Wide Web at

text_image
pioneer.jp/group/index-e.htmlPioneer Gulf.FZE
www.pioneer-uae.com
Pioneer Electronics Australia. Pty.Ltd
www.pioneeraus.com.au
Pioneer Electronics Asiacentre.Pte
www.pioneer.com.sg
Pioneer (HK) Ltd.
www.pioneerhongkong.com.hk
Pioneer High Fidelity Taiwan Co., Ltd.
www.pioneer-twn.com.tw
Pioneer International Latin America S.A.
www.pioneer-latin.com
PIONEERCORPORATION
4-1,MEGURO1-CHOME,MEGURO-KU
TOKYO153-8654,JAPAN
PIONEERELECTRONICS(USA)INC.
P.O.Box1540, LongBeach, California90801-1540, U.S.A.
TEL:(800)421-1404
PIONEEREUROPENV
Haven1087, Keetberglaan1, B-9120Melsele, Belgium
TEL:(0)3/570.05.11
PIONEERELECTRONICSASIACENTREPTE.LTD.
253AlexandraRoad,#04-01,Singapore159936
TEL:65-6472-7555
PIONEERELECTRONICSAUSTRALIAPTY.LTD.
178-184BoundaryRoad, Braeside, Victoria3195, Australia
TEL:(03)9586-6300
PIONEERELECTRONICSOFCANADA, INC.
300AllstateParkway, Markham, OntarioL3ROP2, Canada
TEL:1-877-283-5901
PIONEERELECTRONICSDEMEXICO,S.A.deC.V.
Blvd.ManuelAvilaCamacho13810piso
Col.LomasdeChapultepec,Mexico,D.F.11000
TEL:55-9178-4270
先鋒股份有限公司
總公司:台北市中山北路二段44號13樓
電話:(02)2521-3588
先鋒電子(香港)有限公司
香港九龍尖沙咀海港城世界商業中心
9樓901-6室
電話:(0852)2848-6488
PublishedbyPioneerCorporation.
Copyright©2006byPioneerCorporation.
Allrightsreserved.