DEH-7350BT - Receiver PIONEER - Free user manual and instructions
Find the device manual for free DEH-7350BT PIONEER in PDF.

User questions about DEH-7350BT PIONEER
0 question about this device. Answer the ones you know or ask your own.
Ask a new question about this device
Download the instructions for your Receiver in PDF format for free! Find your manual DEH-7350BT - PIONEER and take your electronic device back in hand. On this page are published all the documents necessary for the use of your device. DEH-7350BT by PIONEER.
USER MANUAL DEH-7350BT PIONEER
REPRODUCTOR DE CD CON RECEPTOR RDS
RECEPTOR DE CD RDS
CD RDS 接收機
تاناوطسا لغشم CD ویدار عم RDS
ThankyouforpurchasingthisPIONEER product.
Toensureproperuse, pleasereachrough this manual before using this product. It is especially important that you read and observe WARN-
INGsandCAUTIONsinthismanual. Please keepthemanualinasafeandaccessibleplacefor futurereference.
FCCID:AJDK033
MODELNO.:DEH-7350BT
This equipment components with FCC/IC radiation exposure limits set forthor uncontrolled equipment and meets the CC/ICAC frequency (RF) Exposure Guidelines in Supplement CtoOF I to. This equipment has very low levels of IR energy that is deemed completely without maximum permiss veexposure evaluation (VPD). But it sees reliable that it should be installed operated with least 20cm and more between the radiator and person's bodyexc using extremities hands, wrists feet and ankles).
This transmitter must not be located or operated in conjunction with any other antenna or transmitter.
InformationtoUser
Alterationomodif cationscarredoutwith- culapproprialeauthor zationmayinvalidale theuser'srigettooperatethecquipment.
Aboutthisunit
CAUTION
- Donotallow this unit to come into contact with liquids. Electrical shock could result. Also, damage to this unit smoke, and overheating could result from contact with liquids.
• Always keep the volume lower enough to hear outside sounds.
• Avoid exposure to moisture. - If the battery is disconnected or discharged, any preset memory will be erased.
CAUTION
This product is a class I as per product classified under the Safety of laser products, IEC 60825-1:2007, and contains a class I as per module. To ensure continued safety, do not remove any covers or temporary lockdown in access to the inside of the product. Refer all servicing to qualified personnel.
CLASS 1 LASER PRODUCT
CAUTION—CLASS 1M INVISIBLE LASER RADIATION WHEN OPEN, DO NOT VIEW DIRECTLY WITH OPTICAL INSTRUMENTS.
CAUTION:
USEOFCONTROLORADJUSTMENTOR PERFORMANCEOFPROCEDURES OTHERTHANTHOSESPECIFIEDHEREIN MAYRESULTINHAZARDOUSRADIATION EXPOSURE.
CAUTION:
THEUSEOFOPTICALINSTRUMENTS WITHTHISPRODUCTWILLINCREASE EYEHAZARD.
BeforeYouStart
Notes
- Functionsettingoperatonsarecompleted evenifthemeniscancelledbeforetheoperationareconfirmed.
- In this manual, iPodanciPhone will be referred to as "iPod".
Demomode
Important
- Failure to connect the lead (ACC) of this un talo terminal coupled with ignition switch on/off operation may lead to battery drain.
- Remember that the feature of continuous operating when the care engine slumped off, it may drain battery power.
The demoautomatically start when the ignition switchissetto ACCorONwhile the unit is turned off. Turning off the unit does not cancel demode. To cancel the demode, operate the function in the initial setting menu. Operating the demow while the ignition switchissetto ACCmay drain battery power.
Operatingthisunit
Headunit
text_image
Diagram of a car front panel with numbered labels pointing to different compartments or parts.| PartPart | |||
| 1S(SRC/OFF)8 | 2 (phone/on hook) | ||
| 7▲/ject(9) | 3 (Back/display scroll) | ||
| 3 | 4 (isk) | 6 | ▲/▼/◄► |
| 4 | MULTI-CONTROL(M.C.) | 1 | ◎ /DISPOFF |
| 5D scloadingslot@1tc6 | |||
| 6USBpcn | 13 | AuKinputjack(3.5mm stereo jack) | |
| 7B(BAND/ESC) | 14Detacnbutton | ||

CAUTION
- Useanoptonal PioneerUSBcable(CD-USCE)toconnect theUSBaudio player/USB memory as any device connected directly to the unit will protrude out from the unit and may be dangerous.
• Donoluse unauthorized products.
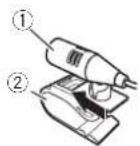
Remotecontrol
text_image
Diagram of a 19-pin electronic component with labeled pins and connections| Part | Operation |
| 15VOLUME | Pressstoincreasoordoc case volume. |
| 16MUTE | Pressstomute.Pressapa mro unmute. |
| 17AUDIO | Presslose lecta audio function. |
| 18DISP/SCRL | Presslose lectdifferenidis-plays.Pressandholdtoscroll through the text information. |
| 19II | Pressstopauseormasumaplay-back. |
| 20 FUNC-TION | Presslose lectfunctions.Pressandholdoracalth initialsettingmenuwhonthesourcesareoff. |
| 21 LIST/ENTER | PressstoDisplayhcalsettie, tracktile, folder, orfilel side-pending on the source. While intheoperating menu, pressocontrol functions. |
Operatingthisunit
Displayindication

text_image
① ② ③ ⑥ ⑧ ⑨ ⑪ ⑫ ④ ⑤ ⑦ ⑩ ⑫ ⑬| Indicator | State | |
| 1 | Maindis playsec-tion | TunerbandandfrequencyBuilt inCD,USBstorage deviceanciPodcelapsed playbacktimeandtextinformation |
| 2▲ | Anuppertlerofthefolderor menuex sts. | |
| 3▲ | Aoverclerofthefolderor menuex stsThiefasheswhanesong/albumrelacedtothesongcurrentlyplayingisselectedfrom thaiPod | |
| 4 | Q (list) | Trelisfunctionisbeingoper-ated. |
| 5 | A (artist) | Theart.stnameisdisplayed.Artistsearchrefinementofthe iPodbrowsingfunctionis n use. |
| 6 | ● (disc) | Tredisc(album)*namescisp ayod.Abumsearchrefinementof theiPodbrowsingfunction s inusc. |
| Indicator | State | |
| 7 | 20 (song) | Theneck(songinamesdisplayed.Aplayableaudiofilehasbeensellectedduringoperationoftheist.SongsearchrefinementtheiPocbrowsingfunctionisinusa. |
| 8LOC | Localseekuringison. | |
| 9 | re-peat) | Trackofolderrepeatison. |
| 10 | xx (random/shuttle) | Randomplayison.ThePodsourceselectedandthoshuffle/shuttle function son. |
| 11 | (autc answer) | Showswhentheautomaticanswerngfunctionison. |
| 12 | (3.ue-toothin sil-cator) | ConnectedoaBluetoothce-vice.Theireisonhold. |
| 13 | S.Rtrv(sound/rever) | Thasoundreiverfunctionson. |
BasicOperations
Important
- Handle gently when removing or attaching the front panel.
- Avoid subjecting the front panel to excessive shock.
- Keep the front panel out of direct sunlight and light temperatures.
- To avoid damaging the device or vehicle interior, remove any cables and devices attached to the front panel before detaching it.
Operatingthisunit
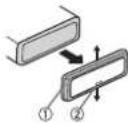
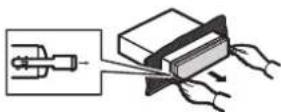
Removing the front panel to protect your run from theft
1 Press the each button release the front panel.
2 Push the front panel upward and pull it toward you.
3) Always keep the detached front panel in a protection device such as a protection case.
Re-attaching(befrontpanel)
TSlideth ofrontpaneltotheloft. Makesuretoinsertthetabsorthelefts deof theheadunitinlotheslotsorthefron panel.
2) Presstnorightsideofthefrontpaneluntilitis firmlysealed.
If you cannot lack the front panel to the head units successfully, makes sure that you are placing the front panel onto the head unit correctly. Forcing the front plane into placemay result in damage the front panel on head unit.
Tum ngtheuniton
TPressS(SRC/OFF)totumtheuniton.
Turningheuniloff
Press(SRC/OFF) and hold until the unit turnsoft.
Selectingasource
1 PressS(SRC/OFF)locyclebetween:
TUNER (tuner)—CD (null-in CD player)—USB (USB)/iPod (Pod)—AUX(AUX)
Adjustingthevolume
1 Turn M.C.toadjustthevolume
Turningthed splayoffandon
1 Press /DISPOFFandholdunlithedisplay turnsoftandon.
CAUTION
Forsafetyreasons, park your vehicle when removing the front panel.
Note
When this unit's blue/white/elecisconnected to the vehicle'sauto-antennarelaycontrol terminal, the vehicle'santennaextendswonth this unit's sourceistumedon. Toretractneantenna,tumthesourceoff.
Operatingthisunit
Useandcareoftheremote control
Using theromote control
[1] Pointeremo.econtrol.Inchedirect or of the frontpanel to operate. When using for that first time, pull out the film protruding from the tray.
Replacingthenattery
T Sidethetrayoutorthebackoftheremote control.
② Insert the battery with the plus (+) and minus (-) poles aligned properly.


WARNING
- Keep the battery out of there each of children. Should the battery be swallowed, consult a doctor immediately.
- Batteries(batterypackorbatteriesinstalled) must not be exposed to excess vehicle such as sunshine, fire or the like.

CAUTION
• UseoneCR2025(3V) lithium battery.
- Removethebattery if theremote control is not used for a month longer.
- Thereisadangerofexplosionifthebatteryis incorrectlyreplaced. Replaceonlywiththe sameorequivalenttype.
- Donothandlethebatterywithmetallictools.
- Donotstorethebatterywithmetallicobjects.
- If the battery leaks, wipether control completely clean and install anew battery.
- Whendisposingcfusedbatteries,comply withgovernmentalregulationsorenvironmentalpublicinstitutions'rulesthataopyn yourcountry/area.
Important
- Donotstoretheremotecontrollnighttemperaturesordirectsunlight.
- Theremote control may not function properly and rect sunlight.
- Donof ettheremotecontrolltantothe floor,whereilmaybecomejammedunder thecrakecracceleratorpedal.
UsingBluetoothtelephone
Important
- Sincetrisunit sonstandbytoconnectwith yourcellularphoneviaBluetoothwireless technology, using it without the engineer running and rainthebatterypower.
- Operations may vary depending on the kind of cellular phone.
- Advanced operations that require attention such as dialing numbers on the monitor, using the phonebook, etc., are prohibited while driving. Parkycurve in a safe place when using these advanced operations.
Settingupforhands-freephoning
Before you can use the hands-free phoning function you must setup the unit for use with your cellular phone.
Operatingthisunit
1Connection
Operate the Bluetooth telephone connection menu. Raferto Connection menu operation page8.
2 Functionsettings
OperatetheBluetoothtelephonefunction menu.RafertoPhonemenoperationpage 8.
BasicOperations
| Makingaphonacall |
| 1.ReferoPhonemenuoperationpage8. |
| Answeringanincorningcall |
| 1:Whenacallisreceived pressM.C. |
| Encingacall |
| 1:Press 2. |
| Rejectinganincorningcall |
| 1:Whenacallisreceived press 2. |
| Answeringacallwaiting |
| 1:Whenacallisreceived pressM.C. |
| Cancolingcal waiting |
| 1:Press 2. |
| Adjustingtheotherparty slisteningvolume |
| 1:Press ▲or▼whiletalkingonthephone. |
| Turningprivatemodeonoroff. |
| 1:PressB(BAND/ESC)whilstalkingonthephone. |
| Switchingtheinformationdisplay |
| 1:Press ▷whiletalkingonthephone. |
| •Pressanchold ▷toscroll. |
Notes
- If private mode is selected on the cellular phone, hands freephoning may not be available.
• The estimated call time appears in the display(this may differ slightly from the actual call time).
Menuoperationsidentical forfunctionsettings/audio adjustments/initialsettings/lists
| ReturningtothepreviousdisplayReturningtothepreviouslist(thefolderonelevelhigher)Press |
| ReturningtothomainmenuReturningtothoptiofrolistPressandroid |
| ReturningtothordinarydisplayCancelingtheinitialsettingmenuPressB(BAND/ESC) |
| ReturningtothordinarydisplayfromtnelistPressB(BAND/ESC) |
Tuner
BasicOperations
| Selectingaband1PressB(BAND/ESC)untilthedasirecband(F1. F2. F3 for FM or AM) s displayed. |
| Manualtuning(sleptysstep)1Press←or▶. |
| Seeking1Pressandhold←or▶,and/menrelease.Youcancancelsocktuningby/iroflypressing←or▶Whilepressinganholding←or▶,youcanskipstations.Seoktuningstartsassoonasyourelease←or▶. |
Operatingthisunit
Storingandrecallingstations foreachband
Usingpreset tuningbuttons
1 When you find astation that you want to store in memory, press one of the preset tuning buttons (1 to 6) and hold until the preset number stops flashing.
2Pressoneofthepresettuningbuttons(1 to6)toselectthedesiredstation.
■Youcanalsorecallsoredrad ostationsbypressing▲or▼duringthofrequencycycisplay.
Switchingthedisplay
Selectingthedesiredtextinformation
●Press ↩.
Programservicename—Frequency
■The frequency appears the displayforeign seconds.
Note
Depending on the area, you cannot switch the display.
Functionsettings
1PressM.C.todisplaythemainmenu.
2TurnM.C.tochangethemenuoption andpresstoselectFUNCTION.
3TurnM.C.toselectthefunction.
Afterselecting, perform the following procedure to set the function.
BSM(beststationsmemory)
BSM (poststations memory) automat callystores thesis strongest stations in the order of their signal strength.
TPressM.C.totumBSMon. Tocancel, pressM.C.again.
Localseekturing let syouture into only those raclostations with sufficiently strong signals for good reception.
1 PressM.C.todisplaythesettingmode. 2 TurnM.C.tosselectthedesireosetting. FM: OFF — LEVEL 1 — LEVEL 2 — LEVEL 3
LEVEL4
AM:OFF—LEVEL1—LEVEL2
The highest level setting all lowsreception of only chest rongeststations, while lower levels allow the reception of weaker stations.
3 PressM.C.to confirm theselection.
CD/CD-R/CD-RWandUSB storagedevices
BasicOperations
| PlayingaCD/CD-R/CD-RW |
| Insertthediscintothad disc loadingslotwth thelabelsideup. |
| EjectingaCD/CD-R/CD-RW |
| 1Press▲. |
| PlayingsongsonaUSBstoragedevice |
| 1OpentheUSBconnectorcoverandplugin |
| theUSBstoragedeviceusingaUSBcable. |
| Stopping playbackoff lesona USBstoragede-vice |
| 1YourmaydisconnecttheUSBstoragedevice, anytime. |
Selectingafolder
1 Press▲or▼.
Selectingatrack
1Press◄or►
Operatingthisunit
| Fastforwardingoverversing1Pressanchold<on>·Whenplayingcompressedaudio,thereisingsoundcuringfastforwardomoverse. |
| Returningtorootfolder1PressancholdB(BAND/ESC). |
| SwitchingbetweencompressedaudioandCD-DA1PressB(BAND/ESC). |
Note
Disconnect USB storage devices from the unit when not in use.
Displayingtextinformation
| Selectingthedesiredtextinformation |
| 1)Press 2 |
| Scrollingthedetextinformat:ortothecleft |
| TI)Pressanchold 3 |
Notes
- Depending on the version of Tunes used to write MP3 files load discscormedia file types, incompatible telext stored within an audio file may be displayed incorrectly.
- TexInformationItems.halcanbechanged dependencemedia.
Selectingandplayingfiles/ tracksfromthenamelist
1PresstosWitchtothefile/trackname listmode.
2UseM.C.toselectthedesiredfilename (orfoldername).
| Changirgthctilcortoldomame1TurnM.C. |
| PlayingTJWnerafi eortrackisselected.pressM.C. |
| Viewingalistothetiles(orto de:s)ntheselecledfolder1 Whenafolderisselected,pressM.C. |
| Play ngasongintheseectedfo der1 Whenafolderisselected,pressancholdM.C. |
Advancedoperationsusing specialbuttons
| Selectingarepeatplayrange |
| 1Press/→ticyclebetweenthefollowing: |
| CD/CD-R/CD-RW |
| •DISC-Repeataltracks |
| •TRACK-Repeathecurrenttrack |
| •FOLDER-Repeathecurrentfolder |
| USBaudioplayer/USBmemory |
| •ALL-Repeatalfiles |
| •TRACK-Repeathecurrenttile |
| •FOLDER-Repeathecurrentfolder |
Playngtracks nrandomorder
IT Press5/ XX toum random playonoroff. Tracks in selected repeat range are played in random order.
Pausing playback
1 Press 2/PAUSE to pause or resume.
Enhancingcompressed audio and restoring rich sound (sound retriever)
1 Press1/S.Rtrvlocyclebetween:
OFF(off)—1—2
- seffective for low compression rates, and 2.
iseffective for high compress or rates.
Functionsettings
1PressM.C.todisplaythemainmenu.
2TurnM.C.tochangethemenuoption andpresstoselectFUNCTION.
Operatingthisunit
3TurnM.C.toselectthefunction.
Afterselecting perform the following procedure to set the function.
REPEAT(repeatplay)
1 PressM.C.todisplaythesettingmode.
2 Turn M.C. to select arepeat play range. Fordetails, referto Selecting arepeat play range orthispage.
3 PressM.C.toconfirmtheselection.
RANDOM(random to ay)
^1 PressM.C.totumrandomlayonorof
PAUSE(nause)
1PressM.C.topauseorresume
S.RTRV(soundreliever)
Automaticallyenhancescompressedaud and restoresrichsound.
1 PressM.C.todisplaythesettingmode.
2 Turn M.C. to select the desired setting. Fordetails, referto Enhancing compressed audio and restoring rich sound (sound reinver) on this page.
3 PressM.C.toconfirmtheselection.
iPod
BasicOperations
| Playingsongsroan!Pod |
| □ OpontheUSBconnectover. |
| □ ConnectaniPodtotheUSBcablingan |
| iPodDoc<Connector. |
| Selectingatrack(chapter) |
| □Press◀or▶ |
| Fastforwardngomoversing |
| □Pressandhold◀or▶. |
Notes
• TheiPodcannotbe returnedonoroffwhenthe controlmodeissettoCTRLAUDIO.
- Disconnectheadphonesfromthe Podbeforeconnectingittothisunit.
- TheiPodwillturnoffabouttwominutesafter the gnitionswitchissettoOFF.
Displayingtextinformation
Selecting the desired text information
1Press
Scrollingthetextinformat ontotheleft
1Pressandroid
Browsingforasong
1PresstosWitchtothetopmenuoflist search.
2UseM.C.toselectacategory/song.
| Changingthenamocthesongorcategory1TurnM.C.Playlists—artists—albums—songs—podcasts—genres—composers—aud ebooks |
| Playing1Whenasongisselected.pressM.C. |
| Viewingalistofsgongsintheselectedcategory1Whenacatoporyissolacted.pressM.C. |
| Playingasongirtheselectedcategory1Whenacagoryisselected.pressandholdM.C. |
| Searchingtheistbyalphabet1Whenalistfortheselectedcategory sols-played,press 0 toswitonthalphabetsearch mode2TurnM.C.toselectaletter3PressM.C.tod splaythealphabetical st. |
Operatingthisunit
Advancedoperationsusing specialbuttons
Selecting arepeatplayrange
1Press6/ ⇌ tocyclebetweenthefollowing:
•ONE-Repeat the currentsong
•ALL—Repeatall songsintheselectedlist
Playing all songs in random order (shuffle all)
ress5/ ×totumshuffleallon
- WhenthecontrolmodeissettoCTRLiPod/
CTRLAPP, shufflep ayison.
Pausing playback
1 Press 2/PAUSE to pause or resume.
Playingsongsrelatedtothecurrentlyplaying
song
You can plays songs from the following lists.
• Albumlistofthecurrentlyplayingartist
• Songlistoftheclrentlyplayingalbum
• Albumlistofthecurrentlyplayinggenre
1PressandholdM.C.toswitcholinkplay
mode
2 TurnM.C.tochangethemode;presstoselect.
•ARTIST-Playsanalbumoftheartiscur-
rentlybeingplayed.
• ALBUM—Playsasongfromthealbum
currentlybeingplayed.
•GENRE-P aysar album from the genre
currentlybeingplayed.
Theselectedsong/albumwillbeplayedafter
the currently playingsong.
Theselectedsong/albummaybecancelecifyou
operatefunctionsotherthanlinksearch(e.g.fast
forward and reverse).
Dependingonthasongselectedtop ay.theond
of the currently playingsongandthebeginningof
theselected song/album may be cutoff.
Operatingthisunit's PodfunctionfromyouriPoc
You can is lentolresoundfromyouriPodapali-
cationsusingyourcar'sspeakers,whenCTRL
APPisselected.
This function is not compatible with the following
iPodmodels.
• iPodnano1stgeneration
- Pod5thgeneration
APP mode is compatible with the following iPod
models.
• iPhone3GS(softwareversion4.0orlater)
• iPhone3G (softwareversion4.0orlater)
• iPhone(softwarevers on3.1.3orlater)
• Podtouch3rdgeneration (software reversion
4.0orlater)
- Podtouch2ndgeneration(softwareversion)
4.0orlater)
- Podtouch1stgeneration(softwareversion
3.13orlater)
1 Press4/iPodtoswitchthecontrolmode.
- CTRL iPod – This unit's iPod function can
beoperatedfromtheconnectediPod.
•CTRLAPP-Playbackthesoundfromyour
iPodapplications.
• CTRL AUDIO – This unit's iPod function
canbeoperatedfromthisunit.
Enhancing compressed audio and restoring rich
sound(soundrelriever)
1 Press1/S.Rtrvtocyclebetween:
OFF(off)—1—2
1iseffectiveforlowcompressionrates,and2
iseffective for high compression rates.
Functionsettings
1PressM.C.todisplaythemainmenu.
2TurnM.C.tochangethemenuoption
andpresstoselectFUNCTION.
Operatingthisunit
3TurnM.C.toselectthefunction.
Afterselecting, perform the following procedure destcsetthefunction.
REPEAT(repeat play)
1PressM.C.todisplaythesettingmode.
2 TumM.C.toselectarepeatp ayrange.
Fordetai s, refer to Selecting are repeat play range
cothispage
3 PressM.C.toconfirmtheselection.
SHUFFLE(shuffle)
TPressM.C.todisplaythesettingmode.
2TurnM.C.loselectyourfavortesetting.
•SONGS-Playbacksongs intheselected
listinrandomorder.
• ALBUMS-Playbacksongsfromaran-
domlyselectedalbuminorder.
•OFF-Cancelrandomplay.
3 PressM.C.toconfirmtheselection.
SHUFFLEALL(shuffleall)
1 PressM.C.totumshuffleallon.
Toturnoff, setSHUFFLE in the FUNCTION
menutooff.
LINKPLAY(Linkplay)
TPressM.C.todisplaythesettingmode.
2TumM.C.tochangethernode;presstoselect.
Fordetail about the settings, refarto Playing
songsrelatedtothecurrentlyplayingsongon
thispage.
PAUSE(pause)
1 PressM.C.topau seorresume.
AUDIOBOOK(audiobookspeed)
1 PressM.C.todisplaythesetting mode.
2TurnM.C.toselectyourfavoritesetting.
• FASTER-Playbackaspeedfasterthan
normal
• NORMAL-Playbackatnorma speed
• SLOWER—Playbackataspeeds lower
thannorma
3 PressM.C.toconfirmtheselection.
S.RTRV(soundretriever)
Automatically enhances compressed audio and restores rich sound.
1 PressM.C.todisplaythesettingmode.
2 TurnM.C.toselectthedesiredsetting.
For details, refer to Enhancing compressed
audioandrestoringrichsound(soundre(never)
onthispage.
3 PressM.C.to:confirmtheselection
Notes
• Switching the control modelo CTRLiPod
pausessong playback. Operatethei Podto resumepayback.
•The following functions are still accessible
fromtheunitevenifthecontrolmodeisset
toCTRLiPod/CTRLAPP
—Pausing
—Fastforward/reverse
—Trackup/down
— Repeat play (ONE/ALL/OFF)
—Rancomplay(shuff e)
— (list)touseiPodmenu
—▲toturntheiPodclickwheeltothelef
—▼tolumtheiPodclickwheelotheright
•WhenthecontrolmodeissettoCTRLiPod
operationsarelimitedasfollows:
—The functionsettings are not available.
—The browsefunction cannot be operated from
thisunit.
Operatingthisunit
BluetoothTelephone
Connectionmenuoperation
Important
Besureloparkyourvehicleinasafeplaceand applytheparkingbrakewhenperformingthis operation.
1Pressandhold
todisplaytheconnec-
tionmenu.
■You cannot operateeth sstepduringgacal.
2TurnM.C.toselectthefunction.
Afterselecting, perform the following procedures to set the function.
DEVICELIST(connectingordisconnectingacellu larphonefromthedevicelist)
TPressM.C.todisplaythesettingmode.
2lumM.C.toselectthenameofadevceyou
van l'exconned/disconnect
- PressancholdM.C. to switch the 3Dadi
dressanddevicename.
3PressM.C. connected/disconnect theselected
cellularphone
[# connection isestabl shed *isindicated
onthedevicename.
DELDEVICE(delet ngace lularphona from the devocels)
1PressM.C.tcdisplaythesettingmode.
2|TurnM.C.toselectthenameofadeviceyou
wanttodelete.
- PressancholdM.C. to switch the 3Dad
dressanddevicename.
3PressM.C.todisplayDELETEYES.
4PressM.C.tcdeleteacellu arhoneinforma-
tionfromthedev celist
•While this function is in use, donotturnoff
theengine.
ADDDEVICE(connectingarowcellularphone)
1 PressM.C. to start searching.
•Tocancel pressM.C. whilesearching.
2 Turn M.C. to select device from the device
st
- If the desired device is not displayed, select
RE-SEARCH
3 Pressandhold M.C. to switch the BD address
addevicename.
4 PressM.C.toconnect theselectedcellular
one
• Tocomplete connection checkthe
vicename(DEH-7350BT;andenterthe
linkcoconyourcellularphone.
•PINcodeissetto0000asthedefault.You
canchangeth scode.RefertoPINCODE
(PINcodeinput)onthispage.
• Iffivedevicesa real ready paired, DEVICE-
FULLisdisplayanditisreptpass bleto
performth sopera or, In this case, delete
apairedevicefirst,
SPCL.DEV.(settngaspecialdevice)
Bluetoothdevicesthatarodificultoestablisha.
connect or with areca ledspecialdevices. If your
Blueoothdev:celisledasaspec:aldevice,se
lecttheappropriateone.
1 PressM.C. to display the setting mode.
2 UseM.C to select aspecial device.
lumtochangethemenuoption.Presstose
lect
• Iffivedevcesa realreadypaired, DEVICE-
FULLisdisplayanditisnetposs bloto
perform th sopera or .In this case. delete
spared device first.
3 Turn M.C. to display this unit's device name.
BDearessandcincode.
4 Use cellular phanetoconnec lothisunit.
• Toccomplete connection checkthe
vicename/DEH-7350BT:andenterthe
linkcodeonyourcellularphone.
•PINcoeissello0000asthedefault.You
canchangeth scode.RefertoPINCODE
(PINcodeInput) on this page.
Operatingthisunit
A. CONN(connect:ngtoaBluetoothdeviceautomatically)
1) Press M.C. to tum automatic connection or
off.
VISIBLE setting the visibility of this unit)
I check the availability of this unit from another
vices. Bluetooth vis bil tyofthisunilcanbelurred
on.
T pressM.C.totumthevis bilitvefthisuniton
criff
• While setting SPCL. DEV., Bluetooth visiol
itvothisunitisturmodontemporarily
PINCODE(PINcodeInput)
Toconnectyourcellularphonetothisunitvia.
Bluetoothwirelesstechnology,you reedtoentera
PINcodeonvournageloverlytheconnection.
Thedefaultcodeis0000.butyoucanchangeit
with this function
1 PressM.C. to display the setting mode.
2 Press▲or▼toselectanumber.
- Press▶to movethecursodolbeneslposi-
tion
4 Afterinputting PINcode pressandholdM.C.
ThePINcode can bestored in the memory.
•Afternputting&digitsPINcode,press
tostoreinmemory.
• After inputting pressing M.C returns you
tothePINcodeinputdisplay, and you can
changethePINcode.
DEV.INFO(BD(Bluetoothdevice)addressbis
pla:
TPressM.C.todisplaythesettingmode.
2TurnM.C.effloswitchlotheBDaddress.
TurningM.C.rightreturnstothedeviocename.
Phonemenuoperation
Important
Besuretoparkyourvehicleinasateplaceand applytheparkingbrakewhenperformingthis operation.
1Press 🔒 todisplaythephonemenu.
2TurnM.C.toselectthefunction
Afterselecting,performthefollowingproce-
durestose:thefunction.
MISSED(m ssedeal history)
DIALED(sialedcall history)
RECENT(receivedcallhistor)
TPressM.C.tcd splavthephonenumberlist.
2TumM.C.loselectanamesmphorenumber.
3PressM.C.tomakeacall.
4When you find a person number that you want
tostorein memory, press and hold done of the
presetuning buttons(1to6).
- Press one of preset buttons 1 to 6 to recall
thedesiredoresetnumber
PHONEBOOK(phoneticbook)
Operatingthisunit
• The phonebook in your cellular phone will be transferred automatically when the phone is connected to this unit.
• Depending on the lularphone, the phone book may not be transferred automatically in this case, operate your lularphone to transforthaphoncook. The visibility function snow obeon. Refer to visible (selling the visibility of this unit) on the previous page.
T PressM.C. to display SEARCH(alphabetical ist).
2TurnM.C. to select the first letter of then a name you are looking for. • Pressanchold M.C. to select the desired character type.
3 PressM.C. to display a register on email:
4 Turn M.C. to select another ameyou are looking for.
5 PressM.C. display the ph or n umberl st. 6 TurnM.C. to select a ph o n e n u m b e r y o u w a n t local.
• When you find a phor anumber that you want to store in memory press and hold one of the preset turing buttons (1 to 6).
- Press one of preset buttons 1 to 6 to recall the desired preset number.
7 PressM.C.tomakeacall.
PRESET(presetphonerumbers)
1 PressM.C. lodislaychesettingmode. 2 UseM.C.tose eottnedasirepresetnumber. Tumtochangethemanoption.Prosstoselect.
- You can also press one of the preset numbers to close octanumber.
3PressM.C.tornakecall.
PHONEFUNC(phone(function)
YoucansetA.ANSRandRINGTONEfrom this menu.For details,refertoFunctionandoperation onthispage.
Functionandoperation
1DisplayPHONEFUNC.
Refer to PHONE FUNC(phone function) on this page.
2PressM.C.todisplaythefunctionmenu.
3TurnM.C.toselectthefunction.
Afterselecting, perform the following procedure to set the function.
A.ANSR(automaticanswering)
1 Press M.C. botumautomat cansweringonor off.
RINGTONE(ringtonese ect)
①PressM.C.olumberingloneorof
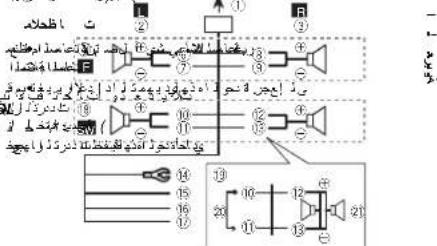
AudioAdjustments
1PressM.C.todisplaythemainmenu.
2TurnM.C.tochangethemenuoption andpresstoselectAUDIO.
3TurnM.C.toselecttheaudiofunction.
Afterselecting,performthetofollowingprocedureslosellheaudiofunction.
FAD/BAL(fader/balanceadjustment)
1PressM.C.odisplaythesellingmode.
2 PressM.C. cycle between fader(front/rear) and balance(left/right).
- TurnM.C. loadjustspeaker balance.
- When therearoutput and RCA output setting
areSW, you cannot adjust front/rears beaker balance. Refer to SWCONTROL(rearoutput and subwoofersetting) or then next page.
EQUALIZER(equalizer-recall)
Operatingthisunit
1PressM.C. tod splaythesettingmode
2 TumM.C. to select the equalizer. DYNAMIC—VOCAL—NATURAL—CUSTOM —FLAT—POWERFUL
3PressM.C.toconfirmtheselection.
TONECTRL(equalizeradjustment)
- Adus eequalizercurvese lingares'oradin CUSTOM.
T pressM.C.tod splaythesettingmode.
2 Press M.C. to select BASS (bass)/MID (mid)/TREBLE(reale).
3 TumM.C. tca adjustt ne level. Adjustment range: +6 to -6
LOUDNESS(loudness)
Loudnesscompensatesfordeficienciesinthelow-and-high-frequencyangesallowvolume.
TPressM.C.todisplaythesettingmode.
2TumM.C.loselectedesiredsetting,
OFF (off)—LOW(low)—HIGH (high)
3PressM.C.toconfirmthaselection.
SUBWOOFER1(subwooferon/offsetting)
Th sun t sequ ppad with asu ewofer output which can octurredonoroff.
1PressM.C. lod splaythesettingmode.
2TumM.C.toselectthedesiredsetting.
NORMAL(normalphase)—REVERSE(reverse
9 PressM.C.toconfirmthaselection.
SUBWOOFER2(subwooferadjustment)
The cut-off frequency and output level can be adjusted when the subwoofer output is on. Only frequencies slow than those in these selected range output to a tron that subwoofer.
- Press M.C. today as residential mode.
2 Press M.C. to cycle between the cut-off frequency and output level of the subwoofer. Cut-off frequency (Cut-off frequency display flashes.)—Output level (Output level display flashes.)
- TurnM.C. to select nodesiro setting. Cut-off frequency: 50HZ—63HZ—80HZ—100HZ—125HZ Output level -24to+6
SLA(source evel adjustment)
SLA(SourceLevelAdjustment)latsyouadjustthe volume level of each source to prevent radical charges in volume when switching between sources.
- Settings are based on the FM volume level, which remains unchanged.
• The AMvolumelvelcanalsobeadjustedwith this function.
- Wh anselecting Masth asource, you cannot switch to SLA
1 PressM.C. to diso aytnesetting mode.
2TurnM.C. to adjust the source volume Adjustment range: +4to-4
3 PressM.C.to confirm theselection.
InitialSettings
1PressS(SRC/OFF)andholduntiltheunit turnsoff.
2PressM.C.andholduntilfunctionname appearsinthedisplay.
3TurnM.C.toselecttheinitialsetting.
Afterselecting,performthefollowingprocedurestosettheinitialsetting.
Operatingthisunit
CLOCKSET(settingtheclock)
1PressM.C. lod splaytheset ing mode.
2) Press M.C. to select these segments of the clock
displayyouwishtoset.
Hour—Minute
3lumM.C.toadjusttheclock.
FMSTEP(FMturingstep)
The Filtuning step employed by socktuning can besw tched between 100kHz, the preset step and 50kHz.
- Itscoekturingisoperformedin50kl-hzstops, stationsmaybetunedinimpreciscy.tunoin (thestlationswithmanualturingoruseseektuningagain
• Thetuningstopromainsat50kHz during manual tuning.
1PressM.C.1odisplaythesettingmode.
2) TurnM.C.toselecttheFMtuningstep.
50KHZ(50kHz)—100KHZ(100kHz)
3PressM.C.loconfirm(theselection,
AMSTEP(AMtuningstep)
The AM tuning step can be switched between 9 kHz, the process step and 10 kHz. When using the tuner in North Centralo South America, reset the tuning step from 9 kHz (531 kHz to 1602 kHz allowable) to 10 kHz (530 kHz to 1640 kHz allowable).
1PressM.C.todisplaythesettingmode. 2TurnM.C.toselecttheAMtuningstep.
3PressM.C.toconfimtheselection,
AUX(auxiliary input)
Activate this setting when using an auxiliary device connected to this unit.
1PressM.C.tctu.mAUXonoroff
USB(plugandplay)
Thissettingallowsyoutoswitchyoursourceto
USB/iPodautomatically
1 PressM.C. column neplugandplayfunction onoroff.
ON-WhaniaUSBstoragedevice/iPodsconnected,dependngorthelyoneofdevice,thesourceisautomatcallyswitchdottoUSB/iPod whenyoulumonheengmelfyodisconnect yourUSBstoragedevice/iPod,thisunit'ssourceistumodoff.
OFF-WhonaUSBstoragodovico/Podisconnected, thesource is not switched to USB/
iPodautomatical y.PloasochangethesourcetoUSB/iPodmanually.
SWCONTROL(rearoutputandsubwoofsetting)
TherearspeakerleadsoutoulandRCAoutput can be used for full ranges speaker or subwoofer connection.
If you switch to REAR-SP SW, you can correct a rearspeaker eaddirectly oasubwoofer without using an auxili anyamp.
Initially, REAR-SP is set for rear full-rangespeaker connector (FUL).
TPressM.C.todispleythesettingmode.
2 Turn M.C. to change the output and press to select.
REAR-SP—PREOUT
3 Turn M.C. tochangetesett ng.
REAR-SP FUL—SW
PREOUT:SW—REA
- Everifyouchangethissetting,therewill benoutputur lessyourturnthesubwooferoutputon(refertoSUBWOOFER1 (subwooferon/offsetting)ontheprevious page).
- If you changel this setting, subwoofer output in the audiomen will return to the factory settings.
DEMO(demon d splaysetting)
1 PressM.C.toluminemodisplayonoroff.
Operatingthisunit
SCROLL(scroll modesetting)
Wheneverscro lissettoON, recordedtextinformationscro iscontinuously nthedisplay Setto OFF fy uprefertheinformationtoscrolljust
once,
1 PressM.C.totumtheeverscrolloncroft
BTCLEAR (resetting the Bluetooth wireless technology module)
Bluetoothtelephoredatacanbedeleted. Top-protectpersonal information were recommenddeleting in scatabeforestransferringtheunittootherpersons. Inefollowingsettingswillbedeleted.
- registration assignment of the Bluetooth telephone
- call history of the Bluetooth telephone
• information of the connected Bluetooth telephone
1 PressM.C. to show the confirmation display.
YESisd splayed.Clearingmemory snowon slandby.
If you are hard to resel phonememory,
press ➕. The displayreverts
2 PressM.C. clear the memory.
CLEARED is displayed, new listings are deleted.
• While this function sin use, don't turn off theeng ne.
VERINFO(Bluetoothversiondisplay)
Youcandisplaythesystemversionsofth-sunit andofBluetoothmodulo.
TPressM.C.todisplaythe information.
S/WUPDATE(updatingthesoftware)
This function is used to update this unit with the latest software. For information on the software and updating, refer to our website.
- Nevertum the unit off while the software is being updated.
1 PressM.C.tod splaythedatatransfermode. Followtheon-screen instructionstof nishup- datingthesoftware.
UsinganAUXsource
1InsertthestereominiplugintotheAUX inputjack.
2PressS(SRC/OFF)toselectAUXasthe source.
Note
AUX cannot be selected unless the auxiliary setting is turned on. Formed details, refer to AUX (auxiliary input) on this page.
Installation
Connections

WARNING
- Usespeakersovers0W(outputvalue)and between 4Ω1c8Ω(impedancevalue). Do nouse1Ω1c3Ωspeakersforlnisunil.
• The black cab is ground. When installing this unit power amp (sold separately), ensure that the ground wire first. Ensure that the ground wire is properly connected to a part of the car's body. The ground wire the power amp and the one of the unit any other device must be connected to the course separate with different screws. If these were for the round new reoosorta, sout, it could result in the generation of smokcormal function.

Other devices (Another electronic device in the car) Metal parts of car's body

Important
- When installing this unit vehicle without an ACC (accessory) position on the ignition switch, failure to connect thered caplet of the terminal that detects operation of the ignition key may result in battery drain.

ACC position

No ACC position
- Use this unil with a 2-vo l battery and negative grounding on y. Failurctodosomayrosullinaf reormalfunction.
- Topreventashort-circuit,overmeatingormal-function,besuretofollowthedirections below.
— Disconnect the negative terminal of the battery before installation.
— Secure the wiring with cable clamps or adhesive tape. Wrap adhesive tape around wiring that comes into contact with metal parts to protect the wiring.
— Place all cables away from moving parts, such as the gear shift and seat rails.
— Place all cables away from hot places, such as near the heater outlet.
— Do not connect the yellow cable to the battery bypass it through the hole to the engine compartment.
— Cover any disconnected cable connectors with insulating tape.
— Do not shorten any cables.
— Never cut the insulation of the power cable of this unit in order to share the power with other devices. The current capacity of the cable is limited.
— Use a fuse of the rating prescribed.
— Never wire the negative speaker cable directly to ground.
— Never band together negative cables of multi-ole speakers. - When this unitilion, controlsigna saresent through the sluy/whitcable. Connect this cable to the system mole control of an external power ramp nor vehic e sauto-antennarclay control terminal (max 300mA12V DC). Ill reveh cile sequi eped wil haglass antenna, connect illothe anlennaboosler powers upoly terminal.
- Neverconnecttheblue/whitecabletothe powerterminalofanexternalpoweramp. Also,neverconnecttitoepowerterminal oftheautoantenna.Doingsomayresultin batterydrainoramalfunction.
Installation
This unit

①Powercordinput
②Microphoneinput
③Microphone
④Rearoutputsubwocteroutput
⑤Frontoutput
⑥Antennainout
⑦Fuse(10A)
⑧Wiredremoleinput
Hard-wiredremolecontroladaptorcanbe connected(soldseparately).
Power cord
Performtheseconnectionswhennotconnectingarearspeakerleadtoasubwoofer.
flowchart
graph TD
    A["①"] --> B["②"]
    B --> C["③"]
    C --> D["④"]
    D --> E["⑤"]
    E --> F["⑥"]
    F --> G["⑦"]
    G --> H["⑧"]
    H --> I["⑨"]
    I --> J["⑩"]
    J --> K["⑪"]
    K --> L["⑫"]
    L --> M["⑬"]
    M --> N["⑭"]
    N --> O["⑮"]
    O --> P["⑯"]
    P --> Q["⑰"]
    Q --> R["⑱"]
    R --> S["⑲"]
    S --> T["⑳"]
    T --> U["㉑"]
    U --> V["㉒"]
    V --> W["㉓"]
    W --> X["㉔"]
    X --> Y["㉕"]
    Y --> Z["㉖"]
Perform these connections when using asub-woofer without the optional amplifier.

flowchart
graph TD
    A["①"] --> B["②"]
    B --> C["③"]
    C --> D["④"]
    D --> E["⑤"]
    E --> F["⑥"]
    F --> G["⑦"]
    G --> H["⑧"]
    H --> I["⑨"]
    I --> J["⑩"]
    J --> K["⑪"]
    K --> L["⑫"]
    L --> M["⑬"]
    M --> N["⑭"]
    N --> O["⑮"]
    O --> P["⑯"]
    P --> Q["⑰"]
    Q --> R["⑱"]
    R --> S["⑲"]
    S --> T["⑳"]
    T --> U["㉑"]
    U --> V["㉒"]
    V --> W["㉓"]
    W --> X["㉔"]
    X --> Y["㉕"]
    Y --> Z["㉖"]
    Z --> AA["㉗"]
    AA --> AB["㉘"]
    AB --> AC["㉙"]
    AC --> AD["㉚"]
    AD --> AE["㉛"]
    AE --> AF["㉜"]
①Topowercorcinput
②Left
③Right
(4) Frontspeaker
⑤Rearspeaker
(6)White
(7)White/black
⑧Gray
⑨Grav/black
@Green
(1)Green/black
12Violet
⑬Violet/black
⑭Black(chassisground)
Connectloaclean, paint-freemetallocation.
15Ye ow
ConnecttoReconstant12Vsupplytermi-
nal.
16Red
Connect to terminal controlled by ignition
switch(12VDC).
⑰Blue/white
Connectosystemcontrolterminalofthe
power a mpor auto-antennare aycontroller
minal(mex,300mA 12VDC).
⑱Subwoofer(4Ω)
Section
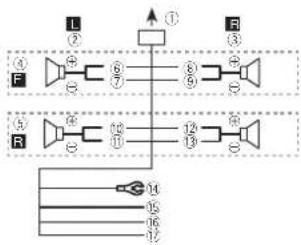
Installation
@Whenusingasubwooferof70W(2Ω),be suretoconnectthesubwooferlothevirol andvirol/blackleadsofthisunit.Donot connectanythingtothegreenandgreen/blackleads.
②Notused
②Subwoofer(4Ω)×2
Notes
- Witha2speakersystem, donetconnectanythingtothespeakerleadsthatarenotconnectedlospeakers.
- Changetneitialsettingofthisunit,Refer toSWCONTROL(rearoutputandsubwoofer setting)onpage10. The subwooferout of this unit is monaural.
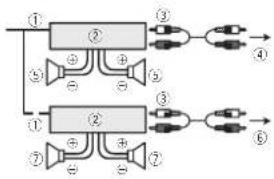
Poweramp(soldseparately)
Performtheseconnectionswhenusingtheo- tionalamplifier.
flowchart
graph TD
    A["①"] --> B["②"]
    B --> C["③"]
    C --> D["④"]
    B --> E["⑤"]
    E --> F["⑥"]
    G["⑦"] --> H["②"]
    H --> I["③"]
    I --> J["⑥"]
    H --> K["⑦"]
    K --> L["⑧"]
    M["⊕"] --> N["⊕"]
    O["⊕"] --> P["⊕"]
    Q["⊕"] --> R["⊕"]
    S["⊕"] --> T["⊕"]
①Systemremotecontrol
ConnecttoBlue/whitecable.
(2)Poweramo(so dseparately)
③ConnectwithRCAcables(soldseparately)
④ToRearoutput/subwooferoutput
⑤Rearspeakerorsubwoofer
⑥ToFrontoutput
⑦ Frontspeaker
Installation
Important
- Checkallconnectionsandsystemsbefore finalinstallation.
• Dorotuseunauthorizedparsasthismay cause malfunctions. - Consultyourdea erifinstalationrequires drillingofholesorothermodificationstothe vehicle.
- Donotinstallthisunitwhere:
— tmayinterferewithoperationofthevehicle.
— tmaycauseinjurycoepassengarasaresult
ofasudenstop.
• Tresemiconductor laser will be damaged if it overheats. Install this unit away from hot places such as near the heater outlet. - Optimum performance is obtained when the unitisinstalledatanangleoflessthan60°.

• To ensure proper health dispersal when using this unit, makes sure you could compare behind there are parallel wrap any loose cables that are not blocking the events when installing the unit.
DINfront/rearmount
This unit can be properly installed using either front mountor rear mount installation. Use commercially available parts when installing.
Installation
DINFront-mount
1Insertthemountingsleeveintothedashboard.
Fornstallation nsmallowspaces,usethosup- pliedmountingsleeve.lithereisencoughspace, usethemountingsleevthatcamewiththevo- hicle.
2Securethemountingsleevebyusinga screwdrivertobendthemetaltabs(90°)into place.

①Dashboard
②Mountngsleeve
3Installtheunitasillustrated.
Usecommerciallyavailablepartswhen installing.

text_image
Technical diagram showing labeled components of a mechanical assembly with numbered parts①Nut
②Firewallormetalsupport
③Metalstrao
④Screw
⑤ Screw(M4×8)
■ Makasurathatth a unit is installed accurately in place. An unstable installat on may cause skipping or thermal malfunctions.
DINRear-mount
1 Determinetheappropriateposition wheretheholesonthebracketandtheside oftheunitmatch.
2Tightentwoscrewsoneachside.

① trusscrew(5mm×8mm)
②Mountingbracket
③ Dashboardorconsole
Removingtheunit
1Removethetrimring.
①Tirring
②Notchedtab
- Releasing the front panel allow easier access to the mining.
- When reattaching the trimming point the sidewith then etched above.

En
Installation
2Insertthesuppliedextractionkeysinto bothsidesoftheunituntiltheyclickinto place.
3Pulltheunitoutofthedashboard.
Removingandre-attachingthe frontpanel
You can remove the front panel to protect your unit from that.
Pressthedetachbuttonandpushthefront panelupwardandpullllowardyou. Fordetails refer toRemovingthefrontpanel to protect your unit from theft and Re-attaching the frontpanel on page 4.
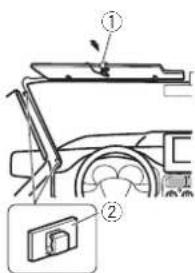
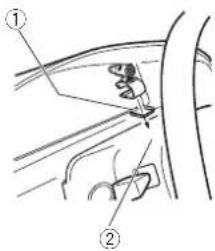
Installingthemicrophone
CAUTION
It is extremely dangerous to allow them microphone lead to become wound around the steering column or gear stick. Besuret installing the unit in such a way that it will not obstruct driving.
Note
Install themicrophone in a position and orientation that will enable it top ckup the voice of the person operating the system.
Wheninstallingthemicrophoneon thesunvisor
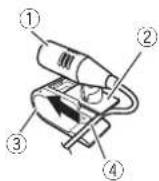
1 Install themicrophoneonthemicro-phoneclip.
①Microphone ②Microphonedip
2Installthemicrophonecliponthesun visor.
With the sunvisoru, install the microphone clip. (Lowering the sun is or reduce the voice recognition rate.)
Installation
text_image
Technical diagram showing a mechanical assembly with labeled parts, including a numbered component and a magnified inset.①Microphoreclip ②Clama Useseparatelyso oclampstosecurethe leadwherenecessaryins cethrevehicle.
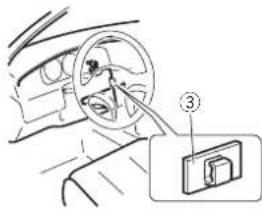
Wheninstallingthemicrophoneon thesteeringcolumn
1 Install themicrophoneonthemicrophoneclip.
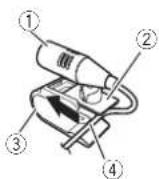
① Microphone ② Microphonebase ③ Microphoneclip ④ Fittner microphonalaedintothagroove.
■Microphonocanbeinstalledwithoutusingmicrophoneclip, intrinsiccase,detachthemicrophonebasefromthemicrophoneclip.Todetachthemicrophonebasefromthemicrophoneclip.slidethemicrophonebase.
2Installthemicrophonecliponthesteeringcolumn.
text_image
Diagram showing car seatbelting technique with labeled parts ① and ②
text_image
Diagram showing car steering wheel and attached door panel with numbered annotation①Double-sidedtape ②Insta lthemicrophoneclipontherearsideof thesteeringcolumn.
③ Clamp Uses separately sold clamp to secure the lead where necessary inside the vehicle.
Appendix
Installation
Adjustingthemicrophoneangle

The microphone angle can be adjusted.
AdditionalInformation
Troubleshooting
| SymptomCauseAction | ||
| Thedisplay automatically rotumstochord narydis-play. | Youdidnotper-formanyopera-tionwithin about30seconds. | Performoperation again. |
| Theropat playrange changesun-expectedly. | Decandingon therepeato ay range,those- listedranga maychange whenanother foldaromrack is beingselected orduringlast forwarding/re-versing. | Selecttheropat playrangeagain. |
| Asupolderis notplayed back. | Subfoldenscan-notcplayed whenFOLDER (folderrepeak)is selected. | Selectarotherre-paatplayrange. |
| NOXXXXappearswhena displays changed(NOTITLE,forex-ampla). | Thereisncem-beddedtexinformation. | Switchchedisplay orplayanother trackfile. |
| Thedisplayis illuminated whentheund isturnedoft. | Denomodels on. | •Press ➔ to canceldemo mode. •Turnoffthe demodisplaysel-ling. |
SymptomCauseAction
| Theunitsma functioning.Thereisinterference. | You are usinga device, such as acellular phone, that transmitselectr wavesnear theunit. | Move electrical device,esthat may becausingtheinterferenceaway from theunit. |
Errormessages
When you contact your dealer or your nearest Pioneer Service Center, besurelonolet the error message.
Built-inCDPlayer
MessageCauseAction
| ERROR-11, 12,17,30 | Thed-scidirty Cleanthed sc. | |
| Thed-scis scratched. | Replacethed disc. | |
| ERROR-10, 11,12,15, 17,30,A0 | Thereisane ectricalorme-chan calerror. | Turntheignition switchOFFand backON,or switchlocouffer-entsourcethen backtotheCD player. |
| ERROR-15Theinserted discisblank | Replacethadisc. |
| ERROR-23 | Unsupported | Replacethedisc. |
| CDformat |
| FRMTREAD | Sometimesthereisade laybetween thestartof laybackand when youstart of hear anysourd. | Wait until hemessaged disappearsandyouhearsound. |
AdditionalInformation
MessageCauseAction
| NOAUDIOTheinserted discdoesnot contanyry playah ef les. | Replacehedisc. |
| SKIPPEDTheinserted discoscontains DRMprotected filos. | Replacehedisc. |
| PROTECTAl thefilesontheinserted discacrambeddedwith DRM. | Replacehedisc. |
USBstoragedevice/iPod
MessageCauseAction
| NODEVICEWhenplug and playisoff,no USBstoragedeviceoriPodis connected. | •Turnthep ug andplayon.•Connectacom- cetbleUSBstor- agedevice/iPod. |
| FRMTREADSometimes thereisadelay between the startof playback knowwhenyou startlohearany sound. | Waitunt lthe messagedisap- pearsandyou noarssound. |
| NOAUDIOThereareno songs. | Transfertheaudio of fiestacheUSB storagedevice andconnect. |
| Theconnected USBstoragedevicehassecur- lyenabled | FollowtheUSB storagedevice in-structionstodis- ablethesecurity. |
MessageCauseAction
| SKIPPEDTheconnectedUSBstoragede-veocortainsfl esembeddedwithWindowsMedia*DRM9/10 | PlayanaudioIlenotembeddedwithWindowsMediaDRM9/10. |
| PROTECTAlthofilosintheUSBstoragedeviceareem-boscdwithWindowsMediaDRM9/10 | TransforaudiofilesnotembaddedwithWindowsMediaDRM9/10totheUSBstoragede-vicandconnect. |
| N/AUSBTheconnectedUSBstoragede-viceorsorsup-portedbythsunit. | ConnectaUSBMassStorageClasscompliantdeviceDisconnectyourdeviceanoreplaceitwithacompatibleUSBstoragedevice. |
AdditionalInformation
MessageCauseAction
| CHECKUSBTheUSBconnectororUSB cablehasshort-circuited. | Checkthatthe USBconnectororUSBcapoleisnot caughtinsomethingordamaged. |
| Theconnected USBstoragcodevicoconsumos morethanb00 mA(maximlu m a lowa c current). | Disconnectthe USBstoragcodevicoardidonot useil.Turnthe ignitionswitchco OFF.thentoACC orONandihen connectiony compliantUSB storagedevces. |
| The Podoperatescorrectly butdoesnot charge. | Makassuretha connectionable forthe Podhas notshortadout (e.g.,notaught inmeta objects). Afterchecking, turntheignition switchOFFand backON,ordisconnectthePod andreconnect. |
MessageCauseAction
| ERROR-19:Communication failed. | •Performances of the following operations.-Turn the ignition switch OFF and backON,-Disconnect the USB storage device,-Changeload iferentsource,Then,return to the USB source.•Disconnect the cae efromthe Pod Once the Pod'smainmanu scisplayed,no connect the Pod andresatic. |
| IPodfailure:Disconnect the cae efromthe Pod Once the Pod'smainmanu scisplayed,no connect the Pod andresatic. | |
| ERROR-23:USB storagede- vicewas to for- malted with FAT'2:FAT16or FAT32 | US2storagede- vices could be for- malted with FAT12:FAT16or FAT32. |
Appendix

Appendix
AdditionalInformation
MessageCauseAction
| ERROR-16ThePocfirmwareversion sold | LpdantheiPod version. | |
| iPodfailureDisconnectthe cablofromthe iPod Oncethe iPod'smainmenu isisplayed.ro connecttheiPod andpresent. | ||
| STOPtherearono songsinthe currentist. | Selectalistthat containssongs. | |
| NOTFOUNDNorelated songs | Transfersongsto theiriPod. | |
BluetoothTelephone
MessageCauseAction
| ERROR-10 InepowerfailedfortheBlue-toolmoduleofth sunit. | TurntheignitionswitchOFandthentoACCorON.Ifineero mes-sageisstilldis-playcodefterperformingtheaboreaction,pleasecontactyourdealcorerauthorizedPioneerServiceStation. |
Handlingguidelines
Discsandplayer
Use only a list that feature either of the following two logos.


Use12-cmdiscs.Donotuse8-cmdiscsoran adapterfor8-cmdiscs.
Use only conventional fully circular discs. Don't use tapered discs.


DonotinsertanythingothertheraCDintothe CD loadingslot.
Donolusecracked,chipped,warped,orther-w,sedamageddiscosastheymaydamagstneplay-Br.
UnfinalizedCD-R/CD-RWciscscannotbeplayed back.
DonotouchtherecordedSurfaceofthediscs.
Storediscs in their cases when not ir use
Donotallachlabels, write on or apply chemicals to the surface of the scs.
TocleanaCD, wipetnediscwithasoftclotnoutwardfromthecenter.
Condensation may temporarily impair the player's performance. Let it rest for about one hour to adjust too warmer temperature. Also, wice any damp disc soff with soft cloth.
AdditionalInformation
Playbackkofd scemaynotbepossiblebecauseof disccharacteristics disformat,recordedapplication,playbackenvr comment,storageconditions, andsoon.
Roadshocksmayinterruptdisplayback.
USBstoragedevice
ConnectionsviaUSBhubarenotsupported
Donotconnecting nothingotherthanaUSBstoragedevice.
Firmlysecure the USB storage device with hindriving. Donotlet the USB storage device for tothe floor, where may be a major under the brake accelerator pedal.
Depending on the USB storage device, the following problems may occur.
• Operationsmayvary.
- The storage device may not be recognized.
• Fi os mayr ctb o played back properly.
• Theo-vice may generate noise in the radio.
iPod
Donot eavelhei Ptxinplaceswithh ghtemperatures.
To ensure proper operation, connected the dock connector cable from the Poddirect ytothisunit.
FirmlysecuretheiPoolwhandriving.Donotlotthe iPoolal ontothefloor,whereitmaybecome jammodunderthebrakesaccoloratorpodal.
AcoutilPodsettings
- When an iPod is connected this sun t changes the EQ (equalizer) setting that the Pod to offer ordertOptimize the acoustics. When you dis connect the iPod, the EQ return to the original selling.
- You cannot set Repeat to for the Pod when using this unit. Repeat is automatically changed to all when the Pod is connected to this unit.
Incompatible text saved on the iPoow II not oed is played by the unit.
DualDiscs
DualDiscsarotwo sidocdiscosthatnavoarccordableCDforaudioononesideandarecordableDVDforvideoontheother.
Sinoctho CDSidictDualDiscs snotphysically compatible with the general CDS standard, it may not be possible to play the CDSidewith this unit. Frequent loading area acting of a Dual Discmay results scratch on synthetic, Serious scratches can lead to playback problemson this unit. In some cases a Dual Discmay become stuck in the disc load nsgsstand will noteject. Toprevent this, we recommend you refra ni from using Dua D sc width this unit.
Pleasere/entoeinformationfromthediscmanufacturerformoredetailedinformationabout. DualDiscs.
Compressedaudio compatibility(disc,USB)
WMA
Fileextlens or: wma
Bitrate:48kbpsto320kbps(CBR),48kbpsto384kbps(VBR)
AdditionalInformation
Sampling frequency: 32 kHz, 44.1 kHz, 48 kHz
WindowsMediaAudioProfessional.Lossless, Voice/DRMStream/StreamwithVideo:Notcompatible
MP3
Fileextension:rp3
Bitrate:8kbpsto320kbps(CB10).VBR
Sampling frequency: 8kHz to 48kHz (32kHz, 44.1 kHz, 48kHz for emphasis)
CompatibleID3tagversion:1.0,1.1,2.2,2.3,2.4 (ID3tagVersion? xisg venpriorilyoverVersion1.x.)
M3up aylist:Notcompatible
MP3i(MP3interactive).mpSPRO:Notcompatiolo
WAV
Fileextension:wav
Quantization bits:8and16(LPCM);A(MS ADPCM)
Sampling frequency: 6kHz to 48kHz (PCM), 22.05kHz to 44.1kHz (MSADPCM)
Supplementalinformation
Onlythefirst32characterscanbedisplayedasa fi ename(includingtheftieextension)orafolder name.
This unit may not operate correctly depending on the application used to encode WMAflas.
Theremaybeaslightdelayatineslanloplayback ofaudiofiesembeddedwithmagedalaoraudioficsstorodonaUSBstoragedovioothathasnumercusfolderhierarchies.
Disc
Playablefolderhierarchysuptoelghtlers(Apracticalhierarchyslessthantwetlers.)
Playable folders: upto99
Playable: les: upto989
Filesystem:ISO9660Level1anc2.Romeo,Jo iel
Multi-sess or playback: Compatible
Packetwrittenatalransfier.Notcompatiole
Regardless of the engithoficar ksections between the songs from neongina recording, compressed aciod scsp aywith asnortoause between songs.
USBstoragedevice
Playable folder hierarchy: uptoeightiers (Apractical hierarchy is less than waiters.)
Playablefolders:upto500
\playable \ + les: upto 15000
Playbackofcopyright protectedfiles:Notcompatible
Part I oned USB storage device Only the first part on can be played.
Theremaybeaslightdelaywhenstartingplay-backofaudiofilesonaJS3storagedevicewith numerousfo der hierarchies.

CAUTION
Donot eavediscsoraUSBstoragedevicein anyplacelhal ssubjectonightemperatures.
AdditionalInformation
iPodcompatibility
This sun is supported only the following Podmodels. Supported Podsoftware version or sareshown
below.Olderversionsmaynotbesupported
- IPILIP,EXS(SOIIWA'ENE)(K214.5)
• iPhone3C (softwareversion4.0)
• iPhone, softwarevers or 3.1.3)
- iPodnanobth-generation(softwareversion 1.0.2)
- iPodnano4th generation (softwareversion 1.0.4)
- iPodnano3rdgeneration (softwareversion 1.1.3)
- iPodnano2ndgeneration(sofwarevers or 1.1.3)
• iPodnano1stgeneration(softwareversion 1.3.1)
- iPodlouch3rdgeneration (softwareversion 4.3)
- iPodlouch2ndgeneration(softwareversion 4.0)
- iPodtouch1stgeneration(softwareversion 3.1.3)
- iPodclass c160GB(softwareversion2.0.4)
• iPodclass c170GB(softwareversion2.0.1)
- iPodclass c(softwareversion1.1.2)
- iPodthgeneration(softwareversion1,3)
Depending on the generation conversion of the iPod, sometime or smaynotbeava lab e.
Operations may vary depending on the software version of iPod.
When using an Pod anti Pod Dock Connector to USB Cable is required.
APioneerCD-U50 interfaceableisa soavailable.Fordetails,consultyourdealer.
About the file format compatible lity refer to the iPodmanuals.
Aud eBook, Podcast: Compatible

CAUTION
PioneeracceptsnoresponsibilityfordatalostonthoiPod, evenifthatdataislostwhilethisunitisused.
Sequenceofaudiofiles
Theusercannotassignfoldernumbersand specify playbacksequenceswiththisunit.
Exampleofahierarchy

Level 1 Level 2 Level 3 Level 4
Folder Compressed audio file 01to05:Folder number ①to⑥:Playback sequence
Disc
Folder selection sequence or the operation may differ depending on the encoding or writing software.
USBstoragedevice
Playbacksequence sthesameasrecorded sequence in the USB storage device.
Tospecifytheplaybacksequence, the following methodisrecommended.
[1] Createafilenamelthatincludesnumbers thatspecifytheplaybacksequenceie.g., 001xxx.mp3and099vyy.mp3).
|2|Putthosefilesintoafolder.
3 SavethefoldercontainingfilesontheUSB storagedevice.
However, depending on the system environment, you may not be able to specify the playback sequence.
Appendix
AdditionalInformation
For USB portable audio players, these sequences different and depend on the player.
Bluetoothprofiles
- InorderlouseBluetoothwire esstechnology, devices must be able to interpret certain profiles. This unit is compatible with the following profiles.
—GAP(GenericAccessProfile)
—SDP(ServiceDiscoveryProtocol)
—OPP(ObjectPushProfile)
—HFP(HandsFreeProfile)
Copyrightandtrademark
Bluetooth
TheBluetooth® wordmarkandlogcsareregisteredtrademarksownedbyBluetooth SIG,Inc, andanyuseofsuchmarksbyPioneer Corporationisunderlicense.Othertrademarks andtradenamesarethoseoftheirrespective owners.
iTunes
Apple and Tunes are trademarks of Apple Inc. registered in the U.S. and other countries.
MP3
Supply of this productionly conveys a license for private, non-commercial use and does not convey a license on implying any right purchase this product in any commercial (i.e. revenue generating) real-time broadcasting (terrestrial, satellite, cabican/orany thereafter), broadcasting/ streaming/Internet, intranels and or other networks or in the electronic distribution systems, such as pay-audio audio-on-demand applications, An incordantlicator such uses is required. Fordalls, please visit https://www.mplicensing.com.
WMA
WindowsMediaandtheWindowslogoare trademarksorregisteredtrademarksof MicrosoftCorporationintheUnitedStatesand/orothercountries.
This product include technology owned by Microsoft Corporation and cannot be used for distributed without a license from Microsoft Licensing, Inc.
iPod&iPhone
iPhone,iPod,iPodclassic,Podnano,andiPod toucharetrademarkscfAppleInc.reg slered in the U.S. and other countries.
"Made for iPod" and "Made for iPhone" mean that an electronic accessory has been designed to connect specifically by iPod or iPhone, respectively and has been certified by the device or computer standards. Apple is responsible for the operation of this device or compliance with safety and regulatory standards.
AdditionalInformation
Specifications
General
| Ratio powersource......14.4VDC | |
| (tallow/above voltage range 12.0 Vto14.4VDC) | |
| Groundingsystem......Negativeness | |
| Maximum current consumption......10.0A | |
| Dimensions(W×H×D) | |
| D/N | |
| Chessis......176mm×50mm×165 mm | |
| Nose......188mm×56mm×17 mm | |
| D | Chessis......176mm×50mm×165 mm |
| Nose......170mm×46mm×17 mm | |
| Weight......2kg | |
Audio
Maximum power output. 50W×4
Continuouspowercrou.pul.
22W×4(50) ztc150001 z.
5%71 D,40 load,bothchan
nelsdriver)
Load impedance .... 4Ω (4Ω to 8Ω allowable)
Preculmaxir uryou.pu.love
20V
Tonecontros
| Bass | |
| Frequency......100Hz | |
| Gain......=12dB | |
| Mid | |
| Frequency......1kHz | |
| Gain......=12dB | |
| Treble | |
| Frequency......10kHz | |
| Gain......=12dB | |
| Surowoferrmonost | |
| Frequency......50/63/80/100/125Hz | |
| Slope......~9dB/vert | |
| Gain......6d3to-2dB | |
| Phase......Norms/Reverse | |
CDplayer
System....Compact disaud osystem
.ish:discs....Compostdisc
Signal-to-noise ratio ..... 94 cB (1 k Hz) [TC-A network]
Number of channels.....2 interest
WV4cccdion ermal. Ver 7.7.1.8.9.10.11.12"ch
audio)
(Windows/MediaPlayer)
VP3decodingformat.....MPEG-12AudioLayer3
WAVsigna format....Linear PCM&MSADPCM
(Non-compressed)
USB
USBstandarspecification
USB2 0f full speed
Maximum current supply
500mA
JSBClass....MSC(MassStoratorClass)
AT12.FAT16.FAT32
WVAdecodingformat...Ver.7.7.1.3.9.10.11.12.2ch
audio
(Windows Media Player)
VP3decoingformat.....MP70-12Audio layer?
WAVsigna format.... linearPCM&MSADPCM
(Non compressed)
FMtuner
| Frequency range | 87.5MHz to 100.0MHz |
| Usable sensitivity | 9 dBi (0.8μV/75 Ω mono. S/N 30dB) |
Signal-to-noiseratio.....72dB(IFC-Anetwork)
AMtuner
Frequencyrange.....531kHz to 1602kHz (9kHz)
530kHz to 1640kHz (10kHz)
Usab esensitivity.....25μV(S/N 20dB)
Signal-to-noiseratio.....62dB(DC-Anetwork)
Bluetooth
Version.....Bluetooth2.0certified
Outputpower....-4dBm Max.
(Powerclass2)
Infraredremotecontrol
Wavelength.....940nm_50nm
Output.....typ:12mw/sroerInfraredLED
Note
Specificationsandthedesignaresubiectto
modificat onwithoutnotice.

natural_image
Two horizontal rounded rectangles side by side, no text or symbols present
English
19m
Sección
01
Antesdecomenzar
text_image
Diagram of a car front panel with numbered labels pointing to different compartments or parts.ParteParte
text_image
Diagram of a 19-pin electronic component with labeled pins and connectionsAM:OFF—LEVEL1—LEVEL2
S.RTRV(SoundRetrever)
FMSTEP(basodesintoniade FM)
text_image
Technical diagram showing labeled components of a mechanical assembly with numbered parts①Tuorca ②Muroconaruegosoportedemeta ③Corroametálica ④Tomillo
text_image
Technical diagram showing a mechanical assembly with labeled parts, including a numbered component and a magnified inset.①Pinza
②:Abrazadema
Juselasaorazaderascomradasporseparado parafjare cableenloslugaresdel interior delveniculodonaseanecesario.
text_image
Diagram showing car seatbelting technique with labeled parts ① and ②
text_image
Diagram showing car interior with steering wheel and hand tool, labeled with number ③①Cintaadhesivadedopecara
WindowsMed aAudioProfessional, Lossless.
Voice/DRMStream/Streamconvideo: incompatible
MP3
MP3 (MP3interactive).mp3PRO: noncompatible
WAV
Extensióndearchive,way
Bitsdequantificación:8y16(LPCM),4(MS ADPCM)
Frecuanciademuastro:16kHza48kHz(LPCM), 22,05kHzy44,1kHz(MSADPCM)
(Windows/MediaPlayer)
Formarocledecodificación VPS
MPFG-1&2AudioLayer3
Forma, cdosefialWAY... PCM Incal & MSADPCM
(Nocem or m de)
SintonizadordeFM
Gamadefrecuencias.... 87.5MHz108.CMHz
Sera bidad, jti izale ..... 9 dBf (0.8 μV/75 Ω mono,
schal/-uide:30(dB)
text_image
Labeled diagram of a car front panel with numbered components for identification| Parte | Parte | ||
| 1 | S(SRC/OFF) | 8 | 2 (Fors/Nogancho) |
| 2 | ▲(Ejistar) | 9 | 3 (Retroceder/D splay/Rolagem) |
| 3 | Q (Lisia) | 10 | ▲/▼/▲▶ |
| 4 | MULTI-CONTROL(M.C.) | 11 | 2 /DISPOFF |
| 5 | Slotdocarrogamentocodisco | 12 | 1a6 |
| 6 | PortaUSB | 13 | Conectordaen-tradaAUX(cor-rectorestéreoce3,5mm) |
| 7 | B(BAND/ESC) | 14 | BotãoDesencealxar |
Controleremoto

text_image
Diagram of a device rear panel with numbered ports and connections, likely for electronic or control design reference.
AVISO
text_image
① ② ③ ⑥ ⑧ ⑨ ⑪ ⑬ ④ ⑤ ⑦ ⑩ ⑫AM:OFF—LEVEL1—LEVEL2
flowchart
graph TD
    subgraph Left_Circuit
        L1["①"] --> A1["+"]
        A1 --> B1["⑥"]
        B1 --> C1["⑧"]
        C1 --> D1["⑨"]
        D1 --> E1["⊕"]
    end
    subgraph Right_Circuit
        R1["③"] --> S1["⊕"]
        S1 --> T1["⑤"]
        T1 --> U1["⑪"]
        U1 --> V1["⑫"]
        V1 --> W1["⑬"]
        W1 --> X1["⊕"]
    end
    Left_Circuit --> Right_Circuit
    style Left_Circuit fill:#f9f,stroke:#333
    style Right_Circuit fill:#bbf,stroke:#333
text_image
Technical diagram showing labeled components of a mechanical assembly with numbered parts①Porca ②Firewallousuportederretal ③Tirademeta ④Parafuso ⑤Parafuso(M4×8)
text_image
Technical diagram showing a mechanical assembly with labeled parts, including a numbered component and a magnified inset.①Predecordom crofone
②:Presl ha
text_image
Diagram showing car seatbelting technique with labeled parts ① and ②
text_image
Diagram showing car steering wheel and attached door panel with numbered annotation①F tao plaface
Audiobook, Podcast: Compostivel
AVISO
(Windows/MediaPlayer)
(Windows/MediaPlayer)
text_image
Diagram of a car front panel with numbered labels pointing to different compartments or parts.部位部位
| 1S(SRC/OFF)8 | 2(電芯/車持間間) | ||
| 2▲(出山)9 | 3(放回/顯示/換動) | ||
| 3 | 4(清单) | 10 | ▲/▼/▲/▶ |
| 4 | MULTI-CONTROL(M.C.) | 11 | ∅/DISPOFF |
| 5 | 碟片槽 | 12 | 1至6 |
| 6USB端 | 13 | M2输入插孔(3.5mm立螺距插孔) | |
| 7 | B(BAND/ESC) | 14 | 拆卸按钮 |

注意
text_image
Diagram of a 19-pin electronic component with labeled pins and connectionsUSB (CSB) / iPod (iPod) - AUX (AUX)
9 KHZ (9 kHz) 10 KHZ (10 kHz)
3 按M.C.确论选择
AUX(辅助输入)
text_image
Technical diagram showing labeled components of a mechanical assembly with numbered partstext_image
Technical diagram showing a mechanical assembly with labeled parts, including a component marked '①' and a close-up inset of a device.①麦克風夾
②夹
使用另售的夹子来固定車輛內部的導線。
將麥克風安裝在方向盤轉向機柱上時
1 將麥克風安裝在麥克風夾上。
①麥克風
②麥克風座
③麦克风夹
④ 将麦克风导线安装在清槽中
text_image
Diagram showing car seatbelting technique with labeled parts ① and ②安装
text_image
Diagram showing car interior with steering wheel and labeled component (③), including a close-up inset of the door.①双面膠
(Vinewas Media Player)
MP2解码格式....MPEG-1&2AudioLayer3
NAV连接格式....磁性POWINS ADPCN
(無厚箱)
USB
訊噪比 84 dB (1 kHz) (IEC A網路)
普通数 2(立體容)

natural_image
Two horizontal rounded rectangles with a black rounded rectangle on the right side (no text or symbols)丹
X

52htw


natural_image
Two identical rounded rectangular shapes with no text, numbers, or symbols
مطومات إضافية

11, 10, 9, 8, 7.1, 7 الاصارات ...... WMA نسیف عر سیل
(قatal صرکیان) 12
(Windows Media Player)
MPEG-1 & 2 Audio Layer 3 ...... MP3
(Windows Media Player)
MPEG-1 & 2 Audio Layer 3 MP3
Linear PCM & MS ADPCM WAV
(1)
باغصو Oman
عاء
Compression as habits a meeting.
iTunes
“IPhone” ∪ ∪ ∪ ∪ ∪ ∪ ∪ ∪ ∪ ∪ ∪ ∪ ∪ ∪ ∪ ∪ ∪ ∪ ∪ ∪ ∪ ∪ ∪ ∪ ∪ ∪ ∪ ∪ ∪ ∪ ∪ ∪ ∪ ∪ ∪ ∪ ∪ ∪ ∪ ∪ ∪ ∪ ∪ ∪ ∪ ∪ ∪ ∪ ∪ ∪ ∩
text_image
Diagram showing car interior with steering wheel and labeled component (③), including a close-up inset of the door.text_image
Technical diagram showing labeled mechanical components with numbered parts, likely from an engineering or manufacturing context.بِيْطَدُدُ لَأَةِ فَلَكَ
#
2024
أَدْكِيمَتَعَلَى
لا سلا
النامع مابع المباني
.
ت. اد outdoors احواج را خد حول بصا
①
② إجع أزحاح
③
②
M. 4
الإيرام
لHLARUNCHIKME,
JSDIN
[Unreadable]
دحو!

text_image
Diagram showing car seatbelting with labeled parts ① and ②
text_image
Diagram showing a mechanical assembly with labeled parts, including a switch and a device inset.دَمْرَّاً إِجَا

text_image
Technical diagram with Arabic script annotations and numbered components, likely from a technical drawing or engineering document.أَلْ وَصُوْتِ بِمْهُ وَجَسَةٍ نَدِ لِفَا رِطَاً وَ عَ اَدُرَدَةٍ إِمْلِيْكَلِّطَّلَّاً لِيْتَنْكُلِّهُ الِمْعَلَّكُولِيْتُ
(الجز) (العربية)
text_image
ت اطHLAD②
③
④
⑤
⑥
⑦
⑧
⑨
⑩
⑪
⑫
⑬
⑭
⑮
⑯
⑰
⑱
⑲
⑳
㉑
㉒
㉓
㉔
㉕
㉖
㉗
㉘
㉙
㉚
㉛
㉜
㉝
㉞
㉟
㉓
㉔
㉕
㉖
㉗
㉘
㉙
㉚
㉛
㉜
㉝
㉞
㉟
㉓
㉔
㉕
㉖
㉗
㉘
㉚
㉛
㉜
㉝
㉞
㉟
㉓
㉔
㉕
㉖
㉗
㉘
㉙
㉚
㉛
㉜
㉝
㉞
㉟
㉒
㉓
㉔
㉕
㉖
㉗
㉘
㉙
㉚
㉛
㉜
㉝
㉞
㉟
㉓
㉔
㉕
㉖
㉗
㉜
㉝
㉞
㉟
㉓
㉔
㉕
㉖
㉗
㉜
㉝
㉞
㉟
㉓
㉔
㉕
㉖
㉗
㉜
- -
1 3. لى خدى
(2)
4(3)
مَأَعْتَ (٢) مَسْ
لا خَاء ٤١
1⑤ ص
Ar


تش civil هذا但他از
| mono, ω | dBf (N· μV/2) | (IEC-A ω) ω |
AM موج ياب
(IPR) (SDP (Service Discovery Protocol — OPP(ObjectPus IPR) (HFP (Hands Free Profile —
(IPROFIL) (GAP (Generic Access Profile —
(نشرسي عموم)
iPod سازگاری با
| إِنْ دَمُعَّادِ فَلَّق قَزْ مَدَل هَدَى هَدَى ٢. تَسَّهُ هَدَى يَسَّيَالِي هَدَى نَدَى در وَرَبْتِهِدَدَدَدَدَدَدَدَدَدَدَدَدَدَدَدَدَدَدَدَدَدَدَدَدَدَدَدَدَدَدَدَدَدَدَدَدَدَدَدَدَدَدَدَدَدَدَدَدَدَد— iPod لِفَرَاقِارِ |
| است ١.٠٠٠ ١.٠٠٠ ١.٠٠٠ ١.٠٠٠ ١.٠٠٠ ١.٠٠٠ ١.٠٠٠ ١.٠٠٠ ١.٠٠٠ ١.٠٠٠ ١.٠٠١ iPod ٢ ئَلَّمَلَ (١٠٠٠٠ iPod ٢ ئَلَّمَلَ (١٠٠٠٠ iPod ٢ ئَلَّمَلَ (١٠٠٠٠ iPod ٢ ئَلَّمَلَ (١٠٠٠٠ iPod ٢ ئَلَّمَلَ (١٠٠٠١ iPod ٢ ئَلَّمَلَ (١٠٠٠٠ iPod ٢ ئَلَّمَلَ (١٠٠٠٠ iPod ٢ ئَلَّمَلَ (١٠٠٠٠ iPod ٢ ئَلَّمَلَ (١١٠٠٠ iPod ٢ ئَلَّمَلَ (١١٠٠٠ iPod ٢ ئَلَّمَلَ (١١٠٠٠ iPod ٢ ئَلَّمَلَ (١١٠٠٠ iPod ٢ ئَلَّمَلَ (١٠٠٠٠ iPod ٢ ئَلَّمَلَ (١٠٠٠٠ iPod ٢ ئَلَّمَلَ (١٠٠٠٠ iPod ٢ ئَلَّمَلَ (١١٠٠١ iPod ٢ ئَلَّمَلَ (١١٠٠٠ iPod ٢ ئَلَّمَلَ (١١٠٠٠ iPod ٢ ئَلَّمَلَ (١١٠٠٠ iPod ٢ ئَلَّمَلَ (١١٠٠١ iPod ٢ ئَلَّمَلَ (١١٠٠٠ iPod ٢ ئَلَّمَلَ (١١٠٠٠ iPod ٢ ئَلَّمَلَ (١٢٠٠٠ iPod ٢ ئَلَّمَلَ (١٢٠٠٠ iPod ٢ ئَلَّمَلَ (١٢٠٠٠ iPod ٢ ئَلَّمَلَ (١٢٠٠٠ iPod ٢ ئَلَّمَلَ (١١٠٠٠ iPod ٢ ئَلَّمَلَ (١١٠٠٠ iPod ٢ ئَلَّمَلَ (١١٠٠٠ iPod ٢ ئَلَّمَلَ (١٢٠٠٠ iPod ٢ ئَلَّمَلَ (١٢٠٠١ iPod ٢ ئَلَّمَلَ (١٢٠٠٠ iPod ٢ ئَلَّمَلَ (١٢٠٠٠ iPod ٢ ئَلَّمَلَ (١٢٠٠٠ iPod ٢ ئَلَّمَلَ (١٢٠٠١ iPod ٢ ئَلَّمَلَ (١٢٠٠٠ iPod ٢ ئَلَّمَلَ (١٩٠٠٠ iPod ٢ ئَلَّمَلَ (١٩٠٠٠ iPod ٢ ئَلَّمَلَ (١٩٠٠٠ iPod ٢ ئَلَّمَلَ (١٩٠٠٠ iPod ٢ ئَلَّمَلَ (١٨٠٠٠ iPod ٢ ئَلَّمَلَ (١٨٠٠٠ iPod ٢ ئَلَّمَلَ (١٨٠٠٠ iPod ٢ ئَلَّمَلَ (١٨٠٠٠ iPod ٢ ئَلَّمَلَ (١٩٠٠٠ iPod ٢ ئَلَّمَلَ (١٩٠٠٠ iPod ٢ ئَلَّمَلَ (١٩٠٠٠ iPod ٢ ئَلَّمَلَ (١٣٠٠٠ iPod ٢ ئَلَّمَلَ (١٣٠٠٠ iPod ٢ ئَلَّمَلَ (١٣٠٠٠ iPod ٢ ئَلَّمَلَ (١٣٠٠٠ iPod ٢ ئَلَّمَلَ (١٩٠٠٠ iPod ٢ ئَلَّمَلَ (١٩٠٠٠ iPod ٢ ئَلَّمَلَ (١٩٠٠٠ iPod ٢ ئَلَّمَلَ (١٧٠٠٠ iPod ٢ ئَلَّمَلَ (١٧٠٠٠ iPod ٢ ئَلَّمَلَ (١٧٠٠٠ iPod ٢ ئَلَّمَلَ (١٧٠٠٠ iPod ٢ ئَلَّمَلَ (١٩٠٠٠ iPod ٢ ئَلَّمَلَ (١٩٠٠٠ iPod ٢ ئَلَّمَلَ (١٩٠٠٠ iPod ٢ ئَلَّمَلَ (١٪٠٠٠ iPod ٢ ئَلَّمَلَ (١٪٠٠٠ iPod ٢ ئَلَّمَلَ (١٪٠٠٠ iPod ٢ ئَلَّمَلَ (١٪٠٠٠ iPod ٢ ئَلَّمَلَ (١٫٠٠٠ iPod ٢ ئَلَّمَلَ (١٫٠٠٠ iPod ٢ ئَلَّمَلَ (١٫٠٠٠ iPod ٢ ئَلَّمَلَ (١٫٠٠٠ iPod ٢ ئَلَّمَلَ (١٩٠٠٠ iPod ٢ ئَلَّمَلَ (١9014) iPod classic 19014. كُجُابِيَاتِ (١٩٠٠٠ iPod ٢ ئَلَّمَلَ (١٩٠٠٠ iPod ٢ ئَلَّمَلَ (١9014) iPod (1.1.1.1.1.1.1.1.1.1.1.1.1.1.1.1.1.1.1.1.1.1.1.1.1.1.1.1.1.1.1.1.1.1.1.1.1.1.1.1.1.1.1.1.1.1.1.1.1.1.1 .1.1.1.1.1.1.1.1.1.1.1.1.1.1.1.1.1.1.1.1.1.1.1.1.1.1.1.1.1.1.1.1.1.1.1.1.1.1.1.1.1.1.1.1.1.1.1.1.1.1,1.1.1.1.1.1.1.1.1.1.1.1.1.1.1.1.1.1.1.1.1.1.1.1.1.1.1.1.1.1.1.1.1.1.1.1.1.1.1.1.1.1.1.1.1.1.1.1.1.1-1.1.1.1.1.1.1.1.1.1.1.1.1.1.1.1.1.1.1.1.1.1.1.1.1.1.1.1.1.1.1.1.1.1.1.1.1.1.1.1.1.1.1.1.1.1.1.1.1.1.-1.1.1.1.1.1.1.1.1.1.1.1.1.1.1.1.1.1.1.1.1.1.1.1.1.1.1.1.1.1.1.1.1.1.1.1.1.1.1.1.1.1.1.1.1.1.1.1.1.1 -1.1.1.1.1.1.1.1.1.1.1.1.1.1.1.1.1.1.1.1.1.1.1.1.1.1.1.1.1.1.1.1.1.1.1.1.1.1.1.1.1.1.1.1.1.1.1.1.1.1 |
Voice/DRM Stream/Stream
MP3
text_image
Diagram showing car interior with steering wheel and labeled component ③①
text_image
Diagram showing car seatbelting with labeled component (①)②
ورکیمپصد

text_image
Technical diagram showing a mechanical assembly with labeled component ①
Fa


① كاًت سدن دکل دج
يُحْظَ لَهِ قَلَا حَنٍ نَا كُرَدِج
text_image
Technical diagram showing labeled components of a mechanical assembly with numbered parts
N. "M" is a small, non-
(Bluetooth (Bluetooth Visibility) مربوطه)
text_image
Scanned document with Arabic and English text, including a diagram of an electronic device and a list of items with Arabic/English labels.
کاکسدر اه دا هق قسیا
text_image
15 7 21 20 1 19 16 10 17 18روده ۱ رز الرا کد

text_image
Diagram of a CD-ROM drive with numbered parts for identification
Visit us on the World Wide Web at
http://pioneer.jp/group/index-e.html
Pioneer Gulf.FZE
http://www.pioneer-uae.com
Pioneer Electronics Australia. Pty.Ltd
http://www.pioneeraus.com.au
Pioneer Electronics Asiacentre.Pte
http://www.pioneer.com.sg
Pioneer (HK) Ltd.
http://www.pioneerhongkong.com.hk
Pioneer High Fidelity Taiwan Co., Ltd.
http://www.pioneer-twn.com.tw
Pioneer International Latin America S.A.
http://www.pioneer-latin.com
PIONEER CORPORATION
1-1, Shin-ogura, Saiwai-ku, Kawasaki-shi,
Kanagawa 212-0031, JAPAN
PIONEER ELECTRONICS (USA) INC.
P.O. Box 1540. Long Beach, California 90801-1540, U.S.A.
TEL:(B00)421-1404
PIONEER EUROPE NV
Haven 1087, Keetberglaan 1, B-9120 Melsele, Belgium/Belgique
TEL: (0) 3/570.05.11
PIONEER ELECTRONICS ASIACENTRE PTE. LTD.
253 Alexandra Road, #04-01, Singapore 159936
TEL: 65-6472-7555
PIONEER ELECTRONICS AUSTRALIA PTY. LTD.
178-184 Boundary Road, Braeside, Victoria 3195, Australia
TEL: (03) 9586-6300
PIONEER ELECTRONICS OF CANADA, INC.
300 Allstate Parkway, Markham, Ontario L3R 0P2, Canada
TEL: 1-877-283-5901
TEL: 905-479-4411
PIONEER ELECTRONICS DE MEXICO, S.A. de C.V.
Blvd.Manuel Avila Camacho 138 10 piso
Col.Lomas de Chapullepec, Mexico, D.F. 11000
TEL: 55-9178-4270
先锋股份有限公司
Published by Pioneer Corporation. Copyright ©2010 by Pioneer Corporation. All rights reserved.
Printed in Thailand