DEH-1350MP - Receiver PIONEER - Free user manual and instructions
Find the device manual for free DEH-1350MP PIONEER in PDF.

User questions about DEH-1350MP PIONEER
0 question about this device. Answer the ones you know or ask your own.
Ask a new question about this device
Download the instructions for your Receiver in PDF format for free! Find your manual DEH-1350MP - PIONEER and take your electronic device back in hand. On this page are published all the documents necessary for the use of your device. DEH-1350MP by PIONEER.
USER MANUAL DEH-1350MP PIONEER
ThankyouforpurchasingthisPIONEER product.
To ensure proper use, pleasereadthrough this manual before using this product. It is especially important that you read and observe
WARNING and CAUTIONs in this manual. Please keep the manual in as safe and accessible place for future reference.
Aboutthisunit
CAUTION
This product is a class I laser product classified in the Safety of laser products, IEC 60825-1:2079, and contains a class I laser module. To ensure recent needs safety, denote moving acovers or attempt to gain access to their inspection product. Referral servicing to qualified personnel.
CLASS 1 LASER PRODUCT
CAUTION—CLASS 1M INVISIBLE LASER RADIATION WHEN OPEN, DO NOT VIEW DIRECTLY WITH OPTICAL INSTRUMENTS.

CAUTION
- Donotallowthisunittocomeintocontact with liquids. Electricalshockcouldresult. Also, damagetothisunit.smoke, and over-hoatingcouldresultfromcontactwith liquids.
• Airways keep the volume below enough to hear outsidesounds.
• Avoid exposure to moisture - if the battery disc is connected to discharged, any preset memory will be erased.
- Should this unitfa ltooperate properly please contact your dealer or near a rest authorized PIONEERService Station.
CAUTION:
USEOFCONTROLORADJUSTMENTOR PERFORMANCE OF PROCEDURES OTHER THAN THOSE SPECIFIED HEREIN MAY RESULTIN HAZARDOUSRADIATION EXPOSURE.
CAUTION:
THEUSEOFOPTICALINSTRUMENTS WITHTHISPRODUCTWILLINCREASE EYEHAZARD.
■
Headunit

| Button | Button | |
| 1 | E (EQ/LOUD) | 1 1:6 |
| 2 | ▲(object) | 3 2 (clock) |
| 3 | AUDIO | 10 ▲/▼/▲ |
| 4 | SRC/OFF | 1 FUNC |
| 5 | Disc loading sol | 19 D (DISP/SCRL) |
| 6 | Detach button | 19 B (BAND/ESC) |
| 7 | AUXinput/jack(3.5 mm stereo/jack) |
Remotecontrol
Operationisthesamresswhenusingthebuttonson.theheadunit.SeetheexplanationoftheheadunitabouttheoperationofeachbuttonwiththeexceptonofATT,whichisexplainedbelow.

| Part | State | |
| 9 | VOLUME(+/-) | Pressloincreasedecreasevoume. |
| 10 | ATT | Presslomule Pressaga ntonmue. |
| Part | Slate | |
| 16 | II (pause) | Preastocauseomesum eplay-back. |
| 17 | SRC (source) | Preastocyc ethrougnall the avai lobes cumes. Press and hold non mtnesourceff. |
Displayindication
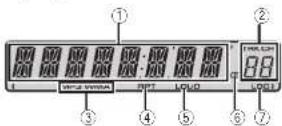
| Indicator | State | |
| 1 | Manicis- playsoc- tion | TunerbandandfrequencyBuilt inCOplayorosped playhardtmeanidtestinfor- mation |
| 2 | Preset number/ tracknum ber | Tnetracknumberorpreset number.Hatracknumber100ermere isolucied ▶onrhotisol thetracknumberindicator will light |
| 3 | MP3/ WMA | helpocilthecurrentlyplaying file. |
| 4 | RPT | Repeat play is turned on. |
| 5 | LOUD | Loucness is on. |
| 6 | CD(stereo) | Receivingthestereobroadcasting. |
| 7 | LOC | Local seek tuning is on |
Section
02
Operatingthisunit
Useandcareoftheremote control
Using the remote control
1 Point theremecte control in the direction of the
frontoaneltooperate.
When using for the first time, pull out the line
protruding from the tray.
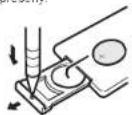
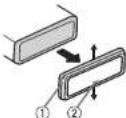
Replacing the battery
①S idelhetryoutonthebackofthe remotecontrol.
2Inserlthecallc with lncplus( )andminus(-) polegal greciproperly.

WARNING
- Keep the battery out of there each of children. Shou dthe battery besallowed, consult a doctor immediately.
- Batteries(batterpackorbatteries installed) must not be exposed to excessive heats such as sunshine, fireorthelike.

CAUTION
• LusconeCR2025(3V) ith u r battery.
- Remove the battery if the remote control is not used for monthlonger.
- Thorcisadangerofexplosionithobatteryis incorrectly replaced. Replace only with the sameorequivalent type.
- Donot handle battery with metallic tools.
- Donotstorethebatterywithmetallicobjects
- If the battery leaks, wipe theremote control completely clean and install anewbattery.
- Whondisoosingofusebatteries.comply withgovernmentalregulationsorenvironmentalpublicinstitutions'rulesthatapplyinyour country/area.

Important
- Donotstoretheremotecontrol in hight temperature sordirect sunlight.
4
En
Operatingthisunit
Section
02
Removing the front pane to protect your own from theft
□ Pressthecetachbuttonreleasesethefront panel.
2 Push the front panel upward and pull forward you.

③ Always keep the detach screen naprotection devices such as protection case.
Re-attachingtheirontpanel
Slicethelronbanelltothelct L. Makesureloinscrllhelabsonlhe cllsiocollthe headunitiatotheslcsonlnefrontpanel.

12 Prostethenights do all the non-panc until its firmly seated.
I you can not take the front panel to head units successfully makes our your original front panel to the head unit correctly. For coming front panel to the head unit, I have made a magelofront panel to the head unit.
Lurringthcunilon
- PressSRC/OFFtolumtheumilon
Turringtheunitoff
PresaSRC/OFFancho.dri.nti.thei.nittumsoff.
Selectingasource
□ PresaSRC/OFFtocycloethroughresolumes Listed below:
TUNER (tuner)—CD (built-in CD player)—AUX
Adjusting the volume
LL Turn SRC/OFFloadadjustments.
Note
When this unit's blue/white lead disconnected to the vehicle's auto-antennarelay control terminal, the vehicle's antenna extends when this unit's source sturnedor. Foretract the antenna turn the source off.
Menuoperationsidentical forfunctionsettings/audio adjustments/initialsettings
Returning the ordinary display
Cancelingtheinit.alsetting menu
1 PressB(BAND/ESC)
You can also cancel initial settings by holding down SRC/OFF until their returns off.
□
Tuner
BasicOperations
Important
If you are using this unit in North, Central or South America, reset the AM tuning step to refer to
AM(AMtuningsteplonpage8)
Selecting band
1 Press B (BAND/ESC) until the desired band (F1, F2, F3 for FM or AM is displayed.
Manual running(sleepbystop)
IT Press ◀or▶.
Seeking Pressanchold◄or►, and then release. You can cancel seektuning by briefly pressing◄ or►. While pressringancholding◄or►, you can skip stations. Seektuning starts assoor as you re-lease◄or►.

CAUTION
Forsafely reasons, park your vehicle when removing the front panel.
En
5
Section
02
Operatingthisunit
Storingandrecallingstations foreachband
- When you find astation that you want to store in memory, press one of the preset tuning buttons (1 to 6) and hold until the preset number stops flashing.
Storedradioslationfrequencycanberecalled bypressingthepresettuningbutton.
■ Press ▲ or ▼ to recall radio station frequencies.
Functionsettings
- PressFUNCtoselectthefunction.
Afterselecting, perform the following procedure to set the function.
BSM(beststationsmemory)
BSM (beststationsmemory) automatically stores the sixstronges: stations in the order of the signal strength.
Storing broadcast frequencies with BSM may replace broadcast frequencies you have saved using 1to6
Thesisstrongestroadsfrequenciesare s.crecin theorecroltheirsigmaisrength. Tocancelthestorageprocess,press▼
Localsee-tuning elayou turcimiconlythoseradio slat or with sul client ystrongsigna sorgood reception.
1 Press ▲ or ▼ to turn local seek tuning on or off. 2 Press ◄ or ▶ to set the sensitivity tv.
The highest level setting allows reception only the strongest stars, while lower levels allow the reception of weaker stations.
■
6
En
CD
BasicOperations
| PlayingaCD/CD-R/CD-RW1)nsettheriiscmothediscloadingsotwiththe labelsizeup. |
| FlectingaCD/CD-R/CD-RW1)Press▲ |
| Selectingafinaler1)Press▲▼. |
| SelectingafarackTPPress◀▶. |
| Fastforward regoverversingTPressandhole◀▶. Wenchplayingcompressedaudio,theresis on soundduringfastforwardreverse. |
| SwitchingbetweencompressedaudioandC2-DATPressB(BAND/ESC) |
Displayingtextinformation
| Selectingtheocosirodebxinformation |
| TPressD(DISP/SCRL) |
| Scoringtheoclinformationtheof |
| TPressandholdD(DISP/SCRL). |
Notes
- Depend ngontheversionofiTunesusedto write MP3filestoadiscormediafiletypes, in-compat bletextstoredwith nanaudiofile maybedisplayedincorrectly.
- Textinformationitemsthatcanbechanged dependonthemedia.
Functionsettings
●PressFUNCtoselectthefunction.
Afterselecting, perform the following procedures to set the function.
RPT(repeatplay)
1Press◄or►losecelltherovalence.
DSC—Repeatall tracks
TRK-Repeatthecumenttrack
FLD-RepeatRecordcurrentHolder
Operatingthisunit
RDM(rancomplay)
Press ▲ or ▼ tou m encomplesor omff.
When random play son, RDMap appears in this play.
If you turn and comp ayonouring folcer repeat, FRDM appears in the display
SCAN(scan play)
Scanpleyscarchos/urasongwithintheselectedropeatrange.
1 Press ▲ to turn scn p ayon.
IlyouumscanplayenduringFLD,FSCNap pearsintheoisplay.
2 When you find the desired track press to turn your playoff.
If the display has automatic yreturned to the playback display, select SCAN again by pushing
FUNC.
Afterscannirgofadisc(folder)istnished,normalplaybackoffnetracksbegins.
PAUSE(pause)
□ Press ▲ or ▼ hope use resume.
SRTRV(soundretriever)
Automatica lyennancescompressedaudicandrestovear chsound.
-
Press ▲ or ▼ to select your favorite setting. OFF:off—1—2
-
seffective for low compression rates, and 2. is effective for high compression rates.
FF/REV(lastforward/reverse)
You can switch the search method between instant words/reverscandsearching every 10 tracks. Selecting ROUGH enables out search every 10 tracks
Press▶toselectROUGH
FF/REV-Fastforward and reverse
ROUGH-Searchingevery1Cracks
ToselectFF/REV.press
2 PressB(BAND/ESC)tonetu rntotheplaybackdis- play
3 Press and hold ◀ or ▶ to search every 10 tracks or discifold).
llherose tracknumberislessthen'0,press andhold◄or► recallsthefirst(last)one.
□
Section
02
AudioAdjustments
AudioAdjustments
●PressAUDIOtoselecttheaudiofunction.
Afterselecting,performthefollowingprocedurestosettheaudiofunct on.
FAD:ade/balance adjustment
Press ▲ or ▼ to adjust factor (front/rear speaker balance).
- Press ◀ or ▶ to adjust the balance (left/right, speakerbalance).
BASS/MID/TREBLE(qualified ustmen)
- Adjusted equal zero vesettingsarestredin CUSTOM
- Press▲or▼loadustthelevel Adjustmentrange:+6to-6
LOUD(int.dness)
Loudnesscompensatesfordeficiencies nthelow-and high-frequencyrangesatflowvolume. [Press ▲ or ▼ tolu nlloudnessanr omff.
- Press◄or►lose sel, modes redsell ng, LOW(low)—HI(high)
- You can a lantum oudnessen or off by pressing and cing E(EQ/LOUD).
SLA(sourcelevela
SLA(SourceLove Adjustment) is you adjust the volume of each source to prevent radical changes involved when switching between sources.
- When selecting a MasResources you cannot switch to SLA.
- Settings are based on the FV volume level, which remains uncharged.
• The AM volume level can also be adjusted with the situation.
Press ▲ or ▼ to adjust the source volume Adjustment range SLA+4 to SLA-4
Usingtheequalizer
- PressE(EQ/LOUD)toselecttheequalizer.
DYNAMIC—VOCAL—NATURAL—CUSTOM FLAT POWERFUL
- CUSTOMallowsyoucreateacustomized setting
En
7
Section
02
Operatingthisunit
OtherFunctions
Adjustinginitialsettings
1PressSRC/OFFandholduntiltheunit turnsoff.
2PressSRC/OFFandholduntiltheclock appearsinthedisplay.
3PressFUNCtoselecttheinitialsetting.
Afterselecting, perform the following procedure duresloseltheinit a setting.
Setting the clock
[1] Press ◀ or ▶ to select the segment of the clock disp ayyouwishtoset.
Hour—Minute
press▲or▼toputaclockright.
FM(FMtu ningstep)
The FM running step employed by seek training can be switched between 100kHz, the preset step, and 50 kHz.
seektuning glispermedin50k-1zsteps, stationsmaybelunoclinimprecisely. Tcnointhesla tionswithmanua tuningorusesseektuning again.
1) Press ◄c ▶ loselecttheMuningslop. 50(50kHz)—100(100kHz)
AM(AMluningscp)
The AMturings,epcanbesw Ichedbetween9kHz, thepresetstep,and10kHz. When using thetunerin North, CentralorSouthAmerica, asethetuning slotfrom9kHz(531kHz to 502kHz allowable) to 10 kHz(530kHz to 540kHz allowable).
1) Press ▶ or ▶ to select the AV tuning step. 9(3kHz)—10(10kHz)
AUX(auxi iayin put)
Activate nisetting when using a auxiliary device connected to this unit.
1) Press ▲ or ▼ to turn auxiliary setting on or off.
Displayingtheclock
●Presstoturntheclockdisplayonor off.
- Theclock so aydisappears temporarily when you perform mother operations, but theclock display appears again after 25 seconds.
8
En
UsinganAUXsource
1Insertthestereominiplugintothe AUXinputjack.
2PressSRC/OFFtoselectAUXasthe source.
■ALX cannot be selected unless the auxiliary setting is determined from predetails refer to
AUX(auxiliaryinput)onthispage.
Installation
Connections
WARNING
• Uses speakers over 50W (output value) and between 4Ω to 8Ω (impedance value). Donot use 1Ω to 3Ω speakers forth is unit.
• The blackable spring. When installing th sunitor poweramp (so separately), make surelconnectgroundwirefinal. Ensure that the groundwireis properly connected to metal parts of the car's body. The groundwire of other devices and the one of this suntor or any other device must be connected to the car separately with different screws. If these screw forthgroundwirecosensoralls out it could result in fire, generation of smokeor malfunction on.

Other devices (Another electronic device in the car) Metal parts of car's body

Important
- When installing this unit navehicle without an ACC (accessory) position on the ignition switch, failure to connect theredable to the terminal at detect so operation of the ignition on key may result in battery drain.

ACCposition NoACCposition

• Use this unit with a 12 volt battery and negative livegrounding only. Failure recovers may result in a firecrash malfunction.
- Topreventashort-circuit overheating normal-function on besuretofollowthedirections below.
Section
03
En
9
Section
03
Installation
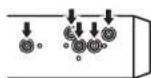
Thisunit
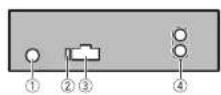
①Antennainput
②Fuse(10A)
③Powercord input
④Rearoutput
Powercord

flowchart
graph TD
    L["①"] --> R["③"]
    F["④"] --> E1["⑥"]
    E1 --> H1["⑨"]
    H1 --> R2["⑧"]
    R2 --> H2["⑩"]
    H2 --> R3["⑪"]
    R3 --> H3["⑬"]
    H3 --> R4["⑦"]
    R4 --> H4["⑮"]
    H4 --> R5["⑭"]
    R5 --> H5["⑮"]
    H5 --> R6["⑯"]
    R6 --> H6["⑰"]
    H6 --> R7["⑱"]
    R7 --> H7["⑲"]
    H7 --> R8["⑳"]
    R8 --> H8["㉑"]
    H8 --> R9["㉒"]
    R9 --> H9["㉓"]
    H9 --> R10["㉔"]
    R10 --> H10["㉕"]
    H10 --> R11["㉖"]
    R11 --> H11["㉗"]
    H11 --> R12["㉘"]
    R12 --> H12["㉙"]
    H12 --> R13["㉚"]
    R13 --> H13["㉛"]
    H13 --> R14["㉜"]
    R14 --> H14["㉝"]
① Topowercardinput
②Left
③Right
④Frontspeaker
⑤Rearspeaker
⑥White
⑦White/black
⑧Gray
⑨Graw/black
©Green
d)Green/black
(2) Viple
Violet/black
©Black(chassisground)
Connecttoaclean.pairt-freemetalocation
15Yellow
Connect to the constant 12V supply terminal.
@Red
Connecttorterminal controlled by ignition switch(12VDC).
⑦Blue/white
Connectosystem control terminal of the power amporauto antennarelaycontrol terminal (max. 300mA12VDC).
Note
Witha2speakersystem,donolconnectanything tolthespeakerleads;halarenolconnectedto speakers.
Poweramp(soldseparately)
Performtheseconnectionswhenusingthe optionalamp fier.
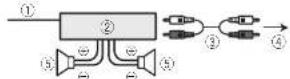
①Systemrematecontrol
ConnecttoBlueAwhitecable.
②Power-rp(soldseparately)
③ConnectwithRCAcables(soldsecarately)
④ToRearoutput
⑤Rearspeaker
Installation
Important
- Checkal connections and systems before final installation.
• Donotuseunauthorizedpartsasthismey cause malfunct ons.
- Consult your dealer if stallation requ resdrilling of ho escrothemodification stothvehicle.
• Dorofinstall this unit where:
—it may nlerferewithoperationofthevehicle.
—ilmaycause injury to lapassengerasare-sullofasuddenslop.
Installation
- These semiconductor laser will be damaged if it overcuts. Install this unit away from hot places such as near the heater outlet.
- Optimum performance obtained when the unit is installed at an angle of 60°.

• To ensure proper heat dispersal when using this unit, makes sure you leave samples pace behind there are propane and wrap any loose cable so they are not blocking the events when installing the unit.
DINfront/rearmount
This unit can be properly installed using either front-mount rear-mounted installation.
DINFront-mount
1Insertthemountingsleeveintothe dashboard.
For installation in shallow spaces, use the sup- plieomountingsleeve. If thereisenough space use the mountings eevethalcame with the vehicle.
2Securethemountingsleevebyusinga screwdrivertobendthemetaltabs(90°) intoplace.

①Dashboard
②Mountingsleave
3Installtheunitasillustrated.
Use commercial available parts when installing.
Section
03


text_image
Technical diagram showing labeled mechanical components with numbered parts, including a bracket and housing assembly.①Nut
②Firewallormetalsupport
③Metalstrao
④Screw
⑤ Screw(M4×8)
■Makesurethat:neuritisinstalledsecurelyin pace.Anunstableinstall at onmaycausskip pngorothermalfunctions.
DINRear-mount
1 Determinetheappropriateposition wheretheholesonthebracketandthe sideoftheunitmatch.
2Tightentwoscrewsoneachside.

①I russcrew(5mm×8mm)
②Mountingbracket
③ Dashboardorconsole
10
En
En
11
Section
03
Installation
Removingtheunit
1Removethetrimring.
①Trimring
②Notchedtab
- Releasing the front panel allows sea eraccesstother miring.
- When reattaching the trim ring, point the sidewith then etched to down.
2Insertthesuppliedextractionkeysinto bothsidesoftheunituntiltheyclickinto place.
3Pulltheunitoutofthedashboard.

Removingandre-attachingthefront panel
You can remove the front panel to protect your unit from theft.
Pressthedetachbuttonandpushthefront paneluowardancpulittowardyou.
Fordetails refer to Removing the front panel to protect your unit from theft and Re-attaching
thefrontpanelpage6.
■
AdditionalInformation
Appendix
Troubleshooting
| SymptomCauseAction | ||
| Thesisplay automatically by return to the ordinary city plan. | You did not perform my operation with in our 30 seconds. | Perform operation again. |
| Therepeat play, psychANGES, orvocably. | Depend ngon Unrecognisplay ranges, projected a remay changes where selection another location is a clear, when last forward warning/reversing. | Selecttherepeat play and go again. |
| Asubfolter is not played back. | Subic denotes can not be played when FLDfolter repeat unless listed. | Selecttheremate play range. |
| NOXXXXao cause whicha display as changed NOT-TTL (or example). | Therein elot in form, on continued. | Switch the play or play another trace file. |
| The unitismall functioning hence sinker-ference. | You are using a device such as cellular phone, thus an its electric waveance heart units. | Move electric devices that maybe causing the infection of away from the unit. |
□
Errormessages
When you contact your dealer or your nearest Pioneer Service Center, please refer to the email message.
MessageCauseAction
| ERROR-11,12, 17,30 | The discidirty,Cleanthedisc. | |
| Inediscis scratched. | Replacelthedisc | |
MessageCauseAction
| ERROR-10,11, 12,15,17,30, A0 | There is a elec- tricalormechan- icalerror. | Turn the ignition switchOFFand backON, or switch toad fferent source, then back totheCDolayer |
| ERROR-15Tneir sclucodisc | Replacethed. sc |
| istalank |
| ERROR-23 | UnsupportedCD | Replacethed sc. |
| Iorma. |
| FRMTREAD | Sometimesthereisadolayoebweenthesartelplayoackandwhonyouslartlthearanysound. | Walumlthemeasagodisapocarsandyouhearsound. |
| NOAUDIO | The nsertedid sc does not contain anyplayable files. | Replacethed sc. |
| PROTECT | All the file son their serleodisc are embedded with DRV. | Replaced his sc. |
| SKIPPED | The inserted disc containsDRM protectedWMALles. | Replaced disc. |
■
Handlingguideline
Discsandplayer
Jaeon yd sacfear ringeit nemoffol owirgtwologos.


Jse12-cmdisc Doncuse8-cmdiscora nadapter lor3-cmdisc.
12
En
En
13
Appendix
AdditionalInformation
Uncommonly conventional, fully recular discs. Donutus-shaped discs

Donotin serar anythingother than a CD into the eCD loadingslot.
Donotusccacked,chipped,warped,protherwisendamageddiscsastneymayosmagertheplayer
Unfinalized CD-R/CD-R/W discplayback is not possible.
Denollbuch therecordedsurfaceolthed scs.
Stored scsintneircaseswhenrotinuse.
Avoid leaving your excessively healthy for men's including under direct sunlight.
Donotattachlabels, writeonorapplychemicalsto theseurfacethediacs.
TocleanaCD, wipe the disc with a soft cloth forward from the center.
Condensation may temporarily impair the player's performance. Leave I would adjust how armor is peratur or about one hour. Also, wipe any clamp disc with asoft cloth.
Playbackoldiscernyne,becoposibobecausaldischaracteristics,disclormal,recordedapolication,playbackenvironment,storageconditions,and soon.
Hoadshocksmayinlerrupoldisplayback.
DualDiscs
Dual Discsaretwo-sided discsthath ave recordable CDforaudioononesideandarecordable DVD for videortheother.
Sir coetheCDs denfDual Discisnotphysically compatible with the general CDstandard in may not be possible clople the CDs dowith this unit.
Frequentboarding depicting a DualDiscmay result inacrarchesontnediac.Serousscratrescan leactoplaybackproblemsonthisur.it.Insome cases,aDualDiscmayecomestucanthedisload ingalelandwillnoteject.Iprove this,wecomemendycuretrainnromusingDualDiscwiththisunit.PleasurefertollicinformationfromthediscmanufactureformercolasticoinformationaboutDualDiscs
■
Compressedaudio compatibility
WMA
Fileextension.wma
B. frate:48kbpsto320kbps(CPR),48kbpsto564kbps(VPR)
Samplingfrequency:32kl izto48kl Iz
Windows MediaAudioProfessional, Lossless, Voice No
MP3
Fileextension.mp3
E trate:8kbpsto320-bpe(CBR).VER
Sampling frequency:6kHz to 48kHz (32,44,1.48kHz foreemphasis)
Compatible D3tagversion:1.0.1.1.2.2.3.2.4(D3 tagVersion2.xisgivenprior tyoverversion1.x.)
M3c play ist: No
MP3i(VIP3interactive),m p3PRO:No
WAV
Fileextension.wav
Quantizationbits:Band16(LPCM)4IVSADPCM)
Sampling frequency: 16kHz to 48kHz (LPCM) 22.05 kHz and 47.1 kHz (MSAOPC)
Supplementalinformation
Onlythefirst32characterspanboedisplayedasaf le namel includingthefi eextens onjorafoloe name.
Trisuniamayncoperatecorrectlydependingonthe application.sertoencodeWMOfles.
Theremayoeaslightdelaywhenstartingplaybackof suciofliesemboddedwithmagedaca.
Disc
Playaolefolder hierarchyuptoeighttiers(Apractical hierarchylessthanlwoliers.)
Playa ole folders upto99
AdditionalInformation
Playablefile:uptc009
Filesystem:ISO9602Level1ard2,Romeo,Jol et
Multi-session playback: Yes
Packetwntedstatransfer:Ne
Regardless of the length of blank section between the song software, original recording, compressed audio discs play with short pause between songs.
□
Sequenceofaudiofiles
Theusercannotassignfeldernumbersand speci fyplaybacksequenceswith this unit.
Exampleofahierarchy
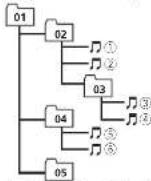
Level 1 Level 2 Level 3 Level 4
Folder Compressed
01 kVörs-Holder
(1)
①to⑤:Playback sequence
Disc
- Fo derselect onsequenceorotheroperationmaydifferdependingontheencodingonwritingsoftware.
Copyrightandtrademark
iTunes
Apple and Tures are trademarks of Apple Inc., registered in the U.S. and other countries.
MP3
Supply of this product only conveys a license for private, non-commercial use and does not convey a licensed or simply any rightouse this product in any commercial (i.e. revenue-generating) realtime broadcasting (terrestrial
satellite,cableand/oranythermed a),broadcastng/streaming via internet,intranetsand/orthernetworksorinotherlectroniccontent structionsystems,suchaspay-audior audio-on-cernandapplications.Anindependent license for such use is required.For details please visit http://www.mo3licensing.com,
WMA
WindowsMediaandtheWindowslogcaretrademarksoregisteredtrademarksofMicrosoft CorporationintheUnitedStatesand/orother countries.
This product includes technology owned by Microsoft Corporation and cannot be used for distributed without a license from Microsoft Licensing, Inc.
Specifications
General
Rated power source.....4.4VDC (allowable voltage range: 12.0V to 14.4VDC)
Groundingsystem......Negative type Maximum current consumption
Dimensions(W×H×D):

Audio
Maximum power output.....50W×4 Continuous power output.....22W×4(50Hz, c15000 I≥5%T I>40load, both
channelsdriven)
Load impedance ....4Ω (4Ω to 8Ω allowable) Precutmax mumou [pu level] 9.7%
Ionecontrols: 3asa Frequency.....100 Hz
Appendix
AdditionalInformation
Gain ±12dB

CDplayer
System....Compactdiscaudinsystem
Usab cdiscs....Compactdisc
Signal-to-noise ratio.....94dB(1kHz)(I=C-Anel
word
Number of channels.....2(stereo)
WV Adecoding format.....Ver.7,7.1,8,9,10,11,12
(2chaudio)
(Windows\MediaPlayer)
MP3decodinglormal.....M-EG-1&2AudioLayer-3
WAVsig nal format....linearPCM&MSADPCM
FMtuner
Frequencyrange.....87.5MHz to 108.0MHz
Usable sensitivity .... 11 dBf (0.7 μV/75 Ω, mono
S/N:30dB
Signal-to-noise ratio.....72dB(IEC-Anetwork)
AMtuner
Frequency range.....531 kHz 1602kHz (9kHz)
530kHz1640kHz(10
|k|-z
Usab osensitivity.....25μV(S/N 20cB)
Signal-to-noise ratio.....62dB(IEC Anetwork)
Infraredremotecontrol
Wavelength.....340nm ± 50nm
Output....vo:12mw/super/nirarcc/
LED
Note
Specificationsandthedesignaresubjecttomed-
ificationswithoutnotice.
16
En
17
Sección
01
Antesdecomenzar
SRTRV(Sound Retriever)
text_image
Technical diagram showing labeled mechanical components with numbered parts, likely illustrating a assembly or assembly process.①Tuerca
②Murocortafuegoosoporteder metal
③Correa retálica
④Tornillo
⑤Tornillo(M4×8)
Cuanconcuti icecladi socs, guárcelosensusca, as
Extens/oncearch/vomma
MP3i(VIP3interactive),mp3PRO:nc
Frequency 3.....1x12
Ganancia.....1.12d3
Acudos
(Windows Media Player)
Formatodedecocificación MP3
M=6.12AudioLayer
FormatodesicalWAV.....PCMlineal&MSADPCM
SintonizadordeFM
Gamade recuencias.....87.5MHz@108.0MHz
1Press one▲carealiver BSM
Assisreqüenciadasdetransmissõoma sierles sácar mazonadasnaorocindaintonsidacido s nal. Paranancel amprocessodeamazenamento, pressione▼.
RPT(Reomducincom/repetician)
d ralsperceived with inlessive SCAN
vezagressionarFUNC
text_image
Technical diagram showing labeled components of a mechanical or electrical assembly with numbered parts①Porca
②Firewallousuportedemetal
③Tirasdemetal
④Parafuso
⑤Parafuso(M4×8)
■Verificueseaunidadefoliinstaladacomsegu-
MP3i(MIP3in(catalve),mp3PRO.nác
an molecular interaction data
(Windows Media Player)
FormatodecodificacámMP3
MP16182Carmadado
áudic3
FormatodesinalWAY.....PCMLineareMSADPCM
SintonizadordeFM
text_image
Technical diagram showing labeled mechanical components with numbered parts, likely illustrating a linkage or assembly.text_image
Technical diagram showing labeled mechanical components with numbered partsThe image is too blurry to recognize any text content.

تملاذهقابكلا
natural_image
Two horizontal rounded rectangular shapes with black rounded corners on white background, no text or symbols present
14 Fa
Fa 14
اطلاعات بیشتر
العربية
صاب بتسط
الکلدهیت
الله بِمْدَّلَى
میدای ریز
- كيلوهاز فركانس
دسته ۱۲ جعسر بل
بخش کننده سی دی
text_image
Technical diagram showing labeled mechanical components with numbered parts, likely illustrating a assembly or assembly process.①
Visit us on the World Wide Web at
http://pioneer.jp/group/index-e.html
Pioneer Gulf.FZE
http://www.pioneer-uae.com
Pioneer Electronics Australia. Pty.Ltd
http://www.pioneeraus.com.au
Pioneer Electronics Asiacentre.Pte
http://www.pioneer.com.sg
Pioneer (HK) Ltd.
http://www.pioneerhongkong.com.hk
Pioneer High Fidelity Taiwan Co., Ltd.
http://www.pioneer-twn.com.tw
Pioneer International Latin America S.A.
http://www.pioneer-latin.com
PIONEER CORPORATION
1-1. Shin-ogura, Saiwai-ku, Kawasaki-shi,
Kanagawa 212-0031, JAPAN
PIONEER ELECTRONICS (USA) INC.
P.O. Box 1540, Long Beach, California 90801-1540, U.S.A.
TEL:(800)421-1404
PIONEER EUROPE NV
Haven 1087, Keetberglaan 1, B-9120 Melsele, Belgium/Belgique
TEL: (0) 3/570.05.11
PIONEER ELECTRONICS ASIACENTRE PTE. LTD.
253 Alexandra Road, #04-01, Singapore 159936
TEL: 65-6472-7555
PIONEER ELECTRONICS AUSTRALIA PTY. LTD.
178-184 Boundary Road, Braeside, Victoria 3195, Australia
TEL: (03) 9586-6300
PIONEER ELECTRONICS OF CANADA, INC.
300 Allstate Parkway, Markham, Ontario L3R 0P2, Canada
TEL: 1-877-283-5901
TEL: 905-479-4411
PIONEER ELECTRONICS DE MEXICO, S.A. de C.V.
Blvd.Manuel Avila Camacho 138 10 piso
Col.Lomas de Chapultepec, Mexico, D.F. 11000
TEL: 55-9178-4270
先锋股份有限公司
總公司:台北市中山北路二段44號13樓
電話:(02)2521-3588
先锋電子(香港)有限公司
香港九龍尖沙嘴海港域世界商業中心
9 樓 901-6 室
電話:(0852)2848-6488
Published by Pioneer Corporation. Copyright ©2010 by Pioneer Corporation. All rights reserved.
Printed in Thailand