MBF 8181 - Baby monitor OLYMPIA - Free user manual and instructions
Find the device manual for free MBF 8181 OLYMPIA in PDF.

User questions about MBF 8181 OLYMPIA
0 question about this device. Answer the ones you know or ask your own.
Ask a new question about this device
Download the instructions for your Baby monitor in PDF format for free! Find your manual MBF 8181 - OLYMPIA and take your electronic device back in hand. On this page are published all the documents necessary for the use of your device. MBF 8181 by OLYMPIA.
USER MANUAL MBF 8181 OLYMPIA
natural_image
Two white electronic devices with 'TX POWER' and '°C' labels, displayed side by side (no additional text or symbols visible)GB Operating instructions
FR Mode d'emploi
GB Operating instructions 15
FR Mode d'emploi 25
natural_image
Technical line drawing of a mobile phone showing internal components and battery pack assembly (no text or symbols)text_image
Diagram showing a connected power supply and a handheld device with labeled parts ⑫/⑳ and ②/④natural_image
Technical line drawing of a smartphone showing internal components and a close-up view (no text or symbols)text_image
Technical line drawing showing two devices with labeled parts, including a digital display and a connected power plug.- 1 x Baby unit
- 1 x Parent unit
- 1 x 6V AC switching power supply for baby unit
- 1 x 6V AC switching power supply for parent unit or rapid charger
- 1 x Intelligent rapid charger
- 1 x 3.6V NiMH rechargeable battery pack
- 1 x User manual
2. PRECAUTIONS
- Please read the operating instructions carefully before using the equipment! This ensures maximum performance & extended service life of the MBF.
- Only use original accessories. The use of other parts may cause damage to the MBF 8181 baby monitor.
- If the baby monitor will not be used for a longer period of time, remove all batteries from the units to prevent damage due to battery leakage.
- Disconnect the AC switching power supply from the power source when the monitor is not being operated.
- The MBF 8181 works best within a temperature range of -9^ to +50^ .
- Do not expose the units to direct sunlight or moisture or place near any heat source for a longer time. Do not use in an excessively dusty environment.
- Do not place the transmitter in a baby's cot or playpen.
• Always place the equipment out of reach of small children. - Safe operation is no longer guaranteed if the equipment has visible damage or is no longer functioning correctly.
- Do not open any part of the units or their accessories; only an authorized specialist may carry out maintenance, adaptation and repair work.
WARNING
The MBF 8181 baby monitor should not be regarded as a medical device. Premature babies or those considered to be at risk should be under the supervision of your doctor or medical personnel. It is strongly recommended to supervise your baby at a regular interval, in addition to using the MBF 8181.
3. OPERATING COMPONENTS
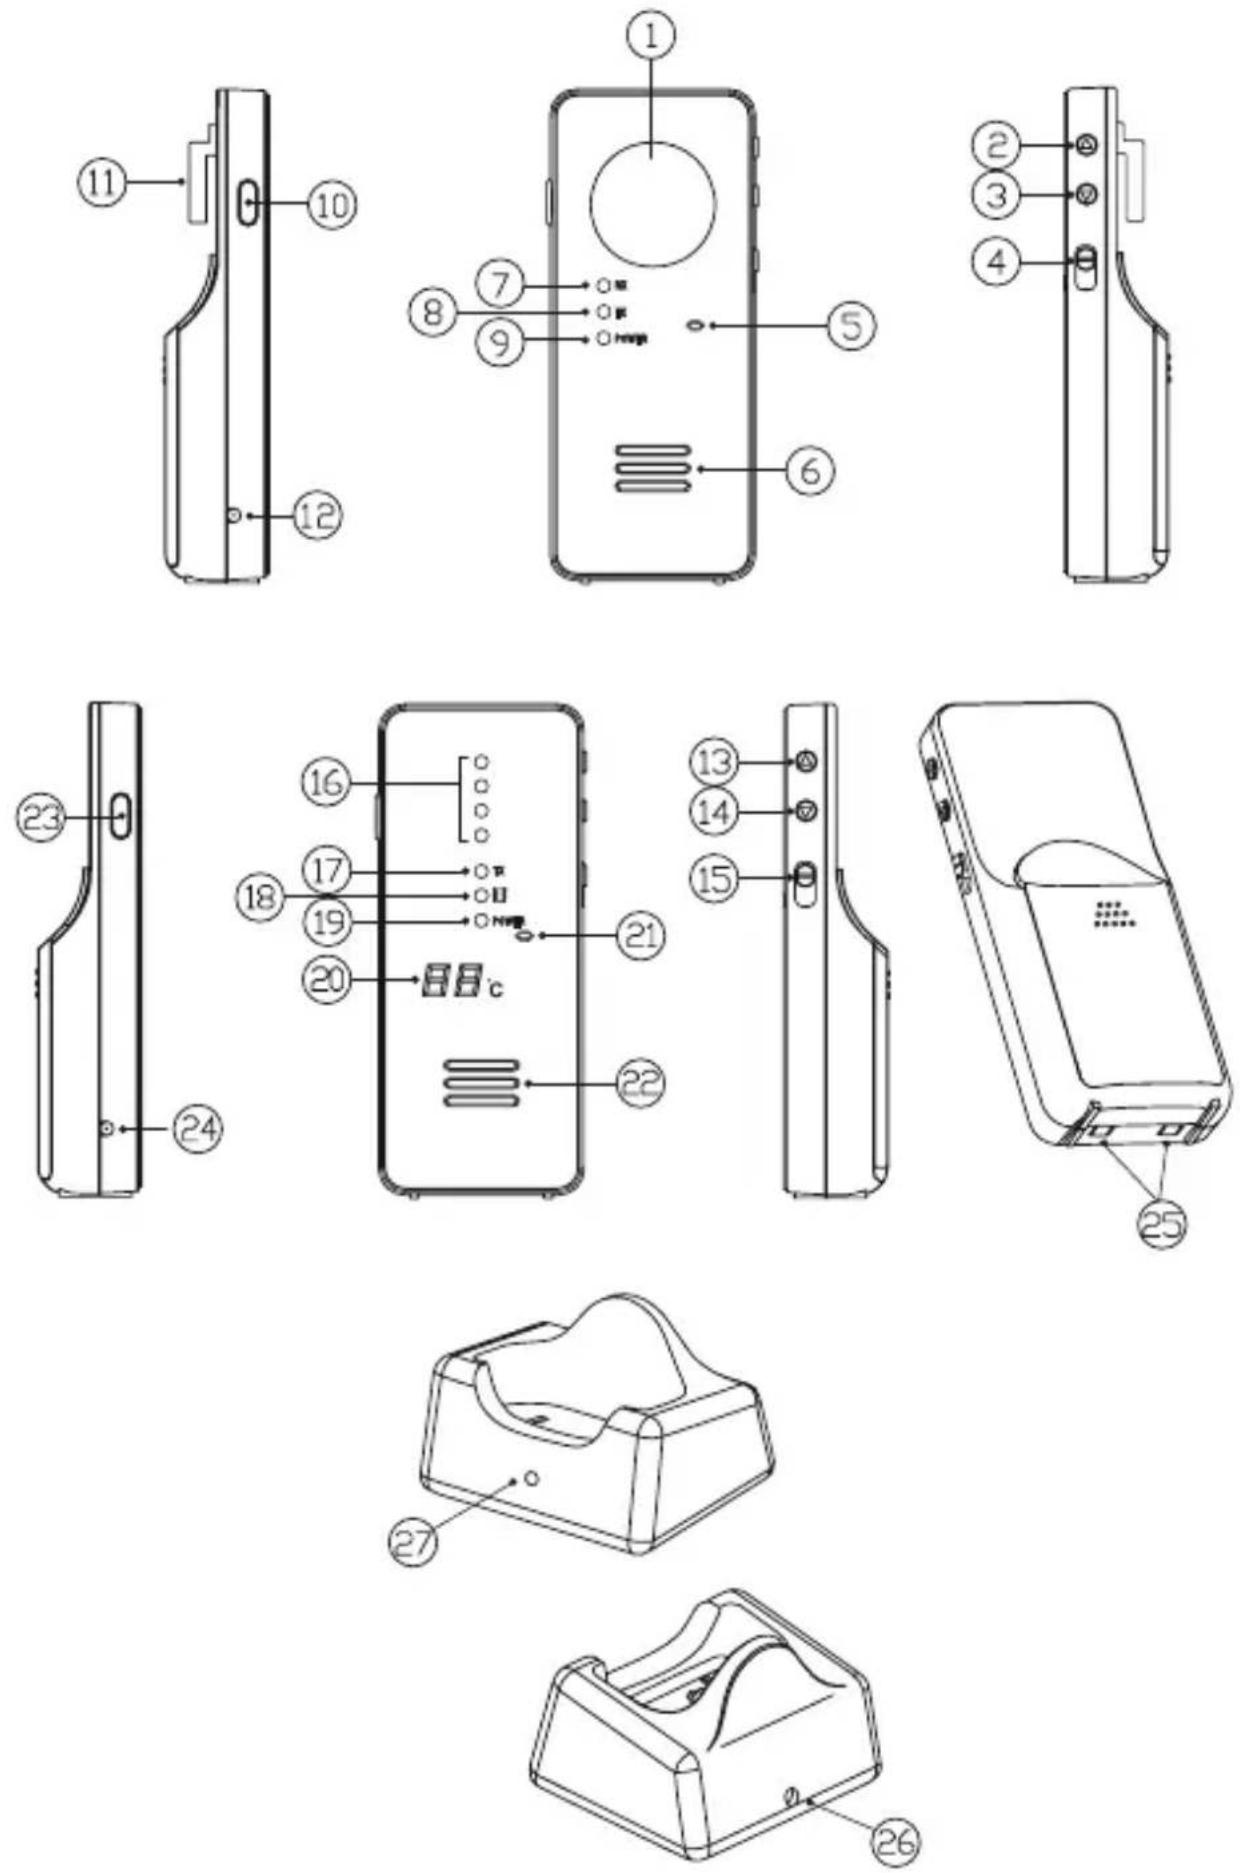
- Night light
- Microphone sensitivity/Volume Up button
- Microphone sensitivity/Volume Down button
- Power ON-OFF and Night Light switch
- Microphone
- Speaker (optional)
- Rx indicator (optional)
- Tx indicator
- Power on/battery low indicator
- Volume control button (optional)
- Temperature sensor
- DC jack
-
Volume Up button
-
Volume Down button
- Power ON-OFF and vibration switch
- LED level meter
- Tx indicator (optional)
- Vibration indicator
- Power on/battery low indicator
- Temperature indicator
- Microphone (optional)
- Speaker
- Talk back PTT button (optional)
- DC jack (optional)
- Charger contact plates (optional)
- Charger DC jack (optional)
- Charging indicator (optional)
4. FEATURES
- Full digital technology operating in the 863 – 870 MHz range with zero interference
- Automatic search and switching to a free channel
- Operating range of 500m in open space
- Low radiating power
- The automatic power reduction system reduces radiation level to half when the baby unit and the parent unit are close to each other
- Temperature indication of baby's room
- Night light on baby's unit
- Audio and visual alert for out-of-range on parent unit
- LED level meter on parent unit
- Low battery warning on both baby and parent unit
- Adjustable microphone sensitivity on baby unit
- Vibration alert on parent unit
- Talk back function
5. DIGITAL TECHNOLOGY AND APRS
= AUTOMATIC POWER REDUCTION SYSTEM
This baby monitor uses full digital technology with zero interference.
The unit automatically selects free channels or switches over to a free channel during communication to avoid interference from other electronic devices.
The Automatic Power Reduction System (APRS) detects the distance between baby and parent unit and automatically reduces the transmission power from the baby unit when the two units are in close vicinity. The level of radiation the baby is exposed to is greatly reduced.
6. POWER SUPPLY
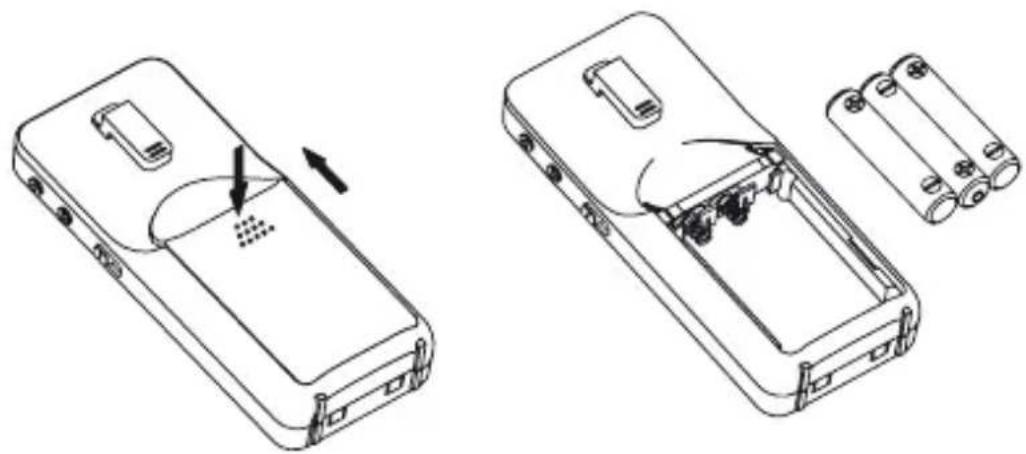
6.1. BABY UNIT AND PARENT UNIT
natural_image
Technical line drawing of a mobile phone showing internal components and battery pack assembly (no text or symbols)6.1.1 Operation using batteries
- Press and slide open the battery door in the direction indicated.
- Insert three AAA alkaline batteries (UM-4) in the battery compartment. Pay attention to correct polarity.
Note:
For the best performance, do not mix old and new batteries or alkaline and rechargeable batteries.
text_image
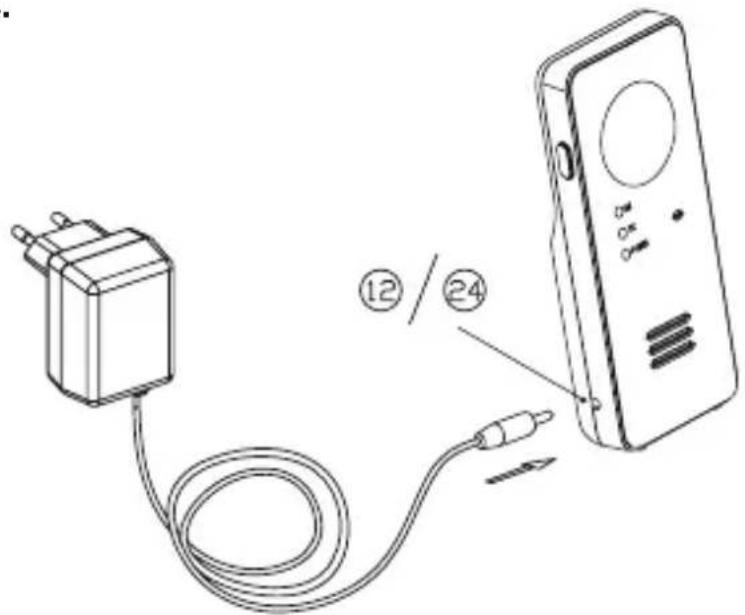
Diagram showing a connected power supply and a handheld device with labeled parts ⑫/⑳ and ②/④6.1.2. Operation using the AC adapter
The unit can be operated via AC mains using the 6V switching power supply contained. Connect the output plug of switching power supply to the DC jack (12) or (24) in the unit. Pay attention to correct polarity. The battery power is cut-off once the switching power supply is plugged into the DC jack.
6.2 PARENT UNIT WITH RECHARGEABLE BATTERY & RAPID CHARGER

natural_image
Technical line drawing of a smartphone showing internal components and a close-up view (no text or symbols)6.2.1. Operation using the NiMH rechargeable battery
- Press and slide open the battery door in the direction indicated.
- Insert the NiMH rechargeable battery pack supplied in the battery compartment. Make sure the two terminals on battery pack are in contact with the metal springs located inside the compartment.

natural_image
Technical line drawing of two electronic devices with labeled parts, connected to a power cord (no text or symbols present)6.2.2. Operation via the AC mains using the intelligent rapid charger
- Connect the output plug of the 6V switching power supply contained to the DC jack (26) of the rapid charger. Pay attention to correct polarity.
- When the parent unit is switched off, place it in the rapid charger. The charging indicator (27) will light up red and green alternately while detecting the status of the battery charge.
- Adjust the position of the parent unit in case the indicator does not light up. After 5 sec, the charging indicator (27) will start flashing red when the battery is being charged. Once the battery is fully charged (this normally takes about 4 hours), the charging indicator (27) turns green. The parent unit can now be switched on for operation. You can either take it out of the rapid charger or leave it in; leaving it in the rapid charger does not damage the battery.
- In the latter case, when the battery is being consumed and voltage falls to a certain level, the rapid charger automatically starts charging the battery again.
Note:
Before using the parent unit for the first time, charge NiMH battery with the rapid charger for at least four hours. Be sure to switch off the unit before charging.
Caution: Before connecting the parent unit with the rapid charger:
1) Ensure that a rechargeable battery is installed. Otherwise, there is a risk of explosion.
2) Ensure that the battery is inserted in the unit correctly. Otherwise, the parent unit cannot operate properly.
7. PAIRING
This process connects the receiver with the transmitter so that the units can communicate with each other and no other devices (even a baby monitor of an identical model) can interfere with the signal. On supply, the units are already paired with factory-preset code. However, we recommend performing following steps for pairing again in order to achieve a higher level of privacy:
- First press and hold the ▼ button (14) on the parent unit.
- Set the Power ON-OFF switch (15) to ON and wait until the temperature indicator (20) starts flashing.
- Now press and hold the ▼ button (3) on the baby unit.
- Set the Power ON-OFF switch (4) to ON and wait until the Tx indicator (8) starts flashing.
- Release the ▼ button (3) and then press and hold the () button (3) again.
- If pairing is successful, the Tx indicator (8) and the P on the temperature indicator (20) should stop flashing. At the same time, the parent unit will emit 2 beep sounds.
- Switch both units off and on again; the baby monitor is now ready for operation.
- In case the units cannot communicate with each other, repeat steps 1 - 7 again.
8. OPERATION
8.1 BABY UNIT (TRANSMITTER)
- Set the Power ON-OFF switch (4) to ON. The power indicator (9) lights up yellow.
- Place the unit about 1 m from the crib with the microphone (5) facing towards the baby.
- Adjust the microphone sensitivity by using the UP/DOWN buttons (2) and (3) so that the unit is set to transmit whenever the microphone (5) detects sounds above a certain noise level. The transmission indicator (8) flashes each time these buttons are pressed. The more frequent the flashes, the higher the sensitivity of the microphone to any noise (max. 4 blinks and min.1 flash). Press ▲ to increase and ▼ to reduce microphone sensitivity.
- Once the unit is in transmit mode, the transmit indicator (8) lights up yellow. The unit returns to standby mode a few seconds after the microphone (5) stops picking up any sound and the
transmit indicator (8) goes out.
-
This baby monitor is equipped with an out-of-range alert function. The baby unit transmits an acoustic signal to the parent unit at regular intervals even when the microphone (5) does not pick up any sound.
-
If you wish to set the night light (1) ON permanently, set the Power ON-OFF switch (4) to position.

-
The battery status is shown by the POWER ON/BATTERY LOW indicator (9). When the battery power begins to weaken, the BATTERY LOW indicator (9) starts flashing. Insert a new battery or use the switching power supply.
-
The temperature sensor (11) measures the temperature in the baby's room and sends a signal to the parent unit. To ensure correct reading, do not block the ventilation of this sensor.
8.2. PARENT UNIT (RECEIVER)
- Set the Power ON-OFF switch (15) to ON. The POWER ON indicator (19) lights up wellow.
- Place the parent unit a reasonable distance away from the baby unit to avoid feedback. If they are too close, a screeching sound will emit from the speaker (22).
- Once the unit receives a signal, the LEDs in the LEVEL METER (16) light up. The louder the baby's voice, the more LEDs light up. This feature is useful in cases where you prefer to turn down the speaker volume to keep the environment quiet.
- The speaker volume can be adjusted by using the VOLUME UP/DOWN buttons (13) & (14). Each time a button is pressed, a beep sound is issued and ☐ to 9 light up respectively in the temperature indicator (20). ☐ means the speaker is muted and 9 means maximum volume.
- This unit is equipped with a vibration alert. Set the Power ON/OFF switch (15) to position, the vibration indicator (18) lights up. Once baby's voice is received, the vibration alert starts functioning. This feature is useful when you are working in a noisy environment (e.g. vacuum cleaning). To save battery power, it is recommended not to use the vibration alert frequently.
- When the parent unit has been beyond the communication range of baby unit for over 2 minutes, an out-of-range alarm is issued and the LED level meter (16) starts flashing to alert the parents. The alarm only stops when the parent unit re-enters the communication range of baby unit.
Note:
This alarm is also sounded in case the baby unit is switched off, its battery is weak, its power is cut off or the pairing process is not successful.
-
The status of the battery power (or rechargeable battery pack) is displayed by the POWER ON/BATTERY LOW indicator (19). When the battery begins to weaken, the indicator (19) starts to flash and an alarm is issued, reminding you to replace the battery (or charge the battery pack using the rapid charger).
-
The temperature of the baby's room is shown on the temperature indicator (20). The measuring range is between -9^ and +50^ . In case the temperature moves outside this range, -- appears in the indicator.
Note:
If the parent unit is switched on first, the temperature indicator (20) will immediately show the baby's room temperature when the baby unit is switched on. If the baby unit is switched on first, it will take a while before the temperature can be displayed on the parent unit.
9. TALK BACK FUNCTION
The talk back function enables you to talk back and comfort the baby with your voice.
- Press and hold the PTT button (23) and then speak towards the microphone (21). The Tx indicator (17) lights up.
- Your voice can be heard from speaker (6) and the Rx indicator (7) lights up correspondingly.
- Press and hold the volume button (10) while using the buttons ▲(2) and ▼(3) to adjust the volume of speaker (6). Each time the buttons (2) or (3) are pressed, the Rx indicator (7) flashes one to four times and the corresponding number of beeps are issued. The higher the number of beeps, the louder the voice.
- Release the PTT button (23) after speaking. Note that when PTT button (23) is pressed, you cannot hear the sound from your baby.
10. TROUBLESHOOTING
| Problem Possible Causes Solution | ||
| Transmitter does not transmit | - Mic sensitivity is too low | - Adjust mic sensitivity higher using up button (2) |
| - Battery has run down or switching power supply is improperly connected | - Replace with new battery or check connection | |
| Transmitter always on - Mic sensitivity is too high | - Adjust mic sensitivity lower using down button (3) such that transmitter becomes voice activated | |
| Out-Of-Range alarm always on | - Transmitter's battery has run down | - Replace with new battery or use switching power supply |
| - Distance between transmitter and receiver exceeds the operating range | - Move the transmitter and receiver closer together | |
| - Pairing is not successful - Perform pairing again | ||
| Always showing low battery alert. | - Battery has run down | - Recharge battery using charger stand or replace with new battery or use the switching power supply |
| - No battery inside receiver | - Put battery pack back into the battery compartment | |
| - Battery pack is damaged - Replace with a new battery pack | ||
| Battery life is short | - Night light is permanently switched on | - Switch off the night light |
| - Vibration alert is switched on - Switch off the vibration alert | ||
| Much static noise and interference | - Transmitter is located near other electrical appliances | - Remove the electrical appliances or relocate the transmitter away from sources of interference |
| Too short communication range | - Many steel structures between baby and parent units | - Re-locate baby & parent unit |
| - Baby unit battery has run down | - Replace with new battery or use switching power supply | |
11. TECHNICAL DATA:
Channels: 50
Operating frequency: 863-870 MHz
Operating range: Up to 500m
Output: 6V, 300mA
Input: 100-240 V - 50/60Hz
Rechargeable battery: 3.6 V
Dimensions: 2 x 4.5 x 11cm (L x W x H) (each unit)
12. NOTES ON DISPOSAL:
Old units, marked with the symbol as illustrated, may not be disposed of in the household rubbish.
used rechargeable and non-rechargeable batteries which are marked
with one of the symbols illustrated may not be disposed of in the household rubbish. You must take them to a collection point for old units, old batteries or special waste (enquire at your local authority) or the dealer from whom you bought them.
13. CARE AND WARRANTY
Before cleaning the unit, disconnect it if necessary from other components; do not use aggressive cleaning agents.
The unit has been carefully checked for defects. In the case of a defect, please return the device together with the receipt and original packing material to the point-of-sale.
We are not liable for damage arising from incorrect handling, improper use or wear and tear.
We reserve the right to make technical modifications.
FR
1. CONTENU DU COFFRET
natural_image
Technical line drawing of a mobile phone casing showing internal components and battery pack (no text or symbols)text_image
Diagram showing a connected power supply with labeled components and connection points ⑫/⑳/⑳/⑳natural_image
Technical line drawing of a mobile phone showing internal components and a separate device (no text or symbols present)text_image
Technical line drawing showing two devices with labeled parts, including a digital display and a connected electrical plug.natural_image
Technical line drawing of a mobile phone showing internal components and battery pack assembly (no text or symbols)text_image
Diagram showing a connected power supply and a handheld device with labeled parts ⑫/⑳ and ②/④natural_image
Technical line drawing of a smartphone showing internal components and a close-up view (no text or symbols)text_image
Technical line drawing showing two devices with labeled parts, including a battery and a connected electrical plug.natural_image
Technical line drawing of a mobile phone showing internal components and battery pack assembly (no text or symbols)text_image
Diagram showing a connected power supply and a handheld device with labeled parts ⑫/⑳ and ②/⑳natural_image
Technical line drawing of a smartphone showing internal components and a close-up view (no text or symbols)6.2.1. Esercizio con batterie ricaricabili Ni-MH
natural_image
Line drawing of a mobile phone with a base mount and indicator lights (no text or symbols)