
FBM 575 A1 - Lawn mower FLORABEST - Free user manual and instructions
Find the device manual for free FBM 575 A1 FLORABEST in PDF.


| Product type | Gas lawn mower |
| Brand | Florabest |
| Model | FBM 575 A1 |
| Engine | Briggs & Stratton 575EX, 140 cm³, 2.1 kW |
| Engine speed | 2900 rpm |
| Fuel | Unleaded gasoline 95 octane |
| Fuel tank capacity | 0.75 L |
| Engine oil | SAE 30 or SAE 10W-30 |
| Oil tank capacity | 0.44 L |
| Spark plug | Champion QC12YC |
| Cutting width | 460 mm |
| Cutting height | 6 levels: 30, 39, 51, 64, 79, 95 mm |
| Blade type | Rotary blade |
| Functions | Mowing, mulching, collection |
| Forward speed | 4.7 km/h |
| Weight | 31 kg (empty tanks) |
| Guaranteed sound level | 95 dB(A) |
| Vibration level | < 2.5 m/s² |
| Safety | Engine brake, emergency stop, protection against projections |
| Grass catcher | Included |
| Warranty | 3 years |
| Wear parts | Blade, spark plug, air filter, belt, cables |
| Maintenance | Cleaning under deck, oil change, blade sharpening |
| Repairability | Spare parts available from after-sales service |
Frequently Asked Questions - FBM 575 A1 FLORABEST
User questions about FBM 575 A1 FLORABEST
0 question about this device. Answer the ones you know or ask your own.
Ask a new question about this device
Download the instructions for your Lawn mower in PDF format for free! Find your manual FBM 575 A1 - FLORABEST and take your electronic device back in hand. On this page are published all the documents necessary for the use of your device. FBM 575 A1 by FLORABEST.
USER MANUAL FBM 575 A1 FLORABEST
natural_image
Black and white photo of a lawn mower with visible blades and mounting bracket (no text or symbols)BENZIN-RASENMÄHER - FBM 575 A1
DE AT

CH
Benzin-Rasenmäher
Instruction and safety manual
INDEX
BESTIMMUNGSZWECK 3
D AUFBAU OBERER GRIFF 4
DÉCLARATION CE DE CONFORMITÉ 9
DÉCLARATION CE DE CONFORMITÉ
C ASSEMBLY LOWER HANDLES 4
D ASSEMBLY UPPER HANDLES 4
E MULCHING CAP INSERTION 4
F ADJUSTMENT OF CUTTING HEIGHT 5
G SAFETY PRECAUTIONS 5
H OPERATION 5
I ADJUSTMENT OF CLUTCH CABLE 6
J MAINTENANCE 6
K BLADE 7
WARRANTY 7
GENERAL SERVICE 8
RECYCLING 8
TECHNICAL DATA 8
EC-DECLARATION OF CONFORMITY 9
We wish to thank you for choosing our lawn mower. We are confident that the high quality of our machine will meet with your satisfaction and appreciation and that your lawn mower will give you long-lasting service. Before starting to use your machine, make sure to read with care this manual, which has been purposely drawn up to provide you with all the necessary information for proper use, in compliance with basic safety requirements. Safety symbols below are located on the deflector, as shown in picture.

1 Caution!
Read the instruction manual before use.
2 Risk of injury from flying objects!
Keep other people well away from the danger area
3 Risk of injury from sharp blade!
Keep away from rotating parts.
4 Risk of inhalation of toxic gases!
Do not use the appliance in closed or poorly ventilated environments.
5 Risk of explosion!
Do not refuel with engine running.
6 Caution!
Hot surface
7 Caution!
Switch off the engine and disconnect the spark plug before undertaking any maintenance work.


1 Manufacturer
2 Model
3 Product number
4 Maintenance level
5 Serial number
6 Type
7 Engine information
8 Weight
9 Sound power level
INTENDED PURPOSE OF USE
This lawn mower is intended to be used for lawn mowing only. The lawn mower is for private use and should be operated by adults only. It is suitable for normal sized lawn.
SAFETY RULES
Safe Operation Practices for Pedestrian-Controlled Rotary Lawnmowers
IMPORTANT: The machine is capable of amputating hands and feet and throwing objects. Failure to observe the following safety instructions could result in serious injury or death.
I. Training
- Read the instructions carefully. Be familiar with the controls and the proper use of the equipment.
- Never allow children or people unfamiliar with the instructions to use the lawnmower. Local regulations may restrict the age of the operator.
- Never mow while people, especially children, or pets are nearby.
- Keep in mind that the operator or user is responsible for accidents or hazards occurring to other people or their property.
II. Preparation
● While mowing, always wear substantial footwear and long trousers. Do not operate the equipment when barefoot or wearing open sandals.
- Thoroughly inspect the area where the equipment is to be used and remove all objects which may be thrown by the machine.
● WARNING - Petrol is highly flammable.
- Store fuel in containers specifically designed for this purpose.
- Refuel outdoors only and do not smoke while refueling.
- Add fuel before starting the engine. Never remove the cap of the fuel tank or add petrol while the engine is running or when the engine is hot.
- If petrol is spilled, do not attempt to start the engine but move the machine away from the area of spillage and avoid creating any source of ignition until petrol vapors have dissipated.
- Replace all fuel tanks and container caps securely.
- Before using, always visually inspect to see that the blades, blade bolts and cutter assembly are not worn or damaged. Replace worn or damaged blades and bolts in sets to preserve balance.
III. Operation
- Do not operate the engine in a confined space where dangerous carbon monoxide fumes can collect.
● Mow only in daylight or in good artificial light.
- Avoid operating the equipment in wet grass, where feasible.
● Always be sure of your footing on slopes.
● Walk, never run.
- For wheeled rotary machines, mow across the face of slopes, never up and down.
- Exercise extreme caution when changing direction on slopes.
- Do not mow excessively steep slopes.
- Use extreme caution when reversing or pulling the lawnmower towards you.
- Stop the blade if the lawnmower has to be tilted for transportation when crossing surfaces other than grass, and when transporting the lawnmower to and from the area to be mowed.
- Never operate the lawnmower with defective guards, or without safety devices, for example deflectors and/or grass catchers, in place.
- Do not change the engine governor settings or overspeed the engine. Operating the engine at excessive speed may increase the hazard of personal injury.
- Disengage drive clutch before starting the engine.
- Start the engine carefully according to instructions and with feet well away from the blade.
- Do not tilt the lawnmower when starting the engine or switching on the motor, except if the lawnmower has to be tilted for starting. In this case, do not tilt more than absolutely necessary and lift only the part which is away from the operator.
- Do not start the engine when standing in front of the discharge chute.
- Do not put hands or feet near or under rotating parts. Keep clear of the discharge opening at all times.
- Never pick up or carry lawnmower while the engine is running.
- Stop the engine and disconnect the spark plug wire:
- before cleaning blockages or unclogging chute;
- before checking, cleaning or working on the lawnmower;
- after striking a foreign object. Inspect the lawnmower for damage and make repairs before restarting and operating the lawnmower;
- if the lawnmower starts to vibrate abnormally (check immediately).
- Stop the engine:
- whenever you leave the lawnmower;
- before refuelling.
IV. Maintenance and Storage
- Keep all nuts, bolts and screws tight to be sure the equipment is in safe working condition.
- Never store the equipment with petrol in the tank inside a building where fumes may reach an open flame or spark.
- Allow the engine to cool before storing in any enclosure.
-
To reduce the fire hazard, keep the engine, silencer, battery compartment and petrol storage area free of grass, leaves, or excessive grease.
-
Check the grass catcher frequently for wear or deterioration.
● Always use the recommended spark plug type. Use of the wrong spark plug can damage the piston/cylinder. - Replace worn or damaged parts for safety. Always use genuine spare parts.
- If the fuel tank has to be drained, this should be done outdoors.

DESCRIPTION/CONTENT OF DELIVERY (Related illustrations in Appendix A)
| 1 Clutch lever | 11 Mulch plug spring |
| 2 Engine stop lever | 12 Mulch plug |
| 3 Tie strap | 13 Rear deflector |
| 4 Fastening knobs for upper handles | 14 Grass catcher |
| 5 Lower handles | 15 Engine start-grip |
| 6 Oil filler cap | 16 Upper handles |
| 7 Fuel cap | 17 Cap |
| 8 Spark plug | 18 Spark plug tool |
| 9 Deck | 19 Owners manual |
| 10 Adjusting lever for cutting height | 20 Canister 5l |

ASSEMBLY OF GRASS CATCHER
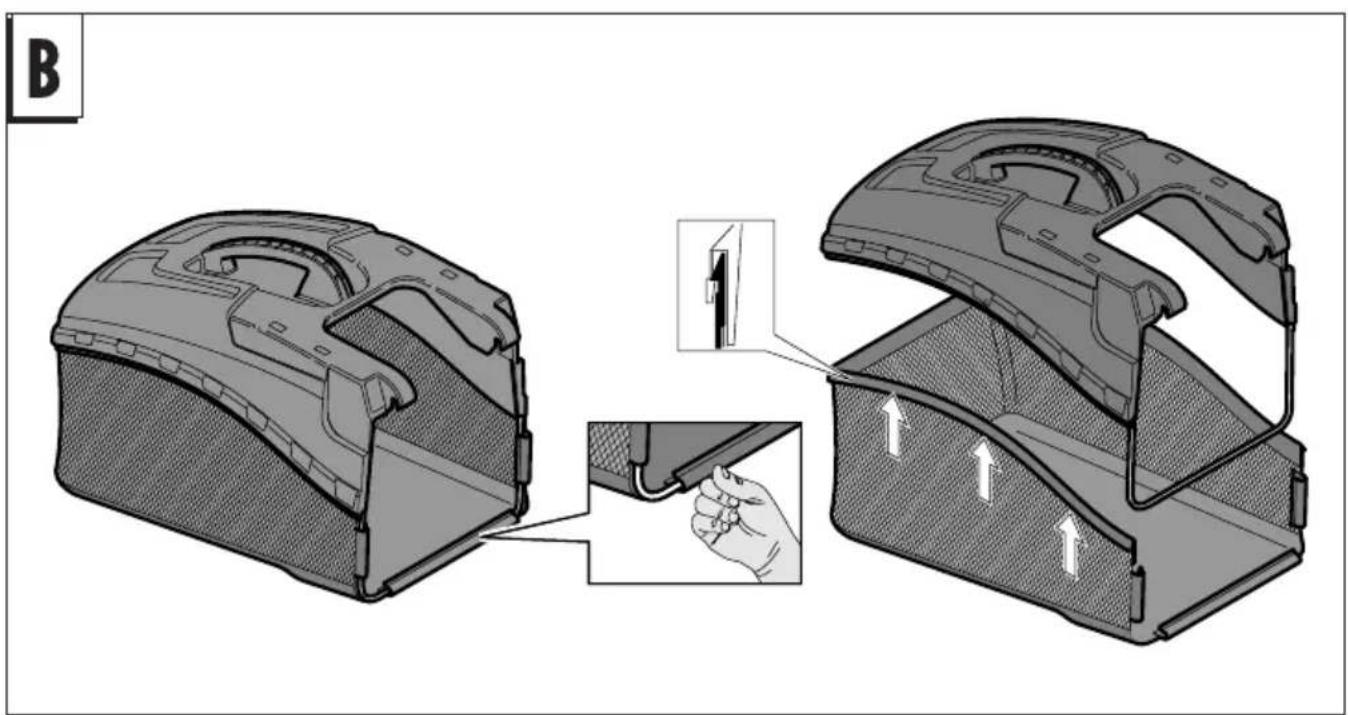
Start by mounting the steel frame in the hard top part of the bag. Then assemble the lower part by pressing the plastic list into the upper part slot as illustrated in Appendix B

ASSEMBLY LOWER HANDLES
Mount the lower handle to the clip deck with screw, washer and knob according to illustration in Appendix C. Insert nut in knob when mounting.

ASSEMBLY UPPER HANDLES
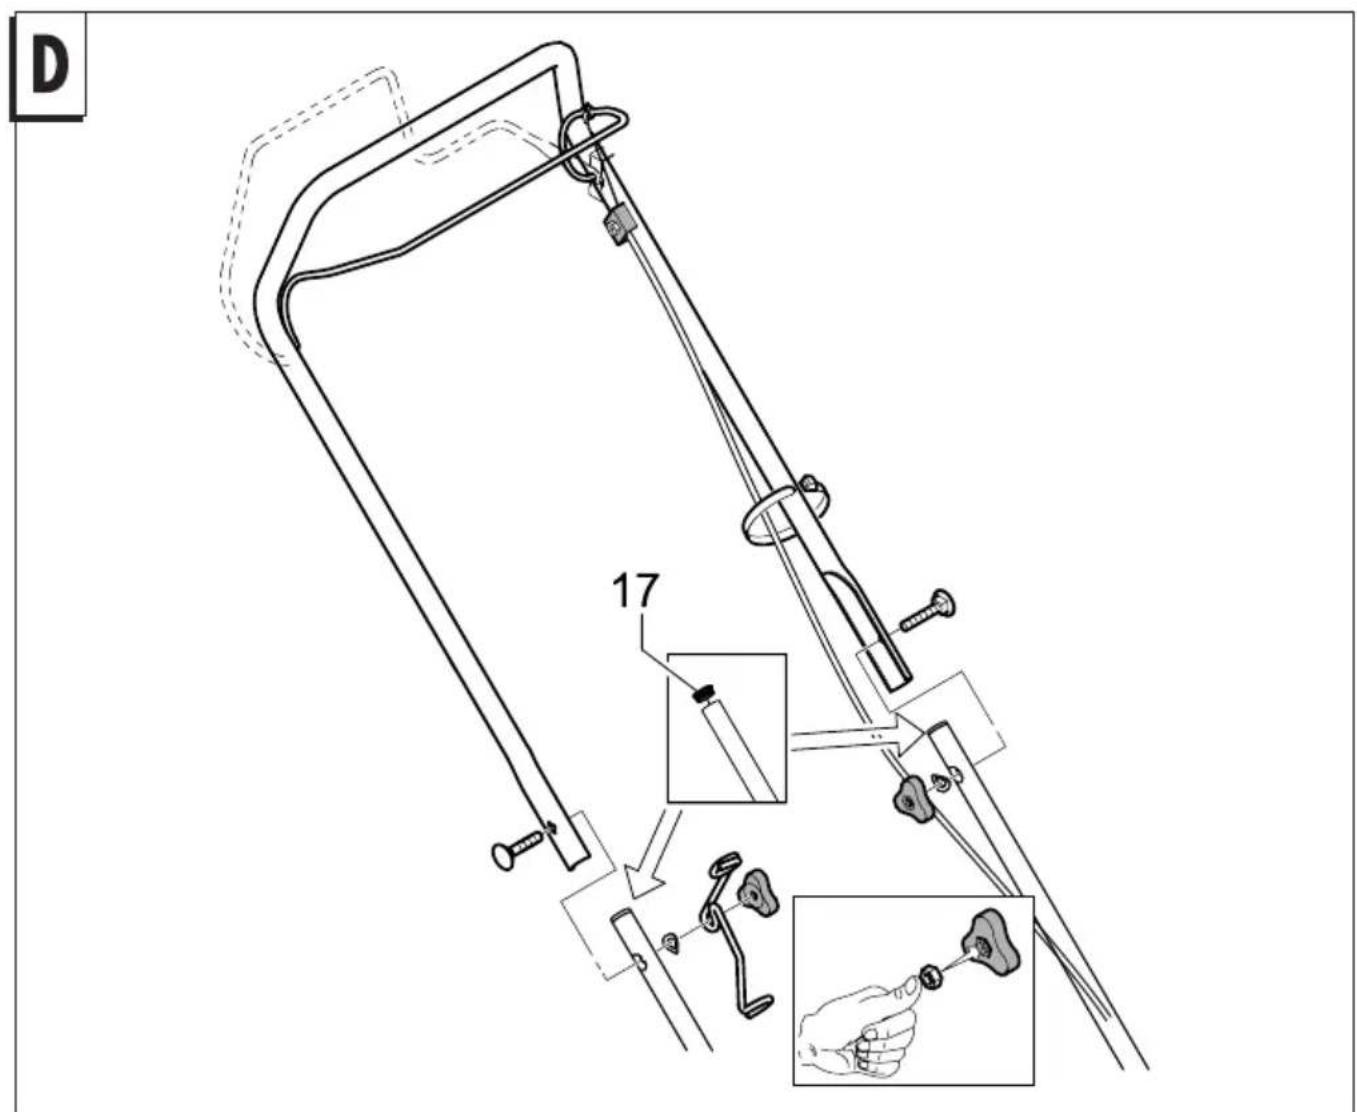
Mount the plastic caps (17) as illustrated in Appendix D. Then mount upper handle with screw, washer, starter cord guide and knob. Use the two straps enclosed to secure the control cables to the left handle bar as shown in fig A and fig D. Place one strap just above the middle folding knob and the other one 10cm from the lower folding knob. Make sure no cable gets in contact with the wheel. Tighten straps just enough to hold the cables tight without deforming them.

MULCHING CAP INSERTION
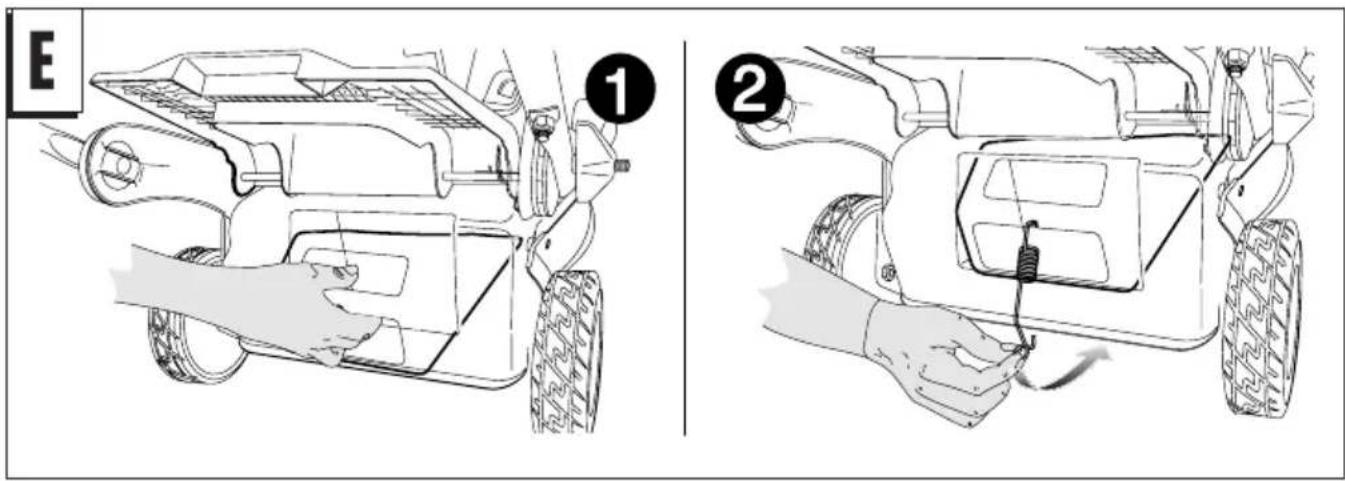
To cut the grass with the mulching system (no grass collection), lift the rear deflector panel and insert the cap by fixing it with the spring as shown in the figure.

ADJUSTMENT OF CUTTING HEIGHT
Cutting height is adjusted with the lever located by the right rear wheel as shown in fig F. Increase cutting height by moving the lever backwards and decrease cutting height by moving it forward. There are 6 steps available (30, 39, 51, 64, 79, 95mm).

SAFETY PRECAUTIONS

● Always operate with the deflector or grasscatcher in the correct position.
● Always stop the engine before removing the grasscatcher or adjusting the height of cut.
- Never place your hands or feet underneath the deck or into the grass discharge chute while the engine is running.
● Before mowing, remove all foreign objects from the lawn which may be thrown by the machine.
● While mowing, stay alert for any foreign objects which may have been missed.
- Never lift the rear of the mower while starting the engine or during normal operation.
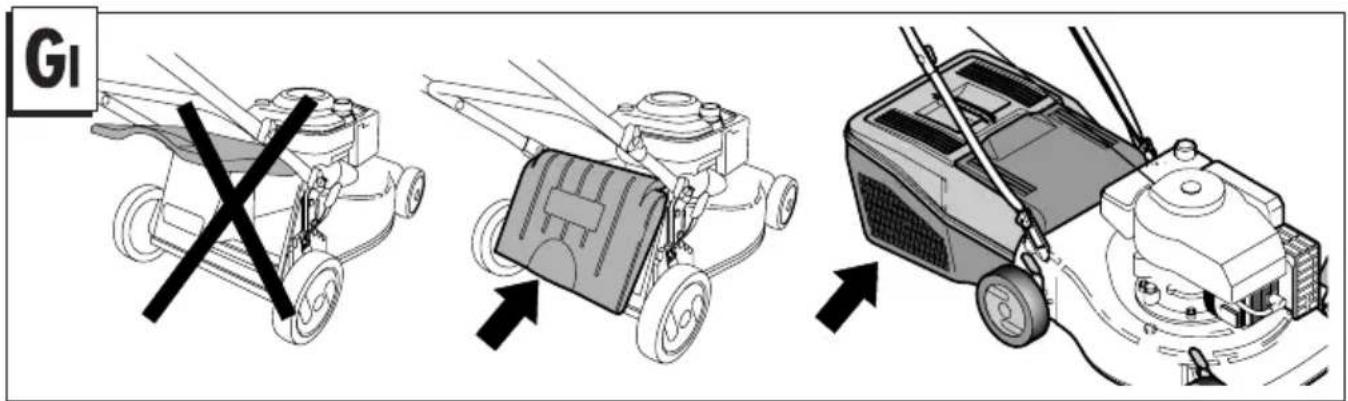
● Make sure the grass bag hatch is in down
position (Fig.G1) while operating the machine without grass bag.
- Use appropriate ear protection while operating the machine.
● Overexposure to vibration can lead to circulatory damage or nerve damage for people who have impaired circulation.

OPERATION
ENGINE PREPARATIONS (Fig.H)
Check oil and fuel level and, if needed, refill in correct inlet according to Fig. H1. Make sure to use correct oil and only 95 octane unleaded petrol for fuel.
For further information, please advise the engine operator's manual.

CAUTION: Oil must be added to the one before first use.
STARTING THE ENGINE (Fig.HII)
Once the machine has been set up properly, start the engine as follows:
a) Activate the engine stop lever (2) to prepare the engine for start, keep lever pressed against handle while starting and using the machine (it operates the engine brake).
b) While holding the engine stop lever (2), reach for the engine start-grip (15) and pull the starter rope gently until you feel the resistance caused by compression. Return the starter rope slowly then pull the handle firmly towards you to its full extent to start engine.
CAUTION: The blade starts turning as soon as the engine is started.
Keep the engine stop lever (2) depressed during machine operation.

TION: Make sure the engine stop
(2) works properly by releasing it
while engine is running.
Engine should stop completely within
3 seconds.
MOWING
To cut the grass, push the lawn mower manually or insert the automatic advance gear.
How to insert automatic advance: Lift up the clutch handle (1) and keep it pressed in position.

UTION: Engage the gear only when
engine is running.
How to disengage advance: Release the clutch handle. (1)
BASIC WORKING TECHNIQUES
Always cut with a sharp blade for optimal results. A dull blade gives an uneven cut and the grass becomes yellow on the surface of the cut.
Never mow more than 1/3 of the length of the grass.
This especially applies during dry periods. Mow fist with the cutting height set high. Then check the result and lower to an appropriate height. If the grass is really long, drive slowly and mow twice if necessary.
Cut in different directions each time in order to avoid stripes in the lawn.
Use the mulchplug if you want the machine to cut the grass in small pieces that will work as lawn fertilizer. See section E for instructions.
Use the bag to collect the grass in order to have a clean lawn.

ADJUSTMENT OF CLUTCH CABLE
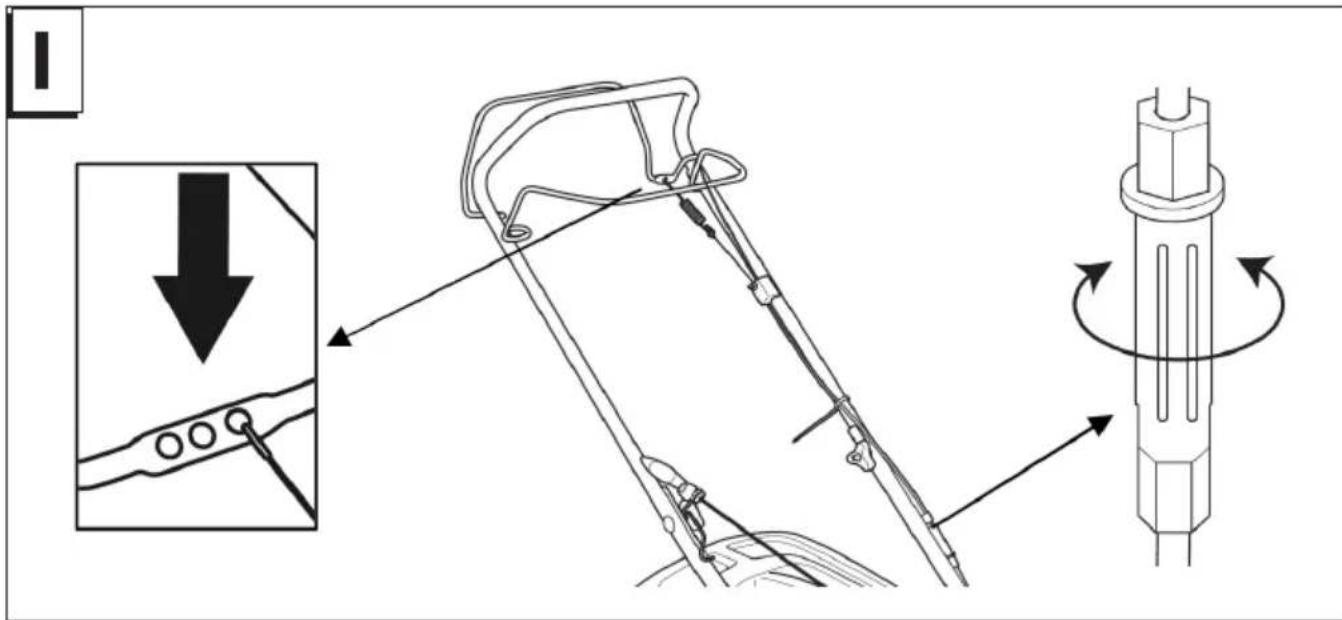
If, when you press the clutch lever, the automatic advance gear does not engage, the clutch cable should be adjusted. To make fine adjustments, turn the adjuster wheel(Fig.I) counter clockwise to engage advance gear earlier. To make rough adjustments, insert the spring (Fig.I) in one of the subsequent holes in the lever.

MAINTENANCE

Caution! Switch off the engine and disconnect the spark plug before undertaking any maintenance work.

CAUTION: The user must only carry out the
aintenance and service work described is Operator's Manual. More extensive work must be carried out by an authorized service workshop.
General Inspection
- Check that all screws and nut are tightened.
- Frequently check the mower and ensure that all grass deposits are removed from beneath the deck.
- Before use check oil level, clipping deck, cutting equipment and function of engine stop lever.
Change oil, replace spark plug and clean/replace air filter, according to the maintenance chart in Engine Operator's Manual.
Cutting Equipment
- Check the cutting attachment for damage or cracks. A damaged cutting attachment should always be replaced. See section K.
● Always ensure the blade is well tightened and balanced correctly.
Sharpening of the blade should always be performed by a professional. Contact your service centre to discuss and arrange the handling.
Oil level
The lawn mower should stand on flat ground when you check the oil level. Check the oil level with the dipstick on the oil filler cap.
- Remove the oil cap and wipe the dipstick clean.
- Put the dipstick back in. The oil filler cap must be completely screwed down to give a correct picture of the oil level.
- If the oil level is low, fill engine oil up to the upper level on the dipstick. See min and max marking.
For further explanation of oil change and engine maintenance, see Engine Operator's Manual.
Cleaning
Never clean the mower by pouring water over it: this may seriously damage the electric system. Use a brush to clean the top from leaves, dust and grass.
If the machine needs to be tilted, it should only be with exhaust muffler facing downwards and with as little fuel in the tank as possible.
CAUTION: Make sure engine is cold as fuel could leak through the ventilation in the cap and onto the exhaust muffler while tilting machine. A hot muffler could cause fuel to start burning.
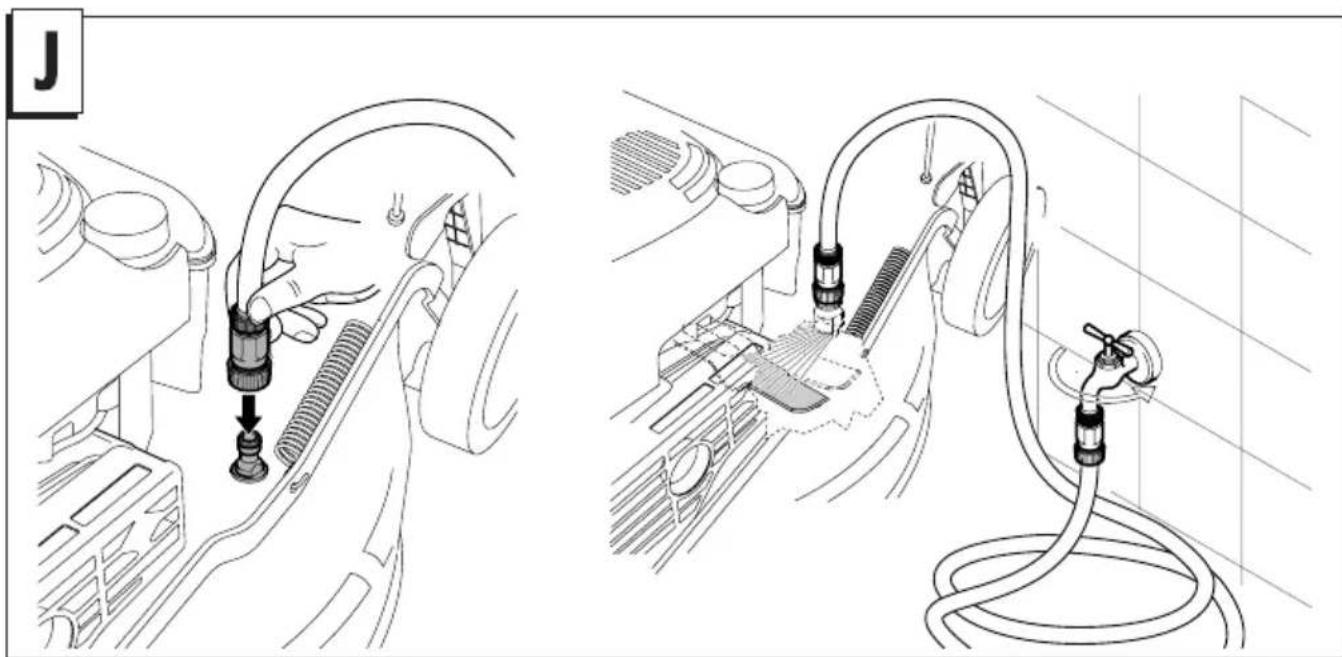
Cleaning under the body work, see illustration in Appendix J. With machine at a standstill and turned off:
- Attach fitting on the deck to the water supply tap. Turn on the tap.
- start up the motor (blade in rotation), allowing it to warm up for a few minutes.
- at the end of cleaning switch off the engine, turn off the tap, detach the tube from the deck connection.
If machine is very dirty underneath, use a wooden or plastic stick to remove grass before cleaning with water.

BLADE
- To remove the blade (23) unscrew the screw (26).
- Check the conditions of the blade-support (22), the washer (24), the key (21) and the washer (25) and replace any parts which are damaged.
- When reassembling, make sure that the key (21) is correctly seated in the shaft and that the cutting edges face in the direction of the engine rotation. The blade screw (26) must be torqued to 5,34 Kgm (52,4 Nm).
WARRANTY
For the purchased device you will get 3 years guarantee.
The warranty period begins on the first sale - the purchase must be demonstrated by a valid cash voucher.
Our guarantee covers all serious defects of the unit, which are proved related to material or workmanship.
In case of a justified complaint, we are entitled to choose to either rectify or replace the product.
In addition to the warranty period of the warranty, the following requirements must be fulfilled:
● The device has been properly, and according to the recommendations of the manual, used in the private sector.
- There should have been no attempt by purchaser or an authorized third party to repair the unit.
Normal wear, maintenance and adjustments are excluded from the guarantee.
Following consumable parts are excluded from warranty:
blade
□ belt
cables
□ starter rope
□ air filter
□ spark plug
□ other maintenance items
This warranty does not affect the existing buyer and seller statutory warranty claims.
GENERAL SERVICE
We are pleased that you have purchased a product from our company. If, despite of all quality assurance, a defect occurs, you should contact the Authorized Servicecentre in your country stated at the back of this manual.
Make sure you have all the necessary equipment data at hand; it can be found on the label of each product. The Service Agent will determine the next steps with you. If repairs are necessary, the device must be handed in to the Service Centre.
DISPOSAL/ENVIRONMENT
Perform service and maintenance according to the instructions in this manual. In this way the engine will last longer and the hazardous emissions are minimized.
When the machine is worn out it should be disposed of for recycling. Drain oil and gasoline tank according to Engine Operator's Manual, and take the machine to a recycle centre for proper disposal. Do not poor oil or gasoline into the sink. Plastics and metals can be separated for recycling. Do not throw the grass clip in the garbage can, but use this as compost material.
Please contact your service centre for further information.
TECHNICAL DATA
| Model FBM 575 A1 | |
| Engine B&S575EX | |
| Displacement 140 cm | 3 |
| Nominal engine output (note 1) 2,1 kW | |
| Engine speed 2900 rpm | |
| Spark plug Champion QC12YC | |
| Fuel capacity 0,75 l | |
| Oil capacity 0,44 l | |
| Engine oil SAE 30/SAE 10W-30 | |
| Weight empty tanks 31 kg | |
| Sound power, measured (see note 2) 94 dB(A) | |
| Sound power, guaranteed LWA (see note 2) 95 dB(A) | |
| Sound pressure level at operators ear, (see note 3) 86 dB(A) | |
| Vibrations (see note 4) < 2,5 m/s | 2 |
| Cutting width 460 mm | |
| Cutting height | 6 step (30, 39, 51, 64, 79, 95mm) |
| Cutter Rotary blade | |
| Speed | 4,7 km/h |
Note 1: The power rating of the engine indicated is the average net output (at specified rpm) of a typical production engine for the engine model measured to SAE standard J1349/ISO1585. Mass production engines may differ from this value. Actual power output for the engine installed on the final machine will depend on the operating speed, environmental conditions and other values.
Note 2: Noise emissions in the environment measured as sound power (LWA) in conformity with EC directive 2000/14/EC.
Note 3: Noise pressure level according to EN 836. Reported data for noise pressure level has a typical statistical dispersion (standard deviation) of 1.2 dB(A).
Note 4: Vibration level according to EN 836, Annex G. Reported data for vibration level has a typical statistical dispersion (standard deviation) of 0.2 m/s2 .
EC-DECLARATION OF CONFORMITY
(Applies to Europe only) Original version
Aktiebolaget Partner, SE-433 81, Göteborg, Sweden, hereby declares that the lawn mower Florabest FBM575A1
complies with the requirements of the EC DIRECTIVE:
• of May 17, 2006 "relating to machinery" 2006/42/EC.
- of December 15, 2004 "relating to electromagnetic compatibility" 2004/108/EC.
• of May 8, 2000 "relating to the noise emissions in the environment" 2000/14/EC.
For information relating to noise emissions, see the Technical data chapter. The following standards have been applied: EN 836, ISO 11094, EN 55012.
Notified body: Nr. 0036, TÜV SÜD Product Service GmbH Ridlerstr. 65, 80339 München / Munich - Germany, has issued reports regarding the assessment of conformity according to annex VI of the EC DIRECTIVE of May 8, 2000 "relating to the noise emissions in the environment" 2000/14/EC.
Emission type No.: e11*97/68SA*2010/26*1581*01
2012-12-04, Göteborg
Bengt Ahlund, Development manager
(Authorized representative for Aktiebolaget Partner and responsible for technical documentation.)





natural_image
Technical illustration showing car interior components with hoses and a valve, no text or symbols present
Authorized Service Partners:
Service Česko:
Tel.: +420 800 100 425
Fax.: +420 272 083 464
Email: servis-infolinka@centrum.cz
Email: service@happy-garden.com
Service Great Britain:
Tel.: +44 844-844 4558
Service Ireland:
Tel.: +353 1 800 882 350
Service Österreich:
Tel.: +43 732-770 101 482
Fax: +43 732-770 101 442
Service Schweiz / Suisse / Svizzera:
Tel.: +41 62 887 37 70
Fax.: +41 62 887 37 77
Email: HOPSwitzerland@gmx.ch
Service Slovensko:
Tel.: +42 1 800 154 044
Fax.: +42 1 445 522 515
Email: servis.infolinka@gmail.com
P/N:1155536-20
Aktiebolaget Partner
Headquarters: SE-433 81 - Göteborg, Sweden

ED.09/2012
Q.TY 10000
PRINTED IN ITALY

GI STUDIO DESSUCASCAI TECNONE
IAN79270
1



- BENZIN-RASENMÄHER - FBM 575 A1
- Benzin-Rasenmäher
- INDEX
- DÉCLARATION CE DE CONFORMITÉ
- INTENDED PURPOSE OF USE
- SAFETY RULES
- Safe Operation Practices for Pedestrian-Controlled Rotary Lawnmowers
- Training
- Preparation
- ● WARNING - Petrol is highly flammable.
- Operation
- Maintenance and Storage
- ASSEMBLY OF GRASS CATCHER
- ASSEMBLY LOWER HANDLES
- ASSEMBLY UPPER HANDLES
- MULCHING CAP INSERTION
- ADJUSTMENT OF CUTTING HEIGHT
- SAFETY PRECAUTIONS
- OPERATION
- ENGINE PREPARATIONS (Fig.H)
- STARTING THE ENGINE (Fig.HII)
- MOWING
- BASIC WORKING TECHNIQUES
- ADJUSTMENT OF CLUTCH CABLE
- MAINTENANCE
- General Inspection
- Cutting Equipment
- Oil level
- Cleaning
- BLADE
- WARRANTY
- GENERAL SERVICE
- DISPOSAL/ENVIRONMENT
- EC-DECLARATION OF CONFORMITY
- Aktiebolaget Partner, SE-433 81, Göteborg, Sweden, hereby declares that the lawn mower Florabest FBM575A1
- Authorized Service Partners:
Brand : FLORABEST
Model : FBM 575 A1
Category : Lawn mower