TA-E1 - Receiver SONY - Free user manual and instructions
Find the device manual for free TA-E1 SONY in PDF.

User questions about TA-E1 SONY
0 question about this device. Answer the ones you know or ask your own.
Ask a new question about this device
Download the instructions for your Receiver in PDF format for free! Find your manual TA-E1 - SONY and take your electronic device back in hand. On this page are published all the documents necessary for the use of your device. TA-E1 by SONY.
USER MANUAL TA-E1 SONY
Do not install the appliance in a confined space, such as a bookcase or built-in cabinet.
For the customers in United States

text_image
CAUTION RISK OF ELECTRIC SHOCK DO NOT OPEN CAUTION TO REDUCE THE RISK OF ELECTRIC SHOCK, DO NOT REMOVE COVER (FOR BACK), NO USER-SERVICEABLE PARTS INIDE, REFER SERVING TO QUALIFIED SERVICE PERSONNEL,
This symbol is intended to alert the user to the presence of uninsulated “dangerous voltage” within the product’s enclosure that may be of sufficient magnitude to constitute a risk of electric shock to persons.

This symbol is intended to alert the user to the presence of important operating and maintenance (servicing) instructions in the literature accompanying the appliance.
CAUTION
You are cautioned that any changes or modification not expressly approved in this manual could void your authority to operate this equipment.
Owner's Record
The model and serial numbers are located on the rear of the unit. Record the serial number in the space provided below. Refer to them whenever you call upon your Sony dealer regarding this product.
Model No. TA-E1
Serial No. ____
For the customers in Canada CAUTION
TO PREVENT ELECTRIC SHOCK, DO NOT USE THIS POLARIZED AC PLUG WITH AN EXTENSION CORD, RECEPTACLE OR OTHER OUTLET UNLESS THE BLADES CAN BE FULLY INSERTED TO PREVENT BLADE EXPOSURE.

АЯ46
Precautions
On safety
Should any solid object or liquid fall into the cabinet, unplug the preamplifier and have it checked by qualified personnel before operating it any further.
On power sources
- Before operating the preamplifier, check that the operating voltage is identical with your local power supply. The operating voltage is indicated on the nameplate at the rear of the preamplifier.
- The unit is not disconnected from the AC power source (mains) as long as it is connected to the wall outlet, even if the unit itself has been turned off.
- If you are not going to use the preamplifier for a long time, be sure to disconnect the preamplifier from the wall outlet. To disconnect the AC power cord, grasp the plug itself; never pull the cord.
- AC power cord must be changed only at the qualified service shop.
On placement
- Place the preamplifier in a location with adequate ventilation to prevent heat buildup and prolong the life of the preamplifier.
- Do not place the preamplifier near heat sources, or in a place subject to direct sunlight, excessive dust or mechanical shock.
- Do not place anything on top of the cabinet that might block the ventilation holes and cause malfunctions.
On operation
Before connecting other components, be sure to turn off and unplug the preamplifier.
On cleaning
Clean the cabinet, panel and controls with a soft cloth slightly moistened with a mild detergent solution. Do not use any type of abrasive pad, scouring powder or solvent such as alcohol or benzine.
If you have any question or problem concerning your preamplifier, please consult your nearest Sony dealer.
About This Manual
The instructions in this manual are for model TA-E1. Check your model number by looking at the front panel. In this manual, the European model is used for illustration purposes unless stated otherwise. Any difference in operation is clearly indicated in the text, for example, "USA/Canada only."
Conventions
- The instructions in this manual describe the controls on the preamplifier.
- The following icon is used in this manual: 🎨 Indicates hints and tips for making the task easier.
TABLE OF CONTENTS
Hooking Up the Components 4
Unpacking 4
Connections to a Power Amplifier (Unbalanced) 5
Connections to a Power Amplifier (Balanced) 6
Connections to Audio Components 7
Power Hookup 8
Location of Parts and Basic Operations 10
Front Panel Parts Description 10
Rear Panel Parts Description 12
Other Operations 13
Recording 13
Additional Information 14
Troubleshooting 14
Specifications 15
Hooking Up the Components
This chapter describes how to connect an amplifier as well as various audio components to the preamplifier. Be sure to read the sections for the components you have before you actually connect them to the preamplifier.
Unpacking
Check that you received the following items with the unit:
- Audio cord (1)
- AC power cord (1)
- AC power plug adapter (3 to 2 prong polarized type) (1) (USA/Canada only)
Before you get started
- Turn off the power to all components before making any connections.
- Do not connect the AC power cords until all of the connections are completed.
- Be sure to make connections firmly to avoid hum and noise.
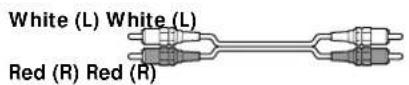
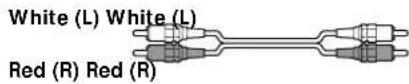
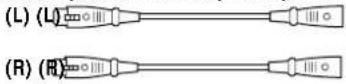
- When connecting an audio cord, be sure to match the color-coded pins to the appropriate jacks on the components: white (left) to white; and red (right) to red.
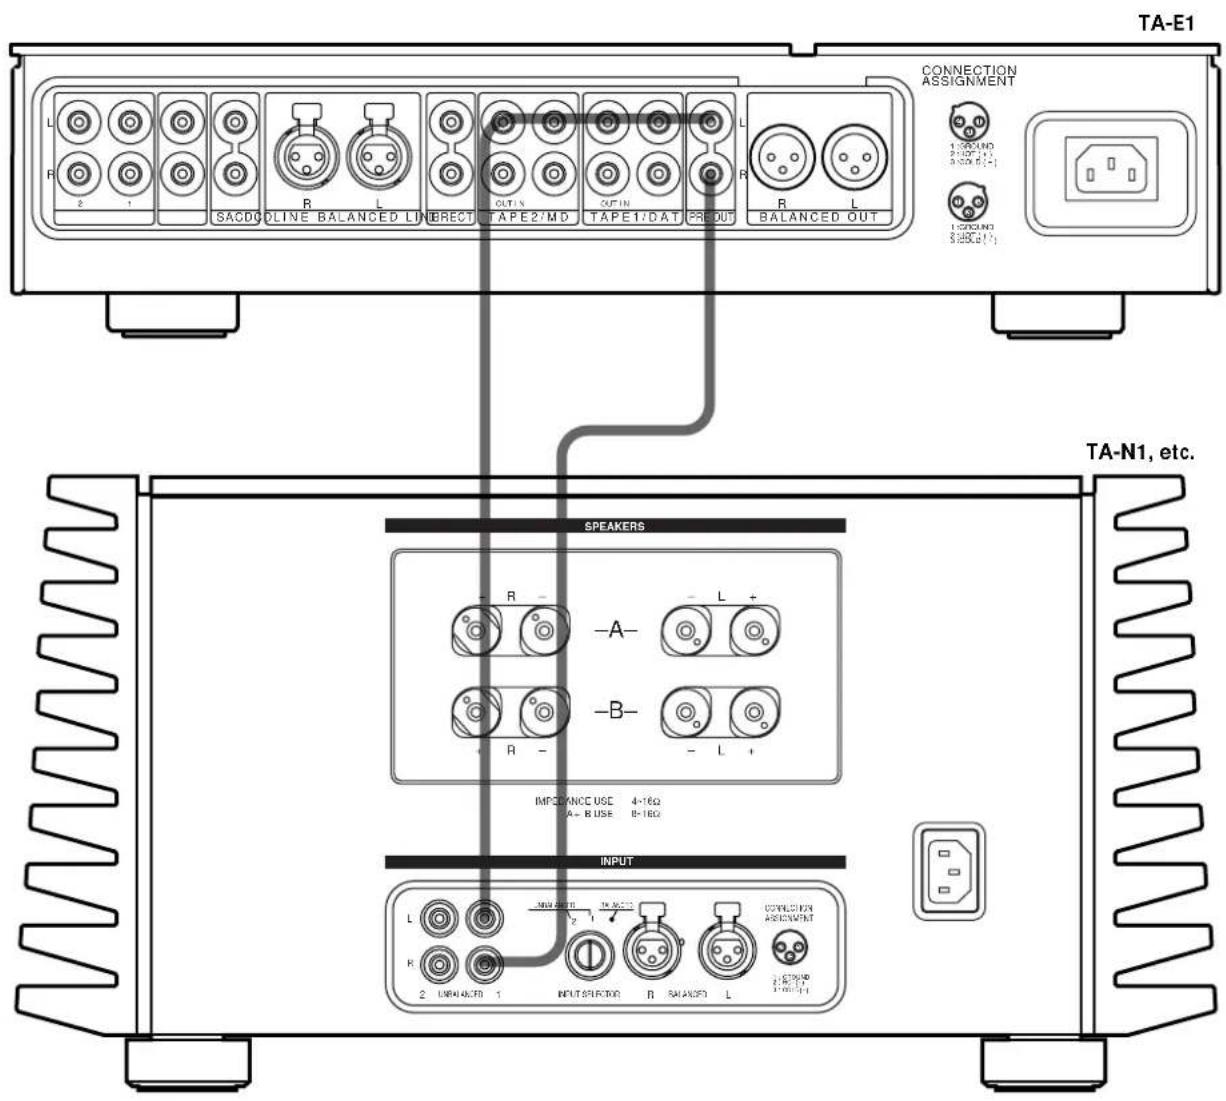
Power Amplifier Hookup (Unbalanced Connections)
Connect the preamplifier's PRE OUT jacks to your power amplifier's UNBALANCED input jacks (Sony TA-N1, etc.). For details, see the operating instructions supplied with your power amplifier.
Required cords
Audio cords (1 cord is supplied)
When connecting a cord, be sure to match the color-coded pins to the appropriate jacks on the components.
text_image
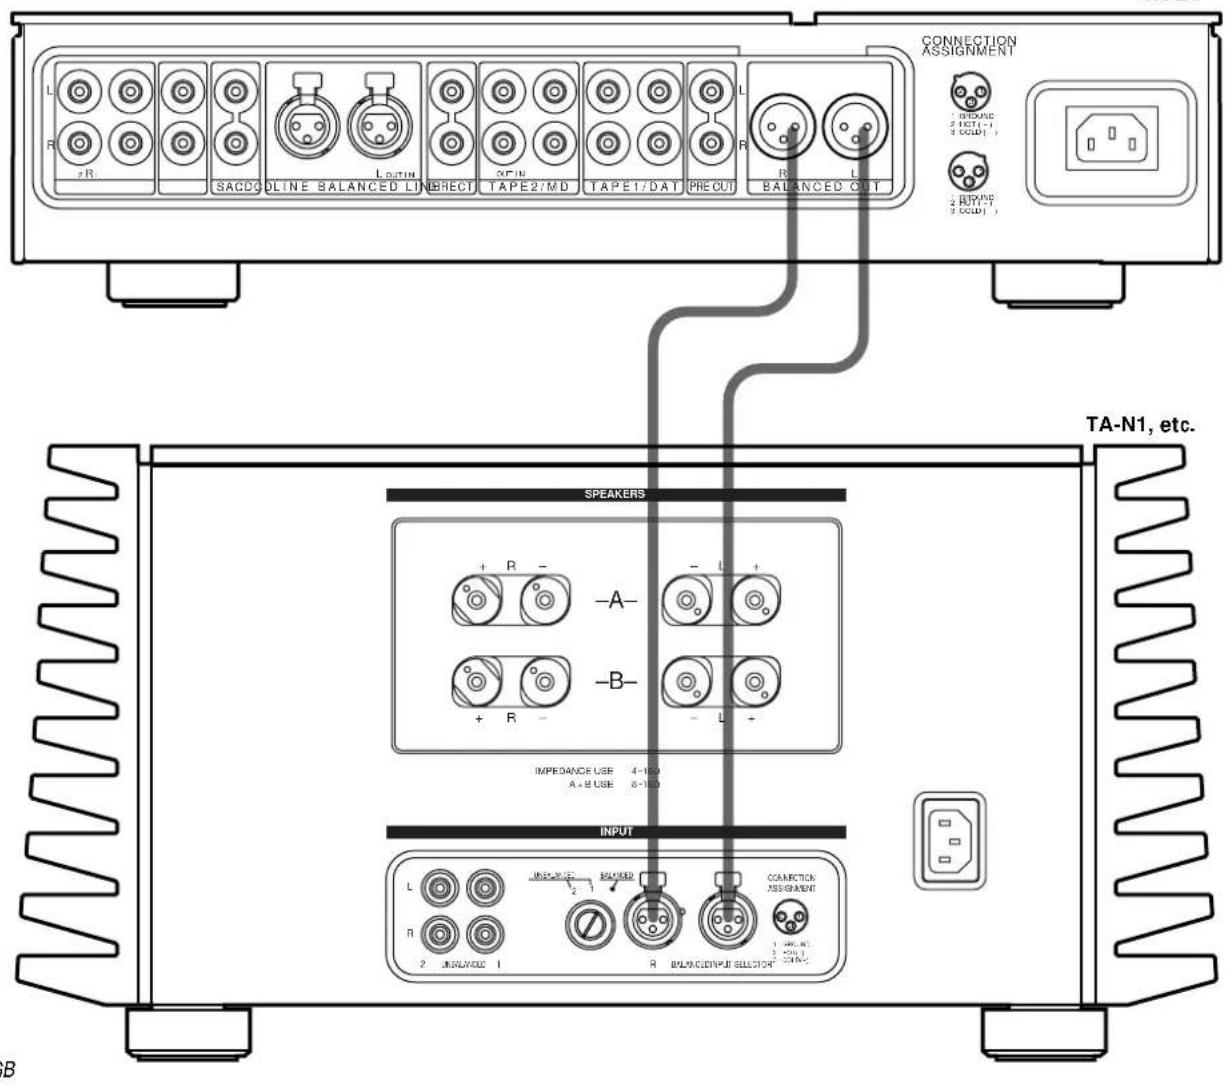
TA-E1 CONNECTION ASSIGNMENT SACDO LINE BALANCED LINE RECT OUTX OUTIN TAPE2:MD TAPE1:DAT PREOUT R L BALANCED OUT SOUND $500.00 $500.00 (-) SOUND $500.00 (+) TA-N1, etc. SPEAKERS R -A- L + -R- -B- -L + IMPORANCE USE 4-16Ω A-B USE 8-16Ω INPUT L NEW OUTPUT TA-36223 OUTPUT FOR ASSIGNMENT R 2 IMPORATE 1 INPUT SECTOR B SALANCED LPower Amplifier Hookup (Balanced Connections)
Connect the preamplifier's BALANCED OUT jacks to your power amplifier's BALANCED input jacks (Sony TA-N1, etc.). For details, see the operating instructions supplied with your power amplifier.
Required cords
Balanced cords (not supplied)
When connecting a cord, be sure to insert the plugs firmly in the jacks. If the plugs are not connected firmly, noise may be produced.
To the preamplifier To the power amplifier


Note
The pin assignment of the BALANCED output jacks on the preamplifier is 1:GROUND, 2:HOT, and 3:COLD. When connections are made to an amplifier with a pin assignment of 1:GROUND, 2:COLD, and 3:HOT, reverse the polarities (⊕ and ⊖) of the speaker cables. For details, refer to the instructions supplied with the preamplifier.

text_image
IN OUT 1: GROUND 2: HOT (+) 3: COLD (−)TA-E1
text_image
TA-N1, etc. SPEAKERS INPUT CONNECTION ASSIGNMENT TA-N1, etc.Audio Component Hookups
Connect the analog line outputs of your audio components (SACD player, CD player, MD deck, DAT deck, tape deck, etc.) to the analog line jacks on this unit. If you have a component with balanced output capability, that component can be connected to the BALANCED LINE jacks on this unit.
Note
When making connections to a CD player (etc.) that has both balanced and unbalanced output capability, make connections to either the CD input jacks or to the BALANCED LINE jacks, but not both. Making connections to both inputs may lessen the quality of the audio output, or audio may not be output at all.
Required cords
Audio cords (not supplied)
When connecting a cord, be sure to match the color-coded pins to the appropriate jacks on the components.
Balanced cords (not supplied)
When connecting a balanced cord, be sure to insert the plugs firmly in the jacks. If the plugs are not connected firmly, noise may be produced.
To the source component To the preamplifier

flowchart
graph TD
    A["CD Player"] --> B["OUTPUT L"]
    C["Super Audio CD Player"] --> D["OUTPUT L"]
    B --> E["TA-E1"]
    D --> E
    E --> F["TA-E1 Connection Assignment"]
    F --> G["OUTPUT L"]
    F --> H["OUTPUT L"]
    F --> I["OUTPUT L"]
    F --> J["OUTPUT L"]
    F --> K["OUTPUT L"]
    F --> L["OUTPUT L"]
    F --> M["OUTPUT L"]
    F --> N["OUTPUT L"]
    F --> O["OUTPUT L"]
    F --> P["OUTPUT L"]
    F --> Q["OUTPUT L"]
    F --> R["OUTPUT L"]
    F --> S["OUTPUT L"]
    F --> T["OUTPUT L"]
    F --> U["OUTPUT L"]
    F --> V["OUTPUT L"]
    F --> W["OUTPUT L"]
    F --> X["OUTPUT L"]
    F --> Y["OUTPUT L"]
    F --> Z["OUTPUT L"]
    F --> AA["OUTPUT L"]
    F --> AB["OUTPUT L"]
    F --> AC["OUTPUT L"]
    F --> AD["OUTPUT L"]
    F --> AE["OUTPUT L"]
    F --> AF["OUTPUT L"]
    F --> AG["OUTPUT L"]
    F --> AH["OUTPUT L"]
    F --> AI["OUTPUT L"]
    F --> AJ["OUTPUT L"]
    F --> AK["OUTPUT L"]
    F --> AL["OUTPUT L"]
    F --> AM["OUTPUT L"]
    F --> AN["OUTPUT L"]
    F --> AO["OUTPUT L"]
    F --> AP["OUTPUT L"]
    F --> AQ["OUTPUT L"]
    F --> AR["OUTPUT L"]
    F --> AS["OUTPUT L"]
    F --> AT["OUTPUT L"]
    F --> AU["OUTPUT L"]
    F --> AV["OUTPUT L"]
    F --> AW["OUTPUT L"]
    F --> AX["OUTPUT L"]
    F --> AY["OUTPUT L"]
    F --> AZ["OUTPUT L"]
    F --> BA["OUTPUT L"]
    F --> BB["OUTPUT L"]
    F --> BC["OUTPUT L"]
    F --> BD["OUTPUT L"]
    F --> BE["OUTPUT L"]
    F --> BF["OUTPUT L"]
    F --> BG["OUTPUT L"]
    F --> BH["OUTPUT L"]
    F --> BI["OUTPUT L"]
    F --> BJ["OUTPUT L"]
    F --> BK["OUTPUT L"]
    F --> BL["OUTPUT L"]
    F --> BM["OUTPUT L"]
    F --> BN["OUTPUT L"]
    F --> BO["OUTPUT L"]
    F --> BP["OUTPUT L"]
    F --> BQ["OUTPUT L"]
    F --> BR["OUTPUT L"]
    F --> BS["OUTPUT L"]
    F --> BT["OUTPUT L"]
    F --> BU["OUTPUT L"]
    F --> BV["OUTPUT L"]
    F --> BW["OUTPUT L"]
    F --> BX["OUTPUT L"]
    F --> BY["OUTPUT L"]
    F --> BZ["OUTPUT L"]
    F --> CA["OUTPUT L"]
Power Hookup
Before connecting the AC power cord of this preamplifier to a wall outlet:
- Make sure that the power switch on the preamplifier is in the off position.
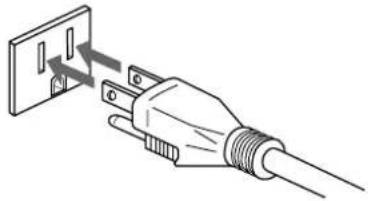
Connect the supplied power cord to the AC IN terminal on this unit.

natural_image
Line drawing of a plug with internal connector (no text or symbols)Connecting to the power outlet
(European model only)
Connect the supplied power cord to a wall outlet.

natural_image
Line drawing of a plug with a circular component inserted, showing internal wiring (no text or symbols)(USA/Canadian model only)
The supplied power cord has a 3-pronged grounded plug. If you are using a 3-pronged grounded outlet, the plug can be inserted directly into the outlet. However, if the socket is a 2-pronged grounded outlet, use the supplied AC power plug adapter or a commercially available AC power plug adapter.
3-pronged grounded outlet
natural_image
Illustration of a plug with a screwdriver inserted into a socket (no text or symbols)2-pronged polarized outlet
- When using a grounded outlet (the inlets are different sizes) Use the supplied AC power plug adapter.
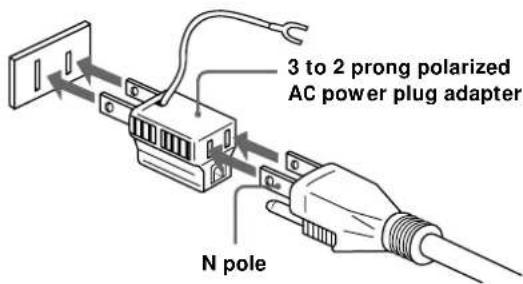
text_image
3 to 2 prong polarized AC power plug adapter N poleIf noise (hum) is produced
Noise may be caused by an electrical potential difference on the ground circuit*. In this case, use the supplied AC power plug adapter and be careful not to connect the ground lead to anything.
* Although the ground of the domestic outlet is normally a safety ground, a slight electrical potential difference may be produced, depending on the outlet. Therefore, use of the supplied 3-pronged power cord may lessen the quality of the audio signal or may produce humming noise.
Note
We recommend that you connect this unit directly to a wall outlet. If you must use a multi-outlet tap, or extension cord, be sure to use one capable of handling high current (at least 10 A) or one designed for office use.
Location of Parts and Basic Operations
This chapter provides information about the locations and functions of the buttons and controls on the front and the various jacks on the rear panel. It also explains basic operations.
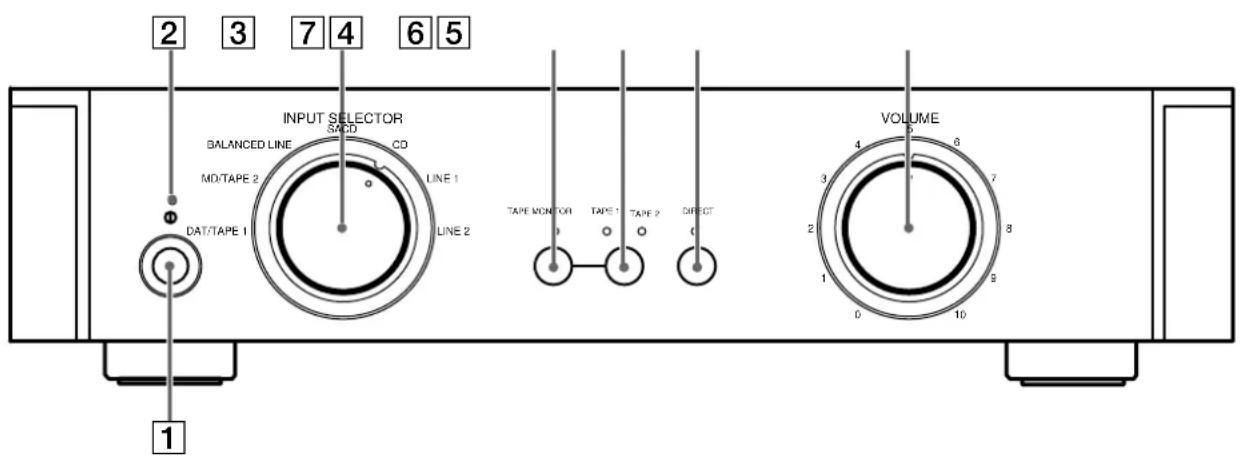
Front Panel Parts Description
1 ① (power) switch
Press to turn the preamplifier on and off.
- Before you turn on the preamplifier, make sure that you have turned the VOLUME control to the leftmost position to avoid damaging your speakers.
2 Power indicator
Lights red for 12 seconds when preamplifier is turned on, and then lights green.
3 INPUT SELECTOR control
Turn to select the component you want to use.
| To select Turn to light |
| DAT deck, tape deck 1 DAT/TAPE 1 |
| MD deck MD/TAPE 2 |
| BALANCED LINE BALANCED LINE |
| SACD player SACD |
| CD player CD |
| LINE 1 LINE 1 |
| LINE 2 LINE 2 |
After selecting the component, turn on the component you selected and play the program source.
text_image
2 3 7 4 6 5 INPUT SELECTOR SACD BALANCED LINE CD MD/TAPE 2 LINE 1 DAT/TAPE 1 LINE 2 TAPE MONITOR TAPE TAPE DIRECT 0 0 0 VOLUME 0 6 7 8 1 9 0 10 14 TAPE MONITOR button
Press to turn the tape monitor on and off. The indicator lights when the tape monitor is on and goes out when the tape monitor is turned off.
5 TAPE MONITOR input select button
When the TAPE MONITOR (4) is on, press to select the input from the TAPE 1 or TAPE 2 input jacks. The indicator lights to show which input is selected.
6 DIRECT button
Press to select the input connected to the DIRECT input jacks. The indicator lights, and the source component connected to the DIRECT input jacks takes priority over the source component selected with the INPUT SELECTOR control (3).
Press the DIRECT button again to return to the source selected with the INPUT SELECTOR control.
7 VOLUME control
After turning on the component you selected, turn to adjust the volume.
Rear Panel Parts Description
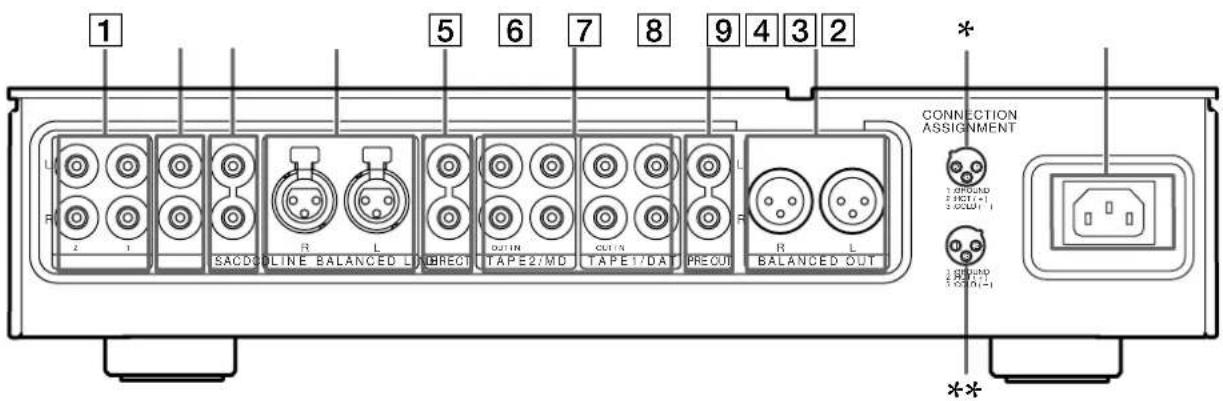
text_image
1 5 6 7 8 9 4 3 2 R 2 1 SACDOLINE BALANCED L BRECT TAPE2/MD TAPE1/DA PRECUT R L BALANCED OUT * CONNECTION ASSIGNMENT 1 OFFUND 2 OUT-1 3 OUT-1 4 OUT-1 **1 LINE 1/2 input jacks
Connect to the analog audio output jacks of your audio components (see page 7).
2 CD input jacks
Connect to the audio output jacks of your CD player (see page 7).
3 SACD input jacks
Connect to the audio output jacks of your SACD player (see page 7).
4 BALANCED LINE input jacks
Connect to the BALANCED OUT jacks of an audio component that is capable of balanced output (XLR type) (see page 7).
5 DIRECT input jacks
Connect to the analog audio output jacks of your audio components. When a component is connected to these jacks, pressing the DIRECT button to select the component causes the indicator on the front panel to light.
When the DIRECT button is pressed, the component connected to these jacks takes priority over the component selected with the INPUT SELECTOR control.
6 TAPE 2/MD, TAPE 1/DAT IN/OUT jacks
Use to connect the input and output jacks of your DAT deck, MD deck, tape player (etc.) (page 7).
7 PRE OUT jacks
Connect to your power amplifier(s) (see page 5).
8 BALANCED OUT jacks
Connect to your power amplifier(s) using balanced cords (see page 6).
* : Displays the pin polarity of the BALANCED LINE jacks.
**: Displays the pin polarity of the BALANCED OUT jacks.
9 AC IN terminal
Connect the supplied power cord to the AC IN terminal and then to the wall outlet to supply power to the unit (see page 8).
Other Operations
This chapter describes the operation necessary to record the output of the components connected to this unit on your DAT deck, MD deck, or tape deck (etc.).
Recording
Your preamplifier makes it easy to record to and from the components connected to it. You don't have to connect the playback and recording components directly to each other: once you select a program source on the preamplifier, you can record and edit as you normally would using the controls on each component.
Before you begin, make sure you've connected all components properly.
Recording on an audio tape or MiniDisc
You can record on a cassette tape or MiniDisc using the preamplifier. See the instruction manual of your tape deck or MD deck if you need help.
1 Turn INPUT SELECTOR to select the component to be recorded.
For example, select CD.
2 Prepare the component for playing.
For example, insert a CD into the CD player.
3 Insert a blank tape or MD into the recording deck and adjust the recording level, if necessary.
4 Start recording on the recording deck, then start playback on the playback component.
You can check what is being recorded (tape monitor) When using a 3-head tape deck, it is possible to check the signal that is actually being recorded. For example, if the tape deck connected to the DAT/TAPE 1 input jacks is being used to make a recording, press TAPE MONITOR to turn the tape monitor on (the indicator lights) and then TAPE 1/TAPE 2 until the indicator above TAPE 1 lights.
Notes
- You cannot record a digital audio signal using a component connected to the analog TAPE 1/DAT OUT jacks or TAPE 2/MD OUT jacks. To record a digital audio signal, connect the digital output of the source component directly to the digital input of the recording deck.
- Sound adjustments do not affect the signal output from the TAPE1/DAT OUT or TAPE 2/MD OUT jacks.
Additional Information
Troubleshooting
If you experience any of the following difficulties while using the preamplifier, use this troubleshooting guide to help you remedy the problem. Should any problem persist, consult your nearest Sony dealer.
There's no sound or only a very low-level sound is heard.
→ Check that all components are connected securely.
→ Make sure that you've selected the correct component on the preamplifier.
The left and right sounds are unbalanced or reversed.
→ Check that all components are connected correctly and securely.
Severe hum or noise is heard.
→ Check that all components are connected securely.
→ Check that the connecting cords are away from a transformer or motor, and at least 3 meters (10 feet) away from a TV set or fluorescent light.
→ Move your TV away from the audio components.
→ The plugs and jacks are dirty. Wipe them with a cloth slightly moistened with alcohol.
Recording cannot be done.
→ Check that the components are connected correctly.
→ Select the source component by rotating the INPUT SELECTOR control.
Specifications
Audio section
Harmonic distortion
Less than 0.005%
(at 2 V, THD)
Frequency response
5 Hz \~ 300 kHz
(0 \~ -1 dB)
Signal-to-noise ratio
More than 115 dB
(Input shorted, A-Fil)
Inputs
Input Sensitivity Impedance
| LINE 1 250 mV 20 kΩ |
| LINE 2 250 mV 20 kΩ |
| CD 250 mV 20 kΩ |
| SACD 250 mV 20 kΩ |
| BALANCED | 250 mV 40 kΩ |
| LINE |
| DAT/TAPE 1 250 mV 20 kΩ |
| MD/TAPE 2 250 mV 20 kΩ |
Outputs
Output Voltage Impedance
| PRE OUT 2 V 47 Ω |
| BALANCED 2 V 220 Ω |
| OUT |
General
Power requirements
USA and Canadian
models :
120 V AC, 60Hz
European models :
230 V AC, 50/60Hz
Power consumption
18 W
including projecting
parts and controls
Mass (Approx.)
21.5 kg (47 lb. 06 oz.)
Supplied accessories
See page 4.
Design and specifications are subject to change without notice.
AVERTISSEMENT
text_image
TA-N1, etc. SPEAKERS INPUT CONNECTION ASSIGNMENT R R SACD LINE BALANCED LINDRECT TAPE2/MD TAPE1/DAT PRE OUT BALANCED OUT + R - -A- +B- IMPEDANCE USE 4-100 A+B USE 6-100 R R R R R R R R R R R R R R R R R R R R R R R R R Rnatural_image
Line drawing of a plug with a connector inserted into a socket (no text or symbols)natural_image
Line drawing of a plug with a circular component and two arrows pointing to it (no text or symbols)natural_image
Line drawing of a hand inserting a plug into a wall socket (no text or symbols)8 Prises BALANCED OUT