Evolution - Sewing machine Carina - Free user manual and instructions
Find the device manual for free Evolution Carina in PDF.

User questions about Evolution Carina
0 question about this device. Answer the ones you know or ask your own.
Ask a new question about this device
Download the instructions for your Sewing machine in PDF format for free! Find your manual Evolution - Carina and take your electronic device back in hand. On this page are published all the documents necessary for the use of your device. Evolution by Carina.
USER MANUAL Evolution Carina
natural_image
Line drawing of a sewing machine with control panel and digital display (no text or symbols)Instruction Manual
SYMBOLINSTRUCTIONS
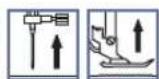
Raiseneedle

RaisepressorfootLowerpressorfoot

IMPORTANT SAFETY INSTRUCTIONS
When using an electrical appliance, basics safety should always be followed, including the following: Read all instructions before using this sewing machine.
DANGER -Tareducetheriskofelectricalshock:
- Anappliances should never be left unattended when plugged in.
- Always unplug this appliance from the electric outlet immediately after using and before cleaning.
WARNING -Tareducetheriskofbums,fire,electricalshock,orinjurytapersons:
- Donotallowtobeusedasatoy. Closeattentionisnecessarywhenthisapplianceisusedbyor nearchildren.
- Use this appliance only for its intended use as described in this manual. Use only the attachments recommended by the manufacturer as contained in this manual.
-
Never operate this appliance ifithasadamaged cordor plug, ifitisnotworking properly, ifit has been droppedordamaged, ordropped intowater. Return the appliance to the nearest authorized dealer or service center for examination, repair, electrical or mechanical adjustment.
4..Keep open to do open places with any aiopenings blocked sewing machine and foot controller free from accumulation of flint, dust, and loose cloth. -
Keepfingersawayfromallmovingparts.Specialcareisrequiredaroundthesewingmachine needle.
-
Alwaysusetheproperneedleplate,asusingthewrongneedleplatemaycausetheneedleto break.
-
Donotusebentneedles.
-
Donotpullorpushfabricwhilestitching. It may deflect the needle causing it to break.
-
Switch these sewing machine off ("O") when making any adjustments in the needle area, such as threading needle, changing needle, threading bobbin, changing presser foot or changing the light.
-
Always sunplug sewing machine from the electrical outlet when removing covers, lubricating, or when making any other users servicing adjustments mentioned in the instruction manual.
-
Neverdroporinsertanyobjectintoanyopening.
-
Donotuseoutdoors.
-
Do not operate where aerosol spray products are being used or where oxygen is being administered.
-
To disconnect, turn all controls to the off ("O") position, then remove plug from outlet.
-
Donotunplugbypullingoncord. Tounplug, grasptheplug, notthecord.
-
Thesound pressure level under normal operating conditions is 75 dB(A).
-
Pleaseturnofforunplugthemachineifitisnotoperatingproperly.
-
Neverplaceanythingonthefootcontroller.
-
This appliance is not intended for use by persons (including children) with reduced physical, sensory or mental capabilities, or lack of experience and knowledge, unless they have been given supervision or instruction concerning use of the appliance by person responsible for their safety.
-
Children should be supervised to ensure that they don't play with the appliance.
SAVETHESEINSTRUCTIONS
Thissewingmachineisintendedforhouseholduseonly.
CONTENTS
PRINCIPALPARTSOFTHEMACHINE 1
MACHINECONTROLBUTTONS 2-3
Operation buttons (see page 24/25)....2
Functionbuttons(seepage26/27/28)....2
Selectionbuttons(seepage29/30)....3
LCDSCREEN 4-5
PATTERNCHART 6-7
ACCESSORIES 8
CONNECTINGTHEMACHINETOTHEPOWERSOURCE 9
Connectingthemachine. 9
WINDINGTHEBOBBIN 10-11
Bobbinwinding....10-11
INSERTINGTHEBOBBIN 12
THREADINGTHEUPPERTHREAD 13-14
USINGTHENEEDLETHREADER 15
DRAWING UP THE LOWER THREAD 16
CUTTINGTHETHREAD 16
TWO-STEPPRESSERFOOTLIFTER 17
STARTINGSEWING 18
Start/stop button 18
Foot control....18
THREADTENSION 19
CHANGINGTHEPRESSERFOOT 20
PRESSERFOOTCHART 21
MATCHINGNEEDLE/FABRIC/THREAD 22
REPLACINGTHENEEDLE 23
RAISEORLOWERFEEDDOGS 23
Stitch width adjustment button 26
Stitch length adjustment button....27
MODE selection button 27
Elongation button (see page 59)....27
Mirror button (see page 60) 28
Twin needle button (see page 61) 28
SELECTIONBUTTONS 29-30
Direct pattern selection and number buttons 29
Edit button....30
Memory button 30
Clear button 30
SEWINGTIPS 31-32
Sewing corners 31
Reverse 31
Free arm....31
Installing the extension table....32
Sewing on heavy fabric 32
NEEDLEPOSITIONANDSTITCHLENGTH 33
ZIGZAGSTITCHES 33
STRETCHSTITCHES 34
CONTENTS
OVERCASTINGSTITCHES 35
Using the overcasting foot 35
Using the all purpose foot 35
BLINDHEMS 36
BUTTONSEWING 37
Inserting a centered zipper 46
Inserting a lapped zipper 47
NARROWHEMMING 48
CORDING 49
Single cording 49
Triple cording 49
SATINSTITCHSEWING 50
EDGE/QUILTING GUIDE....51
GATHERING....52
SMOCKING 53
FREEMOTIONSEWING 54-55
Darning 54
Embroidery 55
Monogramming 55
WALKINGFOOT 56
FAGOTING....57
DECORATIVETOPSTITCHING 57
SCALLOPSTITCH 58
Scallop hem 58
Scallop edging 58
ELONGATION 59
MIRRORIMAGE 60
USINGTHETWINNEEDLE 61
MEMORY....62-65
Combiningpatternsoletters....62-63
Adding patterns or letters....63
Editing patterns 64
Clearing patterns or letters....64
Recalling and sewing the memorized pattern....65
WARNINGFUNCTIONS 66-67
Warning animation message display....66
Instruction animation message display 66
Warning beeping sound....67
BUZZERSOUND 68
MAINTENANCE 69-70
Cleaning the screen....69
Cleaning the sewing machine surface....69
Cleaningthehook. 69-70
TROUBLESHOOTINGGUIDE 71-72
STITCHADJUSTMENTREFERENCECHART 73-78
text_image
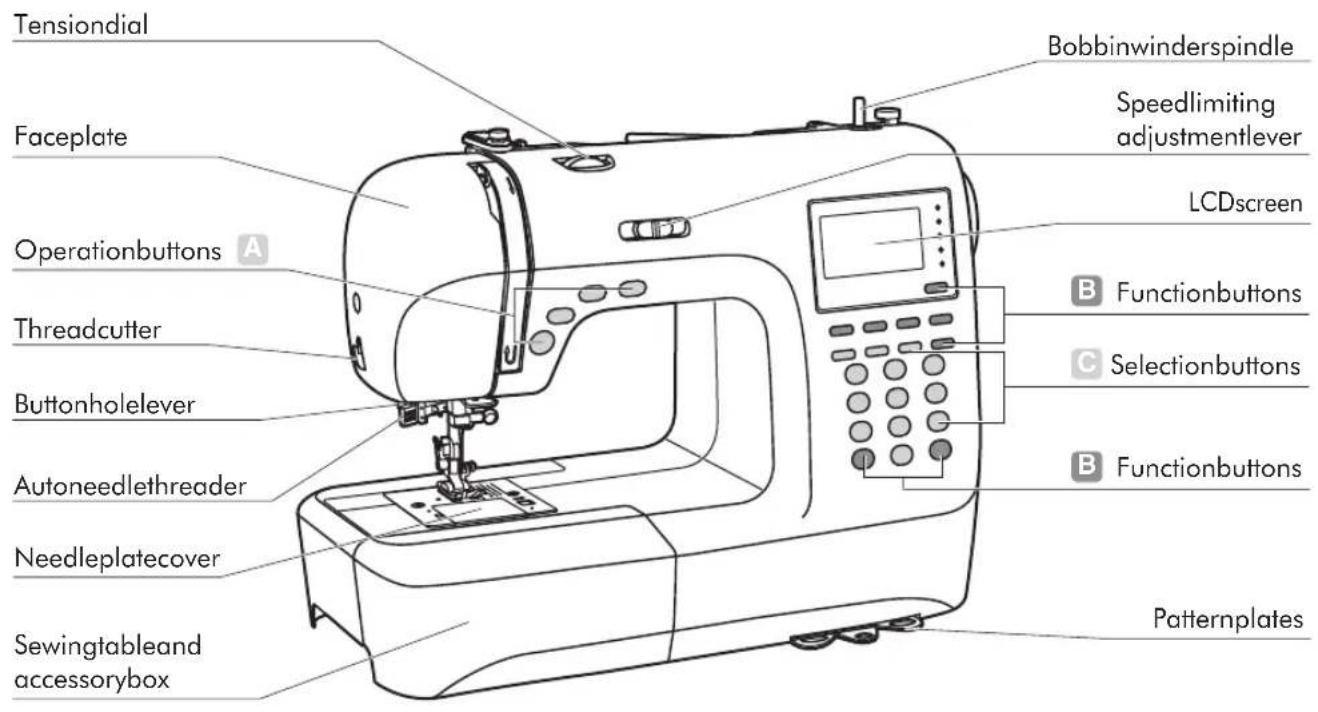
Tensionial Faceplate Operationbuttons A Threadcutter Buttonholelever Autoneedlethreader Needleplatecover Sewingtableand accessorybox Bobbinwinderspindle Speedlimiting adjustmentlever LCDscreen B Functionbuttons C Selectionbuttons B Functionbuttons Patternplates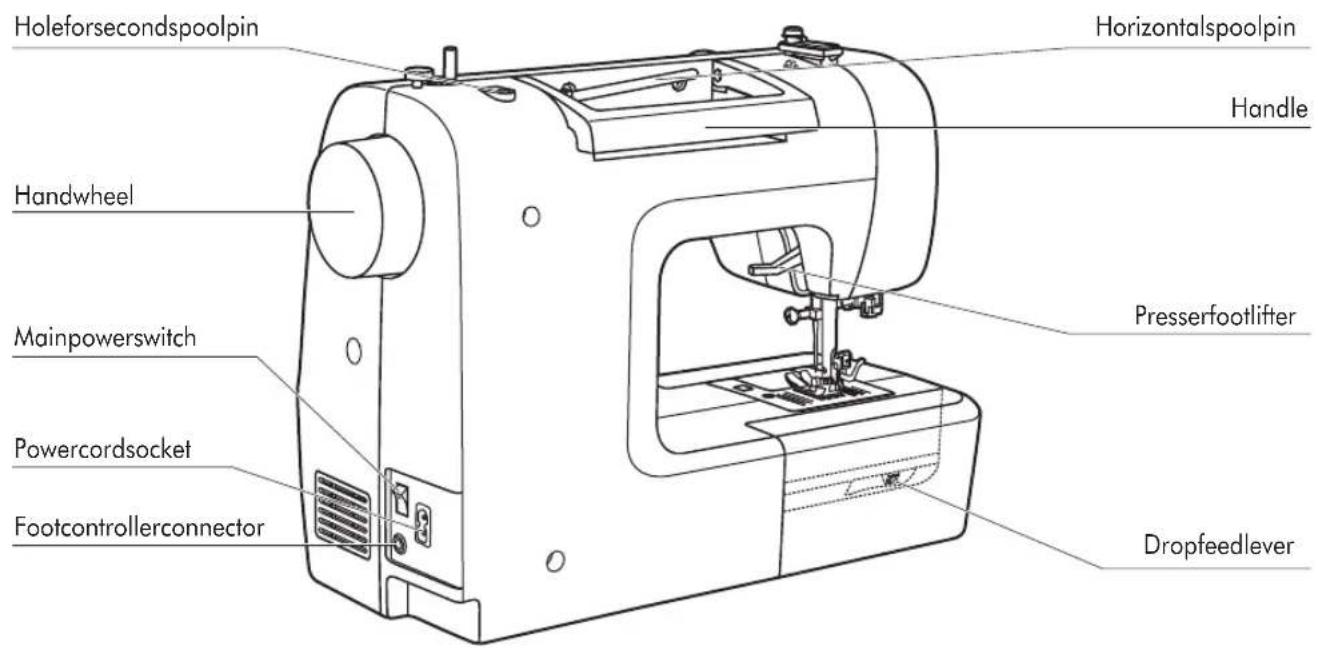
text_image
Holeforsecondspoolpin Horizontalspoolpin Handle Handwheel Presserfootlifter Mainpowerswitch Powercordsocket Footcontrollerconnector Dropfeedlever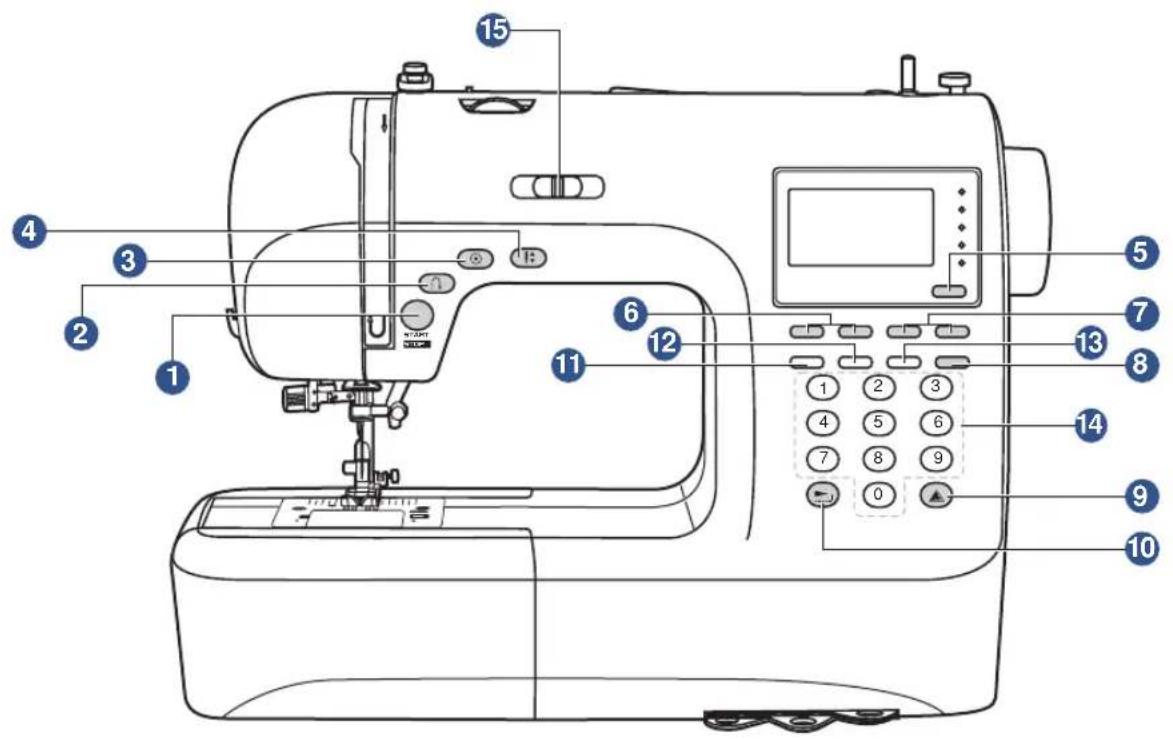
text_image
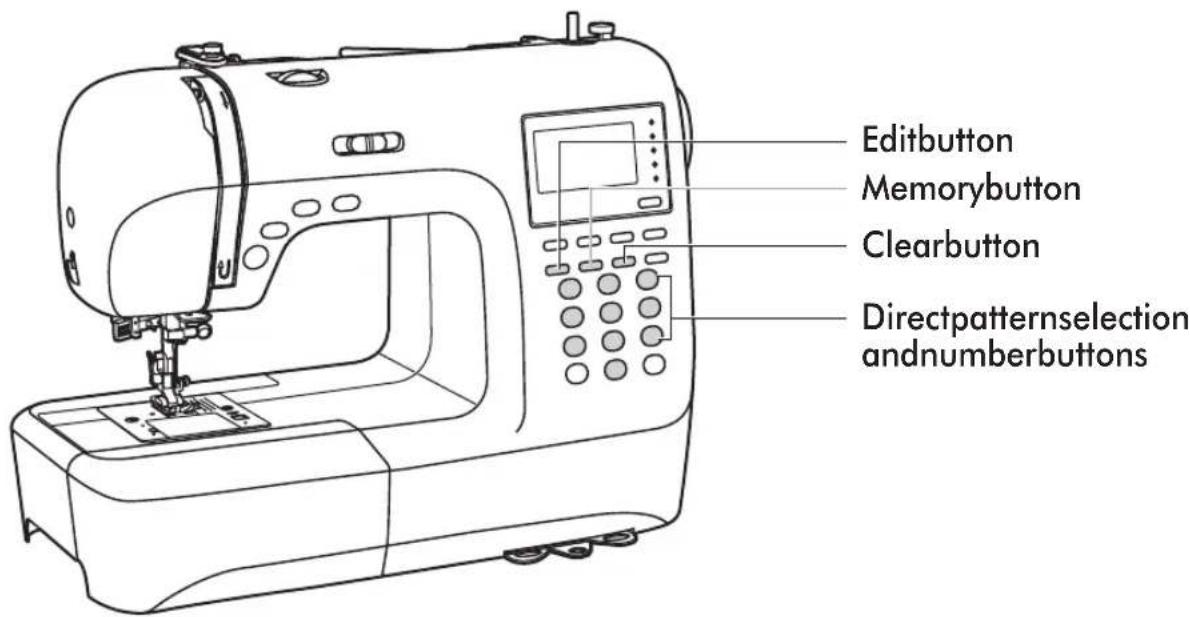
Labeled diagram of a sewing machine with numbered parts for identification and functionA.Operationbuttons(seepage24/25)
1.Start/stopbutton
Pressthisbuttontostartorstopthemachine.
2. Reversebutton
Holddownthisbuttontosewstitchesinreverseorsewreinforcementstitchesatalowspeed.
3. Auto-lockbutton
Holddownthisbuttontosewlockingstitchesimmediatelyorattheendofthecurrentpatterns andautomaticallystop.
4. Needleup/downpositionbutton
Pressthisbuttontomovetheneedletoeitherupordownposition.Needlewillbeprogrammed tostopinselectedpositionuntilbuttonispressedagain.
B.Functionbuttons(seepage26/27/28)
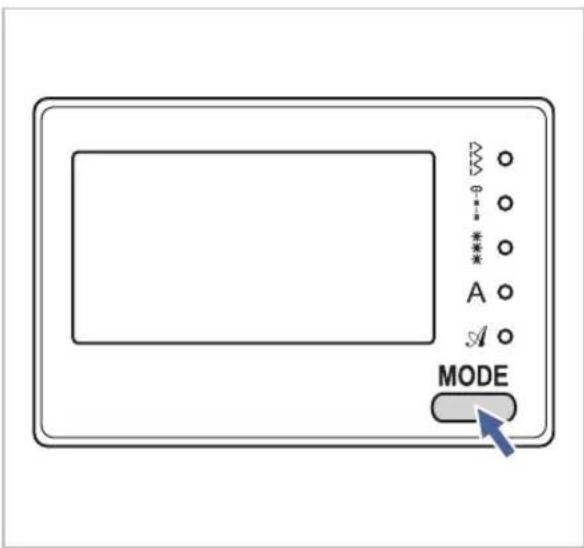
5.Modeselectionbutton
Pressthisbuttontoselectdirectmode,utilityanddecorativepatternmode,blocklettermode,scriptlettermodeandoutlinelettermode.
6.Stitchwidthadjustmentbuttons
Pressthisbuttontoadjustthewidthofthezigzagstitch.
7. Stitchlengthadjustmentbuttons
Pressthisbuttontoadjustthelengthofthestitch.
8.Twinneedlebutton
Pressthisbuttontofixthewidthrangewhenusingthetwinneedletosew.
9.Mirrorbutton
Pressthisbuttontosewareflectionpattern.
10.Elongationbutton
Pattern28to51 can be elongated up to five times its normal length by pressing this button.
C.Selectionbuttons(seepage29/30)
11.Editbutton
Pressthisbuttontosetanaddedpatternwhensewingcombinationsofdecorativestitches.
12.Memorybutton
Pressthisbuttonontoenterorstorethecreatedpatterncombinationinthememory.
13.Clearbutton
Ifanincorrectpatternisselectedormemorized,pressingthisbuttonwillclearit.
14. Directpatternselectionandnumberbuttons
Instantaccesstodirectpatternorpressnumberbuttonsofthepatternnumbertoselectthe desiredpattern.
15. Speedlimitingadjustmentlever
Slidethislevertochangethesewingspeed.
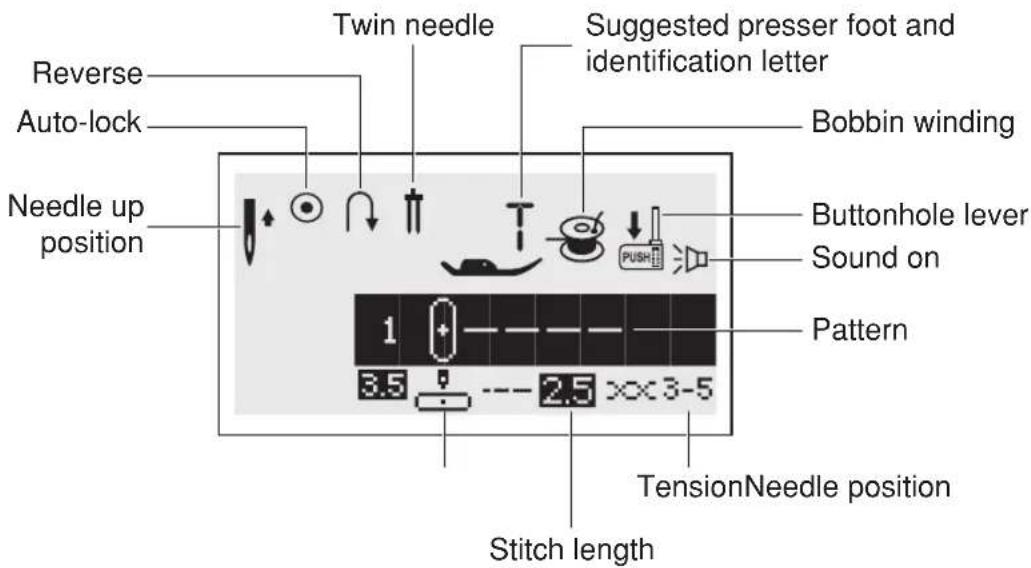
Pattern
text_image
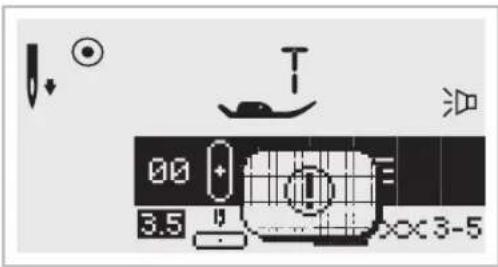
Reverse Auto-lock Twin needle Suggested presser foot and identification letter Needle up position Bobbin winding Buttonhole lever Sound on Pattern 1 3.5 2.5 x 3-5 TensionNeedle position Stitch length
text_image
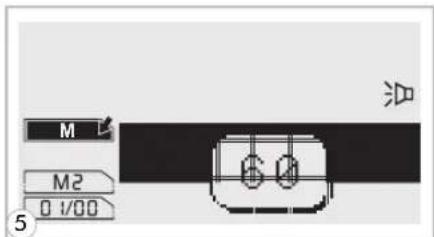
MirrorAuto-stop Needle down position Pattern number Sound off 60 7.0 --- 2.0 ××3-5 Stitch width Stitch length- Alphabet
text_image
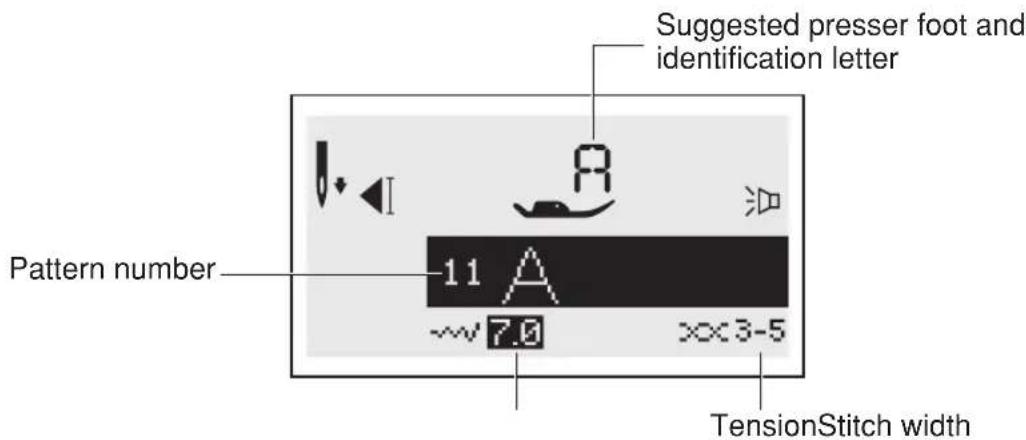
Suggested presser foot and identification letter Pattern number 11 A ~~7.0 XXX3-5 TensionStitch widthMemory
Editingpatterns

text_image
Edit mode Memory group Number of current unit M EDIT M2 04/18 60 7.0 --- 2.0 ××3-5 Total number of unit Pattern to editSewingthememorizedpattern

text_image
Memory mode M 6.0 M2 04/18 7.0 2.0 ××3-5- Elongation
text_image
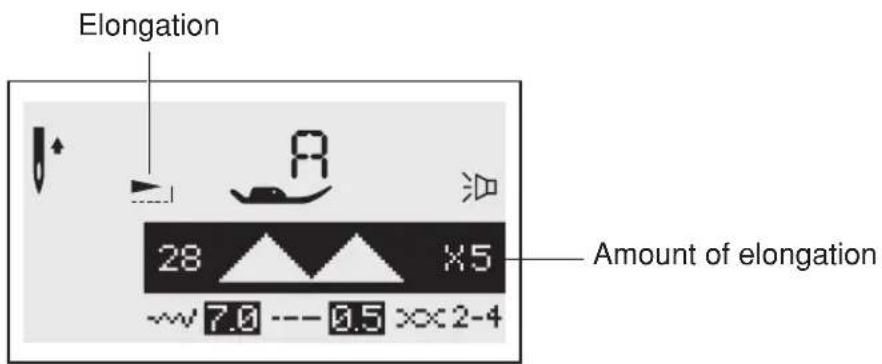
Elongation 28 ×5 Amount of elongation ~7.0 --- 0.5 >×2-4The portions marked in gray (on the chart below) show the single unit of each stitch.
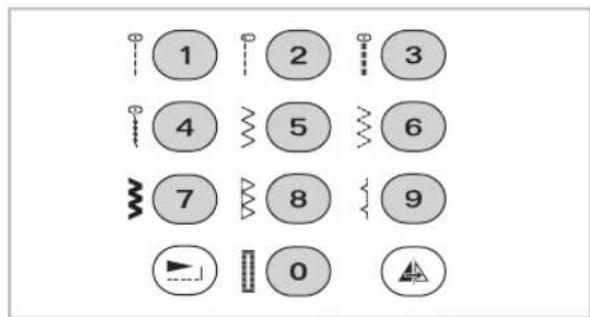
Patterns
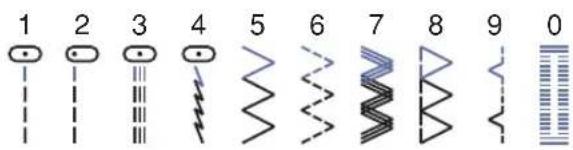
DirectPatterns-10
text_image
1 2 3 4 5 6 7 8 9 0AGroupPatterns-100
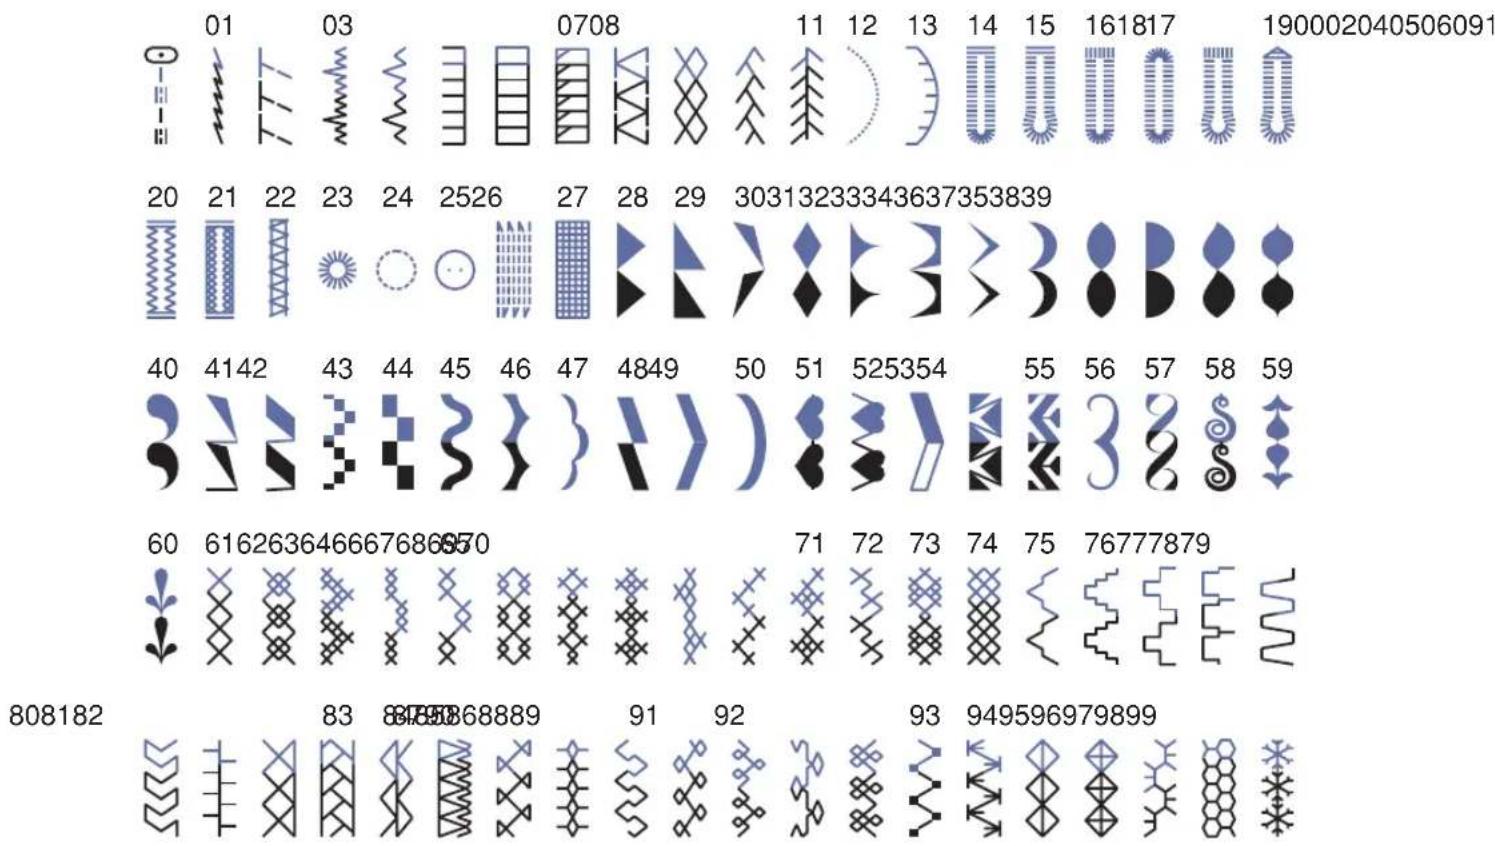
BGroupPatterns-100
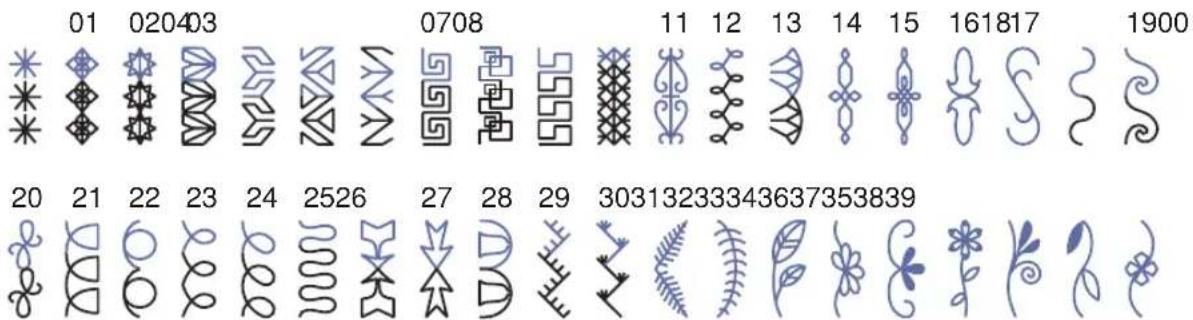
text_image
01 020403 0708 11 12 13 14 15 161817 1900 20 21 22 23 24 2526 27 28 29 30313233343637353839
text_image
40 414249 43 44 45 46 47 48 50 51 525354 55 56 57 58 59 60 6162636466676868570 71 72 73 74 75 76777879 82 83 8485868889918790 93 949596979899928081- Alphabets
Blockstyle
0102 03 04050607080910
1 2 3 4 5 6 7 8 9 0
1112 13 14 1516 17 181920 2122 23 24 2526 27 2829 30313233343536
ABCDEFGHIJKLMNOPQRSTUVWXYZ
3738 39 40 4142 43 44 45 46 47 4849505152 53 54 55 56 57 5859606162
a b c d e f g h i j k l m n o p q r s t u v w x y z
63 64 65 66 67 686970 7172 73 74 75 76 77 78 79 8081 82 83 8485868788
ÄÄÆÑÖ∅ÇÜäåæëèéêñööøiçüüß&
89 909192 93 94959697
? ! _ ” , . - ( )
Scriptstyle
0102 03 04050607080910
1 2 3 4 5 6 7 8 9 0
1112 13 14 1516 17 181920 2122 23 24 2526 27 2829 30313233343536
A B C D E F G H I J K L M N O P Q R S T U V W X Y Z
3738 39 40 4142 43 44 45 46 47 4849505152 53 54 55 56 57 5859606162
a b c d e f g h i j k l m n o p q r s t u r w x y z
63 64 65 66 67 686970 7172 73 74 75 76 77 78 79 8081 82 83 8485868788
Caution: Always makes sure that the machine is unplugged from powers or source and them in switchison "O" when the machine is not in use and before inserting or removing parts.

text_image
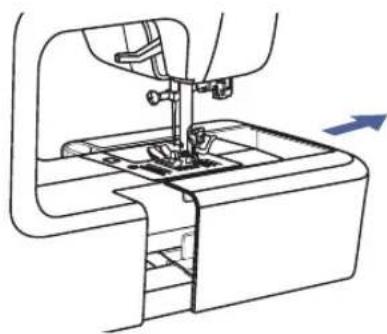
Diagram of a sewing machine with labeled components and directional arrows indicating connection to the right-hand side.
Connectingthemachine
Beforeconnecting the powersupply, makesure that the voltage and frequency shown on the machine is conforming with you electrical power.
Placemachineonastablesurface.
- Connectthepowerlinecordtothemachinebyinsertingthe2-holeplugintothepowercord socket.
- Connect the power line plug to the electric outlet.
- Turnonthepowerswitch.
- Thesewinglampwilllightupwhentheswitchisturnedon.
Todisconnect,turnthepowerswitchtotheoffposition,thenremoveplugfromoutlet.

natural_image
Hand using a power tool to switch an electrical outlet (no text or symbols visible)Polarizedpluginformation
This appliance has apolarized plug (one bladewider than the other), to reduce the risk of electrical shock; this plug will fit in apolarized outlet only on one way. If the plug does not fit fully in the outlet, reverse the plug. If still does not fit, contact a qualified electrician. Donot modify the plugin anyway.
text_image
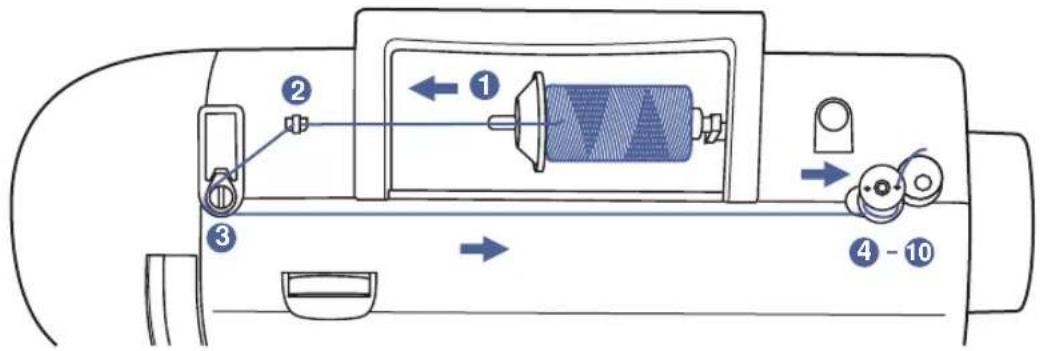
Diagram of a sewing machine's internal components with numbered parts and directional arrows indicating motion or signal flow.Bobbinwinding
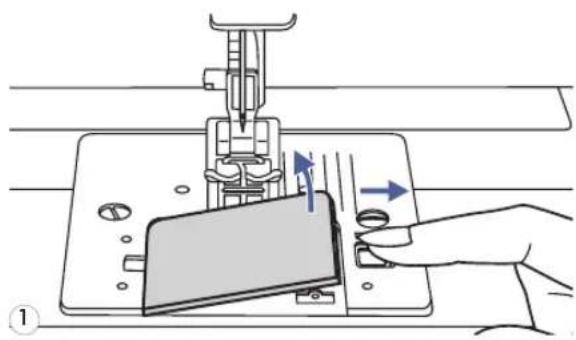
1
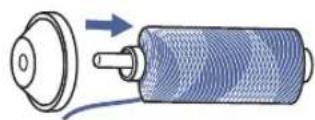
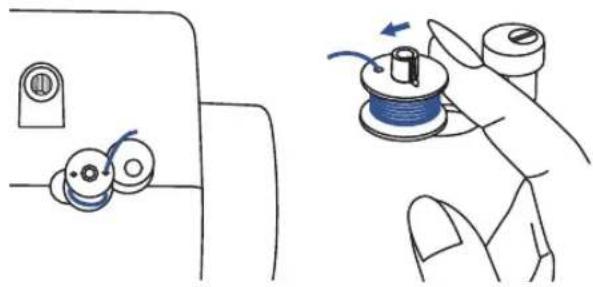
1 Placethethreadandspoolholderontothespoolpin. Forlargerspoolsofthread, placethelargesideofthe spoolholdertowardthespool. Forsmallerspoolsof thread, placethesmallsideofthespoolholdertoward thespool, orusethesmallspoolholder. Ifthethread spoolhasathreadretainingslit, placethisendofthe spooltowardtheright, sothethreaddoesn'tgetcaught whilewindingthebobbin.

natural_image
Illustration of hands performing a manual task with two arrows indicating movement or sequence (no text or symbols present)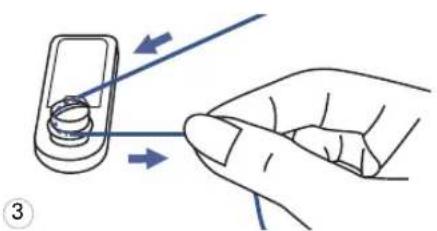
natural_image
Hand holding a mobile phone with a cable being inserted (no text or symbols visible)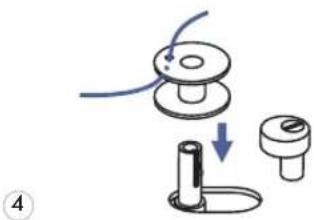
natural_image
Diagram of a mechanical device with a knob, handle, and base (no text or symbols)2 Snapthethreadintothethreadguide.
3 Windthethreadcounter-clockwisearoundthebobbin windertensiondisks.
4 Placethethreadendthroughoneoftheinnerholesin thebobbinasillustratedandplaceemptybobbinon thespindle.
natural_image
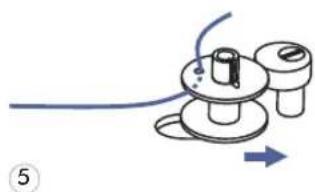
Diagram of a mechanical device with a blue cable and directional arrow, no text or symbols present5 Pushthebobbintoright.

text_image
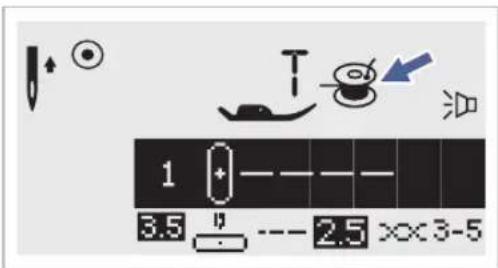
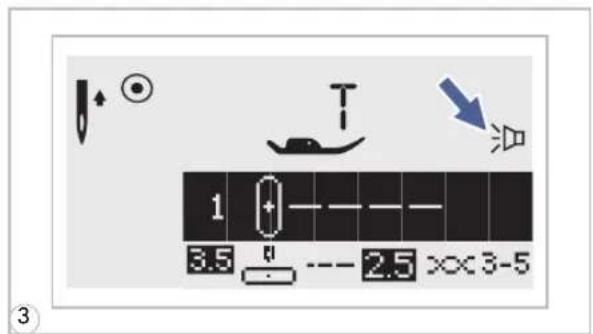
1 3.5 2.5 xx 3-56 Whenthebobbinwinderspindleispushedtotheright, whichisthe"bobbinwindingposition",thesymbol
" " a p p e a r s o n t h
ThesymbolwilldisappearfromtheLCDscreenwhenthe bobbinwinderspindleispushedtotheleft,whichisthe "sewingposition".
natural_image
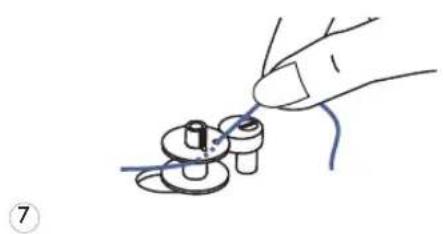
Hand holding a small mechanical component with wires, no text or symbols visible7 Holdthethreadtailsecurelyinonehand.

text_image
Diagram showing foot positioning and foot movement on a shoe, with numbered arrows indicating motion direction.8 PresstheStart/stopbuttonorthefootcontrol.
text_image
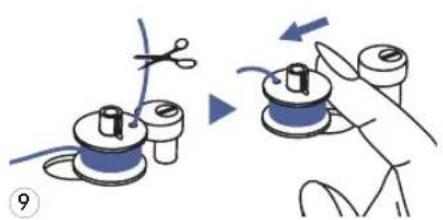
Diagram illustrating the process of a sewing machine, showing hand positioning and cutting tool application steps.9 Afterthebobbinhaswoundafewturnsstopthemachine andcutthethreadneartheholeofthebobbin.Continue windingthebobbinuntilitisfull.Themotorstops automaticallywhenthebobbinisfull.Stopthemachine. Pushthebobbinwinderspindletoleft.
natural_image
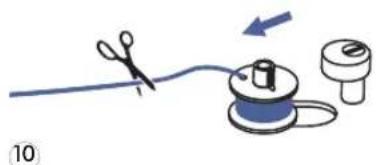
Illustration of a sewing process with scissors, thread, and spool (no text or symbols)10 Cutthethreadandthenremovethebobbin.

PleaseNote: Whenthebobbinwinderswitchisplacedontheright, "bobbinwinding position", themachinewillnotsewandthehandwheelwillnotturn. Tostartsewing, pushthe bobbinwinderswitchtotheleft"sewingposition".

natural_image
Line drawing of a sewing machine needle stitching a small component, with no visible text or symbols
text_image
A ②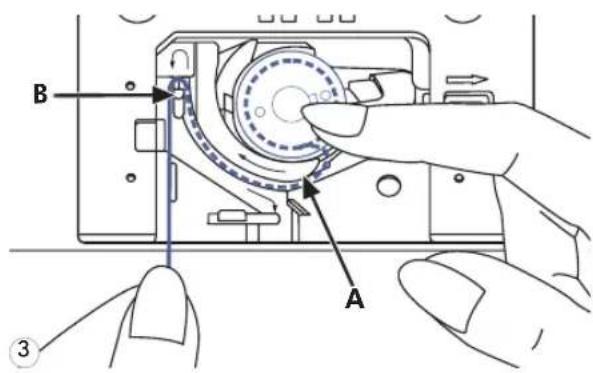
text_image
B A ③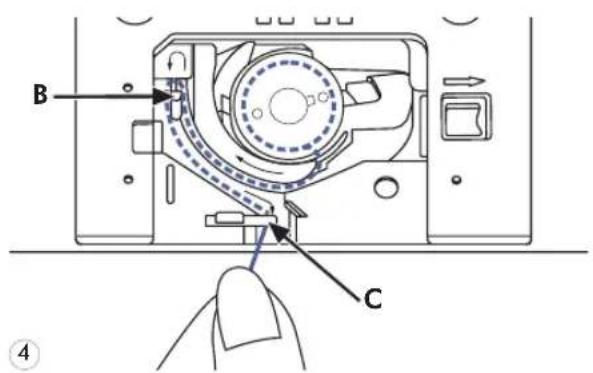
text_image
B C ④Attention: Tumpowerswitchcoff("O") beforeinsertingorremovingthebobbin.
When inserting or removing the bobbin, then needle and presser foot must be fully raised.
1 Insertthebobbininthebobbincasewith thethreadrunninginacounterclockwise direction(arrow).
2 Pullthethreadthroughtheslit(A).
3 Withafingerheldgentlyontopofthe bobbin. Draw thethreadatthearrowmarkingsinto thestitchplatethreadguidefrom(A)to(B)
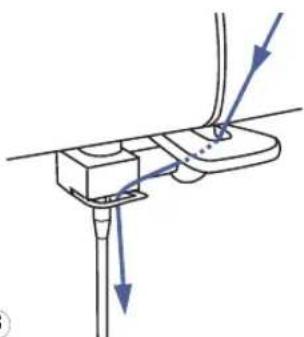
4 Pullthethreadatthearrowmarkingsinto thestitchplatethreadguidefrom(B)to(C). Tocutoffexcessthreadpullthreadback overthecuttingoffbladeatpoint(C). Closethebobbincoverplate.
text_image
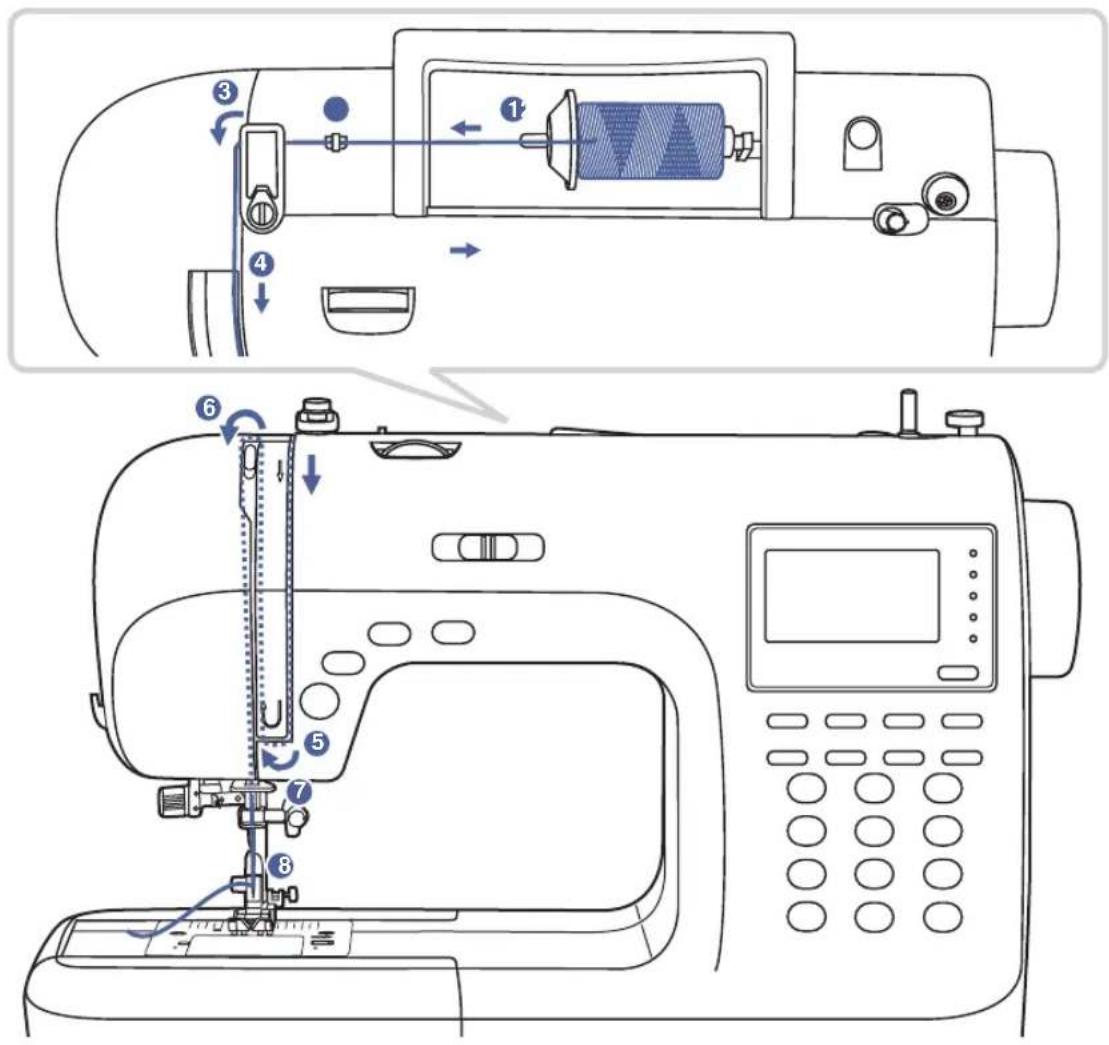
Technical diagram of a sewing machine with numbered parts for assembly or maintenance instructions
PleaseNote: It is important to carry out the threading correctly as by not doing so several sewing problems could result.
____

natural_image
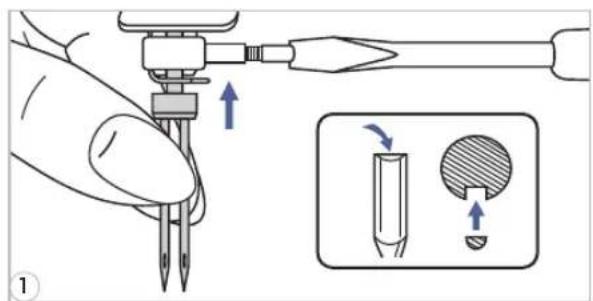
Diagram showing a mechanical component with a circular base and a coiled spring-like structure, no text or symbols present.1
Startbyraisingtheneedletoitshighestpoint, and alsoraisethepressorfoottoreleasethetensiondiscs.
7 Liftupthespoolpin. Placethespo pinsothathethreadcomesfromthefrontofthespool, thenplacethespoolcapattheendofthespoolpin.
text_image
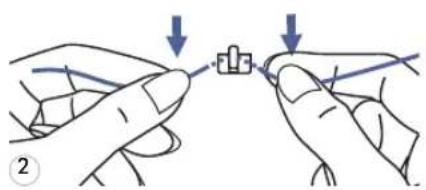
Diagram showing two hands tying a knot with arrows indicating the process, labeled with number 2.2 Drawthethreadfromthespoolthroughtheupper threadguide.
3
natural_image
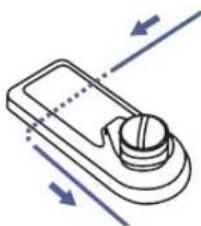
Isometric line drawing of a handheld device with directional arrows indicating motion (no text or symbols)3 Guidethethreadaroundthethreathreadthroughthepre-tensionspringasillustrated.
4

natural_image
Diagram of a car's side profile showing airflow path and vehicle positions (no text or labels)4 Threadthetensionmodulebypassingthethreadbetween thesilverdiscs.

natural_image
Hand holding a tool interacting with a car body panel, showing motion arrows (no text or symbols)5 Then,downandaroundthecheckspringholder.
natural_image
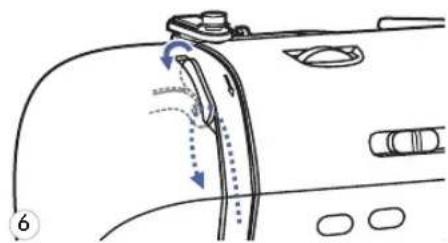
Diagram of a car's side profile showing hand movement and motion arrows (no text or symbols)6 Athetopofthismovement, passthethreadfromrightto theleftthroughtheslottedeyeofthetake-upleverand thendownwardsagain.
78
natural_image
Diagram of a mechanical device with arrows indicating force or movement (no text or symbols)7 Passthethreadbehindtheflat, horizontalthreadguide. Guidethethreadthroughthethreadguidelocatedabove theneedle.
8 Pulltheendofthethreadthroughtheneedlefromfrontto rear, and pulloutabout10cmofthread. Usetheneedlethreadertothreadtheneedle.(Onthenext page.)
text_image
Technical diagram showing hands operating a sewing machine with labeled parts and a magnified inset showing the foot symbol.
text_image
Technical diagram showing a hand operating a sewing machine with labeled parts and directional arrows indicating movement or force.2

natural_image
Technical line drawing of a mechanical clamp or bracket assembly with a magnified inset showing a pin detail (no text or symbols)3
natural_image
Illustration of a hand operating a sewing machine with a close-up inset showing the needle being inserted (no text or symbols present)Attention: Turn power switch to the off position("O").
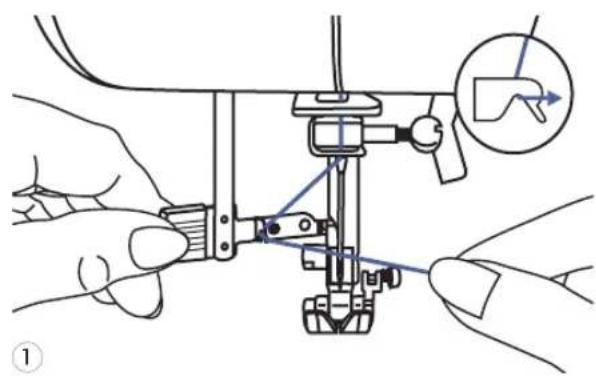
Raisetheneedletoitshighestpositionand lowerthepresserfoot.
7 Lower theneed lethreaderl drawthethreadthroughthethreadguideas illustratedandthentotheright.
2 Theneedlethreaderautom threadingpositionandthehookpinpasses throughtheneedleeye.
3 Takethethreadinfrontofth
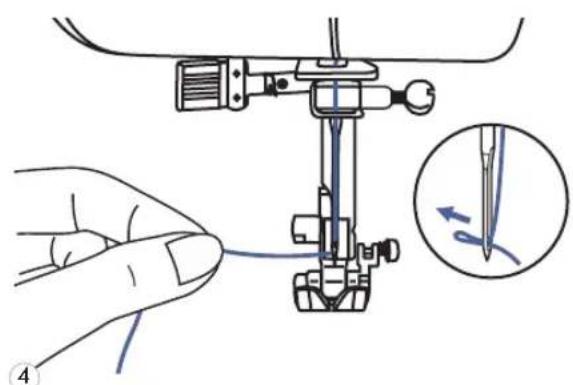
4 Hold the thread loosely and slowly. The hook will turn and pass the thread through the needle eye forming a loop.
Pullthethreadthroughtheneedleeye.

natural_image
Line drawing of a sewing machine with hands operating the tool (no text or symbols present)1 Hold the upper thread with Turnthehandwheeltowardsyou (counterclockwise)lowering,thenraisingthe needle.

natural_image
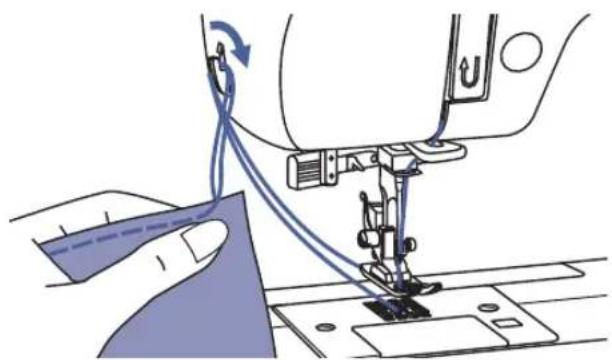
Line drawing of a sewing machine needle stitching fabric, with hands operating the component (no text or symbols)2 Gently pull on the upper thr bobbinthreadupthroughtheneedleplate hole. The bobbinthread will come upina loop.

natural_image
Illustration of a sewing machine needle stitching fabric, with no visible text or symbols3 Pull both th read s to the bac l presserfoot.

CUTTINGTHETHREAD

natural_image
Illustration of a sewing machine needle stitching fabric, showing thread and stitching details (no text or symbols)Raisethepressorfoot.Removethefabric,draw thethreadstotheleftsideofthefacecover andcutusingthethreadcutter.
Thethreadsarecutattheproperlengthto startthenextseam.

text_image
Technical diagram showing sewing process steps with arrows indicating movement and adjustment of a componentThe presserfootlifterraisesandlowersthe presserfoot.
Whensewingseverallayersorthickfabrics, the presserfootcanberaisedasecondstage foreasypositioningofthework.
Start/stopbutton

natural_image
Line drawing of a car interior with a handle and seat, showing no text or symbolsTheStart/Stopbuttoncanbeusedtorunthe machinewhenthefootcontrollerisunplugged fromthemachine.Pressthebuttontostart sewing,thenpressitagaintostopsewing.The machinewillrunslowlyatthestartofsewing.
natural_image
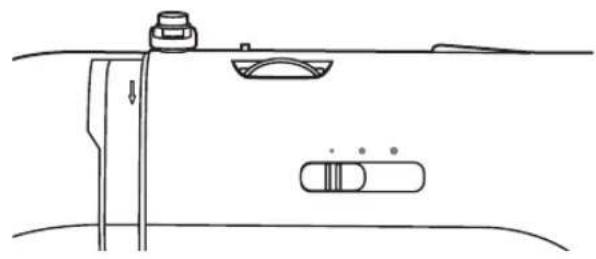
Pure technical line drawing of a mechanical assembly or component without any text, numbers, or symbolsThespeedlimitingadjustmentlevercancontrol thesewingspeed.Toincreasethesewingspeed, slidethelevertotheright,Todecreasethe sewingspeed, slidethelevertotheleft.
Footcontrol

natural_image
Diagram showing cable connection to a device with a plug and cable outlet, no text or symbols presentWith these sewing machine turned off, insert the foot control plug into its connector on these sewing machine.
natural_image
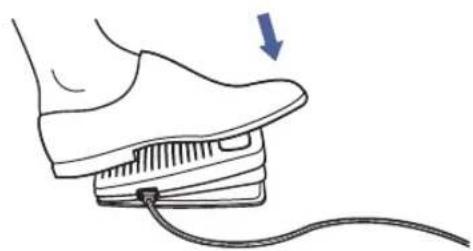
Illustration of a foot pressing down on a shoe with a cable, showing a blue arrow indicating motion (no text or symbols)Turn the sewing machine and h slowly depressthefoot controltostartsewing. Releasethefoot controltostopthesewing machine.

Please Note: The setting of the speed limiting adjustment lever will limit the maximum speed of themachine.

text_image
5 4 3 1-Basicthreadtensionsettingis"4".Toincreasethetension,turnthedialtothenextnumberup.To decreasethetension,turnthedialtothenextnumberdown.
-Propersettingoftensionisimportantforgoodsewing.Thereisnosingletensionsetting appropriateforallthestitchfunctionsandfabrics.However,90%ofallsewingwillbebetween the"3"and"5"(4"isthebasicsetting).
-Fordecorativesewingyouwillalwaysobtainanicerstitchandlessfabricpuckeringwhenthe upperthreadappearsonthebottomsideofyourfabric.
text_image
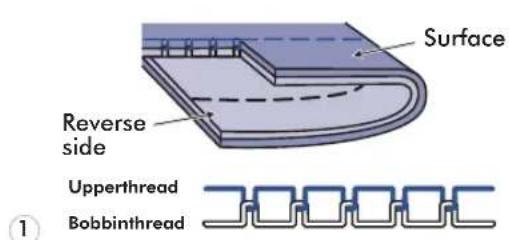
Surface Reverse side Upperthread Bobbinthread ①7 Normal thread tension for str

text_image
Surface Reverse side Upperthread Bobbinthread ②2 Thread tensionistooloosefor sewing.Turndialtohighernumber.
text_image
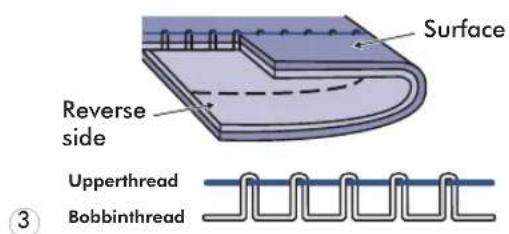
Surface Reverse side Upperthread Bobbinthread ③3 Thread tension is too tight sewing.Turndialtolowernumber.
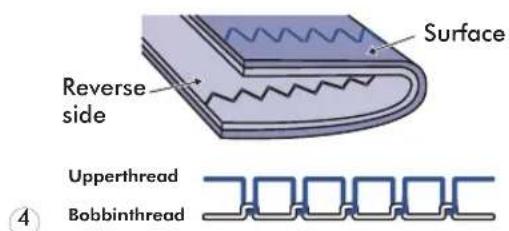
text_image
Surface Reverse side Upperthread Bobbinthread ④4 Normal thread tension for zig zag and decorativesewing.
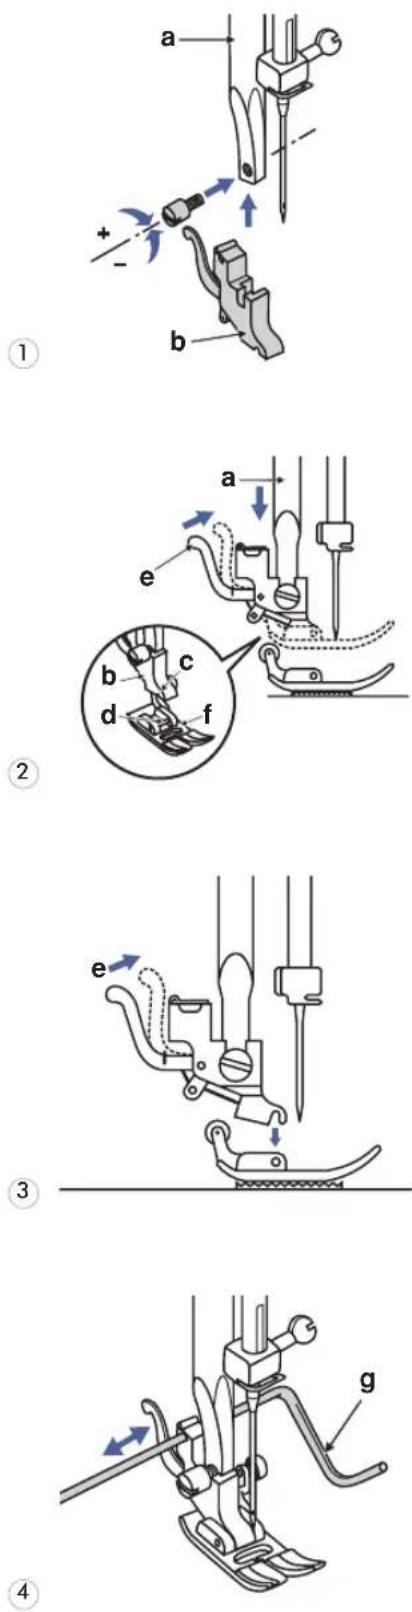
Attention: Turnpowerswitchofoff ("O")positionwhencarryingoutany oftheoperationsshownbelow.
1 Attaching the presser footholder
Raisethepressorfootbar(a)byraising thepressorfootlifter.Attachthepresser footholder(b)asillustrated.
2 Attaching the presser foot
Lowerthepresserfootholder(b)until thecut-out(c)isdirectlyabovethepin (d). Raisethelever(e). Lowerthepresserfootholder(b)and the presserfoot(f)will engage automatically.
3 Removingthepresserfoot
Raisethepressorfoot. Raisethelever(e)andthefootwill disengage.
4 Attachingtheedge/guiltingguide
Theedge/quiltingguide(g)canbe attachedasillustrated.Adjustas neededforhems,pleats,quilting,etc.
(Thetwinneedlecanbeusedforsomestitches,offeringmorestitchingoptions. Formoreinformation,gotothesection:USINGTHETWINNEEDLE)
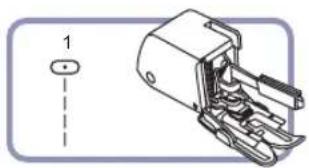
| PRESSERFOOTPRESSEARPPLOITATION | NEEDLEN | NEEDLE | APPLICATION | ||
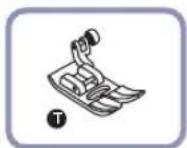
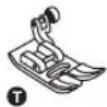 Allpurposefoot(T) Allpurposefoot(T) | Generalsewing, Patchworkstitches, Decorativestitching, Smocking,Fagoting, etc. | Satinstitchfoot(A) | Satinstitchsewing | ||
 Zipperfoot(I) Zipperfoot(I) | Insertingzippers | ||||
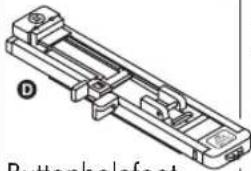 BUTTONHOLEFOOT(D) BUTTONHOLEFOOT(D) | Buttonholesewing, Darning-stitchsewing | Quiltingfoot(P)(Optional) | Quilting | ||
 Cordingfoot(M)(Optional) Cordingfoot(M)(Optional) | Cording | Darning/Embroideryfoot(Optional) | Free-motiondarning, embroidery, monogramming | ||
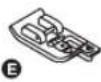 Overcastingfoot(E) Overcastingfoot(E) | Overcasting | Gatheringfoot(Optional) | Gathering | ||
 Blindhemfoot(F) Blindhemfoot(F) | Blindhemstitching | Buttonsewingfoot | Buttonsewing | ||
 Rolledhemfoot(K)(Optional) Rolledhemfoot(K)(Optional) | Narrowhemming | Walkingfoot(Optional) | Thisfoothelpsto preventuneven feedingofquilt layers,napped fabrics,anddifficult-to-handlefabrics. | ||
NEEDLE,FABRIC,THREADSELECTIONGUIDE
| NEEDLESIZEFABRICSTHREAD | ||
| 9-11(70-80)Lightweightfabrics-thincottons,voile,serge,silk,muslin,interlocks,cottonknits,tricot,jerseys,crepes,wovenpolyester,shirt&blousefabrics. | Light-dutythreadincotton,nylon,polyesterorcottonwrappedpolyester. | |
| 11-14(80-90)Mediumweightfabrics-cotton,satin,sailcloth,doubleknits,lightweightwoolen. | Mostthreads sold aremediumsizeandsuitableforthesefabricsandneedlesizes. Use polyesterthreadsonsyntheticmaterialsandcottononnaturalwovenfabricsforbestresults.Alwaysusethe same thread on top andbottom. | |
| 14(90) | Mediumweightfabrics-cottonduck,woolen,heavierknits,terrycloth,denims. | |
| 16(100) | Heavyweightfabrics-canvas,woolens,outdoortentandquiltedfabrics,denims,upholsterymaterial(lighttomedium). | |
| 18(110) | Heavywoolens,overcoatfabrics,upholsteryfabrics,someleathersandvinyls. | Heavydutythread,carpetthread. |

PleaseNote:
-Ingeneral, finethreads and needles are used for sewing fine fabrics, and thicker threads are used for sewing heavy fabrics.
-Alwaysstestthreadandneedlesizeonasmallpieceoffabricwhichwillbeusedforactual sewing.
-Usethesamethreadforneedleandbobbin.

text_image
Diagram illustrating a mechanical tool with labeled components A and B, showing motion and rotation directions with polarity indicators.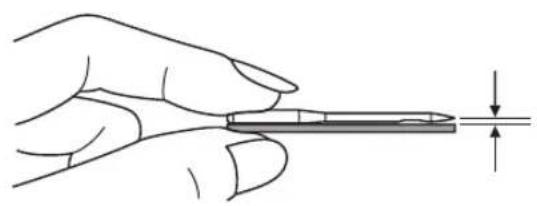
natural_image
Illustration of a hand holding a pen with a ruler, showing measurement alignment (no text or symbols)Attention: Turnpowerswitchofoff("O") positionwhencarryingoutanyofthe operationsshownbelow.
Changetheneedleregularly,especiallyifitis showingsignsofwearandcausingproblems.
Inserttheneedlefollowingtheillustrated instructions.
A. Loosentheneedleclampscrewandtighten againafterinsertingthenewneedle.
Theflatsideoftheshaftshouldbetowards theback.
B. Inserttheneedleasfarupasitwillgo.
Needlesmustbeinperfectcondition.
Problemscanoccurwith:
-Bentneedles
-Bluntneedles
-Damagedpoints

RAISEORLOWERTHEFEEDDOGS
natural_image
Line drawing of a sewing machine needle and base mechanism (no text or symbols)
text_image
a bWith theseewing table off them machine, the feed dogs adjustment lever can be seen on the base in back of these sewing machine.
Slidingthelevertothe"(b)willoverthe feeddog,forexampleduringbuttonsewing.If youwishtocontinuesewingnormally, slidethe levertothe"(a)indertoraisethefeed dogs.
Thefeeddogs willnotraiseup ifyoudonot turnthehandwheel,eveniftheleverisslidto the right. Make a complete turn (one full revolutionofthehandwheel)toraisethefeed dogs.

text_image
Needleup/down positionbutton Auto-lockbutton Reversebutton Start/stopbuttonStart/stopbutton

natural_image
Diagram of a vehicle interior showing a curved road, valve, and directional arrow (no text or symbols)Reversebutton

text_image
1 3.5 2.5 x0x3-5Themachinewillstartrunningwhenstart/stop buttonispressedandwillstopwhenpressed thesecondtime. Themachinewillrotateslowly atthebeginningofsewing.
Thesewingspeedwillincreaseslowlyuntil reachingthespeedsettingselectedwiththe speedlimitingadjustmentlever.
Thefootcontrolmustbedisconnectedto completethisoperation.
SelectDirectPatterns1-5,orAGroupPattern 00andthemachinewillsewinreverse.An arrow""ontheLCDscreendisplayappears whilestitchinginreverse.Themachinewillsew forwardafterthebuttonisreleased.
If you press and reversethe button before starting to sew, them machinew will permanently sew in reverse. Pressthe button againtosew forward again.
SelectDirectpatterns6-9,AGroupPatterns 01-13,28-99,andBGroupPatterns00-99a reinforcementstitchsewsatalowspeedand machineautomaticallystopsifthereverse buttonispressed.
Auto-lockbutton

text_image
1 3.5 2.5 ×× 3-5
text_image
60 ~~7.0 --- 2.0 xx3-5WhenDirectPatterns1-4,andAGroupPattern00areselected,themachinewillimmediately sew3lockingstitcheswhentheAuto-lock buttonispressed,thenautomaticallystop.
TheLCDscreenwilldisplaythefigure"until ● themachineisstopped.
WhenDirectPatterns5-9,AGroupPatterns 01-13,28-99,andBGroupPatterns00-99 areselected,presstheAuto-lockbutton,the machinewillsew3lockingstitchesattheend ofthecurrentpatternandautomaticallystop.
The function will be cancelled if you press the button once again or select another pattern.
TheLCDscreenwilldisplaythefigure ^1 untilthemachineisstopped.

- Needleup/downpositionbutton
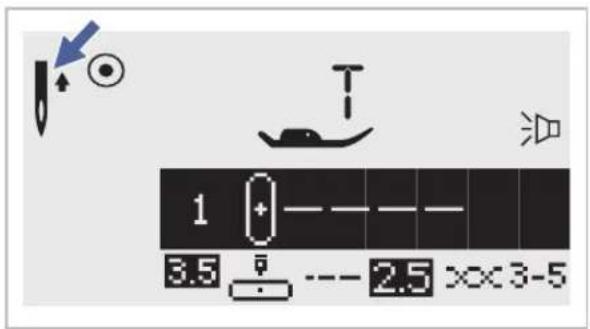
text_image
1 3.5 -- 2.5 xx3-5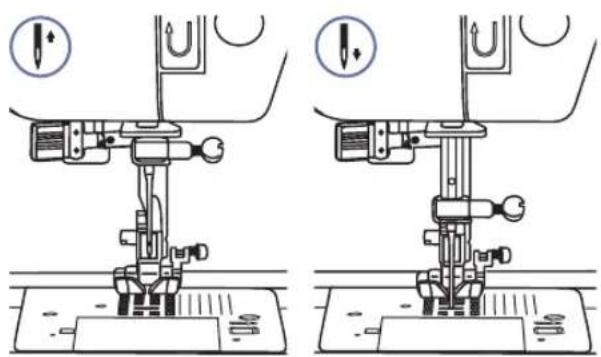
natural_image
Technical line drawing of a sewing machine with two views showing base and top views (no text or symbols)WiththeNeedleup/downpositionbutton, youdecidewhethertheneedleshallstopin theuppositionorinthematerialwhenyou stopsewing.
Whenyoupressthebuttonsothatthearrow (whichdisplaysjusttotherightoftheneedle iconontheLCDscreen)willpointupward,the needlewillstopinthehighestposition.
Whenyoupressthebuttonsothatthearrow (whichdisplaysjusttotherightoftheneedle iconontheLCDscreen)pointsdownward,the machinewillstopwiththeneedleinthelowest position.

text_image
Modeselectionbutton Stitchwidth adjustmentbuttons Stitchlength adjustmentbuttons Twinneedlebutton Mirrorbutton Elongationbutton- Stitchwidthadjustmentbutton
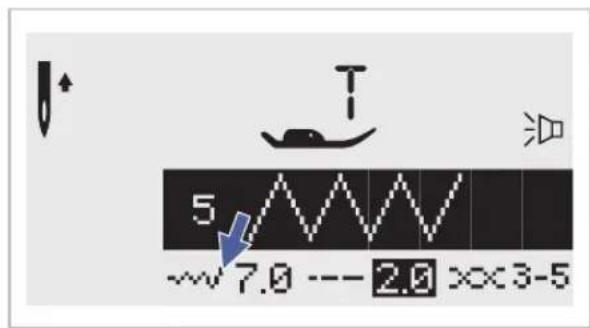
text_image
5 ~7.0 --- 2.0 x×3-5
text_image
Diagram showing wave interaction with a resistor and zigzag spring, including directional arrow and polarity signs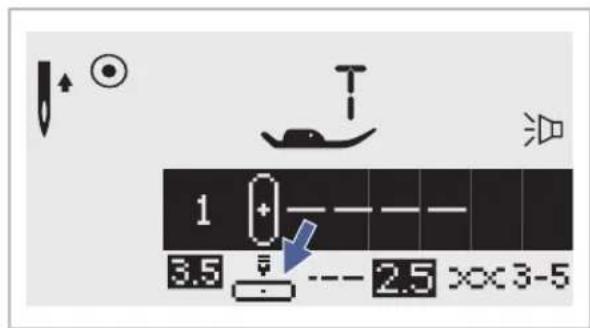
text_image
1 3.5 --- 2.5 ××3-5Whenyouselectastitch, themachinewill automaticallysettherecommendedstitchwidth, whichwillbeindicatedbynumbersontheLCD screen. Thestitchwidthcanberegulatedby pressingthestitchwidthadjustmentbuttons.
Certainstitcheshavealimitedstitchwidth.
Foranarrowerstitch, press the "button(left).
Forawiderstitch, pressthe" + "button(right).
Thestitchwidthcanbeadjustedbetween"0.0-7.0".
Certainstitcheshavealimitedstitchwidth.
When DirectPatterns1-4,andAGroupPattern 00 areselected,theneedlepositionis regulatedbythestitchwidthadjustment buttons.Pressingthe""button(left),will movetheneedletotheleftandpressingthe" +"button(right),willmovethene right.Thenumberswillbechangedfromleft position"0.0"toextremerightposition"7.0". The pre-set center needle position will be indicatedas"3.5".
- Stitchlengthadjustmentbuttons

text_image
1 3.5 ---- 4.5 x×3-5
flowchart
graph TD
    A[" "] --> B[" "]
    C[" "] --> D[" "]
    E[" "] --> F[" "]
    G[" "] --> H[" "]
    I[" "] --> J[" "]
    K[" "] --> L[" "]
    M[" "] --> N[" "]
    O[" "] --> P[" "]
    Q[" "] --> R[" "]
    S[" "] --> T[" "]
    U[" "] --> V[" "]
    W[" "] --> X[" "]
    Y[" "] --> Z[" "]
- MODEselectionbutton
text_image
MODE- Elongationbutton (seepage59)

text_image
4 5 6 7 8 9 0Whenyouselectastitchthemachinewill automaticallysettherecommendedstitch lengthwhichwillbeindicatedbynumberson theLCDscreen.Thestitchlengthcanbe adjusted bypassingthestitchlength adjustmentbuttons.
To another the length of the button(left). For a longer stitch length, press the" + "button(right). The stitch length can be adjusted between "0.0-4.5". Certain stitches have unlimited length.
TheLEDlightwillbesetatdirectmode ^"" whenstartthemachine.Bypassingthe button,LEDlightwillmovestepbystepto selectthestitchmode,asshown.
△
Directmodestitchselection. Utilityandsatinpatternmode: Stitchselectionusingnumberbuttons. Decorativepatternmode: Characterselectionusingnumberbuttons.
A Blocklettermode: Characterselectionusingnumberbuttons.
A Scriptlettermode: Characterselectionusingnumberbuttons.
AGroupPatterns28-51 can be elongated up to five times its normal length by pressing the "button.
Whenthewidththorlengthhorstitchischanged, agreatervarietyofpatternsareavailable.
- Mirrorbutton(seepage60)

text_image
4 5 6 7 8 9 0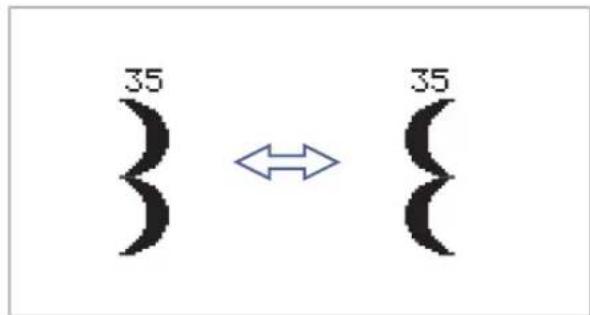
text_image
35 35Twineobutn (seepage61)
text_image
-~ + EDIT M C + ↑TheDirectPatterns1-9,AGroupPatterns00-13,28-99,andBGroupPatterns00-99can bemirrorimagedalongaverticalaxisby pressingthe"button. Themachinewill continuetosewthereflectedpatternuntilthe mirrorbuttonispressedagain. Themirror functionalsowillbecanceledifthepattern changed.
The function for mirror imaging the pattern appears on the LCD screen.
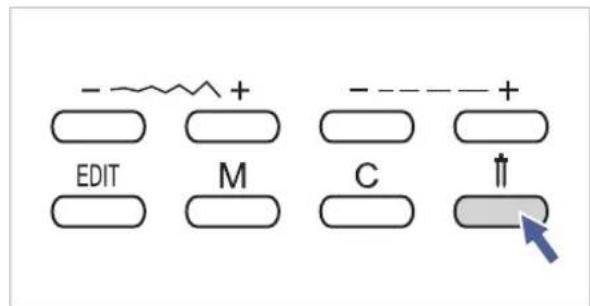
Withthetwinneedle,theDirectPatterns1-9, AGroupPatterns00-13,28-99,andBGroup Patterns00-99canbesewnintwoparallel linesofthesamestitchwithtwodifferent threads.
Press the "↑" button, the machine automatically reduce the maximum width for twin needle sewing. Pressthe button again for single needle sewing.
text_image
Editbutton Memorybutton Clearbutton Directpatternselection andnumberbuttonsDirectpatternselectionandnumberbuttons
text_image
1 2 3 4 5 6 7 8 9 0
text_image
00 3.5 6:0 x0x3-5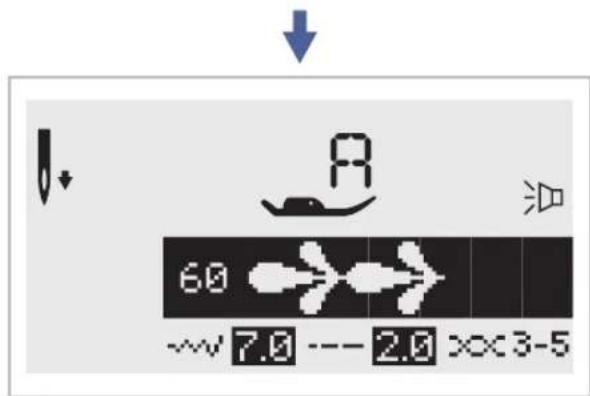
text_image
6.0 ~~7.0 --- 2.0 x3-5Directpatternselection
Pressthebuttonstoselecttheutilitypatterns shownbesidethenumberbuttonwhenthe modebuttonissetattheDirectmode.
Numberbuttons
To selected desire pattern and press the number buttons.
Except the Direct Pattern mode, the other mode can be selected by pressing the desired numbers.
Forexample:pattern60
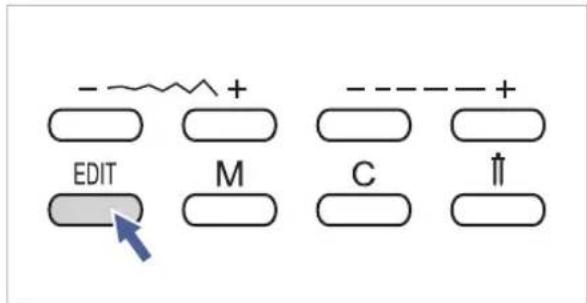
Editbutton
text_image
- - + - EDIT M C ↑If you wishtomodify any settings in the memory mode, us the stitch width " + or" - button to select the pattern to be modified, and press the " but 50 to set these selected pattern under the editing mode, the LED light will turn on. Manual setting function of the stitch width, stitch length, mirror, elongation and auto-lock for these memorized patterns is now possible. Pres the " button again to leavethe editing mode and return to memory mode.
- Memorybutton

text_image
- ~ + - - + EDIT M C ↑Pressthe"buttontoenterthememory mode, and store the combinations of charactersordecorativestitches. Usethestitch width " + " or " - " button to confirm the pattern memorized by pressing this button in memorymode.

PleaseNote:TheDirectmodepatterns andthe A Group Patterns 14-27 cannot bememorized.
Clearbutton
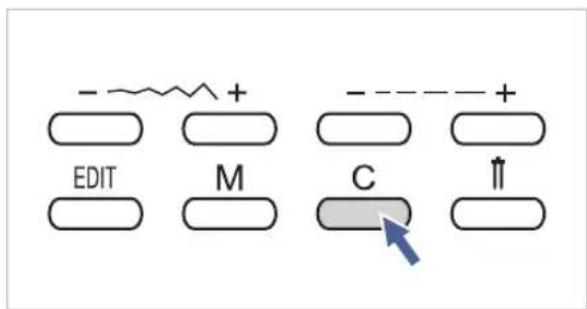
text_image
- ~+ + EDIT M C ↑Pressthisbuttonwhentheincorrectcharacteris selected.Eachpressofthisbuttonerasesone character,orpressthisbuttontoremovean addedpatternwhensewingcombinationsof charactersordecorativestitches.
- Sewingcorners

text_image
Technical diagram of a sewing machine with numbered components and directional arrows indicating motion or assembly steps.- Stop these sewing machine when you reach acorner.
- Lowertheneedleintothefabric manuallyorbypassingthe needleup/downbuttononce.
3.Raisethepressorfoot. - Usetheneedleasapivotand turnthefabric.
- Lower the presser foot and resumesewing.
Reverse

natural_image
Technical illustration showing a sewing machine needle stitching on fabric, and a close-up of a hand pressing a button on a door (no text or symbols present)Reversestitchingisusedtosecure thethreadsatthebeginningand attheendofaseam.
Pressthereversebuttonandsew 4-5stitches.
Themachinewillsewforward whenthebuttonisreleased.
- Freearm

natural_image
Line drawing of a sewing machine needle stitching a fabric pocket, with no text or symbols present.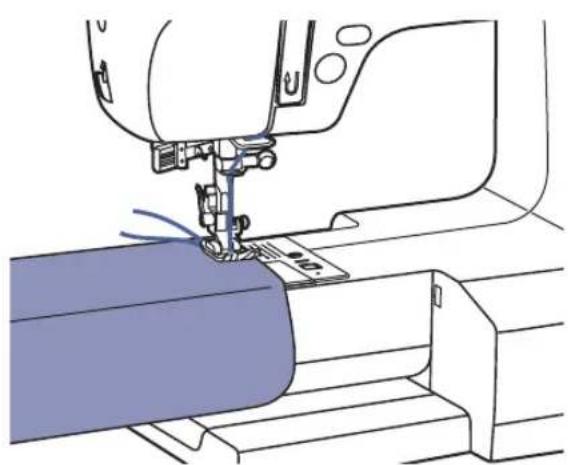
natural_image
Line drawing of a sewing machine needle stitching fabric (no text or symbols)Free-armsewingisconvenientforsewingtubularareassuchaspanthemsandcuffs.
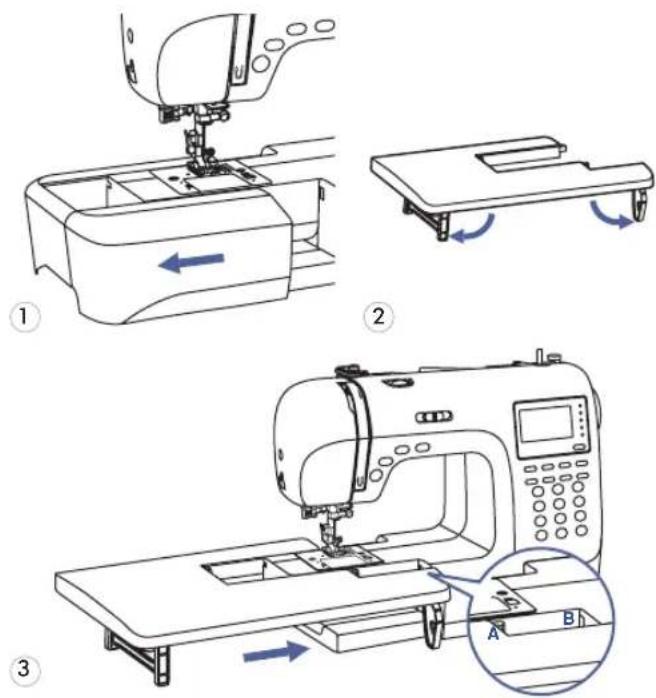
- Installingtheextensiontable
text_image
Technical diagram illustrating sewing machine operation with labeled steps and directional arrows- Sewingonheavyfabrics

text_image
Cardboard or thick fabric* The Extension Table is an optional accessory.
-
Pull theseewing table and accessory box off by sliding it to the left.
-
Follow the arrow, and stretch the foot of the extension table.
-
Snap(A) of the extension table into (B) of the machine.
Theblackbuttonontheleftsideoftheall purposepressorfootwilllockthepresserfoot inahorizontalpositionifyoupushitinbefore loweringthepresserfoot. Thisensureseven feedingatthebeginningofaseamandhelps whensewingmultiplelayersoffabricsuchas sewingoverseamsswhenhemmingjeans.
Whenyoureachthepointofanincreased thickness,lowertheneedleandraisethe presserfoot.Pressthetoeofthefootandpush intheblackbutton,thenlowerthefootand continuesewing.
The blackbuttonreleasesautomaticallyafter sewingfewstitches.
You also car place and the piece of fabric with the same thickness at the back of the seam. Or support the presser foot while feeding by hand and sewing toward the folded side.
text_image
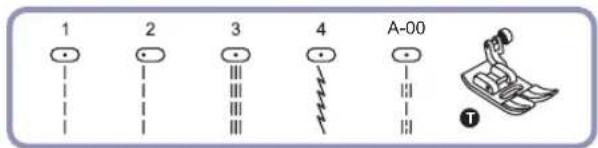
1 2 3 4 A-00 T
text_image
0.0 2.0 3.5 5.0 7.0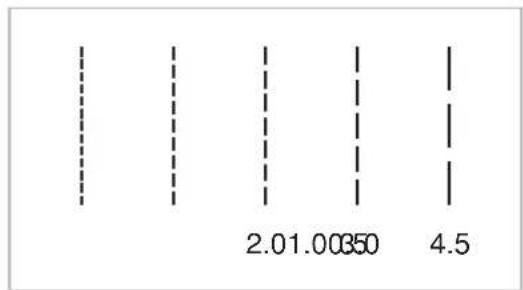
bar
| Category | Value | |---|---| | Bar 1 | 2.01.00350 | | Bar 2 | 4.5 | The values for the first bar are not explicitly labeled in the image. The other three bars are vertically aligned.Changingtheneedleposition
Thesesettingapplyonlyto DirectPatterns1-4,orA GroupPattern00 . The pre - set position is "3.5", c position.Whenyoupressthe"ofstitchwidth adjustmentbutton,theneedlepositionwillbemoved totheleft.Whenyoupressthe"+"ofstitchwidth adjustmentbutton,theneedlepositionwillbemoved totheright.OntheLCDscreen,thepointillustration andthenumberindicate the needleposition.
Changingthestitchlength
To shorterthestitchlengthpresshe"stitch lengthadjustmentbutton.Foralongerstitchlength, pressthe"+"ofstitchlengthadjustmentbutton. Generallyspeaking,thethickerthefabric,threadand needle,thelongerthestitchshouldbe.

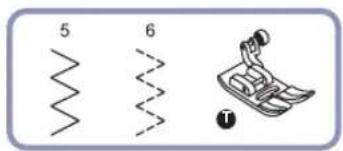
ZIGZAGSTITCHES
text_image
5 6 1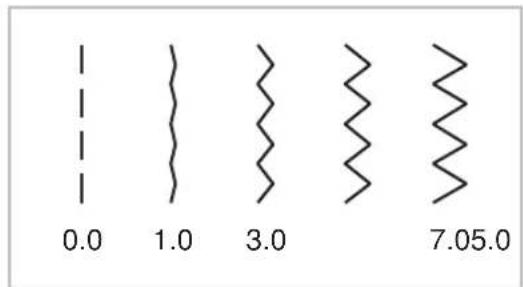
text_image
0.0 1.0 3.0 7.05.0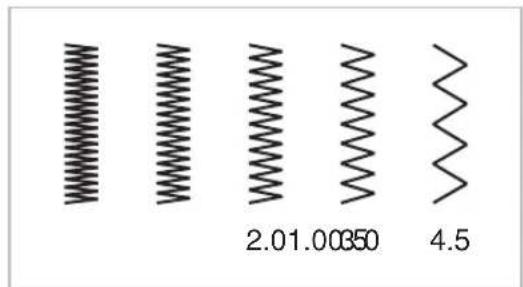
text_image
2.01.00350 4.5Adjustingthestitchwidth
Themaximumzigzagstitchwidthforzigzagstitching is"7.0";however,thewidthcanbereducedonany patterns.Thewidthincreasesasyoupressthe"+"ofstitchwidthadjustmentbuttonfrom"0.0-7.0".
Adjustingthestitchlength
The density of zigzag stitches increase as the setting of stitch length approaches "0.3". Neatzigzag stitches are usually achieved at 1.0-2.5". Closed up zigzag stitches (closetogether) are referred to as a sat in stitch.

text_image
3 4 T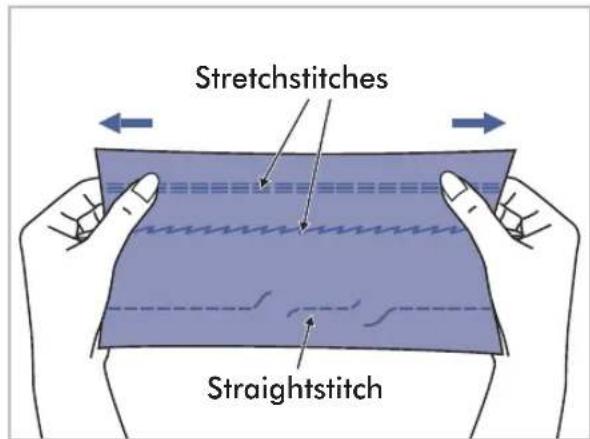
text_image
Stretchstitches Straightstitch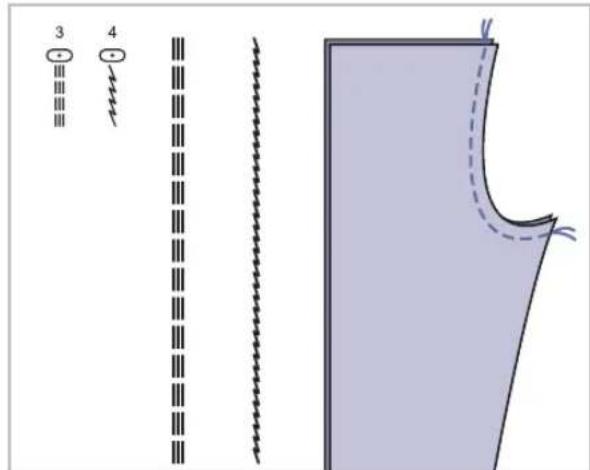
text_image
3 4Stretchstitchesarestrongandflexibleandwill givewiththefabricwithoutbreaking.Goodfor easytoravelandknitfabrics.Itisgoodfor joiningdurablefabricsuchasdenims.
Thesestitchescanalsobeusedasadecorative topstitch.
Straightstretchstitchisusedtoaddtriple reinforcementtostretchandhardwearing seams.
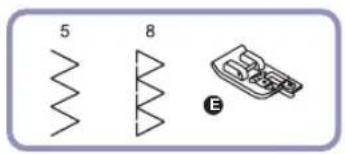
• Usingtheovercastingfoot
text_image
5 8 E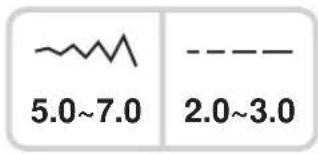
text_image
5.0~7.0 2.0~3.0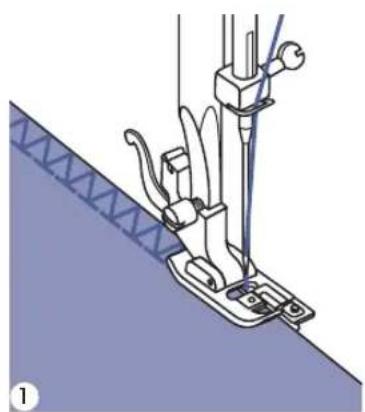
natural_image
Technical illustration of a sewing machine needle stitching fabric (no text or symbols)
natural_image
Diagram of a mechanical device with directional arrows indicating movement or force (no text or symbols present)
natural_image
Pure electrical circuit lines without any symbols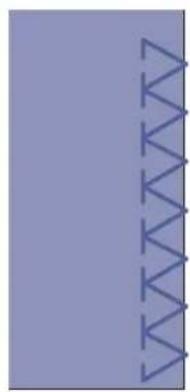
natural_image
Abstract geometric pattern with purple background and blue zigzag lines (no text or symbols)7 Changethe presserfoot to the overcasting foot.
2 Sew the fabric with the fabricated ge against the guide of

Attention: The overcasting foot should be used to sew with Direct Patterns 5 and 8 only. Do not setthestitchwithnarrowerthan"5.0",asitispossiblethattheneedlecouldhitthepresserfoot andbreakwhensewingotherpatternsandwidthsettings.
- Usingtheallpurposefoot

text_image
6 A-02 T
text_image
2.5~4.5 2.0~3.0
natural_image
Line drawing of a sewing machine needle stitching fabric (no text or symbols)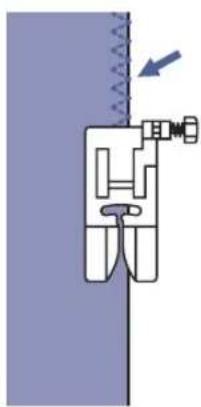
natural_image
Pure mechanical diagram showing a piston-cranked joint with spring and arrow indicating force (no text or symbols)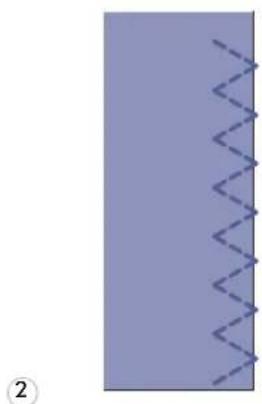
natural_image
Pure electrical circuit lines without any symbols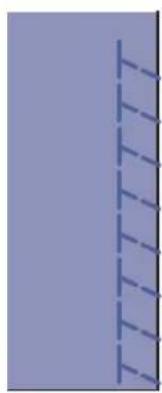
natural_image
Pure vertical line pattern with no text, numbers, or symbols7 Changethe presserfoot to the all purpose foot.
2 Sewing the overcasting along the edge of the fabric so the fabric otherightside.
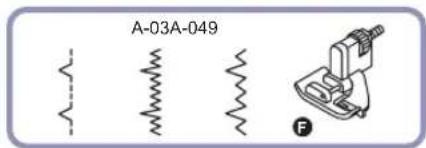
text_image
A-03A-049 F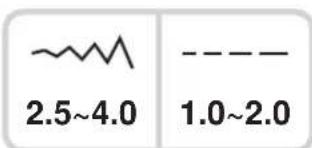
text_image
2.5~4.0 1.0~2.09: Blindhemforwovenfabrics
A-03: Blindhemforstretchfabrics
A-04: Blindhemforstretchfabrics
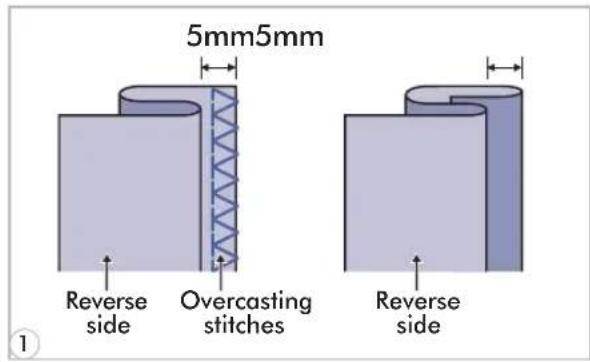
text_image
5mm5mm Reverse side Overcasting stitches Reverse sidePleaseNote: It takes practicetosewblind hems. Always make asewing test first.
7 Foldthefabricasillustratedwiththewrong sideuppermost.

text_image
Technical diagram showing sewing machine tool and mechanical assembly with labeled parts a and b2 Placethefabricunderthefoot.Turnthe handwheelcounter-clockwisebyhanduntil theneedleswingsfullytotheleft.Itshould justpiercethefoldofthefabric.lfitdoes not,adjustthestitchwidthaccordingly.
3 Adjusttheguide(b)byturningtheknob(a) sothattheguidejustrestsagainstthefold.

natural_image
Mechanical sewing machine needle stitching fabric (no text or symbols visible)4 Sewslowly, guiding the fabric carefully along the edge of the guide.
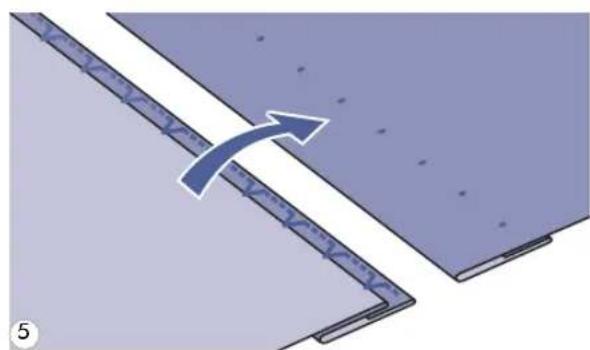
natural_image
Diagram showing a curved arrow pointing from a layered structure, no text or symbols present5 Turnoverthefabric.

natural_image
Simple line drawing of a mechanical component with a circular element and a 3D block (no text or symbols)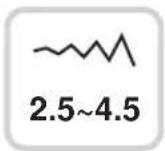

text_image
25 ~~ 3.5 ××2-4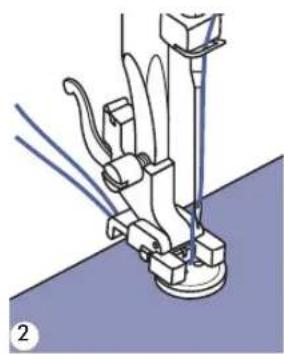
natural_image
Mechanical assembly diagram showing a sewing machine needle inserted into a base plate (no text or symbols visible)
text_image
2.5~4.5 ③ ④
natural_image
Mechanical sewing machine needle stitching a blue fabric surface with circular components (no text or symbols visible)
natural_image
Three circular diagrams with blue molecular or atomic symbols inside, no text or labels present1 Selectthepattern25fromtheGroup Patterns"A"togetthebuttonsewingstitch. Changethepressorfoottothebutton sewingfoot. Movethedropfeedleverto""tolower thefeeddogs.
2 Positiontheworkunderthefoot.Placethe buttoninthedesdesiredposition,lowerthefoot.
3 Adjustthestitchwidthto"2.5-4.5" accordingtothedistancebetweenthetwo holesofthebutton.
4 Tumthehandwheelachedthatneedle goescleanlyintotheleftandrightholesof thebutton.
5 Beforesewing, press the Auto-lock button to sewreinforcement stitches automatically at the beginning and at the end of the stitch. Ifashank is required, placeadarning needle on top of the button and sew.
6 Forbuttonswith4holes,sewthroughthe fronttwoholesfirst,pushworkforwardand thensewthroughthebacktwoholes.

text_image
0 A-14A-14 A-15 A-16 A-17 A-18 A-19 A-20 A-21
text_image
2.5~7.0 0.3~1.0 3.0~7.0 0.3~1.0 2.5~5.5 0.3~1.0 5.5~7.0 0.3~1.0 3.0~7.0 1.0~2.0 3.0~7.0 1.0~3.00: Forlighttomediumweight fabrics
A-14: Forlightormediumweight fabrics
A-15: Forlightormediumweight fabrics
A-16: Forheavierweightfabrics
A-17: Forlightormediumweight fabrics
A-18: Forheavyweightfabrics
A-19: Forjeansortrousers
A-20: Forjeansorstretchfabricwith acoarseweave
A-21: Forstretchfabric

PleaseNote: Beforesewingabuttonholeonyourproject, practiceonascrappieceofthe sametypeoffabric.

natural_image
Simple diagram with two vertical lines and a dashed line below, no text or symbols present.1

natural_image
Simple diagram with two horizontal lines and a vertical dashed line on the left (no text or symbols)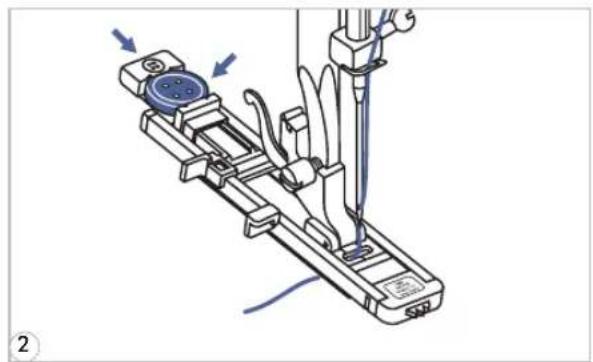
natural_image
Mechanical device with blue circular component and mechanical arms, no visible text or symbols1 Markthepositionsofthebuttonholeonthe fabric.
Themaximumbuttonholelengthis3cm(13/16inch).(Totalofdiameter+thicknessof button.)
2 Attachthebuttonholefoot, thenpullout the buttonholderplate and insert the button. Thesize of the button hole is determined by the button inserted in the button plate.
Thethreadshouldbepassedthroughthe holeinthepresserfoot,thenbeplaced underthefoot.
text_image
Starting point
text_image
PUSH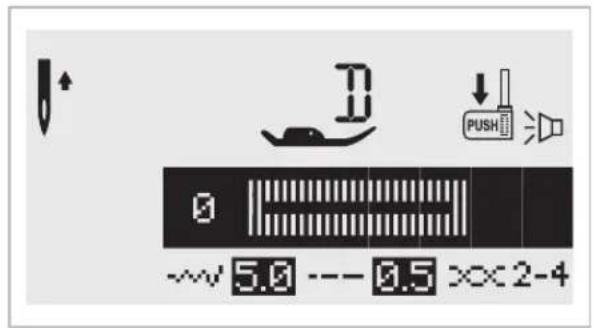
text_image
0 5.0 --- 0.5 ×× 2-4
natural_image
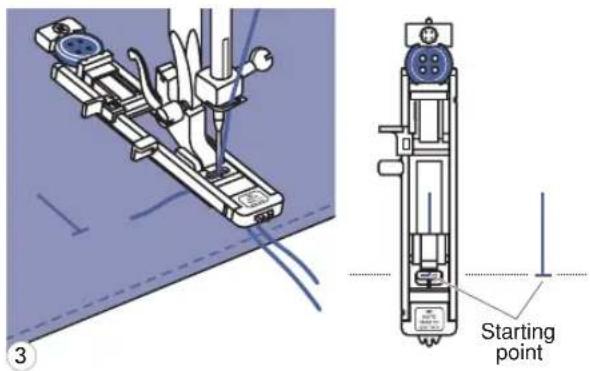
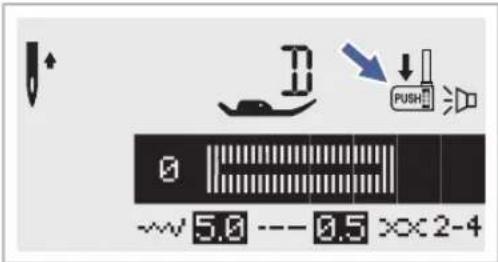
Illustration of a sewing machine needle stitching fabric, with a hand pointing to the seam (no text or symbols present)3 Selectthebuttonholestitch.Adjustthestitch widthandthestitchlengthtothedesired widthanddensity.
4 Positionthefabriunderthepresserfootso thatthecenterline'smarkisaligningwiththe centerofthebuttonholefoot. Lowerthebuttonholelever,makingsureitis positionedbehindthebracketonthe buttonholefoot,asillustrated.

Please Note: When you select any buttonhole pattern, the LCD screen will display the figure ^™ , tore hindyouto lower the button hole lever.
5 Whilelightlyholdingtheendofupper threadandstartsewing.

text_image
0 A-14A-14-16 A-17 A-15 A-18 A-19 A-20 A-21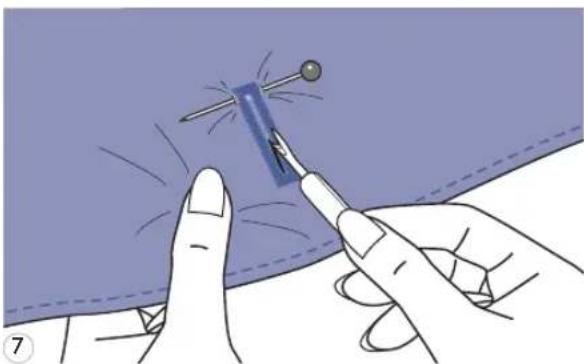
natural_image
Illustration of a hand holding a pen applying material to a blue tool, with no visible text or symbols.6 Buttonholesaresewnfrom presserfoottotheback,asshown.
7 Cut the center of the butt carefulnottocutanystitchesoneitherside. Useapinasastopperatthebartackso youdonotcuttoomuch.
Makingcordedbuttonholes
Whensewingcordedbuttonholes, hookaheavythreadorcordunderthebuttonhole foot.
natural_image
Technical line drawing of a mechanical device with attached wiring and a side-view view (no text or symbols)7 Attachthebuttonholefootandhookthe gimpthreadontothebackofthepresser foot.Bringthetwogimpthreadendstothe frontofthefootandinsertthemintothe grooves, thentemporarilytiethemthere. Lowerthepresserfootandstartsewing. Setthestitchwidthtomatchthediameter of thegimpthread.

natural_image
Illustration of a hand holding a pen with scissors, showing a process step (no text or symbols)2 Oncesewingiscompleted, pullthegimp threadgentlytoremoveanyslack, thentrim offanyexcess.

PleaseNote: It is suggested that you use interfacing on the backside of the fabric.

text_image
A-22 1.0~3.0 0.3~1.0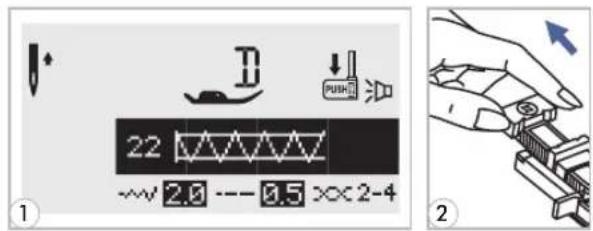
text_image
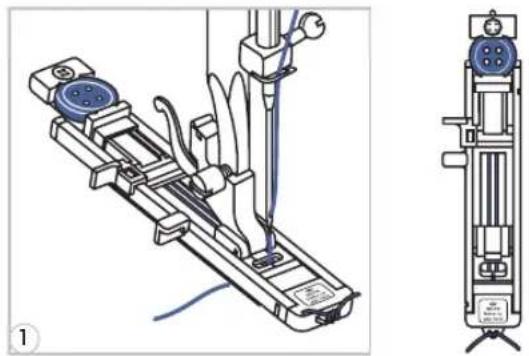
22 2.0 --- 0.5 ××2-41 Select p at fromthePate2ns of Group "A"togetthebartackstitch.Changethe presserfoottothebuttonholefoot.
2 Pull the button holder to the buttonguideplate on the button hole foot to the desired length.
3 Position the fabric so that (1/16")infrontofwhereyouwant the sewing to start, and then lower the presser foot.
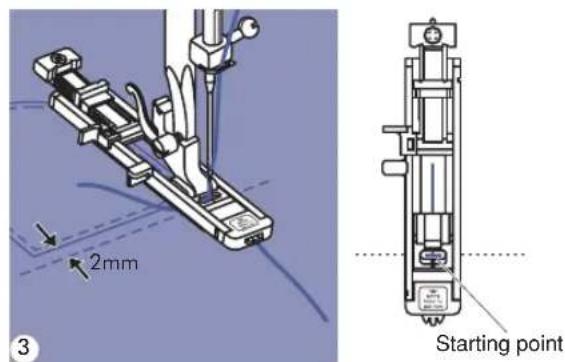
text_image
2mm Starting point
text_image
PUSH 44 Passtheupperthreadaddownt holeinthepresserfoot.Pulldownthe buttonholelever.Thebuttonholeleveris positionedbehindthebracketonthe buttonhole foot. Gently hold the end of the upperthreadin yourlefthand, andthen startsewing.
text_image
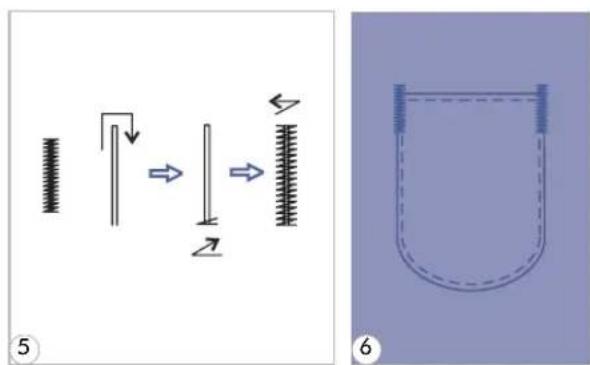
Diagram illustrating a mechanical or fluid system with spring-loaded components and a U-shaped container, labeled with numbers 5 and 6.5 Bartackstitchesaresewn.
6 As an example, the illustration shows the procedure for sewing bar tacks at pocket corners.
text_image
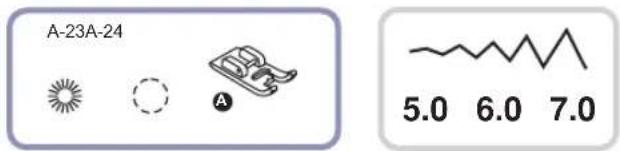
A-23A-24 5.0 6.0 7.0
text_image
23 ~~7.0 XX2-4
flowchart
graph LR
    A["A"] --> B["B"]
    B --> C["C"]
    A --> D["Dashed Circle"]
    B --> E["Dashed Circle"]
    C --> F["Dashed Circle"]

flowchart
graph TD
    A["Start"] --> B["Arrow to Star"]
    B --> C["Arrow to Radial Wave"]
    C --> D["Arrow to Star"]
    D --> E["Arrow to Circle"]
    E --> F["Arrow to Star"]
    F --> G["Arrow to Star"]
    G --> H["Arrow to Star"]
    H --> I["Arrow to Star"]
    I --> J["Arrow to Star"]
    J --> K["Arrow to Star"]
    K --> L["Arrow to Star"]
    L --> M["Arrow to Star"]
    M --> N["Arrow to Star"]
    N --> O["Arrow to Star"]
    O --> P["Arrow to Star"]
    P --> Q["Arrow to Star"]
    Q --> R["Arrow to Star"]
    R --> S["Arrow to Star"]
    S --> T["Arrow to Star"]
    T --> U["Arrow to Star"]
    U --> V["Arrow to Star"]
    V --> W["Arrow to Star"]
    W --> X["Arrow to Star"]
    X --> Y["Arrow to Star"]
natural_image
Illustration of a hand holding a pen tip over a purple surface, with a small blue spot at the bottom (no text or symbols)A-23: Selectforsewingeyeletsonbelts,etc
A-24: Selectforsewingeyeletsonbelts,etc
1 Select pattern 2 3 or 2 4 from Patterns'A'togettheeyeletstitchAttach presserthefoot"A".
2 Press the "or" + "stitc adjustmenttobuttonselecttheeyeletsize.
Sizeofeyelet.
A. Large: 7.0mm (1/4 inch).
B. Medium: 6.0mm (15/64inch).
C.Small:5.0mm(3/16inch).
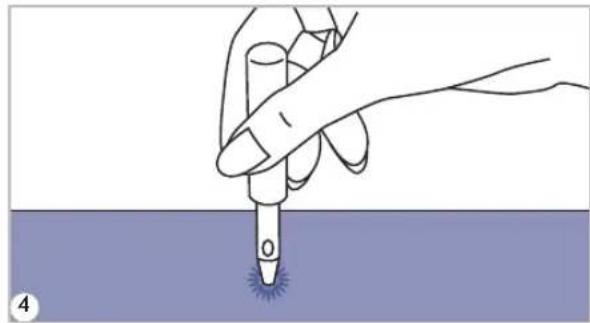
3 Lower the needle into the fabric at the beginning of the stitching, and then lower the presser footlever.
Once sewing is completed, the machine automatically sews reinforcement stitches, thenstops.
4 Make a hole at the center usi punch.
*Eyelet punch is not included with the machine.
text_image
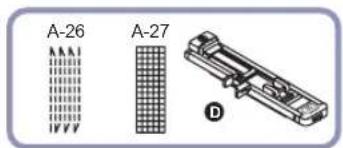
A-26 A-27 D
text_image
3.5~7.0 1.0~2.0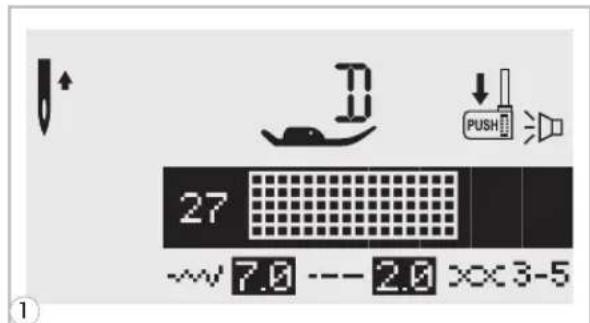
text_image
27 ~v 7.0 --- 2.0 x×3-5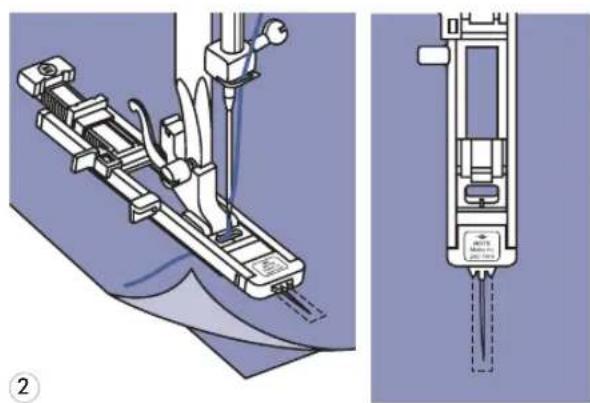
natural_image
Technical illustration of a mechanical device with attached tubing and a close-up view showing internal components (no text or symbols)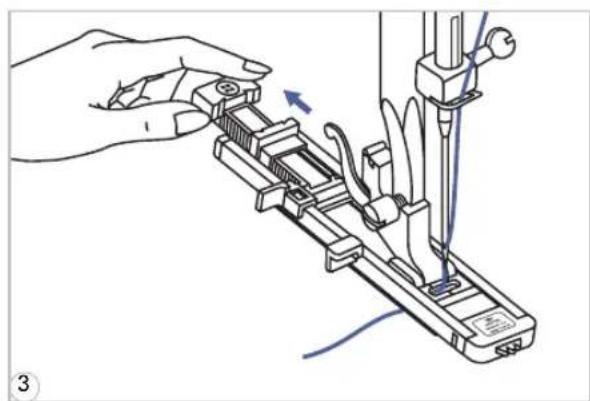
natural_image
Illustration of a hand using a tool to adjust or install a mechanical component, with no visible text or symbols.
text_image
Stop a Start b a Start b Stop Stop1 Select pattern 26 or 27 from Patterns'A'togetthedarningstitch. Changethepressorfoottothebuttonhole foot.
2 Baste the upper fabric an reinforcementfabrictogether.Selectthe widthofthepatternbyusingthestitchwidth button.Lowerthepresserfootoverthe centerofthetear.
- Pullthebuttonholdertorear.Setthebutton guideplateonbuttonholefoottothe desiredlength.
4 The size of the darning cycle is variable. However, themaximumstitchlengthis 2.6cm (1 inch) and the maximum stitch widthis7mm(9/32inch).
a. Thelengthofdarningpattern. b. Thewidthofdarningpattern.

text_image
2mm 5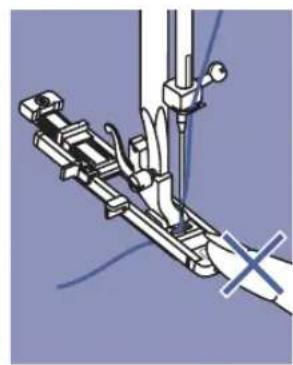
natural_image
Mechanical assembly diagram showing a linkage mechanism with no visible text or symbols
text_image
0.5 PUSH 6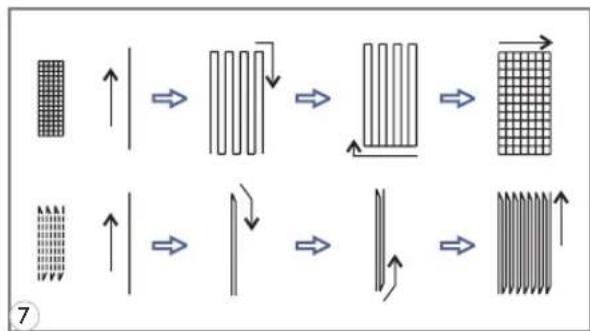
flowchart
graph TD
    A["Heat Grid Structure"] --> B["Intermediate Heat Transfer"]
    B --> C["Intermediate Heat Transfer"]
    C --> D["Intermediate Heat Transfer"]
    D --> E["Intermediate Heat Transfer"]
    E --> F["Intermediate Heat Transfer"]
    style A fill:#f9f,stroke:#333
    style B fill:#ccf,stroke:#333
    style C fill:#cfc,stroke:#333
    style D fill:#fcc,stroke:#333
    style E fill:#cff,stroke:#333
    style F fill:#ffc,stroke:#333
natural_image
Geometric diagram of a cross-shaped grid with a central circular outline and dashed inner circle (no text or symbols)
natural_image
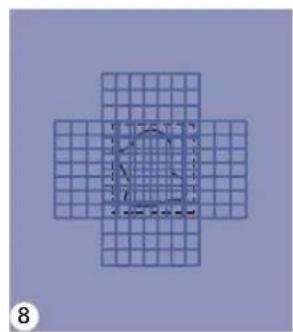
Vertical line with arrow inside a grid pattern (no text or symbols)5 Position the fabric so that (1/16inch)infrontoftheareatobedarned, and then lower the presser footlever.

PleaseNote: When lowering the presser foot, donot push in the front of the presser foot, otherwise arning will not besewn with the correct size.
6 Passtheupperthreaddownthole in the presser foot. Pull down thebuttonhole lever. The buttonhole lever ispositionedbehindthebracketonthebuttonhole foot. Gently hold the end of theupper thread in your left hand, and thenstartsewing.

PleaseNote: When you select any buttonhole pattern nor describing pattern, the LCD screen will display the figure "to remind you to lower the button hole lever."
7 Darning stitches a resewnf the presserfoottotheback,asshown.
8 If the areatobesewnislarge severaltimesacrosstheareatoachievethe desiredresult.

text_image
1 ①
text_image
3.5 1.5~3.0- Insertingacenteredzipper

text_image
2 inch 1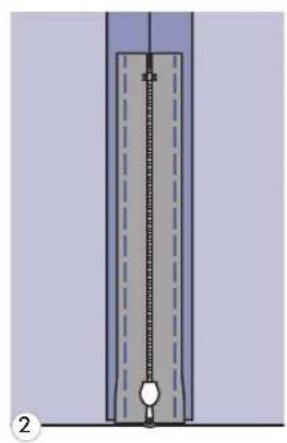
natural_image
Pure diagram of a vertical structure with internal dashed lines and a central circular element, no text or symbols present.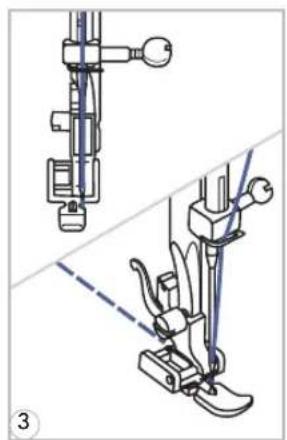
natural_image
Technical line drawing of a sewing machine needle and foot (no text or symbols)
natural_image
Technical illustration of a sewing machine needle and foot, showing mechanical components and alignment lines (no text or symbols)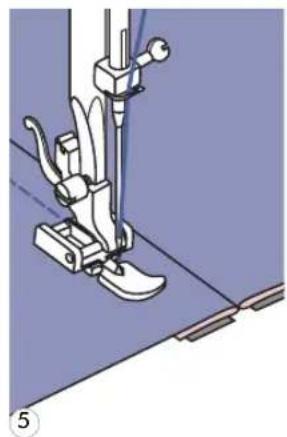
natural_image
Mechanical sewing machine needle stitching a blue surface, no text or symbols visible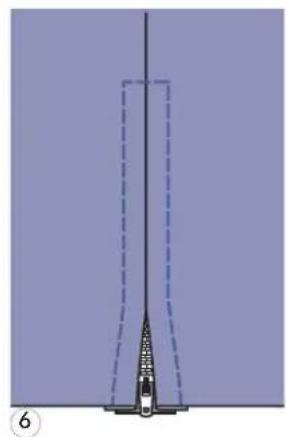
natural_image
Pure diagram of a vertical structure with dashed lines and a central vertical element, no text or symbols present.Attention:Zipperfootshouldbeusedwith machinesetforstraightstitchincenter needleposition.Itispossiblethattheneedle couldhithepressorfootandbreakwhen sewingotherpatterns.
7 Bastethezipperopening
2 Pressopentheseamallowar zipperfacedownontheseamallowance withtheteethagainsttheseamline.Baste thezippertapeinplace.
3 Attach the zipper per foot. Atta of the presser footpinto the holder when sewing the left side of the zipper.
4 Attach the left side of the presser footholder when sewing the rightside of the zipper.
5 Stitch the left side of the zipper from the bottomofthezippertothetop.
6 Stitch acrossthelowerend zipper.Removethebastingandpress.
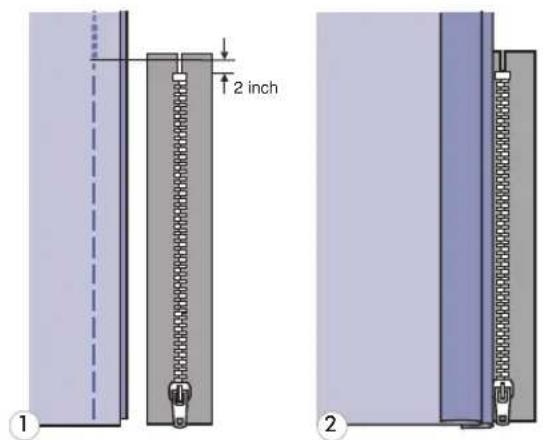
- Insertingalappedzipper
text_image
2 inch ① ②
natural_image
Technical illustration of a sewing machine needle and base assembly (no text or symbols)
natural_image
Two technical diagrams showing a mechanical assembly with dashed lines indicating alignment or positioning, no text or symbols present.1 B a s t e t h e z i p p e r o p e n i n g o n
2 Foldback to the left seamal undertherightseamallowancetoform 3mm(1/8inch)fold.
3 Attach the zipper per foot. Atta of the presser footpinto the holder when sewing the left side of the zipper. Attach the left side of the presser footpinto the presser footholder when sewing the right side of the zipper.
4 Stitch the left side of zipper top.
5 Turn the fabric rightside out the lower end and right side of zipper.
6 Stop about 5 cm (2 inches) fr zipper.Removethebastingandopenthe zipper.Stitchtheremainderoftheseam.
natural_image
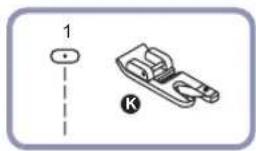
Simple line drawing of a mechanical component with a dashed line and a labeled symbol (K), no text or symbols present.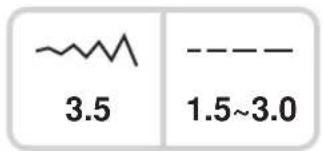
text_image
3.5 1.5~3.0
natural_image
Illustration of a hand holding a pen or ruler over a surface, no text or symbols present
natural_image
Illustration of hands using a sewing machine to cut fabric (no text or symbols visible)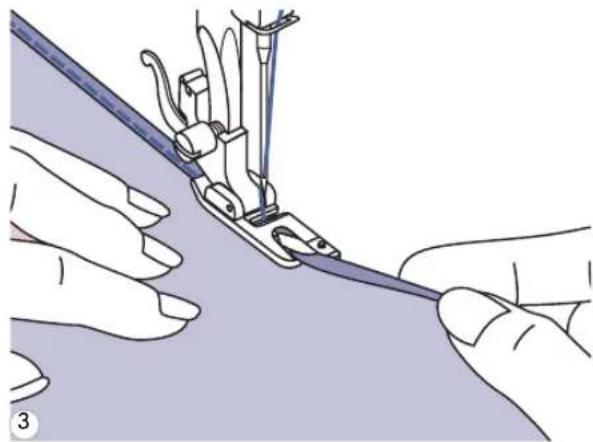
natural_image
Illustration of hands using a sewing machine to handle fabric (no text or symbols visible)* The Rolled hem foot is accessory.
7 Fold the edge of the fabric (1/8inch), then fold it over again 3mm (1/8 inch) for about 5cm (2inches) along the edge of the fabric.
2 Insert theneedleinto the fo handwheeltowardyou,andlowerthe presserfoot.Sewseveralstitchesandraise thepressorfoot.
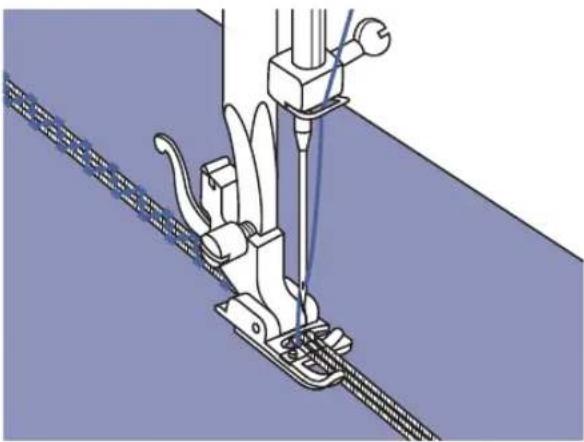
Insertthefabricfoldintothespiralopening oftherolledhemfoot.Movefabricback andforthuntilthefoldformsascrollshape.
3 Lower the presser foot and s slowlyguidingtherawedgeofthefabricin frontoftherolledhemfoot,guidingit evenlyintothescrollofthefoot.
Sewoverone, twoorthreestrandsofcordtoembellishfabrics. Pearlcotton, embroideryflossorfine woolyarncanbeusedforcording.
- Singlecording

*The Cordingfootisanoptionalaccess

natural_image
Technical illustration of a sewing machine needle stitching fabric (no text or symbols)Markthedesignonthefabric.Insertthecordin thecentergrooveofthecordingfootfromthe rightsideopening.Pullthecordabout5cm(2 inches)behindthefoot.
Thegroovesofthefootwillholdthelengthof thecordinplacewhilethestitchesarebeing formedoverthecord.
Selectthestitchandadjustthestitchwidthso thatthestitchesarejustcoveringthecord. Lowerthefootandsewslowly,guidingthecord overthedesign.
- Triplecording

text_image
6A-10A-43Pushthesewingthreadtotheleftandinsert threecordsintothegroovesofthefootandpull about5cm(2inches)ofthecordsbehindthe foot.Selectthedesiredpatternandadjustthe stitchwidthsothatthestitchesarejustcovering thecords.Lowerthefootandsewslowly guidingthecords.
natural_image
Technical illustration of a sewing machine needle stitching fabric (no text or symbols)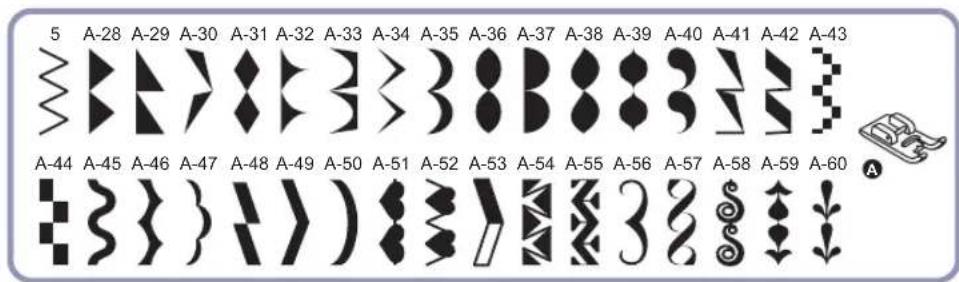
text_image
5 A-28 A-29 A-30 A-31 A-32 A-33 A-34 A-35 A-36 A-37 A-38 A-39 A-40 A-41 A-42 A-43 A-44 A-45 A-46 A-47 A-48 A-49 A-50 A-51 A-52 A-53 A-54 A-55 A-56 A-57 A-58 A-59 A-60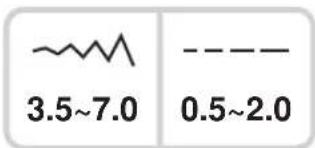
text_image
3.5~7.0 0.5~2.0
natural_image
Illustration of a sewing machine needle stitching fabric (no text or symbols)Usethesatinstitchfootforsatinstitchingand sewingdecorativestitches. Thisfoothasa grooveontheundersidewhichallowsdense stitchingtopassfreelyunderneath.
Tohanghesdinecoxelkpoten,
youmayadjustthelengthandwidthofthe patternbypassingthestitchlengthandwidth adjustmentbuttons.Experimentbysewingon fabricscrapsfirst,untilyouachievethedesired lengthandwidth.

PleaseNote: Whensewingverylight weightfabrics, it is recommended that you use interfacing or stabilizer on the backside of the fabric.
natural_image
Three technical diagrams showing mechanical components: a pin-like component, a clamp-like bracket, and a bent tool (no text or labels)
text_image
~~ 3.5 1.0~3.0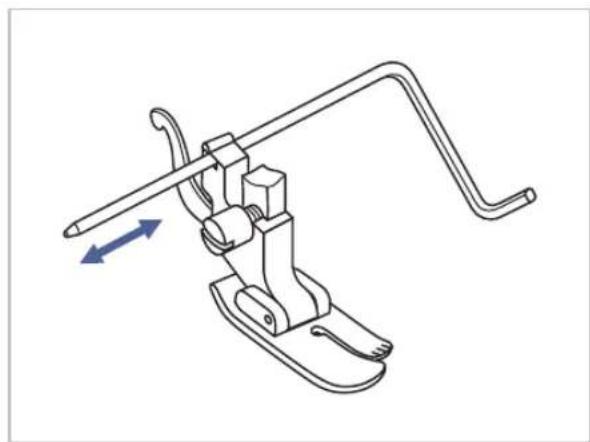
natural_image
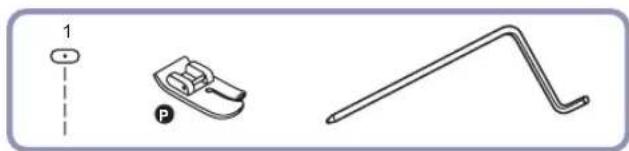
Technical line drawing of a mechanical clamp or lever mechanism with directional arrows indicating movement (no text or symbols)* The quiltingfootisanoptionalaccess
Inserttheedge/quiltingguideinthepresser footholderasillustratedandsetthespaceas youdesire.
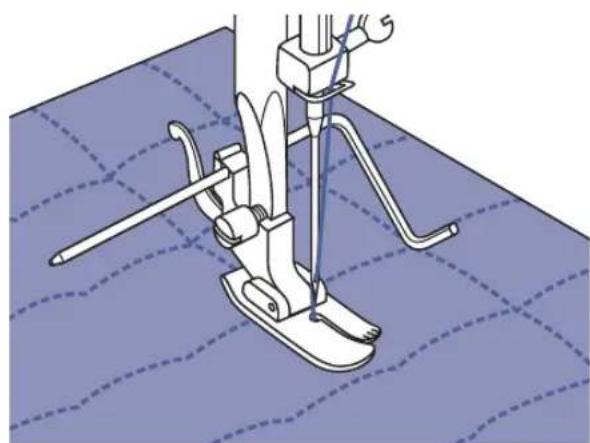
natural_image
Technical illustration of a sewing machine needle stitching fabric (no text or symbols)Sewthefirstrowandmoveoverthefabricto sewsuccessiverowswiththeguideridingalong thepreviousrowofstitching.


text_image
1.0 4.5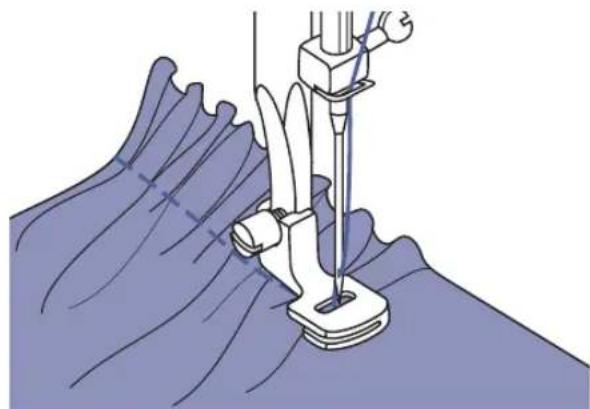
natural_image
Medical procedure illustration showing needle insertion into a surgical instrument on a patient's abdomen (no text or labels)
natural_image
Technical illustration of a sewing machine needle stitching fabric, showing mechanical components and fabric texture (no text or symbols)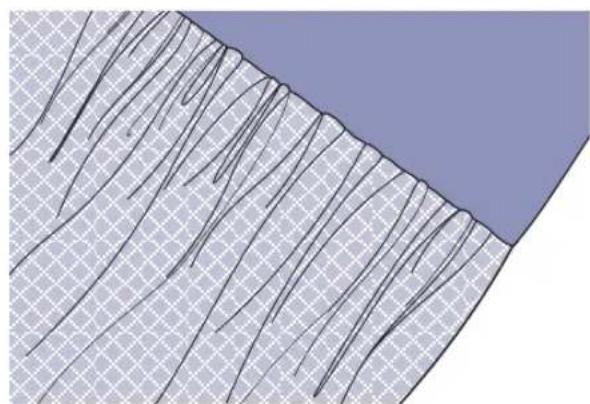
natural_image
Geological cross-section diagram showing layered rock strata with no text or symbols*The Gatheringfootisanoptionalacce
Gatheredfabric
Removethepressorfootholderandattachthe gatheringfoot.
Placefabrictobegatheredunderthepresser foot.
Sewarowofstitching. Thestitcheswill automaticallycausethefabrictogather.
Adjust the upper thread tensionial to achieve the amount of fullness desired. Less tension will result in softer gathers, more tension will result in fuller gathers.
Thestitchlengthdialcanalsobeusedtoadjust fullness. Thelongerthestitchlengthsettingis, themorefullnessthatisachievedinthegathers.
Gatherandattachfabricinonestep
Lookcloselyatthegatheringfoottoseeaslot onthebottom.
Whenusingtheslot,youcangatherthebottom layerofthefabricwhileattachingittoaflattop layer,suchasthewaistbandonadressbodice.
- Remove the presser foot holder and attach gatheringfoot.
- Place the fabric to be gathered with right sideupunderthefoot.
- Place top layer of the fabric right side down intheslot.
- Guide the two layers as illustrated.

Note: When testing machine for adjustmentstoachieveddesiredfullness,work with 10"incrementsofthefabric,trimsor elastic. Thismakesiteasiertodeterminethe adjustmentsandhowmuchchangeis neededforyourproject.Alwaystestonyour projectfabricandonthesamegrainlineas willbeusedinyourfinishedproject.

Note: Sewslowtomediumspeedforbetter fabriccontrol.

text_image
A-09A-10 T A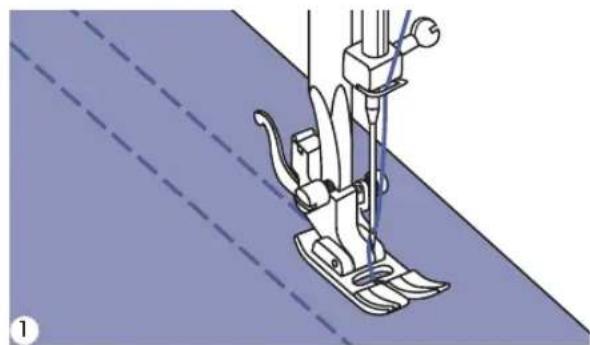
natural_image
Line drawing of a sewing machine needle stitching fabric (no text or symbols)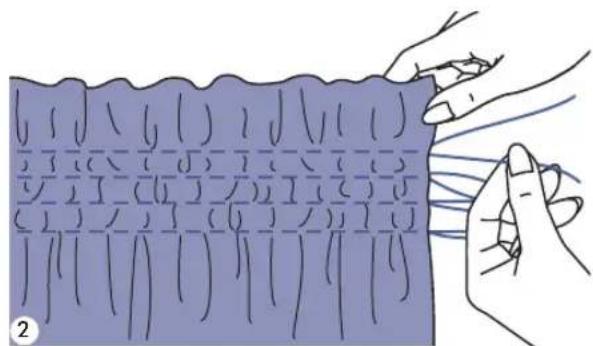
natural_image
Illustration of hands holding a blue rectangular object with grid-like patterns, no text or symbols present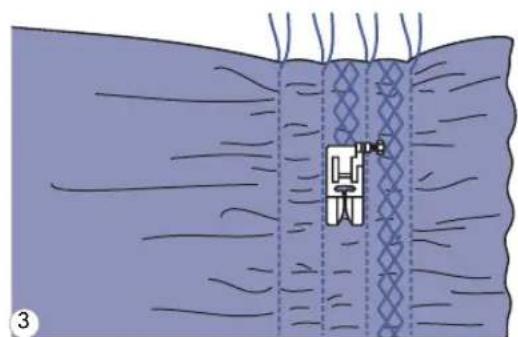
natural_image
Diagram of a sewing machine needle stitching fabric, showing mesh pattern and no text or symbols
natural_image
Illustration of hands tying a knitted fabric with visible stitching pattern (no text or symbols)1 U set the all purpose foottose 1cm(3/8") apart, acrossthearea. It maybe helpfultoreducetheneedlethreadtension slightly, so that the bobbinthread maybe drawnlatertogatherthefabric.
2 Knotthethreadsalongonee bobbinthreadsanddistributethegathers evenly.Securethethreadsattheotherend.
3 Reduce the tension, if necessary decorative pattern stitches between the straight seams.
4 Pullout the gathering stitc

text_image
1 5 3.5~5.0* The Darningfootisanoptionalaccess

text_image
a bMovethedropfeedleverto" "tolower the feeddogs.
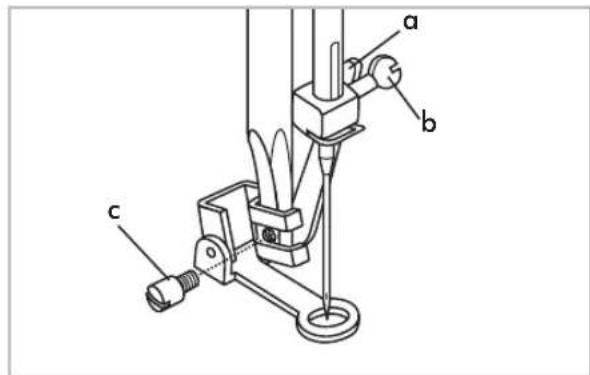
text_image
a b cRemovethepressorfootholder, and attach the darningfoottothepresserfootholderbar. The lever(a) should be behind the needle clamp screw(b). Pressthedarningfooton firmly from behind with your index finger and tighten the screw(c).
Darning

PleaseNote: Freemotiondarningisaccomplishedwithoutthesewingmachineinternalfeed system.Movementofthefabriciscontrolledbytheoperator.Itisnecessarytocoordinate sewingspeedandmovementofffabric.
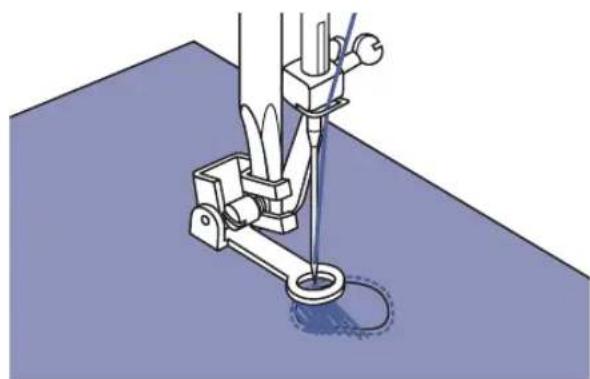
natural_image
Mechanical sewing machine needle stitching a blue fabric surface (no text or symbols visible)Firstsewaroundtheedgesoftheholetosecure thethreads.Stitchacrosstheopeningmoving thehoopbackwardandforwardunderthe needle.Overlaptheoutlinestitchingateach endofthearea,keepingthelinesofstitching closelyspacedandeveninlength.Whenthe openingisfilled,turntheworkandcoverthe areawithcrosswiselinesofstitching.
- Embroidery

natural_image
Illustration of a sewing machine needle stitching a circular base with a flower pattern (no text or symbols)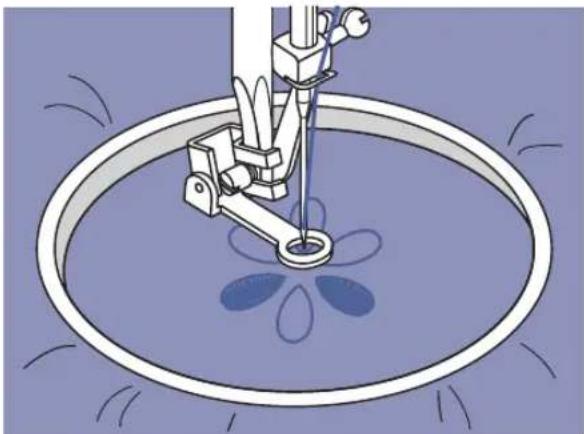
natural_image
Illustration of a sewing machine needle stitching a floral pattern in a circular basin (no text or symbols)Stitchalongtheoutlineofthedesignbymoving theembroideryhoop.Selectzigzagstitch patternandadjustthestitchwidthhasdesired. Whensewing,makesuretomaintaina constantspeed.
Fillinthedesignworkingfromtheoutline towardstheinside.Keepthestitchesclose together.
You wil gelongestitches by moving the hoop faster and shorter stitches by moving the hoop moreslowly.
Securewithreinforcementstitchesattheendby pressingtheAuto-lockbutton.
Monogramming

text_image
AnnieSelectthezigzagstitchpatternandadjustthe stitchwidthhasdesired.Sewataconstantspeed, movingthehoopslowlyalongthelettering.
Whentheletterisfinished.Securewitha reinforcementstitchesattheendbypressAuto-lockbutton.
natural_image
Technical illustration of a mechanical component with a dashed line indicating a dimension (no text or symbols present)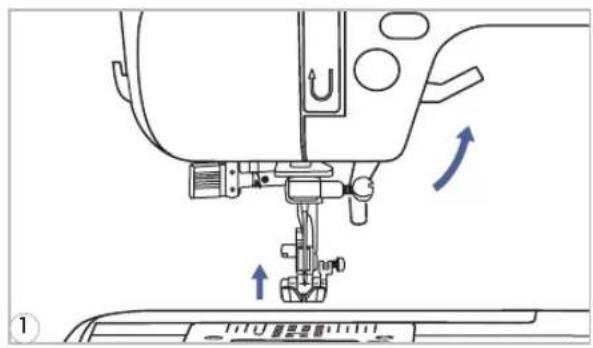
text_image
Technical diagram of a sewing machine with directional arrows indicating movement or force, labeled with Chinese characters.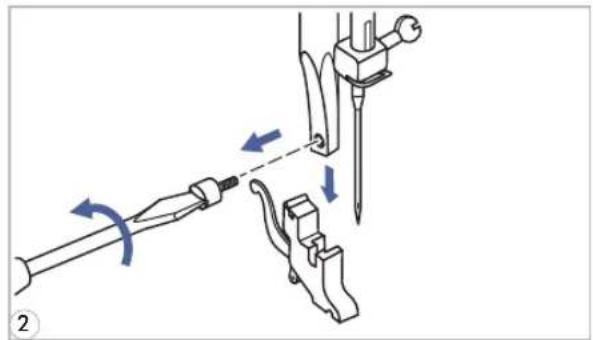
natural_image
Mechanical assembly diagram showing tool manipulation with arrows indicating motion (no text or symbols)
text_image
Technical diagram of a sewing machine with labeled parts (a, b, c) and directional arrows indicating motion or assembly.
natural_image
Mechanical sewing machine needle stitching a blue fabric surface (no text or symbols visible)*The Walkingfootisanoptionalaccessory.

PleaseNote:Alwaystrytosewfirst withoutthewalkingfootaccessorywhich shouldbeusedonlywhennecessary.
Itiseasiertoguidethefabricandyouhavea betterviewoftheseamwhenusingthe standard,regularfootonyourmachine.Your sewingmachineoffersexcellentstitchquality onawiderangeoffabricsfromdelicate chiffonstomultiplelayersofdenim.
The Walkingfootattachmentequalizes the feedingofthefabriclayers.Itimprovesthe matchingofplaids,stripesandpatterns.It alsohelpstopreventunevenfeedingof difficultornappedfabrics,suchasvelvetor corduroy.
1 Lift the presser foot lifter tor a is the presser foot bar.
2 Remove the presser foot unscrewing(counterclockwise)thepresser barattachingscrew.
3 AttachtheWalkingfoottothemachineas follows:
- The arm (a) should fit into above the needlescrewandclamp(b).
-Slidetheattachinghead(c)fromleftto right,sothatitisfittedontothepresser footbar.
-Lowerthepresserfootbar. - Replace and tighten (clockwise) the presserbarattachingscrew.
-Makesureboththeneedlescrew and the presser bar attaching screw are tightly secured.
4 Drawthebobbinthreadupandplaceboth thebobbinthreadandtheneedlethread behindthewalkingfootattachment.

text_image
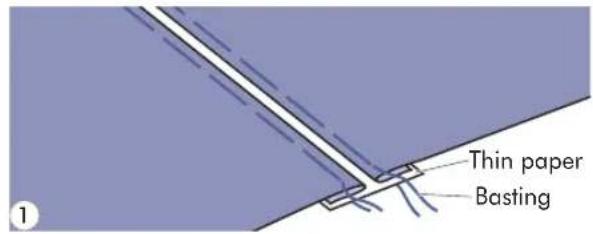
Thin paper Basting
natural_image
Mechanical sewing machine diagram showing needle and handle mechanism (no text or labels)
natural_image
Pure diagram of a vertical structure with diagonal hatching, no text or symbols present7 Separatethefoldededgesofthefabric pieceswithagapof4mm(1/8inch)and bastethemontoapieceofthinpaperor water-solublestabilizersheet.
2 Align the center of the presser foot with the centerofthe twopiecesof fabricandbegin sewing.
3 Aftersewing, removethepaper.

DECORATIVETOPSTITCHING

text_image
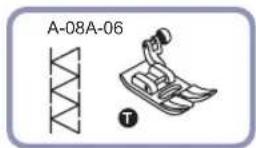
A-08A-09A-86A-10A-61
natural_image
Four abstract geometric patterns: a zigzag line, a chevron, a crosshatch, and a stylized object with a handle (no text or symbols)
natural_image
Simple geometric diagram showing a vertical dashed line dividing a rectangle into two parts (no text or symbols)
natural_image
Diagram showing a curved surface with an arrow indicating rotation, no text or symbols present
natural_image
Illustration of a sewing machine needle stitching fabric, showing measurement setup (no text or symbols)1 Placethetwofabrics,rightsidestogether, andsewusingastraightstitch.
2 Opentheseamallowanceandpressitflat.
3 Workingontherightsideofthefabric, placethecenterofthepresserfootonthe seamlineofthejoinedfabricsandstitch overtheseam.
- Scallophem

text_image
Wrongside offfabric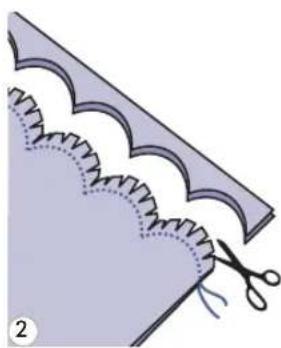
natural_image
Illustration of a sewing process with scissors cutting fabric from a corrugated edge (no text or symbols)
natural_image
Illustration of a folded garment with stitching pattern and a small inset showing a pointed object (no text or symbols)- Scallopedging

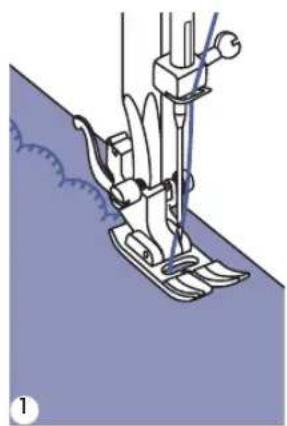
natural_image
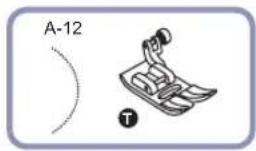
Line drawing of a sewing machine needle stitching fabric (no text or symbols)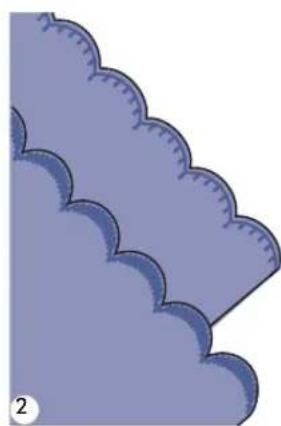
natural_image
Illustration of a stylized cloud border with scalloped edges, no text or symbols present1 Fold the fabric, right sides along the folded edge, as illustrated.
2 Cut the fab rical ong thesea allowanceof3mm(1/8inch)forseaming. Notchtheallowance.
3 Turnfabricoverandpushouseamtothesurfaceandpressit.
1 Sewonhemline.
2 Trim the fabricclosetothes carenottocutthethread.

text_image
A-28 A-29 A-30 A-31 A-32 A-33 A-34 A-35 A-36 A-37 A-38 A-39 A-40 A-41 A-42 A-43 A-44 A-45 A-46 A-47 A-48 A-49 A-50 A-51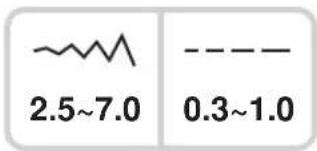
text_image
2.5~7.0 0.3~1.0
text_image
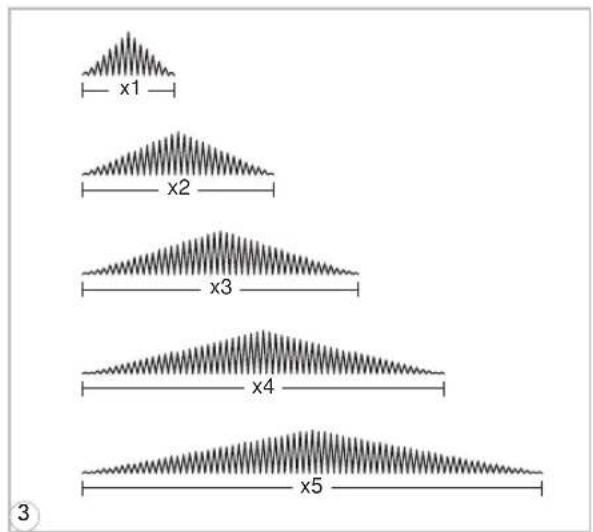
4 5 6 7 8 9 0 17 The st it ch es sh o w n i n t h e d i c can be elong ated upt of i v etimesthe normal length b y pressing the elongation button.

text_image
28 X1 7.0 --- 0.5 XX 2-42 The LCD screen icon forelon of the pattern appears.
text_image
x1 x2 x3 x4 x5 33 Whenthwidthorlengthoft changed,agreatervarietyoftheselected patternisavailable.
PleaseNote: PatternsfromAGroup28-51 can be elongated and mirrored simultaneously.

PleaseNote:
- The DirectPatterns email AGroupPatternsd 4-27
-Mirrorimagedpatternscanalsobecombinedwithotherpatterns.

text_image
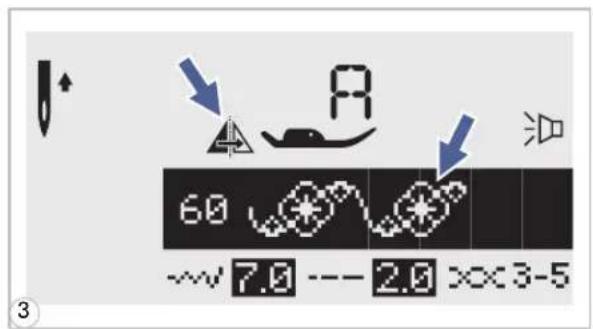
60 7.0 --- 2.0 x×3-51 Select the pattern.

text_image
4 5 6 7 8 9 0 ②2 Pressing themirrorbutton.
text_image
60 7.0 --- 2.0 xx3-53 The LCD screen icon form mir the pattern appears.
natural_image
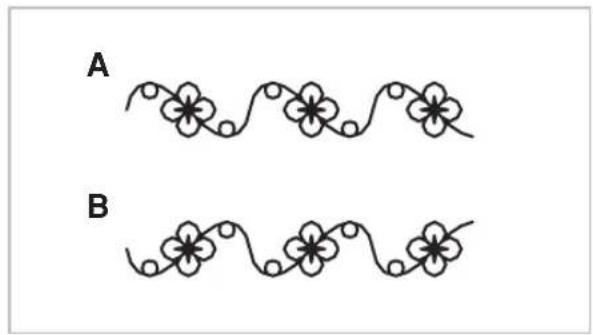
Two identical line-drawn floral patterns labeled A and B, no text or symbols presentA. Normalpatternsewing.
B. Mirrorpatternsewing.

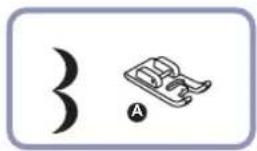
Please Note: When using twin needles, use the "T" presser foot regardless of what kind of sewing will be carried out.
text_image
Diagram illustrating a tool tip application technique with labeled parts and directional arrows indicating movement or change.
text_image
Diagram of a sewing machine with labeled parts and directional arrows indicating motion or operation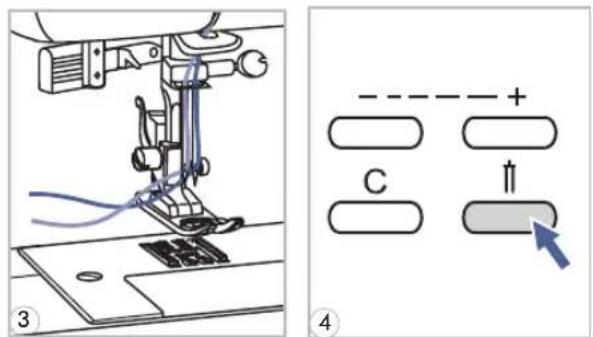
text_image
Technical diagram showing sewing machine operation with labeled components and directional indicator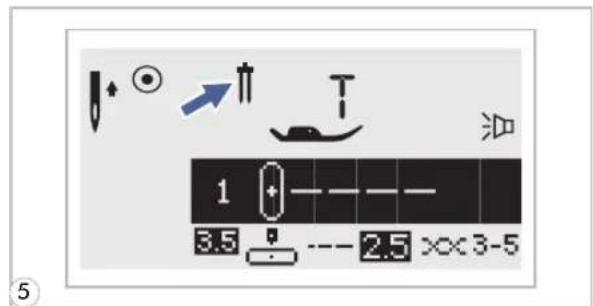
text_image
1 3.5 --- 2.5 ××3-5
natural_image
Five abstract line patterns with wavy, zigzag, and dotted textures, no text or symbols present1 Insertthetwinneedle.
Attention: When using twin needles, use the all purpose foot (T) regardless of what kind of sewing foot will be carried out. Use only twin needle assemblies with max. 2mm needed distance.
2 Followtheinstructionsforsingle-needle threadingusingthehorizontalspoolpin. Threadthroughtheleftneedle. Setthesecondspoolpin(includedwiththe accessories)intotheholeonthetopofthe machine.Threadthroughremainingpoints, makingcertaintoomithethreadguide abovetheneedleandpassthreadthrough therightneedle.
3 Threadeachneedleseparately.
PleaseNote: Makesurethatthetwothreads usedtothreadthetwinneedleareofthe sameweight.Youcanuseoneortwocolors.
4 Press the Twin needle but machineautomaticallyreducethemaximum widthfortwinneedlesewing.
6 Selectapatternandstarttosew.Except the Directpatterns " " and AGroup patterns 14-27,theotherpatternscanbeused. Two lines of stitching are sewn parallel to eachother.
PleaseNote: When sewing withtwin needle, alwaysproceedslowly, and make sure to maintain a low speed to insure qualitystitching.
Combinedpatternscanbestoredforlateruse.Sincestoredpatternsarenotlostafterthe sewing machine is turned off, they can be recalled at any time. This is convenient for patternssuchasnames,whichmaybeusedfrequently.

PleaseNote:
-Multiple patternsselecting from pattern nodes, , , , can k together.
- This machine has 4 modules of program memory and each module can re stitches.
- TheDirectmodepatternsandthe A Group Patternscl 4 - 27
- All the units in thememory can be edited to set its functions such as Stitchleng Elongation, Mirror, and Auto-lock.
• Combiningpatternsoletters

text_image
MODE7 Press"MODE"buttontoselectanydesiredpattern group among 1, 2, A, A on front cover. TheLEDwillindicatetheselectedgroup.

text_image
M 0.0 + M 1-4:_ 3.5 --- 2.5 × 3-52 Press the "M" button to open the memory mode and then appears a sub-screen in the center. It is available to select the number of the memory module when the cursorstartflashing.

text_image
M 00 M 1-4:2 3.5 --- 2.5 × 3-53 Pressnumberofmemorymodule.(e.g.2)

text_image
M M2 0 1/004 Thememoryscreenappearsautomatically.
text_image
M M2 0 1/00
text_image
M 6.0 M2 0 1/0 1 7.0 --- 2.0 xx3-5
text_image
M M2 I9/19 28 31 7.0 XX2-4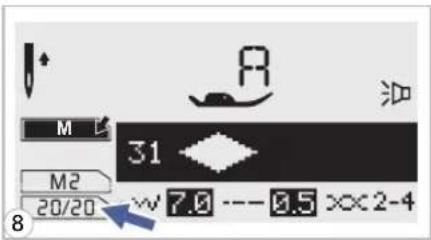
text_image
M L 31 M2 20/20 w 7.0 --- 0.5 xx2-4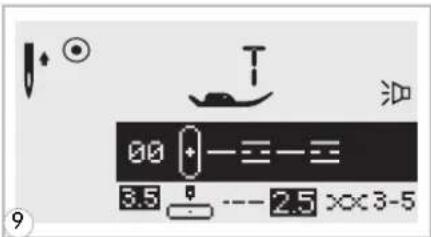
text_image
00 + - = - = 3.5 -- 2.5 x×3-5- Addingpattern sorletters

text_image
M 28 M2 05/10 7.0 --- 0.5 ××2-4
text_image
M 31 M2 06/11 7.0 --- 0.5 >>2-45 Press the desired pattern number.
6 Theselectedpatternndisplaysont
7 Repeat step 5, 6 form more patternst memory.
PleaseNote: Whenthememorythefullwith20units of patterns, themachinewillbeeptosignalit.
9 PressMhe" "buttontoleavethemenreturntothenormalscreen.
Attention: Theselectedpatternwillbeclearedfrom thememorymoduleafterclosingthemachineifyoudo notpressthe™ button againwhenyouhave completedyourselection.
7 Whileinthememorymode,press s button until the stitch number you have selected is displayed,thenaddthenewstitch.
2 Press pattern No. (e.g. 31) The selected pattern will be inserted.
Editingpatterns

text_image
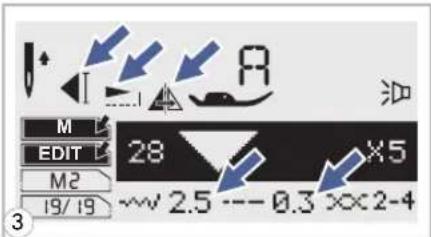
M 28 M2 19/19 ---7.3 --- 0.5 >>2-41 Usethestitchwidthadjustmentbuttontoselectthe patternthatyouwishtoeditwhileinthememorymode.

text_image
M EDIT M2 19/19 28 --- 7.0 --- 0.5 xx2-42 Pressthe""buttoneditthepattern.Thestitch length,stitchwidth,Elongation,Mirror,andAuto-lock ofthepatternscanbeadjustedmanually.
text_image
M EDIT M2 19/19 28 X5 ~~ 2.5 --- 0.3 xx2-4PleaseNote: Thestitchlength, stitchwidth, Elongation, Mirror, and Auto-lock of the pattern scan be adjusted manually.

text_image
M 28 M2 19/19 ×5 ~2.5 --0.3 ××2-44 Pressthe"button whencompleteandreturn to browsestatus.
- Clearingpattern sorletters
text_image
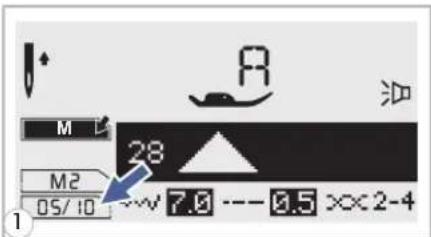
M M2 05/10 28 7.0 --- 0.5 xx2-47 Whileinthememorymode,press s buttonoselectthepatternthatyouwanttoclear.
text_image
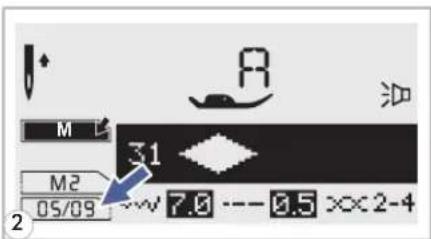
M 31 M2 05/09 7.0 --- 8.5 ××2-42 Pressthe""butfontodeletetheselectedpatternand thenextpatterninthebackwillmoveforward.
- Recalling and sewing the memorized pattern

text_image
M 00 M1-4:_ 3.5 --- 2.5 x 3-51 Press the "button to enter memory input then number of memory module when the cursor start flashing.

text_image
M 00 + M1-4:2 3.5 2.5 × 3-52 Input thenumber of memory modul

text_image
M 60 M2 0 1/20 ~7.0 -- 2.0 xx3-53 LCD screen shows the first patt memorymodule.
Selectorbrowsememorypatternsbypassingstitch width " - " or " + " buttons.

text_image
Diagram showing foot positioning and foot movement of a shoe, with labeled parts and directional arrows indicating movement.4 Press on the foot control or press the start/stop button to startthe sewingmachine.
text_image
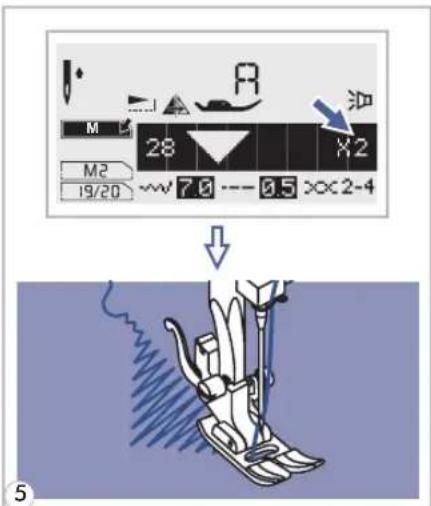
M 28 X2 M2 19/20 7.6 0.5 ××2-4 油5 Thescreenshowsthecurrentsewi

text_image
00 + - = - = 3.5 -- 2.5 xx3-56 Pressthe""buttdytoleavememorymodeand returntothenormalscreen.
Warninganimationmessagedisplay
text_image
00 3.5 T ××3-5Thesewingmachineisexperiencingaproblem
Theanimationmessagemeansthatthethreadistwisted orjammedandthehandwheelaxlecannotmove.
Pleaselookthroughthe"Troubleshootingguide"on page71or72tofindthesolution.Aftertheproblem hasbeensolved,themachinewillcontinuetosew.
- Instructionanimationmessagedisplay
text_image
1 3.5 2.5 x×3-5Bobbinwinding
Thebobbinwinderiswindingthebobbin.
text_image
OFF 5.0 --- 0.5 ××2-4Lowerthebuttonholelever
When you select any button hole or darkning stitch, LCD screen will be demonstrated the figure ^™ , it is to remind you to lower the button hole lever.
Warningbeepingsound
-Whenoperatingcorrectly: 1 beep
-Whenthememoryisfull20unitsofpattern:3-shortbeeps
-Whenoperatingincorrectly:3-shortbeeps
- Whenthesewingmachineisintroubleandcan
Itmeansthatthethreadistwistedorjammedandthehandwheelaxlecan'tmove.Pleaserefer tothe"Troubleshootingguide"onpages71&72forsolutions.Aftertheproblemhasbeen solved,themachinewillcontinuetosew.
natural_image
Illustration showing a hand holding a spool and rotating a cable, with no text or symbols present.Returnbobbinwindershafttoleft
If the bobbin windershaft is positioned to the right (engaged) and any button is pressed a 3-beep warning will be sounded. Move bobbin windershaft to the left (disengaged) to allow the button to be operational.

PleaseNote: If the problem is not resolved, please contact your local dealer.

Attention: During theseewing, if the thread get jammed inside the hook stopping the needle from moving and you continue pressing the foot control, these security switch will stop them machine completely. In order to start these sewing machines, you will have to turn the on/off switch to the OFF position and then ON again.

text_image
- ~+ EDIT M ON OFF1 Pressonthe"buttonandturnonthe powerswitch.

flowchart
graph TD
    A["Top Step"] --> B["Left Arrow: Down Arrow"]
    B --> C["Right Arrow: Up Arrow"]
    C --> D["Bottom Step"]
    D --> E["Left Arrow: Down Arrow"]
    E --> F["Right Arrow: Up Arrow"]
2 Youcanselectthemodebypassingthe stitchwidth" + "or""button.Select desiredmodesoundon""orsoundoff
text_image
1 3.5 2.5 ××3-53 Pressingthe""button[1].TheBuzzer soundsettingmarkwillappearontheLCD screenwhenyouhavesetit.

Attention: Disconnect the power cord from the wall socket before cleaning the screen and sewing machinesurface, otherwise injuryorelectricalshockmayresult.

Cleaningthescreen

natural_image
Illustration of a hand cleaning a small electronic device with a blue cloth (no text or symbols visible)If the front panel is dirty, wipe it gently with a soft, dry cloth.
Donotuseanyorganicsolventsordetergents.

Cleaning these sewing machines surface
If the surface of these sewing machine is dirty, lightly soak a cloth thin mild detergent, squeeze it out firmly and then wipethesurface. After cleaning it once in this way, wipethesurface again with dry cloth.

Cleaningthehook
Iflintandbitsoftthreadaccumulateinthehook,thiswillinterferewiththesmoothoperationofthe machine.Checkregularlyandcleanthestitchingmechanismwhennecessary.

Attention: Disconnect the machine from the wall outlet before carrying out an annual maintenance.
natural_image
Illustration of a sewing machine needle stitching a fabric with arrows indicating direction (no text or symbols)
Removethebobbincoverplateandbobbin.

natural_image
Line drawing of a hand using a screwdriver to adjust or install electronic components on a circuit board (no text or symbols visible)
Cleanthebobbinholderwithabrush.

natural_image
Diagram of a sewing machine needle stitching on a base plate, showing tool path and component placement (no text or symbols)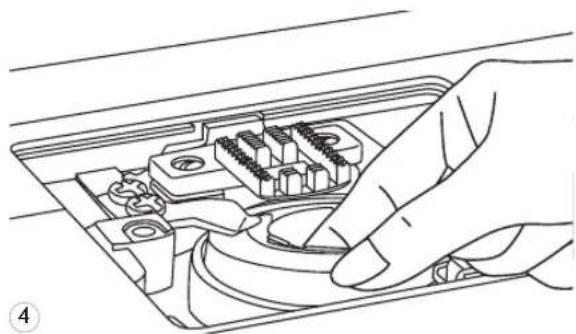
natural_image
Line drawing of a hand inserting a component into an electronic device (no text or symbols visible)
natural_image
Technical line drawing of a hand using a screwdriver to insert or install electronic components on an open circuit board (no text or symbols visible)
text_image
a b3 Remove the needle, press presserfootholder.Removethe bobbin coverplate and bobbin.Removethescrew holding the needle plate and remove the needle plate.
4 Liftupthebobbincaseandremoveit.
5 Cleanthehookrace, feeddogandbobbin casewithabrush. Also cleanthem, using a soft, drycloth.
6 Replacethebobbincase into the hook race so that the tip (a) fit to the stopper (b) as shown.
Beforecallingforservice, checkthefollowingitems. If the problem still persists, contact the place of purchase or your nearest authorized dealer.
| Problem | Cause | Correction | Reference |
| Upperthread breaks | 1.Themachineisnotthreadedcorrectly. | 1.Rethreadthemachine. | Page13 |
| 2.Thethreadtensionistootight. | 2.Reducethethreadtension(lower number). | Page19 | |
| 3.Thethreadistoothickfortheneedle. | 3.Selectalargerneedle. | Page22 | |
| 4.Theneedleisnotinsertedcorrectly. | 4.Removeandreinserttheneedle(flat sidetowardstheback). | Page23 | |
| 5.Thethreadiswoundaroundthespool holderpin. | 5.Removethereelandwindthreadonto reel. | Page13 | |
| 6.Theneedleisdamaged. | 6.Replacetheneedle. | Page23 | |
| Lowerthread breaks | 1.Thebobbincaseisnotinsertedcorrectly. | 1.Removeandreinsertthebobbincase andpullonthethread.Thethread shouldpulleasily. | Page12 |
| 2.Thebobbincaseisthreadedwrong. | 2.Checkbothbobbinandbobbincase. | Page12 | |
| 3.Thelowerthreadtensionistootight | 3.Loosen lowerthreadtension as described. | Page19 | |
| Skipped stitches | 1.Theneedleisnotinsertedcorrectly. | 1.Removeandreinsertneedle(flatside towardstheback). | Page23 |
| 2.Theneedleisdamaged. | 2.Insertanewneedle. | Page23 | |
| 3.Thewrongsizeneedlehasbeenused. | 3.Chooseaneedletosuitthethread. | Page22 | |
| 4.Thefootisnotattachedcorrectly. | 4.Checkandattachcorrectly. | Page20 | |
| 5.Themachineisnotthreadedcorrectly. | 5.Rethreadthemachine. | Page13 | |
| Needlebreaks | 1.Theneedleisdamaged. | 1.Insertanewneedle. | Page23 |
| 2.Theneedleisnotcorrectlyinserted. | 2.Inserttheneedlecorrectly(flatside towardstheback). | Page23 | |
| 3.Wrongneedlesizeforthefabric. | 3.Chooseaneedletosuitthethreadand fabric. | Page22 | |
| 4.Thewrongfootisattached. | 4.Selectthecorrectfoot. | Page73 | |
| 5.Theneedleclampscrewisloose. | 5.Usethescrewdrivertofirmlytightenthe screw. | Page23 | |
| 6.Thepressorfootthatisusedisnot appropriateforthetypeofstitchthat youwishtosew. | 6.Attachthepresserfootthat isappropriateforthetypeofstitchthatyouwish tosew. | Page73 | |
| 7.Theupperthreadtensionistootight. | 7.Loosentheupperthreadtension. | Page19 | |
| Loosestitches | 1.Themachineisnotcorrectlythreaded. | 1.Checkthethreading. | Page13 |
| 2.Thebobbincaseisnotcorrectly threaded. | 2.Threadthebobbincaseasillustrated. | Page12 | |
| 3.Needle/fabric/threadcombinationis wrong. | 3.Theneedlesizemustsuitthefabricand thread. | Page23 | |
| 4.Threadtensioniswrong. | 4.Correctthethreadtension. | Page19 | |
| Seam gatheror pucker | 1.Theneedleistoothickforthefabric. | 1.Selectafinerneedle. | Page22 |
| 2.Thestitchlengthisadjustedwrong. | 2.Readjustthestitchlength. | Page27 | |
| 3.Thethreadtensionistootight. | 3.Loosenthethreadtension. | Page19 | |
| Problem | Cause | CorrectionReference | |
| Seam puckering | 1.Theneedlethreadtensionistootight. | 1.Loosenthethreadtension. | Page19 |
| 2.Theneedlethreadisnotthreaded correctly. | 2.Rethreadthemachine. | Page13 | |
| 3.Theneedleistooheavyforthefabric beingsewn. | 3.Chooseaneedletosuitthethreadand fabric. | Page22 | |
| 4.Shortenstitchlengthistoolongforthe fabric. | 4.Makestitchdense. | Page27 | |
| Patternsare distorted | 1.Thecorrectpresserfootisnotused. | 1.Selectthecorrectfoot. | Page73 |
| 2.Theneedlethreadtensionistootight. | 2.Loosenthethreadtension. | Page19 | |
| 3.Thestitchlengthisnotsuitableforthe fabricbeingsewn. | 3.Makestitchadjustment. | Page27 | |
| Themachine jams | 1.Threadiscaughtinthehook. | Removetheupperthreadandbobbin case.Turnthehandwheelbackwardsand forwardsbyhandandremovethethread remnants. | Page69 |
| 2.Thefeeddogsarepackedwithlint. | |||
| Themachine isnoisy | 1.Lintoroilhavecollectedonthehookor needlebar. | 1.Cleanthehookandfeeddogs described. | Page69 |
| 2.Theneedleisdamaged. | 2.Replacetheneedle. | Page23 | |
| 3.Slighthummingsound comingfrom internalmotor. | 3.Normal | -- | |
| 4.Threadiscaughtinthehook. | Removetheupperthreadandbobbin case.Turnthehandwheelbackwardsand forwardsbyhandandremovethethread remnants. | Page69 | |
| 5.Thefeeddogsarepackedwithlint. | |||
| Uneven stitches, unevenfeed | 1.Poorqualitythread. | 1.Selectabetterqualitythread. | Page22 |
| 2.Thebobbincaseisthreadedwrong. | 2.Removethebobbincase,thethread andreinsertcorrectly. | Page12 | |
| 3.Fabrichasbeenpulled. | 3.Donotpullonthefabricwhilesewing, letitbetakenupbythemachine. | -- | |
| Thesewing machine doesn't operate | 1.Themachineisnotturnedon. | 1.Turnonthemachine. | Page 9 |
| 2.TheStart/stopbuttonwasnotpressed. | 2.PresstheStart/stopbutton. | Page24 | |
| 3.Thepressorfootlifterisraised. | 3.Lowerthepresserfootlifter. | Page17 | |
| 4.TheStart/stopbuttonwaspressed,even throughthefootcontrollerisconnected. | 4.DonotuseStart/stopbuttonwhenthe footcontrolleriscon- nected.Touse Start/stopbutton,disconnectthefoot controller. | Page24 | |
| 5.Athreadiscaughtinthehookrace. | 5.Removetheupperthreadandbobbin case.Turnthehandwheelbackwards andforwardsbyhandandremovethe threadremnants. | Page69 | |
| 6.Themachineisnotpluggedin. | 6.Connectthepowerlineplugtothe electricoutlet. | Page 9 |
Directpatterns-10
| StitchPattern | Width(mm)Length(mm) | Presser Foot | Functions | |||||||||
| AutoManual | AutoManual | Reverse | Auto-lockE | longation | Mirror/ Presserfoot | Twimede | Memory | |||||
| Utility stitches | 1 0---- | 3.5 | 0.0~7.0 | 2.5 | 0.0~4.5 | T | * | * | * | * | * | |
| 2 0---- | 0.0 | 0.0~7.0 | 2.5 | 0.0~4.5 | T | * | * | * | * | * | ||
| 3 0≡≡≡ | 3.5 | 0.0~7.0 | 2.5 | 1.0~3.0 | T | * | * | * | * | * | ||
| 4 0mm | 3.5 | 1.0~6.0 | 2.5 | 1.0~3.0 | T | * | * | * | * | * | ||
| 5 ∧ ∧ ∧ | 5.0 | 0.0~7.0 | 2.0 | 0.3~4.5 | T | * | * | * | * | * | ||
| 6 ∧ ∧ ∧ | 5.0 | 2.0~7.0 | 1.0 | 0.3~4.5 | T | * | * | * | * | * | ||
| 7 ∧ ∧ ∧ | 5.0 | 2.5~7.0 | 2.5 | 1.0~3.0 | T | * | * | * | * | * | ||
| 8 ∧ ∧ ∧ | 5.0 | 3.5~7.0 | 2.5 | 1.0~3.0 | E | * | * | */T | * | * | ||
| 9 -V-V- | 3.5 | 2.5~7.0 | 2.0 | 0.5~4.5 | F | * | * | */T | * | * | ||
| 0 ||||||||| | 5.0 | 2.5~7.0 | 0.5 | 0.3~1.0 | D | |||||||
*:Adjustmentscanbemade.
Agrouppatterns-100
| StitchPattern | Width(mm)Length(mm) | Presser Foot | Functions | |||||||||
| AutoManual | AutoManual | Reverse | Auto-lockE | longation | Mirror/ Presserfoot | Twineede | Memory | |||||
| Utility stitches | 00-==- | 3.5 | 0.0~7.0 | 2.5 | 1.5~3.0 | T | * | * | * | * | * | |
| 01mm | 2.0 | 1.0~7.0 | 2.5 | 1.0~3.0 | T | * | * | * | * | * | ||
| 02/ / / / | 5.0 | 2.5~7.0 | 2.5 | 1.0~3.0 | T | * | * | * | * | * | ||
| 03www | 3.5 | 2.5~7.0 | 1.0 | 0.5~4.5 | F | * | * | */T | * | * | ||
| 04www | 3.5 | 2.5~7.0 | 1.5 | 0.5~4.5 | F | * | * | */T | * | * | ||
| 05TTTTT | 3.5 | 2.5~7.0 | 2.5 | 1.5~3.0 | T | * | * | * | * | * | ||
| 06□□□□ | 5.0 | 2.5~7.0 | 2.5 | 1.5~3.0 | T | * | * | * | * | * | ||
| 07□□□□ | 5.0 | 2.5~7.0 | 3.0 | 2.0~3.0 | A | * | * | * | * | * | ||
| 08√√√ | 5.0 | 2.5~7.0 | 2.5 | 1.0~3.0 | T | * | * | * | * | * | ||
| 09××× | 7.0 | 2.5~7.0 | 2.5 | 1.0~3.0 | A | * | * | * | * | * | ||
| 10<××× | 5.0 | 2.5~7.0 | 2.5 | 1.0~3.0 | A | * | * | * | * | * | ||
| 11<××× | 5.0 | 2.5~7.0 | 2.0 | 1.0~3.0 | A | * | * | * | * | * | ||
| 12 | 7.0 | 2.5~7.0 | 1.5 | 1.0~3.0 | T | * | * | * | * | * | ||
| 13 | 7.0 | 2.5~7.0 | 2.5 | 1.0~4.5 | T | * | * | * | * | * | ||
| Buttonhole stitches | 14□□□□ | 5.0 | 2.5~5.5 | 0.5 | 0.3~1.0 | D | ||||||
| 15□□□□ | 7.0 | 5.5~7.0 | 0.5 | 0.3~1.0 | D | |||||||
| 16□□□□ | 5.0 | 2.5~5.5 | 0.5 | 0.3~1.0 | D | |||||||
| 17□□□□ | 5.0 | 2.5~5.5 | 0.5 | 0.3~1.0 | D | |||||||
| 18□□□□ | 7.0 | 5.5~7.0 | 0.5 | 0.3~1.0 | D | |||||||
| 19□□□□ | 7.0 | 5.5~7.0 | 0.5 | 0.3~1.0 | D | |||||||
| 20□□□□ | 6.0 | 3.0~7.0 | 1.0 | 1.0~2.0 | D | |||||||
| 21□□□□ | 6.0 | 3.0~7.0 | 1.5 | 1.0~3.0 | D | |||||||
| Buttonhole stitches | 22 | 2.0 | 1.0~3.0 | 0.5 | 0.5~1.0 | D | ||||||
| 23 | 7.0 | 7.0,6.0,5.0 | -- | -- | A | |||||||
| 24 | 7.0 | 7.0,6.0,5.0 | -- | -- | A | |||||||
| 25 | 3.5 | 2.5~4.5 | -- | -- | ||||||||
| Darning stitches | 26 | 7.0 | 3.5~7.0 | 2.0 | 1.5~2.0 | D | ||||||
| 27 | 7.0 | 3.5~7.0 | 2.0 | 1.5~2.0 | D | |||||||
| Satin stitches | 28 | 7.0 | 2.5~7.0 | 0.4 | 0.3~1.0 | A | * | * | * | * | * | * |
| 29 | 7.0 | 2.5~7.0 | 0.4 | 0.3~1.0 | A | * | * | * | * | * | * | |
| 30 | 7.0 | 2.5~7.0 | 0.4 | 0.3~1.0 | A | * | * | * | * | * | * | |
| 31 | 7.0 | 2.5~7.0 | 0.4 | 0.3~1.0 | A | * | * | * | * | * | * | |
| 32 | 7.0 | 2.5~7.0 | 0.4 | 0.3~1.0 | A | * | * | * | * | * | * | |
| 33 | 7.0 | 2.5~7.0 | 0.4 | 0.3~1.0 | A | * | * | * | * | * | * | |
| 34 | 7.0 | 2.5~7.0 | 0.4 | 0.3~1.0 | A | * | * | * | * | * | * | |
| 35 | 7.0 | 2.5~7.0 | 0.4 | 0.3~1.0 | A | * | * | * | * | * | * | |
| 36 | 7.0 | 2.5~7.0 | 0.4 | 0.3~1.0 | A | * | * | * | * | * | * | |
| 37 | 7.0 | 2.5~7.0 | 0.4 | 0.3~1.0 | A | * | * | * | * | * | * | |
| 38 | 7.0 | 2.5~7.0 | 0.4 | 0.3~1.0 | A | * | * | * | * | * | * | |
| 39 | 7.0 | 2.5~7.0 | 0.4 | 0.3~1.0 | A | * | * | * | * | * | * | |
| 40 | 7.0 | 2.5~7.0 | 0.4 | 0.3~1.0 | A | * | * | * | * | * | * | |
| 41 | 7.0 | 2.5~7.0 | 0.4 | 0.3~1.0 | A | * | * | * | * | * | * | |
| 42 | 7.0 | 2.5~7.0 | 0.4 | 0.3~1.0 | A | * | * | * | * | * | * | |
| 43 | 7.0 | 2.5~7.0 | 0.4 | 0.3~1.0 | A | * | * | * | * | * | * | |
| 44 | 7.0 | 2.5~7.0 | 0.4 | 0.3~1.0 | A | * | * | * | * | * | * | |
| 45 | 7.0 | 2.5~7.0 | 0.4 | 0.3~1.0 | A | * | * | * | * | * | * | |
| 46 | 7.0 | 2.5~7.0 | 0.4 | 0.3~1.0 | A | * | * | * | * | * | * | |
| 47 | 7.0 | 2.5~7.0 | 0.4 | 0.3~1.0 | A | * | * | * | * | * | * | |
| 48 | 7.0 | 2.5~7.0 | 0.4 | 0.3~1.0 | A | * | * | * | * | * | * | |
| 49 | 7.0 | 2.5~7.0 | 0.4 | 0.3~1.0 | A | * | * | * | * | * | * | |
| 50 | 7.0 | 2.5~7.0 | 0.4 | 0.3~1.0 | A | * | * | * | * | * | * | |
| 51 | 7.0 | 2.5~7.0 | 0.4 | 0.3~1.0 | A | * | * | * | * | * | * | |
| 52 | 7.0 | 2.5~7.0 | 0.5 | 0.3~1.0 | A | * | * | * | * | * | ||
| 53 | 7.0 | 2.5~7.0 | 0.5 | 0.4~1.0 | A | * | * | * | * | * | ||
| 54 | 7.0 | 2.5~7.0 | 1.0 | 1.0~2.0 | A | * | * | * | * | * | ||
| 55 | 7.0 | 4.0~7.0 | 0.5 | 0.5~1.0 | A | * | * | * | * | * | ||
| 56 | 7.0 | 2.5~7.0 | 1.5 | 1.5~3.0 | A | * | * | * | * | * | ||
| 57 | 7.0 | 2.5~7.0 | 0.5 | 0.5~1.0 | A | * | * | * | * | * | ||
| 58 | 7.0 | 4.0~7.0 | 0.5 | 0.5~1.0 | A | * | * | * | * | * | ||
| 59 | 7.0 | 4.0~7.0 | 0.5 | 0.5~1.0 | A | * | * | * | * | * | ||
| 60 | 7.0 | 5.0~7.0 | 0.5 | 0.5~1.0 | A | * | * | * | * | * | ||
| Cross stitches | 61 | 5.0 | 2.5~7.0 | 2.5 | 1.0~3.0 | A | * | * | * | * | * | |
| 62 | 6.0 | 5.0~7.0 | 1.5 | 1.5~3.0 | A | * | * | * | * | * | ||
| Cross stitches | 63 | 6.0 | 5.0~7.0 | 1.5 | 1.0~3.0 | A | * | * | * | * | * | |
| 64 | 4.0 | 3.0~7.0 | 1.0 | 1.0~3.0 | A | * | * | * | * | * | ||
| 65 | 4.0 | 3.0~7.0 | 1.0 | 1.0~3.0 | A | * | * | * | * | * | ||
| 66 | 6.0 | 3.0~7.0 | 1.5 | 1.0~3.0 | A | * | * | * | * | * | ||
| 67 | 6.0 | 3.0~7.0 | 1.5 | 1.0~3.0 | A | * | * | * | * | * | ||
| 68 | 6.0 | 5.0~7.0 | 1.5 | 1.0~3.0 | A | * | * | * | * | * | ||
| 69 | 6.0 | 3.0~7.0 | 1.5 | 1.0~3.0 | A | * | * | * | * | * | ||
| 70 | 6.0 | 3.0~7.0 | 1.0 | 1.0~3.0 | A | * | * | * | * | * | ||
| 71 | 6.0 | 5.0~7.0 | 1.5 | 1.0~3.0 | A | * | * | * | * | * | ||
| 72 | 6.0 | 3.0~7.0 | 2.0 | 1.0~3.0 | A | * | * | * | * | * | ||
| 73 | 6.0 | 5.0~7.0 | 1.5 | 1.0~3.0 | A | * | * | * | * | * | ||
| 74 | 6.0 | 3.0~7.0 | 1.5 | 1.0~3.0 | A | * | * | * | * | * | ||
| Decorative stitches | 75 | 6.0 | 2.5~7.0 | 1.5 | 1.0~3.0 | T | * | * | * | * | * | |
| 76 | 5.5 | 2.5~7.0 | 2.0 | 1.0~3.0 | T | * | * | * | * | * | ||
| 77 | 7.0 | 2.5~7.0 | 2.0 | 1.0~3.0 | T | * | * | * | * | * | ||
| 78 | 7.0 | 2.5~7.0 | 2.0 | 1.0~3.0 | T | * | * | * | * | * | ||
| 79 | 5.0 | 2.5~7.0 | 2.0 | 1.0~3.0 | T | * | * | * | * | * | ||
| 80 | 6.0 | 2.5~7.0 | 3.0 | 1.0~3.0 | T | * | * | * | * | * | ||
| 81 | 5.0 | 2.5~7.0 | 2.0 | 1.0~3.0 | T | * | * | * | * | * | ||
| 82 | 4.0 | 2.5~7.0 | 2.0 | 1.0~3.0 | T | * | * | * | * | * | ||
| 83 | 5.0 | 2.5~7.0 | 2.0 | 1.0~3.0 | A | * | * | * | * | * | ||
| 84 | 5.0 | 4.0~7.0 | 2.5 | 1.5~3.0 | A | * | * | * | * | * | ||
| 85 | 6.0 | 3.5~7.0 | 2.0 | 1.5~3.0 | A | * | * | * | * | * | ||
| 86 | 5.0 | 2.5~7.0 | 2.5 | 1.0~3.0 | T | * | * | * | * | * | ||
| 87 | 6.0 | 4.0~7.0 | 1.5 | 1.5~3.0 | A | * | * | * | * | * | ||
| 88 | 5.0 | 4.0~7.0 | 2.0 | 1.5~3.0 | T | * | * | * | * | * | ||
| 89 | 5.0 | 2.5~7.0 | 1.5 | 1.0~3.0 | T | * | * | * | * | * | ||
| 90 | 5.5 | 2.5~7.0 | 1.5 | 1.0~3.0 | A | * | * | * | * | * | ||
| 91 | 6.0 | 3.5~7.0 | 2.0 | 1.5~3.0 | A | * | * | * | * | * | ||
| 92 | 7.0 | 4.5~7.0 | 1.5 | 1.0~3.0 | A | * | * | * | * | * | ||
| 93 | 5.0 | 3.0~7.0 | 2.0 | 2.0~3.0 | A | * | * | * | * | * | ||
| 94 | 5.0 | 4.0~7.0 | 1.5 | 1.0~3.0 | A | * | * | * | * | * | ||
| 95 | 5.0 | 2.5~7.0 | 2.5 | 1.0~3.0 | T | * | * | * | * | * | ||
| 96 | 6.0 | 2.5~7.0 | 3.0 | 1.5~3.0 | T | * | * | * | * | * | ||
| 97 | 6.0 | 3.5~7.0 | 1.5 | 1.0~3.0 | T | * | * | * | * | * | ||
| 98 | 7.0 | 3.0~7.0 | 2.0 | 1.0~3.0 | T | * | * | * | * | * | ||
| 99 | 7.0 | 4.0~7.0 | 2.5 | 1.5~3.0 | A | * | * | * | * | * | ||
*:Adjustmentscanbemade.
Bgrouppatterns-100
| StitchPattern | Width(mm)Length(mm) | Presser Foot | Functions | |||||||||
| AutoManual | AutoManual | Reverse | Auto-lock | Elongation | Mirror/ Presserfoot | Twimede | Memory | |||||
| Decorative stitches | 00 * * * | 7.0 | 3.0~7.0 | 3.0 | 1.5~3.0 | A | * | * | * | * | * | |
| 01 ◆ ◆ ◆ | 7.0 | 5.0~7.0 | 2.5 | 2.0~3.0 | A | * | * | * | * | * | ||
| 02 ◆ ◆ ◆ | 6.0 | 4.5~7.0 | 2.5 | 1.5~3.0 | A | * | * | * | * | * | ||
| 03 ◆ ◆ ◆ | 5.0 | 3.5~7.0 | 2.5 | 1.5~3.0 | A | * | * | * | * | * | ||
| 04 ◆ ◆ ◆ | 7.0 | 2.5~7.0 | 2.0 | 1.0~3.0 | T | * | * | * | * | * | ||
| 05 ◆ ◆ ◆ | 7.0 | 2.5~7.0 | 2.5 | 1.5~3.0 | T | * | * | * | * | * | ||
| 06 ◆ ◆ ◆ | 7.0 | 2.5~7.0 | 2.5 | 1.5~3.0 | T | * | * | * | * | * | ||
| 07 ◆ ◆ ◆ | 5.0 | 2.5~7.0 | 2.5 | 1.5~3.0 | T | * | * | * | * | * | ||
| 08 ◆ ◆ ◆ | 6.0 | 4.5~7.0 | 2.0 | 1.5~3.0 | T | * | * | * | * | * | ||
| 09 ◆ ◆ ◆ | 5.0 | 2.5~7.0 | 2.5 | 1.5~3.0 | T | * | * | * | * | * | ||
| 10 ◆ ◆ ◆ | 6.0 | 3.5~7.0 | 1.5 | 1.5~3.0 | A | * | * | * | * | * | ||
| 11 ◆ ◆ ◆ | 7.0 | 3.5~7.0 | 2.5 | 2.0~3.0 | A | * | * | * | * | * | ||
| 12 ◆ ◆ ◆ | 7.0 | 3.5~7.0 | 2.0 | 1.0~3.0 | T | * | * | * | * | * | ||
| 13 ◆ ◆ ◆ | 5.0 | 2.5~7.0 | 2.0 | 2.0~3.0 | A | * | * | * | * | * | ||
| 14 ◆ ◆ ◆ | 7.0 | 4.0~7.0 | 3.0 | 2.0~3.0 | A | * | * | * | * | * | ||
| 15 ◆ ◆ ◆ | 7.0 | 4.0~7.0 | 3.0 | 2.0~3.0 | A | * | * | * | * | * | ||
| 16 ◆ ◆ ◆ | 7.0 | 4.0~7.0 | 3.0 | 2.5~3.0 | A | * | * | * | * | * | ||
| 17 ◆ ◆ ◆ | 7.0 | 2.5~7.0 | 2.0 | 1.5~3.0 | T | * | * | * | * | * | ||
| 18 ◆ ◆ ◆ | 5.0 | 2.5~7.0 | 1.0 | 1.0~4.5 | T | * | * | * | * | * | ||
| 19 ◆ ◆ ◆ | 7.0 | 3.5~7.0 | 1.0 | 1.0~3.0 | A | * | * | * | * | * | ||
| 20 ◆ ◆ ◆ | 7.0 | 4.0~7.0 | 3.0 | 2.0~3.0 | A | * | * | * | * | * | ||
| 21 ◆ ◆ ◆ | 5.0 | 3.5~7.0 | 2.0 | 2.0~3.0 | T | * | * | * | * | * | ||
| 22 ◆ ◆ ◆ | 5.0 | 3.0~7.0 | 1.5 | 1.5~3.0 | T | * | * | * | * | * | ||
| 23 ◆ ◆ ◆ | 5.0 | 2.5~7.0 | 1.5 | 1.0~3.0 | T | * | * | * | * | * | ||
| 24 ◆ ◆ ◆ | 5.0 | 2.5~7.0 | 2.0 | 1.0~3.0 | T | * | * | * | * | * | ||
| 25 ◆ ◆ ◆ | 5.0 | 2.5~7.0 | 1.0 | 1.0~3.0 | T | * | * | * | * | * | ||
| 26 ◆ ◆ ◆ | 5.0 | 3.5~7.0 | 3.0 | 2.0~3.0 | A | * | * | * | * | * | ||
| 27 ◆ ◆ ◆ | 5.0 | 3.0~7.0 | 2.5 | 1.5~3.0 | A | * | * | * | * | * | ||
| 28 ◆ ◆ ◆ | 5.0 | 2.5~7.0 | 2.0 | 1.5~3.0 | T | * | * | * | * | * | ||
| 29 ◆ ◆ ◆ | 7.0 | 2.5~7.0 | 1.5 | 1.0~3.0 | A | * | * | * | * | * | ||
| 30 ◆ ◆ ◆ | 7.0 | 2.5~7.0 | 2.0 | 1.0~3.0 | A | * | * | * | * | * | ||
| 31 ◆ ◆ ◆ | 7.0 | 2.5~7.0 | 3.0 | 1.5~3.0 | A | * | * | * | * | * | ||
| 32 ◆ ◆ ◆ | 7.0 | 3.0~7.0 | 2.0 | 1.5~3.0 | A | * | * | * | * | * | ||
| 33 ◆ ◆ ◆ | 7.0 | 3.5~7.0 | 2.0 | 1.5~3.0 | A | * | * | * | * | * | ||
| 34 ◆ ◆ ◆ | 6.0 | 4.0~7.0 | 2.0 | 1.5~3.0 | A | * | * | * | * | * | ||
| 35 ◆ ◆ ◆ | 6.0 | 2.5~7.0 | 2.5 | 2.0~3.0 | A | * | * | * | * | * | ||
| 36 ◆ ◆ ◆ | 7.0 | 2.5~7.0 | 3.0 | 2.5~3.0 | A | * | * | * | * | * | ||
| 37 ◆ ◆ ◆ | 7.0 | 3.0~7.0 | 3.0 | 2.5~3.0 | A | * | * | * | * | * | ||
| 38 ◆ ◆ ◆ | 7.0 | 2.5~7.0 | 2.5 | 1.5~3.0 | A | * | * | * | * | * | ||
| Decorative stitches | 39 | 7.0 | 3.5~7.0 | 2.5 | 1.5~3.0 | T | * | * | * | * | * | |
| 40 | 7.0 | 3.5~7.0 | 2.0 | 1.5~3.0 | T | * | * | * | * | * | ||
| 41 | 7.0 | 3.0~7.0 | 2.5 | 1.0~3.0 | T | * | * | * | * | * | ||
| 42 | 7.0 | 2.5~7.0 | 2.0 | 1.5~3.0 | T | * | * | * | * | * | ||
| 43 | 7.0 | 3.0~7.0 | 2.5 | 1.5~3.0 | T | * | * | * | * | * | ||
| 44 | 7.0 | 3.5~7.0 | 1.5 | 1.5~3.0 | T | * | * | * | * | * | ||
| 45 | 7.0 | 5.0~7.0 | 2.5 | 2.0~3.0 | A | * | * | * | * | * | ||
| 46 | 7.0 | 5.0~7.0 | 2.0 | 2.0~3.0 | A | * | * | * | * | * | ||
| 47 | 7.0 | 3.0~7.0 | 2.0 | 1.5~3.0 | A | * | * | * | * | * | ||
| 48 | 7.0 | 4.0~7.0 | 2.0 | 1.5~3.0 | A | * | * | * | * | * | ||
| 49 | 7.0 | 5.0~7.0 | 2.5 | 2.5~3.0 | A | * | * | * | * | * | ||
| 50 | 6.0 | 3.5~7.0 | 2.0 | 1.5~3.0 | A | * | * | * | * | * | ||
| 51 | 7.0 | 4.0~7.0 | 3.0 | 2.5~3.0 | A | * | * | * | * | * | ||
| 52 | 7.0 | 4.5~7.0 | 2.0 | 2.0~3.0 | A | * | * | * | * | * | ||
| 53 | 7.0 | 3.5~7.0 | 1.5 | 1.5~3.0 | A | * | * | * | * | * | ||
| 54 | 7.0 | 3.0~7.0 | 2.5 | 2.0~3.0 | A | * | * | * | * | * | ||
| 55 | 7.0 | 3.0~7.0 | 2.0 | 2.0~3.0 | A | * | * | * | * | * | ||
| 56 | 7.0 | 3.5~7.0 | 2.5 | 2.0~3.0 | A | * | * | * | * | * | ||
| 57 | 7.0 | 2.5~7.0 | 2.0 | 1.5~3.0 | A | * | * | * | * | * | ||
| 58 | 7.0 | 4.5~7.0 | 2.0 | 2.0~3.0 | A | * | * | * | * | * | ||
| 59 | 7.0 | 4.5~7.0 | 2.0 | 1.5~3.0 | A | * | * | * | * | * | ||
| 60 | 7.0 | 4.0~7.0 | 2.0 | 2.0~3.0 | A | * | * | * | * | * | ||
| 61 | 7.0 | 3.0~7.0 | 2.0 | 1.5~3.0 | A | * | * | * | * | * | ||
| 62 | 7.0 | 3.0~7.0 | 2.0 | 1.5~3.0 | A | * | * | * | * | * | ||
| 63 | 7.0 | 3.5~7.0 | 2.0 | 2.0~3.0 | A | * | * | * | * | * | ||
| 64 | 7.0 | 3.5~7.0 | 2.0 | 1.5~3.0 | A | * | * | * | * | * | ||
| 65 | 7.0 | 3.5~7.0 | 2.0 | 2.0~3.0 | A | * | * | * | * | * | ||
| 66 | 7.0 | 4.5~7.0 | 2.0 | 2.0~3.0 | A | * | * | * | * | * | ||
| 67 | 7.0 | 3.5~7.0 | 2.0 | 1.5~3.0 | A | * | * | * | * | * | ||
| 68 | 7.0 | 3.5~7.0 | 2.5 | 2.0~3.0 | A | * | * | * | * | * | ||
| 69 | 7.0 | 2.5~7.0 | 1.5 | 1.5~3.0 | A | * | * | * | * | * | ||
| 70 | 5.0 | 3.5~7.0 | 1.0 | 1.0~3.0 | A | * | * | * | * | * | ||
| 71 | 7.0 | 2.5~7.0 | 2.0 | 1.5~3.0 | A | * | * | * | * | * | ||
| 72 | 7.0 | 3.5~7.0 | 2.0 | 2.0~3.0 | A | * | * | * | * | * | ||
| 73 | 6.0 | 4.5~7.0 | 1.0 | 1.0~3.0 | A | * | * | * | * | * | ||
| 74 | 7.0 | 4.0~7.0 | 2.0 | 2.0~2.5 | A | * | * | * | * | * | ||
| 75 | 7.0 | 2.5~7.0 | 2.0 | 2.0~2.5 | A | * | * | * | * | * | ||
| 76 | 7.0 | 3.5~7.0 | 2.0 | 2.0~3.0 | A | * | * | * | * | * | ||
| 77 | 7.0 | 5.0~7.0 | 2.0 | 2.0~3.0 | A | * | * | * | * | * | ||
| 78 | 7.0 | 4.5~7.0 | 3.0 | 1.5~3.0 | A | * | * | * | * | * | ||
| Decorative stitches | 79 | 7.0 | 4.0~7.0 | 2.5 | 2.0~3.0 | A | * | * | * | * | * | |
| 80 | 7.0 | 3.5~7.0 | 2.5 | 2.0~3.0 | A | * | * | * | * | * | ||
| 81 | 7.0 | 3.0~7.0 | 2.5 | 2.0~3.0 | A | * | * | * | * | * | ||
| 82 | 7.0 | 3.5~7.0 | 2.5 | 2.0~3.0 | T | * | * | * | * | * | ||
| 83 | 6.0 | 2.5~7.0 | 2.5 | 2.0~3.0 | T | * | * | * | * | * | ||
| 84 | 6.0 | 2.5~7.0 | 2.5 | 1.0~3.0 | T | * | * | * | * | * | ||
| 85 | 6.0 | 4.0~7.0 | 2.5 | 1.5~3.0 | T | * | * | * | * | * | ||
| 86 | 6.0 | 2.5~7.0 | 2.5 | 2.0~3.0 | T | * | * | * | * | * | ||
| 87 | 5.5 | 3.5~7.0 | 2.0 | 1.5~3.0 | A | * | * | * | * | * | ||
| 88 | 6.0 | 4.5~7.0 | 2.5 | 2.0~3.0 | A | * | * | * | * | * | ||
| 89 | 6.0 | 3.5~7.0 | 3.0 | 1.5~3.0 | A | * | * | * | * | * | ||
| 90 | 7.0 | 5.0~7.0 | 3.0 | 2.0~3.0 | A | * | * | * | * | * | ||
| 91 | 6.0 | 5.0~7.0 | 2.5 | 2.0~3.0 | A | * | * | * | * | * | ||
| 92 | 5.0 | 2.5~7.0 | 3.0 | 1.5~3.0 | A | * | * | * | * | * | ||
| 93 | 5.0 | 2.5~7.0 | 2.0 | 1.5~3.0 | T | * | * | * | * | * | ||
| 94 | 5.0 | 4.5~7.0 | 2.0 | 2.0~3.0 | T | * | * | * | * | * | ||
| 95 | 7.0 | 2.5~7.0 | 2.0 | 1.5~3.0 | T | * | * | * | * | * | ||
| 96 | 5.0 | 3.5~7.0 | 2.0 | 1.5~3.0 | T | * | * | * | * | * | ||
| 97 | 5.0 | 3.5~7.0 | 2.0 | 1.0~3.0 | T | * | * | * | * | * | ||
| 98 | 6.0 | 3.5~7.0 | 2.5 | 2.0~3.0 | T | * | * | * | * | * | ||
| 99 | 5.0 | 3.0~7.0 | 2.0 | 1.0~3.0 | T | * | * | * | * | * | ||
*:Adjustmentscanbemade.

Donotdisposeofelectricalappliancesasunsortedmunicipalwaste,useseparatecollection facilities.
Contact your local government for information regarding the collections systems available.
If electrical appliances are disposed of in landfills or dumps, hazardous substances can leak into the groundwater and get into the food chain, damaging your health and well-being.
When replacing old appliances with new once, her retailer is legally obligated to take back your old appliance for disposal at least for free of charge.
Bedienungsanleitung

natural_image
Line drawing of a sewing machine with control panel and buttons (no text or symbols)BEDEUTUNGDERSYMBOLE
Nadelhochstellen
text_image
Labeled diagram of a sewing machine with numbered parts for identification and functionA B C D E F G H I J K L M N O P Q R S T U V W X Y Z
3738 39 40 4142 43 44 45 46 47 4849505152 53 54 55 56 57 5859606162
a b c d e f g h i j k l m n o p q r s t u r w x y z
63 64 65 66 67 686970 7172 73 74 75 76 77 78 79 8081 82 83 8485868788
text_image
Diagram of a sewing machine with labeled components and wiring, including a EIN switch and AUS indicator.natural_image
Hand holding a switch with a blue arrow indicating direction (no text or symbols)text_image
Diagram of a sewing machine's internal structure with numbered components and directional arrows indicating motion or movement.DasWickelnderGarnrolle

1
natural_image
Illustration of hands performing a sewing or sewing process with arrows indicating movement (no text or symbols)
natural_image
Hand holding a mobile phone with a cable being inserted (no text or symbols visible)
natural_image
Diagram showing a mechanical assembly with a knob, handle, and base (no text or symbols)
natural_image
Diagram of a mechanical device with a blue cable and directional arrow, no text or symbols presenttext_image
1 3.5 2.5 xx 3-5natural_image
Hand holding a small mechanical component with wires, no text or symbols visible7 HaltenSiedasFadenendemitderHandfest.
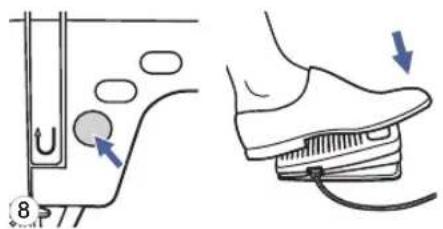
text_image
Diagram showing foot positioning and foot movement on a shoe, with numbered arrows indicating motion direction.natural_image
Illustration of a sewing machine being adjusted for a hand using scissors (no text or symbols)natural_image
Illustration of a sewing process with scissors, thread, and spool (no text or symbols)natural_image
Line drawing of a sewing machine needle stitching into a component, with a hand adjusting the needle (no text or symbols present)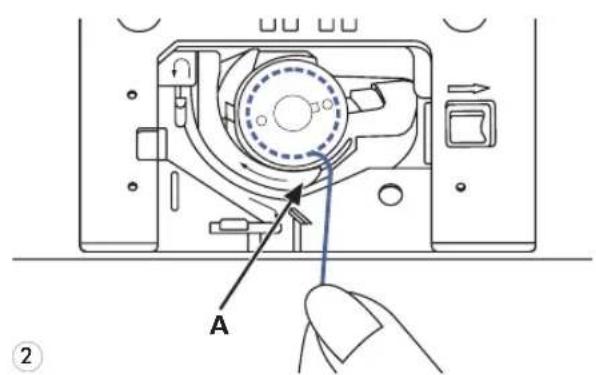
text_image
A ②
text_image
B A ③
text_image
B C ④text_image
Technical diagram of a sewing machine with numbered parts for assembly or maintenance instructions
natural_image
Diagram of a mechanical device with a rotating shaft and housing, showing motion direction (no text or symbols)text_image
Diagram showing two hands tying a knot with arrows indicating direction of movement3

natural_image
Isometric line drawing of a handheld device with directional arrows indicating motion (no text or symbols)natural_image
Diagram showing airflow or traffic flow around a vehicle's side profile, with no visible text or symbolsnatural_image
Hand holding a tool interacting with a mechanical component, showing motion arrows (no text or symbols)5 DannnachuntenundumdenKontrollfedernhalter.

natural_image
Diagram of a car's side profile showing hand positioning and movement arrows (no text or symbols)natural_image
Diagram of a mechanical device with arrows indicating force or movement (no text or symbols)text_image
Technical diagram showing hands operating a sewing machine with labeled parts and a magnified inset showing the foot symbol.
text_image
Technical diagram showing a hand operating a sewing machine with labeled parts and directional arrows indicating movement or force.2
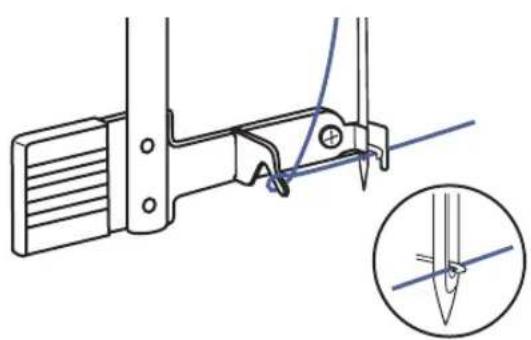
natural_image
Technical line drawing of a mechanical clamp or bracket assembly with a magnified inset showing a pin detail (no text or symbols)3
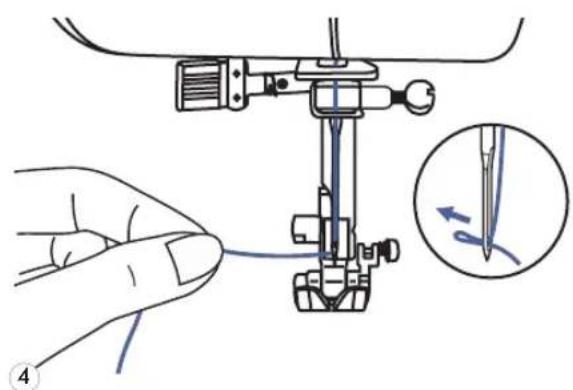
natural_image
Illustration of a hand operating a sewing machine with a close-up inset showing the needle being inserted (no text or symbols present)natural_image
Line drawing of a sewing machine with hands operating the tool (no text or symbols present)natural_image
Line drawing of a sewing machine needle stitching fabric, with no text or symbols presentnatural_image
Illustration of a sewing machine needle stitching fabric, with no visible text or symbolsnatural_image
Illustration of a sewing machine needle stitching fabric, showing thread and stitching (no text or symbols)text_image
Technical diagram showing sewing process steps with arrows indicating movement and adjustment of a componentnatural_image
Illustration of a hand holding a pen or tool with a horizontal line and a vertical arrow indicating measurement (no text or symbols present)natural_image
Line drawing of a sewing machine needle and base mechanism (no text or symbols)natural_image
Diagram of a vehicle interior showing a curved road, valve, and directional arrow (no text or symbols)text_image
1 3.5 2.5 x0x3-5text_image
1 3.5 2.5 xx3-5
text_image
60 ~~7.0 --- 2.0 xx3-5natural_image
Technical line drawing of a sewing machine with two views showing base and top views (no text or symbols)text_image
5 ~7.0 --- 2.0 x×3-5
text_image
Diagram showing wave interaction with labeled components including wavy line, double-wavy line, plus signs, and zigzag lines
text_image
1 3.5 --- 2.5 ××3-5text_image
1 3.5 --- 4.5 ××3-5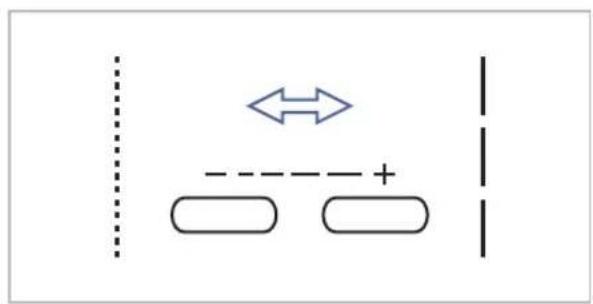
flowchart
graph TD
    A[" "] --> B[" "]
    C[" "] --> D[" "]
    E[" "] --> F[" "]
    G[" "] --> H[" "]
    I[" "] --> J[" "]
    K[" "] --> L[" "]
    M[" "] --> N[" "]
    O[" "] --> P[" "]
    Q[" "] --> R[" "]
    S[" "] --> T[" "]
    U[" "] --> V[" "]
    W[" "] --> X[" "]
    Y[" "] --> Z[" "]
Moduswahltaste

text_image
MODEtext_image
- ~+ + - - - + EDIT M C ↑text_image
6.0 ~~7.0 --- 2.0 x3-5DirekteMusterwahl
text_image
-~ + EDIT M C ↑text_image
- ~ + - - + EDIT M C ↑text_image
- ~+ + - - + EDIT M C ↑text_image
Technical diagram of a sewing machine with numbered components and directional arrows indicating motion or assembly.natural_image
Technical illustration showing a sewing machine needle stitching on fabric, and a close-up of a hand pressing a button on a door (no text or symbols present)natural_image
Line drawing of a sewing machine needle stitching a garment pocket (no text or symbols)
natural_image
Line drawing of a sewing machine needle stitching fabric (no text or symbols)text_image
5 8 E 5.0~7.0 2.0~3.0
natural_image
Technical illustration of a sewing machine needle and its internal structure (no text or symbols)
natural_image
Two identical rectangular panels with wavy internal lines, no text or symbols presentnatural_image
Technical illustration of a sewing machine needle stitching on fabric, showing base and side views (no text or symbols)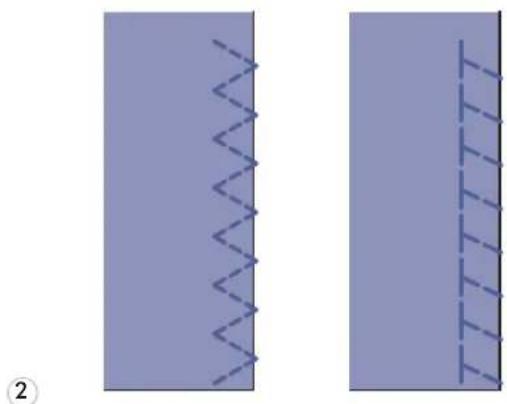
natural_image
Two abstract diagrams showing wavy lines and vertical grid patterns, no text or symbols presenttext_image
2.5~4.0 1.0~2.0natural_image
Mechanical sewing machine needle stitching fabric (no text or symbols visible)
text_image
Technical diagram of a mechanical clamp or connector with labeled parts a and b, showing directional arrows and internal structure.natural_image
Technical line drawing of a sewing machine needle stitching fabric (no text or symbols)natural_image
Diagram showing a curved arrow pointing to a layered structure with no visible text or symbols5 Stoffumdrehen.

natural_image
Simple line drawing of a mechanical component with a circular element and a 3D block (no text or symbols)
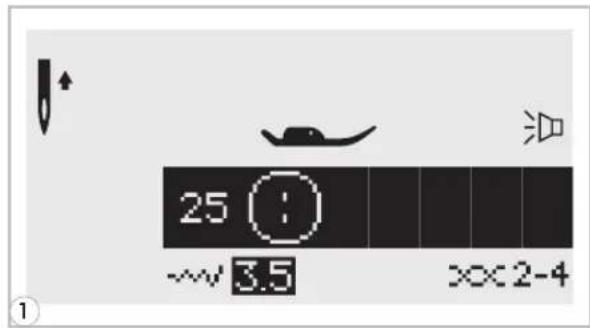
text_image
25 ~3.5 XX2-4
natural_image
Mechanical assembly diagram showing a sewing machine needle inserted into a base plate (no text or symbols visible)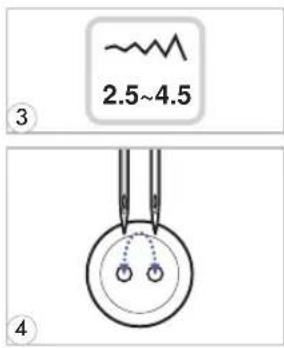
text_image
2.5~4.5 ③ ④
natural_image
Mechanical sewing machine needle stitching a blue fabric surface with circular components (no text or symbols visible)
natural_image
Three circular diagrams with blue molecular or atomic symbols inside, no text or labels presenttext_image
3.0~7.0 1.0~3.0
natural_image
Two vertical lines with horizontal tick marks on a solid background, no text or symbols present.1

natural_image
Two parallel horizontal lines with downward-pointing arrows, no text or symbols present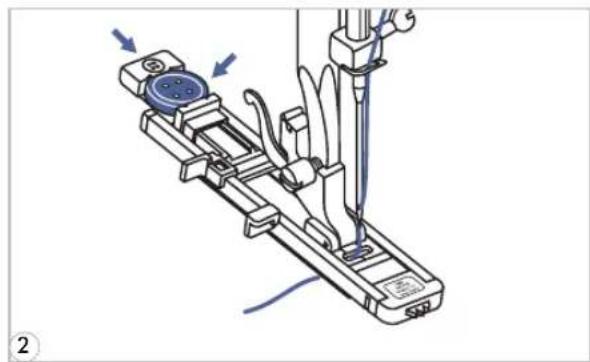
natural_image
Mechanical assembly diagram showing a tool interacting with a device (no text or symbols visible)text_image
0 5.0 --- 0.5 ××2-4
natural_image
Illustration of a sewing machine needle stitching fabric, with a hand pointing to the seam (no text or symbols present)natural_image
Illustration of a hand holding a pen applying material to a blue tool, with no visible text or symbols.natural_image
Technical line drawing of a mechanical device with attached wiring and a side-view view (no text or symbols)natural_image
Illustration of a hand holding a pen with scissors, showing a process step (no text or symbols)natural_image
Technical illustration of a mechanical component with triangular structure and labeled section A-22 (no text or symbols beyond labels)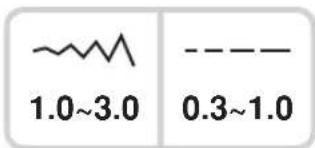
text_image
1.0~3.0 0.3~1.0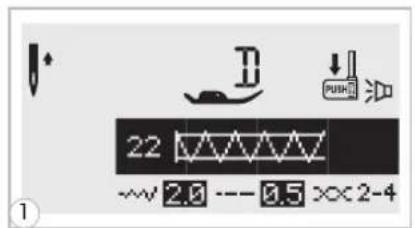
text_image
22 -2.0 -0.5 ××2-4

text_image
2mm 3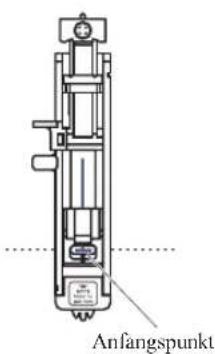
text_image
Diagram showing mechanical or structural deformation with arrows indicating direction and directional components, labeled with number 5.
natural_image
Simple line drawing of a U-shaped container with dashed lines indicating liquid level (no text or symbols)text_image
A-23A-24 5.0 6.0 7.0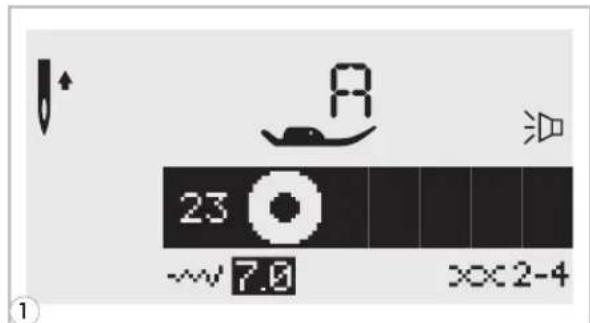
text_image
23 ~~7.0 XX2-4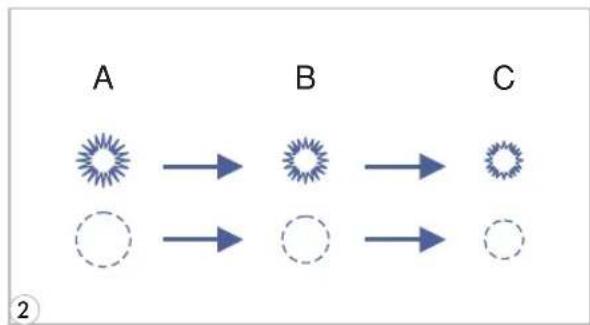
flowchart
graph LR
    A["A"] --> B["B"]
    B --> C["C"]
    A --> D["Dashed Circle"]
    B --> E["Dashed Circle"]
    C --> F["Dashed Circle"]
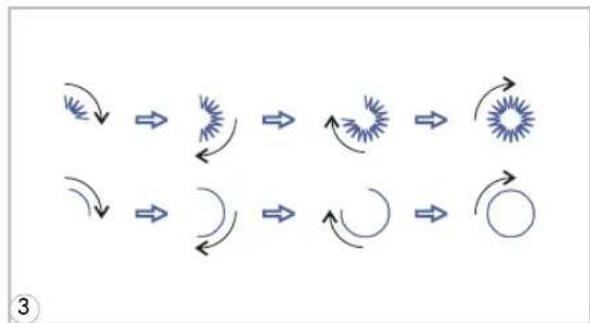
flowchart
graph TD
    A["Start"] --> B["Arrow to Star"]
    B --> C["Arrow to Radial Wave"]
    C --> D["Arrow to Star"]
    D --> E["Arrow to Circle"]
    E --> F["Arrow to Star"]
    F --> G["Arrow to Star"]
    G --> H["Arrow to Star"]
    H --> I["Arrow to Star"]
    I --> J["Arrow to Star"]
    J --> K["Arrow to Star"]
    K --> L["Arrow to Star"]
    L --> M["Arrow to Star"]
    M --> N["Arrow to Star"]
    N --> O["Arrow to Star"]
    O --> P["Arrow to Star"]
    P --> Q["Arrow to Star"]
    Q --> R["Arrow to Star"]
    R --> S["Arrow to Star"]
    S --> T["Arrow to Star"]
    T --> U["Arrow to Star"]
    U --> V["Arrow to Star"]
    V --> W["Arrow to Star"]
    W --> X["Arrow to Star"]
    X --> Y["Arrow to Star"]

natural_image
Illustration of a hand holding a pen tip over a purple surface, with a small blue spot near the tip (no text or symbols)A. Groß:7,0mm(1/4inch).
B. Mittel:6,0mm(15/64inch).
C. Klein:5,0mm(3/16inch).
text_image
A-26 A-27 D
text_image
3.5~7.0 1.0~2.0
text_image
27 ~~ 7.0 --- 2.0 ××3-5
natural_image
Technical illustration of a sewing machine tool and its side view showing internal components (no text or symbols)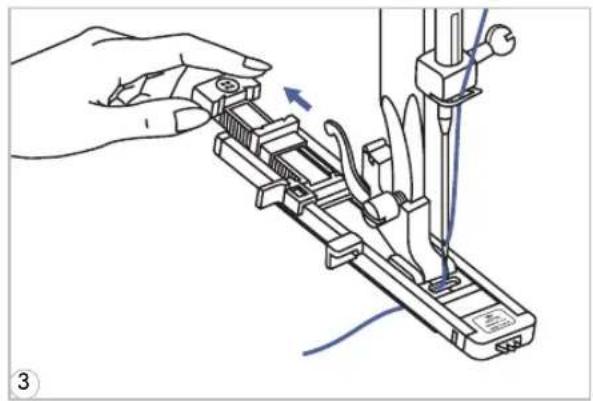
natural_image
Illustration of a hand using a tool to adjust or install a mechanical component, with no visible text or symbols.
text_image
a Start b a Start b StopStopnatural_image
Mechanical assembly diagram showing a lever mechanism with no visible text or symbols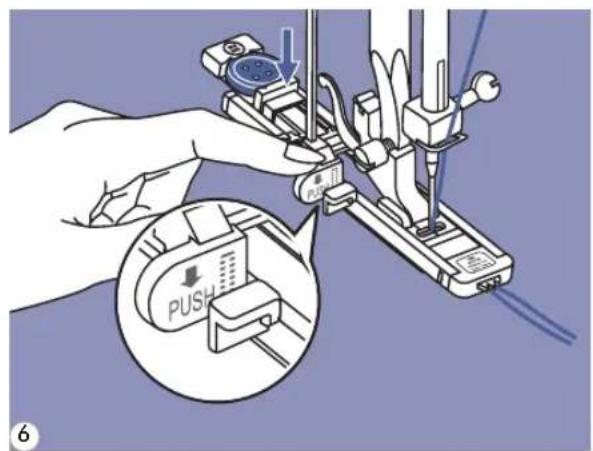
text_image
0.5 PUSH 6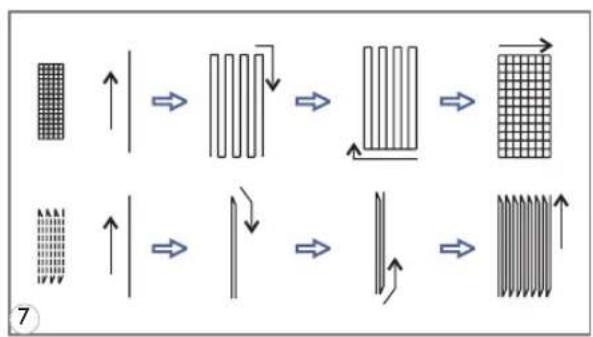
flowchart
graph TD
    A["Initial State"] --> B["Heat Transfer"]
    B --> C["Grid Transition"]
    C --> D["Final State"]

    subgraph State1
        E["Grid State"] --> F["↑"]
        G["Vertical Grid"] --> H["↔"]
        I["Vertical Grid"] --> J["↔"]
        K["Vertical Grid"] --> L["↔"]
    end

    subgraph State2
        M["Vertical Grid"] --> N["↑"]
        O["Vertical Grid"] --> P["↔"]
        Q["Vertical Grid"] --> R["↔"]
        S["Vertical Grid"] --> T["↔"]
    end

    style State1 fill:#f9f,stroke:#333
    style State2 fill:#bbf,stroke:#333
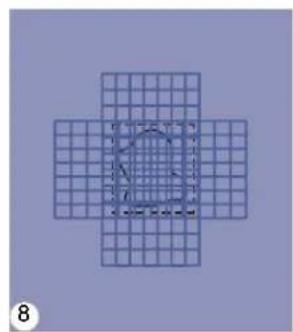
natural_image
Geometric diagram of a cross-shaped grid with a central circular outline and dashed inner lines (no text or symbols)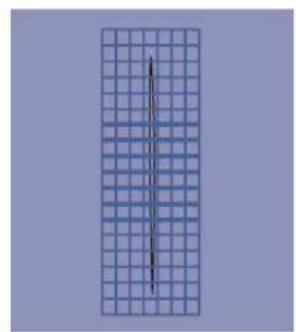
natural_image
Vertical grid pattern with a central vertical line, no text or symbols presentnatural_image
Pure diagram of a vertical structure with internal dashed lines and a central dot, no text or symbols presentnatural_image
Technical line drawing of a sewing machine tool with no visible text or symbols
natural_image
Technical line drawing of a sewing machine needle and foot (no text or symbols)natural_image
Mechanical sewing machine needle stitching fabric (no text or symbols visible)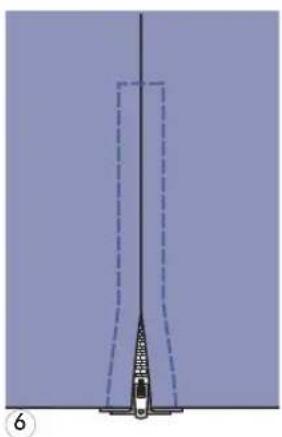
natural_image
Diagram of a vertical structure with dashed lines and a central object, no visible text or symbolsnatural_image
Diagram of a vertical panel with a zipper and a separate side panel, no text or symbols presentnatural_image
Technical illustration of a sewing machine needle with two views (top and side), showing base, handle, and workpiece details without any text or symbols.
natural_image
Mechanical sewing machine needle stitching a blue fabric (no text or symbols visible)natural_image
Simple diagram of a mechanical or electrical component with a vertical line and dashed line, no text or symbols present.
natural_image
Pure technical diagram showing a vertical pipe or channel with a dashed line indicating a depth or width, no text or symbols present.natural_image
Simple line drawing of a mechanical component with a dashed line and a labeled symbol (K), no text or symbols present.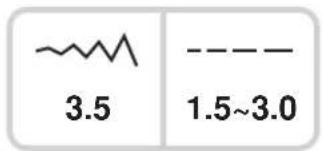
text_image
3.5 1.5~3.0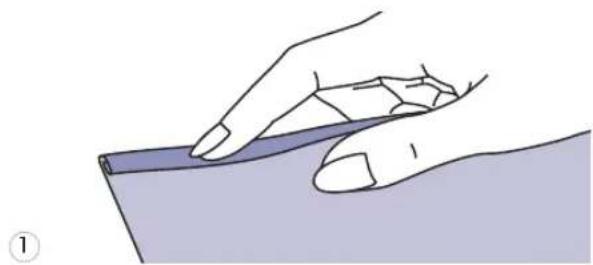
natural_image
Illustration of a hand holding a pen or ruler over a surface, no text or symbols present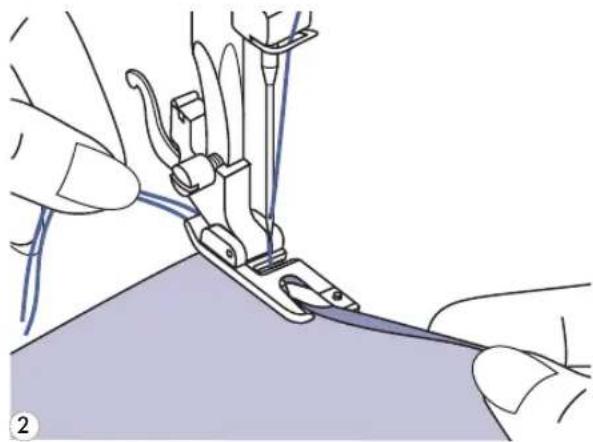
natural_image
Illustration of hands using a sewing machine to cut fabric (no text or symbols visible)
natural_image
Illustration of hands using a sewing machine to handle fabric (no text or symbols visible)natural_image
Technical illustration of a sewing machine needle stitching fabric (no text or symbols)text_image
6A-10A-43
natural_image
Technical illustration of a sewing machine needle stitching a metal strip (no text or symbols)text_image
5 A-28 A-29 A-30 A-31 A-32 A-33 A-34 A-35 A-36 A-37 A-38 A-39 A-40 A-41 A-42 A-43 A-44 A-45 A-46 A-47 A-48 A-49 A-50 A-51 A-52 A-53 A-54 A-55 A-56 A-57 A-58 A-59 A-60
text_image
3.5~7.0 0.5~2.0
natural_image
Technical illustration of a sewing machine needle stitching fabric (no text or symbols)natural_image
Three technical illustrations: a small circular component labeled '1', a mechanical clamp with a handle, and a long L-shaped tool (no text or symbols present)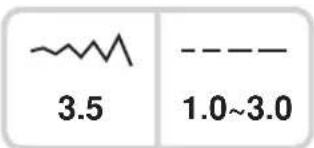
text_image
~~ 3.5 1.0~3.0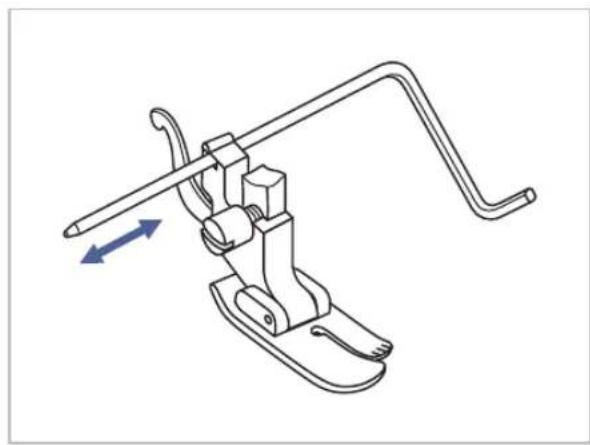
natural_image
Technical line drawing of a mechanical clamp or bracket assembly with directional arrows indicating movement (no text or symbols)natural_image
Technical illustration of a sewing machine needle stitching fabric (no text or symbols)natural_image
Technical diagram showing a mechanical component with a dashed line and a separate view of a bracket (no text or symbols)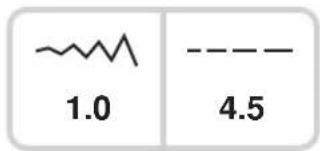
text_image
1.0 4.5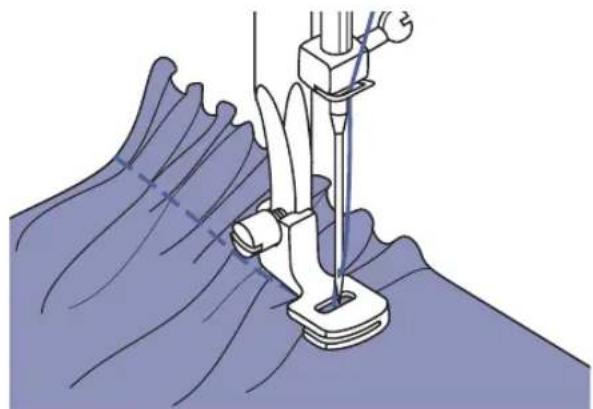
natural_image
Illustration of a sewing machine needle stitching fabric (no text or symbols)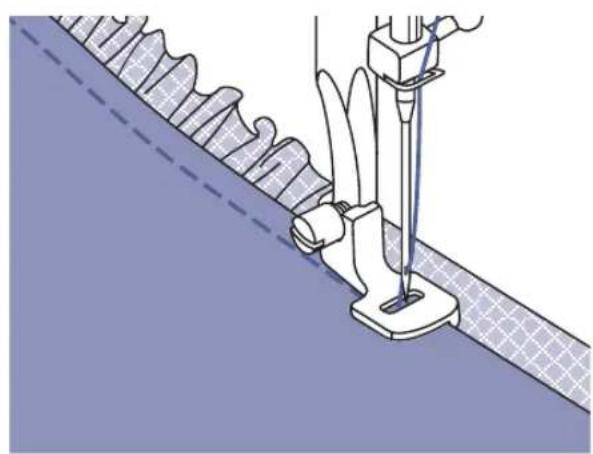
natural_image
Technical illustration of a sewing machine needle stitching fabric, showing blade and measurement setup (no text or symbols)
natural_image
Cross-sectional diagram of layered geological strata with visible strata and grid patterns (no text or labels)text_image
A-09A-10 T A
natural_image
Line drawing of a sewing machine needle stitching fabric (no text or symbols)
natural_image
Illustration of hands holding a blue rectangular object with grid lines, no text or symbols present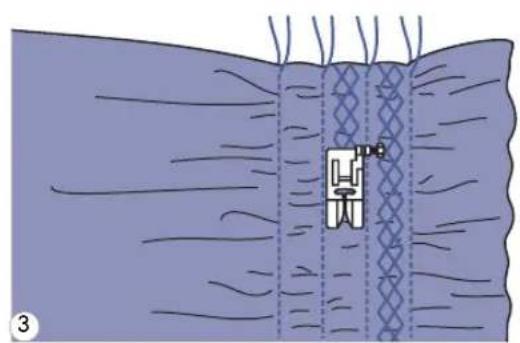
natural_image
Diagram of a medical procedure showing a catheter placement within tissue layers (no text or labels)
natural_image
Illustration of hands tying a knitted fabric with visible stitching and texture (no text or symbols)natural_image
Mechanical sewing machine needle stitching a purple fabric (no text or symbols visible)natural_image
Illustration of a sewing machine needle stitching a circular base with a flower pattern (no text or symbols)natural_image
Illustration of a sewing machine needle stitching a circular basin with a flower pattern (no text or symbols)natural_image
Technical illustration of a mechanical component with a labeled pin (no text or symbols present)text_image
Technical diagram of a sewing machine with directional arrows indicating movement or force, labeled with Chinese text.natural_image
Mechanical assembly diagram showing tool manipulation with arrows indicating motion (no text or symbols)text_image
Technical diagram of a sewing machine with labeled parts (a, b, c) and directional arrows indicating motion or assembly.natural_image
Mechanical sewing machine needle stitching a blue fabric surface (no text or symbols visible)
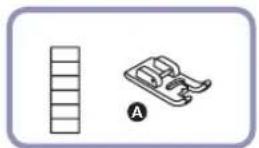
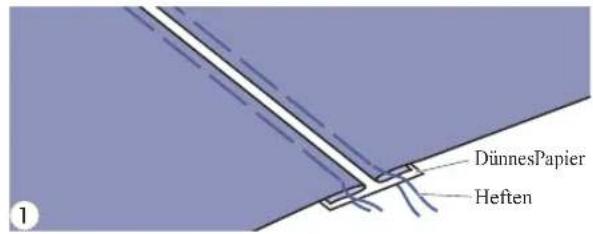
text_image
DünnesPapier Heften
natural_image
Mechanical sewing machine diagram showing needle and handle assembly (no text or labels)
natural_image
Pure diagram of a vertical structure with diagonal hatching, no text or symbols presentnatural_image
Four abstract geometric patterns: a zigzag line, a chevron, a crosshatch, and a stylized object with a handle (no text or symbols)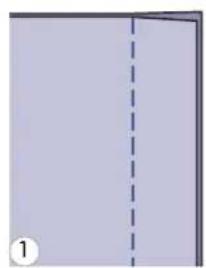
natural_image
Simple diagram showing a vertical dashed line dividing a rectangular area, labeled with number 1 (no text or symbols within the diagram itself)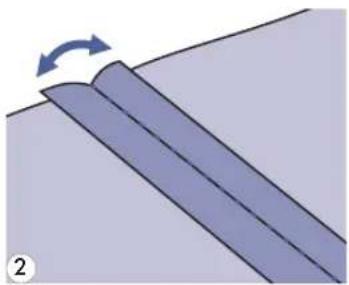
natural_image
Diagram showing a curved surface with an arrow indicating rotation, no text or symbols presentnatural_image
Illustration of a sewing machine needle stitching fabric, showing measurement setup (no text or symbols)GenähterBogensaum

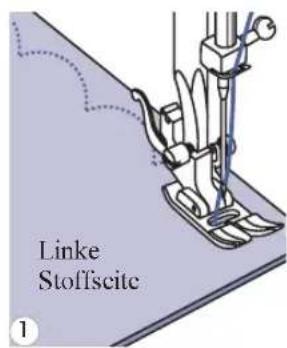
text_image
Linke Stoffscite 1
natural_image
Illustration of a sewing machine needle stitching fabric with scissors (no text or symbols)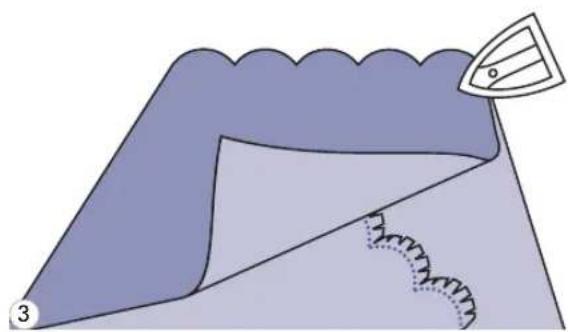
natural_image
Illustration of a folded garment with stitching pattern and a small inset showing a pointed object (no text or symbols)GestickteBogenkante
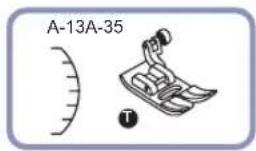


natural_image
Line drawing of a sewing machine needle stitching fabric (no text or symbols)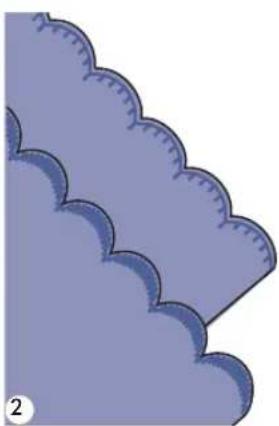
natural_image
Illustration of stylized cloud shapes in purple, no text or symbols presenttext_image
A-28 A-29 A-30 A-31 A-32 A-33 A-34 A-35 A-36 A-37 A-38 A-39 A-40 A-41 A-42 A-43 A-44 A-45 A-46 A-47 A-48 A-49 A-50 A-51
text_image
2.5~7.0 0.3~1.0
text_image
4 5 6 7 8 9 0 1text_image
x1 x2 x3 x4 x5 3text_image
60 7.0 --- 2.0 xx3-51 DieMusterwählen.
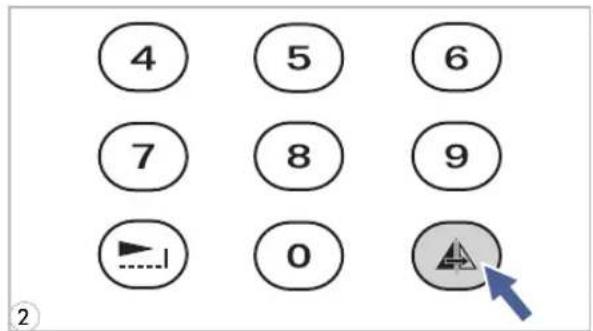
text_image
4 5 6 7 8 9 0 ②natural_image
Two identical line-drawn floral patterns labeled A and B, no text or symbols presentA. NormaleMuster.
text_image
Diagram illustrating a sewing process with labeled parts and directional arrows, including a magnified inset showing the needle tip.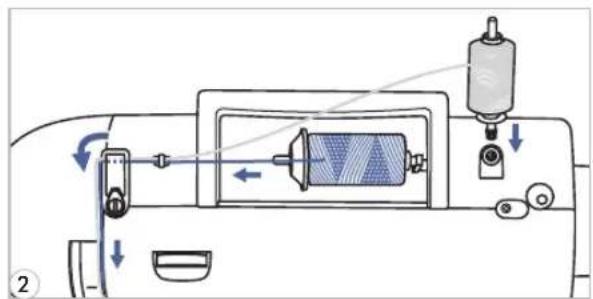
text_image
Diagram of a sewing machine's internal components with labeled parts and directional arrows indicating motion or movement.
text_image
Technical diagram showing sewing machine operation with labeled components and directional indicator
text_image
1 3.5 --- 2.5 ××3-5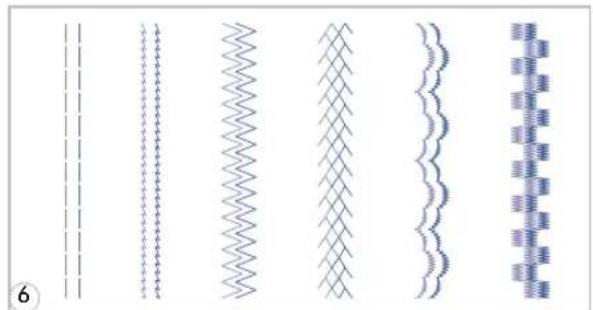
natural_image
Five abstract line patterns with wavy, zigzag, and dotted textures, no text or symbols present7 Zwillingsnadeleinsetzen.
text_image
M 00 + M 1-4:_ 3.5 - 2.5 > 3-5text_image
M 00 M 1-4:2 3.5 --- 2.5 > 3-5text_image
M M2 0 1/00text_image
M M2 0 1/00 5text_image
M 6.0 M2 0 1/0 1 7.0 --- 2.0 xx3-5text_image
M 31 M2 20/20 7.0 --- 8.5 ××2-4text_image
00 + - = - = 3.5 -- 2.5 x×3-5text_image
M 28 M2 05/10 7.0 --- 8.5 ××2-4text_image
M 31 M2 06/11 7.0 --- 0.5 ××2-4text_image
M 28 M2 19/19 7.0 --- 0.5 XX-2-4text_image
M EDIT M2 19/19 28 7.0 --- 6.5 ××2-4text_image
M EDIT M2 19/19 28 X5 -ww 2.5 --- 0.3 xx2-4text_image
M 28 X5 M2 19/19 ~2.5 --- 0.3 ××2-4text_image
M 28 M2 05/10 7.0 --- 0.5 ××2-4text_image
M 31 M2 05/09 7.0 --- 0.5 ××2-4text_image
M 00 + M1-4:_ 3.5 --- 2.5 x 3-5text_image
M 00 M1-4:2 3.5 2.5 X:3-5text_image
Diagram showing foot positioning and foot movement of a shoe, with labeled parts and directional arrows indicating motion.4 DurchDrückendesFusspedalsoderderStart-/Stopp-Taste amNähcomputerwirdderNähvorganggestartet.

text_image
M 28 X2 M2 19/20 7.6 0.5 XXC2-4 油text_image
00 + - = = 3.5 - 2.5 xx3-5text_image
0 5.0 --- 0.5 >x2-4natural_image
Illustration showing a hand holding a spool and rotating a cable, with no text or symbols present.text_image
- ~+ EDIT M ON OFF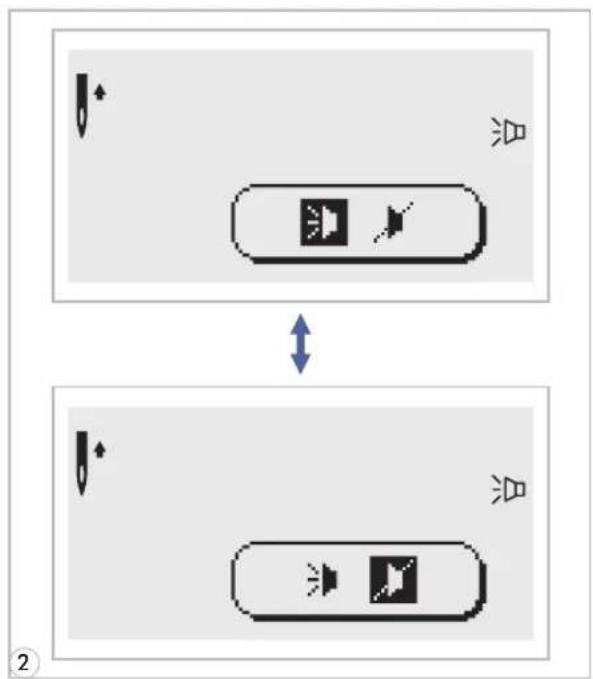
flowchart
graph TD
    A["Top Step"] --> B["Left Arrow"]
    B --> C["Right Arrow with 'Spike' icon"]
    C --> D["Bottom Step"]
    D --> E["Left Arrow"]
    E --> F["Right Arrow with 'Spike' icon"]
    F --> G["Bottom Step"]

text_image
1 3.5 2.5 ××3-51 "EDIT" T a s t e d r ü c l Schalteranschalten.
natural_image
Illustration of a hand using a tool to clean or restore a small electronic device (no text or symbols visible)natural_image
Illustration of a sewing machine needle stitching a fabric with arrows indicating direction (no text or symbols)
natural_image
Illustration of a hand using a screwdriver to adjust or install a mechanical component on a base (no text or symbols visible)
natural_image
Technical diagram of a sewing machine needle and screwdriver on a base plate, showing mechanical components (no text or symbols)
natural_image
Line drawing of a hand inserting a component into an electronic device (no text or symbols visible)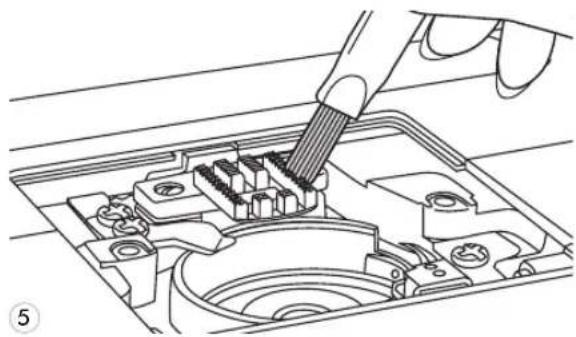
natural_image
Technical line drawing of a hand using a screwdriver to insert or install internal components (no text or symbols visible)