The Custom Loaf BBM800 - Bread maker BREVILLE - Free user manual and instructions
Find the device manual for free The Custom Loaf BBM800 BREVILLE in PDF.

User questions about The Custom Loaf BBM800 BREVILLE
0 question about this device. Answer the ones you know or ask your own.
Ask a new question about this device
Download the instructions for your Bread maker in PDF format for free! Find your manual The Custom Loaf BBM800 - BREVILLE and take your electronic device back in hand. On this page are published all the documents necessary for the use of your device. The Custom Loaf BBM800 by BREVILLE.
USER MANUAL The Custom Loaf BBM800 BREVILLE
natural_image
Exterior view of a modern silver-colored food processor with black handle and side legs (no visible text or symbols)
INSTRUCTION BOOK

MANUEL D'INSTRUCTIONS

2 Breville® Recommends Safety First
7 Components
10 Functions
26 Optional Settings
26 - Using the PAUSE feature
27 - Using the DELAY START button
28 - Using the MODIFY button
30 - Using the CUSTOM setting
31 Tips For Better Bread Making
34 The Vital ingredients
38 Care & Cleaning
40 Troubleshooting
47 Custom Recipe Charts
52 Baking Sequences
103 French
213 Spanish
BREVILLE® RECOMMENDS SAFETY FIRST
At Breville® we are very safety conscious. We design and manufacture consumer products with the safety of you, our valued customer, foremost in mind. In addition, we ask that you exercise a degree of care when using any electrical appliance and adhere to the following precautions.
IMPORTANT SAFEGUARDS
READ ALL INSTRUCTIONS BEFORE USE AND SAVE FOR FUTURE REFERENCE
- Remove and safely discard any packaging materials and promotional labels before using the appliance for the first time.
- To eliminate a choking hazard for young children, remove and safely discard the protective cover fitted to the power plug of this appliance.
-
To protect against electric shock, do not immerse the power plug, power cord or stainless-steel housing in water or any other liquid.
-
Unwind the power cord fully before use.
- Do not allow the power cord to hang over the edge of a table or counter, touch hot surfaces or become knotted.
- Do not place the appliance near the edge of a bench or table during operation. Ensure the surface is dry, level and clean (free of water, flour and other substances). Vibration during operation may cause the appliance to move slightly.
- Do not place this appliance on or near a hot gas or electric burner or in a heated oven. Position the appliance with a minimum distance of 4" (10cm) of space on both sides of the appliance. This will allow for adequate air circulation and help prevent the possibility of wall discoloration due to radiated heat.
- Always operate the appliance on a stable and heat resistant surface. Do not use on a cloth-covered surface, near curtains or other flammable materials.
- Do not operate the appliance on a sink drain board.
- Always ensure the appliance is properly assembled before connecting to a power outlet and operating. Follow the instructions provided in this book.
• Always ensure the collapsible paddle is removed from the base of the baked loaf prior to slicing.
- Do not touch hot surfaces. Appliance surfaces, including the lid and outer surface are hot during and after operation. To prevent burns or personal injury, always use handles and knobs where available and protective hot pads or insulated oven mitts when inserting, removing or handling the bread pan from the stainless-steel housing. Alternatively, allow the appliance to cool completely before inserting or removing parts, disassembling and cleaning.
- Always use protective hot pads or insulated oven mitts when removing bread or jam from the bread pan. In particular, extreme caution must be used when moving the appliance or the bread pan containing hot liquids such as jam, as the jam is extremely hot.
- Steam vents are very hot during and after operation. Do not cover the steam vents when the appliance is in use. Do not place anything on top of the lid.
- Do not leave the lid open for extended periods of time when in use.
- Do not place any ingredients directly into the interior cavity of the stainless-steel housing. Place ingredients into the bread
pan only, ensuring to wipe any spills from the rim and outside of the pan.
- Do not underfill or overfill the bread pan as the bread may not mix properly. The recipes in this book are designed for 1lb to 2.5lb (0.5kg to 1.25kg) loaves. However, if developing your own recipes, as a general guide, a minimum 2 cups and maximum 4,5 cups of total dry ingredients is recommended. On the jam setting, as a general guide, a maximum 3 cups of fruit should be used.
- Do not immerse the outside of the bread pan in water. Doing so may interfere with the free movement of the drive shaft. Submerge and wash only the interior of the bread pan, ensuring the outside is clean and thoroughly dry.
- Do not pour any liquids into the Automatic Fruit and Nut Dispenser. Only use suitably sized ingredients that will not fall through the steam vents.
- Avoid contact with moving parts.
- To turn the appliance OFF, press and hold the CANCEL button. The appliance is OFF when the START | PAUSE button surround is no longer red. Remove the power plug from the power outlet.
• Always turn the appliance OFF by pressing and holding the CANCEL button then
removing the power plug from the power outlet if the appliance is to be left unattended, if not in use, before attempting to move the appliance, before cleaning, disassembling, assembling and when storing the appliance.
- Strictly follow the care and cleaning instructions described in this book.
- This appliance is for household use only. Do not use the appliance for anything other than its intended purpose as described in this book. Do not use outdoors. Do not use in moving vehicles or boats.
- The use of attachments not sold or recommended by Breville may cause fire, electric shock or injuries.
- This appliance is not intended to be operated by means of an external timer or separate remote-control system.
- Do not leave the appliance unattended when in use.
- This appliance is not intended for use by young children or infirm persons without supervision. Close supervision is necessary when this appliance is used by or near children.
- Regularly inspect the power plug, power cord and actual appliance for any damage. Do not operate
if damaged in any way or after the appliance malfunctions. Immediately cease use of the appliance and visit www.Breville.com or call Breville Customer Service on 1-866-BREVILLE for replacement, repair or adjustment.
- For any maintenance other than cleaning, visit www.Breville.com or call Breville Customer Service on 1-866-BREVILLE.
- This appliance is equipped with a power cord having a grounding wire with a grounding plug. The appliance must be grounded using a 3-hole properly grounded outlet. In the event of an electrical short circuit, grounding reduces the risk of electrical shock.
- If the power outlet is a standard 2-prong wall outlet, it is your personal responsibility and obligation to have it replaced with a properly grounded 3-prong wall outlet.
- Do not, under any circumstances, cut or remove the third (ground) prong from the power cord or use an adapter.
- Consult a qualified electrician if the grounding instructions are not completely understood, or if doubt exists as to whether the appliance is properly grounded
BREVILLE ASSIST™ PLUG
Your Breville appliance comes with a unique Assist™ Plug, conveniently designed with a finger hole in the power plug for easy and safe removal from the wall outlet. For safety reasons it is recommended you plug your Breville appliance directly into its own electrical outlet on a dedicated circuit separate from other appliances. If the electric circuit is overloaded with other appliances, your appliance may not function properly. Use in conjunction with a power strip or extension cord is not recommended.
SHORT CORD INSTRUCTIONS
Your Breville appliance is fitted with a short power supply cord as a safety precaution to prevent personal injury or property damage resulting from pulling, tripping or becoming entangled with a longer cord. Do not allow children to use or be near this appliance without close adult supervision. Longer detachable power supply cords (extension cords) or power strips are not recommended but may be used if care is exercised. If an extension cord is used, (1) the marked electrical rating of the
extension cord should be at least as great as the electrical rating of the appliance,
(2) the cord should be arranged so that it will not drape over the countertop or tabletop where it can be pulled on by children or tripped over unintentionally and (3) the extension cord must include a 3-prong grounding plug.

HOT SURFACES DO NOT TOUCH
This symbol indicates that the temperature of accessible surfaces may be high when the appliance is in operation and for some time after use.
FOR HOUSEHOLD USE ONLY SAVE THESE INSTRUCTIONS

Components

natural_image
Top-down view of a rectangular container with internal holes and labeled points A and B (no text or symbols beyond labels)
natural_image
Top-down view of a mechanical component with central hub and mounting holes (no text or symbols visible)A. Non-Stick Bread Pan with Handle
B. Drive Shaft (inside Bread Pan)
C. Wing-Nut (underside of Bread Pan)
D. Stainless Steel Housing
Interior cavity (the baking chamber contains the heating element and drive mechanism
E. Automatic Fruit and Nut Dispenser Steam vents in the dispenser lid and base
F. Viewing Window
G. Removable Lid
H. Ventilation Grills
I. WEIGHT | TEMP button
Press to convert the default imperial temperature and weight (°F and lbs) to metric units (°C and kgs).
Rating Information
120V \~60Hz 830W

text_image
E H F G D CUSTOM W/ BLADE WHOLE W/BLADE BALANCE SOLVER FREE CREPLY LIGHT TARELL HEAD FREE EXHAUM ONION ONION ONION 3:05 JAM BEARING DRUM START MOBRY CANCEL START / PAUSE H RESET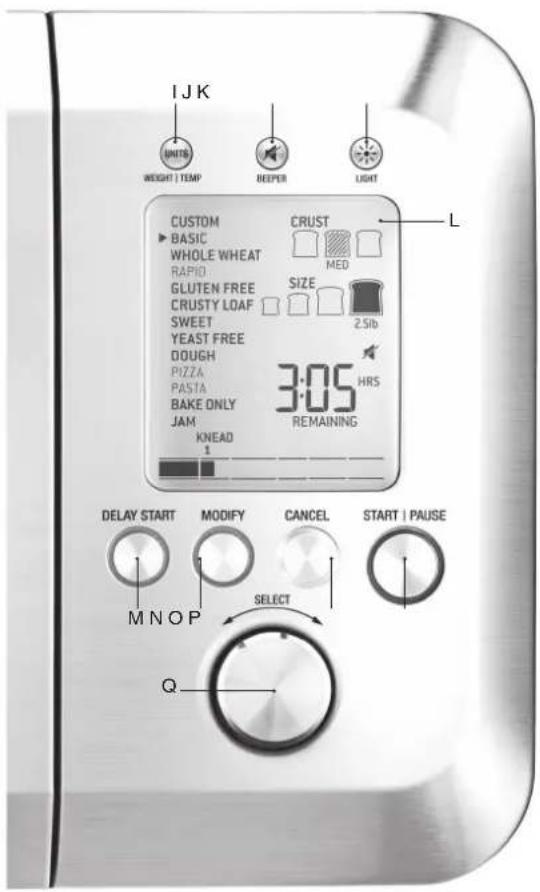
text_image
IJK UNITS WEIGHT | TEMP REOPER LIGHT CUSTOM BASIC WHOLE WHEAT RAPID GLUTEN FREE CRUSTY LOAF SWEET YEAST FREE DOUGH PIZZA PASTA BAKE ONLY JAM KNEAD 1 CRUST MED SIZE 2.5lb 3:05 HRS REMAINING DELAY START MODIFY CANCEL START | PAUSE M N O P SELECT QJ. BEEPER button
Press to mute the sound alerts. The LCD screen will display the [sound mute icon] symbol when the sound alerts have been muted and no symbol when the sound alerts are on.
K. LIGHT button
Press and hold to illuminate the interior baking chamber.
L Backlit LCD screen
M. DELAY START button
Press to select when you would like the loaf to be ready and the bread maker will automatically start at the appropriate time.
N. MODIFY button
Press to modify the default temperatures and times for the preheat, knead, rise, punch-down, bake and keep warm phases.
O. CANCEL button
Before the cycle is activated, press to return to the main menu. After the cycle is activated, press and hold to cancel the cycle.
P. START | PAUSE button
Press to activate the cycle
Press and hold to pause the cycle.
The LCD screen will display a flashing 'PAUSE' until the button is pressed again to resume the cycle.
Q. SELECT push-dial
(turn to scroll, push to select)
Scroll through 14 settings, 3 crust colours and 4 loaf sizes.
Use in conjunction with the MODIFY button to change the default temperatures and times for the preheat, knead, rise, punch-down, bake and keep warm phases.
natural_image
Two black plastic earments with labeled positions: Flat Position and Upright Position (no text or symbols on the parts themselves)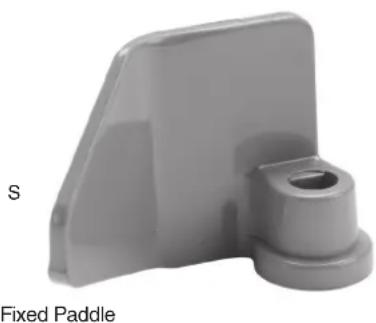
natural_image
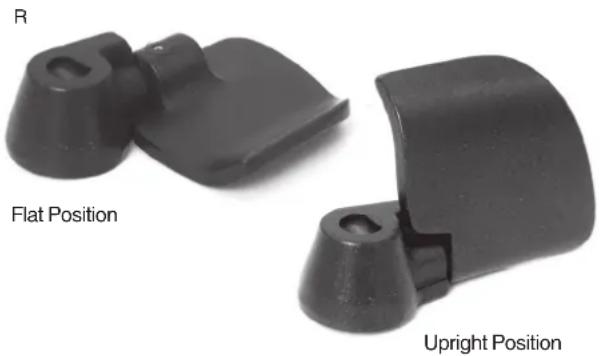
Gray plastic Fixed Paddle component with a circular hole and side plate (no text or symbols on the part itself)R. Collapsible Paddle
For use with dough settings.
Always ensure the collapsible paddle is inserted in the upright position for thorough mixing during the 'knead 1' phase.
The collapsible paddle will automatically collapse into the flat position then return to the upright position during the appropriate times in the 'knead 2', 'rise' and 'punch-down' phases. The collapsible paddle will automatically collapse before the 'bake' phase to minimise the hole at the bottom of the baked loaf.

TIPS
Although the collapsible paddle will automatically collapse before the start of the 'bake' phase to minimise the hole at the bottom of the baked loaf, you can also remove the paddle altogether for an even smaller hole. See page 10 for more details.
S. Fixed Paddle
For use with the jam setting.

NOTE
Non-stick bread pan and collapsible paddle are consumable parts. Limited warranty period.

Functions
BEGINNER'S GUIDE TO BREAD MAKING
- Before using the bread maker for the first time, remove and safely discard any packaging material and promotional labels including the clear film over the display panel. Ensure the power cord is unplugged from the power outlet.
- Wipe the exterior of the stainless-steel housing with a soft, damp cloth. Dry thoroughly.
- Wash the inside of the bread pan with warm soapy water and a soft cloth. Rinse and dry thoroughly. Do not immerse the outside of the bread pan in water as this may interfere with the free movement of the coupling and drive shaft. Wash only the interior of the bread pan.
- Wash the collapsible paddle and fixed paddle in warm soapy water and a soft cloth. Rinse and dry thoroughly.
1. Remove the Bread Pan
b. Place the bread maker on a flat dry surface such as a bench top. Ensure the power cord is unplugged from the power outlet.
c. Lift open the lid and remove the bread pan from the interior baking chamber by holding the handle and lifting straight up.

NOTE
Always remove the bread pan from the baking chamber before inserting the paddle and ingredients. This ensures that ingredients are not spilt onto the heating element and drive mechanism inside the baking chamber.
2. Insert the Collapsible or Fixed Paddle
a. Select the appropriate paddle. Refer to the 'Components' section.
- The collapsible paddle is for use with all bread and dough settings.
- The fixed paddle is for use with the jam setting.
b. Ensure there is no baked-on residue on the drive shaft inside the bread pan or in any of the paddle crevices, including the 'D' shaped hole and hinge area.
c. Align the 'D' shaped hole on the paddle with the 'D' shape on the drive shaft inside the bread pan. Push down firmly. The paddle should rotate with the drive shaft, collapsible parts should be free to move.
It is important that the paddle is properly assembled onto the drive shaft to ensure ingredients are mixed and kneaded properly.
Paddle

text_image
Paddle Drive ShaftPush down firmly

natural_image
Top-down view of a metallic mechanical component with a central slot and bolt holes (no text or symbols visible)d. If using the collapsible paddle, ensure it is inserted in the upright position for thorough mixing during the 'knead 1' phase. The collapsible paddle will automatically collapse into the flat position then return to the upright position during the appropriate times in the 'knead 2', 'rise' and 'punch-down' phases, then collapse before the 'bake' phase begins to minimise the hole at the bottom of the baked loaf.

natural_image
Two black plastic clip components labeled 'Flat Position' and 'Upright Position', showing different orientations (no text or symbols on the clips themselves)- Add ingredients to the Bread Pan
a. If using the collapsible paddle, ensure it is securely inserted an in the upright position.
b. Before adding ingredients to the bread pan, ensure they are:
- Fresh. In particular, fresh flour and yeast are critical – check the 'Best Before Date' stamped on the package. For tips on checking the freshness of your yeast, refer to the comments on yeast in 'The Vital Ingredient' section.
- Measured and weighed accurately. Refer to 'Tips for Better Bread Making - Measuring and Weighing Ingredients' in this book. It is very important to spoon or scoop the dry ingredients loosely into the measuring cup then level the top of the cup by sweeping the excess with the back of a knife or spoon handle. NEVER scoop the cup into the flour bag, tap the cup or pack ingredients into the cup as this extra amount can affect the critical balance of the recipe.
- At room temperature 68^ F - 77^ F ( 20^ C - 25^ C), except all liquids which should be 80^ F ( 27^ C) unless stated otherwise in a recipe. Temperatures too cool or too warm can prevent the yeast from activating and affect the way the bread rises and bakes.
c. Add ingredients to the bread pan in the order listed in the recipe to ensure the dough mixes thoroughly and rises sufficiently. Wipe any spilt ingredients from the rim and outside of the pan and ensure it is clean and dry. - Liquid ingredients
- Fats
• Dry ingredients e.g. salt, sugar, flour - Yeast
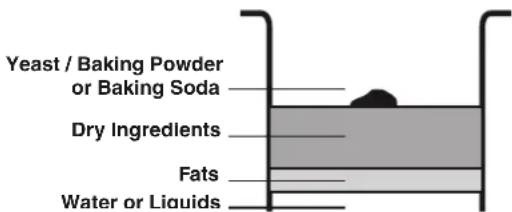
text_image
Yeast / Baking Powder or Baking Soda Dry Ingredients Fats Water or Liquids
TIP
There are three main types of domestic yeast available:
- Cake Yeast: also known as fresh yeast or wet yeast
• Active Dry Yeast - Instant Yeast: also known as quick-rise yeast, rapid-rise yeast, fast-rising yeast, fast-acting yeast or bread machine yeast.
Cake Yeast is not recommended for use with the bread maker. We recommend using Active Dry Yeast, added directly into the flour (no dissolving necessary) if the liquid ingredients are 80^ (27^) , unless stated otherwise.
For the shorter BASIC RAPID and WHOLE WHEAT RAPID settings, use only Instant Yeast or the bread will not rise properly during the shortened 'rise' phase. We also recommend adding Vital Wheat Gluten when using these settings. For recommended quantities, Refer to 'Vital Wheat Gluten', page 35 and 'Yeast', page 36.
Yeast must be separate from wet ingredients, so always ensure to layer ingredients in the bread pan in the order listed in the recipe (liquids, fats, dry ingredients, yeast). When using the Delay Start feature, this is particularly important as the yeast should not be placed in direct contact with water, salt or sugar as these can prematurely activate or decrease the activity of the yeast and the bread may not rise. When using the Delay Start feature, we recommend layering the ingredients in the order listed in the recipe, making a small hollow in the center of the flour (ensuring the hollow does not touch the water, salt or sugar layer) then placing the yeast in the hollow.

NOTE
Do not underfill or overfill the bread pan as the bread may not mix properly. The recipes in this book are designed for 1lb to 2.5lb (0.5kg to 1.25kg) loaves. However, if developing your own recipes, as a general guide, a minimum 2 cups and a maximum 4.5 cups of total dry ingredients is recommended. On the jam setting, as a general guide, a maximum 3 cups of fruit should be used.
4. Return the Bread Pan to the Baking Chamber
a. Align the wing-nut on the underside of the bread pan with the drive mechanism in the interior baking chamber of the stainless-steel housing. You may need to turn the wing-nut slightly if you have difficulty aligning it onto the drive mechanism. Push down firmly until the bread pan is securely in position.
It is important that the bread pan is properly assembled onto the drive mechanism to ensure the paddle operates correctly.
b. Lower the lid. Don't lift open the lid during operation unless stated in the recipe, to check the consistency of the dough during the 'knead' phase, or to glaze and add seeds to the top of the loaf during the 'bake' phase. Refer to 'Using the Pause Feature' in this book on page 26.
5. Load the Automatic Fruit and Nut Dispenser (Optional)
The Automatic Fruit and Nut Dispenser releases fruits, nuts, chocolate chips, seeds or other suitably sized ingredients into the dough at the right time which is programmed for a specific time during the 'knead' phase. If added before this time, excessive kneading will cause the ingredients to break down rather than maintain their shape within the dough.
a. Ensure the bread pan is in the baking chamber.
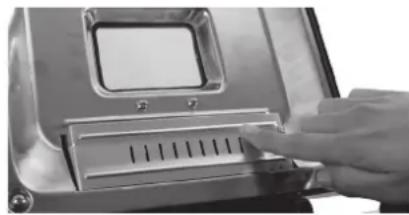
b. Lift open the lid of the main stainless-steel housing. The base of the Automatic Fruit and Nut Dispenser can be identified by the row of steam vents. Push in the base until it clicks into place. Close the main stainless-steel housing lid.
natural_image
Close-up of a hand pressing down on a metallic device with a control panel (no visible text or symbols)c. Lift open the lid of the Automatic Fruit and Nut Dispenser then add a maximum 34 cup of dry ingredients. Always remember:
- Ingredients should be suitably sized, so they do not fall through the steam vents at the base of the dispenser. We recommend separating ingredients that may stick together, such as raisins and other fruits, before adding.
- Liquids should not be added to the dispenser.
- Glacé (glazed) fruits such as cherries, ginger, pineapple; and bottled or canned ingredients such as olives and sun-dried tomatoes etc. should be washed and thoroughly dried on kitchen paper towel before adding into the dispenser.
- It is recommended that the dispenser be cleaned thoroughly with a soft, damp cloth after each use.
d. The Fruit and Nut Dispenser will automatically release its contents on the BASIC, BASIC RAPID, WHOLE WHEAT, WHOLE WHEAT RAPID, GLUTEN FREE, CRUSTY LOAF, SWEET, YEAST FREE and all DOUGH settings. You may notice the base of the dispenser flip open during the bread making cycle even when it is empty. This is normal. It is the dispenser automatically releasing ingredients 8 minutes before the end of the 'knead 2' phase, regardless of whether it has been loaded.

TIP
If ingredients exceed the maximum 34 capacity of the dispenser, lift open the lid and add ingredients manually when the 'add-in' alert sounds 8 minutes before the end of the 'knead 2' phase. Ensure the BEEPER button has not been muted and the sound alerts are on - there should be no [sound mute icon] symbol on the LCD screen. Do not press and hold the CANCEL button to add ingredients as this will cancel the entire cycle.
- Plug in the Power Cord
a. Unwind the power cord completely and insert the power plug into a grounded power outlet.
b. An alert will sound, and the LCD screen will illuminate.
The function options will appear with an indicator on the preset BASIC setting.
- Select the Setting
a. Turn the SELECT push-dial until the indicator on the LCD screen reaches the desired setting. Press the push-dial to select.
b. If you accidentally press the wrong setting, press the CANCEL button to return to the main menu and make your selection again.
The table below outlines the different settings.
| SETTING PADDLE DESCRIPTION CRUST COLOR | OPTIONS | LOAF SIZE OPTIONS | MORE INFORMATION | ||
| CUSTOM Depends on selected setting | This is a setting that allows you to modify the preset, recommended temperatures and times for the 'preheat', 'knead', 'rise', 'punch-down', 'bake' and 'keep warm' phases to suit a specific recipe or your personal preference. It then stores it in the memory of the bread maker. This is particularly useful if you have a favorite recipe that you regularly bake. Alternatively, for advanced bakers it allows you to factor in variables such as the brand and type of flour, quality of the yeast, altitude and climate considerations. Forexample, ina humid climate the rising cycles can be reduced. | Depends on selected setting | Depends on selected setting | 'Using the CUSTOM setting', page 30. | |
BASIC Collapsible | This is an all-purpose setting for white breads, whole wheat breads and whole grain breads that contain more than 50% bread flour. Use this setting for packaged bread mixes. | LIGHTMEDIUMDARK | 1.0lb (0.5kg)1.5lb (0.75kg)2.0lb (1.0kg)2.5lb (1.25kg) | Use the MODIFY button to see the preset phase temperatures and times.Refer to 'Using the MODIFY button', page 28.For recipes, refer to the BASIC section, page 57. | |
| BASIC RAPID | Collapsible | This is an all-purpose setting for white breads, whole wheat breads and whole grain breads that contain more than 50% bread flour. Use this setting for packaged bread mixes.Unlike the BASIC setting, the BASIC RAPID setting reduces all three of the 'rise' phases, shortening the entire cycle time by approximately an hour. For this reason, Instant Yeast (also known as quick-rise yeast, rapid-rise yeast, fast-rising yeast, fast-acting yeast or bread machine yeast) must be used with this setting or the bread will not rise and bake properly.Almost any BASIC recipe can be modified for use with the BASIC RAPID setting by replacing Active Dry Yeast with an equal or larger amount of Instant Yeast. We also recommend adding Vital Wheat Gluten. For recommended quantities, Refer to 'Vital Wheat Gluten', page 35 and 'Yeast', page 36. | LIGHTMEDIUMDARK | 1.0lb (0.5kg)1.5lb (0.75kg)2.0lb (1.0kg)2.5lb (1.25kg) | Use the MODIFY button to see the preset phase temperatures and times.Refer to 'Using the MODIFY button', page 28. For recipes, refer to the BASIC section, page 57. |
| WHOLE WHEAT | Collapsible | This is a setting for breads that contain more than 50% whole wheat, whole grain, or specialty flour such as barley or rye. Due toingredient properties, breads baked on the WHOLE WHEAT setting are generally shorter and denser than breads baked on the BASIC setting. To encourage a lighter, higher loaf, unlike the BASIC setting, the WHOLE WHEAT setting has a 'preheat' phase that warms the ingredients to allow the yeast to perform optimally. The 'preheat' phase also allows heavy grains and flours to absorb liquid, before softening and expanding for better gluten development. | LIGHTMEDIUMDARK | 1.0lb (0.5kg)1.5lb (0.75kg)2.0lb (1.0kg)2.5lb (1.25kg) | Use the MODIFY button to see the preset phase temperatures and times.Refer to 'Using the MODIFY button', page 28. For recipes, refer to the WHOLE WHEAT section, page 91. |
SETTING PADDLE DESCRIPTION CRUST COLOR
| OPTIONS | OPTIONS | INFORMATION | |||
| WHOLE WHEAT RAPID | Collapsible | This is a setting for breads that contain more than 50% whole wheat, whole grain, or specialty flour such as barley or rye. Unlike the WHOLE WHEAT setting, the WHOLE WHEAT RAPID setting reduces all three of the 'rise' phases, shortening the entire cycle time by approximately an hour. For this reason, Instant Yeast (also known as quick-rise yeast, rapid-rise yeast, fast-rising yeast, fast-acting yeast or bread machine yeast) must be used with this setting or the bread will not rise and bake properly. Almost any WHOLE WHEAT recipe can be modified for use with the WHOLE WHEAT RAPID setting by replacing Active Dry Yeast with an equal or larger amount of Instant Yeast. We also recommend adding Vital Wheat Gluten. For recommended quantities, Refer to 'Vital Wheat Gluten', page 35 and 'Yeast', page 36. | LIGHT MEDIUM DARK | 1.0lb (0.5kg) 1.5lb (0.75kg) 2.0lb (1.0kg) 2.5lb (1.25kg) | Use the MODIFY button to see the preset phase temperatures and times. Refer to 'Using the MODIFY button', page 28. For recipes, refer to the WHOLE WHEAT section, page 91. |
| GLUTEN FREE | Collapsible | This is a setting for breads that contain gluten free flours such as rice flour, tapioca flour, potato flour, buckwheat flour, arrowroot etc. Due to ingredient properties, the consistency of the dough is wetter and more like a thick, sticky batter than a firm dough ball. It is important not to over knead gluten-free doughs because of the reduced elastic properties usually provided by gluten. For this reason, in comparison to the BASIC setting, there is a shorter 'knead' phase, shorter 'rise' phase and due to the high moisture content, a higher baking temperature. | LIGHT MEDIUM DARK | 2.0lb (1.0kg) 2.5lb (1.25kg) Due to the ingredient properties of gluten free flours, the quantities for the 1.0lb (0.5kg) and 1.5lb (0.75kg) loaf do not fill the bread pan to the ideal volume for a uniform loaf. For this reason, these loaf sizes have been omitted. | Use the MODIFY button to see the preset phase temperatures and times. Refer to 'Using the MODIFY button', page 28. For recipes, refer to the GLUTEN FREE section, page 81. |
SETTING PADDLE DESCRIPTION CRUST COLOR
| CRUSTY LOAF | Collapsible | This is a setting for breads low in fat and sugar, producing a bread with a crisp crust and a fine-textured, chewy inner crumb. These breads are sometimes referred to as French, European, Continental, Artisan, Peasant or Country breads. In comparison to the BASIC setting, the 'rise' phase is longer, 'bake' time longer and 'bake' temperature higher to produce a crisp crust and a firmer inner texture. | Not applicableThe CRUSTY LOAF setting is preset with the recommended crust color that produces a crisp crusted loaf. The MODIFY button can be used to modify the baking temperature and/or time if acrisper or less crisp crust is desired. Refer to 'Using the MODIFY button', page 28. | 1.0lb (0.5kg)1.5lb (0.75kg)2.0lb (1.0kg)2.5lb (1.25kg) | Use the MODIFY button to see the preset phase temperatures and times.Refer to 'Using the MODIFY button', page 28. For recipes, refer to the CRUSTY LOAF section, page 66. |
SWEET Collapsible | This is a setting for breads high in sugar, fats and proteins.Due to ingredient properties, sweet breads high in sugar, fats and proteins tend to brown quicker. For this reason, in comparison to the BASIC setting, there is a lower 'bake' temperature. | Not applicableThe SWEET setting is preset with the recommended crust color that prevents over browning of most sweet breads high in sugar, fat and protein.The MODIFY button can be used to modify the baking temperature and/or time if a lighter or darker crust is desired. Refer to 'Using the MODIFY button', page 28. | 1.0lb (0.5kg)1.5lb (0.75kg)2.0lb (1.0kg)2.5lb (1.25kg) | Use the MODIFY button to see the preset phase temperatures and times.Refer to 'Using the MODIFY button', page 28.For recipes, refer to the SWEET section, page 86. | |
JAM Fixed | This is a setting for making jams from fresh fruits. They make a delicious accompaniment to freshly baked bread. The bread maker is ideal for making jam as the paddle continuously stirs ingredients. | Not applicable Not applicable Use the MODIFY button | to see the preset phase temperatures and times.Refer to 'Using the MODIFY button', page 28. For recipes, refer to the JAM section, page 84. | ||
SETTING PADDLE DESCRIPTION CRUST COLOR
YEAST FREE Collapsible | This is a setting for breads that contain baking powder or baking soda rather than yeast to make the bread rise. These breads have a cake-like texture and are sometimes referred to as quick breads, batter breads or cake breads. Use this setting for packaged corn bread, quick bread and cake mixes. In comparison to the BASIC setting, the YEAST FREE setting jumps straight from the 'knead' phase to the 'bake' phase - omitting the 'rise' phase due to the omission of yeast. | Not applicableLike a cake mixture, yeast free breads require a fixed baking temperature and time to produce a specific crust color. For this reason, no crust color options are available on this setting.The MODIFY button can be used to modify the baking temperature and/or time if a lighter or darker crust is desired.Refer to 'Using the MODIFY button', page 28. | Not applicable Like a cake mixture, yeast free breads have fixed ingredient quantities to produce a specific loaf size. For this reason, no loaf size options are available on this setting. | Use the MODIFY button to see the preset phase temperatures and times.Refer to 'Using the MODIFY button', page 28.For recipes, refer to the YEAST FREE section, page 99. | |
| DOUGH BREAD | Collapsible | This is a setting for bread doughs that are intended to be shaped by hand into traditional loaf shapes or in special ways - dinner rolls, round loaves, braids, twists, bread sticks, bagels etc - then baked using the BAKE ONLY setting or in an oven. This setting mixes ingredients, then takes the dough through the 'knead' phase and 'rise 1' phase. At the end of the cycle, the dough should be removed, shaped then allowed to rise before baking | Not applicable Not applicable Use the MODIFY button | to see the preset phase temperatures and times.Refer to 'Using the MODIFY button', page 28.For recipes, refer to the DOUGH section, page 74. | |
| DOUGH-PIZZA | Collapsible | This is a setting for pizza and focaccia doughs. In comparison to the DOUGH-BREAD setting, the DOUGH-PIZZA setting has a shorter 'rise 1' phase as the dough does not need to become a big puffy mass that is characteristic of bread doughs. The only difference between pizza crust and focaccia is that instead of being baked immediately after shaping to make a thin, crisp pizza crust, focaccia is left to rise a second time before baking. For this reason, pizza doughs should be removed, shaped then baked, while focaccia doughs should be removed, shaped then allowed to rise before baking. | Not applicable Not applicable Use the MODIFY button | to see the preset phase temperatures and times.Refer to 'Using the MODIFY button', page 28.For recipes, refer to the DOUGH section, page 74. | |
SETTING PADDLE DESCRIPTION CRUST COLOR
OPTIONS
LOAF SIZE OPTIONS
MORE
INFORMATION
| DOUGH-PASTA | Collapsible[K6x3] | This is a setting for pasta doughs. In comparison to the DOUGH-BREAD and DOUGH-PIZZA settings, the DOUGH-PASTA setting omits the ‘rise’ phase due to the omission of yeast. At the end of the cycle, the dough should be removed and allowed to rest at room temperature before rolling and cutting. | Not applicable Not applicable Use the MODIFY button to see the preset phase temperatures and times.Refer to ‘Using the MODIFY button’, page 28. For recipes, refer to the DOUGH section, page 74. |
BAKE ONLY Collapsible | This is a setting to:Darken or crispen loaves already baked and cooled.This only takes a few minutes so check regularly.Re-warm loaves already baked and cooled.Bake doughs that have been hand shaped.Melt or brown toppings on baked bread.The bake time and temperature range is 1:00 min - 2:00 hrs and 140°F - 300°F (60°C - 150°C).NOTE: Due to the small, enclosed baking chamber and close proximity of the heating element, the baking temperatures are lower than a wall oven but hot enough to bake the bread efficiently and evenly. | Not applicable Not applicable Use the BAKE setting with one of the hand-shaping techniques on pages 26. |
8. Select the Crust Color
a. If the selected setting has crust color options, the LCD screen will indicate a blinking 'CRUST' and the preset crust color.
To change the preset crust color, turn the SELECT push-dial until the indicator on the LCD screen reaches the desired crust color – LIGHT, MEDIUM or DARK. Press the push-dial to select.
The crust color can only be selected on the BASIC, BASIC RAPID, WHOLE WHEAT, WHOLE WHEAT RAPID and GLUTEN FREE settings.
b. If you accidentally press the wrong crust color, press the CANCEL button to return to the main menu and make your selection again.
9. Select the Loaf Size
a. If the selected setting has loaf size options, the LCD screen will indicate a blinking 'SIZE' and the preset loaf size. To change the preset loaf size, turn the SELECT push-dial until the indicator on the LCD screen reaches the desired loaf size - 1.0lb (0.5kg), 1.5lb (0.75kg), 2.0lb (1.0kg) or 2.5lb (1.25kg). Press the push-dial to select.
The loaf size can only be selected on the BASIC, BASIC RAPID, WHOLE WHEAT, WHOLE WHEAT RAPID, GLUTEN FREE, CRUSTY LOAF and SWEET settings. Only the 2.0lb (1.0kg) and 2.5lb (1.25kg) loaf size can be selected on the GLUTEN FREE setting.
b. If you accidentally press the wrong loaf size, press the CANCEL button to return to the main menu and make your selection again.

NOTE
Although the bread maker can make 1.0lb (0.5kg), 1.5lb (0.75kg), 2.0lb (1.0kg) or 2.5lb (1.25kg) loaves, we recommend the larger sizes for a better uniform loaf. The ingredient quantities for the 1.0lb (0.5kg) loaf may not fill the bread pan to the ideal volume for a uniform loaf. This is especially true for breads that contain whole grains or other special ingredients. Therefore, some settings have limited, or no loaf size options.

NOTE
The loaf sizes - 1.0lb (0.5kg), 1.5lb (0.75kg), 2.0lb (1.0kg) and 2.5lb (1.25kg) - are a guide to the size of the loaf only. Different ingredients will affect the actual weight and size of the baked loaf.
For example:
A 1.0lb loaf baked with fruit and nuts will be heavier than a plain 1.0lb loaf.
A 1.0lb 100% whole wheat loaf will be smaller and shorter than a 1.0lb regular white loaf as whole wheat flour does not rise as well as bread flour.
10. Start the Bread Maker
The bread maker is now ready to activate, automatically calculating the recommended temperatures and times for the 'preheat', 'knead', 'rise', 'punchdown', 'bake' and 'keep warm' phases based on your selected setting, crust color and loaf size. The LCD screen will indicate the recommended total cycle time.
a. To modify the recommended temperatures and times for the 'preheat', 'knead', 'rise', 'punch-down', 'bake' and 'keep warm' phases, refer to 'Using the MODIFY button'.
b. To activate the cycle using the recommended temperatures and times for the 'preheat', 'knead', 'rise', 'punch-down', 'bake' and 'keep warm' phases, press the START | PAUSE button. The button surround will illuminate red. As the cycle begins, the LCD screen will indicate the time remaining until the loaf is ready and the progress indicator will flash to indicate the current phase of the cycle.

NOTE
When using the bread maker for the first time you may notice the machine emit vapours. These are the protective substances on the heating elements. These are safe, not detrimental to the performance of the bread maker and will dissipate with use.
c. To pause the cycle, press and hold the START | PAUSE button.
Refer to 'Using the PAUSE feature'.
d. To cancel the cycle, press and hold the CANCEL button until the LCD screen returns to the main menu.
The table below outlines the phases of the cycle.
PHASE DESCRIPTION NOTES
| Preheat | The ‘preheat’ phase warms the ingredients to allow the yeast to perform optimally. It also allows heavy grains and flours to absorb liquid, before softening and expanding for better gluten development.During this phase, no movement occurs in the bread pan. | This phase will only occur on the WHOLE WHEAT, WHOLE WHEAT RAPID and JAM settings. |
| Knead 1 | The ‘knead 1’ phase distributes the yeast and moistens the gluten in the flour.During this phase, the paddle will rotate slowly. | Viewing window may fog up. This is normal and will dissipate later in the cycle.There may be lumps and unincorporated ingredients in the corners of the bread pan. This is normal. They will be incorporated during the ‘knead 2’ phase. |
| Knead 2 | The ‘knead 2’ phase thoroughly mixes the ingredients and strengthens the moistened gluten strands to a springy elasticity. A dough ball will form.During this phase, the paddle will rotate faster and in both the clockwise and counterclockwise direction. You may notice the collapsible paddle automatically collapse into the flat position then return to the upright position multiple times during this phase. This action allows the dough ball to accumulate all the unincorporated ingredients in the corners of the bread pan.The Automatic Fruit and Nut Dispenser will automatically release its contents 8 minutes before the end of the ‘knead 2’ phase, regardless of whether it has been loaded. | Viewing window may fog up. This is normal and will dissipate later in the cycle.There may be lumps and unincorporated ingredients in the corners of the bread pan. Be patient - the clockwise and counterclockwise direction of the paddle will eventually incorporate all the ingredients before the end of the ‘knead 2’ phase, however if necessary, use a rubber spatula to fold in any flour from around the edges of the bread pan. This is especially important on the GLUTEN FREE and YEAST FREE settings.Humidity, the way the flour is measured, and the moisture content of the flour affects dough consistency. For this reason, you may wish to check the dough approximately 5 - 10 minutes into this phase. Lift open the lid. Poke the dough ball with your finger, careful to avoid the moving paddle. The dough should feel soft and sticky like scotch tape. If it is too dry, add liquid (27°C), 12 to 1 tablespoon at a time. If it is too wet, add flour 1 tablespoon at a time.NOTE: Gluten free doughs will be wetter and more like a thick, sticky batter, while yeast free bread doughs will look like a cake batter. |
PHASE DESCRIPTION NOTES
| Rise 1Punch DownRise 2Punch Down | The ‘rise’ phase, also known as ‘proofing’, is a period of rest that allows the gluten to become smooth and elastic. The dough ball will become a puffy mass that increases in size. This phase is important to the flavor of the bread.During this phase, no movement occurs in the bread pan.The ‘rise 1’ and ‘rise 2’ phases are separated by two ‘punch down’ phases, also known as ‘deflating’. This phase is necessary to release the trapped carbon dioxide within the dough.During this phase, the paddle will rotate a few turns lasting approx. 10 - 15 seconds. | If the dough is unevenly sitting to one side of the bread pan, it should be centered over the paddle before the ‘rise 3’ phase to avoid a lopsided loaf. This is especially important for the smaller 1.0lb (0.5kg) and 1.5lb (0.75kg) loaf sizes.TIP: Although the collapsible paddle will automatically collapse before the start of the ‘bake’ phase to minimize the hole at the bottom of the baked loaf, you can also remove the paddle altogether for an even smaller hole. At the start of the ‘rise 3’ phase, the ‘remove paddle’ alert will sound. Press and hold the START I PAUSE button to pause the cycle. With protective hot pads or insulated oven mitts, lift open the lid. Hold the bread pan by the handle and lift straight up. Place the bread pan on a wire rack. Close the lid. Take the dough from the bread pan, remove the paddle, form the dough into a neat ball and replace in the center of the bread pan. Return the bread pan to the baking chamber. Close the lid. Press the START I PAUSE button to resume the cycle.It is important to remove the dough when the alert sounds, and to replace the dough in the center of the pan to ensure the dough rises completely and is not lopsided. Removing the paddle is not recommended on the GLUTEN FREE and YEAST FREE settings as the dough is more like a batter. |
| Rise 3 | The ‘rise 3’ phase is the final rise before the loaf is baked.At the end of this rise, the risen dough usually fills the bread pan, taking the shape of the pan. Therefore, this phase is also known as ‘shaping’.During this phase, no movement occurs in the bread pan. | If the dough rises higher than the bread pan, open the lid, pierce the top with a skewer or toothpick and allow it to gently deflate. This should prevent it from baking over the top of the bread pan, collapsing or spilling onto the heating element. |
| Bake | The ‘bake’ phase regulates the baking time and temperature according to the individual recipe.During this phase, no movement occurs in the bread pan. | Steam will emit from the steam vents. This is normal. Do not cover the steam vents or touch appliance surfaces as they will be hot. |
| Keep Warm’ | The ‘keep warm’ phase holds the temperature of the baked bread for up to 60 minutes before automatically turning off. During this phase, no movement occurs in the bread pan. To turn off the ‘keep warm’ phase, or to reduce the 60 minutes keep warm time, refer to ‘Using the MODIFY button’. | To retain a crisp loaf crust, press and hold the CANCEL button and remove the bread pan before the ‘keep warm’ phase. The sides of the loaf may concave and become soggy or the crust may become harder and darker during the ‘keep warm’ phase. |

NOTE
Due to ingredient properties, some settings have been programmed to skip certain phases.

NOTE
You may notice clicking noises during the 'Rise' and 'Bake' phases. This is normal. It is the internal components switching on and off to maintain the correct temperature.

NOTE
The bread maker is equipped with Power Failure Protection. If the power supply is interrupted then restored, this feature allows the cycle to automatically resume where it left off instead of starting from the beginning of the cycle. For the Power Failure Protection to activate, the bread maker must have been operating for a minimum of 5 minutes before the power was interrupted, and the power must be restored within 60 minutes. If the power is not restored within 60 minutes; if you are unsure when the outage occurred; or if the 'bake' phase was interrupted; it is recommended to discard the ingredients, particularly when using perishable ingredients such as dairy products, eggs, etc.
- Remove the Bread Pan
a. When the cycle is complete, an alert will sound and the 'keep warm' phase will automatically begin to count up to 60 minutes. To retain a crisp loaf crust, we recommend removing the bread pan at the beginning of the 'keep warm' cycle. Press and hold the CANCEL button. With protective hot pads or insulated oven mitts, lift open the lid. Hold the bread pan by the handle and lift straight up. Place the bread pan on a wire rack. Be careful not to place it on a tablecloth, plastic surface, or other heat-sensitive surface which may scorch or melt.

NOTE
The appliance surfaces, including the lid, are hot during and after operation. To prevent burns or personal injury, always use protective hot pads or insulated oven mitts when removing the bread pan from the baking chamber, and when removing the baked bread or jam from the bread pan.
b. If the CANCEL button is not pressed and held after the 'bake' phase, the bread maker will automatically commence the 'keep warm' phase. This phase holds the temperature of the baked bread for up to 60 minutes before automatically turning off. During the 'keep warm' phase, the LCD screen will count-up indicating how long the baked loaf has been kept warm.
The 'keep warm' phase is activated on the BASIC, BASIC RAPID, WHOLE WHEAT, WHOLE WHEAT RAPID, GLUTEN FREE, CRUSTY LOAF, SWEET and YEAST FREE settings. To turn off the 'keep warm' phase, or to reduce the 60 minutes keep warm time, refer to 'Using the MODIFY button'.

NOTE
To retain a crisp loaf crust, remove the bread pan before the 'keep warm' phase. The sides of the loaf may concave and become soggy or the crust may become harder and darker during the 'keep warm' phase.
- Remove Bread from the Bread Pan
a. With protective hot pads or insulated oven mitts, hold the bread pan handle to one side and turn the bread pan upside down onto a wire rack. Gently shake the bread out of the bread pan.
The paddle should remain in the bread pan. If it is stuck in the bread, use a non-metal utensil to gently remove it, taking care not to scratch the paddle.

TIP
If the bread is difficult to remove, turn the bread pan on its side and with protective hot pads or insulted oven mitts, wiggle the coupling on the underside of the bread pan a few times. This will loosen the paddle from the bread. Over-turning the coupling can drive the paddle further into the bread and create a large hole.

natural_image
Close-up of a mechanical component with central bore and flanges (no visible text or symbols)b. Place the bread upright on the wire rack to cool for at least 20 minutes before slicing.
The exception is yeast free breads (also known as quick breads, batter breads or cakes). Allow these breads to remain in the bread pan for 20 minutes on a wire rack before removing, then allow to cool for 15 to 30 minutes before slicing.

CAUTION
Always use protective hot pads or insulated oven mitts when handling the bread pan, paddle and bread as they will be very hot. Always remove the paddle from the baked bread before slicing. Never use metal utensils to remove the paddle.
- Unplug the Bread Maker
a. While the bread is cooling, unplug the power cord from the power outlet.

NOTE
If you wish to make another loaf of bread, allow approximately one-hour cooling time before using again. Open or remove the lid to help cool the interior baking chamber. If the bread maker is too hot an error code will appear on the LCD screen. The bread maker will not operate until it cools down to the correct operating temperature for kneading. Refer to 'Troubleshooting'.
b. With protective hot pads or insulated oven mitts, remove the paddle from the drive shaft inside the bread pan. Do not attempt to remove the paddle with your bare hand as it is very hot. If the paddle is difficult to remove, pour some warm water and a little detergent into the bread pan and allow to stand for 10 - 20 minutes to loosen baked-on crust or crumb residue.

NOTE
Never immerse the outside of the bread pan in water as this may interfere with the free movement of the coupling and drive shaft. Wash only the interior of the bread pan.
c. Refer to 'Care and Cleaning'.
- Slice the Bread
a. When the bread has cooled sufficiently, place the bread onto a firmly seated breadboard.

TIP
Cool bread for a minimum of 20 minutes (preferably longer) before slicing it. This allows the steam to escape. The exception is yeast free breads. If you wish to serve bread warm, wrap it in foil and re-heat in the oven.
b. Ensure the paddle is not in the bottom of the baked bread loaf and slice using a serrated bread knife or electric knife. A standard flat-bladed kitchen knife is likely to tear the bread. For rectangular slices, place the loaf on its side and slice across.
- Store the Bread
Store unused bread tightly covered at room temperature for up to 3 days. Sealable plastic bags, plastic containers or a sealable bread box work well. Since homemade bread has no preservatives, it tends to dry out and become stale faster than commercially made bread.
For longer storage, place bread in a sealable plastic bag, removing any air before sealing, then place in the freezer. Bread may be frozen for up to 1 month.

TIP
Leftover or slightly hardened bread can be used to make croutons, breadcrumbs, bread cups, croustades, melba toast, crostini, bread pudding or stuffing's.
Optional Settings
USING THE PAUSE FEATURE
Uses for the pause feature are limited only by your imagination. Bread dough can be hand-shaped into braided breads with decorative crusts, rolled or layered into sweet or savory filled pull-apart breads, or finished with a variety of glazes, crumbles and toppings.
To pause the cycle, press and hold the START | PAUSE button. The LCD screen will display a flashing 'PAUSE' until the START | PAUSE button is pressed again to resume the cycle.

NOTE
The pause feature cannot be selected during the 'keep warm' phase.
Here are a few ideas and techniques to get you started.
Decorative Crusts
- Prepare an egg wash using 1 egg white or 1 whole egg plus 1 tablespoon of water.
- At the start of the 'bake' phase, press and hold the START I PAUSE button to pause the cycle.
- Lift open the lid.
- With the bread pan still in the interior baking chamber, use a very sharp knife or blade to cut a decorative pattern in the top of the loaf (slashes, tic-tac-toe, cross, etc.) Carefully brush the top of the loaf and cuts with the egg wash, careful not to spill or drip the egg wash inside the interior baking chamber as it will burn. Work quickly to limit the amount of heat loss.
- Close the lid. Press the START | PAUSE button to resume the cycle.
Braided Breads
- Prepare an egg wash using 1 egg white or 1 whole egg plus 1 tablespoon of water.
- At the start of the 'rise 3' phase, press and hold the START | PAUSE button to pause the cycle.
- Lift open the lid. Remove the bread pan from the baking chamber and close the lid.
- Remove the dough and paddle from the bread pan.
- Divide the dough into 3 equal pieces. Stretch and roll each piece into a 25cm rope. Place the ropes on a flat surface side by side. Begin braiding from the centre of the ropes rather than the ends for a more even shape. When complete, rotate the half braided bread and repeat the procedure from the middle to the other end. Tuck the ends under and place into the bread pan. Carefully brush the top of the loaf with the egg wash and sprinkle with seeds if desired.
- Return the dough to the bread pan.
- Return the bread pan to the baking chamber.
- Close the lid. Press the START | PAUSE button to resume the cycle.
Pull-Apart Rolls
- Prepare an egg wash using 1 egg white or 1 whole egg plus 1 tablespoon of water.
- At the start of the 'rise 3' phase, press and hold the START | PAUSE button to pause the cycle.
-
Lift open the lid. Remove the bread pan from the baking chamber and close the lid.
-
Remove the dough and paddle from the bread pan.
- Divide the dough into even pieces (12, 18, or 24) and roll each piece into a round ball. Create a single layer of dough balls in the bread pan. Carefully brush the layer with the egg wash and sprinkle with spices. Continue layering and spicing until all the dough balls are used, careful not to spill or drip the egg wash and spices inside the interior baking chamber as these will burn.
- Return the dough to the bread pan.
- Return the bread pan to the baking chamber.
- Close the lid. Press the START | PAUSE button to resume the cycle.
Rolled Breads
- Prepare an egg wash using 1 egg white or 1 whole egg plus 1 tablespoon of water.
- At the end of the 'rise 2' phase, press and hold the START I PAUSE button to pause the cycle.
- Lift open the lid. Remove the bread pan from the baking chamber and close the lid.
-
Remove the dough and paddle from the bread pan.
-
Roll out the dough on a lightly floured surface into a rectangle shape, approximately 20cm x 30cm. Spread tomato paste over the dough and top with Italian mixed herbs, chopped salami, chopped black olives and grated cheese. Roll up lengthwise, as for a Swiss roll. Tuck the ends under and place into the bread pan.
-
Return the bread pan to the baking chamber.
-
Close the lid. Press the START | PAUSE button to resume the cycle. The 'rise 3' phase will begin, followed by the 'bake' phase.
-
At 15 minutes into the 'bake' phase, press and hold the START | PAUSE button to pause the cycle.
- Follow the 'Decorative Crusts' procedure on page 26.
Using the DELAY START button
The DELAY START button conveniently allows you to select when you'd like the loaf to be ready, automatically starting the bread maker at the appropriate time. You can set the timer up to 13 hours in advance before you require the baked loaf to be ready. For this reason, the Delay Start feature has been preset with no sound alerts to minimize noise during overnight baking.
To activate the sound alerts, press the BEEPER button.
While the Delay Start feature can be selected on all settings except for BAKE ONLY and JAM, our experience has shown that some recipes, particularly yeast free breads, do not mix well when delayed, while others do. For this reason, we recommend first testing the recipe with the Delay Start feature before planning to serve it for the first time.

IMPORTANT
Never use the Delay Start feature if the recipe includes perishable ingredients such as dairy products, eggs etc. Some dairy products and eggs may be substituted by using dried ingredients such as dried egg powders, dried buttermilk or dry milk. When using this feature with dried substitutions, add the water to the bread pan first, then add the dried substitution after the flour to keep them separate.
- Using the SELECT push-dial, select the desired setting, crust colour and loaf size. Refer to Steps 1 - 9, 'Operating your Breville Bread Maker – Beginners Guide', page 10.
- Before pressing the START | PAUSE button to activate the cycle, press the DELAY START button. The LCD screen will indicate 'READY IN' and the preset cycle time will flash.

NOTE
During the delayed time, before the bread making cycle commences, ensure the surrounding temperature of the ingredients and baking chamber is not too hot or too cold. This will ensure efficient operation. Recommended room temperature is 68^ F - 77^ F ( 20^ C - 25^ C).
When using the Delay Start feature, we recommend layering ingredients in the bread pan in the order listed in the recipe, making a small hollow in the centre of the flour (ensuring the hollow does not touch the water, salt or sugar layer) then placing the yeast in the hollow. Water, salt or sugar can prematurely activate or decrease the activity of the yeast and the bread may not rise.
- Turn the SELECT push-dial to change the cycle time up to 13 hours in advance, then press to select. The time you select relates to the finish time of the baked loaf. For example, if you select 10 hours, the LCD screen will indicate 'READY IN' and '10:00 HRS', meaning the finished loaf will be ready in 10 hours time.
- If you accidentally press the wrong time, press the CANCEL button to return to the main menu and make your selection again.
- Press the START | PAUSE button to activate the delay start feature. The button surround will illuminate red and the LCD screen will display 'READY IN' and begin to count down. There will be no movement inside the bread pan. Once the correct time has lapsed, the cycle will automatically begin. The LCD screen will indicate the time remaining until the loaf is ready and the progress indicator will flash to indicate the current phase of the cycle.
USING THE MODIFY BUTTON
The preset, recommended temperature and times for the 'preheat', 'knead', 'rise', 'punch-down', 'bake' and 'keep warm' phases can be modified to suit a specific recipe or your personal preference. For example, if you like a crustier loaf, the baking temperature and time can be increased.

NOTE
The modified temperatures and times will not be stored in the memory of the bread maker. Instead, the bread maker will return to its default temperatures and times after the modified cycle has finished. To store the modified temperatures and times, refer to 'Using the CUSTOM setting', page 30.
- Using the SELECT push-dial, select the desired setting, crust colour and loaf size. Refer to Steps 1 - 9, 'Operating your Breville Bread Maker – Beginners Guide', page 10.
- Before pressing the START | PAUSE button to activate the cycle, press the MODIFY button. The LCD screen will display the progress indicator and flash to indicate the phase that can be modified, as well as its preset temperature/time. Use the SELECT push-dial to modify the preset temperature and/or times for each of the phases.
- Once all the phases have been modified to suit your preferences, the LCD screen will indicate the new cycle time. Press the START | PAUSE button to activate the cycle.
Phases can only be modified if they are already applicable to a setting. For example, the BAKE ONLY setting does not have a 'knead' phase, so this phase cannot be modified.
For tables that show the times of each function see back of book. The table below outlines the possible modifications for each of the settings.
PHASE
| SETTING PRE-HEAT TEMP | PRE-HEAT TIME | KNEAD 1 TIME | KNEAD 2 TIME | RISE TEMP | RISE 1 TIME | PUNCH DOWN | RISE 2 TIME | PUNCH DOWN | RISE 3 TIME | BAKE TIME | BAKE TEMP | KEEP WARM TIME | |
| BASIC | 0 mins - 1:00 hrs | 0 mins - 1:00 hrs | 80°F - 93°F (27°C - 34°C) | 0 mins - 1:40 hrs | 0 - 120 secs 0 mins - 1:40 hrs | 0 - 120 secs 0 mins - 1:40 hrs | 0 mins - 2 hrs | 140°F - 300°F (60°C - 150°C) | 0 mins - 1:00 hrs | ||||
| BASIC RAPID | 0 mins - 1:00 hrs | 0 mins - 1:00 hrs | 80°F - 93°F (27°C - 34°C) | 0 mins - 1:40 hrs | 0 - 120 secs 0 mins - 1:40 hrs | 0 - 120 secs 0 mins - 1:40 hrs | 0 mins - 2 hrs | 145°F - 300°F (60°C - 150°C) | 0 mins - 1:00 hrs | ||||
| WHOLE WHEAT | 61°F - 77°F (16°C - 25°C) | 0 mins - 1:00 hrs | 0 mins - 1:00 hrs | 0 mins - 1:00 hrs | 80°F - 93°F (27°C - 34°C) | 0 mins - 1:40 hrs | 0 - 120 secs 0 mins - 1:40 hrs | 0 - 120 secs 0 mins - 1:40 hrs | 0 mins - 2 hrs | 140°F – 300°F (60°C - 150°C) | 0 mins - 1:00 hrs | ||
| WHOLE WHEAT RAPID | 61°F - 77°F (16°C - 25°C) | 0 mins - 1:00 hrs | 0 mins - 1:00 hrs | 0 mins - 1:00 hrs | 80°F - 93°F (27°C - 34°C) | 0 mins - 1:40 hrs | 0 - 120 secs 0 mins - 1:40 hrs | 0 – 120 secs 0 mins - 1:40 hrs | 0 mins - 2 hrs | 140°F – 300°F (60°C - 150°C) | 0 mins - 1:00 hrs | ||
| GLUTEN FREE | 0 mins - 1:00 hrs | 0 mins - 1:00 hrs | 80°F - 93°F (27°C - 34°C) | 0 mins - 1:40 hrs | 0 - 120 secs 0 mins - | 0 mins - 2 hrs | 140°F - 300°F (60°C - 150°C) | 0 mins - 1:00 hrs | |||||
| CRUSTY LOAF | 0 mins - 1:00 hrs | 0 mins - 1:00 hrs | 80°F - 93°F (27°C - 34°C) | 0 mins - 1:40 hrs | 0 - 120 secs 0 mins - 1:40 hrs | 0 - 120 secs 0 mins - 1:40 hrs | 0 mins - 2 hrs | 142°F - 300°F (60°C - 150°C) | 0 mins - 1:00 hrs | ||||
| SWEET | 0 mins - 1:00 hrs | 0 mins - 1:00 hrs | 80°F - 93°F (27°C - 34°C) | 0 mins - 1:40 hrs | 0 - 120 secs 0 mins - 1:40 hrs | 0 - 120 secs 0 mins - 1:40 hrs | 0 mins - 2 hrs | 143°F - 300°F (60°C - 150°C) | 0 mins - 1:00 hrs | ||||
| YEAST FREE | 10 mins - 30 mins | 10 mins - 30 mins | 0 mins - 2 hrs | 140°F - 300°F (60°C - 150°C) | 0 mins - 1:00 hrs | ||||||||
| DOUGH-BREAD | 0 mins - 1:00 hrs | 0 mins - 1:00 hrs | 0 mins - 1:40 hrs | ||||||||||
| DOUGH-PIZZA | 0 mins - 1:00 hrs | 0 mins - 1:00 hrs | 0 mins - 1:40 hrs | ||||||||||
| DOUGH-PASTA | 10 mins - 30 mins | 10 mins - 30 mins | |||||||||||
| BAKE ONLY | 0 mins - 2 hrs | 140°F - 300°F (60°C - 150°C) | |||||||||||
| JAM | 140°F - 158°F (60°C - 70°C) | 0 mins - 1:00 hrs | 0 mins - 2 hrs | 140°F - 300°F (60°C - 150°C) | |||||||||
USING THE CUSTOM SETTING
The preset, recommended temperatures and times for the 'preheat', 'knead', 'rise', 'punch-down', 'bake' and 'keep warm' phases can be modified to suit a specific recipe or your personal preference, then stored in the memory of the bread maker.
This is particularly useful if you have a favourite recipe that you regularly bake. Alternatively, for advanced bakers it allows you to factor in variables such as the brand and type of flour, quality of the yeast, altitude and climate considerations. For example, in a humid climate the rising cycles can be reduced.
- Turn the SELECT push-dial until the indicator on the LCD screen reaches the CUSTOM setting. Press the push-dial to select.
- The LCD screen will indicate 'CUSTOM 1'. This means you are about to program custom recipe number 1. There are 9 custom recipe spaces for you to program.

TIP
We recommend that for your own reference, you record the custom recipe number and recipe, along with a log of the temperatures and times in the charts provided at the end of this booklet.
- Press the MODIFY button. The LCD screen will indicate a flashing 'CUSTOM' and the MODIFY button surround will flash, indicating that you are in programming mode.
- Using the SELECT push-dial, select the setting, crust colour, loaf size and the temperature and times for the 'preheat', 'knead', 'rise', 'punch-down', 'bake' and 'keep warm' phases.

TIPS
Phases can only be modified if they are already applicable to a setting. For example, the BAKE ONLY setting does not have a 'knead' phase, so this phase cannot be modified.
If, for some reason, you would like to include or modify a phase that is not applicable to a setting, select the WHOLE WHEAT setting and use it as a base to program your custom recipe setting. The WHOLE WHEAT setting allows you to modify all of the phases.

NOTE
If you accidentally select the wrong temperature or time, refer to Step 2 in the section 'Modifying a Programmed Custom Recipe'.
- Once all the phases have been modified to suit your preferences, 'CUSTOM' and the MODIFY button surround will no longer flash. The LCD screen will indicate the newly programmed cycle time.
- To activate the cycle, press the START | PAUSE button.
- Alternatively, to activate the Delay Start feature, press the DELAY START button. Turn the SELECT push-dial to change the cycle time and press to select. The time you select relates to the finish time of the baked loaf. Refer to the section 'Using the DELAY START button'.
Modifying a Programmed Custom Recipe
There are 9 custom recipe spaces for you to program. If a space has been filled and the MODIFY button is pressed, the LCD screen will indicate a flashing 'REPLACE?'
- If you don't want to replace your programmed custom recipe, press the CANCEL button. The LCD screen will no longer indicate a flashing 'REPLACE?'. Turn the SELECT push-dial to check if another space has been filled or not.
- If you do want to replace or modify your programmed custom recipe, press the SELECT push-dial. The LCD screen will indicate a flashing 'CUSTOM' and the MODIFY button surround will flash, indicating that you are in programming mode. Using the SELECT push-dial, re-select the setting, crust colour, loaf size and the temperatures and times for the 'preheat', 'knead', 'rise', 'punch-down', 'bake' and 'keep warm' phases. Once all the phases have been modified to suit your preferences, 'CUSTOM' and the MODIFY button surround will no longer flash. The LCD screen will indicate the newly re-programmed cycle time.
TIPS FOR BETTER BREAD MAKING
Measuring And Weighing Ingredients
With bread machine baking, the most important step is accurately measuring and weighing ingredients. The bread pan has a limited capacity so ingredients must be measured accurately to prevent overflow onto the heating elements and to ensure the recipes rise and taste properly.
For best results, always accurately measure and weigh ingredients and add them to the bread pan in the order listed in the recipe.

NOTE
The recipes in this instruction booklet were developed using American imperial weights and measurements. These may differ slightly from metric weights and measurements, so care should be taken to compensate for variances.
Liquid Measuring Cups
For liquid ingredients, use transparent plastic or glass liquid measuring cups with the measurements marked clearly on the side. Do not use non-transparent plastic or metal measuring cups unless they have measurement markings on the side. Place the cup on a horizontal flat surface and view markings at eye level. The level of the liquid must be aligned to the appropriate measurement mark. An inaccurate measurement can affect the critical balance of the recipe. Liquid ingredients should be 80^ F ( 27^ C) unless stated otherwise.
Dry Measuring Spoons
For dry ingredients, use nested plastic or metal dry measuring cups and spoons. Do not use tableware cups or spoons.
It is very important to spoon or scoop the dry ingredients loosely into the measuring cup. There is no need to sift flour. NEVER scoop the cup into the flour bag, tap the cup or pack ingredients into the cup unless otherwise directed eg. packed brown sugar. This extra amount can affect the critical balance of the recipe. Level the top of the cup by sweeping the excess with the back of a knife or spoon handle. Dry ingredients should be at room temperature 68^ F - 77^ F ( 20^ C - 25^ C) unless stated otherwise.
When using measuring spoons for either liquid or dry ingredients such as yeast, sugar, salt, dry milk or honey, measurements should be level, not heaped.
Weighing Scales
For consistent results it is recommended to use weighing scales if possible as they provide greater accuracy than measuring cups. Place a container onto the scale, tare (or zero) the scales, then spoon or pour ingredients in until the desired weight is achieved.
As a general guide:
| 1 cup bread flour = 5 ounces |
| 1 cup whole wheat flour = 4 ounces |
| 1 cup all purpose flour = 434 ounces |
| 1 tablespoon butter = 12 ounce ( 18 stick) |
| 2 tablespoons butter = 1 ounce ( 14 stick) |
| 14 cup butter = 2 ounces ( 12 stick) |
| 12 cup butter = 4 ounces (1 stick) |
| 1 cup granulated sugar = 8 ounces |
| 1 tablespoon granulated sugar = 12 ounce |
| 1 cup brown sugar = 6 ounces |
| 1 tablespoon brown sugar = 13 ounce |
| 1 cup chopped nuts = 4 ounces |
| 1 cup fruits = 514 ounces |
| 1 cup chocolate chips = 3 ounces |
MEASUREMENT CONVERSION CHART
Bread machine recipes often call for some less common measurements such as an 18 cup. Use this chart to familiarize yourself with their equivalents.
| 1 12 teaspoons | = 12 tablespoon |
| 3 teaspoons = 1 tablespoon | |
| 4 teaspoons = 1 12 tablespoons | |
| 12 tablespoon | = 1 12 teaspoons |
| 1 tablespoon = 3 teaspoons | |
| 2 tablespoons | = 18 cup |
| 4 tablespoons | = 14 cup |
| 5 tablespoons + 1 teaspoon | = 13 cup |
| 8 tablespoons | = 12 cup |
| 12 tablespoons | = 34 cup |
| 16 tablespoons | = 1 cup |
| 14 cup | = 4 tablespoons |
| 13 cup | = 5 tablespoons + 1 teaspoon |
| 12 cup | = 8 tablespoons |
| 34 cup | = 12 tablespoons |
| 1 cup | = 16 tablespoons |
| 18 cup | = 2 tablespoons |
| 38 cup | = 14 cup + 2 tablespoons |
| 58 cup | = 12 cup + 2 tablespoons |
| 78 cup | = 34 cup + 2 tablespoons |
| 1 18 cup | = 1 cup + 2 tablespoons |
| 1 14 cup | = 1 cup + 4 tablespoons |
MEASURING INGREDIENTS WHEN DEVELOPING YOUR OWN RECIPES
Use these tips to make developing or adapting a recipe easier.
Loaf sizes
As a general formula:
2-cup flour recipe will produce a loaf that is about 1 pound
3-cup flour recipe will produce a loaf that is about 1 12 pounds
4-cup flour recipe will produce a loaf that is about 2 pounds
5-cup flour recipe will produce a loaf that is about 2 12 pounds.

NOTE
Do not underfill or overfill the bread pan as the bread may not mix properly. The recipes in this book have been especially designed and tested to produce 1lb to 2.5lb (0.5kg to 1.25kg) loaves, so may have slightly more or less flour than the general formula above. However if developing your own recipes, as a general guide, a minimum 2 cups and maximum 4,5 cups of total dry ingredients is recommended to ensure the dough does not rise over the bread pan. On the jam setting, as a general guide, a maximum 3 cups of fruit should be used.
Eggs
As a general formula:
| 1 egg = 1/4 liquid cup |
| 1 egg white = 3 tablespoons |
| 1 egg yolk = 1 tablespoon |
| 1 egg = 3 tablespoons liquid egg substitute |
| 1 egg = 1 tablespoon egg white powder + 2 tablespoonscold water beaten until foamy |
Milk
As a general formula:
1 cup fresh milk = 3 tablespoons dry milk powder + 1 cup water. Use 4-5 tablespoons for a richer flavor.
The Vital ingredients
BREAD IMPROVER - ASCORBIC ACID (VITAMIN C)
A bread improver will help strengthen the framework of the bread resulting in a loaf that is lighter in texture, higher in volume, more stable and with enhanced keeping qualities. The ingredients in a bread improver are usually a food acid such as ascorbic acid (Vitamin C) and other enzymes (amylases) extracted from wheat flours. An unflavored, crushed Vitamin C tablet or Vitamin C powder can be used as a bread improver and added to the dry ingredients. As a general guide, use 1 large pinch per 3 cups of flour.
BAKING POWDER
Double acting baking powder is a leavening agent used in yeast free breads. This type of leavening agent does not require rising time before baking, as the chemical reaction works when liquid ingredients are added, then again during the baking process. Baking powder can be substituted in place of baking soda.
BAKING SODA
Baking soda is another leavening agent. It also does not require rising time before baking as the chemical reaction works during the baking process. Baking soda cannot be substituted in place of baking powder.
EGGS
Eggs add flavor, richness and tenderness to bread. Liquid egg substitutes, powdered egg and powdered egg whites may be substituted for fresh eggs, however all should be at room temperature before adding to the bread pan unless stated otherwise. Fresh eggs should not be used with the Delay Start feature.

TIP
Gently and safely warm cold eggs by placing whole eggs in a bowl and covering with moderately hot tap water for 10 minutes.
FATS
Fats, such as unsalted butter, olive oil or vegetable oil, add taste, texture, moisture and enhanced keeping qualities to breads. If unsalted butter is used, it should be cut into 12 " pieces and brought to room temperature before adding to the bread pan unless stated otherwise. Breads baked on the CRUSTY LOAF setting generally get their crisp crust and texture from the lack of fat added. However if called for, use good quality oils as the flavor of the flour and fats will be very apparent.
FLOUR
Flour is the most important ingredient used for bread making. It provides food for the yeast and structures the loaf. When mixed with liquid, the protein in the flour starts to form gluten. Gluten is a network of elastic stands which interlock to trap the gases produced by yeast. This process increases as the dough undergoes kneading and provides the dough with the structure required to produce the weight and shape of the bread.
Keep flour in a secure, airtight container. Keep whole wheat flours stored in the refrigerator, freezer or a cool area to prevent them from becoming rancid. There is no need to sift flour when bread machine baking, however it is necessary that it comes to room temperature before adding to the bread pan.
All-Purpose Flour
All-purpose flour can be bleached or unbleached, we recommend the unbleached variety. This flour is ideal for yeast free breads (also known as quick breads, batter breads or cake breads) as it produces a tender loaf with good texture and crumb. Bread flour tends to produce a tough yeast free loaf, while pastry flour tends to produce an overly tender loaf.
Bread Flour
Bread flour, also known as baker's flour or bread machine flour is a high protein (gluten), white wheat flour. For bread machine baking, we recommend using unbleached bread flour over all-purpose flour as it produces a tall, springy loaf. "King Arthur" unbleached bread flour was used in the development of all bread flour recipes contained in this booklet.
Rye flour
Rye flour is a low protein (gluten) flour traditionally used to make Pumpernickel and Black breads. Rye flour must generally always be mixed with a high proportion of bread flour as it does not contain enough gluten to develop the structure for a high, even-grained loaf.
Self-Rising Flour
Self-rising flour is not recommended for bread machine baking as it contains leavening ingredients that interfere with bread making. This flour is more suited for biscuits, scones, shortcakes, pancakes or waffles.
Whole Wheat Flour
Whole wheat flour is milled from the entire wheat kernel, hence it contains all the bran, germ and flour of the whole wheat grain. Although breads baked with whole wheat flour will be higher in fiber, the loaf is generally smaller and heavier than white loaves.

TIP
Whole wheat flour with low protein (gluten) can be improved by adding vital wheat gluten (see below).
VITAL WHEAT GLUTEN
Vital wheat gluten is manufactured from wheat flour that has been treated to remove most of the starch, leaving a flour with very high protein content. Adding vital wheat gluten can improve the structure, increase volume and lighten texture when using a low protein, all-purpose, whole wheat, rye or stone ground flour.

TIP
We recommend adding vital wheat gluten to Instant Yeast (also known as quick-rise yeast, rapid-rise yeast, fast-rising yeast, fast-acting yeast or bread machine yeast) when using the BASIC RAPID and WHOLE WHEAT RAPID settings as it produces a better rise during the shortened 'rise' phase.
As a general guide:
2.5lb loaf size = add 2 ^3/4 teaspoons vital wheat gluten
2.0lb loaf size = add 2½ teaspoons vital wheat gluten
1.5lb loaf size = add 2 teaspoons vital wheat gluten
1.0lb loaf size = add 1½ teaspoons vital wheat gluten
GLAZES
Glazes enhance the flavor of baked breads and give them a professional finish. After glazing, breads can be sprinkled with your favorite seeds and toppings eg. poppy, sesame or caraway seeds.
Egg Glaze
Use 1 egg white or 1 whole egg plus 1 tablespoon of water. Brush over dough before baking.
Melted Butter Crust
Brush melted butter over just-baked bread for a softer, more tender crust.
Milk Glaze
Brush milk or cream over just-baked bread for a softer, shiny crust.
Sweet Icing Glaze
Mix 1 cup sifted confectioner's sugar with 1 to 2 tablespoons of milk until smooth. Drizzle over raisin bread or sweet breads when they are almost cool.
MILK
Milk enhances the flavor and increases the nutritional value of bread. All liquids, including milk, should be 80^ F ( 27^ C) before adding to the bread pan unless stated otherwise. Fresh milk should not be substituted for dry milk unless stated in the recipe. Dry milk (fat-free or regular) is convenient and enables you to use the Delay Start feature. When using this feature with dried substitutions, add the water to the bread pan first, then add the dried substitution after the flour to keep them separate.
SALT
Salt is an important ingredient in yeast bread recipes. It not only enhances flavor, but limits the growth of yeast and inhibits rising, so be careful when measuring. Do not increase or decrease the amount of salt shown in the recipes. Table salt, sea salt or kosher salt can be used.
SUGAR
Sugar provides food for the yeast, sweetness and flavor to the crumb and helps brown the crust. White sugar, brown sugar, honey and golden syrup are all suitable to use. When using honey or golden syrup it must be counted as additional liquid.
WATER
When bread machine baking, all liquids, particularly water, should be 80^ F ( 27^ C) unless stated otherwise. Temperatures too cool or too warm can prevent the yeast from activating.
YEAST
Through a fermentation process, yeast produces carbon dioxide gas necessary to make bread rise. Yeast feeds on carbohydrates in sugar and flour to produce this gas and requires liquid and warmth to activate. Three main types of domestic yeast are available, see page 17.
We recommend using Active Dry Yeast for the standard settings and Instant Yeast for the shorter BASIC RAPID and WHOLE WHEAT RAPID settings. Almost any recipe can be modified for use with the RAPID settings with an equal or larger amount of Instant Yeast.
As a general guide, when using the RAPID settings:
2.5lb loaf size = substitute Active Dry Yeast for 3½ teaspoons Instant Yeast
2.0lb loaf size = substitute Active Dry Yeast for 3 teaspoons Instant Yeast
1.5lb loaf size = substitute Active Dry Yeast for 2½ teaspoons Instant Yeast
1.0lb loaf size = substitute Active Dry Yeast for 2 teaspoons Instant Yeast
"Red Star" brand yeast ('Active Dry Yeast', 'Quick Rise Yeast' and 'Bread Machine Yeast') were used in the development of all yeasted recipes contained in this booklet. You can use any brand, however always ensure the liquid ingredients are 80^ (27°C) to ensure the yeast properly activates. Check the used by date, as stale yeast will prevent the bread from rising.
Follow these steps if you are unsure of the freshness of your yeast.
- Using a liquid measuring cup, dissolve 1 teaspoon of granulated sugar in cup warm tap water at 110^ F- 115^ F ( 43^ C - 46^ C). A thermometer is the most accurate way to determine the correct liquid temperature, however if unavailable, the tap water should be warm but not hot to the touch.
- Stir in one oz. packet (7g) or 2 1/4 teaspoons of room temperature yeast until there are no yeast granules on top.
- In three to four minutes, the yeast will have absorbed enough liquid to activate and start to rise. After ten minutes, the foamy yeast mixture should have risen to the 1-cup mark and have a rounded top.
- If this is true, your yeast is active and should be used in your recipe immediately. Remember to deduct a cup of liquid from the recipe to adjust for the water used in this test.
- If the yeast did not rise to the 1-cup mark, your yeast has little or no activity. Discard this yeast.
XANTHAN GUM
Xanthan gum is a thickening agent used in gluten free baking to add volume and act as a binder to retain moisture. Xanthan gum can be replaced by guar gum.

Care & Cleaning
Ensure the bread maker is turned OFF by pressing and holding the CANCEL button. The bread maker is OFF when the START | PAUSE button surround is no longer red. Remove the power plug from the power outlet. Allow the bread maker and all accessories to cool completely before disassembling and cleaning.
Cleaning the Stainless Steel Housing
- Wipe the exterior of the stainless steel housing and the LCD screen with a soft, damp cloth. A non-abrasive liquid cleanser or mild spray solution may be used to avoid build-up of stains. Apply the cleanser to the sponge, not the outer surface or LCD screen, before cleaning. Do not use a dry paper towel or cloth to clean the LCD screen, or use an abrasive cleanser or metal scouring pad to clean any part of the bread maker as these will scratch the surface.

NOTE
Never immerse the stainless steel housing in water or place in the dishwasher. Take care not to allow water or cleaning fluids to seep under the buttons or LCD screen on the control panel.
- If over-spills such as flour, nuts, raisins etc. occur in the interior baking chamber, carefully remove them using a soft, damp cloth. Use extreme caution when cleaning the heating elements. Ensure the bread maker is completely cool then gently rub a soft, damp sponge or cloth along the length of the heating element. Do not use any type of cleanser or cleaning agent.
- Let all surfaces dry thoroughly prior to inserting the power plug into a power outlet.
Cleaning the Lid
- For thorough cleaning, the lid can be removed from the stainless steel housing. Lift open the lid completely. Holding the sides of the lid, lift straight upwards. The lid should detach from the hinge. To replace the lid, align the pivot pins on the lid with the pivot points on the hinge.

natural_image
Close-up of a mechanical device with a black arrow pointing to a component, no visible text or symbolsWipe the lid, viewing window and Automatic Fruit and Nut Dispenser with a soft, damp sponge. A glass cleaner or mild detergent may be used. Do not use an abrasive cleanser or metal scouring pad as these will scratch the surface.

NOTE
Never immerse the lid in water or place in the dishwasher.
- Let all surfaces dry thoroughly prior to inserting the power plug into a power outlet.
Cleaning the Bread Pan
- Half fill the bread pan with warm soapy water. A non-abrasive liquid cleanser or mild spray solution may be used. Allow to stand for 10 - 20 minutes.

NOTE
Do not immerse the outside of the bread pan in water as this may interfere with the free movement of the coupling and drive shaft. Wash only the interior of the bread pan.
- Remove the paddle and wash the inside of the bread pan with a soft cloth. Do not use an abrasive cleanser or metal scouring pad as these will scratch the non-stick coating. Ensure there is no baked-on residue or dough on the drive shaft. Rinse thoroughly.
- Let all surfaces dry thoroughly prior to inserting into the stainless steel housing.

NOTE
- Some discolouration may appear on and inside the bread pan over time. This is a natural effect caused by moisture and steam and will not affect the bread in any way.
- The inside of the bread pan is coated with a high quality non-stick coating. As with any non-stick coated surface, do not use abrasive cleansers, metal scouring pads or metal utensils to clean these items as they may damage the finish.
- Never wash the bread pan in the dishwasher.
Cleaning the Paddle
- Wash the collapsible paddle and fixed paddle with warm soapy water and a soft cloth.
- Ensure there is no baked-on residue in any of the paddle crevices, including the 'D' shaped hole and hinge area. If there is, soak the paddle in warm soapy water. A non-abrasive liquid cleanser or mild spray solution may be used. Allow to stand for 10 - 20 minutes. Use a wooden toothpick, thin wooden skewer or plastic cleaning brush to remove any bread residue from the crevices and hinge area. Failure to clean the hinge area may eventually result in the collapsible paddle not working effectively. Rinse thoroughly.
- Let all surfaces dry thoroughly prior to inserting into the bread pan.

NOTE
We do not recommend washing the paddles in the dishwasher. To extend the life of the non-stick coating, always wash in warm soapy water. Do not use abrasive cleansers, metal scouring pads or metal utensils to clean the paddles as these items may damage the paddle surface.
Storage
- Ensure the bread maker is turned OFF by pressing and holding the CANCEL button. The bread maker is OFF when the START | PAUSE button surround is no longer red. Remove the power plug from the power outlet.
- Ensure the bread maker and all accessories are completely cool, clean and dry.
- Place the bread pan and paddles into the interior baking chamber.
- Ensure the lid is closed.
- Store the appliance in an upright position standing level on its support legs. Do not store anything on top.

Troubleshooting
INGREDIENTS
PROBLEM EASY SOLUTION
| Can other bread recipes be made in this machine? | Results may vary when using other recipes as the recipes in this booklet are sized so that the dough is kneaded properly and the finished bread does not exceed the bread pan capacity. Use only recipes with similar quantities of ingredients.As a general guide, a minimum 300g and maximum 750g of total dry ingredients is recommended on the bread settings. On the jam setting, as a general guide, a maximum 500g of fruit should be used. |
| Can powdered products be used in place of fresh products and visa-versa? | Yes, egg powders, dried buttermilk or dry milk can be used. These products allow you to use the Delay Start feature, however always ensure to add the water to the bread pan first, then add the dried substitution after the flour to keep them separate.Similarly, fresh milk and eggs can be substituted for dry milk and egg powders, but the baked bread will have a heavier texture. If you still choose to use fresh milk, ensure to decrease the same measurement of liquid to equal the fresh milk and omit the milk powder. Do not use the Delay Start feature with perishable ingredients. |
| Can butter or margarine be used in place of oil? | Yes, but the bread crumb may appear a more creamy, yellow colour. |
| Can other sweetening agents be used in place of sugar? | Yes, honey, golden syrup or brown sugar can be used. When substituting honey or similar sweet liquids for sugar, ensure to decrease the same measurement of liquid to equal the liquid sugar substitute. We do not recommend powdered or liquid artificial sweeteners. |
| Can salt be omitted? | Salt plays a very important part in bread making. Omitting it will decrease water retention in the dough, as well as affect mixing, the strength of the gluten development and the fermentation of the yeast. In the finished bread, salt improves the loaf shape, crumb structure and crust colour, as well as extending shelf life and enhancing flavour. |
| Can I use home-ground or home-milled flour? | Depending on the coarseness of the flour, results may not be satisfactory. For best results, we recommend using a blend of bread flour and home-milled flour. Ensure not to grind the flour too coarse as it may damage the bread pan coating. |
| Why do the ingredients need to be placed in the bread pan in the specified order? | To ensure all dry ingredients are mixed with the water and to avoid the yeast activating prematurely with the water, salt or sugar when using the Delay Start feature. |
TEMPERATURES
PROBLEM EASY SOLUTION
| Are the room and water temperatures important? | Yes – room and water temperature influences yeast activity and therefore can affect the quality of the bread. The average room temperature is approximately 20^ - 25^ . Dry ingredients should be at room temperature and liquids at 27^ unless stated otherwise. Never use hot water as it will kill the yeast. |
| Why is the ‘bake’ temperature range so low? | Due to the small, enclosed baking chamber and close proximity of the heating element, the baking temperatures are lower than a wall oven but hot enough to bake the bread efficiently and evenly. Our testing has shown that breads usually baked in a wall oven at 190^ can be successfully baked in the bread maker at 150^ . When using or developing your own recipes, we recommend using the bread makers preset recommended baking temperature as a guide before adjusting the temperature and/or ‘bake’ time to produce the desired results. |
BAKING BREAD
PROBLEM EASY SOLUTION
| A power outage has occurred. What can I do? | If the power is accidentally turned off for 60 minutes or less during operation, the Power Failure Protection will automatically resume the cycle where it was interrupted, when power is restored. |
| If you unintentionally cancelled during the 'knead' phase, what can I do? | Reselect the bread setting and allow dough to re-knead and continue through the rising and baking process. The result may be a loaf higher in volume and lighter in texture. |
| If you unintentionally cancelled during the 'rise' phase, what can I do? | Turn the bread maker off. Leave the dough inside the baking chamber with the lid closed. Allow the dough to rise until almost near the top of the pan. Turn the bread maker on. Select the BAKE ONLY setting, set the required baking temperature and time then press the START | PAUSE button to activate the cycle. |
| If you unintentionally cancelled during the 'bake' phase, what can I do? | Select the BAKE ONLY setting, set the required baking temperature and time then press the START | PAUSE button to activate the cycle. |
| Why did the bread not rise? | There may be several reasons. Check the protein level of the flour, we recommend flours with at least 11 - 12% protein.The yeast may have failed to activate so check the 'Best Before Date' of the yeast, the yeast measurements and the temperature of the liquids (27°C) and dry ingredients (20°C - 25°C). |
| Why do large holes appear inside the bread? | Occasionally air bubbles will concentrate at a certain location during the last 'rise' phase and will bake in this state. This could be caused by too much water and/or yeast or insufficient flour. Check the recipe ingredients and method of weighing/measuring. |
| Why does the top of the bread collapse? | Usually this is because the ingredients are not in balance or low protein flour is used. Check the method of weighing/measuring the ingredients. Too much yeast, water or other liquid ingredients, or insufficient flour, may cause the bread to be pale on top and collapse while baking. |
| Why does the bread sometimes vary in height and shape? | Bread is sensitive to its environment so can be affected by altitude, humidity, weather, room temperature, length of the Delay Start timer and fluctuations in household current. The bread shape can also be affected if stale ingredients are used or are incorrectly measured. |
| Why is my whole wheat loaf shorter than my regular white loaf? | Whole wheat flours and some specialty grains do not rise as well as bread flour. The result will be a shorter and smaller loaf. |
| Why does bread colour differ? | Ingredients and their properties can cause the loaf to brown differently. Try changing the crust colour or modifying the baking temperature and/or time. Also, the crust may have darkened during the 'keep warm' phase. We recommend removing the bread before the 'keep warm' phase begins. |
| Why does bread sometimes have a strange odor? | Too much yeast or stale ingredients, particularly flour and water, can cause odors. Always use fresh ingredients and accurate measurements. |
PROBLEM EASY SOLUTION
| Why does flour sometimes stick to the side of the bread? | During the ‘knead’ phase small amounts of flour may sometimes stick to the sides of the bread pan and bake onto the sides of the loaf. Scrape the floured portion from the outer crust with a sharp knife. The next time you try the recipe, if necessary, during the ‘knead 2’ phase use a rubber spatula to fold in any unmixed flour from around the edges of the bread pan. This is especially important on the GLUTEN FREE and YEAST FREE settings. You may want to spray the bottom and halfway up the sides of the bread pan with cooking oil before adding ingredients for your yeast free breads, and use a rubber spatula toloosen the loaf before turning out. |
| Why does the paddle come out with the bread? | This can happen as the paddle is detachable. Use a non-metal utensil to remove it from the baked loaf before slicing. Use caution as the paddle will be hot. Alternatively, you can remove the paddle before the start of the ‘bake’ phase. |
| Why is there smoke coming out of the bread maker? | It is normal that the bread maker emit a fine smoke during first use as it burns off the protective substances on the heating element. It is also normal that steam emit from the steam vents. However, smoke can also be caused by spilt ingredients on the outside of the bread pan and inside the baking chamber. Without turning off the bread maker, remove the plug from the power outlet. With a soft damp cloth (non-metallic, non-abrasive), clean then thoroughly dry the outside of the bread pan, baking chamber and heating element, using caution as they will be hot. Reinsert the power plug. The Power Failure Protection will automatically resume the cycle where it was interrupted. |
DELAY START
PROBLEM EASY SOLUTION
| Why can't the Delay Start feature be set past 13 hours? | The ingredients may deteriorate in quality or ferment if they are left inside the bread pan for many hours. This is especially the case during summer, when the Delay Start feature should be set to a shorter period of time. |
| Why can't some ingredients be used with the Delay Start feature? | Most protein foods such as milk, cheese, eggs, bacon, etc., are perishable and will deteriorate if left unrefrigerated for more than one hour. |
FRUIT AND NUT DISPENSER
PROBLEM EASY SOLUTION
| The base of the Fruit and Nut Dispenser is open. | Lift open the lid of the main stainless steel housing. The base of the dispenser can be identified by the row of steam vents. Push in the base until it clicks into place. |
 |
ALTITUDE & WEATHER CONDITIONS
PROBLEM EASY SOLUTION
| I live in a high altitude area, are there any adjustments I should make? | In high altitude areas, over 3000 feet (900m):Dough tends to rise faster as there is less air pressure. Reduce yeast by 14 teaspoon. If the dough still rises too high, reduce yeast by another 14 teaspoon the next time you try the recipe. You could also try adding a little more salt and a little less sugar to retard the yeast action and promote slower, more even rising.Flour is drier at higher altitudes and will absorb more liquid. Use less flour or more liquid and pay attention to the dough consistency. |
| I live in a dry or humid climate, are there any adjustments I should make? | In dry climates, flour is drier and will absorb more liquid. Use less flour or more liquid and pay attention to the dough consistency.In humid climates, reduce yeast by 14 teaspoon to avoid over rising of the dough. If the dough still rises too high, reduce yeast by another 14 teaspoon the next time you try the recipe. |
| PROBLEM NO MOVE- | MENT IN BREAD PAN | DAMP OR STICKY LOAF | LOAF RISES TOO HIGH | LOAF RISES THEN FALLS | LOAF IS SHORT & DENSE | |
| Operational Errors | Paddle or Bread Pan not assembled securelySee pages 10 and 11 for correct assembly instructions. | ● | ||||
| ‘Preheat’ PhaseThere is no movement in the bread pan during the ‘preheat’ phase. This phase occurs on the WHOLE WHEAT, WHOLE WHEAT RAPID and JAM settings. | ● | |||||
| LCD displays --H or -H:The baking chamber is too warm and will not operate until it cools down.Lift open the lid, remove the bread pan and allow sufficient time to cool.Once cooled, the LCD screen will return to the main menu. Press the START | PAUSE button to activate the cycle. | ● | |||||
| LCD displays --LThe bread maker is too cold and will not operate until it heats up. Place in a warmer environment, recommended room temperature is 25^ . Once warm enough, the LCD screen will return to the main menu. Press the START | PAUSE button to activate the cycle. | ● | |||||
| Lid was open during bakingIt is not recommended to lift the lid during operation unless stated in the recipe; to check the consistency of the dough; or to glaze and add seeds to the top of the loaf. | ● | ● | ||||
| ‘Keep Warm’ phaseThe bread was left in the baking chamber during the ‘keep warm’ phase.Remove the bread pan before the ‘keep warm’ phase, then remove the bread and allow to cool on a wire rack. | ● | |||||
| Bread sliced just after bakingSteam was not allowed to escape from the baked loaf.Cool bread for a minimum of 20 minutes before slicing it. | ● | |||||
| Operational Errors | E:02Contact your nearest authorised Breville service centre. | |||||
| E:02Contact your nearest authorised Breville service centre. | ||||||
| Water | Not enoughCheck dough consistency during the 'knead 2' phase.If it is too dry, add liquid (27°C), 1⁄2 to 1 tablespoon at a time. | ● | ||||
| Too muchCheck dough consistency during the 'knead 2' phase, see page 21.If it is too wet, add flour 1 tablespoon at a time. | ●●● | |||||
| Temperature too hot or too coldWater and liquids should be (27°C) unless stated otherwise. | ● | |||||
| Flour | Not enoughCheck dough consistency during the 'knead 2' phase.If it is too wet, add flour 1 tablespoon at a time. | ● | ||||
| Too muchCheck dough consistency during the 'knead 2' phase.If it is too dry, add liquid (27°C), 1⁄2 to 1 tablespoon at a time. | ● | |||||
| Wrong type of flour usedUse the recommended flour in the recipe. For bread baking, bread flour with at least 11 - 12% protein is recommended to ensure a tall springy loaf. | ● | |||||
| Yeast | Not enoughIncrease by 1⁄4 teaspoon. | ● | ||||
| Too muchReduce by 1⁄4 teaspoon. | ● | ● | ||||
| Wrong type of yeast usedWe recommend Active Dry Yeast for all standard settings and Instant Yeast for the rapid settings. | ● | ● | ||||
| Stale yeastCheck the 'Best Before Date'. Refer for tips on checking the freshness of your yeast. | ● | |||||
| Yeast prematurely activatedAlways ensure to layer ingredients in the bread pan in the order listed in the recipe, separating the yeast from liquids. When using the Delay Start feature, make a small hollow in the centre of the flour (ensuring the hollow does not touch the water, salt or sugar layer) then place the yeast in the hollow. | ● | |||||
| Sugar | Not enoughSugar is an important part of the bread making process as it provides food for the yeast. We do not recommend powdered or liquid artificial sweeteners. | ● | ||||
| Non-recommended ingredients and quantities used.Use the recommended ingredients, substitutions and quantities.Results may vary when using other recipes. | ● ● ● | |||||
CUSTOM RECIPE CHARTS
Custom Recipe #:
Recipe Name:
Setting:
Crust Colour:
Loaf Size:
PHASE TEMP/TIME
'Preheat' Temperature
'Preheat' Time
'Knead 1' Time
'Knead 2' Time
'Rise' Temperature
'Rise 1' Time
'Punch Down 1' Time
'Rise 2' Time
'Punch Down 2' Time
'Rise 3' Time
'Bake' Time
'Bake' Temperature
'Keep Warm' Time
TOTAL CYCLE TIME
INGREDIENTS
NOTES
BAKING SEQUENCES
Setting: Basic
| SIZE/CRUST KNEAD 1 KNEAD 2 RISE | TEMP(°C) | RISE 1 PUNCHDOWN | RISE 2 SHAPE RISE 3 BAKE BAKE | TEMP(°C) | TOTAL TIME(HOUR:MIN) | WARM | ||||||
| 0.5kg Light | 2 min | 22 min | 32 | 40 min | 10 sec | 25 min | 15 sec | 50 min | 30 min | 140 | 2:49 | 1 hr |
| 0.5kg Medium | 2 min | 22 min | 32 | 40 min | 10 sec | 25 min | 15 sec | 50 min | 40 min | 140 | 2:59 | 1 hr |
| 0.5kg Dark | 2 min | 22 min | 32 | 40 min | 10 sec | 25 min | 15 sec | 50 min | 50 min | 142 | 3:09 | 1 hr |
| 0.75kg Light | 3 min | 22 min | 32 | 40 min | 10 sec | 25 min | 15 sec | 50 min | 35 min | 140 | 2:55 | 1 hr |
| 0.75kg Medium | 3 min | 22 min | 32 | 40 min | 10 sec | 25 min | 15 sec | 50 min | 45 min | 140 | 3:05 | 1 hr |
| 0.75kg Dark | 3 min | 22 min | 32 | 40 min | 10 sec | 25 min | 15 sec | 50 min | 55 min | 142 | 3:15 | 1 hr |
| 1kg Light | 4 min | 22 min | 32 | 40 min | 10 sec | 25 min | 15 sec | 50 min | 40 min | 140 | 3:01 | 1 hr |
| 1kg Medium | 4 min | 22 min | 32 | 40 min | 10 sec | 25 min | 15 sec | 50 min | 50 min | 140 | 3:11 | 1 hr |
| 1kg Dark | 4 min | 22 min | 32 | 40 min | 10 sec | 25 min | 15 sec | 50 min | 1 hr | 142 | 3:21 | 1 hr |
| 1.25kg Light | 5 min | 20 min | 32 | 40 min | 10 sec | 25 min | 15 sec | 50 min | 50 min | 140 | 3:10 | 1 hr |
| 1.25kg Medium | 5 min | 20 min | 32 | 40 min | 10 sec | 25 min | 15 sec | 50 min | 1 hr | 140 | 3:20 | 1 hr |
| 1.25kg Dark | 5 min | 20 min | 32 | 40 min | 10 sec | 25 min | 15 sec | 50 min | 1 hr 10 min | 142 | 3:30 | 1 hr |
Setting: Crusty Loaf
| SIZE/CRUST KNEAD 1 KNEAD 2 RISE | TEMP(°C) | RISE 1 PUNCHDOWN | RISE 2 SHAPE RISE 3 BAKE BAKE | TEMP(°C) | TOTAL TIME(HOUR:MIN) | WARM | ||||||
| 0.5kg | 5 min | 20 min | 32 | 40 min | 10 sec | 30 min | 10 sec | 1 hr | 50 min | 145 | 3:25 | 1 hr |
| 0.75kg | 5 min | 20 min | 32 | 40 min | 10 sec | 30 min | 10 sec | 1 hr | 55 min | 145 | 3:30 | 1 hr |
| 1.0kg | 5 min | 20 min | 32 | 40 min | 10 sec | 30 min | 10 sec | 1 hr | 52 min | 145 | 3:27 | 1 hr |
| 1.25kg | 5 min | 20 min | 32 | 40 min | 10 sec | 30 min | 10 sec | 1 hr | 1 hr 5 min | 145 | 3:40 | 1 hr |
Selection of CRUST and RAPID function is not available on this setting.
Setting: Basic Rapid
| SIZE/CRUST KNEAD 1 KNEAD 2 RISE | TEMP(°C) | RISE 1 PUNCHDOWN | RISE 2 SHAPE RISE 3 BAKE BAKE | TEMP(°C) | TOTAL TIME(HOUR:MIN) | WARM | ||||||
| 0.5kg Light | 2 min | 22 min | 32 | 15 min | 10 sec | 10 min | 10 sec | 30 min | 30 min | 140 | 1:49 | 1 hr |
| 0.5kg Medium | 2 min | 22 min | 32 | 15 min | 10 sec | 10 min | 10 sec | 30 min | 40 min | 140 | 1:59 | 1 hr |
| 0.5kg Dark | 2 min | 22 min | 32 | 15 min | 10 sec | 10 min | 10 sec | 30 min | 50 min | 142 | 2:09 | 1 hr |
| 0.75kg Light | 3 min | 22 min | 32 | 15 min | 10 sec | 10 min | 10 sec | 30 min | 35 min | 140 | 1:55 | 1 hr |
| 0.75kg Medium | 3 min | 22 min | 32 | 15 min | 10 sec | 10 min | 10 sec | 30 min | 45 min | 140 | 2:05 | 1 hr |
| 0.75kg Dark | 3 min | 22 min | 32 | 15 min | 10 sec | 10 min | 10 sec | 30 min | 55 min | 142 | 2:15 | 1 hr |
| 1kg Light | 4 min | 22 min | 32 | 15 min | 10 sec | 10 min | 10 sec | 30 min | 40 min | 140 | 2:01 | 1 hr |
| 1kg Medium | 4 min | 22 min | 32 | 15 min | 10 sec | 10 min | 10 sec | 30 min | 50 min | 140 | 2:11 | 1 hr |
| 1kg Dark | 4 min | 22 min | 32 | 15 min | 10 sec | 10 min | 10 sec | 30 min | 1 hr | 142 | 2:21 | 1 hr |
| 1.25kg Light | 5 min | 20 min | 32 | 15 min | 10 sec | 10 min | 10 sec | 30 min | 50 min | 140 | 2:10 | 1 hr |
| 1.25kg Medium | 5 min | 20 min | 32 | 15 min | 10 sec | 10 min | 10 sec | 30 min | 1 hr | 140 | 2:20 | 1 hr |
| 1.25kg Dark | 5 min | 20 min | 32 | 15 min | 10 sec | 10 min | 10 sec | 30 min | 1 hr 10 min | 142 | 2:30 | 1 hr |
Setting: Sweet
| SIZE/CRUST KNEAD 1 KNEAD 2 RISE | TEMP(°C) | RISE 1 PUNCHDOWN | RISE 2 SHAPE RISE 3 BAKE BAKE | TEMP(°C) | TOTAL TIME(HOUR:MIN) | WARM | ||||||
| 0.5kg | 5 min | 20 min | 32 | 40 min | 10 sec | 25 min | 5 sec | 50 min | 1 hr | 123 | 3:20 | 1 hr |
| 0.75kg | 5 min | 20 min | 32 | 40 min | 10 sec | 25 min | 5 sec | 50 min | 1 hr 2 min | 123 | 3:22 | 1 hr |
| 1.0kg | 5 min | 20 min | 32 | 40 min | 10 sec | 25 min | 5 sec | 50 min | 1 hr 5 min | 123 | 3:25 | 1 hr |
| 1.25kg | 5 min | 20 min | 32 | 40 min | 10 sec | 25 min | 5 sec | 50 min | 1 hr 10 min | 123 | 3:30 | 1 hr |
Selection of CRUST and RAPID function is not available on this setting.
Setting: Wholewheat
| SIZE/CRUST PREHEAT TEMP (°C) | KNEAD 1 | KNEAD 2 | RISE TEMP (°C) | RISE 1 PUNCH DOWN | RISE 2 SHAPE RISE 3 BAKE BAKE | TEMP (°C) | TOTAL TIME (HOUR:MIN) | WARM | ||||||
| 0.5kg Light | 16 | 2 min | 17 min | 32 | 50 min | 10 sec | 25 min | 10 sec | 45 min | 35 min | 140 | 3:24 | 1 hr | |
| 0.5kg Medium | 16 | 2 min | 17 min | 32 | 50 min | 10 sec | 25 min | 10 sec | 45 min | 40 min | 140 | 3:29 | 1 hr | |
| 0.5kg Dark | 16 | 2 min | 17 min | 32 | 50 min | 10 sec | 25 min | 10 sec | 45 min | 48 min | 142 | 3:37 | 1 hr | |
| 0.75kg Light | 16 | 3 min | 17 min | 32 | 50 min | 10 sec | 25 min | 10 sec | 45 min | 37 min | 140 | 3:27 | 1 hr | |
| 0.75kg Medium | 16 | 3 min | 17 min | 32 | 50 min | 10 sec | 25 min | 10 sec | 45 min | 42 min | 140 | 3:32 | 1 hr | |
| 0.75kg Dark | 16 | 3 min | 17 min | 32 | 50 min | 10 sec | 25 min | 10 sec | 45 min | 50 min | 142 | 3:40 | 1 hr | |
| 1kg Light | 16 | 4 min | 17 min | 32 | 50 min | 10 sec | 25 min | 10 sec | 45 min | 40 min | 142 | 3:44 | 1 hr | |
| 1kg Medium | 16 | 4 min | 17 min | 32 | 50 min | 10 sec | 25 min | 10 sec | 45 min | 45 min | 140 | 3:36 | 1 hr | |
| 1kg Dark | 16 | 4 min | 17 min | 32 | 50 min | 10 sec | 25 min | 10 sec | 45 min | 53 min | 140 | 3:31 | 1 hr | |
| 1.25kg Light | 16 | 5 min | 15 min | 32 | 50 min | 10 sec | 25 min | 10 sec | 45 min | 50 min | 142 | 3:53 | 1 hr | |
| 1.25kg Medium | 16 | 5 min | 15 min | 32 | 50 min | 10 sec | 25 min | 10 sec | 45 min | 55 min | 140 | 3:45 | 1 hr | |
| 1.25kg Dark | 16 | 5 min | 15 min | 32 | 50 min | 10 sec | 25 min | 10 sec | 45 min | 1 hr 3 min | 140 | 3:40 | 1 hr | |
Setting: Crusty Loaf
| SIZE | KNEAD 1 | KNEAD 2 | RISE TEMP (°C) | RISE 1 PUNCH DOWN | RISE 2 | SHAPE | RISE 3 | BAKE | BAKE TEMP (°C) | TOTAL TIME (HOUR:MIN) | WARM | |
| 0.5kg | 5 min | 20 min | 32 | 40 min | 10 sec | 30 min | 10 sec | 1 hr | 50 min | 145 | 3:25 | 1 hr |
| 0.75kg | 5 min | 20 min | 32 | 40 min | 10 sec | 30 min | 10 sec | 1 hr | 55 min | 145 | 3:30 | 1 hr |
| 1.0kg | 5 min | 20 min | 32 | 40 min | 10 sec | 30 min | 10 sec | 1 hr | 52 min | 145 | 3:27 | 1 hr |
| 1.25kg | 5 min | 20 min | 32 | 40 min | 10 sec | 30 min | 10 sec | 1 hr | 1 hr 5 min | 145 | 3:40 | 1 hr |
Selection of CRUST and RAPID function is not available on this setting.
Setting: Wholewheat Rapid
| SIZE/CRUST PREHEAT TEMP (°C) | KNEAD 1 | KNEAD 2 | RISE TEMP (°C) | RISE 1 PUNCH DOWN | RISE 2 SHAPE RISE 3 BAKE BAKE | TEMP (°C) | TOTAL TIME (HOUR:MIN) | WARM | |||||
| 0.5kg Light | 16 | 2 min | 17 min | 32 | 30 min | 10 sec | 10 min | 10 sec | 30 min | 35 min | 140 | 2:09 | 1 hr |
| 0.5kg Medium | 16 | 2 min | 17 min | 32 | 30 min | 10 sec | 10 min | 10 sec | 30 min | 40 min | 140 | 2:14 | 1 hr |
| 0.5kg Dark | 16 | 2 min | 17 min | 32 | 30 min | 10 sec | 10 min | 10 sec | 30 min | 48 min | 142 | 2:22 | 1 hr |
| 0.75kg Light | 16 | 3 min | 17 min | 32 | 30 min | 10 sec | 10 min | 10 sec | 30 min | 37 min | 140 | 2:12 | 1 hr |
| 0.75kg Medium | 16 | 3 min | 17 min | 32 | 30 min | 10 sec | 10 min | 10 sec | 30 min | 42 min | 140 | 2:17 | 1 hr |
| 0.75kg Dark | 16 | 3 min | 17 min | 32 | 30 min | 10 sec | 10 min | 10 sec | 30 min | 50 min | 142 | 2:25 | 1 hr |
| 1kg Light | 16 | 4 min | 17 min | 32 | 30 min | 10 sec | 10 min | 10 sec | 30 min | 40 min | 140 | 2:16 | 1 hr |
| 1kg Medium | 16 | 4 min | 17 min | 32 | 30 min | 10 sec | 10 min | 10 sec | 30 min | 45 min | 140 | 2:21 | 1 hr |
| 1kg Dark | 16 | 4 min | 17 min | 32 | 30 min | 10 sec | 10 min | 10 sec | 30 min | 53 min | 142 | 2:29 | 1 hr |
| 1.25kg Light | 16 | 5 min | 15 min | 32 | 30 min | 10 sec | 10 min | 10 sec | 30 min | 50 min | 140 | 2:25 | 1 hr |
| 1.25kg Medium | 16 | 5 min | 15 min | 32 | 30 min | 10 sec | 10 min | 10 sec | 30 min | 55 min | 140 | 2:30 | 1 hr |
| 1.25kg Dark | 16 | 5 min | 15 min | 32 | 30 min | 10 sec | 10 min | 10 sec | 30 min | 1 hr 3 min | 142 | 2:38 | 1 hr |
Setting: Dough
| COURSE | KNEAD 1 | KNEAD 2 | RISE TEMP (°C) | RISE | TOTAL TIME |
| Dough | 5 min | 25 min | 32 | 60 min | 1 hr 30 min |
| Pizza dough | 5 min | 15 min | 32 | 60 min | 50 min |
| Pasta dough | 14 min | 14 min |
Setting: Gluten Free
| SIZE KNEAD 1 KNEAD 2 RISE | RISE 1 SHAPE RISE 3 BAKE BAKE | |||||||||
| TEMP (°C) | TEMP (°C) | TOTAL TIME (HOUR:MIN) | WARM | |||||||
| 1kg Light | 3 min | 17 min | 32 | 50 min | 10 sec | 50 min | 45 min | 135 | 2:45 | 1 hr |
| 1kg Medium | 3 min | 17 min | 32 | 50 min | 10 sec | 50 min | 50 min | 135 | 2:50 | 1 hr |
| 1kg Dark | 3 min | 17 min | 32 | 50 min | 10 sec | 50 min | 55 min | 137 | 2:55 | 1 hr |
| 1.25kg Light | 3 min | 17 min | 32 | 50 min | 10 sec | 50 min | 50 min | 135 | 2:50 | 1 hr |
| 1.25kg Medium | 3 min | 17 min | 32 | 50 min | 10 sec | 50 min | 55 min | 135 | 2:55 | 1 hr |
| 1.25kg Dark | 3 min | 17 min | 32 | 50 min | 10 sec | 50 min | 1 hr | 137 | 3:00 | 1 hr |
BASIC
Almost any BASIC recipe, including the ones on the following pages, can be modified for use with the BASIC RAPID setting.
To reduce the total cycle time by approx. 1 hour, select the BASIC RAPID setting. Follow the recipe and instructions for the BASIC version, however, replace the Active Dry Yeast with Instant (aka Quick-Rise, Rapid Rise) or Bread Machine Yeast and add the vital wheat gluten as it helps produce a better result during the shorter 'rise' phase.
INGREDIENTS
2.5LBS 2.0LBS 1.5LBS 1.0LBS
1.25KG 1.0KG 0.75KG 0.5KG
| Yeast: Instant (aka Quick-Rise, Rapid Rise) or Bread Machine | 3 1⁄2 teaspoons | 3 teaspoons | 21⁄2 teaspoons | 2 teaspoons |
| Vital wheat gluten | 2 3⁄4 teaspoons | 21⁄2 teaspoons | 2 teaspoons | 11⁄2 teaspoons |
BASIC WHITE BREAD
| BREAD NAME | Basic White Bread |
| SETTING | Basic |
| PADDLE | Collapsible |
| CRUST COLOR OPTIONS | Light, Medium, Dark |
| DELAY START | Yes |
INGREDIENTS
2.5LBS 2.0LBS 1.5LBS 1.0LBS
1.25KG 1.0KG 0.75KG 0.5KG
| Water, 80°F (27°C) | 1 3/4 cups + 1 tablespoon | 1 1/2 cups | 1 cup + 2 tablespoons | 3/4 cup |
| Unsalted butter, 1/2" pieces at room temperature | 2 1/2 tablespoons | 2 tablespoons | 1 1/2 tablespoons | 1 tablespoon |
| Salt | 2 1/2 teaspoons | 2 teaspoons | 1/2 teaspoons | 1 teaspoon |
| Sugar, granulated | 2 1/2 tablespoons | 2 tablespoons | 1 1/2 tablespoons | 1 tablespoon |
| Bread flour | 5 cups | 4 cups | 3 cups | 2 cups |
| Vital wheat gluten (optional) | 2 3/4 teaspoons | 2 1/2 teaspoons | 2 teaspoons | 1 1/2 teaspoons |
| Milk powder | 3 1/2 tablespoons | 3 tablespoons | 2 1/2 tablespoons | 1 1/2 tablespoons |
| Yeast: Active Dry* | 2 1/4 teaspoons | 2 teaspoons | 1 1/2 teaspoons | 1 1/4 teaspoons |
Ensure the collapsible paddle is securely attached and in the upright position before adding ingredients to the bread pan in the order listed. Secure the bread pan inside the baking chamber. Select the BASIC setting, desired crust color and loaf size. Press the START I PAUSE button. When the cycle is complete, use oven mitts to remove the bread from the bread machine and transfer to a wire rack to cool. Bread will slice best when allowed to cool.
*If using the BASIC RAPID Setting, substitute the quantities of these two ingredients with the quantities on the BASIC RAPID SETTINGS table on page 53.
BASIC - BREAD FOR STUFFING
| BREAD NAME | Bread for Stuffing |
| SETTING | Basic |
| PADDLE | Collapsible |
| CRUST COLOR OPTIONS | Light, Medium, Dark |
| DELAY START | Yes |
| INGREDIENTS | 2.5LBS 2.0LBS 1.5LBS 1.0LBS |
| 1.25KG 1.0KG 0.75KG 0.5KG |
| Water, 80°F (27°C) | 1 3⁄4 cups | 1 1⁄3 cups | 1 cup | 3⁄3 cup + 1 tablespoon |
| Unsalted butter, 1⁄2" pieces at room temperature | 4 tablespoons | 3 tablespoons | 2 1⁄4 tablespoons | 1 1⁄2 tablespoons |
| Salt | 2 1⁄2 teaspoons | 2 teaspoons | 1 1⁄2 teaspoons | 1 teaspoon |
| Sugar, granulated | 2 1⁄2 tablespoons | 2 tablespoons | 1 1⁄2 tablespoons | 1 tablespoon |
| Bread flour | 3 cups + 2 tablespoons | 2 1⁄2 cups | 1 3⁄4 cups + 2 tablespoons | 1 1⁄4 cups |
| Vital wheat gluten (optional)* | 2 3⁄4 teaspoons | 2 1⁄2 teaspoons | 2 teaspoons | 1 1⁄4 teaspoons |
| Milk powder | 1⁄4 cup | 3 tablespoons | 2 1⁄4 tablespoons | 1 1⁄2 tablespoons |
| Fresh sage, chopped | 1⁄2 cup | 1⁄4 cup | 3 tablespoons | 2 tablespoons |
| Fresh thyme, chopped | 1⁄4 cup | 3 tablespoons | 2 1⁄4 tablespoons | 1 1⁄2 tablespoons |
| Black pepper | 3⁄4 teaspoon | 1⁄2 teaspoon | 1⁄2 teaspoons | 1⁄4 teaspoon |
| Onion powder | 2 1⁄4 teaspoons 2 teaspoons 1 1⁄2 teaspoons 1 teaspoon | |||
| Garlic powder | 1 teaspoon | 3⁄4 teaspoon | 1⁄2 teaspoon | 1⁄2 teaspoon |
| Yeast: Active Dry* | 2 1⁄4 teaspoons | 1 3⁄4 teaspoons | 1 1⁄2 teaspoons | 1 teaspoon |
ADD TO THE AUTOMATIC FRUIT AND NUT DISPENSER
| Dried cranberries (optional) | 112 cup | 114 cup | 114 cup | 3 tablespoons |
| Toasted pecans (optional) | 112 cup | 114 cup | 114 cup | 3 tablespoons |
This bread can be used as a stuffing for chicken and turkey. All the flavors are baked directly into the bread.
Ensure the collapsible paddle is securely attached and in the upright position before adding ingredients to the bread pan in the order listed. Secure the bread pan inside the baking chamber. Place the dried cranberries and toasted pecans into the Automatic Fruit & Nut Dispenser. Select the BASIC setting, desired crust color and loaf size. Press the START I PAUSE button. When the cycle is complete, use oven mitts to remove the bread from the bread machine and transfer to a wire rack to cool. Bread will slice best when allowed to cool.
*If using the BASIC RAPID Setting, substitute the quantities of these two ingredients with the quantities on pages 35 & 37.
BASIC - CHEDDAR CHEESE AND JALAPEÑO CORN BREAD
| BREAD NAME | Cheddar Cheese and Jalapeño Corn Bread |
| SETTING | Basic |
| PADDLE | Collapsible |
| CRUST COLOR OPTIONS | Light, Medium, Dark |
| DELAY START | No |
| INGREDIENTS | 2.5LBS 2.0LBS 1.5LBS 1.0LBS | |||
| 1.25KG 1.0KG 0.75KG 0.5KG | ||||
| Water, 80°F (27°C) | 1 1⁄2 cups | 1 1⁄4 cups | 3⁄4 cup + 2 tablespoons | 3⁄3 cup |
| Unsalted butter, 1⁄2" pieces at room temperature | 3 tablespoons | 2 1⁄2 tablespoons | 2 tablespoons | 1 tablespoon |
| Salt | 2 teaspoons | 1 1⁄2 teaspoons | 1 1⁄4 teaspoons | 3⁄4 teaspoons |
| Sugar, granulated 1⁄4 cup 3 tablespoons 2 1⁄2 tablespoons 1 1⁄2 tablespoons | ||||
| Bread flour | 4 1⁄2 cups | 3 3⁄3 cups | 2 3⁄4 cups | 1 3⁄4 cup + 1 tablespoons |
| Vital wheat gluten (optional)* | 2 3⁄4 teaspoons | 2 1⁄2 teaspoons | 1 3⁄4 teaspoons | 1 1⁄4 teaspoons |
| Corn meal | 3⁄3 cup | 1⁄2 cup | 1⁄3 cup | 1⁄4 cup |
| Sharp cheddar cheese (shredded) | 1 1⁄2 cups | 1 1⁄4 cups | 3⁄4 cup | 3⁄3 cup |
| Jalapeno, finely diced | 2 tablespoons | 1 1⁄2 tablespoons | 1 tablespoon | 3⁄4 tablespoon |
| Milk powder | 3 tablespoons | 2 1⁄2 tablespoons | 1 3⁄4 tablespoons | 1 1⁄4 tablespoons |
| Yeast: Active Dry* | 2 teaspoons | 1 3⁄4 teaspoons | 1 1⁄4 teaspoons | 1 teaspoon |
| OPTIONAL TOPPING | ||||
| Sharp cheddar cheese (shredded) | 1⁄4 cup | 3 tablespoons | 2 1⁄2 tablespoons | 2 tablespoons |
| Egg wash: 1 egg + 1 tablespoon water, beaten | ||||
Ensure the collapsible paddle is securely attached and in the upright position before adding ingredients to the bread pan in the order listed. Secure the bread pan inside the baking chamber. Select the BASIC setting, desired crust color and loaf size. Press the START | PAUSE button. If using the topping, brush the dough at the end of the final rise (prior to bake) with the egg wash and sprinkle shredded cheddar cheese on top. When the cycle is complete, use oven mitts to remove the bread from the bread machine and transfer to a wire rack to cool. Bread will slice best when allowed to cool.
*If using the BASIC RAPID Setting, substitute the quantities of these two ingredients with the quantities on pages 35 & 37.
BASIC - MILK & HONEY BREAD
| BREAD NAME | Milk & Honey Bread |
| SETTING | Basic |
| PADDLE | Collapsible |
| CRUST COLOR OPTIONS | Light, Medium, Dark |
| DELAY START | No |
| INGREDIENTS | 2.5LBS 2.0LBS 1.5LBS 1.0LBS | |||
| 1.25KG 1.0KG 0.75KG 0.5KG | ||||
| Milk, scalded and cooled to 80^ ( 27^ ) | 112 cups | 112 cups + 2 tablespoons | 1 cup + 2 tablespoons | 34 cup + 1 teaspoon |
| Honey | 212 tablespoons | 2 tablespoons | 112 tablespoons | 1 tablespoon |
| Unsalted butter, 12" pieces at room temperature | 212 tablespoons | 2 tablespoons | 112 tablespoons | 1 tablespoon |
| Salt | 214 teaspoons | 2 teaspoons | 112 teaspoons | 1 teaspoon |
| Bread flour | 5 cups | 4 cups | 3 cups | 2 cups |
| Vital wheat gluten (optional)* | 234 teaspoons | 212 teaspoons | 2 teaspoons | 112 teaspoons |
| Yeast: Active Dry* | 212 teaspoons | 2 teaspoons | 1 teaspoon | 1 teaspoon |
Ensure the collapsible paddle is securely attached and in the upright position before adding ingredients to the bread pan in the order listed. Secure the bread pan inside the baking chamber. Select the BASIC setting, desired crust color and loaf size. Press the START | PAUSE button. When the cycle is complete, use oven mitts to remove the bread from the bread machine and transfer to a wire rack to cool. Bread will slice best when allowed to cool.
*If using the BASIC RAPID Setting, substitute the quantities of these two ingredients with the quantities on pages 35 & 37.
BASIC - OATMEAL BREAD
| BREAD NAME | Oatmeal Bread |
| SETTING | Basic |
| PADDLE | Collapsible |
| CRUST COLOR OPTIONS | Light, Medium, Dark |
| DELAY START | Yes |
| INGREDIENTS | 2.5LBS 2.0LBS 1.5LBS 1.0LBS | |||
| 1.25KG 1.0KG 0.75KG 0.5KG | ||||
| Water, 80°F (27°C) | 1 3⁄4 cups | 1 1⁄2 cups + 2 teaspoons | 1 cup + 1 tablespoon | 2⁄3 cup + 1 tablespoon |
| Unsalted butter, 1⁄2" pieces at room temperature | 2 tablespoons | 1 1⁄2 tablespoons | 1 tablespoon | 1 tablespoon |
| Salt | 1 1⁄2 teaspoons | 1 1⁄4 teaspoons | 1 teaspoon | 3⁄4 teaspoon |
| Brown sugar | 1⁄4 cup | 3 tablespoons | 2 tablespoons | 1 1⁄2 tablespoons |
| Bread flour | 4 1⁄4 cups | 3 1⁄2 cups | 2 3⁄3 cups | 1 3⁄3 cups |
| Vital wheat gluten (optional)* | 2 3⁄4 teaspoons | 2 1⁄2 teaspoons | 2 teaspoons | 1 1⁄2 teaspoons |
| Oatmeal | 1 cup | 3⁄4 cup | 1⁄2 cup | 1⁄3 cup + 1 tablespoon |
| Buttermilk powder | 6 tablespoons | 5 tablespoons | 4 tablespoons | 2 1⁄2 tablespoons |
| Yeast: Active Dry* | 2 teaspoons | 1 3⁄4 teaspoons | 1 1⁄2 teaspoons | 1 teaspoon |
| OPTIONAL TOPPING | ||||
| Oatmeal | 3 tablespoons | 3 tablespoons | 2 tablespoons | 2 tablespoons |
Egg wash: 1 egg + 1 tablespoon water, beaten
Ensure the collapsible paddle is securely attached and in the upright position before adding ingredients to the bread pan in the order listed. Secure the bread pan inside the baking chamber. Select the BASIC setting, desired crust color and loaf size. Press the START | PAUSE button. If using the topping, brush the dough at the end of the final rise (prior to bake) with the egg wash and sprinkle oatmeal on top. When the cycle is complete, use oven mitts to remove the bread from the bread machine and transfer to a wire rack to cool. Bread will slice best when allowed to cool.
*If using the BASIC RAPID Setting, substitute the quantities of these two ingredients with the quantities on pages 35 & 37.
BASIC - PEANUT BUTTER & JAM BREAD
| BREAD NAME | Peanut Butter & Jam Bread | |||
| SETTING | Basic | |||
| PADDLE | Collapsible | |||
| CRUST COLOR OPTIONS | Light, Medium, Dark | |||
| DELAY START | No | |||
| INGREDIENTS | 2.5LBS 2.0LBS 1.5LBS 1.0LBS1.25KG 1.0KG 0.75KG 0.5KG | |||
| Water, 80°F (27°C) | 2 cups | 1 3⁄4 cups | 1 1⁄4 cups | 3⁄4 cup + 1 tablespoon |
| Unsalted butter, 1⁄2" pieces at room temperature | 3 tablespoons | 2 1⁄2 tablespoons | 2 tablespoons | 1 tablespoon |
| Smooth peanut butter 1⁄2 cup 1⁄3 cup 1⁄4 cup 3 tablespoons | ||||
| Salt | 2 1⁄4 teaspoons | 2 teaspoons | 1 1⁄2 teaspoons | 1 teaspoon |
| Sugar, granulated | 3 tablespoons | 2 1⁄2 tablespoons | 2 tablespoons | 1 tablespoon |
| Bread flour | 2 1⁄2 cups | 2 cups | 1 1⁄2 cups | 1 cup |
| Whole wheat flour | 2 cups + 1 tablespoon | 1 3⁄4 cups | 1 1⁄4 cups | 3⁄4 cup + 1 tablespoon |
| Vital wheat gluten (optional)* | 2 3⁄4 teaspoons | 2 1⁄2 teaspoons | 2 teaspoons | 1 1⁄2 teaspoons |
| Yeast: Active Dry* | 2 1⁄4 teaspoons | 1 1⁄2 teaspoons | 1 1⁄4 teaspoons | 1 teaspoon |
| FILLING | ||||
| Seedless raspberry jam** | 1⁄2 cup 1⁄2 cup 1⁄3 cup 1⁄4 cup | |||
| ADD TO THE AUTOMATIC FRUIT AND NUT DISPENSER | ||||
| Whole peanuts, unsalted | 3⁄4 cup | 3⁄4 cup | 3⁄8 cup | 1⁄2 cup |
| OPTIONAL TOPPING | ||||
| Peanuts | 3⁄4 cup | 1⁄2 cup | 1⁄3 cup | 1⁄3 cup |
| Egg wash: 1 egg + 1 tablespoon water, beaten | ||||
Ensure the collapsible paddle is securely attached and in the upright position before adding ingredients to the bread pan in the order listed, except for the jam. Secure the bread pan inside the baking chamber. Place the peanuts into the Automatic Fruit & Nut Dispenser. Select the BASIC setting, desired crust color and loaf size. Press the START | PAUSE button. At the end of the second rise and final punch down, press and hold the START | PAUSE button to momentarily pause the cycle. Remove the dough from the bread pan. On a lightly floured surface, roll the dough out into a rectangle about 6" (15cm) wide and 13" (33cm) long. Spread the jam all over the dough, leaving a 1" (2.5cm) border. From the top short end, fold the dough over L of the way down. Then take the shortest end closest to you and roll the dough "jelly roll" style, into a tight roll, sealing the side edges as you roll. Seal the seam by pinching it against the folded dough. Remove the collapsible paddle from the bread pan and place the rolled dough, seam side down, into the bread pan. Use caution as the paddle will be hot. Brush the top with the egg wash and sprinkle with peanuts if desired. Close the lid. Press the START | PAUSE button to resume the cycle. When the cycle is complete, use oven mitts to remove the bread from the bread machine and transfer to a wire rack to cool. Bread will slice best when allowed to cool.
*If using the BASIC RAPID Setting, substitute the quantities of these two ingredients with the quantities on pages 35 & 37.
**Any seedless fruit jam can be substituted.
BASIC - POTATO SOUR CREAM AND CHIVES BASIC
| BREAD NAME | Potato Sour Cream and Chives Basic | |||
| PADDLE | Collapsible | |||
| CRUST COLOR OPTIONS | Light, Medium, Dark | |||
| DELAY START | No | |||
| INGRÉDIENTS | 2.5LBS 2.0LBS 1.5LBS 1.0LBS1.25KG 1.0KG 0.75KG 0.5KG | |||
| Potato water, 80°F (27°C) | 1 cup | 34 cup | 35 cup | 12 cup |
| Mashed potato 1 cup 34 cup 23 cup 13 cup | ||||
| Sour cream | 12 cup + 1 tablespoon | 12 cup | 14 cup | 3 tablespoons |
| Fresh chives, chopped | 3 tablespoons | 2 12 tablespoons | 2 tablespoons | 1 12 tablespoons |
| Unsalted butter, 12" pieces at room temperature | 3 tablespoons | 2 12 tablespoons | 2 tablespoons | 1 12 tablespoons |
| Salt | 2 12 teaspoons | 2 teaspoons | 1 12 teaspoons | 1 teaspoon |
| Sugar, granulated | 2 tablespoons | 1 12 tablespoons | 1 14 tablespoons | 1 tablespoon |
| Bread flour | 4 12 cups | 3 12 cups | 2 34 cups | 1 34 cups |
| Vital wheat gluten (optional)* | 2 34 teaspoons | 2 12 teaspoons | 2 teaspoons | 1 12 teaspoons |
| Milk powder | 2 tablespoons | 1 12 tablespoons | 1 14 tablespoons | 1 tablespoon |
| Yeast: Active Dry* | 2 teaspoons | 1 12 teaspoons | 1 14 teaspoons | 1 14 teaspoons |
This light and airy loaf bakes with a crisp exterior. Use it with smoked salmon and cream cheese, or a bacon, lettuce and tomato sandwich.
Cook the potato in water until fork tender. Reserve enough of the potato water required in the recipe and allow to cool to 80°F (27°C). Ensure the collapsible paddle is securely attached and in the upright position before adding ingredients to the bread pan in the order listed. Secure the bread pan inside the baking chamber. Select the BASIC setting, desired crust color and loaf size. Press the START | PAUSE button. When the cycle is complete, use oven mitts to remove the bread from the bread machine and transfer to a wire rack to cool. Bread will slice best when allowed to cool.
*If using the BASIC RAPID Setting, substitute the quantities of these two ingredients with the quantities on pages 35 & 37.
BASIC - ROSEMARY OLIVE OIL BREAD
| BREAD NAME | Rosemary Olive Oil Bread |
| SETTING | Basic |
| PADDLE | Collapsible |
| CRUST COLOR OPTIONS | Light, Medium, Dark |
| DELAY START | Yes |
| INGREDIENTS | 2.5LBS 2.0LBS 1.5LBS 1.0LBS1.25KG 1.0KG 0.75KG 0.5KG |
Water, 80°F (27°C) 1 3/4 cups + 1 tablespoon 1 ½ cups 1 cup + 2 tablespoons 3/4 cup
Olive oil, extra virgin 1/4 cup + 1 teaspoon 1/4 cup 3 tablespoons 2 tablespoons
| Salt | 2 1⁄2 teaspoons | 2 teaspoons | 1 1⁄2 teaspoons | 1 teaspoon |
| Bread Flour | 5 cups | 4 cups | 3 cups | 2 cups |
| Vital wheat gluten (optional)* | 2 3⁄4 teaspoons | 21⁄2 teaspoons | 2 teaspoons | 1 1⁄2 teaspoons |
| Dried rosemary | 1⁄4 cup + 1 teaspoon | 1⁄4 cup | 3 tablespoons | 2 tablespoons |
| Yeast: Active Dry* | 2 3⁄4 teaspoons | 2 1⁄2 teaspoons | 1 3⁄4 teaspoons | 1 1⁄4 teaspoons |
| OPTIONAL TOPPING | ||||
| Dried rosemary | 2 tablespoons | 2 tablespoons | 1 tablespoon | 1 tablespoon |
| Flaked salt | 1 teaspoon | 1 teaspoon | 1⁄2 teaspoon | 1⁄2 teaspoon |
Egg wash: 1 egg + 1 tablespoon water, beaten
Ensure the collapsible paddle is securely attached and in the upright position before adding ingredients to the bread pan in the order listed. Secure the bread pan inside the baking chamber. Select the BASIC setting, desired crust color and loaf size. Press the START | PAUSE button. If using the topping, brush the top of the dough with the egg wash at the end of the final rise (prior to bake). Sprinkle the dried rosemary over the loaf, then sprinkle with the flaked salt. Close the lid. When the cycle is complete, use oven mitts to remove the bread from the bread machine and transfer to a wire rack to cool. Bread will slice best when allowed to cool.
*If using the BASIC RAPID Setting, substitute the quantities of these two ingredients with the quantities on pages 35 & 37.
CRUSTY LOAF
To retain a crisp crust, it is especially important on the CRUSTY LOAF setting to remove the bread pan before the 'keep warm' phase. The bread should then be immediately transferred to a wire rack to cool. To turn off the 'keep warm' phase, or to reduce the 60 minutes keep warm time, refer to 'Using the MODIFY button', page 28.
CRUSTY LOAF - FRENCH BREAD
| BREAD NAME | French Bread |
| SETTING | Crust Loaf |
| PADDLE | Collapsible |
| CRUST COLOR OPTIONS | Preset |
| DELAY START | Yes |
| INGREDIENTS | 2.5LBS 2.0LBS 1.5LBS 1.0LBS |
| 1.25KG 1.0KG 0.75KG 0.5KG |
| Water, 80°F (27°C) 1 3/4 cups + 1 tablespoon 1 1/2 cups 1 cup + 2 tablespoons 3/4 cup | ||||
| Salt | 2 1/2 teaspoons | 2 teaspoons | 1 1/2 teaspoons | 1 teaspoon |
| Bread flour | 1/4 cup | 3 tablespoons | 2 3/4 tablespoons | 1 1/2 tablespoons |
| Vital wheat gluten | 1 1/2 tablespoons | 1 1/4 tablespoons | 1 tablespoon | 3/4 tablespoon |
| Yeast: Active Dry* | 3 teaspoons | 2 1/2 teaspoons | 1 3/4 teaspoons | 1 1/4 teaspoons |
Ensure the collapsible paddle is securely attached and in the upright position before adding ingredients to the bread pan in the order listed. Secure the bread pan inside the baking chamber. Select the CRUSTY LOAF setting and loaf size. Press the START | PAUSE button. When the cycle is complete, use oven mitts to remove the bread from the bread machine and transfer to a wire rack to cool. Bread slices best when allowed to cool.
CRUSTY LOAF - CLASSIC SOURDOUGH BREAD
| BREAD NAME | Classic Sourdough Bread |
| SETTING | Crust Loaf |
| PADDLE | Collapsible |
| CRUST COLOR OPTIONS | Preset |
| DELAY START | Yes |
| INGREDIENTS | 2.5LBS 2.0LBS 1.5LBS 1.0LBS1.25KG 1.0KG 0.75KG 0.5KG |
| Starter* 1 1⁄4 cups 1 cup 3⁄4 cup 1⁄2 cup | ||||
| Water, 80°F (27°C) 3⁄4 cup + 1 tablespoon 3⁄4 cup 1⁄2 cup + 2 teaspoons | 1⁄3 cup + 1 teaspoon | |||
| Salt | 2 1⁄2 teaspoons | 2 teaspoons | 1 1⁄2 teaspoons | 1 teaspoon |
| Bread flour 3 cups + 2 tablespoons 2 1⁄2 cups 2 cups + 2 tablespoons 1 1⁄4 cups | ||||
| Vital wheat gluten | 1 1⁄2 tablespoons | 1 1⁄4 tablespoons | 1 tablespoon | 3⁄4 tablespoon |
| Yeast: Active Dry | 3⁄4 teaspoon | 1⁄2 teaspoon | 1⁄4 teaspoon | 1⁄4 teaspoon |
*Prepare starter 8 days prior to making this bread. Please see method on next page.

TIP
A 'starter' is a natural or commercial yeast-reinforced sourdough, sponge or piece of old dough that is added to a dough for leavening power - shortening the baking process and enhancing the flavor of the bread. There are many sour dough recipes that do not use starters; however, we have included this 8-day starter for more advanced bakers and those looking for a fuller sourdough flavor.
MAKING THE STARTER
Day 1: Mix 1 teaspoon flour and 1 teaspoon water in a bowl.
Cover with plastic wrap and set aside at room temperature.
Day 2: After noticeable froth, add 1 teaspoon flour and 1 teaspoon water.
Cover with plastic wrap and set aside at room temperature.
Day 3: Stir in 2 teaspoons flour and 2 teaspoons water. Cover with plastic wrap and set aside at room temperature.
Day 4: Stir in 4 tablespoons flour and 4 tablespoons water.
Cover with plastic wrap and set aside at room temperature.
Day 5: Stir in 8 tablespoons flour and 8 tablespoons water.
Cover with plastic wrap and set aside at room temperature.
Day 6: Stir in 34 cup flour and 34 cup water into the starter. Cover with plastic wrap and set aside at room temperature.
Day 7: Take 1 cup of the starter (discarding the rest) and mix it with 1 cup
flour and 1 cup water. Allow to rise at room temperature for 24 hours.
Day 8: You are ready to make Sourdough bread.
MAKING THE BREAD
Ensure the collapsible paddle is securely attached and in the upright position before adding the starter, then the rest of the ingredients to the bread pan in the order listed. Secure the bread pan inside the baking chamber. Select the CRUSTY LOAF setting and loaf size. Press the START | PAUSE button. When the cycle is complete, use oven mitts to remove the bread from the bread machine and transfer to a wire rack to cool. Bread slices best when allowed to cool.
CRUSTY LOAF - OLIVE & ROASTED GARLIC BREAD
| BREAD NAME | Olive & Roasted Garlic Bread |
| SETTING | Crust Loaf |
| PADDLE | Collapsible |
| CRUST COLOR OPTIONS | Preset |
| DELAY START | No |
| INGRÉDIENTS | 2.5LBS 2.0LBS 1.5LBS 1.0LBS1.25KG 1.0KG 0.75KG 0.5KG |
BIGA
| Water, 80°F (27°C) 1/4 cup 3 tablespoons 2 1/4 tablespoons 1 1/2 tablespoons |
Bread Flour 12 cup 13 cup + 1 tablespoon 14 cup 3 tablespoons
| Yeast: Active Dry 1/4 teaspoon 1/8 teaspoon Pinch pinch |
BREAD DOUGH
| Water, 80°F (27°C) 1 1⁄4 cups 1 cup | 3⁄4 cup 1⁄2 cup | |||
| Olive Oil | 2 tablespoons | 1 3⁄4 tablespoons | 1 1⁄2 tablespoons | 1 tablespoon |
| Salt | 1 1⁄2 tablespoons | 1 1⁄4 tablespoons | 1 tablespoon | 3⁄4 tablespoon |
| Coarse semolina (not semolina flour) | 3⁄4 cup | 1⁄2 cup + 1 tablespoon | 1⁄2 cup + 1 tablespoon | 3⁄4 tablespoon |
| Bread flour | 2 cups + 2 tablespoons | 1 3⁄3 cups | 1 1⁄4 cups | 3⁄4 cup + 1 tablespoon |
| Vital wheat gluten | 1 1⁄2 tablespoons | 1 1⁄4 tablespoons | 1 tablespoon | 3⁄4 tablespoon |
Yeast: Active Dry 12 teaspoon 12 teaspoon 14 teaspoon 14 teaspoon
OPTIONAL TOPPING
| Unbleached flour | 1 tablespoon | 1 tablespoon | 12 tablespoon | 1 teaspoon |
Please see method next page.

TIP
'Biga' is a pre-fermentation process. It adds flavor and complexity to the bread. Bigas tend to be dry.
FILLING
2.5LBS 2.0LBS 5.0LBS 1.0LBS
1.25KG 1.0KG 0.75KG 0.5KG
Roasted garlic* 1 whole bulb 34 bulb 12 bulb 13 bulb
Pitted black Mediterranean olives 1 cup 34 cup 12 cup 13 cup
MAKING THE BIGA
In a small bowl, combine the water, flour and yeast and allow to ferment overnight for up to 12 hours.
MAKING THE BREAD
Ensure the collapsible paddle is securely attached and in the upright position before adding the biga, then the rest of the ingredients to the bread pan in the order listed, except for the roasted garlic and olives. Secure the bread pan inside the baking chamber. Select the CRUSTY LOAF setting and loaf size. Press the START | PAUSE button. At the end of the second rise and final punch down, press and hold the START | PAUSE button to momentarily pause the cycle. Remove the dough from the bread pan. On a lightly floured surface, roll the dough out into a rectangle about 6" (15cm) wide and 13" (33cm) long. Spread the roasted garlic and olives all over the dough, leaving a 1" (2.5cm) border. From the top short end, fold the dough over L of the way down. Then take the shortest end closest to you and roll the dough "jelly roll" style, into a tight roll, sealing the side edges as you roll. Seal the seam by pinching it against the folded dough. Remove the collapsible paddle from the bread pan and place the rolled dough, seam side down, into the bread pan. Use caution as the paddle will be hot. Dust the top with flour. Close the lid. Press the START | PAUSE button to resume the cycle. When the cycle is complete, use oven mitts to remove the bread from the bread machine and transfer to a wire rack to cool. Bread will slice best when allowed to cool.
\*ROASTED GARLIC
To roast garlic, slice off the top of a whole garlic bulb. Place in a square sheet of foil paper about 8" x 8" (20cm x 20cm). Drizzle 1 tablespoon of olive oil, place two sprigs of thyme and sprinkle with salt and pepper. Enclose the garlic by bringing up the sides of the foil and pinching the package closed. Bake in a 350°F (175°F) oven for approximately 35 minutes, or until the garlic cloves are soft and creamy in texture. To use in the recipe above, allow to cool. Squeeze the garlic bulb to extract the cloves. Keep them whole for this recipe.
CRUSTY LOAF - PESTO & PINE NUT BREAD
BREAD NAME Pesto & Pine Nut Bread
| SETTING Crust Loaf |
| PADDLE Collapsible |
| CRUST COLOR OPTIONS Preset |
| DELAY START No |
INGREDIENTS 2.5LBS 2.0LBS 1.5LBS 1.0LBS 1.25KG 1.0KG 0.75KG 0.5KG
| Water, 80°F (27°C) | 1 3⁄4 cups | 1 1⁄2 cups | 1 cup | 3⁄4 cup |
| Olive Oil | 2 1⁄2 tablespoons | 2 tablespoons | 1 1⁄2 tablespoons | 1 tablespoon |
| Basil pesto, pre-made or store-bought | 1⁄2 cup | 1⁄3 cup | 1⁄4 cup | 3 tablespoons |
| Salt | 1 3⁄4 teaspoons | 1 1⁄2 teaspoons | 1 teaspoon | 3⁄4 teaspoon |
| Sugar, granulated | 2 teaspoons | 1 1⁄2 teaspoons | 1 teaspoon | 3⁄4 teaspoon |
| Bread flour | 5 cups | 4 cups | 3 cups | 2 cups |
| Vital wheat gluten | 1 teaspoon | 3⁄4 teaspoon | 1⁄2 teaspoon | 1⁄4 teaspoon |
| Freshly grated parmesan cheese | 1⁄2 cup | 1⁄3 cup | 1⁄4 cup | 3 tablespoons |
| Yeast: Active Dry | 2 teaspoons | 1 1⁄2 teaspoons | 1 1⁄4 teaspoons | 3⁄4 teaspoon |
| ADD TO THE AUTOMATIC FRUIT AND NUT DISPENSER | ||||
| Toasted pine nuts | 1⁄2 cup | 1⁄3 cup | 1⁄2 cup | 1⁄4 cup |
Ensure the collapsible paddle is securely attached and in the upright position before adding ingredients to the bread pan in the order listed. Secure the bread pan inside the baking chamber. Place the pine nuts into the Automatic Fruit & Nut Dispenser. Select the CRUSTY LOAF setting and loaf size. Press the START I PAUSE button. When the cycle is complete, use oven mitts to remove the bread from the bread machine and transfer to a wire rack to cool. Bread will slice best when allowed to cool.
CRUSTY LOAF - RUSTIC PROSCIUTTO & PROVOLONE BREAD
| BREAD NAME | Rustic Prosciutto & Provolone Bread |
| SETTING | Crust Loaf |
| PADDLE | Collapsible |
| CRUST COLOR OPTIONS | Preset |
| DELAY START | No |
INGREDIENTS 2.5LBS 2.0LBS 1.5LBS 1.0LBS 1.25KG 1.0KG 0.75KG 0.5KG
| Water, 80°F (27°C) | 2 cups | 1 3⁄4 cups | 1 1⁄4 cups | 3⁄4 cup |
| Salt | 2 1⁄2 teaspoons | 2 teaspoons | 1 1⁄2 teaspoons | 1 teaspoon |
| Bread flour | 4 cups | 3 1⁄4 cups | 2 1⁄2 cups | 1 3⁄3 cups |
| Whole wheat flour | 3⁄4 cup + 2 tablespoons | 3⁄4 cup | 1⁄2 cup + 1 tablespoon | 1⁄2 cup + 1 tablespoon |
| Vital wheat gluten | 2 1⁄2 teaspoons | 2 teaspoons | 1 1⁄2 teaspoons | 1 teaspoon |
| Yeast: Active Dry | 2 3⁄4 teaspoons | 2 1⁄2 teaspoons | 1 3⁄4 teaspoons | 1 1⁄4 teaspoons |
| ADD TO THE AUTOMATIC FRUIT AND NUT DISPENSER | ||||
| Prosciutto, medium size diced | 1⁄2 cup + 1 tablespoon | 1⁄2 cup | 1⁄2 cup + 1 tablespoon | 1⁄4 cup |
| Provolone cheese, medium size diced | 1⁄2 cup + 1 tablespoon | 1⁄2 cup | 1⁄2 cup + 1 tablespoon | 1⁄4 cup |
Ensure the collapsible paddle is securely attached and in the upright position before adding ingredients to the bread pan in the order listed. Secure the bread pan inside the baking chamber. Place the prosciutto and provolone cheese into the Automatic Fruit & Nut Dispenser. Select the CRUSTY LOAF setting and loaf size. Press the START I PAUSE button. When the cycle is complete, use oven mitts to remove the bread from the bread machine and transfer to a wire rack to cool. Bread will slice best when allowed to cool.
CRUSTY LOAF - SUNDRIED TOMATO & FETA CHEESE BREAD
| BREAD NAME | Sundried Tomato & Feta Cheese Bread |
| SETTING | Crust Loaf |
| PADDLE | Collapsible |
| CRUST COLOR OPTIONS | Preset |
| DELAY START | No |
| INGREDIENTS | 2.5LBS 2.0LBS 1.5LBS 1.0LBS |
| 1.25KG 1.0KG 0.75KG 0.5KG |
Water, 80°F (27°C) 1 ½ cups 1 ½ cups 1 cup + 2 tablespoons ¾ cup
| Olive Oil 1⁄4 cup 3 tablespoons 2 tablespoons 1 tablespoon | ||||
| Salt | 2 teaspoons | 1 1⁄2 teaspoons | 1 1⁄4 teaspoons | 3⁄4 teaspoon |
| Bread flour | 5 cups + 3 tablespoons | 4 cups + 2 tablespoons | 3 cups + 2 tablespoons | 2 cups + 1 tablespoon |
| Vital wheat gluten | 1 teaspoon | 3⁄4 teaspoon | 1⁄2 teaspoon | 1⁄4 teaspoon |
| Dried basil | 1 1⁄2 teaspoons | 1 1⁄4 teaspoons | 1 teaspoon | 3⁄4 teaspoon |
| Dried oregano | 1 1⁄2 teaspoons | 1 1⁄4 teaspoons | 1 teaspoon | 3⁄4 teaspoon |
| Yeast: Active Dry | ||||
ADD TO THE AUTOMATIC FRUIT AND NUT DISPENSER
| Chopped sundried tomato, patted dry | 13 cup | 14 cup + 1 tablespoon | 14 cup | 3 tablespoons |
| Coarsely crumbled feta cheese, patted dry | 13 cup | 14 cup + 1 tablespoon | 14 cup | 3 tablespoons |
Ensure the collapsible paddle is securely attached and in the upright position before adding ingredients to the bread pan in the order listed. Secure the bread pan inside the baking chamber. Place the sundried tomato and feta cheese into the Automatic Fruit & Nut Dispenser. Select the CRUSTY LOAF setting and loaf size. Press the START I PAUSE button. When the cycle is complete, use oven mitts to remove the bread from the bread machine and transfer to a wire rack to cool. Bread will slice best when allowed to cool.
DOUGH - CINNAMON BUNS
| BREAD NAME | Cinnamon Buns |
| SETTING | Dough-Bread |
| PADDLE | Collapsible |
| DELAY START | No |
| INGREDIENTS | |
| Milk, 80°F (27°C) 1 cup | |
| Eggs, 2oz (60g), at room temperature, beaten 2 | |
| Unsalted butter, 1⁄2" pieces at room temperature 1⁄4 cup | |
| Salt 1 teaspoon | |
| Sugar, granulated 1⁄3 cup | |
| Bread flour 4 cups | |
| Yeast: Active Dry 2 1⁄4 teaspoons | |
| FILLING | |
| Butter, softened 1⁄2 cup | |
| Brown sugar 1⁄2 cup | |
| Cinnamon 1 teaspoon | |
| Walnuts, chopped 1⁄2 cup | |
| CREAM CHEESE FROSTING | |
| Cream cheese, room temperature 4 oz | |
| Butter, softened 3 tablespoons | |
| Pure vanilla extract 1 teaspoon | |
| Confectioner's sugar 1 1⁄4 cups | |
CREAM CHEESE FROSTING
Beat together the cream cheese and butter until light and fluffy. Mix in the pure vanilla extract. Add the confectioner's sugar and beat until well combined and light and fluffy, about 3-5 minutes. Refrigerate until ready to use.
Ensure the collapsible paddle is securely attached and in the upright position before adding ingredients to the bread pan in the order listed, except for the filling. Secure the bread pan inside the baking chamber. Select the DOUGH BREAD setting. Press the START | PAUSE button. When the cycle is complete, remove the bread pan from the bread machine. On a lightly floured surface, roll the dough out into a rectangle about 6" (15cm) wide and 13" (33cm) long. Spread the softened butter all over the dough, leaving a 1" (2.5cm) border. Sprinkle with the brown sugar then top with the cinnamon and chopped walnuts. From the top short end, fold the dough over L of the way down. Then take the longest end and roll the dough "jelly roll" style, into a tight roll. Seal the seam by pinching it against the folded dough. Cut the dough into 18 rounds using a sharp knife. Use a see-saw motion rather than pressing the blade down. Arrange the rounds evenly onto two 8" (20cm) round spring form pans lined with parchment paper. Cover in plastic wrap and allow to rise a final time for approximately 45 minutes.
Preheat the oven to 350^ F ( 175^ C) and bake the rolls in the center rack for approximately 30 to 35 minutes. Remove the cinnamon buns and allow them to cool to room temperature before topping with the cream cheese frosting.
DOUGH - CORINNA'S BRIOCHE
| BREAD NAME | Corinna's Brioche |
| SETTING | Dough-Bread |
| PADDLE | Collapsible |
| DELAY START | No |
| INGREDIENTS | |
| Egg, 2oz (60g), at room temperature, beaten 3 | |
| Milk 80°F (27°C) 12 cup | |
| Salt 1 14 teaspoons | |
| Sugar, granulated 3 tablespoons | |
| Bread flour 2 34 cups | |
| Vital wheat gluten 1 tablespoon | |
| Yeast: Active Dry 2 14 teaspoons | |
| Unsalted butter, 12" pieces at room temperature 12 cup | |
| OPTIONAL TOPPING | |
| Egg wash: 1 egg + 1 tablespoon water, beaten | |
Ensure the collapsible paddle is securely attached and in the upright position before adding ingredients to the bread pan. Slightly beat the eggs and place them in the bread pan, followed by the remaining ingredients in the order listed, except for the butter. Secure the bread pan inside the baking chamber. Select the DOUGH BREAD setting. Press the START | PAUSE button.
When the alert sounds during the 'knead 2' phase, open the lid of the bread machine. While it is still kneading, add the butter to the dough one piece at a time, allowing the dough to nearly incorporate the butter before adding the next piece. Once all the butter has been added, close the lid. When the cycle is complete, remove the bread pan from the bread machine and cover with plastic wrap. Place the entire bread pan with dough in the refrigerator and refrigerate overnight.
Remove the bread pan from the refrigerator and allow to sit at room temperature for 30 minutes. On a lightly floured surface, take the dough out of the bread pan and divide the dough into 8 equal portions. Roll each portion into a smooth ball.
Remove the collapsible paddle from the bread pan and place the 8 formed dough balls into the bread pan, 2 rows of 4 balls.
Allow the brioche dough to rise until doubled in size, approximately 1 hour. Brush the top of the risen brioche with the egg wash.
Secure the bread pan inside the baking chamber. Select the BAKE ONLY setting, modifying the baking time to 1 hour. Press the START | PAUSE button. When the cycle is complete, use oven mitts to remove the bread pan from the bread machine. Allow the bread to cool in the bread pan for 15 minutes then transfer to a wire rack to continue cooling. Bread will slice best when allowed to cool.

TIP
Brioche makes an excellent French toast.
DOUGH - EGG FREE SEMOLINA PASTA DOUGH
| BREAD NAME | Egg Free Semolina Pasta Dough |
| SETTING | Dough-Pasta |
| PADDLE | Collapsible |
| DELAY START | Yes |
INGREDIENTS
| Water 3/4 cup + 2 tablespoons |
| Unbleached all-purpose flour 2 cups |
| Semolina flour 1 cup |
Ensure the collapsible paddle is securely attached and in the upright position before adding ingredients to the bread pan in the order listed. Secure the bread pan inside the baking chamber. Select the DOUGH PASTA setting. Press the START | PAUSE button. When the cycle is complete, transfer the dough to a lightly floured surface and shape it into a ball. Wrap in plastic wrap and allow to rest 30 minutes prior to hand shaping or placing through a pasta extruder. The dough can be refrigerated for up to 3 days.

TIP
If the dough is too dry, add 1 tablespoon of water at a time. If it is too wet, add flour, 12 to 1 tablespoon at a time.
DOUGH - EGG PASTA DOUGH
| BREAD NAME | Egg Pasta Dough |
| SETTING | Dough-Pasta |
| PADDLE | Collapsible |
| DELAY START | No |
INGREDIENTS
| Eggs, 2 oz (60g), at room temperature, beaten 3 |
Unbleached all-purpose flour 2 cups
Ensure the collapsible paddle is securely attached and in the upright position before adding ingredients to the bread pan in the order listed. Secure the bread pan inside the baking chamber. Select the DOUGH PASTA setting. Press the START | PAUSE button. When the cycle is complete, transfer the dough to a lightly floured surface and shape it into a ball. Wrap in plastic wrap and allow to rest 30 minutes prior to hand shaping or placing through a pasta extruder. The dough can be refrigerated for up to 3 days.

TIP
If the dough is too dry, add 1 tablespoon of water at a time. If it is too wet, add flour, 12 to 1 tablespoon at a time
DOUGH - FOCACCIA DOUGH
| BREAD NAME | Focaccia Dough |
| SETTING | Dough-Pizza |
| PADDLE | Collapsible |
| DELAY START | No |
INGREDIENTS
| BIGA |
| Water, 55°F (13°C) 1⁄4 cup |
| Bread flour 3⁄4 cup |
| Yeast: Active Dry Pinch |
| DOUGH |
| Water, 86°F (30°C) 1 cup |
| Olive oil 4 tablespoons |
| Salt 2 teaspoons |
| Sugar, granulated 1 teaspoon |
| Bread flour 2 cups |
| Yeast: Active Dry 3⁄4 teaspoon |
SUGGESTED TOPPINGS
| Onions, caramelized |
| Black olives |
| Tomatoes, thinly sliced |
| Coarse sea salt |
| Basil, dried |
| Garlic, minced |

TIP
'Biga' is a pre-fermentation process. It adds flavor and complexity to the bread. Bigas tend to be dry.
MAKING THE BIGA
The biga should be prepared one day before you want to serve the focaccia. Combine the ingredients for the biga in a small bowl until well combined. The biga will be stiff and slightly dry. Cover with plastic wrap at room temperature for up to 12 hours.
MAKING THE FOCACCIA
Ensure the collapsible paddle is securely attached and in the upright position before adding the water to the bread pan. Cut the biga into 6 pieces and add it to the water. Break up the biga pieces by hand. Add the remaining ingredients in the order listed. Secure the bread pan inside the baking chamber. Select the DOUGH PIZZA setting. Press the START | PAUSE button. When the cycle is complete, remove the dough from the bread pan and transfer to a lightly floured surface. Divide the dough into 2 portions. Use the heel of your hand to press and flatten a piece of the dough until it is 14 " (0.5mm) thick. Transfer the pressed dough to a baking sheet that has been brushed with olive oil and sprinkled heavily with cornmeal or semolina. Brush the top with olive oil. Cover gently with plastic wrap and allow to rise at room temperature until puffy, about 25 minutes.
Preheat the oven to 400^ F ( 205^ C). Brush the dough again with olive oil and sprinkle with desired toppings. Place the baking sheet on the lowest rack and bake until the focaccia is nicely brown, approximately 20 to 25 minutes.
DOUGH - HAMBURGER BUNS
| BREAD NAME | Hamburger Buns |
| SETTING | Dough-Bread |
| PADDLE | Collapsible |
| DELAY START | Yes |
| INGREDIENTS | |
| SPONGE | |
| Milk 80°F (27°C) 34 cup | |
| Sugar, granulated 12 teaspoon | |
| Bread flour 1 12 cups | |
| Yeast: Active Dry 1 12 teaspoons | |
| DOUGH | |
| Milk 80°F (27°C) 12 cup | |
| Honey 1 12 tablespoons | |
| Unsalted butter, 12 " pieces at room temperature 14 cup | |
| Salt 2 teaspoons | |
| Bread flour 1 12 cups | |
| OPTIONAL TOPPING | |
| Sesame seeds, or coarse sea salt | |
| Egg was: 1 egg + 1 tablespoon water, beaten | |
MAKING THE SPONGE
In a small bowl, combine the sponge ingredients. Cover with plastic wrap and set aside in a warm place to proof for 30 minutes.
MAKING THE HAMBURGER BUN
Ensure the collapsible paddle is securely attached and in the upright position before adding ingredients to the bread pan. Place the milk into the bread pan and add the sponge. Break up the sponge by hand. Add the remaining ingredients in the order listed. Secure the bread pan inside the baking chamber. Select the DOUGH BREAD setting. Press the START I PAUSE button. When the cycle is complete, remove the bread pan from the bread machine. On a lightly floured surface, take the dough out of the bread pan and divide the dough into 6 equal portions. Roll each portion into a ball and place on a parchment paper lined baking sheet, 2 rows of 3 buns. Lightly brush each bun with the egg wash, then flatten each round. Cover with plastic wrap. After 20 minutes, lightly brush with the egg wash and flatten the buns again. Cover with plastic wrap. After 25mins, remove the plastic wrap, lightly brush with the egg wash and sprinkle the buns with sesame seeds and/or coarse sea salt.
Preheat an oven to 400^ F ( 205^ C). Bake the buns in the center rack for approximately 20 - 25 minutes or until golden brown.
DOUGH - PIZZA DOUGH
| BREAD NAME | Pizza Dough |
| SETTING | Dough-Pizza |
| PADDLE | Collapsible |
| DELAY START | Yes |
INGREDIENTS
| Water, 80°F (27°C) 34 cup + 2 tablespoons |
| Olive oil, extra virgin 2 tablespoons |
| Salt 1 teaspoon |
| Sugar, granulated 12 teaspoon |
| Bread flour 1 34 cups |
| Whole wheat flour 12 cup |
| Yeast: Active Dry 2 14 teaspoons |
Ensure the collapsible paddle is securely attached and in the upright position before adding ingredients to the bread pan in the order listed. Secure the bread pan inside the baking chamber. Select the DOUGH PIZZA setting. Press the START | PAUSE button.
Preheat oven to 450^ F - 500^ F ( 230^ C - 260^ C). Place the dough on a lightly floured surface. Using the heel of your hand, press to flatten. Roll out the dough into a circle, then lift it onto a pizza pan that has been brushed with olive oil. Pull and press the dough into a circle to fit the pan. Shape a 12 inch rim around the edge. Spread tomato sauce onto the dough and cover with desired toppings. Place the pizza pan on the lowest rack and bake until the dough is crisp and brown, approximately 12-15 minutes.
DOUGH - SPINACH PASTA DOUGH
| BREAD NAME | Spinach Pasta Dough |
| SETTING | Dough-Pasta |
| PADDLE | Collapsible |
| DELAY START | No |
INGREDIENTS
| Eggs, 2oz (60g), at room temperature, beaten 3 |
| Unbleached all-purpose flour 2 cups |
| • Cooked spinach, chopped fine, squeezed dry 2 tablespoons |
Ensure the collapsible paddle is securely attached and in the upright position before adding ingredients to the bread pan in the order listed. Secure the bread pan inside the baking chamber. Select the DOUGH PASTA setting. Press the START | PAUSE button. When the cycle is complete, transfer the dough to a lightly floured surface and shape it into a ball. Wrap in plastic wrap and allow to rest 30 minutes prior to hand shaping or placing through a pasta extruder. The dough can be refrigerated for up to 3 days.

TIP
If the dough is too dry, add 1 tablespoon of water at a time. If it is too wet, add flour, 12 to 1 tablespoon at a time
DOUGH - WHOLE WHEAT PASTA DOUGH
| BREAD NAME | Whole Wheat Pasta Dough |
| SETTING | Dough-Pasta |
| PADDLE | Collapsible |
| DELAY START | No |
INGREDIENTS
Eggs, 2 oz (60g), at room temperature, beaten 3
Whole wheat flour 2 cups
Ensure the collapsible paddle is securely attached and in the upright position before adding ingredients to the bread pan in the order listed. Secure the bread pan inside the baking chamber. Select the DOUGH PASTA setting. Press the START | PAUSE button. When the cycle is complete, transfer the dough to a lightly floured surface and shape it into a ball. Wrap in plastic wrap and allow to rest 30 minutes prior to hand shaping or placing through a pasta extruder. The dough can be refrigerated for up to 3 days.

TIP
If the dough is too dry, add 1 tablespoon of water at a time. If it is too wet, add flour, 12 to 1 tablespoon at a time.
GLUTEN FREE - GLUTEN FREE BANANA WALNUT BREAD
| BREAD NAME | Gluten Free Banana Walnut Bread |
| SETTING | Gluten Free |
| PADDLE | Collapsible |
| CRUST COLOR OPTIONS | Light, Medium, Dark |
| DELAY START | No |
| INGREDIENTS | 2.5LBS 2.0LBS1.25KG 1.0KG |
| Eggs, 2oz (60g), at room temperature 2 1 | |
| Milk, 80 °F (27 °C) 34 cup 12 cup + 2 tablespoons | |
| Apple cider vinegar 1 teaspoon 34 teaspoon | |
| Mashed ripe banana 1 cup 34 cup + 1 tablespoon | |
| Brown sugar 14 cup 3 tablespoons | |
| Salt 1 14 teaspoons 1 teaspoon | |
| Unsalted butter, melted | 14 cup 3 tablespoons |
| Chickpea / Garbanzo bean flour | 1 cup 34 cup + 1 tablespoon |
| Sorghum flour | 1 cup 34 cup + 1 tablespoon |
| Tapioca starch | 14 cup 3 tablespoons |
| Xanthan gum | 2 12 teaspoons 2 teaspoons |
| Yeast: Active Dry | 1 12 teaspoons 1 14 teaspoons |
| ADD TO THE AUTOMATIC FRUIT AND NUT DISPENSER | |
| Chopped walnuts | 12 cup 14 cup |
Gluten free bread making is very unique and requires a slightly different procedure.
Ensure the collapsible paddle is securely attached and in the upright position before adding ingredients to the bread pan. Slightly beat the eggs and place them in the bread pan, followed by the remaining wet ingredients, then the banana and brown sugar. In a medium sized bowl, sift together the salt, chickpea/garbanzo flour, sorghum flour, tapioca starch and xanthan gum. Mix together and pour over the wet ingredients. Sprinkle the top with the yeast. Secure the bread pan inside the baking chamber. Place the chopped walnuts into the Automatic Fruit & Nut Dispenser. Select the GLUTEN FREE setting, desired crust color and loaf size. Press the START I PAUSE button. When the alert sounds during the 'knead 2' phase, the Automatic Fruit & Nut dispenser will release the walnuts. Open the lid of the bread machine. Gluten free dough should resemble mashed potatoes. If the mixture seems too wet, add 1 tablespoon of chickpea/garbanzo flour at a time. If the mixture is too dry, add 12 to 1 tablespoon of water at a time. Then, while the paddle is still kneading, scrape down the sides of the bread pan with a rubber spatula to ensure all ingredients are thoroughly mixed. Close the lid. When the cycle is complete, use oven mitts to remove the bread pan from the bread machine. Allow the bread to cool in the bread pan for 15 minutes then transfer to a wire rack to continue cooling. Bread will slice best when allowed to cool.
GLUTEN FREE - GLUTEN FREE CHESTNUT BREAD
| BREAD NAME | Gluten Free Chestnut Bread | |
| SETTING | Gluten Free | |
| PADDLE | Collapsible | |
| CRUST COLOR OPTIONS | Light, Medium, Dark | |
| DELAY START | No | |
| INGREDIENTS | 2.5LBS 2.0LBS1.25KG 1.0KG | |
| Eggs, 2oz (60g), at room temperature | 4 | 3 |
| Water, 80 °F (27 °C) 1 1⁄2 + 2 tablespoon 1⁄2 cup | ||
| Buttermilk, 80 °F (27 °C) 1 1⁄4 cups 1 cup | ||
| Apple cider vinegar 1 1⁄4 teaspoons 1 teaspoon | ||
| Unsalted butter melted 1⁄4 cup + 1 tablespoon 1⁄4 cup | ||
| Brown sugar 1⁄4 cup 3 tablespoons | ||
| Salt 1 3⁄4 teaspoons | 1 1⁄2 teaspoons | |
| Chestnut flour | 1 1⁄4 cups + 1 tablespoon | 1 cup |
| Brown rice flour | 1 1⁄4 cups + 1 tablespoon | 1 cup |
| Coconut flour 1⁄2 cup + 2 tablespoons | 1⁄2 cup | |
| Tapioca flour 1⁄4 cup + 1 tablespoon | 1⁄4 cup | |
| Potato flour | 1⁄4 cup + 1 tablespoon 1⁄4 cup | |
| Xanthan gum 1 3⁄4 tablespoons | 1 1⁄2 tablespoons | |
| Yeast: Active Dry | 1 3⁄4 tablespoons | 1 1⁄2 tablespoons |
Gluten free bread making is very unique and requires a slightly different procedure.
Ensure the collapsible paddle is securely attached and in the upright position before adding ingredients to the bread pan. Slightly beat the eggs and place them in the bread pan, followed by the remaining wet ingredients, then the brown sugar. In a medium sized bowl, sift together the salt, chestnut flour, brown rice flour, coconut flour, tapioca flour, potato flour and xanthan gum. Mix together and pour over the wet ingredients. Sprinkle the top with the yeast. Secure the bread pan inside the baking chamber. Select the GLUTEN FREE setting, desired crust color and loaf size. Press the START I PAUSE button. When the alert sounds during the 'knead 2' phase, open the lid of the bread machine. Gluten free dough should resemble mashed potatoes. If the mixture seems too wet, add 1 tablespoon of brown rice flour at a time. If the mixture is too dry, add 12 to 1 tablespoon of water at a time. Then, while the paddle is still kneading, scrape down the sides of the bread pan with a rubber spatula to ensure all ingredients are thoroughly mixed. Close the lid. When the cycle is complete, use oven mitts to remove the bread pan from the bread machine. Allow the bread to cool in the bread pan for 15 minutes then transfer to a wire rack to continue cooling. Bread will slice best when allowed to cool.
GLUTEN FREE - GLUTEN FREE MOCK PUMPERNICKEL BREAD
| BREAD NAME | Gluten Free Mock Pumpemickel Bread | |
| SETTING | Gluten Free | |
| PADDLE | Collapsible | |
| CRUST COLOR OPTIONS | Light, Medium, Dark | |
| DELAY START | No | |
| INGREDIENTS | 2.5LBS 2.0LBS1.25KG 1.0KG | |
| Eggs, 2oz (60g), at room temperature | 3 eggs + enough water to equal 34 cup | 2 eggs + enough water to equal 12 cup + 1 tablespoon |
| Water, 80 °F (27 °C) 1 14 cups 1 cup | ||
| Molasses 3 tablespoons 2 12 tablespoon | ||
| Apple cider vinegar 1 14 teaspoons 1 teaspoon | ||
| Unsalted butter, melted 14 cup 3 tablespoons | ||
| Coffee granules 1 tablespoon 34 tablespoons | ||
| Dark brown sugar 14 cup 3 tablespoons | ||
| Salt 1 12 teaspoons 1 14 teaspoons | ||
| White rice flour 1 34 cups 1 12 cups + 1 teaspoon | ||
| Brown rice flour | 1 cup | 34 cup + 1 tablespoon |
| Millet flour | 12 cup 12 cup + 1 tablespoon | |
| Cocoa powder | 3 tablespoons 2 tablespoons | |
| Xanthan gum | 1 tablespoon 34 tablespoon | |
| Caraway seeds | 1 tablespoon 34 tablespoon | |
| Yeast: Active Dry | 2 14 teaspoons 2 teaspoons | |
| Milk powder | 14 cup 3 tablespoons | |
Gluten free bread making is very unique and requires a slightly different procedure.
Ensure the collapsible paddle is securely attached and in the upright position before adding ingredients to the bread pan. Slightly beat the eggs and place them in the bread pan, followed by the remaining wet ingredients, then the coffee granules and dark brown sugar. In a medium sized bowl, sift together the salt, white rice flour, brown rice flour, millet flour, cocoa powder and xanthan gum. Mix together and pour over the wet ingredients. Sprinkle the top with the yeast, milk powder and caraway seeds. Secure the bread pan inside the baking chamber. Select the GLUTEN FREE setting, desired crust color and loaf size. Press the START I PAUSE button. When the alert sounds during the 'knead 2' phase, open the lid of the bread machine. Gluten free dough should resemble mashed potatoes. If the mixture seems too wet, add 1 tablespoon of white rice flour at a time. If the mixture is too dry, add 12 to 1 tablespoon of water at a time. Then, while the paddle is still kneading, scrape down the sides of the bread pan with a rubber spatula to ensure all ingredients are thoroughly mixed. Close the lid. When the cycle is complete, use oven mitts to remove the bread pan from the bread machine. Allow the bread to cool in the bread pan for 15 minutes then transfer to a wire rack to continue cooling. Bread will slice best when allowed to cool.
JAM - KETCHUP
| NAME | Ketchup |
| SETTING | Jam |
| PADDLE | Fixed |
| DELAY START | No |
INGREDIENTS
| Apple cider vinegar 1⁄2 cup |
| Olive oil 1 tablespoon |
| Molasses 2 tablespoons |
| Unsalted butter, 1⁄2" pieces at room temperature 2 tablespoons |
| Whole canned tomatoes 28oz can |
| Tomato paste 2 tablespoons |
| Cooking onion, small dice 3⁄4 cup |
| Garlic cloves, minced 3 |
| Cinnamon 1⁄4 teaspoon |
| Chili powder 1 teaspoon |
| Paprika 3⁄4 teaspoon |
| Salt 1 teaspoon |
| Brown sugar 1⁄2 cup |
| Ground allspice 1⁄4 teaspoon |
Ensure the fixed paddle is securely attached before adding ingredients to the bread pan in the order listed. Secure the bread pan inside the baking chamber. Select the JAM setting. Press the START | PAUSE button. When the cycle is complete, use oven mitts to remove the bread pan from the bread machine. Allow the ketchup to cool for 15 minutes before removing from the bread pan.

TIP
The ketchup can be pureed in a blender for a smoother appearance.
JAM - MANGO CHUTNEY
| NAME | Mango Chutney |
| SETTING | Jam |
| PADDLE | Fixed |
| DELAY START | No |
INGREDIENTS
| Apple cider vinegar 34 cup | |
| Lime juice | 14 cup |
| Salt 1 teaspoon | |
| Sugar, granulated | 12 cup |
| Sweet onion, finely chopped | 14 cup |
| Green pepper | 12 cup |
| Ginger, freshly grated 2 tablespoons | |
| Mustard seeds | 12 tablespoons |
| Large mangoes, cut into small dices | 2 |
| Dried apricots, chopped | 10 |
| Dried chili flakes | 14 teaspoon |
Ensure the fixed paddle is securely attached before adding ingredients to the bread pan in the order listed. Secure the bread pan inside the baking chamber. Select the JAM setting. Press the START | PAUSE button. When the cycle is complete, use oven mitts to remove the bread pan from the bread machine. Allow the chutney to cool for 15 minutes before removing from the bread pan.
JAM - PEACH MELBA JAM
| NAME | Peach Melba Jam |
| SETTING | Jam |
| PADDLE | Fixed |
| DELAY START | No |
INGREDIENTS
| Lemon juice 1⁄4 cup |
| Peaches, ripe, mashed 3 cups |
| Raspberries 1 cup |
Sugar, granulated 3 cups
Ensure the fixed paddle is securely attached before adding ingredients to the bread pan in the order listed. Secure the bread pan inside the baking chamber. Select the JAM setting. Press the START | PAUSE button. When the cycle is complete, use oven mitts to remove the bread pan from the bread machine. Allow the jam to cool for 15 minutes before removing from the bread pan.
JAM - STRAWBERRY COULIS
| NAME | Strawberry Coulis |
| SETTING | Jam |
| PADDLE | Fixed |
| DELAY START | No |
INGREDIENTS
| Lemon juice 1⁄4 cup |
| Strawberries, fresh, small dice 2 cups |
| Sugar, granulated 1 cup |
Ensure the fixed paddle is securely attached before adding ingredients to the bread pan in the order listed. Secure the bread pan inside the baking chamber. Select the JAM setting. Press the START I PAUSE button. When the cycle is complete, use oven mitts to remove the bread pan from the bread machine. Allow the coulis to cool for 15 minutes before removing from the bread pan.

TIP
Strawberry Coulis is a great accompaniment to vanilla ice cream, crepes, or drizzled on top of angel food cake.
SWEET BREAD - APRICOT, ALMOND & CARDAMOM BREAD
| BREAD NAME | Apricot, Almond & Cardamom Bread |
| SETTING | Sweet |
| PADDLE | Collapsible |
| CRUST COLOR OPTIONS | Preset |
| DELAY START | Yes |
| INGREDIENTS | 2.5LBS 2.0LBS 1.5LBS 1.0LBS |
| 1.25KG 1.0KG 0.75KG 0.5KG |
Water, 80°F (27°C) 1 ½ cups 1 ¼ cups 1 cup + 1 tablespoon ½ cup + 1 tablespoon
| Pure almond extract 1 1⁄2 teaspoons 1 1⁄4 teaspoons 1 teaspoon 3⁄4 teaspoon | ||||
| Unsalted butter, 1⁄2" pieces at room temperature | 1⁄4 cup | 3 tablespoons | 2 tablespoons | 1 tablespoon |
| Salt | 2 teaspoons | 1 1⁄2 teaspoons | 1 teaspoon | 3⁄4 teaspoon |
| Brown sugar | 1⁄4 cup 3 tablespoons 2 tablespoons 1 tablespoon | |||
| Bread flour | 5 cups | 4 cups | 3 cups | 2 cups |
| Vital wheat gluten (optional) | 1 1⁄2 tablespoons | 1 1⁄4 tablespoons | 1 tablespoon | 3⁄4 tablespoon |
| Milk powder | 3 tablespoons | 2 1⁄2 tablespoons | 2 tablespoons | 1 3⁄4 tablespoons |
| Ground cardamom | 1 1⁄2 teaspoons | 1 1⁄4 teaspoons | 1 teaspoon | 3⁄4 teaspoon |
| Yeast: Active Dry | 2 teaspoons | 1 3⁄4 teaspoons | 1 1⁄2 teaspoons | 1 teaspoon |
| ADD TO THE AUTOMATIC FRUIT AND NUT DISPENSER | ||||
| Silvered almonds | 1⁄3 cup | 1⁄3 cup | 1⁄3 cup | 1⁄4 cup |
| Dried apricots, chopped | 1⁄3 cup | 1⁄3 cup | 1⁄3 cup | 1⁄4 cup |
Ensure the collapsible paddle is securely attached and in the upright position before adding ingredients to the bread pan in the order listed. Secure the bread pan inside the baking chamber. Place the slivered almonds and chopped apricots into the Automatic Fruit & Nut Dispenser. Select the SWEET setting and loaf size. Press the START I PAUSE button. When the cycle is complete, use oven mitts to remove the bread from the bread machine and transfer to a wire rack to cool. Bread will slice best when allowed to cool.
SWEET BREAD - CHOCOLATE HAZELNUT BREAD
| BREAD NAME | Chocolate Hazelnut Bread |
| SETTING | Sweet |
| PADDLE | Collapsible |
| CRUST COLOR OPTIONS | Preset |
| DELAY START | No |
| INGREDIENTS | 2.5LBS 2.0LBS 1.5LBS 1.0LBS1.25KG 1.0KG 0.75KG 0.5KG |
| Milk, 80°F (27°C) 1 cup 34 cup 12 cup + 1 teaspoon 13 cup + 1 teaspoon | ||||
| Sour cream 12 cup 12 cup 13 cup + 2 teaspoons 14 cup | ||||
| Hazelnut extract | 2 teaspoons | 134 teaspoons | 112 teaspoons | 1 teaspoon |
| Eggs, 2oz (60g), at room temperature, beaten | 2 | 1 | 1 | 1 |
| Hazelnut butter | 14 cup | 3 tablespoons | 2 tablespoons | 112 tablespoons |
| Salt | 114 teaspoons | 1 teaspoon | 34 teaspoon | 12 teaspoon |
| Sugar, granulated | 14 cup + 1 tablespoon | 14 cup | 3 tablespoons | 2 tablespoons |
| Cocoa powder | 14 cup + 1 tablespoon | 14 cup | 3 tablespoons | 2 tablespoons |
| Bread flour | 5 cups | 4 cups | 3 cups | 2 cups |
| Vital wheat gluten (optional) | 112 tablespoons | 114 tablespoons | 1 tablespoon | 34 tablespoon |
| Yeast: Active Dry | 3 teaspoons | 212 teaspoons | 2 teaspoons | 114 teaspoons |
| ADD TO THE AUTOMATIC FRUIT AND NUT DISPENSER | ||||
| Semi-sweet chocolate chips | 12 cup + 1 tablespoon | 12 cup | 14 cup | 3 tablespoons |
| Toasted hazelnuts | 12 cup + 1 tablespoon | 12 cup | 14 cup | 3 tablespoons |
Ensure the collapsible paddle is securely attached and in the upright position before adding ingredients to the bread pan in the order listed, except for the chocolate chips and toasted hazelnuts. Secure the bread pan inside the baking chamber. Place the chocolate chips and toasted hazelnuts into the Automatic Fruit & Nut Dispenser. Select the SWEET setting and loaf size. Press the START | PAUSE button. When the cycle is complete, use oven mitts to remove the bread from the bread machine and transfer to a wire rack to cool. Bread will slice best when allowed to cool.
SWEET BREAD - FIG & WALNUT BREAD
| BREAD NAME | Fig & Walnut Bread |
| SETTING | Sweet |
| PADDLE | Collapsible |
| CRUST COLOR OPTIONS | Preset |
| DELAY START | No |
| INGREDIENTS | 2.5LBS 2.0LBS 1.5LBS 1.0LBS1.25KG 1.0KG 0.75KG 0.5KG |
FILLING
| Dried figs, roughly chopped 1 cup 34 cup 12 cup 14 cup | ||||
| Toasted walnuts 34 cup 38 cup 12 cup 18 cup | ||||
| Orange liquor or orange juice 2 tablespoons 1 12 tablespoons 1 14 tablespoons 1 tablespoon | ||||
| Honey | 3 tablespoons | 2 12 tablespoons | 2 tablespoons | 1 12 tablespoons |
| OPTIONAL TOPPING | ||||
| Coarse sugar | 1 tablespoon | 34 tablespoon | 12 tablespoon | 12 tablespoon |
| Egg wash: 1 egg + 1 tablespoon water, beaten | ||||

TIP
'Biga' is a pre-fermentation process. It adds flavor and complexity to the bread. Bigas tend to be dry.
INGREDIENTS
2.5LBS 2.0LBS 1.5LBS 1.0LBS
1.25KG 1.0KG 0.75KG 0.5KG
BIGA
| Water, 80°F (27°C) 1/4 cup 3 tablespoons 2 1/4 tablespoons 1 1/2 tablespoons |
| Bread Flour 1/2 cup 1/3 cup + 1 tablespoon 1/4 cup 3 tablespoons |
| Yeast: Active Dry 1/4 teaspoon 1/8 teaspoon Pinch pinch |
BREAD DOUGH
| Water, 80°F (27°C) | 1 1⁄4 cups | 1 cup | 3⁄4 cup | 1⁄2 cup |
| Olive Oil | 2 tablespoons | 1 3⁄4 tablespoons | 1 1⁄2 tablespoons | 3⁄4 tablespoon |
| Salt | 1 1⁄2 tablespoons | 1 1⁄4 tablespoons | 1 tablespoon | 3⁄4 tablespoon |
| Sugar, granulated | 1⁄4 cup | 3 tablespoons | 2 tablespoons | 1 1⁄2 tablespoons |
| Coarse semolina (not semolina flour) | 3⁄4 cup | 1⁄2 cup + 1 tablespoon | 1⁄2 cup + 1 tablespoon | 1⁄4 cup |
| Bread flour | 2 cups + 2 tablespoons | 1 3⁄4 cups | 1 1⁄4 cups | 3⁄4 cup + 1 tablespoon |
| Vital wheat gluten (optional) | 1 1⁄2 tablespoons | 1 1⁄4 tablespoons | 1 tablespoon | 3⁄4 tablespoon |
Yeast: Active Dry 1/2 teaspoon 1/2 teaspoon 1/4 teaspoon 1/4 teaspoon
Making the Biga
In a small bowl, combine the water, flour and yeast and allow to ferment overnight for up to 12 hours. In the meantime, combine the ingredients for the filling and refrigerate overnight.
Making the Bread
Ensure the collapsible paddle is securely attached and in the upright position before adding the biga, then the rest of the ingredients to the bread pan in the order listed. Secure the bread pan inside the baking chamber. Select the SWEET setting and loaf size. Press the START | PAUSE button. At the end of the second rise and final punch down, press and hold the START | PAUSE button to momentarily pause the cycle. Remove the dough from the bread pan. On a lightly floured surface, roll the dough out into a rectangle about 6" (15cm) wide and 13" (33cm) long. Spread the filling all over the dough, leaving a 1" (2.5cm) border. From the top short end, fold the dough over L of the way down. Then take the shortest end closest to you and roll the dough "jelly roll" style, into a tight roll, sealing the side edges as you roll. Seal the seam by pinching it against the folded dough. Remove the collapsible paddle from the bread pan and place the rolled dough, seam side down, into the bread pan. Use caution as the paddle will be hot. Brush the top with the egg wash and sprinkle with sugar if desired. Close the lid. Press the START | PAUSE button to resume the cycle. When the cycle is complete, use oven mitts to remove the bread from the bread machine and transfer to a wire rack to cool. Bread will slice best when allowed to cool.
SWEET BREAD - MAPLE PECAN BREAD
| BREAD NAME | Maple Pecan Bread |
| SETTING | Sweet |
| PADDLE | Collapsible |
| CRUST COLOR OPTIONS | Preset |
| DELAY START | Yes |
| INGREDIENTS | 2.5LBS 2.0LBS 1.5LBS 1.0LBS | |||
| 1.25KG 1.0KG 0.75KG 0.5KG | ||||
| Water, 80°F (27°C) | 1 3⁄4 cups | 1 1⁄3 cups | 1 cup | 3⁄3 cup |
| Pure maple syrup 1⁄3 cup 4 tablespoons 3 tablespoons 2 tablespoons | ||||
| Unsalted butter, 1⁄2" pieces at room temperature | 3 3⁄4 tablespoons | 3 tablespoons | 2 tablespoons | 1 tablespoon |
| Salt | 2 teaspoons | 1 1⁄2 teaspoons | 1 teaspoon | 3⁄4 teaspoon |
| Sugar, granulated | 2 1⁄2 teaspoons | 2 teaspoons | 1 1⁄2 teaspoons | 1 teaspoon |
| Bread flour | 5 cups | 4 cups | 3 cups | 2 cups |
| Vital wheat gluten (optional) | 1 1⁄2 tablespoons | 1 1⁄4 tablespoons | 1 tablespoon | 3⁄4 tablespoon |
| Milk powder | 2 1⁄2 tablespoons | 2 tablespoons | 1 1⁄2 tablespoons | 1 tablespoon |
| Yeast: Active Dry | 2 teaspoons | 1 1⁄2 teaspoons | 1 teaspoon | 3⁄4 teaspoon |
| ADD TO THE AUTOMATIC FRUIT AND NUT DISPENSER | ||||
| Chopped pecans | 3⁄4 cup | 3⁄3 cup | 1⁄2 cup | 1⁄4 cup |
Ensure the collapsible paddle is securely attached and in the upright position before adding ingredients to the bread pan in the order listed. Secure the bread pan inside the baking chamber. Place the pecans into the Automatic Fruit & Nut Dispenser. Select the SWEET setting and loaf size. Press the START I PAUSE button. When the cycle is complete, use oven mitts to remove the bread from the bread machine and transfer to a wire rack to cool. Bread will slice best when allowed to cool.

WHOLE WHEAT
Almost any WHOLE WHEAT recipe, including the ones on the following pages, can be modified for use with the WHOLE WHEAT RAPID setting.
To reduce the total cycle time by approx. 1 hour, select the WHOLE WHEAT RAPID setting. Follow the recipe and instructions for the WHOLE WHEAT version, however, replace the Active Dry Yeast with Instant (aka Quick-Rise, Rapid Rise) or Bread Machine Yeast and add the vital wheat gluten as it helps produce a better result during the shorter 'rise' phase.
| INGREDIENTS | 2.5LBS 2.0LBS 1.5LBS 1.0LBS | |||
| 1.25KG 1.0KG 0.75KG 0.5KG | ||||
| Yeast: Instant (aka Quick-Rise, Rapid Rise) or Bread Machine | 3 1⁄2 teaspoons 3 teaspoons 2 1⁄2 teaspoons 2 teaspoons | |||
| Vital wheat gluten | 2 3⁄4 teaspoons | 2 1⁄2 teaspoons | 2 teaspoons | 1 1⁄2 teaspoons |
WHOLE WHEAT
| BREAD NAME | Whole Wheat Bread |
| SETTING | Whole Wheat |
| PADDLE | Collapsible |
| CRUST COLOR OPTIONS | Light, Medium, Dark |
| DELAY START | Yes |
| INGREDIENTS | 2.5LBS 2.0LBS 1.5LBS 1.0LBS |
| 1.25KG 1.0KG 0.75KG 0.5KG |
| Water, 80°F (27°C) 1 3⁄4 cups + 1 tablespoon 1 1⁄2 cups 1 cup + 2 tablespoons 3⁄4 cup | ||||
| Unsalted butter, 1⁄2" pieces at room temperature | 2 1⁄2 tablespoons | 2 tablespoons | 1 1⁄2 tablespoons | 1 tablespoon |
| Salt | 2 1⁄2 teaspoons | 2 teaspoons | 1 1⁄2 teaspoons | 1 teaspoon |
| Brown Sugar | 1⁄4 cup | 3 tablespoons | 2 1⁄4 tablespoons | 1 1⁄2 tablespoons |
| Whole wheat flour | 5 cups | 4 cups | 3 cups | 2 cups |
| Vital wheat gluten (optional)* | 1 1⁄2 tablespoons | 1 1⁄4 tablespoons | 1 tablespoon | 3⁄4 tablespoon |
| Milk powder | 1⁄4 cup | 3 tablespoons | 2 1⁄4 tablespoons | 1 1⁄2 tablespoons |
| Yeast: Active Dry* | 3 teaspoons | 2 1⁄2 teaspoons | 1 3⁄4 teaspoons | 1 1⁄4 teaspoons |
Ensure the collapsible paddle is securely attached and in the upright position before adding ingredients to the bread pan in the order listed. Secure the bread pan inside the baking chamber. Select the WHOLE WHEAT setting, desired crust color and loaf size. Press the START I PAUSE button. When the cycle is complete, use oven mitts to remove the bread from the bread machine and transfer to a wire rack to cool. Bread will slice best when allowed to cool.
*If using the WHOLE WHEAT RAPID Setting, substitute the quantities of these two ingredients with the quantities on page 91.
WHOLE WHEAT - BRAN BREAD
| BREAD NAME | Bran Bread |
| SETTING | Whole Wheat |
| PADDLE | Collapsible |
| CRUST COLOR OPTIONS | Light, Medium, Dark |
| DELAY START | Yes |
| INGREDIENTS | 2.5LBS 2.0LBS 1.5LBS 1.0LBS | |||
| 1.25KG 1.0KG 0.75KG 0.5KG | ||||
| Water, 80°F (27°C) | 2 cups | 1 3⁄4 cups | 1 1⁄4 cups | 3⁄4 cup |
| Molasses | 1⁄4 cup | 3 tablespoons | 2 1⁄4 tablespoons | 1 1⁄2 tablespoons |
| Unsalted butter, 1⁄2" piece at room temperature | 2 1⁄2 tablespoons | 2 tablespoons | 1 1⁄2 tablespoons | 1 tablespoon |
| Salt | 2 1⁄2 teaspoon | 2 teaspoons | 1 1⁄2 teaspoons | 1 teaspoon |
| Brown sugar | 2 1⁄2 tablespoon | 2 tablespoons | 1 1⁄2 tablespoons | 1 tablespoon |
| Whole wheat flour | 3 cups + 2 tablespoons | 2 1⁄2 cups | 1 3⁄4 cups + 2 tablespoons | 1 1⁄4 cups |
| Bread flour | 1 3⁄4 cups + 2 tablespoons | 1 1⁄2 cups | 1 cup + 2 tablespoons | 3⁄4 cup |
| Vital wheat gluten (optional)* | 1 3⁄4 tablespoons | 1 1⁄2 tablespoons | 1 tablespoon | 3⁄4 tablespoon |
| Bran flakes | 1⁄2 cup + 1 tablespoon | 1⁄2 cup | 1⁄4 cup | 3 tablespoons |
| Milk powder | 1⁄4 cup | 3 tablespoons | 2 1⁄4 tablespoons | 1 1⁄2 tablespoons |
| Yeast: Active Dry* | 2 3⁄4 teaspoons | 2 1⁄2 teaspoons | 1 3⁄4 teaspoons | 1 1⁄4 teaspoons |
| OPTIONAL TOPPING | ||||
| Bran flakes | 2 tablespoons | 2 tablespoons | 1 tablespoon | 1 tablespoon |
Egg wash: 1 egg + 1 tablespoon water, beaten
Ensure the collapsible paddle is securely attached and in the upright position before adding ingredients to the bread pan in the order listed. Secure the bread pan inside the baking chamber. Select the WHOLE WHEAT setting, desired crust color and loaf size. Press the START I PAUSE button. If using the topping, brush the top of the dough with the egg wash at the end of the final rise (prior to bake) and sprinkle the bran flakes over the loaf. When the cycle is complete, use oven mitts to remove the bread from the bread machine and transfer to a wire rack to cool. Bread will slice best when allowed to cool.
*If using the WHOLE WHEAT RAPID Setting, substitute the quantities of these two ingredients with the quantities on page 91.
WHOLE WHEAT - HONEY WHOLE WHEAT CINNAMON RAISIN
| BREAD NAME | Honey Whole Wheat Cinnamon Raisin |
| SETTING | Whole Wheat |
| PADDLE | Collapsible |
| CRUST COLOR OPTIONS | Light, Medium, Dark |
| DELAY START | Yes |
| INGREDIENTS | 2.5LBS 2.0LBS 1.5LBS 1.0LBS | |||
| 1.25KG 1.0KG 0.75KG 0.5KG | ||||
| Water, 80°F (27°C) | 1 3/4 cups | 1 1/2 cups + 1 tablespoon | 1 cup | 3/3 cup |
| Honey 1/3 cup + 1 tablespoon 1/3 cup 3 tablespoons 2 1/2 tablespoons | ||||
| Unsalted butter, 1/2" pieces at room temperature | 2 1/2 tablespoons | 2 tablespoons | 1 1/2 tablespoons | 1 tablespoon |
| Salt | 2 1/2 teaspoon | 2 teaspoons | 1 1/4 teaspoons | 1 teaspoon |
| Bread flour | 2 1/2 cups | 2 cups | 1 1/2 cups | 1 cup |
| Whole wheat flour | 2 1/2 cups | 2 cups | 1 1/2 cups | 1 cup |
| Vital wheat gluten (optional)* | 1 1/2 tablespoons | 1 1/4 tablespoons | 1 tablespoon | 3/4 tablespoon |
| Ground cinnamon | 1 1/4 tablespoons | 1 tablespoon | 3/4 tablespoon | 2 1/2 teaspoons |
| Milk powder | 3 3/4 tablespoons | 3 tablespoons | 2 1/4 tablespoons | 1 1/2 tablespoons |
| Yeast: Active Dry* | 2 3/4 teaspoons | 2 1/4 teaspoons | 1 3/4 teaspoons | 1 1/4 teaspoons |
| ADD TO THE AUTOMATIC FRUIT AND NUT DISPENSER | ||||
| Raisins | 3/4 cup | 1/2 cup | 1/3 cup | 1/4 cup |
Ensure the collapsible paddle is securely attached and in the upright position before adding ingredients to the bread pan in the order listed. Secure the bread pan inside the baking chamber. Place the raisins into the Automatic Fruit & Nut Dispenser. Select the WHOLE WHEAT setting, desired crust color and loaf size. Press the START | PAUSE button. When the cycle is complete, use oven mitts to remove the bread from the bread machine and transfer to a wire rack to cool. Bread will slice best when allowed to cool.
*If using the WHOLE WHEAT RAPID Setting, substitute the quantities of these two ingredients with the quantities on page 91.
WHOLE WHEAT - MULTIGRAIN BREAD
| BREAD NAME | Multigrain Bread |
| SETTING | Whole Wheat |
| PADDLE | Collapsible |
| CRUST COLOR OPTIONS | Light, Medium, Dark |
| DELAY START | Yes |
| INGREDIENTS | 2.5LBS 2.0LBS 1.5LBS 1.0LBS |
| 1.25KG 1.0KG 0.75KG 0.5KG |
| Water, 80°F (27°C) 1 3/4 cups + 1 tablespoon 1 1/2 cups 1 cup + 2 tablespoons 3/4 cup | ||||
| Unsalted butter, 1/2" piece at room temperature | 3 tablespoons | 2 tablespoons | 1 1/2 tablespoons | 1 tablespoon |
| Salt | 2 1/4 teaspoons | 2 teaspoons | 1 1/2 teaspoons | 1 teaspoon |
| Brown sugar | 1/4 cup | 3 tablespoons | 2 1/4 tablespoons | 1 1/2 tablespoons |
| Multigrain flour blend | 5 cups | 4 cups | 3 cups | 2 cups |
| Vital wheat gluten (optional)* | 1 1/2 tablespoons | 1 1/4 tablespoons | 1 tablespoon | 3/4 tablespoon |
| Milk powder | 1/4 cup | 3 tablespoons | 2 1/4 tablespoons | 1 1/2 tablespoons |
| Yeast: Active Dry* | 2 1/4 teaspoons | 2 teaspoons | 1 1/2 teaspoons | 1 teaspoon |
| OPTIONAL TOPPING | ||||
| Rolled oats | 2 tablespoons 2 tablespoons 1 tablespoon 1 tablespoon | |||
Egg wash: 1 egg + 1 tablespoon water, beaten
Ensure the collapsible paddle is securely attached and in the upright position before adding ingredients to the bread pan in the order listed. Secure the bread pan inside the baking chamber. Select the WHOLE WHEAT setting, desired crust color and loaf size. Press the START I PAUSE button. If using the topping, brush the top of the dough with the egg wash at the end of the final rise (prior to bake) and sprinkle the rolled oats over the loaf. When the cycle is complete, use oven mitts to remove the bread from the bread machine and transfer to a wire rack to cool. Bread will slice best when allowed to cool.
*If using the WHOLE WHEAT RAPID Setting, substitute the quantities of these two ingredients with the quantities on page 91.
WHOLE WHEAT - PUMPERNICKEL BREAD
| BREAD NAME | Pumpernickel Bread | |
| SETTING | Whole Wheat | |
| PADDLE | Collapsible | |
| CRUST COLOR OPTIONS | Light, Medium, Dark | |
| DELAY START | Yes | |
| INGREDIENTS | 2.5LBS 2.0LBS 1.5LBS 1.0LBS1.25KG 1.0KG 0.75KG 0.5KG | |
| Water, 80°F (27°C) 1 3⁄4 cups + 2 tablespoons 1 1⁄2 cups 1 cup + 1 tablespoon 3⁄4 cup | ||
| Molasses 1⁄2 cup 1⁄4 cup 3 tablespoons 2 tablespoons | ||
| Unsalted butter, melted | 2 1⁄2 tablespoons | 2 tablespoons |
| Instant coffee | 1 1⁄2 tablespoons | 2 tablespoons |
| Salt | 2 3⁄4 teaspoons | 2 1⁄2 teaspoons |
| Whole wheat flour | 1 1⁄4 cups | 1 cup |
| Rye flour | 2 cups + 3 tablespoons | 1 3⁄4 cups |
| Bread flour | 2 cups + 3 tablespoons | 1 3⁄4 cups |
| Vital wheat gluten (optional)* | 1 3⁄4 tablespoons | 1 1⁄2 tablespoons |
| Wheat germ | 1⁄4 cup | 3 tablespoons |
| Cocoa powder | 1 1⁄4 tablespoons | 1 tablespoon |
| Yeast: Active Dry* | 3 teaspoons | 2 1⁄2 teaspoons |
| OPTIONAL TOPPING | ||
| Cracked wheat | 2 tablespoons | 1 1⁄2 tablespoons |
| Egg wash: 1 egg + 1 tablespoon water, beaten | ||
Ensure the collapsible paddle is securely attached and in the upright position before adding ingredients to the bread pan in the order listed. Secure the bread pan inside the baking chamber. Select the WHOLE WHEAT setting, desired crust color and loaf size. Press the START I PAUSE button. If using the topping, brush the top of the dough with the egg wash at the end of the final rise (prior to bake) and sprinkle the cracked wheat over the loaf. When the cycle is complete, use oven mitts to remove the bread from the bread machine and transfer to a wire rack to cool. Bread slices best when allowed to cool.
*If using the WHOLE WHEAT RAPID Setting, substitute the quantities of these two ingredients with the quantities on page 91.
WHOLE WHEAT - RYE BREAD
| BREAD NAME | Rye Bread |
| SETTING | Whole Wheat |
| PADDLE | Collapsible |
| CRUST COLOR OPTIONS | Light, Medium, Dark |
| DELAY START | Yes |
| INGREDIENTS | 2.5LBS 2.0LBS 1.5LBS 1.0LBS |
| 1.25KG 1.0KG 0.75KG 0.5KG |
Water, 70°F (21°C) 1 ¾ cups + 1 tablespoon 1 ½ cups 1 cup + 2 tablespoons ¾ cup
| Unsalted butter, melted | 2 1⁄4 teaspoons | 2 teaspoons | 1 1⁄2 teaspoons | 1 teaspoon |
| Brown sugar | 3 tablespoons | 2 tablespoons | 1 1⁄2 tablespoons | 1 tablespoon |
| Salt | 2 1⁄4 teaspoons | 2 teaspoons | 1 1⁄2 teaspoons | 1 teaspoon |
| Bread flour | 3 cups + 2 tablespoons | 2 1⁄2 cups | 2 cups | 1 1⁄4 cups |
| Rye flour | 1 3⁄4 cups + 2 tablespoons | 1 1⁄2 cups | 1 cup | 3⁄4 cup |
| Vital wheat gluten (optional)* | 1 1⁄4 tablespoons | 1 tablespoon | 3⁄4 tablespoon | 1⁄2 tablespoon |
| Caraway seeds | 1 1⁄2 tablespoons | 1 1⁄4 tablespoons | 1 tablespoon | 3⁄4 tablespoon |
| Yeast: Active Dry* | 3 teaspoons | 2 1⁄2 teaspoons | 2 teaspoons | 1 1⁄2 teaspoons |
| OPTIONAL TOPPING | ||||
| Cracked wheat | 2 tablespoons | 1 1⁄2 tablespoons | 1 tablespoon | 1 tablespoon |
Egg wash: 1 egg + 1 tablespoon water, beaten
Ensure the collapsible paddle is securely attached and in the upright position before adding ingredients to the bread pan in the order listed. Secure the bread pan inside the baking chamber. Select the WHOLE WHEAT setting, desired crust color and loaf size. Press the START I PAUSE button. If using the topping, brush the top of the dough with the egg wash at the end of the final rise (prior to bake) and sprinkle the cracked wheat over the loaf. When the cycle is complete, use oven mitts to remove the bread from the bread machine and transfer to a wire rack to cool. Bread slices best when allowed to cool.
*If using the WHOLE WHEAT RAPID Setting, substitute the quantities of these two ingredients with the quantities on page 91.
YEAST FREE - IRISH SODA BREAD
| BREAD NAME | Yeast Free Irish Soda Bread |
| SETTING | Yeast Free |
| PADDLE | Collapsible |
| DELAY START | No |
INGREDIENTS
| Buttermilk 2 cups |
| Egg, 2oz (60g), at room temperature, beaten 1 |
| Unsalted butter, melted 3 tablespoons |
| Sugar, granulated 1⁄4 cup |
| Salt 1 teaspoon |
| Unbleached all-purpose flour, sifted 1 3⁄4 cups |
| Whole wheat flour, sifted 1 1⁄4 cups |
| Baking powder 1 tablespoon |
| Baking soda 1 teaspoon |
Ensure the collapsible paddle is securely attached and in the upright position before placing the buttermilk, egg, butter and sugar in the bread pan. In a medium sized bowl, combine the salt, unbleached all purpose flour, whole wheat flour, baking powder and baking soda. Mix together and pour over the wet ingredients. Secure the bread pan inside the baking chamber. Select the YEAST FREE setting. Press the START | PAUSE button. When the alert sounds during the 'knead 2' phase, open the lid of the bread machine. Then, while the paddle is still kneading, scrape down the sides of the bread pan with a rubber spatula to ensure all ingredients are thoroughly mixed. Close the lid. When the cycle is complete, use oven mitts to remove the bread pan from the bread machine. Allow the bread to cool in the bread pan for 15 minutes then transfer to a wire rack to continue cooling. Bread will slice best when allowed to cool.
YEAST FREE - CRANBERRY ORANGE LOAF
| BREAD NAME | Cranberry Orange Loaf |
| SETTING | Yeast Free |
| PADDLE | Collapsible |
| DELAY START | No |
INGREDIENTS
| Egg, 2oz (60g), at room temperature, beaten 1 |
| Milk 80°F (27°C) 13 cup |
| Orange juice 13 cup |
| Unsalted butter, melted 13 cup |
| Orange zest 1 tablespoon |
| Sugar, granulated 34 cup |
| Salt 12 teaspoon |
| Unbleached all-purpose flour, sifted 2 cups |
| Whole wheat flour, sifted 3 tablespoons |
| Baking powder 2 teaspoons |
| Baking soda 1 teaspoon |
| ADD TO THE AUTOMATIC FRUIT AND NUT DISPENSER |
| Dried cranberries 13 cup |
Ensure the collapsible paddle is securely attached and in the upright position before placing the egg in the bread pan. Add the milk, orange juice, butter, orange zest and sugar. In a medium sized bowl, combine the salt, unbleached all-purpose flour, whole wheat flour, baking powder and baking soda. Mix together and pour over the wet ingredients. Secure the bread pan inside the baking chamber. Place the dried cranberries into the Automatic Fruit & Nut Dispenser. Select the YEAST FREE setting. Press the START | PAUSE button. When the alert sounds during the 'knead 2' phase, open the lid of the bread machine. Then, while the paddle is still kneading, scrape down the sides of the bread pan with a rubber spatula to ensure all ingredients are thoroughly mixed. Close the lid. When the cycle is complete, use oven mitts to remove the bread pan from the bread machine. Allow the bread to cool in the bread pan for 15 minutes then transfer to a wire rack to continue cooling. Bread will slice best when allowed to cool.
YEAST FREE - GLUTEN FREE LEMON LIME LOAF
| BREAD NAME | Gluten Free Lemon Lime Loaf |
| SETTING | Yeast Free |
| PADDLE | Collapsible |
| DELAY START | No |
INGREDIENTS
| Egg, 2oz (60g), at room temperature, beaten 6 |
| Coconut milk 13 cup |
| Lemon juice 3 tablespoons |
| Lime juice 3 tablespoons |
| Unsalted butter, melted 14 cup |
| Lime zest 2 teaspoons |
| Sugar, granulated 12 cup |
| Salt 18 teaspoon |
| Lemon zest 1 tablespoon |
| Coconut flour, sifted 1 cup |
| Baking powder 2 teaspoons |
| Baking soda 12 teaspoon |
| CITRUZ GLAZE |
| Confectioner's sugar 14 cup |
| Lemon juice 1 12 teaspoons |
Ensure the collapsible paddle is securely attached and in the upright position before placing the eggs in the bread pan. Add the coconut milk, lemon juice, lime juice, butter, zests and sugar. In a medium sized bowl, combine the salt, coconut flour, baking powder and baking soda. Mix together and pour over the wet ingredients. Secure the bread pan inside the baking chamber. Select the YEAST FREE setting. Press the START I PAUSE button. When the alert sounds during the 'knead 2' phase, open the lid of the bread machine. Then, while the paddle is still kneading, scrape down the sides of the bread pan with a rubber spatula to ensure all ingredients are thoroughly mixed. Close the lid. When the cycle is complete, use oven mitts to remove the bread pan from the bread machine. Allow the bread to cool in the bread pan for 15 minutes then transfer to a wire rack to continue cooling. Bread will slice best when allowed to cool. Combine the confectioner's sugar and lemon juice and drizzle over the loaf.
YEAST FREE - LU-LU'S TRES LECHES CAKE
| BREAD NAME | Lu-Lu's Tres Leches Cake |
| SETTING | Yeast Free |
| PADDLE | Collapsible |
| DELAY START | No |
INGREDIENTS
| Egg, 2oz (60g), at room temperature, beaten 5 |
| Milk 80°F (27°C) 12 cup |
| Vegetable oil 13 cup |
| Pure vanilla extract 1 teaspoon |
| Sugar, granulated 34 cup |
| Salt 14 teaspoon |
| Sugar, granulated 14 teaspoon |
| Cake / pastry flour, sifted 1 12 cups |
| Baking powder 1 teaspoon |
Ensure the collapsible paddle is securely attached and in the upright position before placing the eggs in the bread pan. Add the milk, vegetable oil, pure vanilla extract and sugar. In a medium sized bowl, combine the salt, flour and baking powder. Mix together and pour over the wet ingredients. Secure the bread pan inside the baking chamber. Select the YEAST FREE setting. Press the START | PAUSE button. When the alert sounds during the 'knead 2' phase, open the lid of the bread machine. Then, while the paddle is still kneading, scrape down the sides of the bread pan with a rubber spatula to ensure all ingredients are thoroughly mixed. Close the lid. When the cycle is complete, use oven mitts to remove the bread pan from the bread machine. Allow the bread to cool in the bread pan for 15 minutes then turn the loaf out onto a plate. Using a fork, prick the entire loaf 30 times. Allow the loaf to continue cooling.
MILK SOAKER
| Milk 1 cup | |
| Sweetened condensed milk 12 can | |
| Evaporated milk 12 can | |
| Pure vanilla extract 1 teaspoon | |
| Heavy whipping cream | 34 cup |
| Sugar, granulated | 12 cup |
In a small bowl, whisk together the milk, sweetened condensed milk, evaporated milk, vanilla extract, heavy whipping cream and sugar. Place cooled loaf in a rectangle dish with sides. Pour the milk soaker all over the loaf and allow the loaf to soak up the liquid, aiding it by spooning more over the loaf. Cover and refrigerate overnight.
WHIPPED TOPPING
| Pure vanilla extract 1⁄2 teaspoon | |
| Whipping cream | 1⁄2 cup |
| Sugar, granulated | 1 teaspoon |
Beat together the vanilla extract, whipping cream and sugar until light and fluffy. Top the milk-soaked loaf with the whipped cream mixture.
the Custom Loaf

natural_image
Exterior view of a modern stainless steel loaf with control panel and side legs (no visible text or symbols)
MANUEL D'INSTRUCTIONS
Breville

Sommaire
natural_image
Top-down view of a rectangular electronic component with labeled points A and B (no text or symbols beyond labels)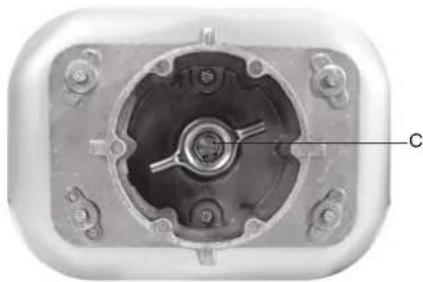
natural_image
Close-up of a mechanical component with a central hub and mounting holes (no visible text or symbols)P. Bouton MARCHE I ARRÊT
natural_image
Gray plastic mechanical bracket with a circular hole and labeled 'Palette fixe' (no other text or symbols)R. Palette rabattable
natural_image
Top-down view of a metallic electrical socket or connector with a central slot and six mounting holes (no text or symbols visible)natural_image
Close-up of a hand pressing down on a metallic appliance with a control panel (no visible text or symbols)natural_image
Close-up of a mechanical component with central hub and bolt holes (no visible text or symbols)natural_image
Close-up of a mechanical device with a black arrow pointing to a component, no visible text or symbolsTEMPS TOTAL DU CYCLE
INGRÉDIENTS
REMARQUES
TEMPS TOTAL DU CYCLE
INGRÉDIENTS
REMARQUES
DE BASE - PAIN AU LAIT ET AU MIEL
PÂTE - BRIOCHES DE CORINNA
| NOM DU PAIN | Brioches de Corinna |
| RÉGLAGE | Pâte à pain |
| PALETTE | Rabattable |
| DÉMARRAGE DIFFÉRÉ | Non |
INGRÉDIENTS
natural_image
Exterior view of a modern stainless steel coffee maker (no visible text or symbols)
natural_image
Top-down view of a rectangular container with six circular holes and labeled points A and B (no text or symbols beyond labels)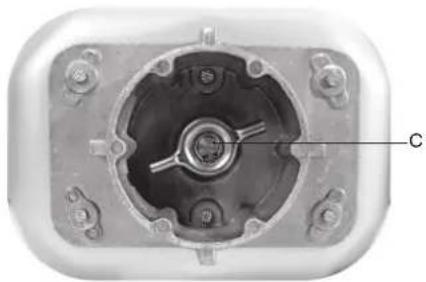
natural_image
Close-up of a mechanical component with a central hub and mounting holes (no visible text or symbols)natural_image
Gray plastic mechanical component with a small circular hole and a side protrusion (no text or symbols visible)Paleta fija
R. Paleta plegable
natural_image
Close-up of a metallic electrical socket or connector with a central slot and mounting holes (no visible text or symbols)natural_image
Close-up of a hand pressing down on a metallic electronic device with ventilation slots (no visible text or symbols)natural_image
Close-up of a mechanical component with central bore and flanged ends (no visible text or symbols)natural_image
Close-up of a kitchen appliance with a hand operating a tool near the window (no visible text or symbols)Breville Service Center
USA
Mail: BrevilleUSA
19400 S. Western Ave, Torrance CA 90501-1119
Phone: 1-866-273-8455
1-866-BREVILLE
Web: breville.com/us/support
Canada
Mail: Breville Canada
300 Town Centre Blvd,
Suite 201, Markham,
Ontario, L3R 5Z6, Canada
Phone: 1-855-683-3535
Web: breville.ca/support
Breville is a registered trademark of Breville Pty. Ltd. A.B.N. 98 000 092 928.
Copyright Breville Pty. Ltd. 2023.
- Due to continued product improvement, the products illustrated/photographed in this brochure may vary slightly from the actual product.