Vengeance M90 - Mouse CORSAIR - Free user manual and instructions
Find the device manual for free Vengeance M90 CORSAIR in PDF.

User questions about Vengeance M90 CORSAIR
0 question about this device. Answer the ones you know or ask your own.
Ask a new question about this device
Download the instructions for your Mouse in PDF format for free! Find your manual Vengeance M90 - CORSAIR and take your electronic device back in hand. On this page are published all the documents necessary for the use of your device. Vengeance M90 by CORSAIR.
USER MANUAL Vengeance M90 CORSAIR
Vengeance® M90 Gaming Software User Guide
Copyright 2012, Corsair Components, Inc. All Rights Reserved. Corsair, the Sails logo, and Vengeance are registered trademarks of Corsair in the United States and/or other countries. All other trademarks and tradenames are the property of their respective owners, who are not affiliated with Corsair.
Table of Contents
Table of Contents......i
Introducing the Vengeance Gaming Software .... 1
Welcome....1
Using This Guide 1
Compatible Products....1
User Interface Overview....2
A. The Activities Bar.... 2
Assign Buttons....2
Manage Performance 2
Manage Profiles.... 3
B. Help Buttons.... 3
C. Device Navigation 3
D. Button Selection.... 3
E. Cancel and Close.... 3
Other Important User Interface Elements 4
Profile selector 4
Macro Record button 4
LED Toggle....4
Using the Vengeance Gaming Software.... 5
Software versus Hardware Playback.... 5
Software Playback....5
Advantages of software playback.... 5
Disadvantages of software playback.... 5
Hardware playback.... 5
Advantages of hardware playback 5
Disadvantages of hardware playback.... 5
Manage Profiles Activity....6
Manage Profiles screen....6
Lock Profile....7
Profile Name and Application....7
Application 8
LED 8
New 9
Delete 9
Import 9
Export 10
Notification....10
On-Screen Display....10
Assign Buttons Activity....10
Button Selection....10
Playback Options ....11
Delay Options....12
Ignore delays....13
Default delay....13
Random delay time....13
No delay options selected....13
Comparing the delay options....13
Advanced Options....14
Button Options....15
How to: Changing a button mapping....15
How to: Assign a keystroke....17
How-to: Record a macro....17
How-to: Edit a macro....20
Manage Performance Activity ....23
Manage Performance Screen....23
DPI Selection....23
Sniper 23
Angle Snapping....24
Report Rate Setting....24
Surface Quality....24
Lift Height....25
Introducing the Vengeance Gaming Software
Welcome
Thanks for choosing the Vengeance M90 laser gaming mouse for your PC gaming. We hope you enjoy using it as much as we do. This Software Guide is designed to help you get the most from your mouse. You can find a community of other Vengeance-equipped gamers at www.corsair.com/forums, on Facebook at www.facebook.com/VengeanceGaming, and on Twitter @CorsairMemory.
Using This Guide
To help make it easy and quick to learn how to use the Vengeance Gaming Software, we used the following formatting conventions in this User Guide:
Items that you click on will be in boldface type.
Items that are particularly important will be in italics.
Button numbers will be shown like this: 1
The terms Select and Click are used interchangeably and indicate that you should left-click on the item.
Right-click means to select the item and press the right mouse button.
Paragraphs that are called out like this are tips for making your experience with the Vengeance Gaming Software and the Vengeance M90 gaming mouse better.
Compatible Products
The Vengeance Gaming Software can be used with the Vengeance K90 MMO/RTS-optimized gaming keyboard, and the Vengeance M90 and M60 laser gaming mice. The Vengeance K60 FPS-optimized gaming keyboard has no programmable functions and therefore does not use the Vengeance Gaming Software.
This User Guide covers the Vengeance M90 gaming mouse. Other User Guides cover the other Vengeance gaming peripherals.
This guide is specifically tailored to the 1.0 release version of the Vengeance Gaming Software. If you are using an earlier version, please update it.
User Interface Overview
The Vengeance Gaming Software is designed to make tuning your gaming profiles, including recording, editing and storing macros, as easy as possible. All of the options can be found on just three tabs, and most configuration changes and edits are stored automatically.
Before following the rest of this guide, please take a moment to familiarize yourself with the basics of the user interface:

text_image
Assign Buttons Manage Performance Manage Profiles Profile Profile 1 C Assign Button 1 > Left Button: Left Playback Options Delay Options Advanced Options Button Options Playback Options: Define N: 1 Fixed Macro Delay Time: 50 ms Hardware playback E CANCEL CLOSE CORSAIR®A. The Activities Bar
There are three activities you can perform with the Vengeance Gaming Software: Assign Buttons, Manage Performance, and Manage Profiles.
Assign Buttons
This activity allows you to change the mouse functions or individual keyboard keystrokes assigned to a button. You can also record, edit, and delete macros, and bind them to the button of your choice on the Vengeance M90 gaming mouse. You can also change how the macros will be played back.
Manage Performance
This activity gives you total control over how the mouse works, including adjusting the DPI settings, the rate at which the mouse reports data to the system, the height at which, when lifted, the mouse will stop tracking, and a test feature to judge how well the sensor in the mouse performs on the surface you are using.
Manage Profiles
The Vengeance M90 gaming mouse can store up to 6 profiles that can be selected on-the-fly. Each profile independently stores all the important data for the mouse: DPI settings, lift height, reporting rate, and button assignments, as well as your macros and their button bindings. The Manage Profiles activity allows you to manage your profiles, including creating new profiles, importing and exporting profiles, and assigning a profile to a slot on the Vengeance M90 mouse.
B. Help Buttons
The help buttons provide access to important information about the Vengeance Gaming Software.
Selecting ⓘ opens the Information dialog box and displays the software version, USB ID information, etc. It is useful for checking the version you are running, and can assist our Technical Support group in the event you have a problem with your mouse.
Selecting ? opens your browser to the Vengeance Gaming Peripherals Frequently Asked Questions page on corsair.com.
Selecting opens your browser to corsair.com
C. Device Navigation
The Device Navigation section shows images of the Vengeance gaming peripherals that are installed on your system, and allows you to choose which one the Vengeance Gaming Software is modifying. You can scroll through devices by clicking on the < and > arrow symbols on the screen. Select the Vengeance gaming peripheral you wish to configure by clicking on the appropriate image.
D. Button Selection
The Button Selection area displays an image of the Vengeance M90 gaming mouse, with each button labeled. When using the Assign Buttons activity, this is where you select the button you would like to modify.
E. Cancel and Close
Generally speaking, most changes you make in the Vengeance Gaming Software are saved automatically to the mouse. The Cancel button provides a single-level undo for any changes that haven't yet been saved to the mouse.
When the Cancel button is available, clicking it will cancel any changes you have made, including any macros you have recorded. When the Cancel button is grayed out, your edits have been saved to the mouse and you cannot cancel them.
Selecting Close will minimize the application to the task bar whenever Notification is enabled. The Vengeance Gaming Software is still be active and can be accessed again by double-clicking the icon in the task bar. If you do not have Notification enabled, the Vengeance Gaming Software will close and you will need to reopen it from the Windows Start menu if you wish to make any changes.
Other Important User Interface Elements
Profile selector

text_image
Profile Profile 1This pull-down allows you to select the profile that you will be modifying. You can only select existing profiles; if you need to create a new profile, use the Manage Profiles activity.
Macro Record button

The Macro Record (MR) button is a toggle that turns macro recording on and off. When Macro Record is active, all of your keystrokes will be recorded until it is turned off. Please see "How-to: Record a Macro" later in this User Guide for step-by-step instructions on using the macro record feature.
LED Toggle

The LED toggle controls the LED lighting on the mouse, allowing you to turn it on and off. The state of the LED toggle is not stored in a profile.
Using the Vengeance Gaming Software
Software versus Hardware Playback
The Vengeance Gaming Software provides two different modes of operation: software playback and hardware playback. They each have advantages and disadvantages. Please read this section to determine which mode is best for you.
Software Playback
This is the default for the Vengeance Gaming Software. In this mode, macros are read from the active profile by a background application played back via the Windows keyboard buffer.
Advantages of software playback
The main advantages of software playback are: 1) auto-switching of profiles based on the application assigned to the profile; 2) more than six profiles can be used; and 3) changes made to a profile, setting, or macro are immediately available.
The automatic profile switching allows you to assign an application to a profile, and when the Vengeance Gaming Software detects that application as running and having focus, it will switch profiles for you. You can assign applications to a profile through the Manage Profiles activity.
The Vengeance M90 gaming mouse is limited to a maximum of six onboard profiles. If you want to be able to choose between more than six active profiles, you'll need to use the software mode.
Disadvantages of software playback
The main disadvantages of software playback are: 1) some applications block macro playback by reading directly from the hardware rather than the Windows keyboard buffer; and 2) because more than six profiles can be used, the profile LEDs on the mouse are disabled as they cannot be mapped to the complete list of profiles.
If you choose to use software playback, enabling On-Screen Display (OSD) will let you see the name of the profile you are switching to, the DPI setting you've selected, and other data. However, because the OSD uses Windows to display the message, you may be switched out of a full-screen game to the Windows desktop when you change a profile or setting. If you choose to use software playback with OSD enabled, be sure to test this before you're in the middle of the action in your favorite game!
Hardware playback
Because the Vengeance M90 gaming mouse has on-board memory, you can playback your macros directly from the hardware. This mode is enabled by selecting Hardware playback from any of the activity screens.
Advantages of hardware playback
The main advantages of hardware playback are: 1) better game compatibility; and 2) visual feedback via the six profile LEDs to identify the profile you're currently using.
Disadvantages of hardware playback
The main disadvantages of hardware playback are: 1) you are limited to just six profiles that can be active at any time, where software playback offers a nearly unlimited number of
profiles; 2) changes you make to your profile must be saved to the Vengeance M90 before they can be used; and 3) auto-switching of profiles does not work.
With up to 54 macros (6 profiles x 9 macro buttons each), the broadest compatibility with games, and the immediate visual feedback of the profile number you're currently using, hardware playback is the mode used by most of the gamers here at Corsair. Unless you're using more than six profiles at a time, this is probably your best choice for gaming.
Manage Profiles Activity
Profiles store information on how your mouse behaves, how the buttons are mapped, and any macros that you may have recorded. This allows on-the-fly customization of your mouse for a different game, or for a different character within a game, or even for different activities within a game. For example, in Battlefield 3, you may have a profile for Assault, another for Engineer, and another for Recon or Support. Or you may create a profile for each of your favorite games. With control over virtually all the buttons, as well as DPI, report rate, and other settings, you can match the Vengeance M90 to whatever game or gaming style you prefer.
When you are using the Vengeance Gaming Software to edit macros or tune performance, be sure to select the correct profile. Many of the changes you make with the Vengeance Gaming Software are saved immediately. If you want to create a new profile, please select Manage Profiles from the Activities Bar, click the New button, and give your profile a name.
Once you've completed setting up a profile and recording your macros, it's a good idea to use the Export feature to keep a backup of your profiles so that you can revert any accidental changes.
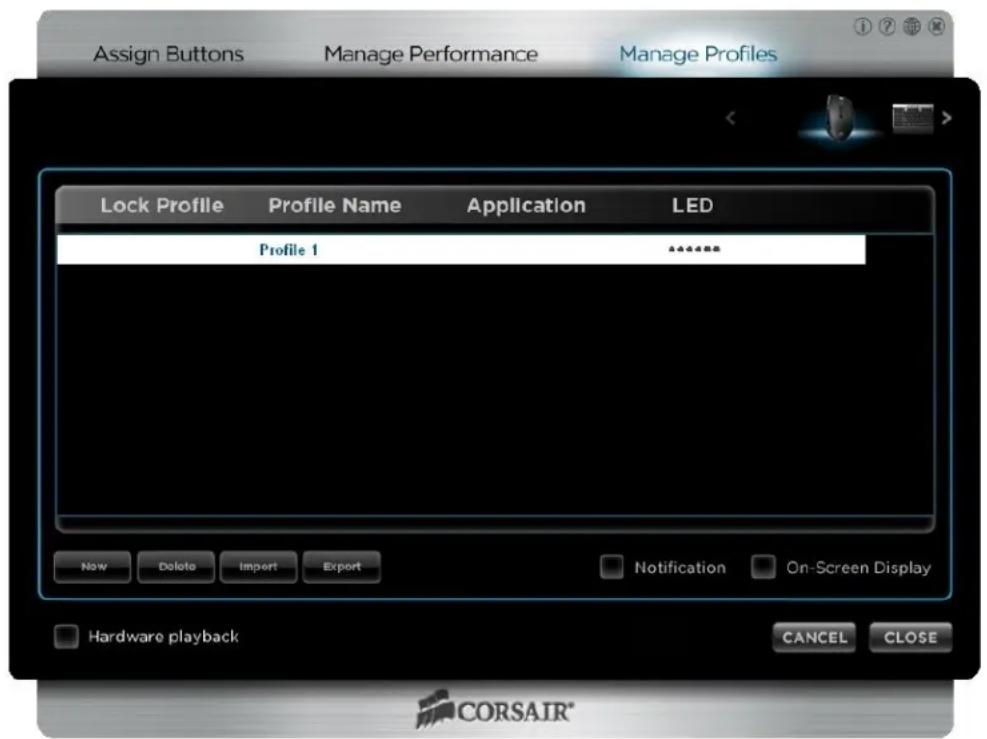
Manage Profiles screen
text_image
Assign Buttons Manage Performance Manage Profiles Lock Profile Profile Name Application LED Profile 1 New Delete Import Export Notification On-Screen Display Hardware playback CANCEL CLOSE CORSAIR®Lock Profile
Lock Profile is used in association with the application detection and automatic profile selection, and works only in software playback mode.
When you launch a new application or change focus to an application, and that application is assigned to a profile, the Vengeance Gaming Software will automatically switch to that profile. If you have a locked profile, once that profile is active, the Vengeance Gaming Software will not be able to switch to different profile automatically. You will still be able to switch profiles using the Profile Up and Profile Down keys (by default, buttons 10 and 11, respectively) or by opening the Vengeance Gaming Software; only the automatic switching will not work.
When a profile is locked, a √ will appear next to the profile name. To unlock a profile, simply select Lock Profile again. You can only have one locked profile.
Profile Name and Application
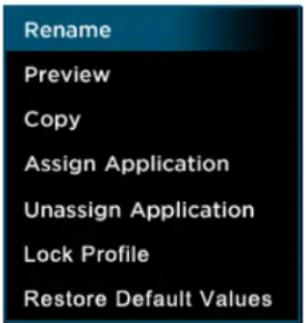
The names of all the profiles stored on your system are shown under Profile Name, whether or not they are associated with a profile slot on the Vengeance M90. If the profile is associated with an application, the name will appear under Application. Right-clicking either the profile name or the application brings up a context menu with the following actions:
text_image
Rename Preview Copy Assign Application Unassign Application Lock Profile Restore Default ValuesRename allows you to rename the current profile.
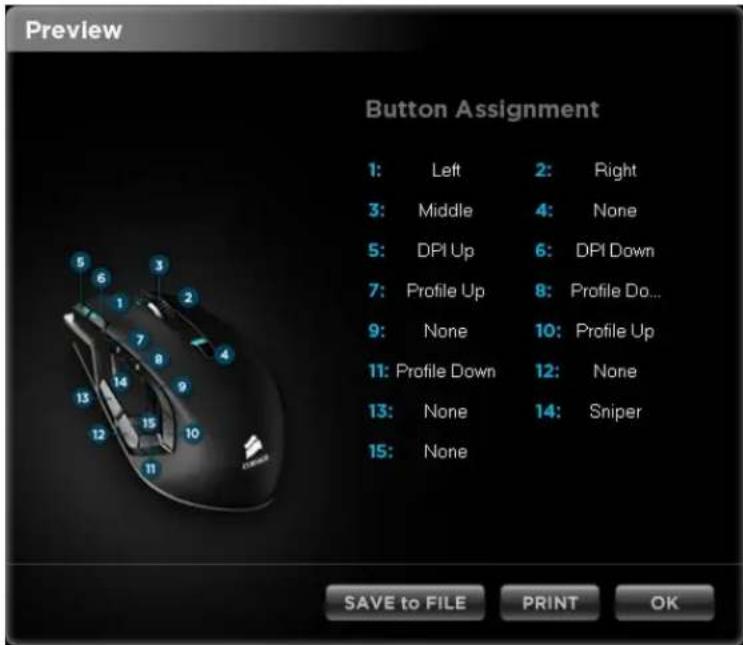
Preview brings up a window (similar to the one shown below) that displays the button assignments for the profile, and allows you to print or save the information to a text file.
text_image
Preview Button Assignment 1: Left 2: Right 3: Middle 4: None 5: DPI Up 6: DPI Down 7: Profile Up 8: Profile Do... 9: None 10: Profile Up 11: Profile Down 12: None 13: None 14: Sniper 15: None SAVE to FILE PRINT OKCopy creates a copy of the currently selected profile.
Assign Application opens a Windows dialog box that allows you to navigate to the application that you wish to associate with the profile. When the Vengeance Gaming Software detects the application is running and has focus, the Vengeance M90 will be switched to the profile assigned to that application.
Unassign Application will delete the association between the profile and the application so that the Vengeance M90 will no longer switch to that profile when the application is active.
Lock Profile will toggle the locked/unlocked state of the profile. It works the same as clicking in the Lock Profile area.
Restore Default Values resets performance settings and button assignments to the factory default.
Application
The name of the application, if any, associated with the profile is listed here.
LED
The six small icons represent the six profile slots available on the Vengeance M90, numbered 1-6 from right to left. When a profile is saved in a profile slot, the icon(s) corresponding to the slot number will be lit. If not LED icon is lit, that profile is not stored in a profile slot on the mouse and will be inactive.
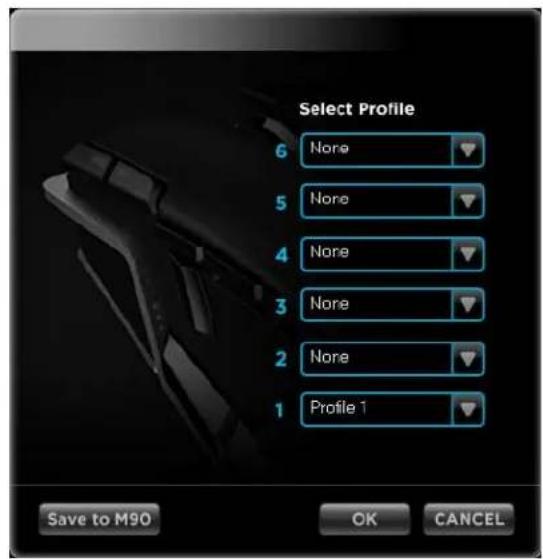
Clicking on the LED icon brings up the following dialog box:
text_image
Select Profile 6 None 5 None 4 None 3 None 2 None 1 Profile 1 Save to M90 OK CANCELTo assign a profile to a profile slot, select the pull-down menu corresponding to the slot, then click on the profile name. All of the unassigned profiles currently available on your PC will appear in the pull-down. To move an assigned profile to a different slot, you must first remove it from its current slot, and then select it from the drop-down list in the slot you want to save it in.
Click OK to save your changes or Cancel to abandon them.
Use Save to M90 to load the assigned profiles to their profile slots on the Vengeance M90 gaming mouse. When you click the button, you will see the progress expressed as a percentage. Once the save reaches 100%, you should click OK to close the Profile Slot dialog box.
If you enable the Hardware playback feature, you must save your profiles to the Vengeance M90 as the Vengeance Gaming Software will not be used to manage your button assignments or playback your macros. Changes to your button assignments, macros or performance settings made in the application will not be available in Hardware playback mode unless they are saved to the Vengeance M90.
New
Creates a new profile, using the default settings.
Delete
Deletes the currently selected profile. A confirmation dialog box will appear to prevent you from accidentally deleting a profile. Selecting "Do not show this message again" will stop the dialog box from appearing, making it a single-click to delete a profile so be certain before removing this safety step.
Import
Opens a Windows dialog box that allows you to browse for and import a profile in the Vengeance Gaming Software XML format. You can import profiles you've exported as a backup or profiles that you receive from other Vengeance Gaming Software users.
Information stored in a profile includes button mappings, macros, and performance settings like DPI and lift height. If you import a profile from another Vengeance Gaming Software user, be sure to use the Preview command (detailed earlier) to check the button mappings, and to review the performance settings using the Manage Performance activity.
Export
Opens a Windows dialog box that allows you browse and select a folder, as well as enter a name, to export the current profile to, in Vengeance Gaming Software XML format.
Exporting is a great way to backup your profiles, once you've perfected them. If your profile were to be inadvertently changed or overwritten, you can Import your XML backup.
Exported profiles can also be shared with other Vengeance M90 owners. Simply send them the exported XML profile and they can use their Vengeance Gaming Software to import them and use them on their Vengeance M90 gaming mouse.
Notification
When Notification is enabled, the Vengeance Gaming Software will be minimized to the system tray when you close the application. If it is disabled, the application will close completely and you will need to relaunch the application from the Windows Start menu to use it.
If you are not using Hardware playback, you should enable Notification, otherwise your button assignments and macros may not be available to you. This is because the Vengeance Gaming Software app must be open for macros to be played back in software.
On-Screen Display
When On-Screen Display is checked, changes to the mouse, such as the name of the profile or the DPI setting will appear briefly in the lower right corner of your screen whenever they are changed.
Assign Buttons Activity
You use the Assign Buttons activity to control what each button on the Vengeance M90 gaming mouse does, as well as bind macros to buttons, and define how the macros are played back when the button is pressed.
The button assignments, macros, and other settings for your Vengeance M90 gaming mouse are stored in profiles. Because most changes are stored automatically to the profiles, you want to be sure to select the correct profile before making changes.
Button Selection
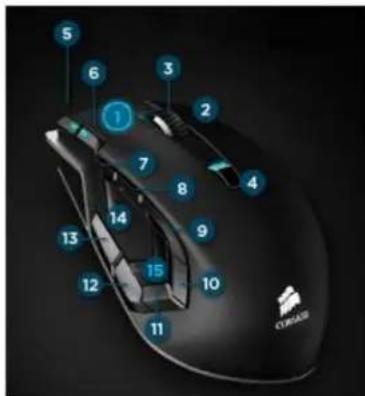
Before you can assign an option to a button, or record a macro, you must select the button in the button selection area, as shown here:
text_image
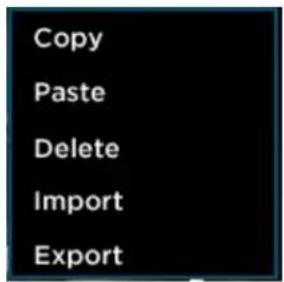
C8GAS 1 2 3 4 5 6 7 8 9 10 11 12 13 14 15Left-clicking on the button number selects that button, and shows you the current assignments for that button. Right-clicking on the button brings up a context menu as shown here:
text_image
Copy Paste Delete Import ExportFrom here, you can: Copy the current button assignment (including any macros and playback options); Paste a macro that's been copied to a button (including the macro name and any playback options); Delete the contents of the selected button; Import a saved macro (including the macro name and any playback options), or Export the macro, macro name, and playback options to a XML file.
You can share your exported macros with other owners of Vengeance M90 gaming mice. Your exported macros can be found in the Macro folder under the Corsair Vengeance\M90 mouse\ folder on your system. To share a macro, simply send it to another Vengeance M90 owner. They can then use Import to assign it to a button
Playback Options
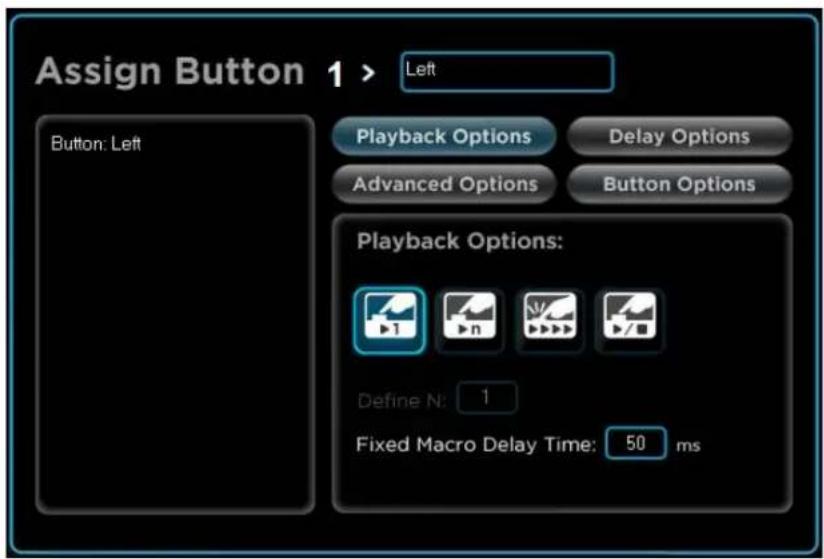
Clicking the Playback Options button brings up four possible macro playback modes, as shown below:
text_image
Assign Button 1 > Left Button: Left Playback Options Delay Options Advanced Options Button Options Playback Options: Define N: 1 Fixed Macro Delay Time: 50 ms
Playback once
Select this option to play the macro once for each time you press the button.

Playback n times
Select this option to play the macro a specific number of times ("n") for each time you press the button. For example, if you enter "6" in the Define N: text box, pressing the button will cause the macro to run 6 times.

Repeat while pressed
This option will cause the macro to repeat as long as the button is held down.

Play until stopped
When this option is used, pressing the button will start the macro and it will repeat until the button is pressed again.
Fixed Macro Delay Time sets a fixed time delay between repeats of the macro being played back. The default is 50ms.
Delay Options
Delay Options are used while you are recording a macro to control how the keystrokes are recorded. The delay options have no impact on previously recorded macros. To change the delays between keypresses in existing macros, you need to edit them individually; please see the "How-to: Edit a macro" later in this guide for instructions.
Selecting the Delay Options button brings up the following choices:
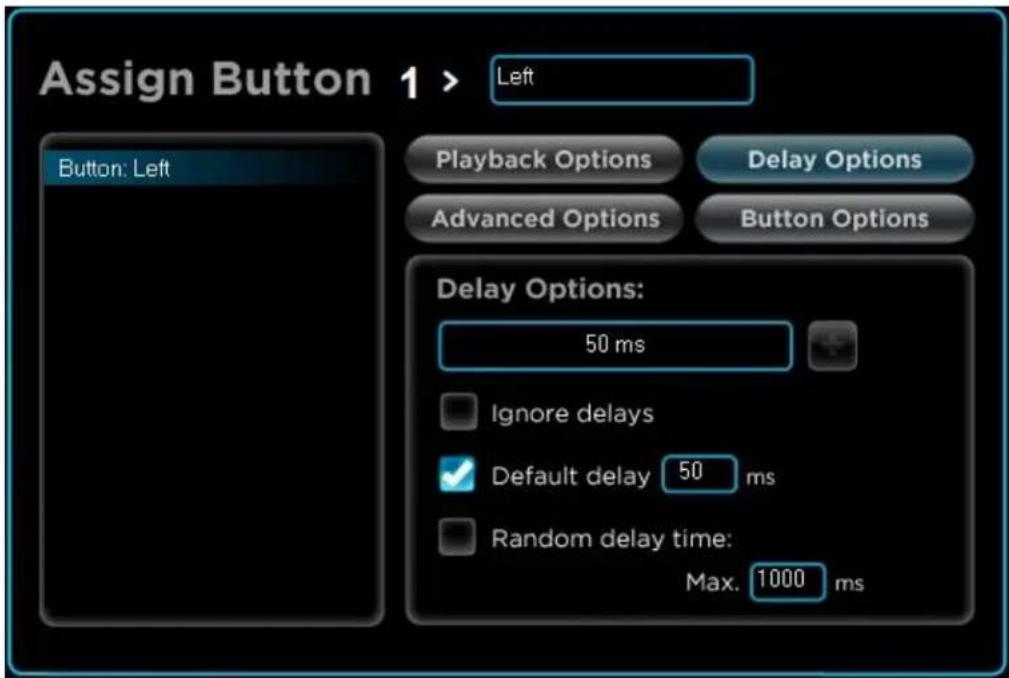
text_image
Assign Button 1 > Left Button: Left Playback Options Delay Options Advanced Options Button Options Delay Options: 50 ms Ignore delays Default delay 50 ms Random delay time: Max. 1000 msThe Delay Options text box and the + button next to it allow you to manually insert a delay while recording a macro. The default is 50ms. If you wish to use a different delay, be sure to enter it before you start recording. While Macro Recording (MR) is active, the + button will be available. Click it to insert a delay in the macro you are recording.
Below the Delay Options text box, there are three options:
Ignore delays
When the Ignore delays option is selected, the macro will be recorded with no delays between the keypresses. This makes the macro execute as fast as possible, but may not work with all applications.
Default delay
This is the default mode for recording macros. It inserts a fixed delay between keypresses as they are recorded. You can specify the delay in the text box; the default is 50ms.
Random delay time
When Random delay time is selected, a random delay is inserted between keypresses, up to the maximum delay specified in the text box. The default value for the maximum delay is 1000ms.
No delay options selected
If none of these options is selected, the actual delay between keypresses is recorded. This creates a very natural macro, in terms of playback, but you may find it surprisingly slow!
Comparing the delay options
The following table illustrates the result of each option using a simple macro (press the A key then the B key):
| Ignore delays | Default delay | Random delay | No delay selected |
| ↓A↑A↓B↑B | ↓A◎0.050 seconds delay↑A◎0.050 seconds delay↓B◎0.050 seconds delay↑B | ↓A◎0.339 seconds delay↑A◎0.524 seconds delay↓B◎0.992 seconds delay↑B | ↓A◎0.078 seconds delay↑A◎0.530 seconds delay↓B◎0.094 seconds delay↑B |
Advanced Options
Selecting Advanced Options allows you to select a Windows action/command that can be mapped to a button on your Vengeance M90 mouse. The following options are available, under the Basic and Advanced Commands pull-down menus:
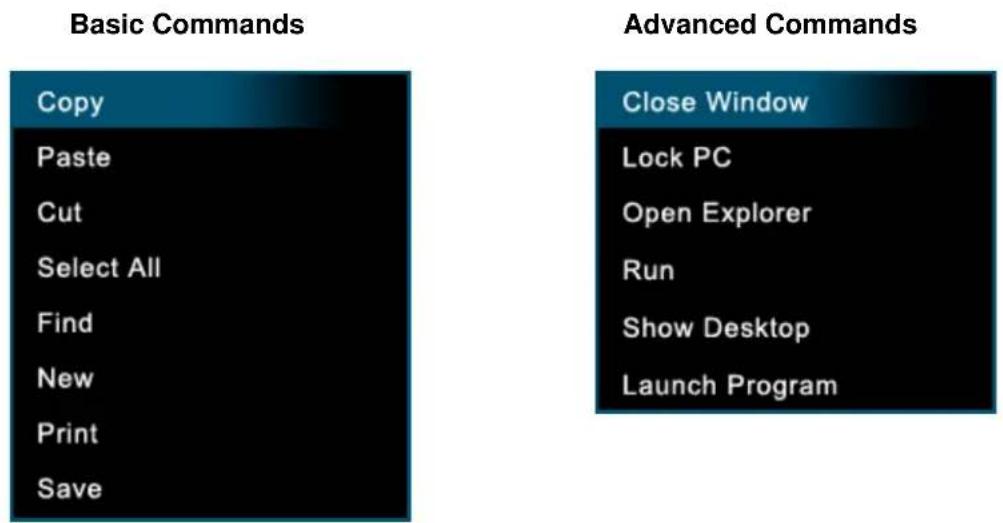
text_image
Basic Commands Copy Paste Cut Select All Find New Print Save Advanced Commands Close Window Lock PC Open Explorer Run Show Desktop Launch ProgramAfter selecting the command you want, click + to assign it to the button. Some commands, like Launch Program, will bring up an additional dialog box before the action is complete.
Button Options
Selecting Button Options allows you to select a mouse-specific action that can be mapped to a button on your Vengeance M90 mouse. The following options are available, under the Basic and Advanced Buttons pull-down menus:
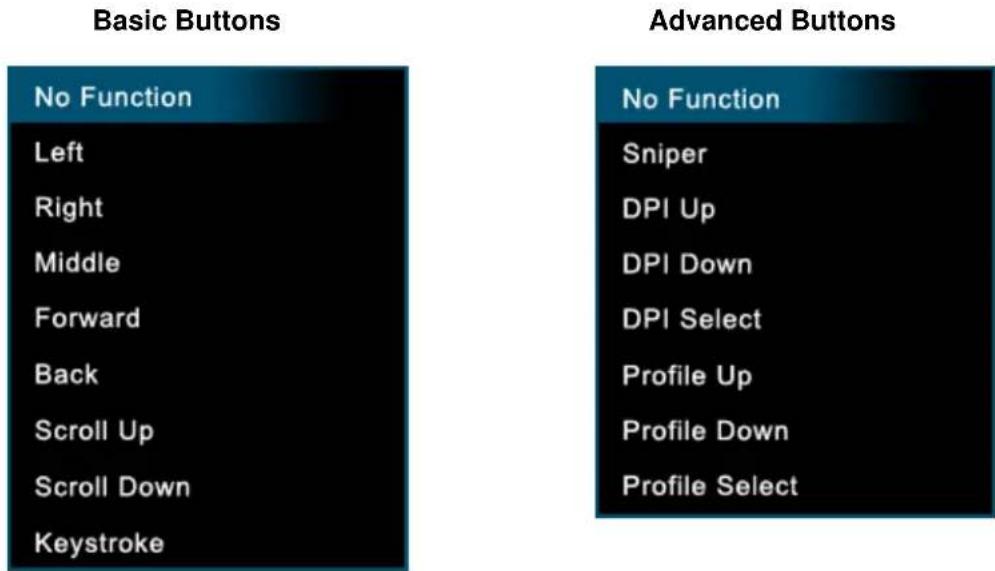
text_image
Basic Buttons No Function Left Right Middle Forward Back Scroll Up Scroll Down Keystroke Advanced Buttons No Function Sniper DPI Up DPI Down DPI Select Profile Up Profile Down Profile SelectAfter selecting the command you want, click + to assign it to the button.
How to: Changing a button mapping
You can control what happens when you click any button on the Vengeance M90. To illustrate how this is done, we'll map the Profile Up and Profile down actions to buttons that currently have no function assigned.
- Open the Vengeance Gaming Software application
- Select the Assign Buttons activity
- Choose a profile to change. In this example, you can simply use the default Profile 1. You can also select an existing profile from the drop-down menu or create a new profile using the Manage Profiles activity.
- In the Button Selection area, click the button to which you want to map a new action. In this case, select 13. Assuming your mouse is set up with the factory defaults, you should see the following screen:
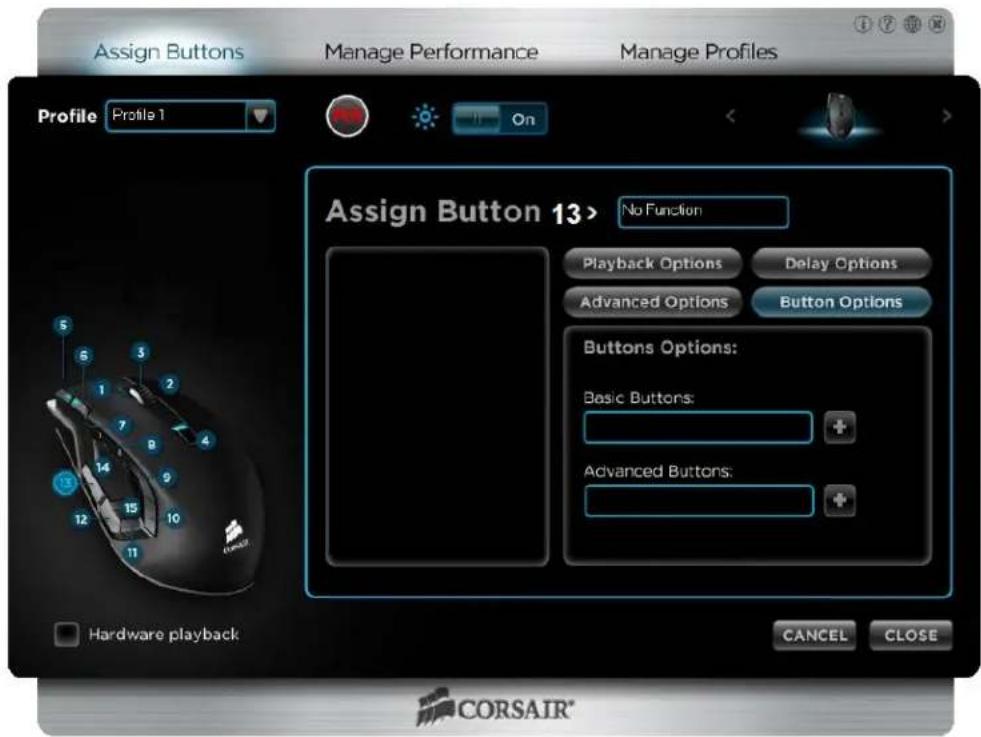
text_image
Assign Buttons Manage Performance Manage Profiles Profile Profile 1 On Assign Button 13> No Function Playback Options Delay Options Advanced Options Button Options Buttons Options: Basic Buttons: Advanced Buttons: Hardware playback CANCEL CLOSE CORSAIR®- Click on Button Options and then click in the Advanced Buttons box. You should see the following screen:
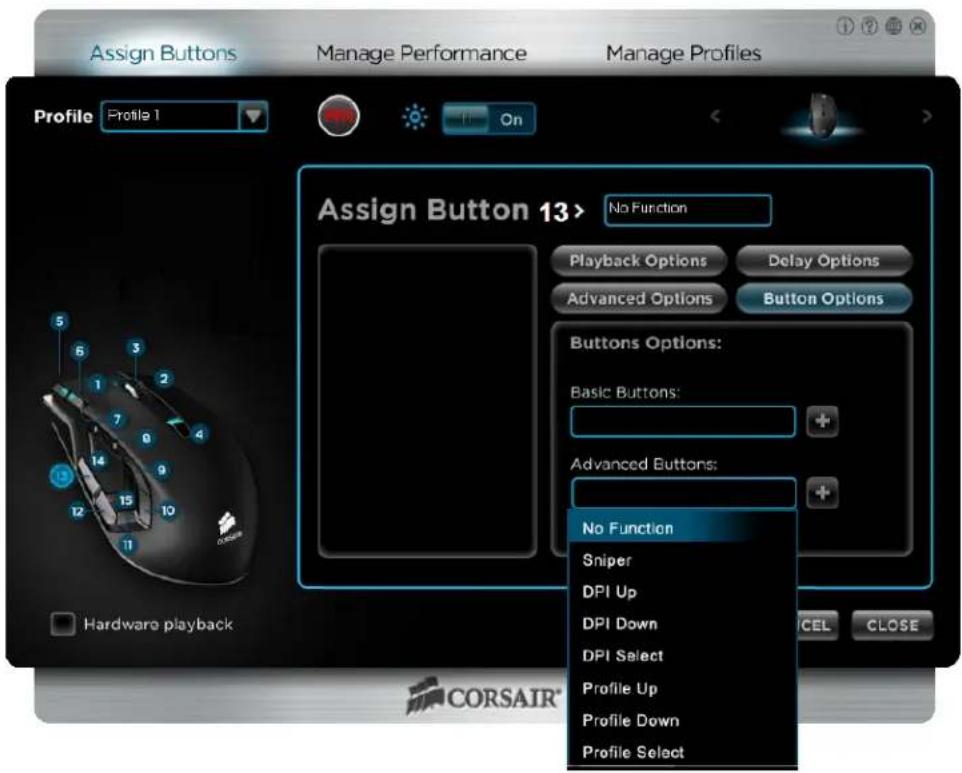
text_image
Assign Buttons Manage Performance Manage Profiles Profile Profile 1 On Assign Button 13 > No Function Playback Options Delay Options Advanced Options Button Options Buttons Options: Basic Buttons: + Advanced Buttons: No Function Sniper DPI Up DPI Down DPI Select Profile Up Profile Down Profile Select Hardware playback CORSAIR®- Click Profile Up to select that function, and then click + to assign the function to button 13 on the mouse. You can change the name of the button by clicking in the text box next to "Assign Button 13 >" and typing in a new name.
- Now click on 14, select Advanced Buttons, click on Profile Down, and then + to assign the function.
- Now click Close.
- That's it! You've mapped Profile Up to button 13 and Profile Down to button 12.
If you are using Hardware playback, you need to save the updated profile to your Vengeance M90 mouse before the new button mapping will be available. You can do this using the Manage Profiles activity. Left-click on the LED icon next to the profile name, and select Save to Vengeance M90. Once the progress indicator reaches 100%, click Close. Your updates are now saved to the Vengeance M90.
Because Windows only recognizes 5 mouse buttons natively, in order to assign functions in a game to your mouse's buttons you must first program them to emulate a keystroke or macro (series of keystrokes) from a keyboard.
How-to: Assign a keystroke
You can assign a keystroke to any button on the Vengeance M90. To illustrate how this is done, we'll create a simple macro that types "Hello World" in any application.
- Open the Vengeance Gaming Software application
- Select the Assign Buttons activity
- Choose a profile to change. In this example, you can simply use the default Profile 1. You can also select an existing profile from the drop-down menu or create a new profile using the Manage Profiles activity.
- In the Button Selection area, click the button to which you want to assign the keystroke. In this case, select 9. Assuming your mouse is set up with the factory defaults, you
should see the following screen:
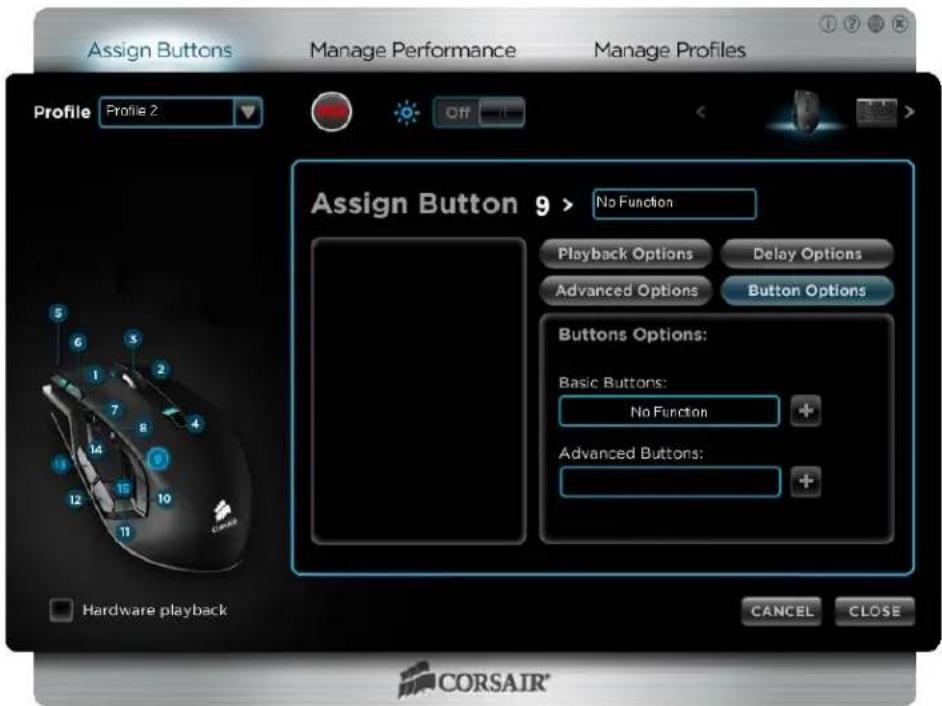
text_image
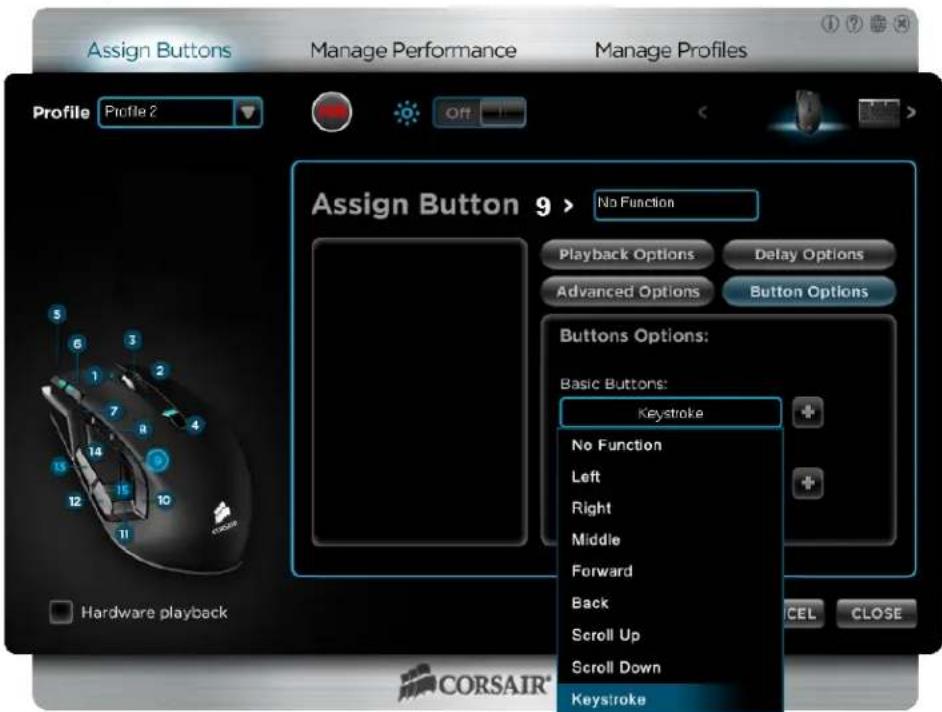
Assign Buttons Manage Performance Manage Profiles Profile Profile 2 Off Assign Button 9 > No Function Playback Options Delay Options Advanced Options Button Options Buttons Options: Basic Buttons: No Function Advanced Buttons: + Hardware playback CANCEL CLOSE CORSAIR®- Click on Button Options and select the Basic Buttons control. Select Keystroke - the bottom option in the list, then click +.
text_image
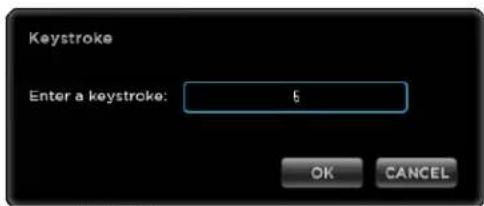
Assign Buttons Manage Performance Manage Profiles Profile Profile 2 Off Assign Button 9 > No Function Playback Options Delay Options Advanced Options Button Options Buttons Options: Basic Buttons: Keystroke No Function Left Right Middle Forward Back Scroll Up Scroll Down Keystroke Hardware playback CEL CLOSE CORSAIR®- Press the keyboard key you would like to bind to button 13, and then press OK. In this example we are using 5.
text_image
Keystroke Enter a keystroke: 5 OK CANCEL- Now click Close.
- That's it! You've assigned your first keystroke and now it's time to test it out. Open Notepad or Word (or your favorite text editor), start a new document, and then press button 13 on your Vengeance M90. You should see the number 5 appear as if you were typing it.
If you are using Hardware playback, you need to save the updated profile to your Vengeance M90 mouse before the new keystroke assignment will be available. You can do this using the Manage Profiles activity. Left-click on the LED icon next to the profile name, and select Save to Vengeance M90. Once the progress indicator reaches 100%, click Close. Your updates are now saved to the Vengeance M90.
How-to: Record and assign a macro
You can record a macro (a series of keystrokes) and assign that to any button on the Vengeance M90. To illustrate how this is done, we'll create a simple macro that types "Hello World" in any application.
- Open the Vengeance Gaming Software application
- Select the Assign Buttons activity
- Choose a profile to change. In this example, you can simply use the default Profile 1. You can also select an existing profile from the drop-down menu or create a new profile using the Manage Profiles activity.
- To start recording a macro, first click on the MR (Macro Record) button.
- In the Button Selection area, click the button to which you want to bind the macro. In this case, select 15. Assuming your mouse is set up with the factory defaults, you should see the following screen:
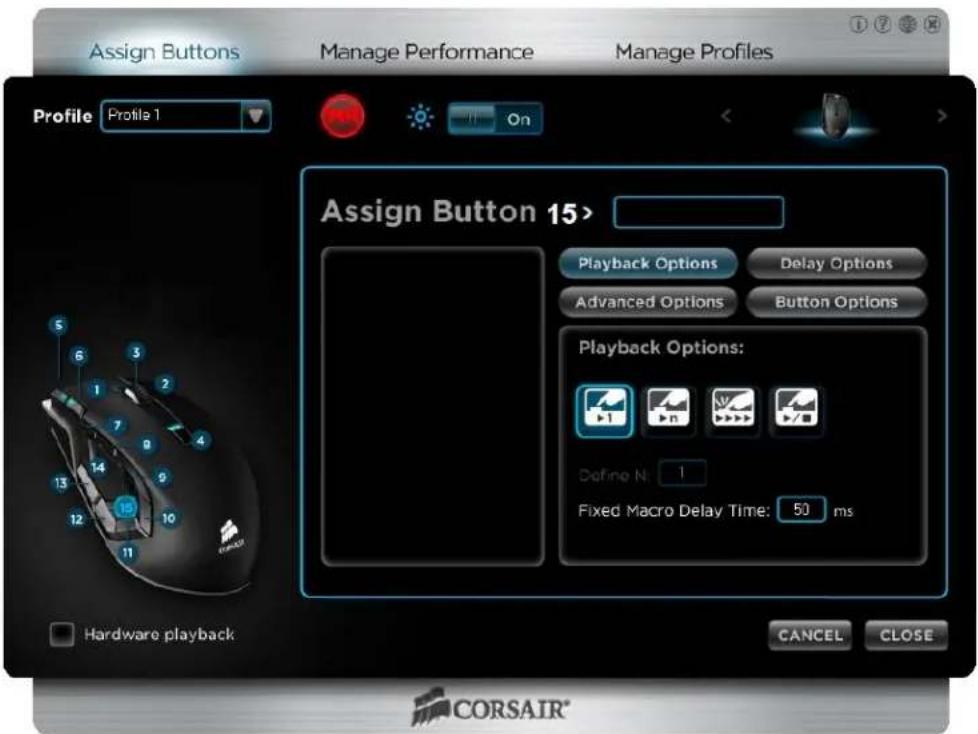
text_image
Assign Buttons Manage Performance Manage Profiles Profile Profile 1 On Assign Button 15> Playback Options Delay Options Advanced Options Button Options Playback Options: Define N: 1 Fixed Macro Delay Time: 50 ms Hardware playback CANCEL CLOSE CORSAIR®- Now, type "Hello World" (without the quotes) on your keyboard. Use the shift key to capitalize the H and W. When you're done typing, click the MR button to stop the recording. You should see a screen similar to this:
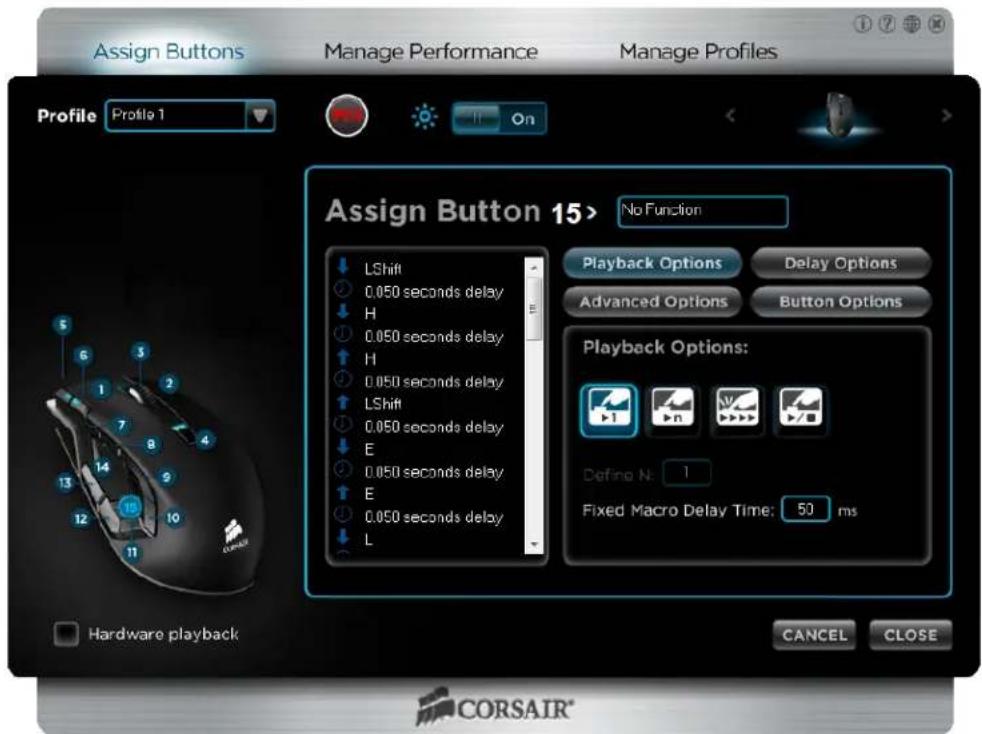
text_image
Assign Buttons Manage Performance Manage Profiles Profile Profile 1 On Assign Button 15> No Function LShift 0.050 seconds delay H 0.050 seconds delay H 0.050 seconds delay LShift 0.050 seconds delay E 0.050 seconds delay E 0.050 seconds delay L Playback Options Delay Options Advanced Options Button Options Playback Options: 1 n 1 Define N: 1 Fixed Macro Delay Time: 50 ms Hardware playback CANCEL CLOSE CORSAIR®-
Now, let's give the macro a name. Click in the text box next to Assign Button 15>. Delete the existing name ("No Function"), type in "Test" and then press Enter.
-
Now click Close.
- That's it! You've created your first macro and now it's time to test it out. Open Notepad or Word (or your favorite text editor), start a new document, and then press button on your Vengeance M90. You should see Hello World appear as if you were typing it.
If you are using Hardware playback, you need to save the updated profile to your Vengeance M90 mouse before the new macro will be available. You can do this using the Manage Profiles activity. Left-click on the LED icon next to the profile name, and select Save to Vengeance M90. Once the progress indicator reaches 100%, click Close. Your updates are now saved to the Vengeance M90.
How-to: Edit a macro
Once you've recorded a macro, you may want to edit it to remove an extra keypress or add one you missed, or change the delay. To illustrate how this is done, we'll edit our Test macro from the "How-to: Record a macro" section in this guide.
You can only edit macros that are bound to a button on your mouse. If you have macros that you have saved (using the Export function) and want to edit, you must first assign them to a button on the mouse.
- Open the Vengeance Gaming Software application
- Select the Assign Buttons activity
- Choose a profile to change. Assuming you're using the Test macro we created in the Record a macro exercise, you can simply use the default Profile 1.
- In the Button Selection area, click the button to which the macro you want to edit is assigned. In this case, select 15. If you're editing our Test macro, you should see the following screen:

text_image
Assign Buttons Manage Performance Manage Profiles Profile Profile 1 On Assign Button 15> Test ↓ LShift ○ 0.050 seconds delay ↓ H ○ 0.050 seconds delay ↑ H ○ 0.050 seconds delay ↑ LShift ○ 0.050 seconds delay ↓ E ○ 0.050 seconds delay ↑ E ○ 0.050 seconds delay ↓ L Hardware playback Playback Options Delay Options Advanced Options Button Options Playback Options: Define N: 1 Fixed Macro Delay Time: 50 ms CANCEL CLOSE CORSAIR®- For this example, let's first add a couple of keystrokes to change the macro from creating "Hello World" to "A Jello World". Start by right-clicking on the first occurrence of Ⓑ 0.050 seconds delay (just below ↓ LShift) to open the edit menu, which looks like this:
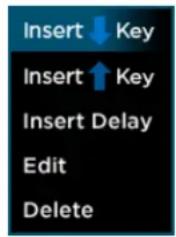
text_image
Insert ↓ Key Insert ↑ Key Insert Delay Edit Delete- We will be adding a keypress, so select Insert ↓ Key and the following dialog box will appear:
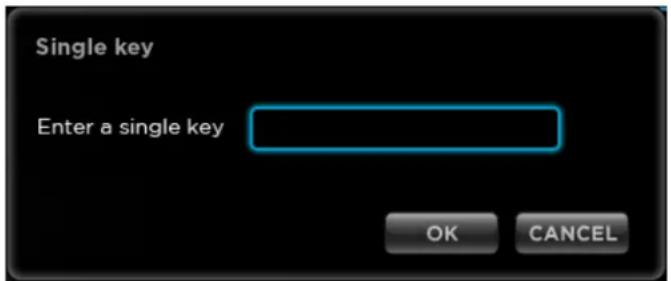
text_image
Single key Enter a single key OK CANCEL- Enter the letter A, click OK and then select the ↓A
- Now click Insert Delay, which inserts the default 50ms delay.
You can change the default value for the delay under Assign Buttons > Delay Options, or if you want a different value for just this delay, you can use the Edit function from the right-click menu to change it.
- We've added the keypress of the letter A and now we need to enter the keyrelease. Right-click on the delay you just added, select Insert ↑ Key, enter A in the dialog box and then click OK.
- Add another delay by right-clicking the ↑ A entry and selecting Insert Delay.
- Do this same sequence to insert the space character: Insert ↓ Key, press the space bar and OK, Insert Delay, Insert ↑ Key, press the space bar and OK, and then Insert Delay to create the sequence that inserts a space.
- Finally, let's change the H to a J and finish the macro. Right-click on H, select Edit., change the H to a J in the dialog box, and click OK.
- Do the same for the ↓ H entry and you've finished editing your macro.
- Now test it out. Open Notepad or Word (or your favorite text editor), start a new document, and then press button 15 on your Vengeance M90. You should see: A Jello World appear as if you were typing it.
If you are using Hardware playback, you need to save the updated profile to your Vengeance M90 mouse before your edited macro will be available. You can do this using the Manage Profiles activity. Left-click on the LED icon next to the profile name, and select Save to Vengeance M90. Once the progress indicator reaches 100%, click Close. Your updates are now saved to the Vengeance M90.
Manage Performance Activity
The Manage Performance activity allows you to control many of the parameters of the advanced Avago sensor used in the Vengeance M90. Settings such as DPI, report rate, and lift height can be tuned to match your gaming style and gaming surface, allowing you to elevate your PC gaming to a new level.
Manage Performance Screen
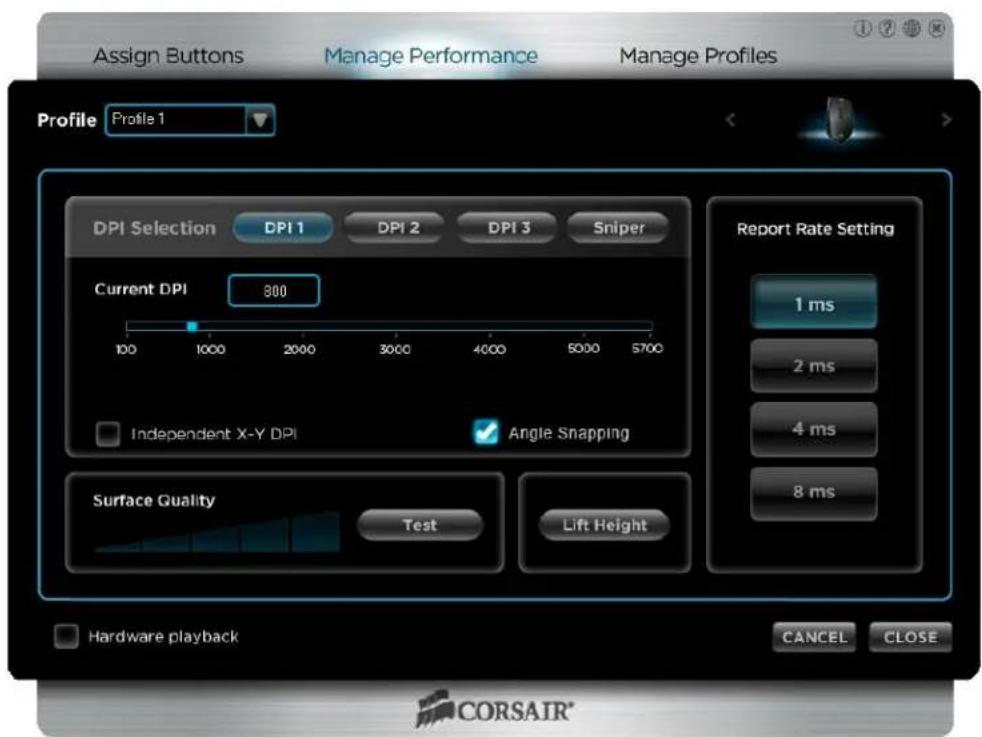
text_image
Assign Buttons Manage Performance Manage Profiles Profile Profile 1 DPI Selection DPI 1 DPI 2 DPI 3 Sniper Current DPI 800 100 1000 2000 3000 4000 5000 5700 Independent X-Y DPI Angle Snapping Surface Quality Test Lift Height Hardware playback CANCEL CLOSE Report Rate Setting 1 ms 2 ms 4 ms 8 ms CORSAIR®DPI Selection
The Vengeance M90 gaming mouse can be assigned up to four simultaneous DPI settings: three that can be selected on-the-fly, and one that is mapped to the Sniper button option under Advanced Buttons.
By default, the three are set to 800, 2400, and 5700 DPI. To set a new DPI, click on the button you wish to change and move the slider to the DPI setting you wish to use.
You can set the DPI independently for the X and Y dimensions. This is very useful for wide monitor setups (2 or 3 monitors in landscape mode), where you want to move quickly from side to side, but don't need as much precision up and down. Experiment by clicking on the checkbox to enable Independent X-Y DPI and adjust the values to suit your gaming setup and style.
Sniper
The Vengeance M90 does not have a dedicated sniper button like the Vengeance M60 FPS-optimized gaming mouse, but the Sniper function is mapped to button 14 by default. The sniper function instantly lowers the DPI of the sensor while it is being pressed, and then restores the prior DPI setting as soon as it is released.
Set the DPI used by the sniper function by clicking Sniper and adjusting the slider to the setting you wish to use.
The Sniper function can be used whenever you need more control over the mouse. At higher DPI settings, even small movements of the mouse can result in large movements of the cursor on-screen. By lowering the DPI, the cursor is easier to control. This can be very useful when using long-range weapons in first-person shooters, or even when editing a pixel mask in Photoshop. Any time you need more control over the cursor, try using the Sniper button.
Angle Snapping
As a mouse tracks over a surface, many points are sampled by the sensor, but never in a straight line. Angle snapping allows the mouse to predict the direction you are moving the mouse and average the samples to create a single, smooth line. This allows you to draw straight lines in applications like Photoshop or Powerpoint, but can interfere with aiming in high-precision games.
By default, Angle Snapping is OFF for the Vengeance M90 gaming mouse. To enable Angle Snapping for the current profile, simply click on the checkbox. Click it again to turn it off. Because the setting for Angle Snapping is specific to a profile, you can easily create a profile for applications, like Photoshop, that work better with it enabled, and leave it turned off for your gaming profiles.
Report Rate Setting
The report rate determines how often the mouse sends data to the system. The default USB reporting rate is 8ms, or 125 reports per second. In its factory configuration, the Vengeance M90 gaming mouse is set to use a 1ms report rate, which means it sends data 1000 times per second.
The higher the report rate, the higher the burden on the CPU but a 1ms report rate isn't a problem for modern CPU. However, if your system seems to slow down when using the mouse, you can adjust the reporting rate to reduce the load.
To change the report rate, simply click on the button corresponding to the setting you wish to use.
Surface Quality
The kind of surface you use for your mouse can have a dramatic impact on the performance of the mouse. The Avago sensor found in the Vengeance M90 works best on a smooth, dark surface that is free of dust, dirt and oils. However, the sensor is capable of functioning on a wide variety of surfaces.
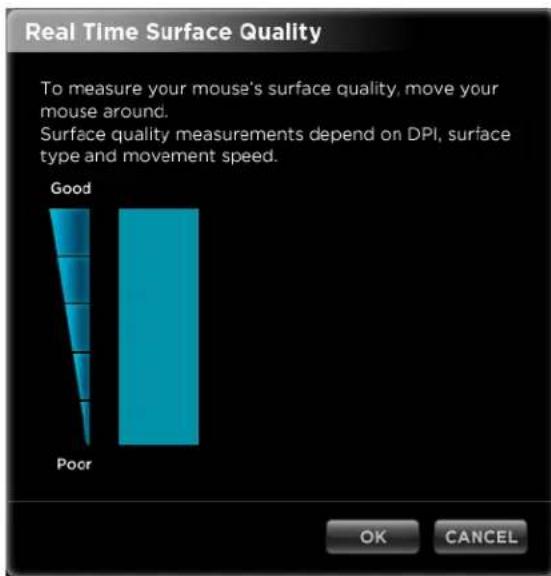
Click the Test button to start the test mode. As you move the mouse across the surface, the sensor will report the quality of the signal. Here are two examples of surface tests (the first is a clean, dark wood desktop, the second was a grimy, light wood desktop):
text_image
Real Time Surface Quality To measure your mouse's surface quality, move your mouse around. Surface quality measurements depend on DPI, surface type and movement speed. Good Poor OK CANCEL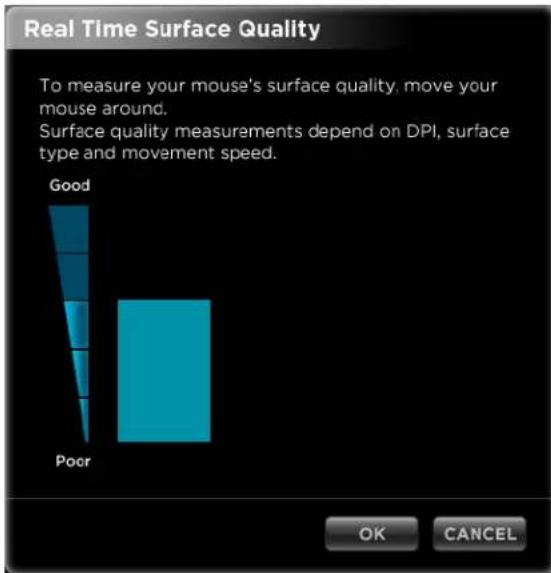
bar
| Rating | Value | | ------ | ----- | | Good | 85 | | Poor | 10 |If you are experiencing problems with your cursor lagging behind your movements, jumping around on the screen, or not tracking your movements of the mouse, you should check your surface quality. If you are getting a poor result, try a different surface or invest in a mouse mat to increase the surface quality.
Lift Height
If you use your mouse by "skipping" or "skating" across the surface, as many FPS gamers do, you will frequently lift your mouse above the surface it is on. This can sometimes result in jerky cursor movement. The Vengeance M90 uses lift detection to compensate for this, making your movements smoother.
By default, the Lift Height is set to Middle. If you are experiencing problems with tracking accuracy while "skating" the mouse, you can try adjusting the lift height. Click on the Lift Height button to see the following screen:
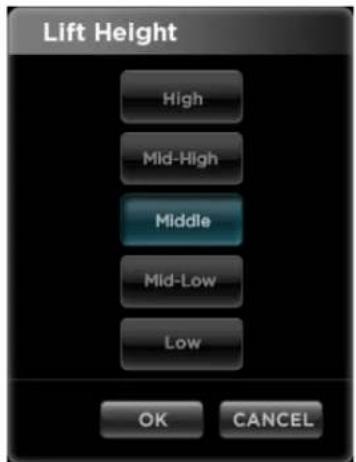
text_image
Lift Height High Mid-High Middle Mid-Low Low OK CANCELThere are five possible choices: Low, Mid-Low, Middle, Mid-High, and High. By default, the Vengeance M90 is set to Middle. For dark surfaces, you probably will not get good results below this setting; for light/white surfaces, you can try any of the settings.