HC-BM05 - Baby monitor KONIG - Free user manual and instructions
Find the device manual for free HC-BM05 KONIG in PDF.

User questions about HC-BM05 KONIG
0 question about this device. Answer the ones you know or ask your own.
Ask a new question about this device
Download the instructions for your Baby monitor in PDF format for free! Find your manual HC-BM05 - KONIG and take your electronic device back in hand. On this page are published all the documents necessary for the use of your device. HC-BM05 by KONIG.
USER MANUAL HC-BM05 KONIG
text_image
KÖNIG ELECTRONICHC-BM05
natural_image
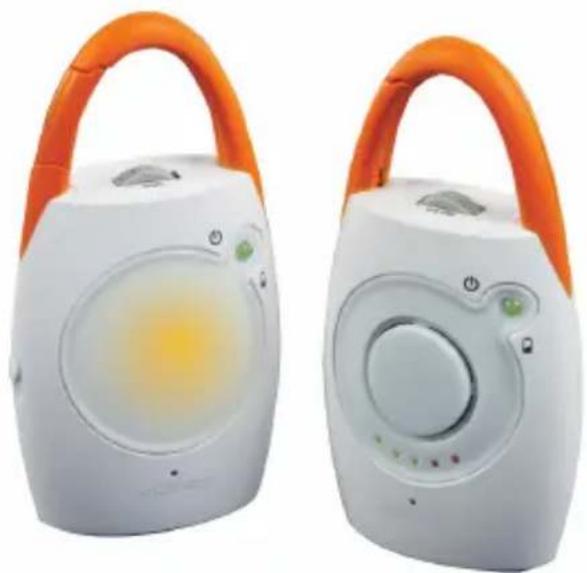
Two white portable electronic devices with orange handles and circular displays, one with a yellow-orange lens (no visible text or symbols)MANUAL (p. 2) Baby monitor
Since the communication is wireless, unknown external interference may sometimes occur during operation. You can try to reorientate/relocate the units and/or use a different channel on both units to improve the quality of communication.
CAUTION
PLEASE READ ALL THE INSTRUCTIONS VERY CAREFULLY BEFORE USING THIS PRODUCT. THIS PRODUCT IS NOT INTENDED TO REPLACE ADULT SUPERVISION OF CHILDREN.
- This product is designed for indoor use only.
- The unit should not be exposed to dripping or splashing. No objects filled with liquids, such as vases, should be placed on the unit.
- The item should not be used near water, for example, near a bath tub, wash bowl, kitchen sink, laundry tub in a wet basement, or near a swimming pool, etc.
- It should not be situated on a bed, sofa, rug or similar surface that may block the ventilation openings, or placed in an enclosed installation, such as a bookcase or cabinet that may impede the flow of air through the ventilation openings.
- It should be situated away from heat sources such as radiators, heat registers, stoves, or other appliances that produce heat. No naked flame sources, such as lighted candles, should be placed on the apparatus or too close to the units.
- Replace only with the same or equivalent type of battery recommended by the manufacturer.
- It should only be connected to the power supplies included in delivery.
- During long periods of non-use, always switch off the units, remove the batteries from the units and unplug the AC adapters from the wall outlets.
- Use the units only under supervision of adults and out of reach from children.
- This product cannot replace responsible adult supervision of a child. You should personally check your child's activity at regular intervals.
Note:
- Never use this wireless baby monitor to the extent that your life or health, or the life or health of others, or the integrity of property depends on its function! The manufacturer will not accept any responsibility or claim for death and injury of any person or loss and damage of any property due to malfunction or misuse of the product.
- Never carry out repairs by yourselves.
WARNING:
STRANGULATION HAZARD – Keep cord out of baby's reach. Children have been STRANGLED by cords.
NEVER place camera or cords within 1 metre of the crib.
Secure cords away from baby's reach.
Never use extension cords with AC adapters. Use only the AC adapters provided.
SETTING UP
Both transmitter and receiver can either be plugged into the mains or powered by standard AAA size alkaline batteries. Only the receiver has the battery recharging function. No other rechargeable batteries can be used in the receiver except those included in delivery.
Never place transmitter or cords within 1 metre of the crib.


To use with mains power
Both transmitter and receiver can be operated by AC adapters (provided).
Insert the adapter plug into the DC jack at the bottom of transmitter and/or receiver. Then plug the adapter into the main socket.
To use with battery
For portable use, the receiver can be operated with 3 x 1.5 V standard AAA size alkaline batteries. Open the battery compartment of the unit by removing the screws on the cover. Insert the batteries according to the correct polarity. Close the cover properly with the screws.
The power LED light will turn RED when the battery power level is low. Always remove the batteries when the unit is not being used for long periods.
Note: The maximum operating time using batteries is two days depending on the frequency of noise transmissions. The range may be restricted during battery operation.
Rechargeable function on receiver
Only the receiver can use the supplied rechargeable batteries. The transmitter does not have the rechargeable function. When the mains adapter is connected to the receiver, the batteries supplied are automatically charged. It takes about 8 hours to fully charge the batteries. As long as the battery power is sufficient for reliable operation, the power LED remains “GREEN”.
Note: Only the rechargeable batteries supplied may be recharged. DO NOT attempt to recharge using commercially available batteries.
CHANGING THE BATTERIES
Insert 3 x AAA size alkaline batteries into the battery compartment of the unit according to the polarity of the batteries (as instructed above).
The power LED light turns "GREEN" when new/fully charged batteries are used.
The power LED light turns "RED" when the batteries are flat.
For extended use, it is advisable to power the units using the AC adapters provided.
OPERATION
Channel setting
This baby monitor has two channels, A and B. Both units are pre-set to channel A in advance by the manufacturer.
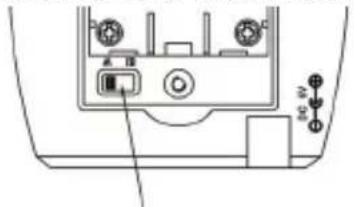
Open the battery compartment of the transmitter and receiver by removing the screw on the cover.
The channel switch has been positioned in the battery compartment to prevent unintentional channel adjustment.
The channel selection switch setting must be the same for both units.
If other voices or sounds can be heard on the receiver using the selected channel, the channel switch should be set to another channel to avoid interference.
The transmitter (Baby unit)
- Place the transmitter at least 2 metres away from the baby for optimum voice detection.
- Select channel A or B for transmission with the channel switch.
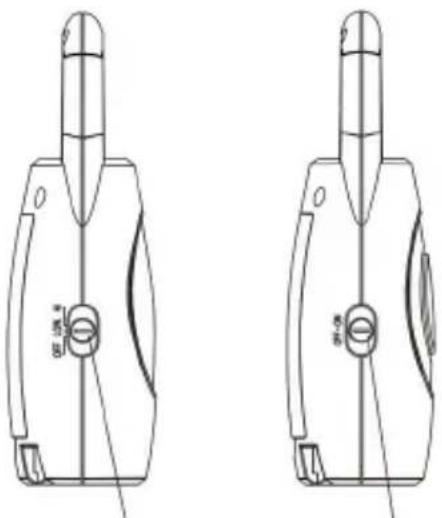
- Turn on the transmitter with the HI/LOW/OFF switch at the side of the transmitter. The power LED light should be turned ON.
- Switch to the HI position to set the microphone sensitivity to high level. Move the slide switch to the LOW position for low level of microphone sensitivity.


HI = full range
LOW = reduced range (for a further reduction in electric smog)
At the highest sensitivity even faint noises are transmitted, and at the lower sensitivity only loud noises are transmitted.
- It will pick up the baby's sounds automatically and transmit it to the receiver immediately.
• VOX (Voice Activation) sensitivity can be adjusted by rotating the switch on top of the transmitter. - The transmitter is only active when sounds can be heard. This function eliminates any unnecessary electric smog.
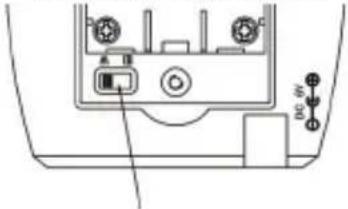
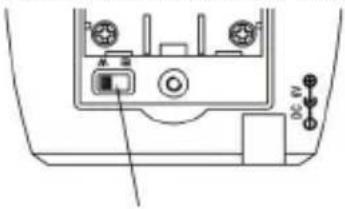
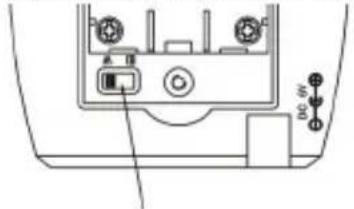
- The night light can be switched to ON or OFF manually, or to AUTO if you want to allow the night light to be activated by VOX (sound). The switch is located at the bottom of the unit.
The receiver (Parent unit)
- Turn on the receiver with the ON/OFF switch at the side of the receiver. The power LED light should be turned ON.
- Select channel A or B for transmission with the channel switch inside the battery compartment. It has to be in the same channel as the transmitter.
- Rotate the volume switch until the desired sound level is obtained.
- The 5 LED lights indicate the intensity of the sound received.
Range control
The receiver is equipped with optical range control. If the signal from the transmitter is no longer adequately received, both red LED's on the receiver LED light strip will flash.
Note:
When using the system as a baby monitor, make sure that the transmitter is positioned at least 1 metre away from the child. This system is not a substitute for personal supervision of a child or person in need of care; it is simply intended to provide additional support. No liability beyond that of the statutory warranty is accepted. This applies in particular to cases where this system is used for medical applications contrary to its intended use.
TROUBLESHOOTING
| Problem Possible Cause – things to do/check | |
| No function • Check the power supply. | • Is the mains adapter connected correctly?• Are the rechargeable or standard batteries inserted correctly?• Are the rechargeable batteries charged? |
| No transmission | • Check the setting of the channel selection switches on both units. They must be set to the same position.• Move the transmitter closer to the baby (but no nearer than 1 metre away from the child) or increase the microphone sensitivity.• Move the receiver closer to the transmitter.• Are both units switched on? |
| Transmission interference | • Select another transmission/reception channel on both units.• Move the receiver closer to the transmitter.• Check the batteries and replace/recharge them if necessary.• Move the slide switch of the transmitter to HI position for full range. |


| Problem Possible Cause – things to do/check | |
| Whistling noise/hissing noise at the receiver | Move the receiver further away from the transmitter.Lower the volume on the receiver.Check the batteries and replace/recharge them if necessary.Check the setting of the channel selection switches on both units. They must be set to the same position. |
| Power control LED indicator on receiver/transmitter turns “RED” | The batteries are flat.On the transmitter: Insert new alkaline batteries.On the receiver: Insert new alkaline batteries or recharge the supplied rechargeable batteries (if provided) by connecting the device to the mains adapter. |
TRANSMITTER/RECEIVER
TOP VIEW

text_image
4 5 6 SENS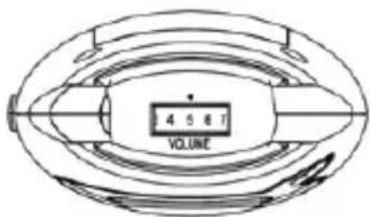
text_image
4 5 6 T VOLUMESensitivity Control Volume Control
natural_image
Technical line drawing of a mechanical part with a circular hole and handle (no text or symbols)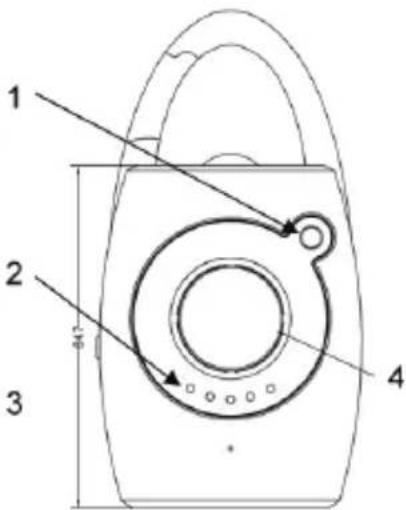
text_image
1 2 3 4-
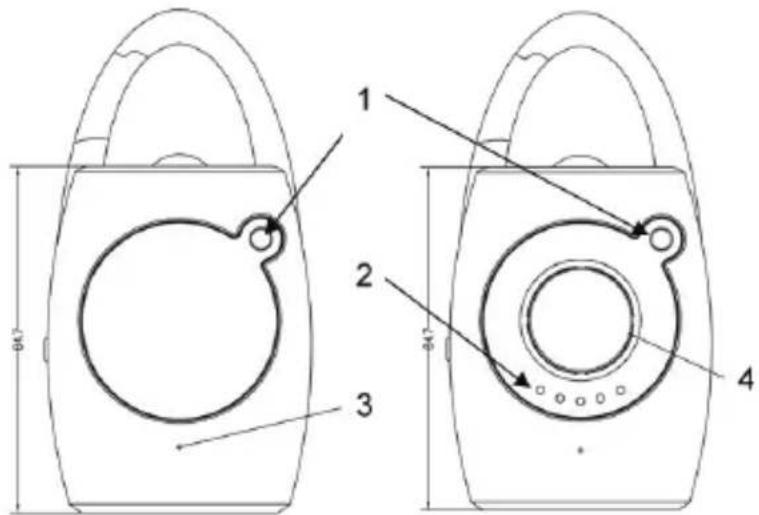
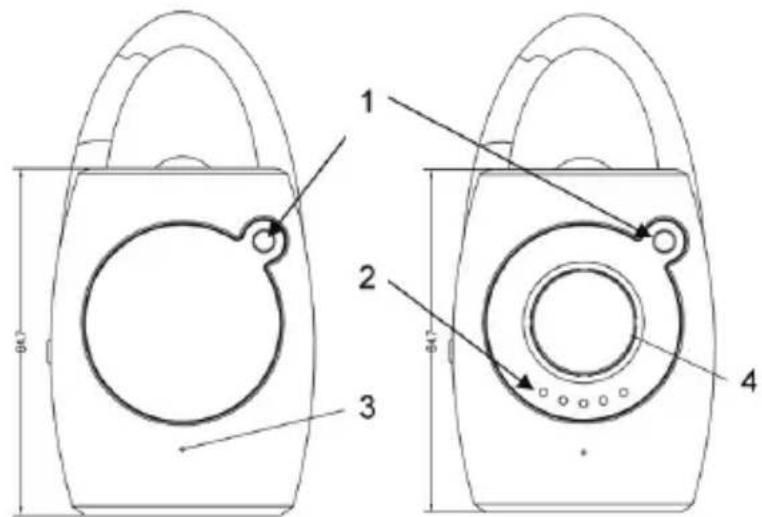
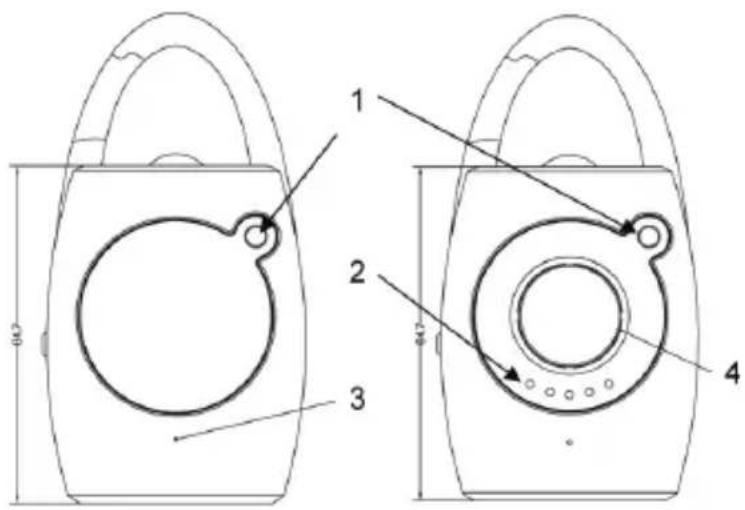
Power LED light
-
Sound level LEDs
-
Mic
-
Speaker

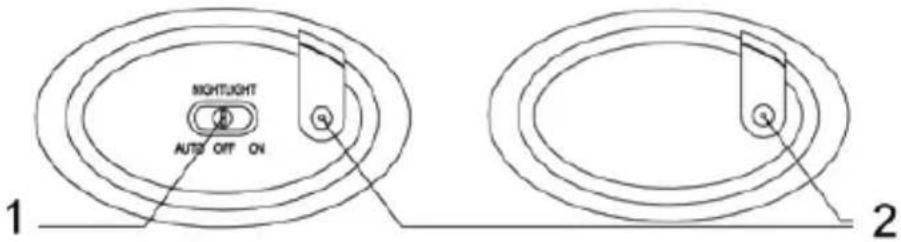
BOTTOM VIEW
text_image
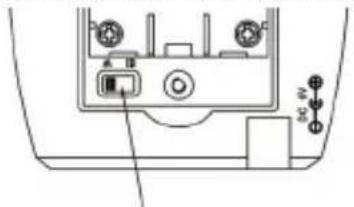
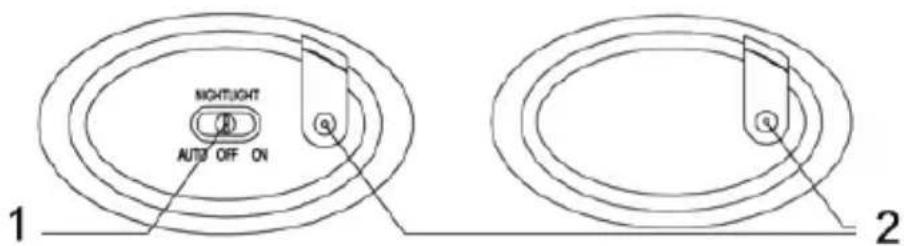
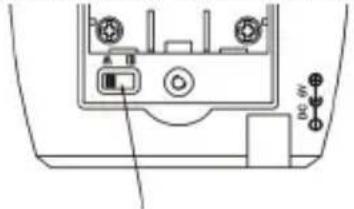
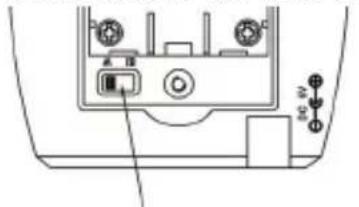
NIGHTLIGHT AUTO OFF ON 1 2- NIGHTLIGHT SWITCH 2. DC JACK
TRANSMITTER/RECEIVER
SIDE VIEW
natural_image
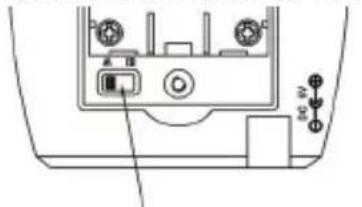
Technical line drawing of two mechanical components with no visible text or symbolsINSIDE BATTERY COMPARTMENT
natural_image
Diagram of a device rear panel with labeled ports and connectors (no text or symbols)Channel Switch
TECHNICAL SPECIFICATIONS
No. of channels: 2
Frequency range: 446 MHz
Mains supply: 6 V 400 mA/230 V \~ 50 Hz, approx. 2-3 W
Transmitter batteries: 3 x 1.5 V standard AAA size alkaline batteries (not incl.)
Receiver batteries: 3 x 1.2 V AAA size NiMH rechargeable batteries (included)
Safety precautions:

text_image
CAUTION RISK OF ELECTRIC SHOCK DO NOT OPENTo reduce risk of electric shock, this product should ONLY be opened by an authorized technician when service is required. Disconnect the product from mains and other equipment if a problem should occur. Do not expose the product to water or moisture.
Maintenance:
Clean only with a dry cloth. Do not use cleaning solvents or abrasives.
Warranty:
No guarantee or liability can be accepted for any changes and modifications of the product or damage caused due to incorrect use of this product.
General:
Designs and specifications are subject to change without notice.
All logos brands and product names are trademarks or registered trademarks of their respective holders and are hereby recognized as such.
Keep this manual and packaging for future reference.
Attention:

This product is marked with this symbol. It means that used electrical and electronic products should not be mixed with general household waste. There is a separate collections system for these products.
DEUTSCH
text_image
4 5 6 7 VOLUMELautstärkeregler
text_image
1 2 3 4 60.71.
- Lautstärke-LEDs
natural_image
Technical line drawing of two mechanical components with no visible text or symbolsINNENANSICHT BATTERIEFACH
natural_image
Diagram of a device rear panel with labeled ports and connectors (no text or symbols)Kanalschalter
TECHNISCHE DATEN
Anzahl Kanäle: 2
text_image
4 5 8 7 VOLUMEnatural_image
Diagram of a device rear panel with labeled ports and connectors (no text or symbols)text_image
4 5 6 7 VOLUMEVolumeregeling

ONDERAANZICHT
natural_image
Technical line drawing of a device rear panel with labeled ports and connectors (no text or symbols)Kanaalschakelaar
TECHNISCHE SPECIFICATIES
Aantal kanalen: 2
Frequentiebereik:
446
MHz
Netvoeding: 6 V 400 mA/230 V \~ 50 Hz, ca. 2-3 W
text_image
4 5 6 7 VOLUMEnatural_image
Technical line drawing of two mechanical components with no visible text or symbolsDENTRO IL COMPARTO BATTERIE

natural_image
Technical line drawing of a device rear panel with ports and a button (no text or symbols)Interruttore canali
SPECIFICHE TECNICHE
Nr. di canali 2
text_image
4 6 6 VOLUMEnatural_image
Technical line drawing of two mechanical components with no visible text or symbolstext_image
Technical diagram of a device rear panel with labeled ports and indicatorsInterruptor de canales
text_image
4 5 6 7 VOLUMEnatural_image
Technical line drawing of two mechanical components with no visible text or symbolsAZ ELEMTARTÓ REKESZ BELSEJE
natural_image
Technical line drawing of a device rear panel with ports and control buttons (no text or symbols)text_image
4 5 6 7 VOLUMEnatural_image
Technical line drawing of two mechanical components with no visible text or symbolsPARISTOKOTELON SISÄLLÄ
natural_image
Technical line drawing of a device rear panel with ports and buttons (no text or symbols)Kanavan kytkin
TEKNISET TIEDOT
Kanavien määrä : 2
Taajuusalue: 446
MHz
Verkkovirta: 6 V 400 mA/230 V \~ 50 Hz, noin. 2-3 W
text_image
4 5 6 7 VOLUMEVolymkontroll

text_image
1 2 3 4natural_image
Technical line drawing of two mechanical components with no visible text or symbolsINUTI BATTERIFACKET
natural_image
Diagram of a device rear panel with labeled ports and indicators (no readable text or symbols)Kanalomställare
TEKNISK SPECIFICATION
Antal kanaler: 2
Frekvensräckvidd:
446
MHz
Nätaggregat: 6V 400 mA/230V \~ 50Hz, ca 2-3W
text_image
3 4 5 6 VOLUMEOvládač hlasitosti

text_image
1 2 3 4 Ø10natural_image
Technical line drawing of two mechanical components with no visible text or symbolsVNITŘEK PROSTORU PRO BATERIE
text_image
Technical diagram of a device rear panel with labeled ports and indicator lightsPřepínač kanálů
TECHNICKÉ ÚDAJE
Počet kanálů: 2
text_image
4 5 6 7 VOLUMEPotentiometru volum
text_image
1 2 3 4natural_image
Technical line drawing of two mechanical components with no visible text or symbolsINTERIOR COMPARTIMENT BATERII
natural_image
Technical line drawing of a device rear panel with ports and indicator lights (no text or symbols)Comutator canale
DATE TEHNICE
Nr. de canale: 2
text_image
4 5 6 VOLUMEΡυθμιστής έντασης
text_image
1 2 3 4 0.0natural_image
Technical line drawing of two mechanical components with no visible text or symbolstext_image
Technical diagram of a device rear panel with labeled ports and indicator lightsΔιακόπτες Καναλιών
text_image
4 5 6 T VOLUMELydstyrke
kc


text_image
1 2 3 4 Ø47- Effekt LED lampe
-
Lydniveau LED lamper
-
Mik
- Højttaler


SET FRA BUNDEN

text_image
NIGHTLIGHT AUTO OFF ON 1 2- NATLYS KONTAKT 2. DC STIK
SENDER/MODTAGER
SET FRA SIDEN

natural_image
Technical line drawing of two mechanical components with no visible text or symbolsINDEN I BATTERIHOLDEREN
natural_image
Diagram of a device rear panel with ports and indicator lights (no text or symbols)Kanal kontakt
TEKNISKE SPECIFIKATIONER
Antal kanaler: 2
Mottakeren (foreldreenhet)
text_image
4 5 6 7 VOLUMEVolumkontroll
natural_image
Technical line drawing of two mechanical components with no visible text or symbols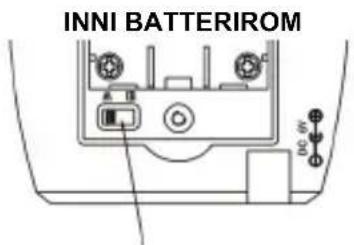
text_image
INNI BATTERIROMKanalbryter
TEKNISKE SPESIFIKASJONER
Antall kanaler: 2
Frekvensområde:
446
MHz
Strømforsyning: 6 V 400 mA/230 V \~ 50 Hz, omtrent 2-3 W
Senders batterier: 3 x 1,5 V standard alkaliske batterier størrelse AAA (ikke inkludert)
Mottakerbatterier: 3 x 1,2 V NiMH oppladbare batterier (inkludert)
Description: Baby monitor