T7.5 - Treadmills Reebok - Free user manual and instructions
Find the device manual for free T7.5 Reebok in PDF.

User questions about T7.5 Reebok
0 question about this device. Answer the ones you know or ask your own.
Ask a new question about this device
Download the instructions for your Treadmills in PDF format for free! Find your manual T7.5 - Reebok and take your electronic device back in hand. On this page are published all the documents necessary for the use of your device. T7.5 by Reebok.
USER MANUAL T7.5 Reebok
www.reebokfitness.de → Service → FAQs
natural_image
Symbol of a trash bin crossed out by two crossed lines, enclosed in a circle (no text or numbers present)e-mail: service@green-fitness.de
web: www.reebokfitness.de
Hinweis
We are pleased, that you have chosen a Reebok Fitness Equipment. This quality product has been designed for in-home use and has been tested and certified according to the European Norm EN 957-1/6. Please carefully read the instructions prior to assembly and first use and be sure to keep the instructions for reference and maintenance.
We wish you lots of success and fun while training,
Your Reebok – Team
Warranty
Reebok quality products have been designed and tested to meet the needs and requirements of a committed Fitness-Training of in-home use. This product is tested to the European Standard EN 957.
Reebok warrants to the original purchaser 2 years against possible defects in material and workmanship.
Excluded from warranty are wearing parts and damages caused by misuse of the product. In the case of claim please contact your specialist dealer.
The warranty period starts at the date the product was purchased (please carefully retain your sales receipt).
Detailed warranty terms you can find at: www.reebokfitness.co.uk
Customer Service
To best possible support you in the case of problems with your product, we would ask you to please quote the product Model Name and Serial Number.
These can be found on the sticker underside your product.
Modelname:
Serialnumber:


Frequently asked questions (FAQs):
If you have any questions about your product or the assembly or meet a problem with the handling, you can find help at:
www.reebokfitness.co.uk → Service → FAQs
Spare Part Order:
By giving the serial number of your product you can order spare parts on our homepage:
www.reebokfitness.co.uk → Service
Waste Disposal

natural_image
Symbol of a trash bin crossed out by two diagonal lines, enclosed in a circle (no text or labels)Reebok products are recyclable. At the end of its useful life please dispose of this article correctly and safely (local refuse sites).
Contact
RFE INTERNATIONAL LTD
DSV HOUSE
MAIDSTONE RD
KINGSTON
MILTON KEYNES
MK10 0AJ
head office tel: 0044 (0) 1908 512244
head office fax: 0044 (0) 1908 512245
e-mail: info@rfeinternational.com
web: www.reebokfitness.co.uk
Technical support:
tel: 0044 (0) 871 474 2614
e-mail: techsupport@rfeinternational.com
Advice
The owner's manual is only for the customer reference. Reebok can not guarantee for mistakes occurring due to translation or change in technical specification of the product.
Precautions
Before assembling or using the treadmill, please read the following instructions carefully. They contain important information for use and maintenance of the equipment as well as for your personal safety. Keep these instructions in a safe place for maintenance purposes or for ordering of replacement parts.
• Product-Scope: This product is made for home use only and tested up to a maximum body weight of 130 kilograms.
- Product-Performance: This treadmill is tested to the European Standard EN 957-1/6 HB. The equipment is not suitable for therapeutic training.
• Product-Scope: Noise compliance: This treadmill meets the requirements of the noise pollution standards.
- Product-Performance: The noise creation of treadmill is under 70db.
- Product-Maintenance: For keeping the run quality use the provided silicon spray every month or after a working time of 100 kilometers between the belt and the running surface.
- Product-Maintenance: Search for noisy parts: If you should notice unusual noises, like grinding, clacking etc. try to locate it and have it repaired by a professional. Make sure the treadmill is not used until after repairs have been made.
- Product-Feature: The speed can be changed by the computer.
- Use-Safety: The function of the immobilization method: The purpose of immobilizing the treadmill is to prevent unauthorized use. This can be accomplished by removing the Safety Key from the console, unclipping it from the cord and putting it in a non-accessible place
- Use-Safety: The emergency dismount: Follow the steps listed below if you experience pain, feel faint or need to stop your treadmill in an emergency situation: 1. Grip handrails for support 2. Step onto the lateral platform 3. Pull the Safety key off the console.
- Use-Safety: The function of the emergency stop: The Safety Key functions as the emergency stop. In an emergency situation, remove the Safety Key from the console and the treadmill will come to a stop.
- Use-Scope: The exerciser may not be used by persons with a weight of over 130 kg.
- Use-Scope: This product is designed for the physical exercise by adults. Please ensure that children only use it under adult supervision
• Use-Environment: Ensure that those present are aware of possible hazards, e.g. movable parts during training. - Use-Environment: Ensure that sufficient space is available to use the home exerciser with 2m long x 1m wide of clearance behind it and 1m of clearance for its flanks.
- Use-Environment: Place the home exerciser on an even, non-slippery surface.
- Use-Environment: Please ensure that liquids or perspiration never enter the electronic.
- Use-Environment: Keep the equipment indoors, away from moisture and dust. Do not put the equipment in a garage, covered patio or near water.
- Use-Environment: The product is made for home use only. Warranty and manufacturer's liability do not extend to any product or damage to the product caused by commercial use.
- User-Health: Consult your physician before starting with any exercise programs to receive advice on the optimal training technique.
- User-Health: Incorrect/excessive training can cause health injuries.
- User-Health: If you feel sickness, chest pain, fits of dizziness or breathlessness during your training, stop training immediately and consult your physician.
• Product-Preparation: Ensure that training only starts after correct assembly, adjustment and inspection of the home exerciser. - Product-Preparation: Follow the steps of the assembly instruction carefully.
• Product-Preparation: Only use suitable tools for assembly and ask for assistance if necessary. - Product-Preparation: Only use original Reebok parts as delivered (see checklist).
- Product-Preparation: Tighten all adjustable parts to prevent sudden movement while training.
- Product-Preparation: We suggest using an equipment mat to prevent damage on the ground.
- Use-Instruction: Please follow the advice as per correct training technique as detailed in the instructions.
- Use-Instruction: Do not use the home exerciser without shoes or with loose fitting footwear.
- Use-Safety: Be aware of the position and proper fixation of adjustable or moving parts while mounting or dismounting the home exerciser.
Precautions
- Use-Safety: Allow the belt to fully stop before dismounting.
- Use-Safety: Pay attention: never insert any part of your body or clothes into the body of the treadmill while it is running or ready for use.
- Use-Safety: Attach the emergency stop cord to your clothing before starting the treadmill. The Treadmill has an emergency stop mechanism for your safety. Before starting your workout, fasten the cord of the safety key to your clothing. If the treadmill has been shut down by removing the safety key, restart it by reinserting the key. An automatic restart of the treadmill belt does not occur. An unmonitored use of the treadmill by other people can be prevented by removing the safety key and keeping it safely hidden. In case of any emergency, hold on tightly to the handrail or handle bar with both hands and leave the treadmill by means of the anti-slipping surface of the lateral platform. Activate the emergence stop mechanism (safety cut-out).
• Use-Safety: Please keep the safety key in a safe place and ensure that it is kept out of reach of children! - Product-Power-Safety: The unit requires a power supply of 220V – 230V / 50Hz. It should be connected to a safety socket with a dedicated 10A fuse. Before powering on and using the unit confirm that the unit is plugged into the appropriate power supply (observe markings) has been connected properly.
- Product-Maintenance: If the equipment is in regular use, check all its components thoroughly every 1 – 2 months. Pay particular attention to the tightness of bolts and nuts. This applies especially to the securing bolts for saddle and handlebars.
- Product-Maintenance: Incorrect repairs and structural modifications (e.g. removal or replacement of original parts) may endanger the safety of the user.
- Product-Maintenance: Damaged components may endanger your safety or reduce the lifetime of the equipment. For this reason, worn or damaged parts should be replaced immediately and the user should refrain from using the equipment until this has been done.
- Product-Maintenance: Only use original Reebok replacement parts.
- Product-Maintenance: Do not under any circumstances carry out electrical repairs or alterations yourself. Always ensure that such work is done by a properly qualified electrician/mechanic.
• Product-Maintenance: Disconnect the apparatus from the mains before doing repair, maintenance or cleaning work.
Gentile Cliente,
www.reebokfitness.co.uk → Service → FAQs
www.reebokfitness.co.uk → Service
Dispositivo rifiuti
natural_image
Symbol of a trash bin crossed out by two diagonal lines, enclosed in a circle (no text or labels)assistenza@rbkfitness.it
info@rbkfitness.it
Attenzione
www.reebokfitness.de → Service → FAQs
natural_image
Symbol of a trash bin crossed out by two diagonal lines, enclosed in a circle (no text or labels)e-mail: service@green-fitness.de
web: www.reebokfitness.de
Pokyny
natural_image
Symbol of a trash bin with no text or labels, crossed by two diagonal lines (no readable text or symbols)e-mail: service@green-fitness.de
web: www.reebokfitness.de
Felhívás
www.reebokfitness.de → Service → FAQs
natural_image
Symbol of a trash bin crossed out by two diagonal lines, enclosed in a circle (no text or labels)e-mail: service@green-fitness.de
web: www.reebokfitness.de
Notificare
www.reebokfitness.de → Service → FAQs
natural_image
Symbol of a trash bin crossed out by two diagonal lines, enclosed in a circle (no text or labels)e-mail: service@green-fitness.de
web: www.reebokfitness.de
Opozorilo
www.reebokfitness.de → Service → FAQs
(Ova je usluga dostupna samo na njemackom jeziku)
natural_image
Symbol of a trash bin crossed out by two crossed lines, enclosed in a circle (no text or labels)Reebok uređaji se mogu reciklirati. Molimo Vas, nakon isteka životnog vijeka uređaja, proizvod odložite na odgovarajuća sabirna mjesta.
Kontakt
Green Fitness GmbH
Am Schlag 5
65549 Limburg a.d.Lahn
e-mail: service@green-fitness.de
web: www.reebokfitness.de
Napomena
www.reebokfitness.de → Service → FAQs
(Ovaj servis je dostupan samo na nemackom jeziku)
natural_image
Symbol of a trash bin crossed out by two diagonal lines, enclosed in a circle (no text or labels)Reebok sprave se mogu reciklirati. Molimo vas da nakon isteka ivotnog veka sprave, istu zbrinete na odgovarajuce strucan nacin (lokalne ustanove za sakupljanje tehnolokog otpada.)
Kontakt
Green Fitness GmbH
Am Schlag 5
65549 Limburg a.d.Lahn
e-mail: service@green-fitness.de
web: www.reebokfitness.de
Obaveštenje
Ovo uputstvo za upotrebu služi kao pomoć mušterijama. Reebok ne preuzima nikakvu odgovornost za štamparkse greške i greške u prevodu kao ni za greške koje nastaju prilikom tehničkih promena produkta.
natural_image
Symbol of a trash bin crossed out by two crossed lines, enclosed in a circle (no text or labels)e-mail: service@green-fitness.de
web: www.reebokfitness.de
Ważne!
www.reebokfitness.de → Service → FAQs
natural_image
Symbol of a trash bin crossed out by two crossed lines, enclosed in a circle (no text or labels)e-mail: service@green-fitness.de
web: www.reebokfitness.de
Pokyny
text_image
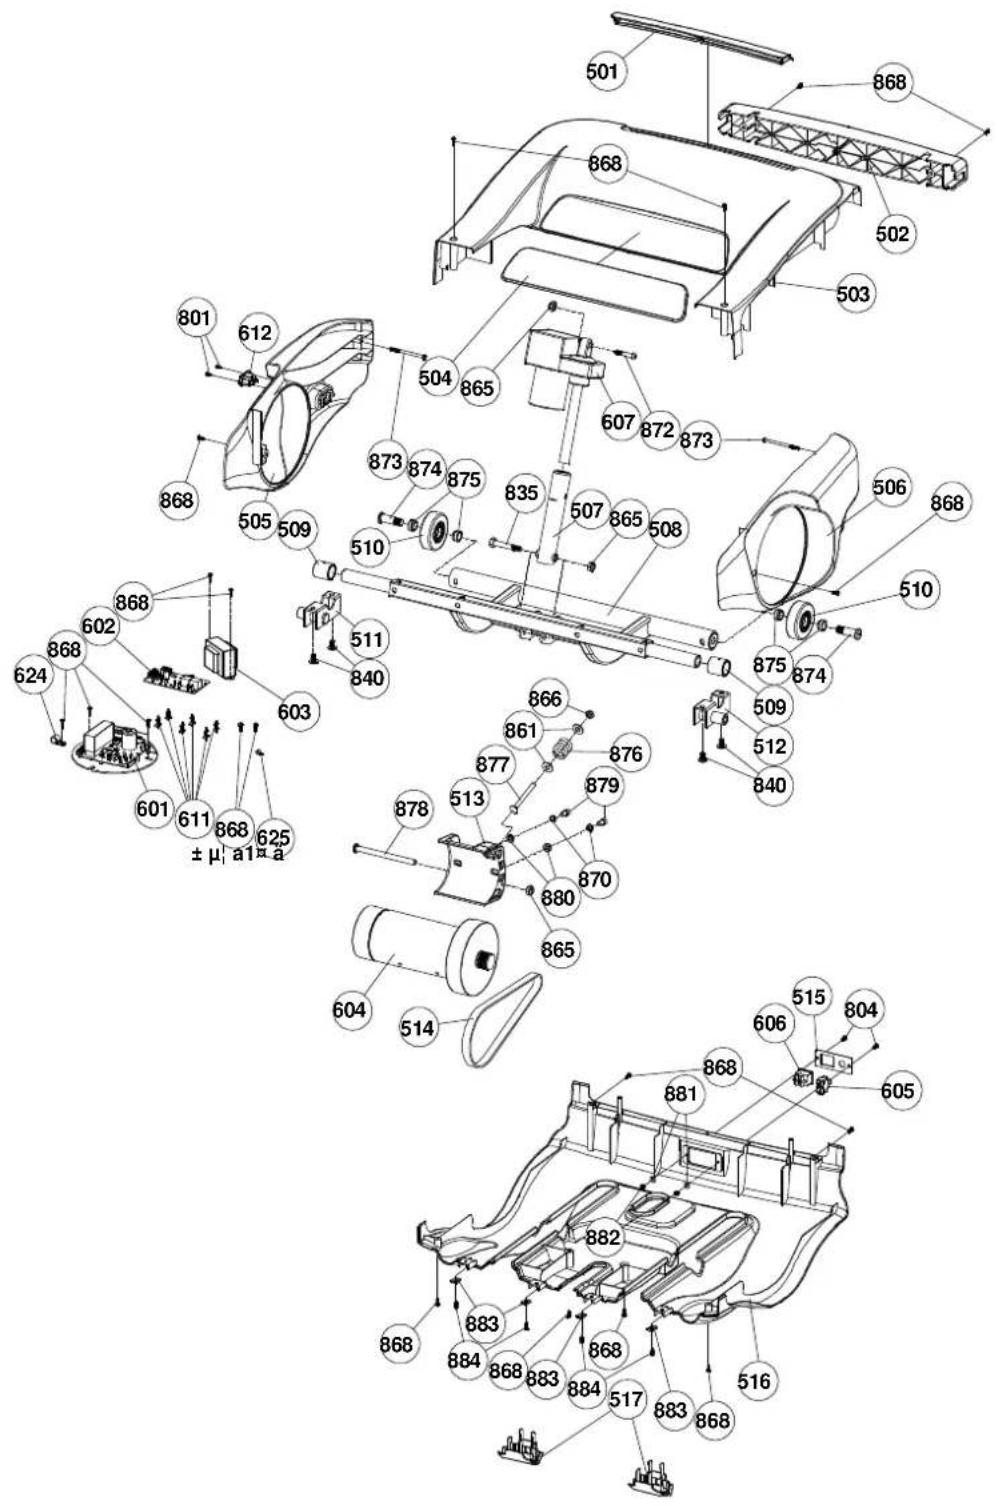
A 6mm Allen key (1 piece) B 5mm Allen key (1 piece) C Water Bottle (1 piece) D Chest Belt (1 piece) E Power Cord (1 piece) F Silicone (1 piece)208

Handlebar Cap
(2 piece)
220
(2 piece)

Side Cover
901

6x20xT2.0 Washer
(2 piece)
902

6mm Washer
(2 piece)
903

M6x12mm Allen Head CAP Bolt
(2 piece)
904
(4 piece

M10x62mm Bolt Thread 15mm
Handlebar- Left Assembly
(1 piece)

Handlebar- Right Assembly
(1 piece)
natural_image
Line drawing of a treadmill with an inset showing the tread pattern and adjustment mechanism (no text or symbols)GB: PULL THE HANDLE, THE TREADMILL WILL BE FOLD AUTO.
D: WENN SIE DEN GRIFF ZIEHEN, KLAPPT SICH DAS LAUFBAND AUTOMATISCH ZUSAMMEN.
I: TIRANDO LA MANIGLIA IL TAPPETO SI RIPIEGHERA' AUTOMATICAMENTE.

natural_image
Technical line drawing of a mechanical device with no visible text or symbols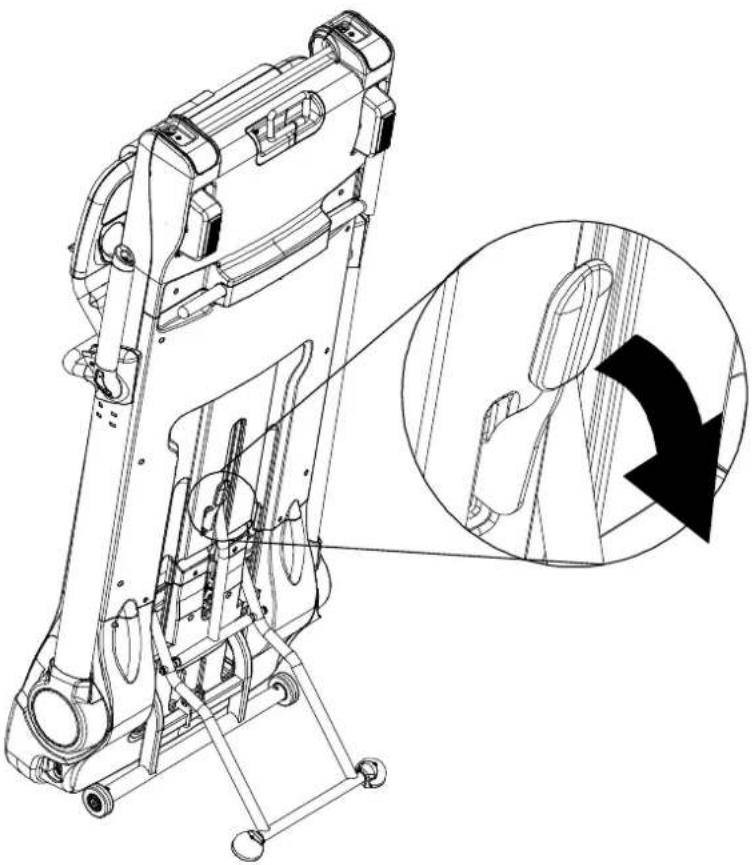
natural_image
Technical line drawing of a mechanical device with an inset showing a circular component being adjusted (no text or symbols present)GB: PRESS THE FOLD HANDLE THE TREADMILL WILL LOWER SLOWLY TILL IT RESTS SECURELY ON THE GROUND.
D: WENN SIE DEN KLAPPGRIFF NACH UNTEN ZIEHEN WIRD SICH DAS LAUFBAND AUTOMATISCH LANGSAM AUFKLAPPEN BIS ES SICHER AUF DEM BODEN STEHT.
I: PREMENDO LA MANIGLIA IL TAPPETO SI APRIRA'LENTAMENTO FINO ALLA POSIZIONE DI UTILIZZO.
Correct Use

natural_image
Line drawing of a humanoid figure running on a treadmill (no text or symbols)D
Correct biomechanical position: Please refer to left picture. Running straight on the treadmill is made easier by focusing on a fixed object in front of you in the room. Run as if you wanted to approach the object. Always keep a distance which you can reach the front hand bar.
Major exercise type: This equipment focuses on your lower body, and it can train your muscle of thigh and shank.
Important: Incorrect/excessive training can cause health injuries.
|
natural_image
Technical line drawing of a vehicle chassis frame with wheels and mounting brackets (no text or symbols)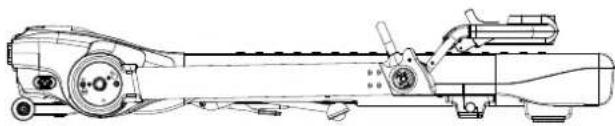
natural_image
Technical line drawing of a mechanical assembly with gears and shafts (no text or symbols)2.

text_image
218 219 904 904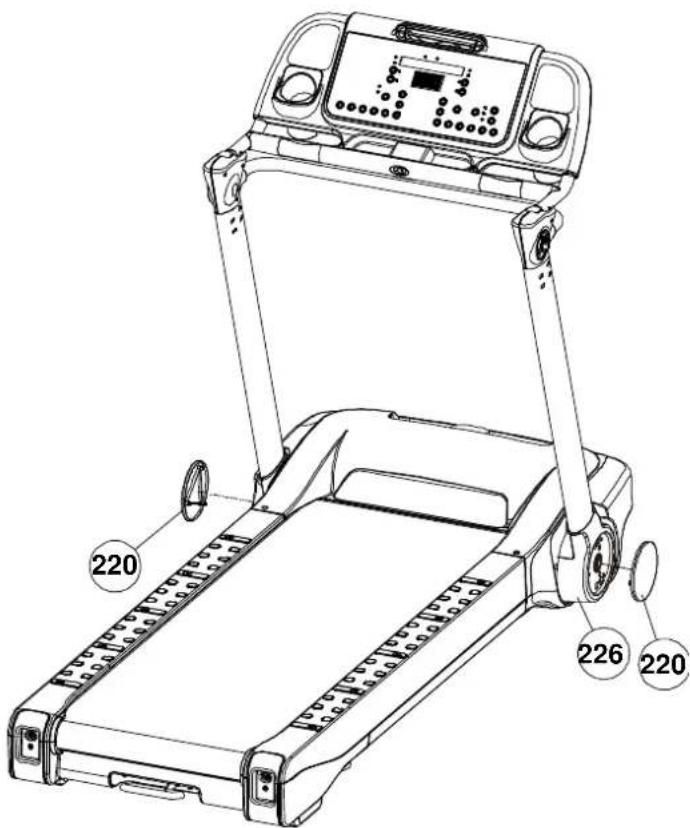
text_image
220 226 220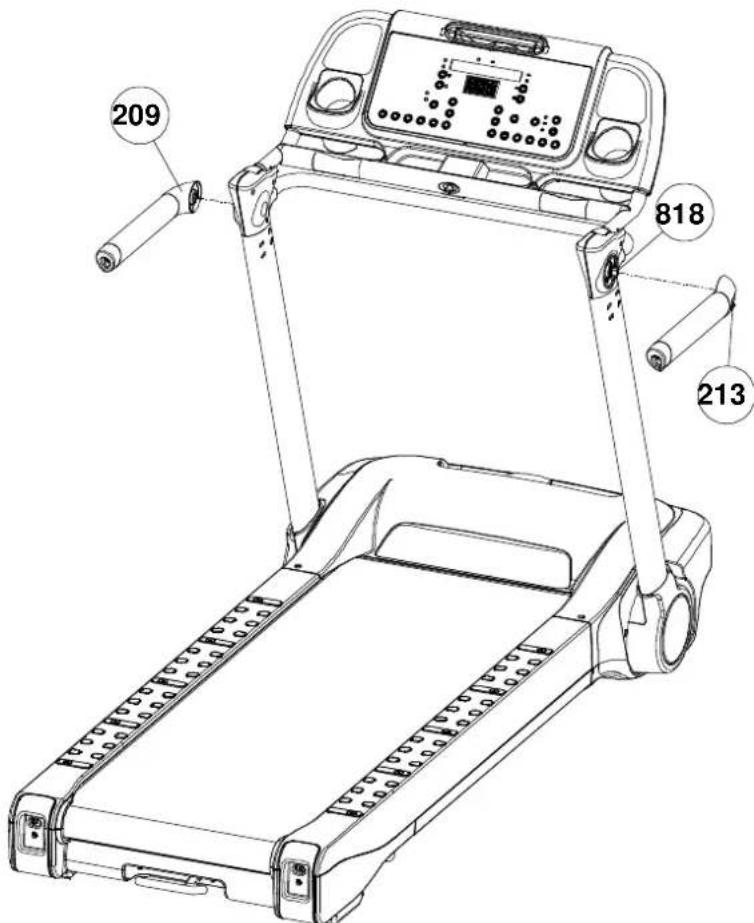
text_image
209 818 213
text_image
5. 903 902 209 901 213 903 901 902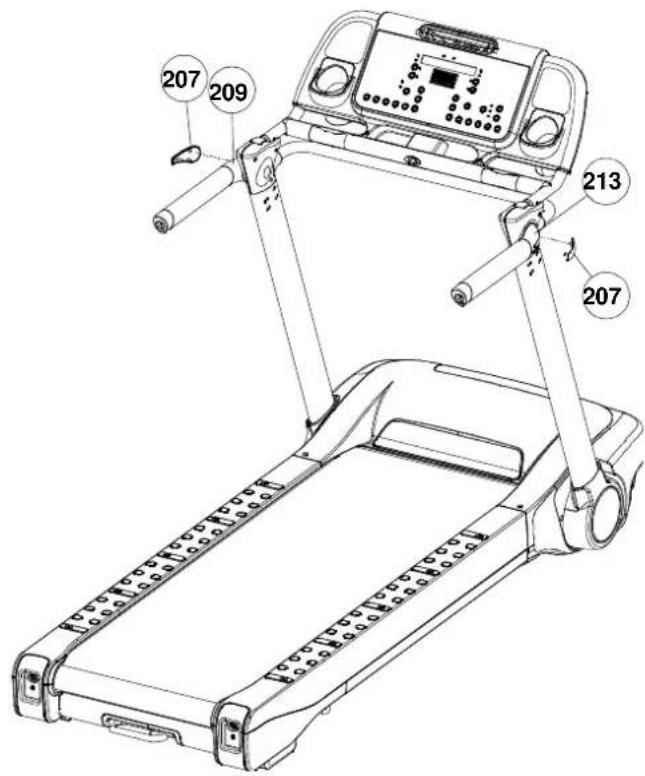
text_image
207 209 213 207
text_image
Technical diagram of a car interior with numbered components and labeled parts, likely for assembly or maintenance purposes.
flowchart
graph TD
    A["806"] --> B["201"]
    B --> C["801"]
    C --> D["3mm"]
    D --> E["806"]
    E --> F["4mm"]
    G["807"] --> H["205"]
    H --> I["813"]
    I --> J["814"]
    J --> K["808"]
    K --> L["206"]
    L --> M["814"]
    M --> N["207"]
    N --> O["809"]
    O --> P["815"]
    P --> Q["210"]
    Q --> R["816"]
    R --> S["213"]
    S --> T["901"]
    T --> U["902"]
    U --> V["903"]
    V --> W["208"]
    X["809"] --> Y["817"]
    Y --> Z["821"]
    Z --> AA["822"]
    AA --> AB["823"]
    AB --> AC["824"]
    AD["818"] --> AE["819"]
    AE --> AF["810"]
    AF --> AG["809"]
    AG --> AH["819"]
    AH --> AI["813"]
    AI --> AJ["818"]
    AJ --> AK["212"]
    AK --> AL["812"]
    AL --> AM["811"]
    AM --> AN["822"]
    AN --> AO["823"]
    AO --> AP["214"]
    AP --> AQ["215"]
    AQ --> AR["216"]
    AR --> AS["824"]
    AT["830"] --> AU["831"]
    AU --> AV["904"]
    AW["833"] --> AX["222"]
    AX --> AY["833"]
    AY --> AZ["223"]
    AZ --> BA["224"]
    BA --> BB["833"]
    BB --> BC["225"]
    BC --> BD["833"]
    BD --> BE["904"]
    BE --> BF["830"]
    BF --> BG["829"]
    BG --> BH["828"]
    BH --> BI["826"]
    BI --> BJ["827"]
    BJ --> BK["825"]
    BK --> BL["226"]
    BL --> BM["806"]
    BM --> BN["220"]

text_image
Technical diagram of a mechanical assembly with numbered components and labeled parts, likely for engineering or manufacturing documentation.
text_image
Exploded view diagram of a vehicle chassis with numbered components and Chinese labels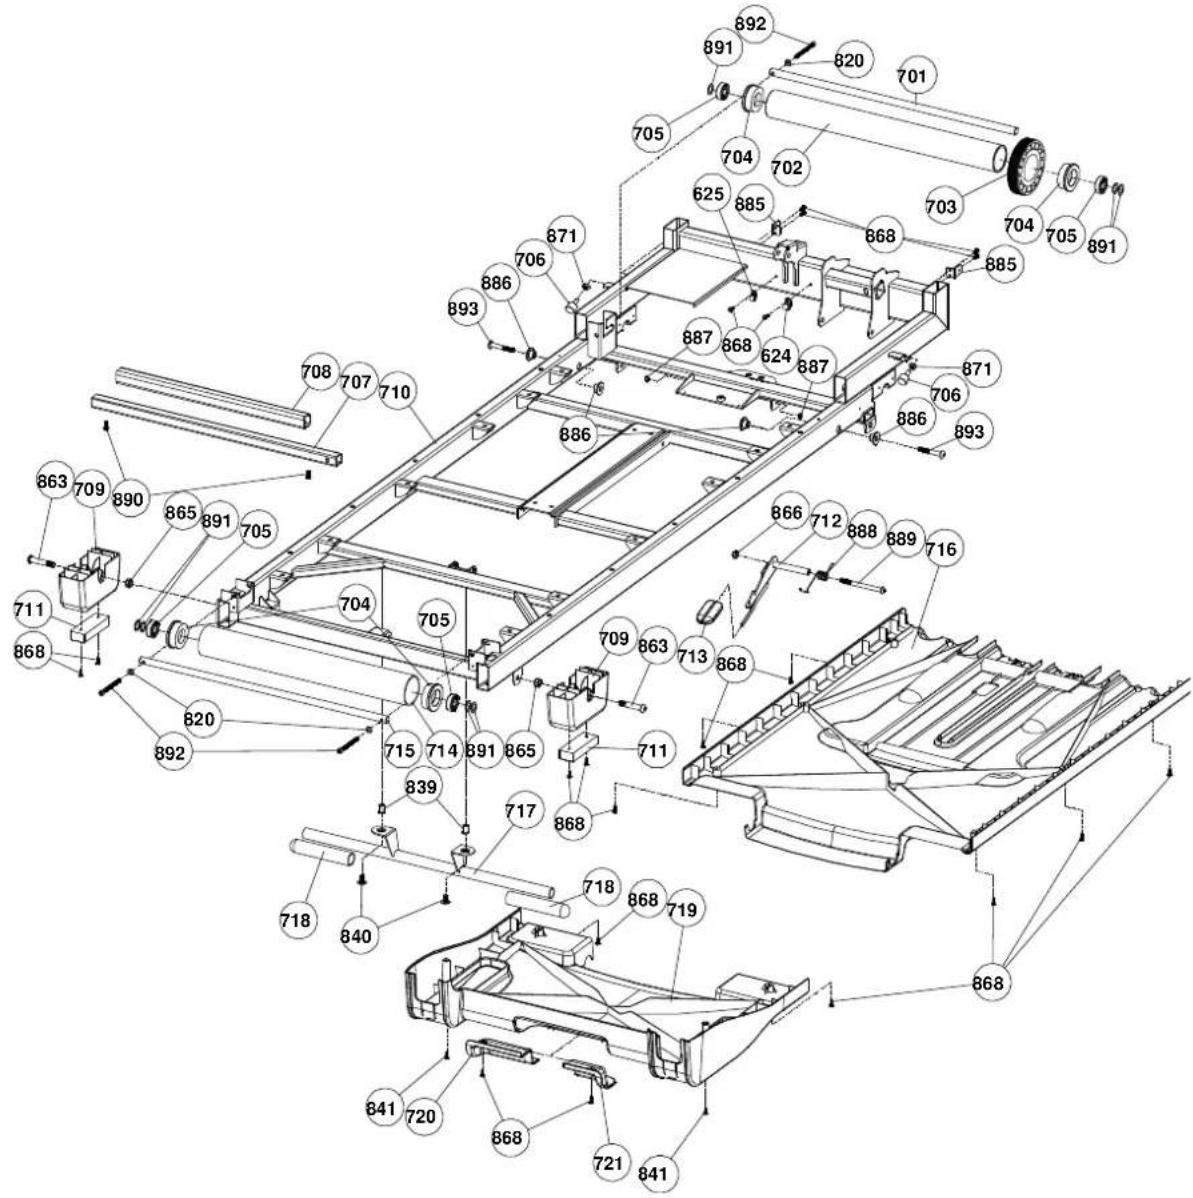
text_image
Technical diagram of a mechanical assembly with numbered components and exploded views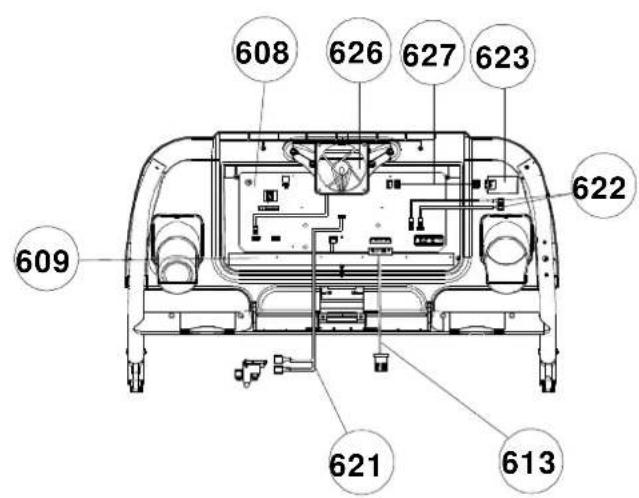
text_image
608 626 627 623 622 609 621 613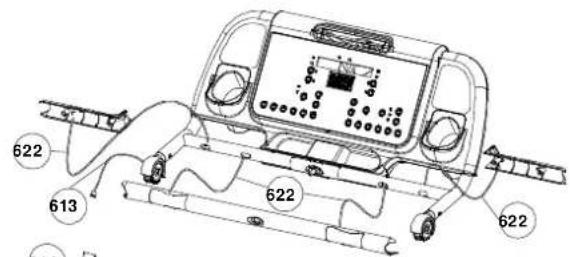
text_image
622 613 622 622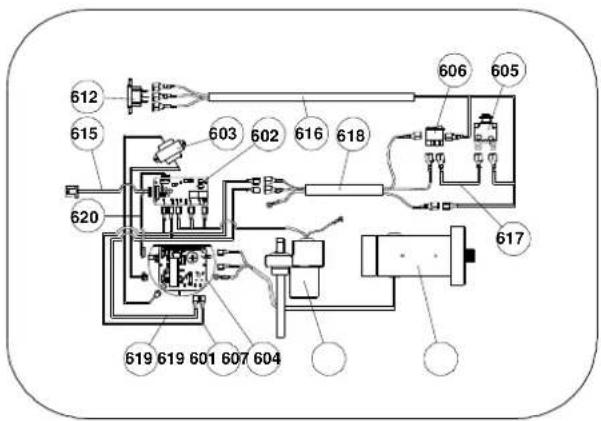
text_image
612 615 620 603 602 616 618 606 605 617 619 619 601 607 604