NeoTV NTV300 - Media player NETGEAR - Free user manual and instructions
Find the device manual for free NeoTV NTV300 NETGEAR in PDF.

User questions about NeoTV NTV300 NETGEAR
0 question about this device. Answer the ones you know or ask your own.
Ask a new question about this device
Download the instructions for your Media player in PDF format for free! Find your manual NeoTV NTV300 - NETGEAR and take your electronic device back in hand. On this page are published all the documents necessary for the use of your device. NeoTV NTV300 by NETGEAR.
USER MANUAL NeoTV NTV300 NETGEAR
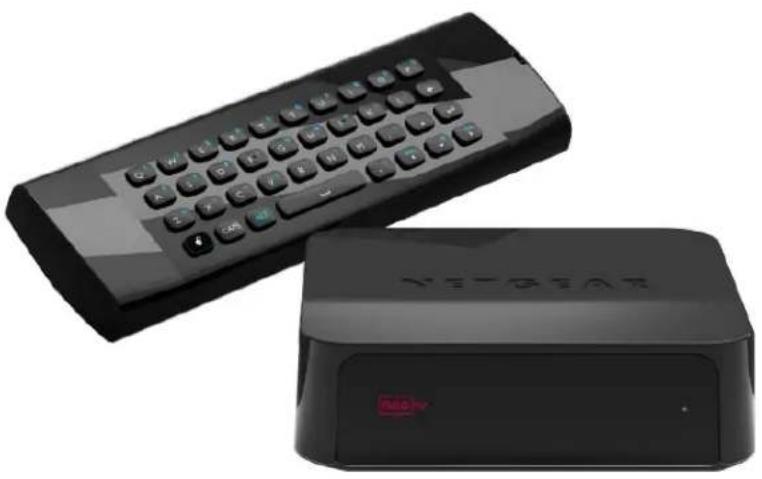
NeoTV MAX Streaming Player
NTV300SL
User Manual
natural_image
Two black remote control devices, one with a keyboard and the other a black device labeled 'VETRIOX' (no additional text or symbols visible)350 East Plumeria Drive San Jose, CA 95134 USA
November 2012 202-11084-01 v1.0
NeoTV MAX Streaming Player
Support
Thank you for choosing NETGEAR.
After installing your device, locate the serial number on the label of your product and use it to register your product at https://my.netgear.com. You must register your product before you can use NETGEAR telephone support. NETGEAR recommends registering your product through the NETGEAR web site. For product updates and web support, visit http://support.netgear.com.
Phone (US & Canada only): 1-888-NETGEAR.
Phone (Other Countries): Check the list of phone numbers at http://support.netgear.com/general/contact/default.aspx.
NETGEAR recommends that you use only the official NETGEAR support resources.
Trademarks
NETGEAR, the NETGEAR logo, and Connect with Innovation are trademarks and/or registered trademarks of NETGEAR, Inc. and/or its subsidiaries in the United States and/or other countries. Information is subject to change without notice. © NETGEAR, Inc. All rights reserved.
HDMI, the HDMI Logo, and HighDefinition Multimedia Interface are trademarks or registered trademarks of HDMI Licensing LLC in the United States and other countries.
Manufactured under license from Dolby Laboratories. Dolby and the double-D symbol are trademarks of Dolby Laboratories.
This product incorporates copyright protection technology that is protected by U.S. patents and other intellectual property rights. Use of this copyright production technology must be authorized by Rovi Corporation, and is intended for home and other limited viewing uses only unless otherwise authorized by Rovi Corporation. Reverse engineering or disassembly is prohibited.
Revision History
| Publication Part Number | Version | Publish Date | Comments |
| 202-11084-01 | v1.0 | November 2012 | First publication |
Contents
Chapter 1 Getting Started
Streaming Basics 6
Hardware Features....7
What Is Included in the Box 7
Front and Rear Views....7
What You Need to Use Your Streaming Player . . . . . . . . . . . . . . . . . . . . . . . . . . . . . . . . . . . . . . . . . . . . . . . . . . . . . . . . . . 8
Installation 8
Connect to the TV....8
Remote Control Batteries 9
Connect to Your Home Network. 9
Reset Button....11
Remote Control 12
Onscreen Quick Setup 14
NeoTV Channels 16
Fling Queue ....17
Intel Wireless Display (WiDi) 19
My Media....21
Chapter 2 Settings
Settings Menu 25
General Settings....26
Restore Factory Settings ....26
Audio & Video Settings....28
Audio Output....28
TV Resolution....28
TV Aspect Ratio ....29
CEC Support 29
Network Settings ....30
Registration 31
About 32
Chapter 3 Maintenance
Update Notification....34
Replace the Remote Control Batteries....34
Error 101 on Flingo Channels. .35
Chapter 4 NeoTV Mobile Apps
NeoTV Remote Control App. 37
NeoTV MAX Streaming Player
Use the App with the Streaming Player 38
Gestures....38
Channels 39
Favorites. 39
Settings. 40
Appendix A Supplemental Information
Factory Default Settings....42
Technical Specifications. 42
Appendix B Notification of Compliance
This chapter covers the following topics:
- Streaming Basics
- Hardware Features
• What You Need to Use Your Streaming Player - Installation
- Reset Button
- Remote Control
- Onscreen Quick Setup
- NeoTV Channels
• Intel Wireless Display (WiDi)
• My Media
For more information about the topics covered in this manual, visit the support website at http://support.netgear.com or http://downloadcenter.netgear.com.
Streaming Basics
For the optimal media streaming experience with the streaming player, NETGEAR recommends the following:
- Broadband Internet service. To watch movies instantly on the streaming player, you need a connection with a speed of 2 to 3 Mbps or faster. The faster your connection, the better the quality. For high-quality video and audio, a connection of least 3 Mbps is required, and for HD 1080p movies, 6 Mbps or faster is recommended.
Note: Streaming quality also depends on the Internet connection quality; sometimes higher bandwidth is required to prevent packet loss.
You can test your bandwidth at one of the following sites:
www.speakeasy.net/speedtest
www.speedtest.net
Or you can sign up for the VUDU service, and run Network Speed Test, available under Settings.
- Network connections. You can connect your streaming player to your broadband Internet connection using a wired or wireless (WiFi) connection. You might need a network router or access point if your cable or DSL modem does not have free ports or wireless support.
- Internet access through your network. The streaming player connects to the Internet through your home network using either a wireless connection or, if you prefer, an Ethernet cable. For wireless connections, the streaming player follows the WiFi standard and is compatible with 802.11b, 802.11g, and 802.11n networks—the most common WiFi networks, depending on your specific model. The streaming player also supports wireless security, including WEP, WPA, and WPA2.
Hardware Features
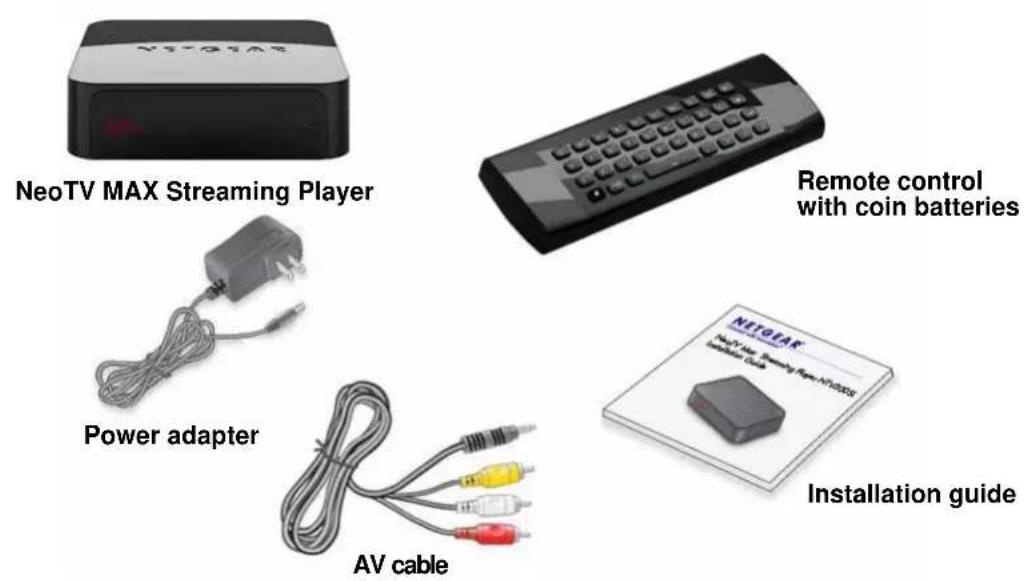
What Is Included in the Box
text_image
NeoTV MAX Streaming Player Power adapter AV cable Remote control with coin batteries NETOLAK Installation guideFront and Rear Views
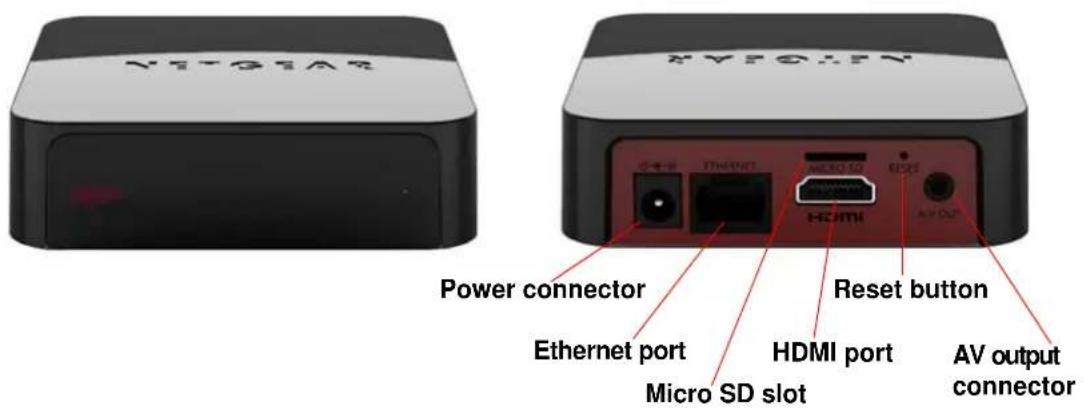
text_image
YETGEAR Power connector Ethernet port Micro SD slot HDMI port Reset button AV output connector XETGEARNote: The USB port is located on the right side panel.
What You Need to Use Your Streaming Player
• TV with HDMI port or AV port
- HDMI cable
• Broadband Internet connection
• A wireless or wired network
Installation
To install your streaming player, you connect it to the TV and to your home network. When you turn on the TV, the NeoTV Quick Setup screen displays.
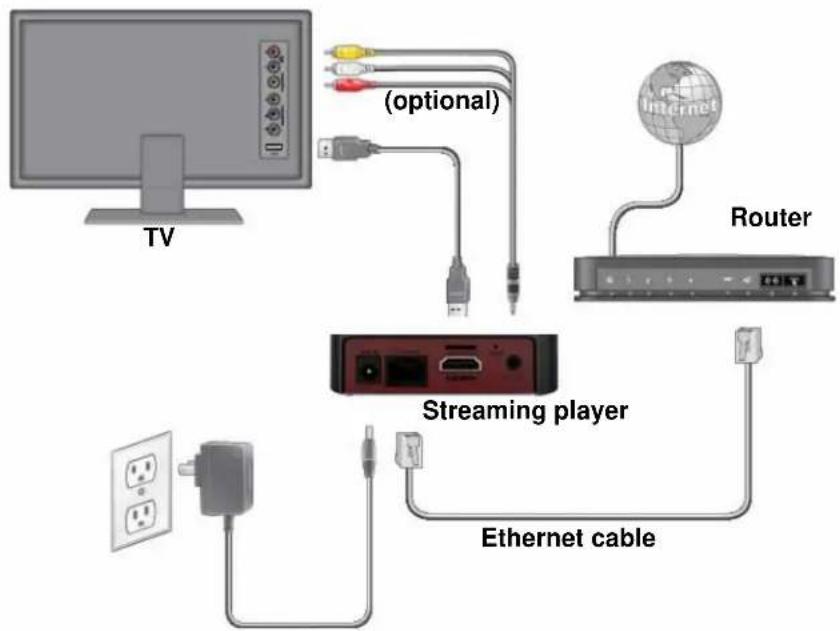
Connect to the TV
- Make sure that your TV is on and set to display the correct video input.
- Connect an HDMI cable (sold separately) to the HDMI port on your streaming player and to the HDMI IN port on your TV. Alternatively, if your TV does not have an HDMI port, you can connect using the AV composite cable. When the HDMI cable is connected, there is no output to the AV composite port.
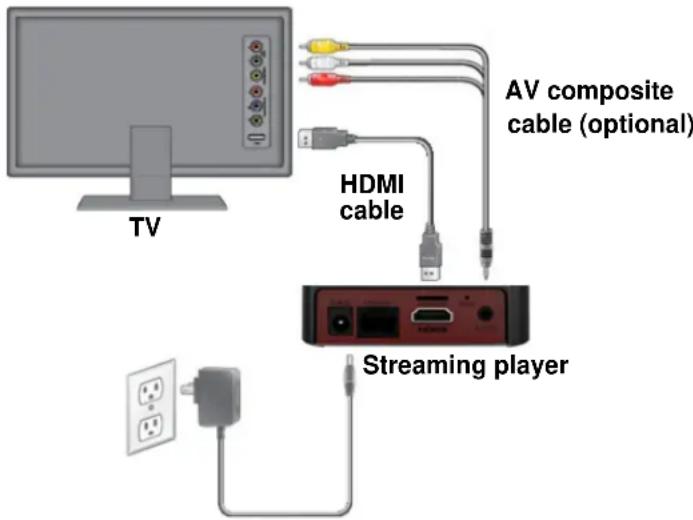
text_image
TV HDMI cable AV composite cable (optional) Streaming playerTIP: HDMI supports 5.1 surround sound (if available). You do not need a separate audio cable.
Note: Do not connect the streaming player through a VCR. Video signals fed through VCRs might be affected by copyright protection systems, and the television picture will be distorted.
- Connect the power adapter to your player, and plug it into an electrical outlet.
Remote Control Batteries
To use the remote control, remove the yellow battery isolation strip beneath the batteries. You do not need to open the battery cover.
text_image
OK Return Menu HOT BackUp OverUpUp FANONE NETGEARFigure 1. Remove the yellow plastic strip beneath the batteries
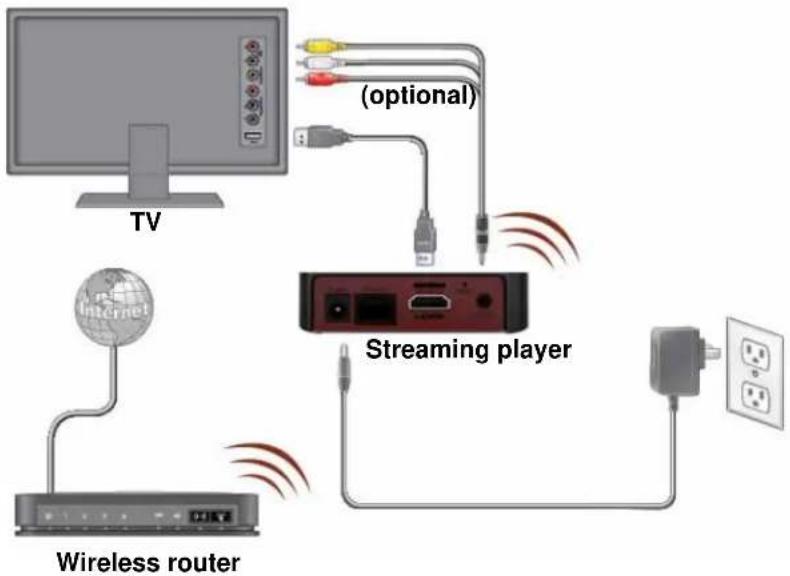
Connect to Your Home Network
To use your player, you need to connect it to your home network with either a wireless or a wired connection. After you get your network ready, the onscreen guided setup helps you connect your player to your network.
NeoTV MAX Streaming Player
Wired Connection
Use an Ethernet cable (sold separately) to connect your player to a LAN port on your router.
flowchart
graph TD
    TV["TV"] -->|optional| StreamingPlayer["Streaming player"]
    StreamingPlayer -->|Ethernet cable| Router["Router"]
    Router --> Internet["Internet"]
    StreamingPlayer -->|USB cable| TV
    StreamingPlayer -->|USB cable| Router
    StreamingPlayer -->|USB cable| TV
Figure 2. Wired LAN connection
Wireless Connection
If you are using a wireless connection, place your player within range of your wireless network. For best wireless reception, avoid enclosing your player in a cabinet.
flowchart
graph TD
    A["TV"] --> B["Internet"]
    B --> C["Wireless router"]
    C --> D["Streaming player"]
    D --> E["USB cable"]
    D --> F["USB cable (optional)"]
    D --> G["USB cable (optional)"]
    D --> H["USB cable (optional)"]
    D --> I["USB cable (optional)"]
    D --> J["USB cable (optional)"]
    D --> K["USB cable (optional)"]
    D --> L["USB cable (optional)"]
    D --> M["USB cable (optional)"]
    D --> N["USB cable (optional)"]
    D --> O["USB cable (optional)"]
    D --> P["USB cable (optional)"]
    D --> Q["USB cable (optional)"]
    D --> R["USB cable (optional)"]
    D --> S["USB cable (optional)"]
    D --> T["USB cable (optional)"]
    D --> U["USB cable (optional)"]
    D --> V["USB cable (optional)"]
    D --> W["USB cable (optional)"]
    D --> X["USB cable (optional)"]
    D --> Y["USB cable (optional)"]
    D --> Z["USB cable (optional)"]
    D --> AA["USB cable (optional)"]
    D --> AB["USB cable (optional)"]
    D --> AC["USB cable (optional)"]
    D --> AD["USB cable (optional)"]
    D --> AE["USB cable (optional)"]
    D --> AF["USB cable (optional)"]
    D --> AG["USB cable (optional)"]
    D --> AH["USB cable (optional)"]
    D --> AI["USB cable (optional)"]
    D --> AJ["USB cable (optional)"]
    D --> AK["USB cable (optional)"]
    D --> AL["USB cable (optional)"]
    D --> AM["USB cable (optional)"]
    D --> AN["USB cable (optional)"]
    D --> AO["USB cable (optional)"]
    D --> AP["USB cable (optional)"]
    D --> AQ["USB cable (optional)"]
    D --> AR["USB cable (optional)"]
    D --> AS["USB cable (optional)"]
    D --> AT["USB cable (optional)"]
    D --> AU["USB cable (optional)"]
    D --> AV["USB cable (optional)"]
    D --> AW["USB cable (optional)"]
    D --> AX["USB cable (optional)"]
    D --> AY["USB cable (optional)"]
    D --> AZ["USB cable (optional)"]
    D --> BA["USB cable (optional)"]
    D --> BB["USB cable (optional)"]
    D --> BC["USB cable (optional)"]
    D --> BD["USB cable (optional)"]
    D --> BE["USB cable (optional)"]
    D --> BF["USB cable (optional)"]
    D --> BG["USB cable (optional)"]
    D --> BH["USB cable (optional)"]
    D --> BI["USB cable (optional)"]
    D --> BJ["USB cable (optional)"]
    D --> BK["USB cable (optional)"]
    D --> BL["USB cable (optional)"]
    D --> BM["USB cable (optional)"]
    D --> BN["USB cable (optional)"]
    D --> BO["USB cable (optional)"]
    D --> BP["USB cable (optional)"]
    D --> BQ["USB cable (optional)"]
    D --> BR["USB cable (optional)"]
    D --> BS["USB cable (optional)"]
    D --> BT["USB cable (optional)"]
    D --> BU["USB cable (optional)"]
    D --> BV["USB cable (optional)"]
    D --> BW["USB cable (optional)"]
    D --> BX["USB cable (optional)"]
    D --> BY["USB cable (optional)"]
    D --> BZ["USB cable (optional)"]
    D --> CA["USB cable (optional)"]
    D --> CB["USB cable (optional)"]
    D --> CC["USB cable (optional)"]
    D --> CD["USB cable (optional)"]
    D --> CE["USB cable (optional)"]
    D --> CF["USB cable (optional)"]
    D --> CG["USB cable (optional)"]
    D --> CH["USB cable (optional)"]
    D --> CI["USB cable (optional)"]
    D --> CJ["USB cable (optional)"]
    D --> CK["USB cable (optional)"]
    D --> CL["USB cable (optional)"]
    D --> CM["USB cable (optional)"]
    D --> CN["USB cable (optional)"]
    D --> CO["USB cable (optional)"]
    D --> CP["USB cable (optional)"]
    D --> CQ["USB cable (optional)"]
    D --> CR["USB cable (optional)"]
    D --> CS["USB cable (optional)"]
    D --> CT["USB cable (optional)"]
    D --> CU["USB cable (optional)"]
    D --> CV["USB cable (optional)"]
    D --> CW["USB cable (optional)"]
    D --> CX["USB cable (optional)"]
    D --> CY["USB cable (optional)"]
    D --> CZ["USB cable (optional)"]
Figure 3. Wireless network connection
If you do not receive a strong signal during the onscreen setup, rotate your player or move it closer to your router.
Reset Button
There is a Reset button on the back of the streaming player. Use the Reset button to reset the streaming player to factory default settings.
To reset to factory default settings, press and hold Reset for 6 seconds. The streaming player turns off, turns back on, and restores the default settings.
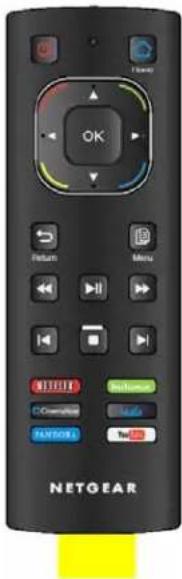
Remote Control
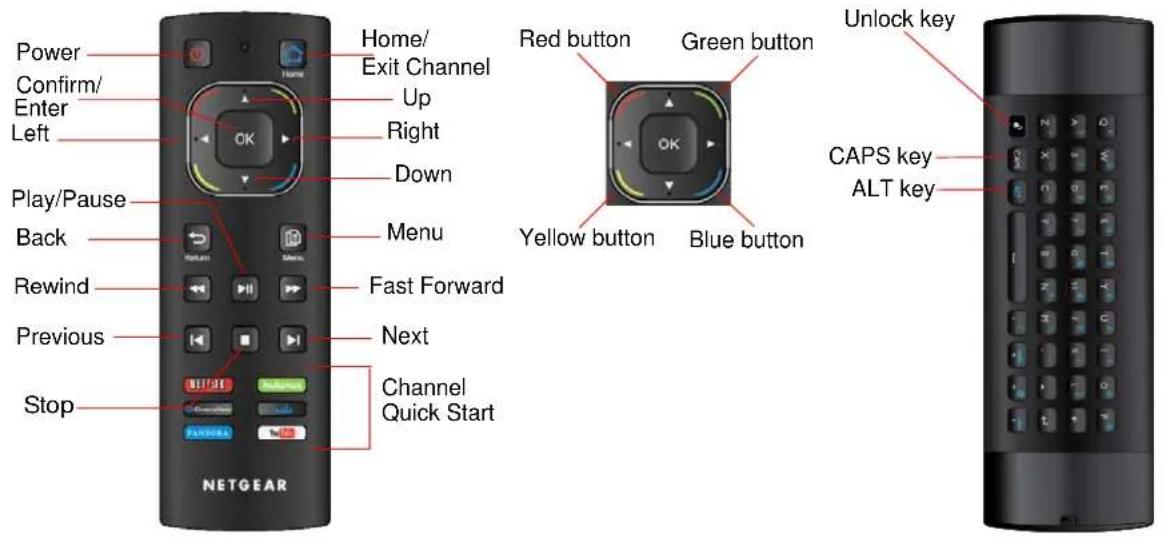
text_image
Power Confirm/ Enter Left Play/Pause Back Rewind Previous Stop Home/ Exit Channel Up Right Down Menu Fast Forward Next Channel Quick Start Red button Green button Yellow button Blue button Unlock key CAPS key ALT key NETGEARFigure 4. Remote control
Table 1. Remote control buttons
| Button Description | |
Power Turns power to  reaming player on and off. reaming player on and off. | |
Home/Exit Channel Guide  home screen or exit the channel. home screen or exit the channel. | |
Up Navigate up. | |
| Down Navigate down.[AKOH] | |
Left Navigate left. | |
| Right Navigate right[SKHW] | |
OK Confirm or enter. | |
| Back Return to the pre- menu. Some services do not use th is button. | |
Menu Additional options. Some channels do not use this button. | |
Play/Pause Play or pa- media. | |
| Fast Forward Fast for.KAG3] | |
Rewind Rewind. | |
Next Skip to next. Son - services do not use this button. | |
Previous Previous mo- chapter. Some services do not use this button. | |
Stop Stop playing med | |
Unlock key On the Qwerty keyboard  | board side of the remote control, the Unlockkey toggles the keyboard side of the remote control on and off. |
CAPS key | On the Qwerty keyboard side of the remote control, press andrelease the CAPS or ALT button before selecting the desiredcapital letter or character.ALT key |
 | |
Note: The functions of the color buttons (red, green, blue, and yellow) at the corners of the directional pad depend on the screen that is displayed.
Onscreen Quick Setup
Onscreen Quick Setup makes it easy to get started with the streaming player.
To use Quick Setup:
- After you connect your streaming player, press Power on the remote control to turn the streaming player on.
- You might need to use your TV remote control to select the HDMI input on your TV where you connected the streaming player.
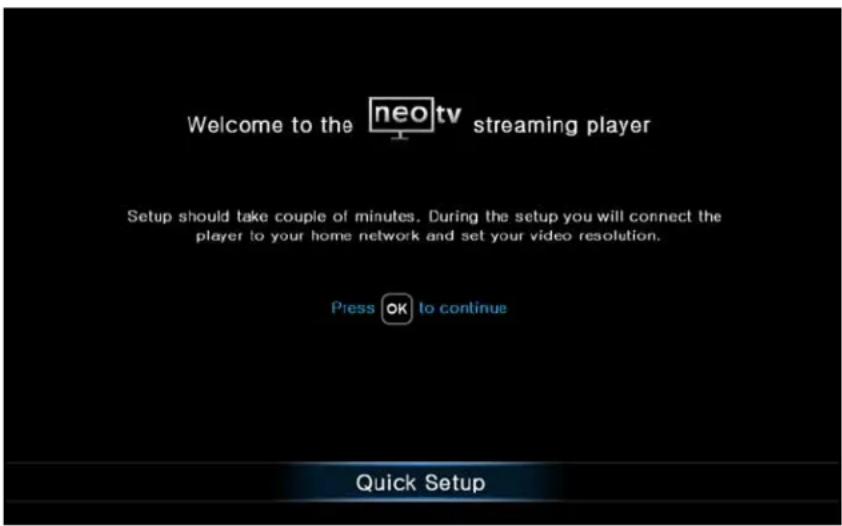
The NeoTV Quick Setup Welcome screen displays.
text_image
Welcome to the neo tv streaming player Setup should take couple of minutes. During the setup you will connect the player to your home network and set your video resolution. Press OK to continue Quick Setup- Fo llow the onscreen setup instructions to select the following:
• TV resolution. This is the resolution of the output to the TV.
- Standby timing. Select the number of minutes that the streaming player waits to display a screen saver when media is not playing.
- WiFi network. Select your home network. If you connected an Ethernet LAN cable, you are not prompted to select a WiFi network. You can use one of the following methods.
- Select your WiFi network. The streaming player displays a list of networks in your area. Select the one that you want to join.
- Connect using WPS. When prompted, press the WPS button on your router to join your network without typing the network password.
- Connect manually. Use the onscreen keyboard to type the name of the network and its WiFi password.
- Check software update. The streaming player checks for software updates. If an update is found, the streaming player upgrades the software.
NeoTV MAX Streaming Player
- Registration. Visit https://my.netgear.com or http://support.netgear.com or scan the QR code on your screen.
- Learn about your remote control. Learn more about the remote control, its buttons, and their usage.
Then the home screen displays:

text_image
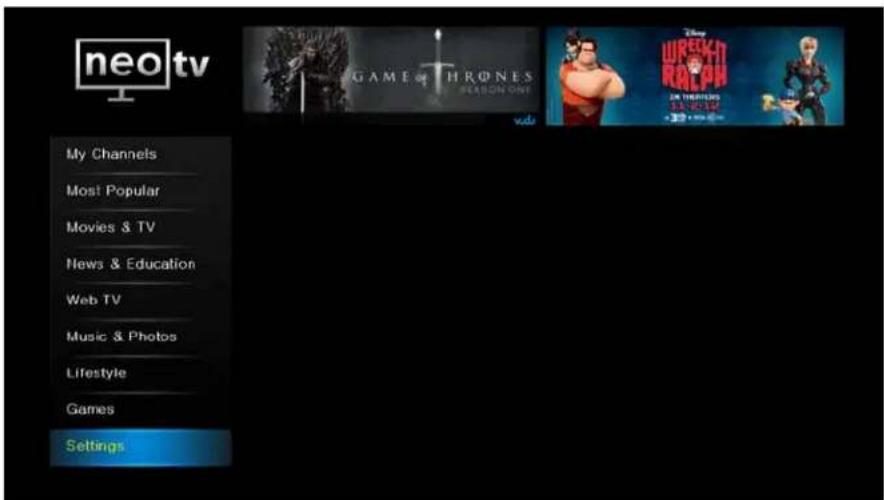
neo tv Game of THRONES SEASON ONE WRECKIT REALW IN THEMUS 11:2:12 -30 LBS 800 My Channels Most Popular Movies & TV News & Education Web TV Music & Photos Lifestyle Games Settings NETFLIX vds HD Movies hulu PLUS Intel WiFi Wireless Display vds Apps WIRESKIT RANANA YouTube PANDORA CinemaNow Rhapsody CinemaNow My Media LIVE TV YUPPTV databozag media TED spiritCLIPSFigure 5. Streaming player home screen
NeoTV Channels
The home screen displays your channel selections in the My Channels category:

text_image
neo tv GAME & THRONES SEASON ONE WIRECHT RIVE PUN IN THEATERS 11:2:17 +30% 100% 00m My Channels Most Popular Movies & TV News & Education Web TV Music & Photos Lifestyle Games Settings NETFLIX vdu HD Movies hulu PLUS Intel WiDi Wireless Display vdu Apps LURESHUT RIVERA IN THEATERS 11:2:12 YouTube PANDORA CinemaNow Rhapsody CinemaNow My Media LIVE TV YUPPTV databozag's media TED spiritCLIPSTo customize My Channels:
- To move a channel to another position, select it and press the blue button on the remote control. Use the arrow button on the remote control to go to the new position, and press OK.
- To remove a channel from the display, press the red button on the remote control, and press OK.
To add channels:
- Navigate to a screen such as Most Popular that displays a selection of channels.
- Use the arrow buttons on the remote control to select a channel that you want to add to My Channels.
- Press the green button on the remote control.
The next time you go to the My Channels screen, the new channel will be included.
To stream a channel:
- Select a me nu item in the left pane on the home screen.
- Select the channe I, and press OK.
NeoTV MAX Streaming Player
Fling Queue
Fling Queue is a free app that lets you select Internet content and send it to your TV.
To set up your computer with Fling Queue:
- Launch a web browser.
- Visit the Flingo website at www.flingo.org.
- Check to make sure that your browser is supported.
- Dra g the Fling button from the Flingo website onto to the bookmarks bar of your browser.
To fling a video from your computer to your TV:
- Turn on the streaming player.
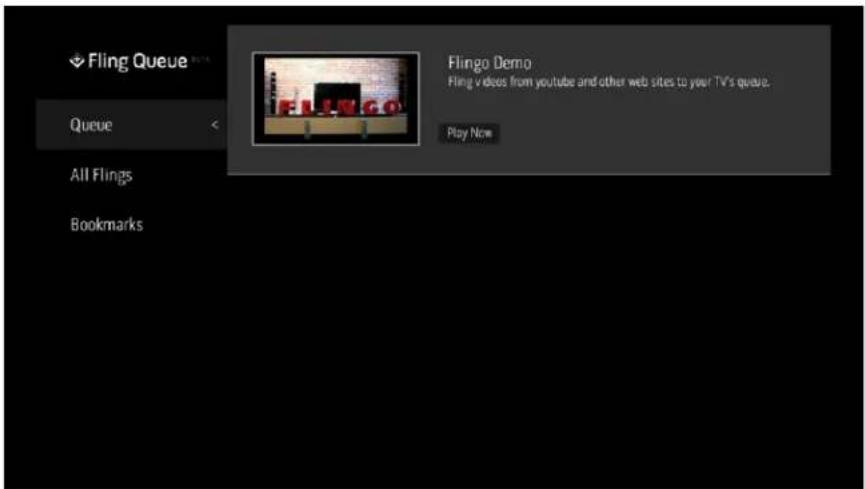
- Select Fl ing Queue.
text_image
Fling Queue Queue All Flings Bookmarks Flingo Demo Fling videos from youtube and other web sites to your TV's queue. Play Now- Ma ke sure that your computer and the streaming player are on the same network.
- On your computer, use your browser to navigate to the Internet content that you want to play on your TV.
- Click the F ling button on your browser. Flingo locates the streaming player on your network and displays the following message:

text_image
Cancel Fling FLINGO ▪ Fling all Fling 'em- Select the items that you want to fling, and click Fling 'em.
NeoTV MAX Streaming Player
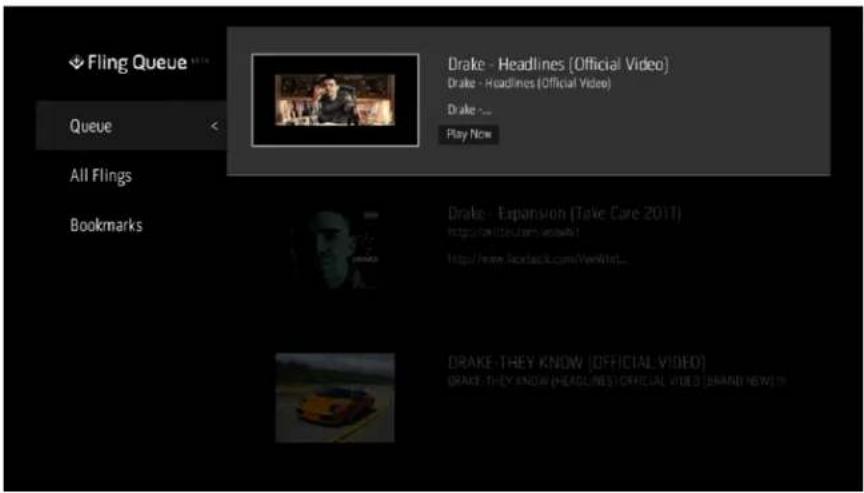
- On your TV, on the Queue screen, select the item that you want to watch.
text_image
Fling Queue Queue All Flings Bookmarks Drake - Headlines (Official Video) Drake - Headlines (Official Video) Drake ... Play Now Drake - Expansion (Take Care 2011) http://www.rockback.com/VerWnt... Drake-They Know [OFFICIAL VIDEO] Drake-They Know [HEADLINE'S] OFFICIAL VIDEO [BRAND NOW] ISIntel Wireless Display (WiDi)
The Intel WiDi channel wirelessly projects your WiDi-capable laptop display to a TV. For more information about the Intel WiDi Wireless Display, visit the Intel website at http://www.intel.com/content/www/us/en/architecture-and-technology/intel-wireless-display.html.
text_image
intel WiDi Wireless DisplayTo project your laptop display to your TV wirelessly:
- Enter the Intel WiDi channel. The Ready for connection screen displays on your TV.
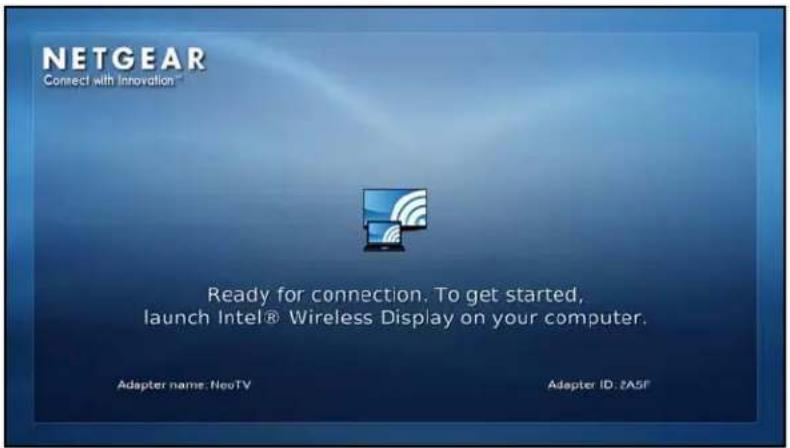
text_image
NETGEAR Connect with Innovation Ready for connection. To get started, launch Intel® Wireless Display on your computer. Adapter name: NeoTV Adapter ID: ZASF- On your laptop, launch the Intel WiDi application. It scans and finds the streaming player. Then, select the NeoTV adapter, and click the Connect button to display your laptop screen wirelessly on the TV screen.
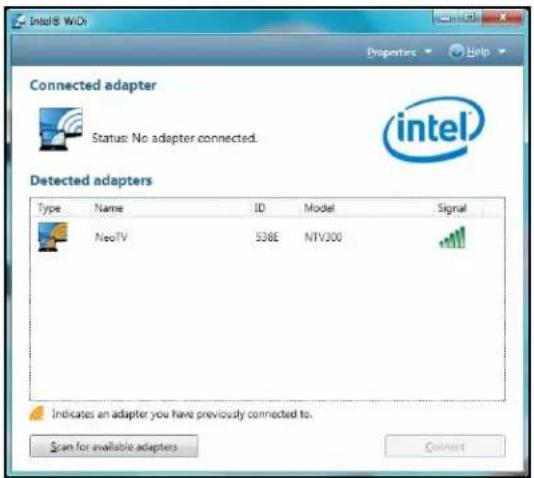
text_image
Intel® WiDi Properties Help Connected adapter Status: No adapter connected. Detected adapters Type Name ID Model Signal NeoTV S38E NTV300 Indicates an adapter you have previously connected to. Scan for available adapters ConnectNeoTV MAX Streaming Player
-
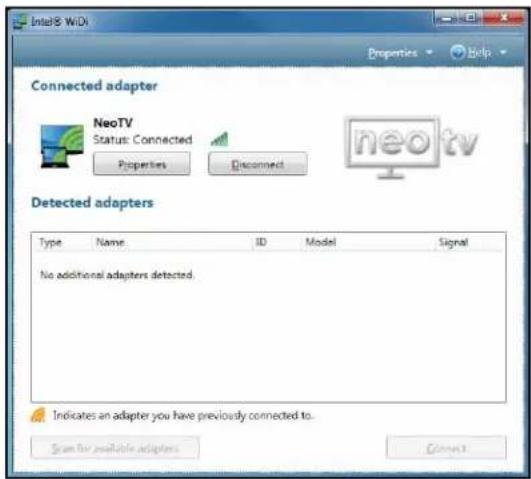
If you are connecting the laptop to the NeoTV adapter for the first time, the streaming player displays a 4-digit security code on the TV screen. Enter this code into the Intel WiDi application. Within a few seconds, the TV screen displays your laptop screen.
-
To terminate the NeoTV WiDi section or to go back to the NeoTV home screen, disconnect the WiDi connection.
a. Click the Disconnect button on your laptop WiDi application, and wait until the Ready for connection screen shows on your TV.
text_image
Intel® WiDi Properties Help Connected adapter NeoTV Status: Connected Properties Disconnect neo tv Detected adapters Type Name ID Model Signal No additional adapters detected. Indicates an adapter you have previously connected to. Scan for available adapters Connectb. Press the NeoTV remote Home button to go back to NeoTV home screen.
My Media
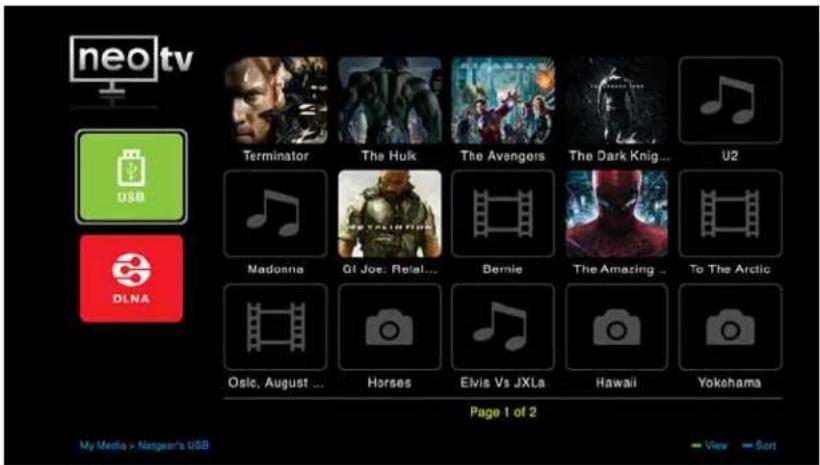
My Media channel lets you play back your local storage content from a USB disk drive and local network DLNA server.
To play back local storage content:
- Click the My Medi a icon on the NeoTV home screen.

- Use the remote control to select the storage device you want to browse. Device icons display on the left.
- Select a video, audio, or photo file, and press OK on the remote control to start playing.
text_image
neo tv UBS DLNA Page 1 of 2 My Media > Netgear's USB Terminator The Hulk The Avengers The Dark Knight... U2 Madonna GI Joe: Retal... Bernie The Amazing ... To The Arctic Osic, August ... Horses Elvis Vs JXLs Hawaii YokohamaWhile playing video or music or viewing a photo, you can do the following with the remote control:
- List mode view and thumbnail view. When you are in the list mode view, press the green button on the remote control to change to the thumbnail view. Press the green button again to move back to the list mode view.
- Video menu. While playing video, press the Menu button on the remote control to display the video menu. Press the Menu button again to close the video menu.
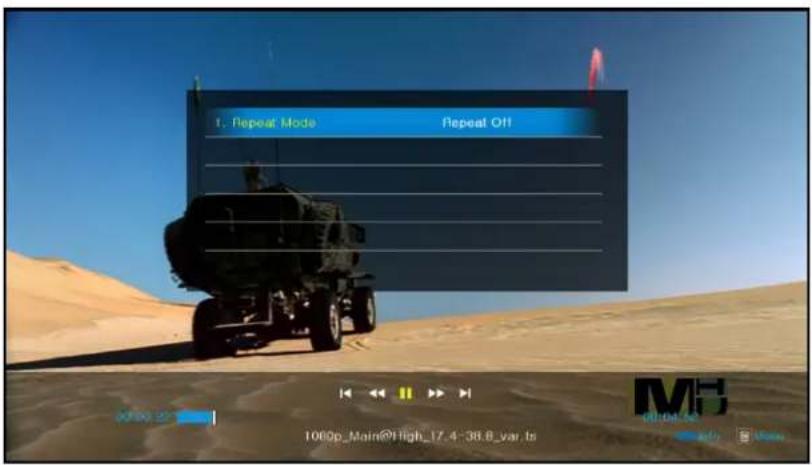
text_image
1. Repeat Mode Repeat Off 1000p_Main@High_17.4-38.8_var.ts MB 00:04:56 info Main- Music menu. While playing music, press the Menu button on the remote control to display the music menu. Press Menu button again to close the music menu.
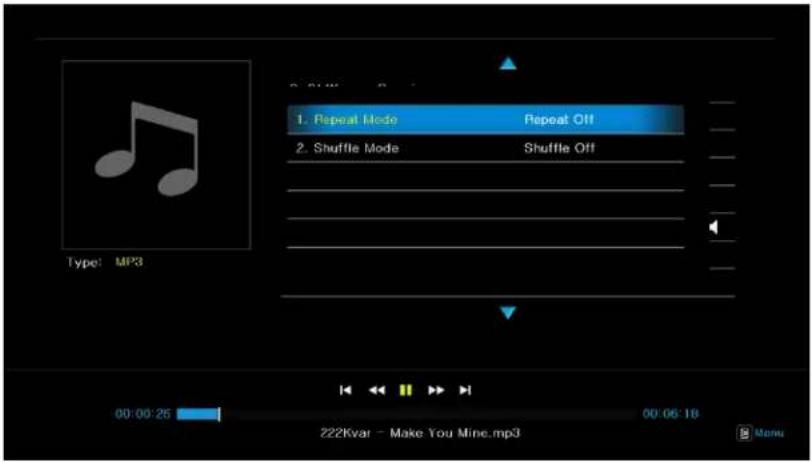
text_image
1. Repeat Mode Repeat Off 2. Shuffle Mode Shuffle Off 00:00:25 00:06:18 Z22Kvar - Make You Mine.mp3 MenuNeoTV MAX Streaming Player
• Picture menu. While viewing a photo, press the Menu button on the remote control to display the picture menu. Press the Menu button again to close the picture menu.
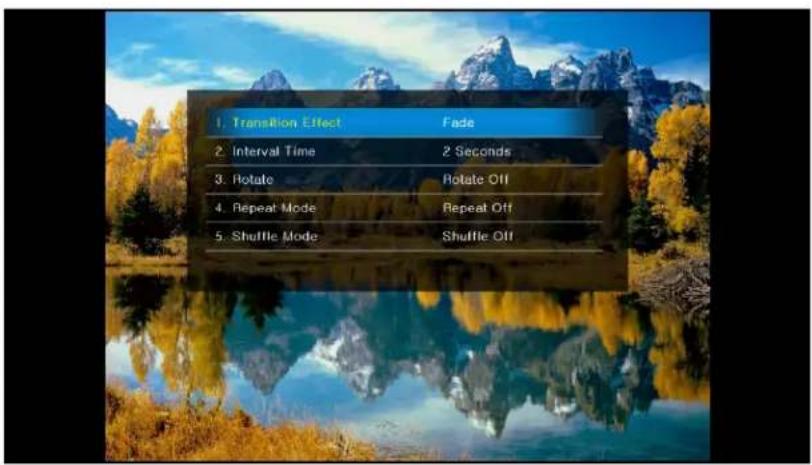
text_image
1. Transition Effect Fade 2. Interval Time 2 Seconds 3. Rotate Rotate Off 4. Repeat Mode Repeat Off 5. Shuffle Mode Shuffle OffSettings
2
This chapter covers the following topics:
- Settings Menu
- General Settings
• Audio & Video Settings
• Network Settings - Registration
- About
Settings Menu
You can customize the settings for your streaming player.
To view or change the settings:
- Select Settings on the home screen.
text_image
neo tv My Channels Most Popular Movies & TV News & Education Web TV Music & Photos Lifestyle Games Settings- Press OK to display the following screen:
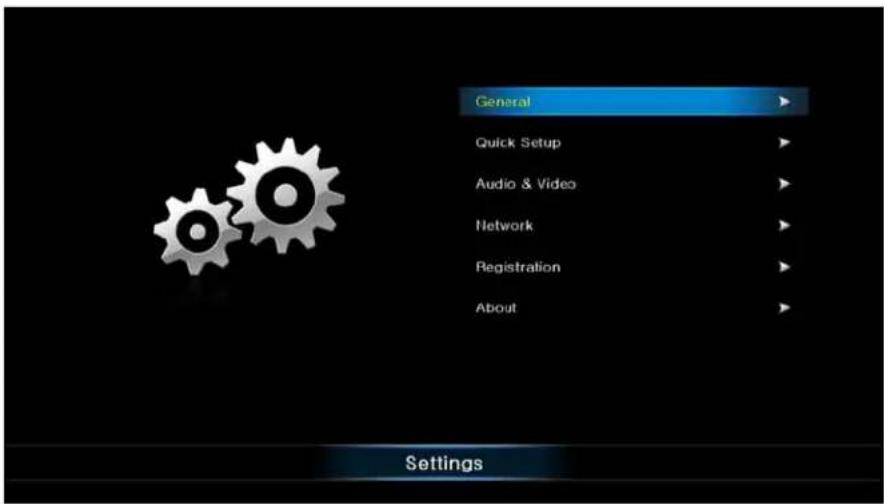
text_image
General Quick Setup Audio & Video Network Registration About SettingsThe setting menus are described in the following sections in this chapter.
General Settings
The General Settings menu includes the following:
- Software Update. Check if a newer version of the software is available. Download the software and install it on the streaming player.
- Screen Saver Timing. Specify how long the streaming player should wait to display a screen saver when no channel is playing.
- Standby Timing. Select the number of minutes the streaming player waits before turning off and going into standby mode.
- Sound Effects. Select Off, Low, Medium, or High to specify the clicking sound you hear when you press a button on the remote control.
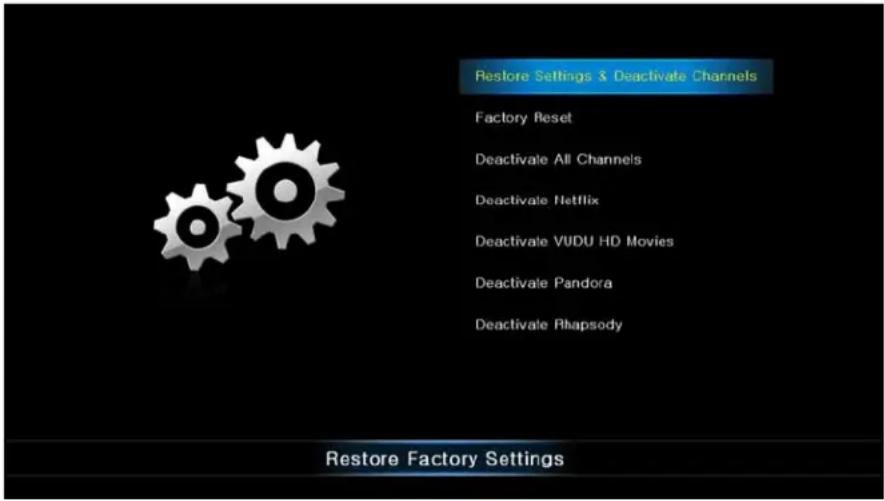
• Language. Select the language for the streaming player. - Restore Factory Settings. Return the streaming player to its factory settings. This option erases all your custom settings but does not remove channel account information or erase software updates. For more information about restoring factory settings, see Restore Factory Settings (the next section).
- Remote Control. Learn about the remote control. Press the Unlock key to unlock the keyboard buttons. Press the Unlock key again to lock the keyboard buttons. For more information about the remote control, see Remote Control on page 12.
• Legal. View legal information about the streaming player.
You can use the restore factory settings option to return the streaming player to its factory settings, or to deactivate streaming services.
Selecting Factory Reset restores the streaming player to default settings, but does not remove the channel account information or erase software updates. To remove the channel account information, select Deactivate All Channels, or deactivate specific channel account information.
To restore factory settings without removing channel information or erasing software updates:
- Select Settings > General > Restore Factory Settings to display the following screen:
text_image
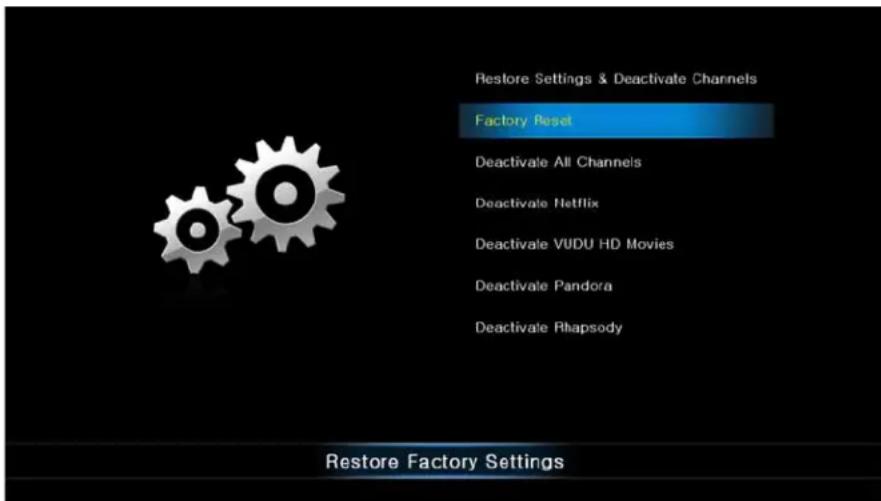
Restore Settings & Deactivate Channels Factory Reset Deactivale All Channels Deactivale Netflix Deactivale VUDU HD Movies Deactivale Pandora Deactivale Rhapsody Restore Factory Settings- Select Fac tory Reset:
text_image
Restore Settings & Deactivate Channels Factory Reset Deactivate All Channels Deactivate Netflix Deactivate VUDU HD Movies Deactivate Pandora Deactivate Rhapsody Restore Factory Settings-
Press OK to confirm.
-
The streaming player erases the settings that you specified during setup and restarts.
• The Quick Setup Welcome screen displays (see Onscreen Quick Setup on page 14). -
To set up your streaming player, follow the onscreen instructions to select your TV resolution, specify the standby timing, and connect to your network.
The streaming player might check for software updates, download and install new software if it is available, and restart.
Audio & Video Settings
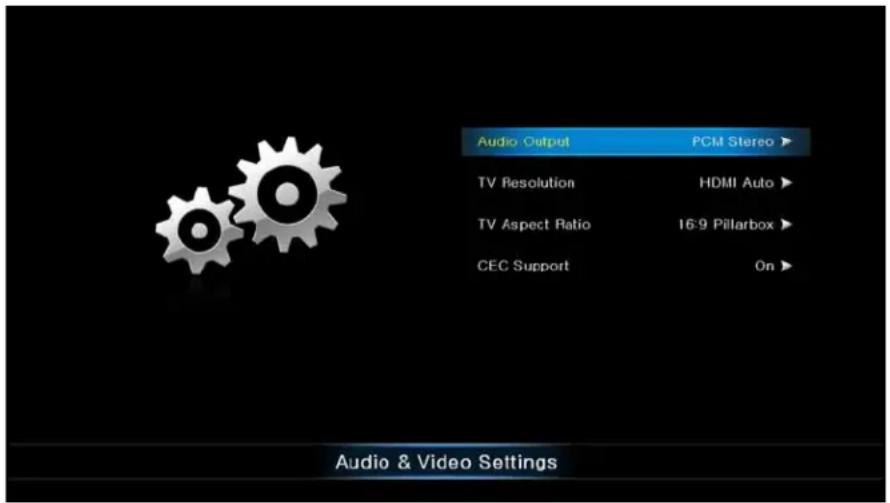
Select Settings > Audio & Video to display the following screen:
text_image
Audio Output PCM Stereo ▶ TV Resolution HDMI Auto ▶ TV Aspect Ratio 16:9 Pillarbox ▶ CEC Support On ▶ Audio & Video SettingsAudio Output
Select the digital output setting for the audio. The default setting is PCM Stereo. If you connect to an AV media center with 5.1 plus audio channels, select Bitstream HD for surround sound.
TV Resolution
Select the resolution for your TV. The following table describes the available settings.
| TV Resolution Setting HDMI TV | ||
| HDMI Auto The streaming | player automatically sets the correct | resolution for your HDTV. |
| 1080p Your TV is a high- | definition TV (HDTV) cap | able of 1080p (any frame rate). |
| 1080i Your TV is a high- | definition TV (HDTV) cap | able of 1080i. |
| 720p Your TV is a high- | definition TV (HDTV) cap | able of 720p. |
| 480p Your TV is standard | -definition TV capable of 480p. | |
| 480i Your TV is standard | definition TV capable o cables only support 480i. | f 480i. Most of the CRT Tvs with RCA AV |
TV Aspect Ratio
Select the aspect ratio. If your TV has a very rectangular (widescreen, or 16:9) aspect ratio, you can select either full screen or pillarboxed). The following table describes these settings.
| Media 16:9 Full 16:9 Pillarboxed | ||
| Movie in widescreen format • 4:3 video | video sources are stretched horizontally to fit the entire screen. • Selecting a 4:3 aspect ratio setting when resolution is set to 720p or 1080i/p has no effect. | 4:3 video sources are shown in center of the screen; vertical bars are on the sides of the screen. |
| HD video in widescreen format | The episode fills the entire screen. | No effect. The episode fills the entire screen. |
| SD (4:3) TV episodes The episode is | stretched horizontally to fit the entire screen. | The episode is shown in the center of the screen with vertical bars on the sides of the screen. |
| Cropped movie (movie put on disk in 4:3 aspect ratio) | The movie is stretched horizontally to fit the entire screen. | The movie is shown in the center of the screen with vertical bars on the sides of the screen. |
CEC Support
The CEC (Consumer Electronics Control) option allows the TV remote control to control certain functions of the streaming player and for the streaming player to control certain functions of the TV.
Note: Not all TVs are compatible with your streaming player's CEC control.
If you press the Power button on the streaming player remote control to wake up the streaming player, if the TV is in standby mode, the TV also wakes up.
Your TV uses CEC to control the streaming player in the following ways.
- Pressing the TV Power button to power down or go to standby mode places the streaming player in standby mode.
• The streaming player becomes a TV CEC device. - Certain TV remote control buttons can operate the streaming player through CEC. For example, the Up, Down, Left, Right, and OK buttons on the TV remote control can operate the streaming player.
Network Settings
You can view or change the network settings for the streaming player. The options displayed in the Network Settings screen depend on whether an Ethernet cable is connected to the streaming player.
Select Settings > Network to display the Network Settings screen.
If no Ethernet cable is connected, the streaming player displays options for a wireless network connection.
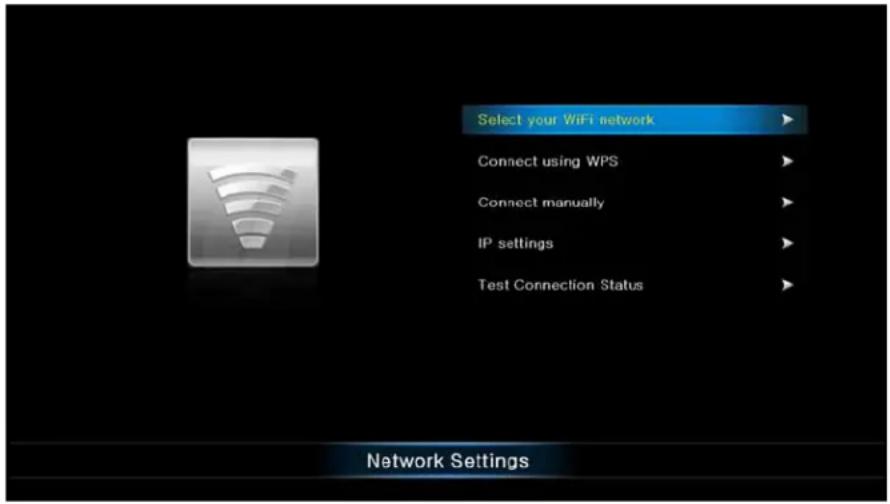
text_image
Select your WiFi network Connect using WPS Connect manually IP settings Test Connection Status Network SettingsIf an Ethernet cable is connected, the streaming player detects it and displays only network information for a LAN cable connection to your network.
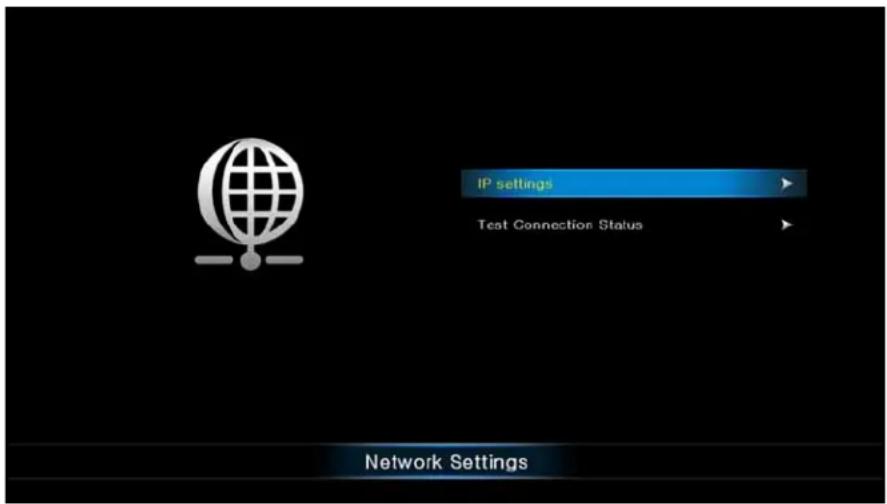
text_image
IP settings Test Connection Status Network SettingsThe Network Settings menu includes the following options:
- Select your WiFi network. The streaming player scans for wireless networks in your area and displays a list. Select your network, and enter its password to connect wirelessly.
- Connect using WPS. WiFi Protected Setup (WPS) lets you join a wireless network that is secured with WPA or WPA2 without typing the password. Your wireless router or access point has to be compatible with WPS.
- Connect manually. Type in the wireless network name (SSID) and network password for your network.
• IP settings. View the IP settings for the streaming player.
• Test Connection Status. Verify that basic network communication is working.
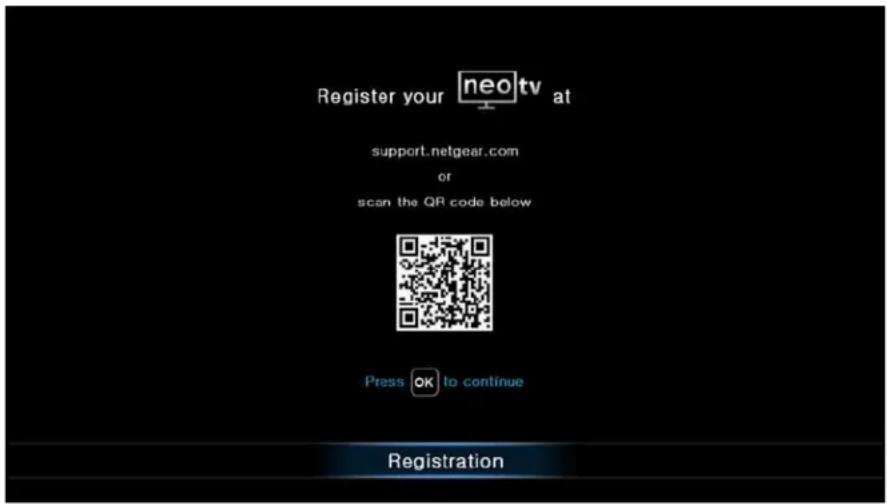
Registration
To register the streaming player, visit https://my.netgear.com or http://support.netgear.com or scan the QR code on your screen. Select Settings > Registration to display the following screen:
text_image
Register your neo tv at support.netgear.com or scan the QR code below Press OK to continue RegistrationAbout
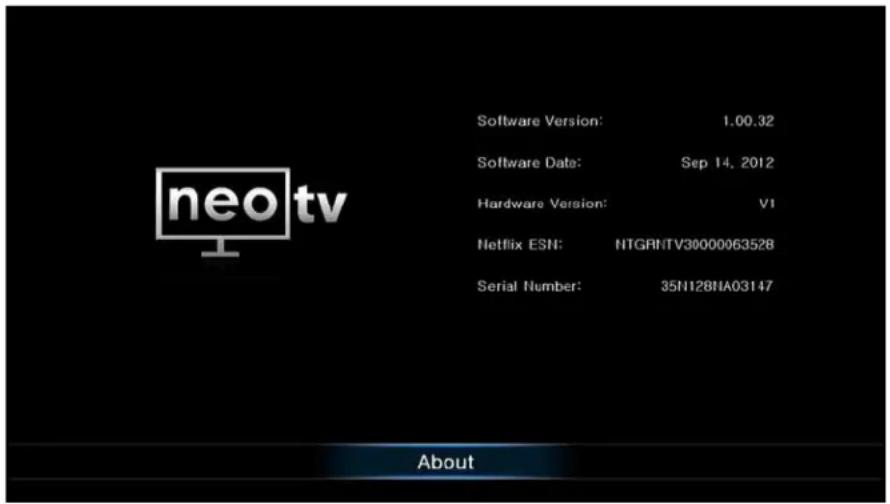
View details about the software and hardware version of your streaming player. Select Settings > About to display the following screen:
text_image
software Version: 1.00.32 Software Date: Sep 14, 2012 Hardware Version: V1 Netflix ESN: NTGRNTV30000063528 Serial Number: 35N128NA03147 About- Software Version. The version of software currently running on your streaming player.
• Software Date. The date your current software was released.
• Hardware Version. The hardware version of this streaming player. - Netflix ESN. The electronic serial number (ESN) used for Netflix. Every streaming player has an individual ESN that is associated with a Netflix account.
- Serial Number. The serial number of this streaming player.
This chapter covers the following topics:
- Update Notification
• Replace the Remote Control Batteries
• Error 101 on Flingo Channels
Update Notification
When there is new firmware, the streaming player notifies you when it powers up or wakes up from standby.
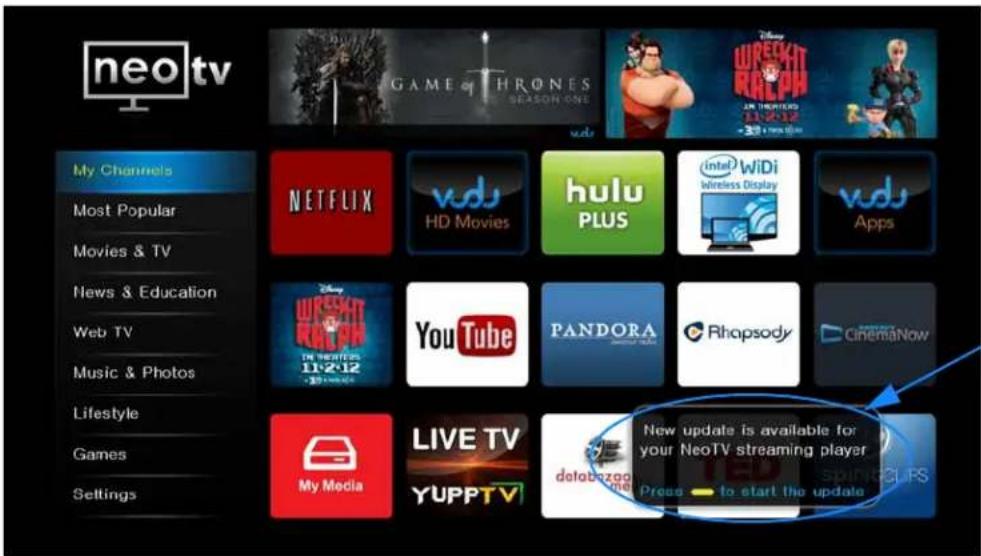
text_image
neo tv Game of THRONES SEASON ONE vdu WIRECKT ROCCOM IN THEATERS 11:2:12 - 30 + 500.00 My Channels Most Popular Movies & TV News & Education Web TV Music & Photos Lifestyle Games Settings NETFLIX vdu HD Movies hulu PLUS intel WiDi Wireless Display vdu Apps WIRECKT ROCCOM IN THEATERS 11:2:12 YouTube PANDORA Rhapsody CinemaNow My Media LIVE TV YUPPTV databozag the Press — to start the update New update is available for your NeoTV streaming player spinningCLPSFollow the onscreen instruction to press the yellow remote control button, and then press OK to update the firmware.
Replace the Remote Control Batteries
The remote control uses two coin batteries.
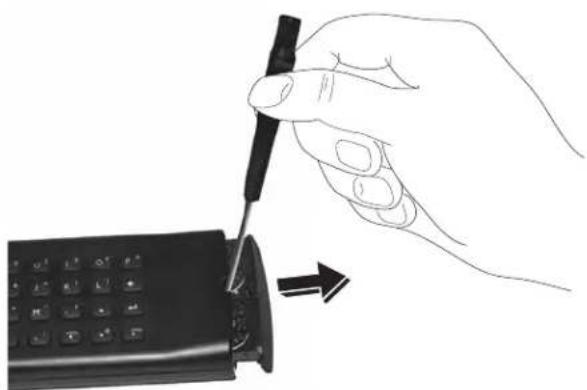
To replace the batteries:
- Use a small flat screwdriver to push the indicated location and open the battery compartment.
natural_image
Hand inserting a card into a mobile phone (no text or symbols visible)NeoTV MAX Streaming Player
- Slide out the battery tray, and remove the batteries.

natural_image
Two views of a black calculator and its internal component, showing the main and side views with arrows indicating transformation (no text or symbols present)- Replace the batteries, and insert the battery tray into the remote control.

natural_image
Two black calculator buttons with icons, one showing a coin and the other showing a coin slot (no text or symbols visible)Error 101 on Flingo Channels
Due to Internet bandwidth and quality of the Internet connection, Flingo channels sometimes display error 101 at the bottom of the display. To correct this error, increase the Internet bandwidth or improve the quality of the Internet connection.
NeoTV mobile apps are available separately. They allow you to use your phone as a remote control for the streaming player. NeoTV mobile apps are free to download from Android market and the Apple App Store.
This chapter covers the following topics:
• NeoTV Remote Control App
• Use the App with the Streaming Player
NeoTV Remote Control App
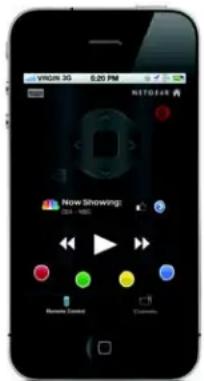
The NeoTV remote control app turns your iPhone, iPod touch, or Android phone into a NeoTV Streaming Player remote control. You can use it to manage devices, and you can specify the feedback settings.
text_image
virus 3G 6:20 PM Now Showing: 024-1885 Remy Goad DoomiaFigure 6. The app is like a virtual NeoTV remote control
To use the NeoTV remote control app:
- Using your iPhone or Android smartphone, navigate to the Apple App Store or Google Play, and search for NeoTV. You can use the following QR codes to speed up this process:

text_image
QR code image containing encoded data, no visible human-readable textApple App Store

text_image
QR code image containing encoded data, no visible human-readable textGoogle Play
- Inst all the app on your phone.
- Ma ke sure that the phone is connected to the same WiFi network (SSID) as your streaming player.
- Launch the app. The app searches for your device and connects.
If the app does not connect to the streaming player automatically, select Settings > Manage Hosts on the app, and click Auto Pair. If the app still does not connect to the streaming player, add the streaming player manually by selecting Add a new device and entering the IP address of the streaming player.
Use the App with the Streaming Player
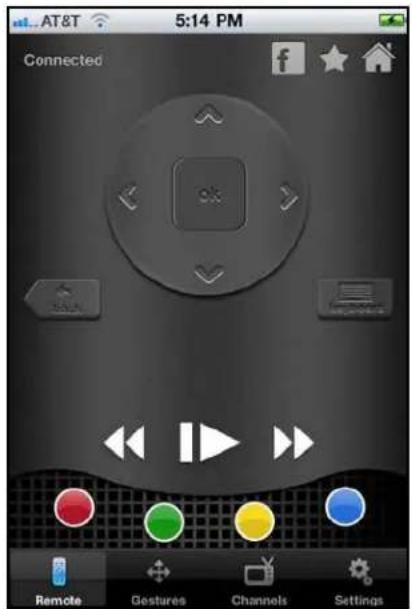
When you select the NeoTV app on your phone, the remote screen displays.
To use the NeoTV app to control the TV:
- Make sure that yo ur TV and the streaming player are turned on and connected to the same WiFi network.
- Use your phone instead of the remote control to make streaming player selections on the TV screen.
text_image
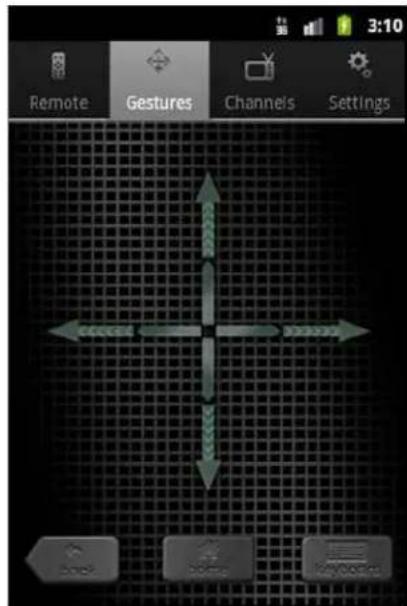
5:14 PM Connected Remote Gestures Channels SettingsGestures
You can use the Gestures screen to slide your finger up, down, left or right to navigate, or you can tap the screen for OK. When you use this screen on your phone, you do not have to look at the phone while you are controlling the streaming player.
text_image
Remote Gestures Channels Settings Back Home My/VideoChannels
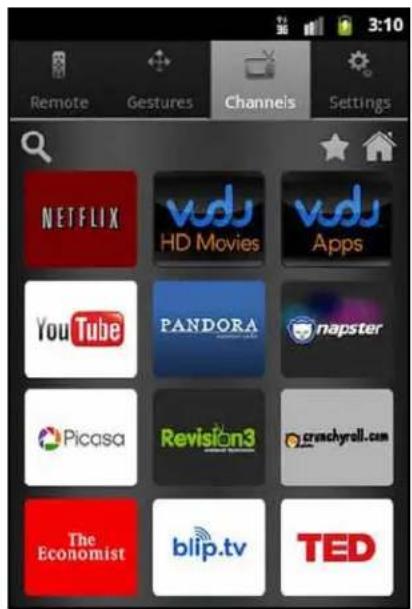
You can use your phone to view the channels that are available on your streaming player and select the one that you want to watch on your TV.

text_image
AT&T 4:50 PM NETFLIX vds HD Movies vds Apps YouTube PANDORA napster Picasa Revision3 vimeo crunchyrell.com The Economist blip.tv Remote Gestures Channels SettingsiPhone Channels
text_image
Remote Gestures Channels Settings NETFLIX vds HD Movies vds Apps YouTube PANDORA napster Picasa Revision3 cranchyroll.com The Economist blip.tv TEDAndroid Channels
Tap the channel that you want to watch on your TV. You can use the star symbol to create a list of favorites.
Favorites
Tap the star icon to go to your list of favorites. You can edit your favorites.
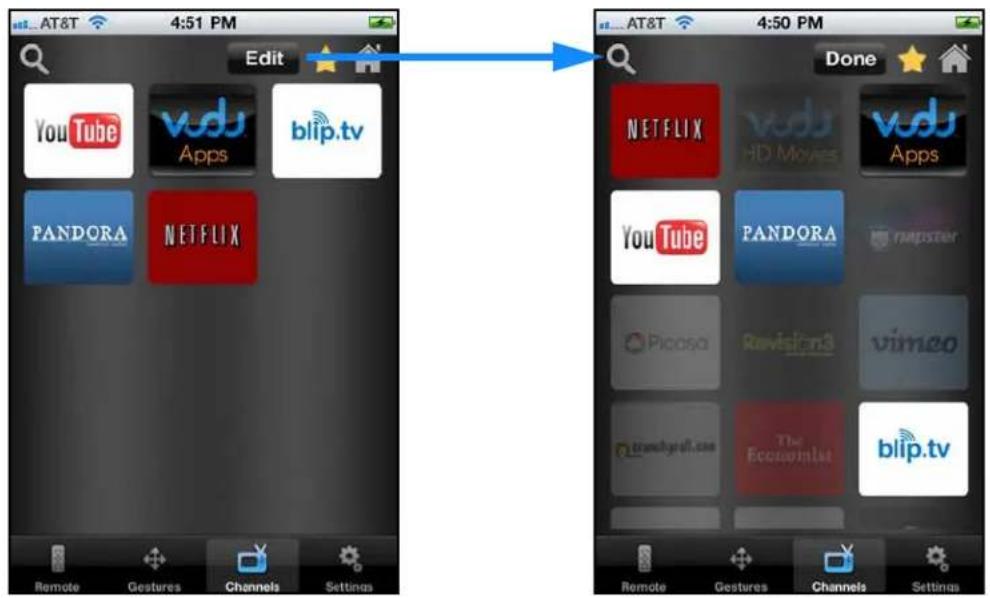
text_image
4:51 PM Edit YouTube vds Apps blip.tv PANDORA NETFLIX Remote Gestures Channels Settings 4:50 PM Done NETFLIX vds HD Movies vds Apps YouTube PANDORA mpster Picosa Revision3 vimeo cranchyall.com The Economist blip.tv Remote Gestures Channels SettingsSettings
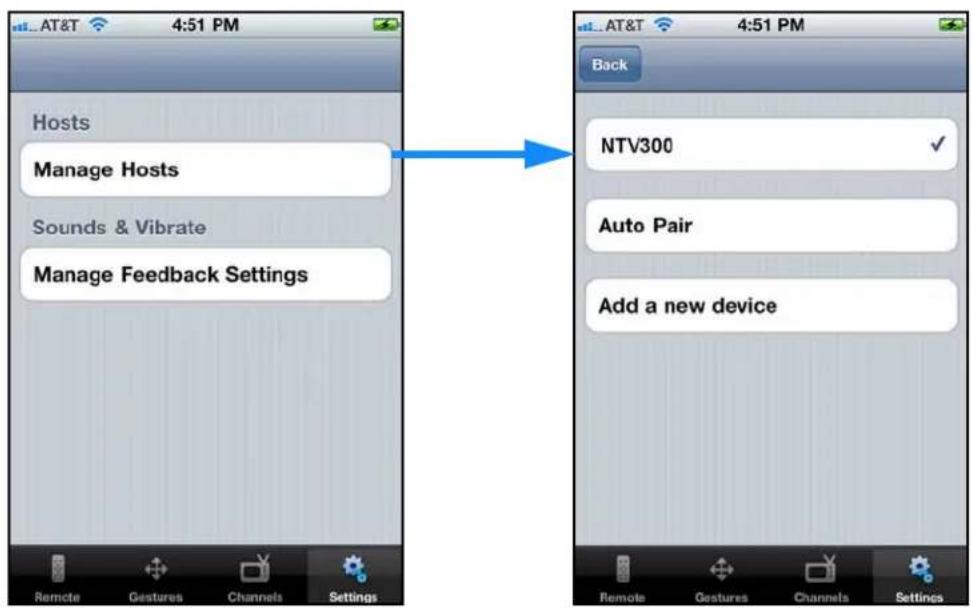
The Hosts setting lets you specify your network connections. Sounds & Vibrate lets you turn sound and vibration on and off.
text_image
Hosts Manage Hosts Sounds & Vibrate Manage Feedback Settings Remote Gestures Channels Settings Back NTV300 ✓ Auto Pair Add a new device 4:51 PM AT&T 4:51The Host screen shows the device that you are currently connected to and lets you change your connection.
- Auto Pair. This option automatically finds the streaming player and connects to it through your WiFi network.
- Add a new device. Manually type in your network information.
Supplemental Information

This appendix covers the following topics:
• Factory Default Settings
• Technical Specifications
Factory Default Settings
You can use the onscreen menus to restore factory settings. Select Settings > Restore Factory Settings. The following table shows the factory settings.
| Feature Setting | |
| Language English | |
| Video mode HDMI auto | |
| Audio output PCM Stereo | |
| TV aspect 16:9 Pillarbox | |
| CEC On | |
| Standby timing 30 minutes |
Technical Specifications
The following table includes technical specifications for the streaming player.
| Feature Description | |
| Data and routing protocol | TCP/IP, DHCP |
| Power input 12V, 1.0A | |
| Power consumption Less than 2W (typical) when streaming HD video | |
| Dimensions 92 x 92 x 25 mm (3.62 x 3.62 x 0.98 inches) | |
| Weight 109g (0.24 lb) | |
| Interfaces | • Wireless LAN: 802.11n 300 Mbps (b/g/n compatible) with WEP, WPA and WPA2 support• Ethernet: 10/100BASE-T, RJ-45 port• HDMI port• AV output connector• Micro SD slot• USB port |
| Video outputs | • 480i (HDMI and composite video)• 480p (HDMI)• 720p (HDMI)• 1080i (HDMI)• 1080p (HDMI) |
| Video modes | • up to 1080p high definition (HD)• 16:9 anamorphic• 4:3 standard |
NeoTV MAX Streaming Player
| Feature Description | |
| Audio output • Analog stereo (mini-jack to left/right/composite video RCA)• Digital over HDMI (5.1 surround sound pass-through and stereo) | |
| Remote control QWERTY keyboard NeoTV MAX infrared remote control | |
| USB media formats • Video: MP4 (H.264), MKV (H.264)• Audio: AAC, MP3• Image: JPG, PNG | |
| Storage expansion | microSD card slot for additional channel storage |
Notification of Compliance
NETGEAR NeoTV MAX Streaming Player NTV300SL
B
Regulatory Compliance Information
This section includes user requirements for operating this product in accordance with National laws for usage of radio spectrum and operation of radio devices. Failure of the end-user to comply with the applicable requirements may result in unlawful operation and adverse action against the end-user by the applicable National regulatory authority.
FCC Requirements for Operation in the United States
FCC Information to User
This product does not contain any user serviceable components and is to be used with approved antennas only. Any product changes or modifications will invalidate all applicable regulatory certifications and approvals
FCC RF Radiation Exposure
RF Exposure Information
The radio module has been evaluated under FCC Bulletin OET 65C (01-01) and found to be compliant to the requirements as set forth in CFR 47 Sections, 2.1093, and 15.247 (b) (4) addressing RF exposure from radio frequency devices. This model meets the applicable government requirements for exposure to radio frequency waves.
This equipment complies with FCC radiation exposure limits set forth for an uncontrolled environment. This equipment should be installed and operated with minimum distance 20cm between the radiator & your body.
FCC Declaration of Conformity
We, NETGEAR, Inc., 350 East Plumeria Drive, San Jose, CA 95134, declare under our sole responsibility that the NETGEAR NeoTV MAX Streaming Player NTV300SL complies with Part 15 Subpart B of FCC CFR47 Rules.
Operation is subject to the following two conditions:
• This device may not cause harmful interference, and
- This device must accept any interference received, including interference that may cause undesired operation.
FCC Radio Frequency Interference Warnings & Instructions
This equipment has been tested and found to comply with the limits for a Class B digital device, pursuant to Part 15 of the FCC Rules. These limits are designed to provide reasonable protection against harmful interference in a residential installation. This equipment uses and can radiate radio frequency energy and, if not installed and used in accordance with the instructions, may cause harmful interference to radio communications. However, there is no guarantee that interference will not occur in a particular installation. If this equipment does cause harmful interference to radio or television reception, which can be determined by turning the equipment off and on, the user is encouraged to try to correct the interference by one or more of the following methods:
- Reorient or relocate the receiving antenna.
- Increase the separation between the equipment and the receiver.
- Connect the equipment into an electrical outlet on a circuit different from that which the radio receiver is connected.
- Consult the dealer or an experienced radio/TV technician for help.
Canadian Department of Communications Radio Interference Regulations
This digital apparatus (NeoTV MAX Streaming Player NTV300SL) does not exceed the Class B limits for radio-noise emissions from digital apparatus as set out in the Radio Interference Regulations of the Canadian Department of Communications.
This Class [B] digital apparatus complies with Canadian ICES-003.
This device complies with RSS-210 of the Industry Canada Rules. Operation is subject to the following two conditions: (1) This device may not cause harmful interference, and (2) this device must accept any interference received, including interference that may cause undesired operation.
IMPORTANT NOTE: Radiation Exposure Statement:
This equipment complies with IC radiation exposure limits set forth for an uncontrolled environment. This equipment should be installed and operated with minimum distance 20cm between the radiator & your body.
