EVA700 - Media player NETGEAR - Free user manual and instructions
Find the device manual for free EVA700 NETGEAR in PDF.

| Brand | NETGEAR |
| Model | EVA700 |
| Product Type | Media Player |
| Dimensions (W x D x H) | 220 x 150 x 40 mm (8.7 x 5.9 x 1.6 in) |
| Weight | 0.5 kg (1.1 lb) |
| Power Supply | 12V DC, 2A |
| Power Consumption | 15W (typical) |
| Video Output | Composite, Component, S-Video, HDMI |
| Audio Output | Stereo RCA, Digital Optical, Coaxial |
| Video Formats Supported | MPEG-1/2/4, DivX, XviD, AVI, WMV |
| Audio Formats Supported | MP3, WMA, AAC, OGG, WAV |
| Image Formats Supported | JPEG, BMP, PNG, GIF |
| Connectivity | Ethernet 10/100, USB 2.0 Host, Wi-Fi 802.11b/g |
| Storage | USB flash drive, external HDD (FAT32/NTFS) |
| Remote Control | Infrared, included |
| Network Protocols | SMB, UPnP AV, FTP |
| Main Functions | Play media from USB, network streaming, photo slideshow |
| Cleaning and Maintenance | Wipe with soft dry cloth; avoid liquids and abrasives. |
| Safety | Use only provided power adapter; keep away from heat sources. |
| Spare Parts and Repairability | Power adapter and remote available from NETGEAR support. |
| General Information | Designed for home media streaming; supports up to 1080i output. |
Frequently Asked Questions - EVA700 NETGEAR
User questions about EVA700 NETGEAR
0 question about this device. Answer the ones you know or ask your own.
Ask a new question about this device
Download the instructions for your Media player in PDF format for free! Find your manual EVA700 - NETGEAR and take your electronic device back in hand. On this page are published all the documents necessary for the use of your device. EVA700 by NETGEAR.
USER MANUAL EVA700 NETGEAR
Digital Entertainer Model EVA700 User Manual
natural_image
Exterior view of a silver NETGEAR wireless router with two antennas and a control panel (no visible text or symbols on the device body)NETGEAR
NETGEAR, Inc.
4500 Great America Parkway
Santa Clara, CA 95054 USA
202-10126-01
May 2006
© 2006 by NETGEAR, Inc. All rights reserved.
Trademarks
NETGEAR is a trademark of Netgear, Inc. Intel, the Intel logo, Intel Viiv, the Intel Viiv logo are trademarks or registered trademarks of Intel Corporation or its subsidiaries in the United States and other countries. Microsoft, Windows, and Windows Media Player are trademarks or registered trademarks of Microsoft Corporation. Other brand and product names are registered trademarks or trademarks of their respective holders.
Statement of Conditions
In the interest of improving internal design, operational function, and/or reliability, NETGEAR reserves the right to make changes to the products described in this document without notice. NETGEAR does not assume any liability that may occur due to the use or application of the product(s) or circuit layout(s) described herein.
Certificate of the Manufacturer/Importer
It is hereby certified that the NETGEAR Digital Entertainer EVA700 has been suppressed in accordance with the conditions set out in the BMPT-AmtsblVfg 243/1991 and Vfg 46/1992. The operation of some equipment (for example, test transmitters) in accordance with the regulations may, however, be subject to certain restrictions. Please refer to the notes in the operating instructions.
Federal Office for Telecommunications Approvals has been notified of the placing of this equipment on the market and has been granted the right to test the series for compliance with the regulations.
Voluntary Control Council for Interference (VCCI) Statement
This equipment is in the second category (information equipment to be used in a residential area or an adjacent area thereto) and conforms to the standards set by the Voluntary Control Council for Interference by Data Processing Equipment and Electronic Office Machines aimed at preventing radio interference in such residential areas.
When used near a radio or TV receiver, it may become the cause of radio interference. Read instructions for correct handling.
SOFTWARE LICENSE AGREEMENT
- This Software License Agreement (the "Agreement") is a legal agreement between you (either an individual or an entity) ("You") and NETGEAR, Inc. ("NETGEAR") regarding the use of NETGEAR's software provided with the NETGEAR Digital Entertainer EVA700 (inside the NETGEAR Digital Entertainer EVA700, any accompanying CDs, and any accompanying documentation; together, the "Software"). BEFORE YOU USE THIS SOFTWARE, CAREFULLY READ THE TERMS AND CONDITIONS OF THIS AGREEMENT. IF YOU ARE NOT AUTHORIZED TO SIGN, THEN DO NOT DOWNLOAD, INSTALL OR USE THE SOFTWARE, BECAUSE BY DOING SO, YOU ARE AGREEING TO BE BOUND BY THIS AGREEMENT. IF YOU DO NOT AGREE TO ALL OF THE TERMS OF THIS AGREEMENT, DO NOT DOWNLOAD, INSTALL OR USE THIS SOFTWARE, AND DESTROY OR RETURN ALL COPIES IN YOUR POSSESSION.
- Subject to the restrictions set forth below, NETGEAR grants You a nonexclusive, personal, nontransferable, perpetual (subject to Section 5) license to install and use 1 copy of the provided version of the Software in object code format, for internal and personal purposes only, on 1 computer. The Software is “in use” on a computer when it is loaded into the temporary memory or installed into the permanent memory of a computer. The license granted hereunder shall not be effective until You have paid all fees in full. Except for the license rights granted above, NETGEAR and NETGEAR’s licensors retain all right, title and interest in and to the Software, including all intellectual property rights therein. YOU MAY NOT (AND MAY NOT ALLOW A THIRD PARTY TO) (a) RENT, LEASE, SUBLICENSE, SELL, ASSIGN, LOAN, USE FOR TIMESHARING OR SERVICE BUREAU PURPOSES OR OTHERWISE TRANSFER THE SOFTWARE OR ANY OF YOUR RIGHTS AND
OBLIGATIONS UNDER THIS AGREEMENT; (b) reverse engineer, decompile, disassemble or attempt to reconstruct, identify or discover any source code, underlying ideas, underlying user interface techniques or algorithms of the Software by any means whatsoever, except to the extent the foregoing restrictions are expressly prohibited by applicable law; (c) remove or destroy any copyright notices or other proprietary markings; (d) attempt to circumvent any use restrictions; (e) modify or adapt the Software, merge the Software into another program or create derivative works based on the Software; (f) use, copy or distribute the Software without NETGEAR's written authorization, excepting 1 copy for archival or backup purposes only; or (g) use the Software or the NETGEAR Digital Entertainer EVA700 for commercial use. YOU MAY NOT (AND MAY NOT ALLOW A THIRD PARTY TO) COPY, REPRODUCE, CAPTURE, STORE, RETRANSMIT, DISTRIBUTE, OR BURN TO CD (OR ANY OTHER FORMAT) ANY COPYRIGHTED CONTENT (INCLUDING BUT NOT LIMITED TO MUSICAL AND MUSIC-RELATED) THAT YOU ACCESS OR RECEIVE THROUGH USE OF THE SOFTWARE. YOU ASSUME ALL RISK AND LIABILITY, CIVIL AND CRIMINAL, FOR ANY SUCH PROHIBITED USE OF COPYRIGHTED CONTENT.
-
THIS AGREEMENT SHALL BE EFFECTIVE UPON INSTALLATION OF THE SOFTWARE AND SHALL TERMINATE UPON THE EARLIER OF: (A) YOUR FAILURE TO COMPLY WITH ANY TERM OF THIS AGREEMENT OR (B) RETURN, DESTRUCTION OR DELETION OF ALL COPIES OF THE SOFTWARE IN YOUR POSSESSION. NETGEAR's rights and your obligations shall survive any termination of this Agreement. Upon termination of this Agreement, You shall certify in writing to NETGEAR or such NETGEAR licensor that all copies of the Software have been destroyed or deleted from any of your computer libraries or storage devices.
-
NETGEAR warrants that the Software will perform substantially in accordance with the documentation accompanying the Software for a period of 90 days after your initial receipt of the Software. NETGEAR's entire liability and your exclusive remedy for breach of this warranty shall be repair or replacement of the Software. This limited warranty shall be void if failure of the Software has resulted from any accident, abuse, misuse or misapplication by You. EXCEPT AS SET FORTH ABOVE, THE SOFTWARE IS PROVIDED ON AN "AS IS" BASIS. YOU ASSUME ALL RESPONSIBILITY FOR SELECTION OF THE SOFTWARE TO ACHIEVE YOUR INTENDED RESULTS AND FOR THE INSTALLATION OF, USE OF AND RESULTS OBTAINED FROM THE SOFTWARE. TO THE MAXIMUM EXTENT PERMITTED BY APPLICABLE LAW, NETGEAR DISCLAIMS ALL WARRANTIES, EITHER EXPRESS, IMPLIED OR STATUTORY, INCLUDING, BUT NOT LIMITED TO, IMPLIED WARRANTIES OF MERCHANTABILITY, NONINFRINGEMENT, QUALITY, ACCURACY, FITNESS FOR A PARTICULAR PURPOSE, AND FITNESS FOR YOUR PURPOSE WITH RESPECT TO THE SOFTWARE AND THE ACCOMPANYING WRITTEN MATERIALS. THERE IS NO WARRANTY AGAINST INTERFERENCE WITH THE ENJOYMENT OF THE SOFTWARE OR AGAINST INFRINGEMENT. NETGEAR DOES NOT WARRANT THAT THE FUNCTIONS CONTAINED IN THE SOFTWARE WILL MEET YOUR REQUIREMENTS, BE UNINTERRUPTED OR ERROR-FREE, OR THAT ALL DEFECTS IN THE SOFTWARE WILL OR CAN BE CORRECTED.
-
In the event that a claim alleging infringement or misappropriation of an intellectual property right arises concerning the Software, NETGEAR in its sole discretion may elect to defend or settle such claim. NETGEAR, in the event of such claim, may also in its sole discretion, elect to terminate this Agreement and all rights to use the Software and require the return and/or destruction of the Software, with a refund of the fees paid for use of the Software less a reasonable allowance for use and shipping. THE FOREGOING ARE NETGEAR'S SOLE EXCLUSIVE OBLIGATIONS, AND YOUR SOLE AND EXCLUSIVE REMEDIES, WITH RESPECT TO INFRINGEMENT AND/OR MISAPPROPRIATION OF ANY INTELLECTUAL PROPERTY RIGHT.
-
UNDER NO CIRCUMSTANCES WILL NETGEAR OR ITS LICENSORS BE LIABLE FOR ANY CONSEQUENTIAL, SPECIAL, INDIRECT, INCIDENTAL OR PUNITIVE DAMAGES WHATSOEVER (INCLUDING, WITHOUT LIMITATION, DAMAGES FOR LOSS OF PROFITS, INTERRUPTION, LOSS OF BUSINESS INFORMATION, LOSS OF DATA OR OTHER SUCH PECUNIARY LOSS), WHETHER BASED ON BREACH OF CONTRACT, TORT (INCLUDING NEGLIGENCE), STRICT LIABILITY, PRODUCT LIABILITY OR OTHERWISE, ARISING OUT OF THE USE OR INABILITY TO USE THE SOFTWARE, EVEN IF NETGEAR AND/OR ITS LICENSORS HAVE BEEN ADVISED OF THE POSSIBILITY OF SUCH DAMAGES. IN NO EVENT SHALL NETGEAR'S AND ITS LICENSORS' AGGREGATE LIABILITY FOR DAMAGES ARISING OUT OF THIS AGREEMENT EXCEED THE FEES PAID BY YOU FOR THE
SOFTWARE. THE FOREGOING LIMITATIONS ARE INDEPENDENT OF THE EXCLUSIVE REMEDY PROVIDED IN SECTION 6 ABOVE AND SHALL APPLY NOTWITHSTANDING ANY FAILURE OF SUCH EXCLUSIVE REMEDY OR OF ITS ESSENTIAL PURPOSE. THE FOREGOING EXCLUSIONS AND LIMITATIONS OF LIABILITY AND DAMAGES SHALL NOT APPLY TO CONSEQUENTIAL DAMAGES FOR PERSONAL INJURY.
-
You may not export or re-export the Software without: (a) the prior written consent of NETGEAR, (b) complying with applicable export control laws, including, but not limited to, restrictions and regulations of the Department of Commerce or other United States agency or authority, and (c) obtaining any necessary permits and licenses. In any event, You may not transfer or authorize the transfer of the Software to a prohibited territory or country or otherwise in violation of any applicable restrictions or regulations.
-
The Software and documentation are considered “commercial computer software” and “commercial computer software documentation,” respectively, pursuant to DFAR Section 227.7202 and FAR Section 12.212, as applicable. Use, duplication or disclosure of the Software and documentation by the U.S. Government is subject to the restrictions set forth in DFAR Section 227.7202 for military agencies and FAR Section 12.212 for civilian agencies. THIS AGREEMENT IS GOVERNED BY THE LAWS OF THE STATE OF CALIFORNIA, U.S.A., WITHOUT REFERENCE TO ITS CONFLICT OF LAWS PRINCIPLES. THIS AGREEMENT WILL NOT BE GOVERNED BY THE U.N. CONVENTION ON CONTRACTS FOR THE INTERNATIONAL SALES OF GOODS. ANY DISPUTE BETWEEN YOU AND NETGEAR ARISING UNDER THIS AGREEMENT SHALL BE SUBJECT TO THE EXCLUSIVE JURISDICTION OF THE COURTS OF THE STATE OF CALIFORNIA. This Agreement is the entire agreement between You and NETGEAR regarding the subject matter herein and supersedes any other communications with respect to the Software. If any provision of this Agreement is held invalid or unenforceable, the remainder of this Agreement will continue in full force and effect. Failure to prosecute a party’s rights with respect to a default hereunder will not constitute a waiver of the right to enforce rights with respect to the same or any other breach.
-
Should you have any questions relating to this Agreement, or if you desire to contact NETGEAR for any reason, please call 1-888-NETGEAR.
Customer Support
Refer to the Support Information Card that shipped with your NETGEAR Digital Entertainer EVA700.
World Wide Web
NETGEAR maintains a World Wide Web home page that you can access at the universal resource locator (URL) http://www.netgear.com.
A direct connection to the Internet and a Web browser such as Internet Explorer or Netscape are required.
Product and Publication Details
Model Number: EVA700
Publication Date: May 2006
Product Family: media player
Product Name: NETGEAR Digital Entertainer EVA700
Home or Business Product: Home
Language: English
Publication Part Number: 202-10126-01
Publication Version Number 1.0
Contents
About This Manual
Conventions, Formats, and Scope ix
How to Print the PDF of This Manual ....x
Chapter 1
Installing Your Digital Entertainer
Package Contents 1-1
Front Panel 1-2
Rear Panel 1-2
Remote Control 1-4
Connecting the Digital Entertainer 1-7
Windows XP Computer Without Intel® Viiv™ Technology 1-8
Installing Software 1-8
Setting up the Digital Entertainer 1-10
Chapter 2
Intel® Viiv™ Technology
Updating the Intel® Viiv™ Software 2-1
Set up your device on the network with Intel® Viiv™ Settings 2-2
Wired Ethernet Network Cable Setup 2-4
Wireless Setup 2-4
Completing the Setup 2-6
Setting up the Intel® Viiv™ Media Library 2-8
Completing your wireless setup if you do not have an Intel® Viiv™ technology verified router ....2-10
Navigating to the Intel® Viiv™ settings screen 2-14
Intel® Viiv™ settings screen menu selections 2-14
Chapter 3
Videos, Pictures, and Music
Media Files and Formats 3-1
Watching Videos 3-2
Viewing Photos 3-2
Playing Music 3-3
Playing Music from the Internet 3-4
Chapter 4
Media Library and Digital Entertainer Settings
Windows Media Connect Software 4-1
Media Player Setup Menu 4-2
Advanced 4-3
IP Config 4-4
WiFi Setup 4-5
Wireless Networks 4-6
Firmware 4-7
Restoring Factory Settings 4-8
Chapter 5
Troubleshooting
No Television Display or Poor Display 5-1
Connecting to the Digital Entertainer 5-2
Windows Media Connect Firewall Conflict 5-3
Physical Connectivity ....5-3
Ethernet Link 5-3
Wireless Link 5-4
IP Address 5-4
Connecting to a Server 5-5
Playing Media 5-6
Appendix A
Technical Specifications
Technical Specifications ...... A-1
Appendix B
Related Documents......B1
About This Manual
The Digital Entertainer Model EVA700 User Manual describes how to install, configure, and troubleshoot the NETGEAR ^® digital entertainer. The information in this manual is intended for readers with basic to intermediate computer and Internet skills.
Conventions, Formats, and Scope
The conventions, formats, and scope of this manual are described in the following sections.
- Typographical conventions. This manual uses the following typographical conventions.
| Italics Emphasis, | books, CDs, URL names |
| Bold User input | |
| Monospace | Screen text, file and server names, extensions, commands, IP addresses |
- Formats. This manual uses the following formats to highlight special messages.

Note: This format is used to highlight information of importance or special interest.

Tip: This format is used to highlight a procedure that will save time or resources.

Warning: Ignoring this type of note may result in a malfunction or damage to the equipment.

Danger: This is a safety warning. Failure to take heed of this notice may result in personal injury or death.
- Scope. This manual is written for the digital entertainer according to these specifications.
Product version NETGEAR Digital Entertainer EVA700
Manual publication date May 2006
Product updates are available on the NETGEAR website at http://kbserver.netgear.com/products/EVA700.asp.
How to Print the PDF of This Manual
A printed manual ships with this product. This manual is also provided in PDF format on the NETGEAR CD. You can print a chapter, or the full manual, according to your needs. Your computer must have the free Adobe Acrobat Reader installed in order to view and print PDF files. The Acrobat Reader is available on the Adobe website at http://www.adobe.com.
- Printing a chapter. Use the PDF of This Chapter link at the top left of any page.
- Click the PDF of This Chapter link at the top right of any page in the chapter that you want to print. The PDF version of the chapter you were viewing opens in a browser window.
- Click the print icon in the upper left of the window.

Tip: If your printer supports printing two pages on a single sheet of paper, you can save paper and toner by selecting this feature.
- Printing the full manual. Use the Complete PDF Manual link at the top left of any page.
- Click the Complete PDF Manual link at the top left of any page in the manual. The PDF version of the manual opens in a browser window.
- Click the print icon in the upper left of the window.

Tip: If your printer supports printing two pages on a single sheet of paper, you can save paper and toner by selecting this feature.
Chapter 1
Installing Your Digital Entertainer
This chapter describes how to install the NETGEAR Digital Entertainer EVA700. For information about product features, see the NETGEAR website at http://www.netgear.com.
Package Contents
The product package should contain the following items:
• NETGEAR Digital Entertainer EVA700.
- Remote control (2AA batteries included).
- Power cable, localized to country of sale.
- Category 5 (CAT5) Ethernet cable.
- Composite Video cable and Audio cable.
• NETGEAR CD, including:
– Media server software.
- This manual.
– The Installation Guide.
– Application Notes and other helpful information.
- Warranty and Support Information card.
If any of the parts are incorrect, missing, or damaged, contact your NETGEAR dealer. Keep the carton, including the original packing materials, in case you need to return the digital entertainer for repair.
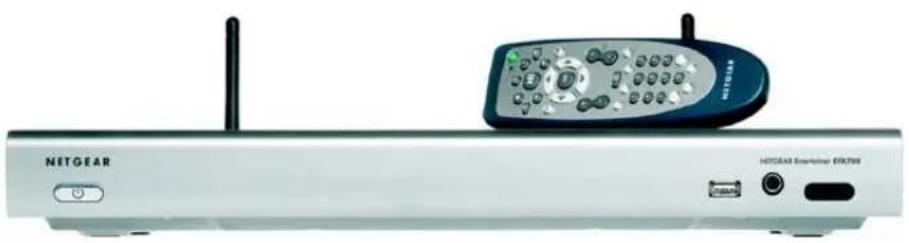
Front Panel
The front panel of the digital entertainer has an LED that shows when it is turned on. It also has a USB port and a jack to connect headphones.

text_image
NEITGEAR Digital Audio Visual Enterprise EV0200 headphones PowerUSB port LEDFigure 1-1
Rear Panel
The rear panel of the digital entertainer is shown in the following illustration:
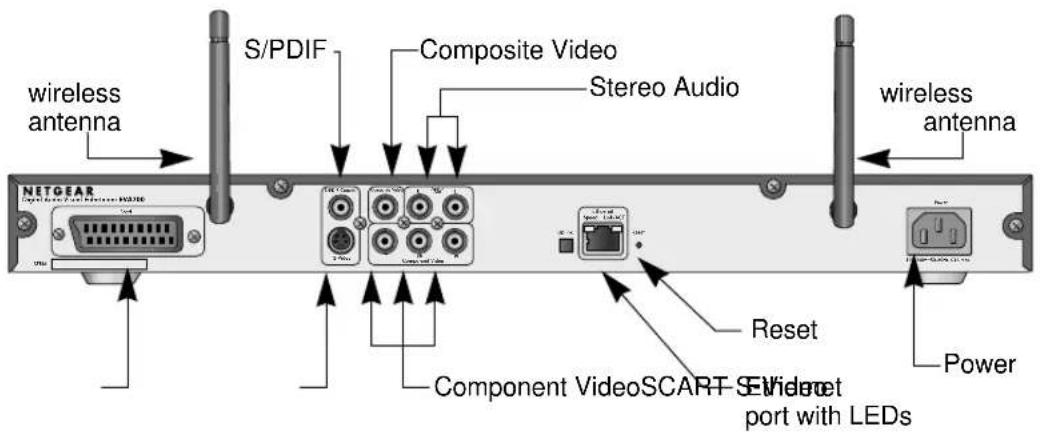
text_image
wireless antenna S/PDIF Composite Video Stereo Audio wireless antenna NETGEAR Component VideoSCART S-Video port with LEDs Reset PowerFigure 1-2
The table below describes the connections on the rear panel when viewed from left to right.
Table 1-1. Rear Panel Connectors
| Connector Description | |
| Wireless antennas | The digital entertainer includes two wireless antennas. |
| SCART This cable is widely used in Europe and Australia.Though this cable is not included in the package, the digital entertainer is compatible with this cable. | |
| S/PDIF (Sony/Philips Digital Interface) port | This cable does not ship with the product, and you will need to change the digital entertainer settings in order to use it. |
| Composite Video and Stereo Audio | The composite video is included, and is compatible with most televisions in the United States. |
| S-Video The audio cable is included, and is compatible with most televisions in the United States. | |
| Component video ports This cable is not included, but the digital entertainer is compatible with it. | |
| Ethernet port 10/100 Mbps Ethernet port for connecting the digital entertainer to a wired local area network (LAN). | |
| Reset button This button resets the digital entertainer. | |
| Power The digital entertainer includes an internal power supply and universal power adapter. | |
Remote Control
Use the remote control to navigate menus, and to select and to watch videos, listen to music, or view photos on your television.
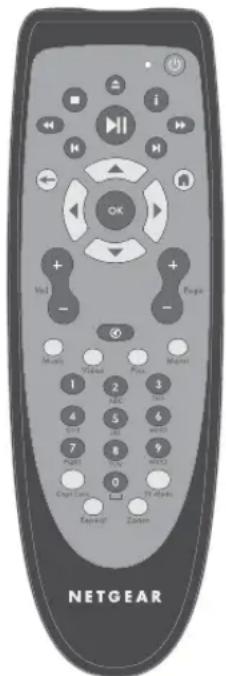
text_image
i OK Vol + - + - Pope - - Master 1 2 3 ABC 4 5 6 000 7 8 9 PUBI TVV Digital Easter Zoom NETGEARFigure 1-3
The table below describes the remote control buttons.
Table 1-1. Remote control buttons
| Button Description | |
| [xc5y] | Power. Turn the digital entertainer off and on. |
| [4w2w] | Back. Go back to the previous screen. |
 | Navigation. Use these buttons to navigate the menu selections. When playing a video, you can use the left and right buttons to seek:• The left button seeks backward by single percentage points in the currently playing stream.• The right button seeks forward by single percentage points in the currently playing stream. |
Table 1-1. Remote control buttons
| Button Description | |
 | Play/Pause. Press Play to play each file in sequence in a list of songs or videos. |
 | Stop. Stop the media that is currently playing. |
 | Rewind. Rewind to the beginning of the media that is currently playing. |
 | Previous. Go to the previous item on a list. |
 | Fast forward. Advance toward the end of the media that is currently playing. |
 | Next. Go to the next item on a list. |
 | Select and Play. Press OK to play an individual song or video, and then stop. |
 | Home. Display the Home menu. |
 | Information. Display media information. |
 | Volume. Increase or decrease volume |
 | Page up and Page down. Scroll up or down. |
 | Mute. Mute or unmute the sound. |
| Music Music | menu. Display the Music menu. |
| Video | Video menu. Display the Video menu to select movies and video clips. |
Table 1-1. Remote control buttons
| Button Description | |
| Pics | Picture menu. Display the Picture menu to select photographs to view. |
| Menu Settings menu. Display the Settings menu. | |
| 0-9 | Numbers. Use this for numeric entry, choosing presets, and searching. When you are playing audio or video media, you can seek in 10% increments (such as 10% or 20%) in the currently playing stream. |
| Caps Lock Caps Lock. Toggle Caps Lock on or off. | |
| TV Mode | TV Output Mode. Change the output mode (such as NTSC or PAL). |
| Repeat | Repeat. Repeat a track or the entire media selection. When you are viewing a slideshow Repeat rotates the photo by 90 degrees. To use this feature the digital entertainer must be connected to a server that supports it, such as Windows Media Connect. |
| Zoom Zoom. | Change the zoom setting for video. |
Connecting the Digital Entertainer
If you are using a Windows XP computer without Intel® Viiv™ technology, connect the digital entertainer first, and install the software as explained in "Windows XP Computer Without Intel® Viiv™ Technology" on page 1-8.
If you are using an Intel® Viiv™ technology, then you must update the software before you connect the digital entertainer. See Chapter 2, “Intel® Viiv™ Technology”.
The digital entertainer is compatible with the following types of video and audio cables:
• Video cable and Audio cable: These two cables are included, and are compatible with most televisions in the U.S.
• SCART: This cable is often used in Europe and Australia, and is not included in the package. However, if you have a SCART cable the digital entertainer recognizes it, and you can continue to use these instructions.
- S-Video, or Component Video: These cables are not included in the package, and you will need to change the digital entertainer settings in order to use them.
The rear view of the digital entertainer is shown below:
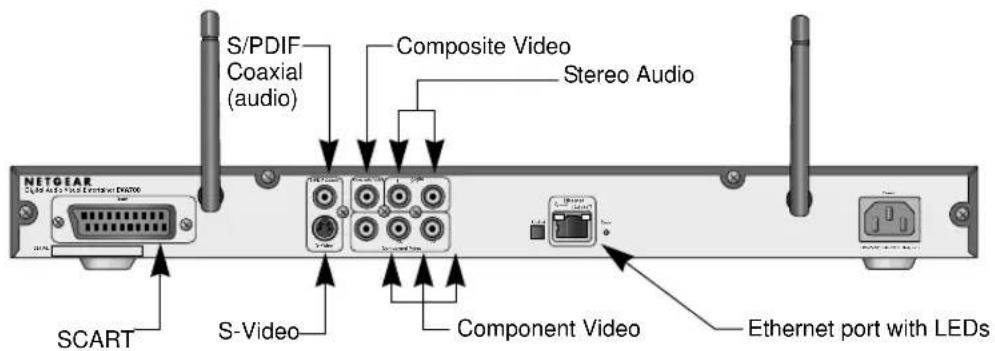
text_image
S/PDIF Coaxial (audio) Composite Video Stereo Audio SCART S-Video Component Video Ethernet port with LEDsFigure 1-4
Follow these steps to connect the digital entertainer.
- Connect the digital entertainer to your television set and audio equipment. If you use a digital a/v receiver, use S/PDIF coaxial cable to connect it.
-
Connect the digital entertainer to the router with an Ethernet cable.
-
Connect the digital entertainer power cord and plug it into an outlet.
- The LED on the front of the digital entertainer lights up to show that it is powered on.
- Install the two AA batteries into the remote control that shipped with the product.
- Use the remote control to turn on the television.
- The television displays "Do you want to use the Viiv network setup?"
If you do not see this message, aim the remote control at the digital entertainer, and push TV mode. You can cycle through the TV modes to get the best display.
Windows XP Computer Without Intel® Viiv™ Technology
After you connect the digital entertainer, you complete the installation in the following order:
- Use the NETGEAR CD to install the software. See “Installing Software” on page 1-8.
- Set up the digital entertainer. See “Setting up the Digital Entertainer” on page 1-10.
Installing Software
Follow these steps to install the software on your Windows XP computer.
- Power on your computer and log in as needed.
- Insert the NETGEAR CD into the CD drive on the computer.
The main CD page opens.

text_image
NETGEAR Resource CD NETGEAR® Everybody's connecting* SmartWizard™ EVA700 NETGEAR Entertainer Install Software View Install Guide View User Manual View Online Manual View Online Support Register Online QuitFigure 1-5
- Select Install Software and then click Next.
- Follow the wizard steps to install the software.
- When prompted, click Next to install Windows Media Connect.
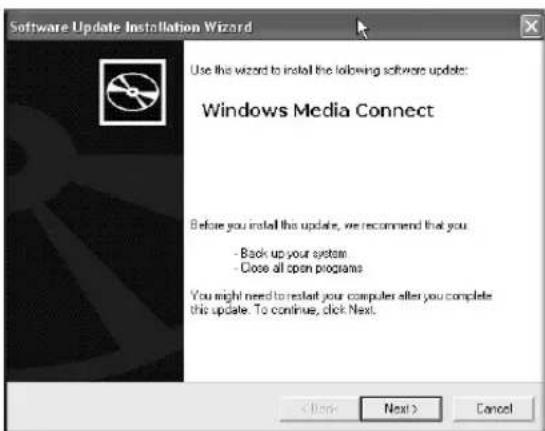
text_image
Software Update Installation Wizard Use this wizard to install the following software update: Windows Media Connect Before you install this update, we recommend that you - Back up your system - Close all open programs You might need to restart your computer after you complete this update. To continue, click Next.Figure 1-6
-
Follow the wizard steps, and click Finish when you are done.
-
Make sure that Folder Sharing in Windows Media Connect is selected.

Note: Windows Media Connect is set to share the My Music and My Pictures folders (and My Video, if present). You can click Sharing in Windows Media Connect to add or remove shared folders. For more information, see the Windows Media Connect help.
Setting up the Digital Entertainer
The digital entertainer must be set up to work with your network and with Windows Media Connect. If you have a wireless network then you will need to know the SSID (also called the network name), and wireless security settings, if used.
Follow these steps:
- Turn on the digital entertainer and turn on the television.
A message on the television screen asks if you want to use Viiv network setup.
-
Select no.
-
Use the remote control to select the onscreen option to allow the digital entertainer to use Windows Media Connect.
-
The television shows the network screen, which displays your network connection.
-
If you are using an Ethernet cable, this screen shows router information such as the MAC address.
- If you are using a wireless connection, see "WiFi Setup" on page 4-5.
-
For help with troubleshooting see “Connecting to the Digital Entertainer” on page 5-2 and “IP Address” on page 5-4.
-
Use the remote control to select the desired media.
Chapter 2
Intel® Viiv™ Technology
To use the instructions in this chapter, you must have an Intel® Viiv™ technology-based PC featuring the Intel® Viiv™ logo below. Otherwise, use the instructions in “Windows XP Computer Without Intel® Viiv™ Technology” on page 1-8.
text_image
intel® VIV™Figure 2-1
Your digital entertainer has been designed to work with Intel Viiv technology-based PCs, to help you add this device to your network and enjoy content from your PC. To enjoy these features, you may need to update the Intel Viiv software on your PC. For more information about Intel® Viiv™ technology, go to www.intel.com/viiv.
Updating the Intel® Viiv™ Software
Insert the CD that came with your digital entertainer into your Intel® Viiv™ technology-based PC, and follow the on-screen instructions to guide you through the upgrade process. You may be prompted to upgrade the Intel® Viiv™ software on your PC if it has not already been upgraded. If an Intel Viiv software upgrade is required follow on-screen instructions to restart your PC to begin using the new software.

Note: The Intel® Viiv™ software will periodically change and be updated to better meet consumer needs. If the screens you see on your PC do not match the screenshots in this guide, please go to www.netgear.com to get the latest version of this user guide.
Set up your device on the network with Intel® Viiv™ Settings
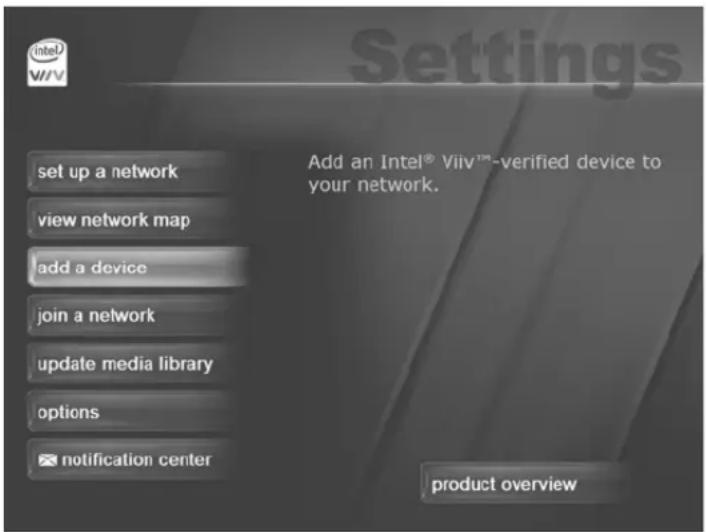
- If you have just updated your software, you will be brought to the Intel® Viiv™ settings screen (shown below) after reboot. (See “Navigating to the Intel® Viiv™ settings screen” on page 2-14 to learn how you can navigate to this screen.)
Select Add a device from the Intel® Viiv™ settings screen.

Note: Set up a network is the option that is highlighted when you first enter this screen. DO NOT select Set up a network.
text_image
set up a network view network map add a device join a network update media library options notification center Add an Intel® Viiv™-verified device to your network. product overviewFigure 2-2
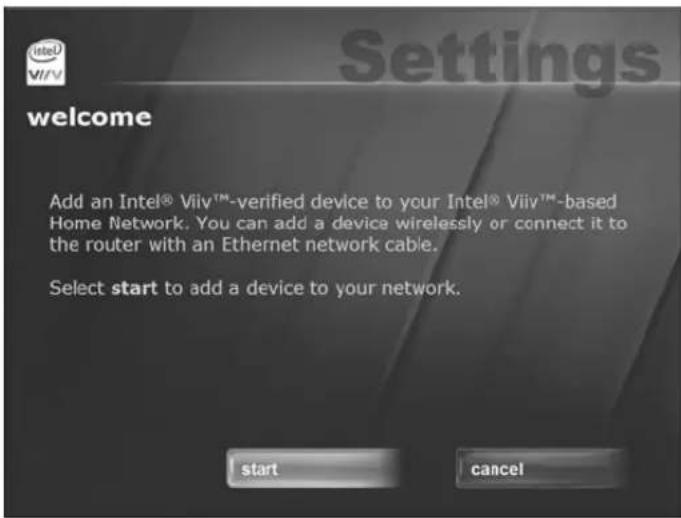
2. Select start.
text_image
Initel® VIV/V Settings welcome Add an Intel® Viiv™-verified device to your Intel® Viiv™-based Home Network. You can add a device wirelessly or connect it to the router with an Ethernet network cable. Select start to add a device to your network.Figure 2-3
- If you are setting up your device by connecting it to your router with an Ethernet network cable, go to "Wired Ethernet Network Cable Setup" on page 2-4. If you are setting up your device with a wireless connection, go to "Wireless Setup" on page 2-4.
text_image
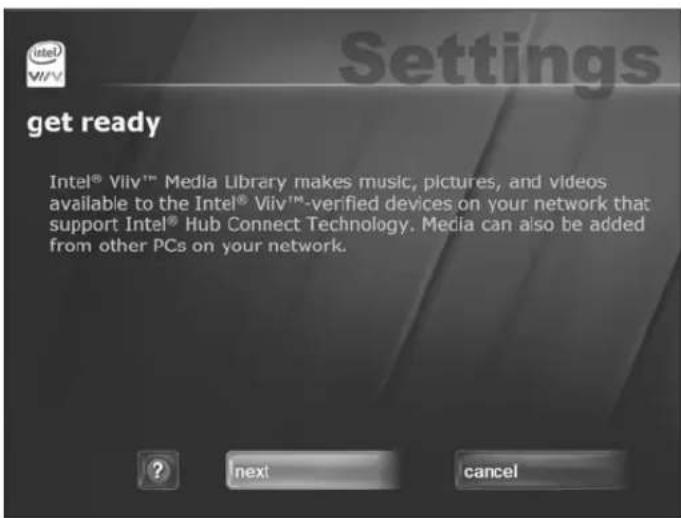
Settings get ready Intel® Viiv™ Media Library makes music, pictures, and videos available to the Intel® Viiv™-verified devices on your network that support Intel® Hub Connect Technology. Media can also be added from other PCs on your network.Figure 2-4
Wired Ethernet Network Cable Setup
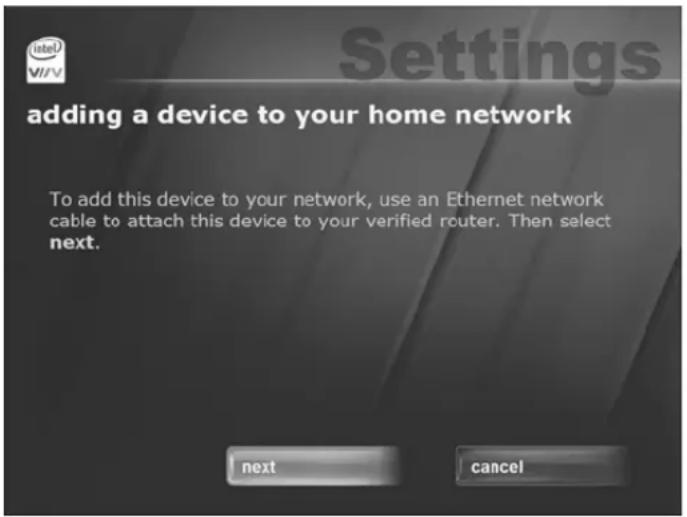
-
Select connecting it to the router with a Ethernet network cable, and then next.
-
Go to your digital entertainer, and make the audio and/or video connections according to the instructions in “Connecting the Digital Entertainer” on page 1-7. Then, power on the digital entertainer.
-
Go back to your PC . Select next.
text_image
adding a device to your home network To add this device to your network, use an Ethernet network cable to attach this device to your verified router. Then select next. next cancelFigure 2-5
- Skip to "Completing the Setup" on page 2-6.
Wireless Setup
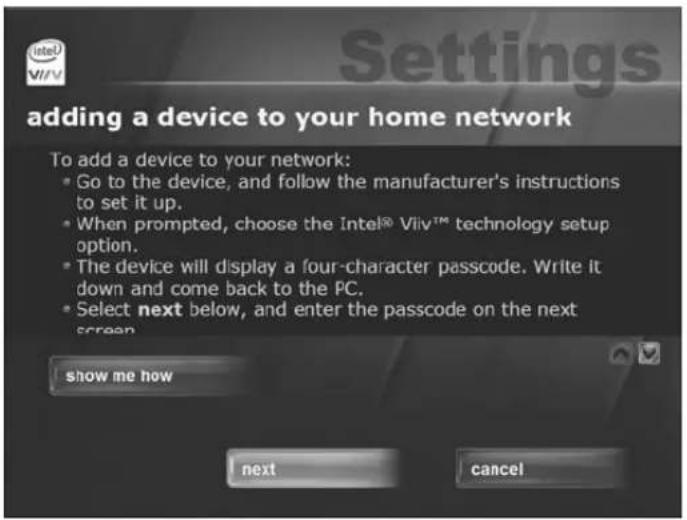
- Select wirelessly, then next. Your PC will check for network equipment.

Note: If the Intel® Viiv™ software does not find an Intel® Viiv™ technology verified wireless router skip to Section 4.
- When you see this screen, go to your device.
text_image
adding a device to your home network To add a device to your network: • Go to the device, and follow the manufacturer's instructions to set it up. • When prompted, choose the Intel® Viiv™ technology setup option. • The device will display a four-character passcode. Write it down and come back to the PC. • Select next below, and enter the passcode on the next screen. show me how next cancelFigure 2-6
- Make the audio and video connections according to the instructions in "Connecting the Digital Entertainer" on page 1-7. Then, power on the digital entertainer.
- Using the remote control for the digital entertainer, follow the instructions on the television screen until you see the Intel® Viiv™ technology setup option. Select yes.
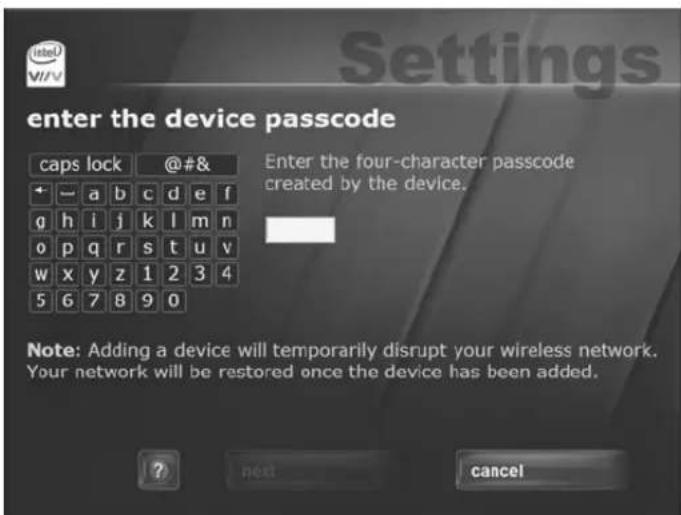
- Follow the on-screen instructions until you see a four-digit passcode.
- Before the ten-minute passcode timer expires, write down the four character passcode, go back to your PC, select next, and enter the passcode. Select next, and continue on to "Completing the Setup" on page 2-6.

Note: If the timer expires before you enter the temporary passcode, restart the device and get a new passcode. You may need to go back to the beginning of “Set up your device on the network with Intel® Viiv™ Settings” on page 2-2 to start again if you cannot successfully enter the new passcode.
text_image
enter the device passcode caps lock @#& + - a b c d e f g h i j k l m n o p q r s t u v w x y z 1 2 3 4 5 6 7 8 9 0 Enter the four-character passcode created by the device. Note: Adding a device will temporarily disrupt your wireless network. Your network will be restored once the device has been added.Figure 2-7
Completing the Setup
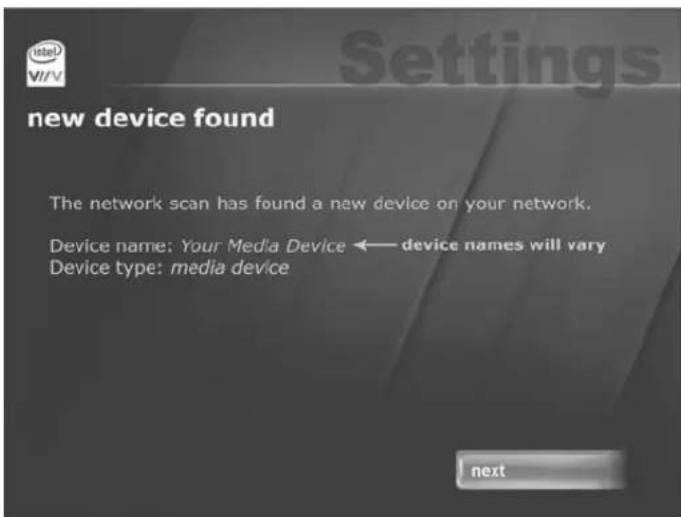
- Your PC will begin adding the device. Please wait...this may take up to five minutes. You will see this screen listing the device name and type when it has been added. Select next.
text_image
new device found The network scan has found a new device on your network. Device name: Your Media Device ← device names will vary Device type: media device nextFigure 2-8
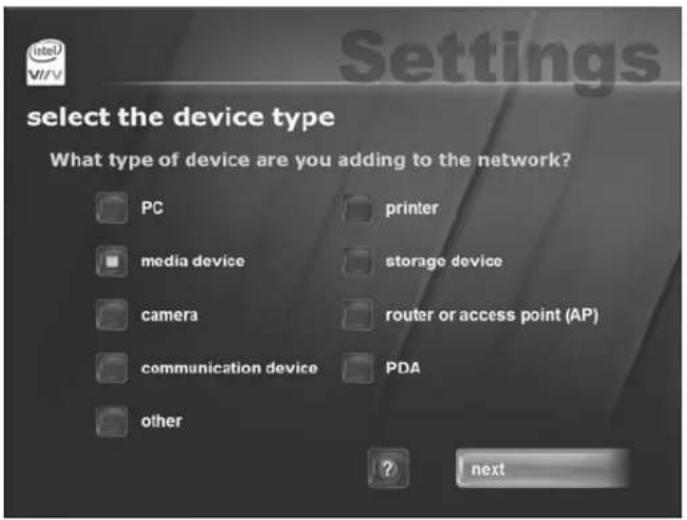
- Select media device, and then next.
text_image
select the device type What type of device are you adding to the network? PC printer media device storage device camera router or access point (AP) communication device PDA other ? NextFigure 2-9
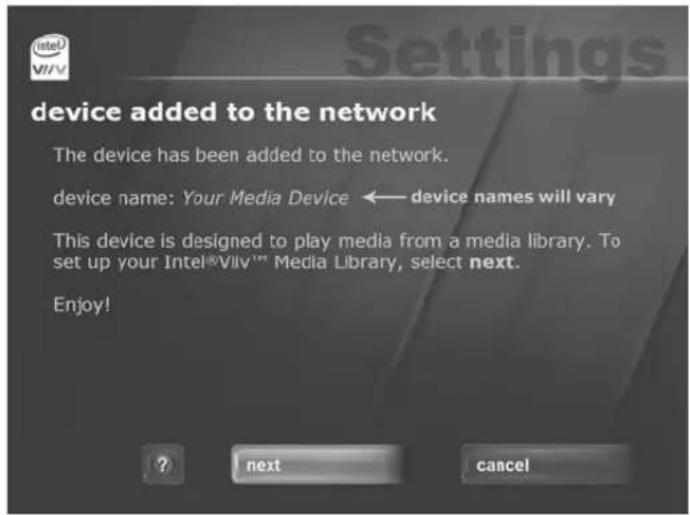
- When you see this screen, your device has been successfully added to the network. Select next to begin building your media library.
text_image
device added to the network The device has been added to the network. device name: Your Media Device ← device names will vary This device is designed to play media from a media library. To set up your Intel®VIV™ Media Library, select next. Enjoy! ? next cancelFigure 2-10
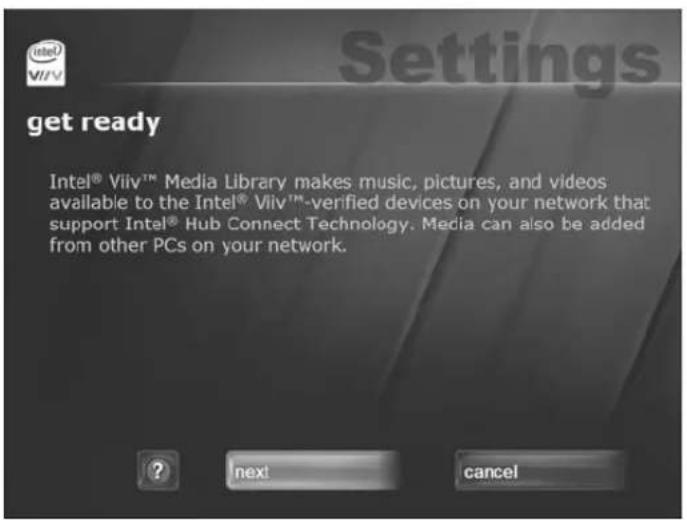
Setting up the Intel® Viiv™ Media Library
- If you have just finished adding your device to your network, you should be brought to this screen automatically.
text_image
Settings get ready Intel® Viiv™ Media Library makes music, pictures, and videos available to the Intel® Viiv™-verified devices on your network that support Intel® Hub Connect Technology. Media can also be added from other PCs on your network. ? next cancelFigure 2-11
Otherwise, go to “Navigating to the Intel® Viiv™ settings screen” on page 2-14 to learn how you can navigate to this screen. Select next.
- Read conditions, select agree to continue.

text_image
media library conditions Setting up an Intel® Viiv™ Media Library will make your media available to select Intel® Viiv™-verified devices on the network. To proceed you must agree to the following conditions: • The media detected by this application can be accessed and played by any other user on this Intel® Viiv™ technology- based PC. • Other PCs on the network, that have been given permission, can access and play this media. • Other media library users can remove media from the media library but they cannot modify or delete the source media files. agree cancelFigure 2-12
- Select Standard setup.
text_image
choose a setup and go Standard Setup adds media under typical folders, such as "My Documents" and "Shared Documents". (Recommended) Custom Setup allows you to add media from other locations or to add or remove media servers.Figure 2-13
- When you see this screen, you have successfully completed the setup of your Intel® Viiv™ Media Library.

text_image
Update complete Media was found on these PCs: Your PC ← device names will vary Your PC If you were expecting more media, select ? ? finishFigure 2-14
Select finish.
Congratulations! Your device is set up!
Completing your wireless setup if you do not have an Intel® Viiv™ technology verified router
Intel® Viiv™ technology verified routers have this logo on them:
text_image
Enjoy with intel VIV™Figure 2-15
-
Refer to the instructions in the Chapter 4, “Media Library and Digital Entertainer Settings” to add your digital entertainer to the network if you do NOT have an Intel® Viiv™ technology verified router.
-
Select View Network Map from the Intel® Viiv™ settings screen on your PC. (Refer to “Navigating to the Intel® Viiv™ settings screen” on page 2-14 for instructions on how to navigate to the Intel® Viiv™ settings screen).
text_image
Settled V/V View a map of your network. By selecting a device icon in the map, you can update device status, including granting and revoking media access permissions. set up a network view network map add a device join a network update media library options notification center product overviewFigure 2-16
- Choose your device from the icons in the network map (the icon should have a “?” on it).
text_image
network map Internet Connection Internet Service Provider: Intel Corporation Internet Your PC1 Your PC2 device names will vary Your Router Your Media Device back network details refreshFigure 2-17
- Select next.
text_image
device details classification: approved name: Your Media Device ← device names will vary category: media device access to Intel® Viv™ Media Server: yes IP Address: 192.168.1.102 ← address will vary If you would like to change the device details, select next. ?Figure 2-18
- Select approved, then next.
text_image
device classification This device's current classification is: approved To change this device's classification, select the classification you want and then select next. For approved devices, you can change other details about the device by selecting next. approved unwanted back nextFigure 2-19
- Select media device, then next.

text_image
select the device type What type of device are you adding to the network? PC printer media device storage device camera router or access point (AP) communication device PDA other ? nextFigure 2-20
- Select yes, then next.
text_image
grant Intel® Viiv™ Media Server access device name: Your Media Device ← device names will vary Do you want to give this device access to the Intel® Viiv™ Media Server on your network? If you select no, your device will remain on the network but will not be able to play content from the Media Server. yes no ? nextFigure 2-21
(The Intel Viiv Software may prompt you to set up additional PCs or devices that are connected to your home network)
- You will see this screen again. Select back to get to the Intel® Viiv™ settings screen.

text_image
network map Internet Connection Internet Service Provider: Intel Corporation Internet Your PC1 Your PC2 device names will vary Your Router Your Media Device back network details refreshFigure 2-22
- Select Update Media Library. Go to Section 3 to build your media library.
Navigating to the Intel® Viiv™ settings screen
You can navigate to the Intel® Viiv™ settings window either by selecting the Intel® Viiv™ logo on your desktop or system tray. The logo can also be found in the More Programs area in Windows* XP Media Center Edition* 2005.
text_image
Intel V/V Intel V/V V/Vor
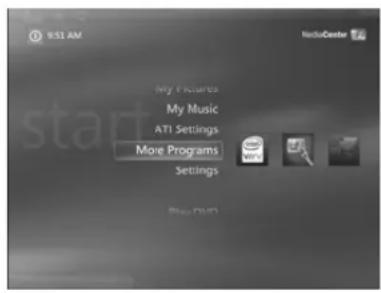
text_image
9:31 AM My Pictures My Music ATI Settings More Programs Settings Play Plus1Figure 2-23
Intel® Viiv™ settings screen menu selections
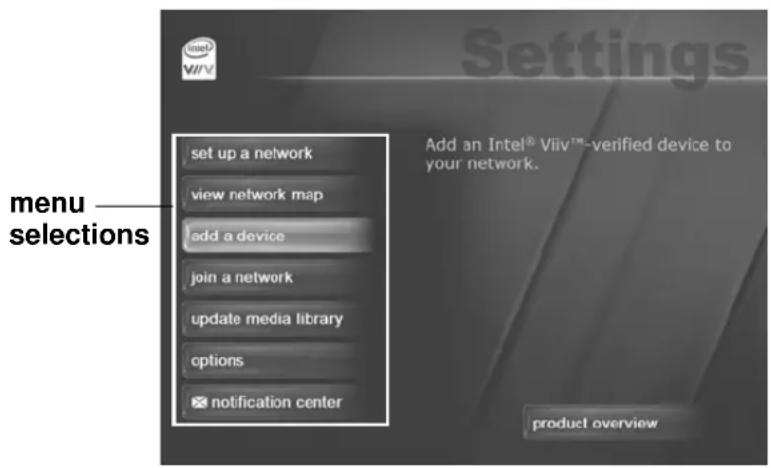
text_image
set up a network view network map add a device join a network update media library options notification center Add an Intel® ViiV™-verified device to your network. menu selections Set Settings product overviewFigure 2-24
| set up a network Guides you through setting up your Intel Viiv technology-based home network1. This menu selection is used when you initially set up your home network1. | |
| view network map Displays a graphical view of your home network connection (if a connection is available), the router, PCs, and other devices. By selecting a device icon on the map, you can update device status, including granting and revoking media access permissions. | 1 including the Internet connection (if a connection is available), the router, PCs, and other devices. By selecting a device icon on the map, you can update device status, including granting and revoking media access permissions. |
| add a device Guides you through adding a device such as a digital media adapter (DMA). Use this menu selection to add new devices to the home network1 after initial set up is complete. | |
| join a network Guides you through adding an Intel Viiv technology-based PC into an existing home network1. | |
| update media library | Helps you manage your media library and allows you to identify what servers and folders to include in your library. |
| options Lets you set options for keeping your Intel Viiv software up-to-date, receiving notifications, turning the Intel® ViivTM Media Server on or off, showing or hiding the tray icon, and automatically updating services. It also tells you how to get product support for Intel Viiv software and view software version information. | |
| notification center | Lists alerts about issues affecting your media, Intel Viiv software, Intel Viiv technology-based PCs, and home network1. |
| product overview Displays an animated overview of Intel Viiv technology and the home network1. | |
1Home networking requires additional devices, software or services. Ability to share some content is limited; subject to authorization from the content owner or service provider and network device capability. Verified devices and services will vary; check for desired features/functionality. May require TV tuner card and/or remote which may be sold separately. Instant on/off feature works after initial boot, when activated. System performance will vary depending on your hardware and software configurations. Intel's network setup software currently only supports DHCP ("Always On") and PPPoE broadband connectivity protocols. PPPoA, PPtP and other protocols require use of router manufacturer's network set up software. Check verified router specifications against Internet provider requirements before purchasing. See www.intel.com/go/viiv_info for more information.
Chapter 3
Videos, Pictures, and Music
Media Files and Formats
To play media, the digital entertainer must be connected to the network, and the media server software must be running. The media files can be stored on any computer on the network, or on a CD in the computer's CD drive. The media player locates the media in your library folders.
Table 3-1. Compatible Video and Audio Formats
| Compatible File Formats | |
| Video Formats • MPEG-1 | VCD format (1.15 Mbps CBR)SD and HD MPEG-2 up to 15 Mbps (using MPEG Audio, AC3, DTS audio formats)SD and HD MPEG-4 (OpenDivX3, 4, 5.11, XviD)SD and HD WMV9 (using WMA audio codec)AVI audio codec: MP3, AC3, PCM, WMA, OggMOV: 3ivX + MP3, 3ivX + PCM (3ivX converted from supported MPEG-4 video codec using Dr. DivX II for MAC OS)MP4: MP4V + MP4A (AAC) (only support non-hinted MP4)Subtitle (MicroDVD, SubRip, Sub Station Alpha, Sami) |
| Audio Formats • MPEG-1 | Layer 1 (MP1)MPEG-1 Layer 2 (MP2)MPEG-1 Layer 3 (MP3)Ogg Vorbis (OGG)AC3 5.1 (AC3)Microsoft PCM Wave (WAV)Advanced Audio Coding (AAC, ADIF, ADTS)Apple MPEG4 AAC Audio (M4A)Microsoft Windows Media Audio version 1 and version 2 (WMA)Microsoft Windows Media Audio Professional (WMA Pro) |
The media server software is installed from the NETGEAR CD as described in Chapter 1, “Installing Your Digital Entertainer”.
Watching Videos
The digital entertainer finds the media files on your computer's hard disk, on other computers, external hard drives, or other storage devices on the network.
To watch a video, follow the steps below.
-
Turn on the television and the digital entertainer.
-
Aim the remote control at the media player and select Video Clips from the main menu displayed on the television.
-
On the Video Clip menu are the following options:
-
Actor. Display video clips by actor.
- All Video. Display all video clips.
- Folder. Display folders with video files in them.
-
Genre. Display video clips by genre.
-
Select the video that you want to watch.
-
You can use the Zoom button on the remote control to zoom in or out when watching a video.
- To display information about the video, push i on the remote control. This option is only available when a movie is listed or playing.
Viewing Photos
The digital entertainer finds the media files on your computer's hard disk, on other computers, external hard drives, or other storage devices on the network.
Use the Pics button on the remote control, or select Photos Albums from the main menu. The Photo Albums menu shows the following selections:
- Album. Show all the digital photographs in a particular album.
- All Pictures. View all pictures.
• Date Taken. View all photographs with a particular date.
- Folders. Show photographs by folder.

Note: The digital entertainer automatically displays one photo after the other. To adjust the length of time each picture is shown for a Slideshow, see “Advanced” on page 4-3.
Playing Music
The digital entertainer finds the media files on your computer's hard disk, on other computers, external hard drives, or other storage devices on the network.
Some audio files may be stored without information in some fields, such as album or genre. If this is the case, these tracks are listed in a category called “Unknown”. For Internet Radio selections, see “Playing Music from the Internet” on page 3-3.
To play music, follow the steps below:

Tip: The Repeat button on the remote control lets you repeat a selection.
- Go to the Music Jukebox menu.
You can use the Music button on the remote control to go to the Music Jukebox menu, or select Music from the main menu displayed on your television.
-
From the Music menu, choose one of the following selections:
-
Album. Display albums in alphabetical order. You can play an entire album, or a specific song in the album.
• All Music. Display all music files in alphabetical order. - Artist. Display music files by artist in alphabetical order.
- Folders. Display the folders containing music files that the media player located.
- Genre. Display music files by genre. The genres that are listed depend on the media files that are on your media server or Internet music server. Some formats, such as MP3 include genre. If a music file does not contain a genre, it is listed as Unknown.
- Playlist. Display music playlists.
- Select the music that you want to play.
Playing Music from the Internet
You can use the digital entertainer to play Internet radio stations such as vTuner.
To play an Internet Radio station:
- From the main menu, select Server Selection.
- Select Live Internet Radio.
- Select the Internet radio station that you want.
- Scroll and select the tracks that you want to play.
Chapter 4
Media Library and Digital Entertainer Settings
This chapter describes how to adjust settings for your media library and the digital entertainer.
- For Intel® Viiv™ technology, see Chapter 2, “Intel® Viiv™ Technology”.
- For Windows Media Connect software, see “Windows Media Connect Software” on page 4-1.
- For the digital entertainer, use the digital entertainer setup menu. See “Media Player Setup Menu” on page 4-2.
Windows Media Connect Software
For Windows XP computers without Intel® Viiv™ technology, the NETGEAR CD installs Windows Media Connect software. You can use it to manage your media library in two ways:
- Allow the media player to have access to your media files.
- Specify which folders contain media files that you want the digital entertainer to use.
You must add the digital entertainer and also use folder sharing in Windows Media Connect in order for the digital entertainer to have access to these files.
After installation you can start Windows Media Connect the same way as other Windows software. From Windows click Start, click All Programs, and then click Windows Media Connect.
To start sharing media files with the digital entertainer, follow these steps:
- From Windows Media Connect, click Sharing, and then click Add.
- Click Browse to select a folder, or type the path to the folder in the Folder box.
By default, Windows Media Connect is set to share the folders My Music and My Pictures. If there is a My Video folder it is also shared.
| Note: To stop sharing for a folder, remove it from the list of shared folders. |
- Select "Make this content available to all devices."
For information about the Windows Media Connect Devices and Settings features, see the Windows Media Connect online help.
Media Player Setup Menu
The NETGEAR Digital Entertainer EVA700 has a Setup menu that can be displayed on the television screen. You can use this menu to go to the following screens:
- Advanced. View or change advanced settings.
- IP Config. View or change the IP configuration.
- WiFi. View or change the wireless network settings.
- Firmware. View the firmware level, and check for updates.
To view or change these settings, follow the steps below:
- Use the remote control to go to the main menu on the television screen.
- Press Menu on the remote control. The Setup button on your television screen is automatically selected.
- Choose the menu that you want to display.
Advanced
The Advanced menu allows you to view and change the following settings:
- Screen Saver. The number of minutes without activity before the screen saver comes on.
- System Language. The language setting for the media player screen displays.
• Encoding Language. The character set used by subtitle files. - Subtitle Language. Some video files have subtitle tracks in different languages. This selects which one is used by default.
- Slide Show Timer. The number of seconds that each picture is displayed.
- Repeat Mode. The default setting is Repeat Off.
To change advanced settings follow these instructions.
- Press Menu on the remote control. The Setup button on your television screen is automatically selected.
- Select Advanced to go to the Advanced menu.
- Use the remote control to change the settings.
- Select one of the buttons displayed at the bottom of the television screen:
- Save. Saves the changes that you made.
- Cancel. Discards the changes that you made.
- Restore Factory Settings. This returns the digital entertainer to its default factory settings, including network settings.

Warning: If you restore factory settings, then you will need to set up the digital entertainer again to run on your network and to access media files.
IP Config
The digital entertainer is set by default to get its IP Address via DHCP. With this setting, the DHCP server on your network assigns the IP Address to the media player, which is a client.
If your network does not use DHCP, you must set up the digital entertainer with a Static IP Address in the range of addresses on your network.
To view or change the IP Configuration, follow these steps:
- Press Menu on the remote control.
The Setup button displayed on the television screen is automatically selected.
-
At the top of the screen, select IP Config.
-
Push OK on the remote control to adjust the following settings:
-
Wired MAC. The MAC address for the wired network (LAN).
- Wireless MAC. The MAC address for the wireless network (if present).
- IP Address.
- Subnet Mask.
- Primary DNS.
- Secondary DNS.
- Default Gateway. The default gateway address for the network.
At the bottom of the television display there are three buttons: Save, Cancel, and Switch to Manual. You can use Switch to Manual to specify the IP address.
Switch to Manual (Static IP Address)
If your network does not use DHCP, then you must set the IP Address for the media player to be in the correct subnet range for your network.
Follow the instructions below if you want to manually set the IP address (use a static IP address).
- On the bottom of the IP Config screen, select Switch to Manual.
The Switch to Manual button at the bottom of the screen changes to Switch to Automatic.
-
Use the number buttons on the remote control to enter the IP Address. Use the OK button to save each number and move to the next field.
-
After the IP address is set, enter the subnet mask.
-
Select the onscreen Save button to save your settings.
- When prompted, press OK on the remote control to reboot the media player.
IP Addresses and Network Connections
The digital entertainer is set from the factory to get its IP Address from a DHCP server. If your network does not use DHCP, you must set up the digital entertainer with a static IP address in the range of addresses on your network.
- If the digital entertainer is set to use DHCP and fails to obtain an IP Address from the server, it will resort to an auto IP address in the range of 169.254.x.x. You can use a static IP address if there is a problem connecting the digital entertainer to the server.
- If the network connection fails, the digital entertainer will time out. Reboot the unit. For more information, see “Physical Connectivity” on page 5-3.
WiFi Setup
The WiFi Setup screen shows the wireless settings for the network that you selected for the digital entertainer to use. To view or change the WiFi setup, follow the steps below.
- Press Menu on the remote control.
- Use the remote control to select WiFi at the top of your television screen.
The screen shows Now Using: Wireless network. The drop-down list shows the network currently in use. - Use the onscreen Select button to display all available networks, and to choose the one that you want.
The screen shows the following information about the current network:
- SSID: The Network Name (SSID).

Note: If your network does not broadcast the Network Name (SSID) then you must enter the SSID manually with the remote control so that the digital entertainer can connect to it.
- Connection. Infrastructure or Ad-hoc mode. Infrastructure is the default setting, which works with a router.
- Security. The default is None. WEP 64-bit/WEP 128-bit can also be entered if your network uses it.
-
Passphrase. You can enter a passphrase, or use the Generate button to create one.
• Key. For wireless networks with WEP, a security key is used. -
Select Save to save your settings, or Cancel to discard your changes.
Wireless Networks

Warning: For video streaming, a wired connection between the computer and the digital entertainer is recommended. A wireless connection can work well if you want to play music or view photos.
If you are planning to use digital entertainer with a wireless network, check the location where you plan to install it for sources of interference. For best results, find a location free of the following common sources of interference:
• Large metal surfaces
- Microwave ovens
• Aquariums or large fish tanks
• 2.4 GHz Cordless phones
In general, 802.11g wireless equipment can communicate through walls.
However, if the walls are made of concrete, or have metal, or metal mesh, the 802.11g effective range will decrease if such materials are between the media player and the wireless router or access point.
Changing the Wireless Network Configuration
For wireless networks you must configure the digital entertainer for the wireless network, and also configure it to work with your media library. You will need to know the network settings such as the SSID (network name). If your network uses wireless security, then you need to know any passwords, passphrases, or keys that are required for access.
Follow these steps:
-
Turn on the digital entertainer and turn on the television.
-
Aim the remote control at the digital entertainer and push Menu.
The Setup menu appears on the television screen.
- Select WiFi at the top of the screen.
By default the Now Using field shows Wired network.
The digital entertainer shows all available wireless networks in your area in the Available field.
-
Select your wireless network.
-
If your network uses wireless security, enter the settings in the Security field, and if applicable in the Passphrase and Key fields.
- WEP. You can do either of the following:
- Manually enter a hex or ascii key in the 'Key' box.
- Enter a passphrase in the Passphrase box and select Generate. The Key box is automatically filled.
- WPA-PSK. Enter the WPA passphrase into the Key box.
-
Select Save to save your settings.
-
Select Reset Network Connection.
The digital entertainer tries to connect to your network.
Firmware
You can view the firmware version and check for updates, even if your computer is not running. The digital entertainer uses your network router to access the Internet. Follow the steps below to check for product updates.

Warning: Do not play media on the digital entertainer during the upgrade.
-
Press Menu on the remote control.
-
At the top of the Setup screen, select Firmware.
The firmware version and file system version are displayed.
-
You can use the following options:
-
Check for firmware update. The digital entertainer checks via the Internet to see if newer firmware is available. Scroll through the list and select the update that you want. The most recent update includes previous versions.
-
Roll back firmware. Change the firmware to an earlier version. The digital entertainer checks via the Internet and displays a list. Scroll through the list and select the firmware version that you want.
-
Select the onscreen OK button to reboot the digital entertainer
Restoring Factory Settings
Restoring the digital entertainer to its default factory settings will erase the network set up and media server selection.

Warning: If you restore factory settings, then you will need to set up the digital entertainer again to run on your network and to access media files.
To restore the factory settings to the digital entertainer, follow the steps below:
- Press Menu on the remote control. The Setup button on your television screen is automatically selected.
- Select Advanced.
- On the Advanced menu screen, select Restore Factory Settings at the bottom of the screen.
Chapter 5
Troubleshooting
This chapter gives information about troubleshooting your digital entertainer.
No Television Display or Poor Display

Note: If the TV Mode that you are using is not the right one for your television, you may not be able to see the menus on the television. To fix this problem, push TV Mode on the remote control. You can cycle through each of the possible TV modes to find and select the correct one.
You can choose S-Video, SCART, Component Progressive, or Component Interlaced.
- S-Video: This cable is not included in the package. If your television uses S-Video, you must provide your own cable and set the Video Output to S-Video.
- SCART: This cable is often used in Europe and Australia, and is not included in the package. However, if you have a SCART cable the digital entertainer will recognize it.
- Component Progressive and Component Interlaced: The digital entertainer is set by default to work with component video cables. To use component progressive you must have a television that supports this technology.
Connecting to the Digital Entertainer
Here are some tips for correcting simple problems that may prevent you from connecting to the digital entertainer.
| Problem Recommended | Action |
| The digital entertainer does not respond to the remote control. | Check the LED on the front panel of the digital entertainer to make sure the power is on.Make sure the television is turned on.The LED on the remote control should flash when you push a button.If the LED does not flash, and the batteries are working, then the remote may be faulty.If the LED does flash, reset the digital entertainer. |
| The digital entertainer does not find my network. | For wireless networks, make sure that the Wireless Network Name (SSID) and security settings of the digital entertainer and media server match exactly.Restart the media server software, then power cycle the media player. |
| The digital entertainer does not find the Windows Media Connect server.The digital entertainer is not in the list of devices in Windows Media Connect. | Make sure that the computer and the digital entertainer are connected to the same network and turned on.If you do not use DHCP on your network, you must set the IP address of the digital entertainer in the range of addresses on your network. SeeIP Address on page 5-4.If the server where Windows Media Connect is running is a member of a Windows domain:Make sure that you are connected to the domain (either by being on the same network, or by using a VPN connection), and then restart folder sharing in Windows Media Connect.If this is not possible, uninstall Windows Media Connect and reinstall it using a local user account. Then set up sharing in Windows Media Connect while logged in with this local user account. |
Windows Media Connect Firewall Conflict
If you are using Windows Media Connect and the built-in Windows firewall, the firewall automatically opens the ports needed to communicate with the digital entertainer.
For other firewalls, you might need to open the following ports:
| Protocol Ports | |
| Transmission Control Protocol (TCP) | 2869, 10243 |
| User Datagram Protocol (UDP) | 1900, 10280, 10281, 10282, 10283, 10284 |
For security reasons it is better to open the ports only for your private and auto IP addresses. For more information, see the Microsoft website at http://www.microsoft.com.
Physical Connectivity
This section explains how to troubleshoot the Ethernet link, wireless link, and the IP address.
Ethernet Link
The digital entertainer expects to be connected to a hub, switch, or router using a standard Ethernet cable. If you want to connect the digital entertainer directly to a PC, either use a crossover Ethernet cable, or press the Uplink button on the back of the digital entertainer so that the button is in a pushed-in position.
If connecting to your network using Ethernet, the link LED on the back of your digital entertainer and on your hub or router should both be on. If not, try the following:
- Make sure that the Ethernet cable connections are secure at the router and at the hub or workstation.
• Make sure that power is turned on to the connected hub or workstation. - If connecting directly to a PC, make sure that the Uplink button on the back of the digital entertainer is in the correct position.
Wireless Link
Please be aware that wireless data rate and throughput decreases as the distance increases between the Access Point (AP) and the digital entertainer. If you are unable to detect any wireless networks, try the following:
- Your wireless AP (access point) may be too far from the digital entertainer. It may be necessary to move either the AP or the digital entertainer so that they are closer together.
- If you are using a wireless connection between the AP (or wireless router) and the computer that serves the media content, you might also need to move the computer and the AP closer together.
- If your access point is configured to disable broadcast of SSID, the digital entertainer will not be able to detect it. You must manually configure your wireless settings as described in “WiFi Setup” on page 4-5.
- The digital entertainer cannot connect to the wireless network while it is connected to the Ethernet network. Disconnect your Ethernet cable.
For detailed information about wireless networks, see the link to this topic listed in “Wireless Communications:” in Appendix B.
IP Address
If the digital entertainer does not receive a valid IP address, try the following:
- Verify that a working DHCP server is on your network. PCs on the network should get IP addresses in the correct range.
If the digital entertainer is set to use DHCP and fails to obtain an IP Address from the server, it will resort to an auto IP Address in the range of 169.254.x.x. You can use a Static IP Address if there is a problem connecting to the server.
- If you are using a wireless network, verify that the digital entertainer is associated with the correct SSID. The SSID that is being used can be displayed by following instructions in “WiFi Setup” on page 4-5.
- If you are using a wireless network, verify that the WEP settings on the digital entertainer match the settings on your access point. This must match the setting on your access point. For information about WEP, see the link listed in “Wireless Communications:” on page B-1.
- If the digital entertainer is set to use DHCP and fails to obtain an IP Address from the server, it will resort to an auto IP Address in the range of 169.254.x.x. You can use a static IP address if there is a problem connecting the digital entertainer to the server.
- If the network connection fails, the digital entertainer will time out. Reboot the unit.
Connecting to a Server
If the digital entertainer cannot find the correct server, try the following:
- Verify that the Media Server software was installed on your PC.
- Verify that the digital entertainer and the PC running the Media Server software are on the same subnet and that they can communicate with each other. In most cases, this means that the first three fields of the two IP address should be the same. Communication can be verified using the Windows Ping utility.
Using Ping
To use ping, follow the steps below:
-
From the Windows toolbar, click on the Start button and select Run.
-
In the field provided, type ping followed by the IP address of the EVA700. Displaying the IP address is described in "IP Config" on page 4-4.
ping 192.168.0.2
- Click OK. You should see a message like this one:
pinging
If the path is working, you see this message:
reply from < IP address>: bytes=32 time=NN ms TTL=xxx
If the path is not working, you see this message:
request timed out
- If you cannot ping the media player, then your network may not be working correctly.
Playing Media
If the digital entertainer cannot play media or music, try the following:
- Check to see if the file is protected. Windows Media Connect is required for Windows XP users to play protected files. See the Microsoft documentation for these products.
- Verify that the file is not corrupt by double-clicking it in the Media Files tab on the Media Server.
Appendix A
Technical Specifications
This appendix describes the dtechnical specifications for the digital entertainer.
Technical Specifications
Network Protocol and Standards Compatibility
Data and Routing Protocols: TCP/IP, DHCP
Power Adapter
North America: 120V, 60 Hz, input
United Kingdom, Australia: 240V, 50 Hz, input
Europe: 230V, 50 Hz, input
Japan: 100V, 50/60 Hz, input
Maximum input current NA: 0.4A, UK, AU: 0.2A, EU: 0.2A, JP: 0.4A
Physical Specifications
Dimensions (H x W x D): 1.5 x 17 x 10 in. (38.1 x 431.8 x 254 mm)
Weight: 4.4 lbs (2.0 kg)
Environmental Specifications
Operating temperature: 32^ to 104^ F ( 0^ to 40^ C)
Operating humidity: 90% maximum relative humidity, noncondensing
Electromagnetic Emissions
Meets requirements of: FCC Part 15 Class B, VCCI Class B, EN 55 022
(CISPR 22), Class B C-Tick N10947
Interface Specifications
LAN: 10BASE-T or 100BASE-Tx, RJ-45
WLAN: 802.11/b/g
Wireless
Radio Data Rates 1, 2, 5.5, 6, 9, 12, 18, 24, 36, 48, and 54 Mbps Auto Rate Sensing
Frequency 2.4-2.5Ghz
Data Encoding: 802.11b: Direct Sequence Spread Spectrum (DSSS) 802.11g: Orthogonal Frequency Division Multiplexing (OFDM)
Maximum Computers Per Wireless Network: Limited by the amount of wireless network traffic generated by each node. Typically 30-70 nodes.
Operating Frequency Ranges: 2.412\~2.462 GHz (US) 2.457\~2.462 GHz (Spain) 2.412\~2.484 GHz (Japan) 2.457\~2.472 GHz (France) 2.412\~2.472 GHz (Europe ETSI)
802.11 Security: 40-bit (also called 64-bit) and 128-bit WEP and WPA-PSK
Appendix B
Related Documents
This appendix provides links to reference documents you can use to gain a more complete understanding of the technologies used in your NETGEAR product.
| Document | Link |
| Internet Networking and TCP/IP Addressing: | http://documentation.netgear.com/reference/enu/tcpip/index.htm |
| Wireless Communications: | http://documentation.netgear.com/reference/enu/wireless/index.htm |
| Preparing a Computer for Network Access: | http://documentation.netgear.com/reference/enu/wsdhcp/index.htm |
| Virtual Private Networking (VPN): | http://documentation.netgear.com/reference/enu/vpn/index.htm |
| Glossary: | http://documentation.netgear.com/reference/enu/glossary/index.htm |
NETGEAR, Inc.
4500 Great America Parkway
Santa Clara, CA 95054 USA

text_image
Black and white barcode image with vertical lines and a central 'B' mark202-10126-01
May 2006
