
NeoTV NTV350 - Media player NETGEAR - Free user manual and instructions
Find the device manual for free NeoTV NTV350 NETGEAR in PDF.


| Product Type | HD Media Player (NeoTV NTV350) |
| Dimensions (H x W x D) | 41 x 172 x 115 mm |
| Weight | 0.308 kg |
| Power Adapter | 100-240V input, 12 VDC/2.5A output |
| Media Sources | USB storage devices, UPnP AV/DLNA servers, Windows Media Player 11 media sharing |
| Video Output | HDMI 1.3a (24bpp deep color, 12 bit xvYCC, HDCP 1.3), Component video, Composite video |
| Audio Output | Stereo analog audio, S/PDIF optical digital audio |
| Supported Video File Formats | WMV 7/8/9, VC-1, H.263, H.264, MPEG 1/2/4, M-JPEG (codec); AVI, Xvid, MOV, MP4, MPEG2-PS, MPEG2-TS, DVD VOB, DVD ISO, FLV, MKV, ASF, RM, RMVB (container) |
| Supported Audio File Formats | MP3, WAV, PCM, LPCM, WMA, WMA Pro, AAC, FLAC, MKA, OGG, APE, Dolby Digital (AC3), DTS |
| Supported Photo File Formats | JPEG (up to 20 megapixels), BMP, GIF, PNG, TIFF |
| Subtitle Formats | srt, sub, sub+idx, ssa, ass, smi, txt, BD subtitle PGS |
| Network Interface | RJ-45, 10/100 BASE-T (wired Ethernet) |
| USB Ports | USB 2.0 x 3 (front and back) |
| Power LED | Front panel indicator |
| Remote Control | Infrared with navigation, playback, options, zoom buttons |
| Firmware Update | Via USB or online (Internet connection required) |
| Factory Reset | Available via menu: Setup > System > Factory Default |
| Operating Temperature | 32°F to 104°F (0°C to 40°C) |
| Operating Humidity | 90% maximum relative humidity (non-condensing) |
| Maintenance | Keep dry; avoid heat sources; clean with soft dry cloth; no user-serviceable parts inside |
| Safety | Use only provided power adapter; do not expose to water; ensure proper ventilation |
Frequently Asked Questions - NeoTV NTV350 NETGEAR
User questions about NeoTV NTV350 NETGEAR
0 question about this device. Answer the ones you know or ask your own.
Ask a new question about this device
Download the instructions for your Media player in PDF format for free! Find your manual NeoTV NTV350 - NETGEAR and take your electronic device back in hand. On this page are published all the documents necessary for the use of your device. NeoTV NTV350 by NETGEAR.
USER MANUAL NeoTV NTV350 NETGEAR
December 2010 202-10672-01 v1.0
©2010 NETGEAR, Inc. All rights reserved.
No part of this publication may be reproduced, transmitted, transcribed, stored in a retrieval system, or translated into any language in any form or by any means without the written permission of NETGEAR, Inc.
Technical Support
Thank you for choosing NETGEAR. To register your product, get the latest product updates, or get support online, visit us at http://support.netgear.com.
Phone (US & Canada only): 1-888-NETGEAR
Phone (Other Countries): See Support information card.
Trademarks
NETGEAR, the NETGEAR logo, ReadyNAS, ProSafe, Smart Wizard, Auto Uplink, X-RAID2, and NeoTV are trademarks or registered trademarks of NETGEAR, Inc. Microsoft, Windows, Windows NT, and Vista are registered trademarks of Microsoft Corporation. Other brand and product names are registered trademarks or trademarks of their respective holders.
DTS
Manufactured under license under US Patent numbers: 5,451,942; 5,956,674; 5,974,380; 5,978,762; 6,487,535 and other US and world patents issued and pending. DTS and the Symbol are registered trademarks, and DTS 2.0 + Digital OUT and the DTS logos are trademarks of DTS, Inc. Product includes software. Copyright DTS, Inc. All Rights Reserved.
Dolby Digital
Dolby and the double-D symbol are trademarks of Dolby Laboratories. Manufactured under license from Dolby Laboratories. Confidential unpublished works. Copyright 1992-1997 Dolby Laboratories. All rights reserved.
Copy Protection Technology
This item incorporates copy protection technology that is protected by U.S. patents and other intellectual property rights of Rovi Corporation. Reverse engineering and disassembly are prohibited.
Statement of Conditions
To improve internal design, operational function, and/or reliability, NETGEAR reserves the right to make changes to the products described in this document without notice. NETGEAR does not assume any liability that may occur due to the use, or application of, the product(s) or circuit layout(s) described herein.
Revision History
| Publication Part Number | Version | Publish Date | Comments |
| 202-10672-01 | v1.0 | December 2010 | First publication |
Contents
Chapter 1 Getting Started
NeoTV 350 HD Media Player (NTV350)....5
NeoTV 350 Cabling 6
Remote Control 7
Navigating Menus....7
Digital Media File Formats 8
Chapter 2 Video
Video File Formats 9
Browsing or Searching for Videos 9
Watching Videos 10
Adjusting the Video You Are Watching....11
Video Playback Options 11
Chapter 3 Music
Music File Formats 12
Browsing or Searching for Music 13
Listening to Music....14
Music Playback Options ....14
Creating a Playlist....15
Chapter 4 Photos
Browsing or Searching for Photos 16
Viewing Photos....17
Adjusting the Slide Show Settings 18
Playing Music during a Slide Show 18
Chapter 5 Internet Media
Accessing Internet Media 19
Viewing Internet Photos 19
Viewing Weather and Stocks 20
Chapter 6 File Manager
Using File Manager to Copy Files ....22
Browsing or Searching for Files 23
Accessing Files on a USB Device .....23
Accessing Network Shares or a Media Server....24
Chapter 7 Enabling Win7 File Sharing
File Sharing with Win7 Password Protection 25
File Sharing without Win7 Password Protection....27
Chapter 8 Setup
System Settings 30
System Information 31
Video Settings 31
TV System Settings 32
Audio Settings 33
Network Settings 33
Chapter 9 Troubleshooting
FAQs 34
Troubleshooting 35
Appendix A Supplemental Information
Factory Settings 36
Technical Specifications. 36
Appendix B Compliance Notification
NeoTV 350 HD Media Player (NTV350)
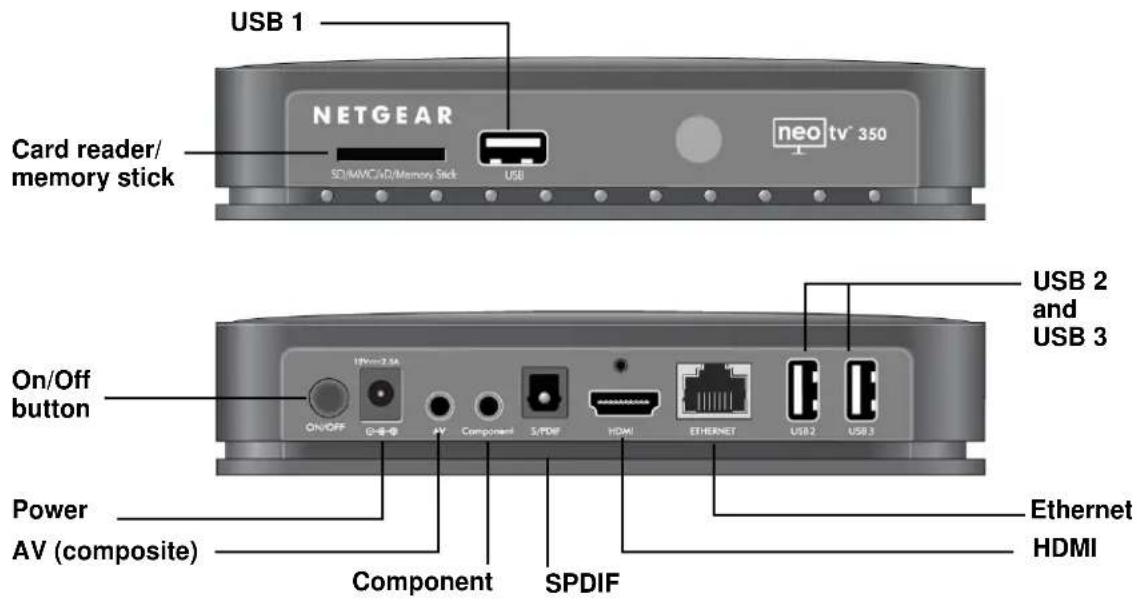
Figure 1. Front and rear panels
NeoTV 350 Cabling
The NeoTV 350 is compatible with HDMI, component, or AV (composite) cables. You can play media from your USB devices, and you can also connect the NeoTV 350 to your home network.
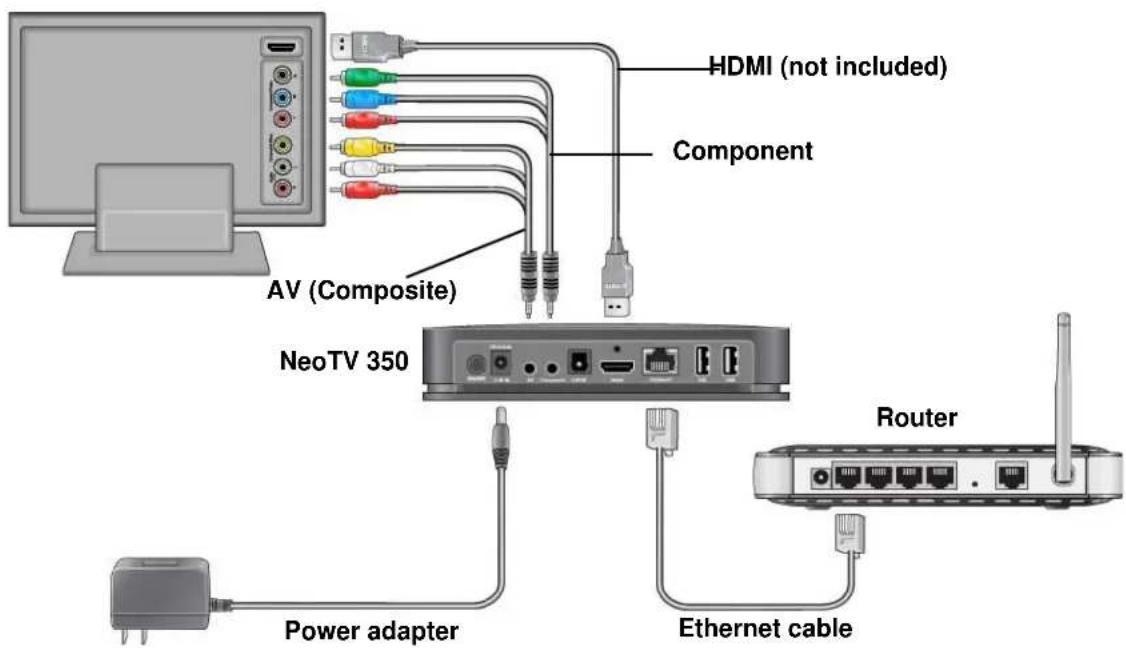
Figure 2. NeoTV 350 cabled to a TV and to a router
For help with installation, see the NeoTV 350 Installation Guide that shipped with your product. In addition to the wired Ethernet connection shown here, the installation guide shows how to use add-on products for a wireless or Powerline connection.
Remote Control
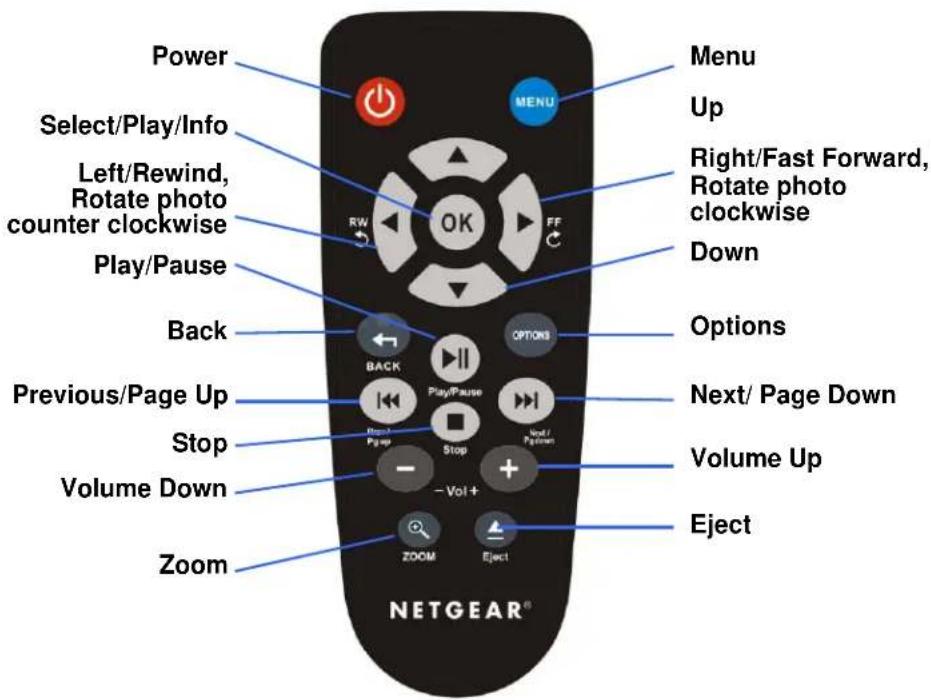
Figure 3. Remote control buttons
Navigating Menus
Press Menu on the remote control to go to the main menu. You can use the arrow buttons on the remote control to scroll through the icons on the main menu from left to right.


Digital Media File Formats
The NeoTV 350 supports the media file formats shown in the following table.
| Media File Format | |
| Audio MP3, WAV, PCM, LPCM, WMA, WMA Pro, AAC, FLAC, MKA, OGG, APE, Dolby® Digital (AC3), DTS | |
| Photos JPEG files up | to 20 megapixels, BMP, GIF, PNG, TIFF |
| Video Codec format + | WMV 7/8/9+ VC-1+ H.263+ H.264+ MPEG 1/2/4+ M-JPEG |
| Video Container format | VI, Xvid, MOV, MP4, MPEG2-PS, MPEG2-TS, DVD VOB, DVD ISO, FLV, MKV, ASF, RM, RMVB |
Video File Formats
The NeoTV 350 supports the following video file formats.
| Video Codec format | WMV 7/8/9, VC-1, H.263, H.264, MPEG 1/2/4, M-JPEG |
| Video Container format | VI, Xvid, MOV, MP4, MPEG2-PS, MPEG2-TS, DVD VOB, DVD ISO, FLV, MKV, ASF, RM, RMVB |
| Subtitle format | srt, sub, sub+ idx, ssa, ass, smi, txt, and BD subtitle PGS |
Browsing or Searching for Videos
You can use the Video Options menu to search for videos or to browse.
- Press Menu on the remote control and select Video from the main menu.
- Select a location (local, network, or media server).
- Press Options on the remote control. A pop-up menu displays:
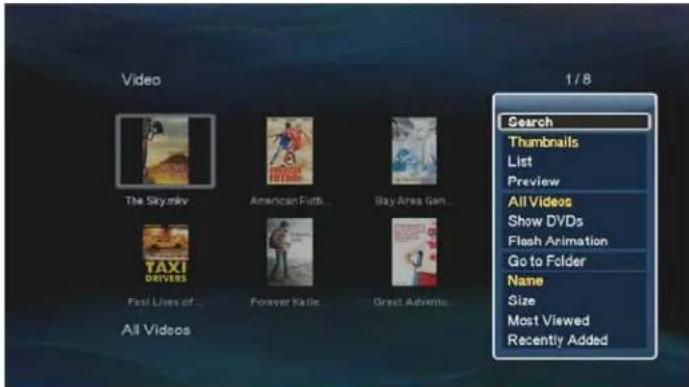
The following menu selections are available:
• Search. Search for a video.
• Thumbnails. Display files in thumbnail view.
• List. Display files as a list.
• Preview. Preview video files.
• All Videos. Display all video files.
• Show DVDs. View DVD contents, such as DVD iso or files.
• Flash Animation. Display only flash animation files.
- Go to Folder. Go to File Manager to view folders.
• Name. Sort files by name.
• Size. Sort files by size.
• Most Viewed. Sort files so that the most viewed display first.
• Recently Added. Display recently added video files.
- Select an option, and press ▶ Play to watch the video.
Watching Videos
- Press Menu and select Video from the main menu.
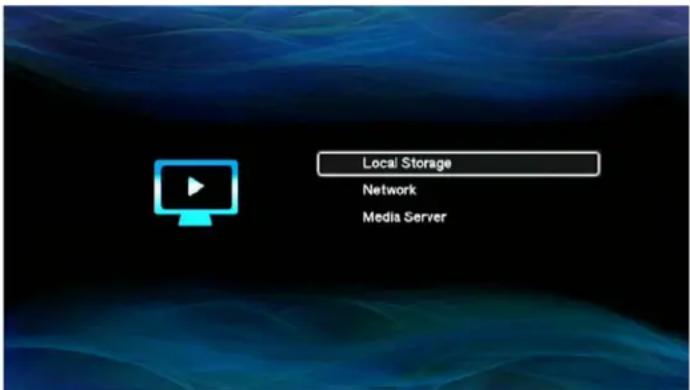
The screen displays these choices:
-
Local storage. Your video files are on a USB device connected to a USB port on the NeoTV 350.
• Network. Your video files are located the same Windows network as the NeoTV 350.
• Media Server. Your video files are on a UPnP DMA-compliant device. -
Select the locatio n of the video that you want to watch.
- Select the video, and it starts playing.
Adjusting the Video You Are Watching
• To exit a video, press Stop or Back.
- The aspect ratio is set to 16:9. If you want to change it, press Home and select Setup > Video > Aspect Ratio.
- To adjust the screen size, press Zoom on the remote control. Each time you press Zoom, the screen changes like this: 1x > 1.1x > 1.2x > 2x > 0.5x > 0.8x > 0.9x .
- Press OK to show the video content information.
- You can use >> to jump to next chapter, or << to jump to previous chapter.
• You can use video playback options, as described in the next section.
Video Playback Options
While you are watching a video, you can press Options to display this pop-up menu:
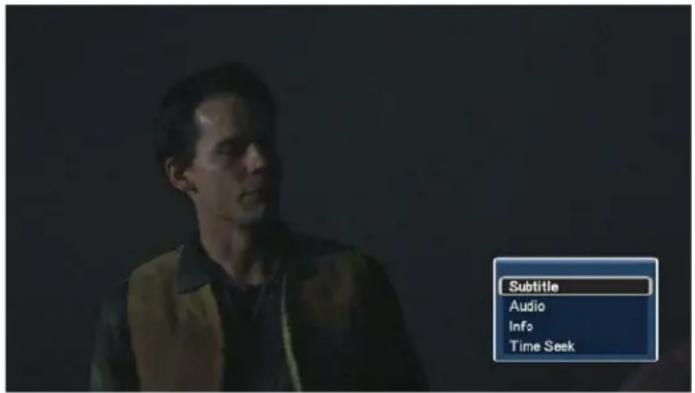
The Options pop-up menu includes the following:
- Subtitle. Display subtitles for the video.
You can select a different subtitle format if the subtitles are not working correctly or if an error displays. Select Setup > System > Text encoding, and select the correct encoding.
• Audio. You can choose a different audio output, such as Dolby 5.1 ch, 2 ch, or DTS.
• Info. Show video content information.
• Time Seek. You can use this to go to a specific time within the video.
Music File Formats
The NeoTV 350 supports the following audio file formats:
AAC
APE
• Dolby® Digital (AC3)
• DTS
FLAC
LPCM
MKA
MP3
OGG
- PCM
• WAV
WMA
WMA Pro
Browsing or Searching for Music
You can use the Music Options menu to help locate songs.
- Press Menu and select Music from the main menu.
- Select the location of your music files (local, network, or media server).
- Press Opti ons on the remote control.
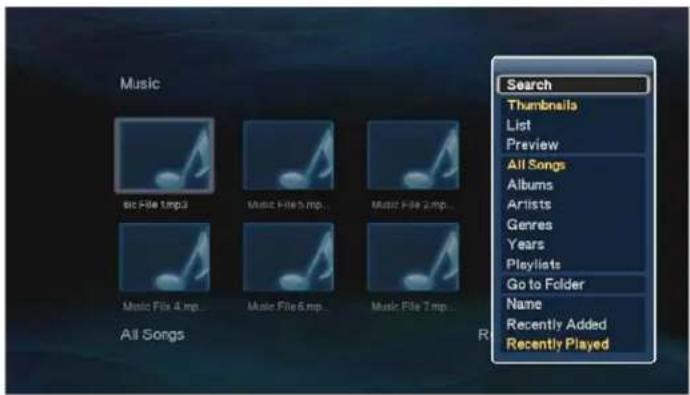
The pop-up Options menu includes the following:
• Search. Search for a song.
• Thumbnails. Display files in thumbnail view.
• List. Display files as a list.
• Preview. Preview songs files.
• All Songs. Display all tracks.
• Albums. Sort songs by album.
• Artists. Sort songs by artist.
- Genres. Sort songs by genre.
• Years. Sort songs by year.
• Playlists. View playlists.
- Go to Folder. Go to File Manager to view folders.
• Name. Sort files by name.
• Recently Added. Display recently added songs.
• Recently Played. Display recently played songs.
Listening to Music
- Press Menu and select Music from the main menu:
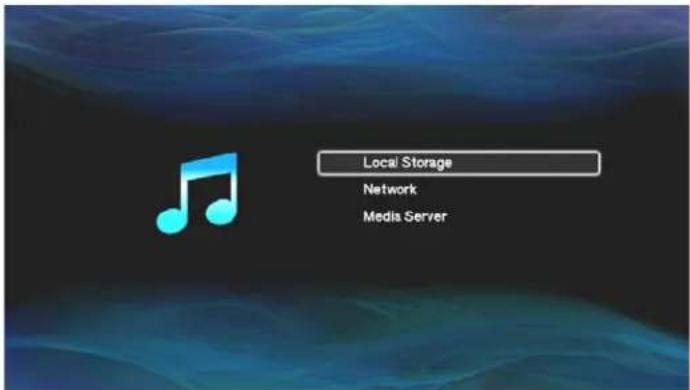
The screen displays these choices:
- Local storage. Your music files are on a USB device connected to a USB port on the NeoTV 350
• Network. Your music files are on the same Windows network as the NeoTV 350.
• Media Server. Your music files are on a UPnP DMA-compliant device.
- Select the location of the music that you want to listen to.
- Select an album or an individual track, and it starts playing.
You can use the music playback options to repeat tracks. You can also create playlists (see Creating a Playlist on page 15.
Music Playback Options
- Press Menu and select Music from the main menu.
- Select the location of your music files (local, network, or media server).
- Press Options on the remote control.
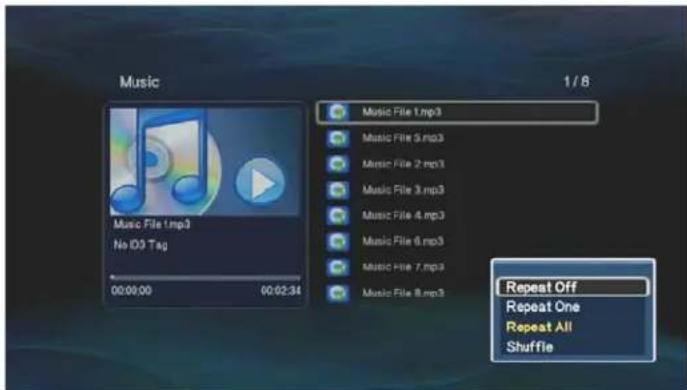
The pop-up Options menu includes the following:
• Repeat Off. Do not repeat tracks.
• Repeat One. Repeat a single track.
- Repeat All. Repeat all selected music tracks.
• Shuffle. Shuffle the selected music tracks.
Creating a Playlist
The NeoTV 350 supports M3U playlists. There are two ways you can create a playlist:
• Use your PC to create a playlist in the same folder as the music files.
• Use the NeoTV 350 to create a playlist.
To use the NeoTV 350 to create a playlist from files on a USB device:
In this example, the USB device is connected to USB1.
- Press Menu and select File Manager > USB > USB1.
- Press Opti ons on the remote control, and select File Copy/Del.
- Select Multiple Select.
- Press the ▶ Play/Pause button on the remote control to add music to the list on the left side.
- Press ▲ Eject on the remote control and select Save Playlist.
Browsing or Searching for Photos
You can use the Photo Options menu to locate photos that you want to view.
- Press Menu and select Photo from the main menu.
- Select the location of your music files (local, network, or media server).
- Press Options on the remote control, and a pop-up menu displays:
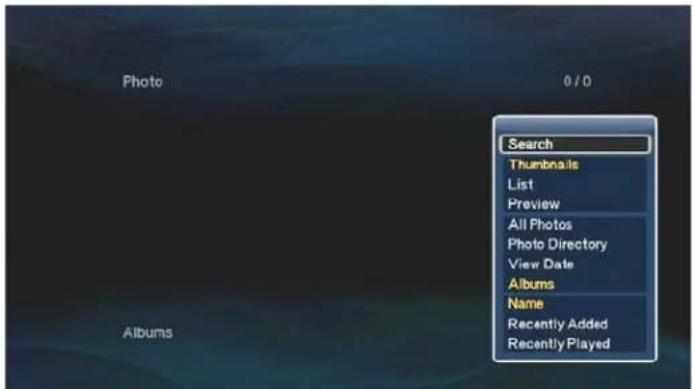
The Options menu includes the following:
• Search. Search for photos.
• Thumbnails. Display files in thumbnail view.
• List. Display files as a list.
• Preview. Preview video files.
• All Photos. Display all photos files.
• Photo Directory. Sort by directory or folde.r.
• View Date. Sort photos by the date they were last viewed.
• Albums. Sort by photo album.
• Name. Sort files by name.
• Recently Added. Display recently added photos.
• Recently Viewed. Display recently viewed photos.
Viewing Photos
- Press Menu and select Photo on the main menu.
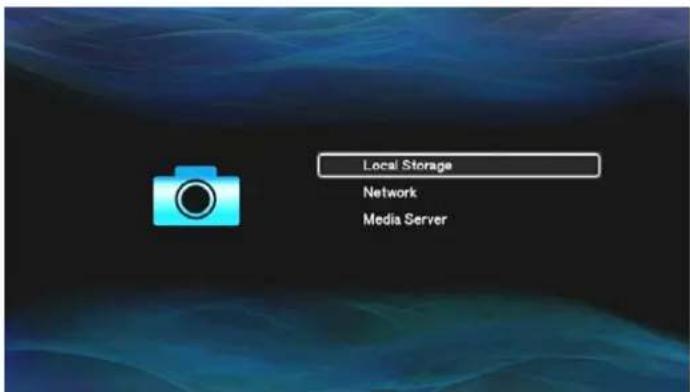
The screen displays these options:
-
Local storage. Your photos are on a USB device connected to a USB port on the NeoTV 350.
• Network. Your photos are located on the same Windows network as your NeoTV 350.
• Media Server. Your photos are on a UPnP DMA-compliant device. -
Select the location of the photos that you want to view. A screen similar to the following displays:
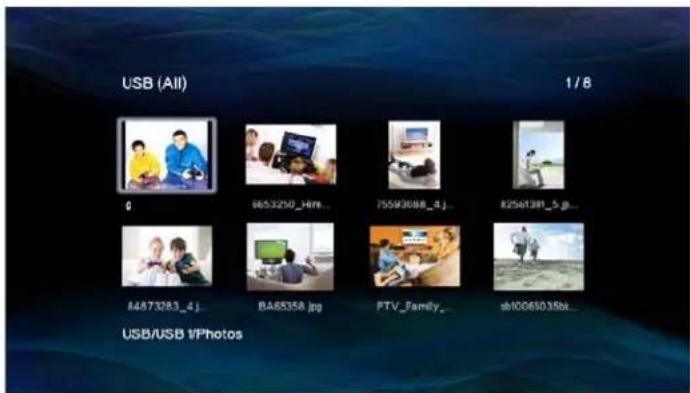
- Select the photos that you want to view, and they are displayed as a slide show.
You can press the Left or Right arrow button on the remote control to rotate a photo.

flowchart
graph LR
    A["Rotate photo counter-clockwise"] --> B((OK))
    B --> C["Rotate photo clockwise"]
Adjusting the Slide Show Settings
When you are viewing a photo, press Options.
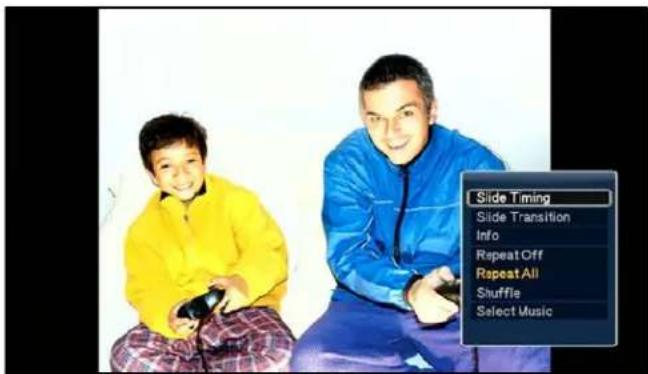
The following selections display:
- Slide Timing. Change the length of time that each slide is displayed.
- Slide Transition. Select the transition that you want to use between slides.
• Info. Show information about this photo, such as the size, dimensions, and date.
- Repeat Off. Do not repeat the slide show.
• Repeat All. Repeat all selected photos.
• Shuffle. Shuffle the selected photos.
- Select Music. Select music to listen to while viewing the slide show. The music must be stored locally (connected to a USB port).
Playing Music during a Slide Show
- Insert your USB device with music in MP3 format into a USB port on the NeoTV 350
- Press Me nu and select Photo from the main menu.
- Select the locatio n of the photos that you want to view.
- Press Options, and choose Select Music.
- Select the music that you want to listen to while viewing photos.
Accessing Internet Media
Press Menu and select Internet Media. The following screen displays:
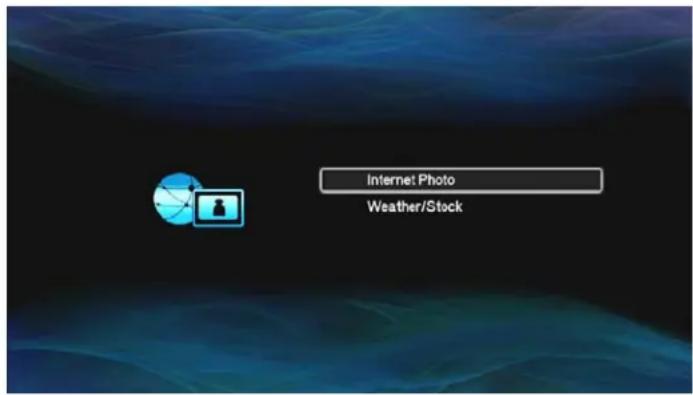
You can view photos, or weather and stocks.
Viewing Internet Photos
Press Menu and select Internet Media > Internet Photo, and the following screen displays:
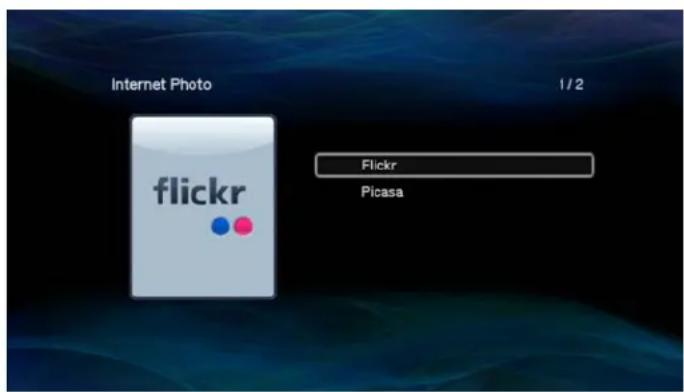
Select either Flickr or Picasa to view your Internet photos.
Viewing Weather and Stocks
- Press Menu and select Internet Media > Weather/Stock, and the following screen displays:
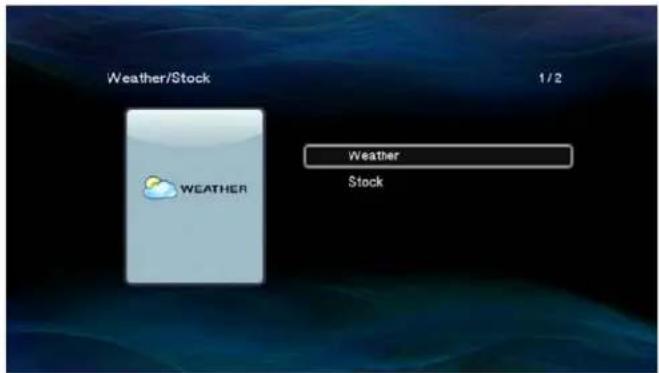
- Select Weather or Stock.
Weather
You can view weather for specific locations, and you can set up favorites.
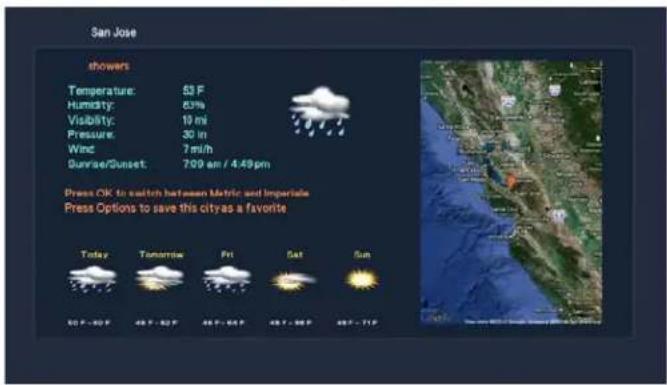
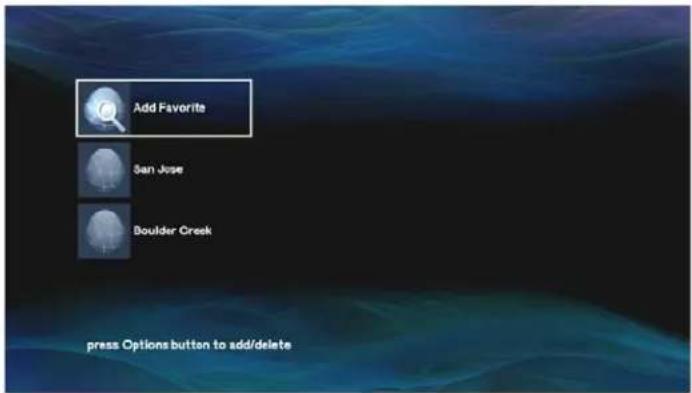
To set up favorites, press Options on the remote control.
Stock
Press Menu and select Internet Media > Weather/Stock > Stock to display the following screen:
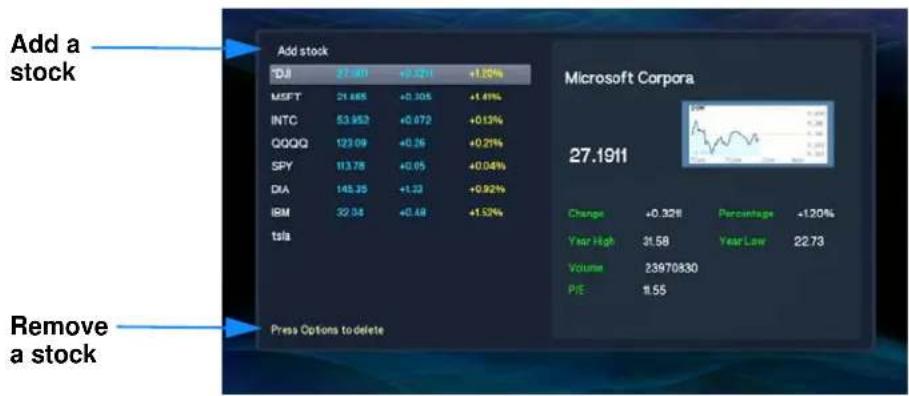
Select Add Stock at the upper left corner of the screen to add the stocks that you want to view. An onscreen keyboard displays. Use the keyboard to type the stock that you want to view.
To remove a stock, press Options on the remote control.
Using File Manager to Copy Files
You can use File Manager to copy media files from one location to another. Press Menu and select File Manager to display the following screen:
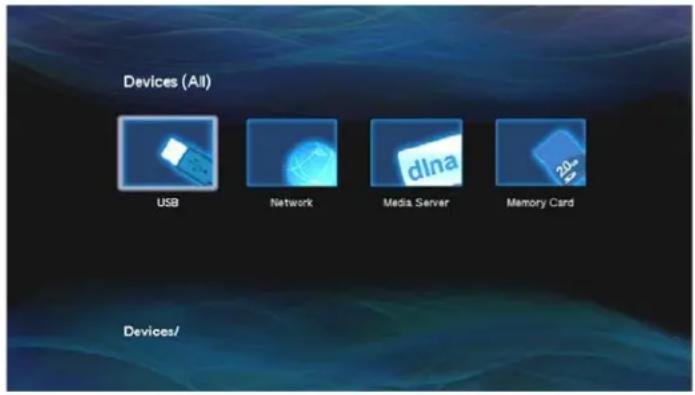
You can look for files at the location that you specify:
• USB. View media files on a USB device connected to a USB port on the NeoTV 350.
- Network. View shared media files that are stored on a computer or storage device on the same network as the NeoTV 350.
• Media Server. View media files located on a media server on the same network as the NeoTV 350.
- Memory Card. View media files located on a memory card connected to the slot on the front of the NeoTV 350.
Browsing or Searching for Files
You can use File Manager options to narrow your search and find files more quickly. Press Menu, select File Manager, and press Options on the remote control.
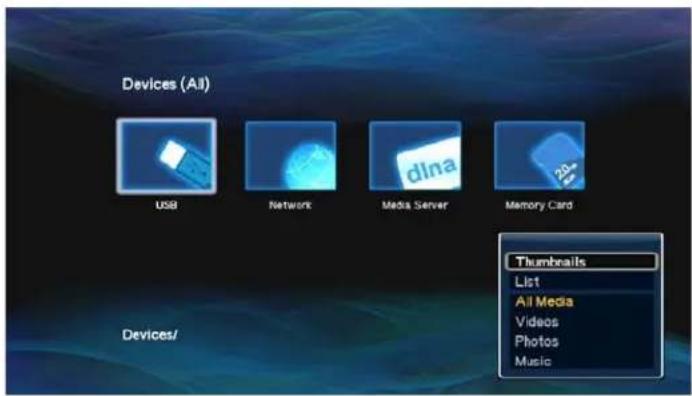
The Options menu displays the following selections:
- Thumbnails. View files as thumbnail images instead of as a list.
• List. View files listed by file name.
• All Media. View all types of media files the location that you specify.
• Videos. View only video files in the location that you specify.
• Photos. View only photos in the location that you specify.
• Music. View only songs in the location that you specify.
Accessing Files on a USB Device
To manage files on a USB device that is connected to your NeoTV 350, press Menu and select File Manager >USB. The next screen displays:
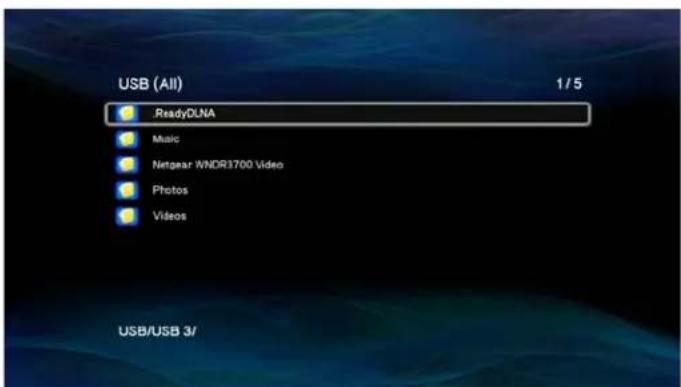
Select the media that you want to access.
Accessing Network Shares or a Media Server
Note: You might be prompted to enter your user ID and password.
To access files on the same wired network as the NeoTV 350, press Menu and select File Manager > Network. The next screen displays:
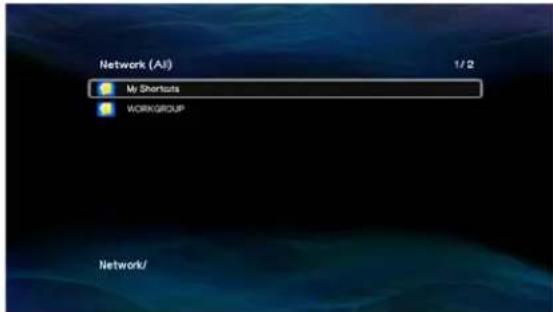
List view
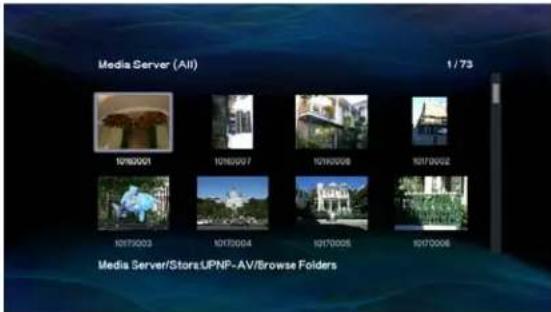
Thumbnail view
Select the media that you want to access.
If you do not see your media, you might need to set up file sharing. For help with Windows file sharing, see Chapter 7, Enabling Win7 File Sharing.
File Sharing with Win7 Password Protection
- In Windows 7, navigate to Control Panel > User Accounts and Family Safety > User Account > Manager Accounts.
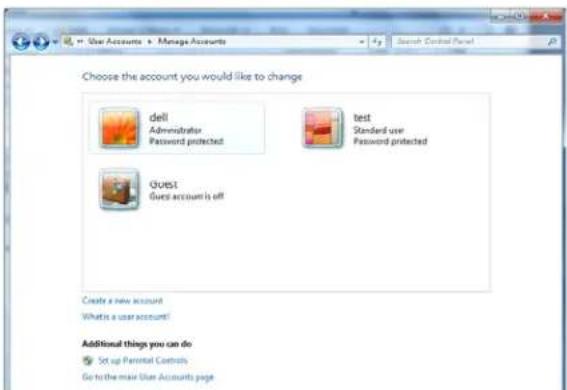
In this example, dell is a user account, and it is password protected.
- Right -click the folder that you want to share and select Share with > Specific people.
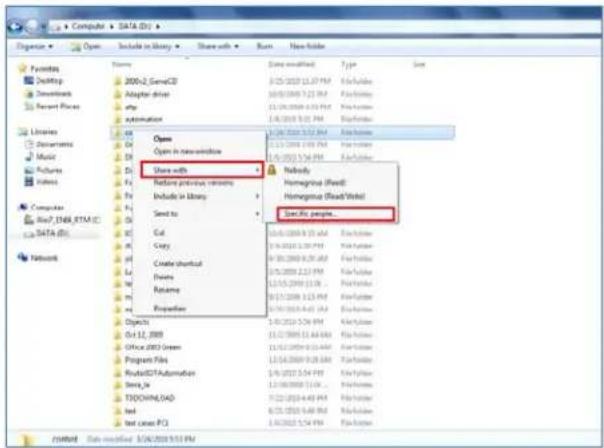
The next screen displays:
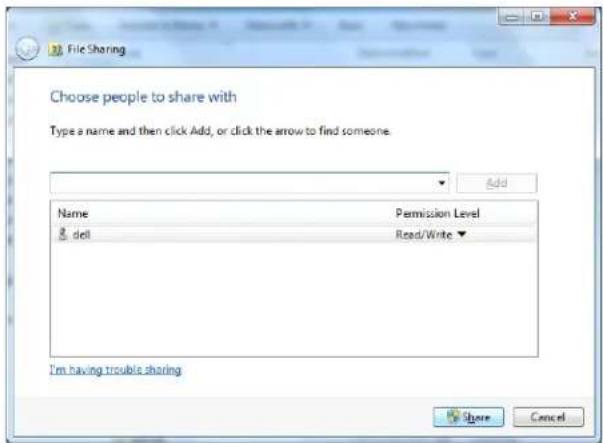
- Click Share to share this folder. The following screen displays:
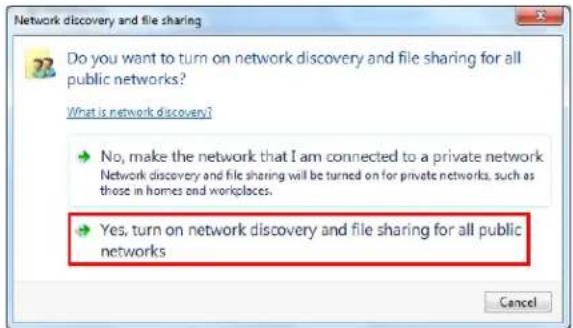
- Select Yes to turn on network discovery and file sharing.
- Go back to File Manager, and it shows a screen similar to the following:
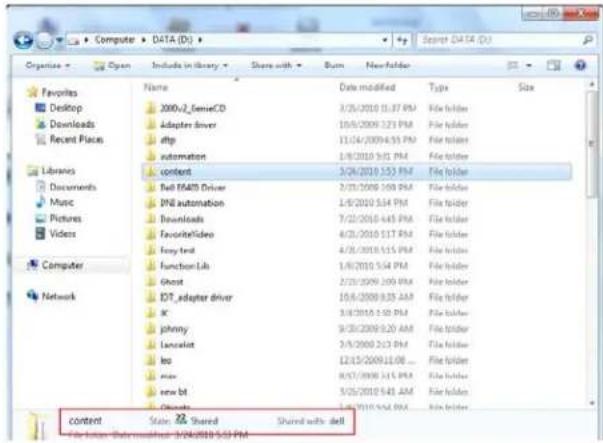
Now you can use the NeoTV 350 to browse the folder that is shared. The NeoTV 350 asks you to enter a user name and password. In this example, dell is the user name.
File Sharing without Win7 Password Protection
- Right-click the folder that you want to share and select Share with > Specific people.
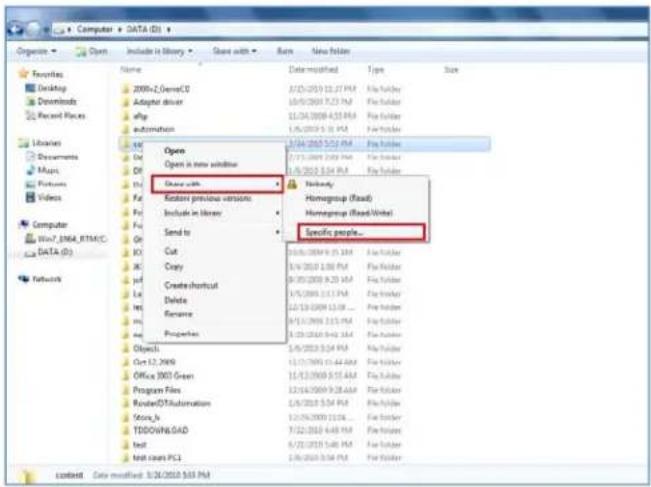
- Select Everyone and add it to the share list.
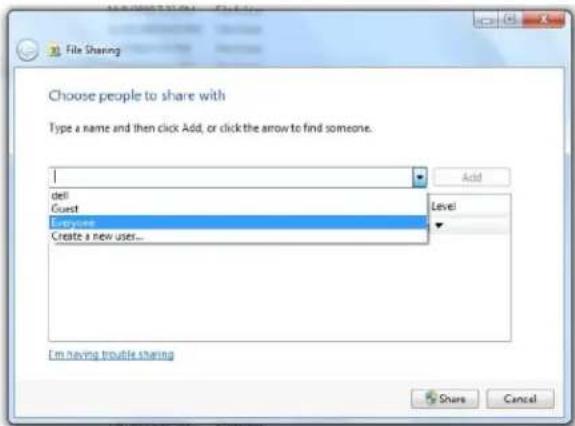
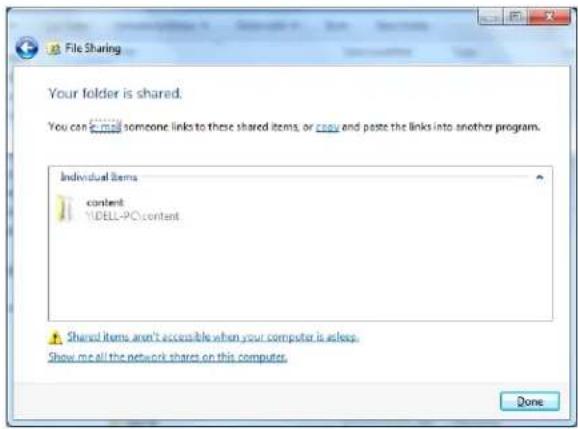
- Click Share, and a new window displays.
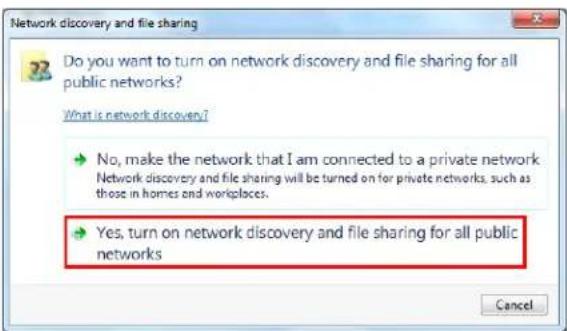
- Select Yes to turn on network discovery and file sharing.
Now this folder is shared on your network. The File Manager shows which folder is shared.
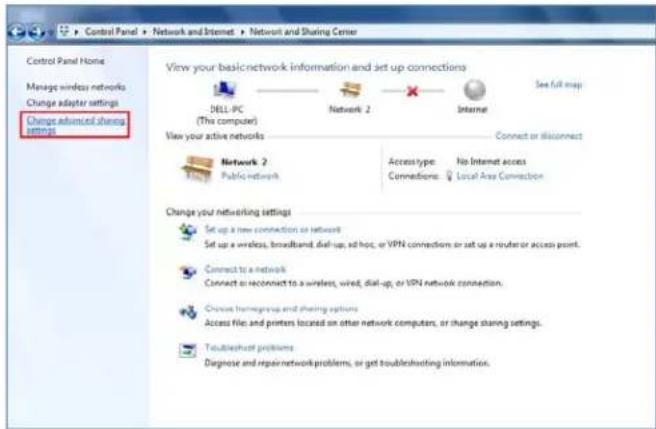
- To turn off password-protected sharing, select Control Panel > Network and Internet > Network and Sharing Center and click Change advanced sharing settings.
6. Select Turn off password protection sharing.
Change sharing options for different network profiles
Windows creates a separate network profile for each network you use. You can choose specific options for each profile.
Home or Work

Public (current profile)

Network discovery
When network discovery is on, this computer can see other network computers and devices and is visible to other network computers. What is network discovery?
Turn on network discovery
Turn off network discovery
File and printer sharing
When file and printer sharing is on, files and printers that you have shared from this computer can be accessed by people on the network.
Turn on file and printer sharing
Turn off file and printer sharing
Public folder sharing
When Public folder sharing is on, people on the network, including homegroup members, can access files in the Public folders: What are the Public folders?
Turn on sharing so anyone with network access can read and write files in the Public folders
Turn off Public folder sharing (people logged on to this computer can still access these folders)
Media streaming
When media streaming is on, people and devices on the network can access pictures, music, and videos on this computer. This computer can also find media on the network.
File sharing connections
Windows 7 uses 128-bit encryption to help protect file sharing connections. Some devices don't support 128-bit encryption and must use 40- or 56-bit encryption.
Use 128-bit encryption to help protect file sharing connections (recommended)
○ Enable file sharing for devices that use 40- or 56-bit encryption
Password protected sharing
When password protected sharing is on, only people who have a user account and password on this computer can access shared files, printers attached to this computer, and the Public folders. To give other people access, you must turn off password protected sharing.
Turn on password protected sharing
Turn off password protected sharing
Now you can use NeoTV 350 to access network shares without a password.
System Settings
Press Menu and select Setup > System to go to the System menu.
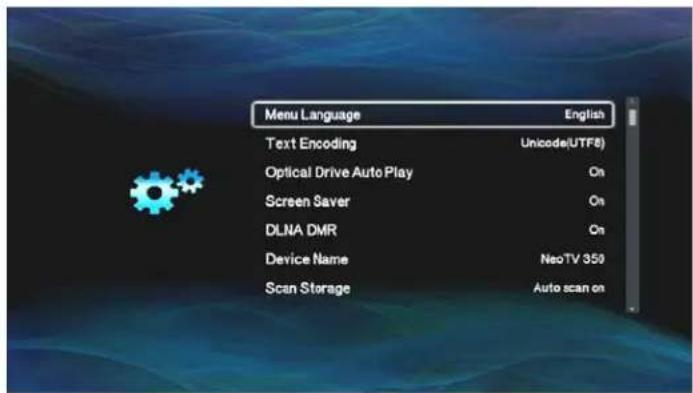
The following settings are displayed. You might have to scroll down to see all the settings.
- Menu Language. You can change the language for the menus. English is the default setting.
• Text Encoding. Unicode (UTF8)
- Optical Drive Auto Play. The NeoTV 350 supports an external optical drive. This feature is on by default to allow auto playback of optical drive content (CD and DVD).
• Screen Saver. On.
• DLNA DMR: On.
• Device Name. You can customize your device name. By default it is NeoTV 350.
- Scan Storage. When you attach a USB device, the NeoTV 350 automatically scans the content and creates a database. This makes browsing faster. Scan storage is on by default.
- Resume Play. When you play a video that you already began watching, the NeoTV 350 asks if you want to start at the same place you stopped the last time you watched. This feature is on by default.
- Factory Default. You can use this selection to return the NeoTV 350 to its factory default settings.
- USB Firmware Update. Update the NeoTV 350 firmware from a file located on a device connected to a USB port on the NeoTV 350.
- Online Firmware Update. Use the Internet to check for new firmware for the NeoTV 350, and update the firmware.
• System Info. View system information as described in the following section.
System Information
To view system information, press Menu and select Setup > System > System Info. The following settings are displayed.
• Device Name. This is set as NeoTV350 by default.
• Firmware Version. The firmware version currently running on the NeoTV 350.
- MAC Address. This applies only if you use a wireless adapter (sold separately) to connect the NeoTV 350 to a wireless network.
- Subnet Mask. This applies only if you use a wireless adapter (sold separately) to connect the NeoTV 350 to a wireless network.
- Default Gateway. This applies only if you use a wireless adapter (sold separately) to connect the NeoTV 350 to a wireless network.
Video Settings
To view video settings, press Menu and select Setup > Video. The following settings are displayed.
- Aspect Ratio. This is set to 16:9 by default. The following settings are available:
- Pan Scan 4:3
- Letter Box 4:3
- 16:9
- 16:10
- TV System. This selection displays a screen, which is described in the following section, TV System Settings on page 32.
- Digital Noise Reduction. Reduce the visibility of random artifacts during playback of the video. The default setting is Auto.
- 1080P 24HZ. This feature is Off by default. If your content source is 24 Hz, you can change the setting to On. If it is on, then the NeoTV 350 uses 24 frame per seconds to play back the file.
TV System Settings
This feature allows you to change the video resolution/signal format that the NeoTV 350 outputs to the TV. Press Menu and select Setup > Video > TV System.
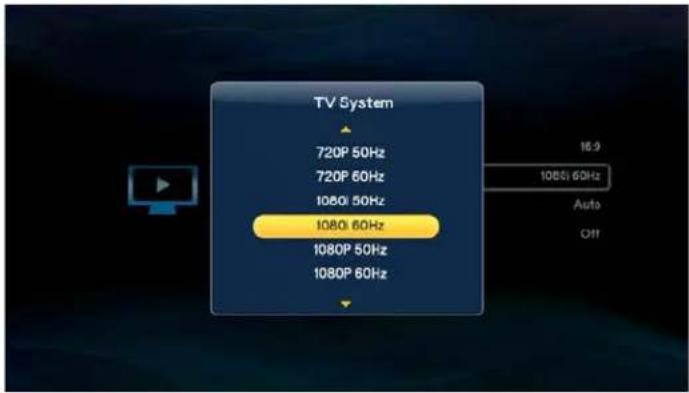
Scroll up and down to view all the settings. The following selections are available:
- HDMI auto
NTSC
PAL
480P
576P
720P 50 Hz
720P 60 Hz
1080i 50 Hz
1080i 60 Hz
1080P 60 Hz
Audio Settings
Press Menu and select Setup > Audio to go to audio settings.
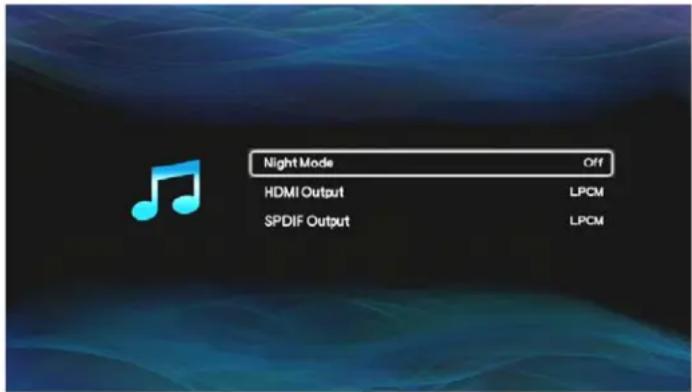
The following settings are displayed
• Night Mode. This can be set to Off, On, or Comfort.
- On. T urning on night mode automatically lowers the intensity of bass sounds.
- Comfort. This setting smooths out high and low volume levels for all media and TV channels. This prevents sudden changes in volume when you change media or a channel.
- HDMI Output. By default, the digital output setting is LPCM. You can change it to LPCM Multi-Ch or RAW. With the RAW setting, you need to connect a receiver to decode the audio.
- SPDIF Output. The LPCM setting converts multi-channel audio into stereo. The RAW setting plays digital audio without decoding.
Network Settings
Press Menu and select Setup > Network to go to the network settings. The only option on this menu is Wired LAN Setup. By default this is set to DHCP IP (Auto). If you are using a static IP address, you can change the setting here by selecting FIX IP (MANUAL).
FAQs
- I can't see the NeoTV 350 startup screen or menu. Make sure that the TV input is set to the port where the NeoTV 350 cable is connected and make sure that all cable connections are firmly secured.
- How do I get the best signal from my remote? Aim the remote at the front of the NeoTV 350.
- What are the USB ports used for? You can use these ports to connect a flash drive, or a USB external drive (hard drive), or a larger personal USB drive that is powered separately. The file formats supported by the USB ports are FAT16, FAT32, and NTFS.
- My personal USB drive is not accessible. Your USB drive might require external power. The NeoTV 350 USB ports provide only 5 volts and 500 mA.
- How can I reset the NeoTV 350? To reset your device to factory settings, on your screen navigate to Setup/System and select Factory Default.
- What network speeds do you need to play Internet content? NETGEAR recommends at least 1.2 Mbps. You might also need a router if you cannot connect the player directly to your cable or DSL modem.
Troubleshooting
• The remote control does not respond.
Check to see if the battery is inserted correctly.
• There is no audio or video output.
- Make sure that the A/V (RCA) and component cables are inserted completely and firmly at both ends.
- Remove the power cable and insert it again.
• Using HDMI to DVI converter.
HDMI to DVI converters are not supported.
Factory Settings
To return the unit to factory default settings, press Menu and select Setup > System > Factory Default.
| Feature Default Setting | |
| Language English | |
| Video mode Auto HDMI | |
| Device name NeoTV 350 | |
| Network connection Wired LAN | |
Technical Specifications
| Feature Description | |
| Media sources • USB storage | devices• UPnP AV and DLNA servers• Windows Media Player 11 media sharing |
| Video and audio output | • HDMI 1.3a, 24bpp deep color, 12 bit xvYCC processing and HDCP 1.3 compliant• Component video• Composite video• Stereo analog audio• S/PDIF optical digital audio |
| Digital media file formats • V | ideo codec. WMV 7/8/9, VC-1, H.263, H.264, MPEG 1/2/4, M-JPEG• Video container. AVI, Xvid, MOV, MP4, MPEG2-PS, MPEG2-TS, DVD VOB, DVD ISO, FLV, MKV, ASF, RM, RMVB• Audio. MP3, WAV, PCM, LPCM, WMA, WMA Pro, AAC, FLAC, MKA, OGG, APE, Dolby® Digital (AC3), DTS• Photo. JPEG files up to 20 megapixels, BMP, GIF, PNG, TIFF |
| Power adapter Full range PA, | 100-240V input t, 12 VDC/2.5A output |
| Feature (Continued) Description (Continued) | |
| Physical specifications • Weight | 0.308 kg.Dimensions (H x W x D): 41 x 172 x 115 mm |
| Environmental specifications • | Operating temperature: 32 degrees F~104 degrees FOperating humidity: 90% maximum relative humidity, noncondensing |
| Interface • LAN: RJ-45, 10/100 | BASE-TUSB: 2.0 x 3 |
Compliance Notification
NETGEAR Wired Products
B
Regulatory Compliance Information
This section includes user requirements for operating this product in accordance with National laws for usage of radio spectrum and operation of radio devices. Failure of the end-user to comply with the applicable requirements may result in unlawful operation and adverse action against the end-user by the applicable National regulatory authority.
This product's firmware limits operation to only the channels allowed in a particular Region or Country. Therefore, all options described in this user's guide may not be available in your version of the product.
FCC Requirements for Operation in the United States
FCC Information to User
This product does not contain any user serviceable components and is to be used with approved antennas only. Any product changes or modifications will invalidate all applicable regulatory certifications and approvals
This device complies with Part 15 of the FCC Rules. Operation is subject to the following two conditions: (1) This device may not cause harmful interference, and (2) this device must accept any interference received, including interference that may cause undesired operation.
FCC Guidelines for Human Exposure
This equipment complies with FCC radiation exposure limits set forth for an uncontrolled environment. This equipment should be installed and operated with minimum distance of 20 cm between the radiator and your body.
This transmitter must not be co-located or operating in conjunction with any other antenna or transmitter.
FCC Declaration Of Conformity
We, NETGEAR, Inc., 350 East Plumeria Drive, San Jose, CA 95134, declare under our sole responsibility that the NeoTV 350 HD Media Player (NTV350) complies with Part 15 of FCC Rules.
Operation is subject to the following two conditions:
• This device may not cause harmful interference, and
- This device must accept any interference received, including interference that may cause undesired operation.
FCC Radio Frequency Interference Warnings & Instructions
This equipment has been tested and found to comply with the limits for a Class B digital device, pursuant to Part 15 of the FCC Rules. These limits are designed to provide reasonable protection against harmful interference in a residential installation. This equipment uses and can radiate radio frequency energy and, if not installed and used in accordance with the instructions, may cause harmful interference to radio communications. However, there is no guarantee that interference will not occur in a particular installation.
If this equipment does cause harmful interference to radio or television reception, which can be determined by turning the equipment off and on, the user is encouraged to try to correct the interference by one or more of the following methods:
• Reorient or relocate the receiving antenna.
- Increase the separation between the equipment and the receiver.
- Connect the equipment into an electrical outlet on a circuit different from that which the radio receiver is connected.
- Consult the dealer or an experienced radio/TV technician for help.
Modifications made to the product, unless expressly approved by NETGEAR, Inc., could void the user's right to operate the equipment.
Canadian Department of Communications Radio Interference Regulations
This digital apparatus, NeoTV 350 HD Media Player (NTV350), does not exceed the Class B limits for radio-noise emissions from digital apparatus as set out in the Radio Interference Regulations of the Canadian Department of Communications.
European Union
The NeoTV 350 HD Media Player (NTV350) complies with essential requirements of EU EMC Directive 2004/108/EC and Low Voltage Directive 2006/95/EC as supported by applying the following test methods and standards:
• EN55022: 2006 / A1: 2007
• EN55024: 1998 / A1: 2001 / A2 : 2003
• EN60950-1: 2005 2nd Edition
EN 61000-3-2:2006
• EN 61000-3-3:1995 w/A1: 2001+A2: 2005

- Technical Support
- Trademarks
- DTS
- Dolby Digital
- Copy Protection Technology
- Statement of Conditions
- Contents
- Chapter 1 Getting Started
- Chapter 2 Video
- Chapter 3 Music
- Chapter 4 Photos
- Chapter 5 Internet Media
- Chapter 6 File Manager
- Chapter 7 Enabling Win7 File Sharing
- Chapter 8 Setup
- Chapter 9 Troubleshooting
- Appendix A Supplemental Information
- Appendix B Compliance Notification
- NeoTV 350 HD Media Player (NTV350)
- NeoTV 350 Cabling
- Remote Control
- Navigating Menus
- Digital Media File Formats
- Video File Formats
- Browsing or Searching for Videos
- Watching Videos
- Adjusting the Video You Are Watching
- Video Playback Options
- Music File Formats
- Browsing or Searching for Music
- Listening to Music
- Music Playback Options
- Creating a Playlist
- To use the NeoTV 350 to create a playlist from files on a USB device:
- Browsing or Searching for Photos
- Viewing Photos
- Adjusting the Slide Show Settings
- Playing Music during a Slide Show
- Accessing Internet Media
- Viewing Internet Photos
- Viewing Weather and Stocks
- Weather
- Stock
- Using File Manager to Copy Files
- Browsing or Searching for Files
- Accessing Files on a USB Device
- Accessing Network Shares or a Media Server
- File Sharing with Win7 Password Protection
- File Sharing without Win7 Password Protection
- Select Turn off password protection sharing.
- System Settings
- System Information
- Video Settings
- TV System Settings
- Audio Settings
- Network Settings
- FAQs
- Troubleshooting
- Factory Settings
- Technical Specifications
- Compliance Notification
- B
- Regulatory Compliance Information
- FCC Requirements for Operation in the United States
- FCC Information to User
- FCC Guidelines for Human Exposure
- FCC Declaration Of Conformity
- FCC Radio Frequency Interference Warnings & Instructions
- Canadian Department of Communications Radio Interference Regulations
- European Union
Brand : NETGEAR
Model : NeoTV NTV350
Category : Media player