Espresseria Automatic EA8025 - Coffee machine KRUPS - Free user manual and instructions
Find the device manual for free Espresseria Automatic EA8025 KRUPS in PDF.

User questions about Espresseria Automatic EA8025 KRUPS
0 question about this device. Answer the ones you know or ask your own.
Ask a new question about this device
Download the instructions for your Coffee machine in PDF format for free! Find your manual Espresseria Automatic EA8025 - KRUPS and take your electronic device back in hand. On this page are published all the documents necessary for the use of your device. Espresseria Automatic EA8025 by KRUPS.
USER MANUAL Espresseria Automatic EA8025 KRUPS
text_image
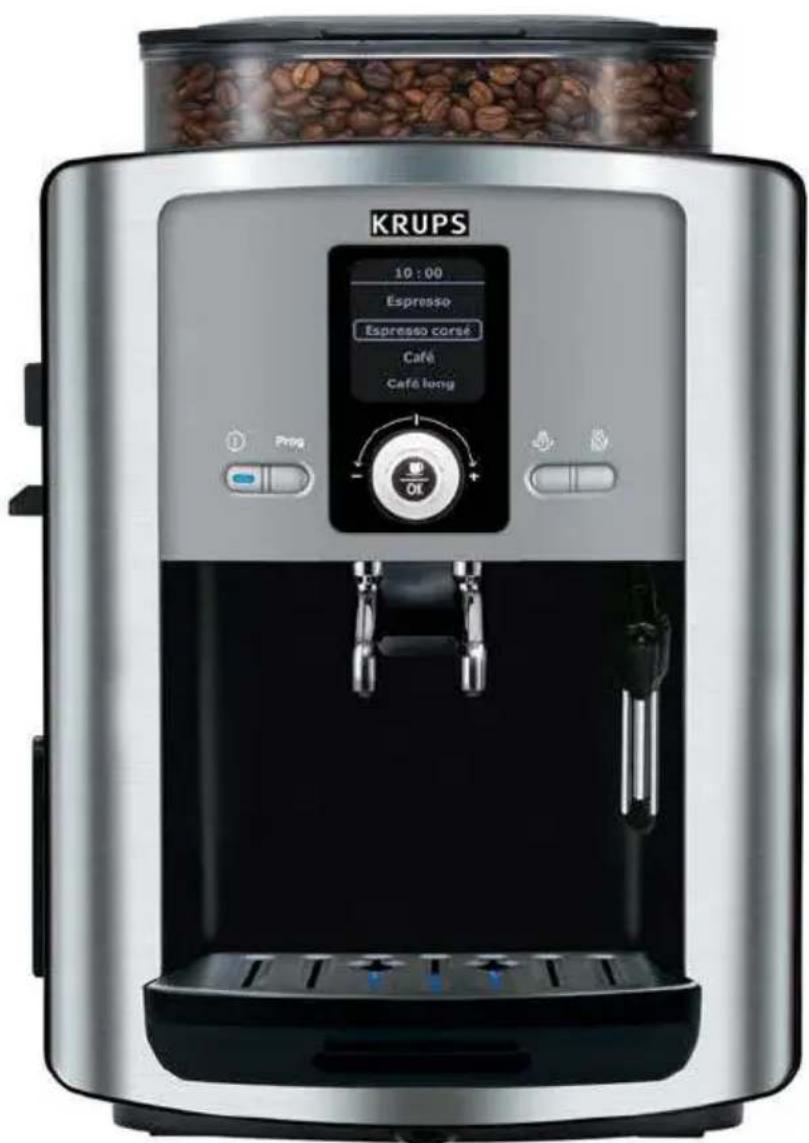
KRUPS 10:00 Espresso- Espresso strong Coffee Long coffeewww.krups.com
text_image
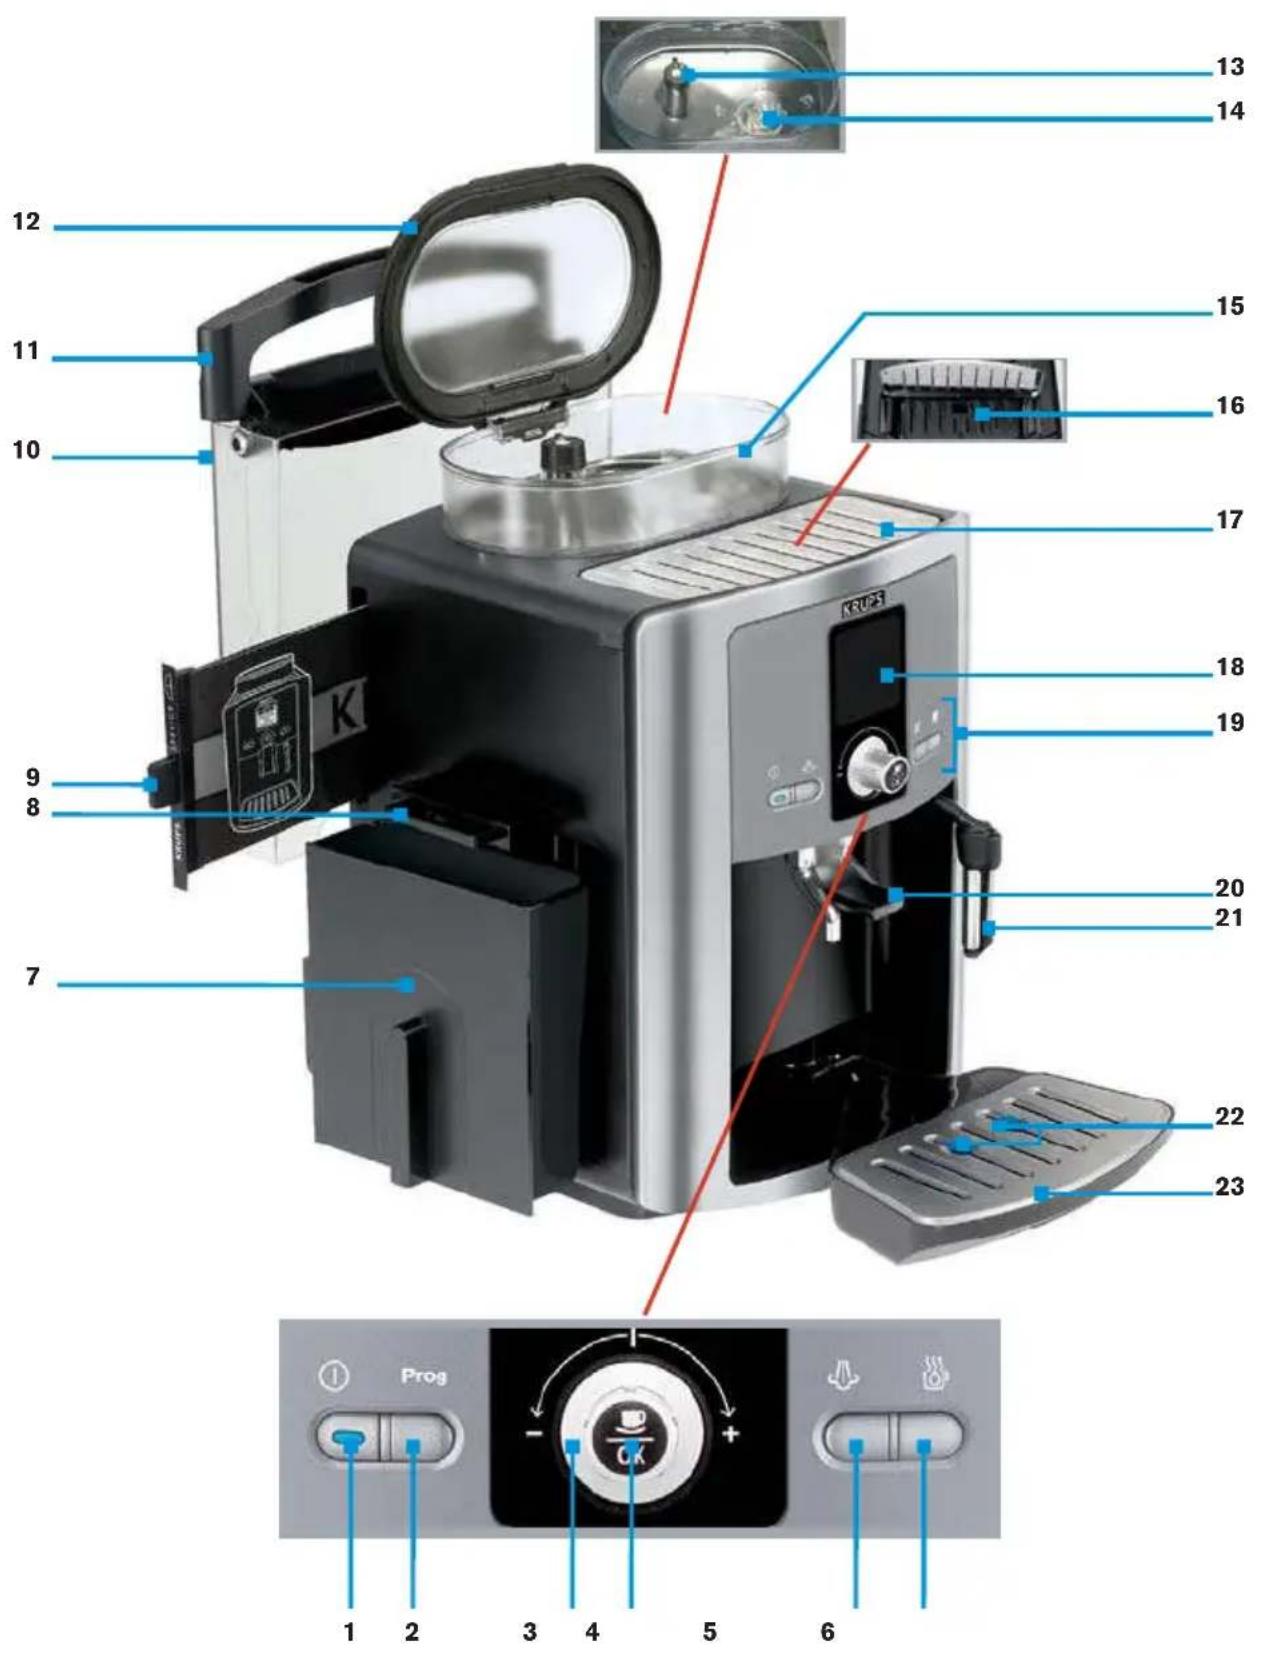
13 14 12 15 11 16 10 17 18 9 8 19 20 21 7 22 23 Prog CKKRUPS
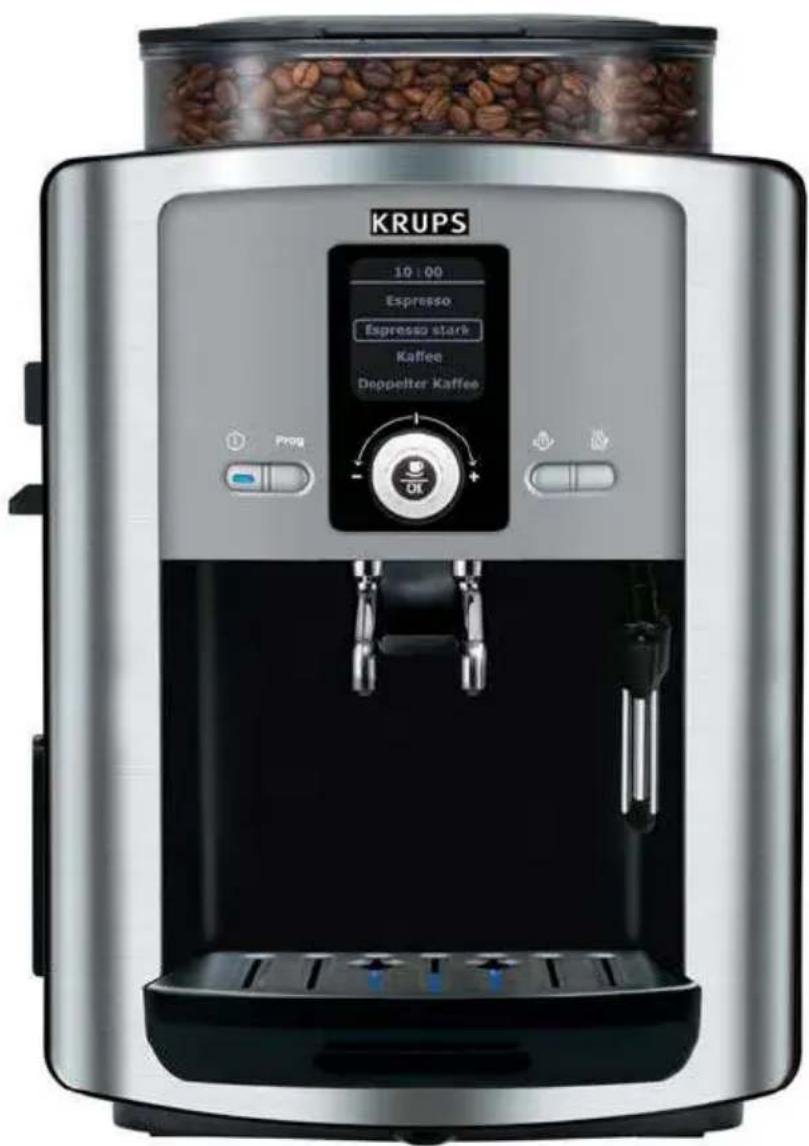
ESPRESSERIA AUTOMATIC
SERIE EA 80XX
text_image
KRUPS 10:00 Espresso Espresso stark Kaffee Doppelter Kaffee Prog OKnatural_image
Three mechanical components: a black cylindrical tool, a metallic cutting tool, and a small cylindrical pin (no text or symbols visible)text_image
KRUPS 10:00 Espresso Espresso strong Coffee Long coffee Prog OKUse and maintenance
Important
Read these instructions carefully and keep them.
Please follow the safety guidelines.
Manufacturer
1 Important information on the appliance and instructions .....5
1.1 Your Automatic Espresseria ....5
1.2 Guide to the symbols used in the instructions .....
1.3 Safety guidelines ....6
1.4 Correct use ....8
1.5 Products supplied with your machine ....8
1.6 Factory check....8
2 Overall view of your Automatic Espresseria and its operation ....9
2.1 Controls of the appliance ....9
2.2 Screen and operation .....10
3 First use of your Automatic Espresseria ....11
3.1 Before first use (optional) .....11
3.2 Preparing the appliance ....13
3.3 Initial settings ....14
3.4 Rinsing the coffee circuit ....15
3.5 Setting the grinder ....16
3.6 The menus....16
4 Use 20
4.1 Switching on the appliance 20
4.2 Preparing an espresso or a coffee .....21
4.3 Preparing a cappuccino 22
4.4 Using the auto-cappuccino accessory (optional) .....
4.5 2-cup function .....25
4.6 Preparation of hot water 26
5 Maintenance and cleaning 27
5.1 Regular maintenance .....27
5.2 The cleaning programme .....28
5.3 The descaling programme ....30
6 Troubleshooting ....32
7 Technical data ....35
8 Transport....35
9 Disposal of waste 35
10 Service ....36
11 Index 36
1 Important information on the appliance and instructions
You will find in this manual all of the important information concerning the preparation, use and maintenance of your automatic espresso/coffee maker. Important safety guidelines are also included.
Read these instructions carefully before using the appliance for the first time and keep them: Krups may not be held responsible for any incorrect use.
1.1 Your Automatic Espresseria
Espresso or lungo, ristretto or cappuccino, your automatic espresso/coffee maker has been designed to allow you to taste the same coffee at home as in a coffee bar at any time of the day. With its Thermoblock System, 15 bar pump and using only freshly ground coffee, your Automatic Espresseria will allow you to make a full flavoured drink, topped with a deliciously thick, golden froth, a product that comes from the natural oil of the coffee beans. Espresso coffee has a richer aroma than a normal, filter coffee. In spite of its stronger taste, stronger initially and longer lasting, espresso coffee in fact contains less caffeine than filter coffee (approximately 20 mg less per cup). This is due to the shorter percolation.
With its simplicity of use, the visibility of its tank/holder and its automatic cleaning and descaling programmes, your Automatic Espresseria will prove very easy to use.
1.2 Guide to the symbols used in the instructions
Symbols and associated words used in these instructions
| Symbol | Associated word | Meaning |
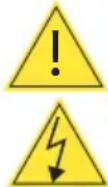 | Danger | Warning against risks of serious or fatal injuries.The lightning bolt symbol warns against electrical dangers. |
 | Warning | Warning against risks of slight injuries. |
 | Caution | Warning against the risk of incorrect operation, damage or destruction of the appliance.. |
 | Important to Note | General or important note on the operation of the appliance. |
 | Tip | Detailed information or advice on the use of the appliance. |
1.3 Safety guidelines
Danger : These safety guidelines are intended to protect you and other persons and the appliance. They must therefore be respected.
Conditions of use
- The appliance, the power cord and the mains plug must not be brought into contact with humidity or liquids. Any contact of the conductive parts of the appliance with humidity or water may lead to fatal injuries due to the presence of electricity! This appliance must only be used indoors in dry areas.
• In the case of a change in the ambient temperature, from cold to hot, wait for a
few hours before using your machine so that it is not damaged by condensation.
- Avoid leaving the appliance in direct sunlight, exposed to heat, cold, frost or humidity.
- Do not place the appliance on a hot surface such as a hob or close to a naked flame, in order to avoid any risks of fire!
Electrical power supply
Danger : Failing to respect these guidelines may lead to fatal injuries due to electricity !
- Check that the supply voltage marked on the rating plate of the appliance is the same as that of your electrical supply. Only connect the appliance to an earthed mains socket.
Voltage : 220-240V\~/50 Hz.
- Ensure that the mains socket is easily accessible so that the appliance may be unplugged easily in the event of any failure or a thunderstorm for example. For the safety of the appliance, unplug it from the socket during thunderstorms. Do not pull the power cord but the plug itself to unplug it
- Unplug it from the mains socket immediately if any operational failure occurs or if there is a problem with the percolation.
Unplug the appliance when it is not to be used for a long period.
- Do not use the appliance if the power cord is damaged. Using a damaged power cord or having your appliance repaired incorrectly means that there is a risk of electrical shock, fire or short-circuit. Furthermore, the guarantee on the appliance will be invalidated in such conditions. The power cord must be replaced by a Krups' Approved After-Sales Service Centre.
- Do not let the power cord dangle over the edge of a table or a work top. Do not leave the power cord close to or in contact with the hot parts of the appliance.
- We do not recommend the use of extensions or multi-adapter plugs.
- Any incorrect connection invalidates the guarantee.
Children
- Keep the appliance out of the reach of children.
- This appliance must not be used by children or by persons with diminished physical, mental or sensorial capacities or lacking experience or knowledge. They must be watched or be instructed by a
responsible person to ensure that they can use the appliance in complete safety.
•Children must be watched by a responsible person to ensure that they do not use the appliance as a toy.
The appliance
- Do not pour water into the coffee bean holder and/or under the maintenance cover, as this may cause overflows.
- Except for cleaning and descaling as described in the procedures in the instructions for the appliance, all work on the appliance must be carried out by a KRUPS' Approved After-Sales Service Centre.
- For your safety, only use KRUPS approved accessories and consumables for your appliance.
- Unplug the appliance when leaving the room or the home for prolonged periods, as in the event of a failure the appliance may overheat and cause a fire.
- WARNING - Do not open the appliance as there is a high risk of fatal injury due to electricity! Any unauthorised
opening of the appliance invalidates the guarantee. Do not use the appliance if it is not operating correctly, if it has been dropped, if it is leaking or if it has been damaged. In this case, we recommend having the appliance checked by a KRUPS' Approved After-Sales Service Centre (see list in the KRUPS service handbook).
- For safety and approval (CE) reasons, any transformation or modification of the appliance, carried out by an individual, is prohibited as only tested appliances have been approved and the manufacturer is absolved of all responsibility in the event of damage.
Use and maintenance
- In the event of a problem or incorrect operation, check the appliance and try to resolve the problem (see chapter 6 Troubleshooting) or have the appliance repaired if the problem persists. When the appliance cannot operate without risk of danger, unplug it from the mains socket.
•Always refer to the instructions in this manual for the descaling of the
appliance. Unplug from the socket before any cleaning or maintenance operation.
• In the case of descaling, cleaning or regular maintenance not being carried out or if there is a foreign particle in the grinder, this is not covered by the product guarantee (see separate document).
1.4 Correct use
This Automatic Espresseria espresso/coffee machine is only to be used to prepare espresso or coffee, to froth milk and heat liquids.
This product has been designed only for domestic use in the home. Any commercial use, inappropriate use or failure to comply with the instructions, the
manufacturer accepts no responsibility and the guarantee will not apply. Any use other than that described in this manual does not comply with these recommendations and may lead to injuries and damage to equipment as well as damage or destruction of the appliance (see point 1.3 "Safety guidelines").
1.5 Products supplied with the machine
Check the products supplied with the machine. If any parts are missing, contact our hotline (see chapter 10).
Parts supplied :
•Automatic Espresseria
- XS 6000 auto-cappuccino accessory (optional, depending on models), including :
- Milk jug
- Special nozzle
- Connector tube
- Stainless steel tube
- Claris – Aqua Filter System cartridge (Krups – ref F088 – optional)
Starter set, including :
- Filter cartridge
- Cartridge fitting accessory
- Maintenance kit, including :
- 1 descaling sachet (KRUPS – ref F054)
- 2 cleaning tablets (KRUPS - ref XS3000)
- Stick for testing the water hardness
- Cleaning wire for the steam nozzle
- Directory of KRUPS' Approved After-Sales Service Centres
- Guarantee document
- Instructions for use
1.6 Factory check
All of the appliances are subjected to strict quality control. Random operating
tests are carried out on appliances, which may leave traces of use.
2 Overall view of your Automatic Espresseria and its operation
All of the controls and displays of your Automatic Espresseria are presented below.
Each function is briefly described, to help you understand the instructions and familiarise yourself with the appliance.
The controls of the machine are
associated to numbers referred to in these instructions. The corresponding references in brackets refer to the fold-out page.
We recommend that you fold out this page so that you have the picture of the appliance in front of you at all times.
2.1 The controls of the appliance
The fold-out page shows a photo of the appliance. Fold out this page. The various controls of the appliance are listed below along with a brief description of them :
| N° | Identification Function | |
| 1 | ON/OFF button and indicator light | Switches the appliance on and off.The indicator light is lit when in operation. |
| 2 | Programme button | Used to display the menu selection page/from the menu, to return to the drink selection menu. |
| 3 | Knob Used to select a menu and increase or reduce values. | |
| 4 | OK button | Used to validate a choice of menu or start a function or procedure. |
| 5 | Steam button Used to activate or deactivate steam production. | |
| 6 | Hot water button Used to activate or deactivate hot water production. | |
| 7 | Used coffee collector Collects the used coffee. | |
| 8 | Cleaning drawer | Used to get rid of any used coffee deposits from inside the appliance. |
| 9 | "Service Guide" maintenance instructions | Brief description for the maintenance of the machine and a list of the hotline numbers worldwide. |
| 10 | Water tank Contains the water used to make drinks and rinse. | |
| 11 | Water tank cover handle Used to remove the water tank. | |
| 12 | Coffee bean holder lid Holds the coffee beans. | |
| 13 | Setting button | Used to set the grinding fineness of the coffee beans: fine, medium or coarse grind. |
| 14 | Grinder Grinds the coffee beans. | |
| 15 | Coffee bean holder Holds the coffee beans (max. 275 g). | |
| 16 | Cleaning tablet opening Holds the cleaning tablet. | |
| N° | Identification Function | |
| 17 | Maintenance cover with cup grid | Cover open: to receive the cleaning tablets.Cover closed: warms the cups stood on it. |
| 18 | Screen | Displays the menus, commands and maintenance instructions. |
| 19 | Control panel Includes the setting button and knob | |
| 20 | Coffee tube and handle The drink flows from here. | |
| 21 | Steam nozzle Production of hot water or steam to froth milk. | |
| 22 | Water level gauges Mechanical device to prevent overflows. | |
| 23 | Grid and drip tray | Collects the water from the appliance and drips during preparations. |
Table 1: The control panel and the coffee bean holder of the Automatic Espresseria
2.2 Screen display and operation
The screen displays the menus and the options and messages of the appliance. For the various functions, the steps are shown in images on the screen, for
example having to place a recipient under the coffee tube when rinsing. The menus are defined in point 3.6. The use of the menus is described below.
| →The functions and/or values that can be modified are displayed in the text zones.→An arrow above or below a text zone indicates in which direction the knob (3) may be turned to select other options :Arrow pointing downwards : turn the knob to the right.Arrow pointing upwards : turn the knob to the left→The selected zone appears with a circle around it. | 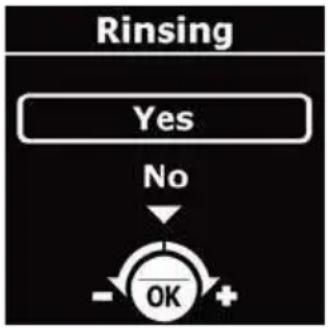 | |
| Using the knob, select the chosen function (= the text zone appears with a circle around it).Press the OK button (4) to validate the function and/or start.The flashing values may be set using the knob and then validated using the OK button. |  | |
Important : Pay attention to the screen display, especially before pressing the OK button and/or starting operations !
3 First use of your Automatic Espresseria

Danger : Connect the appliance to a mains socket of 230 V that is earthed.
Failure to do so means that you run the risk of fatal injury due to electricity!
Respect the safety guidelines (see point 1.3).
Installing the appliance
Place your machine on a stable, flat, heat-resistant surface. Ensure that the location
chosen is sufficiently ventilated as the appliance gives off heat.
3.1 Before using for the first time
Before using the appliance for the first time, check the hardness of your water so that you can adapt the appliance to suit. This operation is also to be carried out when you use your machine in a place where the hardness of the water is
different or if you notice a difference in the hardness of the water.
To check the water hardness, use the stick supplied with your machine or contact your local water authority.
Measuring the water hardness
| Fill a glass of water and immerse the stick in it for several seconds.Wait for a minute before reading the water hardness.The red zones on the stick indicate the degree of hardness: no red zone = class 0, One red zone = class 1, etc. (see illustration). | 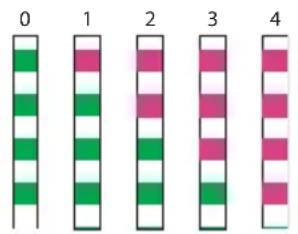 |
| The hardness class observed (from 0 to 4) will be requested during the initial set up of the machine described in point 3.3 in the "water hardness" sub-menu. Use the data in the table below for this purpose : |
| Degree of hardness | Class 0 Class 1 Class 2 Class 3 Class 4 | ||||
| °dH | <3°>4° | >7°>14°>21° | |||
| °e | <3,75° | >5° | >8,75° | >17,5° | >26,25° |
| °f | <5,4° | >7,2° | >12,6° | >25,2° | >37,8° |
| Setting the appliance | 0 | 1 | 2 | 3 | 4 |
Table 2: The water hardness classes for the initial setting of the appliance (point 3.3).
Installing the filter cartridge (optional)
The Krups Aqua Filter System F088 cartridge improves the taste of your water. It is made of an anti-scale substance like activated carbon, which reduces chlorine, impurities, lead, copper, pesticides, etc. present in water (Reduction of the carbonate hardness of up to 75%*, chlorine up
to 85%*, lead up to 90%*, copper up to 95%*, aluminium up to 67%*). Minerals and trace elements are conserved.
* Measures provided by the manufacturer
| Remove the filter cartridge and the cartridge fitting accessory from the packaging and assemble the cartridge fitting accessory as illustrated. | 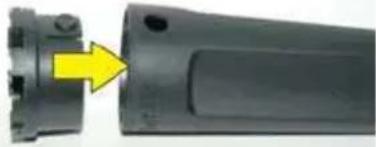 |
| Set the month when the cartridge is fitted (position 1 on the illustration, left side figure in the opening) by turning the grey ring located on the upper end of the filter.The month that the filter is to be replaced is indicated on the right side in the opening (position 2 on the illustration). | 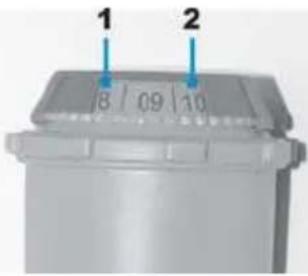 |
| Attach the cartridge fitting accessory to the filter cartridge as shown in the illustration. | 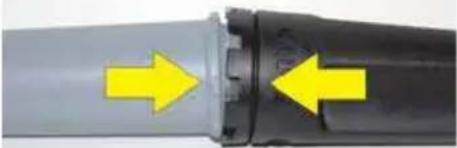 |
| Screw the filter cartridge into the screw thread at the bottom of the water tank:1. Place the filter cartridge into the thread.2. Screw in the cartridge.Remove the cartridge fitting accessory from the filter cartridge.Note: the filter cartridge has to be replaced approximately every 50 litres of water or at least every 2 months.Your machine tells you how many days or litres before you need to change the cartridge: go to the "Product information/Filter" menu, then select "Replacement". | 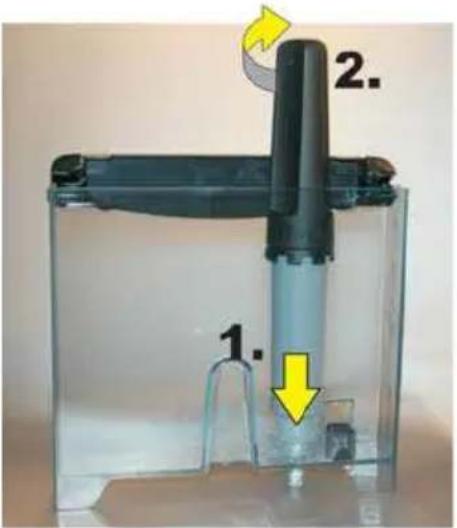 |
Programme settings when using the filter cartridge
If you use a filter cartridge, in the "Filter" settings menu, answer the question with "Yes" or "OK". This programme can also be accessed by going to "Product Info" then selecting "Filter" and "Installer" or by going to "Maintenance / Filter / Exit". Place a recipient with a capacity of around 0.5 litres under the steam nozzle
as the programme fills the water filter cartridge and a greater quantity of water is therefore dispensed from the steam nozzle. 1 message on the screen then invites you to set the date that the filter is fitted so that the programme can advise when to change the filter (in 2 months or after 50 litres of water).
3.2 Preparing the appliance
Before switching on the appliance, carry out the following steps.
Caution : Water tank (10) : Do not fill the tank with hot water, mineral water, milk or any other liquid as this could damage the appliance.
Coffee bean holder (15): Do not put ground coffee or water into the coffee bean holder as the grinder could be da-
maged. Ensure that no foreign particles (e.g. small stones in the coffee beans) get into the holder as they could damage the grinder (not covered by the guarantee!).
Drip tray (23) : To avoid the risk of burns due to hot water splashing, check that the drip tray is fitted correctly!
| Remove the water tank (10) and fill it with cold water. i Tip: You can fill the tank without removing it: open the lid and pour in the water using a suitable recipient. | Important: Respect the maximum filling level (reference "Max") of the water tank. |
| Fit it and close the lid. | Note: If, when the appliance is switched on, the water tank is missing or does not contain enough water (under the reference "Calc"), the message "Fill the tank" will be displayed and it will not be possible to prepare espresso or coffee. |
| Open the lid (12) of the coffee bean holder (15) and fill it with coffee beans (max. 275 g). | |
| Close the lid of the coffee bean holder. |
3.3 Initial settings
When using the machine for the first time, you will be asked to confirm several
settings. Follow the instructions displayed on the screen.
Confirming the settings
| Switch on the appliance by pressing the ON/OFF button (1).→ A welcome message is displayed on the screen, followed by the "Language" setting menu. | 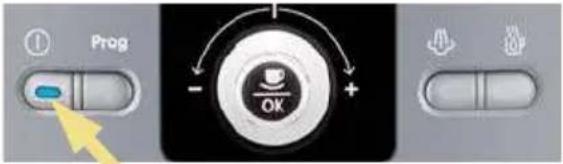 |
| Using the knob, select a language for the display and validate your choice by pressing the OK button. |  |
| Make the other settings by following the indications on the screen. For the parameters, follow the explanations provided in point 3.6, "Settings" menu. |
Note: If you unplug your appliance or following a power cut, you will be asked to save certain parameters again, such as the time and the date or to confirm settings. The appliance will then run an automatic test.
Important : Ensure that all of the lids and the maintenance flap are closed and that all parts of the machine are fitted correctly before starting to prepare a drink.
3.4 Rinsing the coffee circuit
After several days without being used, you need to rinse the coffee circuit. You may rinse after switching on the ap-
pliance or at any time, via the "Maintenance" menu and by selecting "Rinsing".
| Press the ON/OFF button (1). | 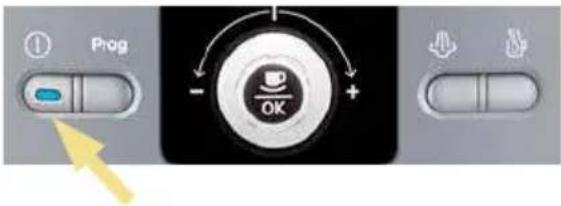 |
| →A welcome message is displayed on the screen, then another warning that the appliance is preheating. A few seconds later, a question will appear on the screen asking if the appliance needs to be rinsed or not. | 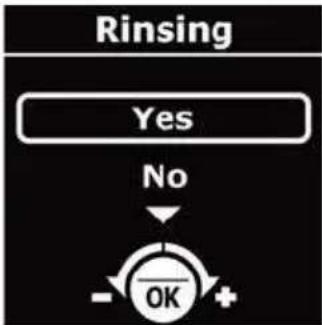 |
| Place a sufficiently large recipient under the coffee tubes, then select "Yes" with the knob and confirm by pressing OK.→The rinsing procedure starts and stops automatically, after around 40 ml have passed through. | 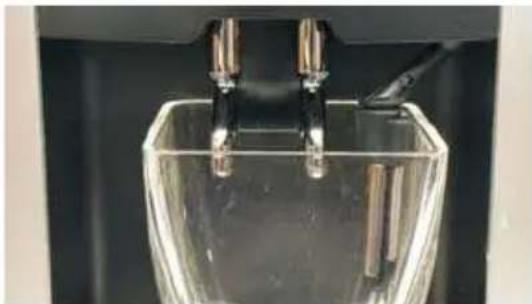 |
| The drink selection menu is then displayed on the screen. | |
3.5 Setting the grinder
You can set the grinding fineness of the grinder. The finer the grinder setting for the coffee, the stronger the aroma of the coffee will be, and the coffee will also be creamier.
Caution: Only turn the knob (13) during grinding so as to avoid damaging the grinder.
Do not force the grinder setting knob! Set the grinding fineness for the next drink preparation, while the coffee beans are being ground.
Meaning of the setting knob positions
- Fine grind
- Medium grind
Coarse grind
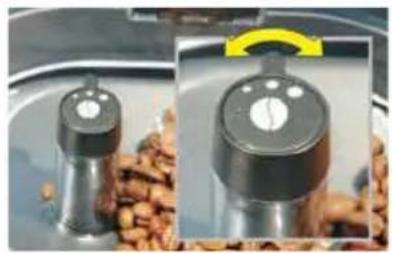
natural_image
Close-up of two kitchen kitchen appliances with a yellow circular knob, placed on a surface with scattered nuts (no visible text or symbols)3.6 The menus
The menus of your Automatic Espresseria contain a number of different functions and settings, with which you can set your appliance for optimum performance.
Press the Programme button (2) to display the menus preview on the screen or to return to the drink selection menu. The operating principle is explained in point 2.2 of these instructions.
Operation of menu selection

When you are in the drink selection menu, press the Programme button (2)
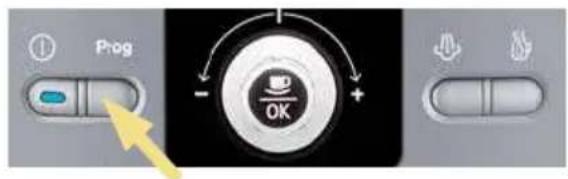
text_image
Prog OK
The menu preview is displayed on the screen.
Info : Pressing the Programme button several times allows you to change from the drink selection menu to the menu preview. When you press the programme button in a menu or a sub -menu, the menu function is interrupted and you return to the drink selection menu.
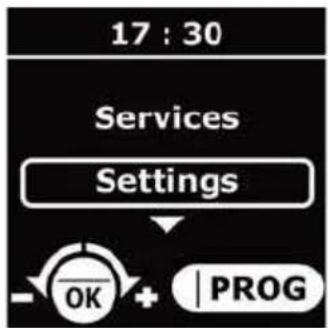
flowchart
graph TD
    A["17 : 30"] --> B["Services"]
    B --> C["Settings"]
    C --> D["OK + PROG"]
Here are the menus proposed at the main level :
| Menu Function | |
| Maintenance | Cleaning and maintenance functions. |
| Settings | Initial settings of the appliance. |
| Product Info | Provides access to information on the procedures carried out.Can be used to start various programmes. |
| Demo mode | Activates or deactivates the presentation mode. |
| Exit | End of the menu preview. |
The settings and functions of the sub-menus are detailed below.
"Maintenance" Menu
| Sub-menu Function | |
| Rinsing | Allows a rinsing cycle to be launched. ! Important: Position the cups before pressing the OK button! |
| Cleaning | Allows the cleaning programme to be launched. |
| Filter | Access to the filter mode. |
| Exit | End of the preview of the sub-menus. |
"Settings" Menu
| Sub-menu Function | |
| Language | Allows the display language to be selected. |
| Screen contrast | Set the optimum screen contrast with the knob and validate by pressing the OK button. |
| Date | Allows the date to be set, i.e. day, month, year (2 figures for each).Important:If you use an anti-scale filter cartridge, you must set the date. |
| Clock | 1st step: select the clock format: 24 hour or 12 hour display (AM/PM).2nd step: Set the time. |
| Auto-off | You can select the length of time after which your appliance switches off automatically. From 30 min. to 4 hours, in steps of 30 minutes. |
| Auto-on | You can automatically start the preheating of your appliance at a given time. |
| Unit of measurement | You can select the unit of measurement for the drinks made: ml or oz. |
| Water hardness | You can set the hardness of your water between 0 and 4 (point 3.1). |
| Coffee temperature | You can adjust the temperature of your coffee or espresso to 3 levels, where level 3 is the hottest temperature. |
| Exit | End of the preview of the sub-menus. |
Menu "Product info"
| Sub-menu Function | |
| Coffee cycles | Displays the total number of coffee cycles carried out by the machine. |
| Hot water cycles | Displays the total number of hot water cycles carried out by the machine. |
| Steam cycles | Displays the total number of steam cycles carried out by the machine. |
| Rinsing | Displays the total number of rinsing operations carried out by the machine. |
| Cleaning | Access to the following sub-menus. |
| - Last | Number of coffees prepared since the last cleaning. |
| - Next | Number of coffees that can be made before next cleaning. |
| - Clean | Starts the cleaning programme. |
| - Exit | End of Cleaning menu. |
| Descaling | Access to the following sub-menus. |
| - Last | Number of hot water or steam cycles made since the last descaling. |
| - Next | Number of hot water or steam cycles that can be made before next descaling. |
| - Exit | End of the Descaling menu. |
| Note: The "Last" and "Next" options are only accessible if you have fitted a filter beforehand, accessible via Product info/Filter/Install. | |
| Filter | Access to the following sub-menus. |
| - Last | Displays the date when the filter was last changed and the quantity of water filtered since then. |
| - Next | Displays the date when the filter needs to be changed and the quantity of water that may be filtered until then. |
| - Install | Starts the filter replacement procedure. |
| - Exit | End of the Filter menu. |
| Sortie | End of the preview of the sub-menus. |
"Demo mode" Menu
| Sub-menu Function | |
| Activate | Allows the presentation mode to be launched.When this mode is activated, the various menus and their access are automatically displayed in the drink selection menu. |
| Deactivate | Allows the presentation mode to be deactivated.. |
| Exit | End of the preview of the sub-menus. |
Drink selection menu
| Sub-menu Function | |
| Espresso | Prepares a normal espresso. |
| Espresso strong | Prepares a strong espresso. |
| Coffee | Prepares a normal coffee. |
| Long coffee | Prepares a long coffee. |
4 Use
Respecting the instructions below will ensure good results. Several tests will probably be required to find the mix and roasting of the coffee beans to your taste.
The quality of the water used is also a factor in the taste of your coffee. Ensure that the water is fresh from the tap, that it is cold and that it does not smell of chlorine.
Do not use stagnant water.
Caution : Your appliance is only designed to use coffee beans. When preparing your first coffee, after several days without using the machine or after carrying out maintenance, a little steam or hot water will come out of the steam nozzle. Keep at a safe distance from the steam nozzle and place a cup underneath the outlets to avoid any risk of burns or splashes with the steam or hot water. The main commands are described below :
The coffee outlet
The height of the coffee outlet is adjustable. Raise it to fit or remove taller
cups more easily.
The steam nozzle
The steam nozzle can be moved to the left or right and tilted forward slightly,
which allows the cup underneath to be removed more easily.
The drip tray
This tray collects the water used by the appliance or spilled during preparation. The machine warns against this by means
of a mechanical float system (22) when the tray needs to be emptied.
4.1 Switching on the appliance
| Press the ON/OFF button (1). |  |
| →A welcome message is displayed on the screen, then another warning that the appliance is preheating. Next a question will appear on the screen asking if the appliance needs to be rinsed or not. | Note: If the machine has not been used for several days, it must be rinsed. |
If required, rinse it (see point 3.4) or validate the "No" proposition by pressing "OK".
→ The screen then displays the drink selection menu.
If you want to prepare an espresso or a coffee, read the instructions in point 4.2. To prepare a cappuccino, refer to point 4.3.

text_image
15 : 00 Espresso Espresso strong Coffee Long coffee4.2 Preparation of an espresso or a coffee
You can set the quantity of water required for an espresso between 20 and 70 ml, for a coffee between 80 and 120 ml and for a large coffee between 120 (2x60) ml and 240 (2x120) ml.
To set the water temperature as desired, go to the "Settings" menu and select "Coffee temperature". For the espresso function, you can choose between two strengths: "standard" or "strong".
Preparation of an espresso or a coffee
| Place a cup underneath the coffee tube (20). You can raise or lower the coffee tube to suit the cup. | 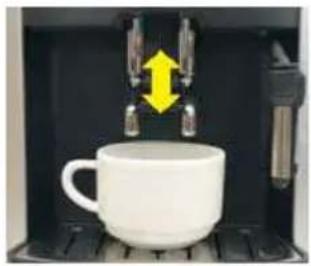 |
| Select your drink using the knob and validate with the "OK" button.The screen displays the last volume of water selected during the grinding or heating procedure. | 1. Select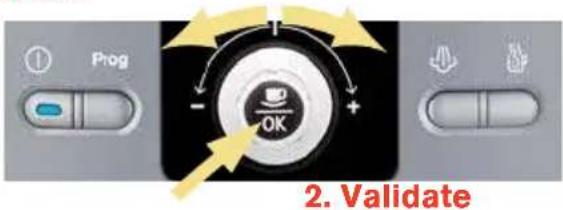 |
| Check the volume of water saved and modify if required using the knob (3).Once the heating cycle is complete, the machine starts to pour the drink. | Note: To stop the drink being dispensed, because the cup is full or any other reason, press the button of your choice. To stop the drink being dispensed, because the cup is full or any other reason by turning the knob. |
| Wait for the end of the dispensing and the message "Drink ready" to be displayed on the screen before removing the cup. |
Caution: DO NOT REMOVE THE HOLDER BEFORE THE END OF THE CYCLE (i.e. 15 seconds after the coffee has started to be dispensed).
4.3 Preparation of a cappuccino
Cappuccino is a drink prepared with an espresso and frothed milk. Cappuccino lovers prepare the frothed milk first and then add the espresso as the espresso loses its exceptional aroma very quickly. The proportion of frothed milk to the espresso is the same but of course you can adapt it to your own taste. We
recommend that you use very fresh semi-skimmed milk.
! Tip : Preferably use a cappuccino cup as it is not as high and can contain a large volume; it is therefore easier to remove it from the steam nozzle.
Preparation of frothed milk with steam
| Press the Steam button (5).→ The machine preheats. A message then invites you to place a recipient under the steam nozzle. | 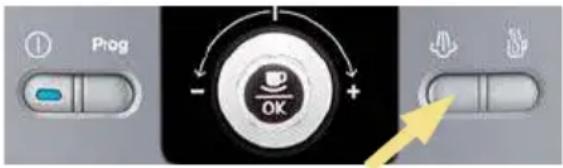 |
| Place a recipient or a cappuccino cup filled halfway with fresh cold milk (6 to 10°C) underneath the steam nozzle (21) and press the Steam button. | ! Note: If the end of the steam nozzle does not reach the milk, raise the cup until the frothing is complete. |
| As soon as steam production is started, the remaining production time is displayed in seconds on the screen. Two options are available:A) You can increase or reduce the time displayed with the knob and wait until the steam production stops automatically.B) You can stop the steam production at any time by pressing the Steam button. | Important: the production of steam does not stop immediately after pressing the Steam button.Press the button early enough to avoid overflows. |
| Remove the cappuccino cup and place it underneath the coffee tube (20). | Important: Remove the nozzle and pass it underneath running water immediately (see point 5.1). Fit it again and place a recipient underneath and press the Steam button in order to remove any residues of milk from the inside. Let the steam flow for at least 10 seconds. |
| Add an espresso or a coffee depending on the drink you wish to prepare following the instructions described in point 4.2. | |
| Remove the cup and add a little sugar or chocolate shavings to your taste. |
4.4 Using the auto-cappuccino accessory (optional)
The XS 6000 auto-cappuccino accessory facilitates the preparation of a cappuccino or caffe latte (white coffee) with your Automatic Espresseria. The
accessory includes a brushed stainless steel milk jug, a riser tube and a connector tube, and a special nozzle.
Assembly and fitting of the auto-cappuccino accessory
| Insert the stainless steel tube into the rubber seal of the milk jug. It should reach down almost to the bottom of the jug. |  |
| Set the special nozzle as follows for each drink :Turn the central section 180° so that the drink symbol chosen is at the front. | 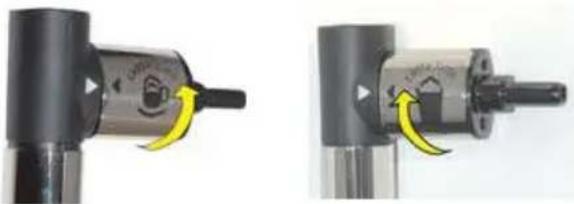 Cappuccino Café Latte Cappuccino Café Latte |
| Fit the special nozzle :A) remove the steam nozzle (21) andB) replace it with the special nozzle. | 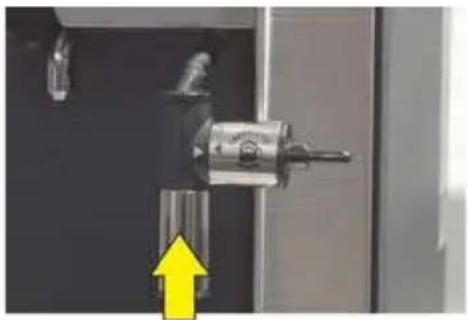 |
| Fill the milk jug with cold milk (6 – 10°C). | 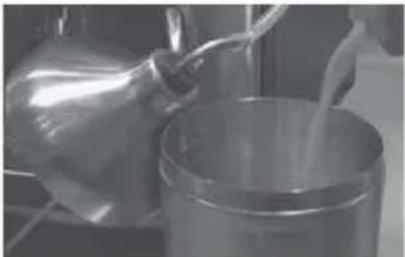 |
| Connect the special nozzle and the stain-less steel tube using the connector tube. | 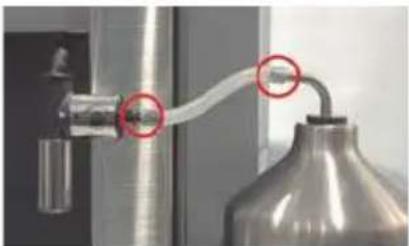 |
Preparation of a cappuccino or a caffe latte with the auto-cappuccino accessory
| Press the Steam button (5).The machine preheats. A message invites you to place a recipient underneath the steam nozzle. | 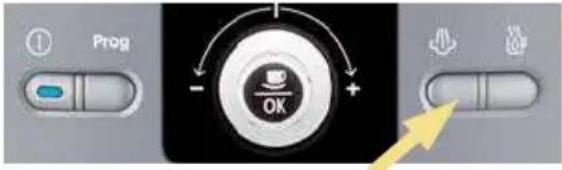 |
| Place a cappuccino cup underneath the special nozzle and press the Steam button. | 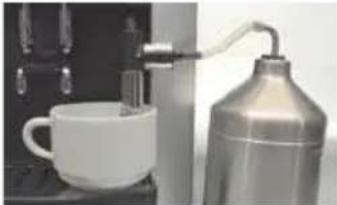 |
| As soon as steam production is started, the remaining production time is displayed in seconds on the screen. Two options are available:A) You can increase or reduce the time displayed with the knob and wait until the steam production stops automatically.B) You can stop the steam production at any time by pressing the Steam button. | Important: the production of steam does not stop immediately after pressing the Steam button.Press the button early enough to avoid overflows. |
| Remove the cappuccino cup and place it underneath coffee outlet. | 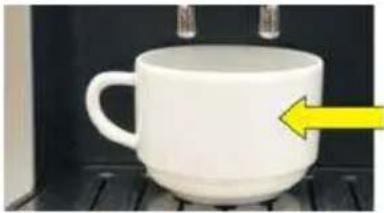 |
| Add an espresso following the instructions described in point 4.2. | |
| Remove the cup and add a little sugar or chocolate shavings to your taste. |  |
| We recommend cleaning the special nozzle immediately after every use to avoid milk drying inside.Remove the nozzle (see illustration) and clean the parts with a small brush and washing up liquid if required.If required, unblock the small opening (circled on the illustration) with the cleaning wire (supplied with your machine). | 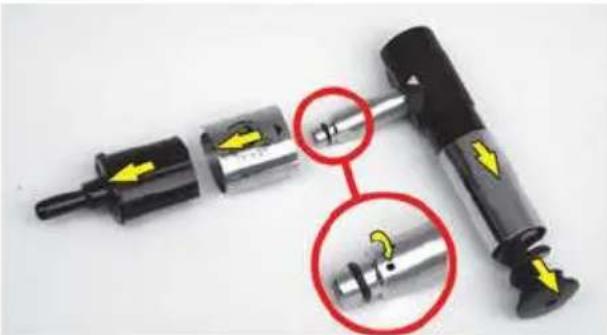 |
4.5 Two cup function
Your appliance allows you to prepare 2 cups, which is to say twice the quantity of the selected drink.
The machine automatically continues with a second coffee preparation cycle.
| Place two cups underneath the coffee tubes and adjust their height to suit the cups. | 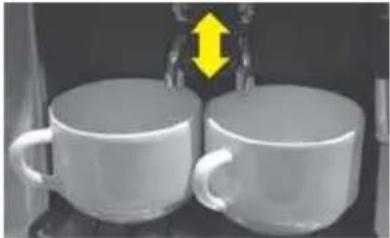 |
| Select your drink with the knob (3). Then validate by pressing the OK button twice quickly. | 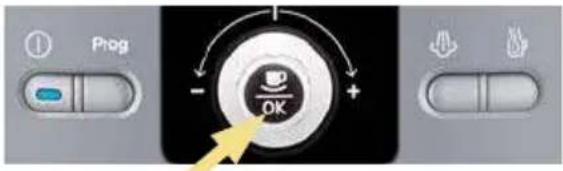 Press twice Press twice |
| →A message indicates that you have asked for two cups.Note: You may interrupt the function by pressing any button while the coffee is being poured. | |
| Wait until the two percolation cycles are complete before removing the cups. |
Note: When using the 2-cup function, at the start of the cycle, the used coffee collector may need to be emptied. Once the necessary actions have been carried out, the 2-cup cycle is carried out automatically.
i Info : For "Large coffee" drinks, the 2-cup function is not available.
4.6 Preparation of hot water
With your machine, you can also prepare hot water, for example to dilute coffee that is too strong. The maximum quantity
of hot water per cycle is limited to 300 ml.
| When the screen displays the drink selection menu, press the Hot water button (6). | 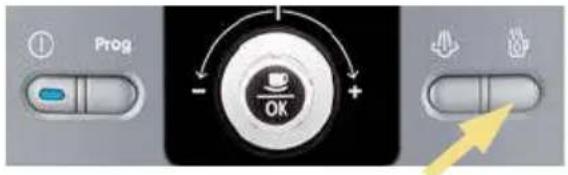 |
| A message will invite you to place a recipient underneath the steam nozzle.Place a recipient underneath the steam nozzle. | |
| Press the hot water button again and select the quantity of hot water desired using the knob.Note: You may interrupt the hot water production at any time by pressing any button. | 1. Press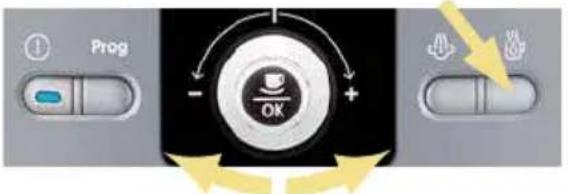 2. Select 2. Select |
5 Maintenance and cleaning
Danger : Any contact of the conductive parts of the appliance with humidity or water may lead to fatal injuries due to the presence of electricity!
Before cleaning your machine, unplug it from the mains socket and leave it to cool down.
Before moving or tilting the appliance,
ensure that the drip tray is empty to avoid water or the cleaning or descaling product from being spilt.
Tip : When cleaning or descaling the steam nozzle, water may be splashed quite forcefully. Place a paper towel on the drip tray and the steam nozzle.
5.1 Regular maintenance
Certain parts of your machine require regular maintenance :
The used coffee collector (7): the used coffee collector collects the used coffee. On the screen, a message indicates when the collector needs to be emptied. In general it needs to be emptied after preparing 9 coffees. From time to time, pass the collector under running water to clean it. Dry it thoroughly.
Important : Ensure that the used coffee collector is completely emptied to avoid any overflow. If the collector is not fitted correctly, the warning message will remain on the screen. If the used coffee collector is fitted in less than 6 seconds, the appliance will ask for confirmation, using the OK button, that it has been emptied. No preparations can be made until the message is cleared.
The cleaning drawer (8): this drawer is used to eliminate any deposits of used coffee from the appliance. Remove the cleaning drawer before emptying the used coffee collector. If the drawer is very dirty, pass it under running water then dry it.
The drip tray (23): the drip tray collects the used water as well as water spilt du-
ring preparations. A message on the screen indicates when the tray needs to be emptied. The appliance also has a mechanical water gauge (22). If the tray is dirty, clean it by passing it under running water.
Coffee circuit : the coffee circuit pipes must be rinsed if the appliance has not been used for several days.
Every time that the appliance is switched on, a message on the screen asks if you wish to rinse it (rinsing procedure, see point 3.4).
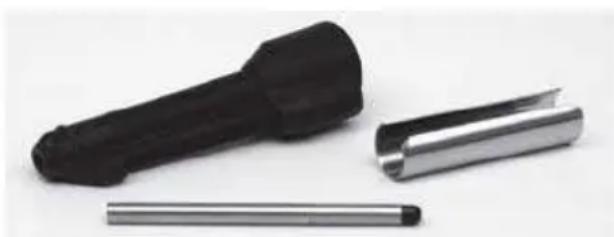
Ensure that the steam nozzle (21) is cleaned thoroughly after several uses: remove it and pass it under running water. It may be removed for cleaning (see illustration). Use a rinsing brush and a little washing up liquid. Dry all parts thoroughly and ensure that the air inlets are not blocked. Use the cleaning wire supplied with your machine to unblock the holes if necessary.
natural_image
Three mechanical components: a black cylindrical tool, a metallic cylindrical part, and a metal rod (no text or symbols visible)5.2 The cleaning programme
A message on the screen indicates when a cleaning programme needs to be carried out on the appliance. Cleaning is required around every 360 preparations. To run this cleaning programme, you will need a recipient with a capacity of at least 0.6 litres and that can fit underneath the coffee tube, and a KRUPS cleaning tablet (XS 3000).
The automatic cleaning programme has 3 phases: one cleaning cycle and two rinsing cycles. The programme lasts around 20 minutes.
i Info : You may run this programme at any time and independently of the warning message via the "Maintenance" menu and by selecting "Cleaning".
Caution: To respect the guarantee conditions, the cleaning cycle must be carried out when the appliance requests it.
Caution: You are not obliged to carry out the cleaning programme immediately when the appliance requests it, but it must be carried out reasonably soon. Only use KRUPS cleaning tablets (XS 3000) otherwise the guarantee will not cover any material damaged caused by the use of other brands of tablets. Cleaning tablets are available from your KRUPS After Sales Service Centre.
Running the cleaning programme
| Ensure you have a recipient with a minimum capacity of 0.6 litres.Caution: Protect your work tops from any splashes of cleaning solution, especially if they are made of marble, stone or wood.Protect the surface below the drip tray, for example with paper towels. |  |
| When the message "Cleaning required" is displayed on the screen, press the Programme button (2), to display the Cleaning menu. | 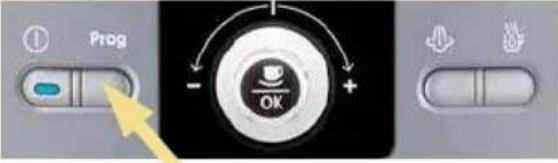 |
| To run the cleaning programme, select the "Start" option and validate with the OK button. Then follow the instructions on the screen.A message will invite you to open the "cover".Open the maintenance cover (17). Insert the cleaning tablet into the opening (16). |  |
| Important: Run the cleaning programme right to the end. | |
| ! Note : the cleaning programme operates discontinuously. It is essential that you wait until it is completely finished (after around 20 min.). | ! Caution : Avoid any contact with the cleaning liquid that runs from the machine, as it contains substances that are bad for your health.Keep the tablets out of the reach of children ! |
| A message on the screen indicates when the programme is finished. | |
Caution : If the cleaning programme is interrupted by a power cut or accidental unplugging of the machine, it must be started again from the beginning. A new
cleaning tablet will be required in this case. The programme must be started again completely in order to rinse the water circuit and eliminate any traces of harmful cleaning products.
5.3 The descaling programme
A message on the screen will indicate when a descaling programme needs to be run for the appliance. The frequency of this programme depends on the quality of the water used, the harder the water, the more often the appliance has to be descaled.
To run the descaling programme, you will need a recipient with a capacity of at least 0.6 litres that may be placed underneath the coffee tube and the steam nozzle, and a KRUPS descaling sachet (F 054) (40 g). You may also use citric acid or tartaric acid.
The automatic descaling programme has 3 phases: one descaling cycle and two rinsing cycles. The programme lasts approximately 22 minutes.
Caution: To respect the guarantee conditions, the descaling cycle must be run when the appliance requests it.
Caution: You are not obliged to carry out the descaling programme immediately when the appliance requests it, but it must be carried out reasonably soon. Only use KRUPS descaler (F 054) otherwise the guarantee will not cover any material damaged caused by the use of other brands of tablets. Descaling products are available from your KRUPS After Sales Service Centre. Under no circumstances must traditional amidosulphonic acid or other products containing this acid be used.
Running the descaling programme
| Place a recipient with a capacity of at least 0.6 litres underneath the coffee tube and the steam nozzle.Caution: Protect your work tops from any splashes of descaling solution, especially if they are made of marble, stone or wood. Protect the surface below the drip tray, for example with paper towels. |  |
| When the message "Descaling required" is displayed on the screen, press the Programme button (2), to display the Descaling menu. | 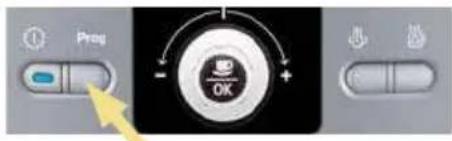 |
| If you use the Krups Aqua Filter System F088 filter cartridge, remove it before the descaling operation and fill the water tank up to the Calc line (0.5 l) with warm water. | 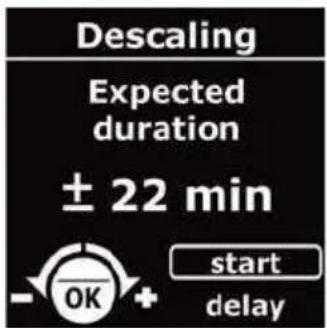 |
| To run the descaling programme, select the "Start" option and validate with the OK button. Then follow the instructions on the screen. | |
| →A message will invite you to pour the contents of the descaling sachet into the water tank.Use a large spoon with a long handle to mix the water in the tank or remove the water tank and carefully shake it from left to right until the descaler is dissolved. | |
| Run the descaling programme right to the end.Note: The pump operates intermittently. It is essential that you wait until the descaling programme is completely finished (after around 22 min). | Caution: Avoid any contact with the descaling liquid that runs from the machine, as it contains substances that are bad for your health.Keep the descaler out of the reach of children! |
| A message on the screen will indicate when the programme is finished. | |
Caution : If the descaling programme is interrupted by a power cut or accidental unplugging of the machine, it must be started again from the begin-
ning. A new descaling sachet will be required in this case. The programme must be started again completely in order to rinse the water circuit and eliminate any traces of harmful descaling products.
General maintenance guidelines
Rinse the cleaning drawer (8), the drip tray (23) and the used coffee collector (7) under running water. Use washing up liquid if required.
Rinse the water tank (10) in clean water.
Clean the body of the appliance and its
parts and accessories with a damp cloth. Do not use corrosive or abrasive cleaning products.
Caution : these accessories are not dishwasher proof.
6 Troubleshooting
If your machine is not operating correctly, try to resolve it by referring to this troubleshooting guide. If the problems persist in spite of this, contact our hotline (see chapter 10).

Danger : Only a qualified technician authorised to carry out repairs on the over cord and the 230 V electrical sys- . Failure to respect this exposes you fatal injuries due to the presence of electricity !
Do not use an appliance that is visibly damaged!
| Problem Probable causes Corrective actions | ||
| The appliance does not switch on when the ON/OFF button is pressed. | ● Power failure or blown fuse.● The mains plug is not pushed into the mains socket correctly or the mains socket is faulty.● The appliance is faulty. | ✕ Check the fuses of your electrical installation.✕ Check that the plug is correctly inserted into the socket or have the socket repaired.✕ Have the appliance checked by a qualified technician. |
| The espresso or coffee is not hot enough. | ● The temperature of the coffee is not set high enough.● The coffee cup is cold. | ✕ Check the temperature of the coffee in the "Settings" menu.✕ Warm the cup by rinsing it with hot water before starting the preparation. |
| The coffee is too lightly coloured or too weak. | ● There is not enough coffee in the coffee bean holder (15).● The coffee is too coarse.● Too much coffee is prepared. | ✕ Add coffee beans to the holder.✕ Use the grinder setting button (13) to obtain a finer grind.✕ Reduce the quantity of coffee using the knob (3). |
| The coffee dispenses too slowly. | ● The coffee is too fine. | ✕ Use the grinder setting button (13) to obtain a coarser grind. |
| The coffee is not creamy. | ● The coffee is too coarse.● The coffee is not fresh. | ✕ Use the grinder setting button (13) to obtain a finer grind.Use fresher coffee beans. |
| You have accidentally used ground coffee instead of coffee beans. | ✕ Suck out the coffee in the coffee bean holder with your vacuum cleaner. | |
| The coffee does not come out of the coffee tube (20). | ● The tube is blocked. | ✕ Unblock the tube with the cleaning wire or a toothpick. |
| The coffee grinder makes a strange noise. | ● Foreign particles are inside the grinder. | ✕ Contact KRUPS Customer Service. |
| The grinder setting button (13) is difficult to turn. | ● Has the grinder setting button been moved when grinding was not taking place ? | ✕ Only turn the setting button during grinding. |
| No steam comes out of the steam nozzle (21). | ● The nozzle or the nozzle support is blocked. | ✕ Remove the steam nozzle from its support and unblock these two parts using the cleaning wire.✕ Temporarily remove the Claris cartridge. |
| There is not enough frothed milk. | ● Check that steam is coming out of the nozzle.● Check if the small air inlet in the upper part of the nozzle is blocked.● The recipient and milk are not cold enough.● The milk is not fresh enough. | ✕ Unblock the steam nozzle with the cleaning wire.✕ Unblock the inlet, dry it and if necessary rinse it with water.✕ Make sure the recipient and milk are cold before frothing.✕ We recommend using very fresh pasteurised or UHT milk. |
| The frothed milk is not thick enough. | ● Check if the two ends of the small stainless steel tube are connected to the steam nozzle. | ✕ Correct the position of the stainless steel tube. |
| The auto-cappuccino accessory (optional) does not suck up the milk. | ● Check that the accessories are connected correctly to one another and that they are not blocked. | ✕ Connect the accessories correctly to one another and un-block them if needed. |
| After filling the water tank (10), the warning message remains displayed on the screen. | ● The water tank is not fitted correctly.● The float at the bottom of the tank does not move freely.● The water tank is scaled. | ✕ Fit the water tank correctly.✕ Rinse the water tank under water and descale if required. |
| The cleaning or descaling programme will not start. | ● Programme error. | ✕ Unplug the appliance then plug it back in and switch it on. Restart the programme. |
| After emptying the used coffee collector (7), the warning message remains displayed on the screen. | ●The used coffee collector is not fitted correctly.●The used coffee collector has been refitted too quickly. | ✕ Refit the used coffee collector correctly.✕ In general wait for at least 6 seconds before refitting the empty collector. |
| After cleaning the cleaning drawer (8), the warning message remains displayed on the screen. | ●The cleaning drawer is not fitted correctly.●The cleaning drawer has been refitted too quickly. | ✕ Refit the cleaning drawer correctly.✕ In general wait for at least 6 seconds before refitting the drawer. |
| A power cut occurs during the cycle. | ✕ The appliance is automatically reinitialised when it is switched back on. | |
| There is water underneath the appliance. | ●The drip tray (23) is not correctly fitted or is overflowing. | ✕ Check that the drip tray has been fitted correctly and empty it if required. |
| A "Fault n° xxx" message appears on the screen. | ●Programme error. | ✕ Unplug the appliance for 20 seconds, remove the Claris cartridge if fitted then plug in the appliance.If the message is still displayed, write down the fault number and contact the KRUPS Customer Service. |
| Tip: Programming problems are often resolved by unplugging the appliance for about one minute and then plugging it in again. | ||

Caution : Do not carry out any work yourself on the appliance !
7 Technical data
Appliance : Automatic Espresseria
Electrical power supply : 220-240V\~ / 50 Hz
Energy consumption : In operation : 1450 W
In stand-by : < 1 W
Storage and use : indoors, in a dry place (free from frost)
Dimensions : 24,5 x 36,5 x 33,0 cm
Weight : 7,3 kg
Under reserve of technical modifications.
8 Transport
Keep the original packaging to transport the appliance. Empty the drip tray (23), when moving the appliance and empty all tanks when packing the appliance for transport.
Caution : If the appliance is dropped without its packaging during transport, it is preferable to take it to an After Sales Service centre to have it checked and avoid any risk of fire or electrical danger.
9 Disposal of waste
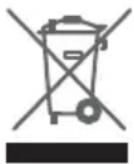
The symbol on the appliance or its packaging indicates that this product may not be processed as household waste. Therefore it must be taken to a waste collection centre for the recycling of ele and electronic equipment.
By sorting waste and disposing of old equipment correctly, you are helping to preserve the natural resources and preventing damaging consequences for the environment and people's health.
To obtain more information on the waste collection site, please contact your local council, local waste collection authorities or your retailer.
i Info : Your appliance contains many materials that may be recycled or recovered.
10 Service
For all questions or problems, please contact our hotline on the following numbers :
DE : Tél. 0800 - 980 00 00
Times : Monday to Friday from 8 am to 6 pm and Saturday from 9 am to 2 pm
A : Tel. 0800 - 225 225
Times : Monday to Friday from 8 am to 6 pm and Saturday from 9 am to 2 pm
BE : Tel. 070 - 233 159
Times : Monday to Thursday: 9-12:30 am and 1-5 pm and Friday from 9-12 am
FR : Tel. 0810 61 10 61
Times : Monday to Thursday from 8:30 to 18:30 and Friday from 8:30 to 5 pm
CH : Tel. 0800 - 37 77 37
Times : Monday to Friday from 8-12 am and from 1-5 pm
GB : Tel. 0845 330 6460
ROI : Tel. (01) 677 4003
Times : Monday to Thursday from 8:30 am to 4:30 pm and Friday from 8:30 to 4 pm
Times : Monday to Thursday from 8:30 am to 4:30 pm and Friday from 8:30 to 4 pm
NO : Tel. 815 09 567
Times : Monday to Thursday from 8:30 am to 4:30 pm and Friday from 8:30 to 4 pm
FI : Tel. 09 6229 420
Times : Monday to Thursday from 8:30 am to 4:30 pm and Friday from 8:30 to 4 pm
11 Index
Auto-cappuccino accessory .....23
Choice of menus ....16
Controls 9
Cleaning 27,31
Cleaning programme ....28
Cleaning the steam nozzle.....22, 27
Cleaning the special nozzle ....24
Correct use......8
Display 10
Descaling programme ....30
Disposal of waste 35
Drink selection menu....19
Demo Mode menu ....19
First use....11
Fitting the filter cartridge ....12
Guide ....5
Initial settings....14
Maintenance....27
Maintenance menu....17
Operation 10
Overall view of operation....9
Overall view of the appliance ....9
Products supplied with the appliance ..8
Product info ....5
Product Info menu....18
Preparation of the appliance ....13
Preparation of a coffee 21
Preparation of an espresso ....21
Preparation of a caffe latte....24
Preparation of a cappuccino....22
Preparation of hot water 26
Rinsing....15
Safety guidelines 6
Steam nozzle 20, 22
Special nozzle 23
Setting the grinder ....16
Settings menu....17
Service 36
Symbols 5
Switching on the appliance....20
Technical data 35
Troubleshooting....32
Transport 35
Use 20
Warning words....5
Water hardness ....11
2-cup function....25
KRUPS
ESPRESSERIA AUTOMATIC
SERIE EA 80XX
text_image
KRUPS 10 : 00 Espresso Espresso corsé Café Café long Prog OTnatural_image
Close-up of a kitchen kitchen sink with a black and gray model, showing food arrangement (no visible text or symbols)3.6 Les menus
natural_image
Close-up of three mechanical components: a black cylindrical tool, a metallic cylindrical part, and a metal rod (no text or symbols visible)natural_image
Close-up of a kitchen appliance with a circular dial and lid, showing food arrangement (no visible text or symbols)3.6 De menu's
natural_image
Three mechanical components: a black cylindrical tool, a metallic cylindrical part, and a metal rod (no text or symbols visible)Auto-cappuccino accessoire .....23
Bedieningselementen....9
natural_image
Close-up of two kitchen utensils on a stove, one with a yellow circular knob and the other showing food (no visible text or symbols)3.6 Menuerne
natural_image
Three mechanical components: a black cylindrical tool, a metallic cutting tool, and a thin rod (no text or symbols visible)natural_image
Close-up of a kitchen appliance with a yellow circular indicator showing a yellow arrow, and a photo of nuts on the surface (no visible text or symbols)3.6 Menyerna
text_image
Prog - OK
natural_image
Three mechanical components: a black cylindrical tool, a metallic cutting tool, and a cylindrical rod (no text or symbols visible)5.2 Rengöringsprogrammet
- 2 rengjøringstabletter (KRUPS – ref XS3000)
natural_image
Close-up of three mechanical components: a black cylindrical tool, a metallic bracket, and a metric tool (no text or symbols visible)Vannets hardhetsgrad ....11
Veiledning ....5
Varselinfo ....5
Vedlikeholdsmeny 17
KRUPS
ESPRESSERIA AUTOMATIC
SERIE EA 80XX
text_image
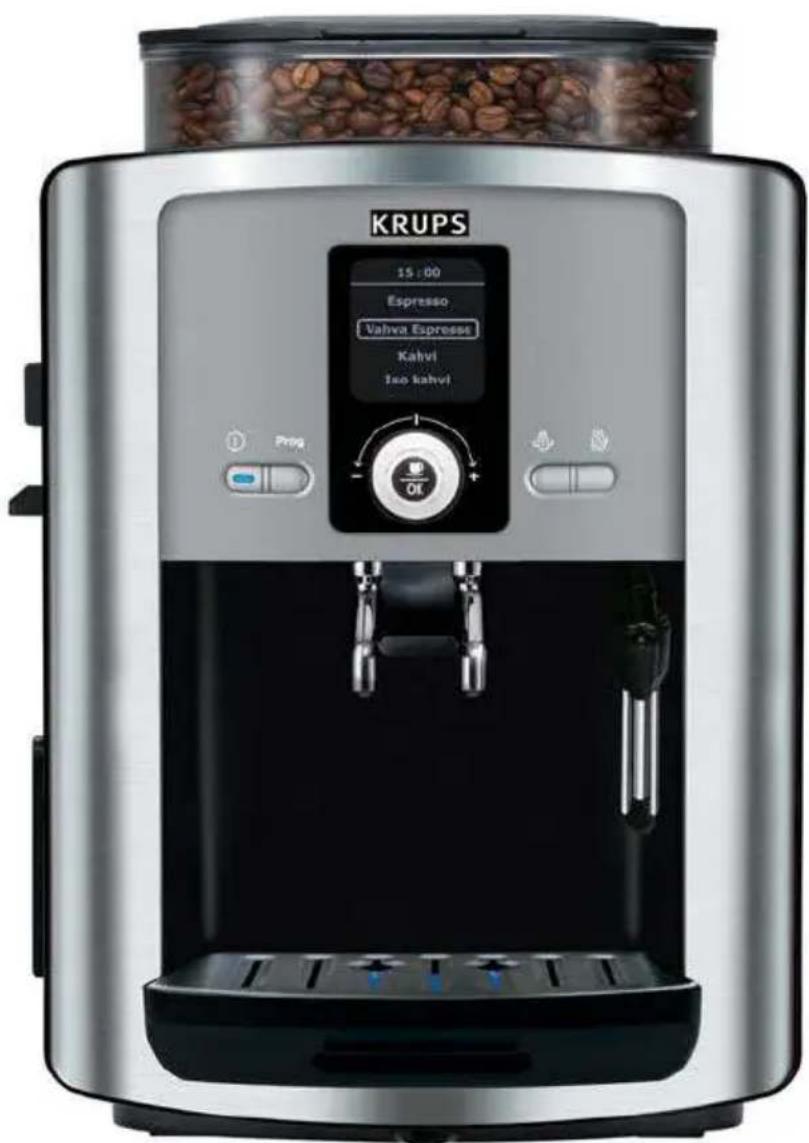
KRUPS 15:00 Espresso Vahva Espresses Kahvi Iso kahvi Prog OKKäyttö ja huolto