
Activys OV1000 - Oven TEFAL - Free user manual and instructions
Find the device manual for free Activys OV1000 TEFAL in PDF.


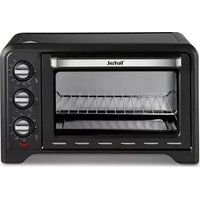
| Product type | Freestanding electric oven |
| Brand | Tefal |
| Model | Activys OV1000 |
| Power supply | 220-240 V ~, 50/60 Hz |
| Cooking functions | Oven, Grill, Grill + Rotisserie |
| Temperature range | 100°C to 280°C |
| Timer | 0 to 120 minutes |
| Automatic shut-off | Yes, at end of timer |
| Included accessories | Reversible grid, drip tray, rotisserie kit (spit, 2 forks, support) |
| Door type | Tempered glass door with handle |
| Maintenance | Clean exterior with damp sponge; interior with mild detergent; foldable/liftable heating elements (non-removable) |
| Safety | Automatic shut-off, hot exterior surface (use gloves), do not immerse in water, do not use abrasive products |
| Repairability | Do not disassemble yourself; contact an Authorized Service Center |
| Not built-in | Yes, place on worktop |
Frequently Asked Questions - Activys OV1000 TEFAL
User questions about Activys OV1000 TEFAL
0 question about this device. Answer the ones you know or ask your own.
Ask a new question about this device
Download the instructions for your Oven in PDF format for free! Find your manual Activys OV1000 - TEFAL and take your electronic device back in hand. On this page are published all the documents necessary for the use of your device. Activys OV1000 by TEFAL.
USER MANUAL Activys OV1000 TEFAL
FIN

*selon modèle - afhankelijk van het model - je nach Modell - according to model - consoante o modelo - afhængig af model - beroende på modell - avhengig av modell - mallista riippuen - aváloya με το μοντέλο

PRECAUTIONS IMPORTANTES
Take the time to read all instructions and refer to the «User Guide».
- This appliance conforms to safety rules and conditions in effect and with the directives in force.
- Bearing in mind the diversity of standards in force, if this appliance is used in a different country from the one in which it was bought, have it checked by an approved service centre.
- Never leave the appliance operating unattended:
⚠️ young children and severely disabled persons who are not familiar with these instructions should only use this appliance under surveillance of a responsible adult.
Children should be supervised to ensure they do not play with the appliance.
- Do not move or carry the appliance during use.
- Your oven is not designed to be built-in.
- Use on a flat, stable, heat resistant surface, away from any contact with water and never use underneath a built-in kitchen alcove.
- Leave approximately 2 cm between the food and the grill element in grill function.
- Run your oven for the first time (EMPTY) for 15 minutes, at maximum temperature, to eliminate the smell of newness. A small amount of smoke may be produced initially, this is perfectly normal and will soon disappear.
- Check that the mains voltage is that shown on the appliance (alternating current only). This appliance must be earthed.
- Do not use the appliance if:
- it has a faulty cord,
- the appliance has fallen, shows visible damage or does not function correctly.
In this case, the appliance must be sent to the nearest approved after-sales service centre so as to avoid any danger.
- Make sure that the electrical installation is sufficient for supplying an appliance of this wattage.
• Always use an earthed plug to connect the appliance. - Do not let the cord hang down or touch hot parts of the oven. Do not disconnect the appliance by pulling on the cord.
- Only use an extension lead that is in good condition, with an earthed plug and power cord at least equivalent to the cord supplied with the product.
- Disconnect the appliance when not in use and before cleaning it.
- So as to avoid electric shocks, do not immerse the electric cord, plug or appliance in water or any other liquid.
- Do not place the appliance close to a heat source. Do not put it on the top of another appliance.
- This electrical appliance operates with high temperatures which could cause burns. Do not touch metal or glass parts.
- The temperature of the door may be high when the appliance is in operation.
- Use the handles and knobs. Use oven gloves when necessary.
- Handle the door of your oven with care: any hard shocks or excessive thermal constraints may cause the glass to break. The door is made of tempered glass to prevent any risk of glass being projected and conse-
quently any danger for the user.
- If any part of the product should catch fire, do not attempt to extinguish with water. Smother flames with a damp cloth. Disconnect the appliance and do not open the door.
- Do not keep flammable products close to or under the unit where the appliance is placed.
- Do not operate the appliance under a wall unit, shelf, or close to flammable materials such as blinds, curtains, drapes, etc...
- Do not use the appliance as a source of heat.
- Never put paper, cardboard or plastic in the appliance and do not place anything on top (utensils, racks, objects, etc...).
- Do not place dishes directly onto the bottom heating element.
- Do not place aluminium foil under the appliance or between the heating elements or on the side panels or on the bottom heating element. You risk damaging the oven functions seriously or degrading the work surface.
- Do not put anything into the air vents, or obstruct them.
- Do not use harsh cleaning products (such as caustic soda cleaning compounds), or scouring sponges, or abrasive pads.
- For your own safety, never dismantle the appliance yourself; as this will negate the guarantee; send to an approved service centre.
- This appliance is designed for domestic use only. Any commercial use, inappropriate use, or failure to comply with the instructions, the manufacturer accepts no responsibility and the guarantee will not apply.
- Timer : For times less than 25 minutes, turn the knob to 30 minutes and come back to the required time. Keep these instructions.
If you have any product problems or queries, please consult our website: www.tefal.co.uk or call our Helpline on: 0845 602 1454 - UK
(01) 461 0390 - Ireland

Environment protection first !
Your appliance contains valuable materials which can be recovered or recycled.
Leave it at a local civic waste collection point.


Appliance characteristics
1 Mains indicator lamp
2 Timer setting knob (0 to 120 minutes)
3 Function select knob :

Oven

Grill

Grill + Rotisserie
4 Temperature setting knob (100°C to 280°C)
5 Hinged grill element
6 Hinged bottom element*
7 Spit support fixing hole*
8 Reversible shelf
9 Fixed cord
10 Rotisserie kit* (1 spit, 2 spit forks)
11 Spit support*
12 Drip pan*
Using the appliance
Before using your appliance, read the page, "Important precautions".
Before using for the first time
- Place your oven on a flat, stable, heat-resistant surface.
- Remove all self-adhesive labels and protection from inside and outside your oven.
- Remove the accessories* from the oven (shelf, spit etc.).
- Clean oven and accessories with a damp cloth. Dry thoroughly. (Fig A)
- Close the door using the handle only. (Fig H)
- Connect the cord to an earthed socket. (Fig B)
- Set the function selector knob to "oven"(Fig C)
- Set the oven thermostat knob to 280^ . (Fig D)
- Set the timer to 15 minutes. (Fig E)
- The oven will start.
The packaging is recyclable but can be useful to transport the oven or return it to an approved service centre.
Some smoke may be produced. This is quite normal and will soon disappear with use.
Always use the handle when opening or closing the door.
Stopping the oven
- Whatever cooking mode is being used, the oven can be stopped before cooking has finished. To do this, set the cooking time to 0 using the timer.
Oven cooking

- Insert the shelf at the desired height. (Fig F)
- Place your prepared dish of food on the shelf and close the oven door. (Fig G) - (Fig
- Turn the selector knob to "oven" * (Fig C)
- Turn the thermostat knob to the desired temperature according to your recipe. (Fig
- Set the timer knob to the desired cooking time. Fig I)
- Cooking will start.
- At the end of the cooking time, the oven will turn off automatically.
- You can stop the oven before the end of the cooking time by setting the timer to 0.
Your oven is powerful and fast. Preheating is not always necessary.
The door and outer wall temperatures are high when the oven is operating.
Use oven gloves For certain dishes, we recommend that:
- you keep a check on the cooking and do not eat fried food if it is burned; fried food should be just lightly browned, especially chips cooked in your oven, - you eat a balanced, varied diet, including large amounts of fruit and vegetables
Grilling

• To grill or prepare cheese dishes.
- Allow about 4 minutes for preheating.
- Place your dish or your meat on the shelf as close as possible to the grill element without the food touching it. (Fig J)
- Leave the door ajar. (Fig R)
- Set the function selector switch to "grill" *. (Fig K)
- Set the timer knob to the desired cooking time. (Fig L)
- The oven will start.
- Meat should be turned halfway through grilling (sausages, pork chops etc.).
- At the end of the cooking time, the oven will turn off automatically.
Spit roasting under the grill

• To cook poultry or meat on the spit.
- Fitting the spit:
To install the spit, fit the spit support in the holes on the left wall. (Fig M) Slide one spit fork along the spit. Screw in to lock the spit fork in place. (Fig N)
Truss poultry and meat tightly, then skewer them on the spit. Slide the second spit fork into the meat as far along as possible, so that the meat to be roasted is held securely in place. Screw in to lock the second spit fork in place.
- Move the first spit fork, if necessary, in order to centre the meat on the spit, and lock the 2 forks in place.
- Remove the shelf and insert the drip pan in the oven. (Fig O)
- Insert the pointed end of the spit into the drive hole in the right wall of the oven and push it home. (Fig P)
• Fit the other end of the spit in the support. (Fig Q) - Leave the door ajar. (Fig R)
- Set the selector knob to the position, "grill/rotisserie" (Fig S).
- Set the timer knob to the desired cooking time.
• Cooking will start, and the spit will begin to turn. - At the end of the cooking time, the oven will turn off automatically.
Always leave the door ajar when using the grill function.
Cleaning and care
Do not allow grease to accumulate in the appliance.
Do not use aggressive cleaning products (especially soda-based oven cleaners), scouring sponges or abrasive pads.
Never attempt to move the heating elements by force.
- Before cleaning or care, allow the oven to cool.
- A quick wipe with a sponge is sufficient to clean the outside of the appliance.
- Clean the door, enamelled or lacquered surfaces and translucent parts with a damp sponge and a mild detergent. (Fig T)
- To facilitate cleaning of the self-cleaning sides after cooking fatty food, heat the empty oven for ten minutes with the thermostat at its maximum setting and with the door closed.
- The grill element is hinged but cannot be removed*. (Fig U)
- The oven has a hinged bottom element* (Fig V) (not removable).
- All accessories* (shelf, pan, rotisserie kit) can be cleaned with water and detergent or put in the dishwasher.
Cooking table
- The cooking times below are given by way of indication. They can vary depending on the size, thickness, freshness and initial temperature of the item to be cooked.
Shelf position

| Dish | Temperature setting | Cooking time | Shelf position |
| Chicory with ham 200/220°C 20 min. 3 | |||
| Gratin Dauphinois 220°C 70 min. 3 | |||
| Roast pork 240°C 75 min. 3 | |||
| Leg of lamb 240°C 60/70 min. 2 | |||
| Chicken (1.5 kg) 80 min. Door ajar. [3CSX] | |||
| Roast beef 240°C 35/40 min. 3 | |||
| Fish in white wine 240°C 15 min. 3 | |||
| Frozen thin crust pizza 240°C 12 min. 5 | |||
| Cheese soufflé | 220°C 25/30 min. 2 | ||
| Vol-au-vents | 180°C 33/35 min. 3 | ||
| Individual pies 180/200°C 30 min. 4 | |||
| Quiche Lorraine | 240°C 20/25 min. 4 | ||
| Frozen chips 300g | 260°C 14/16 min. 5 | ||
| Chicken drumsticks | 240°C 25/30 min. 4 | ||
| Stuffed tomatoes | 220/240°C | 35/40 min. 2 | |
| Brioche | 180°C 30/35 min. 2 | ||
| Raisin cookies | 180°C 10/15 min. 4 | ||
Sponge cake  | 180°C 32/35 min. 2 | ||
| Crème caramel | 240°C 30/35 min. 2 | ||
| Clafoutis | 180°C 40/45 min. 3 | ||
| Tarte Tatin 260°C 20/25 min. 4 | |||
| Fruit cake 180°C 40/45 min. 2 | |||
| Apple tart | 260°C 23/25 min. 4 | ||
| Marble cake | 180°C 35/40 min. 2 | ||
PRECAUÇÕES IMPORTANTES
APPARATETS TEKNISKE DATA



- PRECAUTIONS IMPORTANTES
- Environment protection first !
- Appliance characteristics
- Using the appliance
- Before using your appliance, read the page, "Important precautions".
- Before using for the first time
- Stopping the oven
- Oven cooking
- Grilling
- Spit roasting under the grill
- Cleaning and care
- Cooking table
- PRECAUÇÕES IMPORTANTES
- APPARATETS TEKNISKE DATA
Brand : TEFAL
Model : Activys OV1000
Category : Oven