KZ-1216 - Coffee machine TRISTAR - Free user manual and instructions
Find the device manual for free KZ-1216 TRISTAR in PDF.

User questions about KZ-1216 TRISTAR
0 question about this device. Answer the ones you know or ask your own.
Ask a new question about this device
Download the instructions for your Coffee machine in PDF format for free! Find your manual KZ-1216 - TRISTAR and take your electronic device back in hand. On this page are published all the documents necessary for the use of your device. KZ-1216 by TRISTAR.
USER MANUAL KZ-1216 TRISTAR
natural_image
Black and silver coffee maker with a black mug and control panel, no visible text or symbols on the device itself.KZ-1216
text_image
Labeled diagram of a coffee maker with parts marked A through I, showing internal components like blender, filter, and cup.A. Deksel
B. Hoofdapparaat
text_image
Labeled diagram of a coffee maker with parts A through I, showing interior components and parts for cooking or processing.A. Deckel
B. Gerätegehäuse
C. Ein/Aus-Schalter
D. Messlöffel
E. Filter
F. Filterhalter
G. Wasserauslauf
H. Keramiktassen
text_image
Labeled diagram of a coffee maker with parts marked A through I, showing interior components and parts for cooking or processing.A. Couvercle
B. Partie principale
General safety instructions
Check if the tension of your supply corresponds with the voltage indicated on the rating plate of your appliance.
- Before commissioning this device please read the instruction manual carefully and keep this so that you can check them later.
- Please keep these instructions, the guarantee certificate, the sales receipt and, if possible, the carton with the inner packaging!
- The device is intended exclusively for private and not for commercial use! 'eep it away from direct heat, sun and moist and protect it against sharp impacts.
- Always remove the plug from the socket whenever the device is not in use, when attaching accessory parts, cleaning the device or whenever a disturbance occurs. Switch off the device before. Pull on the plug, not on the cable.
- This appliance is not intended for use by persons with reduced physical, sensory or mental capacities, or lack of experience and knowledge (including children), unless they have been supervised or instructed concerning use of the appliance by a person responsible for their safety.
- In order to protect children from the dangers of electrical appliances, never leave them unsupervised with the device. Consequently, when selecting the location for your device, do so in such a way that children do not have access to the device. Take care to ensure that the cable does not hang down.
- Test the device, plug and the cable regularly for damage. If there is damage of any kind, the device should not be used but the appliance must be repaired by a qualified technician in order to avoid a hazard. Only original spare parts must be used.
- A damaged cord or plug must be replaced by an authorized technician to avoid a hazard. Do not repair the device yourself,.
- 'eep the device and the cable away from heat, direct sunlight, moisture, sharp edges and such like.
- Never use the device unsupervised! Switch off the device whenever you are not using it, even if this is only for a moment.
- Do not use the device outdoors.
- Under no circumstances must the device be placed in water or other liquid, or come into contact with such. Do not use the device with wet or moist hands.
- Should the device become moist or wet, remove the mains plug from the socket immediately. Do not reach into the water.
- Use the device only for the intended purpose.
Parts list
text_image
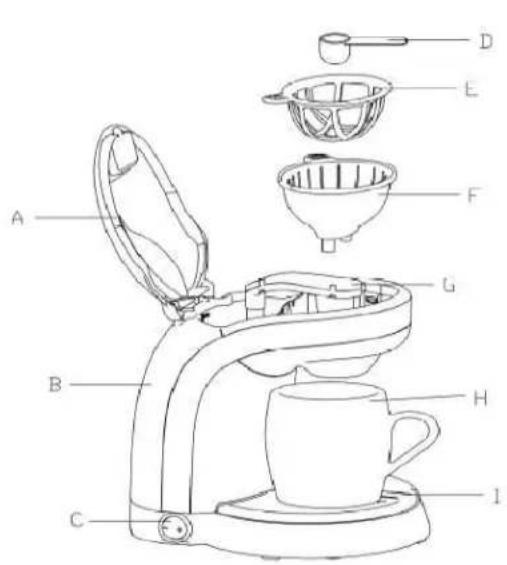
Labeled diagram of a coffee maker with parts A through I, showing internal components and parts for cooking or processing.A. Lid
B. Main body
C. Power switch
D. Spoon
E. Filter
F. Filter holder
G. Water extension
H. Ceramic Mugs
I. Mug Pad
Important points before using the coffee maker.
- Please read this instruction manual carefully before using.
- Before plug in the socket, check the rating information on product, which should match with your local supply voltage.
- Your supply socket must be properly earth.
- Before using the coffee maker make sure that a maximum amount of water, 2 cups, passed through the machine. Pour away this water.
- The product should only be placed on horizontal flat surface.
- During usage, the product must be located at a position, which is not easily reached by children to avoid injury by spillage of hot water.
- Do not plug in product without water. To avoid damage to the product, never turn on the appliance with empty container.
• Fill in water according to the pre-set water level for 1 or 2 cups of coffee.
- Temperature control device6 When there is no water in the water container, the temperature will increase, the temperature control device will cut off the power automatically at the required temperature. Unplug the appliance at once.
- Thermo fuse device6 This appliance equipped with a second temperature protection. In case the temperature control device malfunction, the thermo fuse device will cut off the power. Unplug the appliance at once.
Operation
- To prepare coffee: put filter (E) into the filter holder (F) then add necessary amount of ground coffee (approx.6g per cup). Insert the filter holder with filter into position. Fill up the water container with required quantity of water, put on the lid (A) and place the mugs (H) into position. Turn on the power switch (C) and the appliance will start working.
• No anti-drip function: do not take out the mugs during cooking, because coffee will drip out.
Cleaning
- Unplug the product after use. Clean the filter (E) and filter holder (F) with water after cool down. Clean the other parts with a dry cloth then store the unit at a proper location.
- If your local supply is hard water, please descale the appliance at least once a month. Add descaler and fill up the water container, this has to stand for about 5 minutes. Turn on the appliance so water will go through the machine. Repeat this twice without adding coffee.
- Never immerse the whole product into the water.
Guidelines for protection of the environment
This appliance should not be put into the domestic garbage at the end of its useful life, but must be disposed of at a central point for recycling of electric and electronic domestic appliances. This symbol on appliance, instruction manual and packaging puts your attention to this important issue. The materials used in this appliance can be recycled. By recycling used domestic appliances you contribute an important push to the protection of our environment. Ask your local authorities for information regarding the point of recollection.

text_image
Labeled diagram of a coffee maker with parts A through I, showing interior components and parts for cooking or processing.A. Coperchio
B. Corpo principale
C. Interruttore
text_image
Labeled diagram of a coffee maker with parts marked A through I, showing interior components and parts for cooking or processing.A. Tapa
B. Cuerpo principal
C. Interruptor encendido
D. Cuchara
E. Filtro
F. Soporte filtro
G. Extensión agua
text_image
Labeled diagram of a coffee maker with parts marked A through I, showing interior components and parts for cooking or processing.A. Tampa
B. Corpo principal