AL-1252 - Printer SHARP - Free user manual and instructions
Find the device manual for free AL-1252 SHARP in PDF.

User questions about AL-1252 SHARP
0 question about this device. Answer the ones you know or ask your own.
Ask a new question about this device
Download the instructions for your Printer in PDF format for free! Find your manual AL-1252 - SHARP and take your electronic device back in hand. On this page are published all the documents necessary for the use of your device. AL-1252 by SHARP.
USER MANUAL AL-1252 SHARP
natural_image
Line drawing of a printer with paper tray and front panel (no text or symbols)DIGITAL LASER COPIER/PRINTER
OPERATION MANUAL
DIGITALER LASERKOPIERER/-DRUCKER
BEDIENUNGSANLEITUNG

natural_image
Line drawing of a printer with no visible text or symbolsnatural_image
Line drawing of a printer with lid and front panel (no text or symbols)DIGITAAL LASER KOPIEERAPPARAAT/
PRINTER
GEBRUIKSAANWIJZING
COPIADORA/IMPRESORA DIGITAL LÁSER
natural_image
Line drawing of a printer with lid and front panel (no text or symbols)FOTOCOPIATRICE / STAMPANTE DIGITALE
LASER
In some areas, the "POWER" switch positions are marked "I" and "0" on the copier instead of "ON" and "OFF".
CAUTION: For a complete electrical disconnection, pull out the main plug.
The socket-outlet shall be installed near the equipment and shall be easily accessible.
This equipment complies with the requirements of Directives 89/336/EEC and 73/23/EEC as amended by 93/68/EEC.
As an ENERGY STAR® Partner, SHARP has determined that this product meets the ENERGY STAR® guidelines for energy efficiency.

text_image
Technical diagram of a mechanical assembly with labeled components and directional arrows indicating assembly steps.GB
-
Operation manual / Printer driver (CD-ROM)
-
Power cord
-
TD cartridge
-
Drum cartridge (installed in copier)
-
Interface cable
(IBM PC/AT or compatible computer)

- If anything is not included or is damaged, contact your Sharp dealer.
- Save the carton and packing materials. These can be re-used for transporting the machine, should it be necessary.
D
(IBM PC/AT compatibele computer)

text_image
Technical diagram of a printer internal structure with numbered components for identification | ||
| 1. Original cover | 10. Paper output tray | 19. Drum cartridge handle |
| 2. Side cover | 11. Paper output tray extension | 20. Transfer charger |
| 3. Bypass tray | 12. Handle | 21. Charger cleaner |
| 4. Bypass tray guides | 13. Power switch | 22. Fusing unit release lever |
| 5. Side cover open button | 14. Power cord socket | 23. Feeding roller cover |
| 6. Front cover | 15. Parallel interface connector | 24. SPF and R-SPF exit area |
| 7. Paper trays | 16. TD cartridge lock release button | 25. Original guides |
| 8. Operation panel | 17. TD cartridge | 26. Document feeder tray |
| 9. Original table | 18. Drum cartridge | |
 | ||
| 1. Originalabdeckung | 9. Vorlagenglas | 17. Entwicklereinheit |
| 2. Seitenabdeckung | 10. Papierausgabefach | 18. Trommeleinheit |
| 3. Kassette für Mehrfacheinzug | 11. Verlängerung desPapierausgabefachs | 19. Griff der Trommeleinheit |
| 4. Führung der Kassette für Mehrfach-einzug | 12. Griff | 20. Übertragungscorona |
| 5. Verriegelungstaste derSeitenabdeckung | 13. Netzschalter | 21. Coronareiniger |
| 14. Netzkabelbuchse | 22. Entriegelungshebel Fixiereinheit | |
| 6. Frontabdeckung | 15. Paralleler Schnittstellenstecker | 23. Abdeckung der Einzugsrolle |
| 7. Papierfach | 16. Entriegelungsknopf derEntwicklereinheit | 24. Original-Ausgabebereich |
| 8. Bedienfeld | 25. Originalführungen | |
| 26. Originaleinzugsfach | ||
 | ||
| 1. Couvercle de l'original | 10. Plateau de sortie du papier | 19. Poignée de la cartouche de tambour |
| 2. Couvercle latéral | 11. Extension du plateau de sortie du papier | 20. Chargeur de transfert |
| 3. Plateau d'alimentation auxiliaire | 12. Poignées | 21. Pince de nettoyage du chargeur |
| 4. Guides du plateau d'alimentation auxiliaire | 13. Interrupteur d'alimentation | 22. Levier de libération de l'unité de fixation |
| 5. Bouton d'ouverture du couvercle latéral | 14. Fiche du cordon d'alimentation | 23. Couvercle du rouleau de chargement |
| 6. Couvercle frontal | 15. Connecteur interface parallèle | 24. Zone de sortie du chargeur de documents |
| 7. Magasins papier | 16. Bouton de déverrouillage de la cartou-che toner/développeur | 25. Guides du document original |
| 8. Tableau de commande | 17. Cartouche toner/développeur | 26. Plateau du chargeur de document |
| 9. Vitre d'exposition | 18. Cartouche de tambour | |
 | ||
| 1. Documentdeksel | 10. Papier uitvoerlade | 18. Drumpatroon |
| 2. Zijklep | 11. Verlengstuk papier uitvoerlade | 19. Hefboom voor drumpatroon |
| 3. Handinvoer lade | 12. Hefboom | 20. Corona-eenheid |
| 4. Geleiders van handinvoer | 13. Aan-/uitschakelaar | 21. Reiniger voor coronabedrading |
| 5. Opentoets voor het zijdeksel | 14. Bus voor netsnoer | 22. Heatereenheid ontgrendelingshefboom |
| 6. Frontdeksel | 15. Parallelle interfaceaansluiting | 23. Deksel voedingswals |
| 7. Papierlade | 16. Tonerpatroon vergrendelings-/ont-grendelingstoets | 24. Origineel uitvoerlade |
| 8. Bedieningspaneel | 17. Tonerpatroon | 25. Geleiders van het origineel |
| 9. Glasplaat | 26. Origineel invoerlade | |
 | ||
| 1. Cubierta de originales | 9. Pantalla de exposición | 17. Cartucho TD |
| 2. Cubierta lateral | 10. Bandeja de salida del papel | 18. Cartucho tambor |
| 3. Bandeja de alimentación manual multi-hojas | 11. Extensión de la bandeja de salida del papel | 19. Palanca del cartucho tambor |
| 4. Guías de papel de la bandeja de alimentación manual multi-hojas | 12. Asidero | 20. Corona de transferencia |
| 5. Control para apertura de lacubierta lateral | 13. Interruptor | 21. Limpiador de la corona de carga |
| 6. Cubierta frontal | 14. Conector hembra para el cable de alimentación | 22. Palanca de liberación de la unidad fusora |
| 7. Bandeja | 15. Conector de interfaz en paralelo | 23. Cubierta del rodillo de alimentación |
| 8. Panel de mando | 16. Botón de fijación/liberación del cartu-cho TD | 24. Sector de salida SPF |
| 25. Guías de originales | ||
| 26. Bandeja para alimentación de originales | ||


text_image
Diagram of a vehicle air conditioner panel with labeled buttons, dials, and control knobs① Exposure mode selector key and indicators
Use to sequentially select the exposure modes: AUTO, MANUAL (☐ ⋯) or PHOTO (☐ Selected mode is shown by a lit indicator. (p.1-14)
② Light(①) and dark (▶) keys and exposure indicators
Use to adjust the MANUAL (☐…) or PHOTO (☐) exposure level. Selected exposure level is shown by a lit indicator. (p. 1-14)
Use to start and terminate user program setting. (p. 1-22)
③ Alarm indicators
◎: Drum replacement required indicator (p.1-24)
8V : Misfeed indicator (p.1-27)
∴: TD cartridge replacement required indicator (p.1-23)
④ Copy ratio selector key and copy ratio indicators
Use to sequentially select preset reduction/enlargement copy ratios. Selected copy ratio is shown by a lit indicator. (p.1-16)
⑤ Zoom indicator (p.1-16)
⑥ Copy ratio display (%) key (p.1-16)
⑦ Display
Displays the specified copy quantity, zoom copy ratio, user program code, and error code.
⑧ ONLINE indicator
Lights up when the machine is used as a printer. For description of the ON LINE indicator, see the printer operation manual.
⑨ Power save indicator
Lights up when the copier is in a power save mode. (p.1-20)
⑩ Tray select (⊖) key and indicators (except for AL-1043, AL-1252)
Use to manually select a paper tray.
⑪ Paper feed location indicator (AL-1551 only)
Light up to show the selected paper feed station.
⑫ Zoom keys (hearts, the hat)
Use to select any reduction or enlargement copy ratio from 50 to 200% in 1% increments. (p. 1-16)
⑬ Copy quantity keys (▲, ▲)
- Use to select the desired copy quantity (1 to 99). (p.1-12)
- Use to make user program entries. (p.1-22)
⑭ Clear key (©)
- Press to clear the display, or press during a copy run to terminate copying. (p. 1-12)
- Press and hold down during standby to display the total number of copies made to date. (p.1-33)
⑮ Print key and ready indicator (💡)
- Copying is possible when the indicator is on.
- Use to set a user program.
⑯ SPF/R-SPF indicator(○)
Concern only the models equipped with SPF/R-SPF.
⑰ SPF/ RSPF misfeed indicator (◀) (p.1-33)
Concern only the models equipped with SPF/R-SPF.
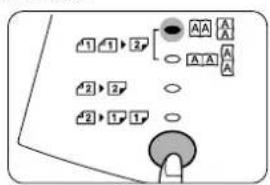
⑱ Original to copy key and indicators
(p.1-12) (AL-1551 only)

text_image
Two-sided copies from one-sided originals.Turn on Long Edge or Turn on Short Edge can be selected.

Two-sided copies from two-sided originals. (Can be selected only when the R-SPF is used.)

Single-sided copies from two-sided originals. (Can be selected only when the R-SPF is used.). Short Edge can be selected.

text_image
Diagram of a refrigerator control panel with labeled buttons, indicators, and function keystext_image
Diagram of a refrigerator control panel with labeled buttons, dials, and indicator lights(p. 2-12) (AL-1551 uniquement)
text_image
Diagram of a car air conditioner panel with labeled buttons, dials, and indicator lightstext_image
Diagram of a refrigerator control panel with labeled buttons, indicators, and function keystext_image
Diagram of a car air conditioner panel with labeled buttons, dials, and control knobsRequired in Appendix ZB of BS 7002 (En 60 950) – United Kingdom
MAINS PLUG WIRING INSTRUCTIONS
The mains lead of this equipment is already fitted with a mains plug which is either a non-rewireable (moulded) or a rewireable type. Should the fuse need to be replaced, a BSI or ASTA approved fuse to BS1362 marked or and of the same rating as the one removed from the plus must be used.
Always refit the fuse cover after replacing the fuse on the moulded plug. Never use the plug without the fuse cover fitted.
In the unlikely event of the socket outlet in your home not being compatible with the plug supplied either cut-off the moulded plug (If this type is fitted) or remove by undoing the screws if a rewireable plug is fitted and fit an appropriate type observing the wiring code below.
DANGER: The fuse should be removed from the cut-off plug and the plug destroyed immediately and disposed of in a safe manner. Under no circumstances should the cut-off plug be inserted elsewhere into a 13A socket outlet as a serious electric shock may occur.
To fit an appropriate plug to the mains lead, follow the instructions below:
IMPORTANT: The wires in this mains lead are coloured in accordance with the following code:
GREEN-AND-YELLOW: Earth
BLUE: Neutral
BROWN: Live
As the colours of the wires in this mains lead may not correspond with coloured markings identifying the terminals in your plug, proceed as follows:
The wire which is coloured GREEN-AND-YELLOW must be connected to the terminal in the plug which is marked with the letter E, or by the safety earth symbol ± , or coloured green or green-and-yellow.
The wire which is coloured BLUE must be connected to the terminal which is marked with the letter N or coloured black.
The wire which is coloured BROWN must be connected to the terminal which is marked with the letter L or coloured red.
If you have any doubt, consult a qualified electrician.
WARNING: THIS APPARATUS MUST BE EARTHED:
This copier has been designed to provide intuitive operating ease while requiring a minimum amount of space. To get full use of all copier features, be sure to familiarize yourself with this manual and the copier. For quick reference during copier use, keep this manual in a handy location.
Depending on the model purchases, your copier is equipped with a Single Pass Feeder (SPF), a Reverse Single Pass Feeder (R-SPF) and a 250-sheet paper feed unit.
These copiers can also be used as a laser printer. This manual describes only the copier features. For description of the printer features, see the printer manual.
Conventions used in this manual
In this manual, the following icons are used to provide the user with information pertinent to the use of the copier.

Warning
Warns the user that injury to the user or damage to the copier may result if the contents of the warning are not properly followed.

Caution
Cautions the user that damage to the copier or one of its components may result if the contents of the caution are not properly followed.

Note
Notes provide information relevant to the copier regarding specifications, functions, performance, operation and such, that may be useful to the user.

A letter shown in the display indicates a problem with the copier. (Please refer to section 1-27 for a detailed explanation).
Illustrations in this manual refer to AL-1551 unless otherwise specified.
CONTENTS INHALT
Unpacking.... I
Part names .... III
Operation panel V
Introduction 1-1
A word on copier installation 1-2
Cautions 1-4
Set up 1-6
Installing the TD cartridge.... 1-7
Loading copy paper 1-8
Normal copying 1-10
Exposure adjustment/Photo copying 1-14
Automatic exposure adjustment 1-15
Reduction/Enlargement/Zoom 1-16
Bypass feed (special paper) 1-17
Two sided copying 1-19
Descriptions of special functions 1-20
Toner save mode 1-21
User programs 1-22
TD cartridge replacement 1-23
Drum cartridge replacement 1-24
User maintenance 1-26
Misfeed removal 1-27
Misfeed in the lower paper feed area 1-29
Misfeed removal from SPF/ R-SPF 1-30
Copier trouble 1-31
Status indicators 1-33
Specifications 1-35
Supply part numbers and storage 1-37
Moving instructions 1-38
Improper installation may damage the copier. Please note the following during initial installation and whenever the copier is moved.
If the copier is moved from a cool place to a warm place, condensation may form inside the copier. Operation in this condition will cause poor copy quality and malfunctions. Leave the copier at room temperature for at least 2 hours before use.

natural_image
Illustration of a printer emitting a screen to its side, with no visible text or symbols.-
Do not install your copier in areas that are:
-
damp, humid, or very dusty
- exposed to direct sunlight
- poorly ventilated
-
subject to extreme temperature or humidity changes, e.g., near an air conditioner or heater.
-
Be sure to allow the required space around the machine for servicing and proper ventilation.
- Do not expose the drum cartridge to direct sunlight.
Doing so will damage the surface (green portion) of the drum cartridge, causing smudges on copies.
- Store spare supplies such as drum cartridges and TD cartridges in a dark place without removing from the package before use.
If they are exposed to direct sunlight, smudges on copies may result. - Do not touch directly the surface (green portion) of the drum cartridge with a hand.
Doing so will damage the surface of the cartridge, causing smudges on copies.
A small amount of ozone is produced within the copier during operation. The emission level is insufficient to cause any health hazard.
The present recommended long term exposure limit for ozone is 0.1 ppm (0.2 mg/m ^3 ) calculated as an 8 hr. Time weighted average concentration. However, since the small amount that is emitted may have an objectionable odor, it is advisable to place the copier in a ventilated area.
- Ensure that the power switch of the copier is in the OFF position. Insert the attached power cord into the power cord socket at the rear of the copier.
If you use the copier in a country other than the country where the copier was purchased, you will need to make sure that your local power supply is compatible with your model. If you plug the copier into an incompatible power supply, severe damage to the copier may result.
- Plug the other end of the power cord into the nearest outlet.
Only insert the power cord into a properly grounded wall socket.
natural_image
Line drawing of a mechanical device with a magnified inset showing a labeled component (no text or symbols present)Turn the power switch on the left side of the copier to the "ON" position. The ready (☐) indicator will light up and other indicators which show the initial settings of the operation panel will also light up to indicate the ready condition. For the initial settings, see the "Initial settings of operation panel" described below.

The copier will enter a power save mode once the set time has elapsed without any copier operation after the last copy of a run is made or power is turned on.
The settings of the power save modes can be modified. See page 1-22, USER PROGRAMS.
The copier will return to the initial settings a preset amount of time after the last copy is made. The preset amount of time (auto clear time) can be changed. See page 1-22, USER PROGRAMS.
The copier assumes the initial settings when the copier is turned on or a preset time (auto clear time) elapses after the last copy is made.
- The fusing area is hot. Exercise care in this area when removing misfed paper.
- Do not look directly at the light source. Doing so may damage your eyes.
- Do not switch the copier rapidly on and off. After turning the copier off, wait 10 to 15 seconds before turning it back on.
- Copier power must be turned off before installing any supplies.
- Place the copier on a firm, level surface.
- Do not install the copier in a humid or dusty location.
- When the copier is not used for long time, for example during prolonged holidays, turn the power switch off and remove the power cord from the outlet.
- When moving the copier, be sure to turn the power switch off and remove the power cord from the outlet.
- Do not cover the copier with a dust cover, cloth or plastic film while the power is on. Doing so may prevent heat radiation, damaging the copier.
Use of controls or adjustments or performance of procedures other than those specified herein may result in hazardous radiation exposure.
Caution
This product contains a low power laser device. To ensure continued safety do not remove any cover or attempt to gain access to the inside of the product. Refer all servicing to qualified personnel.
VAROITUS!
LÄITTEEN KÄYTTÄMINEN MUULLA KUIN TÄSSÄ KÄYT-TOOHJEESSA MAINITULLA TAVALLA SAATTAA ALTISTAA KÄYTTÄJÄN TURVALLISUUSLUOKAN 1 YLITTÄVALLE NÄ-KYMÄTTÖMÄLLE LASERSÄTEILYLLE.
WARNING
OM APPARATEN ANVÄNDS PÅ ANNAT SÄTT ÄN I DENNA BRUKSANVISNING SPECIFICERATS, KAN ANVÄNDAREN UTSÄTTAS FÖR OSYNLIG LASERSTRÄLNING, SOM ÖVERSKRIDER GRÄNSEN FÖR LASERKLASS 1.
CLASS 1 LASER PRODUCT
LASER KLASSE 1
LUOKAN1 LASERLAITE
KLASS1 LASERAPPARAT

natural_image
Line drawing of an open printer with internal structure and external casing (no text or symbols)
natural_image
Technical line drawing of a mechanical device with no visible text or symbolsCLASS 1 LASER PRODUCT
LASER KLASSE 1

Laserstrahl
CAUTION INVISIBLE LASER RADIATION WHEN OPEN AND INTERLOCKS DEFEATED. AVOID EXPOSURE TO BEAM.
Class 1 Laser product
Invisible laser radiation when open and interlocks defeated. Avoid exposure to beam. At the production line, the output power of the scanner unit is adjusted to 0.6 MILLIWATT PLUS 13.4 PCTS and is maintained constant by the operation of the Automatic Power Control (APC).
This product contains a low power laser device. To ensure continued safety do not remove any cover or attempt to gain access to the inside of the product. Refer all servicing to qualified personnel.
Cautions on laser
| Wave length 770 nm -795 nm |
| Pulse times 11.82 μs /7 mm |
| Output power 0.17 mW ± 0.01 mW |
MAIN FEATURES HAUPTFUNKTIONEN
①High-speed laser copying
- Since warm-up time is zero, copying can be started immediately after the power switch is turned on.
- First-copy time is only 9.6 seconds (normal mode).
- Copying speed is 10 copies/min. (AL-1043), 12 copies/min. (AL-1252), 14 copies/min. (AL-1452) or 15 copies/min. (AL-1551), which adapts to business use, allowing improvement of working efficiency.
②Digital high-quality image
- High-quality image copying with 600 dpi can be performed.
- In addition to the automatic exposure mode, the manual exposure can be adjusted in five steps.
- The photo mode copying function which allows clear copying of delicate halftone original images such as monochrome photos and color photos can be used.
③Substantial copying functions
- Zoom copying from 50% to 200% in 1% increments can be performed.
- Continuous copying of 99 sheets can also be performed.
- Automatic document feeding through the single pass feeder (SPF) can be performed (AL-1252, AL-1452) or through the Reverse Single Pass Feeder (R-SPF) (AL-1551) can be performed.
- Toner save mode for reducing toner consumption by approximately 10% can be set.
- User programs which allow setting/modification of functions for customer's needs are provided.
④Scan once/Print many (except for AL-1043)
- This copier is equipped with a 1-page memory buffer. This memory allows the copier to scan an original one time only and make up to 99 copies. This feature allows for improved workflow, reduced operating noise from the copier and reduced wear and tear on the scanning mechanism. This feature provides for a higher reliability.
⑤Environmentally friendly design
- Paper output tray is housed in the copier for space saving.
- Preheat mode and auto power shut-off mode are provided to reduce power consumption in standby mode.
⑥Printer feature
- This copier can be used as a laser printer.

Lasergerät Klasse 1
natural_image
Line drawing of a hand holding a stack of documents or files (no text or symbols visible)AL-1043
text_image
Technical diagram of a mechanical device with labeled parts (a, b, c, d, e, f) for assembly or identification.AL-1043

text_image
Diagram of an open printer with labeled parts (g) and (h)natural_image
Technical line drawing of a mechanical device with no visible text or symbols
text_image
Technical diagram of a printer with labeled parts (a, b, c) showing open lid and cover structure
natural_image
Line drawing of a printer with an open lid and magnified view of its base (no text or symbols)
Store the screw in the paper tray because it will be required if the copier has to be moved. (p. 1-38)
text_image
Technical diagram showing a hand inserting a component into a device with arrows indicating direction of movement or force.natural_image
Technical line drawing of a mechanical device with internal components (no text or symbols)natural_image
Technical line drawing of a printer with a paper feeding into a slot (no text or symbols)natural_image
Diagram of a device with bidirectional arrows indicating movement or force (no text or symbols)natural_image
Diagram showing a mechanical component being inserted into a tray, with an arrow indicating the direction (no text or symbols present)natural_image
Illustration of a hand inserting a device into a machine (no text or symbols visible)When closing the covers, be sure to close the front cover securely and then close the side cover. If the covers are closed in the wrong order, the covers may be damaged.
natural_image
Diagram of a printer or printer with an arrow indicating a loading or movement (no text or symbols present)text_image
Diagram showing hands installing or adjusting a component with an inset magnified view highlighting a mechanical part.text_image
Technical diagram showing a hand operating a device with labeled parts (a) and (b), likely illustrating a mechanical or electrical assembly.Move paper guide ⓑ to the appropriate slot as marked on the tray.
text_image
Diagram showing a hand pressing a component with a magnified inset highlighting a mechanical assembly or component.Do not load paper above the maximum height line (▼▼). Exceeding the line will cause a paper misfeed.

natural_image
Line drawing of a printer with an arrow indicating compression or disassembly (no text or symbols present)After loading copy paper, to cancel the blinking "P" without restarting copying, press the clear (©) key. The "P" in the display will go out and the ready (®) indicator will light up.

| Type of paper feeding | Type of media Size Weight | |||
| Paper tray Standard paper A4 56 to 80 g/mB5A5LetterLegalInvoice | 2 | |||
| Manual bypass/Bypass tray thick paper B5(AL-1551) A5 | Standard paper and A4 52 to 128 g/mB5LetterLegalInvoice | 2** | ||
| Special media | Transparency film | A4Letter | ||
| Envelope* | International DL International C5 Commercial 10 Monarch | |||
* Do not use envelopes that have metal clasps, plastic snappers, string closures, windows, linings, self-adhesive, patches or synthetic materials. These will cause physical damage to the copier.
**For paper weighing from 110 to 128g / m^2 ,A4 is the maximum size that can be fed through the manual bypass or the bypass tray (AL-1551).
- Special papers such as transparency film and labels must be fed one sheet at a time through the manual bypass.
PAPIER
AL-1252, AL-1452, AL-1451: This copier has two document input stations – a single pass feeder (SPF) for automatic document feeding and an original table for manual handling of documents. The SPF is designed to hold up to 30 originals measuring from A5 to B4 and weighing from 52 to 90 g/m ^2 .
For AL-1551 :
This copier has two document input stations -reversing single pass feeder (R-SPF) for automatic document feeding and an original table for manual handling of documents. The R-SPF is designed to hold up to 30 originals measuring from A5 to B4 and weighing from 52 to 90g/m².
When copying from the R-SPF, two-sided originals can be copied without having to manually turn them over. Automatic two-sided coying can also be performed with this copier. When copying from one-sided originals to two-sided copies, copying orientation can be selected between Tun on Long Edge and Turn on Short Edge.
- When making two-sided copies from the original table, the copy paper size must be A4.Non-standard size paper cannot be used with the R-SPF.
- When making two-sided copies from the R-SPF, a multiple number of copies cannot be set.
- When making two-sided copies, the bypass tray cannot be used.
- When using two-sided invoice size originals from the R-SPF, be sure to place them in the landscape orientation. Otherwise, an original misfeed will occur.
Für AL-1551 :
natural_image
Illustration of a hand inserting a small object into a cabinet drawer (no text or symbols)natural_image
Illustration of hands using a power tool to press or install a machine (no text or symbols visible)A. When using the SPF or the R-SPF
(1) Make sure that no original is left on the original table.
(2) Adjust the original guides to the size of original.
(3) Set the originals face up in the document feeder tray. Go to step 4.

natural_image
Illustration of a hand using a computer to press or install a drive, with no visible text or symbols.- Before feeding originals in the document feeder tray, be sure to remove any staples or paper clips from them.
- Before placing curled or wavy originals into the document feeder tray, be sure to flatten them. If not, original misfeeds may result.
- The SPF or R-SPF (○) indicator on the operation panel will light up. If this indicator does not light up, the originals are not properly set or the SPFor R-SPF is not properly closed.
- Badly damaged originals may misfeed in the SPF or R-SPF. It is recommended that such originals be copied from the original table.
- Special originals such as transparency film should not be fed via the SPF or R-SPF, but should be placed directly on the original table.
- Image loss (max. 4mm) can occur at the trailing edges of the copier. Also image loss (max. 4.5 mm in total) can occur along the other edges of the copies. It can be 6 mm max. at the trailing edge of the second copy of two-sided copying (AL-1551).
natural_image
Line drawing of a laptop with a screen and a small screen on the cover (no text or symbols)mark/Markierung
B. When using the original table
- Open the original cover.
- Place the original face down on the original table. Align it with the original scale and the centering (▶) mark. Go to step 4.
When copying a book or an original which has been folded or a crumpled original, press down the original cover lightly. If the original cover is not securely closed, the copies may be striped or blurred.
- Set the number of copies using the two copy quantity (▲, ▲) keys.

- Press the clear (©) key to clear an entry if a mistake is made.
-
A single copy can be made with the initial setting, i.e., when "0" is displayed.
-
Press the right copy quantity key to set the unit digit from 0 to 9. This key will not change the tens digit.
-
Press the left copy quantity key to set the tens digit from 1 to 9.
-
Die Anzahl der Kopien über die beiden Kopienanzahl-Tasten (▲, ▲) einstellen.

flowchart
graph TD
    A["1"] --> B["2"]
    B --> C["3"]
    C --> D["..."]
    D --> E["A"]
    D --> F["A"]
    D --> G["A"]
    D --> H["A"]
    A --> I["2"]
    I --> J["3"]
    J --> K["..."]
    K --> L["A"]
    K --> M["A"]
    K --> N["A"]
    K --> O["A"]
    A --> P["2"]
    P --> Q["3"]
    Q --> R["..."]
    R --> S["A"]
    R --> T["A"]
    R --> U["A"]
    R --> V["A"]
    R --> W["A"]
    R --> X["A"]
- Press the print ( ) key.
To display the number of copies made in a continuous run, press the left copy quantity key.
To stop copying in the middle of a run, press the clear (©) key. Copying will stop and the number in the display will be reset to "0".
- Select the desired original to copy mode. (AL-1551)
a. When copying in the one-sided to one-sided mode:
Ensure that no indicator is lit among the original to copy indicators.
AL-1551
text_image
1 1 2 AA A A A A 2 2 2 1 1b When copying in a one-sided to two-sided mode:
Use the original to copy key to select the desired one-sided to two-sided copying mode (Turn on Long Edge or Turn on Short Edge). See the illustrations on page 1-10.
AL-1551

text_image
1 1 → 2 [ ○ AA A ○ A'A 2 → 2 2 → 1 1AL-1551
flowchart
graph TD
    A["1"] --> B["2"]
    B --> C["○"]
    B --> D["○"]
    B --> E["○"]
    F["2"] --> G["2"]
    G --> H["○"]
    G --> I["○"]
    J["2"] --> K["1"]
    K --> L["●"]


c. When copying in the two-sided to two-sided mode:
Use the original to copy key to select the two-sided to two-sided copying mode. The originals must be set in the R-SPF before this mode can be set (step 3).
d. When copying in the two-sided to one-sided mode:
Use the original to copy key to select the two-sided to one-sided copying mode. The originals must have been set in the R-SPF in step 3.
- Paper sizes that can be used in the duplex mode are letter, legal, and invoice. (When copying from the original table in the duplex mode, only A4 size paper can be used.)
- The bypass tray cannot be used in the duplex mode.
- When making two-sided copies from the original table, place the second original on the original table and press the print (⑤) key. (AL-1551)
To cancel two-sided copying after scanning the first original, press the clear (©) key. (AL-1551).
Stream feeding mode (AL-1252, AL-1452, AL-1551)
If the stream feeding mode has been enabled using user program No.4, the SPF/R-SPF (○) indicator will blink approximately 5 seconds after printing of all copies from the SPF/R-SPF is complete. While this indicator is blinking, any new originals placed in the document feeder tray will be fed and copied automatically. If the stream feeding mode has been enabled, the print (⑧) key must be pressed each time the originals are set immediately after completion of a copy run from the SPF/R-SPF. See page 1-22, USER PROGRAMS.
natural_image
Illustration of hands installing a laptop on a rack with an arrow indicating the next component (no text or symbols present)Setting a large original
The original cover can be removed to allow copying of bulky objects.
- Simply lift the original cover straight up.
- To reattach the original cover, reverse the above procedure.
Copy density adjustment is not required for most originals in the automatic exposure mode. To adjust the copy density manually or to copy photographs, the exposure level can be adjusted in 4 steps manually.
The automatic exposure level can be adjusted to suit your copying needs. This level is set for copying from the original table and copying from the SPF/R-SPF respectively (AL-1252, AL-1452, AL-1551).
- Press and hold down the exposure mode selector key for approximately 5 seconds.
The photo (f) indicator will go out and the AUTO indicator will begin to blink. One or two exposure indicators corresponding to the automatic exposure level which has been selected will light up.
- Press the exposure selector key. The AUTO indicator will stop blinking and light up steadily.
- This automatic exposure level will remain in effect until you change it again by this procedure.
Three preset reduction ratios and two enlargement ratios can be selected. The zoom function enables copy ratio selection from 50% to 200% in 1% increments.
- Set the original and check the copy paper size.
- Use the copy ratio selector key and/or zoom (✉,✉) keys to select the desired copy ratio.
• To verify a zoom setting without changing the zoom ratio, press and hold down the copy ratio display (%) key. When the key is released, the display will return to the copy quantity display.
- To reset the ratio to 100%, press the copy ratio selector key repeatedly until the 100% indicator lights up.
text_image
200% 141% A5 A4 100% 81% 34 mA1 70% A4 A5 50%To select a preset copy ratio:
Preset reduction and enlargement ratios are: 50%, 70%, 81%, 141%, and 200%
When a zoom (💡 or ⚙) key is pressed, the ZOOM indicator will light up and the zoom ratio will be displayed in the display.
In order to quickly change the zoom ratio, press and hold down the (💡 or 🔗) key. The displayed setting will stop on any preset reduction or enlargement setting. To further reduce or raise the zoom ratio, firstly release the key and then press and hold down.
The bypass tray automatically feeds up to 50 sheets of standard copy paper. The single-sheet manual bypass and the bypass tray can be used to feed standard paper, transparency film, labels and other special purpose papers measuring from A6 to A4 and in the weight range of 52 to 128 g/m ^2 . (For paper weighing from 110 to 128 g/m ^2 , A4 is the maximum size.)
AL-1043, AL-1252, AL-1452

natural_image
Illustration of a hand inserting a card into a printer (no text or symbols visible)
- Place the original face down on the original table. Align it with the original scale and close the original cover.
The original image must be smaller than the paper or media for copying. If the original image is bigger than the paper or media, this may cause smudging on the edges of the copies.
AL-1043, AL-1252, AL-1452

natural_image
Illustration of a hand inserting a card into a printer (no text or symbols visible)natural_image
Diagram showing three steps of a bed seat assembly with arrows indicating motion (no text or symbols present)AL-1551 only :
- Open the bypass tray and extend the tray.
AL-1551 only :
text_image
Diagram illustrating a mechanical or electrical component with labeled parts and directional arrows, including a magnified inset showing a detail.To close the bypass tray, perform step1 and then step 2 in the illustration and push the round projections at the right of the tray until they click.
natural_image
Illustration of a hand using a tool to press or install electronic components (no text or symbols visible)natural_image
Illustration of a hand inserting a component into a printer (no text or symbols visible)Two-sided copying can be made on this copier using the manual bypass.
Example: The following two originals will be copied onto two sides of copy paper.
- Place the first original face down on the original table with the TOP toward the LEFT. Make a copy.
The first copy can be made using either the paper tray or the manual bypass.
N.B : 60g/m² copy paper is not recommended for two-sided copying.
AL-1252, AL-1452, AL-1551: Both the first and second originals can be set in the SPF/R-SPF but they must be set separately. If the stream feeding mode for the SPF/R-SPF has been enabled, set the second original after the SPF/R-SPF (○) indicator goes out. See page 1-13.
- For tablet binding, turn the first copy over left to right as shown below.
For booklet binding, turn the first copy over top to bottom (not shown). Feed the first copy into the manual bypass.
Copying will begin automatically.
Reduces toner consumption by approximately 10%.
Power save modes (page 1-22)
The copier has two power save modes of operation: preheat mode and auto power shut-off mode.
Preheat mode
When the copier enters the preheat mode, the power save ( ① ) indicator will light up and other indicators will remain on or off as before. In this condition, the fuser in the copier is maintained at a lower heat level, thereby saving power. To copy from the preheat mode, make desired copier selections and press the print ( ⑧ ) key using the normal copying procedure.
Auto power shut-off mode
When the copier enters the auto power shut-off mode, the power save (☐) indicator will light up and other indicators will go out. The auto power shut-off mode saves more power than the preheat mode but requires a longer time before starting copying. To copy from the auto power shut-off mode, press the print (☐) key. Then make desired copier selections and press the print (☐) key using the normal copying procedure.
Auto clear (page 1-22)
The copier returns to the initial settings a preset amount of time after the last copy is made. This preset amount of time (auto clear time) can be changed.
Stream feeding mode (except for AL-1043) (page 1-20)
For description of the stream feeding mode, see page 1-13.
-
Press the exposure mode selector key to select the manual (☐ ⋯) mode.
-
Press and hold down the exposure mode selector key for approximately 5 seconds.
The manual ( ·s ) indicator will go out and the photo ( ) indicator will begin to blink. The exposure indicator marked "5" will light up, indicating the standard toner mode is active.
The exposure indicator marked "1" will light up, indicating the toner save mode is selected.
To return to the standard mode, repeat the procedure but use the dark (☐) key to select exposure level "5" in step 3.
The user programs allow the parameters of certain functions to be set, changed, or cancelled as desired.
Setting the power save modes and auto clear time, and stream feeding mode. (except for AL-1043)
- Press and hold down the light (①) and dark (①) keys simultaneously for more than 5 seconds until all the alarm indicators (②, 8V, ◦) blink and “—” appears in the display.
- Use the left copy quantity (▲) key to select a user program number. The selected number will blink in the left side of the display.
- Press the print (☐) key. The entered program number will be steadily lit and the currently selected parameter number for the program will blink on the right side of the display.
| Program No./Mode Parameters | |
| 1 | 0Auto clear time 1⇒30 sec.*2⇒60 sec.3⇒90 sec.4⇒120 sec.5⇒10 sec. |
| 2 | *Preheat mode 1⇒60 sec.2⇒90 sec. |
| 3 | 0Auto power * 1⇒5 min.shut-off timer 2⇒15 min.3⇒30 min.4⇒60 min.5⇒120 min. |
| 4 Stream feeding mode (except for AL-1043) | 0⇒OFF*1⇒ON |
| 5 Auto powershut-off mode | 0⇒OFF*1⇒ON |
Factory default settings are indicated with an asterisk (*).
Be sure to use only genuine SHARP parts and supplies.
The TD cartridge replacement required ( ) indicator will light up when toner is needed. For more information on purchasing the TD cartridge, see SUPPLY PART NUMBERS AND STORAGE on page 1-37. If copying is continued while the indicator is lit, copies will gradually become lighter until the copier stops and the indicator begins blinking.
Replace the old TD cartridge by following the procedure given below.

- After the copier stops, it may be possible to make a few more copies by taking the TD cartridge out of the copier, shaking it horizontally, then reinstalling it. If copying is not possible after this operation, replace the TD cartridge.
- During a long copy run of a dark original, the ready (💡) indicator may blink, the s indicator light up, and the copier stop, even though toner is left. The copier automatically replenish the toner level for up to 2 minutes and then the ready (💡) indicator will light up. Press the print (💡) key to restart copying.
natural_image
Illustration of a printer with paper being inserted, showing mechanical components and arrows indicating motion (no text or symbols)
natural_image
Illustration of a printer with paper sheets and a paperclip, showing internal structure without any text or symbols.
natural_image
Diagram of a printer's internal structure showing a printer's base and internal components, with no visible text or symbols.- Ensure that the bypass tray (AL-1551 only) is open and then open the side cover while pressing the side cover open button.
Then, push gently on both sides of the front cover to open the cover.
-
Gently pull the TD cartridge out whilst pressing the lock release button. Dispose of the old TD cartridge in accordance with local regulations.
-
Install a new TD cartridge. To install the new cartridge, see page 1-7, INSTALLING THE TD CARTRIDGE.
-
Close the front cover and then the side cover by pressing the round projections near the side cover open button. The ⋯ indicator will go out and the ready (☐) indicator will light up.

When closing the covers, be sure to close the front cover securely and then close the side cover. If the covers are closed in the wrong order, the covers may be damaged.
natural_image
Illustration of a printer with a hand inserting a paper into the cover (no text or symbols visible)Do not remove the protective cover on the drum portion (black paper) of a new drum cartridge before use. The cover protects the drum against external light.
- Ensure that the bypass tray (AL-1551 only) is open and then open the side cover while pressing the side cover open button.
natural_image
Technical line drawing of a printer with paper feed and paper cladding (no text or symbols)Then, push gently on both sides of the front cover to open the cover.
natural_image
Technical line drawing of a mechanical assembly with an arrow indicating a component (no text or symbols present)natural_image
Illustration of hands holding a cylindrical device with a downward arrow indicating compression or disassembly (no text or symbols present)Do not touch the surface of the drum (green portion) of the cartridge. Doing so may cause smudges on the copies.
natural_image
Diagram of a hand operating a mechanical device with a tool, no visible text or symbolsWhen closing the covers, be sure to close the front cover securely and then close the side cover. If the covers are closed in the wrong order, the covers may be damaged.
To find out how many more copies can be made before the 18,000 maximum is reached, follow the procedure described below.
- Press and hold down the light (①) and dark (②) keys simultaneously for more than 5 seconds until all the alarm indicators (③, 8V, ◦) blink and “—” appears in the display.
- Press and hold down the clear (©) key for more than 5 seconds to find out how many more copies can be made.
Example: 500 copies can be made before the next drum cartridge replacement.
Proper care is essential in order to get clean, sharp copies. Be sure to take a few minutes to regularly clean the copier.
natural_image
Line drawing of an open printer with a lid and paper tray (no text or symbols)
natural_image
Line drawing of a printer with an open lid and hand inserting a paper into it (no text or symbols)natural_image
Technical line drawing of a printer with paper feeding into a slot (no text or symbols)
natural_image
Line drawing of a hand inserting a component into a machine (no text or symbols visible)
natural_image
Illustration of hands installing or adjusting a device panel inside a computer chassis (no text or symbols visible)
natural_image
Illustration of a hand using a tool to adjust or install a component, with an arrow indicating the process (no text or symbols present)Cabinet
Wipe the cabinet with a soft, clean cloth.
Original table and original cover
Stains on the glass cover or SPF/R-SPF rollers will also be copied. Wipe the glass cover and SPF/R-SPF rollers with a soft, clean cloth. If necessary, dampen the cloth with a glass cleaner.
Transfer charger
If copies start becoming streaky or blotchy, the transfer charger may be dirty. Clean the charger using the following procedure.
- Turn the power switch off.
- Ensure that the bypass tray (AL-1551 only) is open and then open the side cover while pressing the side cover open button.
-
Take the charger cleaner out by holding the tab.
-
Set the charger cleaner onto the right end of the transfer charger, gently slide the cleaner to the left end, and then remove it. Repeat this operation two or three times.
Slide the charger cleaner from the right end to the left end along the groove of the transfer charger. If the cleaner is stopped on the way, smudges on copies may occur.
- Return the charger cleaner to its original position. Close the side cover by pressing the round projections near the side cover open button.
- Turn the power switch on.
Gehäuse
When the misfeed (8V) indicator blinks or P blinks in the display, the copier will stop because of a misfeed. AL-1252, AL-1452, AL-1551: If a misfeed occurs when using the SPF or in the R-SPF, a number may appear in the display after a minus sign. This indicates the number of the originals that must be returned to the document feeder tray after a misfeed. Return the required number of originals. Then this number will disappear when copying is resumed or the clear (©) key is pressed. When the SPF or the R-SPF misfeeds an original sheet, the copier will stop and the SPF or the R-SPF misfeed (◀) indicator will blink, while the misfeed (8V) indicator will remain off. For a misfeed of originals in the SPF or in the R-SPF, see "E. Misfeed in the SPF or in the R-SPF" on page 1-30.
natural_image
Technical line drawing of a printer with paper feed and paper roll (no text or symbols)- Ensure that the bypass tray (AL-1551 only) is open and then open the side cover whilst pressing the side cover open button.
- Check the misfeed location. Remove the misfed paper following the instructions for each location in the illustration below.
If P blinks in the display, proceed to "A Misfeed in the paper feed area".
text_image
Technical diagram of a printer with numbered parts labeled ① to ④① If the misfed paper is seen from this side, proceed to "C Misfeed in the transport area". (p.1-29)
② If paper is misfed here, proceed to "B Misfeed in the fusing area". (p.1-28)
③ If paper is misfed here, proceed to "A Misfeed in the paper feed area".
④ If paper is misfed here, proceed to "D Misfeed in the lower paper feed area (AL-1452, AL-1551)". (p.1-29)
natural_image
Diagram of a hand operating a mechanical device with a tool, no visible text or symbolsA Misfeed in the paper feed area
- Gently remove the misfed paper from the paper feed area as shown in the illustration.
When ■P blinks in the display and the misfed paper is not seen from the paper feed area, pull out the paper tray and remove the misfed paper.

The fusing unit is hot. Do not touch the fusing unit when removing mis-fed paper.
- Do not touch the surface of the drum (green portion) of the drum cartridge when removing the mis-fed paper.
- If the paper has been fed through the manual bypass, do not remove the misfed paper through the manual bypass. Toner on the paper may stain the paper transport area, resulting in smudges on copies.
natural_image
Line drawing of a hand operating a mechanical device with a tool, no visible text or symbolsB Misfeed in the fusing area
- Lower the fusing unit release lever.
natural_image
Illustration of a printer's internal structure with paper inside, showing no text or symbolsThe fusing unit is hot. Do not touch the fusing unit when removing mis-fed paper.
Do not touch the surface of the drum (green portion) of the drum cartridge when removing the misfed paper. Do not remove the misfed paper from above the fusing unit. Unfixed toner on the paper may stain the paper transport area, resulting in smudges on copies.
- Raise the fusing unit release lever and then close the side cover by pressing the round projections near the side cover open button.
natural_image
Line drawing of a hand using a tool to adjust or install a mechanical component (no text or symbols visible)C Misfeed in the transport area
- Lower the fusing unit release lever.
natural_image
Technical line drawing of a printer or printer with paper spool and paper holder (no text or symbols)When closing the covers, be sure to close the front cover securely and then close the side cover. If the covers are closed in the wrong order, the covers may be damaged.
natural_image
Line drawing of a printer with paper being inserted, showing internal structure and page layout (no text or symbols)D Misfeed in the lower paper feed area (AL-1452, AL-1551)
- Open the lower side cover (under the bypass tray) and remove the misfed paper. If P blinks and the misfed paper is not seen from the area of the lower side cover, pull out the lower paper tray and remove the misfed paper. Then close the lower paper tray.
natural_image
Illustration of a hand pressing down on a stack of books with an arrow indicating motion (no text or symbols present)E Misfeed in the SPF or in the R-SPF An original misfeed may occur at one of three locations: if the misfed original is seen from the document feeder tray, (A) in the document feeder tray; if the misfed original is not seen from the document feeder tray, (B) in the exit area or (C) under the feeding roller. Remove the misfed original following the instructions for each location.
(A) Open the feeding roller cover and pull the original gently to the left and out from the document feeder tray. Close the feeding roller cover. Open and close the original cover to clear the SPF or R-SPF misfeed (▲) indicator. If the misfed original cannot be easily removed, proceed to (C) under the feeding roller without pulling the original forcibly from the document feeder tray.
(B) Open the original cover and rotate the roller rotating knob to remove the misfed original from the exit area. If the misfed original cannot be easily removed, proceed to (C) under the feeding roller without pulling the original forcibly.
natural_image
Illustration of a hand holding a folded paper or sheet with an arrow, next to a magnified view of a wooden shelf (no text or symbols)With the R-SPF, pull out the reversing tray to remove the misfed original.
With the R-SPF, after removing the misfed original form the exit area, be sure to insert the reversing tray into the exit area until it locks in place.
natural_image
Line drawing of two views of a printer with handles and a paper clip (no text or symbols)natural_image
Illustration of a hand using a tool to lift a wooden block, showing motion arrows (no text or symbols)
(C) Open the original cover and rotate the roller rotating knob to remove the misfed original from the document feeder tray or exit area. If it is difficult, remove the misfed original from under the feeding roller.
A number may appear in the display after a minus sign, indicating the number of the originals that must be returned to the document feeder tray. Clear the misfeed and return the required number of originals. Then press the print (☐) key to resume copying.
If any problem occurs, check the list below before contacting the Sharp Service Center. In the cases described below, the copier does not malfunction.
| Problem | Possible cause | Solution |
| Copier does not operate. | Copier plugged in? | Plug the copier into a grounded outlet. p. 1-3 |
| Power switch on? | Turn the power switch on. p. 1-3 | |
| Side cover closed securely? | Gently close the side cover. p. 1-7 | |
| Front cover closed? | Gently close the front cover and then close the side cover. p. 1-7 | |
| Blank copies | Istheoriginal placed facedown on the original table or face up in the SPF or in the R-SPF? | Place the original face down on the original table or face up in the SPF or int the R-SPF. p. 1-12 |
| Power save (⏻) indicator on. | Is the copier in the preheat mode? | Press any key to cancel the preheat mode. p. 1-20 |
| Is the copier in the auto power shut-off mode? | Press the print (💡) key to cancel the auto power shut-off mode. p. 1-20 | |
| Copies are too dark or too light. | Is original image too dark or too light? | Adjust the exposure manually. p. 1-14 |
| Is the copier in the automatic exposure mode? | Adjust the automatic exposure level. p. 1-15 | |
| Is the copier in the photo exposure mode? | Cancel the photo exposure mode. p. 1-14 | |
| Dust, dirt, smudges appear on copies. | Original table or original cover dirty? | Clean regularly. p. 1-26 |
| Original smudged or blotchy? | Use a clean original. | |
| Striped copies | Is transfer charger clean? | Clean the transfer charger. p.1-26 |
| Excessive paper curl after copying | Quality of paper | Try turning the paper over in the cassette. p. 1-26 |
| Paper misfeeds frequently. | Non-standard paper used? | Use standard paper. If using special papers, feed the paper through the manual bypass. p. 1-17 |
| Paper curled or damp? | Store copy paper flat in the wrapper in a dry location. p. 1-37 | |
| Pieces of paper inside copier? | Remove all pieces of misfed paper. p. 1-27 | |
| Paper guides in the paper tray not set properly? | Set the guides properly depending on the paper size. p. 1-8 | |
| Too much paper in the paper tray or badly placed in the cassette? | Remove excessive paper from the paper tray or follow advice. p. 1-8 | |
| Images rub off the copy easily. | Is the copy paper too heavy? | Use copy paper within the specified range. p. 1-9 |
| Paper damp? | Replace with dry copy paper. If the copier is not used for a long time, remove the paper from the paper tray and store it in its wrapper in a dry location. p. 1-37 |
FEHLERSUCHE
Be sure to use only genuine SHARP parts and supplies.
When the following indicators light up or blink on the operation panel or the following symbols appear in the display, solve the problem immediately referring to both the table below and the relevant page.
| Indication | Cause and remedy | ||
| ◎ | Drum replacement required indicator | Steadily lit | Replacement of drum cartridge will be needed soon. Prepare a new cartridge. p. 1-24 |
| Blinking | Drum cartridge must be replaced. Replace it with a new one. p. 1-24 | ||
| ∴ | TD cartridge replace-ment required indicator | Steadily lit | Replacement of TD cartridge will be needed soon. Prepare a new cartridge. p. 1-23 |
| Blinking | TD cartridge must be replaced. Replace it with a new one. p. 1-23 | ||
| 8V | Misfeed indicator | Blinking | A misfeed has occurred. Remove the misfed paper referring to the description of „Misfeed removal.“ p. 1-27. Lever of fusing area is not raised. p. 1-28 |
| ◀ | SPF/R-SPF misfeed indicator | Blinking | An original misfeed has occurred in the SPF or in the R-SPF. Remove the misfed originals referring to the description of "Mis-feed in the SPF or in the R-SPF". p. 1-30. |
 | The paper tray indicator is blinking. | The paper tray is not installed properly. Push the tray into the copier securely. p.1-8. | |
 | „CH“ is blinking in the display. | The TD cartridge is not installed. Check if the cartridge is instal-led. p. 1-7 | |
| „CH“ is steadily lit in the display. | Side cover is open. Close the side cover securely by pressing the round projections near the side cover open button. p. 1-7 | ||
 | „P“ is blinking in the display. | Paper tray or bypass tray is empty. Load copy paper. p. 1-8 | |
| A misfeed has occurred in the paper tray or bypass tray. Remo-ve the misfed paper. p. 1-28 | |||
| Paper tray is not securely installed. Push the tray in securely. p. 1-8 | |||
  | A letter and a number appear alternately. | The copier will not function. Turn the power switch off and then switch it on,and if there is again an error, remove the power cord from the outlet, and contact your authorized Service representative. | |
DISPLAYING TOTAL NUMBER OF COPIES
Use the following procedure to display the total number of copies.
- Press the clear (©) key to reset the display to zero.
- Press and hold down the clear (©) key for approximately 5 seconds. The total number of copies will appear in two steps, each with three digits.
Example:
Total number of copies is 1,234.

STATUSANZEIGEN

| Type Digital copying machine, desk-top type | |
| Copy system Dry, electrostatic transfer | |
| Originals Sheets, bound documents | |
| Original size Max. B4 | |
| Automatic original feed (SPF/R-SPF) | Up to 30 sheets |
| Copy sizes A6 to A4 | (Feed copy paper lengthwise only.)Image loss: Max. 4 mm (leading and trailing edges)Max. 4.5 mm (either of the other edges)Max. 6 mm (the trailing of the second copy of two-sided copying) |
| Copy speed AL-1043: 10 copies/min.AL-1252: 12 copies/min.AL-1452: 14 copies/min.AL-1551: 15 copies/min. | |
| Continuous copying Max. 99 copies; subtractive counter | |
| First-copy time 9.6 sec. (normal copying mode) | |
| Copy ratio Variable: 50% to 200% in 1% increments (total 151 steps)Fixed: 50%, 70%, 81%, 100%, 141%, 200% | |
| Exposure system | Moving optical source, slit exposure (stationary platen) with automatic exposure/SPF/R-SPF: Moving original |
| Copy paper feed | One paper tray with automatic feed (250 sheets); one single-sheet manual bypass/One bypass tray with 50-sheet automatic feed capability |
| Fusing system | Heatrollers |
| Development system | Magnetic brush development |
| Light source Xenon lamp | |
| Resolution | Scan: 400 dpi Output: 600 dpi |
| Gradation | Scan: 256 levels Output: 2 levels |
| Memory | 6 MB |
| Power supply Local voltage ±10% (For this copiers power supply requirements, see the name plate located on the back of the unit.) | |
| Power consumption | Max. 1000 W |
| Overall dimensions | 607 mm (W) x 445 mm (D) (AL-1043)607 mm (W) x 477 mm (D) (AL-1252, AL-1452)809 mm (W) x 477 mm (D) (AL-1551) |
| Weight | 18 kg (AL-1043), 21.3 kg (AL-1252), 23.8 kg (AL-1452); 24.6 kg (AL-1551)TD and drum cartridges included |
| Copier dimensions | 518 mm (W) x 445 mm (D) x 293 mm (H) (AL-1043)518 mm (W) x 477 mm (D) x 379 mm (H) (AL-1252)518 mm (W) x 477 mm (D) x 476 mm (H) (AL-1452, AL-1551) |
| Operating conditions | Temperature: 10°C to 30°C |
| Humidity | 20% to 85% |
| Noise level | Sound Power Level LWA(1B=10dB) Copying: 7.1 [B (A)]Sound Pressure Level LPA(bystander positions)Copying: 40 [dB (A)], Standby: Background noise levelNoise emission measurement in accordance with ISO 7779. |
First-copy time may differ depending on operating conditions, such as power-supply voltage and room temperature. The values for copy speed are rounded to the nearest whole number.

As a part of our policy of continuous improvement, SHARP reserves the right to make design and specification changes for product improvement without prior notice. The performance specification figures indicated are nominal values of production units. There may be some deviation from these values in individual units.
TECHNISCHE DATEN
When ordering supplies and option, please use the correct part numbers as listed below.

Be sure to use only genuine SHARP parts and supplies.
For best copying results, be sure to use only SHARP Genuine Supplies which are designed, engineered, and tested to maximize the life and performance of SHARP copiers. Look for the Genuine Supplies label on the toner package.

| Supply Part no. Usable life | |
| TD cartridge | AL-100TD Approx. 6,000 sheets* |
| AL-110TD Approx. 4,000 sheets* | |
| Drum cartridge AL-100DR Approx. 18,000 sheets | |
* Based on copying onto A4 or letter size paper at 5% toned area. The life of the TD cartridge which has been included in the copier at the factory is approximately 2,000 sheets.
-
Store the supplies in a location that is:
-
clean and dry,
• at a stable temperature,
• not exposed to direct sunlight. -
Store copy paper in the wrapper and lying flat.
- Paper stored out of the wrapper or in packages standing on end may curl or get damp, resulting in paper misfeeds.
When moving this copier, follow the procedure below.
When moving this copier, be sure to remove the TD cartridge in advance.
- Turn the power switch off and disconnect the power cord.
- ① Ensure that the bypass tray (AL-1551 only) is open and then open the side cover whilst pressing the side cover open button. ② Push gently on both sides of the front cover to open the cover.
- Gently pull the TD cartridge out while pressing the lock release button. See page 1-7, TD CARTRIDGE REPLACEMENT.
- Close the front cover and then the side cover.
When closing the covers, be sure to close the front cover securely and then close the side cover. If the covers are closed in the wrong order, the covers may be damaged.
- Raise the handle of the paper tray and pull the paper tray out until it stops.
- Push the center of the pressure plate down until it locks in place and secure the plate using the pressure plate lock which has been stored in the front of the paper tray.
- Use a coin (or suitable object) to attach to the left side of the copier the screw that has been stored in the front of the paper tray.
When shipping the copier, the screw must be reinstalled to prevent shipping damage.
- Push the paper tray back into the copier.
- Close the bypass tray (AL-1551 only) and close the paper output tray extension, and attach the packing materials and tape which were removed during installation of the copier. See page 1-6, SET UP.
- Pack the copier into the carton.
MATERIAL SAFETY DATA SHEET (1/4)
MSDS No. F-00831
1. PRODUCT AND COMPANY IDENTIFICATION
Product Name : AL-100TD / DM-150TD / AL-110TD / AL-110DC (Black Toner)
Supplier Identification : Sharp Corporation
22-22 Nagaike-cho, Abeno-ku, Osaka, Japan
Local suppliers are listed below. Please contact the nearest supplier for additional information.
| (Country) (Name | and Telephone Number) |
| U.S.A. Sharp Electronics CorporationTelephone number for information :1-800-237-4277Emergency telephone number :1-800-255-3924 | |
| Canada Sharp Electronics of Canada Ltd.Telephone number for information : 905-890-2100Emergency telephone number :1-800-255-3924 | |
| United Sharp Electronics (U.K.) Ltd.Kingdom Telephone number for information : 01922-474013 | |
| Australia Sharp Corporation of Australia PTY. Ltd.Telephone number for information : 1300-12-50-22 | |
| Germany Sharp Electronics (Europe) GMBHTelephone number for information : 40-2376-2737 | |
2. COMPOSITION/INFORMATION ON INGREDIENTS
| Substance [ ] | Preparation [ X ] | |||||
| Ingredient | CAS No. | Proportion | OSHA PEL | ACGIH TLV | MAK-TWA | NOHSC-TWA |
| Styrene-Acrylate copolymer | 29497-13-1 | 35-45% | Not listed | Not listed | Not listed | Not listed |
| Styrene-homopolymer | 9002-52-6 | 35-45% | Not listed | Not listed | Not listed | Not listed |
| Carbon black | 1332-86-4 | 5-10% | 3.5g/m^3 | 3.5g/m^3 | Not listed | 3.5g/m^3 |
| Iron oxide | 1317-61-9 | 5-10% | Not listed | Not listed | Not listed | Not listed |
| Polypropylene | 9010-79-1 | 1-5% | Not listed | Not listed | Not listed | Not listed |
| parafirine | 8002-73-2 | 1-5% | Not listed | Not listed | Not listed | Not listed |
3. HAZARDOUS IDENTIFICATION
Most Important Hazards and Effects of the Products
Human Health Effects : There are no anticipated carcinogenic effects from exposure based on animal tests performed using toner. When used as intended according to instructions, studies do not indicate any symptoms fibrosis will occur.
Environmental Effects: No data are available.
Specific hazards : Dust explosion (like most finely dicided organic powders).
4. FIRST-AID-MEASURES
| Route(s) of Entry : | Inhalation?Yes | Skin?No | Ingestion?Possible but very unusual. |
Inhalation : Remove to fresh air. If symptoms occur, consult medical personnel.
Skin Contact : Wash with soap and water for 15 minutes or until particle is removed. If irritation does occur, consult medical personnel.
Eye Contact : Flush eyes immediately with water for 15 minutes. If irritation does occur, consult medical personnel.
Ingestion : Rinse with water and drink several glasses of water. If irritation or discomfort does occur, consult medical personnel.

MATERIAL SAFETY DATA SHEET (2/4)
MSDS No. F-00831
- FIRE-FIGHTING MEASURES
| Extinguishing Media : water, CO | _2 , foam and dry chemicals |
| Special Fire fighting Procedure : None | |
| Fire and Explosion Hazards : Toner material, like most finely divided organic powders, may form an explosive mixture. | |
- ACCIDENTAL RELEASE MEASURES
| Personal Precautions : None | |
| Environmental Precautions : None | |
| Methods for Cleaning Up : | Wipe off with paper or cloth. Do not use vacuum cleaner when a large amount is released. It, like finely divided organic powders, is capable of creating dust explosion. |
- HANDLING AND STORAGE
| Handling | |
| Technical Measures : None | |
| Precautions : None | |
| Safe Handling Advice : Use of a dust mask is recommended when handling a large quantity of toner or during long term exposure, as with any non-toxic dust. Try not to disperse the particles. | |
| Storage | |
| Technical measures : None | |
| Storage Conditions : Keep container closed and Store in a cool and dry place.Keep out of the reach of children. | |
| Incompatible Products : None |
- EXPOSURE CONTROLS/PERSONAL PROTECTION
| Engineering Measures | |
| Ventilation | :Not required under intended use. |
| Exposure limit values | |
| OSHA-PEL(USA) | :15g/m ^3 (Total Dust), 5g/m ^3 (Respirable Dust) |
| ACGIH-TLV(USA) | :10g/m ^3 (Total Dust), 3g/m ^3 (Respirable Dust) |
| Personal Protective Equipment | |
| Respiratory Protection | :Not required under intended use. |
| Hand Protection | :Not required under intended use. |
| Eye Protection | :Not required under intended use. |
| Skin Protection | :Not required under intended use. |
| Other Protective equipment | :Use of a dust mask and goggles are recommended when handling a large quantity of toner or during long term exposure, as with any non-toxic dust. |
- PHYSICAL AND CHEMICAL PROPERTIES
| Appearance | |||
| Physical State : | Solid Form : Powder | Color : Black | Oder : Odorless |
| Ph | : Not applicable | ||
| Boiling/Melting point | : Not applicable | ||
| Softening Point (°C) | : No data | ||
| Flash Point (°C) | : Not applicable | ||
| Ignition Point (°C) | : No data | ||
| Explosion Properties | : No data | ||
| Density (g/cm ^3 ) | : 1.1 (bulk density : 0.34) | ||
| Solubility in water | : Negligible | ||

MATERIAL SAFETY DATA SHEET (3/4)
MSDS No. F-00831
10. STABILITY AND REACTIVITY
Stability :Stable
Hazardous Reactions :Dust explosion, like most finely divided organic powders.
Conditions to avoid :Electri discharge, throwing into fire.
Materials to avoid :Oxidizing Materials
Hazardous Decomposition Products :Co, CO 2 and NO x
Further Information : None
11. TOXICOLOGICAL INFORMATION
Acute Toxicity
Ingestion (oral) : LD50 > 2000mg/kg (Rats)
Dermal : LD 50 > 2000mg/kg (rats
Inhalation : No data
Eye irritation : Not an irritant
Skin irritation : Not an irritant
Skin sensitizer : No sensitization
Mutagenicity
Carcinogenicity
: Negative (Ames Test)
: In 1996 the IARC reevaluated carbon black as a Group 2B carcinogen (possible human carcinogen). This classification is given to chemicals for which there is inadequate human evidence, but sufficient animal evidence on which to base an opinion of carcinogenicity. The classification is based upon the development of lung tumors in rats receiving chronic inhalation exposures to free carbon black at levels that induce particle overload of the lung. Studies performed in animal models other than rats did not show any association between carbon black and lung tumors.
Moreover, a two-year cancer bioassay using a typical toner preparation containing carbon black demonstrated no association between toner exposure and tumor development in rats.
Chronic Effects
: In a study in rats of chronic inhalation exposure to a typical toner, a mild to moderate degree of lung fibrosis was observed in 92% of the rats in the high concentration (16mg/m ^3 ) exposure group, and a minimal to mild degree of fibrosis was noted in 22% of the animals in the middle (4mg/m ^3 ) exposure group, but no pulmonary change was reported in the lowest (1mg/m ^3 ) exposure group, the most relevant level to potential human exposures.
12. ECOLOGICAL INFORMATION
No data are available.
13. DISPOSAL CONSIDERATIONS
Waste from residues
:Waste material may be dumped or incinerated under conditions which meet all federal, state and local environmental regulations.
Contaminated Packaging
:Waste may be disposed or incinerated under conditions which meet all federal, state and local environmental regulations.
MATERIAL SAFETY DATA SHEET (4/4)
MSDS No. F-00831
14. TRANSPORT INFORMATION
UN Classification : None
Land DOT (USA) : None
Sea IMDG : None
Air ICAO-TI : None
15. REGULATORY INFORMATION
US Information
TSCA (Toxic Substances Control Act) : All chemical substances in this product comply with all applicable rules or order under TSCA. SARA (Superfund Amendments and Reauthorization Act) Title III 302 Extreme Hazardous Substance : None 311/312 Hazard Classification : None
EU Information
1999/45/EEC and 67/548/EEC
Symbol & Indication
R-Phrase
76/769/EEC
: Not required
: Not required
: All chemical substances in this product comply with all applicable rules or order under 76/69/EEC.
16. OTHER INFORMATION
NFPA Rating (USA)
: Health = 1 Flammability = 1 Reactivity = 0
WHMIS Legislation (Canada)
: This product is not a controlled product.
References
IARC (1998) : IARC monographs on the Evaluation of the Carcinogenic Risk of Chemicals to Humans, Vol. 65, Printing Process And Printing Inks, Carbon Black and Some Nitro Compounds, Lyon, pp-149-261 H. Muhle, B. Bellmann, O. Creutzenberg, C. Dasenbrock, H. Ernst, R. Kilpper, J. C. MacKenzie, P. Morrow, U. Mohr, S. Takenaka, and R. Mermelstein (1991) Pulmonary Response to Toner upon Chronic Inhalation Exposure in Rats. Fundamental and Applied Toxicology 17, pp. 280-299.
The information of this data sheet represents our current data and best opinion as to the proper use in handling of this product under normal conditions. However, all materials may present unknown hazards and should be used with caution. Although certain hazards are described herein, we do not guarantee that these are the only hazards which exist.
MATERIAL SAFETY DATA SHEET (1/4)
MSDS No. F-30831
1. PRODUCT AND COMPANY IDENTIFICATION
Product Name : AL-100TD / DM-150TD / AL-110TD / AL-110DC (Black Developer)
Supplier Identification : Sharp Corporation
22-22 Nagaike-cho, Abeno-ku, Osaka, Japan
Local suppliers are listed below. Please contact the nearest supplier for additional information.
| (Country) (Name | and Telephone Number) |
| U.S.A. Sharp Electronics CorporationTelephone number for information :1-800-237-4277Emergency telephone number :1-800-255-3924 | |
| Canada Sharp Electronics of Canada Ltd.Telephone number for information : 905-890-2100Emergency telephone number :1-800-255-3924 | |
| United Sharp Electronics (U.K.) Ltd.Kingdom Telephone number for information : 01922-474013 | |
| Australia Sharp Corporation of Australia PTY. Ltd.Telephone number for information : 1300-12-50-22 | |
| Germany Sharp Electronics (Europe) GMBHTelephone number for information : 40-2376-2737 | |
2. COMPOSITION/INFORMATION ON INGREDIENTS
| Substance [ ] | Preparation [ X ] | |||||
| Ingredient | CAS No. | Proportion | OSHA PEL | ACGIH TLV | MAK-TWA | NOHSC-TWA |
| Iron powder | 7439-89-6 | 85-95% | Not listed | Not listed | Not listed | Not listed |
| Styrene-Acrylate copolymer | 29497-13-1 | 1-5% | Not listed | Not listed | Not listed | Not listed |
| Styrene homopolymer | 9002-52-6 | 1-5% | Not listed | Not listed | Not listed | Not listed |
| Carbon black | 1332-86-4 | < 1% | 3.5g/m^3 | 3.5g/m^3 | Not listed | 3.5g/m^3 |
3. HAZARDOUS IDENTIFICATION
Most Important Hazards and Effects of the Products
Human Health Effects : There are no anticipated carcinogenic effects from exposure based on animal tests performed using toner. When used as intended according to instructions, studies do not indicate any symptoms fibrosis will occur.
Environmental Effects: No data are available.
Specific hazards : None
4. FIRST-AID-MEASURES
| Route(s) of Entry : | Inhalation? | Skin? | Ingestion? |
| No | No | Possible but very unusual. |
Inhalation : Remove to fresh air. If symptoms occur, consult medical personnel.
Skin Contact : Wash with soap and water for 15 minutes or until particle is removed. If irritation does occur, consult medical personnel.
Eye Contact : Flush eyes immediately with water for 15 minutes. If irritation does occur, consult medical personnel.
Ingestion : Rinse with water and drink several glasses of water. If irritation or discomfort does occur, consult medical personnel.

MATERIAL SAFETY DATA SHEET (2/4)
MSDS No. F-30831
- FIRE-FIGHTING MEASURES
| Extinguishing Media : water, CO | _2 , foam and dry chemicals |
| Special Fire fighting Procedure : None | |
| Fire and Explosion Hazards : Like most finely divided organic powders, it may form an explosive mixture. | |
- ACCIDENTAL RELEASE MEASURES
| Personal Precautions : None | |
| Environmental Precautions : None | |
| Methods for Cleaning Up : | Wipe off with paper or cloth. Do not use vacuum cleaner when a large amount is released. It, like finely divided organic powders, is capable of creating dust explosion. |
- HANDLING AND STORAGE
| Handling | |
| Technical Measures : None | |
| Precautions : None | |
| Safe Handling Advice : Use of a dust mask is recommended when handling a large quantity of toner or during long term exposure, as with any non-toxic dust. Try not to disperse the particles. | |
| Storage | |
| Technical measures : None | |
| Storage Conditions : Keep container closed and Store in a cool and dry place.Keep out of the reach of children. | |
| Incompatible Products : None |
- EXPOSURE CONTROLS/PERSONAL PROTECTION
| Engineering Measures | |
| Ventilation | :Not required under intended use. |
| Exposure limit values | |
| OSHA-PEL(USA) | :15g/m ^3 (Total Dust), 5g/m ^3 (Respirable Dust) |
| ACGIH-TLV(USA) | :10g/m ^3 (Total Dust), 3g/m ^3 (Respirable Dust) |
| Personal Protective Equipment | |
| Respiratory Protection | :Not required under intended use. |
| Hand Protection | :Not required under intended use. |
| Eye Protection | :Not required under intended use. |
| Skin Protection | :Not required under intended use. |
| Other Protective equipment | :Use of a dust mask and goggles are recommended when handling a large quantity of toner or during long term exposure, as with any non-toxic dust. |
- PHYSICAL AND CHEMICAL PROPERTIES
| Appearance | |||
| Physical State : | Solid Form : Powder | Color : Black | Oder : Odorless |
| Ph | : Not applicable | ||
| Boiling/Melting point | : Not applicable | ||
| Flash Point (°C) | : Not applicable | ||
| Explosion Properties | : No data | ||
| Density (g/cm3) | : 5.4 (bulk density : 2.09) | ||
| Solubility in water | : Negligible | ||
MATERIAL SAFETY DATA SHEET (3/4)
MSDS No. F-30831
10. STABILITY AND REACTIVITY
Stability :Stable
Hazardous Reactions :Dust explosion, like most finely divided organic powders.
Conditions to avoid :Electri discharge, throwing into fire.
Materials to avoid :Oxidizing Materials
Hazardous Decomposition Products :Co, CO 2 and NO x
Further Information : None
11. TOXICOLOGICAL INFORMATION
Acute Toxicity
Ingestion (oral) : LD50 > 2000mg/kg (Estimated from the constituent components)
Dermal : LD 50 > 2000mg/kg (rats
Inhalation : No data
Eye irritation : Not an irritant (Rabbits)
Skin irritation : Not an irritant (Rabbits)
Skin sensitizer : No sensitization
Mutagenicity
Carcinogenicity
: Negative (Ames Test)
: In 1996 the IARC reevaluated carbon black as a Group 2B carcinogen (possible human carcinogen). This classification is given to chemicals for which there is inadequate human evidence, but sufficient animal evidence on which to base an opinion of carcinogenicity. The classification is based upon the development of lung tumors in rats receiving chronic inhalation exposures to free carbon black at levels that induce particle overload of the lung. Studies performed in animal models other than rats did not show any association between carbon black and lung tumors.
Moreover, a two-year cancer bioassay using a typical toner preparation containing carbon black demonstrated no association between toner exposure and tumor development in rats.
Chronic Effects
: In a study in rats of chronic inhalation exposure to a typical toner, a mild to moderate degree of lung fibrosis was observed in 92% of the rats in the high concentration (16mg/m ^3 ) exposure group, and a minimal to mild degree of fibrosis was noted in 22% of the animals in the middle (4mg/m ^3 ) exposure group, but no pulmonary change was reported in the lowest (1mg/m ^3 ) exposure group, the most relevant level to potential human exposures.
12. ECOLOGICAL INFORMATION
No data are available.
13. DISPOSAL CONSIDERATIONS
Waste from residues
:Waste material may be dumped or incinerated under conditions which meet all federal, state and local environmental regulations.
Contaminated Packaging
:Waste may be disposed or incinerated under conditions which meet all federal, state and local environmental regulations.
MATERIAL SAFETY DATA SHEET (4/4)
MSDS No. F-30831
14. TRANSPORT INFORMATION
UN Classification : None
Land DOT (USA) : None
Sea IMDG : None
Air ICAO-TI : None
15. REGULATORY INFORMATION
US Information
TSCA (Toxic Substances Control Act) : All chemical substances in this product comply with all applicable rules or order under TSCA. SARA (Superfund Amendments and Reauthorization Act) Title III 302 Extreme Hazardous Substance : None 311/312 Hazard Classification : None
EU Information
1999/45/EEC and 67/548/EEC
Symbol & Indication
R-Phrase
76/769/EEC
: Not required
: Not required
: All chemical substances in this product comply with all applicable rules or order under 76/69/EEC.
16. OTHER INFORMATION
NFPA Rating (USA)
WHMIS Legislation (Canada)
References
: Health = 1 Flammability = 1 Reactivity = 0
: This product is not a controlled product.
IARC (1998): IARC monographs on the Evaluation of the Carcinogenic Risk of Chemicals to Humans, Vol. 65, Printing Process And Printing Inks, Carbon Black and Some Nitro Compounds, Lyon, pp-149-261 H. Muhle, B. Bellmann, O. Creutzenberg, C. Dasenbrock, H. Ernst, R. Kilpper, J. C. MacKenzie, P. Morrow, U. Mohr, S. Takenaka, and R. Mermelstein (1991) Pulmonary Response to Toner upon Chronic Inhalation Exposure in Rats. Fundamental and Applied Toxicology 17, pp. 280-299.
The information of this data sheet represents our current data and best opinion as to the proper use in handling of this product under normal conditions. However, all materials may present unknown hazards and should be used with caution. Although certain hazards are described herein, we do not guarantee that these are the only hazards which exist.
INTRODUCTION
INLEIDING
Reproduction normale 2-10
Réduction/Agrandissement/Zoom 2-16
natural_image
Illustration of a printer emitting exhaust heat from a window (no text or symbols)
text_image
(20cm) (10cm) (10cm)
text_image
(20cm)natural_image
Technical line drawing of a mechanical device with a magnified inset showing a labeled component (no text or symbols present)natural_image
Line drawing of an open printer with internal structure and external frame (no text or symbols)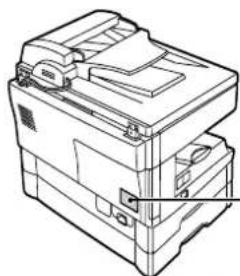
natural_image
Technical line drawing of a mechanical device with no visible text or symbolsCLASS 1 LASER PRODUCT
LASER KLASSE 1
LUOKAN1 LASERLAITE
KLASS1 LASERAPPARAT
CLASS 1 LASER PRODUCT
LASER KLASSE 1

Laserstrahl
CAUTION INVISIBLE LASER RADIATION WHEN OPEN AND INTERLOCKS DEFEATED. AVOID EXPOSURE TO BEAM.
natural_image
Line drawing of a hand holding a stack of documents or files (no text or symbols visible)AL-1043
-
Déballez le copieur et amenez-le à l'endroit de son installation uniquement en le tenant par les poignées prévues des deux côtés de l'appareil.
-
Pak de kopieermachine aan beide handgrepen aan de zijkanten van de kopieermachine vast tijdens het uitpakken en wanneer u de kopieermachine naar de opstellingsplaats transporteert.

text_image
Technical diagram of a mechanical device with labeled parts (a, b, c, d, e, f) for assembly or identification.AL-1043
text_image
Technical diagram of an open printer with labeled parts (① and ⑤)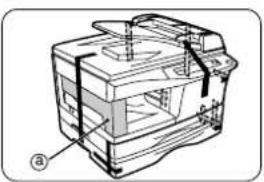
natural_image
Technical line drawing of a mechanical assembly with no visible text or symbols-
Ouvrez ensuite le couvercle de l'original et enlevez les matériaux de protection ⑨ et ⑬.Passez à l'étape 6.
-
Open vervolgens het documentdeksel en verwijder het beschermings materiaal ⑨ en ⑬.Ga naar stap 6.
-
Enlevez toutes les bandes adhésives apposées sur le copieur. Enlevez la protection Ⓐ.
-
Verwijder alle stukjes tape van het kopieerapparaat. Verwijder beschermmateriaal ⓐ.

text_image
Technical diagram of a printer with labeled parts (a, b, c) showing open lid and internal compartments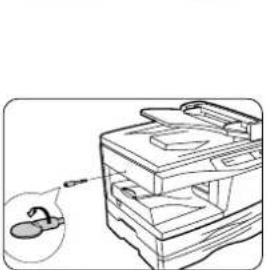
natural_image
Line drawing of a printer with an open lid and magnified view of the lid (no text or symbols)text_image
Technical diagram showing a hand inserting a component into a device with arrows indicating direction of movement or force.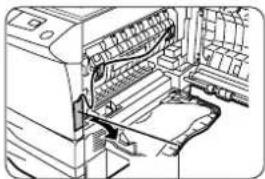
natural_image
Line drawing of an open industrial machine with internal components (no text or symbols)ruban adhésif
ATTENTIE tape

natural_image
Technical line drawing of a printer with a paper rack and paper holder (no text or symbols)broches de protection
Beschermpennen
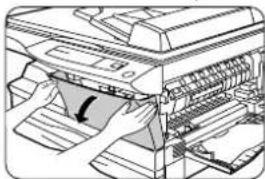
natural_image
Diagram of a printer with paper feed and paper roll, showing internal structure without any text or symbols
natural_image
Diagram of a vehicle inside a container with bidirectional arrows indicating movement (no text or symbols)
natural_image
Diagram showing a mechanical component being inserted into a housing, with an arrow indicating the direction (no text or symbols present)
natural_image
Illustration of a hand inserting a component into a machine (no text or symbols visible)
natural_image
Diagram of a printer or printer with an arrow indicating compression or disassembly (no text or symbols present)text_image
Diagram showing a hand pressing a component with an inset magnified view highlighting a device's internal structure.-
Débloquez et enlevez le verrou de la plaque de pression. Faites tourner le verrou de la plaque de pression dans le sens de la flèche pour l'enlever tout en appuyant sur la plaque de pression du magasin.
-
Verwijder de vergrendeling van de aandrukplaat. Draai de drukplaatvergrendeling in de pijlrichting om deze te verwijderen terwijl u de drukplaat van de papierlade omlaag drukt.
text_image
Technical diagram showing a hand operating a mechanical device with labeled parts (a) and (b)text_image
Diagram showing a computer interface with a hand interacting with the screen, highlighting a button and a magnified view of the screen area.natural_image
Line drawing of a printer or printer with an arrow indicating compression or disassembly (no text or symbols present)natural_image
Illustration of a hand inserting a small object into a cabinet (no text or symbols)natural_image
Illustration of hands using a power tool to press or install a machine (no text or symbols visible)natural_image
Line drawing of a laptop with a screen and a small screen (no text or symbols)marque markering
text_image
1 1 2 AA A A A A A A A 2 2 2 1 1text_image
-1 1 → 2 [ ○ AA A ○ A1A A ] 2 → 2 -2 → 1 1 ] 1 1AL-1551

flowchart
graph TD
    A["1"] --> B["2"]
    B --> C["○"]
    B --> D["○"]
    B --> E["○"]
    F["2"] --> G["2"]
    G --> H["○"]
    G --> I["○"]
    G --> J["○"]
    K["2"] --> L["1"]
    L --> M["●"]
    M --> N["○"]
    style A fill:#f9f,stroke:#333
    style F fill:#f9f,stroke:#333
    style K fill:#f9f,stroke:#333


natural_image
Illustration of hands installing a laptop on a rack with an arrow indicating the component (no text or symbols present)text_image
200% 141% A5×A4 100% 81% 34×M1 70% A4×A5 50%AL-1043, AL-1252, AL-1452
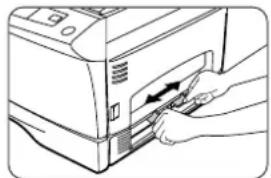
natural_image
Illustration of a hand inserting a card into a printer (no text or symbols visible)AL-1043, AL-1252,
AL-1452
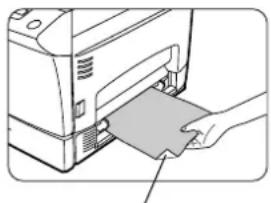
natural_image
Illustration of a hand inserting a card into a printer (no text or symbols visible)natural_image
Diagram showing three steps of a bedside seating arrangement with arrows indicating movement (no text or symbols present)AL-1551 only :
text_image
Diagram illustrating a mechanical assembly or assembly process with labeled components and directional arrows indicating motion.
natural_image
Illustration of hands using a tool to press or install electronic components (no text or symbols visible)natural_image
Illustration of a printer's internal structure with a hand inserting a component (no text or symbols visible)
Second original Tweede origineel
flowchart
graph TD
    A["a"] --> B["8"]
    B --> C["A"]
natural_image
Illustration of a printer with arrows indicating parts of the printer's internal structure (no text or symbols present)
natural_image
Illustration of a printer with paper spools and a paper feeding into a slot (no text or symbols visible)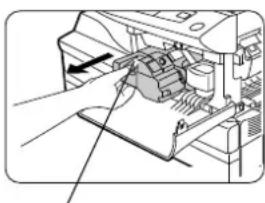
natural_image
Diagram of a printer's internal structure with an arrow indicating the component (no text or symbols present)natural_image
Illustration of a printer with a hand inserting a paper into the cover (no text or symbols visible)natural_image
Technical line drawing of a mechanical device with no visible text or symbolsnatural_image
Diagram of a hand operating a mechanical device with a black arrow indicating the left side (no text or symbols present)- Enlevez délicatement la cartouche toner/développeur en enfonçant le bouton de déverrouillage. Pour enlever la cartouche toner/développeur, voir page 2-23, étape 2.
-
Dégagez délicatement la cartouche de tambour en la saisissant par sa poignée. Eliminez l'ancienne cartouche conformément à la réglementation en vigueur.
-
Trek de tonerpatroon voorzichtig naar buiten terwijl u op de vergrendelings/ontgrendelingstoets drukt. Om de tonerpatroon te verwijderen zie pagina 2-23, stap 2.
- Houd de hefboom van de drumpatroon naar beneden en trek de patroon eruit. Verwijder de oude drumpatroon volgens de plaatselijke voorschriften.
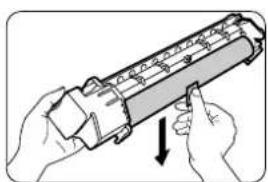
natural_image
Illustration of hands holding a cylindrical device with a downward arrow indicating motion (no text or symbols)natural_image
Technical line drawing of a mechanical assembly with a hand operating a component (no text or symbols visible)
natural_image
Line drawing of an open printer with a paper airplane being inserted (no text or symbols)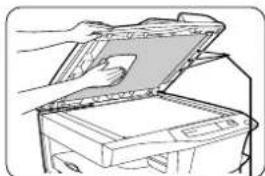
natural_image
Illustration of a hand opening a device with a partially open lid (no text or symbols visible)natural_image
Technical line drawing of a printer with paper feed and paper roll (no text or symbols)Capots extérieurs
natural_image
Line drawing of a hand inserting a component into a machine (no text or symbols visible)natural_image
Illustration of hands installing or adjusting a device panel inside a storage unit (no text or symbols visible)text_image
Diagram showing a hand inserting a component into a device, with an arrow indicating the insertion direction.natural_image
Technical line drawing of a printer with paper being inserted (no text or symbols)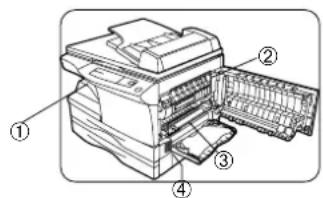
text_image
Technical diagram of a printer with numbered parts labeled ① to ④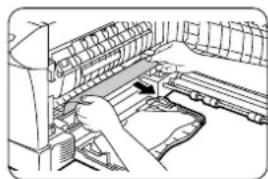
natural_image
Line drawing of a hand operating a mechanical device with no visible text or symbols
natural_image
Line drawing of a hand operating a computer with a scroll wheel (no text or symbols)natural_image
Illustration of a printer's internal structure with paper and printer tray (no text or symbols visible)natural_image
Illustration of a hand operating a printer with a scroll wheel (no text or symbols visible)natural_image
Technical line drawing of a printer with paper feed and paper tray (no text or symbols)Rouleau d'alimentation Voedingsrol
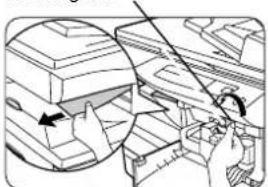
natural_image
Technical line drawing showing mechanical assembly with arrows indicating motion (no text or symbols)-
Appuyez délicatement sur les deux côtés du couvercle frontal pour ouvrir ce couvercle.
-
Faites tourner le rouleau d'alimentation dans le sens de la flèche et dégagez soigneusement le papier bloqué situé dans la zone de sortie.
-
Soulevez le levier de libération de l'unité de fixation, refermez le couvercle frontal et refermez ensuite le couvercle latéral en appuyant sur les zones arrondies à côté du bouton de déverrouillage du capot latéral. Le témoin de blocage de papier (8V) s'éteint et le témoin de prêt (5) s'allume.
-
Druk voorzichtig op beide kanten van de frontdeksel om deze te openen.
-
Draai de transportroller in de pijlrichting en verwijder voorzichtig het vastgelopen papier uit het uitvoergebeid.
-
Beweeg de ontgrendelingshefboom van de heater-eenheid omhoog en sluit de zijklep door op de ronde uitsteeksels bij de opentoetsen voor het zijdeksel te drukken. De papierstoring (8v) indicatie gaat uit en de bedrijfsklaar (③) indicatie gaat branden.

natural_image
Line drawing of a printer with paper being inserted, showing internal structure and page layout (no text or symbols)natural_image
Diagram of a hand pressing down on a mechanical component with an arrow indicating force (no text or symbols present)
natural_image
Illustration of a hand holding a document with arrows indicating motion, next to a magnified view of a book (no text or symbols present)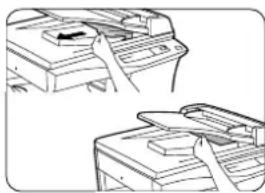
natural_image
Illustration of two hands operating a printer with a paper airplane (no text or symbols)natural_image
Diagram showing a hand holding a mechanical component with an inset view of a cylindrical part (no text or symbols present)
natural_image
Illustration of a printer emitting exhaust heat from a window (no text or symbols)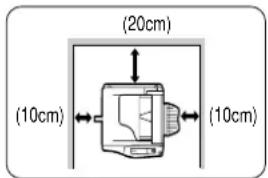
text_image
(20cm) (10cm) (10cm)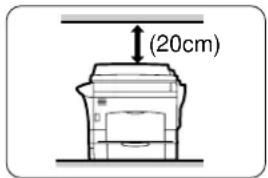
text_image
(20cm)natural_image
Line drawing of a mechanical device with a magnified inset showing a labeled component (no text or symbols present)natural_image
Line drawing of an open printer with internal structure and external frame (no text or symbols)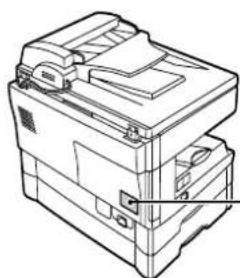
natural_image
Technical line drawing of a mechanical device with no visible text or symbolsCLASS 1 LASER PRODUCT
LASER KLASSE 1
LUOKAN1 LASERLAITE
KLASS1 LASERAPPARAT
CLASS 1 LASER PRODUCT
LASER KLASSE 1

Laserstrahl
CAUTION INVISIBLE LASER RADIATION WHEN OPEN AND INTERLOCKS DEFEATED. AVOID EXPOSURE TO BEAM.
natural_image
Line drawing of a hand holding a stack of documents or files (no text or symbols visible)AL-1043
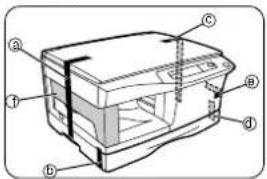
text_image
Technical diagram of a mechanical device with labeled parts (a, b, c, d, e, f) for assembly or identification.AL-1043
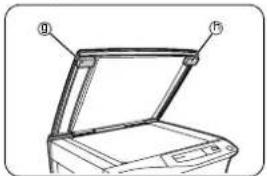
text_image
Diagram of an open printer with labeled parts (① and ⑤) indicating internal structure.natural_image
Technical line drawing of a mechanical device with no visible text or symbols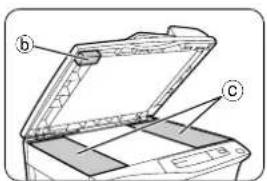
text_image
Technical diagram of an open file organizer with labeled parts (b) and (c)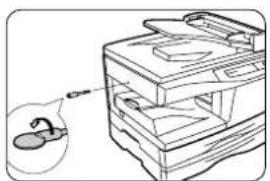
natural_image
Line drawing of a mechanical device with a magnified inset showing a small component (no text or symbols)text_image
Technical diagram showing a hand inserting a component into a device with arrows indicating direction of movement or force.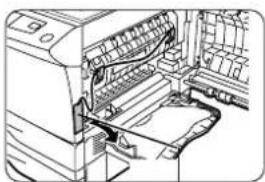
natural_image
Line drawing of an open industrial machine with visible wiring and components (no text or symbols)Cinta CAUTION
Nastro ATTENZIONE
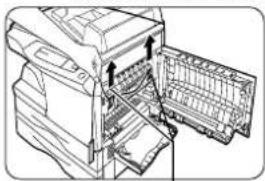
natural_image
Technical line drawing of a printer with a paper rack and paper holder (no text or symbols)natural_image
Diagram of a printer with paper feed and paper roll, showing internal structure without any text or symbols
natural_image
Diagram of a vehicle inside a container with bidirectional arrows indicating movement (no text or symbols)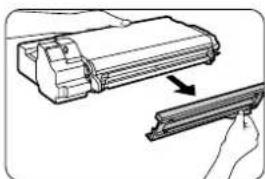
natural_image
Diagram showing a mechanical component being inserted into a housing, with an arrow indicating the direction (no text or symbols present)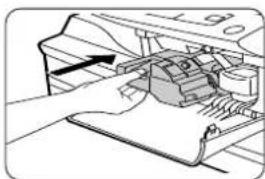
natural_image
Illustration of a hand inserting a device into a printer (no text or symbols visible)
natural_image
Diagram of a printer or printer with an arrow indicating a loading or movement (no text or symbols present)text_image
Diagram showing a hand pressing a component with an inset magnified view highlighting a mechanical component.text_image
Technical diagram showing a hand operating a device with labeled parts (a) and (b), likely illustrating a mechanical or electrical assembly.natural_image
Line drawing of a printer with an arrow indicating compression or disassembly (no text or symbols present)PAPEL
natural_image
Illustration of a hand inserting a small object into a cabinet (no text or symbols)natural_image
Illustration of hands using a power tool to press or install a machine (no text or symbols visible)natural_image
Diagram of a hand pressing a button on a mechanical component (no text or symbols visible)natural_image
Line drawing of a laptop with a screen and a small screen showing a button (no text or symbols)Señal/Marcatura
text_image
1 1 2 AA A A A A A A A 2 2 2 1 1text_image
1 1 2 [ ○ AA A ○ A A A 2 2 2 ● 2 1 1 ○ LAL-1551
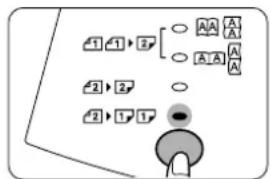
flowchart
graph TD
    A["1"] --> B["2"]
    B --> C["○"]
    B --> D["○"]
    B --> E["○"]
    F["2"] --> G["2"]
    G --> H["○"]
    G --> I["○"]
    J["2"] --> K["1"]
    K --> L["●"]
    L --> M["○"]


c. Para copiar dos caras al modo de dos caras :
natural_image
Illustration of hands installing a laptop on a rack with an arrow indicating the component (no text or symbols present)Colocación de un original mayor
text_image
200% 141% A5 A4 100% 81% 34 mA1 70% A4 A5 50%AL-1043, AL-1252, AL-1452
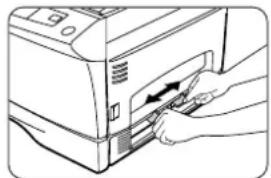
natural_image
Illustration of a hand inserting a card into a printer (no text or symbols visible)
AL-1043, AL-1252, AL-1452

natural_image
Illustration of a hand inserting a card into a printer (no text or symbols visible)natural_image
Diagram showing three steps of a bed seat assembly with arrows indicating motion (no text or symbols present)AL-1551 only :
text_image
Diagram illustrating a mechanical or electrical component with labeled parts and directional arrows, including a magnified inset showing a detail view.
natural_image
Illustration of hands using a computer to press or install an electronic device (no text or symbols visible)natural_image
Illustration of a printer's internal structure with a hand inserting a component (no text or symbols visible)natural_image
Illustration of a printer's internal structure with arrows indicating parts (no text or symbols)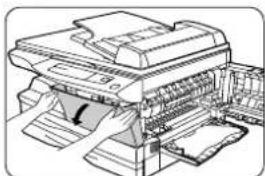
natural_image
Illustration of a printer with paper sheets and a paperclip, showing internal structure without any text or symbols.
natural_image
Diagram of a printer's internal structure showing paper feeding into a printer (no text or symbols visible)natural_image
Illustration of a printer with a hand inserting a paper into the cover (no text or symbols visible)natural_image
Technical line drawing of a printer with paper feeders and paper spools (no text or symbols)natural_image
Mechanical assembly diagram showing a hand pressing a component into a machine (no text or symbols visible)natural_image
Illustration of hands holding a cylindrical device with a downward arrow indicating motion (no text or symbols)natural_image
Technical line drawing of a mechanical assembly with a hand operating a component (no text or symbols visible)- Instale con cuidado el cartucho TD. Para la instalación del mismo, véase la página 3-7 "INSTALACIÓN DEL CARTUCHO TD".
-
Cierre la cubierta frontal y, a continuación, la lateral pulsando sobre los salientes redondos que se encuentran al lado del botón para apertura de la cubierta. El indicador (⑧) "Requerido recambio del cartucho tambor" se apaga y el indicador PREPARADA (⑨) se ilumina.
-
Installate delicatamente la cartuccia TD. Per installare la cartuccia TD, vedere pagina 3-7, INSTALLAZIONE DELLA CARTUCCIA TD.
- Chiudete il pannello di copertura anteriore e quindi il pannello di copertura laterale, premendo le sporgenze rotonde vicino al pulsante di apertura del pannello laterale. L'indicatore richiesta sostituzione cilindro (☐) si spegnerà e l'indicatore di pronto (☐) si accenderà.

natural_image
Line drawing of an open printer with a lid and baseplate (no text or symbols)
natural_image
Line drawing of a printer with open lid and paper holder (no text or symbols)Para modelo con SPF/R-SPF
Per modello con SPF/R-SPF
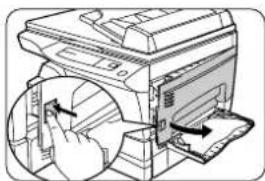
natural_image
Technical line drawing of a printer with internal components and arrows indicating motion (no text or symbols)
natural_image
Diagram of a printer's internal structure showing a hand inserting a component into a rack (no text or symbols visible)
natural_image
Illustration of hands installing or adjusting a mechanical component inside a device (no text or symbols visible)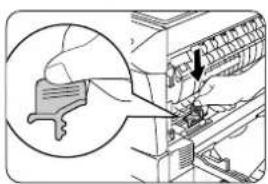
natural_image
Illustration of a hand using a tool to adjust or install a mechanical component, with no visible text or symbols.natural_image
Technical line drawing of a printer with paper feed and paper holder (no text or symbols)
text_image
Technical diagram of a printer with numbered parts labeled ① to ④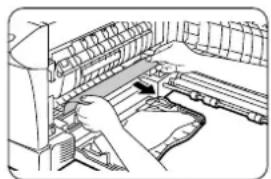
natural_image
Diagram of a hand operating a mechanical device with a cable inserted (no text or symbols visible)
natural_image
Line drawing of a hand operating a mechanical device with a tool, no visible text or symbolsnatural_image
Illustration of a printer's internal structure with paper and printer tray (no text or symbols)
natural_image
Line drawing of a hand operating a computer with a scroll wheel (no text or symbols)natural_image
Technical line drawing of a printer or printer with paper spool and paper holder (no text or symbols)Rodillo de alimentación Rullo di alimentazione
