Jamie Oliver HomeCooker HR1040 - Kitchen appliance PHILIPS - Free user manual and instructions
Find the device manual for free Jamie Oliver HomeCooker HR1040 PHILIPS in PDF.

User questions about Jamie Oliver HomeCooker HR1040 PHILIPS
0 question about this device. Answer the ones you know or ask your own.
Ask a new question about this device
Download the instructions for your Kitchen appliance in PDF format for free! Find your manual Jamie Oliver HomeCooker HR1040 - PHILIPS and take your electronic device back in hand. On this page are published all the documents necessary for the use of your device. Jamie Oliver HomeCooker HR1040 by PHILIPS.
USER MANUAL Jamie Oliver HomeCooker HR1040 PHILIPS
Always there to help you
Register your product and get support at
www.philips.com/welcome

text_image
Question? Contact PhilipsHR1040

natural_image
Black and white photo of a Philips Jamie Oliver cooking pot with two side handles and digital display (no visible text or symbols on the device itself)
natural_image
Simple line drawing of an open book with a grid on the left and a closed page on the right (no text or symbols)
text_image
Exploded view diagram of a cooking appliance with numbered parts and a digital temperature display showing 21°C.ENGLISH 6
РУССКИЙ 21
УКРАЇНСЬКА 40


Introduction
Congratulations on your purchase and welcome to Philips!
This HomeCooker has been developed to help you cook a vast array of dishes and gives you long-lasting performance. It has been designed to allow easy cleaning and all accessories (except the safety ring) are dishwasher-proof.
Some of the advantages of your HomeCooker:
- Time saving: The HomeCooker allows you to do other things during cooking. So you can enjoy other things you like and cook at the same time.
- No burned food: The stirrer prevents your food from burning on the bottom. Furthermore the appliance stops heating automatically when the set temperature has been reached and the set time has elapsed.
- Versatile: You can melt, keep warm, simmer, boil, steam, fry with or without the stirrer.
- Very user-friendly: The simple user interface allows you to easily adjust the settings at the touch of a button.
- Portable: The HomeCooker has a compact design, which allows you to take it with you and cook anywhere you have electricity and a wall socket (e.g. at a campsite, in a summer house or on your patio).
- Safe: The HomeCooker has a safety ring around the heating plate to prevent finger burning.
Special benefits of product registration
You have bought a culinary tool for life and we want to ensure that you remain satisfied. We would like you to register your purchase so that we can stay in contact with you and you can receive additional recipes from use. Register within 3 months to receive benefits including:
- Fresh ideas for recipes via email.
- Tips to use and maintain your HomeCooker.
- Special offers for accessories and other products.
Please visit www.philips.com/welcome to register your HomeCooker.
General description (Fig. 1)
1 Glass lid
2 Steam vent
3 Steaming tray
4 Steaming basket
5 Pasta insert
6 Stirrer
7 Pot
8 Spindle
9 Heating plate
10 Removable safety ring
11 Base
12 Control panel with display
13 Temperature increase button
14 Temperature decrease button
15 Temperature indication (°C or °F)
16 Stirrer on/off button
17 Start/pause button
18 Set time indication
19 Time increase button
20 Time decrease button
21 'Heating plate hot' light
22 Mains cord with plug
23 On/off button
24 Cord storage compartment
Important
Read this user manual carefully before you use the appliance and save it for future reference.
Danger
- Never use the appliance on an induction cooker, stove, gas stove, oven or other cooking appliances.
- Never immerse the base in water or any other liquid, nor rinse it under the tap.
Warning
- Check if the voltage indicated on the appliance corresponds to the local mains voltage before you connect the appliance.
- Only connect the appliance to an earthed wall socket.
- Do not operate the appliance by means of an external timer or a separate remote control system.
- This appliance is not intended to be operated by means of an external timer or separate remote-control system.
- Do not use the appliance if the plug, the mains cord or other parts are damaged.
- If the mains cord is damaged, you must have it replaced by Philips, a service centre authorised by Philips or similarly qualified persons in order to avoid a hazard.
- The appliance can be used by children aged 8 or above and by persons with reduced physical, sensory or mental capabilities or lack of experience and knowledge if they have been given instructions in safe use of the appliance or supervision to establish safe use and if they have been made aware of the hazards involved.
- Do not allow children to play with the appliance.
- keep the appliance and its mains cord out of reach of children aged 8 or under when the appliance is switched on or cooling down.
text_image
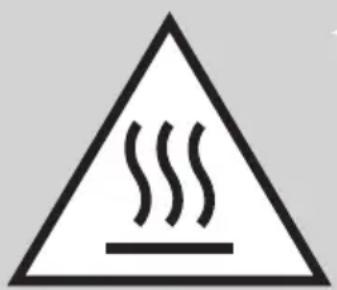
Warning sign with steam symbol inside a triangle, indicating hazardous material- Children aged 8 or above are only allowed to clean the appliance under supervision.
- Do not let the mains cord hang over the edge of the surface or worktop on which the appliance stands.
- Keep the appliance and the mains cord away from hot surfaces.
- Leave at least 10cm free space behind and on both sides of the appliance.
- Do not place objects close to the appliance when it is operating.
- Always fully unwind the mains cord before you plug in the appliance.
- Never let the appliance operate without the pot on the base.
- The appliance becomes very hot and stays hot for a long time after cooking. When the red ‘heating plate hot’ indication light on the control panel lights up, the heating plate is hot and must not be touched.
- Never remove the safety ring when the heating plate is on or hot.
- Keep long hair, jewelry, loose clothing etc. away from the stirrer.
- The temperature of accessible surfaces is high when the appliance is operating.
- Overheated oil and fat may catch fire.
Caution
- This appliance is intended for normal household use only. It is not intended for use in environments such as staff kitchens of shops, offices, farms or other work environments. Nor is it intended to be used by clients in hotels, motels, bed and breakfasts and other residential environments.
- If the appliance is used improperly or for professional or semi-professional purposes or if it is not used according to the instructions in the user manual, the guarantee becomes invalid and Philips refuses any liability for damage caused.
- Never use any accessories or parts from other manufacturers or that Philips does not specifically recommend. If you use such accessories or parts, your guarantee becomes invalid.
- Only use the pot in combination with its original base. Do not use the pot on an induction cooker, stove or other cooking device.
- Only use the steaming basket, the pasta insert and steaming tray in combination with the original base and pot.
- Only cover the pot, the steaming basket or the pasta insert with the lid supplied. Never use a towel or something similar for this purpose.
- Always place the appliance on a dry, flat and stable surface.
- Do not place the appliance near or underneath objects that would be damaged by steam, such as walls and cupboards.
- Do not use the appliance to deep fry food.
- Do not use the appliance or any of its parts in the microwave.
- You can blend the ingredients in the pot with a hand blender, but only if you remove the stirrer from the pot first.
- Do not exceed the MAX indication on the pot (3 litres).
- Always make sure that the steaming slots in the steaming baskets and steaming tray are free from fat, food remnants and dirt.
- Only use a moist cloth to clean the base.
- Never let the appliance operate when the pot is empty.
- Always use the lid when you want to steam food.
- Consult the recipe book for the correct quantities and cooking times.
- Always use oven mitts if you want to handle the appliance while it is operating or still hot.
- Always remove the lid carefully and away from you. Let condensation drip off the lid into the pot to avoid scalding.
- Beware of the hot steam that comes out of the steam vent in the lid during cooking or out of the pot when you remove the lid. When you check the food, always use kitchen utensils with long handles.
- When you switch off and/or unplug the appliance, the red 'heating plate hot' indication light goes out. However, the heating plate may still be hot.
Always let the heating plate cool down completely before you handle or clean the base.
- Always press the buttons on the control panel with your fingertips. Do not use your nails to prevent damage to the protection foil.
- Always carry the pot by its handles.
- Always hold the steaming basket, the pasta insert and the steaming tray by their handles when they contain hot food.
- Do not move the appliance while it is operating.
- Never clean the safety ring in the dishwasher.
- Always check if the food is properly cooked before you eat it.
Electromagnetic fields (EMF)
This Philips appliance complies with all standards regarding electromagnetic fields (EMF). If handled properly and according to the instructions in this user manual, the appliance is safe to use based on scientific evidence available today.
Overheat protection
The HomeCooker is equipped with overheat protection. If the appliance overheats, it switches off automatically. Unplug the appliance and let it cool down to ambient temperature. Then put the mains plug back into the wall socket and press the on/off button to switch on the appliance again.
Before first use
1 Remove all packaging materials from the appliance and the protection foil from the control panel.
2 Thoroughly clean the parts that come into contact with food before you use the appliance for the first time (see chapter 'Cleaning').
Preparing for use

natural_image
Technical line drawing of a mechanical component with a cylindrical body and attached plug (no text or symbols)1 Put the appliance on a dry, flat and stable surface.
2 Pull the mains cord out of the cord storage compartment.
natural_image
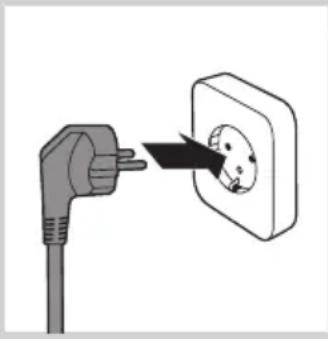
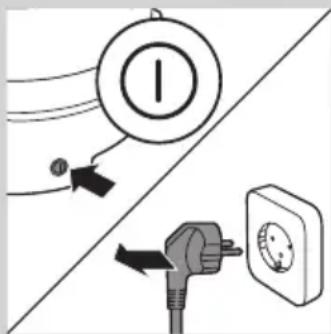
Illustration of an electrical outlet with a plug and socket, showing a black arrow pointing to the socket (no text or symbols present)3 Put the mains plug in the wall socket.
natural_image
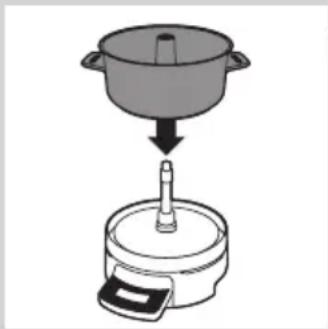
Illustration of a cooking step showing a pot being placed on a stand with a tool, no text or symbols present.4 Place the pot on the base.
Using the appliance
For cooking and steaming tips and recipes, see the recipe book and visit our website www.philips.com/homecooker.
Using the control panel

natural_image
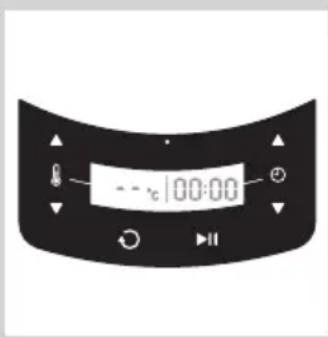
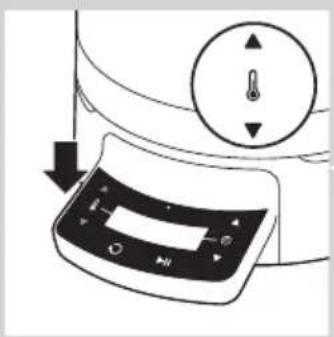
Simple line drawing of a toilet or sink with a circular button and a black arrow pointing to the outlet (no text or symbols)1 Press the on/off button.
text_image
- - °C 100:00The temperature shown on the display is ‘- -’ and the time shown is 00:00.
Note: If you do not use the appliance for 10 minutes, it goes into standby mode to save energy. In this mode, the start/pause button flashes every 10 seconds. If you want to switch the appliance back on, press the start/pause button.
Note: If the appliance is still hot but is cooling down, it goes into standby mode to save energy. The 'heating plate hot' light lights up as long as the plate is hot. If you want to switch the appliance back on, press the start/pause button.
Note: If you switch off the appliance or if you unplug the appliance, the 'heating plate hot' light goes out. However, the heating plate may still be hot.
ENGLISH12
natural_image
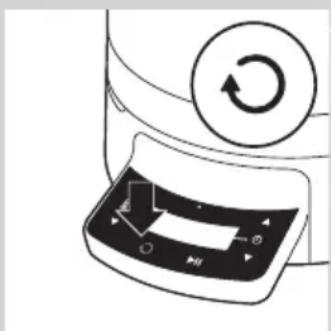
Diagram of a refrigerator control panel with directional arrows indicating movement (no text or symbols)2 Press the temperature increase or decrease button one or more times to set the required temperature.
text_image
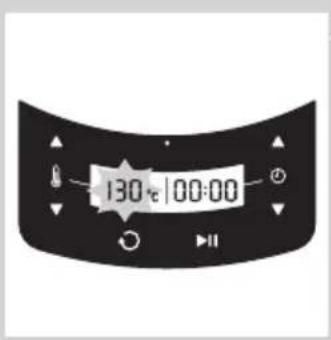
130°C 100:00The set temperature is shown on the display. The temperature flashes to indicate that the appliance is changing the temperature.

text_image
70°C 100:00When the red 'heating plate hot' light on the display lights up, the heating plate is hot and must not be touched.

text_image
130°C 100:00When the heating plate or bottom of the pot has finally reached the set temperature, the temperature on the display stops flashing. The appliance maintains the set temperature while you can do something else.
Note: Due to the different ambient temperature it might happen that the temperature display starts flashing again.
Note: If you press the temperature increase and decrease buttons briefly at the same time, the temperature is reset to zero ('--').
Note: If you press the temperature increase and decrease buttons at the same time for 3 seconds, you can switch from ^ to ^ and back.
Note: You can also adjust the temperature while the appliance is operating. If you set a higher temperature, the temperature light starts flashing again.
natural_image
Diagram of a microwave oven with a rotary knob and control buttons (no text or symbols)
text_image
130°C 25:00
natural_image
Illustration of a computer monitor with playback control buttons and a circular play button (no text or symbols)
natural_image
Diagram of a device with a circular button labeled 'Return' and a control panel with arrows (no text or symbols)Temperature settings
- Melting: 40°C/104°F*
- Keeping warm: 70°C/158°F*
- Simmering: 90°C/194°F*
- Boiling: 110°C/230°F*
- Steaming: 130°C/266°F*
- Frying: 175°C/347°F*
- Turbo: 250^ C/482°F** (to heat up ingredients quickly or to roast large amounts of ingredients)
* indicates temperature on the bottom of the pot
* * indicates temperature on heating plate
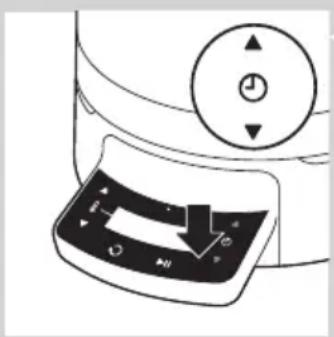
3 Press the timer increase or decrease buttons to set the required cooking time. You can set a time from 1 to 99 minutes.
The set time is shown on the display.
Note: The longer you keep the button pressed, the faster the time is put forward or backward.
Note: You can also adjust the time while the appliance is operating.
Note: If you press the timer increase and decrease button briefly at the same time, the time is reset to 00:00.
Tip: When you have become more familiar with the appliance and when you want to prepare your own recipes, you can also use it without setting the timer. In that case, the time starts counting up from zero and the appliance continues to operate for 99 minutes or until you switch it off yourself. If you press the pause button while cooking without setting the timer, the timer is reset to 00:00.
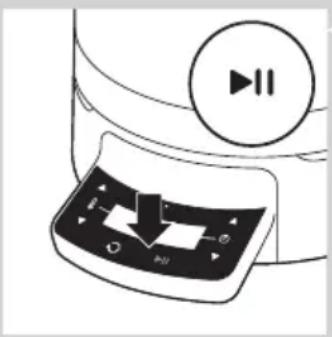
4 Press the start/pause button to start the cooking process.
The time on the display is counted down (in minutes and seconds) and the start/pause button flashes slowly to indicate that the appliance is operating.
The appliance starts to heat up.
The stirrer starts rotating.
Note: If you want to switch off the stirrer to cook for instance potatoes or if you want to steam, press the stirrer on/off button. To activate the stirrer again, press the stirrer on/off button again.
Note: To deactivate the stirrer, press the stirrer on/off button right after you switched on the appliance.
natural_image
Diagram of a device's control panel with playback buttons and a circular play button (no text or symbols)5 If you want to interrupt the cooking process, press the start/pause button.
The start/pause button lights up continuously and the time on the display stops counting down or up.
Note: If you did not set a cooking time, the display shows 00:00.
6 To resume the cooking process, press the start/pause button again.
The time on the display starts counting down or up again and the start/pause button starts flashing again.
Note: If you did not set a cooking time, the display starts counting up from 0 again when you press the start/pause button.
Note: If you do not resume the cooking process within 10 minutes, the appliance goes into standby mode. In this mode, the start/pause button flashes every 10 seconds.
7 When the set time has elapsed, the appliance beeps and the start/pause button lights up continuously. Press any button to stop the beeping.
Melting, keep warm, simmering, boiling, and frying with stirrer

natural_image
Line drawing of a cooking pot with a hand holding a tool above it, no text or symbols present1 Place the stirrer on the cone in the pot.
Note: For easy assembly, always put the stirrer in the pot before you add the ingredients.
2 Put the ingredients you want to prepare in the pot. If necessary, add water (e.g. to cook potatoes).
Caution: Make sure the ingredients in the pot do not exceed the MAX indication.
natural_image
Line drawing of a cooking pot with a lid and lid removed, showing a handle and lid (no text or symbols)Note: Certain ingredients may cause discolouration. If you spill ingredients on the outside of the appliance, wipe away the spills immediately.
Tip: For cooking times and temperatures, see the recipe book.
3 If desired, put the lid on the pot.
4 Follow the instructions in section 'Using the control panel'.
5 When the set time has elapsed, remove the ingredients from the pot with a spatula or a scoop. Press any button to stop the beeping.
Note: You can blend the ingredients in the pot with a hand blender, but only if you remove the stirrer from the pot first.
Note: If you want to remove the stirrer, never touch the hot ingredients and only touch the top of the stirrer.
6 Switch off and unplug the appliance.
text_image
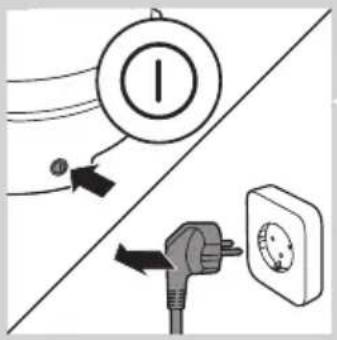
Diagram showing electrical connections with a switch, power plug, and circular component labeled 'I'Caution: When you switch off and/or unplug the appliance, the red 'heating plate hot' indication light goes out. However, the heating plate may still be hot. Always let the heating plate cool down completely before you handle or clean the base.
Steaming and boiling without stirrer

1 Remove the stirrer from the cone in the pot.
2 Pour water into the pot. For the quantity of water, see the recipe book.
Caution: Make sure the water and ingredients in the pot do not exceed the MAX indication.
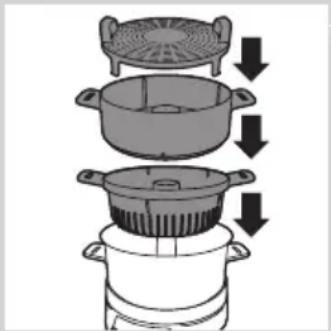
3 Put the ingredients you want to prepare in the steaming basket, the pasta insert and/or the steaming tray. Put the steaming basket, the pasta insert and the steaming tray in place.
- Put the pasta insert in the pot. Use the pasta insert to steam large ingredients.
- Put the steaming basket on the pot. Use the steaming basket to steam smaller ingredients.
- Put the steaming tray in the steaming basket. Use the steaming tray to steam delicate ingredients, e.g. fish.
natural_image
Diagram showing a cooking process with a pot, lid, and side pot (no text or symbols)- You can also use the steaming basket, the pasta insert and the steaming tray at the same time.
Caution: Make sure that you place the steaming basket, the pasta insert and the steaming tray properly and that they do not wobble.
Caution: Make sure that you put the food in the steaming basket, the pasta insert and the steaming tray in such a way that there is some space between the pieces and that some of the steaming slots stay clear to allow optimal steam flow. Do not overload the steaming baskets and the steaming tray.
natural_image
Line drawing of a cooking pot with lid and side handles, no text or symbols presentNote: Certain ingredients may cause discolouration. If you spill ingredients on the outside of the appliance, wipe away the spills immediately.
Tip: For steaming and boiling times and temperatures, see the recipe book.
Tip: For the best taste, do not prepare fish and other ingredients at the same time.
4 Put the lid on the pot.
Caution: Always use the lid when you want to steam food.
natural_image
Diagram of a device with a circular button labeled 'Recycle' and a scroll arrow pointing to a control panel (no text or symbols present)5 Follow the instructions in section 'Using the control panel'.
Note: After you have switched on the appliance, press the stirrer on/off button to deactivate the stirrer motor.
6 If you want to steam ingredients that require different steaming times, you can do this in the following way:
- Set the timer to the longest steaming time.
- Put the food that requires the longest steaming time in the large steaming basket (according recipe book).
- Let the appliance operate until the time on the display is equal to the shorter steaming time.
- Press the start/pause button to pause the appliance. Do not pause longer than 10 minutes to prevent the appliance from going into standby mode.
- Carefully remove the lid with oven mitts.
- Place the steaming basket containing the ingredients requiring the shorter steaming time on the pot.
- Put the lid on the steaming basket.
- Press the start/pause button again and let the appliance operate until the set time has elapsed.
Tip: For more information on the steaming and boiling times of ingredients, see the recipe book.
7 When the set time has elapsed, remove the ingredients from the steaming basket, the pasta insert and/or the steaming tray with a spatula or scoop. Press any button to stop the beeping.
text_image
Diagram showing electrical connections with a power plug, switch, and alarm unit labeled 'I'8 Switch off and unplug the appliance.
Caution: When you switch off and/or unplug the appliance, the red 'heating plate hot' light goes out. However, the heating plate may still be hot. Always let the heating plate cool down completely before you handle or clean the base.
Cleaning
Never use scouring pads, abrasive cleaning agents or aggressive liquids such as petrol or acetone to clean the appliance.
1 Switch off and unplug the appliance.
2 Let the appliance cool down.
3 Clean the pot, the stirrer, the steaming basket, the pasta insert and the steaming tray with warm water and some washing-up liquid or in the dishwasher.
4 Wipe the base and the heating plate with a moist cloth.
Danger: Never immerse the base in water, nor rinse it under the tap. Do not clean it in the dishwasher either.

natural_image
Illustration of a hand pressing down on a cylindrical mechanical component (no text or symbols)Caution: Always keep the heating plate dry, as dampness and steam lead to rust formation.
natural_image
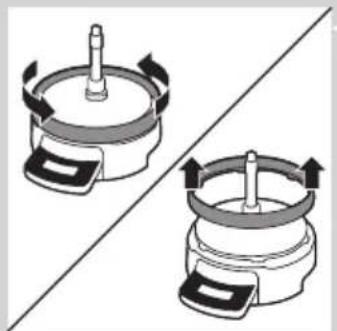
Diagram showing two mechanical components with rotating arrows, no text or symbols present5 Remove the safety ring from time to time for extra thorough cleaning. Wipe the safety ring with a moist cloth.
Never remove the safety ring when the heating plate is hot.
Caution: Never clean the safety ring in the dishwasher.
6 Wipe all parts of the appliance dry with a tea towel.
Note: If there are scale deposits on the heating plate, remove them with white vinegar (4% acetic acid). Then wipe away the vinegar residues with a soft cloth moistened with fresh water.
Storage

text_image
Diagram showing electrical connections with a bulb, switch, and power plug, likely illustrating an electrical circuit or safety concept.1 Switch off and unplug the appliance.
2 Let the appliance cool down.
text_image
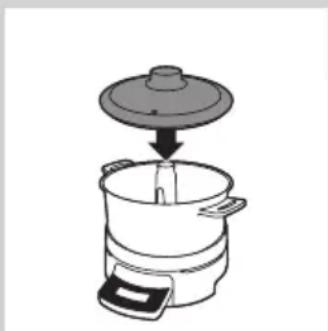
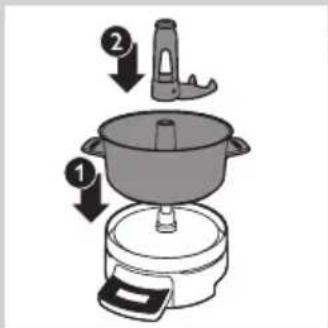
Diagram showing cooking process steps with labeled arrows indicating step 1 and step 2 of a pot3 Put the pot on the base (1) and put the stirrer on the cone (2).

text_image
Diagram showing a cooking process with labeled steps 1 and 2 indicating step 1 of the lid and lid.4 Put the pasta insert in the pot (1) and put the steaming basket on the pasta insert (2).

text_image
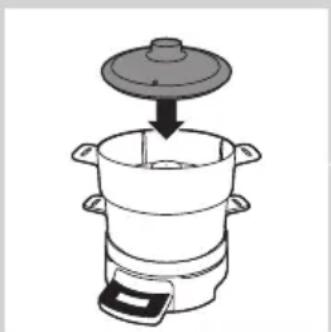
Diagram of a cooking pot with labeled parts, showing a lid and side view with arrows indicating components.5 Put the steaming tray in the steaming basket (1) and put the lid on the steaming basket (2).

natural_image
Diagram of a mechanical component with a lever and pin, no text or symbols present6 Push the mains cord into the cord storage compartment.
7 Store the appliance on a dry, flat and stable surface, preferably on the working top in your kitchen.
Ordering accessories
To purchase accessories for this appliance, please visit our online shop at www.shop.philips.com/service. If the online shop is not available in your country, go to your Philips dealer or a Philips service centre. If you have any difficulties obtaining accessories for your appliance, please contact the Philips Consumer Care Centre in your country. You find its contact details in the worldwide guarantee leaflet.
Tip: You can also use the HomeCooker in combination with the specially designed Cutting tower (HR1055/HR1056). This Cutting tower shreds and slices vegetable like cucumbers, carrots, potatoes, leeks and onions as well as certain kinds of cheese and meat and ejects the processed ingredients straight into the HomeCooker pot. You can order the Cutting tower in the online shop at www.shop.philips.com/service by looking for HR1055/HR1056 or at www.philips.com/homecooker.
Guarantee and service
Philips guarantees its products for two years after the date of purchase.
Defects due to faulty materials and poor workmanship will be repaired or the product will be replaced at Philips' expense, provided that convincing proof of purchase is provided.
Replacement products and repaired parts are guaranteed for the remaining time of the guarantee or a period of six months, whichever is longer.
The guarantee does not apply to any defect that results from an accident, misuse, improper maintenance or that is due to normal wear and tear.
The terms of the guarantee do not exclude, restrict or modify your statutory rights.
If you believe your product is defective, please contact your local
Consumer Care hotline. You will find the Consumer Care hotline phone numbers on www.philips.com/support.
Environment

natural_image
Symbol of a waste bin with crossed lines indicating no waste or restriction, and a solid black rectangle below (no text or symbols)- Do not throw away the appliance with the normal household waste at the end of its life, but hand it in at an official collection point for recycling. By doing this, you help to preserve the environment.
Troubleshooting
This chapter summarises the most common problems you could encounter with the appliance. If you are unable to solve the problem with the information below, contact your local Consumer Care hotline. You find the Consumer Care hotline phone numbers on www.philips.com/support.
Problem Possible cause Solution
| The appliance does not work | The appliance is not plugged in. | Put the plug in the wall socket. |
| The appliance is not switched on. | Press the on/off button on the side of the base to switch on the appliance. | |
| You did not press the start/pause button. | Press the start/pause button to start the cooking or steaming process. | |
| The appliance was in standby mode, but you thought it was switched off and pressed the on/off button in an attempt to switch it on, but in fact you switched it off. | Press the on/off button once more to switch on the appliance. |
The mains cord is damaged. If the mains cord is damaged, you must have it replaced by Philips, a service centre authorised by Philips or similarly qualified persons in order to avoid a hazard.
Problem Possible cause Solution
| Not all the food is steamed/cooked. | Some pieces of food in the pot, steaming baskets or steaming tray are larger than others and/or require a longer steaming/cooking time than others. | Set a longer steaming/cooking time. When you use both steaming baskets and the steaming tray, you can easily prepare ingredients with different steaming times (see chapter 'Using the appliance', section 'Steaming and boiling without stirrer'). |
| You put too much food in the steaming baskets and on the steaming tray. | Make sure you put the food in the steaming baskets and on the steaming tray in such a way that there is some space between the pieces and that some of the steaming slots stay clear to allow optimal steam flow. Please consult the recipe book for the correct quantities. | |
| You did not put the lid on the appliance (or not properly on the appliance) when you were steaming. | Always place the lid properly on the appliance when you are steaming, otherwise a lot of steam escapes and the food is not steamed properly. | |
| The temperparture is not hot enough. | Always let the appliance heat to the right temperature before you steam the food. | |
| The food is too dark. | You set a too high temperature or a too long cooking time. | Set a lower cooking temperature and/or a shorter cooking time. Please consult the recipe book for the correct temperature. |
| I want to change the temperature during cooking. | This is possible. Press the temperature increase or decrease button during cooking until the display shows the desired temperature. | |
| The appliance produces some smoke. | The heating plate and/or pot are not completely clean. | Make sure you clean the heating plate and the pot properly after each use. |
| The appliance may produce some smoke when you use it for the first time. | It is normal for a new product to produce an unpleasant smell or emit some smoke when it is first used. This is because new electric motors have a safety lacquering on the motor windings, which emit this unpleasant smell or even smoke, when they get warm during the first uses. This phenomenon stops after you have used the appliance a few times. | |
| The stirrer blocks. You put too many ingredients in the pot. | Remove the ingredients and give the stirrer a light push. Do not overload the pot. | |
| During roasting a piece of meat got stuck on the bottom of the pot. | Give the stirrer a slight push. | |
| The message 'Err' appears on the display. | An error has occurred. Have the appliance checked by a service centre authorised by Philips. | |
| The display shows °C, but I want to work with °F. | This is possible. Press the temperature increase and decrease button at the same time for 3 seconds to switch from °C to °F and back again. | |
Введение
text_image
Warning sign with steam symbol inside a triangle, indicating hazardous materialnatural_image
Technical line drawing of a mechanical device with a central shaft and attached cable (no text or symbols)natural_image
Illustration of an electrical outlet with a plug and socket, showing a black arrow pointing to the socket (no text or symbols present)natural_image
Illustration of a cooking step showing a pot being placed on a stand with a tool, no text or symbols present.natural_image
Simple line drawing of a toilet with a circular button and arrow pointing to the bottom outlet (no text or symbols)natural_image
Diagram of a microwave oven with a control panel and indicator lights (no text or symbols)natural_image
Diagram of a device's front panel with control buttons and a circular dial (no text or symbols)natural_image
Diagram of a device's control panel with playback buttons and a circular play button (no text or symbols)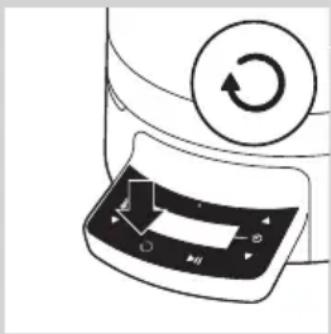
natural_image
Diagram of a device with a circular button and clockwise arrow, showing a control panel (no text or symbols)
natural_image
Illustration of a computer monitor with playback control buttons and a circular play button (no text or symbols)natural_image
Line drawing of a cooking pot with a handle and lid, showing a downward arrow indicating a process (no text or symbols)natural_image
Line drawing of a cooking pot with a lid and a side panel, no text or symbols present
text_image
Diagram showing electrical connections with a switch, power plug, and alarm symbolnatural_image
Line drawing of a cooking pot with an upward arrow indicating motion (no text or symbols)natural_image
Line drawing of a hand pouring liquid into a cooking pot (no text or symbols)natural_image
Line drawing of a cooking pot with a lid and lid being placed into a pot (no text or symbols)natural_image
Illustration of a cooking process showing a pan being placed into a pot (no text or symbols)natural_image
Line drawing of a cooking pot with a lid and side handles, no text or symbols presentnatural_image
Diagram showing a cooking process with a pot and lid being lifted by arrows (no text or symbols)natural_image
Line drawing of a cooking pot with lid and side legs, no text or symbols present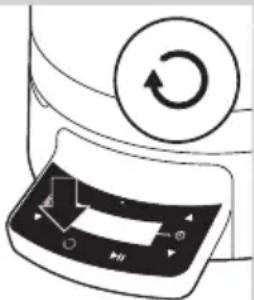
natural_image
Diagram of a device with a circular button and a scroll wheel, showing a scroll with an arrow and control buttons (no text or symbols)
natural_image
Line drawing of a cooking pot with a lid and side arm, showing a downward arrow indicating cooling (no text or symbols)
natural_image
Diagram of a device with a circular button labeled 'Recycle' and a scroll arrow pointing to a control panel (no text or symbols present)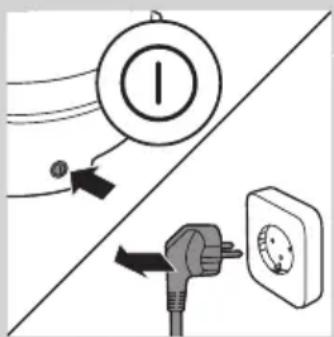
text_image
Diagram showing electrical connections with a power plug, switch, and circular component labeled 'I'natural_image
Illustration of a hand pressing down on a circular mechanical component (no text or symbols)natural_image
Two identical diagrams showing a mechanical component with rotating arrows, no text or symbols present.text_image
Diagram showing electrical connections with a switch, power plug, and circular symbol, likely illustrating a power system or circuit breaker.text_image
Diagram showing cooking process steps with numbered arrows indicating step 1 and step 2 of a pot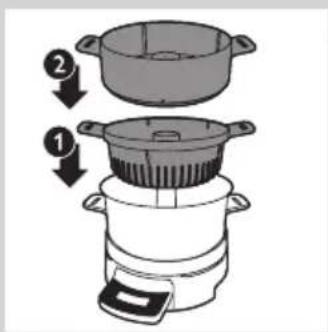
text_image
Diagram showing a cooking process with labeled steps 1 and 2 indicating step 1 of the lid and lid.text_image
Diagram of a cooking or heating device with labeled parts 1 and 2, showing internal components and flow arrows.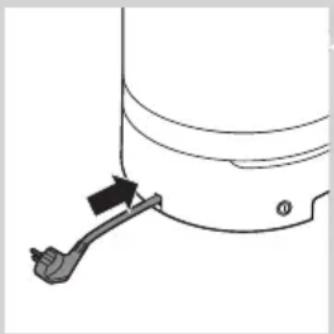
natural_image
Diagram of a mechanical component with a lever and pin, no text or symbols presentnatural_image
Symbol of a trash bin crossed with no text or numbers, representing environmental restriction (no text present)text_image
Warning sign with steam symbol inside triangle, indicating hazardous materialnatural_image
Technical line drawing of a mechanical component with a cylindrical top and attached cable (no text or symbols)natural_image
Illustration of an electrical outlet with a plug and socket, showing a black arrow pointing to the socket (no text or symbols present)natural_image
Simple line drawing of a cooking pot being placed on a stand (no text or symbols)natural_image
Simple line drawing of a toilet with a circular button and a black arrow pointing to the handle (no text or symbols)natural_image
Diagram of a refrigerator control panel with directional arrows indicating movement (no text or symbols)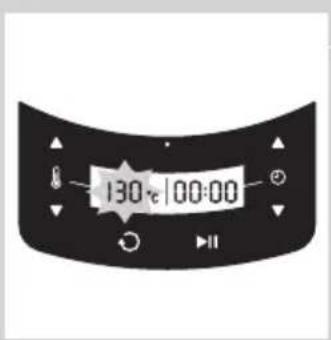
text_image
130:00:00
text_image
70°C 100:00
text_image
130°C/00:00natural_image
Close-up of a kitchen appliance's door panel with a circular control knob and directional arrows (no text or symbols)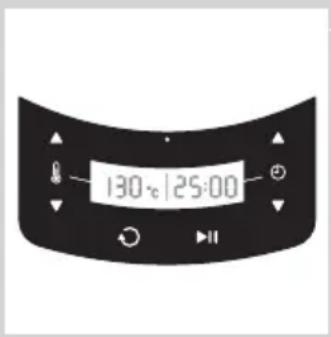
text_image
130°C 125:00
natural_image
Diagram of a device's control panel with playback buttons and a circular play button (no text or symbols)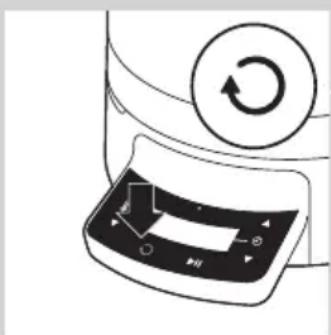
natural_image
Diagram of a device with a circular button labeled 'Return' and a control panel with arrows (no text or symbols)natural_image
Diagram of a device's front panel with playback control buttons and a circular play button (no text or symbols)natural_image
Illustration of a cooking pot with a lid and handle, showing a drop from the top (no text or symbols)natural_image
Illustration of a cooking pot with a lid and handle, showing a drop from the lid to the side (no text or symbols)text_image
Diagram showing electrical connections with a switch, power plug, and wall-mounted switch, including a circled symbol indicating current.natural_image
Line drawing of a cooking pot with an upward arrow indicating motion (no text or symbols)natural_image
Illustration of a hand pouring liquid into a cooking pot (no text or symbols)natural_image
Line drawing of a cooking pot with a lid and a side pot, showing a downward arrow indicating cooling (no text or symbols)natural_image
Illustration of a cooking process showing a pan being lifted by a lid (no text or symbols)natural_image
Line drawing of a cooking pot with a lid and side handles, showing a downward arrow indicating a process (no text or symbols)natural_image
Diagram showing a cooking process with a pan, lid, and side dish, all down arrows indicating downward steps (no text or symbols)natural_image
Line drawing of a cooking pot with lid and side handles, no text or symbols presentnatural_image
Diagram of a device with a circular button labeled 'Return' and a control panel with arrows (no text or symbols)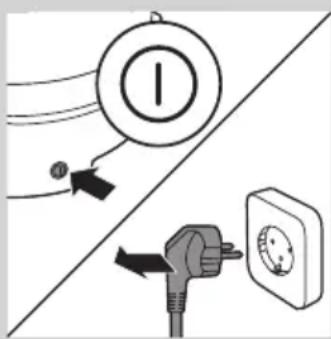
text_image
Diagram showing electrical connections with a switch, power plug, and bulb, including Chinese labels.natural_image
Illustration of a hand cleaning a circular mechanical component with a handle (no text or symbols)natural_image
Two identical diagrams showing a mechanical component with rotational arrows, no text or symbols present.text_image
Diagram showing electrical connections with a switch, power plug, and wall-mounted devicetext_image
Diagram showing a cooking step with labeled parts: pan, pot, and tooltext_image
Diagram showing a cooking process with labeled steps 1 and 2 indicating step 1 of the lid and lid.text_image
Diagram of a cooking pot with labeled parts, showing a lid and side view with numbered arrows.natural_image
Diagram of a mechanical component with a lever and pin, no text or symbols presentnatural_image
Diagram of a cooking pot and evaporator with arrows indicating process flow (no text or symbols)
text_image
Diagram of a cooking or heating device with labeled parts and directional arrows indicating flow or movement.natural_image
Diagram of a mechanical component with a lever and arrow indicating direction (no text or symbols)سفارشى دانى لوازم
natural_image
Illustration of a hand pressing down on a cylindrical mechanical component (no text or symbols)
natural_image
Two identical diagrams showing a mechanical component with rotational arrows, no text or symbols present.نگهداری
text_image
Diagram showing electrical connections with a switch, power plug, and circular component labeled 'I'text_image
Diagram showing cooking process steps with labeled arrows indicating direction of a cooking stepflowchart
graph TD
    A["Induction: Plate with lid"] --> B["Add: Down"]
    B --> C["Add: Down"]
    C --> D["Add: Down"]
    D --> E["Add: Down"]
    E --> F["Final Rotation: Plate with scroll icon"]

text_image
Diagram showing electrical connections with a bulb, switch, and power outlet, likely illustrating an electrical system or circuit breaker.text_image
Diagram showing electrical connections with a bulb, switch, and power plug, likely illustrating a circuit or safety concept.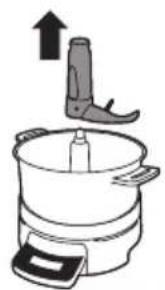
natural_image
Line drawing of a kitchen appliance with an upward arrow indicating motion (no text or symbols)
natural_image
Illustration of a hand pouring liquid into a cooking pot (no text or symbols)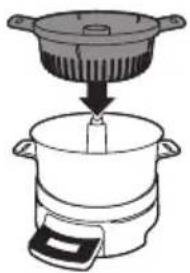
natural_image
Illustration of a cooking pot with a lid and a side pot, showing a downward arrow indicating cooling (no text or symbols)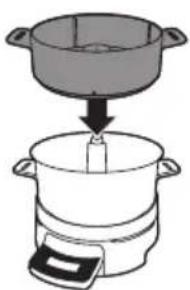
natural_image
Illustration of a cooking process showing a pan being placed into a pot (no text or symbols)natural_image
Diagram of a device with a circular button labeled 'Return' and an arrow pointing to a control panel (no text or symbols present)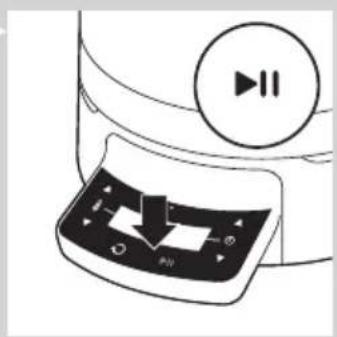
natural_image
Illustration of a device's front panel with playback control buttons and a circular play button (no text or symbols)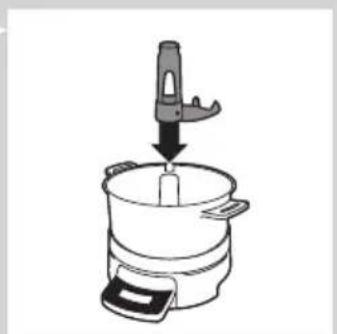
natural_image
Line drawing of a cooking pot with a handle and lid, no text or symbols present
natural_image
Line drawing of a cooking pot with lid and side arm, showing internal components (no text or symbols)natural_image
Diagram of a refrigerator with a circular control knob and directional arrows indicating action buttons (no text or symbols)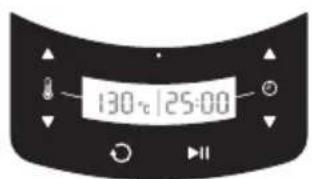
text_image
130°C 125:00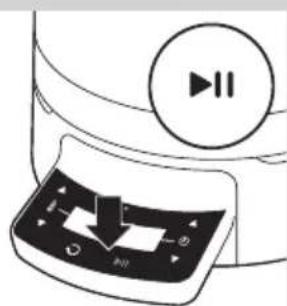
natural_image
Illustration of a device with a play button and control panel (no text or symbols)natural_image
Simple line drawing of a toilet with a circular button and arrow pointing to the bottom outlet (no text or symbols)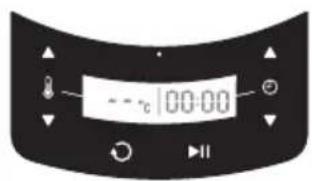
text_image
- - °C 100:00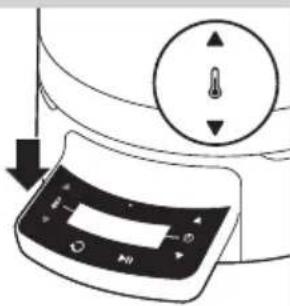
natural_image
Diagram of a device with a control panel and circular dial indicator (no text or symbols)
text_image
130 t 100:00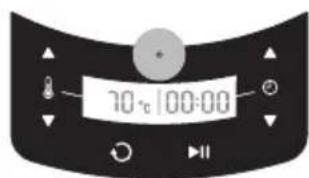
text_image
10°C/100:00natural_image
Technical line drawing of a mechanical component with a central shaft and base, showing no text or symbols.natural_image
Illustration of an electrical outlet with a plug inserted into a socket (no text or symbols)natural_image
Illustration of a cooking pot being placed on a stand with a tool, no text or symbols presentاستفاده ازدستگاه
text_image
Warning sign with steam symbol inside a triangle, indicating hazardous materialمقدمة
text_image
Diagram showing a cooking process with labeled steps 1 and 2, indicating step 1 of a pot and step 2 of a lid.
text_image
Diagram of a cooking or heating device with labeled parts and directional arrows indicating flow or movement.
natural_image
Diagram of a mechanical component with a lever and pin, no visible text or symbolsطلب الملحقات
natural_image
Illustration of a hand holding a cylindrical object with a base, no text or symbols present
natural_image
Two identical diagrams of a mechanical device with rotating components, no text or symbols present.ال tangزين
text_image
Diagram showing electrical connections with a bulb, switch, and power plug, likely illustrating an electrical circuit or safety concept.text_image
Diagram showing cooking process steps with labeled arrows indicating heating and cooling stepsnatural_image
Line drawing of a cooking pot with a lid and side handles, no text or symbols present
natural_image
Diagram showing a cooking process with three panes and a lid, each downward with arrows indicating downward motion (no text or symbols)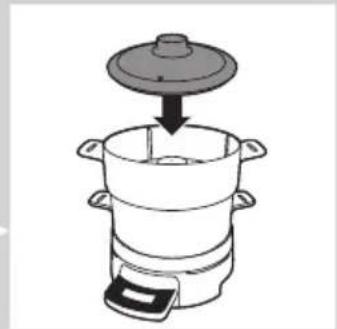
natural_image
Line drawing of a cooking pot with lid and side handles, no text or symbols present
natural_image
Diagram of a device with a circular button and an arrow indicating rotation (no text or symbols)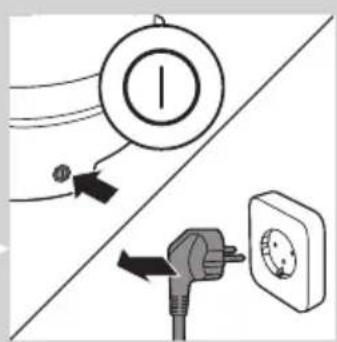
text_image
Diagram showing electrical connections with a bulb, switch, and power outlet, likely illustrating an electrical system or circuit breaker.text_image
Diagram showing electrical connections with a switch, power plug, and circular component, likely illustrating a power system or circuit breaker.الtbخيروالHavingwritten中文版
natural_image
Illustration of a kitchen appliance with a handle and upward arrow (no text or symbols)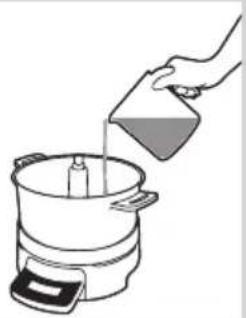
natural_image
Illustration of a hand pouring liquid into a cooking pot (no text or symbols)
natural_image
Illustration of a cooking pot with a lid and a side pot, showing a cooking step (no text or symbols)natural_image
Illustration of a cooking process showing a pan being added to a pot (no text or symbols)natural_image
Diagram of a device with a circular button and an arrow indicating rotation (no text or symbols)
natural_image
Diagram of a device with a play button and control panel, no text or symbols present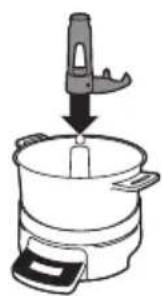
natural_image
Illustration of a cooking pot with a hand holding a tool above it, no text or symbols present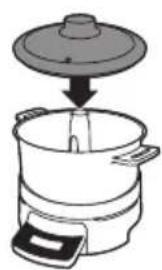
natural_image
Illustration of a cooking pot with a lid and side arm, showing a downward arrow indicating a drop (no text or symbols)natural_image
Diagram of a microwave oven with a rotary dial and control panel (no text or symbols)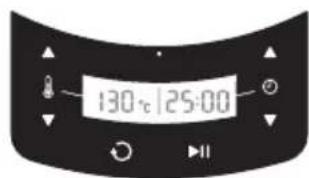
text_image
130°C 125:00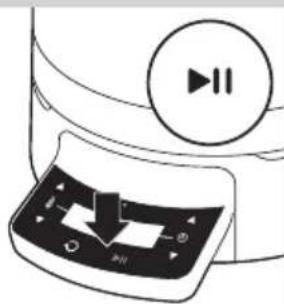
natural_image
Diagram of a device with a play button and playback control panel (no text or symbols)natural_image
Simple line drawing of a toilet with a circular button and arrow pointing to the bottom outlet (no text or symbols)
text_image
- -c 100:00
natural_image
Diagram of a refrigerator control panel with directional arrows indicating movement (no text or symbols)
text_image
130:00:00