S100 - Kitchen scale DYMO - Free user manual and instructions
Find the device manual for free S100 DYMO in PDF.

User questions about S100 DYMO
0 question about this device. Answer the ones you know or ask your own.
Ask a new question about this device
Download the instructions for your Kitchen scale in PDF format for free! Find your manual S100 - DYMO and take your electronic device back in hand. On this page are published all the documents necessary for the use of your device. S100 by DYMO.
USER MANUAL S100 DYMO
text_image
DYMO® S50 | S100 | S180Portable Digital USB Shipping Scale User Guide
DYMO® Portable Digital USB Shipping Scale....1
DYMO® Portable Digital USB Shipping Scale

Your new DYMO® Portable Digital USB Shipping Scale has a no-skid platform surface and a detachable display for hand-held viewing or mounting. This User Guide provides instructions for using the scale.
When moving the scale, lift the scale by the handles located on the sides of the scale. Do not lift the scale by the display.
Visit www.dymo.com/register to register your scale.
Setting Up the Scale
The scale is powered through the included power adapter. Optionally, the scale can be powered through a USB port on your computer or by three AAA batteries.
To set up the scale
-
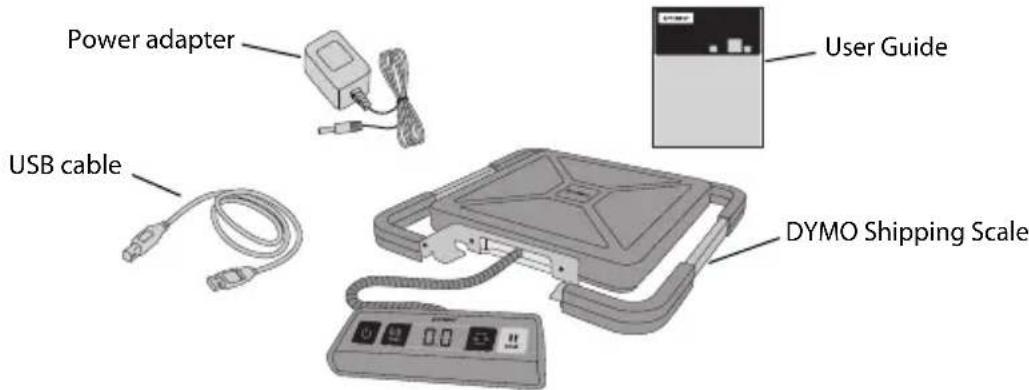
Unpack the scale.
-
Make sure you have all the items shown in the following figure.
text_image
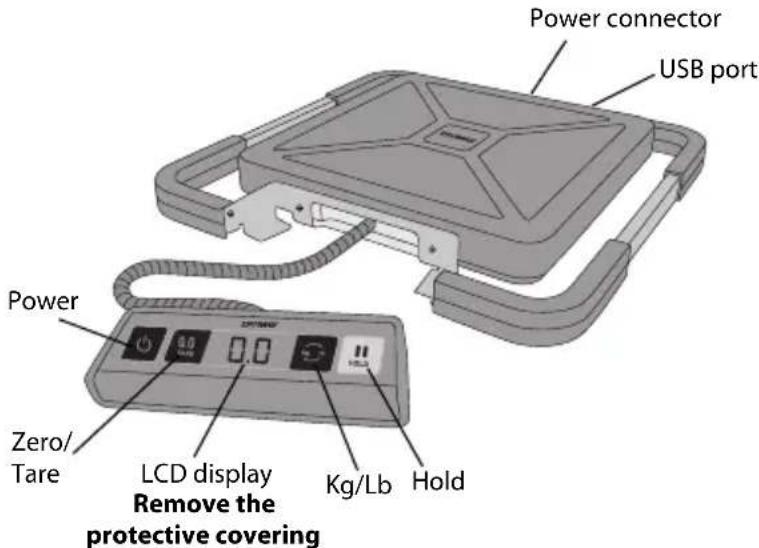
Power adapter USB cable User Guide DYMO Shipping Scale- Become familiar with the major components of the scale.
text_image
Power connector USB port Power Zero/ Tare LCD display Remove the protective covering Kg/Lb Hold-
Set the scale on a firm, flat surface.
-
Remove the protective covering from the LCD display.
Connecting the Power
The scale is powered through the included power adapter. Optionally, the scale can be powered through a USB port on your computer or by three AAA batteries.
To connect the power adapter
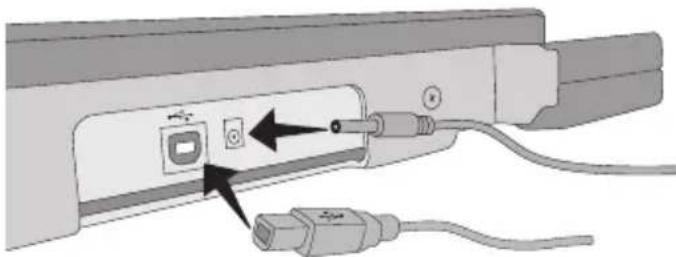
- Plug the power adapter into the power connector on the back of the scale.
- Plug the other end of the power adapter into a power outlet.
natural_image
Diagram of a cable connector with two connectors and cable links (no text or symbols)To connect the USB cable
-
Plug the USB cable into the USB port on the back of the scale.
-
Plug the other end of the USB cable into an available USB port on your computer. The scale is automatically recognized by your computer when the power is turned on.
If connecting the scale through a USB hub, always use a powered hub or another source of power, such as the included power adapter or batteries.
To insert the batteries
- Disconnect the power adapter or USB cable from the scale.
- Remove the battery compartment cover from the back of the scale.
- Insert three AAA batteries as shown.
Make sure to insert the batteries correctly. Inserting the batteries backwards can damage the scale.
- Replace the battery compartment cover.
Remove the batteries if the scale will not be used for a long period of time.

natural_image
Diagram of a device with an open socket and multiple battery cells labeled 'AAA' (no text or symbols on the socket itself)Turning On the Power

The scale has an Auto Shut Off feature which automatically turns off the scale after three minutes of inactivity. You can turn off this Auto Shut Off feature.
To turn the scale on
◆ Press on the front of the scale.
When the scale is first turned on, wait a few seconds for the scale to stabilize before weighing items. The display shows 0.0 when ready.
To turn the scale off
◆ Press on the front of the scale to turn the scale off.
The scale turns off automatically after three minutes of inactivity.
To turn off Auto Shut Off
- While the scale is off, press and hold
- While holding press .
The display shows A.OF and then 0.0 when ready.
The scale now remains on until manually turned off.
Turning off the Auto Shut Off feature is temporary. You need to repeat this procedure each time you turn on the scale.
Using the Scale
Always wait for 0.0 to display before placing an item on the scale platform.
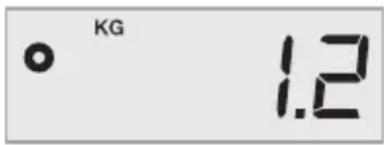
After placing an item on the scale, wait for several seconds for the weight to appear. When the scale is ready, a 0 appears to the left of the weight.
text_image
° KG 1.2To weigh an item
◆ Place an item on the scale platform.
Free DYMO Scale Software
Display the scale weight on your Mac ^® or PC screen.
Download the DYMO Scale software: www.dymo.com/scalesoftware
Using the Tare Feature
You can weigh small items or items that cannot be easily placed on the scale platform by placing the items in a container and using the Tare/Zero button to eliminate the weight of the container.
To use the tare feature
- Place an empty container on the platform.
- When the scale is ready, press 0.0 TAIRE
The display is set to zero.
- Place the items to be weighed in the container.
The display shows the weight of the items, without the weight of the container.
- After removing the container, press 0.0 TARE reset the scale to zero.
Using the Hold Feature
When an item being weighed extends over the front of the scale and you cannot see the display, you can freeze the display so that the weight is still displayed after removing the item.
To use the Hold feature
- Press .
The display shows HOLD and then 0.0 when ready.
-
Place the item on the scale.
-
After a few seconds, remove the item from the scale.
The weight continues to be displayed for about ten seconds.
- Press 📄 to deactivate the hold feature.
Changing the Units of Measure
Your scale can display weight in English (pounds) or metric (kilograms) units. The default unit of measure is metric. Each time you turn on the scale, the scale defaults to the unit of measure that was last used.
To change the units of measure
◆ Press toggle between English and metric units.
Mounting the Display
The scale features a detachable display. The display can be mounted to most metallic surfaces using the built-in magnets. You can also mount the display using the mounting holes on the back of the display and standard screws. A mounting template is included at the back of this User Guide. The display can be mounted up to 1.8 meters (6 feet) from the scale base.
To mount the display to a non-metallic surface
-
Drill two holes 120 mm (4 3/4 inch) apart at the desired height on the wall using the template at the back of this User Guide.
-
Screw one screw into each of the holes until the screw head sticks out from the wall 3 mm (1/8 inch).
Allowing the screw heads to stick out farther than 3 mm (1/8 inch) may damage the scale display.
-
Align the holes on the back of the scale display with the screws.
-
Slide the display onto the screws.
The display should slide onto the screws firmly and securely.
Caring for the Scale
With proper care and handling, your scale will give you years of service. Keep the following in mind when using your scale:
- Your scale works best when operated and stored at normal room temperature. Avoid lengthy exposure to extreme heat or cold.
- Only operate the scale on a stable, vibration free surface.
- Exposure to dust, dirt, moisture, vibration, and air currents; and proximity to other electronic equipment can affect the reliability and accuracy of your scale.
- Using the scale in proximity to wireless devices, such as mobile phones, can cause the scale display to fluctuate when the device is in use.
- Although this scale is designed to be quite durable, gently place items to be weighed on the platform. Avoid rough treatment, as this may permanently damage the internal sensor and void your warranty.
- You can permanently damage the scale by placing significantly overweight items on the scale platform.
- Avoid shaking, dropping, or otherwise shocking the scale. This is a precision instrument and MUST BE HANDLED WITH EXTREME CARE.
- The scale has been calibrated at the factory and will not need to be calibrated again.
Technical Specifications
NOT LEGAL FOR TRADE
| Model S50 S100 S180 | |||
| Capacity 0.5 | → 50 kg (1 → 110 Pounds) | 0.5 → 100 kg (1 → 220 Pounds) | 1 → 180 kg (2.5 → 396 Pounds) |
| Weight Increments 0.5 | → 50 kg (1 → 110 Pounds) | 0.5 → 100 kg (1 → 220 Pounds) | 1 → 180 kg (2.5 → 396 Pounds) |
| Accuracy | |||
| Under 50 kg | ±200 g | ±200 g | ±400 g |
| Over 50 kg | ±400 g | ±800 g | |
| Units kg/g (lb/oz) kg/g (lb/oz) kg/g (lb/oz) | |||
| Auto Shut Off After three minutes of inactivity | |||
| Operating Temperature 10° - 40°C (50° - 104°F) | |||
| Interface USB 2.0 Low Speed HID Scale Device | |||
| Power AC adapter, USB, or 3 AAA alkaline batteries | |||
For information about our other scale products, visit www.dymo.com.
Troubleshooting
| Problem/Error Message Solution | |
| No display Ensure the scale is plugged in, or replace the batteries. | |
| LOis displayed Replace the batteries. | |
| Negative number is displayed A tare value is displayed as a negative number when the items are removed from the scale. Press reset the scale to zero. | |
| 00000is displayed The item on the scale platform exceeds the maximum capacity of the scale. Remove the item immediately to prevent damage to the scale. | |
| Display reads 0.0with an item on the platform | This can happen because:• The Tare/Zero button, , 0.0 is pressed while an item was on the scale.• Power to the scale was disconnected or turned off and then on again with an item on the scale.In both of these cases, remove the item from the platform and press return the display to 0.0. |
If you need further assistance, you can obtain support at www.dymo.com.
Warranty
TWO-YEAR LIMITED WARRANTY
Dymo scales are sold with a two-year warranty from the date of purchase against defects in design, materials and workmanship. If this product is found to be defective within that time, we will promptly repair or replace it at our cost. This warranty does not cover accidental damage, wear and tear or consequential or incidental loss.
WHAT IS COVERED?
This warranty covers this product only and only against defects in design, materials or workmanship. If, after inspection of your returned product, we find that the product is defective in design, materials or workmanship, we shall at no charge to you repair or replace the product at our discretion, and return the product to you. You are responsible for the full cost of shipping the product to Dymo, but there is no charge for the inspection or the return postage.
WHAT IS NOT COVERED?
This warranty does not cover loss of or damage to a computer or other devices connected directly or indirectly to this Dymo product. This warranty also does not cover any loss of or damage to data, programs, records or other information. This warranty does not cover any defect or loss which would not have occurred if instructions in the owner's manual had been followed. This warranty does not cover other incidental or consequential damages even if Dymo has been informed of the possibility of such damages. This warranty is in lieu of all other warranties, express or implied. This warranty gives you specific rights and you may also have other rights, which may vary from state to state or country to country.
HOW TO MAKE A WARRANTY CLAIM
To make a warranty claim, please contact customer support: www.dymoservice.com
Electrostatic Discharge Precautions
Electrostatic discharge (Static Electricity or ESD) can cause damage to any electronic device, including the scale. To avoid damage, follow these simple steps:
• Always disconnect the scale from your computer or USB hub when changing the battery.
- Always discharge any accumulated static electricity from yourself before connecting the scale to your computer or USB hub. If your computer uses a three-pin, grounded connector, you can do this by touching the metal case of your computer. As an alternative, try touching a cold water faucet.
Environmental Information

The equipment that you bought has required the extraction and use of natural resources for its production. It may content hazardous substances for the health and the environment.
In order to avoid the dissemination of those substances in our environment and to diminish the pressure on the natural resources, we encourage you to use the appropriate take-back systems. Those systems will reuse or recycle most of the materials of your end life equipment in a sound way.
The crossed-bin symbol marked in your device invites you to use those systems.
natural_image
Symbol of a trash bin with no text or labels, crossed by diagonal lines and a solid rectangle below (no text or symbols present)If you need more information on the collection, reuse and recycling systems, please contact your local or regional waste administration. You can also contact us for more information on the environmental performance of our products.
Documentation Feedback
We are constantly working to produce the highest quality documentation for our products. We welcome your feedback. Send us your comments or suggestions about our online Help, printed, or PDF manuals.
Please include the following information with your feedback:
• Product name and version number
- Type of document: printed manual, PDF, or online Help
- Topic title (for online Help) or page number (for printed or PDF manuals)
- Brief description of content (for example, step-by-step instructions that are inaccurate, information that requires clarification, areas where more detail is needed, and so on)
- Suggestions for how to correct or improve the documentation
We also welcome your suggestions for additional topics you would like to see covered in the documentation.
Send email feedback to:
documentation@dymo.com
Please keep in mind that this email address is only for documentation feedback. If you have a technical question, please contact Customer Service.
natural_image
Diagram of an electronic device showing a cable connector with a switch and plug, no text or symbols presentnatural_image
Diagram of a device's internal component with labeled pins and an arrow indicating a specific area (no text or symbols present)Mise en marche

natural_image
Symbol of a trash bin with crossed lines indicating no waste or discharge (no text or labels)natural_image
Diagram of a cable connector with labeled ports and cables (no text or symbols)natural_image
Diagram of a device panel with an arrow pointing to a component, showing no text or symbols on the panel itself.Gratis DYMO Scale Software
natural_image
Symbol of a trash bin crossed with no text or numbers, representing waste sorting or disposal (no text present)natural_image
Diagram of a cable connector with two USB cables and a power plug, showing connection points (no text or symbols)text_image
Diagram showing a device with labeled ports (AAA) and an arrow pointing to a socket component, likely illustrating a device's internal structure or status.Einschalten

natural_image
Symbol of a trash bin with no text or labels, crossed by diagonal lines and a solid rectangle below (no readable text or symbols)natural_image
Diagram of an electronic device showing a port with two cables and a plug, no text or symbols presentnatural_image
Diagram of a device's internal component with labeled pins and an arrow indicating insertion (no text or symbols present)natural_image
Symbol of a trash bin crossed with no text or numbers, representing waste sorting or disposal (no text present)natural_image
Diagram of a cable connector with two USB cables and a power outlet (no text or symbols)Para ligar o cabo USB
text_image
Diagram showing a device with an internal socket and multiple labeled ports (AAA) pointing to it, with an arrow indicating the insertion point.Ligar a balança

Faça o download do software DYMO Scale: www.dymo.com/scalesoftware
natural_image
Symbol of a trash bin crossed with no text or labels
natural_image
Diagram of a cable connector with two cables and a switch, showing connection points (no text or symbols)natural_image
Diagram of a device's internal component with labeled pins and an arrow indicating a location (no text or symbols beyond basic labels)Accensione

natural_image
Symbol of a trash bin crossed with no text or labelsnatural_image
Diagram of a cable connector with two cables and a switch, showing connection points (no text or symbols)
natural_image
Diagram of a device panel with an arrow pointing to a socket, showing no text or symbols on the component itself.Gratis DYMO Scale-software
Download DYMO Scale-software: www.dymo.com/scalesoftware
natural_image
Symbol of a trash bin with crossed lines indicating no waste or discharge (no text or labels)natural_image
Diagram of an electronic device showing a port with two cables and connectors (no text or symbols)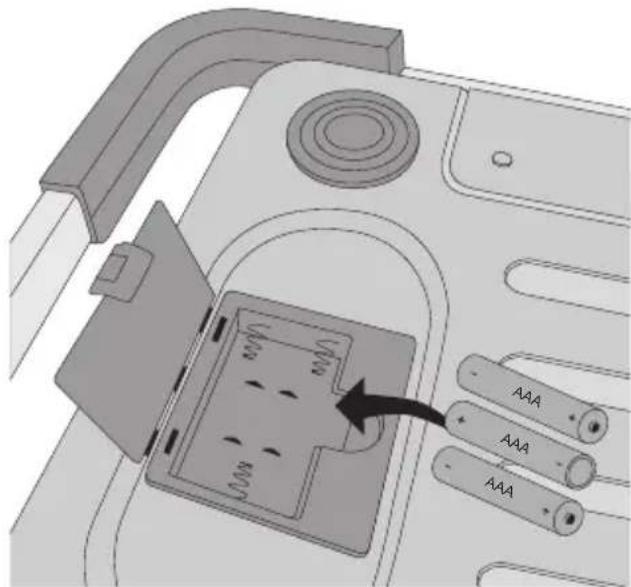
natural_image
Diagram of a device panel with an arrow pointing to a component, showing no text or symbols on the main diagram area.Starta vägen

INTE TILLÅTNA FÖR HANDEL
Modell S50 S100 S180
| Kapacitet 0,5 | → 50 kg (1 → 110 Pund) | 0,5 → 100 kg (1 → 220 Pund) | 1 → 180 kg (2,5 → 396 Pund) |
| Viktsteg 0,1 kg (0,2 lb) | 0,1 kg (0,2 lb) | 0,2 kg (0,5 lb) | |
| Noggrannhet | |||
| Under 50 kg | ±200 g | ±200 g | ±400 g |
| Över 50 kg | ±400 g | ±800 g | |
| Enhet kg/g (lb/oz) kg/g (lb/oz) kg/g (lb/oz) | |||
| Autom. avstängn. Efter tre minuters inaktivitet | |||
| Driftstemperatur 10 - 40 °C (50 - 104 °F) | |||
| Gränssnitt Våg med låghastighets USB 2.0 HID | |||
| Ström Nätadapter, USB eller tre alkaliska AAA-batterier | |||
natural_image
Symbol of a trash bin crossed with no text or numbers, representing waste sorting or disposal (no text present)natural_image
Diagram of a computer cable connector showing port, cable, and cable connections (no text or symbols)natural_image
Diagram of a device panel with labeled pins and an arrow indicating a component (no text or symbols present)Virran kytkeminen

natural_image
Symbol of a trash bin crossed with no text or numbers, representing waste sorting or disposal (no text present)natural_image
Diagram of a USB cable connector with two cables and a switch, showing connection points (no text or symbols)natural_image
Diagram of a device's internal component with labeled pins and an arrow indicating insertion (no text or symbols beyond labels)Slå på strømmen

natural_image
Symbol of a trash bin crossed with no text or numbers, representing waste sorting or disposal (no text present)natural_image
Diagram of an electronic device showing a port with cable and plug connections (no text or symbols)natural_image
Diagram of an electronic device with a plug inserted into a socket, showing no text or symbols on the socket itself.Włączanie zasilania

GWARANCJA NIE OBEJMUJE
natural_image
Symbol of a trash bin crossed with no text or numbers, representing waste sorting or disposal (no text present)natural_image
Diagram of an electronic device showing a port with two cables and a switch, no text or symbols presentnatural_image
Diagram of a device's internal socket with labeled pins (AAA), showing no readable text or symbols beyond the label.Zapnutí napájení

natural_image
Symbol of a trash bin crossed with no text or numbers, representing waste sorting or disposal (no text present)natural_image
Diagram of a cable connector with two USB cables and a power outlet, showing connection points (no text or symbols)text_image
Diagram showing a device component with labeled pins and an arrow pointing to a specific area, likely indicating a location or connection point.Gücü Açma

natural_image
Symbol of a trash bin crossed with no text or numbers, representing waste sorting or disposal (no text present)natural_image
Diagram of an electronic device showing a cable connector with a switch and power plug (no text or symbols)natural_image
Diagram of a device with an open socket and labeled ports (no text or symbols on the socket itself)Bekapcsolás

natural_image
Symbol of a trash bin crossed with no text or numbers, representing environmental protection (no text present)natural_image
Diagram of an electronic device showing a cable connector with two USB cables and a switch (no text or symbols present)Pripojenie USB kábla
natural_image
Diagram of a device with an internal socket and labeled pins (no text or symbols present)Zapnutie váhy

natural_image
Symbol of a trash bin crossed out by two diagonal lines (no text or numbers present)
text_image
4 3/4 in 120 mmDYMO®
A NewellRubbermaid Brand
1214 Vernier - Switzerland
Represented in the EU by / Représenté en UE par:
NWL Belgium Services BVBA
Industriepark-Noord 30
9100 Sint-Niklaas - Belgium
Distributed in Poland by / Distribué en Pologne par:
Newell Poland SA
63-112 Brodnica – Poland
www.dymo.com
© 2010 Sanford, L.P.