NOXON dRadio 100 - Radio TERRATEC - Free user manual and instructions
Find the device manual for free NOXON dRadio 100 TERRATEC in PDF.

User questions about NOXON dRadio 100 TERRATEC
0 question about this device. Answer the ones you know or ask your own.
Ask a new question about this device
Download the instructions for your Radio in PDF format for free! Find your manual NOXON dRadio 100 - TERRATEC and take your electronic device back in hand. On this page are published all the documents necessary for the use of your device. NOXON dRadio 100 by TERRATEC.
USER MANUAL NOXON dRadio 100 TERRATEC
text_image
NOXON ① ② ③ ④CE/FCC declaration....12
Important safety information....13
Welcome! 14
Scope of delivery 14
Overview 15
Front. 15
Back....15
Control Panel 16
Connection 16
Operation....16
Receiving DAB+/DAB stations....16
Receiving FM stations 17
Further operation notes 17
Setup 18
The DAB menu....18
The FM menu....18
The System Setup menu 18
CE/FCC declaration
TERRATEC Electronic GmbH · Herrenpfad 38 · 41334 Nettetal · Germany hereby declare that the product:
NOXON dRadio 100 (DAB+/DAB/FM Radio)
to which this declaration refers is in compliance with the following standards or standardizing documents:
EN 55022:1998 + A1:2000 + A2:2003, CLASS B, EN 55024: 1998 + A1:2001 + A2:2003, EN 61000-3-2:2000, Class A, EN 61000-3-3:1995+A1:2001, IEC 61000-4-2:2001, IEC 61000-4-3:2002+A1:2002, IEC 61000-4-4:2004, IEC 61000-4-5:2001, IEC 61000-4-6:2003+A1:2004, IEC 61000-4-8:2001, IEC 61000-4-11:2004
This device may only be used in the following environments and operating conditions: residential, commercial and industrial environments, as well as small businesses. The basic protective requirements of EMC Directive 89/336/EEC are thus fulfilled.
CE conformity has been demonstrated. As stipulated in R&TTE Directive (1999/5/EC), this device corresponds to a Class 1 radio system (Commission Decision 2000/299/EC). The device also complies with FCC Part 15, Subpart B, Class B, and ANSI C63.4:2003.
Important safety information
This device has been developed and manufactured so that it does not endanger personal safety. Improper use can cause electric shock or fire. The safety features integrated into this device can protect you only if you observe the following instructions for installation, use and maintenance:
- Please read this operating manual in its entirety.
- Observe all warnings and instructions.
- Do not use the device close to water.
- Clean it using a dry cloth only. Do not use any liquids!
- Do not cover up any ventilation openings. Install the device according to the instructions in this manual.
- Do not install the device in the immediate vicinity of heat sources such as radiators, ovens or other devices that give off a great deal of heat.
- Route all cables so that no one can step on them and they are not pinched, especially not on the connector, on the power outlet or at the location where the network cable exits the device.
- Unplug the power cable from the socket during electrical storms or when the device will not be used for a long time.
- All maintenance work may be carried out by qualified service technicians only. Maintenance work is required whenever the device has been damaged in any way, e.g. if power cables or connectors are damaged, liquid gets into the device or objects fall into it, if it has been exposed to rain or moisture, if it no longer functions normally or has fallen down.
- The device may be operated at ambient temperatures of 5 °C to 35 °C (41 °F to 95 °F) only.
- Do not drop the device or expose it to mechanical shock!
- Do not move the device as long as it is switched on.
- Place the device on a level, dry surface to prevent fire and electrical shock hazards as well as possible damage to the player itself.
- Do not place objects filled with liquid such as vases or bottles on the device.
- If the device has been exposed to extreme differences in temperature, allow it to adjust to the room temperature for one hour before plugging it in. Condensation may have formed inside the device, which impairs its functionality or can cause damage to the device itself.
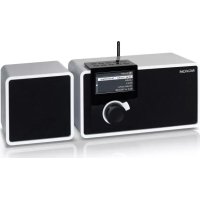
dRadio 100
Welcome!
Thank you very much for choosing a NOXON product.
With your new NOXON dRadio 100 you can receive DAB+ and DAB radio stations in CD quality. On top of a superior audio quality, the digital broadcasting services also offer interesting additional services and information on their program.
But this does not mean you have to do without the analog stations from now on, as you can switch the dRadio to FM operation by a single button – it's just this easy.
The integrated speaker of the dRadio 100 enables you to use it anywhere you like, but you can also connect it to a home stereo system or listen to your favourite stations on headphones as well.
We hope you will have lots of fun with your NOXON dRadio 100. Enjoy the radio of the future!
Scope of delivery
Please start by checking the contents of the package:
- NOXON dRadio 100
- Telescopic antenna
- Antenna adapter (IEC female)
- Mains cable
- Manual English/German
- Service card
Overview
Front

text_image
NOXON ① ② ③ ④- Navigation wheel for menu navigation and altering the volume
- Back button takes you back one level from the current menu
- LCD display shows menus and station information
- Speaker for playing back the tuned station
Back
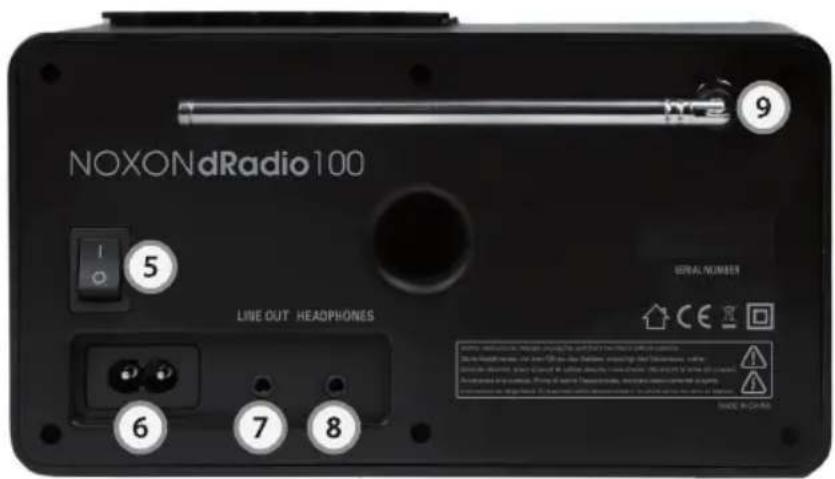
text_image
NOXONdRadio100 5 LINE OUT HEADPHONES 6 7 8 9 SERIAL NUMBER CE ISO WARNING: No. 10-00000000000000000000000000000000000000000000000000000000000000000000000000000000000000000000- Mains switch completely disconnects the device from mains
- Mains connector connect the provided mains cable here
- Line out for connecting to a hi-fi system, active speakers etc.
- Headphones out allows undisturbed musical enjoyment with headphones
- Antenna in for the provided telescopic antenna or an antenna cable
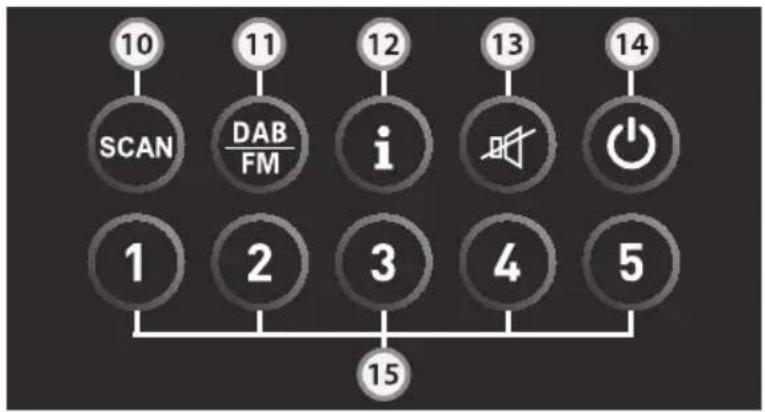
Control Panel
flowchart
graph TD
    A["10"] --> B["SCAN"]
    C["11"] --> D["DAB/FM"]
    E["12"] --> F["i"]
    G["13"] --> H["Speaker Icon"]
    I["14"] --> J["Power Button"]
    K["15"] --> L["End"]
- Scan starts scanning available stations
- DAB/FM switches from DAB+/DAB to FM mode and vice versa
- Info (i) shows additional information (if broadcasted by station)
- Mute reduces the volume to 0
- On/Off activates or deactivates your dRadio 100 (Standby)
- Memory saves and recalls your favourite stations
Connection
The connection of your dRadio 100 is really easy:
- Start by connecting the provided mains cable with the mains connector (6) on the unit and a power outlet.
- Proceed by inserting the provided telescopic antenna into its dedicated connector (9) and extend it to its full length.
• Alternatively, you can also use a DAB active antenna or a signal coming from your rooftop antenna. In this case, please use the provided adapter. - Set the mains switch (5) into the "I" position. In order to activate or deactivate the dRadio 100, just press the On/Off button (14) on the control panel located on top of the unit.
Operation
Receiving DAB+/DAB stations
Switch into DAB+/DAB mode
The upper left corner of the display shows the mode your dRadio 100 is currently set to (FM, DAB or Menu). If it is not set to DAB+/DAB already, just press the DAB/FM button (11) on the control panel once.
Scan stations
Press the Scan button (10) on the control panel in order to start scanning the available stations automatically. Your dRadio 100 scans the complete frequency range and then writes the stations it has found into the station list. This comes in very handy, because this way you do not have to execute the scan process over and over again.
Show station list
Press the navigation wheel (1) shortly. Start turning it and you will see the list of available stations, which you can choose from by pressing the navigation wheel on the one you would like to listen to.
Prune station list
If your DAB+/DAB station list contains stations which have a question mark in front of their name, the reception situation has changed since the last recent station scan, with the effect that the marked station can currently not be received anymore. If you would like to clear such marked stations from the station list, please use the “Prune” function in the System Setup menu.
Receiving FM stations
Switch into FM mode
The upper left corner of the display shows the mode your dRadio 100 is currently set to (FM, DAB or Menu). If it is not set to FM already, just press the DAB/FM button (11) on the control panel once.
Scan stations
Press the Scan button (10) on the control panel in order to start scanning for the next available FM station.
Find only strong stations
If you are only interested in the stronger stations with a good reception quality and skip the weaker ones, you can make the corresponding setting under "FM Scan Setting" in the System Setup menu.
Tune manually
Press the navigation wheel (1) once shortly. By turning it you can now navigate to a desired frequency manually.
Further operation notes
The following functions can be used both in DAB and FM mode:
Save stations as favourites
If you have found a station which you especially like and which you would like to listen to again later without the need to search for it first, simply save it as one of your favourites. Press one of the five available memory buttons (15) for three seconds. In order to recall
dRadio 100
the station later, just press the same memory button for a short time. By the way, you can of course save different stations in DAB and in FM mode (so you have five memory buttons available for DAB and FM each).
Change volume
In order to change the volume of your dRadio 100, turn the navigation wheel (1) to the left for a lower volume or to the right in order to make it louder. If you want to completely mute your radio temporarily, press the mute button (13) on the control panel.
Display additional information
Press the info button (12) in order to display additional info broadcasted by the currently tuned station. Please note the type of information broadcasted can alter from one station to the next.
Setup
Start by pressing the back button (2) in order to navigate to the main menu of your dRadio 100. There you will find the following sub menus:
The DAB menu
Station List
Shows the station list. If a question mark appears in front of the name of a station, it cannot be received at the moment.
Full Scan
Executes an automatic scan though the complete frequency range and writes the available stations into the station list.
Manual Tune
Use this if you want to navigate to a certain frequency manually.
The FM menu
At the moment, the FM menu does not contain any further sub menus or functions. Therefore it redirects to the FM reception mode.
The System Setup menu
Language
Here you can choose from several languages for the menu navigation.
Time Setup
This menu lets you choose from different formats for displaying time and date. You can
also set time and date information manually here.
FM Scan Setting
With this option you can decide if the automatic FM scan should only find strong stations with a good reception quality, or if it should also stop on weaker stations as well.
Prune
If your DAB+/DAB station list contains stations marked with a question mark (meaning that your dRadio 100 cannot receive these stations at the moment), you can permanently remove them from the station list. If you want to add them to the station list again later (for example after changing location in order to achieve a better quality of reception), you have to execute a new station scan.
DRC
DRC means Dynamic Range Control. This function aims at smoothing the differences in volume between different stations, which can result in an overall more homogeneous listening experience.
SW Version
This shows the software version running on your device.
Factory Reset
Should you decide to reset your dRadio 100 to its default settings, you can do this here. Attention: This will delete all of your settings and saved stations!